

Homedics UHE-WMTF25 User Manual

PLEASE TAKE A
MOMENT NOW
REGISTER YOUR PRODUCT AT:
www.homedics.com/register
Your valuable input regarding this
product will help us create the
products you will want in the future.
INSTRUCTION MANUAL AND WARRANTY INFORMATION
2-YEAR LIMITED WARRANTY
UHE-WMTF25

IMPORTANT SAFETY INSTRUCTIONS
WHEN USING ELECTRICAL PRODUCTS, BASIC SAFETY PRECAUTIONS SHOULD ALWAYS BE FOLLOWED,
INCLUDING THE FOLLOWING:
READ ALL INSTRUCTIONS BEFORE USING.
DANGER
• Always place humidifier on a firm, flat surface. A waterproof mat or pad is recommended for use
• Always unplug the unit from the electrical outlet immediately after using and before cleaning.
• DO NOT reach for a unit that has fallen into water. Unplug it immediately.
• DO NOT place or store the unit where it can fall or be pulled into a tub or sink.
• DO NOT place or drop into water or other liquids.
• DO NOT use water above 86°F.
– TO REDUCE THE RISK OF ELECTRIC SHOCK:
under the humidifier. Never place it on a rug or carpet, or on a finished floor that may be damaged by
exposure to water or moisture.
WARNING
• Use this unit only for its intended use as described in this manual. Do not use attachments not
recommended by HoMedics; specifically, any attachments not provided with this unit.
• NEVER drop or insert any object into any opening.
• DO NOT operate where aerosol (spray) products are being used, or where oxygen is being administered.
• NEVER operate the appliance if it has a damaged cord or plug, if it is not working properly, if it has
been dropped or damaged, or dropped into water. Return the appliance to a HoMedics Service Center
for examination and repair.
• Always unplug the unit when filling or moving the unit.
• Ensure that your hands are dry when operating the controls or removing the plug.
• NEVER use the humidifier in an environment where explosive gases are present.
• DO NOT place the humidifier near heat sources, such as a stove, and do not expose the humidifier to
direct sunlight.
• DO NOT carry this unit by the power cord or use the power cord as a handle.
• To disconnect, turn all controls to the off position, then remove the plug from the outlet.
• CAUTION: All servicing of this humidifier must be performed by authorized HoMedics service
personnel only.
– TO REDUCE THE RISK OF BURNS, FIRE, ELECTRIC SHOCK, OR INJURY TO PERSONS:
2

SAVE THESE INSTRUCTIONS
CAUTION
• This product is intended for household use only.
• Never cover the unit while it is operating.
• Always keep the cord away from high temperature and fire.
• Perform regular maintenance on the ultrasonic membrane.
• Never use detergent to clean the ultrasonic membrane.
• Never clean the ultrasonic membrane by scraping with a hard object.
• Do not attempt to adjust or repair the unit. Servicing must be performed by professional
• Stop using this unit if there is an unusual noise or smell.
• Unplug this unit when not in use for a long period of time.
• Do not touch the water or any parts of the unit that are covered by water while the unit
• Never operate without water in the tank.
• Only use water in the tank.
• Never use any additive in the water.
• Keep this unit out of reach of children. Do not allow children to use this unit without supervision.
• DO NOT use outdoors. For indoor use only.
– PLEASE READ ALL INSTRUCTIONS CAREFULLY BEFORE OPERATING.
or qualified personnel.
is on or plugged in.
3

UNIQUE FEATURES & SPECIFICATIONS
ULTRASONIC TECHNOLOGY
This humidifier uses ultrasonic, high-frequency technology to convert water into a fine mist that is
dispersed evenly into the air.
WARM & COOL MIST FUNCTION
Choose either warm or cool mist for customized comfort.
TOP-FILL TANK
Easy to fill without removing a water tank. Easy to clean inside the tank.
MIST OUTPUT SETTINGS
Select low or high mist output.
DUAL 360° ROTATING MIST NOZZLES
Easily adjusts the mist output direction.
AUTO-OFF TIMER
Choose from 4-, 8-, or 12-hour options.
NIGHTLIGHT
An independent light feature with 3 brightness levels.
AUTO SHUT-OFF PROTECTION
When the tank is empty the unit will shut off automatically.
CAPACITY
0.63 gallons – 2.4 liters.
RUNTIME
Up to 30 hours. Runtime is based on using cool mist and setting the mist level on the low setting.
Based on the natural humidity level in your home, the temperature of water your use, and the
mist-level setting, you may experience longer or shorter runtimes.
OIL TRAY
Includes 3 essential oil pads. Use with your favorite essential oil to deliver aroma into the air.
CLEAN TRANSDUCER/ULTRASONIC MEMBRANE
A red LED will illuminate above the clean icon, indicating it is time to clean the
transducer/ultrasonic membrane.
4

T
MIST NOZZLE
REMOTE
TANK CAP
ANK COVER
MIST CHIMNEY
POWER
MIST OUTPUT
NIGHTLIGHT
OIL TRAY
MIST TEMPERATURE
TIMER
TRANSDUCER/ULTRASONIC MEBRANE*
WATER TANK
LED LIGHT
*The mist chimney must be removed to access.
WATER RESERVOIR
5
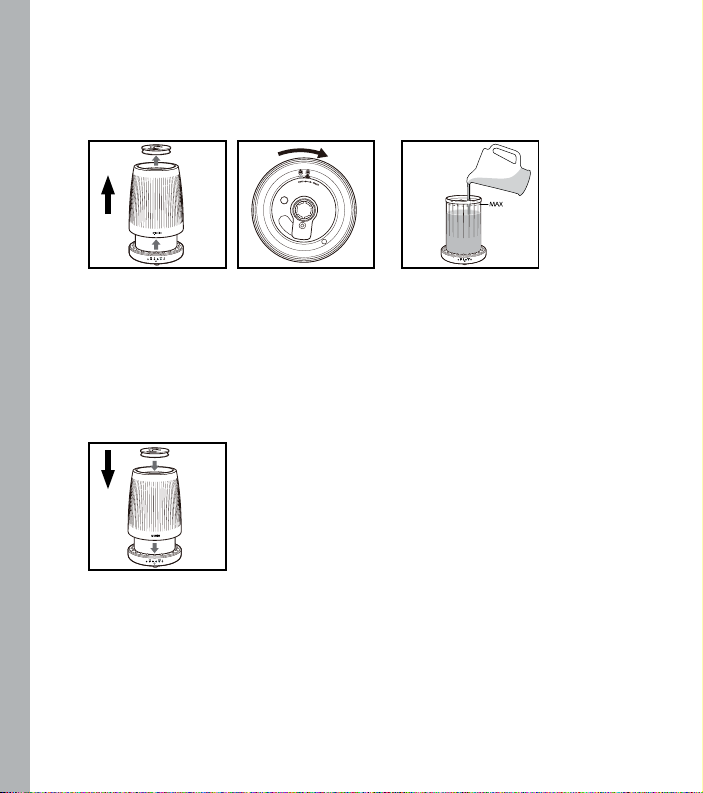
HOW TO FILL
CAUTION: Before filling the tank with water, turn the power off and unplug the unit from the outlet.
NOTE: The water tank is not removable from the humidifier base.
1. Before filling, remove the tank cap and tank
cover. Be sure the mist chimney is locked into the
humidifier tank by pushing down and turning the
mist chimney to the right, so the pointer is pointing
to the lock symbol.
CAUTION: Never fill the water reservoir with
water before the mist chimney is locked.
3. Replace the tank cover
and tank cap.
2. Fill the tank with clean, cool (not cold) water
until the water level reaches the MAX fill ring.
CAUTION: Never add essential oils or any
other additives to the water tank. Even a
few drops will damage the unit.
6

Power
Power/Out
of Water
Indicator
Mist
Output
Mist
Temperature
Nightlight Timer Clean
Transducer/
Ultrasonic
Membrane
Indicator
POWER ON/OFF BUTTON & OUT OF WATER INDICATOR
Plug unit into a 120-volt AC electrical outlet. Press the power button to turn unit on.
When the humidifier is out of water, the LED will glow red.
NOTE: If the mist chimney is not completely locked, the water reservoir will overfill causing the out of
water LED to glow red. Should this happen, follow steps 1-3 in the cleaning the transducer/ultrasonic
membrane instructions.
MIST OUTPUT
Mist adjusts from the lowest output (1) to the highest output (2). To increase the mist output, press the
mist output button. The corresponding mist level will be lit above the button. Continue to press the
mist output button to cycle through the mist output settings.
MIST TEMPERATURE SETTING
To change the mist temperature from cool to warm mist, press the mist temperature button. Red will
be illuminated above the button. To change the mist temperature from warm to cool mist, press the mist
temperature button again. The LED will turn off.
NOTE: Once warm mist is selected, it will take approximately 20 minutes to heat up before the mist
becomes warm.
360° DUAL ROTATING MIST NOZZLE
Rotate the tank cap to adjust the mist output direction. Rotate the smaller tank cap ring to direct the mist
output to a second direction.
NIGHTLIGHT
The nightlight feature has 3 brightness levels: low, medium, and high. Continuously press the nightlight
button to cycle through low, medium, high, and off.
The nightlight feature can be used when the humidifier is off.
7

TIMER
Press the timer button. Keep pressing the timer button until the desired timer setting is lit. The
timer button will cycle through the following settings: 4 hours, 8 hours, 12 hours, and off. To cancel
the timer at any time, press the timer button until all LEDs are off.
NOTE: Always be sure the humidifier has a full tank of water prior to using the timer setting.
AUTO-OFF
When the water in the tank is almost gone, the humidifying function will power off and the out of water
indicator will illuminate red, indicating it is time to refill the tank.
NOTE: It is normal to have a small amount of water in the tank after use.
CLEAN TRANSDUCER/ULTRASONIC MEMBRANE
The clean LED will illuminate red after 60 hours of use, indicating it is time to clean the transducer/
ultrasonic membrane. See cleaning instructions in the Cleaning and Care section. Press and hold the
clean transducer/ultrasonic membrane button for 3 seconds to reset the clean indicator.
HOW TO USE
ESSENTIAL OIL
Use your favorite essential oil to deliver aroma into the air.
NOTE: For use with the included HoMedics essential oil pads only.
NOTE: Do not leave a filled essential oil pad in the oil tray of the humidifier if it will be out of use for a
long period of time.
ARE ESSENTIAL OILS SAFE TO USE AROUND PETS?
We should always exercise caution when using essential oils around our pets. Keep all essential oil and
aromatherapy products (like diffusers) out of the reach of pets. Keep open bottles away from pets to avoid
internal consumption. We do not recommend the topical use of essential oils on pets, as they have a strong
sense of smell and cannot get rid of the oil if they don’t like it or it is disturbing them. When diffusing essential
oils around pets, always diffuse in a well-ventilated area and leave an option for them to remove themselves
from the space, such as leaving a door open. Every animal is different, so carefully observe how each animal
responds when introducing an essential oil for the first time. If irritation occurs, discontinue the use of the
essential oil. We recommend seeking medical attention if ingestion of essential oil occurs.
8
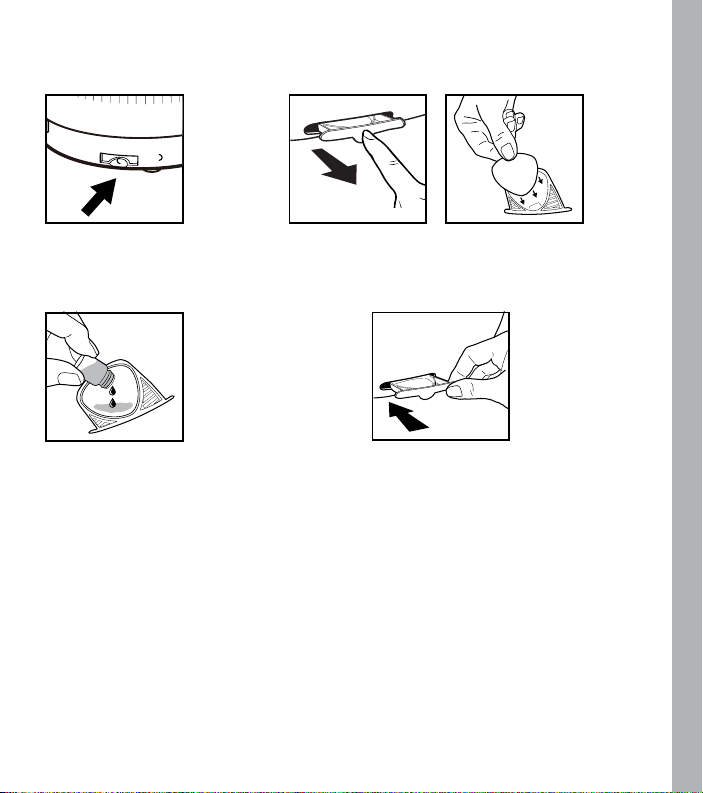
ADDING ESSENTIAL OILS
WARNING: Putting oil anywhere but the oil tray will damage the humidifier.
1. The oil tray is located on the
back of the humidifier at the
bottom of the humidifier base.
3. Add 5–7 drops of essential oil
to the pad. You may use more
or less depending on personal
preference.WARNING: Only
place essential oil on the
pad and NOT directly into
the tray.
2. Push to open and remove the tray. Place 1 aroma pad (3
included) into the oil tray.
4. Place the oil tray
back in its
compartment and
push to close. The
scent will start
automatically when
the mist is turned on.
ABOUT WHITE DUST
Use of high mineral content hard water may cause a white mineral residue to accumulate on surfaces
in the room near the humidifier. The mineral residue is commonly called “white dust.” The higher the
mineral content (or, the harder your water is), the greater the potential for white dust. The white dust is
not caused by a defect in the humidifier. It is caused only by minerals suspended in the water.
HOW AND WHY TO USE DEMINERALIZATION CARTRIDGES
The HoMedics demineralization cartridge will help reduce the potential for white dust, a deposit of
minerals left behind from using hard water in your humidifier. The cartridge should be replaced every
30–40 fillings. The cartridge may need to be replaced more often if you are using very hard water. Replace
the cartridge when you notice an increase in white dust buildup. If white dust still forms around the
humidifier after a new cartridge has been installed, consider using distilled water.
To purchase genuine HoMedics Replacement Essential Oil Pads, Model # UHE-PAD1, go to the retailer where you purchased your HoMedics
TotalComfort Ultrasonic Humidifier, or visit www.homedics.com (US), www.homedics.ca (CAN).
To purchase genuine HoMedics Essential Oils, go to the retailer where you purchased your HoMedics TotalComfort Ultrasonic Humidifier, or
visit www.homedics.com (US), www.homedics.ca (CAN).
9
If you live in an area with hard water, or use a water softener, we recommend using distilled water for
better results from your humidifier. Never use water-softening additives in your humidifier.
INSTALLATION INSTRUCTIONS
1. Remove demineralization cartridge from packaging and soak
in water for 10 minutes.
2. Remove the tank cap.
3. Fill the tank with water as shown in the How to Fill section of
this instruction book.
4. Add the soaked demineralization cartridge to the tank.
5. Replace the tank cap on the humidifier.
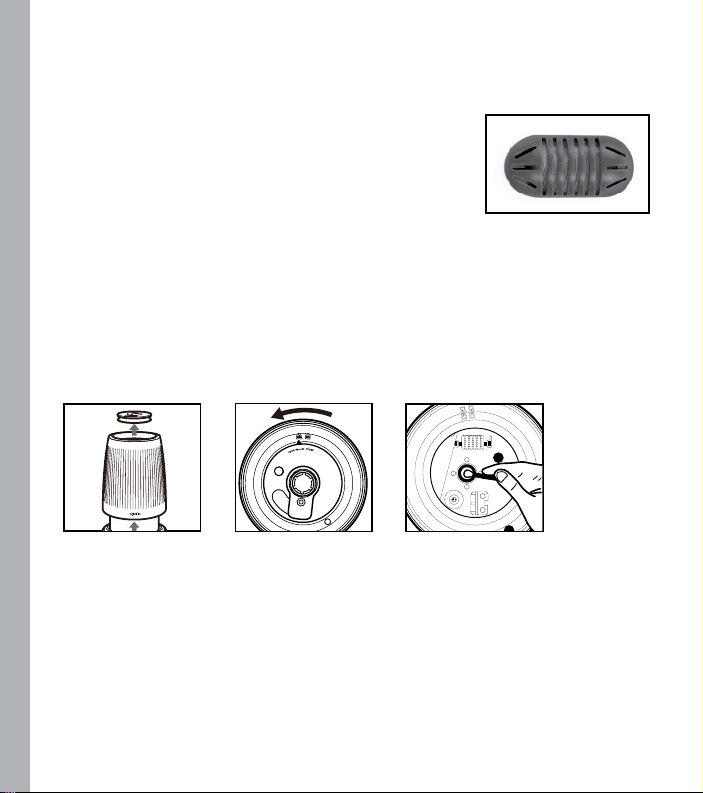
Demineralization Cartridge
CLEANING AND CARE
CAUTION: Before cleaning the unit, turn power off and unplug unit from the outlet.
CLEANING THE TRANSDUCER/ULTRASONIC MEMBRANE
The transducer/ultrasonic membrane must be cleaned to remove water mineral deposits when the red
LED is illuminated above the clean transducer/ultrasonic membrane button. Failure to do so may cause
reduced or no mist output.
1. Remove the tank cap
and tank cover and
set aside.
To purchase new Demineralization Cartridges, Model # UHE-HDC4, go to the retailer or visit www.homedics.com (US), www.homedics.ca (CAN).
2. Remove the mist
chimney by pushing
down and turning it
to the left until the
pointer is pointing to
the unlock icon and
pulling up.
3. Pour out any water
remaining in the
tank.
4. Clean the transducer/ultrasonic membrane
with a 50/50 mix of whi te vinegar and
water on a cotton swab. Wipe off with a damp
cotton swab. NEVER touch the transducer/
ultrasonic membrane with your fingers; the
natural oils in the skin can damage the
surface. NEVER submerge the base in water
or any other liquid.
10
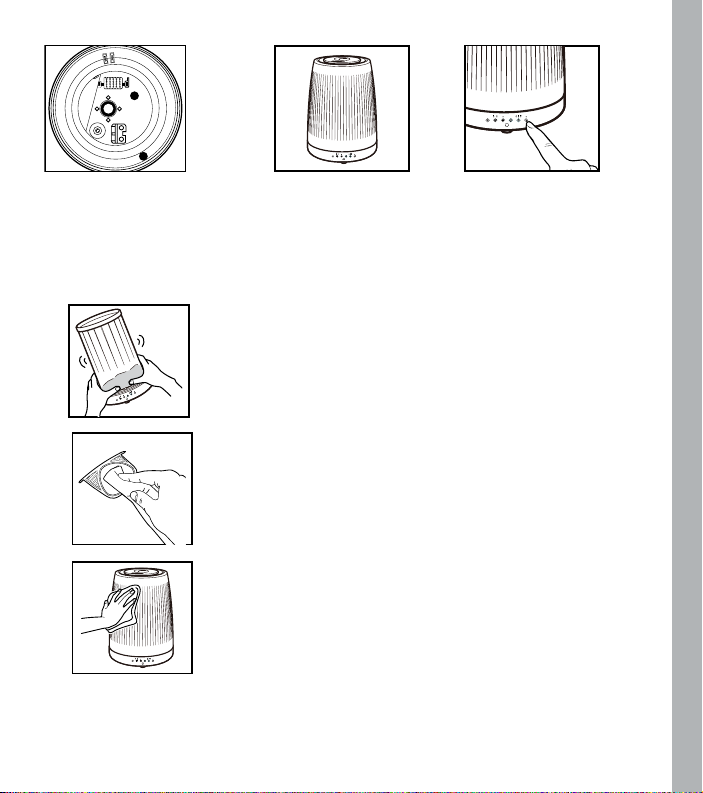
5. Clean the water reservoir with a
50/50 mix of white vinegar and
water on a cotton ball or clean,
soft cloth as needed. Wipe off
with a damp cotton ball or soft,
clean, damp cloth.
TO CLEAN THE TANK
Remove the tank cap and tank cover from the humidifier.
Every day: Empty and rinse the inside of the tank before refilling.
Every week: To remove any scale or buildup, use a 50/50 mixture of white
vinegar and lukewarm water to clean the inside of the tank.
TO CLEAN THE OIL TRAY
Open the oil tray and remove the pad. Essential oil pads should be changed
when switching to a different scent. If continuing to use the same scent, set
the oil pad aside for reuse. Wipe the inside of the oil tray with a soft cloth.
Place the essential oil pad back in the tray and close.
NOTE: Leave the essential oil pad out of the oil tray when storing.
TO CLEAN THE SURFACE
Clean the surface of the unit with a soft, damp cloth.
STORAGE
Clean the surface of the unit with a soft, damp cloth. Clean the tank
cap, tank, mist chimney, water reservoir, and the transducer/ultrasonic
membrane with a 50/50 mixture of white vinegar and water. Be sure to rinse
and let all parts dry completely before storing. Clean the oil tray with a soft,
damp cloth.
After storing: Rinse the tank with water prior to operating.
6. After cleaning,
reassemble the
humidifier, fill with
water, plug in, and
turn on.
11
7. Press and hold the clean
transducer/ultrasonic
membrane button for 3
seconds, until the LED light
above the button turns off.

TROUBLESHOOTING
PROBLEM POSSIBLE CAUSE SOLUTION
No power/no mist from spout • Unit is not plugged in
• No power at unit
• Low water level
• Transducer/ultrasonic
membrane needs cleaning
• The mist chimney is not
locked into the humidifier
tank, or the pointer is not
pointing to the lock icon
Peculiar odor • Unit is new
• If unit is in use, the odor
may be a dirty tank or old
tank water
• Old water in water reservoir
Excessive noise • Unit is not level
• Low water level
• Plug unit in
• Press the power button to
turn the unit on
• Check circuits and fuses or
try a different outlet
• Refill the tank with water
• Follow Cleaning the
Transducer/Ultrasonic
Membrane instructions
in the Cleaning and Care
section
• Remove the mist chimney
first and then pour out any
water remaining in the water
reservoir, replace the mist
chimney and make sure it
is locked before filling with
water
• Remove the tank cap and let
the tank air out in a cool, dry
place for 12 hours
• Empty the old water,
clean the tank, and fill
with clean water
• Empty the water tank;
remove the mist chimney
and pour out any remaining
water in the water reservoir
• Place unit on a flat,
even surface
• Check the water level; refill
the tank if the water is low
12
PROBLEM POSSIBLE CAUSE SOLUTION
White dust accumulation • Hard water used
• Demineralization Cartridge
needs to be replaced
• Use distilled water and a
Demineralization Cartridge
• Replace Demineralization
Cartridge
FCC DISCLAIMER
This product has been tested and complies with the requirements for Federal Communication Commission,
Part 18 and CAN ICES-1/NMB-1. Although this product is tested and complies with FCC regulations, it
may interfere with other devices. If this product is found to interfere with another device, separate the
other device and this product. Conduct only the user maintenance found in this instruction manual. Other
maintenance and servicing may cause harmful interference and can void the required FCC compliance.
CAUTION: All servicing of this humidifier must be performed by authorized HoMedics service
personnel only.
13
 Loading...