

HoMedics UHE-CM55BL, UHE-CM55BY, UHE-CM55WT Instruction Manual
Instruction Manual and
Warranty Information
UHE-CM55
UHE-CM55BL
UHE-CM55BY
UHE-CM55WT
Cool Mist
Ultrasonic Humidifier
El manual en Español
empieza a la página 13
Le manuel en francais
commence à la page 25
Garantie limitée d'un an
Les produits mis à vente par HoMedics sont considérés comme exempts de vices de matériaux
et de fabrication pendant une période d'un an à partir de la date de l'achat initial, hormis dans les
cas indiqués ci-dessous. HoMedics garantit que ce produit est exempt de vices de matériaux et
de fabrication dans des conditions normales d'utilisation et de service. Cette garantie s'applique
uniquement aux consommateurs et non pas aux détaillants.
Pour obtenir un service au titre de la garantie pour votre produit HoMedics, veuillez communiquer
avec un représentant du service des relations clientèle. Veuillez vous assurer d'avoir le numéro de
modèle du produit à portée de main.
HoMedics n'autorise personne, y compris - mais non exclusivement - les détaillants/revendeurs,
le consommateur acheteur ultérieur du produit auprès d'un détaillant/revendeur, ou les acheteurs
par correspondance, à contraindre HoMedics d'une manière quelconque au-delà des clauses
énoncées ici même. Cette garantie ne couvre pas les dommages causés par une mauvaise
utilisation ou un abus; tout accessoire utilisé sans autorisation; toute modification apportée
au produit; une mauvaise installation, les réparations ou modifications non autorisées; une
mauvaise utilisation du courant électrique; une panne de courant; un produit qui est tombé,
un dysfonctionnement ou un dommage à une pièce opérationnelle suite au non-respect des
mesures d'entretien recommandées par le fabricant; les dommages durant le transport; le vol, la
négligence, le vandalisme ou les conditions environnementales; une perte d'utilisation pendant
la période durant laquelle le produit se trouve dans un centre de réparation ou en attente de
pièces ou d'une réparation; ou toutes autres conditions quelconques ne pouvant être imputées à
HoMedics.
Cette garantie prend effet dans la mesure où le produit est acheté et utilisé dans le
pays d'achat du produit. Un produit devant faire l'objet de modifications ou de réglages afin de
permettre son fonctionnement dans un pays autre que celui pour lequel il est conçu, fabriqué,
approuvé et/ou autorisé, ou encore la réparation de produits endommagés par ces modifications,
ne sont pas couverts par cette garantie.
LA GARANTIE STIPULÉE ICI MÊME CONSTITUE LA SEULE ET UNIQUE GARANTIE. IL N'Y A
AUCUNE AUTRE GARANTIE, EXPRESSE OU IMPLICITE, Y COMPRIS TOUTE GARANTIE IMPLICITE
DE COMMERCIABILITÉ OU D'APTITUDE À L'EMPLOI DE LA PART DE LA SOCIÉTÉ QUANT AUX
PRODUITS COUVERTS PAR CETTE GARANTIE. LA SOCIÉTÉ HOMEDICS NE SAURAIT ÊTRE TENUE
RESPONSABLE DE TOUT TYPE DE DOMMAGES INDIRECTS, CONSÉCUTIFS OU PARTICULIERS.
CETTE GARANTIE NE PEUT EN AUCUN CAS DÉPASSER LES LIMITES DE LA RÉPARATION OU DU
REMPLACEMENT DE TOUTE OU TOUTES PIÈCE(S) AVÉRÉE(S) DÉFECTUEUSE(S) PENDANT LA
PÉRIODE DE GARANTIE. AUCUN REMBOURSEMENT NE POURRA AVOIR LIEU. DANS LE CAS OÙ
DES PIÈCES DE RECHANGE POUR DES MATÉRIAUX DÉFECTUEUX SERAIENT INDISPONIBLES,
HOMEDICS SE RÉSERVE LE DROIT D'OPÉRER UNE SUBSTITUTION DE PRODUITS AU LIEU D'UNE
RÉPARATION OU D'UN REMPLACEMENT.
Cette garantie ne prend pas en compte l'achat de produits ouverts, utilisés, réparés, réemballés et/
ou rescellés, y compris, mais non exclusivement, la vente de tels produits sur des sites Internet
de ventes aux enchères et/ou les ventes desdits produits par des revendeurs en vrac ou de
surplus. Les réparations, remplacements, altérations ou modifications de tous produits ou pièces
s'y rattachant, sans le consentement écrit préalable et exprès de HoMedics, mettent fin à toutes
les garanties et entraînent leur résiliation immédiate.
Cette garantie vous confère des droits juridiques précis. Il est également possible que vous
bénéficiiez d'autres droits qui peuvent varier d'une juridiction à l'autre. Compte tenu de la
réglementation particulière de chaque pays, certaines des limitations et des exclusions
précédentes peuvent ne pas s'appliquer à votre cas.
Pour plus amples renseignements relatifs à notre ligne de produits aux É.-U., rendez-vous sur :
www.homedics.com. Pour le Canada, rendez-vous sur le site suivant : www.homedics.ca.
HoMedics® est une marque de commerce déposée de HoMedics, LLC.
© 2014 HoMedics, LLC. Tous droits réservés.
IB-UHECM55
Courriel:
cservice@homedics.com
Du lundi au vendredi,
de 8 h 30 à 19 h, HNE
1.800.466.3342
P
l
e
a
s
e
T
a
k
e
A
M
o
m
e
n
t
N
o
w
Register
Your Product At:
www.homedics.com/register
Your valuable input regarding this
product will help us create
the products you will
want in the future.
1
year
limited warranty
Distribué par

2 3
IMPORTANT SAFETY INSTRUCTIONS:
WHEN USING ELECTRICAL PRODUCTS, ESPECIALLY WHEN CHILDREN ARE PRESENT,
BASIC SAFETY PRECAUTIONS SHOULD ALWAYS BE FOLLOWED, INCLUDING
THE FOLLOWING:
READ ALL INSTRUCTIONS BEFORE USING
DANGER - TO REDUCE THE RISK OF ELECTRIC SHOCK:
• Always place humidifier on a firm, flat surface. A waterproof mat or pad is
recommended for use under the humidifier. Never place it on a rug or carpet, or
on a finished floor that may be damaged by exposure to water or moisture.
• Always unplug the unit from the electrical outlet immediately after using and
before cleaning
• DO NOT reach for a unit that has fallen into water. Unplug it immediately.
• DO NOT use while bathing or in the shower.
• DO NOT place or store the unit where it can fall or be pulled into a tub or sink.
• DO NOT place or drop into water or other liquids.
• DO NOT use water above 86° Fahrenheit.
WARNING - TO REDUCE THE RISK OF BURNS, ELECTRIC SHOCK, FIRE
OR INJURY TO PERSONS:
• A unit should never be left unattended while plugged in.
• Close supervision is necessary when this unit is used by or near children,
invalids, or disabled persons.
• Use this unit only for its intended use as described in this manual. Do not use
attachments not recommended by HoMedics; specifically any attachments not
provided with this unit.
• NEVER drop or insert any object into any opening.
• DO NOT operate where aerosol (spray) products are being used, or where
oxygen is being administered.
• Always hold the water tank firmly with both hands when carrying a full tank
of water.
• NEVER use the humidifier in an environment where explosive gasses
are present.
• DO NOT place the humidifier near heat sources, such as a stove, and do not
expose the humidifier to direct sunlight.
• DO NOT carry this unit by the power cord or use the power cord as a handle.
• To disconnect, turn all controls to the “off” position, then remove the plug from
the outlet.
• This unit is designed for personal, non-professional use only.
• DO NOT use outdoors. For indoor use only.
SAVE THESE INSTRUCTIONS
CAUTION - PLEASE READ ALL INSTRUCTIONS CAREFULLY BEFORE
OPERATION.
• Never cover the unit while it is operating.
• Always keep the cord away from high temperature and fire.
• If the cord sustains damage, you must stop using this product immediately
and contact HoMedics consumer relations (see Warranty section for consumer
relations contact information).
• Perform regular maintenance on the ultrasonic membrane.
• Never use detergent to clean the ultrasonic membrane.
• Never clean the ultrasonic membrane by scraping with a hard object.
• Do not attempt to adjust or repair the unit. Servicing must be performed by
professional or qualified personnel.
• Stop using this unit if there is an unusual noise or smell.
• Unplug this unit when not in use for a long period of time.
• Do not touch the water or any parts of the unit that are covered by water while the
unit is on or plugged in.
• Never operate without water in the tank.
• Only use water in the tank.
• Never use any additive to the water.
• Do not wash, adjust, or move this unit without first unplugging it from the
electrical outlet.
• Keep this unit out of reach of children. Do not allow children to use this unit
without supervision.
4 5
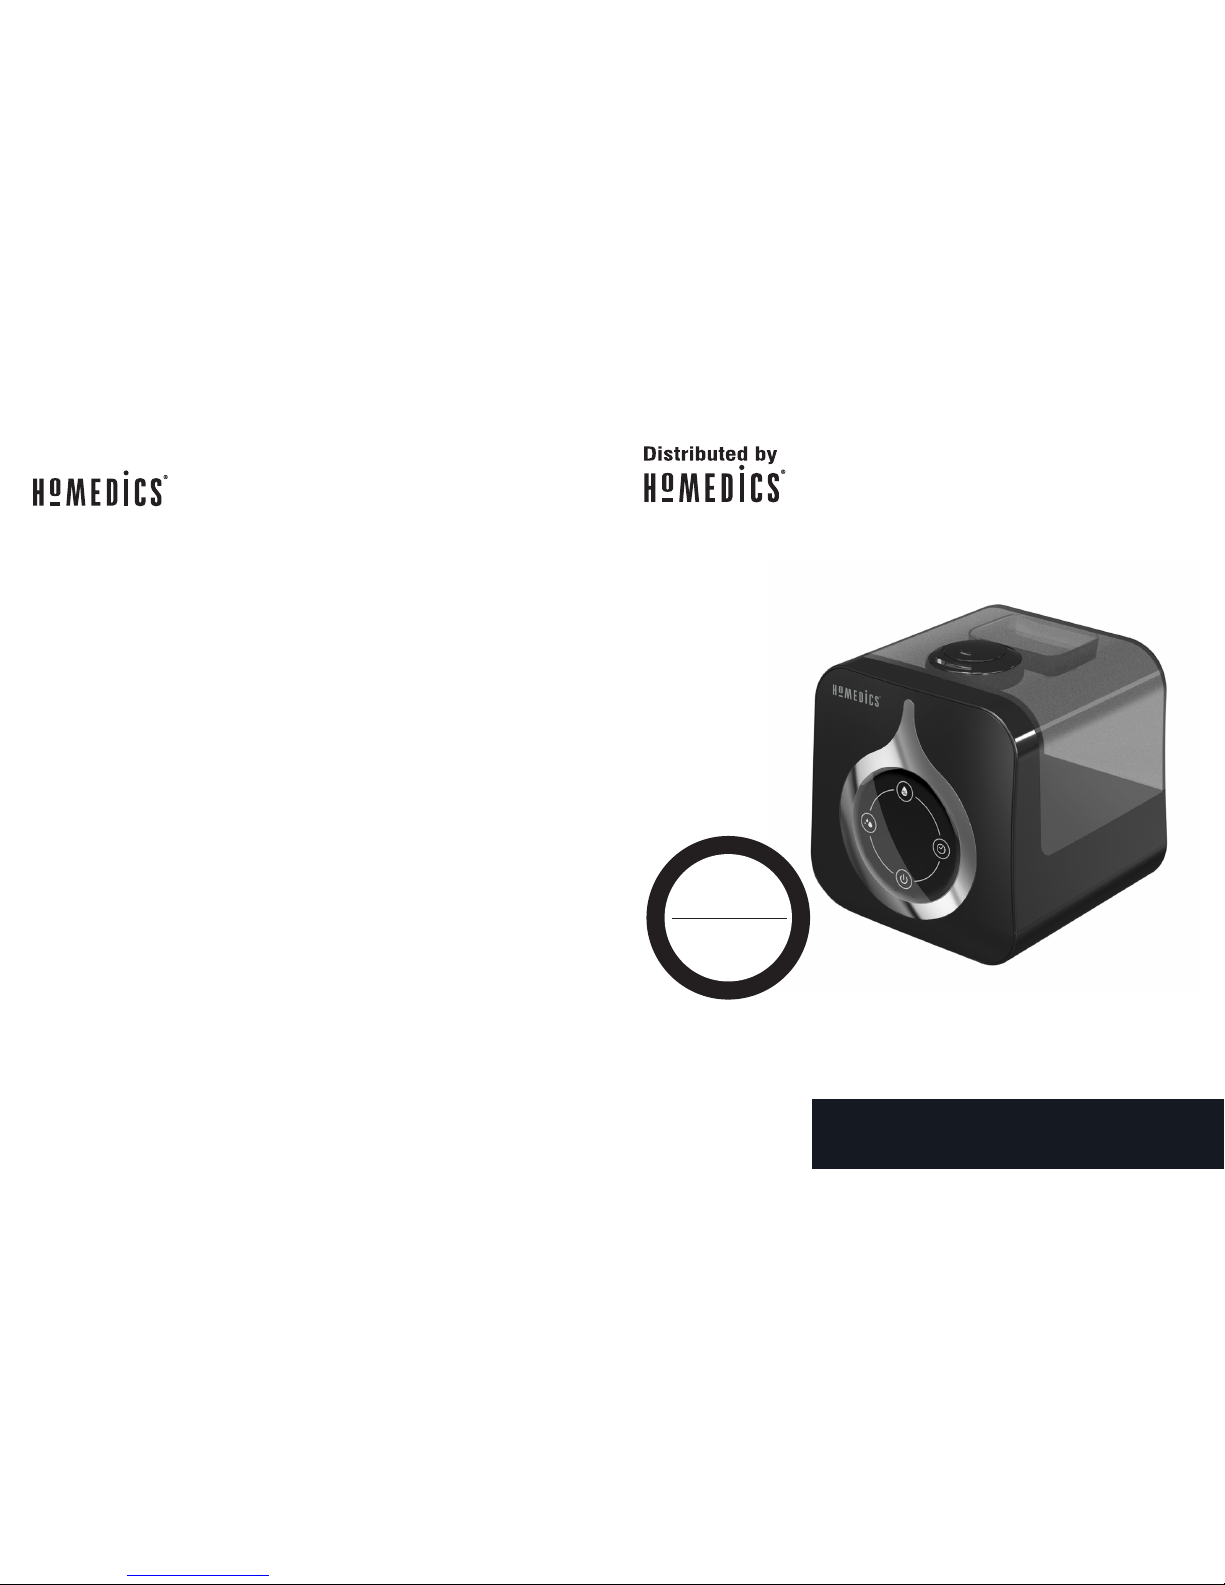
Cool Mist Ultrasonic Humidifier
Fig.1
CAUTION: This appliance has a polarized plug (one blade wider than the
other). To reduce the risk of shock, this plug is intended to fit only one way
in a polarized outlet. If the plug does not fit fully in the outlet, reverse the
plug. If it still does not fit, contact a qualified electrician.
DO NOT attempt to defeat this safety feature. To do so could result in an
electric shock hazard.
Unique Features and Specifications
Ultrasonic Technology
This humidifier uses ultrasonic high frequency technology to convert the water into 1–5 million
super particles that are dispersed into the air evenly.
Night Mode
Turns off display, mutes buttons, and sets humidistat to 40%.
Programmable Humidistat
Customize the level of humidity.
Built-In Timer
Programmable time, up to 9 hours.
Auto Shut-Off Protection
When the tank is empty the unit will shut off automatically.
Voltage Watts Capacity
120V/50Hz 25 1.3 gallon – 4.9 liters
Run Time: 48 hours
Run time is calculated based on using cool water and setting the mist level between the low
and medium settings. Based on the natural humidity level in your home, the temperature of
water you use, and the mist level setting you choose, you may experience longer or shorter
run times.
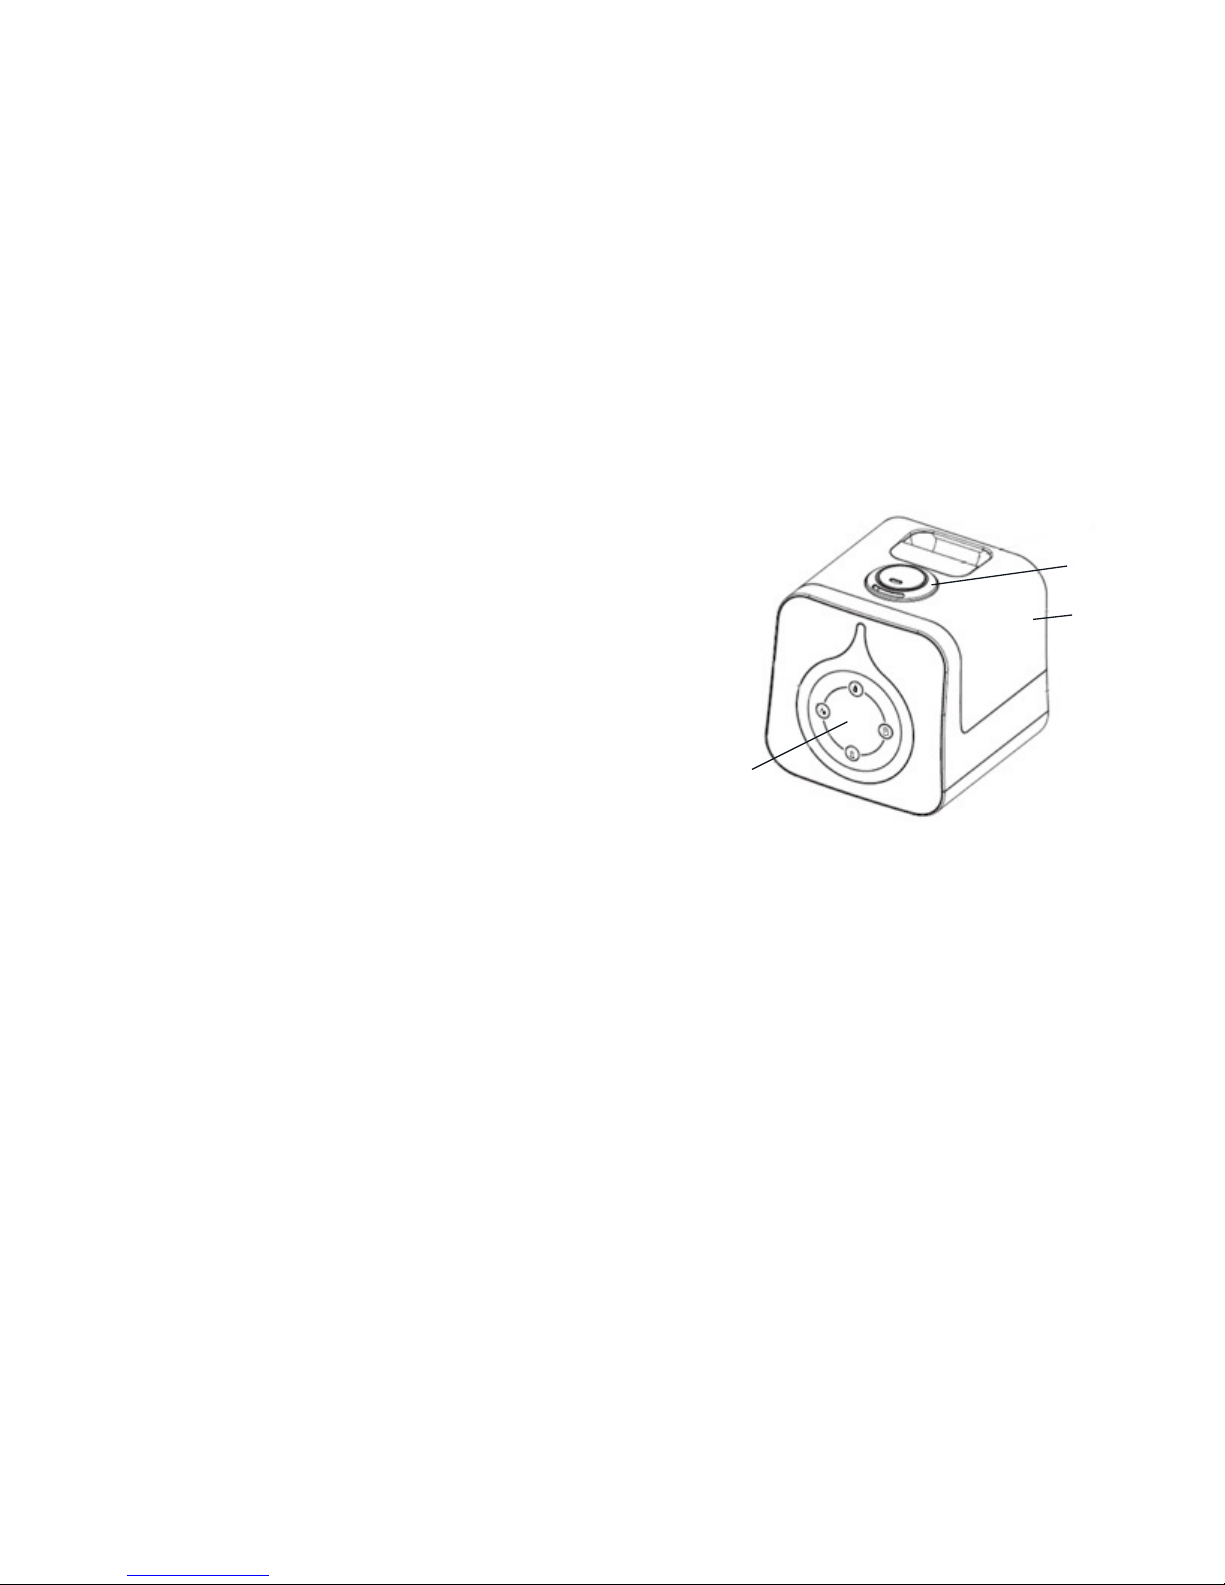
Mist Spout
Tank
Control Panel
6 7
Fig. 2
How To Use
Power Button
Plug unit into a 120 volt AC electrical outlet. Press the POWER BUTTON ( ) once to turn the
humidifier on.
ATTENTION: When the water in the tank is almost empty, the humidifying function will power off to
indicate to the user to refill the tank.
Dual Swivel Mist Spout
This unit has a dual swivel mist spout that allows you to direct the mist 360°. Simply adjust the outlets
to aim the mist in whichever direction you want.
Mist Adjustment Setting
Mist adjusts from MINIMUM ( 1 ) mist to MAXIMUM ( 3 ) mist. To increase the mist output, press the
MIST button. To decrease mist output, cycle through all three mist settings.
Night Mode
Press the TIMER ( ) button for three seconds to turn off all display LED's. To turn night mode off,
and control lights on, press and hold TIMER ( ) button for three seconds.
Programmable Humidistat
This unit has a programmable humidistat that can be set in 5% increments from 35% - 60% humidity.
To program the humidity level, press the HUMIDISTAT button and cycle through selections. After
selection is made display will revert to showing existing RH%. After 60% screen will display "--" and
clear the program. Once the programmed humidity level is reached, the unit will stop misting until the
humidity level drops below the programmed level. Then it will resume misting.
Timer
The timer will cycle through the following settings: 1 hour, 2 hours, 4 hours, 6 hours, 8 hours, 9 hours,
and "0". Press the TIMER button to activate the timer. The timer setting indicator will read "1". To select
the desired timer setting, keep pressing the TIMER button until the desired timer setting is lit. To turn
the timer off, press the TIMER button until "0" is displayed, after 2 seconds the timer will turn off.
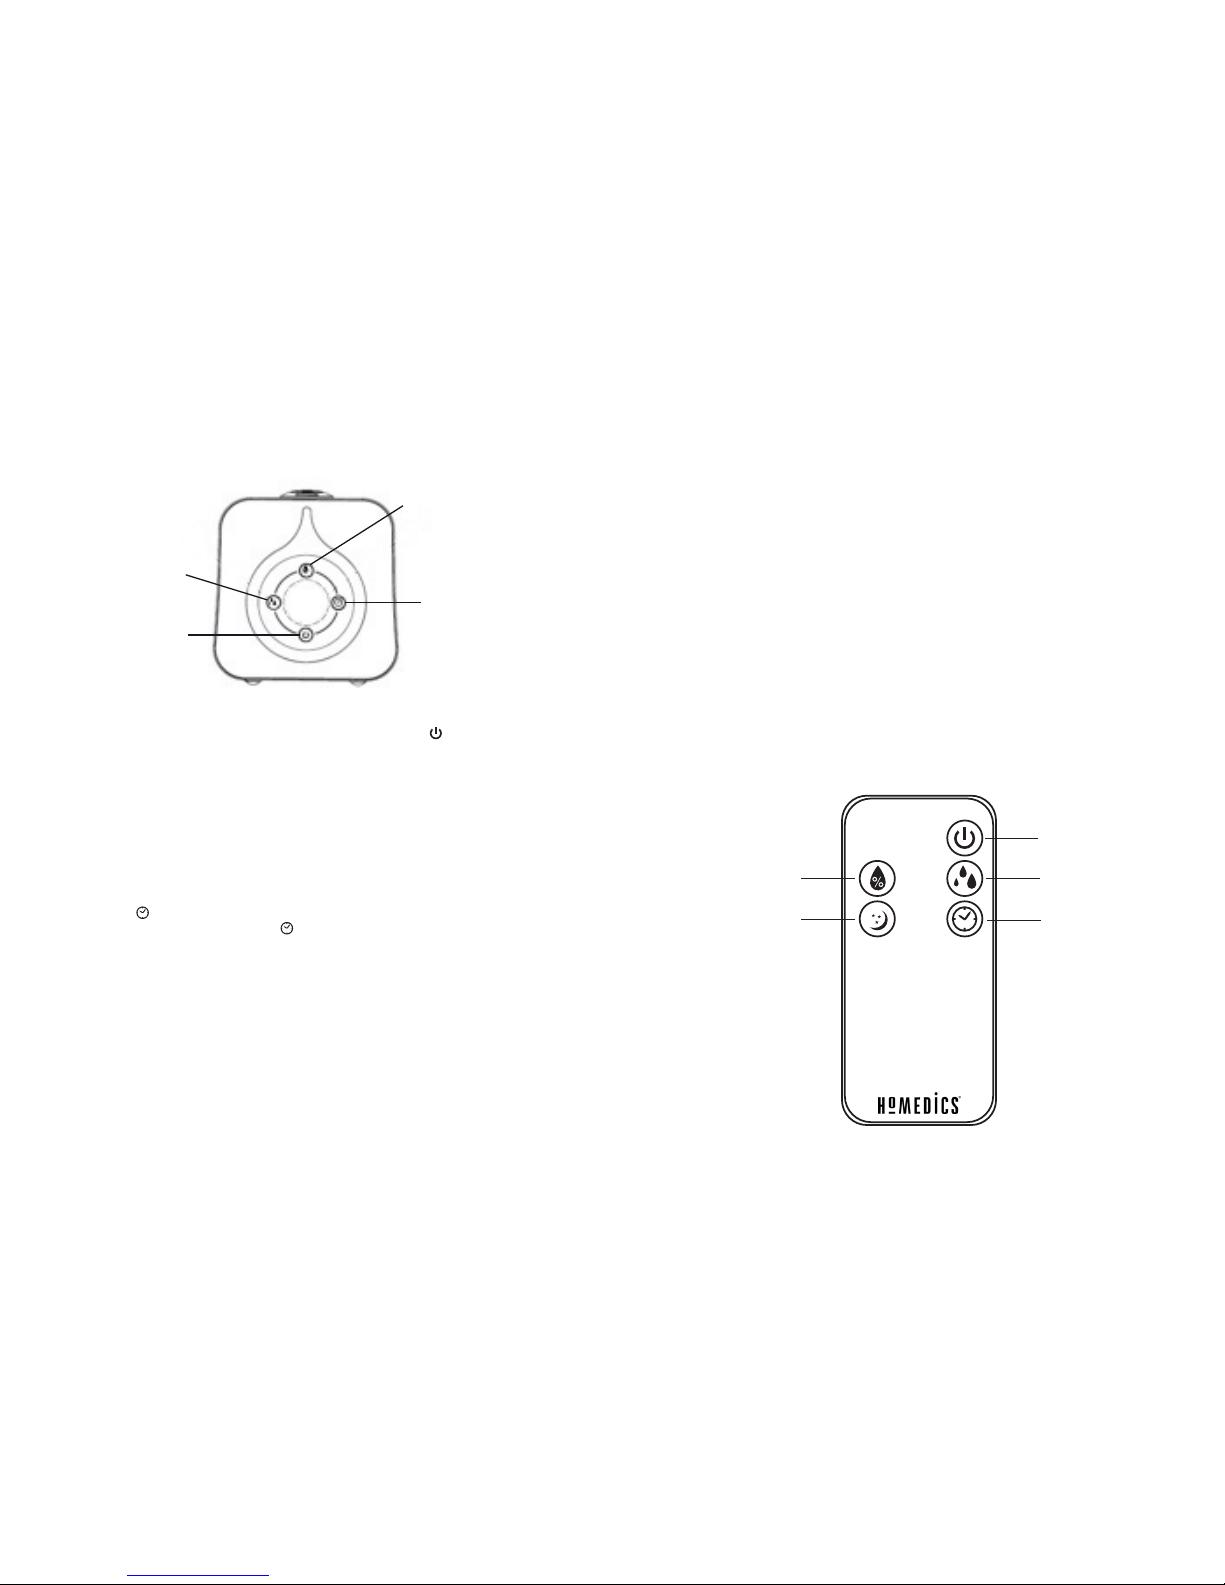
Programmable
Humidistat
Timer
Power
ON/OFF
Mist
Adjust
Using the Remote Control
BEFORE FIRST USE, REMOVE PLASTIC PULL TAB FROM BATTERY COMPARTMENT.
Battery Installation
One CR2025 3V battery is included with the remote control. To change the battery,
remove the battery door at the back of the remote by squeezing the tab and pulling the
door away from the back of the remote. Please insert the battery into the remote with the
positive side up as shown on the drawer.
NOTE:
Always keep the battery and remote control out of the reach of children.
BATTERY NOTE
• If the unit is not going to be used for a long period of time, remove batteries to
prevent damage due to possible battery leakage.
• Clean the battery contacts and also those of the device prior to battery installation.
• Remove used batteries promptly.
• Dispose of properly in accordance with all state, province, and country regulations.
• Do not dispose of batteries in fire. Batteries may explode or leak.
• Use only the size and type of batteries specified.
• When installing batteries, observe proper polarity +/-. Improper installation of
batteries may cause damage.
Power ON/OFF
Timer
Mist Level
Humidistat
Night Mode
ON/OFF
8 9
About White Dust:
Use of high mineral content hard water may cause a white mineral residue to accumulate on
surfaces in the room near the humidifier. The mineral residue is commonly called “white dust.”
The higher the mineral content (or, the harder your water is), the greater the potential for white
dust. The white dust is not caused by a defect in the humidifier. It is caused only by minerals
suspended in the water.
How and Why To Use Demineralization Cartridges:
The HoMedics demineralization cartridge will help reduce the potential for white dust, a
deposit of minerals left behind from using hard water in your humidifier. The cartridge should
be replaced every 30 – 40 fillings. The cartridge may need to be replaced more often if
you are using very hard water. Replace the cartridge when you notice an increase in white
dust build-up. If white dust still forms around the humidifier after a new cartridge has been
installed, consider using distilled water. To purchase new demineralization cartridges, model
# UHE-HDC4, go back to the retailer (where you purchased your humidifier), or
visit www.homedics.com
If you live in an area with hard water, or use a water softener, we recommend using
distilled water for better results from your humidifier. Never use water softening
additives in your humidifier.
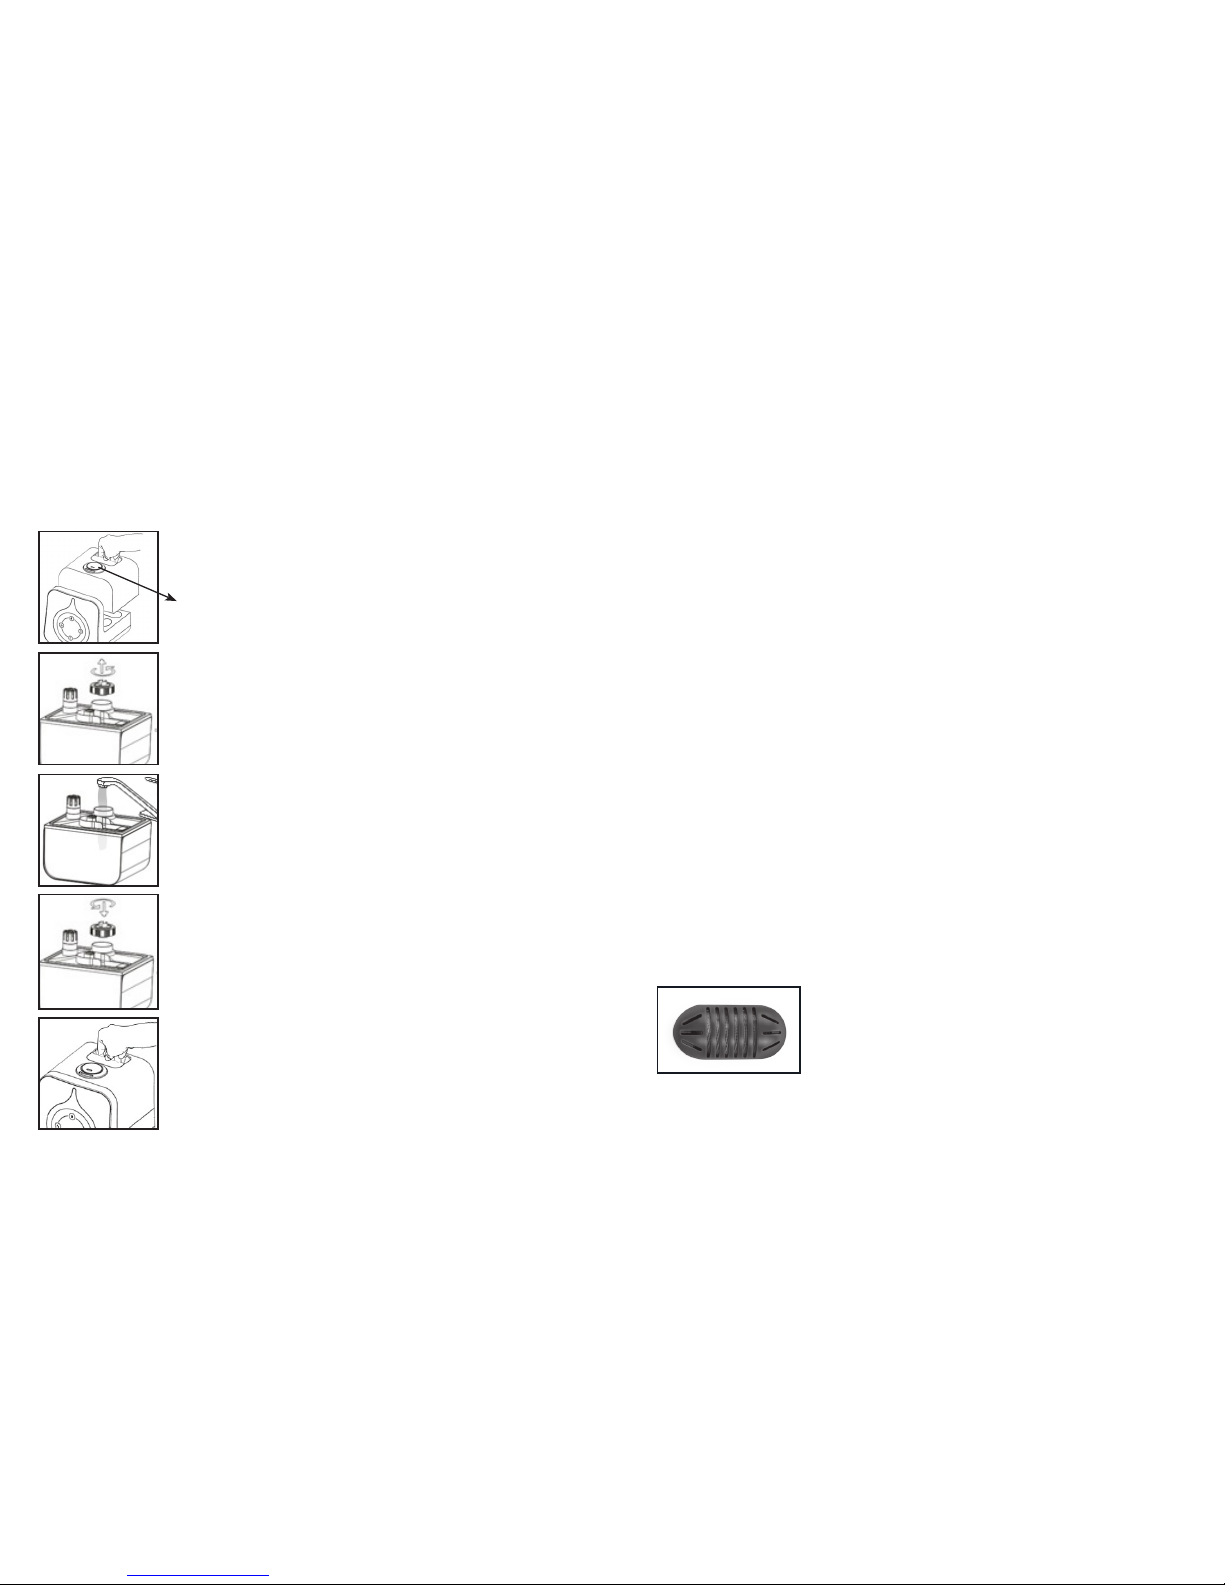
Installation Instructions
1. Remove demineralization cartridge from packaging and let it soak
in water for 10 minutes.
2. Remove the tank from humidifier base and turn it over.
3. Unscrew the tank cap by turning the cap counter-clockwise.
4. Fill the tank with water as shown in the How to Fill section of the instructions included
with your humidifier.
5. Add the soaked demineralization cartridge into the tank.
6. Replace the tank cap by turning clockwise.
7. Place the tank back on the base.
Demineralization Cartridge
How to Fill
CAUTION: Before filling unit with water, turn the power off and unplug the unit from the outlet.
NOTE: Always use two hands to carry the water tank.
1. Grasp tank handle and lift up from humidifier base. (Fig. 3)
NOTE: Mist nozzle is removable for cleaning. Be sure to remove
mist nozzle before turning tank upside down for filling.
2. Turn the tank upside down—remove the tank cap by turning it
counter-clockwise. (Fig. 4)
3. Fill the water tank with clean, cool (not cold) water. We
recommend using distilled water if you live in a hard water area.
(Fig. 5)
4. Replace the tank cap by turning clockwise until tight. (Fig. 6)
5. Install the tank back on the base of the unit. Make sure the tank
is firmly seated and mist nozzle is in place. (Fig. 7)
NOTE: It is normal to have a small amount of water in the base
during and after use.
Fig. 3
Fig. 5
Fig. 4
Fig. 6
Fig. 7
10 11
PROBLEM POSSIBLE CAUSE SOLUTION
No Power/
No Mist from Spout
• Unit is not plugged in
• No power at unit
• Low water level
• Plug unit in
• Turn the Power/Mist knob
clockwise to turn the
power on
• Check circuits and fuses or
try a different outlet
• Refill the tank with water
Peculiar Odor • Unit is new
• If unit is in use, the odor may
be a dirty tank or old tank
water
• Open the water tank cap
and keep it in a shady, cool
place for 12 hours
• Empty the old water,
clean the tank and fill
with clean water
Excessive Noise • Unit is not level
• Low water level
• Place unit on a flat,
even surface
• Check the water level. Refill
the tank if the water is low
White Dust Accumulation • Hard water used
• Demineralization Cartridge
needs replacement
• Use distilled water and a
Demineralization Cartridge
• Replace Demineralization
Cartridge
FCC Disclaimer
NOTE: This dev ice complies wit h Part 15 of the FCC guidelines. Operation is subject to the following t wo
conditi ons: (1) this dev ice may not cause harmful interferenc e, and (2) this device mu st accept any inter ference
received, including interference that may cause undesired operation.
NOTE: The manufacturer i s not responsible for any radio or T V interferenc e caused by unauthorized
modific ations to this equip ment. Such modifi cations could void the user authorit y to operate the equipm ent.
NOTE: This equipment has been tested a nd found to comply with the limi ts for a Class B digital device,
pursuan t to Part 15 of the FCC Rules. T hese limits are desi gned to provide reasonable protection ag ainst
harmful interference in a residential installation. This equipment generates, uses and can radiate radio
frequen cy energy and, if not installed and used in accordan ce with the instructions, may c ause harmful
interference to radio communications. However, there is no guarantee that interference will not occur in a
particular installation. I f this equipment do es cause harmful interference to radio or televisio n reception,
which ca n be determined by tu rning the equipme nt off and on, the use r in encouraged to tr y to correct the
interference by one or more of the following measure:
• Reorie nt or relocate the receiving ante nna.
• Increase the separation between the equipment and receiver.
• Connect the equipment in to an outlet on a circuit dif ferent from that to whic h the receiver is connec ted.
• Consul t the dealer or an experienced radio/TV technician for help.
Troubleshooting
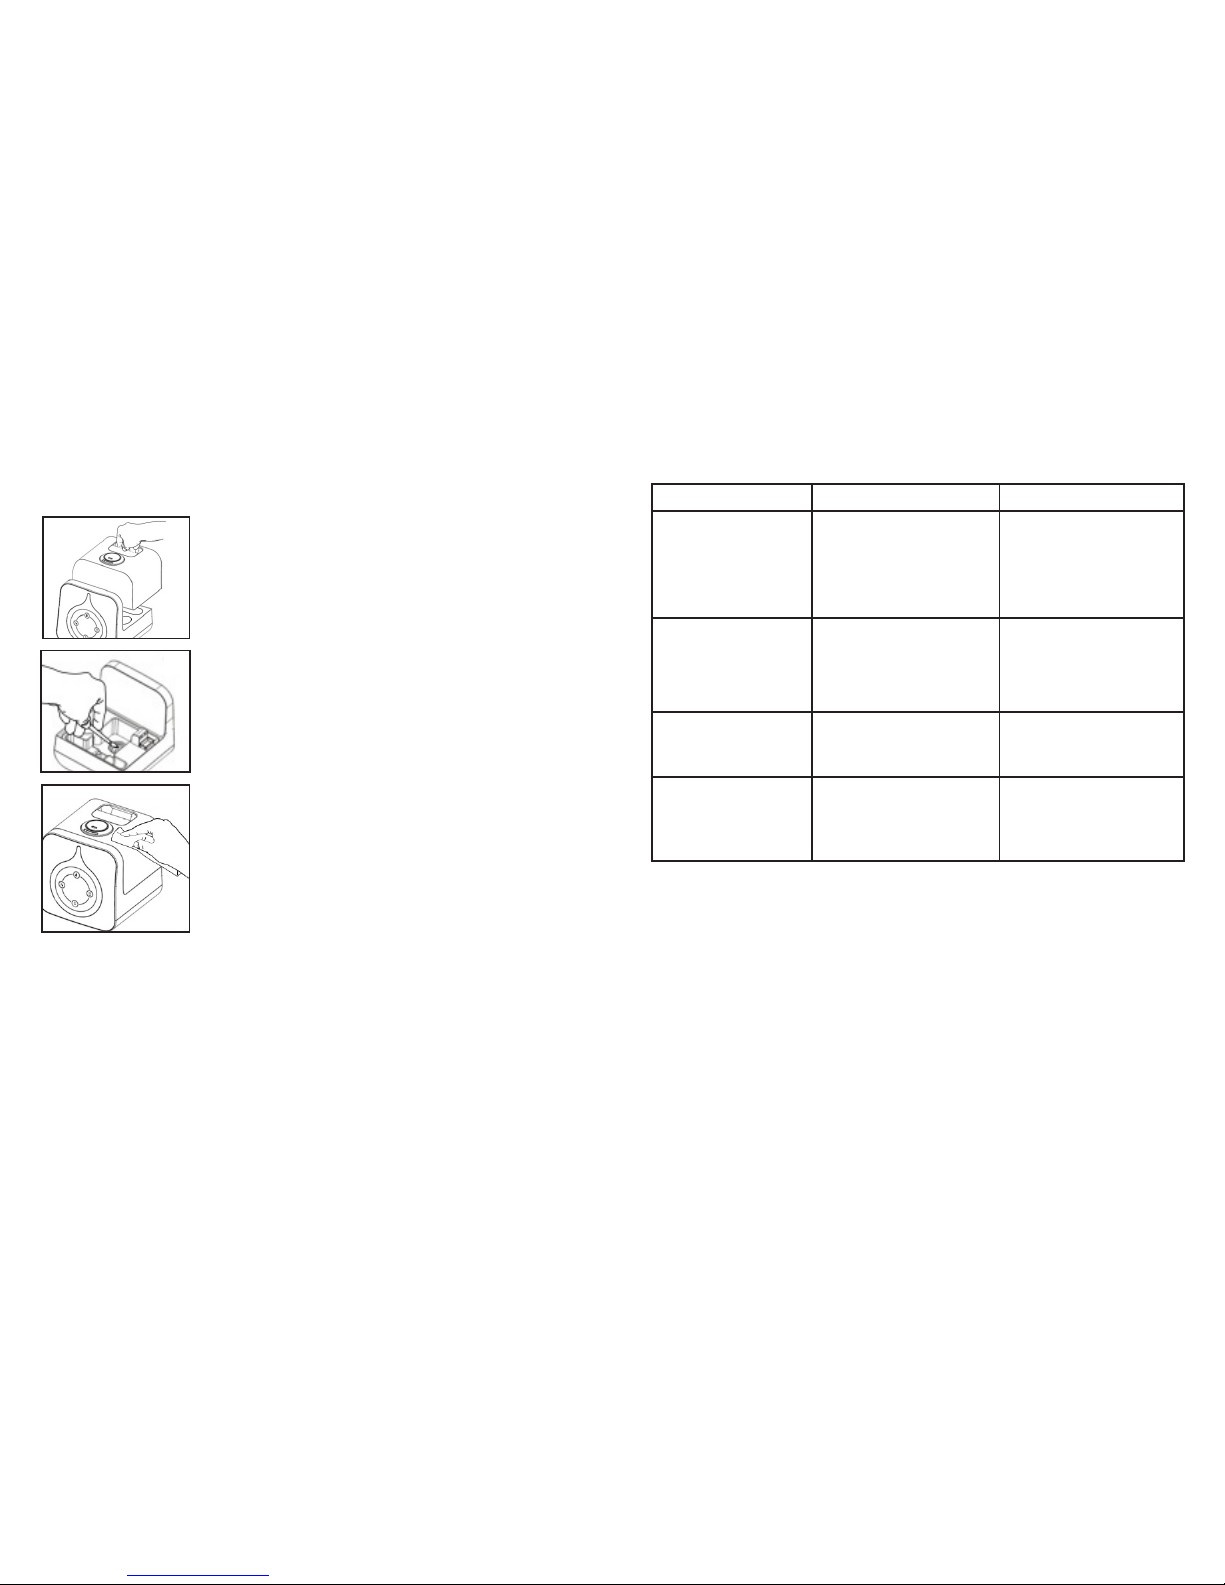
Cleaning and Care
CAUTION: Before cleaning the unit, turn power off and unplug unit from the outlet.
To Clean the Tank
Remove the water tank from the humidifier base by lifting it
from the main unit. Unscrew the tank cap and rinse inside the
tank with clean water. To remove any scale or build up, use
a 50/50 mixture of vinegar and lukewarm water to clean the
inside of the tank. (Fig. 8)
Suggestion: Clean the water tank once every two to three
weeks, depending on your water conditions.
To Clean the Ultrasonic Membrane
Pour a 50/50 mixture of vinegar and water on the surface of
the ultrasonic membrane, then soak for five minutes. Brush
clean with a soft-bristle brush (not included) and rinse.
NEVER touch the ultrasonic membrane with your fingers as
the natural oils in skin can damage the membrane. (Fig. 9)
Suggestion: Clean the membrane once every two to three
weeks, depending on your water conditions.
NOTE: Never submerge the base in water or any liquid
To Clean the Surface
Clean the surface of the unit with a clean damp soft cloth as
often as needed. (Fig. 10)
Fig. 10
Fig. 9
Fig. 8
 Loading...