

HoMedics TT-200, TT-201 User Manual

limited warranty
year
2
™
Por servicio o
™
reparación, no
devuelva esta unidad
al distribuidor. Póngase
en contacto con
HoMedics Consumer
Relations, al:
Dirección:
HoMedics
Consumer Relations
Service Center Dept. 168
3000 Pontiac Trail
Commerce Township,
MI 48390
Correo electrónico:
cservice@homedics.com
Teléfono:
1-800-466-3342
Horas de trabajo:
8:30 am – 5:00 pm
Hora del este
de lunes a viernes
GARANTÍA LIMITADA POR DOS AÑOS
(Válida únicamente en los EE.UU.)
HoMedics, Inc., garantiza este producto contra defectos en material
y mano de obra durante el período de dos años a partir de la fecha
original de compra con las excepciones que se detallan
a continuación.
Esta garantía de producto de HoMedics no cubre daños causados
por un uso inadecuado, abuso, accidente, la conexión de accesorios
no autorizados, la alteración del producto o cualquier otra condición
sin importar cual sea que se encuentre fuera del control
de HoMedics. Esta garantía es válida sólo si el producto
es comprado y usado en los EE.UU. Esta garantía no cubre
un producto que requiera modificación o alteración para que pueda
usarse en cualquier otro país distinto del país por el cual fue
diseñado, fabricado, aprobado y/o autorizado, o la reparación
de productos dañados a causa de estas modificaciones. HoMedics
no será responsable de ningún tipo de daños incidentales,
consecuentes o especiales. Todas las garantías implícitas, incluyendo
entre otras aquellas garantías implícitas de idoneidad
y comerciabilidad, están limitadas a la duración total de dos años
a partir de la fecha de compra original.
Para obtener un servicio cubierto por la garantía para su producto
HoMedics, puede entregar la unidad personalmente o enviarla por
correo junto con su recibo de compra fechado (como prueba
de la compra), el franqueo pagado, junto con un cheque o una orden
de pago por el monto de $5.00, pagadero a HoMedics, Inc. para
cubrir los gastos de manipulación.
Una vez recibido, HoMedics reparará o reemplazará su producto,
según lo que sea apropiado y se lo enviará con el franqueo pagado.
Si es apropiado reemplazar su producto, HoMedics lo reemplazará
con uno igual o comparable, a opción de Homedics. La garantía
es válida únicamente a través del Centro de Servicio HoMedics.
El servicio realizado a este producto por cualquier otro diferente
al Centro de servicio HoMedics anulará la garantía.
Esta garantía le proporciona derechos legales específicos.
Es posible que usted tenga derechos adicionales que pueden variar
de un estado a otro. Debido a las regulaciones de los diferentes
estados, es posible que algunas de las limitaciones y exclusiones
no se apliquen en su caso.
Por más información con respecto a nuestra línea de productos
en los EE.UU., visítenos en: www.homedics.com
Deluxe Instant
Ear Thermometer
©2004 HoMedics, Inc. y sus compañías afiliadas, reservados todos los derechos.
HoMedics® es una marca registrada de HoMedics, Inc. y sus compañías afiliadas.
TheraP™ es una marca registrada de HoMedics, Inc. y sus compañías afiliadas.
Reservados todos los derechos.
IB-TT200/201-A
TT-200/TT-201
El manual en
español empieza
a la página 16

IMPORTANT PRODUCT NOTICES
AND SAFETY INSTRUCTIONS
When using your ear thermometer, basic precautions should always
be followed. Please read and follow all instructions and warnings
before using this product. Save these instructions for future
reference.
Please note that this product is intended for household use only
and should not serve as a substitute for the advice of a physician
or medical professional. Do not use this device for diagnosis or
treatment of any health problem or disease. Measurement results
are for reference only. Contact your physician if you have or
suspect any medical problem.
This ear thermometer is designed for taking temperatures from the
ear canal only. Do not use it to take rectal, oral or axillary temperatures. This device is designed for use in human ears only.
• Use ear thermometer only for its intended use.
• This ear thermometer should only be used under the supervision
of an adult.
• Prolonged high fever requires medical attention - especially for
young children.
• Stand or sit still while taking a temperature.
• Thermometer should be used in a dry ear canal.
• Gentle force should be used when inserting the probe into the ear.
Excessive force may injure the ear canal or eardrum.
• Do not expose the monitor to extreme temperature, very high
humidity, or direct sunlight.
• Handle product with care and avoid dropping.
• Do not immerse the unit in water or other liquids.
• Do not disassemble or attempt to repair the unit.
• When not in use, keep thermometer in its storage case and out of
the reach of children.
• Never attempt to insert any object into the probe tip.
• Please observe the following regarding batteries:
• Battery liquid can be harmful to the ear thermometer
if leakage occurs. When the ear thermometer will not
be used for an extended period of time (three
months or more), batteries should be removed.
• A worn battery should be replaced immediately with
a new one.
• Observe caution when inserting battery to avoid
insertion with polarities in wrong direction.
Additional product notices and safety instructions are
found in the following sections of this manual:
• Important notes regarding temperature measurement (pg. 10)
• Special situations in which the ear thermometer should not
be used (pg. 11)
• Care, maintenance, and cleaning (pg. 12)
Deluxe Instant Ear Thermometer
How does this product work?
This ear thermometer is a delicate and high-tech electronic device
designed to measure body temperature. This unit provides accurate
and reliable temperature readings by detecting infrared heat from
the eardrum and surrounding tissue.
The thermometer takes 512 scans of the eardrum and surrounding
tissue in just one second and displays the calculated temperature.
The temperature displayed represents the measured ear canal
temperature converted to the more familiar oral equivalent
is performed using a mathematical adjustment of the ear canal
temperature. Note that this reading will not necessarily be the same
as a temperature measured orally at the same time.
When consulting a physician, it is important to communicate that the
temperature reading was taken in the ear and converted to an oral
equivalent.
. This
21
What is normal body temperature? What is a fever?
°
°
°
Normal body temperature is a range that varies from person to
person, by age, and throughout the day. The average normal body
temperature is 98.6˚F (37˚C). Fever is defined as a body temperature elevated over an individual’s normal body temperature.
It is important to determine each person’s normal body temperature
in order to properly assess whether or not a fever is actually present.
This range can easily be determined by tracking temperatures on a
consistent basis, using the same ear and measuring at the same
time each day.
This ear thermometer converts the ear temperature to an oral
equivalent and meets industry standards regarding temperature
accuracy. For temperatures between 96.8˚F - 102.2˚F (36.0˚C -
39.0˚C), it is accurate to +/- 0.4°F (+/- 0.2°C). See “Product
Specifications” (p.14) for more information.
What is the Fever Alarm?
The Fever Alarm is a unique feature that will alert a user anytime a
temperature reading exceeds 100°F (37.8˚C) with a visual notice on
the display (a frowning face) and a double beep audio alert (visual
alert only in memory mode). At readings above this temperature it
Y that a fever is present.
is LIKEL
Note: A temperature reading at or below 100°F (37.8˚C) does
not mean that a fever is not present. Likewise, a temperature
above 100°F (37.8˚C) does not guarantee the presence of a
fever.
Each individual’s physiology is different and you should monitor
your own body temperature to determine your “normal” temperature
range in order to determine when a fever is present. Classification
of a temperature as a fever also varies by age.
This product is not intended as a substitute for consultation with a
physician. Contact your physician if you feel an illness is present
with or without a fever. A physician should be consulted if any of
the following conditions are present:
• Vomiting
• Diarrhea
• Changes in breathing, activity, or appetite
• Irritability, lethargy, or unusual sleepines
s
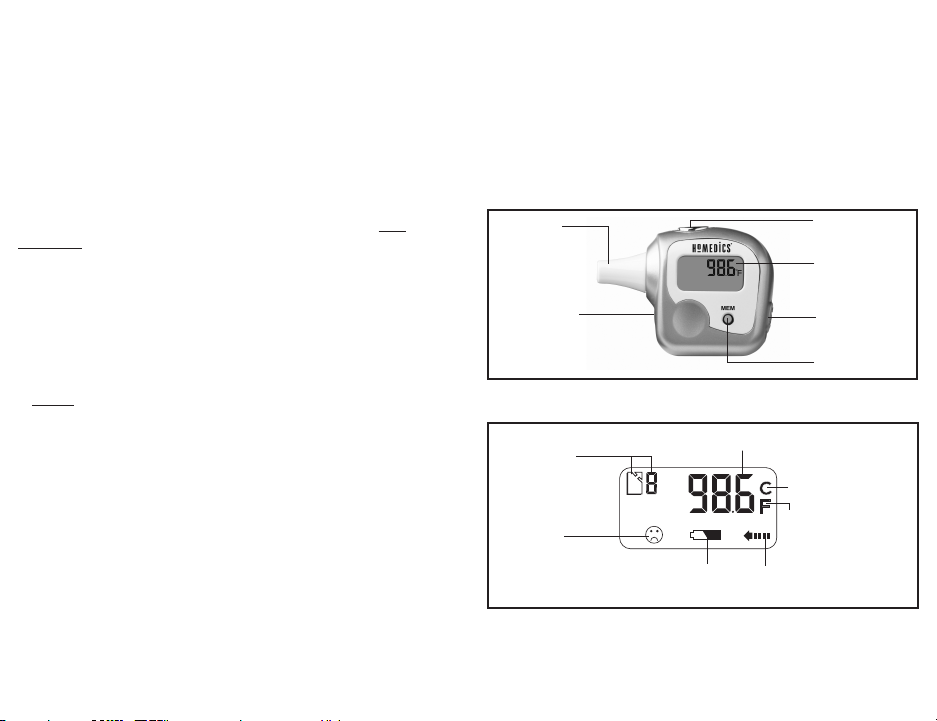
DEVICE DESCRIPTION
Probe
Flashlight
Scan Button
LCD
Display
Night Mode/
Day Mode
Memory
Button
DESCRIPTION OF DISPLAY SYMBOLS
Memory
Symbol
and Record
Number
Fever
Alarm
Temperature
Low Battery
Warning
Celsius
Fahrenheit
Measurement
Indicator
43
°
°
Figure 1
Figure 2
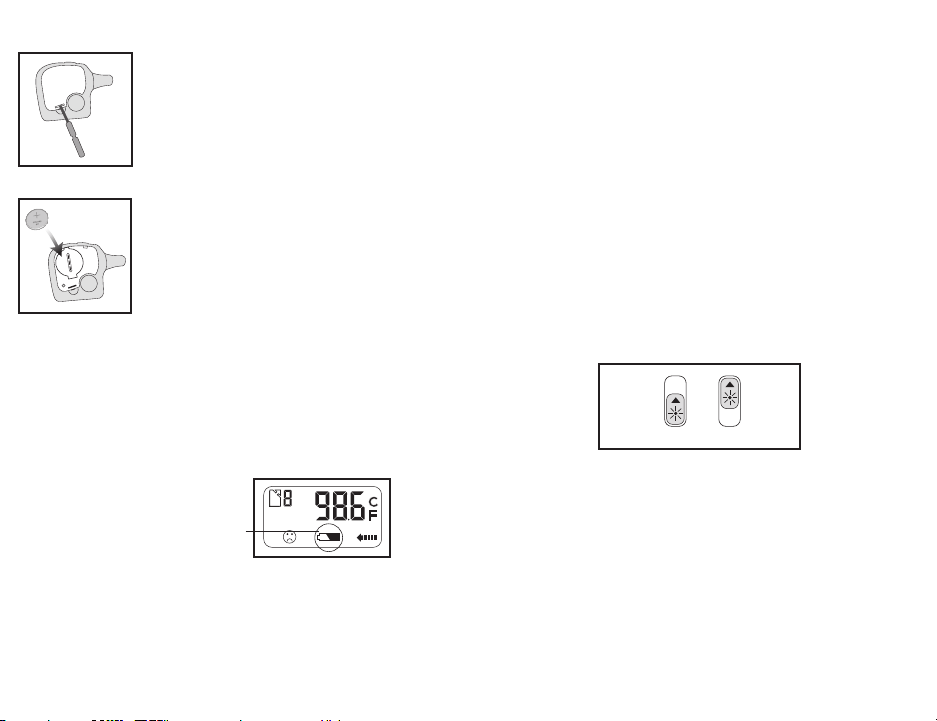
INSERTING AND REPLACING BATTERIES
1. Carefully remove the battery cover as
shown in Figure 1 using a small flat
instrument.
2. Carefully remove the battery by pressing
down on the metal clip holding the battery
in place. Do not use metal tweezers or a
screwdriver to remove the battery.
3. Insert one CR-2032 (3.0 V dc) battery with
the plus symbol (+) up as shown in
Figure 2.
4. Replace the battery cover.
Note that the thermometer will display a
default temperature of 00.0˚F/00.0˚C after
battery power is restored and until a
measurement is taken.
When the low battery symbol appears on the
display (Figure 3), the battery should be
replaced. When the low battery symbol
appears with the “Lo” symbol, the battery
must be replaced in order for the ear
thermometer to function.
Figure 3
Low battery
warning
NOTE: Do not discard used lithium batteries
in trash. Please turn in at an official collection
point. If the monitor will not be used for an
extended period of time (three months or
more), please remove battery.
CHANGING TEMPERATURE SCALE BETWEEN
CELSIUS AND FAHRENHEIT
To switch between Celsius and Fahrenheit readings, press and hold
the “Scan” button while the unit is on and immediately press the
“MEM” button to toggle between scales. Once the desired scale is
selected, press the “Scan” button to take a new reading or allow the
unit to turn off automatically and then turn it back on to view the
converted temperatures stored in memory.
USING NIGHT MODE & DAY MODE
Night Mode is a unique feature that allows a temperature reading to
be taken in a dark setting.
Night Mode functions like Day Mode with the addition of an LED
flashlight feature to aid in guiding the probe into the ear canal and
a display that will illuminate for 5 seconds after measurement.
Select Night Mode or Day Mode by using the slide switch on the
right side of the device. For Night Mode, slide the switch into the
up position. For Day Mode, slide it into the down position.
(UP)
(DOWN)
Day Mode
Night Mode
Day Mode is recommended for general use in order to preserve
battery life. Modes can be changed at any time before or after
measurement. They can also be changed regardless of whether
the unit is turned on/off. Do not change modes during measurement as the accuracy of the reading may be affected.
65
MEMORY RECALL
°
°
°
°
°
This thermometer will automatically store the last 10 measurements
in memory. The most recent reading will automatically display when
the unit is turned on. Each new temperature reading will also be
entered into the memory as the most recent record.
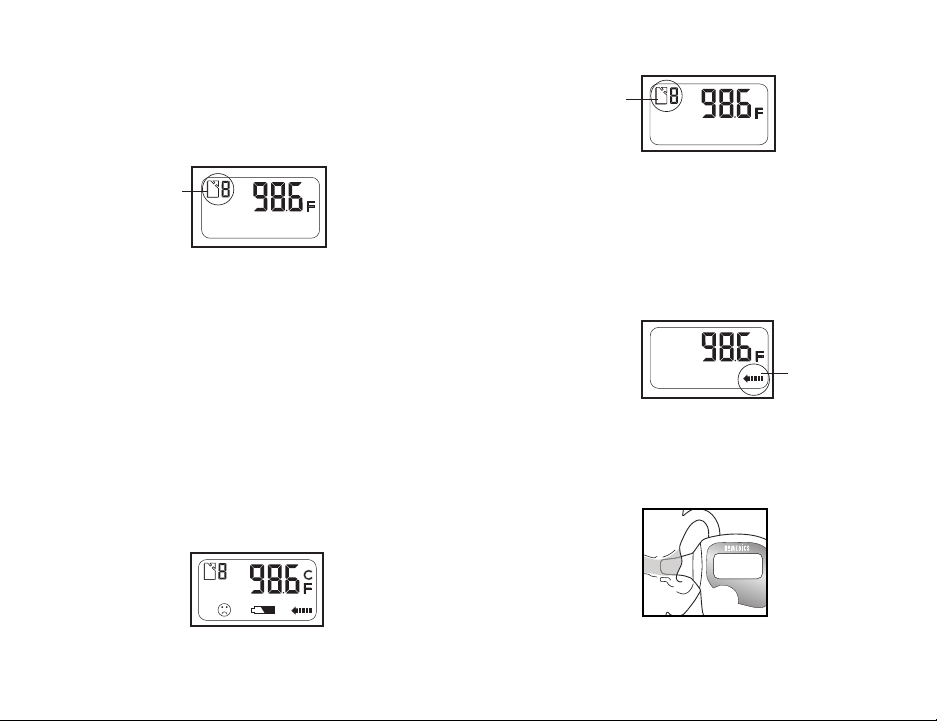
When in memory mode, an arrow in the upper left corner will
appear with the memory record number to the right as shown
in the illustration below.
Indicates memory
reading and number
Press “MEM” to cycle through the records from number 0 (the most
recent reading) to number 9.
Note that when memory is at capacity, the oldest record will be
deleted to make room for a new reading.
Memory will be cleared as a result of battery removal or power
failure. A default reading of 00.0°F (00.0°C) will be displayed when
memory is cleared until a new temperature reading is taken.
HOW TO TAKE A TEMPERATURE READING
1. Always make sure that the waterproof probe has been cleaned
with a cotton swab moistened with alcohol since its previous
usage.
2. Press and release the “SCAN” button on the top of the device.
All display symbols will appear for approximately one second
(Figure 1).
Figure 1
3. When the ear thermometer is ready, the display will next show
the results of the most recent reading. The unit is ready for
measurement at this point (Figure 2).
Figure 2
Indicates a
memory
reading
4. Press and release the “SCAN” button again
with the ear
thermometer outside of the ear.
In DAY MODE: An arrow symbol will appear on the
display (Figure 3).
In NIGHT MODE: In addition to the arrow symbol,
the flashlight will turn on for approximately two
seconds.
Figure 3
Indicates
measurement
in progress
5. Insert the probe tip of the ear thermometer into the ear
canal within two seconds (Figure 4). It is important that
the probe tip be well positioned within the ear canal.
Measurement time for the actual reading is approx. one
second.
Figure 4
87
 Loading...