

Homedics SS-8000 Instruction Manual
HoMedics Service Center
Max
SoundSoundSpaMax
1.800.466.3342
8:30 – 5:00 p.m. (EST) M – F
Dirección postal:
HoMedics
Consumer Relations
Service Center Dept. 168
3000 Pontiac Trail
Commerce Township, MI
48390
Correo electrónico:
cservice@homedics.com
GARANTÍA LIMITADA POR UN AÑO
HoMedics vende sus productos con la intención de que no tengan defectos de fabricación ni de mano de
obra por un plazo de un año a partir de la fecha de compra original, con las siguientes excepciones.
HoMedics garantiza que sus productos no tendrán defectos de material ni de mano de obra bajo condiciones
de uso y servicio normales. Esta garantía se extiende únicamente a consumidores y no a distribuidores.
Para obtener servicio para su producto HoMedics, envíe por correo el producto y su recibo de compra
fechado (como comprobante de compra), con franqueo pago, a la siguiente dirección:
HoMedics Consumer Relations
Service Center Dept. 168
3000 Pontiac Trail
Commerce Township, MI 48390
No se aceptarán pagos contra entrega.
HoMedics no autoriza a nadie, incluyendo, pero sin limitarse a, distribuidores, posteriores consumidores
compradores del producto a un distribuidor, o compradores remotos, a obligar a HoMedics de forma alguna
más allá de las condiciones aquí establecidas. La garantía de este producto no cubre daños causados por
uso inadecuado o abuso, accidente, conexión de accesorios no autorizados, alteración del producto,
instalación inadecuada, reparaciones o modificaciones no autorizadas, uso inadecuado de la fuente de
energía/electricidad, cortes de energía, caída del producto, funcionamiento incorrecto o daño de una pieza
de funcionamiento debido al no cumplimiento del mantenimiento recomendado por el fabricante, daños
durante el transporte, robo, descuido, vandalismo, condiciones climáticas, pérdida de uso en el período
durante el cual el producto está en una instalación de reparación o a la espera de piezas o reparación, o
cualquier otra condición, sin importar cual sea, que se encuentre fuera del control de HoMedics.
Esta garantía es válida únicamente si el producto es comprado y operado en el país en el cual se compró el
producto. Un producto que requiera modificaciones o adaptación para habilitar su funcionamiento en
cualquier país que no sea aquél para el que fue diseñado, fabricado, aprobado y/o autorizado, o la
reparación de productos dañados por estas modificaciones no están cubiertos bajo esta garantía.
LA GARANTÍA AQUÍ ESTABLECIDA SERÁ LA ÚNICA Y EXCLUSIVA GARANTÍA. NO HABRÁ NINGUNA OTRA
GARANTÍA EXPRESA NI IMPLÍCITA, INCLUYENDO NINGUNA GARANTÍA DE COMERCIALIZACIÓN O APTITUD
NI NINGUNA OTRA OBLIGACIÓN POR PARTE DE LA COMPAÑÍA CON RESPECTO A PRODUCTOS
CUBIERTOS POR ESTA GARANTÍA. HOMEDICS NO TENDRÁ RESPONSABILIDAD ALGUNA POR NINGÚN
DAÑO INCIDENTAL, CONSECUENTE NI ESPECIAL. BAJO NINGÚN CONCEPTO ESTA GARANTÍA REQUERIRÁ
MÁS QUE LA REPARACIÓN O CAMBIO DE ALGUNA PIEZA O PIEZAS QUE SE HALLEN DEFECTUOSAS
DENTRO DEL PERÍODO DE VIGENCIA DE ESTA GARANTÍA. NO SE EFECTUARÁN REEMBOLSOS. SI NO HAY
PIEZAS DE REPUESTO DISPONIBLES PARA LOS MATERIALES DEFECTUOSOS, HOMEDICS SE RESERVA EL
DERECHO DE REALIZAR SUSTITUCIONES EN VEZ DE REPARAR O CAMBIAR.
Esta garantía no se extiende a la compra de productos abiertos, usados, reparados, embalados otra vez y/o
abiertos y vueltos a cerrar, incluyendo entre otras cosas la venta de dichos productos en sitios de remate por
Internet y/o la venta de dichos productos por revendedores o mayoristas. Todas y cada una de las garantías
cesarán y terminarán inmediatamente con respecto a cualquier producto o pieza del mismo que estén
reparados, cambiados, alterados o modificados sin el consentimiento previo explícito y por escrito de
HoMedics.
Esta garantía le proporciona derechos legales específicos. Es posible que usted tenga derechos adicionales
que pueden variar de un país a otro. Debido a las regulaciones de ciertos países, es posible que algunas de
las limitaciones y exclusiones no se apliquen en su caso.
Por más información con respecto a nuestra línea de productos en los EE.UU., visítenos en:
www.homedics.com
.
™
dock for iPod®| time projection | sound machine | remote control
© 2007 HoMedics, Inc. y sus compañías afiliadas, reservados todos los derechos.
HoMedics® es una marca registrada de HoMedics, Inc. y sus compañías afiliadas.
iSoundSpa™ es una marca comercial de HoMedics Inc. y sus compañías afiliadas.
iPod®, iPod nano®, nano®, iPhone™ y el diseño del iPod® son marcas registradas de Apple Inc.
Reservados todos los derechos.
IB-SS8000A
El manual en español empieza
a la página 21
Instruction Manual and
Warranty Information
SS-8000

Create your perfect sleep environment.
Thank you for purchasing iSoundSpa Max, the HoMedics ultimate dock for iPod and
relaxation machine. This, like the entire HoMedics product line, is built with highquality craftsmanship to provide you years of dependable service. We hope you will
find it to be the finest product of its kind.
iSoundSpa Max helps create your perfect sleep environment. Fall asleep to any of
the six calming sounds, then wake to iPod/iPhone, sounds, radio, or beep tone.
iSoundSpa Max can also mask distractions to improve your concentration while you
read, work or study.
IMPORTANT SAFETY INSTRUCTIONS:
When using an electrical appliance, basic precautions should always be followed,
including the following:
READ ALL INSTRUCTIONS BEFORE USING
DANGER
• Always unplug the appliance from the electrical outlet immediately after using
• Do not reach for an appliance that has fallen into water. Unplug it immediately.
• Do not place or store appliance where it can fall or be pulled into a tub or sink.
WARNING
• Close supervision is necessary when this appliance is used by or near children,
• Use this appliance only for its intended use as described in this manual. Do not
• Never operate this appliance if it has a damaged cord, plug, cable or housing.
• Keep cord away from heated surfaces.
• Never drop or insert any object into any opening.
• Do not operate where aerosol (spray) products are being used or where oxygen
- To reduce the risk of electric shock:
and before cleaning.
Do not place in or drop into water or other liquid.
- To reduce the risk of burns, fire, electric shock or injury to persons:
invalids or disabled persons.
use attachments not recommended by HoMedics; specifically any attachments
not provided with the unit.
If it is not working properly, if it has been dropped or damaged, return it to
Homedics Service Center for examination and repair.
Caution: All
servicing of
this product
must be
performed by
authorized
HoMedics
Service
Personnel only.
is being administered.
• Do not carry this appliance by power cord or use cord as handle.
• To disconnect, remove plug from outlet.
• This appliance is designed for indoor use only. Do not use
outdoors.
• Only set on dry surfaces. Do not place on surface wet from
water or cleaning solvents.
SAVE THESE INSTRUCTIONS
CCaauuttiioonn –– PPlleeaassee rreeaadd aallll iinnssttrruuccttiioonnss ccaarreeffuullllyy bbeeffoorree ooppeerraattiinngg.
• Never leave the appliance unattended, especially if
children are present.
• Never cover the appliance when it is in operation.
• This unit should not be used by children without
adult supervision.
• Always keep the cord away from high temperature
and fire.
• Do not lift, carry, hang, or pull the product by the
power cord.
• If the adaptor sustains damage, you must stop using
this product immediately and contact the HoMedics Service
Center. (See the warranty section for the HoMedics address.)
.
2
3

15
Removal Slot
Insert
Locking Tabs
Alarm Icons
PM Indicator
1
11
5
6
3
4
7
12
13
2
10
9
8
14
16
1 Set +/-
2 Volume +/-
3 Dock for iPod
4 Power Button
5 Timer Button
6 Sounds Button
7 Audio Button
17
18
8 AL Set Button
9 AL Mode Button
10 AL1/AL2 Button
11 Bass
12 Treble
13 Snooze/Nap Button
14 LCD Display
19
15 Projection
16 iPod Inserts (7)
17 Aux Connection Cable
18 DC Adaptor
19 AM Antenna
20 Remote Control
iSoundSpa Max Clock Radio Features
• 6 Nature Sounds: Night, Ocean, Brook,
Sunrise, Rain and Water Fall
• Charging docking station for iPod
• Premium quality speakers
plus subwoofer
• AM/FM radio with digital tuner
• Dual Alarm with Snooze
• Nap and Auto timer options: 15, 30,
45 or 60 minutes
• Four wake options - iPod, radio,
beep or nature sound
• Easy-to-read clock with
LCD display
• Bass and treble adjustment
• Projection feature projects
time on the wall or ceiling
• Full function remote control
4
20
Figure 1
Nature Sounds
Dimmer Hi/L
AM/FM Antennas
o
Aux
Figure 2
Focus Knob
Projector On/Off
DC Jack
Dock
Projector Tube
5
Pin Connector
Time Rotation Knob
Time Set
Figure 3
AM/FM
Figure 4

Before You Begin
The iSoundSpa Max uses a backup battery system to provide continuous
alarm settings in the event of a power failure. Two “AA” batteries (included)
must be inserted into the battery compartment if memory back-up is
desired. When the backup batteries are installed: In the event of power
outages or if the DC cord is accidentally disconnected, the LCD display
will not be illuminated, but the current time and alarm settings will be
temporarily maintained. As soon as the power supply returns, the LCD
display will indicate the correct time.
Getting Started
Setting Clock Time
1. Press the TIME SET BUTTON located on the back of the unit (Fig. 4);
hour digit will begin flashing. Turn the SET +/- KNOB until the current
hour is displayed. Remember to set the correct AM or PM (an icon in
the upper left of the time display is the PM INDICATOR; there is no AM
indicator) (Fig. 2).
2. Press the TIME SET BUTTON again; minute digits will begin flashing.
Turn the SET +/- KNOB until the current minute is displayed.
3. Press the TIME SET BUTTON again to exit the clock setting mode or
after 5 seconds the display will stop flashing to indicate the time is set.
Install/Replace Backup Battery
1. Make sure the DC adaptor is connected. Otherwise the time setting
may be lost during battery replacement.
2. Open the battery compartment cover located on the bottom of the unit.
3. Insert two “AA” batteries, checking that the positive polarity follows the
direction of the instructions inside the battery compartment.
4. Close the compartment cover.
Note: Batteries must be installed in order for time & alarm memory
back-up to operate. In the event of a power failure or
disconnection, if the battery is not installed, the clock and
alarm will need to be re-set when power is restored.
Battery Precautions
• Use only the size and type of batteries specified.
• When installing batteries, observe proper +/- polarities. Incorrect
installation of battery may cause damage to the unit.
• Do not mix different types of batteries together (e.g., alkaline with
carbon-zinc or old batteries with new ones).
• If the unit is not going to be used for a long period of time, remove
batteries to prevent damage due to possible battery leakage.
• Do not dispose of batteries in fire. Batteries may explode or leak.
6 7
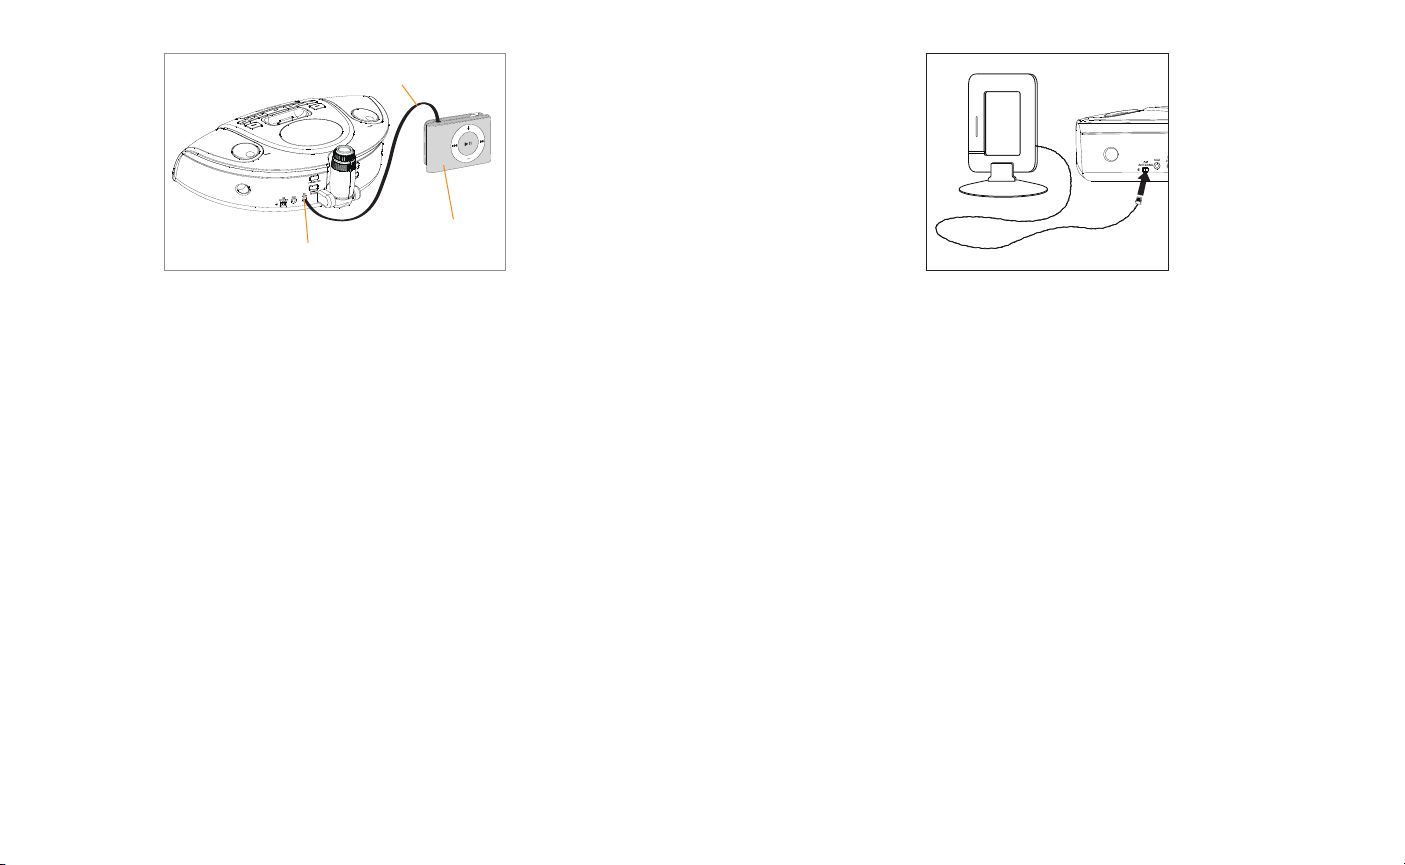
Charging your iPod/iPhone™
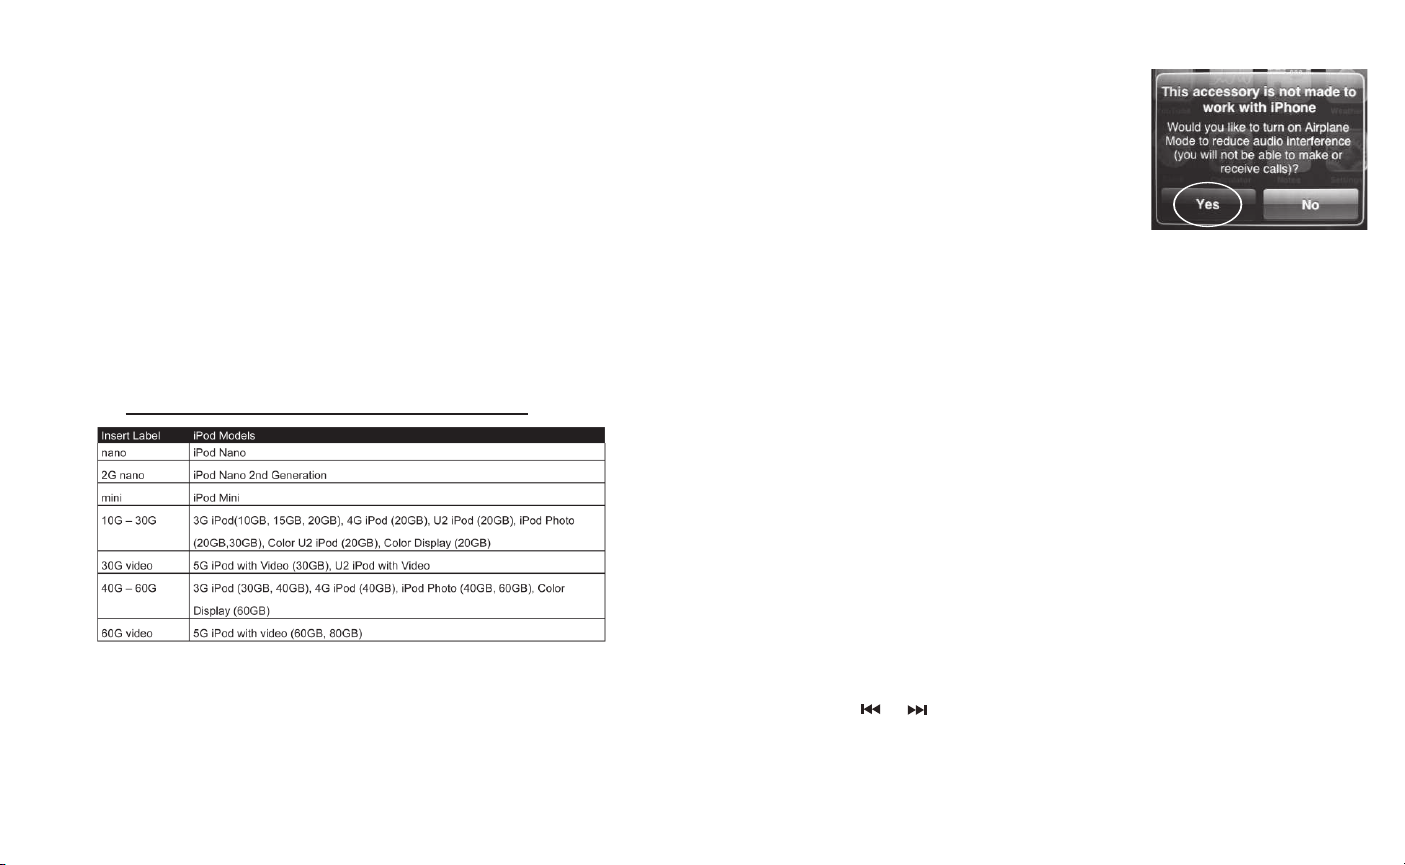
1. Select the correct insert for your particular iPod model from among the
7 different inserts included (Fig. 1). Each insert is labeled with the name
and/or size of an iPod model. Place the selected insert in the docking
area so that the iPod 30-pin connector passes through the opening in
the insert (Fig. 3). iPhone insert not included. You may contact
HoMedics Consumer Relations at 1-800-466-3342 to order the
correct insert for your iPod/iPhone.
Note: Make sure you are using the correct insert for your
iPod/iPhone (see chart) and that it is properly docked into the
iSoundSpa Max. Failure to do so may damage your iPod/iPhone.
WARNING: INSERTS ARE DESIGNED FOR APPLE iPOD MUSIC
PLAYERS ONLY. ATTEMPTING TO ATTACH OR FORCE ANY
NON- iPOD MUSIC PLAYER INTO ANY OF THE ENCLOSED INSERTS
WILL DAMAGE AND EVEN DESTROY YOUR DEVICE.
2. Carefully place your iPod/iPhone into the docking area so that the
30-pin connector in the dock is fully connected to the 30-pin socket on
the bottom of your iPod/iPhone. (The iPod/iPhone must not be in a case
or “skin”). You will hear a “chirp”, indicating that your iPod is properly
connected.
NOTE: When you dock your iPod/iPhone it recharges (until fully
charged).
8
FOR iPHONE USERS ONLY:
Once properly connected, your iPhone will ask
you if you’d like to turn on Airplane Mode. Select
“Yes” (Fig. 5). When your iPhone is set to
Airplane Mode, no cell phone, radio, Wi-Fi, or
Bluetooth signals are emitted from iPhone. As a
result, all incoming calls will be sent directly to
voicemail.
NOTE: If iPhone is already in Airplane Mode you will just need to
click “OK”.
3. To remove/replace an insert, first remove your iPod/iPhone, then place
fingernail in slot on insert (Fig. 3) and gently pull up.
Important: The iPod Shuffle will NOT charge or dock. See Listening to a
non-docking iPod (page 10)
Figure 5
Listening to Your iPod/iPhone
1. Press the POWER BUTTON (Fig. 1) on the iSoundSpa Max to turn it on.
2. Toggle through the AUDIO BUTTON (Fig. 1) to play the iPod/iPhone.
The IPOD ICON will appear on the LCD display in the upper right corner to
indicate that the iPod mode has been selected (Fig. 2).
Note: When the iPod/iPhone is docked and in standby mode, it will
automatically begin playing once the iPod mode is selected
on the unit.
3. Press the PLAY/PAUSE button on your iPod/iPhone to pause play; press
again to resume play.
4. Turn the VOLUME KNOB (Fig. 1) on the unit to adjust the system volume.
5. Press the or on your iPod/iPhone to go to the next or previous track.
6. To turn off the unit, press the POWER BUTTON. The iPod/iPhone will
continue charging in the dock.
9
Connection
Cable
iPod®Shuffle
Aux
Figure 6
Figure 7
Listening to a non-docking iPod or other
portable audio devices
If you are using an iPod without a docking port, other MP3 player, or other
portable audio device, you can play it through the iSoundSpa Max via
the Aux Jack (Fig. 6) located on the back of the unit.
1. Plug one end of the Connection Cable (included) (Fig. 1) into the
headphone or line-out jack on your MP3 device and the other end of the
Connection Cable into the iSoundSpa Max Aux jack, located on the back of
the unit (Fig. 6).
2. Press the POWER BUTTON (Fig. 1) on the unit to turn it on.
3. Toggle through the AUDIO BUTTON (Fig. 1) on the unit until you reach the
auxiliary mode. The AUX ICON will appear on the right side of the LCD
display to indicate that the auxiliary mode has been selected (Fig. 2).
4. Turn on and play your MP3 device.
5. Use the VOLUME KNOB (Fig. 1) on the unit to adjust the system volume.
Note: You may need to adjust the volume on your MP3 device also.
6. To turn off the unit, press the POWER BUTTON.
Note: You also need to turn off your MP3 device.
10
Listening to the Radio
Extend FM wire antenna fully for best FM reception (do not strip, alter or attach
to other antennas). Snap the AM loop antenna into the base provided. Next,
plug the AM loop antenna into the connecter located on the back of the unit for
best AM reception (Fig 7).
1. Press the POWER BUTTON (Fig. 1) on the unit to turn it on.
2. Toggle through the AUDIO BUTTON (Fig. 1) to play the radio. The RADIO
ICON will appear on the right side of the LCD display to indicate that the
radio is on (Fig. 2).
3. Press the AM/FM BUTTON (Fig. 4) located on the back of the unit to select
AM or FM band. The FM ICON will appear on the left side of the LCD to
indicate FM radio is selected; there is no AM indicator.
4. Turn the SET +/- KNOB (Fig. 1) on the unit to tune in the desired station.
5. Turn the VOLUME KNOB (Fig. 1) on the unit to adjust the system volume.
6. To turn off the unit, press the POWER BUTTON.
11
 Loading...