

Page 1
© 2005 HoMedics, Inc. y sus compañías afiliadas, reservados todos los derechos.
HoMedics® es una marca registrada de HoMedics, Inc. y sus compañías afiliadas.
SoundSpa™ es una marca comercial de HoMedics Inc. y sus compañías afiliadas.
Reservados todos los derechos.
IB-SS6000
GARANTÍA LIMITADA POR DOS AÑOS
(Válida únicamente en los EE.UU.)
HoMedics, Inc., garantiza este producto contra defectos en material y mano de obra durante el
período de dos años a partir de la fecha original de compra con las excepciones que se detallan a
continuación.
Esta garantía de producto de HoMedics no cubre daños causados por un uso inadecuado, abuso,
accidente, la conexión de accesorios no autorizados, la alteración del producto o cualquier otra
condición sin importar cual sea que se encuentre fuera del control de HoMedics. Esta garantía es
válida sólo si el producto es comprado y usado en los EE.UU. Esta garantía no cubre un producto
que requiera modificación o alteración para que pueda usarse en cualquier otro país distinto del
país por el cual fue diseñado, fabricado, aprobado y/o autorizado, o la reparación de productos
dañados a causa de estas modificaciones. HoMedics no será responsable de ningún tipo de daños
incidentales, consecuentes o especiales. Todas las garantías implícitas, incluyendo entre otras
aquellas garantías implícitas de idoneidad y comerciabilidad, están limitadas a la duración total de
dos años a partir de la fecha de compra original.
Para obtener un servicio cubierto por la garantía para su producto HoMedics, puede entregar la
unidad personalmente o enviarla por correo junto con su recibo de compra fechado (como prueba
de la compra), el franqueo pagado, junto con un cheque o una orden de pago por el monto de
$10,00, pagadero a HoMedics, Inc. para cubrir los gastos de manipulación.
Una vez recibido, HoMedics reparará o reemplazará su producto, según lo que sea apropiado y se
lo enviará con el franqueo pagado. Si es apropiado reemplazar su producto, HoMedics lo
reemplazará con uno igual o comparable, a opción de Homedics. La garantía es válida
únicamente a través del Centro de Servicio HoMedics. El servicio realizado a este producto por
cualquier otro diferente al Centro de Servicio HoMedics anulará la garantía.
Esta garantía le proporciona derechos legales específicos. Es posible que usted tenga derechos
adicionales que pueden variar de un estado a otro. Debido a las regulaciones de los diferentes
estados, es posible que algunas de las limitaciones y exclusiones no se apliquen en su caso.
Por más información con respecto a nuestra línea de productos en los EE.UU.,
visítenos en:
www.homedics.com
Dirección postal:
HoMedics
Consumer Relations
Service Center Dept. 168
3000 Pontiac Trail
Commerce Township, MI
48390
Correo electrónico:
cservice@homedics.com
CD PLAYER, CLOCK RADIO AND SOUND MACHINE
Instruction Manual and
Warranty Information
SS-6000
El manual en español empieza
a la página 13
SOUND SPA
™
PLATINUM
Page 2

2
3
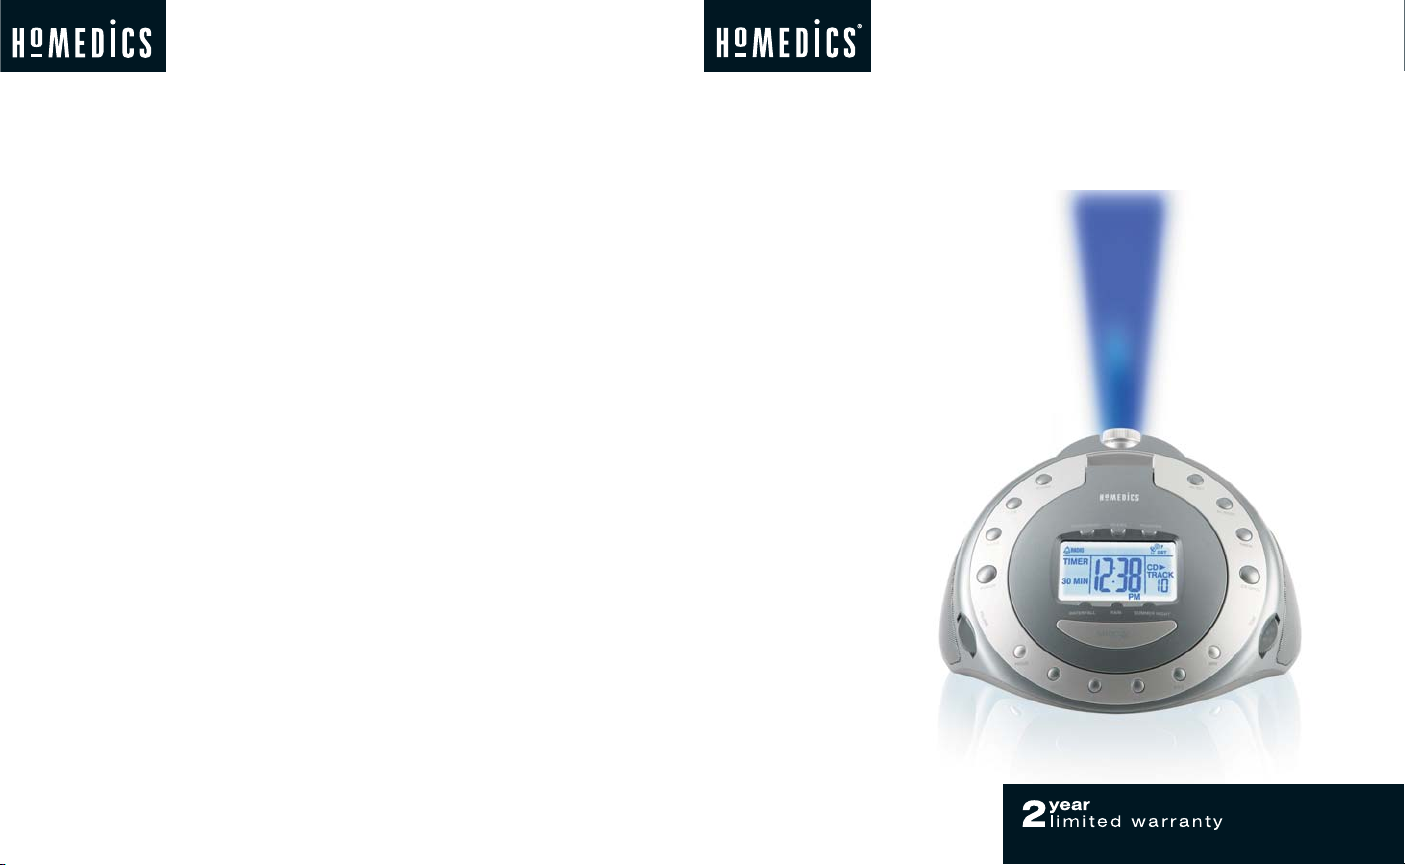
Create your perfect sleep environment.
Thank you for purchasing Sound Spa Platinum, the HoMedics acoustic
relaxation machine. This, like the entire HoMedics product line, is built with
high-quality craftsmanship to provide you years of dependable service. We
hope you will find it to be the finest product of its kind.
Sound Spa Platinum helps create your perfect sleep environment. Fall
asleep to any of the six calming sounds, then wake to sound, CD, radio, or
alarm. Sound Spa Platinum can also mask distractions to improve your
concentration while you read, work or study.
IMPORTANT SAFETY INSTRUCTIONS:
When using an electrical appliance, basic precautions should always be
followed, including the following:
READ ALL INSTRUCTIONS BEFORE USING
DANGER
- To reduce the risk of electric shock:
• Always unplug the appliance from the electrical outlet immediately after
using and before cleaning.
• Do not reach for an appliance that has fallen into water. Unplug it immediately.
• Do not place or store appliance where it can fall or be pulled into a tub
or sink. Do not place in or drop into water or other liquid.
WARNING
- To reduce the risk of burns, fire, electric shock or injury to
persons:
• Close supervision is necessary when this appliance is used by or near
children, invalids or disabled persons.
• Use this appliance only for its intended use as described in this manual. Do not use attachments not recommended by HoMedics; specifically any attachments not provided with the unit.
• Never operate this appliance if it has a damaged cord,
plug, cable or housing. If it is not working properly, if it
has been dropped or damaged, return it to Homedics
Service Center for examination and repair.
• Keep cord away from heated surfaces.
• Never drop or insert any object into any opening.
• Do not operate where aerosol (spray) products are
being used or where oxygen is being administered.
• Do not carry this appliance by supply cord or use cord
as handle.
• To disconnect, remove plug from outlet.
• This appliance is designed for indoor use only. Do not
use outdoors.
• Only set on dry surfaces. Do not place on surface wet
from water or cleaning solvents.
SAVE THESE INSTRUCTIONS
Caution – Please read all instructions
carefully before operating.
• Never leave the appliance unattended, especially if
children are present.
• Never cover the appliance when it is in operation.
• This unit should not be used by children without adult
supervision.
• Always keep the cord away from high temperature
and fire.
• Do not lift, carry, hang, or pull the product by the
power cord.
• If the adaptor sustains damage, you must stop using
this product immediately and contact the HoMedics
Service Center. (See the warranty section for the
HoMedics address.)
Caution: All
servicing of
this product
must be
performed by
authorized
HoMedics
Service
Personnel only.
Page 3
5
4
• 6 Nature Sounds: Rain Forest,
Ocean, Thunder, Summer Night,
Rain and Water Fall
• CD player with Dual Mono
Sound System
• Atomic time
• AM/FM radio with alarm and
snooze
• Four gentle- wake options - CD,
radio, alarm or soothing sound
• Easy-to-read clock with
LCD display
• Projection feature projects
time on the wall or ceiling in
a soothing blue light
• Auto-timer lets you choose
how long you listen - 15, 30, 60
minutes or continuously
• Adjustable volume control
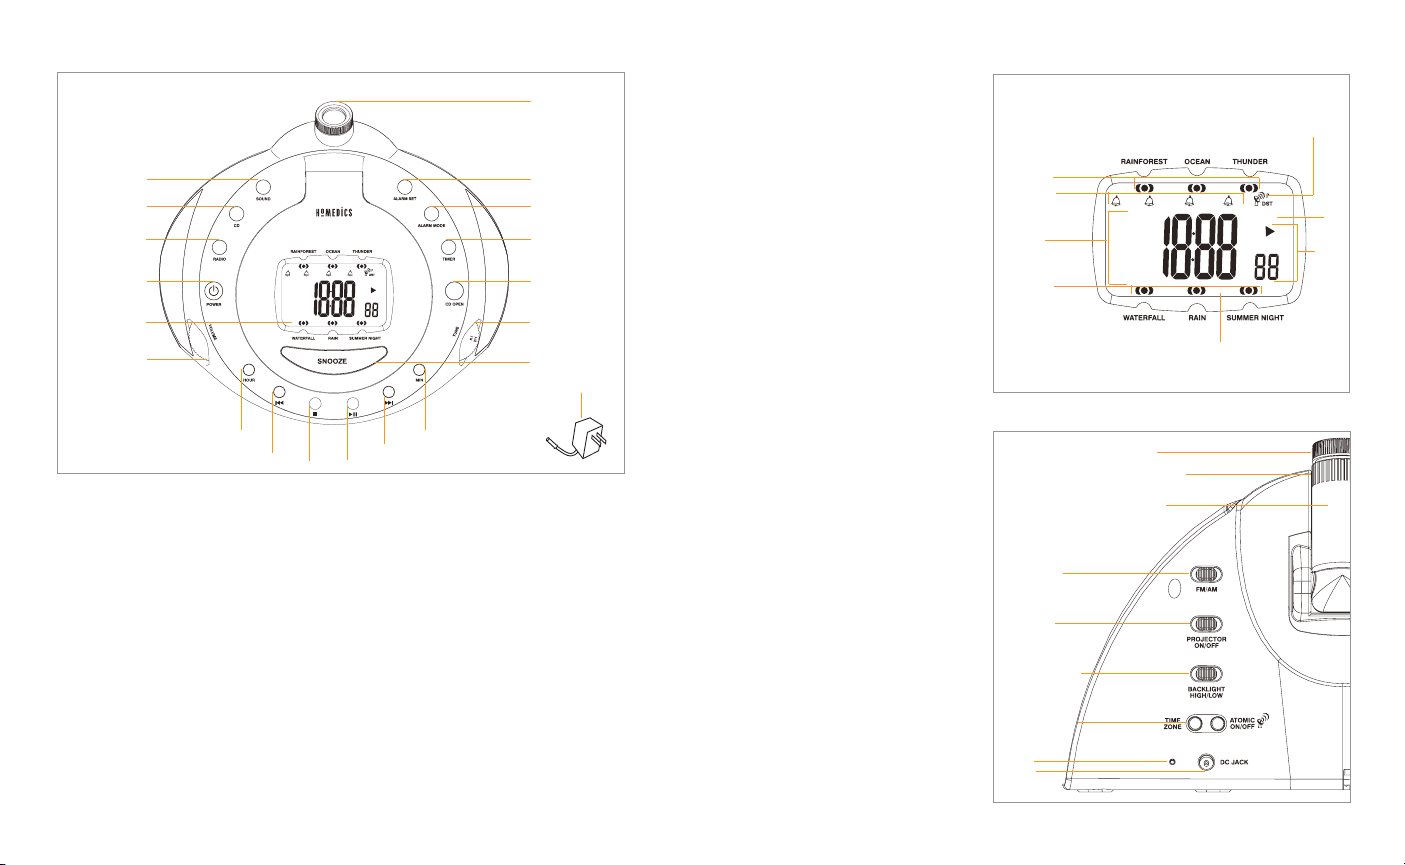
Figure 1
Figure 3
Figure 2
Projection
Alarm Set
Alarm Mode
Timer
CD Open
Tuner
Snooze
LCD Display
Power
Radio
CD
Sounds
Volume
Hour
Seek/Track
Seek/Track
PM Indicator
Timer Icon
Atomic Time and Time
Zone Indicator
Radio
CD/ Track
Display
Alarm Modes
Sound Icons
Sound Icons
Focus Knob
Time Rotation Knob
FM/AM Switch
Projector On/
Off Switch
Backlight High/Low
Switch
Time Zone/Atomic
On/Off Buttons
DC Jack
Stop
Play/Pause
Minute
Adaptor
Sound Spa CD Player and Clock
Radio Features
Projector Tube
Antenna
RADIO
TIMER
60 MIN
30 MIN
15 MIN
OFF
SOUNDS BUZZER CD
RADIO
CD
TRACK
PM
RADIO
SOUNDS BUZZER CD
TIMER
OFF
60 MIN
30 MIN
15 MIN
PM
RADIO
CD
TRACK
Page 4

Setting Time
Using the Atomic Time
The Sound Spa Platinum will start synchronizing the clock to the Pacific
Time Zone as soon as the unit is plugged in.
Selecting a time zone
1. Press the ATOMIC ON/OFF button (Fig. 3) to turn off the atomic time
function. To indicate you are at the off position, the antenna icon will
be removed from the display.
2. Toggle through the TIME ZONE button (Fig. 3) until you reach your
desired time zone. (P - Pacific Standard Time, M - Mountain Standard
Time, C - Central Standard Time, E - Eastern Standard Time)
3. Once you have selected your time zone, press the ATOMIC ON/OFF
button again to turn on the atomic time function. To indicate you are at
the on position, the antenna bands , over the satellite icon ,will
reappear flashing. (When it appears flashing the unit is searching for the
atomic time signal.)
4. If the antenna bands disappears afterwards, the atomic time signal is
not available at that moment. Try setting the unit in other locations.
Remember to place the unit away from sources of interference such as
mobile phones, appliances, TV etc.
5. The antenna bands will appear on screen if the atomic time reception
is successful. The radio-controlled clock will have a daily synchronization at 1:00 am everyday. If previous attempts of reception were unsuccessful, the home receiver will attempt synchronization each hour until
successful. Each reception cycle ranges from 2 – 10 minutes.
Note: You can adjust the backlight intensity on the LCD screen by moving
the BACKLIGHT High/Low switch (Fig. 3) on the back of the unit.
6 7
Assembly and Instructions for Use
1. Unpack the product and check to make sure everything is included. (Fig. 1)
2. This unit is powered by a DC adaptor, which is included.
3. The battery power is designed only to provide MEMORY BACK-UP for
the clock and alarm settings. One 9 Volt battery (not included) should
be inserted into the battery compartment if memory back-up is desired
(in the event of power outages or if the unit is unplugged). The time will
be illuminated on the clock display, however, the backlight will not be
illuminated. As soon as the power supply returns, the display will indicate
the correct time.
Note: Battery must be installed in order for clock memory back-up to
operate. In the event of a power failure or disconnection, if the battery
is not installed, the clock and alarm will need to be re-set when power
is restored.
4. To install battery, remove compartment cover. Insert one 9 Volt battery
into the compartment on the bottom of the unit. Replace cover and
snap into place.
5. Attach the DC adaptor jack to the base of the unit (Fig. 3) and insert
the cord into a 120V household outlet.
Page 5

8 9
Manual Setting of Clock
1. Press & hold the HOUR or MIN button (Fig. 1) until the time begins
to flash, then release.
2. While the time is flashing press the HOUR or MIN button until you
have reached the desired time.
Note: A PM indicator (Fig. 2) will display during the PM hours. Be
sure to set the time for the correct 12 hour period - AM (morning)
or PM (evening).
Listening to Nature Sounds
1. Press the SOUND button (Fig. 1) to activate the nature sounds.
2. Toggle through the SOUND button to select one of the six nature
sounds. A corresponding symbol (Fig. 2) will appear next to the
sound to indicate which sound is on.
3. To adjust the volume, turn the VOLUME knob (Fig. 1) to your
desired level.
4. When finished listening to the sounds you may turn them off by
pressing the POWER button. (Fig. 1)
Note: When the unit is turned on it will always default to the last
mode used.
Listening to the Radio
1. Press the RADIO button (Fig. 1).
2. Use the AM/FM switch located on the back of the unit (Fig. 3) to
change between bands.
3. Rotate the TUNER (Fig. 1) to select a radio station.
4. To adjust the volume turn the VOLUME knob (Fig 1) to your desired level.
5. When finished listening to the radio you may turn it off by pressing
the POWER button. (Fig. 1)
Note: Adjust the antenna on the back of the unit to better the radio
reception if needed.
Playing Audio Compact Discs (CD)
1. Press the CD OPEN (Fig. 1) button to open the compartment door.
2. Insert the disc, label side up, into the CD compartment.
Note: Be sure CD is securely fastened in to center.
3. Close the CD compartment door
4. Press the CD button (Fig. 1), the number of tracks will display.
Note: NO will be displayed if you press CD when there is no disc
in the disc player
5. Press PLAY/PAUSE (Fig. 1) to begin playing CD
6. Press SEEK/TRACK (Fig. 1) to skip to beginning of the current
track; press SEEK/TRACK (Fig. 1) twice to skip to the beginning
of the previous track; press SEEK/TRACK (Fig. 1) to skip to the
next track.
Page 6

10 11
7. Press and hold SEEK/TRACK (Fig. 1) to scan backward quickly
through a track; press and hold SEEK/TRACK (Fig. 1) to scan
forward quickly through a track.
8. Press PLAY/PAUSE (Fig. 1) to pause a playing CD. Press
PLAY/PAUSE (Fig. 1) again to resume play.
9. Press STOP (Fig. 1) to stop a CD.
10.To remove disc press CD OPEN to open the compartment door
Using The Auto-Timer
When the power is on and you are listening to a nature sound, CD, or
radio you may set a timer so the unit will automatically turn off.
1. Toggle through the TIMER button (Fig. 1) until the time of your choice
is displayed. 15, 30, or 60 minutes.
2. To cancel the timer, toggle through the TIMER button until you reach
the off position, or press POWER (Fig. 1).
Note: The TIMER ICON (Fig. 2) will disappear after 10 seconds.
Setting And Using The Alarm
1. Press the ALARM SET button (Fig. 1). The time will flash.
2. While the time is flashing press the HOUR button (Fig. 1) until you reach
the correct hour. Then press the MIN button (Fig. 1) until you reach the
desired minute.
3. After 5-10 seconds the alarm set time will stop flashing and it will be
programmed, or you may press the ALARM SET button to confirm.
Note: The PM indicator (Fig. 2) also applies to the alarm. You can
review the alarm setting anytime by pressing the ALARM SET button.
4. To activate the alarm you may choose one of 4 wake options:
a. To wake to RADIO press the ALARM MODE (Fig. 1) button once.
b. To wake to sounds press the ALARM MODE (Fig. 1) button twice.
It will set to the last sound you listened to. If you wish to choose
a different sound toggle through the SOUND (Fig. 1) button.
c. To wake to BUZZER press the ALARM MODE (Fig. 1) button three times.
d. To wake to CD press the ALARM MODE (Fig. 1) button four times.
Note: The chosen alarm mode icon (Fig. 2) will display to indicate
that the alarm is set.
Page 7

5. When the alarm sounds you may either:
a. SNOOZE: Press the SNOOZE button (Fig. 1) Your sleep time will be
extended by 9 minutes. You may use this feature until you turn off
the alarm.
b. RESET: Turn the alarm off by pressing the POWER (Fig. 1) button.
The alarm clock will automatically set for the next day in its current mode.
Note: The chosen alarm mode icon (Fig 2) will display to indicate
the alarm is still set. If you wish to change the wake mode follow step 4
under Setting and Using the Alarm.
c. OFF: To completely turn off the alarm so it is not set for the next day,
toggle through the ALARM MODE (Fig. 1) button until no alarm icon
appears.
Note: If the alarm sounds for 30 minutes continuously it will
automatically turn off.
USING THE PROJECTION FEATURE
1. To turn the projection feature on, slide the ON/OFF switch (Fig 3) on the
back of the unit to the ON position. The time is now projected on the
wall or ceiling.
NOTE: If the projection feature is OFF, you may hit the SNOOZE
button (Fig. 1) to trigger the 15 seconds of projections.
2. The angle of the projector can be adjusted to angle on the ceiling or
wall by moving the PROJECTOR TUBE (Fig. 3) forward or backward.
3. To turn the angle of the time that appears on the wall or ceiling, rotate
the TIME ROTATION KNOB (Fig. 3) until you have reached your
desired result.
NOTE: The TIME ROTATION KNOB will rotate up to 350 degrees.
4. To focus the time on the wall or ceiling rotate the FOCUS KNOB
(Fig. 3) until you have reached your desired result.
12 13
Page 8

Maintenance
To Store
You may leave the unit on display, or you can store it in its box
or a cool, dry place.
To Clean
Use only a soft dry cloth to clean the enclosure of the unit.
NEVER use liquids or abrasive cleaner to clean.
Modifications not authorized by the manufacturer may void users authority
to operate this device.
Note: This equipment has been tested and found to comply with the limits
for a Class B digital device, pursuant to Part 15 of the FCC Rules. These
limits are designed to provide reasonable protection against harmful
interference in a residential installation. This equipment generates, uses
and can radiate radio frequency energy and, if not installed and used in
accordance with the instructions, may cause harmful interference to radio
communications. However, there is no guarantee that interference will not
occur in a particular installation. If this equipment does cause harmful
interference to radio or television reception, which can be determined by
turning the equipment off and on, the user is encouraged to try to correct
the interference by one or more of the following measures:
• Reorient or relocate the receiving antenna.
• Increase the separation between the equipment and receiver.
• Connect the equipment into an outlet on a circuit different
from that to which the receiver is connected.
• Consult the dealer or an experienced radio/TV technician for help
14 15
Page 9

©2005 HoMedics, Inc. and its affiliated companies, all rights reserved.
HoMedics® is a registered trademark of HoMedics, Inc. and its affiliated companies.
SoundSpa™ is a trademark of HoMedics, Inc. and its affiliated companies.
All rights reserved.
IB-SS6000
TWO YEAR LIMITED WARRANTY
(Valid in USA only)
HoMedics, Inc., guarantees this product free from defects in material and workmanship for a period of two years from the date of original purchase, except as
noted below.
This HoMedics product warranty does not cover damage caused by misuse or
abuse; accident; the attachment of any unauthorized accessory; alteration to the
product; or any other conditions whatsoever that are beyond the control of HoMedics.
This warranty is effective only if the product is purchased and operated in the USA.
A product that requires modification or adaptation to enable it to operate in any
country other than the country for which it was designed, manufactured, approved
and/or authorized, or repair of products damaged by these modifications is not
covered under warranty. HoMedics shall not be responsible for any type of incidental,
consequential or special damages. All implied warranties, including but not limited
to those implied warranties of fitness and merchantability, are limited in the total
duration of two years from the original purchase date.
To obtain warranty service on your HoMedics product, either hand deliver or mail
the unit and your dated sales receipt (as proof of purchase), postpaid, along with
check or money order in the amount of $10.00 payable to HoMedics, Inc. to cover
handling.
Upon receipt, HoMedics will repair or replace, as appropriate, your product and
return it to you, postpaid. If it is appropriate to replace your product, HoMedics will
replace the product with the same product or a comparable product at HoMedics’
option. Warranty is solely through HoMedics Service Center. Service of this product
by anyone other than HoMedics Service Center voids warranty.
This warranty provides you with specific legal rights. You may have additional
rights which may vary from state to state. Because of individual state regulations,
some of the above limitations and exclusions may not apply to you.
For more information regarding our product line in the USA, please visit:
www.homedics.com
Mail To:
HoMedics
Consumer Relations
Service Center Dept. 168
3000 Pontiac Trail
Commerce Township, MI
48390
e-mail:
cservice@homedics.com
EQUIPO DE CD, RADIO RELOJ Y SONIDO
Manual de instrucciones e
Información de garantía
SS-6000
SOUND SPA
™
PLATINUM
Page 10

2
3
Cree su ambiente perfecto para dormir.
Gracias por comprar el Sound Spa Platinum, el equipo de relajación acústica de
HoMedics. Éste, al igual que toda la línea de productos HoMedics, está fabricado
con mano de obra de alta calidad para brindarle años de servicio confiable.
Esperamos que lo encuentre como el mejor producto de su clase.
Sound Spa Platinum ayuda a crear su ambiente perfecto para dormir. Duérmase
con cualquiera de sus seis sonidos calmantes, luego despiértese con el sonido, el
CD, el radio o la alarma. El Sound Spa Platinum puede también encubrir
distracciones para mejorar su concentración mientras lee, trabaja o estudia.
IMPORTANTES INSTRUCCIONES DE SEGURIDAD:
Cuando se utiliza un artefacto eléctrico, siempre se deben seguir ciertas
precauciones básicas, incluyendo lo siguiente:
LEA TODAS LAS INSTRUCCIONES ANTES DE USAR
PELIGRO
- Para reducir el riesgo de choque eléctrico:
• Siempre desenchufe el artefacto del tomacorriente, inmediatamente después de
usar y antes de limpiarlo.
• No intente tomar un artefacto que haya caído al agua. Desenchúfelo de
inmediato.
• No coloque ni guarde el artefacto en donde pueda caerse o ser tirado en una
tina o pileta. No lo coloque ni lo deje caer en agua ni en ningún otro líquido.
ADVERTENCIA
- Para reducir el riesgo de quemaduras, incendio, choque eléctri-
co o lesiones a las personas:
• Se requiere una supervisión estricta cuando este artefacto es usado por o cerca
de niños, personas minusválidas o incapacitadas.
• Utilice este artefacto sólo para el uso para el cual está diseñado y como se
describe en este manual. No use accesorios no recomendados por HoMedics,
específicamente ningún accesorio no proporcionado con la unidad.
• Nunca haga funcionar este aparato si tiene el cordón, el enchufe, el cable o el
armazón dañado. Si no está funcionando adecuadamente, si se ha caído o
dañado, envíelo al Centro de servicio de HoMedics para que
sea examinado y reparado.
• Mantenga el cable alejado de superficies calientes.
• Nunca lo deje caer ni inserte ningún objeto en ninguna
abertura.
• No lo haga funcionar donde se utilizan productos de rociado
por aerosol o donde se está administrando oxígeno.
• No lleve este artefacto tomado del cable, ni use el cable como
manija.
• Para desconectarlo, retire el enchufe del tomacorriente.
• Este artefacto está diseñado para uso al interior
exclusivamente. No lo use en exteriores.
• Coloque esta unidad sólo sobre superficies secas. No coloque
esta unidad sobre superficies mojadas con agua o solventes
para limpieza.
GUARDE ESTAS INSTRUCCIONES
Precaución - Lea todas las instrucciones con atención antes de
poner en funcionamiento.
• Nunca deje el artefacto sin vigilancia, especialmente si hay
niños presentes.
• Nunca cubra el artefacto mientras está en funcionamiento.
• Esta unidad no debe ser usada por niños sin la supervisión
de un adulto.
• Mantenga siempre el cordón alejado de temperaturas
elevadas y de llamas.
• No levante, lleve, cuelgue ni tire de la unidad tomándola del
cable de corriente
• Si el adaptador se daña, debe suspender el uso de este
aparato de inmediato y contactar el Centro de servicio de
HoMedics. (Ver la dirección de Homedics en la Sección de
Garantía).
Precaución:
Todo el
servicio de
este producto
debe ser
realizado
únicamente por
Personal de
servicio
autorizado de
HoMedics.
Page 11

5
4
• 6 Sonidos Naturales: Bosque
lluvioso, Océano, Trueno, Noche de
verano, Lluvia y Cascada
• Equipo de CD con Sistema Dual de
Sonido Singular
• Hora Atómica
• Radio AM/FM con alarma y alarma
repetida
• Cuatro opciones de despertador
suave – CD, radio, alarma o sonido
suave
• Reloj de fácil lectura con pantalla
LCD
• La función de proyección proyecta
la hora en la pared o el cielorraso
con luz azul suave
• El auto-temporizador permite
seleccionar la duración de la
escucha - 15, 30, 60 minutos o
continuamente
• Control de volumen ajustable
Figura 1
Figura 3
Figura 2
Proyección
Ajuste de Alarma
Modo de Alarma
Temporizador
CD Abierto
Sintonía
Snooze (de repetición)
Pantalla LCD
Encendido
Radio
CD
Sonidos
Volumen
Horas
Búsqueda/Pista
Búsqueda/Pista
Indicador PM
Icono de
temporizador
Indiador de Hora Atómica y
Zona Horaria
Radio
Pantalla de
CD/Pista
Modos de Alarma
Iconos de Sonido
Iconos de
Sonido
Perilla de Enfoque
Perilla de rotación de la hora
Interruptor FM/AM
Interruptor On/Off
(encendido/apagado)
del proyector
Interruptor High/Low
(alto/bajo) de
iluminación del fondo
Botones On/Off de
Zona Horaria/Hora
atómica
Parar
Escuchar/Pausa
Minutos
Adaptador
Funciones del Equipo CD y
Radio Reloj Sound Spa
Enchufe CC
Tubo proyector
Antena
RADIO
TIMER
60 MIN
30 MIN
15 MIN
OFF
SOUNDS BUZZER CD
RADIO
CD
TRACK
PM
RADIO
SOUNDS BUZZER CD
TIMER
OFF
60 MIN
30 MIN
15 MIN
RADIO
CD
TRACK
PM
Page 12

Cómo Configurar La Hora
Acerca del reloj atómico
El Sound Spa Platinum comienza a sincronizar el reloj a la hora del Pacífico apenas
la unidad queda enchufada.
Selección de la zona horaria
1. Presione el botón ATOMIC ON/OFF (Fig. 3) para apagar la función de hora
atómica. Para indicar que se encuentra en la posición OFF (apagado), el icono
de la antena desaparece de la pantalla.
2. Oprima alternativamente el botón TIME ZONE (Zona Horaria) (Fig. 3) hasta
alcanzar la zona horaria deseada. (P – Hora estándar del Pacífico,
M – Hora estándar de las Montañas Rocosas, C – Hora estándar del Centro,
E - Hora estándar del Este)
3. Una vez seleccionada su zona horaria, presione el botón ATOMIC ON/OFF
nuevamente para encender la función de hora atómica. Para indicar que se
encuentra en la posición ON (encendido), las bandas de la antena , sobre el
icono del satélite reaparecen destellando. (Cuando aparece destellando, la
unidad está buscando la señal atómica de la hora).
4. Si posteriormente las bandas de la antena desaparecen, se debe a que la
señal horaria de radio no está disponible en ese momento. Intente colocar la
unidad en otras ubicaciones. Recuerde colocar la unidad lejos de fuentes de
interferencia tales como teléfonos celulares, artefactos, televisores, etc.
5. Las bandas de la antena aparecerán en la pantalla si la recepción de la señal
horaria atómica es exitosa. El reloj controlado por radio tendrá una
sincronización diaria, todos los días a la 01:00 am. Si los intentos de recepción
anteriores fracasaron, el receptor doméstico intentará sincronizar cada hora,
hasta tener éxito. Cada ciclo de recepción varía de 2 hasta 10 minutos.
ATENCIÓN: Usted puede ajustar la intensidad de la iluminación del fondo en la
pantalla LCD desplazando el interruptor BACKLIGHT High/Low (Fig. 3) al
respaldo de la unidad.
6 7
Instrucciones de uso y montaje
1. Desempaque el producto y asegúrese de que no falte nada. (Fig. 1).
2. Esta unidad se alimenta con un adaptador de CC incluido.
3. La corriente de la batería sirve sólo para proporcionar MEMORIA DE
RESPALDO para los ajustes del reloj y alarma. En el compartimiento para la
batería se debe colocar sólo una batería de 9 voltios (no incluida), si se desea
el respaldo de la memoria (en el caso de un apagón de corriente o si se
desenchufa la unidad). La hora queda iluminada en la pantalla del reloj, sin
embargo, la iluminación de fondo no queda encendida. Apenas vuelva la
corriente, la pantalla indicará la hora correcta.
ATENCIÓN: Es necesario instalar la batería para hacer funcionar la memoria de
respaldo del reloj. En el caso de un apagón o desconexión, si la batería no ha
sido instalada, cuando vuelva la corriente, será necesario reajustar la hora y la
alarma.
4. Para instalar la batería, retire la tapa del compartimiento. Inserte una batería
alcalina de 9 voltios en el compartimiento en el fondo de la unidad. Vuelva a
colocar la tapa y presiónela en su lugar.
5. Conecte el enchufe del adaptador de CC a la base de la unidad (Fig. 3)
y enchufe el cordón en un tomacorriente doméstico de 120 voltios.
Page 13

8 9
Ajuste manual del reloj
1. Oprima y sostenga el botón HOUR (hora) o MIN (minutos) (Fig. 1) hasta que la
hora empiece a destellar, luego suéltelo.
2. Con la hora destellando, oprima el botón HOUR o MIN hasta alcanzar la hora
deseada.
ATENCIÓN: El indicador PM (Fig. 2) aparece durante las horas de PM.
Asegúrese de ajustar la hora para el período de 12 horas correcto –
AM (mañana) o PM (tarde).
Escucha de sonidos naturales
1. Presione el botón SOUND (sonido) (Fig. 1) para activar los sonidos naturales.
2. Presione alternativamente el botón SOUND para seleccionar uno de los seis
sonidos naturales. El símbolo correspondiente aparece (Fig. 2) al lado del
sonido para indicar cuál sonido está encendido.
3. Para ajustar el volumen, gire la perilla VOLUME (volumen) (Fig. 1) al nivel
deseado.
4. Una vez terminado de escuchar los sonidos usted puede apagarlos presionando
el botón POWER (energía). (Fig. 1)
ATENCIÓN: Cuando se prende la unidad, ésta queda por defecto en el último
modo empleado.
Escucha del radio
1. Oprima el botón RADIO (Fig. 1).
2. Use el interruptor AM/FM ubicado en el respaldo de la unidad (Fig. 3) para
cambiar de banda.
3. Gire el TUNER (sintonía) (Fig. 1) para seleccionar la radioemisora.
4. Para ajustar el volumen, gire la perilla VOLUME (volumen) (Fig. 1) al nivel
deseado.
5. Una vez terminado de escuchar el radio usted puede apagarlo presionando el
botón POWER (energía). (Fig. 1)
ATENCIÓN: Ajuste la antena en el respaldo de la unidad para mejorar la
recepción del radio, si fuera necesario.
Para escuchar CDs
1. Presione el botón CD OPEN (abrir CD) (Fig. 1) para abrir la puerta del
compartimiento.
2. Inserte el CD en el compartimiento para CDs con la etiqueta hacia arriba.
ATENCIÓN: Asegúrese de que el CD quede bien sujetado en el centro.
3. Cierre la puerta del compartimiento del CD
4. Presione el botón CD (Fig. 1), el número de la pista magnética aparece.
ATENCIÓN: Si usted presiona CD cuando no hay un CD en el compartimiento,
aparece NO.
5. Presione PLAY/PAUSE (Fig. 1) para empezar a escuchar el CD
6. Presione SEEK/TRACK (Fig. 1) para saltar al principio de la pista actual;
presione SEEK/TRACK (Fig. 1) dos veces para saltar al principio de la pista
anterior; presione SEEK/TRACK (Fig. 1) para saltar al principio de la pista
siguiente;
Page 14

10 11
7. Presione SEEK/TRACK (Fig. 1) para la búsqueda rápida revertida en una
pista; presione SEEK/TRACK (Fig. 1) para la búsqueda rápida hacia adelante
en una pista;
8. Presione PLAY/PAUSE (Fig. 1) para suspender la escucha del CD. Presione
PLAY/PAUSE (Fig. 1) para seguir escuchando el CD.
9. Presione STOP (Fig. 1) para parar el CD.
10. Para retirar el CD, presione CD OPEN para abrir la
Uso del auto-temporizador
Cuando la unidad está encendida y usted escucha un sonido natural, el CD o el
radio, puede ajustar el temporizador para que la unidad se apague
automáticamente.
1. Oprima alternativamente el botón TIMER (temporizador) (Fig. 1) hasta alcanzar
la hora deseada. 15, 30 ó 60 minutos.
2. Para cancelar el temporizador, presione alternativamente el botón TIMER hasta
alcanzar la posición OFF (apagado), o presione POWER (Fig. 1).
ATENCIÓN: El icono TIMER (Fig. 2) desaparece después de 10 segundos.
Ajuste y uso de la alarma
1. Oprima el botón ALARM SET (Fig. 1). La hora empieza a destellar.
2. Con la hora destellando, oprima el botón HOUR (hora) (Fig. 1) hasta alcanzar la
hora correcta. Luego oprima el botón MIN (minutos) (Fig. 1) hasta alcanzar los
minutos deseados.
3. Después de 5 a 10 segundos la hora seleccionada para la alarma dejará de
destellar y quedará programada, o usted puede oprimir el botón ALARM SET
para confirmar.
ATENCIÓN: El indicador PM (Fig. 2) también se aplica a la alarma. Usted
puede revisar el ajuste de la alarma en cualquier momento oprimiendo el botón
ALARM SET.
4. Para activar la alarma, usted puede escoger una de las 4 opciones de
despertador:
a. Para despertarse con el RADIO, oprima el botón ALARM MODE (Fig. 1)
una vez.
b. Para despertarse con los sonidos, oprima el botón ALARM MODE (Fig. 1)
dos veces. El sonido quedará ajustado con el último sonido que usted ha
escuchado. Si desea seleccionar un sonido diferente, oprima
alternativamente el botón SOUND (Fig. 1).
c. Para despertarse con la ALARMA (buzzer), oprima el botón ALARM MODE
(Fig. 1) tres veces.
d. Para despertarse con el CD, oprima el botón ALARM MODE (Fig. 1) cuatro
veces.
ATENCIÓN: El icono del modo de alarma seleccionado (Fig. 2) aparece
para indicar que la alarma está programada.
Page 15

5. Cuando la alarma empieza a sonar, usted puede hacer lo siguiente:
a. SNOOZE (alarma repetida): Presione el botón SNOOZE (Alarma repetida)
(Fig. 1). Le quedarán 9 minutos más para dormir. Usted puede usar esta
función hasta apagar la alarma.
b. REAJUSTE: Apague la alarma oprimiendo el botón POWER (Fig. 1). La
alarma volverá a programarse automáticamente para el día siguiente en al
modo actual.
ATENCIÓN: El icono del modo de alarma seleccionado (Fig. 2) aparece
para indicar que la alarma está todavía programada. Si desea cambiar el
modo del despertador, siga el paso 4 en la sección Ajuste y Uso de la
Alarma.
c. OFF (apagado): Para apagar la alarma por completo para que no quede
programada para el día siguiente, oprima el botón ALARM MODE (Fig. 1)
hasta que no aparezca ningún icono de alarma.
ATENCIÓN: Si la alarma suena por 30 minutos seguidos, se apaga
automáticamente.
12 13
Page 16

USO DE LA FUNCIÓN DE PROYECCIÓN
1. Para encender la función de proyección, deslice el interruptor on/off (Fig. 3) al
respaldo de la unidad en la posición ON (encendido). La hora se proyecta
entonces en la pared o el cielorraso.
ATENCIÓN: Si la función de proyección está apagada, usted puede oprimir el
botón SNOOZE (alarma repetida) (Fig. 1) para activar la proyección por 15
segundos.
2. El ángulo del proyector puede ajustarse para la proyección angular en el
cielorraso moviendo el TUBO PROYECTOR hacia delante o atrás (Fig. 3).
3. Para cambiar el ángulo de visión de la hora que aparece en la pared o el
cielorraso, gire la PERILLA DE ROTACIÓN DE LA HORA hasta lograr el resultado
deseado (Fig. 3).
ATENCIÓN: La PERILLA DE ROTACIÓN DE LA HORA gira hasta 350 grados.
4. Para enfocar la hora en la pared el cielorraso, gire la perilla del enfoque
(FOCUS KNOB) (Fig. 3) hasta lograr el resultado deseado.
Mantenimiento
Para guardar
Puede dejar la unidad en exhibición o puede guardarla en su caja o en un lugar
fresco y seco.
Para limpiar
Para limpiar la carcasa de la unidad use sólo un paño suave y seco.
NUNCA use líquidos o limpiadores abrasivos para limpiar la unidad.
14 15
 Loading...