

Dirección postal:
HoMedics
Service Center Dept. 168
3000 Pontiac Trail
Commerce Township, MI
48390
Correo electrónico:
cservice@homedics.com
©2005 HoMedics, Inc. y sus compañías afiliadas, reservados todos los derechos. HoMedics® es
una marca registrada de HoMedics Inc. y sus compañías afiliadas. The beauty of living well™ es
una marca registrada de HoMedics, Inc. y sus compañías afiliadas. Reservados todos los derechos.
IB-SEV1
GARANTÍA LIMITADA POR DOS AÑOS
(Válida únicamente en los EE.UU.)
HoMedics, Inc., garantiza este producto contra defectos en material y mano de
obra durante el período de dos años a partir de la fecha original de compra con
las excepciones que se detallan a continuación.
Esta garantía de producto de HoMedics no cubre daños causados por un uso
inadecuado, abuso, accidente, la conexión de accesorios no autorizados, la
alteración del producto o cualquier otra condición sin importar cual sea que se
encuentre fuera del control de HoMedics. Esta garantía es válida sólo si el
producto es comprado y usado en los EE.UU. Esta garantía no cubre un
producto que requiera modificación o alteración para que pueda usarse en
cualquier otro país distinto del país por el cual fue diseñado, fabricado,
aprobado y/o autorizado, o la reparación de productos dañados a causa de
estas modificaciones. HoMedics no será responsable de ningún tipo de daños
incidentales, consecuentes o especiales. Todas las garantías implícitas,
incluyendo entre otras aquellas garantías implícitas de idoneidad y
comerciabilidad, están limitadas a la duración total de dos años a partir de la
fecha de compra original.
Para obtener un servicio cubierto por la garantía para su producto HoMedics,
puede entregar la unidad personalmente o enviarla por correo junto con su
recibo de compra fechado (como prueba de la compra), el franqueo pagado,
junto con un cheque o una orden de pago pagadera a HoMedics, Inc. para
cubrir los gastos de manipulación. El servicio en garantía del marco del
espaldar cuesta $20.00. Refiérase por favor a la sección “Remoción del Marco
del Espaldar para el Servicio en Garantía” en la página 10 para las instrucciones
para la remoción del cojín/marco del espaldar para el servicio en garantía.
Una vez recibido, HoMedics reparará o reemplazará su producto, según lo que
sea apropiado y se lo enviará con el franqueo pagado. Si es apropiado
reemplazar su producto, HoMedics lo reemplazará con uno igual o comparable,
a opción de Homedics. La garantía es válida únicamente a través del Centro de
Servicio HoMedics. El servicio realizado a este producto por cualquier otro
diferente al Centro de servicio HoMedics anulará la garantía.
Esta garantía le proporciona derechos legales específicos. Es posible que usted
tenga derechos adicionales que pueden variar de un estado a otro. Debido a las
regulaciones de los diferentes estados, es posible que algunas de las
limitaciones y exclusiones no se apliquen en su caso.
Por más información con respecto a nuestra línea de productos en los EE.UU.,
visítenos en: www.homedics.com
SEV-1
Seville
SHIATSU MASSAGING CHAIR
AND OTTOMAN
El manual en
español empieza
a la página 12
Instruction Manual and
Warranty Information

IMPORTANT SAFEGUARDS
WHEN USING ELECTRICAL PRODUCTS, ESPECIALLY WHEN
CHILDREN ARE PRESENT, BASIC SAFETY PRECAUTIONS SHOULD
ALWAYS BE FOLLOWED, INCLUDING THE FOLLOWING:
READ ALL INSTRUCTIONS BEFORE USING
DANGER
- TO REDUCE THE RISK OF ELECTROCUTION:
• Always unplug the appliance from the electrical outlet immediately
after using and before cleaning.
• DO NOT reach for an appliance that has fallen into water. Unplug it
immediately.
• Do not use while bathing or showering.
WARNING
- TO REDUCE THE RISK OF BURNS,
ELECTROCUTION, FIRE OR INJURY TO PERSONS:
• An appliance should never be left unattended when plugged in. Unplug
from outlet when not in use and before putting on or taking off parts
or attachments.
• Close supervision is necessary when this appliance is used by, on or
near children, invalids or disabled persons.
• Use this appliance only for its intended use as described in this manual.
Do not use attachments not recommended by HoMedics; specifically
any attachments not provided with the unit.
• NEVER operate this appliance if it has a damaged cord or plug, if it is
not working properly, if it has been dropped or damaged, or dropped into
water. Return it to HoMedics Service Center for examination and repair.
• NEVER use pins or other metallic fasteners with this appliance.
• Keep cord away from heated surfaces.
• NEVER use while sleeping or fall asleep while using the massager.
• NEVER drop or insert any object into any opening.
• DO NOT operate where aerosol (spray) products are being used or
where oxygen is being administered.
• DO NOT carry this appliance by supply cord or use cord
as handle.
• To disconnect, turn all controls to the “off” position, then remove plug
from outlet.
• This appliance is designed for household use only.
• This appliance is designed for personal, non-professional use only. This
appliance should be used only for personal, non-professional uses.
2
SAVE THESE INSTRUCTIONS
Caution — Please read all instructions carefully
before operating.
• If you have any concerns regarding your health consult
your doctor before using this product.
• Individuals with pacemakers should consult a doctor
before use.
• Never leave the appliance unattended, especially if
children are present.
• Never cover the appliance when it is in operation.
• Do not use this product for more than 15 minutes at a time.
• Extensive use could lead to the products excessive heating
and shorter life. Should this occur, discontinue use and
allow the unit to cool before operating.
• Never use this product directly on swollen or inflamed
areas or skin eruptions.
• This product is a non-professional appliance designed to
provide soothing massage to worn muscles. Do not use
this product as a substitute for medical attention.
• Do not use this product before bed. The massage has a
stimulating effect and can delay sleep.
• This product should never be used by any individual
suffering from any physical ailment that would limit the
user’s capacity to operate the controls.
• This product should never be used by any individual
suffering from any ailments that would limit or altogether
inhibit the user’s capacity to feel or have any sensation in
the body part that the product is being used on.
• This unit should not be used by children or invalids
without adult supervision.
3
Caution : All
servicing of this
massager must
be performed
by authorized
HoMedics service
personnel only.
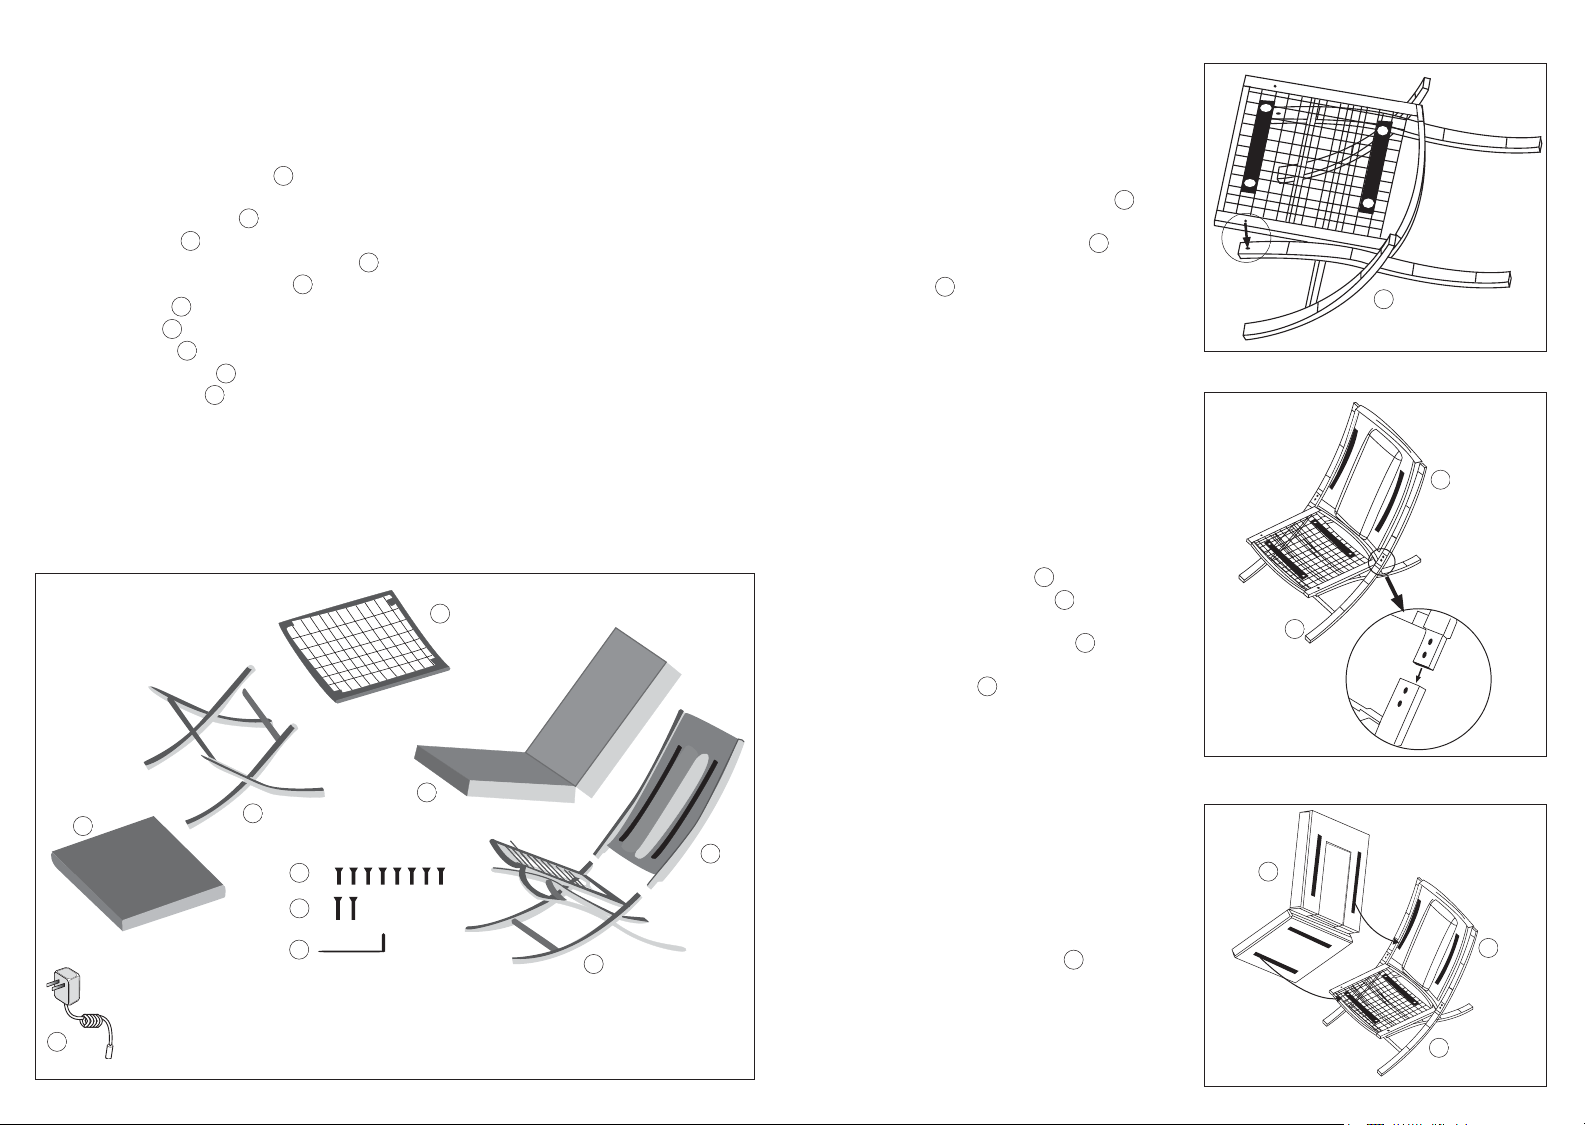
2.Attach Chair Back
• Slide the chair back B into the open
ends of the seat frame A as shown in
Figure 3.
• Secure with 4 small bolts D in
locations 7, 8, 9 and 10 using the
allen wrench F . See Figure 3.
TIPS: Do not fully tighten any bolt until
you have lined up and partially tightened
all 4 bolts.
Make sure the chair back is fully upright
when you are tightening the bolts. It
may help to support the chair back
with either your hand or your body.
• Make sure all bolts are fully tightened.
This includes the bolts that were already
inserted in the frame.
• Attach the chair cushion C as shown
in Figure 4. For proper fit, line up the
recess in the cushion with the massage
mechanism in the chair back.
Also, make sure the adhesive strips
are lined up.
4 5
Components
Carefully remove all contents from packaging and inspect the product to make sure
all components of the chair and ottoman have been received.
These should include:
• Chair seat frame and legs A
• Chair back frame with incorporated
massage mechanism B
• Chair cushion C
• Small bolts for chair and ottoman (8) D
• Large bolts for chair seat (2) E
• Allen wrench F
• AC Adapter G
• Ottoman legs H
• Ottoman top frame I
• Ottoman cushion J
See Figure 1.
Easy to Follow Guide to
Chair and Ottoman
Assembly
1.Assemble Chair Base
• Unfold the chair seat and legs A as
shown in Figure 2.
• Secure with the large bolts E in
locations 5 and 6 using the allen
wrench F .
See Figure 2.
TIPS: Do not fully tighten the first bolt
until you have lined up and partially
tightened both bolts..
Assembly will be easier if you turn the
base on its side.
Figure 1
Figure 2
Figure 3
F
E
C
D
B
J
A
I
A
B
A
C
B
A
9
7
8
10
5
6
Figure 4
G
H
4.Connect Power Source
• Locate the output jack behind the
Seville chair in the lower right hand
corner of the chair back (if viewed from
behind). The input jack will be found
along the side of the chair cushion near
the control panel. Making sure to line
up the arrows, firmly insert the input
jack into the output jack to connect the
massage mechanism with the control
panel. See Figure 7.
TIP: You may wish to thread the input
jack just inside the edge of the chair
back frame before connecting it so that
the cords are less visible.
6
Figure 8
7
Figure 9
Figure 7
3.Assemble Ottoman
• Unfold the ottoman legs H as shown in
Figure 5.
• Making sure to line up the marked corners
(1, 2, 3, 4),place the ottoman top frame
I on top of the legs H assembly will
be easier if you turn the ottoman on its
side as shown in Figure 5.
• Secure with 4 small bolts D in
locations 1, 2, 3 and 4 using the allen
wrench F . See Figure 5.
TIP: Do not fully tighten any bolt until
you have lined up and partially tightened
all 4 bolts.
• Make sure all bolts are fully tightened.
• Attach the ottoman cushion J as shown
in Figure 6. For proper fit, make sure
the adhesive strips are lined up.
Figure 6
J
H
I
Figure 5
H
1
2
3
4
Power Adapter Instructions
Connect the Adapter jack to the massage
chair power receptacle located along the
right side of the chair. Once inserted, plug the
other end into an AC power outlet. Use only
the AC power Adapter provided with this unit.
AC Power Adapter
Information
Your massage chair is powered by an
attached custom AC home Adapter. Use
only the supplied AC home Adapter as
other similar-looking adapters may cause
irreparable damage to the unit and will void
your warranty.
Massage Chair and Control
Panel Instructions
The control panel is located along the side
of the chair cushion as shown (Figure 8).
It opens away from the chair to expose the
control buttons (Figure 9). Press the
POWER button once to activate the control
panel. The LED indicator will illuminate. To
deactivate, press again. For complete
instructions, please see page 11.
 Loading...