

Page 1
Dirección postal:
HoMedics
Service Center Dept. 168
3000 Pontiac Trail
Commerce Township,
MI 48390
Correo electrónico:
c s e r v i c e @ h o m e d i c s . c o m
GARANTÍA LIMITADA DE POR VIDA
HoMedics vende sus productos con la intención de que no tengan defectos de fabricación
ni de mano de obra durante la vida del comprador original a partir de la fecha de compra
original, con las siguientes excepciones. HoMedics garantiza que sus productos no tendrán
defectos de material ni de mano de obra bajo condiciones de uso y servicio normales. Esta
garantía se extiende únicamente a consumidores y no a distribuidores.
Para obtener servicio para su producto HoMedics, envíe por correo el producto y su recibo
de compra fechado (como comprobante de compra), con franqueo pago, a la siguiente
dirección:
HoMedics Consumer Relations
Service Center Dept. 168
3000 Pontiac Trail
Commerce Township, MI 48390
No se aceptarán pagos contra entrega.
HoMedics no autoriza a nadie, incluyendo, pero sin limitarse a, distribuidores, posteriores
consumidores compradores del producto a un distribuidor, o compradores remotos, a
obligar a HoMedics de forma alguna más allá de las condiciones aquí establecidas.
La garantía de este producto no cubre daños causados por uso inadecuado o abuso,
accidente, conexión de accesorios no autorizados, alteración del producto, instalación
inadecuada, reparaciones o modificaciones no autorizadas, uso inadecuado de la fuente de
energía/electricidad, cortes de energía, caída del producto, funcionamiento incorrecto o
daño de una pieza de funcionamiento debido al no cumplimiento del mantenimiento
recomendado por el fabricante, daños durante el transporte, robo, descuido, vandalismo,
condiciones climáticas, pérdida de uso en el período durante el cual el producto está en
una instalación de reparación o a la espera de piezas o reparación, o cualquier otra
condición, sin importar cual sea, que se encuentre fuera del control de HoMedics.
Esta garantía es válida únicamente si el producto es comprado y operado en el país en el
cual se compró el producto. Un producto que requiera modificaciones o adaptación para
habilitar su funcionamiento en cualquier país que no sea aquél para el que fue diseñado,
fabricado, aprobado y/o autorizado, o la reparación de productos dañados por estas
modificaciones no están cubiertos bajo esta garantía.
LA GARANTÍA AQUÍ ESTABLECIDA SERÁ LA ÚNICA Y EXCLUSIVA GARANTÍA. NO HABRÁ
NINGUNA OTRA GARANTÍA EXPRESA NI IMPLÍCITA, INCLUYENDO NINGUNA GARANTÍA DE
COMERCIALIZACIÓN O APTITUD NI NINGUNA OTRA OBLIGACIÓN POR PARTE DE LA
COMPAÑÍA CON RESPECTO A PRODUCTOS CUBIERTOS POR ESTA GARANTÍA. HOMEDICS
NO TENDRÁ RESPONSABILIDAD ALGUNA POR NINGÚN DAÑO INCIDENTAL,
CONSECUENTE NI ESPECIAL. BAJO NINGÚN CONCEPTO ESTA GARANTÍA REQUERIRÁ MÁS
QUE LA REPARACIÓN O CAMBIO DE ALGUNA PIEZA O PIEZAS QUE SE HALLEN
DEFECTUOSAS DENTRO DEL PERÍODO DE VIGENCIA DE ESTA GARANTÍA. NO SE
EFECTUARÁN REEMBOLSOS. SI NO HAY PIEZAS DE REPUESTO DISPONIBLES PARA LOS
MATERIALES DEFECTUOSOS, HOMEDICS SE RESERVA EL DERECHO DE REALIZAR
SUSTITUCIONES EN VEZ DE REPARAR O CAMBIAR.
Esta garantía no se extiende a la compra de productos abiertos, usados, reparados,
embalados otra vez y/o abiertos y vueltos a cerrar, incluyendo entre otras cosas la venta de
dichos productos en sitios de remate por Internet y/o la venta de dichos productos por
re v e n d e d o res o mayoristas. Todas y cada una de las garantías cesarán y terminarán inmediatamente
con respecto a cualquier producto o pieza del mismo que estén reparados, cambiados,
alterados o modificados sin el consentimiento previo explícito y por escrito de HoMedics.
Esta garantía le pro p o rciona derechos legales específicos. Es posible que usted tenga dere c h o s
adicionales que pueden variar de un país a otro. Debido a las regulaciones de ciertos
países, es posible que algunas de las limitaciones y exclusiones no se apliquen en su caso.
Por más información con respecto a nuestra línea de productos en los EE.UU., visítenos en:
www.homedics.com
©2006 HoMedics, Inc. y sus compañías afiliadas, reservados todos los derechos.
HoMedics® es una marca registrada de HoMedics, Inc. y sus compañías
afiliadas. The beauty of living well™ es una marca registrada de HoMedics, Inc.
y sus compañías afiliadas. Reservados todos los derechos.
IB-SC650A
Por servicio o
reparación, no
devuelva esta unidad
al distribuidor.
Póngase en contacto
con Relaciones con
el consumidor de
HoMedics por el
1-800-HOMEDIC
(1-800-466-3342).
Instruction Manual
Professional Beam Scale
El manual en español
empieza a la página 9
SC-650
SC-650-A.qxd 10/2/06 6:10 PM Page 1
Page 2
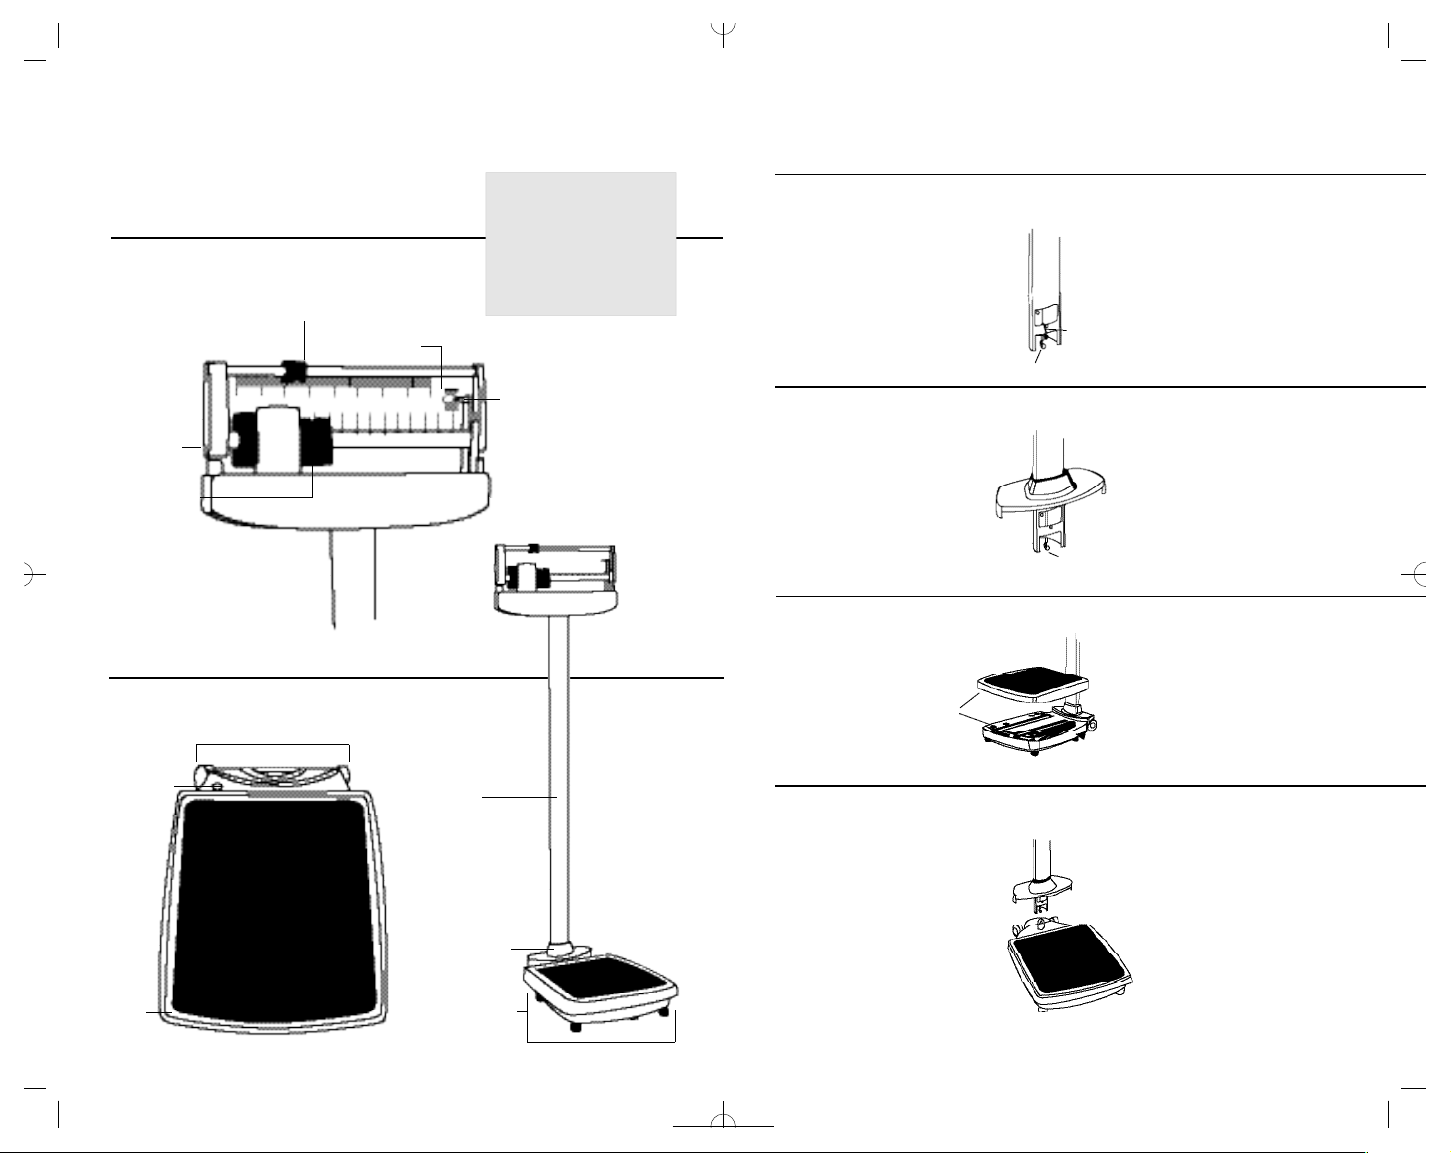
Assembly
Parts
Top Section
Base
Upper Sliding Weight
Lower Sliding Weight
Level Indicator
Casters
Platform
Pole
Pole Cover
Leveling Feet
Display
Pointer Tip
Adjusting Screw
Assembly Instructions
1. Cut and remove BAND which secures POTHOOK and POLE.
2. Place POLE COVERon P O L E. Slide POLE COVER up for easier assembly.
3. Remove PLATFORM from BASE.
4. Insert POLE into the hole in BASE until screw holes align.
Pole
Band
Pothook
Pole
Pole Cover
Pothook
2
3
Platform
Base
Base
Pole
Snaps
Package Contents
Pole with Top section
Pole Cover
Scale Base with Platform
Screws (4 pcs)
Screw Driver (1 pc)
Allen Key (1 pc)
Instruction Manual
SC-650-A.qxd 10/2/06 6:10 PM Page 3
Page 3

Setting The Zero Point
and Balance
Before using the scale for the first time or
when the scale has been moved to another
place, you must set the zero point and
balance the scale before weighing yourself.
Zero Point
1. With nothing on the PLATFORM, slide
the UPPER and LOWER sliding weights
to ZERO.
2. To set the POINTER TIP in the middle of
the OVAL you must use the ADJUSTING
SCREW.
A. Turn the ADJUSTING SCREW
counterclockwise towards “ – “
to raise the POINTER TIP.
B.Turn the ADJUSTING SCREW
clockwise towards “ + “
to lower the POINTER TIP.
5. Use SCREW DRIVER to hook POTHOOK
into the hole of the LONG ARM CONNECTION PLATE.
6. Use ALLEN KEY to remove pre-set A S S E M B LY SCREW (located on the
bottom of the base) to release the LONG ARM CONNECTION PLAT E
into place.
7. Use ALLEN KEY to attach POLE to BASE by inserting and turning
the 4 SCREWS tightly.
8. Slide POLE COVER down.
9. Replace PLATFORM by sliding it onto BASE and push down until it
snaps into place.
Long Arm
Connection Plate
Assembly
Screw
Screws
Upper Weight
Lower Weight
Adjusting Screw
Adjusting Screw Detail
Leveling Feet
Level
Leveling Foot
Locking
Dial
Platform Top
Side
Pointer Tip
Pothook
Step1
4
5
Step2
Balance
Place the scale on a flat, firm surface. Turn the 6 LEVELING FEET until the bubble inside
the LEVEL is directly in the middle of the circle. Use LOCKING DIAL to lock LEVELING FEET
into place.
SC-650-A.qxd 10/2/06 6:10 PM Page 5
Page 4

Reaching Target Weight
Maintaining proper weight is essential to healthy living. The Body Mass
Index (BMI) is the most widely accepted measurement of weight according
to health professionals. Use the chart below to determine your own BMI by
matching your height in the left hand column with your weight in the center.
Anyone, male or female, with a BMI of 25 to 29 is considered overweight
and a body mass index of 30 is considered obese. Remember to eat right
and exercise.
General Operation
1. Place feet on scale so weight is evenly distributed as shown.
2. Lift the LOWER sliding weight and slide it to the right.
Be sure the weight sits in the groove of the roughly
estimated weight.
3. A. Slide the UPPER sliding weight to the right.
B. Slide the weight until the POINTER settles
in the middle of the OVAL.
4. Add the UPPER and LOWER weights together to
determine total weight.
Trouble Shooting
In Case of Difficulty...
1. Make sure the ZERO POINT is set
2. Make sure the ASSEMBLY SCREW has been removed
3. Make sure the P O T H O O K is attached onto the LONG ARM
CONNECTION PLAT E
4. Make sure scale is level
5. Place your feet in the same position each time you weigh yourself.
6. Weigh yourself without clothing, whenever possible. Clothes can
vary in weight.
7. For the most consistent readings, weigh yourself at the same time
of day.
8. Allow for weight fluctuations due to food or drink in yours system.
Care and Maintenance
• Do not disassemble scale; it contains no user serviceable parts.
Damage to the scale may occur as a result of improper handling.
• Clean the scale after use with a lightly dampened cloth.
Do not use solvents or immerse the unit in water.
• Avoid excessive impact or vibration to the scale.
NOTE: BMI has some limitations: It can overestimate body fat in people who are very muscular,
and it can underestimate body fat in people who have lost muscle mass, such as the elderly.
For service or repairdo not return this
unit to the retailer.
Contact HoMedics
Customer Service at:
1 . 8 0 0 . H O M E D I C
( 1 . 8 0 0 . 4 6 6 . 3 3 4 2 ) .
Step 1
6
7
Step 2
SC-650-A.qxd 10/2/06 6:10 PM Page 7
Page 5

Mail To:
HoMedics
Service Center Dept. 168
3000 Pontiac Trail
Commerce Township,
MI 48390
e-mail:
c s e r v i c e @ h o m e d i c s . c o m
LIMITED LIFETIME WARRANTY
HoMedics sells its products with the intent that they are free of defects in manufacture and
workmanship for the life of the original purchaser from the date of original purchase, except
as noted below. HoMedics warrants that its products will be free of defects in material and
workmanship under normal use and service. This warranty extends only to consumers and
does not extend to Retailers.
To obtain warranty service on your HoMedics product, mail the product and your dated sales
receipt (as proof of purchase), postpaid, to the following address:
HoMedics Consumer Relations
Service Center Dept. 168
3000 Pontiac Trail
Commerce Township, MI 48390
No COD's will be accepted
HoMedics does not authorize anyone, including, but not limited to, Retailers, the
subsequent consumer purchaser of the product from a Retailer or remote purchasers, to
obligate HoMedics in any way beyond the terms set forth herein.
This warranty does not cover damage caused by misuse or abuse; accident; the attachment
of any unauthorized accessory; alteration to the product; improper installation; unauthorized
repairs or modifications; improper use of electrical/power supply; loss of power; dropped
product; malfunction or damage of an operating part from failure to provide manufacturer’s
recommended maintenance; transportation damage; theft; neglect; vandalism; or
environmental conditions; loss of use during the period the product is at a repair facility or
otherwise awaiting parts or repair; or any other conditions whatsoever that are beyond the
control of HoMedics.
This warranty is effective only if the product is purchased and operated in the country in
which the product is purchased. A product that requires modifications or adoption to enable
it to operate in any other country than the country for which it was designed, manufactured,
approved and/or authorized, or repair of products damaged by these modifications is not
c o v e red under this warranty.
THE WARRANTY PROVIDED HEREIN SHALL BE THE SOLE AND EXCLUSIVE WARRANTY.
THERE SHALL BE NO OTHER WARRANTIES EXPRESS OR IMPLIED INCLUDING ANY
IMPLIED WARRANTY OF MERCHANTABILITY OR FITNESS OR ANY OTHER OBLIGATION ON
THE PART OF THE COMPANY WITH RESPECT TO PRODUCTS COVERED BY THIS WARRANTY.
HOMEDICS SHALL HAVE NO LIABILITY FOR ANY INCIDENTAL, CONSEQUENTIAL OR SPECIAL
DAMAGES. IN NO EVENT SHALL THIS WARRANTY REQUIRE MORE THAN THE REPAIR OR
REPLACEMENT OF ANY PART OR PARTS WHICH ARE FOUND TO BE DEFECTIVE WITHIN
THE EFFECTIVE PERIOD OF THE WARRANTY. NO REFUNDS WILL BE GIVEN. IF REPLACEMENT
PARTS FOR DEFECTIVE MATERIALS ARE NOT AVAILABLE, HOMEDICS RESERVES THE
RIGHT TO MAKE PRODUCT SUBSTITUTIONS IN LIEU OF REPAIR OR REPLACEMENT.
This warranty does not extend to the purchase of opened, used, repaired, repackaged and/or
resealed products, including but not limited to sale of such products on Internet auction
sites and/or sales of such products by surplus or bulk resellers. Any and all warranties or
guarantees shall immediately cease and terminate as to any products or parts thereof which
are repaired, replaced, altered, or modified, without the prior express and written consent of
HoMedics.
This warranty provides you with specific legal rights. You may have additional rights which
may vary from country to country. Because of individual country regulations, some of the
above limitations and exclusions may not apply to you.
For more information regarding our product line in the USA, please visit:
www.homedics.com
© 2006 HoMedics, Inc. and its affiliated companies, all rights reserved.
HoMedics®is a registered trademark of HoMedics, Inc. and its affiliated
companies. The beauty of living well.™is a trademark of HoMedics, Inc.
and its affiliated companies. All rights
reserved.
IB-SC650A
For service or
repair - do not
return this unit to
the retailer.
Contact HoMedics
Consumer
Relations at
1-800-HOMEDIC
(1-800-466-3342).
Manual de instrucciones
Báscula de Astil Profesional
SC-650
SC-650-A.qxd 10/2/06 6:10 PM Page 9
Page 6

Armado
Piezas
Top Section
Base
Pesa deslizante superior
Pesa deslizante
inferior
Indicador
de nivel
Ruedecillas
Plataforma
Poste
Cubierta
del poste
Patas
niveladoras
Mira
Puntero
Tornillo de ajuste
10
11
®
Contenido del paquete
Poste con sección superior
Cubierta del poste
Base de la báscula con plataforma
Tornillos (4 unidades)
Destornillador (1)
Llave Allen (1)
Manual de instrucciones
Instrucciones de armado
1. Corte y retire la BANDA que sujeta el GANCHO y el POSTE.
2. Coloque la CUBIERTA del POSTE sobre el POSTE. Deslice hacia arriba la CUBIERTA del
POSTE para facilitar el armado.
3. Retire la PLATAFORMA de la BASE.
4. Inserte el POSTE en el orificio de la BASE hasta que los orificios de los tornillos queden
alineados.
Poste
Banda
Gancho
Poste
Cubierta del poste
Gancho
Plataforma
Base
Base
Poste
Cierres de presión
SC-650-A.qxd 10/2/06 6:10 PM Page 11
Page 7

Ajuste en Cero y Equilibrio
Antes de usar la báscula por primera vez o
después de que haya sido trasladada a otro
lugar, usted necesita ajustar el cero y el
equilibrio de la báscula antes de poder pesarse.
Ajuste en cero
1. Con la PLATAFORMA desocupada, deslice
las pesas SUPERIOR e INFERIOR al CERO.
2. Para ajustar el PUNTERO en el medio del
ÓVALO necesita usar el TORNILLO DE
AJUSTE.
A. Gire el TORNILLO DE AJUSTE en sentido
anti-horario hacia “ – ” para levantar el
PUNTERO.
Gire el TORNILLO DE AJUSTE en sentido
horario hacia “ – ” para bajar el PUNTERO.
5. Use el DESTORNILLADOR para enganchar el GANCHO en el orificio
de la PLACA DE CONEXIÓN del BRAZO LARGO.
6. Use la LLAVE ALLEN para quitar los TORNILLOS DE ARMADO
pre-montados (ubicados al fondo de la base) para soltar la PLACA DE
CONEXIÓN DEL BRAZO
LARGO en su lugar.
7. Use la LLAVE ALLEN para sujetar el POSTE a la BASE, insertando y
ajustando firmemente los 4 TORNILLOS.
8. Deslice la CUBIERTA del POSTE hacia abajo.
9. Vuelva a colocar la PLATAFORMA deslizándola en la BASE y
empújela hacia abajo hasta que quede presionada en su lugar.
Placa de Conexión
del Brazo Largo
Tornillo
de armado
Tornillos
Pesa superior
Pesa inferior
Detalle del tornillo de ajuste
Tornillo de ajuste
Patas niveladoras
Nivel
Pata
niveladora
Disco de
bloqueo
Parte superior de la plataforma
Lado
Puntero
Gancho
Paso 1
12
13
Paso 2
Equilibrio
Coloque la báscula en una superficie firme y plana. Gire las 6 PATAS NIVELADORAS hasta
que la burbuja dentro del NIVEL quede exactamente en el medio del círculo. Use el DISCO DE
BLOQUEO para bloquear las PATAS NIVELADORAS en su lugar.
SC-650-A.qxd 10/2/06 6:10 PM Page 13
Page 8

Logrando el Peso Deseado
Mantener el peso apropiado es fundamental para una vida saludable.
El Índice del Peso Corpóreo (BMI) es la medida del peso más
comúnmente aceptada según los profesionales de la salud. Use la tabla
que aparece debajo para determinar su propio IMC haciendo
corresponder su altura en la columna de la izquierda con su peso en el
centro. Cualquier persona, hombre o mujer, con un IMC de 25 a 29 es
considerada con sobrepeso y un índice de masa corporal de 30 se
considera obesidad. Recuerde comer adecuadamente y hacer ejercicio.
Funcionamiento general
1. Coloque los pies en la báscula como se indica para que el peso
quede distribuido.
2 . Levante la pesa deslizante I N F E R I O R y deslícela a la izquierda.
Asegúrese de que la pesa quede en la ranura de la estimación amplia
del peso.
3 . A. Deslice la pesa deslizante S U P E R I O R a la izquierda.
B . Deslice la pesa hasta que el P U N T E R O quede en el medio del
ó v a l o .
4 . Sume el valor de la pesa S U P E R I O R e I N F E R I O R para determinar el
peso total.
Resolución de problemas
En Caso de Problemas...
1. Asegúrese de que el CERO haya quedado ajustado
2. Asegúrese que el TORNILLO DE ARMADO haya sido quitado
3. Asegúrese de que el GANCHO quede sujetado a LA PLACA DE
CONEXIÓN DEL BRAZO LARGO.
4. Asegúrese de que la báscula esté nivelada
5. Cada vez que se pesa, coloque sus pies en la misma posición.
6. Pésese sin ropa, cuando le sea posible. El peso de la ropa
puede variar.
7. Para obtener lecturas más constantes, pésese a la misma hora
del día.
8. Permita un margen de fluctuación en el peso debido a comidas
o bebidas en su sistema.
Cuidados y Mantenimiento
• No desarme la báscula; no contiene piezas que necesiten servicio
por parte del usuario. Puede producirse un daño si la báscula no
es manejada adecuadamente.
• Limpie la báscula con un paño apenas húmedo luego de usar. No
utilice solventes ni sumerja la unidad en el agua.
• Evite que la báscula sufra impactos o vibraciones excesivos.
NOTA: El BMI tiene algunas limitaciones: Puede avaluar en más la grasa del cuerpo en personas que
son muy musculares, y avaluar en menos la grasa en personas que han perdido masa muscular,
como los ancianos.
Por servicio o
reparación, no
devuelva esta unidad
al distribuidor.
Póngase en contacto
con HoMedics
Customer Service al:
1 . 8 0 0 . H O M E D I C
( 1 . 8 0 0 . 4 6 6 . 3 3 4 2 ) .
Paso 1
14 15
Paso 2
SC-650-A.qxd 10/2/06 6:10 PM Page 15
 Loading...