

Homedics AP-T20 User Manual
TOTALCLEAN
IN
5 1
INSTRUCTION MANUAL AND WARRANTY INFORMATION
AIRPURIFIER
TM
3-YEAR LIMITED WARRANTY
AP-T20

IMPORTANT SAFETY INSTRUCTIONS:
WHEN USING ELECTRICAL PRODUCTS, ESPECIALLY WHEN CHILDREN ARE PRESENT, BASIC SAFETY
PRECAUTIONS SHOULD ALWAYS BE FOLLOWED, INCLUDING THE FOLLOWING:
READ ALL INSTRUCTIONS BEFORE USING.
DANGER –
• Always unplug the air purifier from the electrical outlet immediately after using and before
cleaning or replacing filters.
• Keep cord away from heated surfaces.
• Always place the air purifier on a firm, level surface.
• Always place the air purifier at least 6 inches away from walls and 3 feet from heat sources such as
stoves, radiators, or heaters.
• DO NOT reach for an appliance that has fallen into water. Unplug it immediately.
• DO NOT place or store appliance where it can fall or be pulled into a tub or sink.
• DO NOT place in or drop into water or other liquid.
• Keep dry — DO NOT operate in wet or moist conditions.
• Check your air purifier cord and plug connections. Faulty wall outlet connections or loose plugs can
cause the outlet or plug to overheat. Be sure the plug fits tightly in the outlet.
NOTE: This appliance has a polarized plug (one blade is wider than the other). To reduce the risk of shock, this
plug is intended to fit only one way in a polarized outlet. If the plug does not fit fully in the outlet, reverse the
plug. If it still does not fit, contact a qualified electrician.
CAUTION: DO NOT attempt to defeat this safety feature. To do so could result in an electric shock
hazard.
WARNING –
• Always unplug the air purifier when not in use.
• Do not operate the air purifier with a damaged cord or plug, or after the air purifier malfunctions, or has
been dropped or damaged in any manner. Return to a HoMedics Service Center for examination, electrical
or mechanical adjustment, or repair.
• This air purifier is not intended for use in bathrooms, laundry areas, and similar moist indoor locations.
• Do not run cord under carpeting. Do not cover cord with throw rugs, runners, or similar coverings. Do not
route cord under furniture or appliances. Arrange cord away from traffic areas where it can be tripped over.
• To disconnect the air purifier, first turn controls to the off position, then remove plug from outlet.
• Do not tilt or move the air purifier while it is in operation. Shut off and remove plug from outlet
before moving.
TO REDUCE THE RISK OF ELECTRIC SHOCK:
TO REDUCE THE RISK OF BURNS, FIRE, ELECTRIC SHOCK, OR INJURY TO PERSONS:
2

• Do not insert or allow foreign objects to enter any ventilation or exhaust opening as this may cause an
electric shock or fire, or damage the air purifier.
• Do not block air intakes or exhaust in any manner. Do not use on any soft surface, like a bed, where
openings may become blocked.
• Use this air purifier only for its intended use as described in this manual. Any other use not
recommended by the manufacturer may cause fire, electric shock, or injury to persons.
• DO NOT use outdoors.
• This product is intended for household use only.
SAVE THESE IMPORTANT INSTRUCTIONS FOR EASY REFERENCE.
3

UNIQUE FEATURES & SPECIFICATIONS
ALL-IN-ONE HEPA-TYPE FILTRATION SYSTEM
• HEPA-TYPE FILTRATION
Removes up to 99% of airborne particles as small as 0.3 microns, such as allergens, pollen, dust,
germs, pet dander, odor, mold spores, and smoke from air that passes through the filter.
• CARBON ODOR FILTRATION
Reduces household odors and VOCs (volatile organic compounds)/gases as shown by independent
laboratory testing.
• PRE-FILTER
Captures large particles.
UV-C TECHNOLOGY WITH ON/OFF
When on, UV-C technology kills germs, viruses, and bacteria.
IONIZER WITH ON/OFF
When on, assists in the air purification process.
3 SPEEDS
Low, medium, and high.
BUILT-IN TIMER
Choose from 2, 4, 8, or 12 hours.
REPLACE FILTER INDICATOR
Illuminates when it is time to replace the filter.
SUGGESTED ROOM SIZE
170 FT2/15.8 M2. Portable air purifiers will be more effective in rooms where all the doors and
windows are closed.
AIR CHANGES PER HOUR
This air purifier will purify the air in a 170 FT2/15.8 M2 room (assuming an 8 FT/2.43 M ceiling)
4.8 times per hour on high speed in a closed room.
OIL TRAY
Includes 3 essential oil pads. Use with essential oil (not included) to deliver scent into the air.
4
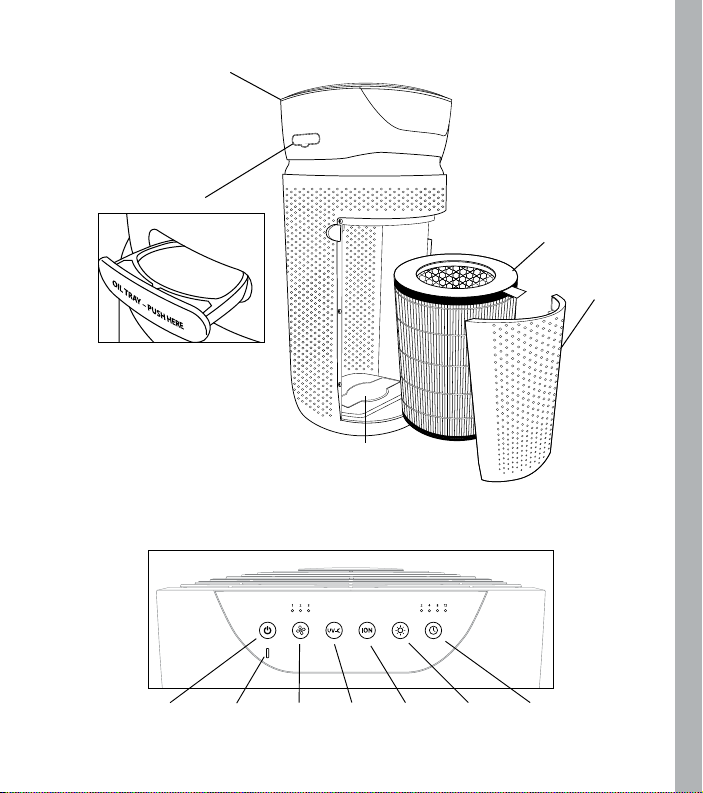
CONT ROL PANEL
MAIN UNIT
OIL T RAY
CONT ROL PANEL
POWER
BUTTON
REPLACE
FILTER LIGHT
FAN SPEED
BUTTON
UV-C BUL B
COVER
UV-C
BUTTON
5
IONIZER
BUTTON
NIGHTLIGHT
BUTTON
ALL-IN-ONE
HEPA-TYPE FILTER
TIMER
BUTTON
GRILLE
COVER
HOW TO USE
BEFORE TURNING THE UNIT ON
• Take the air purifier out of the box and remove the clear protective plastic bag.
• Place the air purifier on a firm, level surface.
• Plug the power cord into a standard AC outlet.
POWER BUTTON AND FAN SPEED SETTINGS
• To turn the air purifier on, press the power button.
• This air purifier has 3 fan speed settings: low (1), medium (2), and high (3). The higher the fan speed
setting, the faster the air will be purified. To select or change fan speed, press the fan speed
until the desired setting is reached.
UV-C TECHNOLOGY WITH ON/OFF
The UV-C technology kills germs, viruses, and bacteria by penetrating its DNA, resulting in the microorganism's
death or the inability to reproduce. Press the button to turn the UV-C technology on. The blue LED will
glow. Press the button again to turn the UV-C technology off.
IONIZER SETTING WITH ON/OFF
Ion particles have a positive or negative charge that attaches to airborne particles, making them easier to be
captured by the filtration system. Press the ionizer button to turn the ionizer on. The blue light will glow to
indicate the ionizer is in use. Press the ionizer button again to turn the ionizer off.
NOTE: Dust particles may accumulate on surfaces around the air purifier when the ionizer is in use. These
dust particles can be vacuumed or wiped away with a soft, damp cloth.
NOTE: You may hear occasional popping sounds when the ionizer is used. This is normal.
NOTE: The ionizer produces less ozone than the UL-established limits of 0.05 ppm. Ozone may be harmful
around birds and small pets. To prevent ozone buildup, use the ionizer feature in a well-ventilated area.
NIGHTLIGHT
The nightlight has 3 options. Press once to turn the blue nightlight on. Press again to turn the blue nightlight
ring and the display lights off. Press a third time to turn the display lights on.
TIMER
Press the timer button until the desired timer setting is lit on the display. The timer button will cycle
through the following settings: 2 hours, 4 hours, 8 hours, 12 hours, and off. To cancel the timer at any time,
press the timer button until all timer LEDs are off. The air purifier will run continuously when the timer
function is off.
OIL TRAY
Use essential oil (not included) to deliver scent into the air.
NOTE: For use with the included HoMedics essential oil pads only. Do not add essential oils anywhere else in
the unit as it may cause damage.
NOTE: Do not leave a filled essential oil pad in the oil tray if it will be out of use for a long period of time.
6
button
ARE ESSENTIAL OILS SAFE TO USE AROUND PETS?
We should always exercise caution when using essential oils around our pets. Keep all essential oil and aromatherapy products (like diffusers) out of reach of pets. Keep open bottles away from pets to avoid internal
consumption. We do not recommend the topical use of essential oils on pets, as they have a strong sense of
smell and cannot get rid of the oil if they don’t like it or it is disturbing them. When diffusing essential oils
around pets, always diffuse in a well-ventilated area and leave an option for them to remove themselves
from the space, such as leaving a door open. Every animal is different, so carefully observe how each animal
responds when introducing an essential oil for the first time. If irritation occurs, discontinue the use of the
essential oil. We recommend seeking medical attention if ingestion of essential oil occurs.
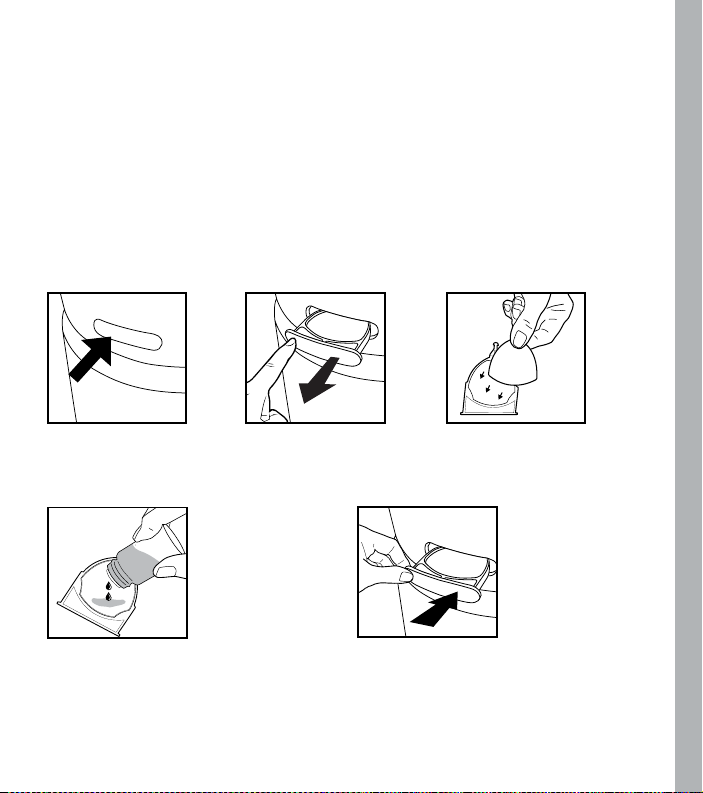
ADDING ESSENTIAL OILS
WARNING: PUTTING OIL ANYWHERE BUT THE OIL TRAY WILL DAMAGE THE AIR PURIFIER.
1. The oil tray is located on the
side of the air purifier above
the nightlight ring.
To purchase genuine HoMedics Replacement Essential Oil Pads, Model # UHE-PAD1, go to your retailer where you purchased your HoMedics
TotalClean AIr Purifier, or visit www.homedics.com (US), www.homedics.ca (CAN).
To purchase genuine HoMedics Essential Oils, go to your retailer where you purchased your HoMedics TotalClean AIr Purifier, or visit
www.homedics.com (US), www.homedics.ca (CAN).
2. Push to open and remove
the tray.
4. Add 5–7 drops of essential
oil to the pad. You may use
more or less depending
on personal preference.
WARNING: Only place
essential oil on the pad and
NOT directly into the tray.
7
3. Place 1 aroma pad (3 included)
into the oil tray.
5. Place the oil tray back in
its compartment and push
to close. The scent will
start automatically when
the air purifier is turned on.
FILTER REPLACEMENT
REPLACE FILTER LIGHT
The replace filter light illuminates when it is time to replace the HEPA-type filter based on the air purifier’s
hours of use.
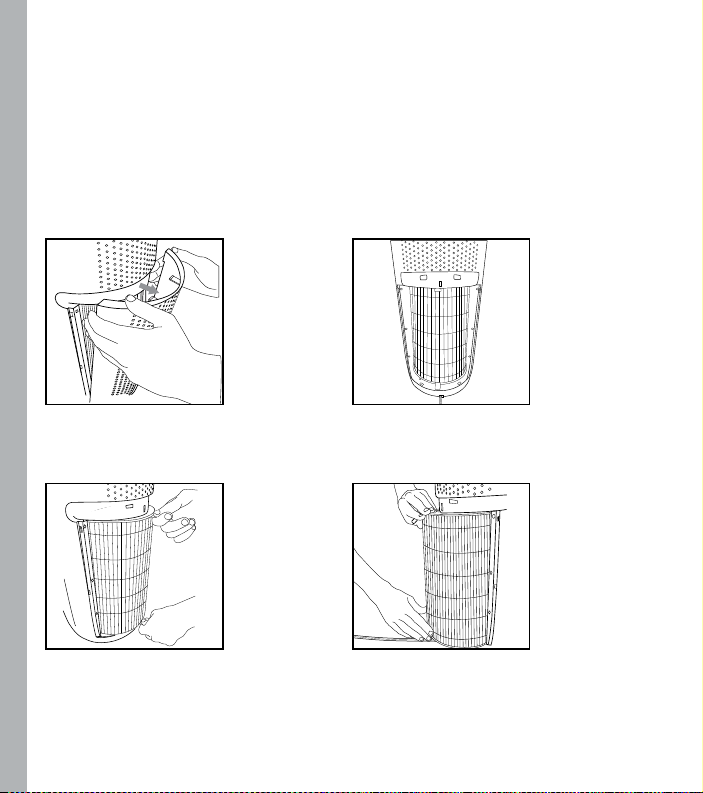
REPLACING THE HEPA-TYPE FILTER
For optimal performance, replace every 12 months under normal usage conditions.
1. Unplug the air purifier. Pull
the indents on each side of
the grille cover.
3. Pull the tabs to remove the
old filter.
To purchase genuine H oMedics replace ment HEPA-typ e filters, model AP -T20F L, go back to your retail er where you purchased y our air purifier,
or visit ww w.homedics.com (U S), www.homedics. ca (CAN).
2. Remove the grille cover and
set aside.
4. With the filter tabs facing outward,
slide the new HEPA-type filter into
the filter cavity.
8
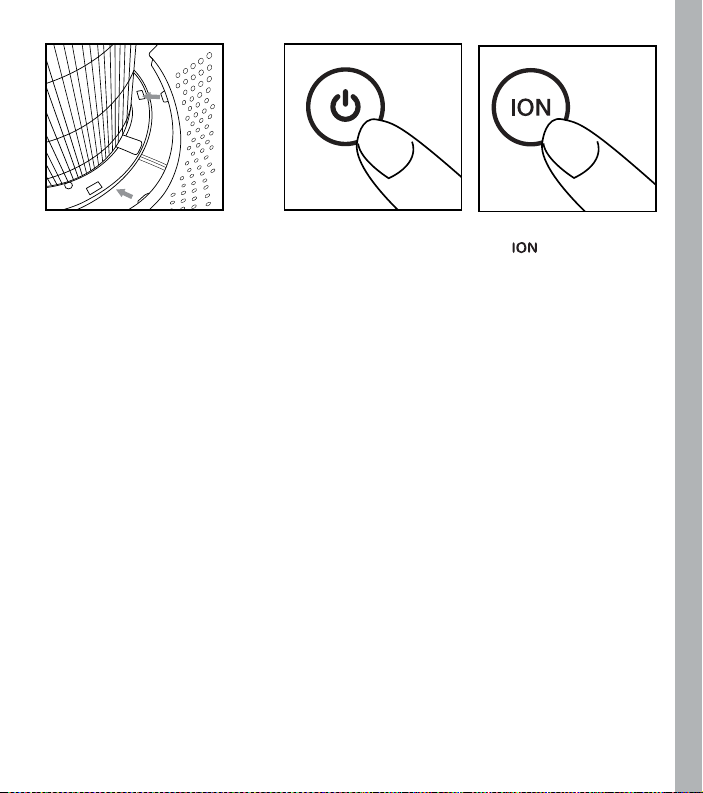
5. Place the tabs at the bottom of
the grille cover into the base of the
air purifier. Gently push the grille
cover until it snaps into place.
6. Plug the power cord into a standard AC outlet. Turn the air
purifier on. Press and hold the ionizer button for 3 seconds
to reset the indicator.
9
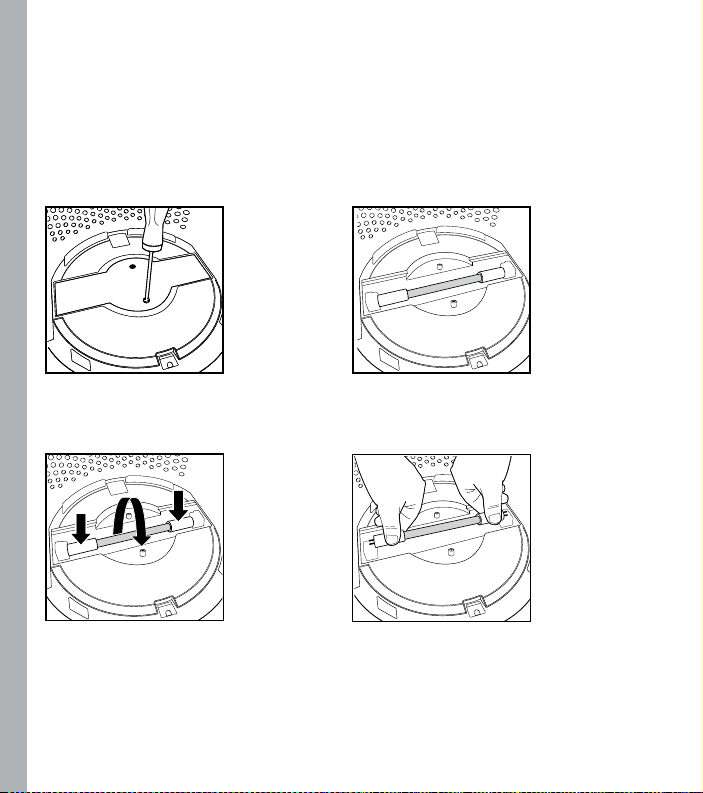
UV-C BULB REPLACEMENT
REPLACING THE UV-C BULB
The UV-C bulb is designed to last for approximately 10,000 hours of use. The UV-C button on the control panel will flash red
when the UV-C bulb burns out and needs to be replaced. The UV-C button will change to blue once the bulb has been replaced.
NOTE: The air purifier will continue to operate without the UV-C function when the UV-C bulb burns out.
CAUTION: Do not operate the air purifier without the protective UV-C bulb cover.
CAUTION: Unplug the power cord before servicing or replacing the UV-C bulb.
1. Unplug the air purifier and remove the HEPA-type
filter. Using a Phillips-head screwdriver (not
included), unscrew the 2 screws located on the
UV-C bulb cover.
3. Gently push from the sides and rotate
the UV-C bulb to remove.
NOT E: The UV-C bulb con tains mercury (Hg ). Dispose of according to l ocal, state, and feder al law / www.lamprecy cle.org.
To purchase genuine H oMedics UV-C r eplacement bulbs, mod el AP-UVC1, go back to yo ur retailer where yo u purchased your air purif ier, or visit
www.homedics.com (US), www.homedics.ca (CAN).
2. Remove the cover to expose the UV-C bulb.
4. Remove and replace the UV-C bulb. Re-install the UV-C
bulb cover, HEPA-type filter, and grille cover.
10
CLEANING AND MAINTENANCE
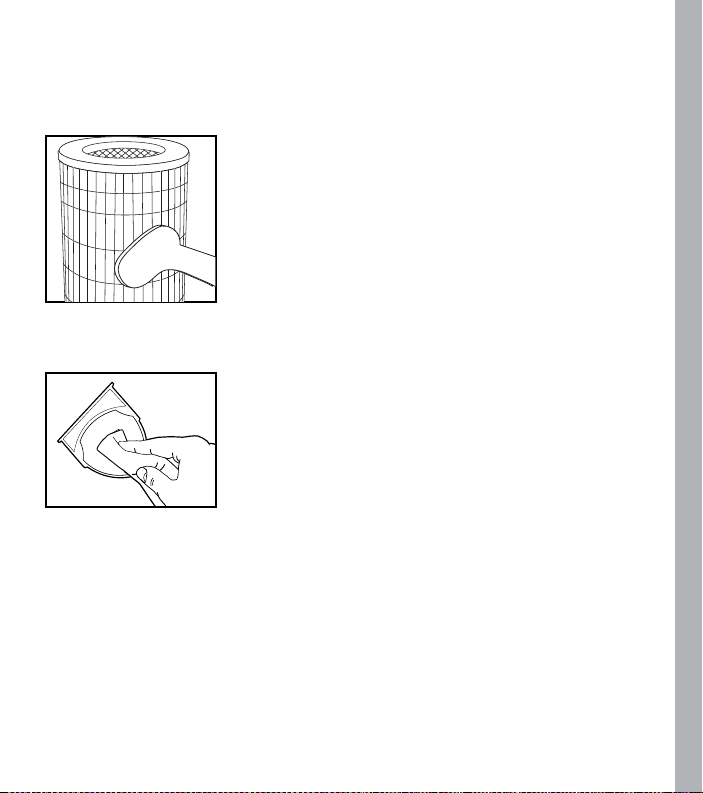
CLEANING THE PRE-FILTER
NOTE: For best performance, vacuum the pre-filter once a month under
normal usage.
1. Unplug the air purifier.
2. Remove the HEPA-type filter as described in the Replacing the HEPA-Type
Filter section.
3. Vacuum the outside of the HEPA-type filter using the brush
attachment of your vacuum cleaner, cleaning it thoroughly.
4. Place the HEPA-type filter back into the air purifier and close grille.
5. Plug the power cord into a standard AC outlet.
TO CLEAN THE OIL TRAY
Open the oil tray and remove the pad. Essential oil pads should be
changed when switching to a different essential oil scent. If continuing to
use the same scent, set the essential oil pad aside for reuse. Wipe down
the inside of the oil tray with a soft cloth. Place the essential oil pad back
in the tray and close.
NOTE: Leave the essential oil pad out of the oil tray when storing.
FOR BEST PERFORMANCE:
• NEVER use water or any household cleaners or detergents to clean the HEPA-type filter.
• Clean off the outside of the unit with a soft, dr y cloth as needed.
• NEVER use water, wax, polish, or any chemical solution to clean the outside of the unit.
• Clean off the grille cover using a soft, damp cloth or the brush attachment of your vacuum as needed.
• Vacuum the pre-filter monthly under normal usage conditions.
• Replace the HEPA-type filter every 12 months under normal usage conditions.
• Always use a genuine HoMedics replacement filter for optimal per formance.
11
This product e arned the ENERGY S TAR by meeting stric t energy efficie ncy guidelines set by the U S EPA.
US EPA does n ot endorse any manufactur er claims of healthier indoo r air from the use of this produ ct.
The energ y efficiency of this E NERGY STAR qualified m odel is measured based on a r atio between the
model’s CADR f or dust and the electric al energy it consumes , or CADR/ Watt.
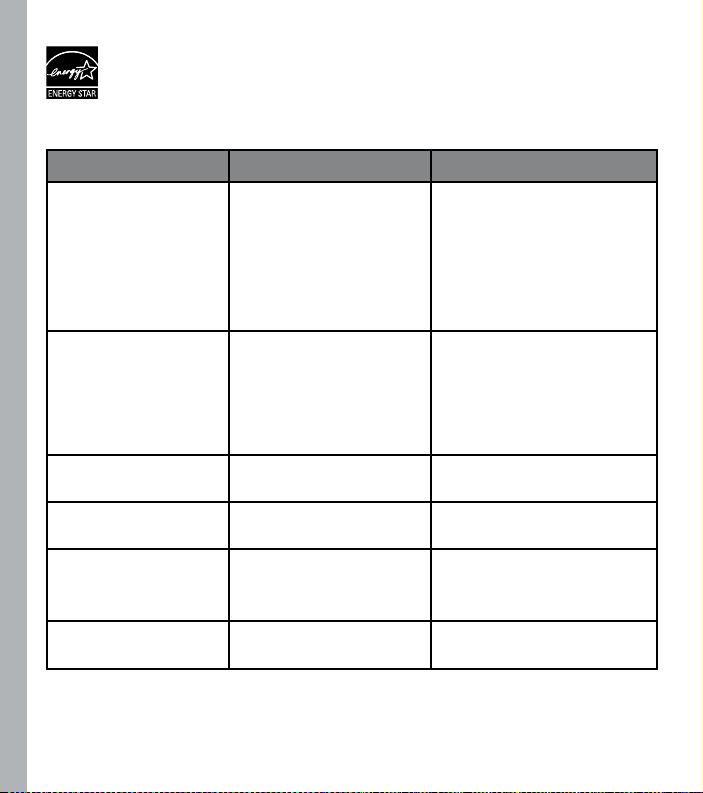
TROUBLESHOOTING
PROBLEM POSSIBLE CAUSE SOLUTION
Unit will not operate • Unit is not plugged in
• Power button not pressed
• No power to unit
• HEPA-type filter not installed
correctly
• Grille cover not installed
correctly
Reduced airflow • The grille may be blocked
• Pre-filter needs to be
vacuumed
• The HEPA-type filter needs to
be replaced
Reduced odor removal • The HEPA-type filter needs to
be replaced
Excessive noise • The unit is not level • Place the unit on a flat, level
Replace filter light remains
lit after filter replacement
• The replace filter indicator
needs to be reset
• Plug unit in
• Press the power button to turn the
power on
• Check circuits, fuses, try a
different outlet
• Reinstall the HEPA-type filter
• Reinstall the grille cover
• Check to make sure nothing is
blocking the grille and air outlet
• Vacuum the pre-filter with the
brush attachment of your vacuum
cleaner
• Replace the HEPA-type filter
• Replace the HEPA-type filter
surface
• Press and hold the ionizer button
for 3 seconds until the replace
filter light turns off
Display lights are off • Nightlight setting • Press the nightlight button until
the desired lights are on/off
12
 Loading...