

Page 1
Explorer
GM-305 Personal Navigator
User’s Guide
Version: 1.03 EI
Date: Mar. 07, 2001
Vertrieb Deutschland
Telefon: 030-36 35 362 Fax: 030-364 00 722
E-Mail:info@holux-gps.de Web: www.holux-gps.de
o. j. imports, Sascha Schwalbe
Alt-Gatow 33 b, 14089 Berlin
All Right Reserved
Page 2

Thank You!
Thank you for choosing HOLUX Explorer Handheld GPS as your personal navigator. We
hope it will be useful to you for a long time.
Warranty
This Explorer is warranted to be free from defects in material and functions for one year
from the date of purchase. Any failure of this product within this period under normal operation will
be repaired at no charge to you. Please refer to the Warranty Card in the package.
HOLUX
provider. We started research and development of GPS and RF products in 1994. Our goal is
continuously to provide people with items that make difficult tasks easier. We hope everyone in the
world shares our achievement.
If you have questions about the operation, function or design of this unit, do please contact us at any
time.
Technology, Inc. is a professional consumer GPS (Global Positioning System) products
Holux Vertrieb Deutschland
E-Mail: info@holux-gps.de
Web: www.holux-gps.de
2
Page 3

Table of Contents
Chapter 1 QUICK
REFERENCE
Chapter 2 BEFORE OPERATING
NAME ……………………………………………………………………………
I.
ALL MODELS ……………………………………………………………………
II.
OPTIONAL ACCESSORIES ……………………………………………………
III.
IV.
V.
VI.
STANDARD PACKAGE …………………………………………………………
CAUTIONS ………………………………………………………………………
ACTIVE ANTENNA DISMANTLE & ASSEMBLE
Chapter 3 OPERATING DETAIL
ON/OFF & BACKLIGHT ………………………………………………………..
I.
SIMULATION ……………………………………………………………………
II.
MAJOR NAVIGATION FUNCTION KEYS
III.
Chapter 4 FUNCTION DETAIL IN PAGES
I.
II.
III.
IV.
Chapter 5 SYSTEM MENU
I.
II.
III.
IV.
V.
VI.
VII
Chapter 6 SPECIFICATION
SATELLITES PAGE
MAP PAGE ……………………………………………………………………..
STATUS PAGE …………………………………………………………………..
COMPASS PAGE
WAYPOINT ………………………………………………………………………
ROUTE …………………………………………………………………………..
TRACK LOGS …………………………………………………………………..
POWER SAVING MODE
UPLOAD …………………………………………………………………………..
DOWNLOAD ………………………………………………………………………
SYSTEM UPGRADE
……………………………………………………………
………………………………………………………………..
………………………………………………………
………………………………………………………
……………………………………………………………..
……………………………………………………..
Chapter 7 MANUFACTURING SETTING
I.
II.
BASIC SETTING ….………………………………………………………………
SPECIAL ENGINEERING SETTING ……………………………………………..
Chapter 8 TROUBLE SHOOTING
………………………………………………
……………………………………………..
………………………………………………
……………………………………………..
……………………………..
…….…………………………….
…………………………………
……………….…………………..
4
7
7
7
8
9
10
11
12
12
13
13
17
17
18
21
21
23
23
25
28
30
30
32
33
35
37
23
25
38
Appendix A EARTH DATUMS ……………………………………………
40
3
Page 4

Chapter 1 QUICK REFERENCE
I. CAUTIONS
A. Please select cold start mode under the following situations:
(i) Initial use.
(ii) Moving more than 500 km without performing satellite acquiring.
(iii) Unused for more than one month regardless of looking up map.
B. Environment and antenna position
(i) Outdoors without shade.
(ii) Have the built-in antenna paralleled the ground (i.e. the angle between Explorer
and ground is 30º) and faced up to the sky.
C. Battery
(i) Remove batteries from the cartridge when not use more than 30 days.
(ii) Use a certified charger to ensure batteries are full charged when using
rechargeable batteries.
D. Program Waypoint and Routes
When complete, you must turn off Explorer. Then Waypoint and routes will be saved in
the system.
II. ON/OFF
A. On: press “ “ for 2 seconds.
B. Off: press ” “ for 2 seconds.
C. Backlight: press ”
“ once to turn on/off backlight when the unit is on.
III. SIMULATION
Satellite page, press “ ”, select Stop Navigation and press ” ” for power saving when
looking up a map or setting up parameters without satellites acquiring. Be sure to return to
Navigation after parameters set.
IV. COLD START
Satellite page, press “ ”, select Cold Start and press ” ” to erase obsolete or incorrect
satellite data.
V. POWER SAVING MODE
Select Pw Saving On in Main Menu page and press ” ”. Turn on this function may make
batteries last longer up to 30-70% longer but it may reduce the ability of acquiring satellites.
4
Page 5

VI. MAJOR NAVIGATION FUNCTION KEYS
A. MENU “ ”
The gate key to operate all functions.
B. PAGE “
”
(i) Switch among pages of satellite, map, status and compass.
(ii) Press for 2 seconds to change screen orientation, either horizontal or vertical.
C. ZOOM IN “
” / ZOOM OUT “ ”
(i) Enlarge/narrow down map scale.
(ii) In map page, press “
” for 2 seconds to erase/redisplay the data in the right down corner.
(iii) Also in map page, press “ ” for 2 seconds to erase/redisplay road lines.
D. ESCAPE ”
(i) The same function as PAGE “
”
”, only in reverse order.
(ii) To quit change of field’s data or return to previous page.
E. ENTER (CONFIRM) ”
”
(i) To confirm operation.
(ii) Press for 2 seconds to mark a waypoint in map page.
VII. FURTHER OPERATION
A. Search object
In map page, press “ ”,
(i) GM-305-DT, GM-305-HT: Go to Search Object, Select Region, Select A Type
and then Select A Name.
(ii) GM-305-WT: No back up map, you may search Waypoint and Route only.
B. Screen Search (For GM-305-D and GM-305-HT only)
In map page, search in current screen page.
C. Show Map Information (For GM-305-D and GM-305-HT only)
In map page, select “Show MapInfo” to show details information when cursor touch a road
or an interesting point.
D. Shortcut
After picking up a certain spot, select Shortcut On, and press ” ”.
E. Display (For GM-305-DT, GM-305-HT only)
All icons in the map are displayed as requested. Activate Display and select all or some.
F. Moving Map
Hold direction key for 8 directions.
G. Measure distance
Show Dist On enables to measure distance between any two points in the map.
H. Map Orientation
In map page, press “ ”, you may select map orientation.
(i) North up
(ii) Track up
5
Page 6

I. Adjust time
Go to Change Time from the status page for changing to daylight saving time or the real
time in the area across more than one time zone.
J. Adjust contrast
Press “ ” or ” ” key in satellite page to adjust contrast.
K. Waypoints
Creating a waypoint: either go to Waypoints from Main Menu or press ”
in map page.
(i) GM-305-WT: Various icons available for Bank, Gas Station, School,……etc.
(ii) GM-305-DT, GM-305-HT: One icon only.
As long as a waypoint is edited into a route, it is undeletable.
L. Routes
The unit is able to memorize 20 routes, up to 30 waypoints each.
“*” will show at the right side of the route name once a route is set to navigation.
M. Track logs
Select Track Logs from Main Menu. You may set intervals by time or distance.
N. Optional Datum
In satellite page, 219 built-in datums for your options.
O. NMEA 0183 Output
In satellite page, you may use
navigation system.
Explorer as a ordinary GPS receiver linking to other
” for 2 seconds
XIII. UPLOAD
Through serial cable, you may upload Waypoint & Route or Track logs to PC. Select Upload
from Main Menu to transfer the Waypoint&Route or Track logs data from your
Explorer to PC. The data communication baud rate is 57,600bps.
IX. DOWNLOAD
Select Download from Main Menu to store new Map, Waypoint&Route, Tracking
Logs or Font in the system memory.
X. SYSTEM UPGRADING
When new HOLUX OS released, you may upgrade your unit by this function.
6
Page 7
Chapter 2 BEFORE OPERATING
I. NAMES
A. Front
Ext. Antenna Port
(At side)
On-Off/ Blcklight
Page
Menu
Enter (Confirm)
Display
B. Back
Serial Port for data communication (Under rubber cover).
Built-in Antenna
Zoom-Out
Zoom-In
Escape
Model No.
(At side)
Battery
Cartridge
II. ALL MODELS
A. GM-305-WT
With track recording, waypoints and routes functions, special designed for outdoors use
wherever in the open field, on the water or when exploring. You may preprogram your route,
input waypoint or set track recouding ON to void getting lost. You may also upload your track
logs to computer, e-mail it to your fellows for them to trace you or to share with you the
interesting places you have been.
B. GM-305-DT
In additional to GM-305-WT, there is a 2-MB built-in memory for map of cities, inter-city
roads or recreation area.
C. GM-305-HT
In additional to GM-305-WT, there is an 8-MB built-in memory for map downloading. You
may download any interesting places available in the map CD supplied by your local
distributor or HOLUX Web Site.
7
Page 8

III. OPTIONAL ACCESSORIES
A. Single Item
(i) Explorer Holder (A-30501)
When using the unit in a car, stick the holder on the dashboard with enclosed 3M
adhesive pad. you may have the unit held with the antenna facing up to the sky for better
signal receiving and reading.
(ii) Data Cable (A-30502)
To up load / down load map, data or to upgrade system.
(iii) Active Antenna
When using Explorer in a RV car, truck or bus, connect an extensional active
antenna to get better satellite signals. The windshields which are heavily tinted may
interfere with signal reception. An active antenna then becomes essential.
A-30503 w/2-M cable
A-30503 w/5-M cable
A-30503S w/0.5-M cable
(iv) Extension Antenna Holder (A-30503-00)
Hold the active antenna to have it face up to the sky.
(v) Extension Cable
For extending the reach of active antenna.
A-30504-01: 1 M cable
A-30504-02: 2 M cable
A-30504-05: 5 M cable
(vi) Hanging Strip Set (A-30505)
150 and 450 mm each
(vii) Carrying Bag (A-30506)
With ring for hanging at waist or on neck.
(viii) Antenna Supporting Rod
For supporting extensional antenna when biking or mountaineering.
A-30507-00: Universal connector for adjusting antenna facing up to the sky.
A-30507-01: 100 mm.
A-30507-02: 200 mm.
A-30507-05: 500 mm.
(ix) Clip Set (A-30508)
Use with A-30507 to grip something to support extensional antenna.
(x) Holding Strip (A-30509)
For holding Explorer on the frame of bike or motorcycle.
(xi) Holding Bracket (A-30510)
To hold Explorer standing on frame of bike or motorcycle.
8
Page 9

(xii) Antenna Bracket (A-30511)
For holding antenna rod on bike or motorcycle.
(xiii) Travelling Bag (A-30512)
To receive all accessories and main unit for travelling or storage.
(xiv) Antenna Rod Supporting Strip (A-30513)
For holding antenna rod to support A-30503 when mountaineering or hiking.
(xv) Optional Map
Mountaineering map, sea map, recreation area map or street map.
(xvi) Battery Charger (A-100B99)
The battery charger is certified and packed with 4 AA batteries of 1,300 mAh nickel-
metal hydride rechargeable.
A-100B99: 110V plug
A-100B99EU: 230V European plug
A-100B99AU: Australian plug
(xvii) Rechargeable Battery
A-100B13: 2 AA rechargeable batteries with 1,300 mAH nickel-metal hydride.
A-100B17: 2 AA rechargeable batteries with 1,700 mAH nickel-metal hydride.
B. ACCESSORY KIT (K-3051)
Special designed for mountaineering and biking. The kit includes:
(i) 1 x A-30503 Active antenna with 2-m cable.
(ii) 1 x A-30503-00 Active antenna holder.
(iii) 1 x A-30505 Hanging strip.
(iv) 1 x A-30506 Carrying bag.
(v) 1 x A-30507-00 Universal connector.
1 x A-30507-01 Antenna supporting rod.
3 x A-30507-02 Antenna supporting rod.
(vi) 1 x A-30508 Clip set.
(vii) 1 x A-30509 Holding strip.
(viii) 1 x A-30510 Holding bracket.
(ix) 1 x A-30511 Antenna bracket
(x) 1 x A-30512 Travelling bag.
(xi) 1 x A-30513 Antenna rod supporter.
IV. STANDARD PACKAGE
A. Single Package
(i) Main Unit (GM-305)
Please remove the plastic covering on the display to get a clear screen.
(ii) Manual
Packed with a quick reference card and warranty card.
9
Page 10
B. Full Package (GM-305-??) (?? for different language version)
Details please refer above Optional Accessories or single package.
(i) Main Unit (GM-305)
(ii) Manual
Packed with a quick reference card and warranty card.
(iii) A-30501 Holder
(v) A-30502 Data Cable
(vi) M-305-?? Map CD (?? varies in different countries)
Your country map CD. You may download any or some areas to the unit.
(vii) 4 AA NI-MH rechargeable batteries, 1300mAH (2 x A-100B13)
V. CAUTIONS
A. Cold Star
Please select Cold Start under the following situations:
(i) Initial use.
(ii) Moving more than 500 km without using in the way.
(iii) Unused for more than one month regardless of looking up map.
B. Antenna Position
Please keep in mind the following principles whenever you use the unit to receive satellite
signals.
(i) The GPS navigator relies on the satellite signals, which are not amplified or transmitted
by base stations on earth. Contrary to GSM on cellular phones, the signals is weak so
please use the Explorer outdoors with a clear view to the sky.
(ii) The built-in antenna should be parallel to the ground and face to the sky. The best angle
to the ground is 30º.as Fig. 2-4-1.
SMA Connector
C. Battery
(i) Use 4 AA alkaline or rechargeable batteries.
Fig. 2-4-1
10
Page 11

(ii) Use a certified charger to ensure batteries are full charged.
(iii) Remove batteries from the cartridge when not use more than 30 days.
VI. EXTENSION ANTENNA ASSEMBLE & DISASSEMBLE
A. Remove rubber cover at right top side as Fig.2-4-1.
B. Connect active antenna with SMA connector to the unit.
11
Page 12
Chapter 3 OPERATING DETAILS
The Explorer Handheld GPS is a miniature computer, composed of a CPU, memory
IC and operation system (OS), called
HOLUX
OS. It is designed to receive the satellite
signals once every 100 milli-second, i.e. 10 times per second, and to calculate all the
retrieved data in the CPU. In that case, there will be some delay after you press a
button. Also its processing speed is not as quick as a desktop computer for the sake
of low power consumption.
I. ON/OFF & BACKLIGHT
A. On
Press and hold “ “ for 2 seconds to turn on the unit as Fig. 3-1-1. It will switch to acquiring
satellites page and search satellite signals automatically in 3 seconds as Fig. 3-1-2. Once a
satellite is acquired, the signal bar will appear. If the satellite signal fixed, the bar will turn
black. The stronger the signal is, the longer the bar is. After more than 3 satellites are acquired
and fixed, your position is identified and the display goes to the map page as Fig. 3-1-3 for
GM-305-DT and GM-305-HT or a “ ” only in the map for GM-305-WT.
Model Name
Software Version
Back light
Satellite spread
status and its no.
Home Page
Backlight “ON” Backlight “OFF”
B. Off
Press and hold ” “ for 2 seconds.
C. Backlight
press ”
“ to turn on/off backlight as Fig. 3-1-4 when the unit is on.
Fig. 3-1-1
Fig. 3-1-4
Battery status
Map Version
& Map provider
5 satellites locked
2 satellites unlocked
Coordinate
Fig. 3-1-2
Fig. 3-1-3
Note: The following message will show up when Explorer can not get position identified for
10 minutes continuously: This message may show in any page.
12
Page 13
In fact, You do not need to operate Cold Start. But you must improve satellite-
acquiring environment unless incorrect satellite data stored in the system.
Poor GPS Signal
Select Cold Start
ˇ
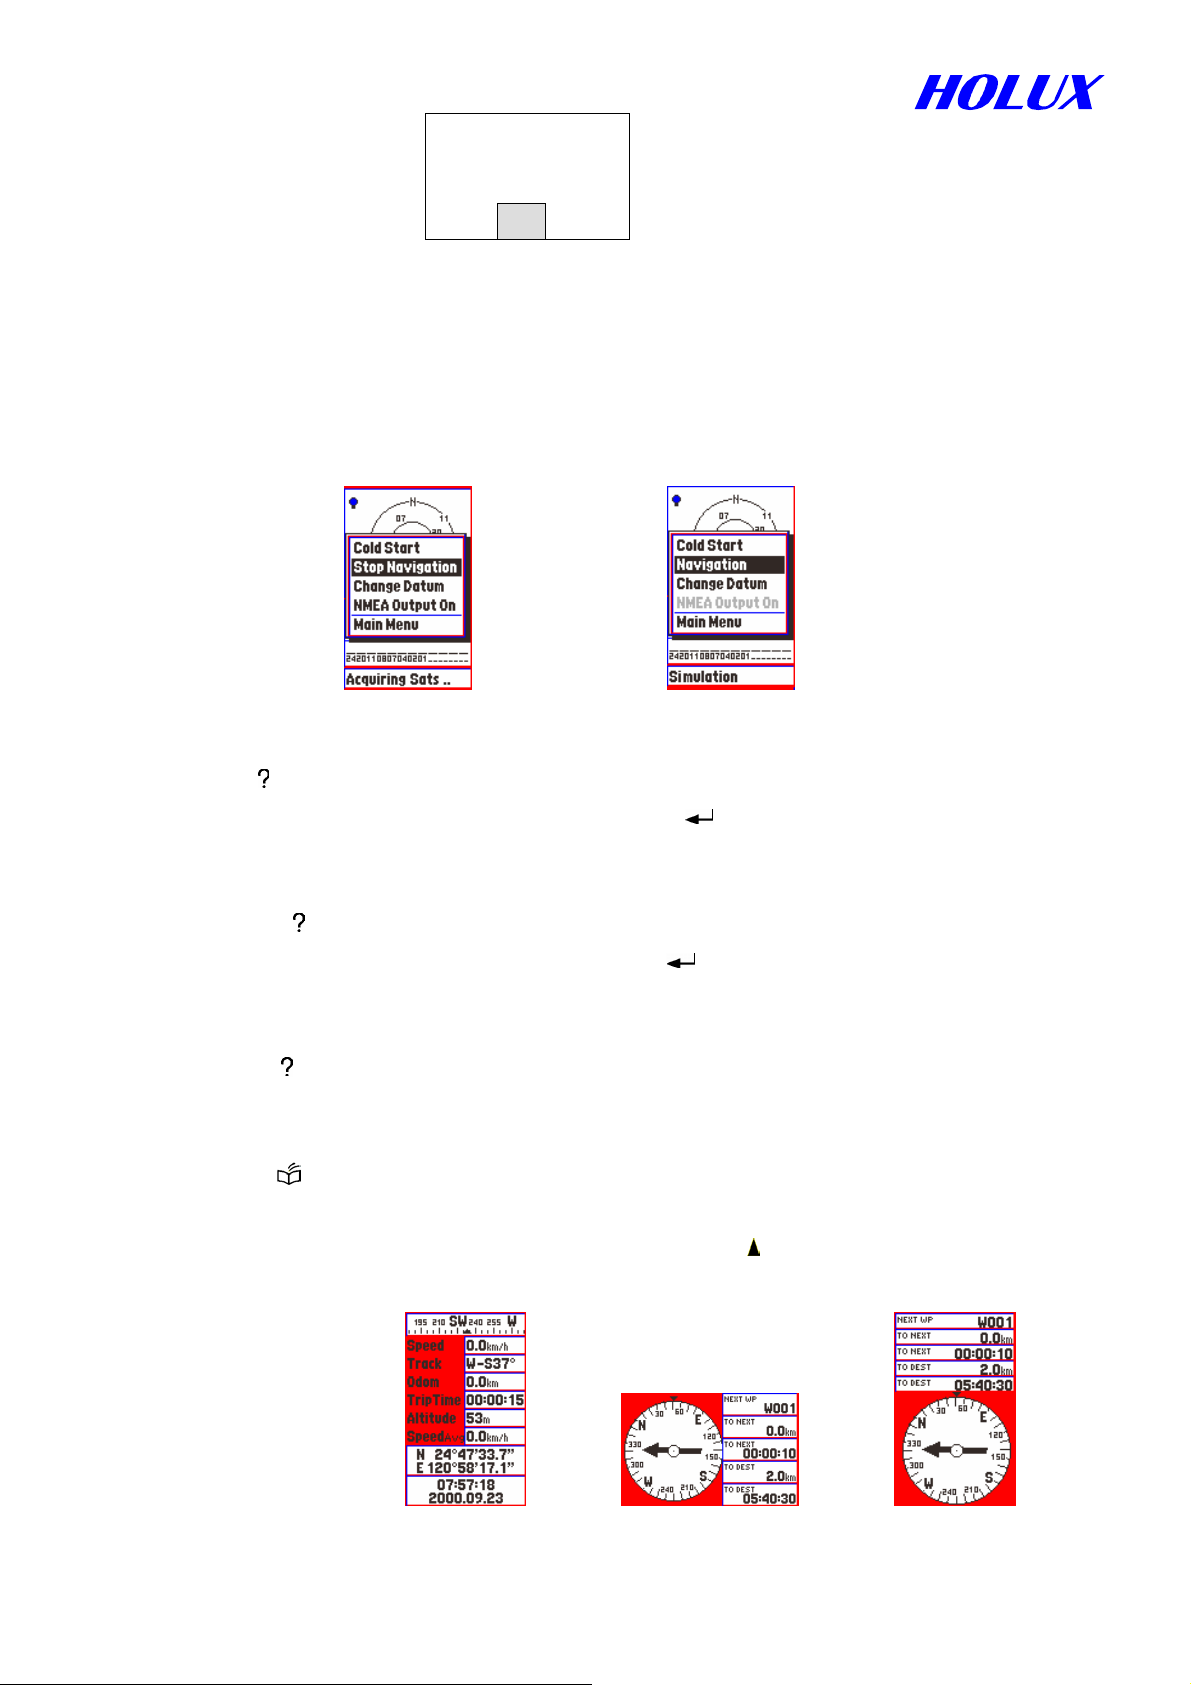
II. SIMULATION
This function is for looking up a map or setting up waypoints and routes regardless of acquiring
satellite signals. It may save power and respond quicker.
Fig 3-2-1 Fig 3-2-2
A. Press “ ”.
B. Select Stop Navigation as Fig. 3-2-1, and press ” ”.
C. Be sure to switch to Navigation when you use navigation on the way. Otherwise, you will
never get your position identified.
(i) Press “ ”
(ii) Select Navigation as Fig. 3-2-2, and press ” ”.
III. MAJOR NAVIGATION FUNCTION KEYS
A. MENU “ ”
It is the initial key to all kinds of functions. Details will be described in later chapters.
B. PAGE “
(i) Press to switch pages among satellite as Fig. 3-1-2, map as Fig. 3-1-3, status as Fig. 3-3-1
and compass as Fig. 3-3-3. There are a central mark “ ” and scale only in map page for
GM-305-CT.
”
Fig. 3-3-1 Fig. 3-3-2 Fig. 3-3-3
13
Page 14
(ii) Press and hold ”
” for 2 seconds to change screen orientation, horizontal or vertical
as Fig. 3-3-2 and Fig. 3-3-3.
(iii) Satellite Page
In this page, you may see battery level, backlight and what & how many satellites are
acquired. Once a satellite is acquired and fixed, the signal bar will turn dark. Moreover,
strength of satellite signal will be told by length of signal bar as Fig. 3-1-2. Press
direction key “
” or ” ” to enter and adjust the contrast of screen as Fig. 3-3-4, “ ” for
lighter and ” ” for darker, Press ” ” to confirm or “ ” to ignore.
Fig. 3-3-4 Fig. 3-3-5 Fig. 3-3-6
(iv) Map Page
(a) You may move map with direction keys, or ZOOM-IN / ZOOM-OUT the map.
(b) The cursor arrow is full when your position is identified, otherwise it will
be hollow.
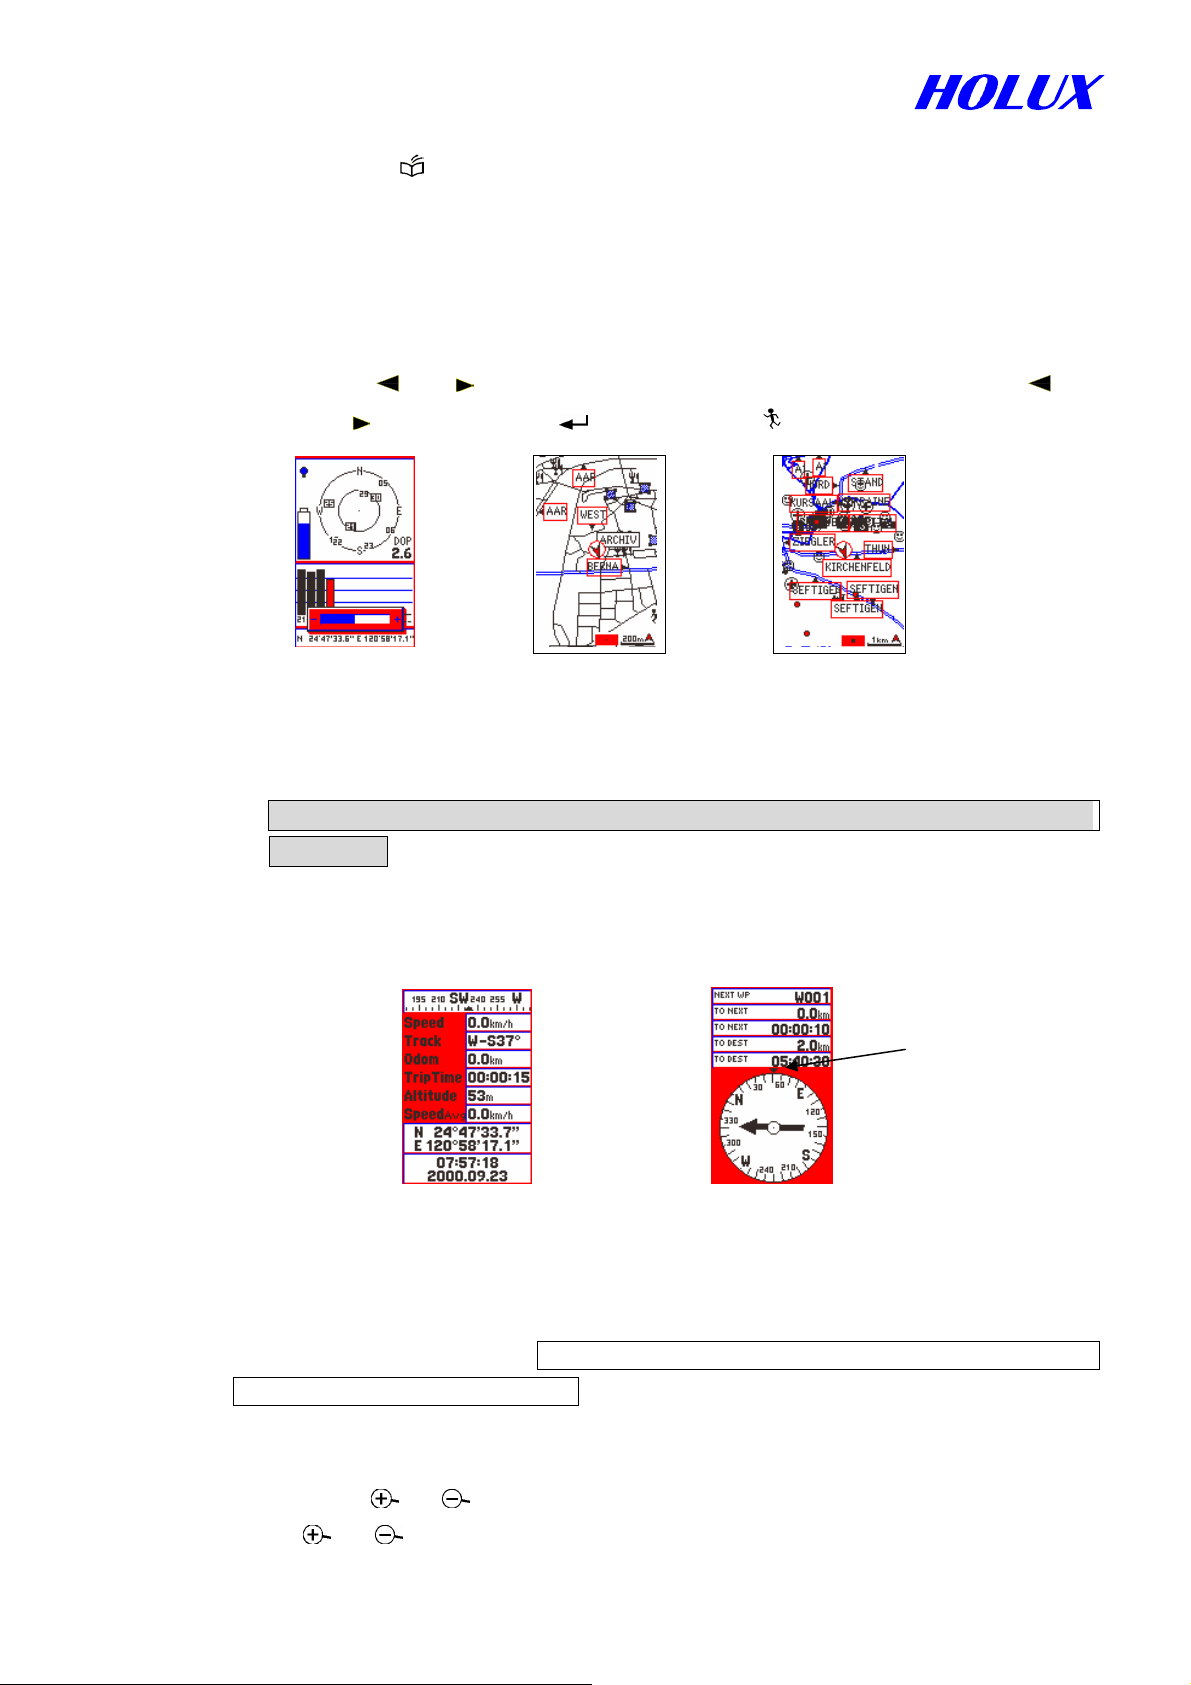
(v) Status Page
This page gives the following information: Speed, Track, Odom, Trip Time, Altitude,
Average Speed, Latitude, Longitude, Time and Date as Fig. 3-3-7.
Fig. 3-3-7 Fig. 3-3-8
(vi) Compass Page
You may see your moving direction, next waypoint, distance & time to next waypoint and
distance & time to destination. If you do not input route in the system, the arrow will not
Moving Direction
show and all value fields will be 0. The arrow in the compass points to the direction to
next waypoint and your proceeding direction as Fig. 3-3-8.
C. ZOOM IN/OUT “ ” \ “ ”
(i) Press “ ” \ “ ” to switch map scale from 100m, 200m, 500m, 1km, 2km, 5km, 10km,
14
Page 15
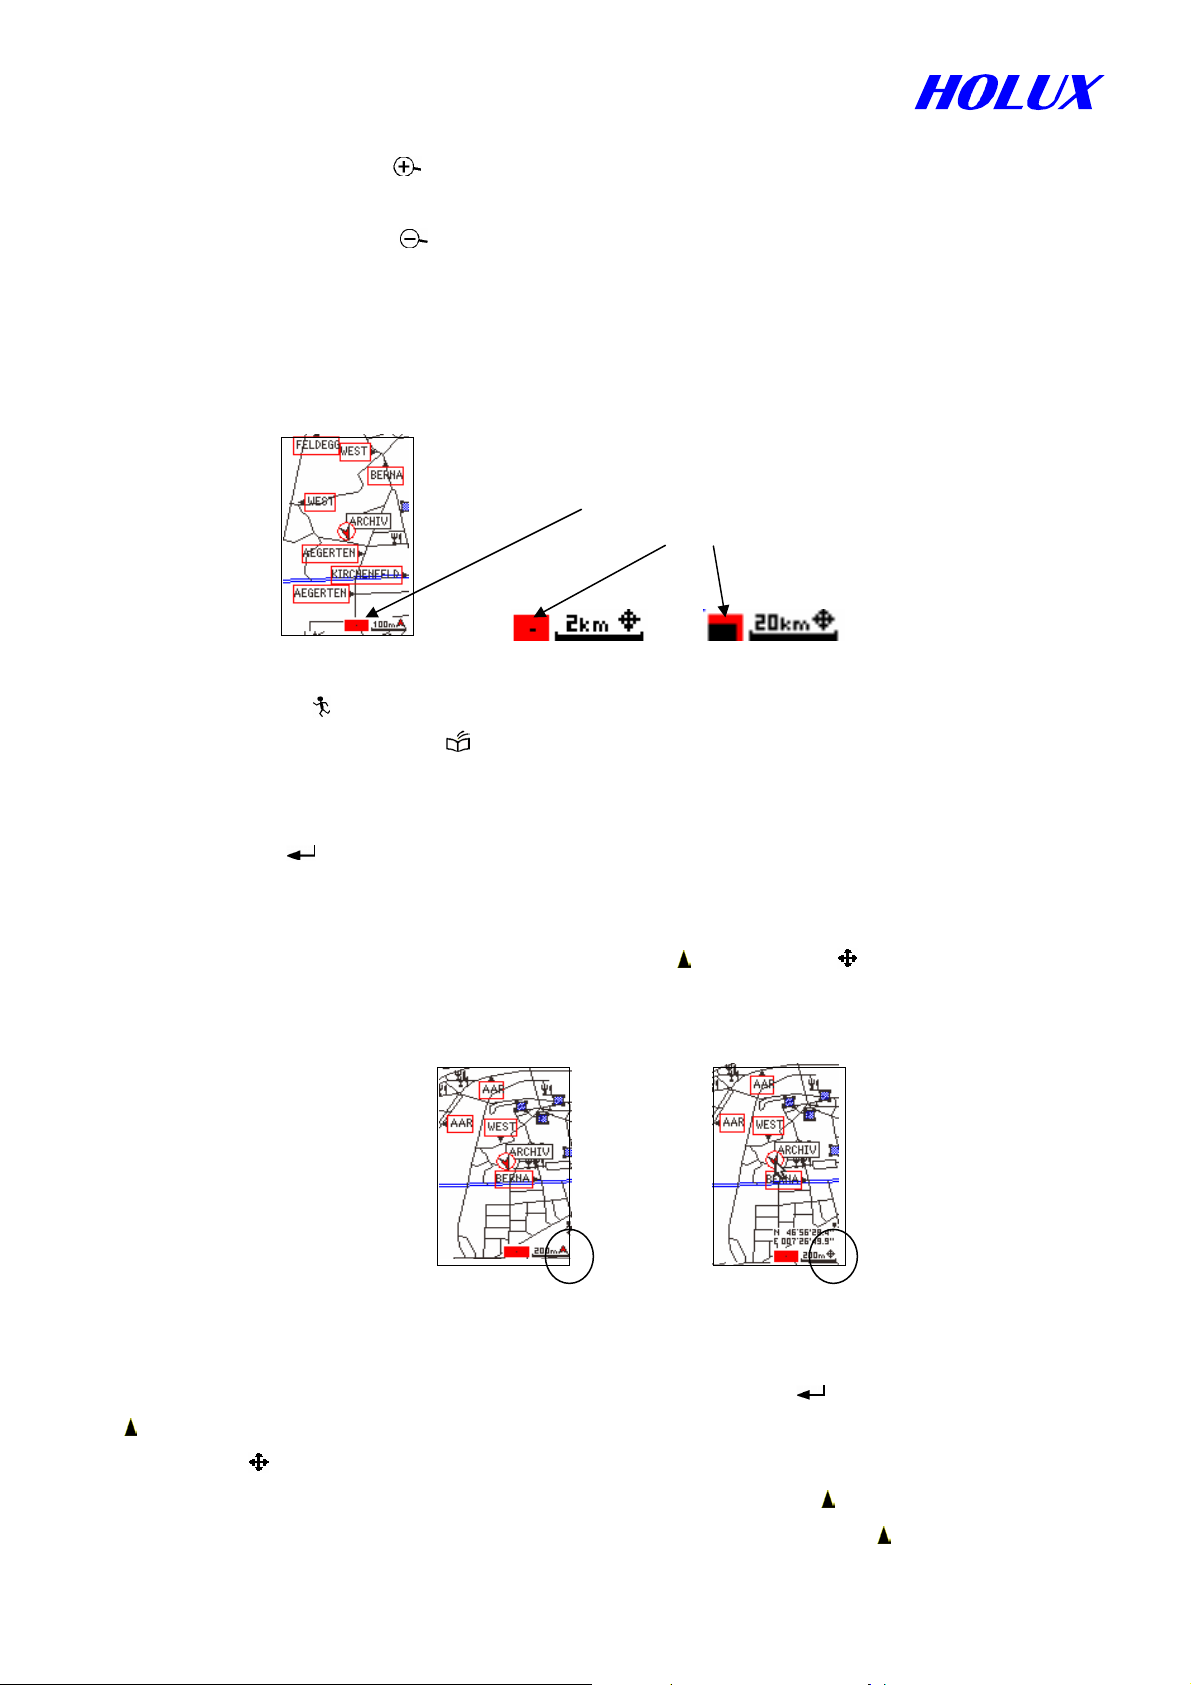
20km, 50km, 100km, 200km, 500km, 12 levels in total.
(ii) Press and hold “ ” for 2 seconds to display/clear scale, map mode and area size in right
down corner.
(iii)Press and hold “ ” for 2 seconds to display/clear roads to check routes or track logs.
(For GM-305-DT and GM-305-HT only)
(iv) When zooming in/out map, a black dot in the right down square changes size and related
position accordingly as Fig. 3-3-9. The dot denotes the map displayed in the screen and
the square denotes the whole map. (For GM-305-DT and GM-305-HT only)
Ratio & related position
of screen size to whole map
Fig. 3-3-9
D. ESCAPE “ ”
(i) The same function as “ ” in reverse order.
(ii) To ignore a selection in the menu.
E. ENTER ” ”
(i) Press and hold for 2 seconds to create a waypoint at the cursor position in map page.
Detail describes in page 23 Method 2.
(ii) To change operating mode, either navigation “ ” or view map“ ” in map page. The
symbol at right down corner shows in navigation mode as Fig. 3-3-10, and in view map
mode as Fig. 3-3-11.
Fig. 3-3-10 Fig. 3-3-11
F. Moving map
There are total 8 directions for direction function keys. Press “ ” to switch the symbols
“ ”
and “ ” at the right down corner.
(i) In view map mode, the screen shows a cursor ”Û”, an arrow “ ” and data about latitude
and longitude appearing in right down corner. If position is fixed, “ ” is your present
15
Page 16

position. Before position fixed, “ ” is your last position or the center position when
downloading map in last operation. The “ ” is fixed and can’t be moved.
(a) Click any direction key once to scroll map 1/2 page.
(b) Hold a direction key to move cursor ”Û”. When the cursor goes to the edge of screen,
the map still moves accordingly until you release the key.
(c) The cursor stops at any position. If you change to other pages, it will still be at the
same position as in last map page.
(ii) In navigation mode, there is only a symbol “ ” as Fig. 3-3-11.
(a) Hold a direction key for a second to make cursor “Û” appear as well as latitude and
longitude. You may move the map by doing the former action.
(b) Press “ ” to make the cursor “Û” disappear and return to navigation mode. You will
see “ ” shows in the center of map. If you got position identified, it is your real
position.
(iii) When moving the cursor to touch an interest spoint or road, its name will show.
16
Page 17

Chapter 4 FUNCTION DETAIL IN PAGES
I. SATELLITE PAGE
A. Adjust Contrast
(i) Press direction key “ ” or ” ” to adjust the contrast of screen as Fig. 3-3-4, “ ” for
lighter and ” ” for darker.
(ii) Press “ ” to confirm or “ ” to escape.
B. Cold Start
This function is to clear obsolete or incorrect satellite data stored in its memory. If you cannot
receive satellite signals to identify your position after turning on for a few minutes, you may
turn off and turn on again. The obsolete data and uneven distribution of satellites may cause
poor signal receiving. So when doing this action for two or three times but fail, and if you are
not under shade in the forest, close to a high building or at a side of a sharp mountain, i.e. you
do have a clear view to the sky, please select Cold Start and press “ ” to confirm. It may
help you got position identified quicker.
C. Simulation
Please refer to page 13 as Fig. 3-2-1 and Fig. 3-2-2.
D. Change Datum
Explorer provides 219 map datums. You may change it. Detailed datums please refer to
Appendix A. After turned on Explorer, the 1st highlighted datum in the “Select A
Datum” page is the current datum used in the unit.
(i) Press “ ”, select change datum as Fig. 4-1-1 and press “ ” as Fig. 4-1-2.
(ii) Press “
” to start searching a datum by alphabet sequence as Fig. 4-1-3.
Fig. 4-1-1 Fig. 4-1-2 Fig. 4-1-3
Note: If you turn on the unit, select Change Datum and move marked datum without
pressing “
select Change Datum, the hightlighted datum is not the one used in the system
because you did not change the datum in above actions.
”, when you switch to other page then switch back to satellite page and
17
Page 18

E. NMEA Output
The Explorer provides NMEA 0183 output to enable you to use this unit as an ordinary
GPS receiver for linking to a notebook PC or other devices for navigation or other
applications.
(i) Press “ ”
(ii) Select NMEA output On/Off and press “ ”
You may output all satellite positioning information through the serial port cable A-30502.
The default of output is:
(i) Update rate: once per second.
(ii) Baud rate: 4,800 bps.
Note: (a) When NMEA OUTPUT ON, the setting of Explorer changes as follows
automatically:
POWER SAVING OFF
UPLOAD and DOWNLOAD OFF
(b) When NMEA OUTPUT OFF, the setting of Explorer returns to that before
NMEA OUTPUT ON.
(c) When Explorer outputs the satellite information, the reaction speed of the
unit will slow down significantly.
(d) In simulation mode, the NMEA OUTPUT ON is grayed.
F. Main Menu
Please refer to page 23 as Fig. 5-1-1.
II. MAP PAGE
---- For GM-305-DT & GM-305-HT ----
Press “
Search Object, Screen Search, Show MapInfo, Shortcut On/Off, Display, High/Low
Speed, Show Dist On/Off, North/Track up and Main Menu as Fig. 4-2-1.
”, options are as follows:
Fig. 4-2-1
Fig. 4-2-2 Fig. 4-2-3 Fig. 4-2-4 Fig. 4-2-5
A. Search Object (For GM-305-DT & GM-305-HT)
18
Page 19

(i) Select Search Object, and press “ ”.
(ii) Move marked field to select a region as Fig. 4-2-2 and press “
”.
(iii) Move marked field to select a type, e.g. City, as Fig. 4-2-3 and press “ ” as Fig.
4-2-4.
(iv) Press “ ” to move marked field to top level to start searching a City name by alphabet
sequence as Fig. 4-2-4. Press “ ” or “ “ to change character, press “ ” or ” ” to change
column. You may select up to 4 columns. When you change the alphabet, the City in the
screen will change accordingly.
(v) Press “ ” to move marked field back to lower level to select a City.
(vi) Press “ ” to show detailed City information. There are district, city, country,
direction/distance from current position and phone number (for an interesting point only)
shown in the screen as Fig. 4-2-5.
(vii) Move marked field to “ˇ”, press “ ” to show selected City in the map or press
“ ” to ignore and press “ ” again and again to former map page.
Note: To search a waypoint, you may go into a region and press “ ”. Then move marked
field to Waypoint.
---- For GM-305-WT ----
Press “ ”, options are as follows:
Search Object, Shortcut On/Off, High/Low Speed, Show Dist On/Off, North/Track
up and Main Menu as Fig. 4-2-1A.
Fig. 4-2-1A Fig. 4-2-2A Fig. 4-2-3A
Fig. 4-2-4A
A-1. Search Object (For GM-305-W)
(i) Select Search Object, as Fig. 4-2-1A and press “ ” as Fig. 4-2-2A.
(ii) Move marked field to select Waypoint or Route and press “ ” as Fig. 4-2-3A or 4-2-4A.
B. Screen Search (For GM-305-DT and GM-305-HT only)
(i) Select Screen Search and press “
” to show all roads and interest points in the
current map page.
(ii) Move marked field to select an item, e.g. a road and press “
”. The selected object
will show in the map.
(iii) When moving marked field, you may press “ ” or “ “ once to next item or press and
19
Page 20

hold to roll the page.
C. Show Map Information (For GM-305-DT and GM-305-HT only)
(i) Move cursor to tough a road or an interesting point, then press “ ”.
(ii) Move marked field to Show MapInfo, press “ ” to show map information.
(iii) When cursor is not touching a road or an interesting point, the Show MapInfo will be
not active (grayed).
D. Shortest Way
From present position to the selected object directly
is the shortcut as Fig. 4-2-6.
(i) Select an object by Search Object or Screen
Search function.
(ii) Select Shortcut On and press “
”. There will
be a line between the two positions. When you
move, your end of the line will move in accordingly.
(iii)Press “
” to return to “ ” navigation mode and get
Fig.4-2-6
your real position from view map mode.
(iv) Select Shortcut Off and press “ ” to withdraw the short cut line.
E. Display (For GM-305-CT and GM-305-DT only)
Fig. 4-2-7 Fig. 4-2-8 Fig. 4-2-9 Fig. 4-2-10 Fig. 4-2-11
(i) Select Display and press “
” as Fig. 4-2-7. Follow Step (a) to show/hide individual
icons. You may also follow Step (b) to show/hide all icons.
(a) Move the cursor to icon you need and press “
”. You may select more than one
icon. To erase a selected icon, just move the cursor to the icon to be erased and
press “ ”.
(b) Press “ ” and press “ ” to show/hide all icons.
(ii) Move the cursor to “ˇ” and press “
” to return to the map page.
When setting, you may follow steps below for more information and further options:
(i) Move the cursor to Ð and press “
” to check icons as Fig. 4-2-8. Press ” ” to
confirm
20
Page 21

selection and return to the map Page or press ” ” to ignore and return to the former page.
(ii) Move the cursor to ? and press “ ” to check out the meaning of every icon as Fig.
4-2-9, 4-2-10 and 4-2-11. Switch pages by selecting Ð and Ï and press ” ”. You may
press ” ” to ignore and return to the former page.
F. Cursor Speed (For GM-305-DT and GM-305-H only)
Select Low/High Speed and press “
” to select suitable cursor speed.
G. Distance Measuring
(i) Select Show Dist On and press ”
”.
(ii) Move the cursor to the beginning point and
press “ ”.
(iii) Move the cursor to the second point and press
“ ”. The distance will be marked in the middle
of the line between the two points as Fig.4-2-12.
You may repeat to measure the distance to the
Fig. 4-2-12
next point and up to 5 spans can be shown.
(iv) Press “ ”, select Show Dist Off and press “ ” to end distance measuring and erase all
the marks.
P.S. (i) You may measure distance in view map mode or navigation mode respectively.
(ii) When you switch to other pages, all distance measurement and marks will be erased
automatically. And the system will change to show distance Off as well.
H. Map Orientation
Select North / Track up and press “
” to define map orientation.
(i) North up: To display the map by North fixed at top of the screen.
(ii) Track up: To rotate the map automatically to keep your orientation at top of the screen.
There will be a “North” indicator at the right top corner in this mode. The black side of
the indicator pointing to north.
H. Main Menu
Please refer to page 23 as Fig. 5-1-1.
III. STATUS PAGE
In this page, your moving Direction, Speed, Distance, Averaged Speed and Trip Time will be told
as well as the data about Altitude, Latitude, Longitude, Time and Date in your current position as
Fig. 4-3-1. Press “
” to get Change Time and Main Menu for options as Fig. 4-3-2.
21
Page 22

A. Time Adjustment
(i) Prior to changing the time, make sure of the actual difference between the time stored in
the Explorer and your local time. You only need to change the hours. The date and
minutes can’t be changed.
(ii) Select Change Time and press “
(iii) Move the marked field to Minus/Plus and press “
(iv) Move the marked field to Hour and press “ ”.
(v) Press direction keys, “ ” or ” ” to mark one of the two figures.
(vi) Press direction keys, “ ” or “ “ to adjust time and press “ ”.
(vii) Move marked field to “ˇ” and press “ ”.
(viii) Let the Explorer position fixed to get correct time. If the Explorer is position
fixed within one month, the Explorer should already show the correct time.
B. Main Menu
Fig.4-3-2 Fig.4-3-3 Fig.4-3-1
Fig.4-3-4
” as Fig. 4-3-3.
” as Fig.4-3-4, 4-3-5.
Please refer to page 23 as Fig. 5-1-1.
IV. COMPASS PAGE
Your moving direction is displayed in this page as well as the name, distance and time to
next waypoint and destination respectively as Fig. 3-3-8 in gage 14.
Time to destination = (distance) / (average speed)
The moving direction is as “ “ pointing at the top outside the compass. There will be an
arrow ”Д in the compass pointing to the direction to next waypoint while route navigation
function on. Please refer to page 25 to create routes.
Press “ ” to go to Main Menu. Please refer to page 22 as Fig. 5-1-1.
22
Page 23

Chapter 5 SYSTEM MENU
Press “ ” in any page to select Main Menu as Fig.5-1-1 (for GM-305-DT, GM-305-HT only) and
press “ ”. There are Waypoints, Routes, Track Logs, Pw Savings On/Off and UpLoad
and DownpLoad for options as Fig. 5-1-2.
I. WAYPOINTS
Explorer can hold up to 500 waypoints.
Fig. 5-1-1 Fig. 5-1-2 Fig. 5-1-3
Select Waypoints and press ” ”. You may see name, distance, waypoints and a set of figures,
2/2/500 at the bottom as Fig.5-1-3. The first digit is the number of waypoints meeting the disply
criteria. The second one is the sum of waypoints which you have created in the unit. The last one
is the maximum of waypoints which may be used in the system.
A. Criteria
The name and distance are the criteria to show waypoints in the column. To change the
criteria do as follows:
(i) Name
(a) Move the marked field to Name and press “
or symbols. The data of waypoints in the column will change accordingly. “-“ means
ignoring all criteria and all waypoints will show.
e.g. --------: shows all waypoints,
W ----: shows the waypoints with W initial, and
---s----: shows the waypoints with s in the fourth column and ignoring
other columns.
” to enter up to 8 characters, numbers
(b) Press direction keys “
“ ” setup is complete.
(ii) Distance
(a) Move the marked field to Distance and press “
mark followed by any digit within 9,999,999m. The data in the column will change
accordingly.
” or “ “ to change data, “ ” or ” ” to change column. Press
” to enter a larger “>”/smaller ‘<”
23
Page 24

(b) Press direction keys “ ” and “ “ to change data, “ ” or ” ” to change column.
(c) Press “ ” when set up complete.
The functions of direction keys:
“ ” : Select alphabet, number or symbol. The order is …D, C, B, A, …..
“ ": Select alphabet, number or symbol. The order is ….A, B, C……
“ ” and ” ”: change column.
The order for all alphabets, numbers and symbols are ”A B C…a b c…. 0 1
2 …..9 . : ; ! ? + - = * / # “( )”. There are 52 alphabets, 10 numbers and 14
symbols.
B. Create New Waypoints
Press “
” to get New, Edit, Delete and Delete All displayed as Fig. 5-1-4.
Fig. 5-1-4
Fig. 5-1-5
(GM-305-DT/HT)
Fig. 5-1-5A
(GM-305-W)
Display On/Off switch
Fig. 5-1-6
Method 1:
Select New and press ”
” to turn the page as Fig. 5-1-5 for GM-305-DT & GM-305-HT,
as
Fig. 5-1-5A for GM-305-WT. You may get a default waypoint name starting from W001. All
the active fields are changeable by demand.
(i) Name: Move the marked field to Name and press ”
” to edit.
(ii) Comment: Move the marked field to Comment and press “ ” to edit.
(iii) Coordinate, Date: Repeat the actions above to edit latitudes (N/S), longitude (E/W),
time and date.
(iv) Waypoint (for GM-305-WT only): Repeat the actions above to select the mark you
need. There are 28 different type of marks for your options as fig. 4-2-9, 4-2-10 and
4-2-11 in page 19.
(v) Show: You may move the marked field to Active and press ” ” to have the waypoint
shown (or not) in the map as Fig. 5-1-6.
(vi) OK: Move the marked field to ; and press ” ” to complete your new entry.
(vii) Press ”
” to go back to former page.
Method 2:
24
Page 25

(i) Move the cursor “Û” to the objective in map page.
(ii) Press and hold ” ” for one second to turn the page as Fig. 5-1-5.
(iii) Follow the steps as Method 1.
(iv) The time and date is your present one.
Note: If you have not changed the coordinate, the waypoint you created is:
(a) Method 1: At present address at “ ”.
(b) Method 2: At the cursor “Û” in the map. If there is no cursor in the map, it is at “ ”.
C. Edit Waypoints
(i) Go back to previous page or go to Waypoints from main menu
(ii) Move the marked field to the list of waypoints and press ”
as Fig. 5-1-3.
”.
(iii) Select the waypoint to be edited, press ” ”.
(iv) Press “
”, select Edit and press “ ” as Fig. 5-1-5.
(v) Go step by step as creating a new waypoint.
D. Delete Waypoints
(i) Go back to previous page or go to Waypoints from main menu as Fig. 5-1-3.
(ii) Move the marked field to the list of waypoints and press ”
”.
(iii) Select the waypoint to be deleted, press ” ”.
(iv) Press “ ”, Select Delete and press ” ”.
(v) Press ” ” to go back to former page.
E. Delete All
(i) Go back to previous page or go to Waypoints from main menu as Fig. 5-1-3.
(ii) Press “
”, select Delete All and press “ ”. All waypoints not edited into a route will
be
deleted.
Note! (a) The waypoint is undeletable once it is edited into a route.
(b) Once a Waypoint is edited into a route, “*” will show at right side of the name of
the waypoint.
(c) The name of deleted waypoint will not appear again in the system unless you edit
a new one and name it again.
(d) When complete, you must turn off Explorer. Then all waypoints you created
will be saved in the system.
25
Page 26

II. ROUTES
The Explorer can hold 20 routes, 30 waypoints each.
1: Number of Routes set in the
system.
20: Maximum Routes
*
:The route is set for navigation
Fig. 5-2-1 Fig. 5-2-2
2: Number of waypoints set in R001.
30: Maximum waypoints for each
available in the
A. Route Page
(i) Select Routes from Main Menu and press “ ” as Fig. 5-2-1. The created routes are
displayed in routes column. The definitions of figures outside the routes and waypoints
columns are explained as Fig.5-2-1.
(ii) Press “ ” to move into further options as Fig.5-2-2, New, Edit, Delete, Delete All,
Set Navi and Cancel Navi. Only New is active when you have not built any route yet.
B. Create New Routes
(i) Select New and press “ ” as Fig.5-2-3.
(ii) The default in the system begins with R001. Press direction keys to rename. Please refer
to the section WAYPOINTS in page 22/23.
Fig. 5-2-3 Fig. 5-2-4 Fig. 5-2-5
(iii) Press “ ”, options as follows:
Append WP, Insert WP, Delete WP, Delete All and Invert WP as Fig. 5-2-4.
(a) Append Waypoints
Add a new waypoint in a route.
(1) Select Append WP and press “
” as Fig.5-2-5. You may set the criteria of
waypoints to minimize the quantity of the waypoints to be selected. Please refer
to Criteria of Waypoints in page 22.
26
Page 27

(2) Move the marked field to the list of waypoints and press “ ”.
(3) Select a waypoint and press “ ”.
(4) Move marked field to “ˇ” and press “ ”. The waypoint is now selected into
the
route.
(5) To append second waypoint, just press “ ” and duplicate the above steps (1) – (4).
(6) Move marked field to “ˇ” and press “ ” to complete creating a new route..
(7) Press ” ” to go back to former page.
Note! In Waypoint, the name and distance field defines the displaying column. Please
refer to P. 22 Waypoint A. Criteria step by step.
e.g. --------: means to display all waypoints;
w------: means display the entire ‘w’ initial waypoints.
---s---: shows the waypoints with s in the fourth column and
ignoring other columns.
(b) Insert Waypoints
Insert a waypoint before an existing waypoint.
(1) Move the marked field to the waypoint column in Fig. 5-2-3 and press “ ”.
(2) Select a waypoint, press “ ”.
(3) Press “ ”, select Insert WP and press “ ”.
(4) Move the marked field to the list of waypoints and press “ ”.
(5) Select a waypoint and press “ ”.
(6) Move marked field to “ˇ” and press “ ”. The waypoint is now selected into
the
route.
(7) To insert 2nd waypoint before the one you just inserted, follow steps (3) – (6)
again.
(8) To insert a new waypoint before another waypoint, follow steps (1) - (6) again.
(9) Press
” ” when complete.
(c) Delete Waypoints
Delete a waypoint from a route
(1) Move the marked field to the waypoint column in Fig. 5-2-3 and press “
”.
(2) Select the waypoint to be deleted, press “ ”.
(3) Press “ ”, select Delete WP and press “ ”.
(4) Move marked field to “ˇ” and press “ ” to complete the deletion.
(5) Press
” ” when complete.
C. Edit Routes
(i) Go back to the page as Fig. 5-2-1 or select from Main Menu.
(ii) Select the route to be edited and press “
” as Fig. 5-2-3.
27
Page 28

(iii) Please refer to Waypoints in page 22 for editing.
(iv) When complete, move marked field to“ˇ” and press “
” to return to previous page.
Then press ” ” to return to former page.
D. Delete a Route
(i) Go to the page as Fig. 5-2-1 or select from Main MENU.
(ii) Select the route to be deleted.
(iii) Press “ ”.
(iv) Select Delete and press “ ” to erase the route.
(v) Press ” ” when complete.
Note! (a) The route can not be deleted if a navigation route existing. Be sure to cancel
navigation before deleting.
(b) The name of deleted waypoint and route will not appear again in the system unless
you edit it and name it again.
E. Delete All Routes
The same as above, select Delete All.
F. Set Navigation
(i) Go to the page as Fig. 5-2-1 or select from Main MENU.
(ii) Select the route to be navigated.
(iii) Press “ ”, Select Set Navi and press “ ”. A mark of “*” will show at right side of
the route.
(iv) Press “ ” to return to the former page. The selected route will link all waypoints created
and show in the map screen.
G. Cancel Navigation
(i) Go to the page as Fig. 5-2-1 or select from Main MENU.
(ii) Press “
”, Select Cancel Navi and press “ ”.
III. TRACK LOGS
Explorer can hold up to 6 tracks, 5 in back up and 1 in use.
Select Track Logs from Main Menu and press “ ” to the page as follows:
Off: Stop recording track logs
Fill: Recording Track log until
memory full (up to 2,500 points)
Wrap:Endlessly recordingTrack log.
2: total track logs saved.
5: total track logs back up
Memory space occupied
(by current recording track)
ON: Display Track
logs in Map.
Off: No display in map.
28
available in the system.
Fig. 5-3-1
Page 29

A. Start to Track
Fig. 5-3-2 Fig. 5-3-3 Fig. 5-3-4
(i) Move marked field to Off/Fill/Wrap, press “
”
(ii) Select Fill or Wrap and press “ ”.
(iii) Press “
”, select Recording Mode as Fig. 5-3-2 and press “ ” as Fig. 5-3-3 to set
your recording mode. There are two parameters-- time and distance. You may set either
one or both as recording criteria.
(a) Distance
Move the marked field to Dist Interval and press “ ”. Interval options include 20,
50, 100, 200, 500m, 1, 2 and 5km. You may select one or leave the field “-----“ to
ignore the parameter and press “ ”.
(b) Time
Move the marked field to Time Interval and press “ ”. Interval options includes
1, 2, 5, 10, 20, 30 seconds, 1, 2, 5 and 10 minutes. You may also select one or leave
the field “-----“ to ignore the parameter and press “ ”.
(iv) Move the marked field to “ˇ” as Fig. 5-3-3 and press “ ”.
(v) Move the marked field to “ˇ” as Fig. 5-3-1 and press “ ”.
(vi) As soon as the Explorer identifies your position, it starts recording track logs. It sets
a track log when meeting either parameter. There will be a dotted line between two track
logs if they are far from each other.
(vii) 2,500 track logs are maximum for each tracking log. But the dots in the dotted line
mentioned above (vi) are not included in the 2,500 track logs.
Important: If you set recording mode FILL, when the
Explorer records up to 2,500 points, the
screen will show:
Tracking Full
Save or Clear
29
Page 30

OK
You are recommended to take following actions:
(a) Press “ ” or “ ” to clear the message.
(b) Follow the steps in next paragraph to save or clear current track log. Otherwise, the
message will show again once you turn on the Explorer.
B. Further Operation on Tracking
As Fig. 5-3-1 Press “
”. Options are Clear Tracking, Save Tracking, Delete, Show
Off/On, Edit and Recording Mode.
(i) Clear Tracking
This function erases current track logs in use.
(a) Select Clear Tracking and press “ ”.
(b) Move the marked field to “ˇ” as Fig. 5-3-1 and press “
” to return to former page.
(ii) Save Tracking Log
(a) Select Save Tracking and press “ ” to save tracking log in use in real Time. The
name of track log is changeable on demand.
(b) Move the marked field to “ˇ” as Fig. 5-3-1 and press “ ” to return to former page.
Note: When you save the 6th track log while other 5 track logs already saved in the
system, the following message will show up:
Track Full
Delete a track
ˇ
(iii) Delete
Return to the page as Fig. 5-3-1 to do as follows:
(a) Move the marked field to saved track logs and press “ ”.
(b) Select the tracking log to be deleted and press “ ”.
(c) Press “
(d) Move marked field to “ˇ” and press “
”, select Delete and press “ ” to complete the deletion.
” or press “ ” to return to former page.
Note: To execute deletion, it doesn’t matter if the tracking log is Show ON or OFF.
(iv) Show On/Off
This function is for display/hide the tracking log. Return to the page as Fig. 5-3-1 to do as
follows:
(a) Move the marked field to saved track logs and press “ ”.
(b) Select the tracking log to be displayed and press “ ”.
30
Page 31

(c) Press “ ”.
(d) Select Show On/Off and press “
(e) Move the marked field to “ˇ” and press “
Note: you may pick up more than one tracking logs to display at the same time.
(v) Edit
Return to the page as Fig. 5-3-1 to do as follows:
(a) Move the marked field to saved track logs and press “ ”.
(b) Select the tracking log to be edited and press “ ”.
(c) Press “ ”.
(d) Select Edit and press “
tracking log as Fig. 5-3-4.
(e) Please follow the instructions as editing waypoints in P.23.
(f) Move the marked field to “ˇ” and press “
(vi) Recording Mode
Set your parameters to record track logs. Return to the page as Fig. 5-3-1 to do as follows:
”. You may see the name and number of the points of this
” to display/hide..
” or press “ ” to return to former page.
”.
(a) Press “ ”, select Recording Mode and press “ ”.
(b) Operation details are the same as Start to track in page 26.
IV. Power Saving Mode
A. Power Saving ON
Select Pw Saving Mode and press “ ”. If the Explorer receives satellite
signals
well, it works in power saving mode automatically. Otherwise it may turn this function
off to
get better acquisition to satellites. When receiving condition improved, it will return to
power
saving mode again.
B. Power Saving OFF
Select Pw Saving Off and press “ ” to have Explorer work in continuous
mode to
have better satellite acquisition when outsourcing power.
V. UPLOAD
This function is for saving all waypoints & routes and Track Logs from
Explorer into a
PC for later use. You may share these data with your friends via email.
31
Page 32

A. Before Operation
Connect Explorer and PC’s serial port with data cable, A-30502.
Note! Be sure to check the power supply sufficiently to complete the uploading
B. Operation in Explorer
Fig. 5-5-1 Fig. 5-5-2 Fig. 5-5-3 Fig. 5-5-4
(i) Select Upload from Main Menu as Fig. 5-5-1 and press “
(ii) Press “
” as Fig. 5-5-3, select Waypoint & Route or Track Log and press “ ”.
” as Fig. 5-5-2.
(iii) If there is no data in Waypoint & Route (Track Logs), Empty Wpt&Route (or
Empty Track Logs) will show as Fig. 5-5-4. If there are some data in waypoints &
Routes (or Track Logs), Waiting for Output will then show in the screen.
C. Operation in PC
(i) Execute MapEZ305.exe file.
(ii) Click Port and select COM1 or COM2 which you connected.
(iii) Click File and select Upload Save As. The screen will come up Save As.
(iv) Select file branch to save. Name the file (*.wpt for Waypoint&Route or *.tkl for Track
Log) to be saved, e.g. Zoo.wpt (or Zoom.tkl). Saving cannot be executed without a file
name.
(v) Click Save, the screen will show
Upload Waypoint &
Route
File is C:\…..\??.wpt
OK
(or Upload Track Log)
File is C:\…..\??.trk
(vi) Click OK, the screen will show
Waiting for upload start….
(vii) Click Transfer, select Upload and click. The screen shows
File Length: ?????? bytes
Start to receive data from
Explorer
32
Page 33

(viii) When complete, the screen shows
File Length: ?????? bytes
File Uploaded Successfully!
(ix) Press “ ” to load another or Press “ ” to return.
Note: Be sure to select file type (*.tki) When up load Track log.
V. Downloading
This function is for downloading Map, Waypoint&Route, Track Logs and Font from PC to
Explorer.
A. Before Operation
Connect Explorer and PC’s serial port with data cable, A-30502.
Note! Be sure to check the power supply sufficiently to complete the uploading
B. Operating in Explorer
(i) Select Down Load as Fig. 5-5-5 from Main Menu and press “ ” to go to the page as
Fig. 5-5-6.
(ii) Press “ ” to select an item to be downloaded as Fig. 5-5-7 and press “ ”
(iii) “Waiting for Input” will show up as Fig. 5-5-8.
Fig. 5-5-5 Fig. 5-5-6 Fig. 5-5-7 Fig. 5-5-8
C. Operation in PC **
(i) Execute MapEZ305.exe.
(ii) Click Port and select COM1 or COM2 which you connected.
(iii) Click File and select Download Open. “Open Field” will show up in the screen.
(iv) Select File Name and File Type, Map file (*.crd), Waypoint&Route file (*.wpt),
Track Log file (*.tkl) and Font file (*.fnt).
(v) After Opening file, the screen displays as
33
Page 34

File Length: ??????
When downloading map file to GM-305-DT \ GM-305-HT, the map size must be
smaller than the memory size built-in the unit. If the map size is too big, the screen will
show:
Map size too big, Over xxxx bytes
the overage to the built-in memory size
(vi) Click Transfer and Download. The screen shows:
File Length: ??????? bytes
Transferring data to Explorer
??% completed
(vii) When complete, it will say:
File Downloaded Successfully!
(viii) Press “ ” to load another or Press “ ” to return.
IMPORTANT!!!
You may merge several maps and download them into Explorer memory.
(i) Execute MapEZ305.exe.
(ii) Click File and select Merge. Open Field will show up in the screen.
(iii) Click the first map file (*.crd), then Hold ctrl and click 2
“OK”.
(iv) Select a destination and a map name to store the merged file. The screen shows:
Merge Processing
Cancel
Note: The merging can be terminated at any time by pressing Cancel icon.
(v) When complete, the screen shows map size. Click Transfer and Download. The rest
steps are the same as downloading single map file.
CAUTIONS! If the data is not 100% transferred, you need to download again.
nd
, 3rd…map file, then click
34
Page 35

VII. Operation System (HOLUX O.S.) Upgrading
This function is for upgrading your Explorer O.S.. You may get the newest version
of
Explorer O.S. from our web site or your local distributor free of charge within 1 year
from
the date of purchase.
A. Before Operation
Connect Explorer and PC’s serial port with data cable, A-30502.
Note! Be sure to check the power supply sufficiently to complete the uploading
B. Operation in Explorer **
(i) Turn off the unit.
(ii) Press and hold both “ ” and “ ” for 2 seconds to come up the page as follows:
EZ-Way Boot-Loader
Ver 3.00I
Load Program
QUIT Boot Loader
(It might be different from yours.)
(iii) If you intend to quit, select Quit and press “ ” to turn off the unit.
(iv) Select Load program and press “
”, the screen shows
EZ-Way Boot-Loader
Ver 3.00I
waiting for command….
(v) If you intend to quit while waiting for command shows, you have to remove batteries
and resume power after 5 seconds.
C. Operation in PC **
(i) Execute MapEZ305.exe.
(ii) Click Port and select COM1 or COM2 which you connected.
(iii) Click File and select Download Open. Open Field will show up in the screen.
(iv) Click the file to be downloaded, e.g. V103EID.bin.
Definition of V103EID
V103: Version 1.03.
C: Language
C for Chinese
35
Page 36

(iv) Click Transfer and Download. The screen will show
File Length: ?????bytes
Transferring data to Explorer
??% complete
(v) When complete, it will say:
File Download Successfully!
(vi) will turn off automatically.
Note: It is vital that the cable will not become disconnected during download.
36
Page 37

Chapter 6 SPECIFICATION
I. MAP
A. Display Scale:
(i) Screen width: 400m ~ 3,000km.
(ii) Map layer: 12 levels for zooming in/out.
B. Map Memory:
(i) GM-305-WT: 0 Byte.
(ii) GM-305-DT: 2M Byte.
(iii) GM-305-HT: 8M Byte.
II. NAVIGATION
A. Waypoints: 500 maximum, including name, symbol, comment and display.
B. Routes: 20 maximum, up to 30 waypoints each.
C. Track logs: 6 maximum -- 5 in back up and 1 in use. Up to 2,500 points each.
III. FUNCTION
A. Receiving and tracking 12 satellites.
B. Acquiring Time:
(i) Cold start: 75 seconds averaged.
(ii) Warm start: 40 seconds averaged.
(iii) Hot start: 15 seconds averaged.
(iv) Acquiring rate: 0.1 second.
(v) Updating Rate: 1 second.
IV. ACCURACY
A. Position: 5-25 meters.
B. Speed: 0.1 m/sec.
C. Time: ±1µs.
V. LIMITATION
A. Latitude: -1,000m ~ 18,000m.
B. Speed: < 515 m/sec.
C. G: ±4G.
VI. INTERFACE
RS-232 for data communication and NMEA output.
37
Page 38

VII. ANTENNA
A. Built-in: patch antenna.
B. Optional: External antenna with SMA connector.
XIII. PHYSICAL
A. Size: 153 x 60 x 34 mm.
B. Weight: 170g without battery.
C. Battery: 4 AA battery, 0.15 – 0.66W.
IX. DISPLAY
A. 4-gray, Black & White.
B. Size: 6.0 x 3.8 cm.
C. Backlight: high contrast electroluminescent.
D. Resolution: 100 x 160 dots.
X. MISC.
A. Operation keys:
6 function, 1 on/off and 1 rocking pad for 8 directions.
B. Temperature:
Operation: -10~60°C.
Storage: -40~85°C.
38
Page 39

I. BASIC SETTING
A. Power saving: ON
B. Display (GM-305-DT, GM-305-HT only):
(i) Interesting point: Waypoint only
(ii) Road: All Roads
C. Cursor speed: Low Speed
D. Distance measuring: OFF
E. Map orientation: North Up
F. Time: Greenwich Time
G. Navigation: ON
H. Datum: WGS 1984
I. NMEA output: OFF
J. Waypoints: Starts from W001
K. Routes: Starts from R001
L. Waypoints & Routes
Saved in built-in memory. Will remain in memory when downloading new map.
M. Track log: OFF
Saved in built-in memory. Will remain in memory when downloading new map.
(i) Recording mode
(a) Distance: 50m
(b) Time: 10sec
(ii) Show: OFF (for saved track logs)
N. Down load / Up load program port: COM1 (305v100.exe)
II. SPECIAL ENGINEERING SETTING
Both pages as Fig. 7-0-1 and Fig. 7-0-2 are engineering setting. If you are not a specialty,
please
do not Configure it. The setting is displayed only vertically, not horizontally. Once a
mistake has
been made, please do as follows:
A. Press and hold ” ” for 2 seconds
satellite page as Fig. 7-0-1.
B. Press “ ” as Fig. 7-0-2.
C. Press ” ”.
D. Move the marked field to “ˇ” and
press ” ”.
Fig. 7-0-1 Fig. 7-0-2
39
Page 40

Chapter 8 TROUBLE SHOOTING
Q1: What should I do when I press ”
A: 1. Be sure to press and hold ” “ for two seconds. To ensure that the unit is not turned on
accidentally, the unit is designed to turn on after the “ “ being pressed for two seconds. If it
doesn’t work, please refer to the following.
2. Remove the batteries for 5 seconds and then re-fill or replace with new ones.
Q2: Why does the unit not respond to my press?
A: Press slightly and firmly again or press counter key. If you press the left key and get no respond,
try the right one. The correct way to have a key function is to press it perpendicularly. Most of
the keys are able to function in both press and hold. If still no function, remove the batteries
then try again.
Q3: Why does the unit not respond when I press the direction keys “ ”, “ ", “ ” or ” ” to move
map?
A: 1. In navigation mode, e.g. on map, at the bottom right hand corner there is a “ ” only. There
will not be a cursor “Û” to move the map. Press and hold any direction key for one second to
have the Cursor appear to move. Please refer to F. Moving map in page 15.
“ for several times but fail in turning on the unit?
2. If it still does not respond, remove the batteries for 5 seconds and then re-fill.
Q4: I moved map to other page. What should I do to return to my current position?
A: 1. In navigation mode, e.g. on map, in the bottom right hand corner is “ ”, press “ ” to
return to your Current position.
2. In view map mode, e.g. on map, in the bottom right hand corner is "
return to navigation mode to your current position.
Q5: Why does the unit not identify my current position, I am not in the shade?
A: 1. Check the antenna if it is facing up to the sky as shown in the description in page 10.
2.
the elevation of all satellites on orbit is small i.e. all satellites signals are “unhealthy” to be
locked, or be used even being locked. The Explorer will need clearer view to the sky to
acquire more than 3 “healthy” satellites to identify the position.
3. Check if you use Simulation mode. If yes, please press “ ”, select Navigation and
press “ ”. Please refer to P.13 Simulation.
Explorer needs, at least, to lock 3 satellites to identify the current position. Sometimes
", press “ ” to
Q6: When I preprogram my route, I find my destination, say Yellow Stone, and operate from
MENU “ ” to set a new waypoint at the place. I do select Display All but fail to see an icon
there. Why?
40
Page 41

A: The waypoint you created may not be at Yellow Stone. It is your current position. You
have to create waypoint by Method 2 of “Create new waypoint”. It is to press “
” for
one second to have the page as Fig. 5-1-5 show up and then press “ ”. Please
practice creating a waypoint by both Method 1 and Method 2.
Q7: I find my destination and have the shortcut on but fail to return to the previous position.
What should I do?
A: Press “
”. This is for you to return to navigation mode “ ” from view map mode " ". When
You search an object, the unit changes and remains in view map mode. The position is then not
not your real position.
Q8. On navigation mode when I moved cursor to create a new waypoint by method 2, I can not find
it in the map. I am on my current position. What’s wrong?
A: If you intend to create a new waypoint on navigation mode, please press “ ” to change the unit
to view map mode (with a "
" mark on right down corner).
Q9. I have pressed “ ” when “Tracking full, Save or Clear” appears during navigation on the
road. Once I turn on the unit next time it shows again. What’s wrong with my Explorer?
A: You need to save or to clear the current track log. Details please refer Further operation on
Track Log in page 29.
41
Page 42

A
A
Appendix A DATUM
The Explorer supports 219 datums. You may change it by following Change Datum step
by step on page. 15 in Chapter 4. Its setting is WGS-84 when you use the unit initially.
Note: dX, dY and dZ are the 3 dimension tolerance with WGS-84 (scale: meter).
1.
2.
WGS-84
Adindan
Datum
3. Adindan
4.
Adindan
5.
Adindan
6. Adindan
7.
Adindan
8.
Adindan
9.
Afgooye
10.
Ain el Abd 1970
11. Ain el Abd 1970
American Samoa
12.
1962
13.
Anna 1 Astro 1965
Antigua Island Astro
14.
1943
15.
Arc 1950
16.
Arc 1950
17.
Arc 1950
18.
Arc 1950
19.
Arc 1950
20.
Arc 1950
21.
Arc 1950
22.
Arc 1950
23.
Arc 1950
24. Arc 1960
25.
Arc 1960
26.
Arc 1960
scension Island 1958 -205 107 53
27.
28.
Astro Beacon E 1945
29.
Astro DOS 71/4
Astro Tern Island
30.
(FRIG) 1961
Astronomical Station
31.
1952
32.
Australian Geodetic
dX dY dZ
0 0 0
-118 -14 218
-134 -2 210
-165 -11 206
-123 -20 220
-166 -15 204
-128 -18 224
-161 -14 205
-43 -163 45
-150 -250 -1
-143 -236 7
-115 118 426
-491 -22 435
-270 13 62
-138 -105 -289
-153 -5 -292
-125 -108 -295
-161 -73 -317
-143 -90 -294
-134 -105 -295
-169 -19 -278
-147 -74 -283
-142 -96 -293
-160 -6 -302
-157 -2 -299
-175 -23 -303
145 75 -272
-320 550 -494
114 -116 -333
124 -234 -25
-133 -48 148
Ellipsoid Region of use Name in EXPLORER
WGS 84 Global WGS 1984
Clarke 1880 Burkina Faso
dindan- Burkina Faso
Clarke 1880 Cameroon Adindan- Cameroon
Clarke 1880 Ethiopia Adindan- Ethiopia
Clarke 1880 Mali Adindan- Mali
Clarke 1880
Mean for Ethiopia;
Sudan
Adindan-Regional
Mean
Clarke 1880 Senegal Adindan- Senegal
Clarke 1880 Sudan Adindan- Sudan
Krassovsky 1940 Somalia Afgooye- Somalia
International 1924 Bahrain Ain el Abd’70- Bahrain
International 1924 Saudi Arabia
Clarke 1866
American Samoa
Islands
Ain el Abd’70- Saudi
Arabia
American Samoa’62
Australian National Cocos Islands Anna 1 Astro’65
Clarke 1880
Antigua (Leeward
Islands)
Antigua Island
Astro’43
Clarke 1880 Botswana Arc’50- Botswana
Clarke 1880 Burundi Arc’50- Burundi
Clarke 1880 Lesotho Arc’50- Lesotho
Clarke 1880 Malawi Arc’50- Malawi
Mean for Botswana;
Clarke 1880
Lesotho; Malawi;
Swaziland; Zaire;
Arc’50-Regional Mean
Zambia; Zimbabwe
Clarke 1880 Swaziland Arc’50- Swaziland
Clarke 1880 Zaire Arc’50- Zaire
Clarke 1880 Zambia Arc’50- Zambia
Clarke 1880 Zimbabwe Arc’50- Zimbabwe
Clarke 1880
MEAN FOR Kenya;
Tanzania
Arc’60- Mean of
Kenya, Tanzania
Clarke 1880 Kenya Arc’60- Kenya
Clarke 1880 Tanzania Arc’60- Tanzania
International 1924 Ascension Island Ascension Island’58
International 1924 Iwo Jima Astro Beacon E’45
International 1924 St Helena Island Astro DOS 71/4
International 1924 Tern Island Astro Tern Island
International 1924 Marcus Island
Astronomical
Station’52
Australian National Australia; Tasmania Australian
42
Page 43

A
1966 Geodetic’66
Australian Geodetic
33.
1984
34.
Ayabelle Lighthouse
35. Bellevue (IGN)
36.
Bermuda 1957
37.
Bissau
38.
Bogota Observatory
39. Bukit Rimpah
40. Camp Area Astro
41.
Campo Inchauspe
42.
Canton Astro 1966
43.
Cape
44.
Cape Canaveral
45.
Carthage
Chatham Island Astro
46.
1971
47.
Chua Astro
48.
Corrego Alegre
49.
Dabola
50. Deception Island
51.
Djakarta (Batavia)
52. DOS 1968
53.
Easter Island 1967
Estonia Coordinate
54.
System 1937
55.
European 1950
56.
European 1950
-134 -48 149
-79 -129 145
-127 -769 472
-73 213 296
-173 253 27
307 304 -318
-384 664 -48
-104 -129 239
-148 136 90
298 -304 -375
-136 -108 -292
-2 151 181
-263 6 431
175 -38 113
-134 229 -29
-206 172 -6
-83 37 124
260 12 -147
-377 681 -50
230 -199 -752
211 147 111
374 150 588
-104 -101 -140
-130 -117 -151
Australian National Australia; Tasmania
Clarke 1880 Djibouti Ayabelle Lighthouse
International 1924
Efate & Erromango
Islands
Clarke 1866 Bermuda Bermuda 1957
International 1924 Guinea-Bissau Bissau
International 1924 Colombia Bogota Observatory
Bessel 1841
International 1924
Indonesia (Bangka &
Belitung Ids)
ntarctica (McMurdo
Camp Area)
International 1924 Argentina Campo Inchauspe
International 1924 Phoenix Islands Canton Astro’66
Clarke 1880 South Africa Cape- South Africa
Clarke 1866 Bahamas; Florida Cape Canaveral
Clarke 1880 Tunisia Carthage- Tunisia
International 1924
New Zealand
(Chatham Island)
International 1924 Paraguay Chua Astro- Paraguay
International 1924 Brazil Corrego Alegre
Clarke 1880 Guinea Dabola- Guinea
Clarke 1880
Deception Island;
Antarctia
Bessel 1841 Indonesia (Sumatra) Djakarta-Batavia
International 1924
New Georgia Islands
(Gizo Island)
International 1924 Easter Island Easter Island’67
Bessel 1841 Estonia Estonia Coord Sys’37
International 1924 Cyprus Euro’50- Cyprus
International 1924 Egypt Euro’50- Egypt
Australian
Geodetic’84
Bellevue
Bukit Rimpah
Camp Area Astro
Chatham Island
Astro’71
Deception Island
DOS 1968
England; Channel
European 1950
57.
-86 -96 -120
International 1924
Islands; Scotland;
Euro’50- England
Shetland Islands
58. European 1950
59.
European 1950
60.
European 1950
61.
European 1950
62.
European 1950
63.
European 1950
64.
European 1950
65.
European 1950
66. European 1950
-86 -96 -120
-87 -95 -120
-84 -95 -130
-117 -132 -164
-97 -103 -120
-97 -88 -135
-107 -88 -149
-87 -98 -121
-87 -96 -120
England; Ireland;
International 1924
Scotland; Shetland
Islands
International 1924 Finland; Norway
International 1924 Greece Euro’50- Greece
International 1924 Iran Euro’50- Iran
International 1924 Italy (Sardinia) Euro’50-Italy-Sardinia
International 1924 Italy (Sicily) Euro’50-Italy-Sicily
International 1924 Malta Euro’50-Malta
Mean for Austria;
Belgium; Denmark;
Finland; France; W
Germany; Gibraltar;
International 1924
International 1924
Greece; Italy;
Luxembourg;
Netherlands; Norway;
Portugal; Spain;
Sweden; Switzerland
Mean for Austria;
Denmark; France; W
Germany; Netherlands;
Euro’50- North
Regional Mean
Euro’50- Finland,Norway
Euro’50-West
Regional Mean
Euro’50-East
Regional Mean
43
Page 44

.
.
.
.
.
67. European 1950
68.
European 1950
69.
European 1950
70. European 1979
71. Fort Thomas 1955
72.
Gan 1970
73.
Geodetic Datum 1949
Graciosa Base SW
74.
1948
75.
Guam 1963
76.
Gunung Segara
77.
GUX 1 Astro
78.
Herat North
Hermannskogel
79.
Datum
80.
Hjorsey 1955
81.
Hong Kong 1963
82.
Hu-Tzu-Shan
83.
Indian
84.
Indian
85.
Indian
86.
Indian 1954
87. Indian 1960
88.
Indian 1960
89.
Indian 1975
90.
Indonesian 1974
91.
Ireland 1965
92.
ISTS 061 Astro 1968
93.
ISTS 073 Astro 1969
94.
Johnston Island 1961
95.
Kandawala
Kerguelen Island
96.
1949
97. Kertau 1948
98.
Kusaie Astro 1951
Korean Geodetic
99.
System
100
L. C. 5 Astro 1961
101
Leigon
102
Liberia 1964
103
Luzon
104.Luzon
105
M'Poraloko
-103 -106 -141
-84 -107 -120
-112 -77 -145
-86 -98 -119
-7 215 225
-133 -321 50
84 -22 209
-104 167 -38
-100 -248 259
-403 684 41
252 -209 -751
-333 -222 114
653 -212 449
-73 46 -86
-156 -271 -189
-637 -549 -203
282 726 254
295 736 257
283 682 231
217 823 299
182 915 344
198 881 317
210 814 289
-24 -15 5
506 -122 611
-794 119 -298
208 -435 -229
189 -79 -202
-97 787 86
145 -187 103
-11 851 5
647 1777
0 0 0
42 124 147
-130 29 364
-90 40 88
-133 -77 -51
-133 -79 -72
-74 -130 42
-1124
Switzerland
Mean for Iraq; Israel;
International 1924
Jordan; Lebanon;
Kuwait; Saudi Arabia;
Syria
International 1924 Portugal; Spain
Euro’50-South
Regional Mean
Euro’50- Portugal,Spain
International 1924 Tunisia Euro’50- Tunisia
Mean for Austria;
International 1924
Clarke 1880
Finland; Netherlands;
Norway; Spain;
Sweden; Switzerland
Nevis; St. Kitts
(Leeward Islands)
European 1979
Fort Thomas 1955
International 1924 Republic of Maldives Gan 1970
International 1924 New Zealand Geodetic Datum’49
Azores (Faial;
International 1924
Graciosa; Pico; Sao
Graciosa Base SW’48
Jorge; Terceira)
Clarke 1866 Guam Guam’63 Guam
Bessel 1841
Indonesia (Kalimantan)
Gunung Segara
International 1924 Guadalcanal Island GUX 1 Astro
International 1924 Afghanistan Herat North
Bessel 1841
(Namibia)
Croatia -Serbia,
Bosnia-Herzegovina
Hermannskogel
Datum
International 1924 Iceland Hjorsey 1955
International 1924 Hong Kong Hong Kong’63
International 1924 Taiwan Hu-Tzu-Shan
Everest (India 1830) Bangladesh Indian- Bangladesh
Everest (India 1956) India; Nepal Indian- India,Nepal
Everest (Pakistan) Pakistan Indian- Pakistan
Everest (India 1830) Thailand Indian 1954
Everest (India 1830)
Everest (India 1830)
Vietnam (Con Son
Island)
Vietnam (Near 16øN)) Indian’60-Vietnam
Indian
Island
’60- Con Son
Everest (India 1830) Thailand Indian 1975
Indonesian 1974 Indonesia Indonesian’74
Modified Airy Ireland Ireland 1965
International 1924
South Georgia Islands
ISTS 061 Astro’68
International 1924 Diego Garcia ISTS 073 Astro’69
International 1924 Johnston Island Johnston Island’61
Everest (India 1830) Sri Lanka Kandawala
International 1924 Kerguelen Island Kerguelen Island’49
Everest (Malay. &
Sing)
West Malaysia &
Singapore
Kertau 1948
International 1924 Caroline Islands Kusaie Astro’51
GRS 80 South Korea Korean Geo Sys
Clarke 1866 Cayman Brac Island L. C. 5 Astro’61
Clarke 1880 Ghana Leigon
Clarke 1880 Liberia Liberia 1964
Clarke 1866
Clarke 1866
Philippines (Excluding
Mindanao)
Philippines
(Mindanao)
Luzon-Philip
Luzon-Philip-
Mindanao
Clarke 1880 Gabon M'Poraloko
44
Page 45

.
.
.
.
.
.
.
.
.
.
.
.
.
106
Mahe 1971
107
Massawa
108
Merchich
109
Midway Astro 1961
110
Minna
111
Minna
Montserrat Island
112
Astro 1958
113.Nahrwan
114.Nahrwan
115.Nahrwan
116
Naparima BWI
117.North American 1927
118.North American 1927
119.North American 1927
120.North American 1927
121.North American 1927
122.North American 1927
123.North American 1927
124
North American 1927
North American 1927
125
126
North American 1927
127
North American 1927
128
North American 1927
129.North American 1927
130.North American 1927
131.North American 1927
132.North American 1927
133.North American 1927
134.North American 1927
41 -220 -134
639 405 60
31 146 47
912 -58 1227
-81 -84 115
-92 -93 122
174 359 365
-247 -148 369
-243 -192 477
-249 -156 381
-10 375 165
-5 135 172
-2 152 149
2 204 105
-4 154 178
1 140 165
-7 162 188
-9 157 184
-22 160 190
4 159 188
-7 139 181
0 125 201
-9 152 178
11 114 195
-3 142 183
0 125 194
-10 158 187
-8 160 176
-9 161 179
Clarke 1880 Mahe Island Mahe 1971
Bessel 1841 Ethiopia (Eritrea) Massawa
Clarke 1880 Morocco Merchich
International 1924 Midway Islands Midway Astro’61
Clarke 1880 Cameroon Minna- Cameroon
Clarke 1880 Nigeria Minna- Nigeria
Clarke 1880
Clarke 1880
Montserrat (Leeward
Islands)
Oman (Masirah
Island)
Clarke 1880 Saudi Arabia
Clarke 1880
United Arab
Emirates
Montserrat Island
Astro’58
Nahrwan-Oman-Masir
ah Island
Nahrwan- Saudi
Arabia
Nahrwan- United Arab
Emirates
International 1924 Trinidad & Tobago Naparima BWI
Clarke 1866
Clarke 1866
Clarke 1866
Clarke 1866
Clarke 1866
Clarke 1866
Clarke 1866
Alaska (Excluding
Aleutian Ids)
Alaska (Aleutian Ids
East of 180øW)
Alaska (Aleutian Ids
West of 180øW)
Bahamas (Except
San Salvador Id)
Bahamas (San
Salvador Island)
Canada (Alberta;
British Columbia)
Canada (Manitoba;
Ontario)
N-Amer’27-Alaska
N-Amer’27-Aleutian
Ids E
N-Amer’27-Aleutian
Ids W
N-Amer’27-Bahamas
N-Amer’27-San
Salvador
N-Amer’27-Alberta
N-Amer’27- Manitoba,
Ontario
Canada (New
Clarke 1866
Brunswick;
Newfoundland; Nova
N-Amer’27- New
Brunswick
Scotia; Quebec)
Clarke 1866
Canada (Northwest
Territories;
Saskatchewan)
N-Amer’27-
Saskatchewan
Clarke 1866 Canada (Yukon) N-Amer’27- Yukon
Clarke 1866 Canal Zone
N-Amer’27-Canal Zone
Clarke 1866 Cuba N-Amer’27-Cuba
Clarke 1866
Clarke 1866
Clarke 1866
Clarke 1866 Mean for Canada
Clarke 1866 Mean for Conus
Clarke 1866
Greenland (Hayes
Peninsula)
Mean for Antigua;
Barbados; Barbuda;
Caicos Islands; Cuba;
Dominican Republic;
Grand Cayman;
Jamaica; Turks
Islands
Mean for Belize; Costa
Rica; El Salvador;
Guatemala; Honduras;
Nicaragua
Mean for Conus (East
of Mississippi; River
N-Amer’27-Greenland
N-Amer’27-Antigua,
Barbados
N-Amer’27-Costa
Rica, El Salvador
N-Amer’27- Mean of
Canada
N-Amer’27-Mean of
Conus
N-Amer’27-E-Mississi
ppi
45
Page 46

.
.
.
.
.
.
.
.
.
.
.
.
.
.
.
.
.
.
.
.
.
.
.
.
.
135.North American 1927
136
North American 1927
137.North American 1983
-8 159 175
-12 130 190
0 0 0
Including Louisiana;
Missouri; Minnesota)
Mean for Conus (West
Clarke 1866
of Mississippi; River
Excluding Louisiana;
Minnesota; Missouri)
N-Amer’27-W-Mississi
ppi
Clarke 1866 Mexico N-Amer’27-Mexico
GRS 80
Alaska (Excluding
Aleutian Ids)
N-Amer’83-Alaska
North American 1983
138
139
North American 1983
140
North American 1983
141
North American 1983
142.North American 1983
143
North Sahara 1959
Observatorio
144
Meteorologico 1939
145
Old Egyptian 1907
146
Old Hawaiian
147
Old Hawaiian
148
Old Hawaiian
149.Old Hawaiian
150
Old Hawaiian
151
Oman
Ordnance Survey
152
Great Britain 1936
Ordnance Survey
153
Great Britain 1936
Ordnance Survey
154
Great Britain 1936
Ordnance Survey
155
Great Britain 1936
Ordnance Survey
156
Great Britain 1936
157
Pico de las Nieves
158
Pitcairn Astro 1967
159.Point 58
160
Pointe Noire 1948
161.Porto Santo 1936
Provisional South
162
American 1956
Provisional South
163
American 1956
Provisional South
164
American 1956
Provisional South
165
American 1956
-2 0 4
0 0 0
0 0 0
1 1 -1
0 0 0
-186 -93 310
-425 -169 81
-130 110 -13
89 -279 -183
45 -290 -172
65 -290 -190
61 -285 -181
58 -283 -182
-346 -1 224
371 -112 434
371 -111 434
375 -111 431
384 -111 425
370 -108 434
-307 -92 127
185 165 42
-106 -129 165
-148 51 -291
-499 -249 314
-270 188 -388
-270 183 -390
-305 243 -442
-282 169 -371
GRS 80 Aleutian Ids
N-Amer’83-Aleutian Ids
GRS 80 Canada N-Amer’83-Canada
GRS 80 Conus N-Amer’83-Conus
GRS 80 Hawaii N-Amer’83-Hawaii
GRS 80
Mexico; Central
America
N-Amer’83-Mexico,
Central America
Clarke 1880 Algeria North Sahara’59
International 1924
Azores (Corvo &
Flores Islands)
Observatorio
Meteorologico’39
Helmert 1906 Egypt Old Egyptian 1907
Clarke 1866 Hawaii Old Hawaiian- Hawaii
Clarke 1866 Kauai Old Hawaiian- Kauai
Clarke 1866 Maui Old Hawaiian- Maui
Old
Hawaiian-Regional
Mean
Clarke 1866
Mean For Hawaii;
Kauai; Maui; Oahu
Clarke 1866 Oahu Old Hawaiian- Oahu
Clarke 1880 Oman Oman
Airy 1830 England
Airy 1830
Airy 1830
Airy 1830
England; Isle of
Man; Wales
Mean For England; Isle
of Man; Scotland;
Shetland Islands;
Wales
Scotland; Shetland
Islands
Ord Sur GB’36-
England
Ord Sur GB’36- Isle of
Man
Ord Sur
GB’36-Regional Mean
Ord Sur GB’36-
Scotland, Shetland
Airy 1830 Wales Ord Sur GB’36- Wales
International 1924 Canary Islands Pico de las Nieves
International 1924 Pitcairn Island Pitcairn Astro 1967
Clarke 1880
MEAN FOR Burkina
Faso & Niger
Point 58
Clarke 1880 Congo Pointe Noire 1948
International 1924
Porto Santo;
Madeira Islands
International 1924 Bolivia
International 1924
International 1924
Chile (Northern;
Near 19
øS)
Chile (Southern;
Near 43
øS)
International 1924 Colombia
Porto Santo 1936
Prov S-Amer’56-
Bolivia
Prov
S-Amer’56-Chile-Nort
h
Prov
S-Amer’56-Chile-Sout
h
Prov S-Amer’56-
Colombia
46
Page 47

.
.
.
.
.
Provisional South
166
American 1956
Provisional South
167
American 1956
Provisional South
168
American 1956
Provisional South
169
American 1956
Provisional South
170
American 1956
-278 171 -367
-298 159 -369
-288 175 -376
-279 175 -379
-295 173 -371
International 1924 Ecuador
International 1924 Guyana
Mean for Bolivia;
International 1924
Chile; Colombia;
Ecuador; Guyana;
Peru; Venezuela
Prov S-Amer’56-
Ecuador
Prov S-Amer’56-
Guyana
Prov
S-Amer’56-Regional
Mean
International 1924 Peru Prov S-Amer’56- Peru
International 1924 Venezuela
Prov S-Amer’56-
Venezuela
47
Page 48

.
.
.
.
.
.
.
.
.
.
.
.
.
.
.
202
South American 1969,
203.South American 1969,
204.South American 1969,
205
South Asia
Tananarive
206
Observatory 1925
207.Timbalai 1948
208
To kyo
209
To kyo
210
To kyo
211
To kyo
212
Tristan Astro 1968
213
Viti Levu 1916
214
Voirol 1960
Wake Island Astro 1952 276 -57 149
215
216
Wake-Eniwetok 1960
217
WGS 1972
218
Yaca re
219
Zanderij
-58 0 -44
-45 12 -33
-45 8 -33
7 -10 -26 Modified Fischer 1960
-189 -242 -91
-679 669 -48
-148 507 685
-148 507 685
-158 507 676
-147 506 687
-632 438 -609
51 391 -36
-123 -206 219
102 52 -38
0 0 0
-155 171 37
-265 120 -358
South American 1969 Peru S-Amer’69- Peru
South American 1969 Trinidad & Tobago
South American 1969 Venezuela
S-Amer’69-
Trinidad,Tobago
S-Amer’69-
Venezuela
Singapore South Asia
International 1924 Madagascar Tananarive Observ’25
Everest (Sabah
Sarawak)
Brunei; E. Malaysia
(Sabah Sarawak)
Timbalai 1948
Bessel 1841 Japan Tokyo- Japan
Bessel 1841
Mean for Japan; South
Korea; Okinawa
Tokyo-Regional Mean
Bessel 1841 Okinawa Tokyo- Okinawa
Bessel 1841 South Korea Tokyo- South Korea
International 1924 Tristan da Cunha Tristan Astro’68
Clarke 1880 Fiji (Viti Levu Island) Viti Levu 1916
Clarke 1880 Algeria Voirol 1960
International 1924 Wake Atoll Wake Island Astro’52
Hough 1960 Marshall Islands Wake-Eniwetok’60
WGS 72 Global Definition WGS 1972
International 1924 Uruguay Yacare
International 1924 Suriname Zanderij
48
 Loading...