

Page 1
Viera™ Portable
Breast Ultrasound
User Manual
Page 2

Disclaimer:
This disclaimer extends to all printed matter accompanying the Viera™ Portable Breast
Ultrasound.
This manual is licensed under the Terms and Conditions available at www.clarius.com/termsconditions. You may not use this manual except in compliance with the license. The information
contained in these materials is proprietary and confidential to Clarius Mobile Health Corp.
(“Clarius“) and is provided for the sole use of the individual or entity to whom it is addressed
and therefore these materials must be kept in the strictest confidence. No portion of this
manual may be copied, reproduced, republished, modified, sold, disclosed, or distributed
without the prior written permission of Clarius. Unauthorized copying or distribution of this
manual, in addition to infringing copyright, may reduce the ability of Clarius to provide updates
and current information to users.
Clarius has taken care to ensure the accuracy of this document, however, revisions may not be
possible in all situations. Information in this document may be subject to change without
notice, and Clarius assumes no liability for errors or omissions. Clarius reserves the right to
make changes without further notice to any products herein to improve reliability, function, or
design. Clarius may make improvements or changes in the products or programs described in
this document at any time.
These materials may contain third-party copyright and/or trademark materials, the use of which
has not always been specifically authorized by the intellectual property owner. All copyrights
and/or trademarks contained in these materials are the sole and exclusive property of their
respective owners.
“Clarius”, the Clarius logo, “Ultrasound Anywhere,” “Point-and-Shoot Ultrasound”, “Act One”,
“Tri-Scanner”, and “My New Stethoscope” are trademarks or registered trademarks, and are the
sole and exclusive property of Clarius.
The Clarius products/services referenced in this document may be covered by one or more
patents or pending patent applications. See www.clarius.com/patents for details.
All names used in Clarius (whether online, in print, or any other media) are fictitious and are
used herein for the purposes of example and demonstration on how to use the Viera™ Portable
Breast Ultrasound. Any similarity to real people is a coincidence.
© 2018 Clarius Mobile Health Corp.
All rights are reserved. Reproduction or transmission in whole or in part, in any form or by any
means, electronic, mechanical or otherwise, is prohibited without the prior written consent of
the copyright owner.
Published in Canada.
15-03-00055
Page 3

Hologic Technical Support
USA Support Center: (877) 371-4372
+1 (781) 999 7750
BreastHealth.Support@hologic.com
European Support Center: +32 2 711 45 45
BE-Techsupport@hologic.com
Australia Support Center: 1800 264 073
+61 2 9888 8000
Page 4

Table of Contents
About This Manual ........................................................................................................1
Target Audience...................................................................................................................1
Document Conventions .....................................................................................................2
Touch Gestures........................................................................................................................2
Icons ...........................................................................................................................................3
Symbols Glossary....................................................................................................................3
Chapter 1: About the Viera™ Portable Breast Ultrasound .........................9
Scanner Description ................................................................................................ 10
Scanner Dimensions................................................................................................ 12
Product Usage........................................................................................................... 13
Indications for Use ........................................................................................................ 13
Contraindications.......................................................................................................... 16
Hardware.................................................................................................................... 17
Warranty.......................................................................................................................... 17
Disposal ........................................................................................................................... 17
Security ...................................................................................................................... 17
Information Security..................................................................................................... 17
Network Security........................................................................................................... 17
Confidentiality ............................................................................................................... 18
Integrity ........................................................................................................................... 19
Availability...................................................................................................................... 19
Accountability ................................................................................................................ 19
System Requirements............................................................................................. 19
Chapter 2: A Quick Tour ............................................................................21
Overview of the Interface...................................................................................... 21
Icons ................................................................................................................................. 21
Menu Options................................................................................................................. 23
Screen Overview...................................................................................................... 30
Sign-in Page....................................................................................................................30
i
Page 5

Viera™ Portable Breast Ultrasound
Scanners Page.................................................................................................................31
Workflows Page..............................................................................................................32
Patient Demographics...................................................................................................33
Indications Page .............................................................................................................33
Imaging Page...................................................................................................................34
Review Page ....................................................................................................................35
Impressions Page ...........................................................................................................35
System Capabilities..................................................................................................36
Error Messages................................................................................................................36
Sleep Mode......................................................................................................................37
Auto Shutdown ...............................................................................................................37
Scanner Locator..............................................................................................................38
Need Help?.................................................................................................................38
Additional Training ........................................................................................................38
Need More Help?............................................................................................................38
Chapter 3: Using the Viera™ Portable Breast Ultrasound ......................... 39
Downloading the Clarius App................................................................................39
Apple iOS .........................................................................................................................39
Android™..........................................................................................................................40
Updating the Viera™ Portable Breast Ultrasound.............................................40
Software Updates...........................................................................................................40
Firmware Updates..........................................................................................................40
Inserting & Removing the Battery ........................................................................41
Inserting the Battery .....................................................................................................41
Removing the Battery ...................................................................................................41
Turning the System on & off..................................................................................42
Starting the Clarius App................................................................................................42
Exiting the Clarius App .................................................................................................42
Signing in & out ........................................................................................................42
Signing in .........................................................................................................................42
Signing out.......................................................................................................................43
Connecting Your Smart Device to Viera™ ..........................................................43
Connecting Apple iOS Devices to Scanners ............................................................43
Connecting Android™ Devices to Scanners.............................................................44
Managing Exams .......................................................................................................44
Starting New Exams.......................................................................................................44
Pausing an Exam.............................................................................................................45
Ending an Exam ..............................................................................................................45
User Manual version 4.2.0 ii
Page 6

Viera™ Portable Breast Ultrasound
Resuming a Paused Exam.............................................................................................46
Managing Patient Information...............................................................................46
Entering Patient Information.......................................................................................46
Populating Indications..................................................................................................47
Selecting Scanning Modes......................................................................................47
B-Mode .............................................................................................................................47
Color Doppler..................................................................................................................48
Power Doppler................................................................................................................51
M-Mode ............................................................................................................................51
Imaging .......................................................................................................................52
Adjusting Gain.................................................................................................................53
Using the Center Line....................................................................................................55
Using Needle Enhance ..................................................................................................56
Using Automated Heart Rate.......................................................................................57
Freezing/Unfreezing Cineloops..................................................................................58
Capturing Cineloops & Images ...................................................................................60
Zooming in & out ...........................................................................................................62
Changing Depth..............................................................................................................63
Flipping Images ..............................................................................................................63
Using Annotations..........................................................................................................64
Using the Measuring Tools...........................................................................................67
Using the View-Sharing Mode.....................................................................................68
Using Chromecast™.......................................................................................................70
Review Findings........................................................................................................70
Reviewing Cineloops & Images ..................................................................................70
Deleting Items ................................................................................................................70
Populating Impressions...........................................................................................71
Exporting Exams .......................................................................................................71
Maintenance ..............................................................................................................71
Hardware Maintenance.................................................................................................71
System Maintenance .....................................................................................................73
Chapter 4: Accessories .............................................................................75
Clarius Dock ...............................................................................................................75
Parts ..................................................................................................................................76
Setting up.........................................................................................................................78
Using the Clarius Dock..................................................................................................78
Maintenance....................................................................................................................79
Troubleshooting.............................................................................................................80
User Manual version 4.2.0 iii
Page 7

Viera™ Portable Breast Ultrasound
Clarius Fan..................................................................................................................80
Chapter 5: Cleaning & Disinfecting ..........................................................81
Cleaning......................................................................................................................82
Cleaning the Viera™ Portable Breast Ultrasound...................................................82
Cleaning the Clarius Dock............................................................................................83
Cleaning the Clarius Fan...............................................................................................83
Disinfecting................................................................................................................84
Disinfecting the Viera™ Portable Breast Ultrasound ............................................84
Disinfecting the Clarius Fan ........................................................................................86
Spaulding Classification .........................................................................................86
Chapter 6: Safety......................................................................................87
About Diagnostic Ultrasounds...............................................................................87
Interactions with Matter...............................................................................................87
Studies..............................................................................................................................87
Benefits & Risks..............................................................................................................88
Safety Topics .............................................................................................................88
Product Safety ................................................................................................................89
Battery Safety .................................................................................................................90
Cleaning Safety ..............................................................................................................91
Clinical Safety .................................................................................................................93
Biological Safety ............................................................................................................93
ALARA Principle ..............................................................................................................95
Fire & Electrical Safety .................................................................................................105
Electromagnetic Safety ................................................................................................106
Chapter 7: References ..............................................................................112
Compliance Statement............................................................................................112
The Viera™ Portable Breast Ultrasound..............................................................112
Authorized Representative..........................................................................................112
Product Classification ...................................................................................................112
Product Serial Number..................................................................................................113
System Specifications...................................................................................................113
Scanner Specifications .................................................................................................114
Standards....................................................................................................................115
Biocompatibility.............................................................................................................115
User Manual version 4.2.0 iv
Page 8

Viera™ Portable Breast Ultrasound
Chemical...........................................................................................................................115
Electrical Safety..............................................................................................................115
Federal..............................................................................................................................116
Labeling............................................................................................................................116
Quality ..............................................................................................................................116
Security & Privacy..........................................................................................................118
Wireless............................................................................................................................118
Doppler Sensitivity .................................................................................................119
Viera™ Scanner ..............................................................................................................119
Acoustic Output Tables ..........................................................................................120
Viera™ Scanner: B-Mode & M-Mode .........................................................................120
Viera™ Scanner: Color Doppler Mode ......................................................................121
Viera™ Scanner: Needle Enhance Mode .................................................................122
Control Effects Guidance Documents..................................................................123
Cleaners & Disinfectants ........................................................................................123
Cleaner & Disinfectant Usage.....................................................................................123
Cleaner & Disinfectant Details ...................................................................................124
Sterilization Systems.....................................................................................................125
Glossary of Terms.....................................................................................................125
Acoustic Outputs............................................................................................................125
Acoustic Artifacts ...........................................................................................................128
Known Issues .............................................................................................................130
Revision History........................................................................................................131
User Manual version 4.2.0 v
Page 9

About This Manual
To obtain a printed copy of this manual at no additional cost, please contact Hologic
Technical Support.
This document is licensed as part of the purchase of the Viera™ Portable Breast Ultrasound
and meets applicable regulatory requirements. Use of this document by unauthorized persons
is strictly prohibited.
This document contains the following information:
• About the Viera™ Portable Breast Ultrasound: Describes the product, and lists technical
specifications, and its intended use.
• A Quick Tour: Shows you how to get started and begin scanning.
• Using the Viera™ Portable Breast Ultrasound: Introduces you to the features and concepts,
helps you set up your system, and explains the tasks you can perform.
• Accessories: Describes additional accessories you can purchase for use with your Viera™
Portable Breast Ultrasound.
• Cleaning & Disinfecting: Explains how to clean and disinfect your scanner.
• Safety: Outlines important safety standards, principles, and policies to follow when using
the product.
• References: Offers information such as product standards, regulatory requirements, terms
and conditions, glossary of terms, and acoustic output data.
Access to user documentation may be affected by: Internet availability and accessibility,
website availability, and local electromagnetic interference.
Target Audience
This document is written for trained medical professionals who operate and maintain your
Viera™ Portable Breast Ultrasound. It contains instructions and reference material pertaining
to the usage and maintenance of the product.
1
Page 10
Viera™ Portable Breast Ultrasound
Document Conventions
Touch Gestures
Gesture Title of
gesture
Drag Touch the screen with a finger and move the finger across the screen without
Double tap Touch the screen briefly twice with the same finger.
Pinch Touch the screen with two fingers and move them toward each other.
Tap Touch a control with your finger.
Press and hold Touch the screen for a short time without moving your finger.
Description
lifting the finger.
Spread Touch the screen with two fingers and move them apart.
Swipe Touch the screen with your finger and move the finger in a quick motion right,
User Manual version 4.2.0 2
left, up, or down.
Page 11
Viera™ Portable Breast Ultrasound
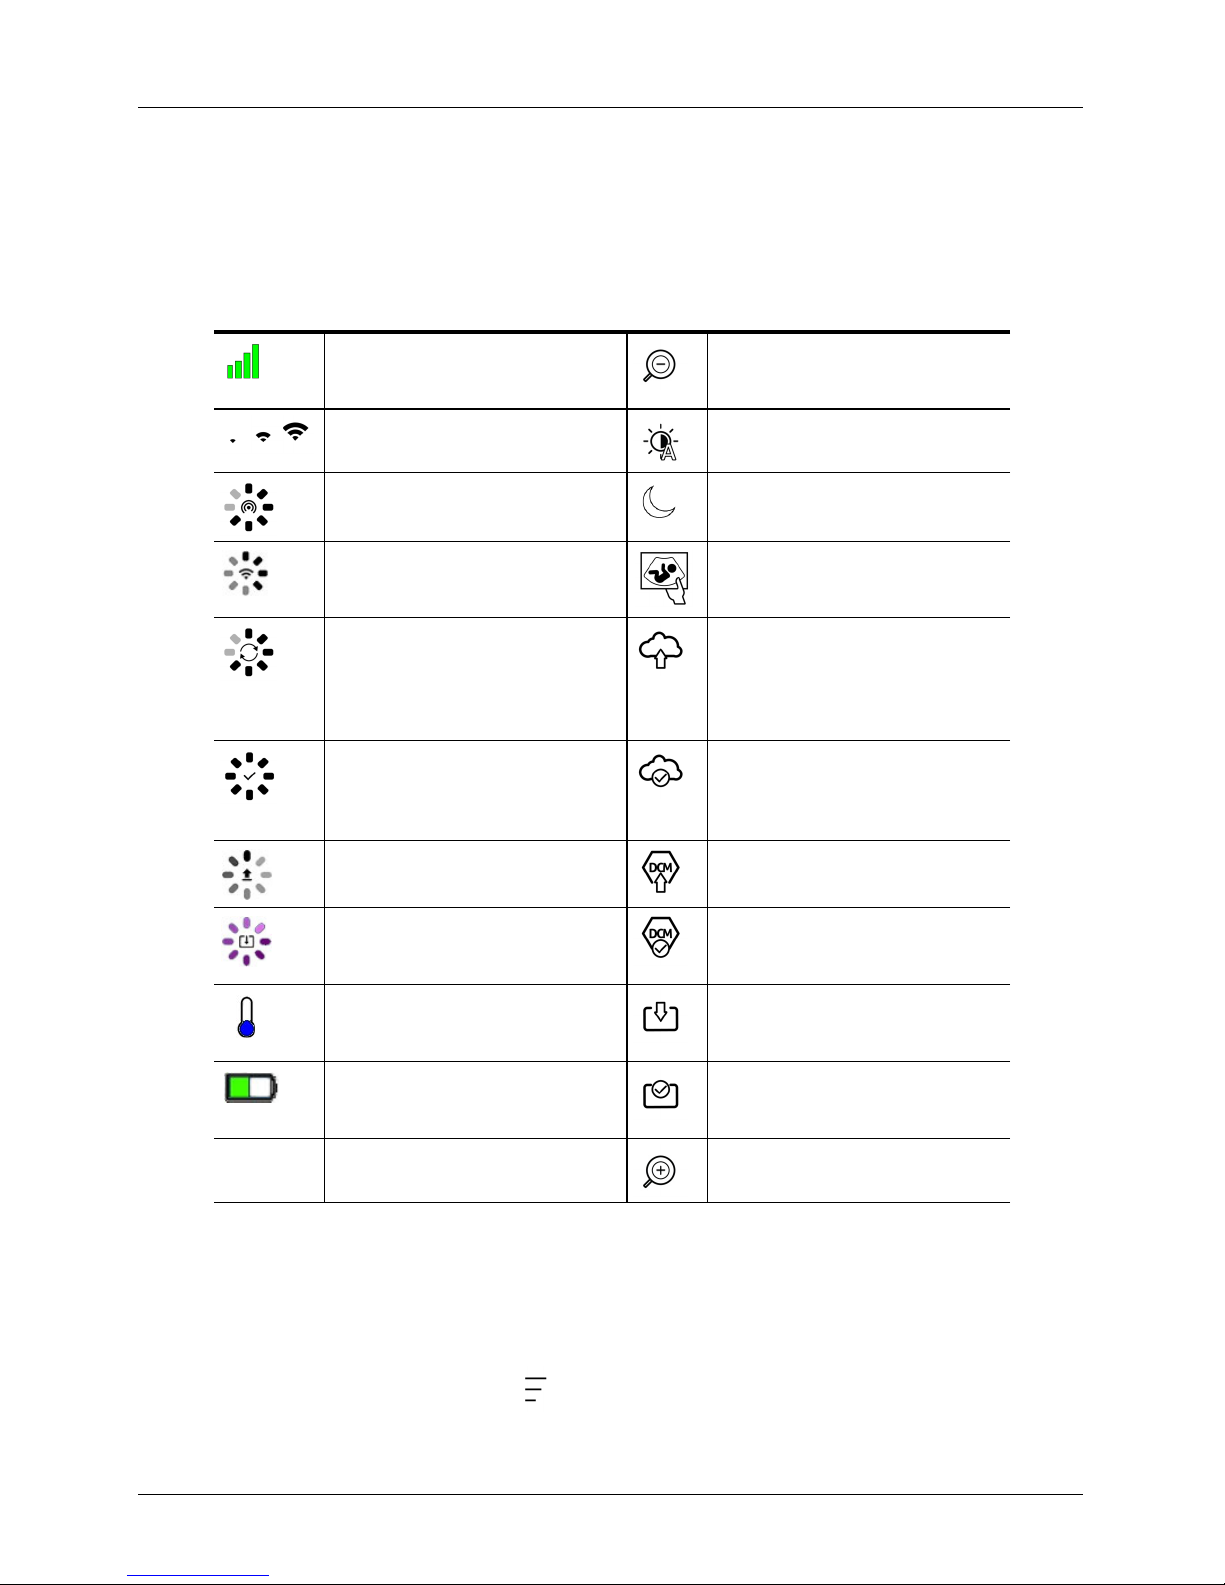
Icons
Icon Title of Icon Description
Alert Possible risks beyond the reasonable control of Clarius.
Do not do this This icon indicates actions to avoid.
Note This icon indicates informative material or helpful suggestions.
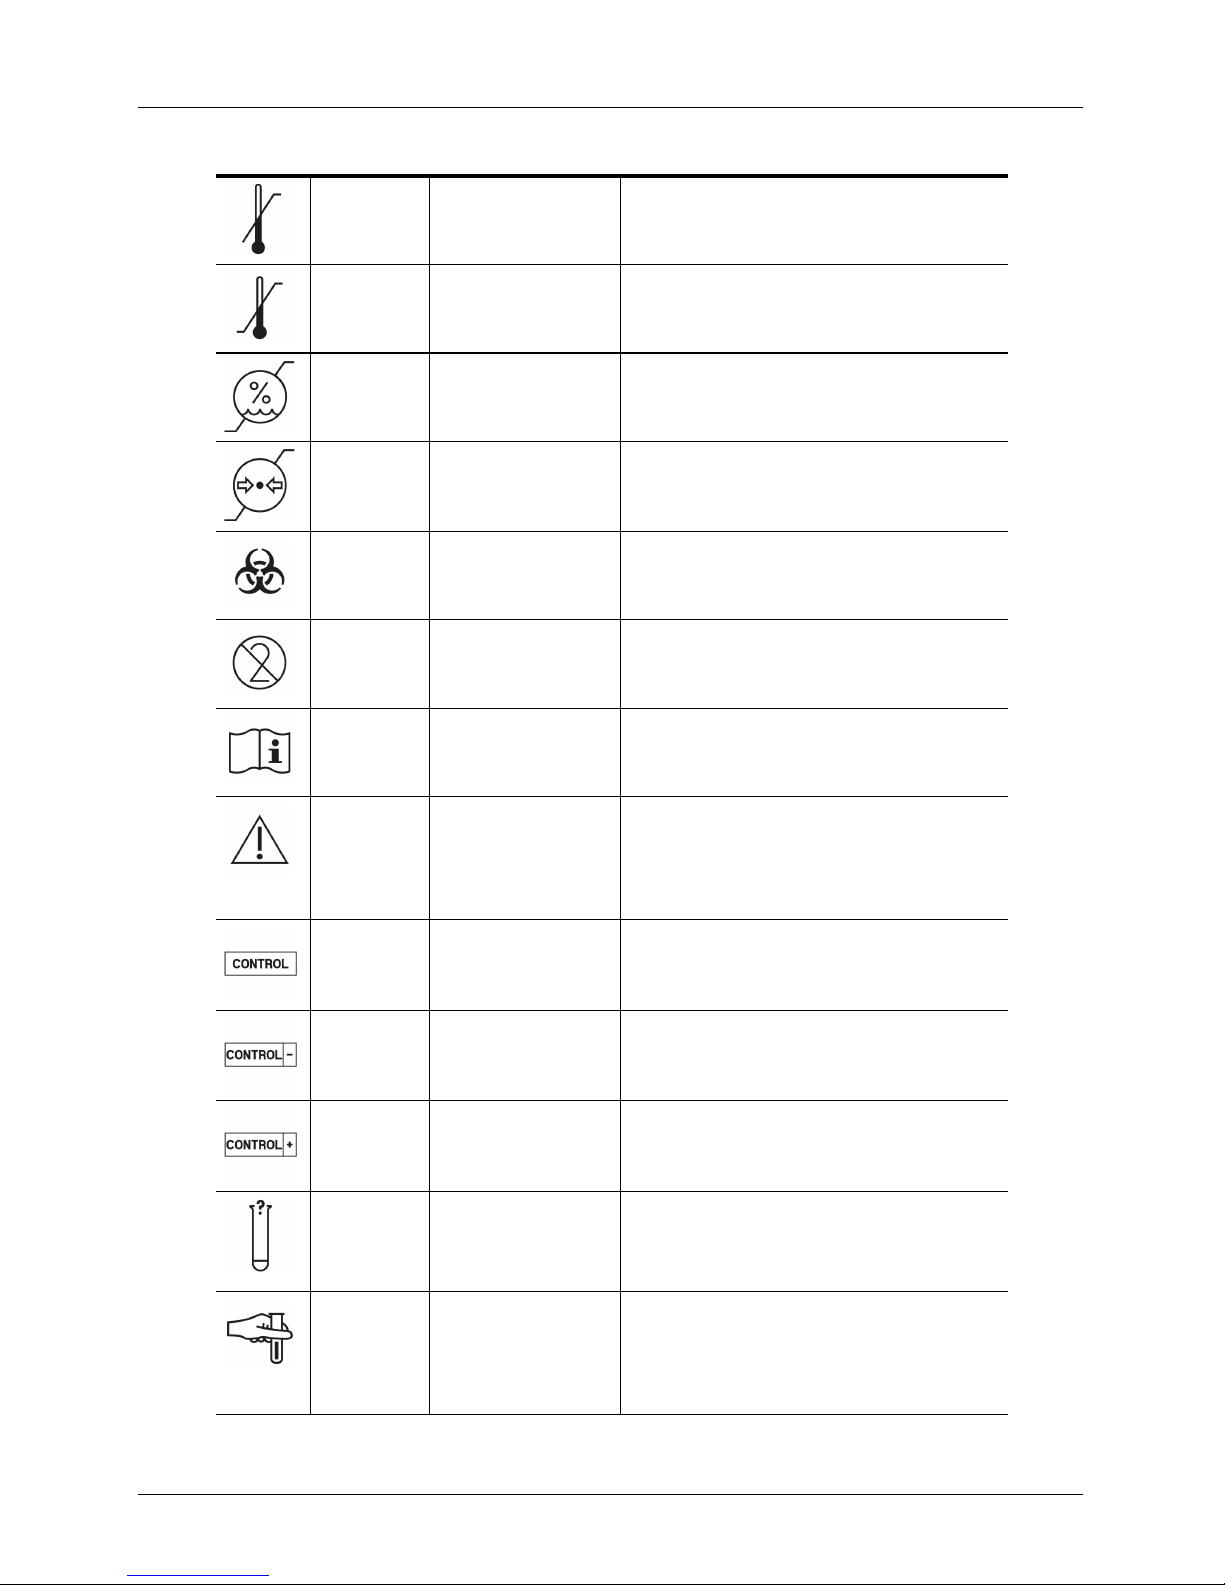
Symbols Glossary
The symbols shown in this document and on the Viera™ Portable Breast Ultrasound are
compliant with current versions of the following standards: ISO 7000, ISO 7010, IEC 6417, (EN)
ISO 15223-1, and EN 15986.
STANDARD: ISO 7000 — GRAPHICAL SYMBOLS FOR USE ON EQUIPMENT — REGISTERED SYMBOLS
Symbol Reference Title Description
3082 Manufacturer Indicates the medical device manufacturer, as defined
2497 Date of manufacture Indicates the date when the medical device was
2607 Use by date Indicates the date after which the medical device is not
2492 Batch code Indicates the manufacturer's batch code so that the
in EU Directives 90/385/EEC, 93/42/EEC and 98/79/
EC.
manufactured.
to be used.
batch or lot can be identified.
2493 Catalogue number Indicates the manufacturer's catalogue number so that
2498 Serial number Indicates the manufacturer's serial number so that a
User Manual version 4.2.0 3
the medical device can be identified.
specific medical device can be identified.
Page 12
Viera™ Portable Breast Ultrasound
STANDARD: ISO 7000 — GRAPHICAL SYMBOLS FOR USE ON EQUIPMENT — REGISTERED SYMBOLS
2499 Sterile Indicates a medical device that has been subjected to
a sterilization process.
2500 Sterilized using aseptic
processing techniques
2501 Sterilized using ethylene
oxide
2502 Sterilized using irradiation Indicates a medical device that has been sterilized
2503 Sterilized using steam or
dry heat
2608 Do not resterilize Indicates a medical device that is not to be resterilized.
2609 Non-sterile Indicates a medical device that has not been subjected
2606 Do not use if package is
damaged
Indicates a medical device that has been
manufactured using accepted aseptic techniques.
Indicates a medical device that has been sterilized
using ethylene oxide.
using irradiation.
Indicates a medical device that has been sterilized
using steam or dry heat.
to a sterilization process.
Indicates a medical device that should not be used if
the package has been damaged or opened.
3084 Sterile fluid path Indicates the presence of a sterile fluid path within the
medical device in cases when other parts of the
medical device, including the exterior, might not be
supplied sterile.
0621 Fragile; handle with care Indicates a medical device that can be broken or
damaged if not handled carefully.
0624 Keep away from sunlight Indicates a medical device that needs protection from
light sources.
0615 Protect from heat and
radioactive sources
0626 Keep away from rain Indicates a medical device that needs to be protected
0534 Lower limit of temperature Indicates the lower limit of temperature to which the
Indicates a medical device that needs protection from
heat and radioactive sources.
from moisture.
medical device can be safely exposed.
User Manual version 4.2.0 4
Page 13
Viera™ Portable Breast Ultrasound
STANDARD: ISO 7000 — GRAPHICAL SYMBOLS FOR USE ON EQUIPMENT — REGISTERED SYMBOLS
0533 Upper limit of temperature Indicates the upper limit of temperature to which the
0632 Temperature limit Indicates the temperature limits to which the medical
0224 Measure humidity Indicates the range of humidity to which the medical
medical device can be safely exposed.
device can be safely exposed.
device can be safely exposed.
2621 Atmospheric pressure
limitation
0659 Biological risks Indicates that there are potential biological risks
1051 Do not re-use Indicates a medical device that is intended for one use,
1641 Operator's manual;
operating instructions
0434A Caution Indicates the need for the user to consult the
2494 Control Indicates a control material that is intended to verify
2495 Negative control Indicates a control material that is intended to verify
Indicates the range of atmospheric pressure to which
the medical device can be safely exposed.
associated with the medical device.
or for use on a single patient during a single
procedure.
Indicates the need for the user to consult the
instructions for use.
instructions for use for important cautionary
information such as warnings and precautions that
cannot, for a variety of reasons, be presented on the
medical device itself.
the performance characteristics of another medical
device.
the results in the expected negative range.
2496 Positive control Indicates a control material that is intended to verify
3083 In vitro diagnostic (IVD)
2715 Sampling site On medical devices or blood process application: to
User Manual version 4.2.0 5
device for performance
evaluation
the results in the expected positive range.
Indicates an IVD device that is intended to be used
only for evaluating its performance characteristics
before it is placed on the market for medical diagnostic
use.
indicate that the device or process application includes
a system dedicated to the collection of samples of a
given substance stored in this medical device or blood
container.
Page 14
Viera™ Portable Breast Ultrasound
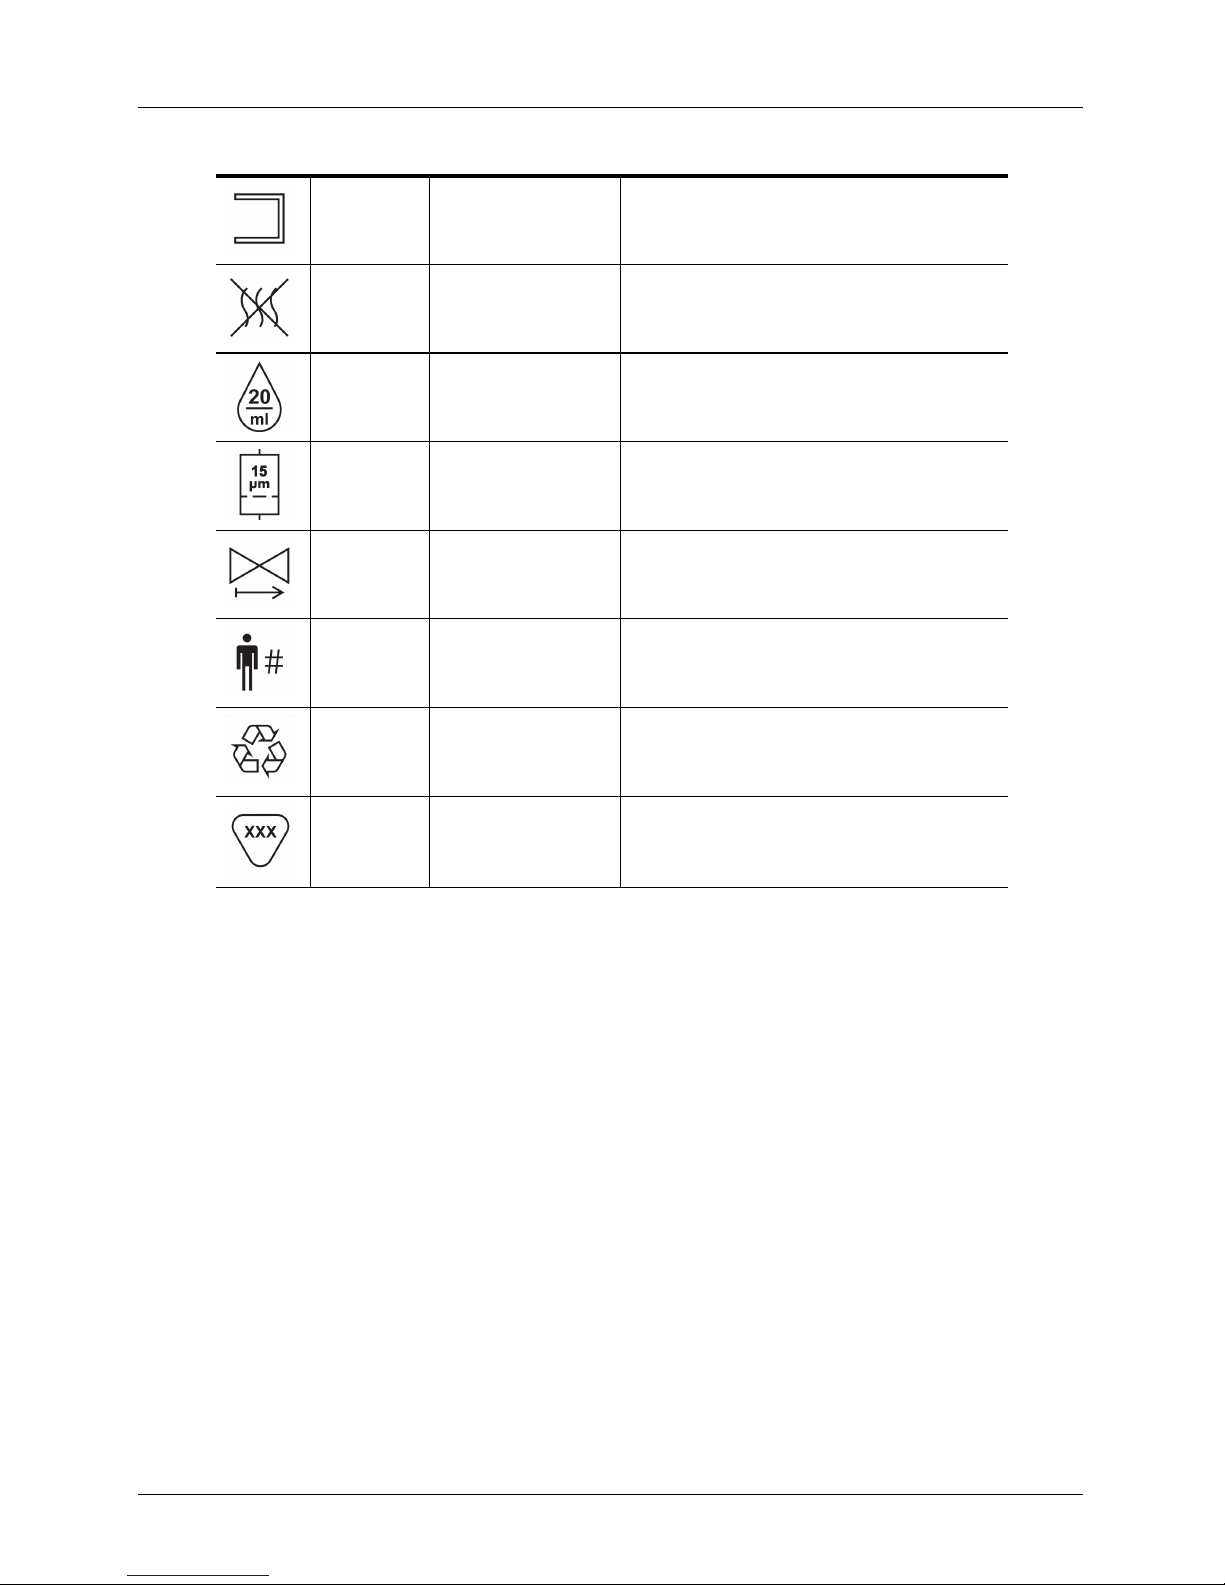
STANDARD: ISO 7000 — GRAPHICAL SYMBOLS FOR USE ON EQUIPMENT — REGISTERED SYMBOLS
2722 Fluid path Indicates the presence of a fluid path.
2724 Non-pyrogenic Indicates a medical device that is non-pyrogenic.
2726 Drops per milliliter Indicates the number of drops per milliliter.
2727 Liquid filter with pore size Indicates an infusion or transfusion system of the
2728 One-way valve Indicates a medical device with a valve that allows flow
2610 Patient number Indicates a unique number associated with an
medical device that contains a filter of a particular
nominal pore size.
in only one direction.
individual patient.
1135 General symbol for
recovery/recyclable
2725 Contains or presence of On medical devices: to indicate that the equipment
To indicate that the marked item or its material is part
of a recovery or recycling process.
contains the identified product or substance.
User Manual version 4.2.0 6
Page 15
Viera™ Portable Breast Ultrasound
You may see some of these standard symbols on your Viera™ Portable Breast Ultrasound,
accessories, and packaging:
OTHER STANDARDS — GRAPHICAL SYMBOLS FOR USE ON EQUIPMENT — REGISTERED SYMBOLS
Symbol Standard Reference Title Description
ISO 7010 M002 Refer to instruction
IEC 6417 5172 Class II equipment To identify equipment meeting the safety
IEC 6417 5957 For indoor use only To identify electrical equipment designed
IEC 6417 5333 Type BF applied part To identify a type BF applied part
manual/booklet
Indicates to read the instruction manual/
booklet before starting work or before
operating equipment or machinery.
requirements specified for Class II
equipment according to IEC 60536.
primarily for indoor use.
complying with IEC 60601-1.
You may see these other symbols on your Viera™ Portable Breast Ultrasound, accessories, and
packaging:
.
OTHER GRAPHICAL SYMBOLS FOR USE ON EQUIPMENT
Symbol Title Description
Contains sufficient for
<n> tests
In vitro diagnostic
medical device
Indicates the total number of IVD tests that can be performed with
the IVD kit reagents.
Indicates a medical device that is intended to be used as an in vitro
diagnostic medical device.
Power connector Indicates a barrel-type power connector.
RoHS compliant Identifies electrical and electronic equipment that meets the
Restriction of Hazardous Substances (RoHS) Directive 2011/65/EU.
European Conformity Conforms to European Council Directive 93/42/EEC.
FCC Conforms to US Federal Communications Commission.
CSA certification Certified by the Canadian Standards Association. The number
User Manual version 4.2.0 7
below this symbol indicates the contract number.
Page 16
Viera™ Portable Breast Ultrasound
OTHER GRAPHICAL SYMBOLS FOR USE ON EQUIPMENT
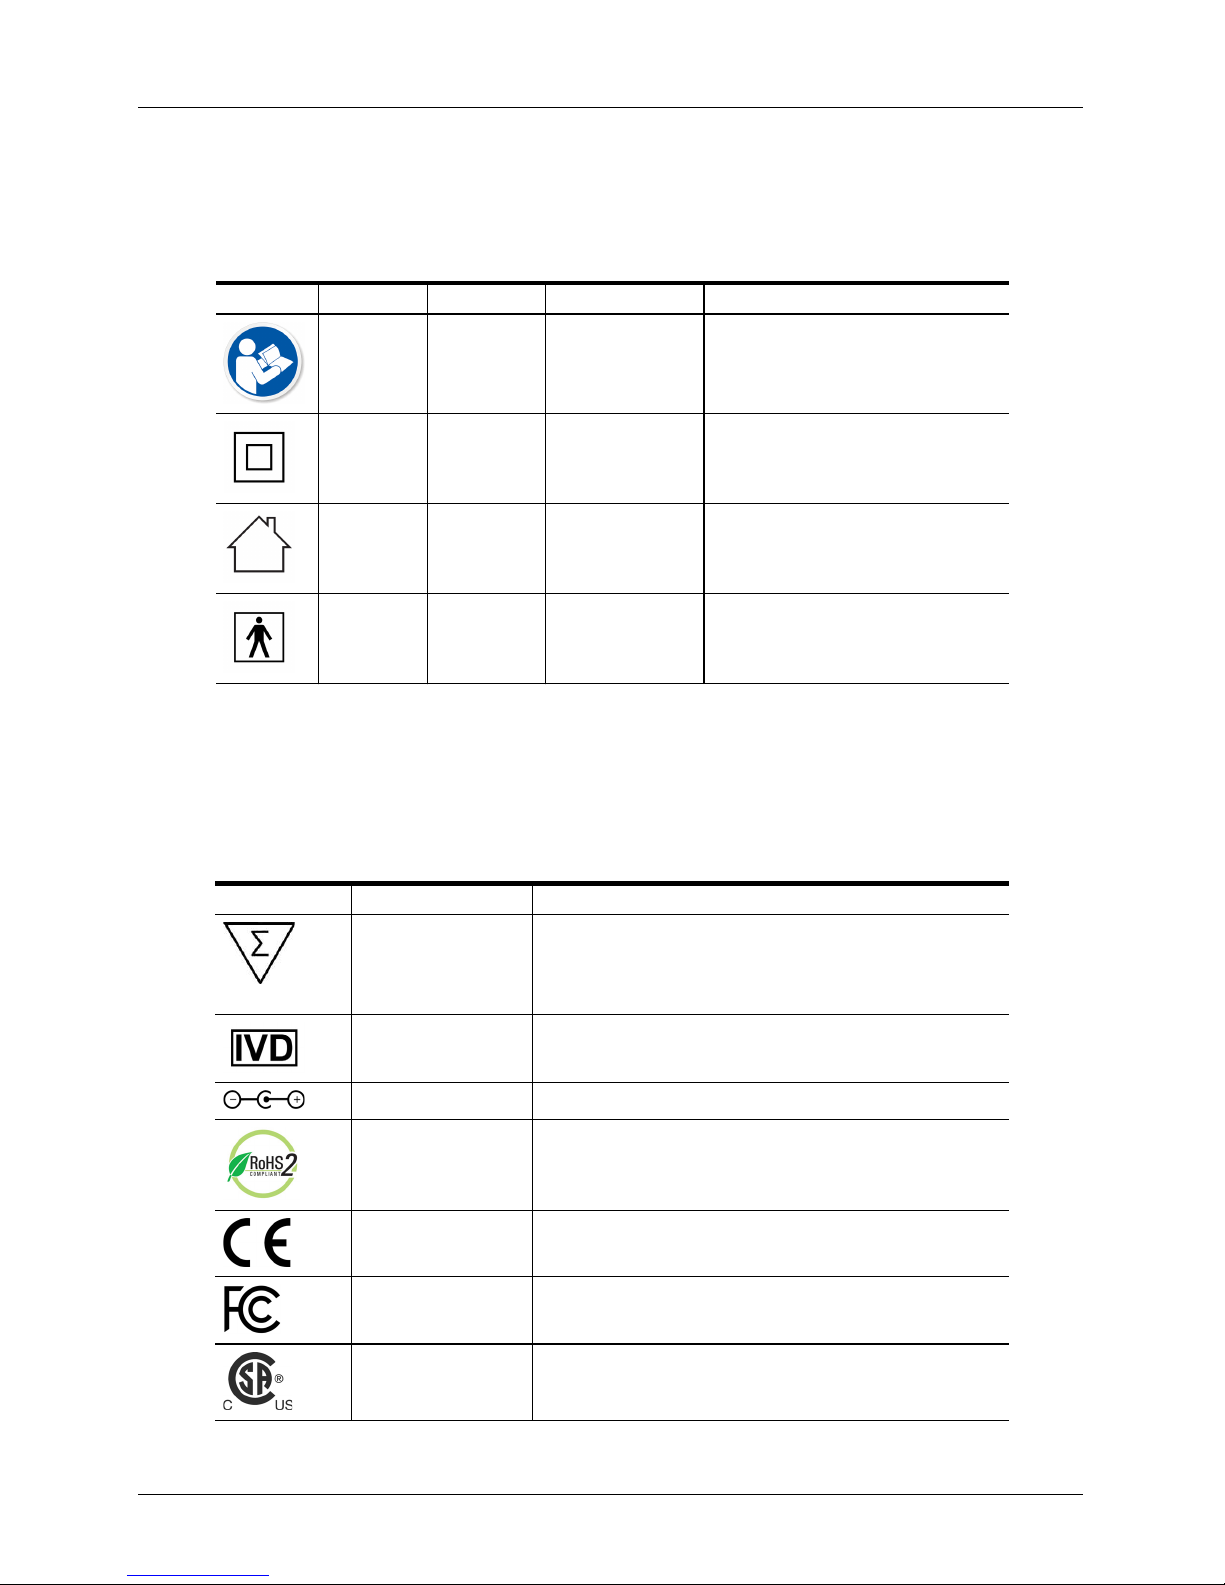
Waste Electrical and
Electronic Equipment
Ingress protection rating The equipment inside the enclosure is protected from tools and
DC Direct current.
GS1 DataMatrix Identifies GS1 encoded DataMatrix.
Global Medical Device
Nomenclature Code
Global Trade Item
Number
Model name Model name for the device.
Authorized
representative in the
European Community
ANATEL Conforms to the Brazilian Agency of Telecommunications.
Requires separate collection for electrical and electronic equipment
in compliance with the Waste Electrical and Electronic Equipment
(WEEE). Directive. When accompanied by or ,
components of the device may contain lead or mercury,
respectively, which must be recycled or disposed of in accordance
with local, state, or federal laws. The backlight lamps in an LCD
system monitor contain mercury.
wires greater than 2.5 millimeters, and is also protected from
immersion up to 1 meter in depth for 30 minutes.
A system of internationally agreed generic descriptors used to
identify all medical device products.
An identifier to look up product information in a database, often by
entering the number through a bar code scanner pointed at an
actual product.
Indicates the Authorized representative in the European
Community.
RCM Regulatory Compliance Mark for Australia and New Zealand.
NCC Conforms to Taiwan’s National Communications Commission.
User Manual version 4.2.0 8
Page 17

About the Viera™ Portable
Breast Ultrasound
Install, operate, and maintain this product according to the safety
and operating procedures in this manual, and only for its intended
purpose. Always use the information in this document with sound
clinical judgment and best clinical procedures.
This product is subject to the law in the jurisdiction that the product
is used. Install, use, and operate the product only in ways that adhere
to applicable laws or regulations, which have the force of law.
• Product package must be maintained with medical device. Do
not dispose.
• Using the product incorrectly, or for purposes other than those
intended and expressly stated by Clarius and/or Hologic, may
relieve Clarius and/or Hologic or its agents from all or some
responsibility for resultant noncompliance, damage, or injury.
1
• Using portable and mobile radio-frequency (RF) communications
equipment can affect the operation of medical equipment.
• Operating this system in the presence of flammable gases or
anesthetics can cause an explosion.
• Install and operate medical equipment according to
electromagnetic compatibility (EMC) guidelines.
• Users are responsible for image quality and diagnosis.
• This device complies with part 15 of the FCC rules. Operation is
subject to the following two conditions: (1) this device may not
cause harmful interference, and (2) this device must accept any
interference received, including interference that may cause
undesired operation.
• This product has demonstrated EMC compliance under
conditions that included the use of compliant peripheral
devices. It is important that you use compliant peripheral
devices to reduce the possibility of causing interference to
radios, televisions, and other electronic devices.
9
Page 18
Viera™ Portable Breast Ultrasound Scanner Description
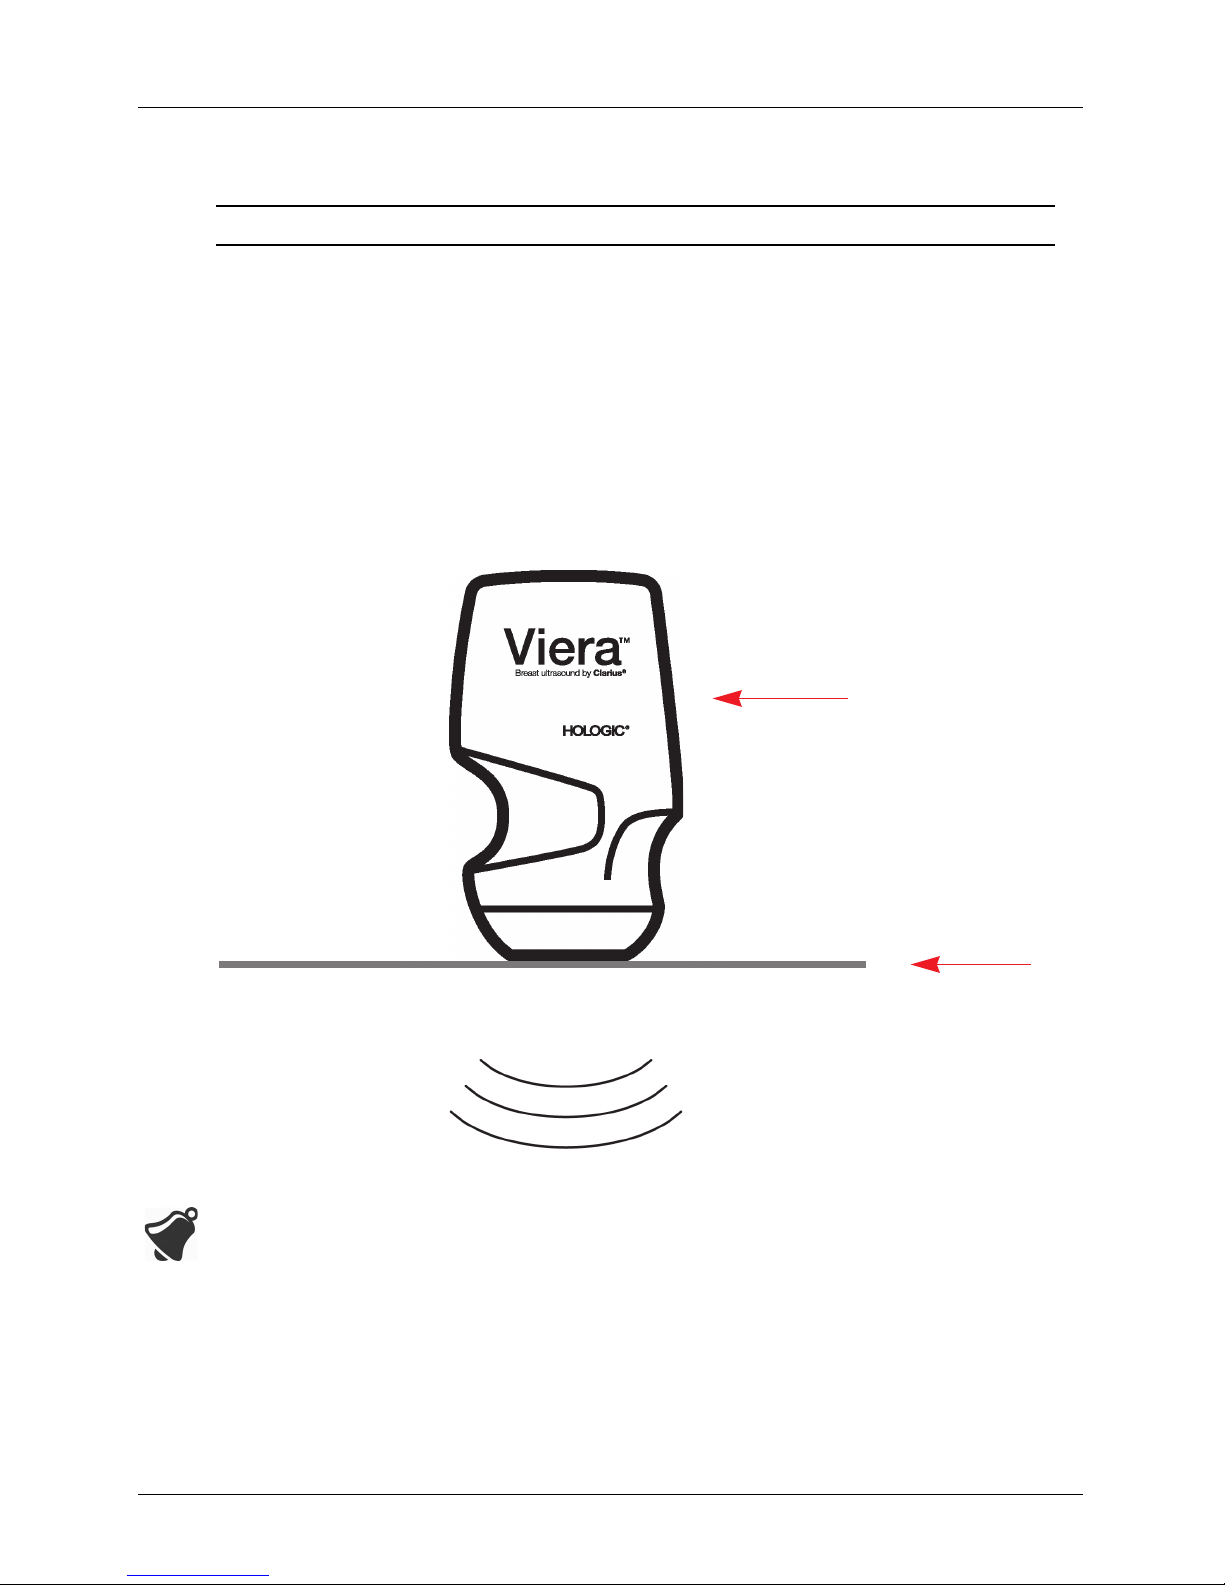
Scanner Description
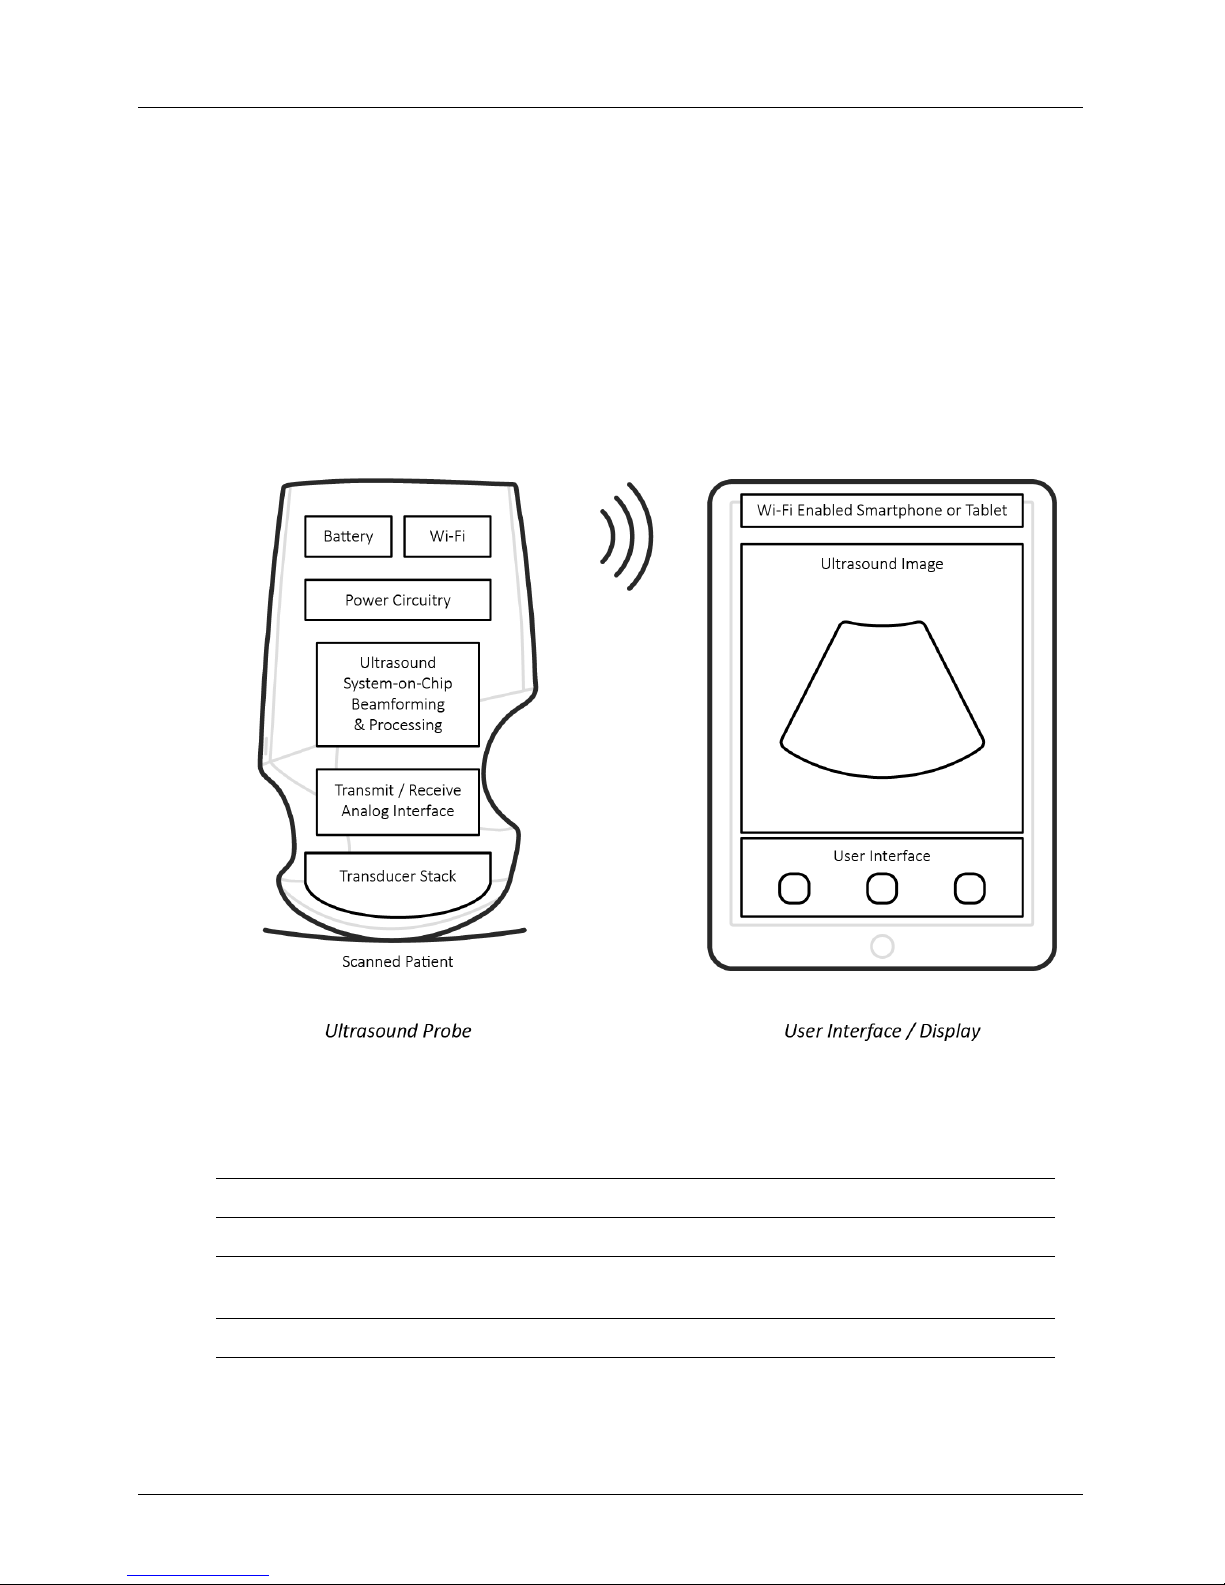
The Viera™ Portable Breast Ultrasound is a portable, general purpose, software controlled,
diagnostic ultrasound system used to acquire and display high-resolution, real-time
ultrasound data through a COTS (commercial off-the-shelf) Apple iOS or Android™ device. The
Viera™ Portable Breast Ultrasound series of wireless scanners are Bluetooth and Wi-Fi-based
scanners that communicate with a traditional tablet/smartphone via direct Wi-Fi to allow
users to export ultrasound images and display in different modes of operation. The Viera™
Portable Breast Ultrasound houses a battery and power generator, multichannel beamformer,
prescan converter and Wi-Fi components. The battery is removable and comes with a
separate charger.
Battery manufacturer Clarius
Battery model number 81-02-00001
Battery chemistry Li-ion
Battery management JEITA guideline compatible charger, in-pack fuel gauge with protection circuitry,
Battery life 500 - 1000 discharge cycles before reduction in charge
User Manual version 4.2.0 10
cell balancing, and temperature monitoring
Page 19
Viera™ Portable Breast Ultrasound Scanner Description
Charger Input: 100-240 VAC, 50/60 Hz, 0.5-0.2 A
Output: 12 VDC, 1.5 A
Scanner 7.2 V/2350 mAh
• Clarius App
• Scanners: All scanners have 192 elements
The concept of the Viera™ Portable Breast Ultrasound and software is primarily to provide an
easy to use, high-performance, low-cost, ultrasound platform for teaching and clinical
applications.
Viera™ Portable Breast Ultrasound
• Circumstances in the patient’s environment may negatively impact the scanner and the
exam. For example: (1) Chemicals and gases in the operating room. (2) Altitudes below
-382 m or above 4000 m.
Skin
• Vulnerable patients, such as children and pregnant/nursing women, may be more prone to
the exposure of acoustic energy when the scanner is used for prolonged periods.
• Biological incompatibility may exist between the scanner materials used and the biological
tissues, cells, and body fluids of the patient/user, taking account of the intended purpose
of the scanner.
User Manual version 4.2.0 11
Page 20

Viera™ Portable Breast Ultrasound Scanner Dimensions
• Using the scanner in the patient environment may be unsafe if the following conditions
exist: (1) Extremes in humidity (RH<15% and RH>90%). (2) Ambient temperatures that are
excessively high (40°C / 104°F) or excessively low (0°C / 32°F).
Users will be trained medical professionals (e.g., doctors, nurses, technicians) with previous
training in ultrasound. Images produced by the scanner are transmitted wirelessly to the user’s
smart device (tablet or smart phone).
Caution: Federal law restricts this device to sale by or on the order of a physician.
Unqualified/untrained personnel purchasing and using the Viera™ Portable Breast Ultrasound
may be unable to attain quality images.
Scanner Dimensions
Item Length (in/mm) Width (in/mm) Height (in/mm) Weight (oz/g)
Viera™ Portable
Breast Ultrasound
Scanner
(without battery)
Viera™ Rechargeable
Li-ion Battery
Viera™ Battery
Charger (without plug
adapter)
3.94/100 1.66/42 6.65/169 15.4/437
2.95/75 0.67/17 2.83/72 3.6/103
3.15/80 3.50/89 1.26/32 1.9/55
User Manual version 4.2.0 12
Page 21

Viera™ Portable Breast Ultrasound Product Usage
Product Usage
Indications for Use
The Viera™ Portable Breast Ultrasound is a software-based ultrasound imaging system and
accessories, intended for diagnostic imaging. It is indicated for diagnostic ultrasound imaging
and fluid flow analysis in the following applications: abdominal, intra-operative (non-
2
neurological)
vessel, carotid, and procedural guidance of needles into the body.
The system is a transportable ultrasound system intended for use in environments where
healthcare is provided by trained healthcare professionals.
, pediatric, small organ, musculo-skeletal (conventional, superficial), peripheral
1
1. The following indications are specific to the Viera™ Portable Breast Ultrasound, which is within the Clarius Ultrasound Scanner family of scanners. For full indications for use for the Clarius Ultrasound Scanner
system, please refer to the Clarius Ultrasound Scanner User Manual.
2. Intra-operative is defined as used on or inside an open wound. This indication is valid in the US only. Use
in surgical environments is acceptable in all other markets.
User Manual version 4.2.0 13
Page 22

Viera™ Portable Breast Ultrasound Product Usage
Viera™ Scanner
DEVICE NAME: VIERA™ SCANNER
INTENDED USE: DIAGNOSTIC ULTRASOUND IMAGING OR FLUID FLOW ANALYSIS OF THE HUMAN BODY AS FOLLOWS:
Clinical Application Mode of Operation
General
(Track 1 Only)
Ophthalmic Ophthalmic P
Fetal Imaging
& Other
Specific
(Tracks 1 & 3)
Fetal
Abdominal P P P P N B+M; B+CD;
Intra-operative (Abdominal
organs & vascular)
Laparoscopic
Pediatric P P P P N B+M; B+CD;
Small Organ (Thyroid, Prostate,
Scrotum, Breast)
Neonatal Cephalic
Adult Cephalic
Trans-rectal
Trans-vaginal
B M Color
Doppler
P P P P N B+M; B+CD;
P P P N B+CD; B+PD Note 1
Power
Doppler
PW
Doppler
Combined
(Specify)
B+PD
B+PD
B+PD
Other*
Note 1
Note 1
Note 1
Trans-urethral
Trans-esophageal (non-Cardiac)
Musculo-skeletal (Conventional) P P P P N B+M; B+CD;
Musculo-skeletal (Superficial) P P P P N B+M; B+CD;
Intravascular
Other (Urology, Gynecology)
Cardiac Cardiac Adult
Cardiac Pediatric
Intravascular (Cardiac)
Trans-esophageal (Cardiac)
Intra-cardiac
Other (specify)
Note 1
B+PD
Note 1
B+PD
User Manual version 4.2.0 14
Page 23

Viera™ Portable Breast Ultrasound Product Usage
DEVICE NAME: VIERA™ SCANNER
INTENDED USE: DIAGNOSTIC ULTRASOUND IMAGING OR FLUID FLOW ANALYSIS OF THE HUMAN BODY AS FOLLOWS:
Peripheral
Vessel
N = new indication; P = previously cleared by FDA; E = added under this appendix
Note 1: Needle Enhancement in B-Mode.
Peripheral Vessel P P P P N B+M; B+CD;
Other (Carotid) P P P P N B+M; B+CD;
Note 1
B+PD
Note 1
B+PD
User Manual version 4.2.0 15
Page 24

Viera™ Portable Breast Ultrasound Product Usage
Contraindications
For Use Outside USA
Do not use the Viera™ Portable Breast Ultrasound in the following situations. Doing so may
produce images with inaccurate results:
• Patients who have had surgery, which may have changed the c
examining tissue (for example, a mastectomy), as this could skew or alter the measured
density.
• Patients whose bodies contain foreign artifacts (for example, implants), in the examining
tissue.
• Ophthalmic use or any use causing the acoustic beam to pass through the eye.
• Intra-operative use (defined as introducing a scanner into a surgical incision or burr hole).
• Endocavitary use (defined as introducing a scanner within a body cavity or organ, for
example, an atrium, esophagus, rectum, or vagina).
For Use in Surgical Environments
Before you use the Viera™ Portable Breast Ultrasound for intra-operative procedures or in a
surgical environment, follow the instructions for high-level disinfection (for instructions see
High-Level Disinfection
on page 85), then cover the Viera™ Portable Breast Ultrasound with a
sheath:
• Use only CIVCO REF 610-1212.
• Do
wnload the usage instructions from http://civco.com/mmi/ultrasound/covers/generalpurpose/Latex-Free-Wireless-Ultrasound-Probe-Covers-610-1212.htm and read all the
information before use.
omposition of the
When you have finished using the Viera™ Portable Breast Ultrasound, immediately clean it (for
instructions see Cleaning the Viera™ Portable Breast Ultrasound on page 82), followed by
another high-level disinfection.
If the sheath breaks during the intra-operative procedure, dispose
same cleaning and high-level disinfecting process as above, then cover the Viera™ Portable
Breast Ultrasound with a new sheath before continuing to use it.
For Use in Ophthalmic Procedures
Do not use the scanner for any use that may cause the acoustic beam to pass through the eye.
Doing so may result in serious and irreversible harm to the eye of the patient.
User Manual version 4.2.0 16
the sheath and follow the
Page 25

Viera™ Portable Breast Ultrasound Hardware
Hardware
Warranty
Your Viera™ Portable Breast Ultrasound includes a one-year warranty. To purchase extended
warranty, contact your Hologic representative.
Disposal
Hologic is an active participant in the protection of the natural environment. The equipment
and its accessories are designed and manufactured according to environmental protection
guidelines, and the disposal of this equipment is intended to follow the same principles. The
equipment materials that are essential for functionality are also harmful to the natural
environment, therefore, you must dispose these materials appropriately.
For proper disposal of the Viera™ Portable Breast Ultrasound or any of its accessories, dispose
it in accordance with local, state, and federal regulations. Alternatively, you can return it to
Hologic.
The improper disposal of the Viera™ Portable Breast Ultrasound (when the battery is no
longer working or the scanner has exceeded its shelf life), or any of its accessories, adds
hazardous materials to our landfills.
Security
Information Security
When entering data using the Clarius App, it is your responsibility to protect your security
credentials (e.g. passwords) and the personal information of patients (e.g. names).
Network Security
When connecting your smart device, use a network that supports Wi-Fi 802.11n. We
recommend that you secure this network using WPA (Wi-Fi Protected Access) or WPA2 (Wi-Fi
Protected Access II) as your security protocol.
For information on setting up your wireless network security, refer to your network
equipment’s documentation.
User Manual version 4.2.0 17
Page 26

Viera™ Portable Breast Ultrasound Security
You may run into situations where no wireless access point is available. Using an untrusted
wireless access point may allow malicious parties to see your Wi-Fi signals, perform harmful
actions, and view communications between the two smart devices. When no secure access
point is available, operate the Clarius App in Wi-Fi Direct mode, and it will automatically set up
encryption.
For security purposes:
• Use secure passwords.
• Use secure wireless equipment using the latest firmware and software, and secure
protocols.
• Lock your smart devices.
The following actions could introduce new risks to patients, operators, and third parties. It is
your organization's responsibility to identify, analyze, evaluate, and control these risks:
• Changing network configurations.
• Connecting to additional networks or disconnecting from existing networks.
• Upgrading to new equipment or updating existing equipment.
Confidentiality
Confidentiality of information is assured as follows:
• The scanner contains no patient-identifying information.
• When the scanner connects to a wireless network, it encrypts and stores the Wi-Fi
password.
• The data transferred between the Viera™ Portable Breast Ultrasound and the Clarius App
is encrypted.
• Image data contains no patient- or user-identifying information, and is transmitted in
unencrypted form. If you want this data encrypted, connect to a:
• Wi-Fi network where only trusted parties are permitted. The Wi-Fi network
• Wi-Fi Direct network. The Wi-Fi Direct network encrypts all image data, and
encrypts all image data sent from other Wi-Fi networks.
because no other users are on the Wi-Fi Direct network, the image data is
confidential.
• If no images are exported to Clarius Cloud or DICOM, the Clarius App stores them in the
Viera™ Portable Breast Ultrasound indefinitely. If images are exported, these images will
be deleted from the device 10 days after export (you can change the default number of
days to 30, 60, 90, or never).
User Manual version 4.2.0 18
Page 27

Viera™ Portable Breast Ultrasound System Requirements
Integrity
Integrity of the data transmitted between the Viera™ Portable Breast Ultrasound and the
Clarius App is assured as follows:
• Authenticated encryption prevents malicious users from intercepting and modifying data.
• Integrity checks ensure completion and validity of data received. If any data is incomplete
or invalid, it is discarded.
• TCP channels used over Wi-Fi ensures that data is delivered correctly. For transmitting
image data, a UDP channel is used.
Availability
If Wi-Fi connection is unattainable (e.g. Wi-Fi access points are unavailable or the network is
down), use Wi-Fi Direct network, which is managed by the smart device. Because Wi-Fi Direct
network is a peer-to-peer connection using the Wi-Fi protocol, it disallows other users from
connecting, thereby reducing DDOS (Distributed Denial of Service) attacks.
If the Wi-Fi Direct network is disrupted, the Viera™ Portable Breast Ultrasound continues to
monitor itself, and shuts down after a period of inactivity. This reduces acoustic energy
transmission and battery usage.
Accountability
The concept of accountability does not apply to the Viera™ Portable Breast Ultrasound.
However, ownership (i.e. the active user) of a smart device is assigned to one user at a time.
Once you begin using the smart device, no other user can connect to the same smart device.
All data transmitted between the smart device and the Clarius App is owned by the active
user.
System Requirements
Using the Viera™ Portable Breast Ultrasound on a smart device that does not meet the
minimum requirements may result in low-quality images, unexpected results, and possible
misdiagnoses.
To run the Clarius App, a smart device must meet or exceed the following minimum
specifications:
Technical Features:
User Manual version 4.2.0 19
Page 28

Viera™ Portable Breast Ultrasound System Requirements
• Supports Bluetooth LE v4.0+
• Supports Wi-Fi 802.11n and Wi-Fi Direct
• 8 GB of storage (on-board)
• 512 MB of memory
Operating System:
• Android™ 4.4.2 (API 19)+ or Apple iOS 9.0+
Processor:
• Dual core processor (CPU)
• ARM-based CPU architecture (for Android™-based devices)
Display:
• Resolution (in pixels) of 960x640 (or 640x960)
• Contrast ratio of 800:1
• Supports OpenGL ES 2.0
• Some sections of this User Manual may not apply to earlier versions of the Viera™ Portable
Breast Ultrasound. Make sure you have the latest version of the Clarius App.
• Using a smart device that is too small may not have the necessary resolution for viewing
small structures.
User Manual version 4.2.0 20
Page 29
A Quick Tour
Overview of the Interface
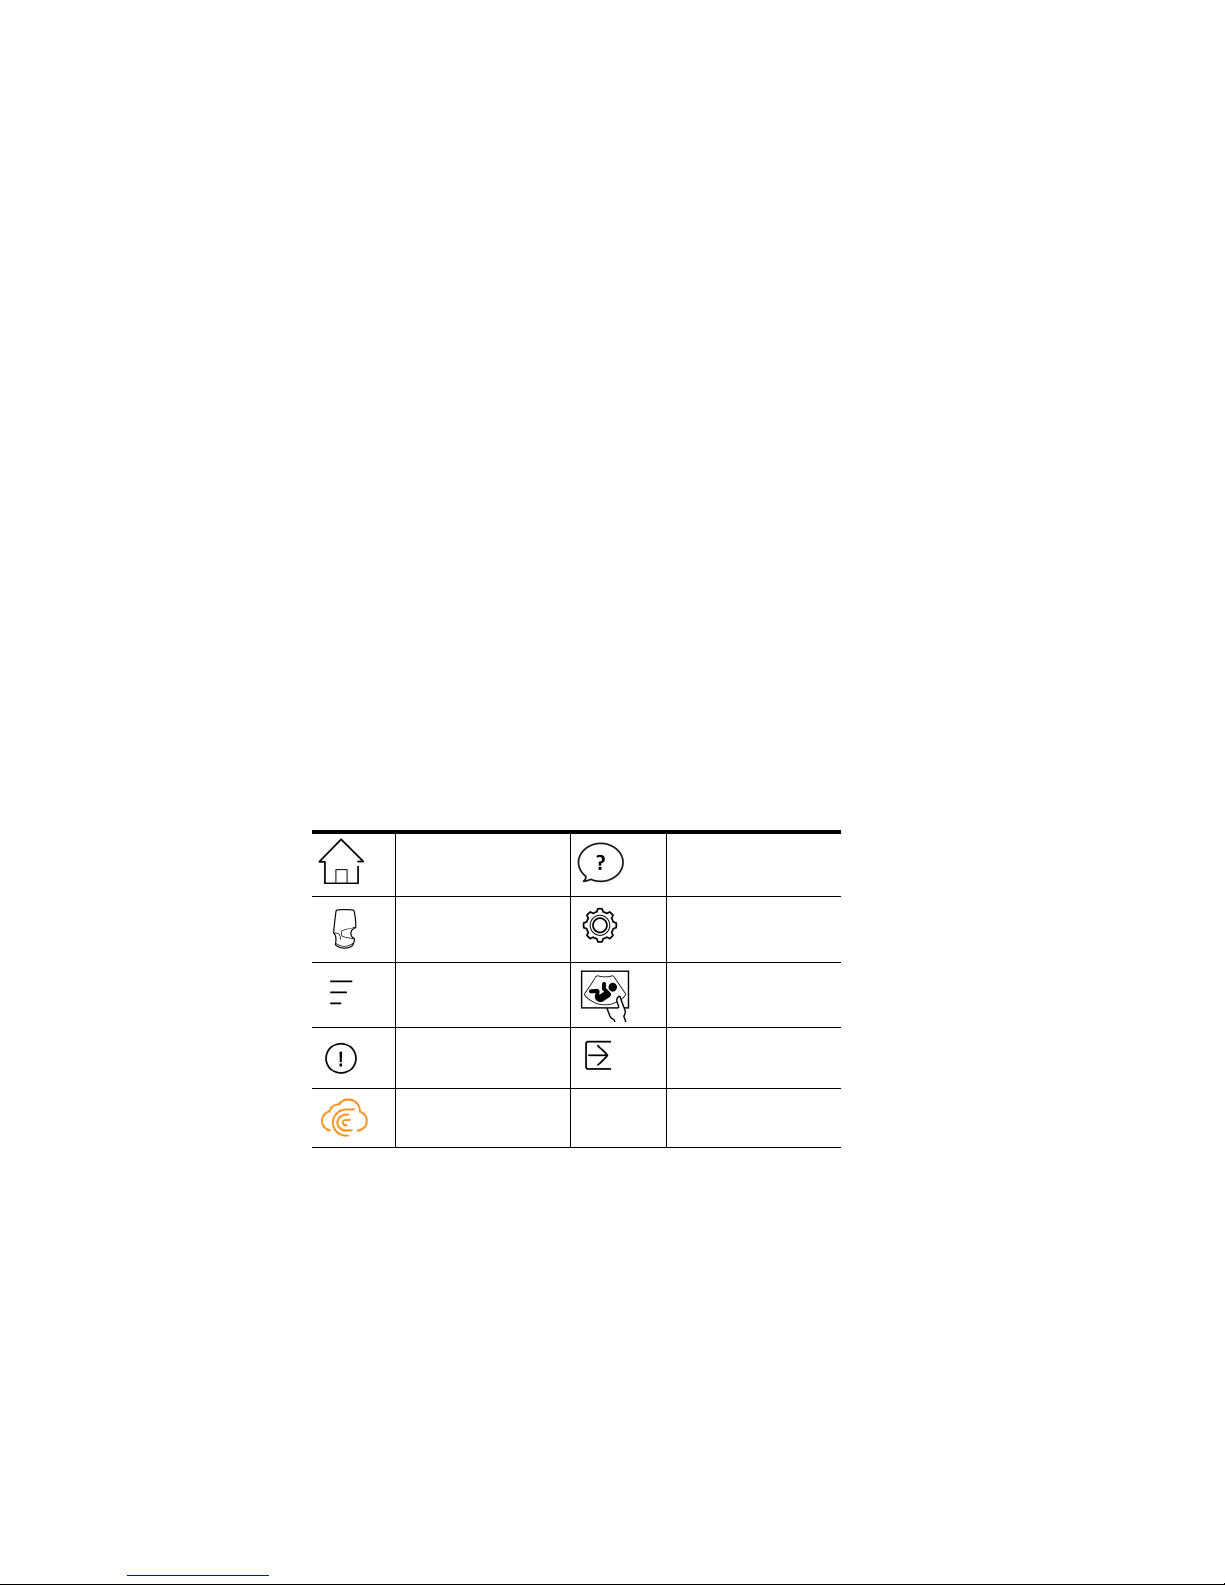
Icons
Menu Icons
Menu icons are navigational tools at the top of the screen that takes
you to a different page.
MENU ICONS
2
Home page. Support page.
Scanners page.
Scan QR Code page.
Display menu list. Exams page.
About page. Sign out.
Clarius Cloud
webpage.
Settings page.
21
Page 30
Viera™ Portable Breast Ultrasound Overview of the Interface
Tools Icons
Tool icons are task buttons that perform an action when you select them.
TOOL ICONS
Discard selected item. Save image. Freeze/unfreeze a live-
scanning image.
Disable auto-freeze.
Return to previous
page.
Go to next page. To begin measuring,
Display search field. To create a single
Clear contents. To create a dual
Submit. To draw a
Zoom in/out of image. To draw a circle, tap
Open the tools list. To toggle auto-gain on/
Save cineloop. Display center line on
To flip the image on its
axis, drag this icon left/
right or up/down.
tap this icon and select
a measuring tool.
measure, tap two areas
on the image
measure, tap two areas
on the image to draw
one line, repeat to draw
second line.
circumference, drag
your finger around the
region of interest.
two areas on the region
of interest.
off, select this icon from
the tools list.
live imaging.
Disconnect active
scanner and turn off its
power.
Open Clarius' Facebook
page.
Open Clarius' Twitter
page.
Open Clarius' LinkedIn
page.
Open Clarius'
Instagram page.
Open Clarius' YouTube
page.
Use B-Mode of imaging.
Use Needle Enhance
feature.
Use Color Doppler
mode of imaging.
Use M-Mode of
imaging.
View image on normal
speed.
User Manual version 4.2.0 22
Use Power Doppler
mode of imaging.
Add annotations. Reverse the colors on
View image on slow
speed.
Select a pictogram from
the options.
Color Doppler image.
Page 31
Viera™ Portable Breast Ultrasound Overview of the Interface
Status Icons
Status icons are view-only indicators that animate or change color to show the status of a
component.
STATUS ICONS
Quality of network connection is good.
Yellow, orange, or red indicates varying
degrees of congestion.
Bluetooth signal from a nearby scanner is
weak, satisfactory, or excellent.
Wi-Fi Direct has been selected for this
connection.
Wi-Fi has been selected for this
connection.
The Clarius App is waiting for your
selection (e.g. update firmware or select
network).
The scanner you selected is now
connected to the Clarius App. Tapping
this icon displays the temperature, battery
power, and option to display QR code.
Scanner is uploading a new software
package.
Scanner is updating to the latest software
package. During this time, do not remove
battery from the scanner.
Scanner is cool. Red indicates that it is
warm. Tapping this icon displays the
temperature in degrees Celsius.
Scanner's battery power. Tapping this icon
displays the percentage of battery power
remaining.
MI/TI Acoustic display indicators. Image is zoomed in.
Image is zoomed out.
Auto-gain is turned on.
Scanner is in sleep mode.
Number of in-progress exams.
Number of exams waiting to be uploaded
to the Clarius Cloud. These images will
automatically upload to the Clarius Cloud
the next time you have network
connection.
Exam has successfully uploaded to the
Clarius Cloud.
Images are currently being uploaded to
the selected DICOM server.
Images have successfully uploaded to the
selected DICOM server.
Images are currently being exported to
your smart device’s camera roll.
Images have successfully uploaded to
your smart device’s camera roll.
Menu Options
To access the menu options, select .
User Manual version 4.2.0 23
Page 32

Viera™ Portable Breast Ultrasound Overview of the Interface
Support
To access the Support page, select .
Settings
Displays the following buttons:
• What’s New: Takes you to the webpage containing frequently ask
ed questions.
• Tutorials: Takes you to the webpage containing tutorials.
• User Manual: Takes you to the webpage containing the user manuals.
• Technical Support: Opens your default email account with pre-populated fields for asking
questions about the product.
• Feedback: Opens your default email account with pre-populated fields for sending general
feedback about the product.
• Submit Logs: The Viera™ Portable Breast Ultrasound sends the system logs to the Clarius
Cloud. For more information, see Sending Activity Logs on page 73.
To access the Settings page, select .
When you make changes in the Settings page, the new values displa
y the next time you sign in.
User Manual version 4.2.0 24
Page 33

Viera™ Portable Breast Ultrasound Overview of the Interface
Options
• Control Placement: The location of the controls on the Imaging page.
• Scanner Shutdown Timeout (minutes): Select the number of minutes of inactivity before
the scanner shuts down.
• Scanner Performance:
• High Performance: Optimum power level.
• Power Savings: Reduced power level for longer scan times and lower heat.
• Automated Heart Rate: This setting is shown if your Clarius App is currently connected to a
scanner. This automated heart rate feature, available only in the cardiac workflow,
measures the heart rate when you scan the heart. For instructions on using this feature,
see Using Automated Heart Rate on page 57.
• Post Capture Freeze: If disabled, capturing a cineloop continues imaging. If enabled,
capturing a cineloop freezes the image.
• Show Virtual Scanners: Displays virtual scanners on the Scanners page. Virtual scanners are
used to simulate the Viera™ Portable Breast Ultrasound for demonstration and evaluation
purposes.
Screen Calibration
To obtain optimal screen-viewing for your current operating environment, adjust the contrast
on your smart device by using the horizontal grayscale calibration slider. Contrast adjustment is
useful when swapping one smart device with another, or when extending the view of the
current exam on a second smart device; or in any situation where the brightness of one screen
User Manual version 4.2.0 25
Page 34

Viera™ Portable Breast Ultrasound Overview of the Interface
you are using is different from another. If your smart device is equipped with an autobrightness feature, you may want to turn this feature off. The brightness control affects only
the monitor, not the saved images.
Local Storage
Press to clear the log files. Note that deleting these log files could make it difficult or
impossible for Hologic Technical Support to provide help in cert
Scanner Information
ain situations.
Connect the Clarius App to a Viera™ Portable Breast Ultrasound to view the following
information:
• Scanner Information: Details about the scanner such as name, model, and serial number
• Factory Reset: Clears all stored Wi-Fi information and other cached data.
• Reset Wi-Fi Settings: Select this button if your Wi-Fi password changes. This clears all
stored Wi-Fi network passwords and resets the Wi-Fi Direct password.
• Identify: Locates the scanner with an audible sound. See Scanner Locator on page 38.
Scanner Customization
Connect the Clarius App to a Viera™ Portable Breast Ultrasound to view the following
information:
• Wi-Fi Direct Settings: This section lets you program the netw
• Auto-Boot: If disabled, inserting the battery sets the scanner to standby mode. From here
you will manually connect the Clarius App to the scanner. If enabled, inserting the battery
automatically connects the Clarius App to the scanner. If it fails to connect within two
minutes, the scanner will go to sleep mode.
This page displays a list of exams that have been uploaded to the
the Clarius App and re-installed it, it will remove these records.
.
ork name and password.
Clarius Cloud. If you delete
Exams
To access the Exams page, select .
User Manual version 4.2.0 26
Page 35

Viera™ Portable Breast Ultrasound Overview of the Interface
This page displays a list of completed exams and the status of any uploads or exports.
To view exams currently uploading to the Clarius Cloud:
Clarius Cast
To access the Clarius Cast page, select .
Go to the home screen and select
.
User Manual version 4.2.0 27
Page 36

Viera™ Portable Breast Ultrasound Overview of the Interface
About
When using the QR Code® / barcode reader, if you have multiple barcodes close to each other,
adjust the frame to ensure you restrict the frame size to display only one barcode in the
window.
You can connect up to five smart devices to an active Viera™ Port
able Breast Ultrasound for
viewing real-time exams. This lets patients hold a separate smart device to view their images
while the ultrasound technician conducts the exam using their own smart device. It also lets
students have view-only access to live exams performed by an instructor. For instructions on
using the view-sharing mode, see Using the View-Sharing Mode on pag
e 68.
To access the About page, select .
User Manual version 4.2.0 28
Page 37

Viera™ Portable Breast Ultrasound Overview of the Interface
Displays the following information:
• Version of the Clarius App and Viera™ Portable Breast Ultrasound software
• Copyright information
Links to:
• Terms & Conditions
• Privacy Policy
• Acknowledgments
• About Us
Social media pages for:
Facebook Twitter LinkedIn
Instagram
User Manual version 4.2.0 29
YouTube
Page 38

Viera™ Portable Breast Ultrasound Screen Overview
Sign Out
Select to sign out of the Clarius App. If an exam is currently in progress, it will be saved in
the list of in-progress exams.
Screen Overview
Sign-in Page
When you open the Clarius App, it displays a sign-in screen.
• Create Account: This takes you to the account creation pag
enter your email address using the same domain that your administrator used to register,
and then create yourself a strong password containing the following parameters:
• At least six characters
• At least one upper case, digit, or special character
Once registered, you can go to the Clarius Cloud to add details to your account.
• Forgot Password: This takes you to the Clarius webpage for resetting your password.
• Need Help: This takes you to the Clarius webpage containing contact and help information.
User Manual version 4.2.0 30
e. To create a new account,
Page 39

Viera™ Portable Breast Ultrasound Screen Overview
Scanners Page
When you sign in, the Clarius App displays the Scanners page. This page lists active scanners in
your area to which your institution has access rights. If your Clarius App cannot locate your
scanner, either because the scanner is powered off or because it is located outside its
Bluetooth range, the scanner is grayed out on the list.
A
beside a Viera™ Portable Breast Ultrasound indicates that you have no access to it. To
access this scanner, contact your administrator.
The Scanners page displays the following:
• A representative image of the scanner type.
• The currently selected scanner is displayed at the top of the list, indicated by . Tapping
this icon disconnects the scanner from your smart device. It also turns off the scanner’s
power.
• The Bluetooth RSSI (signal strength) .
• Custom scanner name. You can define this in the Clarius Cloud.
• Length of time since last activity.
To choose your Viera™ Portable Breast Ultrasound’s settings:
Tap to display the following options:
User Manual version 4.2.0 31
Page 40

Viera™ Portable Breast Ultrasound Screen Overview
• Wi-Fi Direct: The scanner creates a peer-to-peer network connection using Wi-Fi
protocol.
• the name of your Wi-Fi network
• Wi-Fi Direct Channel: This is shown if you have Wi-Fi Direct selected. For best
results, keep the Auto option selected, it auto-connects the Clarius App to the most
recently used Viera™ Portable Breast Ultrasound. To use this feature, your smart
device must support 5GHz Wi-Fi.
Workflows Page
Exam types are characterized as workflows, a sequence of steps to complete an exam.
Workflows guide you towards collecting all the information needed to produce a complete and
accurate report for the reviewing physician.
Only those exam types applicable to the selected Viera™ Portable Breast Ultrasound are
displayed in the Workflow page. See following tables for list of exams.
To search for a workflow:
• Scroll through the options.
• Enter search field: Tap the to display the search field and enter your search criteria.
The Clarius App accepts partial searches.
User Manual version 4.2.0 32
Page 41
Viera™ Portable Breast Ultrasound Screen Overview
WORKFLOWS AVAILABLE WITH THE VIERA™ SCANNER
Workflow B-Mode M-Mode Power
Breast X X X X X X
Dense Breast X X X X X X
Interventional X X X X X X
Radiology X X X X X X
a. US only.
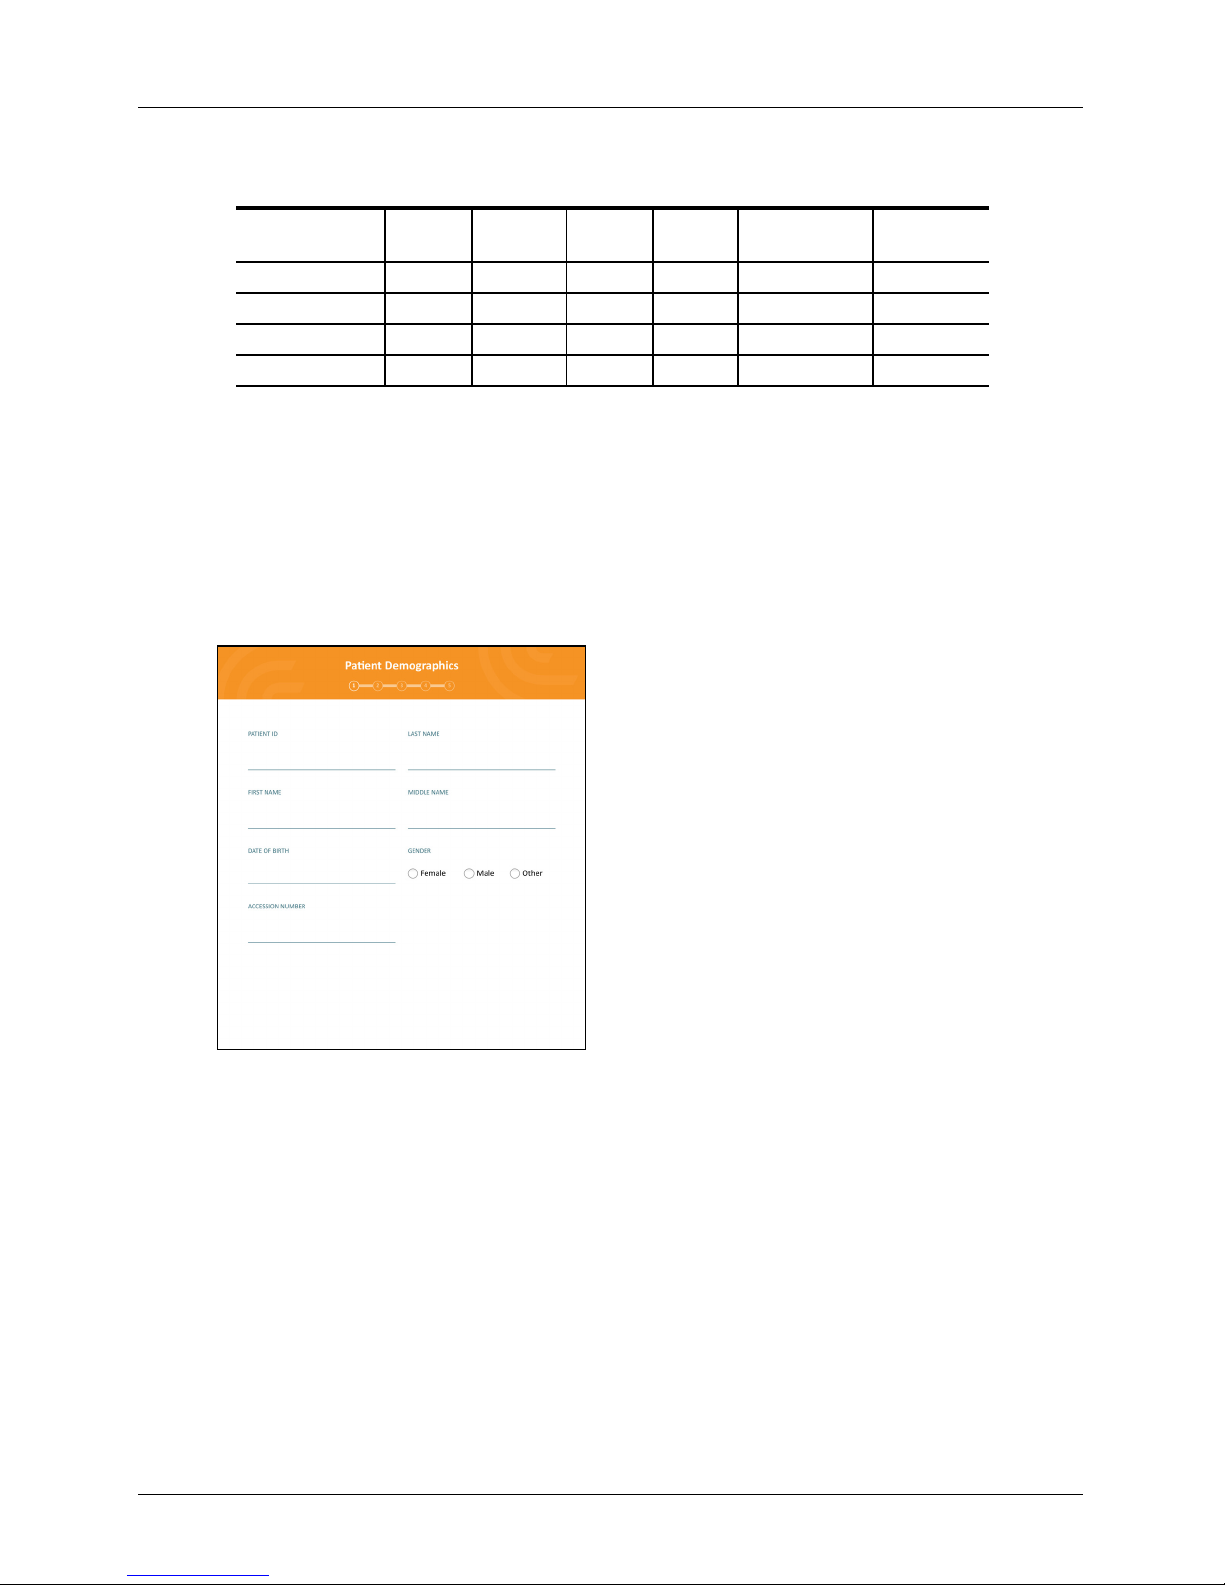
Patient Demographics
This is where you enter the patient’s basic information.
Doppler
Color
Doppler
Needle Enhance
PW Doppler
a
You can tap on a field to display a barcode icon and scan their ID bracelet using your smart
device's barcode scanner. The Accession field is a unique identifier assigned to images when
uploading to DICOM.
Indications Page
This is where you can enter notes such as the patient’s medical history, current symptoms,
allergies, and medications.
User Manual version 4.2.0 33
Page 42

Viera™ Portable Breast Ultrasound Screen Overview
Imaging Page
This is the live imaging screen.
User Manual version 4.2.0 34
Page 43

Viera™ Portable Breast Ultrasound Screen Overview
Review Page
When you have finished imaging, you can evaluate and edit findings that were acquired during
the exam.
Impressions Page
After reviewing the images, use this page to record your findings.
User Manual version 4.2.0 35
Page 44

Viera™ Portable Breast Ultrasound System Capabilities
System Capabilities
Error Messages
The Viera™ Portable Breast Ultrasound displays no error messages. Instead, the Viera™
presents visual notifications in the form of status lights, and audible notifications in the form
of status alerts.
Status Lights
The following table defines the Viera™ Portable Breast Ultrasound’s status lights:
Color Display Meaning
Blue Flashing Scanner is booting up.
Blue Solid Scanner is ready for a Wi-Fi connection, or has a connection and is not imaging.
Green Solid Scanner is imaging.
Orange Flashing Battery is low.
Orange Solid
Red Flashing Battery is critically low.
Red Solid
Purple Flashing Software/firmware is updating. Do not remove battery.
a. Remove the battery from the scanner, wait 10 seconds, re-insert the battery, and re-connect it
to your smart device. If symptoms persist, contact Hologic.
Audible Notifications
The following table defines the audible indicators the Viera™ Portable Breast Ultrasound
emits:
Internal communications error.
Critical boot-up error has occurred.
a
a
Sounds Meaning
1 short beep Wi-Fi Network connected
2 short beeps Wi-Fi Direct enabled
2 quick beeps Scanner components are ready
User Manual version 4.2.0 36
Page 45

Viera™ Portable Breast Ultrasound System Capabilities
3 quick beeps Bluetooth is ready
2 tone-increasing pitches Power on
2 tone-decreasing pitches Power off
1 beep every few seconds Critically low battery
4 long alerts Embedded processor is preparing for software update
4 short beeps No network connected
4 quick beeps App Find Request (based on selected ringtone)
8 long alerts App Find Request (important)
Sleep Mode
Sleep mode turns off the display on your smart device while pausing all current functions. This
is to help save the Viera™ Portable Breast Ultrasound’s battery power when the Clarius App is
not in use.
After five minutes of dormancy (no live scanning), the Clarius App displays a 30-second
countdown. You have the following options:
• Doing nothing will let the Viera™ Scanner go to sleep. The connection status area displays
and the live imaging page is in freeze mode.
• Selecting Cancel prevents the Viera™ Scanner from entering sleep mode.
To wake up the Viera™ Portable Breast Ultrasound:
• Unfreeze the live imaging page.
• Return to the Scanners page and re-select the scanner.
Auto Shutdown
If there is no connection between the Viera™ Portable Breast Ultrasound and the Clarius App
(e.g. you signed out of the Clarius App but left the Viera™ Scanner running), the scanner
automatically turns off to save battery power.
User Manual version 4.2.0 37
Page 46

Viera™ Portable Breast Ultrasound Need Help?
Scanner Locator
If you have misplaced the Viera™ Scanner, the Clarius App can signal the Viera™ Portable
Breast Ultrasound to emit an audible response.
To locate your Viera™ Portable Breast Ultrasound:
Go to the Settings menu and select the Identify button. You will hear an audible
sound.
Need Help?
Additional Training
If you require more training on the Viera™ Portable Breast Ultrasound, see the tutorials on
www.clarius.com/category/education.
Need More Help?
If you require additional assistance, you can do one of the following:
• Refer to the Clarius FAQ at www.clarius.com/support/faq
• Please contact Hologic Technical Support.
User Manual version 4.2.0 38
Page 47

Using the Viera™ Portable
Breast Ultrasound
This chapter explains how to install and use your Viera™ Portable
Breast Ultrasound safely and effectively.
Refer to Safety on page 87 before handling the Viera™ Portable
Breast Ultrasound.
Your Viera™ Portable Breast Ultrasound is already activated and
ready for use. You just need to download the Clarius App on an
Apple iOS device or an Android™-based device.
Downloading the Clarius App
Apple iOS
3
You must have an App Store account and create a password.
1. Go to the Apple Store App.
2. Search for the Clarius App.
If you cannot find the Clarius App, your smart device may
not be meeting minimum specifications. See System
Requirements on page 19.
3. Tap the Install button and follow the instructions on your
screen.
This downloads the application.
4. Tap the Open button.
This opens the Clarius App.
39
Page 48

Viera™ Portable Breast Ultrasound Updating the Viera™ Portable Breast Ultrasound
Note: Restoring factory settings on your iOS device deletes the Clarius App from your home
screen. If this occurs, reinstall the Clarius App.
Android™
The Clarius App is available from the Google Play Store, a Google-operated digital media store
where you can download applications for your smart device. Before installing the Clarius App,
make sure your smart device meets the minimum requirements.
You must have a Google account and create a password.
1. On your smart device, go to the Google Play Store.
2. Search for the Clarius App.
If you cannot find the Clarius App, your smart device may not be meeting minimum
specifications. See System Requirements on page 19.
3. Tap the Install button and follow the instructions on your screen.
This downloads the application.
4. Tap the Open button.
This opens the Clarius App.
Updating the Viera™ Portable Breast Ultrasound
Software Updates
When an app update becomes available, you will receive an email notification.
To update the software:
1. Open the message and tap Download & Install.
2. Tap Install and follow the instructions on the screen.
Firmware Updates
If a Viera™ software update is required, the Clarius App will notify you.
User Manual version 4.2.0 40
Page 49

Viera™ Portable Breast Ultrasound Inserting & Removing the Battery
To update the firmware:
Tap Update.
During the updating process, do not remove the battery. If the battery level is too low,
the system will decline the update.
During the update, the Viera™ emits a purple flashing light. Also, a purple indicator
displays at the top right of the screen. Once the update is complete, the Viera™ light
turns blue.
Inserting & Removing the Battery
If the battery is low or empty, recharge it by following the instructions on Recharging Batteries
on page 72.
Inserting the Battery
To insert the battery into the Viera™ Portable Breast Ultrasound:
1. Make sure that the battery contacts are facing downward and that the battery label is
facing the Viera™.
2. Slide the battery into the Viera™ until it locks into place.
When the battery contacts are detected, the Viera™ will emit a sound.
Removing the Battery
To remove the battery from the Viera™ Portable Breast Ultrasound:
1. Pull back on the latch located at the top of the Viera™.
This unlocks the battery.
2. Slide the battery out of the Viera™.
User Manual version 4.2.0 41
Page 50

Viera™ Portable Breast Ultrasound Turning the System on & off
Turning the System on & off
Starting the Clarius App
Before you begin using the Viera™ Portable Breast Ultrasound, make sure you have the
Viera™, and also your smart device with the Clarius App installed on it.
To open the Clarius App on your smart device:
Go to your smart device’s home screen and tap .
The Clarius App opens to the sign-in screen.
Next, you can select a scanner.
Exiting the Clarius App
To close the Clarius App on an Apple device:
Refer to your mobile device’s user manual.
To close the Clarius App on an Android
Refer to your mobile device’s user manual.
If you close the Clarius App without ending the exam, the system pauses the exam.
Signing in & out
TM
device:
Signing in
When you open the Clarius App, it displays a sign-in screen for your user ID and password.
User Manual version 4.2.0 42
Page 51

Viera™ Portable Breast Ultrasound Connecting Your Smart Device to Viera™
Signing out
To sign out:
1. Select the Sign Out menu option.
2. Select Yes.
If you want to remain signed in, select No.
Connecting Your Smart Device to Viera™
If the active Viera™ reaches its maximum idle time, the Clarius App disconnects your smart
device from the Viera™, making the Viera™ available to other smart devices. To set the
maximum idle time, see
Settings on page 24.
Connecting Apple iOS Devices to Scanners
If you are using iOS 11 or a later version, it automatically connects to the network. If you are
using an earlier version, follow these instructions:
To connect your Apple iOS device to a Viera™ Portable Breast Ultrasound:
1. From the Scanners page, tap the image or the name of the Viera™ Portable Breast
Ultrasound you want to select.
This activates the selected Viera™ and attempts to connect it to your smart device’s
Wi-Fi. When the Viera™ emits an audible beep and its light flashes blue, the Wi-Fi
Direct is enabled. When you hear another audible beep and the scanner light turns
solid blue, the Viera™ is ready for Wi-Fi connection.
If the status light shows nothing (empty battery), or it is orange (low
battery), recharge the battery.
Once the checkmark appears in the status circle, the Clarius App displays the name of
the selected Viera™ Portable Breast Ultrasound’s Wi-Fi network and the password.
Remember the network name. The Clarius App has copied the password, so you do
not need to memorize it.
2. Go to your smart device’s Settings page, select the Wi-Fi section, and tap on the name
of your Viera™ Portable Breast Ultrasound’s Wi-Fi network. This automatically pastes
the password in the field (this happens in the background).
User Manual version 4.2.0 43
Page 52

Viera™ Portable Breast Ultrasound Managing Exams
3. Return to the Clarius App.
The status light on the selected Viera™ turns blue, indicating its connection to your
smart device. All other Viera™ Portable Breast Ultrasounds remain in standby mode.
Workflows that apply to the selected Viera™ become enabled.
Next, select a workflow. For information, see Starting New Exams on page 44.
Connecting Android™ Devices to Scanners
If you are using an Android™ device, it automatically connects to the network.
Next, select a workflow. For information, see Starting New Exams on page 44.
Managing Exams
• Notifications and alerts from third-party applications may interrupt you or the Clarius App,
thereby interfering with the exam. Configure your smart device in accordance with your
institution's security policies.
• Vibration range that is too high for the scanner may cause the scanner to malfunction
during an exam.
• Using improper gel type or combining different gel types may expose patients to risks and
produce poor-quality images.
For proper transmission of the acoustic beam, use only Aquasonic 100, and use it only before
its expiry date. Download the usage instructions from www.parkerlabs.com/ and read all the
information before operating the device.
Do not use:
• Lotion-based products or gels that contain mineral oil.
• Hand-sanitizing gels.
• Scanners left soaking in gel.
Starting New Exams
For information on selecting a Viera™ Portable Breast Ultrasound, see Connecting Your Smart
Device to Viera™ on page 43.
User Manual version 4.2.0 44
Page 53

Viera™ Portable Breast Ultrasound Managing Exams
To begin a new exam:
From the Workflows page, select a workflow.
The Clarius App displays the last-used workflow at the top of the screen.
Once you have selected a workflow, you can enter the patient’s information. See Entering
Patient Information on page 46.
Pausing an Exam
If there is data entry that requires no patient presence (for example, performing
measurements on captured images), you can mark the exam as incomplete by pausing it, and
return to it later to continue.
An exam is paused when you:
• Exit the Clarius App.
• Tap to return to the home screen.
Ending an Exam
Once you have finished entering your impressions, you can end the exam. Once you end an
exam, it is marked as complete, and you cannot re-open or resume it.
To end the exam:
From the Impressions page, tap End Exam, then select one of the following options:
• Discard: This permanently deletes the current exam, including all images. The
Clarius App takes you to the Workflows page for selecting another exam type.
• Submit: This ends the exam and marks it as complete, even if you have not provided
all the information on the worksheet, and prepares it for export to the Clarius
Cloud. The Clarius App places the images in queue to upload to your Clarius Cloud
account the next time network connection is made.
• Cancel: This cancels the action so that you can continue the current exam.
User Manual version 4.2.0 45
Page 54

Viera™ Portable Breast Ultrasound Managing Patient Information
Resuming a Paused Exam
To continue an in-progress exam:
1. Go to either the Scanners page or the Workflows page.
2. Tap .
3. Select Open Exam.
The application takes you to the Patient Demographics page.
To discard an in-progress exam, select End Exam.
Managing Patient Information
Entering Patient Information
Once you have selected a workflow, you will see the Patient Demographics page.
Before you begin scanning, enter the fields provided.
To enter patient information:
1. Tap a field to display .
2. Tap to display the Barcode page.
3. Align the patient’s barcode within the frame.
When the Clarius App captures the barcode, it will return to the Patient
Demographics page, and display the patient’s information in the fields.
Alternatively, you can enter patient information manually.
When you have entered all required patient information, tap
populate the indications. For information on populating indications,
Indications on pag
e 47.
to go to the next page to
see Populating
User Manual version 4.2.0 46
Page 55

Viera™ Portable Breast Ultrasound Selecting Scanning Modes
Populating Indications
Enter notes on this page.
When you have entered all the indications, tap
For information on imaging, see Imaging on pag
Selecting Scanning Modes
To select a mode:
1. From the imaging screen, tap .
2. Select from the options.
B-Mode
When you start an exam, it defaults to B-Mode (brightness mode). Sometimes referred to as
2D Mode, this two-dimensional imaging mode displays in grayscale.
To view the image in B-Mode:
to go to the next page to begin imaging.
e 52.
Tap , and then .
User Manual version 4.2.0 47
Page 56
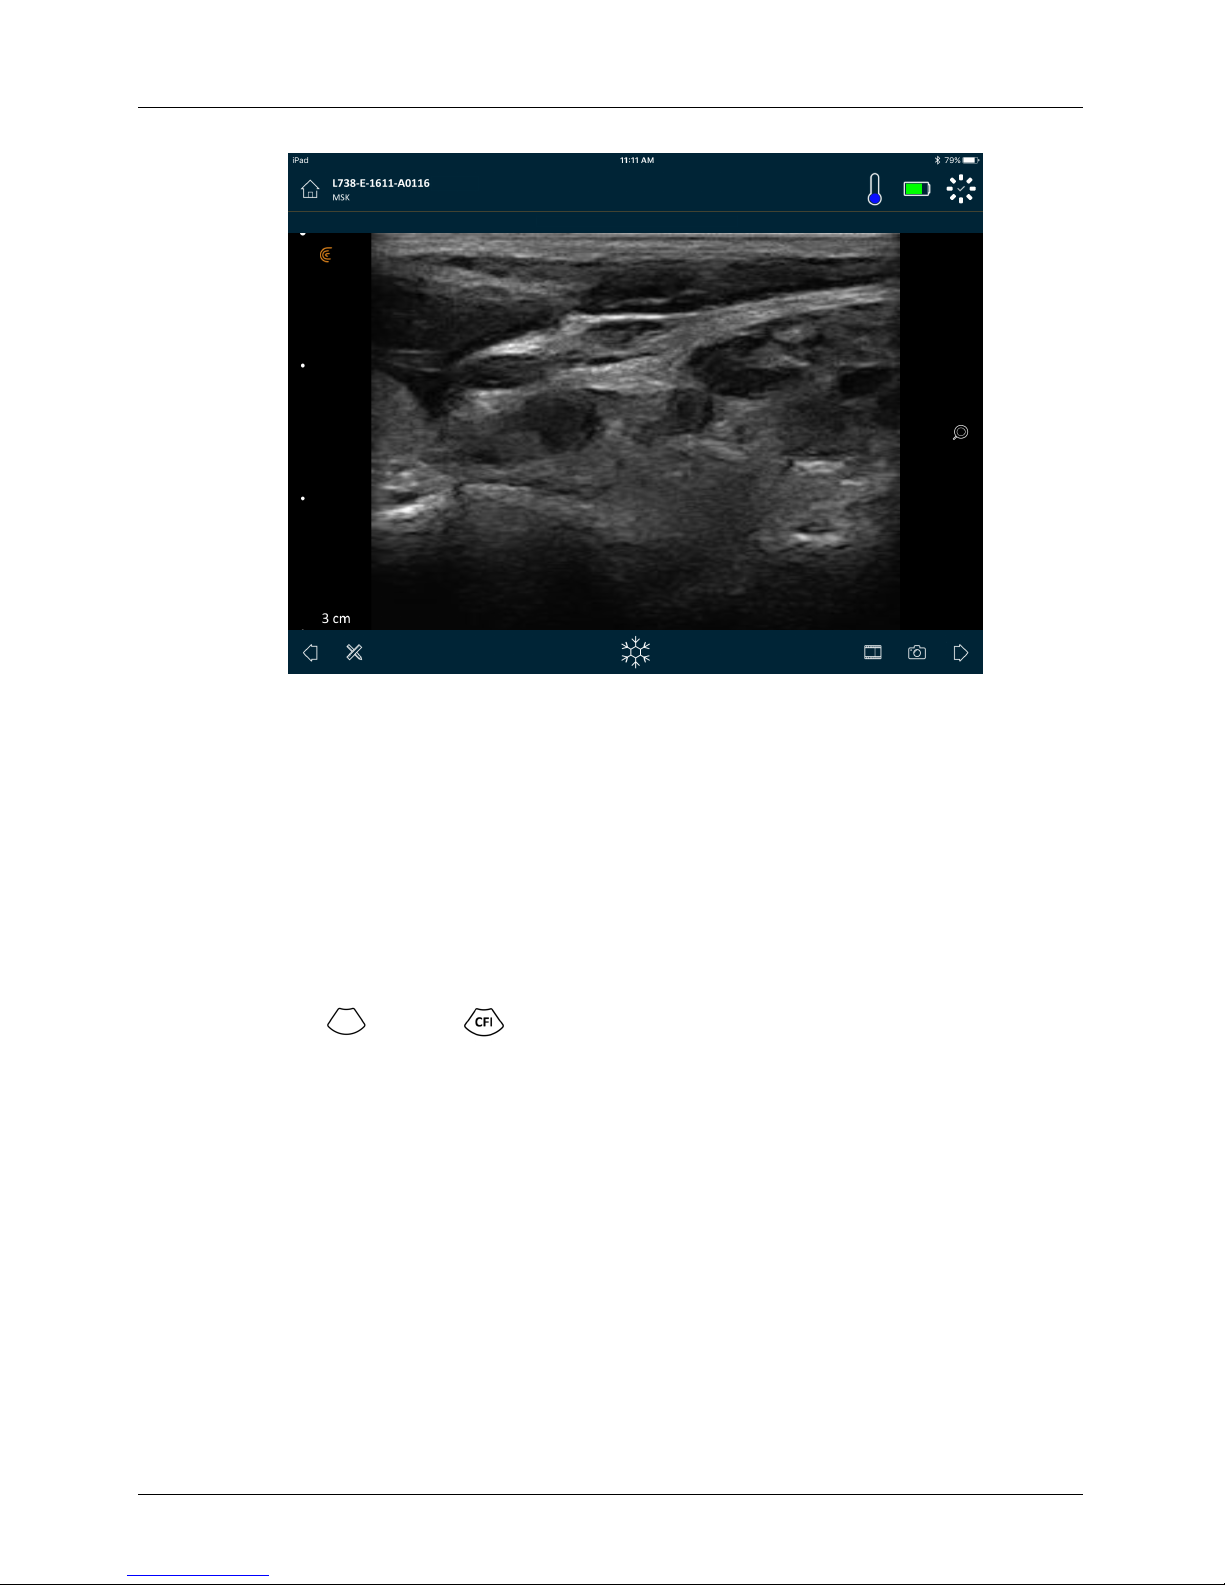
Viera™ Portable Breast Ultrasound Selecting Scanning Modes
Color Doppler
This scanning mode estimates the average velocity of flow within a vessel by color-coding the
information. The direction of blood flow toward and away from the ultrasound transducer is
represented by red and blue.
To view the image in Color Doppler:
Tap , and then .
User Manual version 4.2.0 48
Page 57

Viera™ Portable Breast Ultrasound Selecting Scanning Modes
To reverse the flow colors:
Tap .
To view the image in normal or slow speed:
1. Tap to display a list of options.
2. Tap to view in slow speed.
3. Tap to return to normal speed.
To resize the yellow frame:
1. Drag the yellow frame to display arrows.
2. Press and hold , then drag it vertically or diagonally.
User Manual version 4.2.0 49
Page 58

Viera™ Portable Breast Ultrasound Selecting Scanning Modes
To reshape the yellow frame:
1. Drag the yellow frame to display arrows.
2. Press and hold , then drag it horizontally.
To move the yellow frame:
Drag the yellow frame to a new location.
User Manual version 4.2.0 50
Page 59

Viera™ Portable Breast Ultrasound Selecting Scanning Modes
Power Doppler
This scanning mode is used to obtain images that are difficult to acquire with standard color
Doppler. It provides greater detail of blood flow, especially in vessels that are located inside
organs. Power Doppler is more sensitive than color Doppler for the detection and
demonstration of blood flow, but provides no information about the direction of flow.
To view the image in Power Doppler:
Tap and then .
You can re-size, re-shape, and move the area of interest the same way as you would in Color
Doppler mode. For more information, see
M-Mode
This scanning mode determines the velocity of specific organ structures by using quicksuccession pulses on a single line in B-Mode imaging. In ultrasound, this is the equivalent of a
video.
User Manual version 4.2.0 51
Color Doppler on page 48.
Page 60

Viera™ Portable Breast Ultrasound Imaging
To view the image in M-Mode:
Tap and then .
To adjust the line placement:
If you hold the smart device in portrait mode, the image displays above the spectrum. If you
hold the smart device in landscape mode, the image displays to the left of the spectrum.
Imaging
When you go to the image acquisition page to begin an exam, the Viera™ automatically
switches from standby mode to scanning mode.
A typical use of the Viera™ is described as five continuous scanning minutes followed by
minutes in standby mode (or turned off).
10
The M-line appears over the image. You can adjust its placement before adding the
spectrum.
Tap and hold the line, then drag.
When you release the line, the spectrum displays on the screen.
User Manual version 4.2.0 52
Page 61

Viera™ Portable Breast Ultrasound Imaging
Adjusting Gain
Turning Auto-Gain on & off
The system selects the auto-gain mode by default. When auto-gain is turned on, is
displayed on the screen. Auto-gain automatically adjusts the gain
detecting the noise floor and signal strength in the image. You can turn off auto-gain and
adjust the gain manually.
To toggle auto-gain on and off:
Tap and then .
of B-Mode images by
If you find that some images on auto-gain mode appear too bright or to dark, you can adjust
the gain.
To adjust the gain on auto-gain mode:
1. Drag anywhere on the screen.
This displays a vertical line down the center of the screen.
User Manual version 4.2.0 53
Page 62

Viera™ Portable Breast Ultrasound Imaging
2. Slide the bars left and right to adjust the gain.
Manually Adjusting Gain
To manually adjust gain:
1. Make sure auto-gain is turned off.
If you see , you have auto-gain turned on. To turn it off, see Turning Auto-Gain
on & off on page 53.
2. Drag anywhere on the screen.
This displays three vertical lines down the center of the screen.
3. Slide the bars left and right to adjust the gain.
User Manual version 4.2.0 54
Page 63

Viera™ Portable Breast Ultrasound Imaging
Saving the image retains the gain adjustment.
Using the Center Line
The center line tool is a dotted vertical line displayed down the center of the imaging screen. It
can be used, for example, to guide the needle's location during needle guidance procedures.
To show the guidance tool:
1. Make sure you are in live imaging mode. This enables the tool icon.
2. Select and then . The center line displays.
User Manual version 4.2.0 55
Page 64

Viera™ Portable Breast Ultrasound Imaging
To remove the guidance tool:
• Repeat the steps for displaying this tool.
• Freeze the imaging screen.
Using Needle Enhance
If you are using a linear scanner, the Needle Enhance feature is available in the tools list. Using
this feature highlights the needle inside the tissue.
To use the Needle Enhance feature:
1. From the imaging screen, tap .
2. Tap
The needle is displayed in grayscale by default.
3. Press the toggle button in the pop-up menu to turn color on (orange) and off (white).
User Manual version 4.2.0 56
Page 65

Viera™ Portable Breast Ultrasound Imaging
Using Automated Heart Rate
The automated heart rate feature is available in the cardiac workflow. When you scan the
heart, it automatically detects and measures the heart rate.
To use the automated heart rate feature:
1. Start a new exam and select the cardiac workflow.
For instructions on starting new exams, see Starting New Exams on page 44.
2. Go to the imaging page and begin scanning.
When the Viera™ Portable Breast Ultrasound detects the heart rate, it displays it on
the screen.
User Manual version 4.2.0 57
Page 66

Viera™ Portable Breast Ultrasound Imaging
Select the cardiac workflow.
When the Viera™ Portable
Breast Ultrasound detects
the heart rate, it displays it
on the screen.
Freezing/Unfreezing Cineloops
A cineloop is a sequence of still images presented in the form of a video. By default, the system
retains the last 20
can scroll back and review these frames.
To freeze the cineloop:
During live imaging, tap .
User Manual version 4.2.0 58
seconds of the imaging session. When you freeze an imaging session, you
Page 67

Viera™ Portable Breast Ultrasound Imaging
This pauses the cineloop. The icon decreases in size, the Viera™ Portable Breast
Ultrasound changes to standby mode, and the light turns blue.
When you freeze a cineloop, you can:
• Add annotations. For instructions, see Using Annotations on page 64.
• Make measurements. For instructions, see Using the Measuring Tools on page 67.
• Save the currently displayed image. For instructions, see Saving Images on page 61.
If the Viera™ Portable Breast Ultrasound detects no activity for 30 seconds, it changes to
standby mode and the Clarius App freezes the live imaging screen. You can disable this feature
so that after 30 seconds of inactivity, the Viera™ Portable Breast Ultrasound remains in
scanning mode and the Clarius App continues imaging.
To disable auto-freeze:
Press and hold .
The icon turns green.
The auto-freeze feature is now disabled. After 30 seconds of inactivity, the Clarius
App continues imaging unless you manually freeze it.
To enable auto-freeze:
• Press and hold until it turns blue.
• Start a new exam.
User Manual version 4.2.0 59
Page 68

Viera™ Portable Breast Ultrasound Imaging
Capturing Cineloops & Images
When you have finished capturing your cineloops and images, there is no need to manually
upload them to the Clarius Cloud. When you disconnect your smart device from the Viera™ at
the end of the scanning session, your smart device reconnects to the network and
automatically uploads them to the Clarius Cloud. You can then sign into the Clarius Cloud to
view them.
Saving Cineloops
To record a cineloop:
1. During live imaging, tap and hold to display a list of options.
2. Select time length.
You can record 3, 5, 10, 20, or 30 seconds of live imaging.
3. Tap again to begin recording.
During the live-image recording, a counter displays beside the icon. When the counter
disappears, the recording is saved.
To edit the length of the cineloop:
1. Record a cineloop.
When you capture a cineloop, the Clarius App displays a horizontal scroll bar at the
bottom of the screen. This scroll bar remains visible for three seconds. To display it
again, slide your finger along the bottom of the screen.
2. Use the two dots to scroll through the cineloop.
The left dot lets you scroll from the beginning of the cineloop. The right dot lets you
scroll from the end.
To activate a dot, tap on it. When it turns from blue to orange, slide it along the
horizontal scroll bar.
User Manual version 4.2.0 60
Page 69

Viera™ Portable Breast Ultrasound Imaging
3. Once you have marked the desired range, tap to save this.
Saving Images
1. During live imaging, tap .
2. Slide your finger along the horizontal scroll bar to view the sequence of still images
3. Find an image you want to save.
4. Tap .
The Clarius App saves both the original capture and the edited capture.
from the recorded cineloop.
User Manual version 4.2.0 61
Page 70

Viera™ Portable Breast Ultrasound Imaging
Zooming in & out
To expand (zoom in) an area of the image:
Spread the image.
Alternatively, tap and drag up to the plus sign (“ + “).
To reduce (zoom out) an area of the image:
Pinch the image.
Alternatively, tap and drag down to the minus sign (“ -“).
To return to default zoom:
Tap and drag to .
User Manual version 4.2.0 62
Page 71

Viera™ Portable Breast Ultrasound Imaging
To pan or move the magnified image:
Tap the image and drag it.
Changing Depth
While live imaging, you can adjust the depth of the scan.
To change depth:
1. Make sure you are using B-Mode and default zoom.
2. Drag your finger up and down the left vertical bar to increase and decrease the depth.
The screen displays a depth scale, in centimeters. The increments of the scale depend
on the depth and size of the display.
Flipping Images
You can flip an image on its axis to view the image from a different angle.
To flip the image:
Press and hold , and then drag it.
User Manual version 4.2.0 63
Page 72

Viera™ Portable Breast Ultrasound Imaging
Using Annotations
Labeling Images
To identify specific objects, or to describe an entire image, you can add text labels on the
imaging screen. There are two main types of text labels:
• Image label: Text referring to the entire cineloop or image, placed in one of the four
corners of the imaging screen. Image labels remain visible when uploaded to the Clarius
Cloud.
• Pinned label: Text referring to an area of interest, placed close to the object. You can draw
arrows to mark a specific point on the object. Pinned labels are removed when the images
are uploaded to the Clarius Cloud.
User Manual version 4.2.0 64
Page 73

Viera™ Portable Breast Ultrasound Imaging
You can create labels either before or after capturing the image.
To create a label:
1. Tap and select .
The screen displays a text field.
2. Enter text and tap . Alternatively, press the Enter key.
Note: To create multiples labels, tap .
The label defaults to an image label and is placed in the corner of the screen. To
change this to a pinned label, drag the label to an area of interest, then drag the
to draw an arrow to a specific point on the object. You can draw multiple arrows to
different points on the image. If you drag the pinned label to a different location on
the image, the arrow remains anchored to the location you placed it.
The following table summarizes the labels’ behavior when used with the various imaging tools.
User Manual version 4.2.0 65
Page 74

Viera™ Portable Breast Ultrasound Imaging
Action Image Label Pinned label
Zooming in and out Zooming in/out has no effect on image
Freezing and unfreezing Image labels you create during live
Applying labels to a
cineloop
Using Pictograms
Use pictograms (symbols resembling objects you are scanning) to represent specific areas of
the body that you are scanning, and to illustrate the placement and angle of the Viera™
Portable Breast Ultrasound on the body. Pictograms give reviewers quick references on how
you scanned a body part.
labels. They are retained in the corner of
the view.
imaging remain visible when you freeze
the image.
Image labels you create in a cineloop
are retained in the corner of the view,
even when you scroll through the
frames.
Zooming in/out retains pinned labels on the
objects. If the object is outside the view, the
label displays along the closest edge of the
screen, and arrows remain attached to the offscreen image.
You must freeze the image to pin a label to an
object. When you return to live imaging, the
pinned label is removed.
Pinning a label to a specific object in a cineloop
displays the label in that frame only.
To apply a pictogram to an image:
1. Tap to display a list of tools, then select the pictogram icon.
The Pictogram screen displays.
2. From the screen, select a pictogram.
3. Drag the scanner diagram to an area.
You can flip the scanner indicator by touching the screen with two fingers and rotating
them.
4. Select the back icon.
This takes you back to the imaging screen and displays the pictogram. You can move
this pictogram anywhere on the screen.
When you capture the image, the pictogram is also saved.
User Manual version 4.2.0 66
Page 75

Viera™ Portable Breast Ultrasound Imaging
Using the Measuring Tools
Measurements can be made using B-Mode.
To make measurements, tap
When you tap to mark your points on the screen, the system displa
surrounding purple circle. If you want to move the end points to a more accurate location on
the image, apply your finger on the purple circle and drag it to move the end points. Do not
place your finger directly on the green crosses, as this obstructs the view of the end points,
making it difficult to accurately relocate them.
A 2D distance measurement uses two calipers to measure the length
two points. You cannot magnify an image while using the 2D distance measuring tool. When
you unfreeze the image or end the exam, the system removes the measurements from the
image. To retain the measurement, save the image.
Common Measuring Tools
• Single measurement: Tap on an area to mark the first point, then tap on another area
to mark a second point. This creates a distance line between the two points. If you are
measuring bladder volume, you can select the Pre-Void or Post-Void option, and the
Clarius App automatically calculates the volume using the formula: (/6) x length x width x
height.
• Dual measurement: Tap on an area to mark the first point, then tap on another area
to mark a second point. This creates a distance line between the two points. You can
create a maximum of five distances.
to display a list of tools, then select from the options.
ys a green cross with a
of a straight line between
• Trace: Press and hold an area, then drag in a circle. This draws a circumference.
• Ellipse: Tap on an area to mark the first point, then tap on another area to mark the
second point. The application marks two additional points to create a circle.
• Single vertical measurement: Tap on an area to mark the first point, then tap on
another area to mark a second point. This creates a vertical distance line between the two
points. Available in M-mode only.
Measurement Accuracy
You can use the ultrasound system to make measurements on ultrasound images. The
measurements are then used with other clinical data to make a diagnosis.
Never make a diagnosis based solely on measurements. When quantif
ying data, consider
other factors. The accuracy of each measurement is highly dependent on image quality, which
in turn is highly dependent on system design, operator scanning technique, familiarity with
system controls, and patient echogenicity.
User Manual version 4.2.0 67
Page 76
Viera™ Portable Breast Ultrasound Imaging
You are responsible for image quality and diagnosis. Ensure that the data used for inspection
and diagnosis is sufficient, both spatially and temporally, for the measur
Measurement Accuracy Table
ement method.
Each figure below is derived from the sum of all parts of the Viera™ Portable Breast
Ultrasound.
2D MEASUREMENT RANGE & ACCURACY
Measurement Relative Error Minimum Range Maximum Range
Axial Distance < ± 2% 0.2 mm
Lateral Distance < ± 2% 0. 2 mm
30.0 cm
30.0 cm
Inaccurate measurements or misinterpretation of results taken fr
misdiagnosis.
Using the View-Sharing Mode
Before you begin using this feature, make sure that:
• All smart devices you are using for the current listening session ar
version of the Clarius App.
• The Clarius App’s camera feature is turned on. To do this, go to your smart device’s
Settings page, select the Clarius App, and turn on the camera.
If using an Android™ device, disable cellular data before you begin.
To use the view-sharing mode:
1. Go to the first device (we'll call this the “scanning device”) and sign into the Clarius
App using your sign-in credentials.
2. Connect the scanning device to a Viera™ Portable Breast Ultrasound using Wi-Fi
Direct network.
om an exam may lead to
e running on the same
3. Select the Clarius Cast menu option.
User Manual version 4.2.0 68
Page 77

Viera™ Portable Breast Ultrasound Imaging
4. Go to the second device (we'll call this the “listening device”).
5. Go to the main menu and select the Clarius Cast option to display the Scan QR Code®
page.
User Manual version 4.2.0 69
Page 78

Viera™ Portable Breast Ultrasound Review Findings
6. Align the scanning area with the QR Code of the scanning device. The frame can be
adjusted by dragging the corners. The scanning device automatically captures the QR
Code.
The listening device can zoom into a scanned image, but cannot perform any other action.
When the driver disconnects their smart device from the Viera™ Portable Breast Ultrasound,
the listener device also disconnects from that scanner.
Using Chromecast™
For information about Chromecast, go to:
https://store.google.com/magazine/google_cast_platform_story
For instructions on connecting your Clarius App to your TV, go to
https://support.google.com/androidtv/answer/3006709?hl=en
Review Findings
When you have finished imaging, you can evaluate and edit the findings acquired during the
exam.
Reviewing Cineloops & Images
To view cineloops and images during an exam:
Go to the Review section.
To view thumbnail images and videos:
Swipe left and right, or up and down.
:
Deleting Items
You can delete unwanted images and cineloops from the Review page by tapping next to
the item.
When you are done reviewing, tap
impressions. For information on populating impressions, see Populating Impressions o
page 71.
User Manual version 4.2.0 70
to go to the next page of the application to populate
n
Page 79

Viera™ Portable Breast Ultrasound Populating Impressions
Populating Impressions
Once you have reviewed the images, record your findings from the exam.
Once you have entered your impressions, you can end the exam. For information on ending
the exam, see
Ending an Exam on page 45.
Exporting Exams
When you have finished an exam, you can export it using the following options:
• Upload the exam to the Clarius Cloud: When you end the exam and disconnect your smart
device from the Viera™, the smart device reconnects to the network and automatically
uploads the exam to the Clarius Cloud.
• Upload the images to a DICOM server. You can do this after you end the exam, when you
select to submit it to the Clarius Cloud. Alternatively, you can go to the Exams page, select
the exam from the list, and then select to upload it to a DICOM server. Before you use
DICOM, read the DICOM statement at www.clarius.com/support/docs/product.
• Export to Local Media. To send a copy of the scanned images or cineloops to your smart
device’s saved photos, go to the Exams page and select the Export to Local Media option.
Maintenance
There is no recommended periodic maintenance required for the system, scanners, or
accessories. There are no internal adjustments or alignments required. There are no functions
that require periodic testing or calibration. The only maintenance required is to clean and
disinfect the Viera™ Portable Breast Ultrasound and battery according to the instructions in
Cleaning & Disinfecting on page 81.
Perform maintenance regularly and as needed. The system must be serviced by trained
personnel only.
Failing to regularly maintain or verify the Viera™ Portable Breast Ultrasound may lead to
undetected performance errors.
Hardware Maintenance
Testing Scanners
When you turn on the system, the scanner powers up and automatically tests its internal
components. The Viera™ Portable Breast Ultrasound’s LED will light up and you will hear a
two-tone beep. The table below defines these conditions:
User Manual version 4.2.0 71
Page 80

Viera™ Portable Breast Ultrasound Maintenance
Battery Condition Priority Visual Indication Audible Indication
Low battery Low Orange flashing status LED None
Critically low battery Low Red flashing status LED 1 beep every few seconds
Also, the system runs a series of tests in the background. If your smart device is not connected
to a wireless or cellular network, the logs are queued until you
have network connectivity. For
more information, please contact Hologic Technical Support.
Recharging Batteries
Because the Viera™ Portable Breast Ultrasound is battery-operated, you must recharge the
battery when necessary. An empty battery takes approximately 1 ½ hours to fully charge. A full
battery has approximately 45 minutes of typical scanning time and can last up to two weeks in
sleep mode.
The battery power level is displayed on the screen. When the bat
under 10 minutes of residual scanning time, a visual warning is presented
tery reaches a level equal to
to the user. Battery
warning notifications from Viera™ Portable Breast Ultrasounds in sleep mode via BLE are
displayed to the user using the standard notification services of the smart device running the
Clarius App.
When you receive your Viera™ Portable Breast Ultrasound, the battery is 30%
charged. Charge the battery to 100% before use.
Connecting the battery charger to a power supply that is not manufactured by Clarius may
have the incorrect voltage/current, which could damage the battery char
ger.
Charge the battery using only the specified charger.
If you turn on the Viera™ Portable Breast Ultrasound and leave it untouched, it will go through
the following modes to help reduce temperature and battery power:
1. After three seconds, it decreases frame rate.
2. After 30 seconds of decreased frame rate, it freezes.
3. After 10 seconds in freeze mode, it goes idle.
4. After five minutes of idle time, it shuts down.
User Manual version 4.2.0 72
Page 81

Viera™ Portable Breast Ultrasound Maintenance
The battery has approximately 45 minutes of continuous scanning time and lasts
approximately seven days in standby mode.
Do not charge the battery while on board any aircraft.
To charge the battery:
1. Connect the line cord of the AC power adapter to an indoor electrical outlet.
2. Connect the AC power adapter to the receptacle on the battery charger.
3. Remove the battery from the Viera™ Portable Breast Ultrasound by following the
instructions on Removing the Battery on page 41.
4. Insert the battery into a slot on the battery charger.
The charger displays the following status lights:
• Orange: Battery is currently charging.
• Green: Battery is fully charged.
Storing Scanners
To protect your Viera™ Portable Breast Ultrasound:
• Dry them thoroughly before storage.
• Avoid storing them in extreme temperatures.
• Avoid placing them under direct sunlight for prolonged periods of time. This will not
impact the Viera™ Portable Breast Ultrasound’s safety and performance but may discolor
the housing's finish.
• Store them separately from other equipment.
The scanner may degrade in performance or become unusable if stored or transported in
ambient temperatures below -20°C (-4°F) or above 50°C (122°F).
System Maintenance
Sending Activity Logs
Select the Support menu option to go to the Support page and select the Submit Logs button.
This downloads logs from the Viera™ Portable Breast Ultrasound, then combines them with
the logs from the Clarius App. This bundle is then sent to the Clarius Cloud where they can be
retrieved by a Hologic Technical Support staff. The log files contain diagnostic information.
User Manual version 4.2.0 73
Page 82

Viera™ Portable Breast Ultrasound Maintenance
If the log files grow too large, you may want to delete them to save space on your smart
device. To delete the log files, go to the Settings menu.
User Manual version 4.2.0 74
Page 83

To order these additional accessories, contact your Hologic
representative:
• Clarius Dock (CIDN 99-02-00025): This docking station combines
a cooler (for up to three scanners) and a battery charger (for up
to five batteries).
• Clarius Fan (CIDN 99-02-00028): Attaching this fan to the Viera™
Portable Breast Ultrasound allows for longer scanning time.
• Viera™ Rechargeable Li-Ion battery (CIDN 81-02-00023)
• Viera™ Battery Charger and AC adapter (CIDN 81-02-00024)
Clarius Dock
Accessories
4
The Clarius Dock is a separate accessory that you can purchase for
your Viera™ Portable Breast Ultrasound. This docking station
combines a cooling station that can hold three probes; a battery
charger that can charge up to five batteries; and a USB charger that
can charge two smart devices, smart phones and/or tablets.
An external power supply is used to connect the Clarius Dock to the
AC wall outlet using the supplied power cord.
The Clarius Dock is designed for use in professional healthcare
facilities. The device is not intended to contact the patient during
normal use. It is not to be used in emergency medical services
environments including during patient transport or the home
healthcare environment. The Clarius Dock may be used on a counter,
desk, or table top. It is not to be placed within 1.5m of the
examination table or patient bed.
The Clarius Dock is designed to be used with the Viera™ Portable
Breast Ultrasound (CIDN 81-02-00011).
75
Page 84

Viera™ Portable Breast Ultrasound Clarius Dock
Parts
The Clarius Dock is made up of the following parts:
• A fully-assembled docking station (CIDN 99-02-00025).
• A power supply (CIDN 50-02-00024) with a cord that is compatible with your country's
socket and voltage.
Figure 1: Clarius Dock
Figure 2: Top View
User Manual version 4.2.0 76
Page 85

Viera™ Portable Breast Ultrasound Clarius Dock
Figure 3: Right Side View
Figure 4: Back View
Before you begin using your Clarius Dock, clean and disinfect it. For cleaning and disinfecting
instructions, see Cleaning & Disinfecting on page 81.
Technical Specifications
Input 12 VDC, 11.5 A
Output 8.4 VDC, 1.5 A x 5 (charger), 5.0 VDC, 2.3 A x 2 (USB)
Protection Against Electric Shock Class II
Applied Part None
Ingress Protection IP00
Mode of Operation Continuous
System Specifications
Pressure 620 hPa to 1060 hPa (3,954 m to -38 m) n/a
Operating Limits Transportation & Storage Limits
Humidity 15% to 95%s 0% to 95%
Temperature 10°C (50°F) to 40°C (113°F) -20°C (-4°F) to 50°C (122°F)
User Manual version 4.2.0 77
Page 86

Viera™ Portable Breast Ultrasound Clarius Dock
Setting up
To use the Clarius Dock:
1. Clean and disinfect the scanners before placing them in the Clarius Dock.
For cleaning and disinfecting instructions, see Cleaning & Disinfecting on page 81.
2. Insert the DC power connector into the Clarius Dock.
3. Connect the AC power cord to the power supply.
4. Insert the AC Male Plug into a power source.
The Clarius Dock is now ready to use.
• Do not place the Clarius Dock within 1.5m of the examination table/patient bed.
• Do not touch the patient and the Clarius Dock at the same time.
• If the AC power cord is damaged, contact Hologic for a replacement.
Using the Clarius Dock
Using the Scanner Coolers
To cool the Viera™ Portable Breast Ultrasound:
Move the fan-enable switch to the ON position; indicator on the switch will be green.
Place your scanner directly in the cooling slot.
You can remove the batteries or leave them in the scanner. The fan will activate
automatically. It takes approximately five minutes to cool a scanner to operable
temperature range.
The cooling fans continue to run while the scanners remain in the cooling
slot. When the scanners have cooled, turn off the fan with the enable
switch. This will maximize the cooling station's lifespan.
For the fans to operate, the fan-enable switch must be in the ON
position.
User Manual version 4.2.0 78
Page 87

Viera™ Portable Breast Ultrasound Clarius Dock
Using the Viera™ Battery Charger
To charge the scanner battery:
1. Remove the battery from the scanner.
2. Insert the battery into one of the battery slots. There will be a click when the battery
is fully inserted.
If you are having problems inserting the battery, start by placing the battery in the
charging slot, press down on the battery edge closet to the front of the Clarius Dock
then roll the battery towards the back until you hear the click.
It takes approximately 1 ½ hours for an empty battery to fully charge.
Each charger displays the following status lights:
• Orange: Battery is currently charging.
• Green: Battery is fully charged.
• Off: No battery installed, battery not inserted fully, no power connected, or a
problem with the battery.
Do not touch battery charger contacts. Only charge Viera™ Rechar
81-02-00023).
Using the Smart-Device Charger
The Clarius Dock can charge any smart device that is used with the Viera™ Portable Breast
Ultrasound.
To charge your smart devices:
1. Connect the smart device's charging cable to the smart device as described in the
smart device's user manual.
2. Connect the opposite end of the charging cable to one of the two USB Type-A ports
on the back of the Clarius Dock. Charge status will be indicated on the smart device.
Do not touch the patient while touching the USB ports. Do not touch
device connected to the USB ports.
geable Li-Ion battery (CIDN
the patient with any
Maintenance
The only maintenance required by the Clarius Dock is to clean and disinfect it. For cleaning
instructions, see Cleaning the Viera™ Portable Breast Ultrasound
instructions, see Disinfecting the Viera™ Portable Breast Ultrasound on pag
User Manual version 4.2.0 79
on page 82. For disinfecting
e 84.
Page 88

Viera™ Portable Breast Ultrasound Clarius Fan
If your Clarius Dock requires servicing, contact your Hologic representative.
Troubleshooting
The power does not turn on:
The DC power connector may not be fully plugged into the Clarius Dock. Slide the
rectangular portion of the DC power connector away from the metallic barrel and reinsert it into the DC jack on the Clarius Dock.
• The DC power connector fits only one way. Ensure that the rectangular side (with
the arrows) is facing up.
• The DC power connector fits tight, so you may need to gently wiggle it into the
Clarius Dock until you hear a faint click.
Clarius Fan
The Clarius Fan attaches to the built-in heatsink of any Viera™ Portable Breast Ultrasound. Use
the Clarius Fan to extend scanning time.
To use the Clarius Fan:
1. Align the prongs of the fan with the outlet on the heatsink of the Viera™ Portable
Breast Ultrasound.
2. Insert the prongs into the outlet and press until it snaps into place.
Make sure that the prongs are plugged in all the way.
When the Viera™ Portable Breast Ultrasound reaches a temperature of 35°C (95°F),
the fan automatically activates.
Clean and disinfect the Clarius Fan after each use. For cleaning instructions, see Cleaning the
Clarius Fan on page 83. For disinfecting instructions, see Disinfecting the Clarius Fan on
page 85.
User Manual version 4.2.0 80
Page 89

Cleaning & Disinfecting
It is important to clean and disinfect the Viera™ Portable Breast
Ultrasound immediately after use. This chapter will guide you
through the cleaning and disinfecting process.
The classification of cleaning and disinfecting you select will depend
on the type of tissue the Viera™ Scanner comes into contact with. To
find the correct classification, refer to
page 86.
When cleaning and disinfecting:
• Follow the procedures in the order they are described in this
guide, without skipping steps.
• Use only solutions approved by Clarius Mobile Health. Other
solutions may be incompatible with the system and could
damage the scanner.
Spaulding Classification on
5
• Follow the manufacturer's instructions, recommendations, and
guidelines for cleaners and disinfectants, as well as your regional
regulations.
• Check expiry dates, concentration, and efficacy of the chemicals
used.
• Wear the appropriate personal protective equipment (PPE), such
as eyewear and gloves, as recommended by the chemical
manufacturer.
• Due to repeated use and cleaning, the cleanliness and sterility of
the hardware deteriorates over its service life (five years for the
scanner, fan, and Clarius Dock).
• Using incompatible solutions to clean the scanner may damage
its surface.
• The scanner and its parts (including accessories) may not
withstand the cleaning or disinfecting processes (including
repetitive process) specified in this manual, and may damage or
81
Page 90

Viera™ Portable Breast Ultrasound Cleaning
deteriorate its safety provisions.
• Cleaning or disinfecting the scanner while the battery is installed may cause the battery to
short-circuit and overheat, causing an electric shock or burn.
• Cleaning or disinfecting the scanner using IPA (isopropyl alcohol) may damage it.
During an emergency where the scanner is used to examine multiple patients in a short period
of time, the lack of proper cleaning and disinfecting between patients may spread infections to
other patients and users.
Cleaning
Cleaning the Viera™ Portable Breast Ultrasound
Before cleaning, visually inspect the scanner to determine that it is free of any unacceptable
deterioration, such as corrosion, discoloration, pitting, or cracked seals. If damage is evident,
discontinue use and contact Hologic Technical Support.
Cleaning the scanner requires that you select the proper cleaning level. Before you begin,
determine the level of cleaning by referring to
have determined the level, have the cleaning solution ready and follow the procedure below.
Spaulding Classification on page 86. Once you
To clean the Viera™ Portable Breast Ultrasound:
1. Make sure the Viera™ Portable Breast Ultrasound is turned off.
2. Remove the battery and fan from the scanner.
It is important that you clean the two pieces separately.
3. To clean the scanner, dampen a soft cloth using a compatible cleaner. Alternatively,
use a premoistened disinfectant wipe.
For a list of compatible cleaners, see Cleaners & Disinfectants on page 123.
4. Start at the top of the scanner and wipe toward the scan head. Be sure to remove any
gels or particulate matter.
5. Clean the heat sink (the grooves along the body of the scanner) using a thin,
disposable instrument, such as a swab, to push a soft cloth lightly dampened with a
cleaning solution (or use a premoistened wipe) across the slot. Move the cloth back
and forth from one side of the heat sink to the other.
6. Dispose the cloth and the instrument used to insert the cloth.
User Manual version 4.2.0 82
Page 91

Viera™ Portable Breast Ultrasound Cleaning
7. Verify that all gel, particulate matter, and bodily fluids have been removed.
8. Repeat with new cleaning material if necessary.
9. To clean the battery, dampen another soft cloth using a compatible cleaner or
disinfectant. Alternatively, use a premoistened disinfectant wipe.
10. Remove all gel, particulate matter, and bodily fluids from the battery.
11. Repeat with new cleaning material if necessary.
When you are done, keep the two parts separate. You will be disinfecting them
individually. For disinfecting instructions, see Disinfecting the Viera™ Portable Breast
Ultrasound on page 84.
Due to particulate matter (for example, biological agents, ultrasound gel, and dirt) in the
scanner crevasses, openings, and/or cavities, there is the possibility that the scanner is not
cleaned easily or correctly.
Cleaning the Clarius Dock
To clean the Clarius Dock:
1. Turn off the fan-enable switch.
2. Unplug the DC power connector from the Clarius Dock.
3. Wipe down all surfaces using a premoistened disinfectant wipe.
For a list of compatible cleaners, see Cleaners & Disinfectants on page 123.
4. Repeat with new cleaning material if necessary.
5. Air-dry the Clarius Dock.
Alternatively, towel-dry with a clean, non-linting cloth.
Cleaning the Clarius Fan
To clean the Clarius Fan:
1. Remove the Clarius Fan from the Viera™ Portable Breast Ultrasound.
2. Wipe down all surfaces using a premoistened disinfectant wipe.
For a list of compatible cleaners, see Cleaners & Disinfectants on page 123.
3. Repeat with new cleaning material if necessary.
User Manual version 4.2.0 83
Page 92

Viera™ Portable Breast Ultrasound Disinfecting
4. Air-dry the Clarius Fan.
Alternatively, towel-dry with a clean, non-linting cloth.
When you are done, keep the two parts separate. You will be disinfecting them
individually.
Disinfecting
Disinfecting the Viera™ Portable Breast Ultrasound
Before you begin disinfecting, make sure you have cleaned the scanner (see Cleaning on
page 82).
Disinfecting requires that you choose the proper disinfecting level. Determine the necessary
disinfection level by referring to
determined the required disinfecting level, have the disinfectant ready and follow one of the
appropriate procedures below. Note that different levels of disinfection require different steps,
not just different solutions.
Spaulding Classification on page 86. Once you have
Intermediate Disinfection
Refer to Cleaners & Disinfectants on page 123 for a list of disinfectants recommended for
intermediate disinfection of the scanner.
If the scanner has come into contact with broken skin, mucosal membranes, or blood, it is
classified as semi-critical, and you must perform a high-level disinfection. See
Disinfection on page 85 for steps.
1. Make sure the battery and fan are still detached from the scanner.
2. Disinfect the scanner by wiping with a cloth moistened with a compatible disinfectant.
Alternatively, use a premoistened disinfectant wipe.
3. Disinfect the heat sink (the grooves along the body of the scanner) using a thin,
disposable instrument, such as a swab, to push a soft cloth lightly dampened with a
disinfectant (or use a premoistened wipe) across the slot. Move the cloth back and
forth from one side of the slot to the other.
4. Remove the disinfecting wipe from the slot.
High-Level
It is important that you disinfect the two pieces individually.
5. Air-dry. Alternatively, towel-dry with a clean, non-linting cloth.
User Manual version 4.2.0 84
Page 93

Viera™ Portable Breast Ultrasound Disinfecting
6. Examine the scanner for damage, such as cracks or splitting where fluid can enter. If
damage is evident, do not use the scanner and contact Hologic Technical Support.
7. Disinfect the battery and the battery connector by wiping with a cloth moistened with
a compatible disinfectant. Alternatively, use a premoistened disinfectant wipe.
The battery connector is delicate. Handle gently.
8. Air-dry. Alternatively, towel-dry with a clean, non-linting cloth.
9. Examine the battery for damage, such as cracks or splitting where fluid can enter. If
damage is evident, do not use the battery and contact Hologic Technical Support.
High-Level Disinfection
Refer to Cleaners & Disinfectants on page 123 for a list of disinfectants recommended for
high-level disinfection of the scanner.
1. Make sure the battery is still detached from the scanner.
It is important that you disinfect the two pieces individually.
2. Mix the disinfectant solution by following the disinfectant label instructions for
solution strength and disinfectant contact duration.
3. Using a compatible disinfectant at a temperature of 23°C (73°F), immerse the scanner
and the battery in the disinfectant solution for 45 minutes.
If the battery has been recently used or charged, wait 30 seconds before
submersing it in any liquid.
It is important that you immerse the two pieces individually, detached
from each other.
4. Using the instructions on the disinfectant label, rinse both the scanner and the
battery.
5. Air-dry both pieces. Alternatively, towel-dry with a clean, non-linting cloth.
6. Examine the parts for damage, such as cracks or splitting where fluid can enter. If
damage is evident, discontinue use of the scanner and/or battery, and contact
Hologic Technical Support.
User Manual version 4.2.0 85
Page 94

Viera™ Portable Breast Ultrasound Spaulding Classification
Disinfecting the Clarius Fan
Before you begin disinfecting, make sure you have cleaned the Clarius Fan (see Cleaning the
Clarius Fan on page 83).
Because the Clarius Fan cannot be submerged in liquid, you must always use intermediatelevel disinfection. Refer to
recommended for intermediate disinfection of the Clarius Fan.
1. Make sure that the Clarius Fan is detached from the scanner.
It is important that you disinfect the two pieces individually.
2. Disinfect the Clarius Fan by wiping with a cloth moistened with a compatible
disinfectant. Alternatively, use a premoistened disinfectant wipe.
3. Air-dry. Alternatively, towel-dry with a clean, non-linting cloth.
4. Examine the Clarius Fan for damage, such as cracks or splitting. If damage is evident,
do not use the fan and contact Hologic Technical Support.
Cleaners & Disinfectants on page 123 for a list of disinfectants
Spaulding Classification
The level of cleaning and disinfecting required for your Viera™ Portable Breast Ultrasound is
based on the Spaulding classification system. Following the correct classification will help
reduce cross-contamination and infection.
Each Spaulding classification mandates a specific level of cleaning and disinfecting of the
equipment before it can be used in the next exam. Determine the Spaulding classification
based on your scanner’s usage.
SPAULDING CLASSIFICATION
Class Use Method
Non-Critical Class Touches intact skin Cleaning followed by intermediate
disinfection
Semi-Critical Class Touches mucous
membranes and nonintact skin
Cleaning followed by high-level
disinfection (HLD)
User Manual version 4.2.0 86
Page 95

Safety
This chapter provides instructions on the product's safe usage and
offers information on safety guidelines. Pay special attention to
warnings and cautions, and follow them before, during, and after
operating the product:
• Warnings indicate information vital to the safety of you, the
operator, and the patient.
• Cautions highlight possible damages to the product that may
void your warranty or service contract, or lose patient or system
data.
About Diagnostic Ultrasounds
6
Interactions with Matter
When using diagnostic ultrasound, the sound waves are directed
towards an area of interest, which then interacts with any matter
along its path. This interaction is determined by the characteristics of
the ultrasound wave, as well as the physical properties of the matter
through which the sound wave passes. Diagnostic ultrasound
frequencies range from 2
Studies
Exposure-effect studies have been performed at intensity levels
much higher than those in diagnostic ultrasound practice, which
revealed two mechanisms known to alter biological systems:
• Thermal mechanism: Heating of soft tissue and bone.
• Non-thermal mechanism: Mechanical phenomena, such as
cavitation.
MHz to 15 MHz.
87
Page 96

Viera™ Portable Breast Ultrasound Safety Topics
These mechanisms are discussed later.
Benefits & Risks
Ultrasound is widely used because it provides many clinical benefits to the patient and has an
outstanding safety record. In more than three decades of use, there has been no known longterm negative side-effects associated to this technology.
More questions of safety are being discussed because more applications are being discovered,
and the industry is producing technically sophisticated scanners that provide more diagnostic
information. Dialogue among the medical community, manufacturers, and the FDA has
resulted in a standard that allows higher outputs for greater diagnostic capability.
Ultrasound benefits:
• Multiple diagnostic uses
• Immediate results with high-quality information
• Replacement or complimentary or used with other procedures
• Cost-effectiveness
• Portability
• Patient acceptance
• Safety record
Ultrasound risks:
The potential for adverse bioeffects caused by heating or cavitation.
“… the benefits to patients of the prudent use of diagnostic ultrasound outweigh the risks, if
any, that may be present.” -- AIUM
Safety Topics
Use the Viera™ Portable Breast Ultrasound only if you have read and understood all the
information in this section. Operating the system without proper safety awareness could lead
to fatal or serious personal injury.
This section covers general safety information. Safety information applicable to specific tasks
are noted in the procedure. The Viera™ Portable Breast Ultrasound is intended for use by a
trained medical professional, or by the direction and supervision of a licensed physician
qualified to instruct its usage.
User Manual version 4.2.0 88
Page 97

Viera™ Portable Breast Ultrasound Safety Topics
“Diagnostic ultrasound is recognized as a safe, effective, and highly flexible imaging modality
capable of providing clinically relevant information about most parts of the body in a rapid and
cost-effective fashion.” -- WHO (World Health Organization)
Product Safety
Hologic is responsible for the safety of the scanners. The safety of your smart device is your
responsibility. Always follow the safety guidelines provided with your smart device before,
during, and after use.
Product Warnings
The following actions may cause fatal or other serious injury:
• Using the system without adequate training on its safe and e
ffective operation. If you are
unsure of your ability to operate the system safely and effectively, do not use it.
• Attempting to remove, modify, override, or frustrate any safety provisions on the system.
• Using the system with any product that Clarius does not recognize as compatible with the
system, or operate the product for unintended purposes.
• If the system appears to be malfunctioning, stop use immediately. Please contact Hologic
Technical Support.
• To avoid exposing you and the patient to safety hazards, if any part of the system is known
or suspected to be defective or incorrectly adjusted, do not use the system until it is
repaired.
• To avoid compromising the effectiveness of the system and the safety of the patient, the
user, and others, do not operate the system with patients unless you have an adequate
understanding of its capabilities and functions.
• Configure your smart device in compliance with your institution's security policies. For
example, notifications and alerts from third-party applications may interfere with an exam.
• Selecting an incorrect or hazardous imaging mode may deliver excessive acoustic energy to
the patient during the exam.
• Heat dissipates through the heatsink and the metal portion of the scanner enclosure. Do
not touch these parts or apply them against the patient for longer than one minute. Hold
the scanner using the black rubber handle.
Product Compatibility
The Viera™ Portable Breast Ultrasound comes with a battery, a battery charger, and a power
supply for the charger. Do not use your system in combination with other products or
User Manual version 4.2.0 89
Page 98

Viera™ Portable Breast Ultrasound Safety Topics
components not made by Clarius, unless Clarius expressly recognizes those other products or
components as compatible.
Changes and additions to the system can be made only by Clarius or by third parties expressly
authorized by Clarius to do so. Such changes and additions must comply with all applicable
laws and regulations that have the force of law within the jurisdictions concerned, and best
engineering practices. System changes and additions that are made without the appropriate
training or by using unapproved spare parts may carry risks of system damage and personal
injury.
Battery Safety
If the battery fails to charge fully, replace it.
• Keep the battery away from heat sources. For example, do not charge the battery near a
fire or heater.
• Do not discard the battery in fire.
• Do not open, crush, puncture, or short-circuit contacts.
• If the battery leaks or emits an odor, remove it from the scanner and contact Hologic
Technical Support.
• If the battery emits an odor or heat, is deformed or discolored, or in any way appears
abnormal during use, recharging or storage, immediately remove it and stop using it. If
you have any questions about the battery, please contact Hologic Technical Support.
• If the battery is to remain unused for over a month, keep the charge level between 40%
and 50% to prolong its life, and store it in temperatures between -20°C (-4°F) and 20°C
(68°F).
The following actions may damage the battery:
• Returning a battery without instructions from Hologic Technical Support.
• Short-circuiting the battery by connecting the positive and negative terminals directly to
metal objects.
• Using the battery in temperatures below -20°C (-4°F) or above 60°C (140°F).
• Charging the battery in temperatures below 10°C (50°F) or above 45°C (113°F).
• Forcing the battery into the system. The polarity of the battery terminals is fixed and
cannot be reversed.
• Connecting the battery to an electrical power outlet.
• Charging the battery using non-Clarius equipment. Always charge the battery using the
battery charger provided by Clarius.
• Do not touch battery contacts.
• Do not leave the battery in direct sunlight.
User Manual version 4.2.0 90
Page 99

Viera™ Portable Breast Ultrasound Safety Topics
Cleaning Safety
It is important to clean and maintain the ultrasound system and peripherals. Thorough
cleaning is particularly important for pieces of peripheral equipment, because they contain
electromechanical parts. If exposed to constant and excessive sunlight and humidity, the
scanner will suffer in both performance and reliability.
It is your responsibility to clean and disinfect your scanner in accordance with the cleaning and
disinfecting instructions in this manual. For instructions on cleaning and disinfecting the
Viera™ Portable Breast Ultrasound, refer to
Cleaners & Disinfectants
• Use only cleaners and disinfectants recommended by Clarius. Avoid acetone, Methyl ethyl
ketone (MEK), paint thinner, or other strong solvents and abrasive cleaners.
• Always use protective eyewear and gloves when cleaning and disinfecting equipment.
• Disinfectants are recommended based on their chemical compatibility (not their biological
effectiveness) with product materials. For the biological effectiveness of a disinfectant, see
the guidelines and recommendations of the disinfectant manufacturer, the U.S. Food and
Drug Administration, and the U.S. Centers for Disease Control.
Cleaning on page 82.
• If a pre-mixed solution is used, check the expiry date.
• The level of disinfection required for a scanner is determined by the type of tissue it
contacts. Ensure the disinfectant is appropriate for the scanner and its application. Also,
read the disinfectant label instructions and the recommendations of the Association for
Professionals in Infection Control, the U.S. Food and Drug Administration, and the U.S.
Centers for Disease Control.
• Clean the scanner after each use. This is an essential step before disinfection.
• When disinfecting a scanner, ensure that the solution's strength and duration of contact
are appropriate for disinfection.
• Selecting a non-recommended solution, using an incorrect solution strength, or immersing
a scanner deeper or longer than recommended can damage the scanner and will void
warranty.
• Follow the manufacturer's recommendations and instructions when using cleaners and
disinfectants.
Minimizing the Effects of Residual Disinfectant
If you use an OPA-based disinfectant, residual solution may remain on your scanners if you do
not carefully follow the manufacturer's instructions.
To minimize the effects from residual OPA, or any other disinfectant, Clarius recommends the
following:
• Follow the disinfectant manufacturer's instructions very carefully.
• Limit the time that scanners are soaked in the disinfectant solution to the minimum time
User Manual version 4.2.0 91
Page 100

Viera™ Portable Breast Ultrasound Safety Topics
recommended by the disinfectant manufacturer.
Factors Affecting Disinfectant Efficacy
The following factors will affect the efficacy of a disinfectant solution:
• Number and location of microorganisms
• Innate resistance of microorganisms
• Concentration and potency of disinfectants
• Physical and chemical factors
• Organic and inorganic matter
• Duration of exposure
• Biofilms
Scanner Care
Lint, dust, and light (including sunlight) have no effect on the scanner’s basic safety and
essential performance.
• Avoid sharp objects, such as scissors, scalpels, or cauterizing knives, from touching the
scanners.
• Avoid bumping the scanner on hard surfaces.
• Avoid surgeon's brushes when cleaning scanners. Even soft brushes can damage scanners.
• Before storing scanners, make sure they are completely dry. If it is necessary to dry the
scanner lens or acoustic window, apply a soft cloth to the area, and blot rather than wipe.
• Use only liquid solutions to disinfect scanners.
• Regularly check the lens of the scanner’s acoustic window for degradation, as described in
Cleaning on page 82, to prevent degradation of image quality and abrasions to the
patient’s skin.
The following actions may damage your scanner:
• Cleaning or disinfecting a scanner using methods unapproved by Clarius.
• Using paper or abrasive products. They damage the soft lens of the scanner's acoustic
window. If the lens is damaged to the point that the scanner elements are exposed, stop
using the scanner and please contact Hologic Technical Support immediately. Exposed
scanner elements may cause burns or electric shock to the patient.
• Soaking the scanner for extended periods. Use soaking time and depth recommended by
the disinfectant manufacturer.
User Manual version 4.2.0 92
 Loading...