

Page 1
ThinPrep
®
2000 Processor
LABORATORY SOLUTIONS
Operator’s Manual
Operator’s Manual
MAN-02585-001 Rev. 005
Page 2

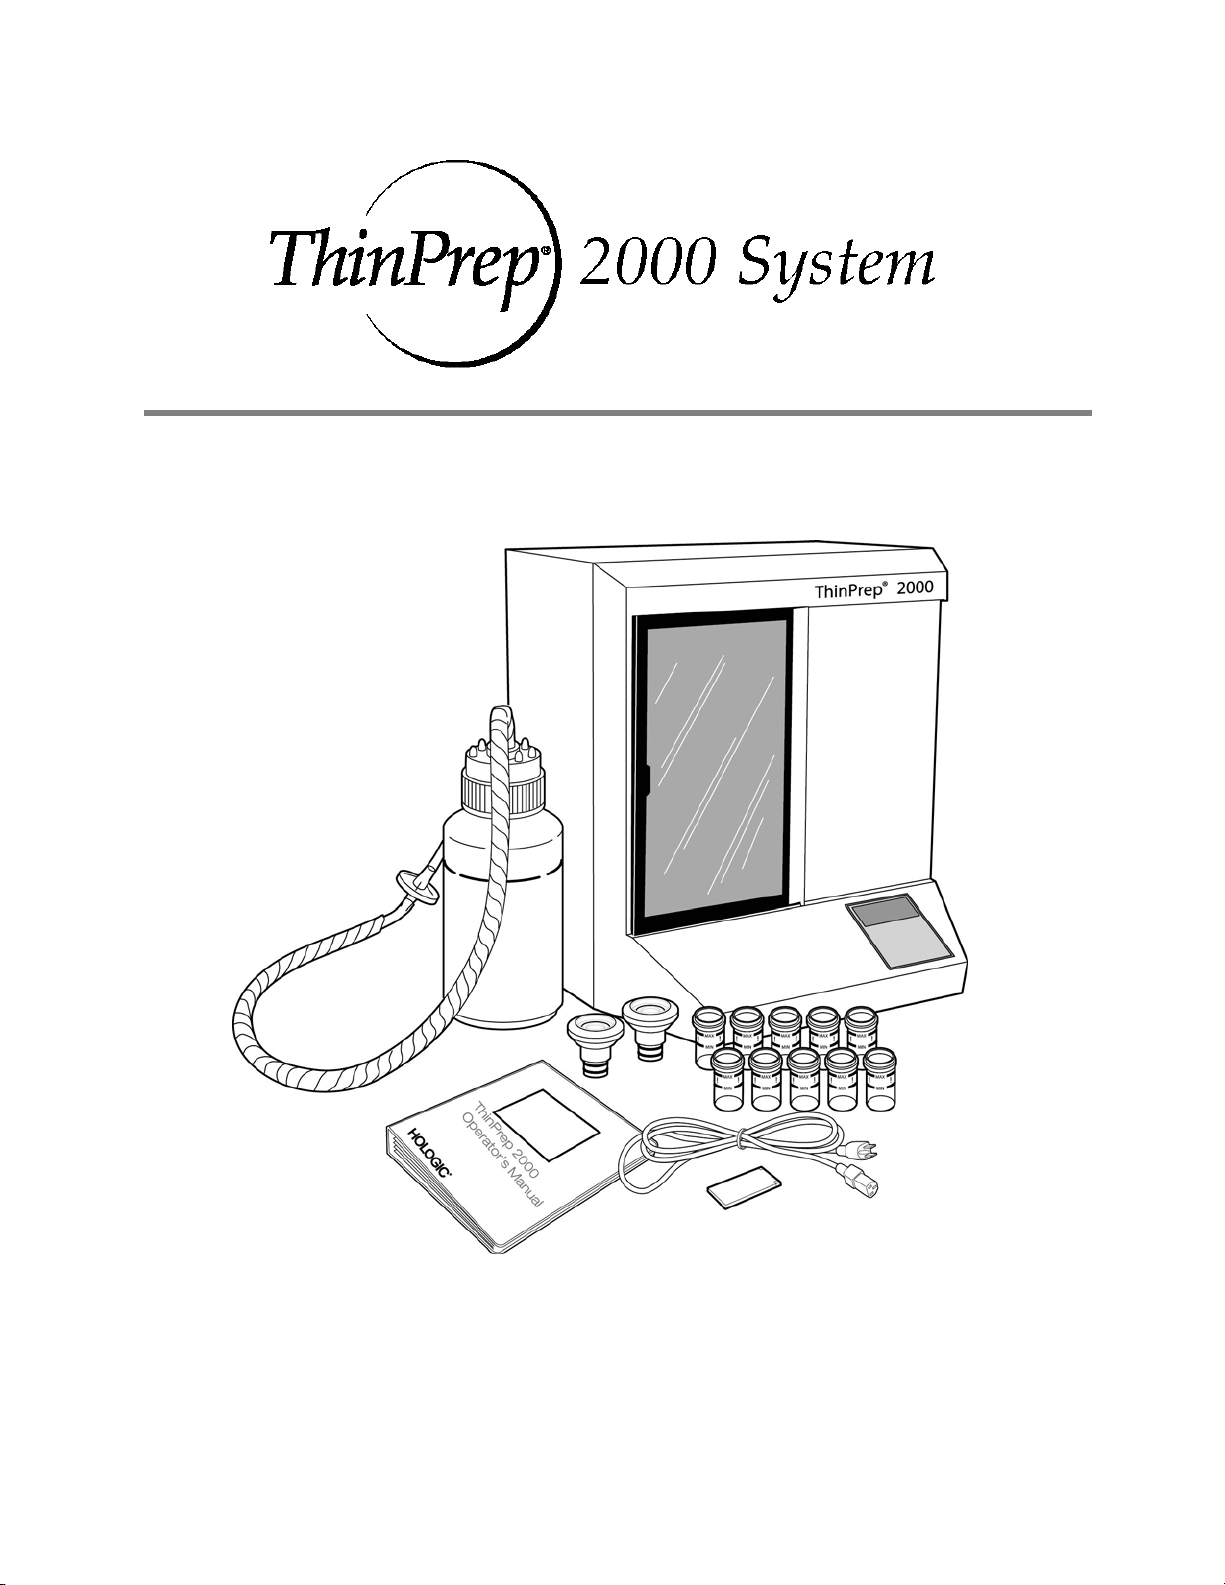
ThinPrep® 2000 System
Operator’s Manual
HOLOGIC, INC.HOLOGIC (UK) LIMITED
250 CAMPUS DRIVE UNIT 2, LINK 10 NAPIER WAY
MARLBOROUGH, MA 01752 USA CRAWLEY, WEST SUSSEX RH10 9RA
T
EL: 1-800-442-9892 UNITED KINGDOM
1-508-263-2900 TEL: +44 (0) 1293 522 080
F
AX: 1-508-229-2795 FAX: +44 (0) 1293 528 010
W
EB: WWW.HOLOGIC.COM
MAN-02585-001
Page 3

Caution: Federal law restricts this device to sale by or on the order of a physician, or any other
practitioner licensed by the law of the State in which the practitioner practices to use or order the use
of the device and are trained and experienced in the use of the ThinPrep 2000 System.
Preparation of microscope slides using the ThinPrep 2000 System should be performed only by
personnel who have been trained by Hologic or by organizations or individuals designated by
Hologic.
Evaluation of microscope slides produced with the ThinPrep 2000 System should be performed only
by cytotechnologists and pathologists who have been trained to evaluate ThinPrep-prepared slides
by Hologic or by organizations or individuals designated by Hologic.
© Hologic, Inc., 2014. All rights reserved. No part of this publication may be reproduced,
transmitted, transcribed, stored in a retrieval system, or translated into any language or computer
language, in any form, or by any means, electronic, mechanical, magnetic, optical, chemical, manual,
or otherwise, without the prior written permission of Hologic, 250 Campus Drive, Marlborough,
Massachusetts, 01752, United States of America.
Although this guide has been prepared with every precaution to ensure accuracy, Hologic assumes
no liability for any errors or omissions, nor for any damages resulting from the application or use of
this information.
This product may be covered by one or more U.S. patents identified at
http://hologic.com/patentinformation
Hologic, CytoLyt, PreservCyt and ThinPrep are registered trademarks of Hologic, Inc. or its
subsidiaries in the United States and/or other countries. All other trademarks are the property of
their respective companies.
Caution: Changes or modifications to this unit not expressly approved by the party responsible
for compliance could void the user’s authority to operate the equipment.
Document number: AW-08263-001 Rev. 004
Page 4

Instructions for Use
ThinPrep 2000
ThinPrep 2000
Instructions for Use
Page 5
Instructions For Use
MAN-02624-001 Rev. 003 page 1 of 15
Page 6
INTENDED USE
The ThinPrep
smear preparation for use in screening for the presence of atypical cells, cervical cancer, or its
precursor lesions (Low-grade Squamous Intraepithelial Lesions, High-grade Squamous
Intraepithelial Lesions), as well as all other cytologic categories as defined by The Bethesda
System for Reporting Cervical/Vaginal Cytologic Diagnoses
®
2000 System is intended as a replacement for the conventional method of Pap
1
.
SUMMARY AND EXPLANATION OF THE SYSTEM
The ThinPrep process begins with the patient’s gynecologic sample being collected by the
clinician using a cervical sampling device which, rather than being smeared on a microscope
slide, is immersed and rinsed in a vial filled with 20 ml of PreservCyt
The ThinPrep sample vial is then capped, labeled, and sent to a laboratory equipped with a
ThinPrep 2000 Processor.
At the laboratory, the PreservCyt sample vial is placed into a ThinPrep 2000 Processor and a
gentle dispersion step breaks up blood, mucus, non-diagnostic debris, and thoroughly mixes the
cell sample. The cells are then collected on a ThinPrep Pap Test Filter specifically designed to
collect diagnostic cells. The ThinPrep 2000 Processor constantly monitors the rate of flow
through the ThinPrep Pap Test Filter during the collection process in order to prevent the
cellular presentation from being too scant or too dense. A thin layer of cells is then transferred
to a glass slide in a 20 mm-diameter circle, and the slide is automatically deposited into a
fixative
solution.
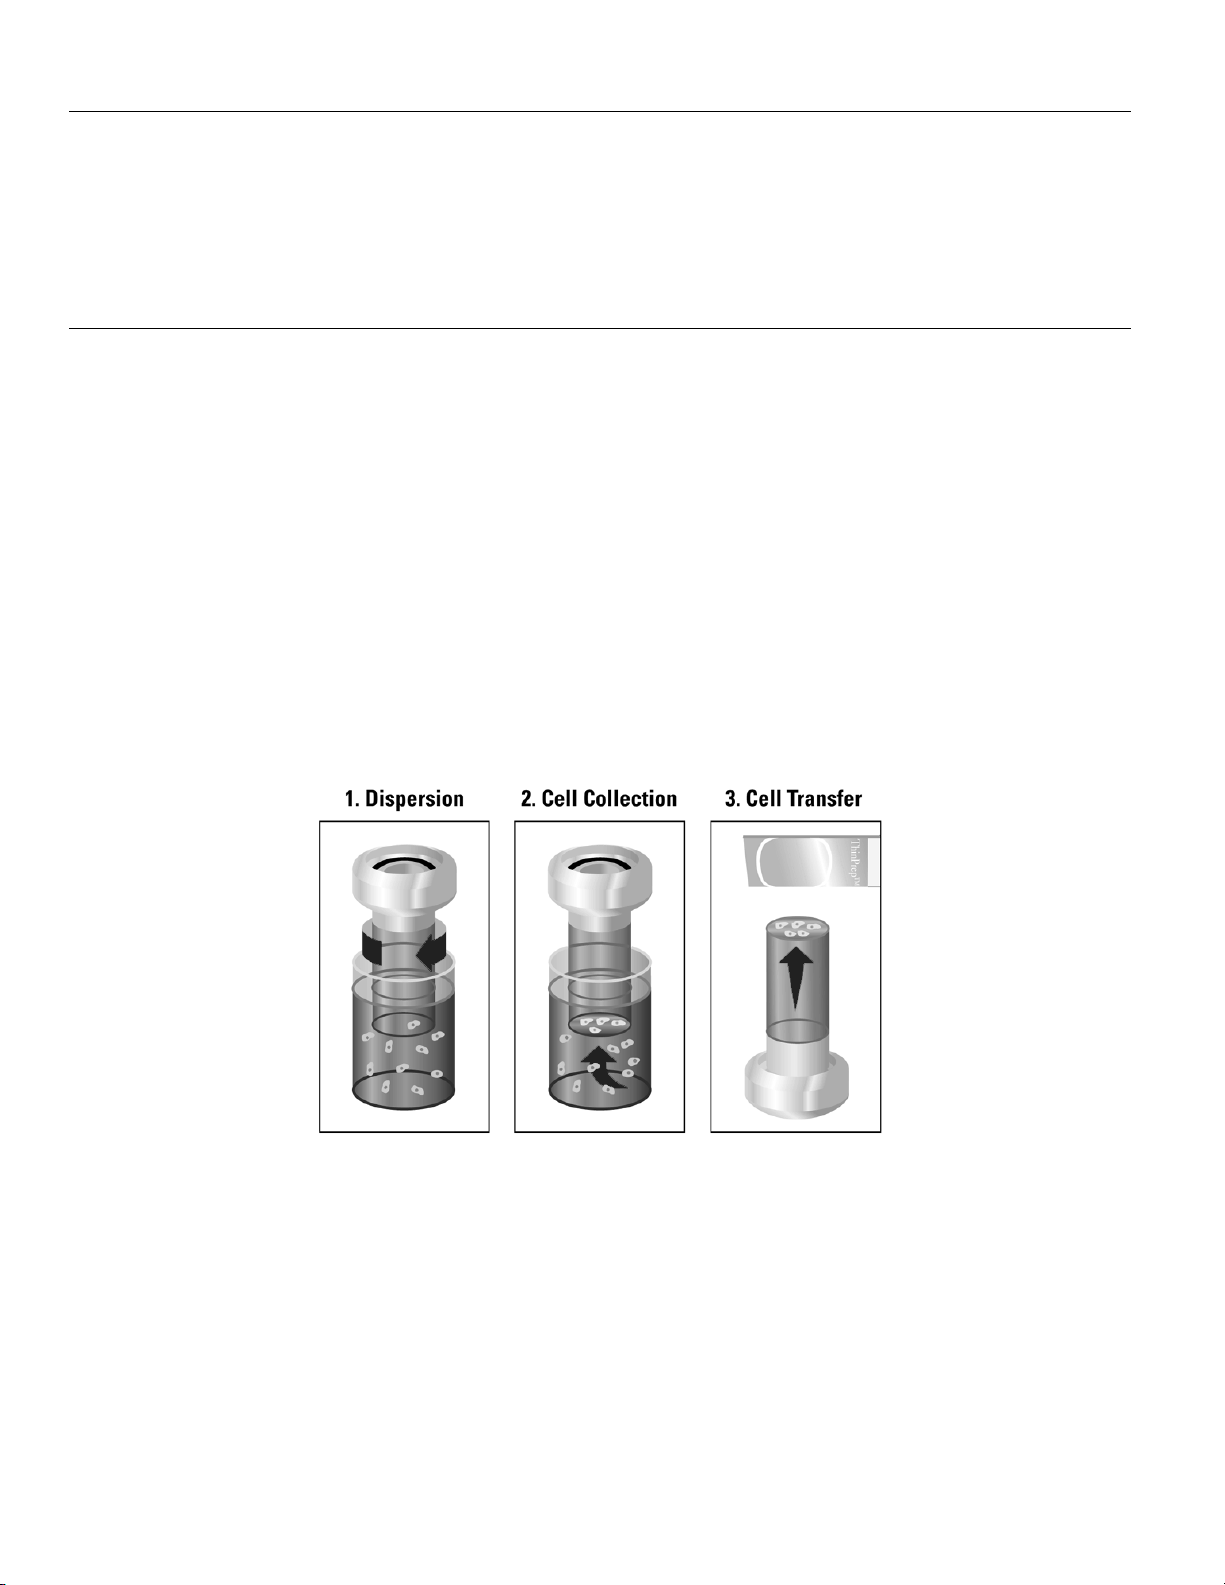
The ThinPrep Sample Preparation Process
®
Solution (PreservCyt).
(1) Dispersion (2) Cell Collection (3) Cell Transfer
The ThinPrep Pap Test Filter rotates within the
sample vial, creating currents in the fluid that
are strong enough to separate debris and
disperse mucus, but gentle enough to have no
adverse effect on cell appearance.
A gentle vacuum is created within the ThinPrep
Pap Test Filter, which collects cells on the
exterior surface of the membrane. Cell
collection is controlled by the ThinPrep 2000
Processor’s software that monitors the rate of
flow through the ThinPrep Pap Test Filter.
After the cells are collected on the membrane,
the ThinPrep Pap Test Filter is inverted and
gently pressed against the ThinPrep Microscope
Slide. Natural attraction and slight positive air
pressure cause the cells to adhere to the
ThinPrep Microscope Slide resulting in an even
distribution of cells in a defined circular area.
MAN-02624-001 Rev. 003 page 2 of 15
Page 7

As with conventional Pap smears, slides prepared with the ThinPrep
®
2000 System are examined
in the context of the patient’s clinical history and information provided by other diagnostic
procedures such as colposcopy, biopsy, and human papillomavirus (HPV) testing, to determine
patient management.
The PreservCyt
and transport medium for gynecologic specimens tested with the Cervista
Cervista
®
®
Solution component of the ThinPrep 2000 System is an alternative collection
®
HPV HR Test, the
HPV 16/18 Test, the Roche cobas® HPV Test and the Digene Hybrid Capture
System HPV DNA. Refer to the respective manufacturer’s package inserts for instructions for
using PreservCyt Solution for collection, transport, storage, and preparation of specimens for use
in those systems.
The PreservCyt Solution component of the ThinPrep 2000 System is an alternative collection
and transport medium for gynecologic specimens tested with the Hologic APTIMA COMBO 2
CT/NG Assays, the Hologic APTIMA
x
CT Q
Amplified DNA Assay. Refer to the respective manufacturer’s package inserts for
®
Trichomonas vaginalis Assay, and the BD ProbeTec™
®
instructions for using PreservCyt Solution for collection, transport, storage, and preparation of
specimens for use in those systems.
The PreservCyt Solution component of the ThinPrep 2000 System is also an alternative
collection and transport medium for gynecologic specimens tested with the Roche Diagnostics
COBAS AMPLICOR
TM
CT/NG assay. Refer to Hologic’s labeling (Document #MAN-02063-
001) for instructions for using PreservCyt Solution for collection, transport, storage, and
preparation of specimens and to the Roche Diagnostics COBAS AMPLICOR CT/NG package
insert for instructions for use of that system.
LIMITATIONS
Gyne cologic sa mples col lected fo r preparat ion using the T hinPrep 2 000 System should be
collected using a broom-type or endocervical brush/plastic spatula combination collection
devices.
Preparation of microscope slides using the ThinPrep 2000 System should be performed only
by personnel who have been trained by Hologic or by organizations or individuals
designated by Hologic.
Evaluation of microscope slides produced with the ThinPrep 2000 System should be
performed only by cytotechnologists and pathologists who have been trained to evaluate
ThinPrep prepared slides by Hologic or by organizations or individuals designated by
Hologic.
Supplies used in the ThinPrep 2000 System are those designed and supplied by Hologic
specifically for the ThinPrep 2000 System. These include PreservCyt Solution vials,
ThinPrep Pap Test Filters, and ThinPrep Microscope Slides. These supplies are required for
proper performance of the system and cannot be substituted. Product performance will be
compromised if other supplies are used. After use, supplies should be disposed of in
accordance with local, state, and federal regulations.
A ThinPrep Pap Test Filter must be used only once and cannot be reused.
The performance of HPV DNA and CT/NG testing on reprocessed sample vials has not been
evaluated.
MAN-02624-001 Rev. 003 page 3 of 15
Page 8

WARNINGS
For In Vitro Diagnostic Use
PreservCyt Solution contains methanol, which is poisonous and may be fatal or cause
blindness if swallowed. Methanol vapor may be harmful. PreservCyt is flammable; keep
away from fire, heat, sparks, and flame. Other solutions must not be substituted for
PreservCyt Solution. PreservCyt Solution should be stored and disposed of in accordance
with local, state, and federal regulations.
Do not process a cerebral spinal fluid (CSF) specimen or other sample type that is suspected
of possessing prion infectivity (PrPsc) derived from a person with a TSE, such as
Creutzfeldt-Jakob disease, on a ThinPrep processor. A TSE-contaminated processor cannot
be effectively decontaminated and therefore must be properly disposed of in order to avoid
potential harm to users of the processor or service personnel.
PRECAUTIONS
Specific processing steps must be followed before and during use of the ThinPrep 2000 processor
if planning to perform Chlamydia trachomatis and Neisseria gonorrhoeae testing, using the Roche
Diagnostics COBAS AMPLICOR CT/NG test, on the residual specimen after a slide has been
prepared using a ThinPrep 2000 processor. Follow the procedures found in Chapter 5B of the
ThinPrep 2000 Operator’s Manual.
This equipment generates, uses and can radiate radio frequency energy, and if not installed and
used in accordance with the Operator’s Manual, may cause interference to radio communications.
Operation of this equipment in a residential area is likely to cause harmful interference, in which
case the user will be required to correct the interference at his/her own expense.
PreservCyt Solution with cytologic sample intended for ThinPrep Pap testing must be stored
between 15
PreservCyt Solution with cytologic sample intended for CT/NG testing using the Roche
Diagnostics COBAS AMPLICOR CT/NG test must be stored between 4
and tested within 6 weeks of collection.
PreservCyt Solution was challenged with a variety of microbial and viral organisms. The
following table presents the starting concentrations of viable organisms, and the number of viable
organisms found after 15 minutes in the PreservCyt Solution. The log reduction of viable
organisms is also presented. As with all laboratory procedures, universal precautions should be
followed.
oC
(59oF) and 30oC (86oF) and tested within 6 weeks of collection.
o
C (39oF) and 25oC (77oF)
MAN-02624-001 Rev. 003 page 4 of 15
Page 9

Organism Initial Concentration
Candida albicans 5.5 x 10⁵ CFU/mL >4.7
Aspergillus niger* 4.8 x 10⁵ CFU/mL 2.7
Escherichia coli 2.8 x 10⁵ CFU/mL >4.4
Staphylococcus aureus 2.3 x 10⁵ CFU/mL >4.4
Pseudomonas aeruginosa 2.5 x 10⁵ CFU/mL
Mycobacterium tuberculosis** 9.4 x 10⁵ CFU/mL 4.9
Rabbitpox virus 6.0 x 10⁶ PFU/mL 5.5***
HIV-1 1.0 x 10
* After 1 hour >4.7 log reduction
** After 1 hour >5.7 log reduction
*** Data is for 5 minutes
Log Reduction after
15 min.
>4.4
7.5
TCID50/mL 7.0***
PERFORMANCE CHARACTERISTICS: REPORT OF CLINICAL
STUDIES
A prospective multi-center clinical study was conducted to evaluate the performance of the ThinPrep
2000 System in direct comparison to the conventional Pap smear. The objective of the ThinPrep
clinical study was to demonstrate that gynecologic specimens prepared using the ThinPrep 2000
System were at least as effective as conventional Pap smears for the detection of atypical cells and
cervical cancer or its precursor lesions in a variety of patient populations. In addition, an assessment of
specimen adequacy was performed.
The initial clinical study protocol was a blinded, split sample, matched pair study, for which a
conventional Pap smear was prepared first, and the remainder of the sample (the portion that normally
would have been discarded) was immersed and rinsed into a vial of PreservCyt Solution. At the
laboratory, the PreservCyt sample vial was placed into a ThinPrep 2000 Processor and a slide was then
prepared from the patient’s sample. ThinPrep and conventional Pap smear slides were examined and
diagnosed independently. Reporting forms containing patient history as well as a checklist of all
possible categories of The Bethesda System were used to record the results of the screening. A single
independent pathologist reviewed all discrepant and positive slides from all sites in a blinded fashion to
provide a further objective review of the results.
LABORATORY AND PATIENT CHARACTERISTICS
Cytology laboratories at three screening centers (designated as S1, S2, and S3) and three hospital
centers (designated as H1, H2, and H3) participated in the clinical study. The screening centers in the
study serve patient populations (screening populations) with rates of abnormality (Low-grade
Squamous Intraepithelial Lesion [LSIL] and more severe lesions) similar to the United States average
of less than 5%.
(hospital populations) characterized by high rates (>10%) of cervical abnormality. Data on race
2
The hospital centers in the study serve a high risk referral patient population
MAN-02624-001 Rev. 003 page 5 of 15
Page 10

demographics was obtained for 70% of the patients that participated in the study. The study population
consisted of the following race groups: Caucasian (41.2%), Asian (2.3%), Hispanic (9.7%), African
American (15.2%), Native American (1.0%) and other groups (0.6%).
Table 1 describes the laboratories and the patient populations.
Table 1: Site Characteristics
Site Type of
Population
S1 Screening 300,000 1,386 18.0 - 84.0 10.6% 8.8% 2.3%
S2 Screening 100,000 1,668 18.0 - 60.6 0.3% 10.7% 2.9%
S3 Screening 96,000 1,093 18.0 - 48.8 0.0% 7.1% 3.8%
H1 Hospital 35,000 1,046 18.1 - 89.1 8.1% 40.4% 9.9%
H2 Hospital 40,000 1,049 18.1 - 84.4 2.1% 18.2% 12.9%
H3 Hospital 37,000 981 18.2 - 78.8 11.1% 3 8.2% 24.2%
Laboratory Characteristics Clinical Study Demographics
Patient
Laboratory
Volume -
Smears per
Year
Cases Patient
CLINICAL STUDY RESULTS
The diagnostic categories of The Bethesda System were used as the basis of the comparison between
conventional and ThinPrep
statistical analyses for all clinical sites are presented in Tables 2 through 11. Cases with incorrect
paperwork, patient’s age less than 18 years, cytologically unsatisfactory slides, or patients with a
hysterectomy were excluded from this analysis. Few cases of cervical cancer (0.02%
represented in the clinical study, as is typical in the United States patient population.
®
findings from the clinical study. The diagnostic classification data and
Age Range
Post-Meno-
pausal
Previous
Abnormal Pap
Smear
Convent.
Prevalence
LSIL+
3
) were
Table 2: Diagnostic Classification Table, All Categories
ThinPrep NEG
ASCUS
AGUS 13 2 3 0 1 0 1 20
LSIL 114 84 0 227 44 0 0 469
HSIL 11 15 0 35 104 2 0 167
SQ CA 0 0 0 0 0 1 0 1
GL CA 0 0 0 0 0 0 0 0
TOTAL 5680 521 8 367 167 3 1 6747
Abbreviations for Diagnoses: NEG = Normal or negative, ASCUS = Atypical Squamous Cells of
Undetermined Significance, AGUS = Atypical Glandular Cells of Undetermined Significance, LSIL = Lowgrade Squamous Intraepithelial Lesion, HSIL = High-grade Squamous Intraepithelial Lesion, SQ CA =
Squamous Cell Carcinoma, GL CA = Glandular Cell Adenocarcinoma
Conventional
NEG ASCUS AGUS LSIL HSIL SQ CA GL CA TOTAL
5224 295 3 60 11 0 0 5593
318
125 2 45 7 0 0 497
MAN-02624-001 Rev. 003 page 6 of 15
Page 11

Table 3: Three Category Diagnostic Classification Table
Conventional
NEG ASCUS/AGUS+ LSIL+ TOTAL
ThinPrep NEG
ASCUS/
AGUS+
LSIL+ 125 99 413 637
TOTAL 5680 529 538 6747
5224 298 71 5593
331 132 54 1154
Table 4: Two Category Diagnostic Classification Table, LSIL and More Severe Diagnoses
Conventional
NEG/ASCUS/
AGUS+
ThinPrep NEG/ASCUS/
AGUS+
LSIL+ 224 413 637
TOTAL 6209 538 6747
5985 125 6110
LSIL+ TOTAL
Table 5: Two Category Diagnostic Classification Table, ASCUS/AGUS and More Severe Diagnoses
NEG ASCUS/AGUS+ TOTAL
ThinPrep NEG
ASCUS/
AGUS+
TOTAL 5680 1067 6747
5224 369 5593
456 698 1154
MAN-02624-001 Rev. 003 page 7 of 15
Page 12

The diagnostic data analysis from the sites is summarized in Table 6 and 7. When the p-value is significant (p <
0.05), the method favored is indicated in the tables.
Table 6: Results by Site, LSIL and More Severe Lesions
Site
S1
Cases ThinPrep
LSIL+
1,336 46 31 48% 0.027 ThinPrep
Convent.
LSIL+
Increased
Detection*
p-Value Method
Favored
S2
S3
H1
H2
H3
*Increased detection = ThinPrep® LSIL+ - Conventional LSIL+ x 100%
Conventional LSIL+
1,563 78 45 73% <0.001 ThipPrep
1,058 67 40 68% <0.001 ThinPrep
971 125 96 30% <0.001 ThinPrep
1,010 111 130 (15%) 0.135 Neither
809 210 196 7% 0.374 Neither
For LSIL and more severe lesions, the diagnostic comparison statistically
favored the ThinPrep
®
method at four sites and was statistically equivalent at
two sites.
Table 7: Results by Site, ASCUS/AGUS and More Severe Lesions
Site
S1 1,336 117 93 26% 0.067 Neither
S2 1,563 124 80 55% <0.001 ThinPrep
S3 1,058 123 81 52% <0.001 ThinPrep
Cases ThinPrep
ASCUS+
Convent.
ASCUS+
Increased
Detection*
p-Value Method
Favored
H1 971 204 173 18% 0.007 ThinPrep
H2 1,010 259 282 (8%) 0.360 Neither
H3 809 327 359 (9%) 0.102 Neither
*Increased detection = ThinPrep ASCUS+ - Conventional ASCUS+ x 100%
Conventional ASCUS+
For ASCUS/AGUS and more severe lesions, the diagnostic comparison statistically favored the
ThinPrep method at three sites and was statistically equivalent at three sites.
One pathologist served as an independent reviewer for the six clinical sites, receiving both slides from
cases where the two methods were either abnormal or discrepant. Since a true reference cannot be
determined in such studies and therefore true sensitivity cannot be calculated, the use of an expert
cytologic review provides an alternative to histologic confirmation by biopsy or human papillomavirus
(HPV) testing as a means for determining the reference diagnosis.
The reference diagnosis was the more severe diagnosis from either of the ThinPrep or conventional
Pap slides as determined by the independent pathologist. The number of slides diagnosed as abnormal
at each site, compared to the reference diagnosis of the independent pathologist, provides the
proportion of LSIL or more severe lesions (Table 8) and the proportion of ASCUS/AGUS or more
severe lesions (Table 9). The statistical analysis allows a comparison of the two methods and a
determination of which method is favored when using the independent pathologist for expert cytologic
review as the adjudicator of the final diagnosis.
MAN-02624-001 Rev. 003 page 8 of 15
Page 13

Table 8: Independent Pathologist Results by Site, LSIL and More Severe Lesions
Site
S1 50 33 25 0.170 Neither
S2 65 48 33 0.042 ThinPrep
S3 77 54 33 <0.001 ThinPrep
H1 116 102 81 <0.001 ThinPrep
H2 115 86 90 0.876 Neither
H3 126 120 112 0.170 Neither
For LSIL and more severe lesions, the diagnostic comparison statistically favored the ThinPrep method at three sites and
was statistically equivalent at three sites.
Table 9: Independent Pathologist Results by Site, ASCUS/AGUS and More Severe Lesions
Site
S1 92 72 68 0.900 Neither
S2 101 85 59 0.005 ThinPrep
S3 109 95 65 <0.001 ThinPrep
H1 170 155 143 0.237 Neither
H2 171 143 154 0.330 Neither
H3 204 190 191 1.000 Neither
For ASCUS/AGUS and more severe lesions, the diagnostic comparison statistically favored the ThinPrep method at two sites
and was statistically equivalent at four sites.
Cases
Positive
by Independent
Pathologist
Cases
Positive
by
Independent
Pathologist
ThinPrep
Positive
ThinPrep
Positive
®
Conventional
Positive
Conventional
Positive
p-Value Method Favored
p-Value Method Favored
MAN-02624-001 Rev. 003 page 9 of 15
Page 14

Table 10 below shows the summary for all sites of the descriptive diagnosis for all Bethesda System categories.
Table 10: Summary of Descriptive Diagnosis
Descriptive Diagnosis
Number of Patients: 6747
Benign Cellular Changes:
Infection:
Trichomonas Vaginalis
Candida spp.
Coccobacilli
Actinomyces spp.
Herpes
Other
Reactive Cellular Changes
Associated with:
Inflammation
Atrophic Vaginitis
Radiation
Other
Epithelial Cell Abnormalities:
Squamous Cell:
ASCUS
favor reactive
favor neoplastic
undetermined
LSIL
HSIL
Carcinoma
Glandular Cell:
Benign Endometrial cells in
Postmenopausal Women
Atypical Glandular Cells (AGUS)
favor reactive
favor neoplastic
undetermined
Endocervical Adenocarcinoma
Note: Some patients had more than one diagnostic subcategory.
ThinPrep
N % N %
1592
136
406
690
2
3
155
353
32
2
25
1159
501
128
161
213
469
167
1
7
21
9
0
12
0
23.6
2.0
6.0
10.2
0.0
0.0
2.3
5.2
0.5
0.0
0.4
17.2
7.4
1.9
2.4
3.2
7.0
2.5
0.0
0.1
0.3
0.1
0.0
0.2
0.0
Conventional
1591
185
259
608
3
8
285
385
48
1
37
1077
521
131
140
250
367
167
3
10
9
4
3
2
1
23.6
2.7
3.8
9.0
0.0
0.1
4.2
5.7
0.7
0.0
0.5
16.0
7.7
1.9
2.1
3.7
5.4
2.5
0.0
0.1
0.1
0.1
0.0
0.0
0.0
Table 11 shows the rates of detection for infection, reactive changes, and the total benign cellular
changes for both the ThinPrep
®
and conventional methods at all sites.
Table 11: Benign Cellular Changes Results
N % N %
Benign
Cellular
Changes Reactive
Total*
* Total includes some patients that may have had both an infection and reactive cellular change.
Infection
Changes
ThinPrep
1392 20.6 1348 20.0
412 6.1 471 7.0
1592 23.6 1591 23.6
Conventional
MAN-02624-001 Rev. 003 page 10 of 15
Page 15

Tables 12, 13, and 14 show the specimen adequacy results for the ThinPrep method and conventional
smear method for all of the study sites. Of the 7,360 total patients enrolled, 7,223 are included in this
analysis. Cases with patient’s age less than 18 years or patients with a hysterectomy were excluded
from this analysis.
Two additional clinical studies were conducted to evaluate specimen adequacy results when samples
were deposited directly into the PreservCyt
®
vial, without first making a conventional Pap smear. This
specimen collection technique is the intended use for the ThinPrep 2000 System. Tables 15 and 16
present the split sample and direct to vial results.
Table 12: Summary of Specimen Adequacy Results
Specimen Adequacy
Number of Patients: 7223
Satisfactory 5656 78.3 5101 70.6
Satisfactory for Evaluation but
Limited by:
Air-Drying Artifact
Thick Smear
Endocervical Component Absent
Scant Squamous Epithelial
Component
Obscuring Blood
Obscuring Inflammation
No Clinical History
Cytolysis
Other
Unsatisfactory for Evaluation:
Air-Drying Artifact
Thick Smear
Endocervical Component Absent
Scant Squamous Epithelial
Component
Obscuring Blood
Obscuring Inflammation
No Clinical History
Cytolysis
Other
Note: Some patients had more than one subcategory.
ThinPrep Conventional
N % N %
1431
1
9
1140
150
55
141
12
19
10
136
0
0
25
106
23
5
0
0
31
Table 13: Specimen Adequacy Results
Conventional
ThinPrep SAT
SBLB
UNSAT
SAT SBLB UNSAT TOTAL
4316 1302 38 5656
722
63 41
665 44 1431
19.8
0.0
0.1
15.8
2.1
0.8
2.0
0.2
0.3
0.1
1.9
0.0
0.0
0.3
1.5
0.3
0.1
0.0
0.0
0.4
32 136
2008
136
65
681
47
339
1008
6
119
26
114
13
7
11
47
58
41
0
4
9
27.8
1.9
0.9
9.4
0.7
4.7
14.0
0.1
1.6
0.4
1.6
0.2
0.1
0.2
0.7
0.8
0.6
0.0
0.1
0.1
TOTAL
SAT=Satisfactory, SBLB=Satisfactory But Limited By, UNSAT=Unsatisfactory
5101 2008 114
7223
MAN-02624-001 Rev. 003 page 11 of 15
Page 16

Table 14: Specimen Adequacy Results by Site
Site Cases Thin
Prep
SAT
Cases
S1
1,386 1092 1178 265 204 29 4
Convent.
SAT
Cases
Thin
Prep
SBLB
Cases
Convent.
SBLB
Cases
Thin
Prep
UNSAT
Cases
Convent.
UNSAT
Cases
S2
S3
H1
H2
H3
All Sites
1,668 1530 1477 130 178 8 13
1,093 896 650 183 432 14 11
1,046 760 660 266 375 20 11
1,049 709 712 323 330 17 7
981 669 424 264 489 48 68
7,223 5656 5101 1431 2008 136 114
The Satisfactory But Limited By (SBLB) category can be broken down into many subcategories,
one of which is the absence of Endocervical Component. Table 15 shows the Satisfactory But
Limited By category “No ECC’s” for ThinPrep
®
and conventional slides.
Table 15: Specimen Adequacy Results by Site, SBLB Rates for no Endocervical Component.
SBLB Due to No ECC’s
Site Cases ThinPrep
SBLB-
no ECC’s
S1
S2
S3
1,386 237 17.1% 162 11.7%
1,668 104 6.2% 73 4.4%
1,093 145 13.3% 84 7.7%
ThinPrep
SBLB-
no ECC’s (%)
Conventional
SBLB-
no ECC’s
Conventional
SBLB-
no ECC’s (%)
H1
H2
H3
All Sites
1,046 229 21.9% 115 11.0%
1,049 305 29.1% 150 14.3%
981 120 12.2% 97 9.9%
7,223 1140 15.8% 681 9.4%
For the results of the clinical study involving a split-sample protocol, there was a 6.4 percent difference
between conventional and ThinPrep methods in detecting endocervical component. This is similar to
previous studies using a split sample methodology.
DIRECT-TO-VIAL ENDOCERVICAL COMPONENT (ECC) STUDIES
For the intended use of the ThinPrep
into a PreservCyt
®
vial, rather than splitting the cellular sampl e. It was expected that this woul d result in
®
2000 System, the cervical sampling device will be rinsed directly
an increase in the pick-up of endocervical cells and metaplastic cells. To verify this hypothesis, two
studies were performed using the direct-to-vial method and are summarized in Table 16. Overall, no
difference was found between ThinPrep and conventional methods in these two studies.
MAN-02624-001 Rev. 003 page 12 of 15
Page 17

Table 16: Summary of Direct-to-vial Endocervical Component (ECC) Studies
Study Number of
Direct-to-Vial
Feasibility
Direct-to-Vial
Clinical Study
1. Direct-to-Vial Feasibility study compared to overall clinical investigation conventional Pap
smear SBLB-No Endocervical Component rate.
2. Direct-to-Vial Clinical study compared to site S2 clinical investigation conventional Pap smear
SBLB-No Endocervical Component rate.
DIRECT-TO-VIAL HSIL+ STUDY
Following initial FDA approval of the ThinPrep System, Hologic conducted a multi-site direct-to-vial
clinical study to evaluate the ThinPrep 2000 System versus conventional Pap smear for the detection of
High Grade Squamous Intraepithelial and more severe lesions (HSIL+). Two types of patient groups
were enrolled in the trial from ten (10) leading academic hospitals in major metropolitan areas
throughout the United States. From each site, one group consisted of patients representative of a
routine Pap test screening population and the other group made up of patients representative of a
referral population enrolled at the time of colposcopic examination. The ThinPrep specimens were
collected prospectively and compared against a historical control cohort. The historical cohort
consisted of data collected from the same clinics and clinicians (if available) used to collect the
ThinPrep specimens. These data were collected sequentially from patients seen immediately prior to
the initiation of the study.
The results from this study showed a detection rate of 511 / 20,917 for the conventional Pap smear
versus 399 / 10,226 for the ThinPrep slides. For these clinical sites and these study populations, this
indicates a 59.7% increase in detection of HSIL+ lesions for the ThinPrep specimens. These results
are summarized in Table 17.
Table 17: Summary of Direct-to-Vial HSIL+ Study
Site
S1
S2
S3
S4
S5
S6
S7
S8
S9
S10
Total CP
(n)
2,439 51 2.1 1,218 26 2.1
2,075 44 2.1 1,001 57 5.7
2,034 7 0.3 1,016 16 1.6
2,043 14 0.7 1,000 19 1.9
2,040 166 8.1 1,004 98 9.8
2,011 37 1.8 1,004 39 3.9
2,221 58 2.6 1,000 45 4.5
2,039 61 3.0 983 44 4.5
2,000 4 0.2 1,000 5 0.5
2,015 69 3.4 1,000 50 5.0
Evaluable
Patients
SBLB due to No
Endocervical
Component
Comparable
Conventional Pap
Smear Percentage
299 9.36% 9.43%1
484 4.96% 4.38%2
HSIL+
Percent
(%)
Total TP
(n)
HSIL+
Percent
(%)
Percent
Change (%)
+2.1
+168.5
+357.6
+177.3
+20.0
+111.1
+72.3
+49.6
+150.0
+46.0
Total
20,917 511 2.4 10,226 399 3.9
59.7( p<0.001)
Percent Change (%) = ((TP HSIL+/TP Total)/(CP HSIL+/CP Total)-1) *100
MAN-02624-001 Rev. 003 page 13 of 15
Page 18

GLANDULAR DISEASE DETECTION – PUBLISHED STUDIES
The detection of endocervical glandular lesions is an essential function of the Pap test. However,
abnormal glandular cells in the Pap sample may also originate from the endometrium or from
extrauterine sites. The Pap test is not intended to be a screening test for such lesions.
When suspected glandular abnormalities are identified, their accurate classification as true glandular
versus squamous lesions is important for proper evaluation and subsequent treatment (e.g. choice of
excisional biopsy method versus conservative follow-up). Multiple peer-reviewed publications
report on the improved ability of the ThinPrep 2000 System to detect glandular disease versus the
conventional Pap smear. Although these studies do not consistently address sensitivity of different Pap
testing methods in detecting specific types of glandular disease, the reported results are consistent with
more frequent biopsy confirmation of abnormal glandular findings by the ThinPrep Pap Test compared
to conventional cytology.
Thus, the finding of a glandular abnormality on a ThinPrep Pap Test slide merits increased attention
for definitive evaluation of potential endocervical or endometrial pathology.
CONCLUSIONS
The ThinPrep
populations and may be used as a replacement for the conventional Pap smear method for the detection
of atypical cells, cervical cancer, or its precursor lesions, as well as all other cytologic categories as
defined by The Bethesda System.
The ThinPrep 2000 System is significantly more effective than the conventional Pap smear for the
detection of Low-grade Squamous Intraepithelial (LSIL) and more severe lesions in a variety of patient
populations.
Specimen quality with the ThinPrep 2000 System is significantly improved over that of conventional
Pap smear preparation in a variety of patient populations.
®
2000 System is as effective as the conventional Pap smear in a variety of patient
4-9
MATERIALS REQUIRED
MATERIALS PROVIDED
The ThinPrep 2000 System consists of the following components:
ThinPrep Processor Instrument (Model TP 2000) 2 filter Caps
PreservCyt
ThinPrep Pap Test Filter for Gynecologic Applications Power cord
Program Memory Card for Gynecologic Applications ThinPrep Microscope slides
Waste bottle assembly - includes bottle, bottle cap,
tubing set, fittings, waste filter
Additional items supplied:
ThinPrep 2000 Operator’s Manual
10 fixative vials
MATERIALS REQUIRED BUT NOT PROVIDED
Slide staining system and reagents 20 ml PreservCyt
Standard laboratory fixative ThinPrep
Coverslips and mounting media Cervical collection device
®
Solution vial 2 spare filter seal O-rings
®
Solution vial
®
Pap Test Filter for Gynecologic Applications
MAN-02624-001 Rev. 003 page 14 of 15
Page 19

STORAGE
Store PreservCyt Solution between 15°C (59°F) and 30°C (86°F). Do not use beyond the expiration
date printed on the container.
Store PreservCyt Solution with cytologic sample intended for ThinPrep Pap testing between 15°C
(59°F) and 30°C (86°F) for up to 6 weeks.
Store PreservCyt Solution with cytologic sample intended for CT/NG testing using the Roche
Diagnostics COBAS AMPLICOR CT/NG test between 4°C (39°F) and 25°C (77°F) for up to 6
weeks.
BIBLIOGRAPHY
1. Solomon D., Davey D, Kurman R, Moriarty A, O’Connor D, Prey M, Raab S,
Sherman M, Wilbur D, Wright T, Young N, for the Forum Group Members and the
2001 Bethesda Workshop. The 2001 Bethesda System Terminology for Reporting
Results of Cervical Cancer. JAMA. 2002;287:2114-2119.
2. Jones HW. Impact of The Bethesda System, Cancer 77 pp. 1914-1918, 1995.
3. American Cancer Society. Cancer Facts and Figures, 1995.
4. Ashfaq R, Gibbons D, Vela C, Saboorian MH, Iliya F. ThinPrep Pap Test. Accuracy for
glandular disease. Acta Cytol 1999; 43: 81-5
5.
Bai H, Sung CJ, Steinhoff MM: ThinPrep Pap Test promotes detection of glandular lesions
of the endocervix. Diagn Cytopathol 2000;23:19-22
6. Carpenter AB, Davey DD: ThinPrep Pap Test: Performance and biopsy follow-up un a university
hospital. Cancer Cytopathology 1999; 87: 105-12
7. Guidos BJ, Selvaggi SM. Detection of endometrial adenocarcinoma with the ThinPrep Pap test.
Diagn Cytopathol 2000; 23: 260-5
8. Schorge JO, Hossein Saboorian M, Hynan L, Ashfaq R. ThinPrep detection of cervical and
endometrial adenocarcinoma: A retrospective cohort study. Cancer Cytopathology 2002; 96: 33843
9. Wang N, Emancipator SN, Rose P, Rodriguez M, Abdul-Karim FW. Histologic follow-up of
atypical endocervical cells. Liquid-based, thin-layer preparation vs. conventional Pap smear. Acta
Cytol 2002; 46: 453-7
TECHNICAL SERVICE AND PRODUCT INFORMATION
For technical service and assistance related to use of the ThinPrep 2000 System, contact Hologic:
Telephone: 1-800-442-9892
Fax: 1-508-229-2795
For international or toll-free blocked calls, please contact 1-508-263-2900.
Email: info@hologic.com
Hologic, PreservCyt, ThinPrep, and associated logos are registered trademarks of Hologic, Inc. and/or its subsidiaries in the
United States and other countries. All other trademarks, registered trademarks, and product names are the property of their
respective owners.
Hologic, Inc.
250 Campus Drive
Marlborough, MA 01752
1-800-442-9892
www.hologic.com
Hologic UK
Unit 2, Link 10 Napier Way
Crawley, West Sussex RH10 9RA
United Kingdom
+44 1293 522 080
©2014 Hologic, Inc. All rights reserved.
AW-07100-001 Rev. 003
MAN-02624-001 Rev. 003 page 15 of 15
Page 20

ThinPrep 2000 System
for Gynecologic Use
for Gynecologic Use
ThinPrep 2000 System
Page 21

ThinPrep® 2000 System
For Gynecologic Use
Section 1 (white tabs) describes the use of the
ThinPrep
®
2000 system for gynecologic applications. In addition, it
contains all information regarding the installation, operation, and
®
maintenance of the ThinPrep
2000 processor.
ThinPrep 2000 Processor Operator’s Manual
i
Page 22

This page intentionally left blank.
ii
ThinPrep 2000 Processor Operator’s Manual
Page 23

Table of Contents
Chapter One
INTRODUCTION
TABLE OF CONTENTS
SECTION A:
SECTION B:
SECTION C
SECTION D:
SECTION E:
SECTION F:
Chapter Two
THINPREP 2000 INSTALLATION
SECTION A:
SECTION B:
SECTION C:
SECTION D:
SECTION E:
SECTION F:
Overview and Function
of the ThinPrep
Principles of Operation 1.7
: ThinPrep 2000 System Technical Specifications 1.12
Internal Quality Control 1.16
ThinPrep 2000 Hazards 1.16
Disposal 1.19
General 2.1
Action Upon Delivery 2.1
Preparation Prior to Installation 2.2
Internal Packaging Removal 2.2
Connecting the Waste Bottle 2.6
Inserting the Program Memory Card 2.7
®
2000 System 1.1
SECTION G:
SECTION H:
SECTION I
SECTION J:
SECTION K:
Chapter Three
PRESERVCYT SOLUTION
SECTION A:
SECTION B:
Connecting the Power Cord 2.8
Turning On Your ThinPrep 2000 Processor 2.9
: Run a Blank Sample 2.11
Storage and Handling - Post Installation 2.12
Turning Off the ThinPrep 2000 Processor 2.12
Introduction 3.1
PreservCyt® Solution 3.2
ThinPrep 2000 Processor Operator’s Manual
iii
Page 24

TABLE OF CONTENTS
Chapter Four
GYNECOLOGIC SAMPLE PREPARATION
SECTION A:
SECTION B:
SECTION C:
SECTION D:
SECTION E:
SECTION F:
Introduction 4.1
Collection Preparation 4.2
Specimen Collection 4.3
Special Precautions 4.5
Specimen Processing 4.6
Sample Preparation Troubleshooting 4.7
Chapter Five A
OPERATING INSTRUCTIONS
SECTION A:
SECTION B:
SECTION C:
SECTION D:
SECTION E:
:Introduction 5A.1
Optional Instructions for Ancillary Testing 5A.2
Material Requirements 5A.4
Pre-operation Checklist 5A.5
Overview of
Loading the ThinPrep
SECTION F:
Loading the PreservCyt Sample Vial 5A.7
®
2000 Processor 5A.6
SECTION G:
SECTION H:
SECTION I:
SECTION J:
SECTION K:
SECTION L:
SECTION M:
SECTION N:
iv
ThinPrep 2000 Processor Operator’s Manual
Loading the ThinPrep Pap Test Filter 5A.8
Loading the ThinPrep Microscope Slide 5A.11
Loading the Fixative Vial 5A.14
Closing the Door 5A.15
Selecting and Initiating a Sequence 5A.16
Unloading the ThinPrep 2000 Processor 5A.18
Interrupting the Slide Preparation Process 5A.20
Status, Maintenance, and Test Screens 5A.21
Page 25

TABLE OF CONTENTS
Chapter Five B
OPERATING INSTRUCTIONS
FOR PROCESSING COBAS AMPLICOR™ CT/NG SAMPLES
SECTION A:
SECTION B:
SECTION C:
SECTION D:
SECTION E:
SECTION F:
SECTION G:
SECTION H
SECTION I
: Loading the ThinPrep Microscope Slide 5B.11
SECTION J:
SECTION K
SECTION L
SECTION M:
SECTION N:
SECTION O
Introduction 5B.1
Material Requirements 5B.2
Pre-operation Checklist 5B.4
Overview of
®
Loading the ThinPrep
2000 Processor 5B.5
Preparing the Filter Caps 5B.6
Loading the Fixative Vial 5B.7
Loading the ThinPrep Pap Test Filter 5B.8
: Loading the PreservCyt Sample Vial 5B.10
Closing the Door 5B.14
: Selecting and Initiating a Sequence 5B.15
: Unloading the PreservCyt Sample Vial 5B.18
Unloading the ThinPrep Microscope Slide 5B.11
Unloading the Filter Assembly 5B.20
: Interrupting the Slide Preparation Process 5B.21
SECTION P:
Status, Maintenance, and Test Screens 5B.22
Chapter Six
INSTRUMENT TROUBLESHOOTING
SECTION A:
SECTION B:
SECTION C:
SECTION D:
Introduction 6.1
How to use this Section 6.2
Contents 6.3
Error History 6.37
ThinPrep 2000 Processor Operator’s Manual
v
Page 26

TABLE OF CONTENTS
Chapter Seven
MAINTENANCE
SECTION A:
SECTION B:
SECTION C:
SECTION D:
SECTION E:
SECTION F:
SECTION G:
SECTION H:
SECTION I:
SECTION J:
SECTION K
SECTION L:
SECTION M:
Introduction 7.1
Emptying Waste Bottle 7.2
Filter Cap Cleaning 7.4
Filter Cap O-ring Lubrication 7.5
Filter Seal O-ring Replacement 7.6
Door Cleaning 7.7
Cap Seal Cleaning 7.8
General Cleaning 7.9
Waste Tubing Replacement 7.10
Waste Filter Replacement 7.14
: Emptying and Cleaning the Catch Tray 7.16
Moving The ThinPrep® 2000 Processor 7.17
Maintenance Schedule 7.18
Chapter Eight
FIXATION, STAINING, AND COVERSLIPPING
SECTION A:
SECTION B:
SECTION C:
SECTION D:
SECTION E:
Introduction 8.1
Fixation 8.2
Staining 8.3
Coverslipping 8.6
References 8.6
Chapter Nine
THINPREP PAP TEST TRAINING PROGRAM 9.1
INDEX
vi
ThinPrep 2000 Processor Operator’s Manual
Page 27

1. Introduction
1. Introduction
Page 28

INTRODUCTION
1
SECTION
A
Chapter One
Introduction
This chapter describes an overview and the principles of operation of the ThinPrep® 2000 system for
gynecologic sample processing.
Note:
Specific processing steps using the ThinPrep 2000 system must be followed for specimens
undergoing subsequent testing for
Roche Diagnostics COBAS AMPLICOR™ CT/NG test. (See Chapter 5B, “Operating
Instructions for Processing COBAS AMPLICOR™ CT/NG Samples”.)
Chlamydia trachomatis
and
Neisseria gonorrhoeae
using the
OVERVIEW AND FUNCTION OF THE THINPREP® 2000 SYSTEM
The ThinPrep 2000 system is used in the processing of fluid-based gynecologic specimens for use
with the ThinPrep
microscope slides in preparation for staining, coverslipping and screening. The processor produces
thin, uniform preparations of cells on ThinPrep microscope slides.
Indication for Use
Intended Use
The ThinPrep 2000 system is intended as a replacement for the conventional method of Pap smear
preparation for use in screening for the presence of atypical cells, cervical cancer, or its precursor
lesions (Low Grade Squamous Intraepithelial Lesions, High Grade Squamous Intraepithelial
Lesions), as well as all other cytologic categories as defined by The Bethesda System for Reporting
Cervical/Vaginal Cytologic Diagnoses
®
Pap test. The samples are collected, processed, transferred and fixed onto
1
.
1. Kurman RJ, Solomon D. The Bethesda System for Reporting Cervical/Vaginal Cytologic Diseases, Springer-Verlag, New York 1994.
ThinPrep 2000 Processor Operator’s Manual
1.1
Page 29
1
INTRODUCTION
ThinPrep
®
2000
CYTYC
corporation
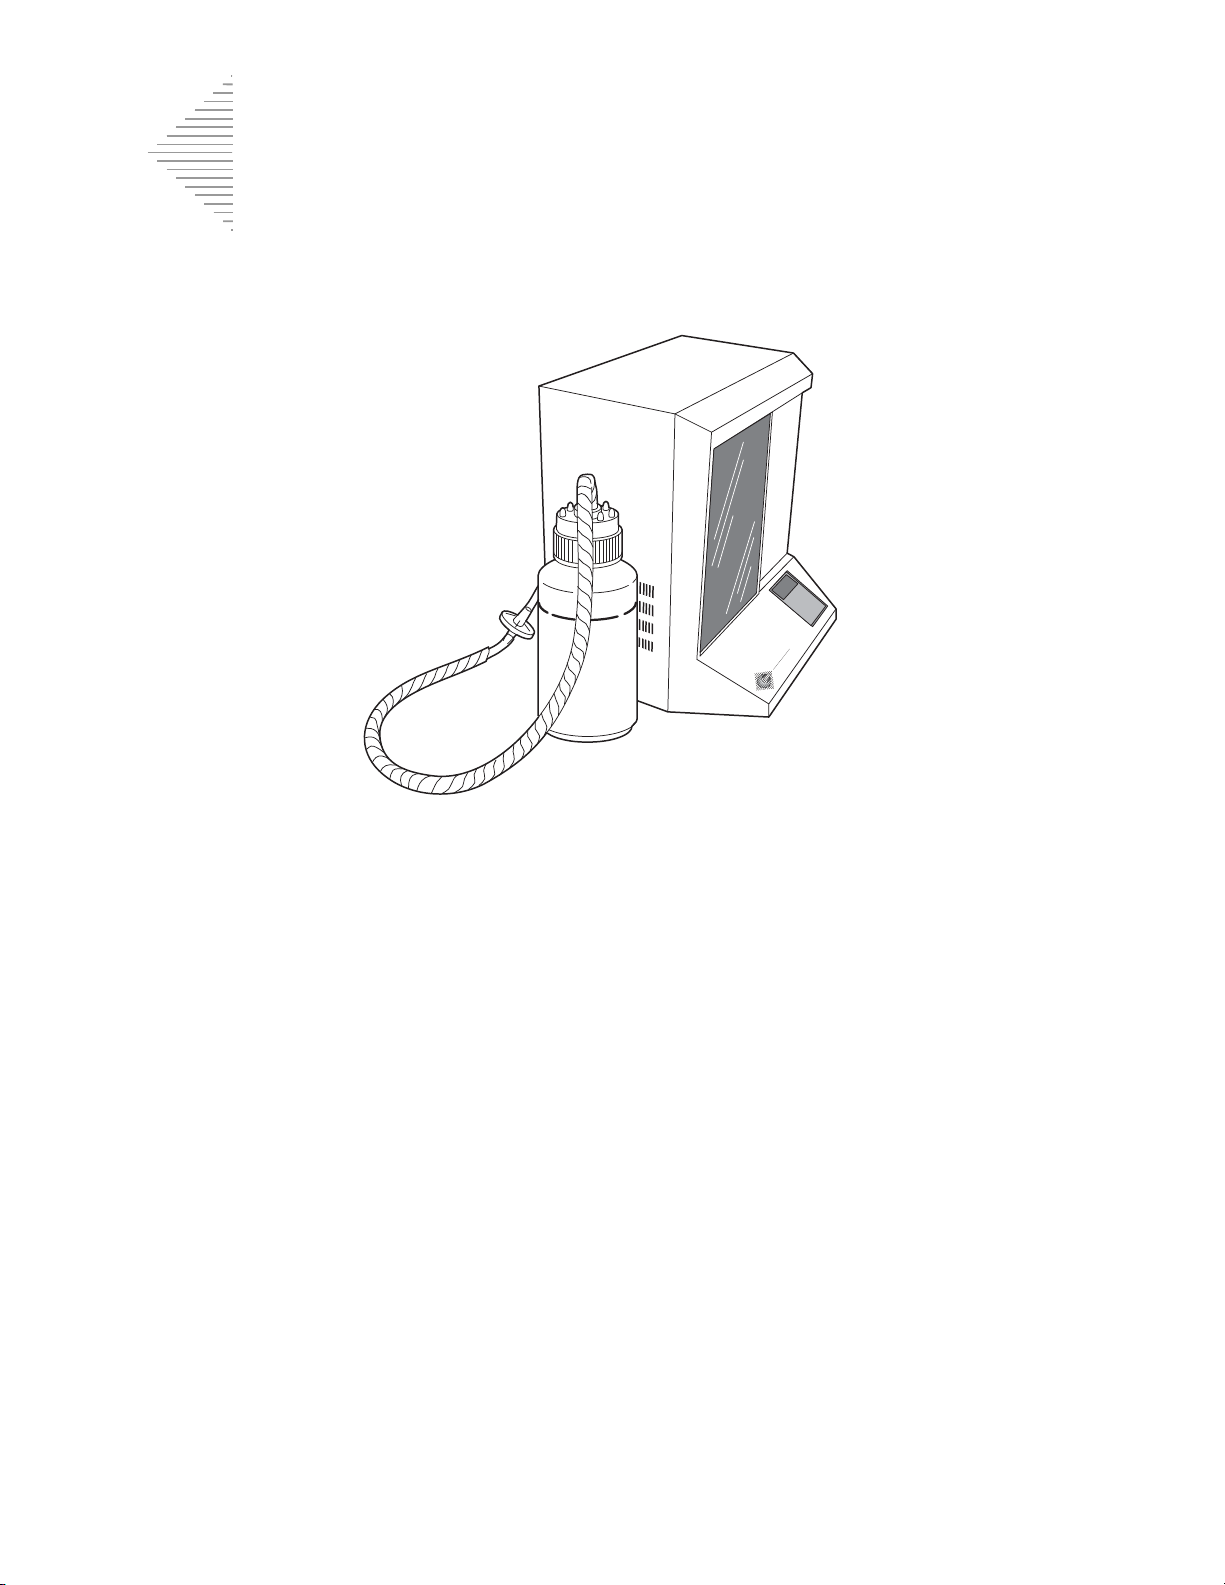
Figure 1-1 The ThinPrep 2000 Processor and Waste Bottle
Summary and Explanation of the System
The ThinPrep process begins with the patient’s gynecologic sample being collected by the clinician
using a cervical sampling device which, rather than being smeared on a microscope slide, is
®
immersed and rinsed in a vial filled with PreservCyt
Solution. The ThinPrep sample vial is then
capped, labeled, and sent to a laboratory equipped with a ThinPrep 2000 processor.
At the laboratory, the PreservCyt sample vial is placed into a ThinPrep 2000 processor and a gentle
dispersion step breaks up blood, mucus, non-diagnostic debris, and thoroughly mixes the cell
sample. The cells are then collected on a ThinPrep Pap test filter specifically designed to collect
diagnostic cells. The ThinPrep 2000 processor constantly monitors the rate of flow through the
ThinPrep Pap test filter during the collection process in order to prevent the cellular presentation
from being too scant or too dense. A thin layer of cells is then transferred to a glass slide in a 20-mmdiameter circle. The slide is then automatically deposited into a fixative solution.
1.2
ThinPrep 2000 Processor Operator’s Manual
Page 30
1
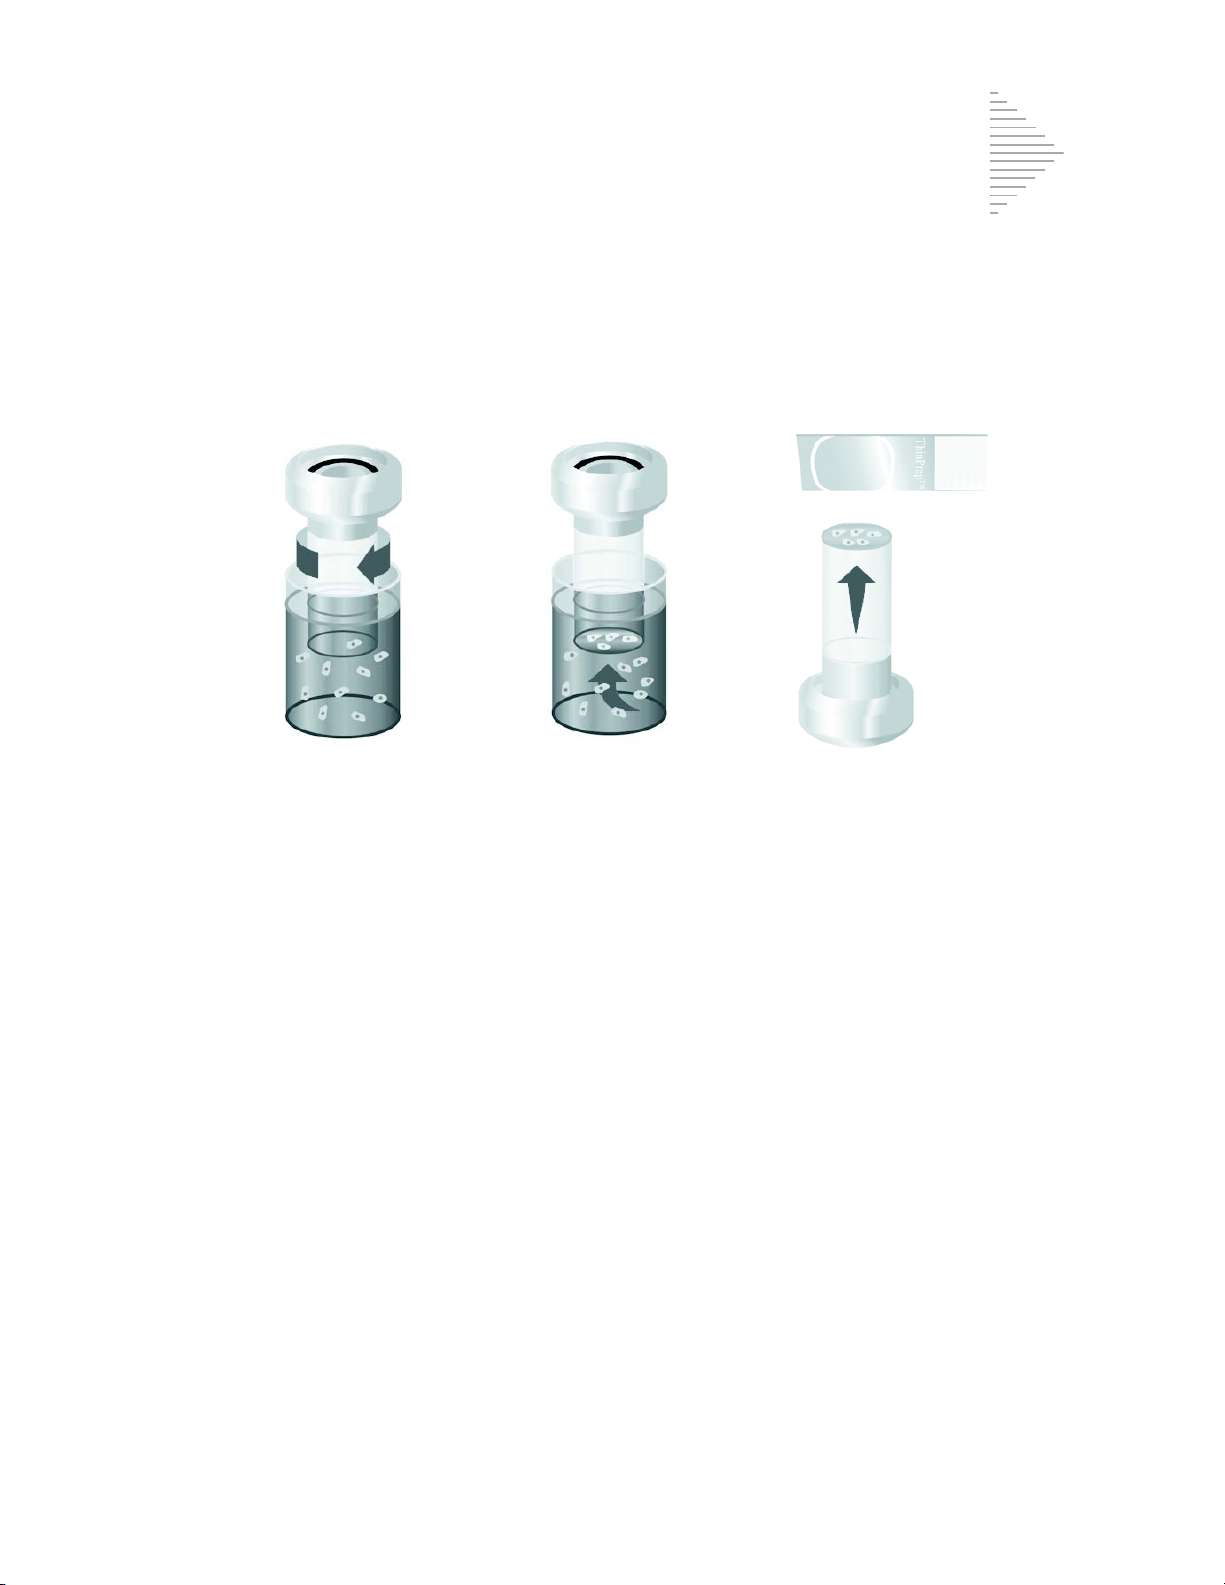
The ThinPrep Sample Preparation Process
1. Dispersion 2. Cell Collection 3. Cell Transfer
(1) Dispersion
The ThinPrep Pap test filter
rotates within the sample
vial, creating currents in the
fluid that are strong enough
to separate debris and
disperse mucus, but gentle
enough to have no adverse
effect on cell appearance.
(2) Cell Collection
A gentle vacuum is created
within the ThinPrep Pap test
filter, which collects cells on
the exterior surface of the
membrane. Cell collection is
controlled by the ThinPrep
2000 processor’s software that
monitors the rate of flow
through the ThinPrep Pap test
filter.
(3) Cell Transfer
After the cells are collected on
the membrane, the ThinPrep
Pap test filter is inverted and
gently pressed against the
ThinPrep microscope slide.
Natural attraction and slight
positive air pressure cause the
cells to adhere to the ThinPrep
microscope slide resulting in
an even distribution of cells in
a defined circular area.
INTRODUCTION
As with conventional Pap smears, slides prepared with the ThinPrep 2000 system are examined in
the context of the patient’s clinical history and information provided by other diagnostic procedures
such as colposcopy, biopsy, and human papillomavirus (HPV) testing, to determine patient
management.
Limitations
•
Gynecologic samples collected for preparation using the ThinPrep 2000 system should be
collected using a broom-type cervical collection device or endocervical brush/plastic
spatula combination collection device.
ThinPrep 2000 Processor Operator’s Manual
1.3
Page 31

1
INTRODUCTION
•
Preparation of microscope slides using the ThinPrep 2000 system should be performed
only by personnel who have been trained by Hologic or by organizations or individuals
designated by Hologic.
•
Evaluation of microscope slides produced with the ThinPrep 2000 system should be
performed only by cytotechnologists and pathologists who have been trained to evaluate
ThinPrep-prepared slides by Hologic or by organizations or individuals designated by
Hologic.
•
Supplies used in the ThinPrep 2000 system are those designed and supplied by Hologic
specifically for the ThinPrep 2000 system. These include PreservCyt Solution vials,
ThinPrep Pap test filters, and ThinPrep microscope slides. These supplies are required for
proper performance of the system and cannot be substituted. Product performance will be
compromised if other supplies are used. After use, supplies should be disposed of in
accordance with local, state, and federal regulations.
•
A ThinPrep Pap test filter must be used only once and cannot be reused.
Warnings
•
PreservCyt Solution contains methanol which is poisonous and may be fatal or cause
blindness if swallowed. Methanol vapor may be harmful. PreservCyt Solution is
flammable; keep away from fire, heat, sparks, and flame. Other solutions must not be
substituted for PreservCyt Solution. PreservCyt Solution should be stored and disposed of
in accordance with local, state, and federal regulations.
•
Strong oxidizers, such as bleach, are incompatible with PreservCyt Solution and therefore
should not be used to clean the waste bottle.
• Do not process a cerebral spinal fluid (CSF) specimen or other sample type that is suspected
of possessing prion infectivity (PrPsc) derived from a person with a TSE, such as CreutzfeldtJakob disease, on a ThinPrep processor. A TSE-contaminated processor cannot be effectively
decontaminated and therefore must be properly disposed of in order to avoid potential harm
to users of the processor or service personnel.
Precautions
•
This equipment generates, uses, and can radiate radio frequency energy, and if not
installed and used in accordance with the operator’s manual, may cause interference to
radio communications. Operation of this equipment in a residential area is likely to cause
harmful interference, in which case the user will be required to correct the interference at
his/her own expense.
• PreservCyt Solution
between 15°C (59°F) and 30°C (86°F) and tested within 6 weeks of collection.
with
cytologic sample intended for ThinPrep Pap testing must be stored
1.4
ThinPrep 2000 Processor Operator’s Manual
Page 32

INTRODUCTION
1
• PreservCyt Solution
with
cytologic sample intended for CT/NG testing using the Roche
Diagnostics COBAS AMPLICOR CT/NG test must be stored between 4°C (39°F) and 25°C
(77°F) and tested within 6 weeks of collection.
PreservCyt Solution was challenged with a variety of microbial and viral organisms. The following
table presents the starting concentrations of viable organisms and the number of viable organisms
found after 15 minutes in the PreservCyt Solution. The log reduction of viable organisms is also
presented. As with all laboratory procedures, universal precautions should be followed.
Organism Initial Concentration
Candida albicans
Aspergillus niger*
Escherichia coli
Staphylococcus aureus
Pseudomonas aeruginosa
Mycobacterium tuberculosis**
5.5 x 10
4.8 x 10
2.8 x 10
2.3 x 10
2.5 x 10
9.4 x 10
5
CFU/mL
5
CFU/mL
5
CFU/mL
5
CFU/mL
5
CFU/mL
5
CFU/mL
Log Reduction after
15 min.
>4.7
2.7
>4.4
>4.4
>4.4
4.9
Rabbitpox virus
HIV-1
* After 1 hour >4.7 log reduction
** After 1 hour >5.7 log reduction
*** Data is for 5 minutes
6.0 x 10
1.0 x 10
6
PFU/mL
7.5
TCID50/mL
5.5***
7.0***
MATERIALS REQUIRED
Materials Provided
The ThinPrep 2000 system consists of the following components:
•
ThinPrep processor instrument (Model: ThinPrep 2000)
•
PreservCyt Solution vial
•
Gyn ThinPrep Pap test filter (clear)
•
Program Memory Card
ThinPrep 2000 Processor Operator’s Manual
1.5
Page 33

1
INTRODUCTION
•
Power cord
•
2 Filter caps
•
2 spare filter seal O-rings
•
Waste bottle assembly — includes bottle, bottle cap, tubing set, fittings, waste filter
•
ThinPrep microscope slides
Additional items supplied:
•
ThinPrep 2000 System Operator’s Manual
•
10 fixative vials
•
Cervical collection device
•
Sealed cylinder
Materials Required But Not Provided
•
Slide staining system and reagents
•
Standard laboratory fixative
•
Coverslips and mounting media
•
Lint-free wipes
Storage
• Store PreservCyt Solution between 15°C (59°F) and 30°C (86°F). Do not use beyond the
expiration date printed on the container.
• Store PreservCyt Solution
15°C (59°F) and 30°C (86°F) for up to 6 weeks.
• Store PreservCyt Solution
Diagnostics COBAS AMPLICOR CT/NG test between 4°C (39°F) and 25°C (77°F) for up to
6 weeks.
with
cytologic sample intended for ThinPrep Pap testing between
with
cytologic sample intended for CT/NG testing using the Roche
1.6
ThinPrep 2000 Processor Operator’s Manual
Page 34

INTRODUCTION
1
SECTION
B
PRINCIPLES OF OPERATION
The ThinPrep 2000 processor makes use of mechanical, pneumatic, and fluidic principles for cell
dispersion, collection, and transfer. A rotary drive mechanism gently disperses samples. A
pneumatic/fluidic system, controlled by a microprocessor, monitors cell collection.
Electrochemical principles, the pneumatic and fluidic systems, the natural binding qualities of
cells, and the qualities of the ThinPrep Pap test filter are responsible for cell transfer.
Each ThinPrep processor slide preparation processing sequence is optimized for the biological
characteristics of the various cytological specimens.
The ThinPrep processor slide preparation process can be divided into the following phases:
Sample preparation/instrument loading
•
•
Start of cycle
•
Fluid level detection
•
Dispersion
•
Filter wetting
•
Cell collection
•
Waste clearing
•
Bubble point
•
Cell transfer
•
Slide ejection
•
Completion of cycle
The following sections describe the principles of each of these phases in detail.
ThinPrep 2000 Processor Operator’s Manual
1.7
Page 35

1
INTRODUCTION
Sample Preparation/Instrument Loading
Before the ThinPrep processor can process gynecologic samples, the samples must be placed into
PreservCyt Solution. Gynecologic samples must be prepared according to the protocols described in
Chapter 4, “Gynecologic Sample Preparation”. Once the cells are added to the PreservCyt Solution
vial by the appropriate method, the instrument can process the sample vial.
In preparation for sample processing, the operator loads four essential items into the ThinPrep 2000
processor: a PreservCyt Sample vial, a ThinPrep Pap test filter attached to the filter cap, a ThinPrep
slide and a fixative vial containing a standard laboratory fixative. The processes of loading and
operating the instrument are explained in Chapter 5A, “Operating Instructions”.
Start of Cycle
When the operator initiates a sequence, the ThinPrep 2000 processor verifies installation of
disposables, motor positions, and the positive and negative pressures in the pressure reservoirs.
After this the instrument processes the slide using the selected sequence.
Fluid Level Detection
The cap seal lowers to seal the filter assembly and the sample vial is raised towards the filter
membrane. The sample vial stops when the filter membrane makes contact with the surface of fluid.
If the fluid level is satisfactory, the instrument will continue the slide preparation process. An error
message and audible alarm indicate an unsatisfactory fluid level.
Dispersion
The cap seal lifts and the dispersion system rotates the ThinPrep Pap test filter assembly within the
cell suspension, creating shear forces in the fluid that are strong enough to separate randomly joined
material and disperse mucus, and are not known to have an adverse effect on the cellular
architecture or on adhesive forces joining diagnostically relevant groups of cells.
1.8
ThinPrep 2000 Processor Operator’s Manual
Page 36

INTRODUCTION
1
Negative pressure
creates a vacuum
ThinPrep Pap
test filter
Flow of fluid
Filter
pores
Filter Wetting
The head seal lowers to seal the filter assembly. Negative pressure is briefly applied, drawing a small
amount of fluid through the ThinPrep Pap test filter to wet it. Following wetting, the system gently
blows out the liquid in the ThinPrep Pap test filter. This clears any cellular material from the filter
surface.
Cell Collection
The filter membrane is biologically neutral and is mounted at one end of the ThinPrep Pap test filter
cylinder. The membrane is a flat, smooth, porous surface that collects the cellular material on one
plane.
The pneumatic system applies negative pressure to the filter in a series of pulses. These negative
pressure pulses (sips) draw PreservCyt Solution through the filter membrane and collect suspended
cellular material onto the outer membrane surface.
The collection process ceases when a target filter coverage, predetermined by the processor sequence,
is attained. Cell collection is controlled by an embedded microprocessor that monitors the pressure in
the ThinPrep Pap test filter cylinder. After collection, the cells sit on a single plane over the pores,
ready for transfer to the slide. Figure 1-2 illustrates cell collection.
Figure 1-2 Cell Collection
ThinPrep 2000 Processor Operator’s Manual
1.9
Page 37

1
INTRODUCTION
Waste Clearing
When collection ends, the ThinPrep Pap test filter is withdrawn from the sample vial and the filtrate
is aspirated into the waste bottle as the filter is inverted. The collected cells remain on the ThinPrep
Pap test filter due to the negative holding pressure.
Bubble Point
Bubble point removes excess fluid from the filter membrane prior to transferring cells onto the slide
to enhance cell adhesion to the slide.
Bubble point is performed after all of the fluid is evacuated. This is evident by the bubbling activity
on the inside of the filter membrane. Cells do not air-dry during bubble point.
Cell Transfer
When bubble point is complete, the slide handler moves the slide into contact with the inverted
ThinPrep Pap test filter.
The natural adhesion properties of cells and the electrochemical charge of the glass slide are
responsible for the transfer of cells from the filter membrane to the slide. The cells have a higher
affinity for the glass slide than for the membrane; slight positive air pressure behind the filter
membrane enhances cell transfer.
Slide Ejection
Once cell transfer is complete, the slide is removed from contact with the filter and automatically
ejected into the fixative vial.
Cycle Completion
All the motorized mechanisms return to their initial positions and the display returns to the Main
Menu. If the system detects an error during the process, a message will be displayed and an audible
alarm will sound.
1.10
ThinPrep 2000 Processor Operator’s Manual
Page 38

1
Figure 1-3 Overview of Processing
Pap test filter are in
place. Operator
initiates sequence.
2. Elevator raises sample
to filter and system
checks for appropriate
fluid level.
3. Dispersion. ThinPrep
Pap test filter rotates
to disperse sample
material.
4. Filter Wetting. Liquid
is drawn into the filter
then pushed out.
drawn into ThinPrep
Pap test filter in a
controlled manner.
6. Waste Clearing. Filter
is inverted, waste is
cleared to waste
bottle and sample
vial is lowered.
7. Cell Transfer. Slide
holder contacts filter.
Cells are transferred
to slide.
8. Slide Ejection. Slide
is deposited into
fixative bath. Filter
returns to starting
point.
INTRODUCTION
ThinPrep 2000 Processor Operator’s Manual
1.11
Page 39

1
INTRODUCTION
SECTION
C
ThinPrep 2000
Fix vials
Power cord
Program Memory
Card
Operator’s manual Filter cap assemblies
Waste bottle with cap
and filter
THINPREP 2000 SYSTEM TECHNICAL SPECIFICATIONS
Overview of Components
Figure 1-4 ThinPrep 2000 System Components
1.12
ThinPrep 2000 Processor Operator’s Manual
Page 40
1
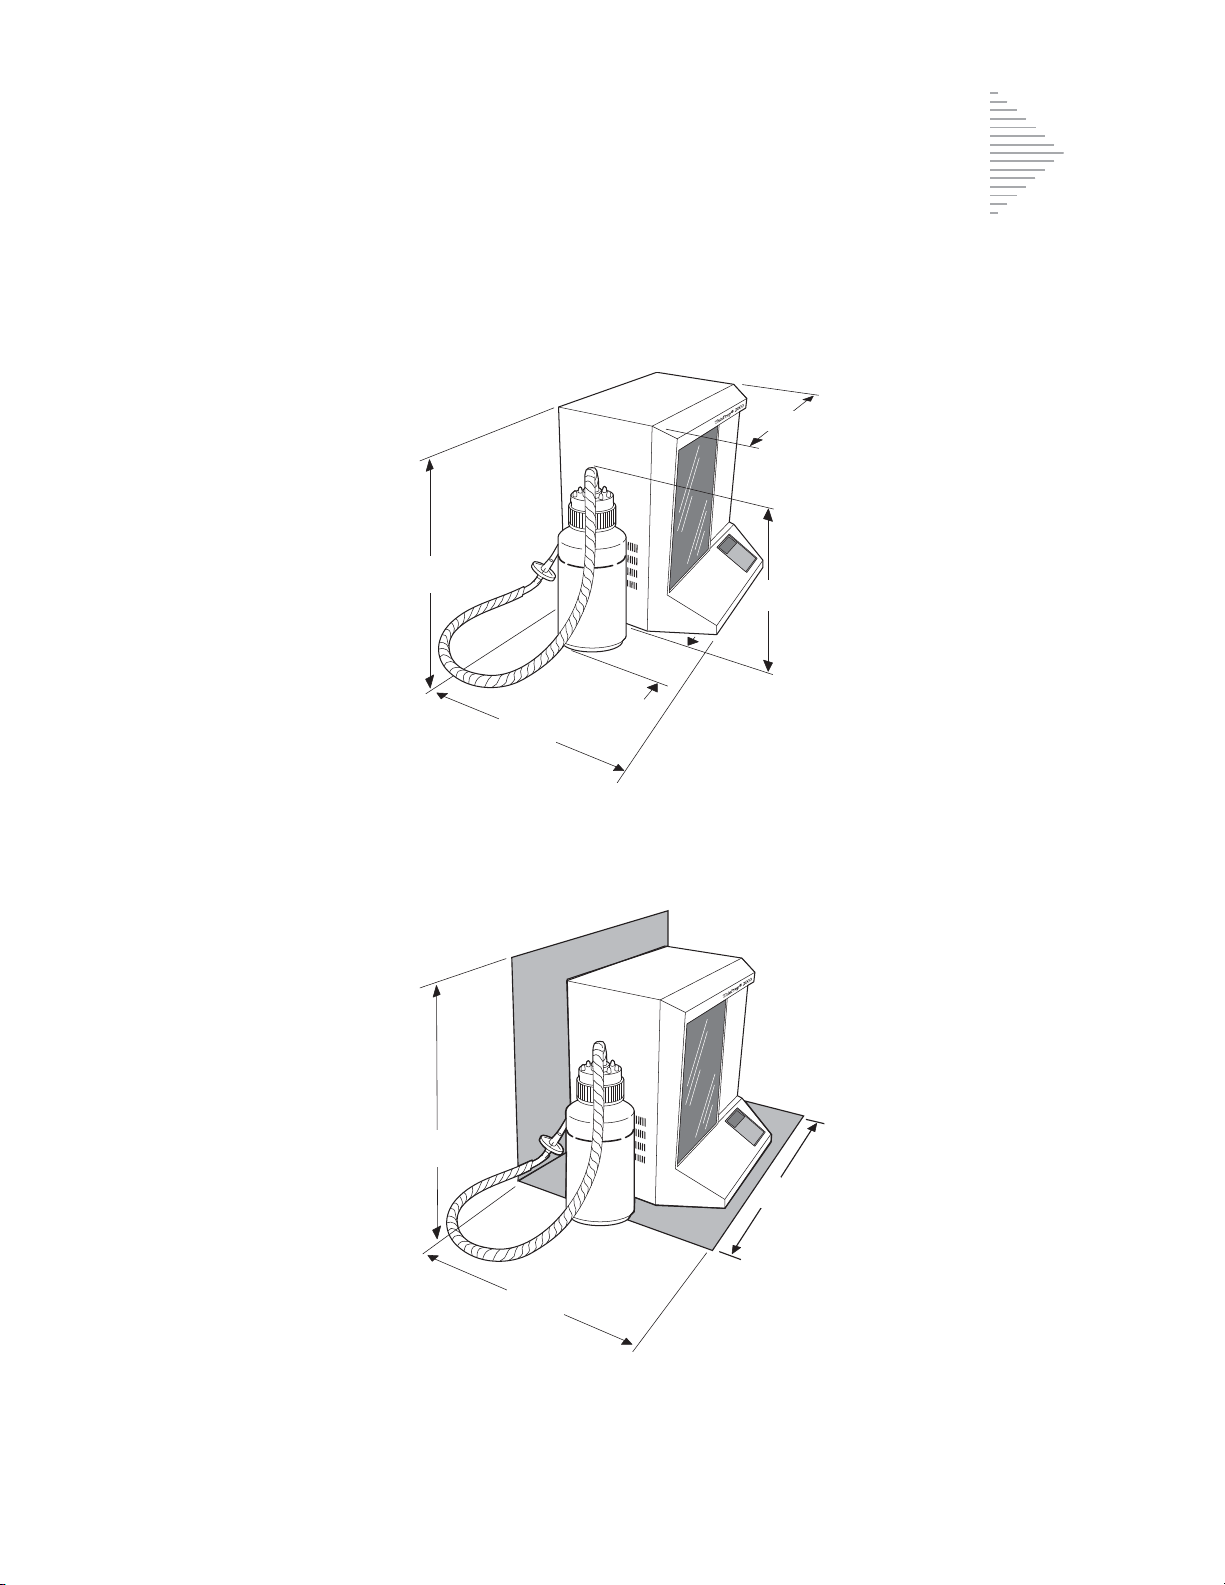
ThinPrep 2000 Dimensions and Clearances
19.5”/50 cm
15”/38 cm
17”/43 cm
18”/46 cm
6”/15 cm
22.5/59 cm
18/46 cm
24/61 cm
Figure 1-5 Processor Dimensions
INTRODUCTION
Figure 1-6 Processor Clearances
ThinPrep 2000 Processor Operator’s Manual
1.13
Page 41

1
INTRODUCTION
Dimensions and Weight (Approximate)
ThinPrep Processor: 19.5”/50 cm H x 18”/46 cm W x 15”/38 cm D
41 lbs/18.6 kg
Waste Bottle: 17”/43 cm H x 6”/15 cm diameter
Environmental
Operating Temperature
15–32°C
59–90°F
Operating Humidity
20%–90% RH, non-condensing
Pollution Degree: II
, in accordance with IEC 60664.
Category II,
environment.
Altitude
Atmospheric Pressure:
the ThinPrep 2000 is for indoor use only in an office or a clean laboratory
: 0 meters (sea level) to 2000 meters.
1100 millibar to 500 millibar.
Power
Electrical Voltage
100/120 VAC at 2 amps
220/240 VAC at 1 amp
Frequency Power
47–63 Hz
Maximum 200 watts
Fusing
Two 3.15A/250V 5x20 mm glass, time delay
1.14
ThinPrep 2000 Processor Operator’s Manual
Page 42

INTRODUCTION
1
Pin 1
Pin 5
Pin 9 Pin 6
Pin Signal Description
1 CD Carrier Detect
2 RD Receive Data
3TD Transmit Data
4 DTR Data Termina l Ready
5 SG Signal Ground
6 DSR Data Set Ready
7 R TS Request To Send
8 CTS Clear To Send
9 RI Ring Indicator
RS-232 Connection
ThinPrep 2000 Standards
The ThinPrep 2000 System has been tested and certified by a U.S. nationally recognized testing
Laboratory (NRTL) to comply with current Safety, Electro-Magnetic Interference (EMI) and ElectroMagnetic Compatibility (EMC) standards. Refer to the processor product label, located on the rear of
the instrument, to see the safety certification markings.
This equipment meets the emission and immunity requirements of IEC 61326-2-6. This equipment
has been designed and tested to CISPR 11 Class A. In a domestic environment it may cause radio
interference, in which case, you may need to take measures to mitigate the interference. The
electromagnetic environment should be evaluated prior to operation.
Do not use this device in close proximity to sources of strong electromagnetic radiation (e.g.,
unshielded intentional radio frequency sources), as these may interfere with the proper operation.
Caution:
compliance could void the user’s authority to operate the equipment.
This equipment has been tested and found to comply with the limits for a Class A digital device,
pursuant to Part 15 of the FCC Rules. These limits are designed to provide reasonable protections
against harmful interference when the equipment is operated in a commercial environment. This
equipment generates, uses, and can radiate radio frequency energy; and if not installed and used in
accordance with the instruction manual may cause harmful interference to radio communications.
Operation of this equipment in a residential area is likely to cause harmful interference, in which case
the user will be required to correct the interference at his own expense.
This product is
Changes or modifications to this unit not expressly approved by the party responsible for
in vitro diagnostic
(IVD) medical equipment.
ThinPrep 2000 Processor Operator’s Manual
1.15
Page 43

1
INTRODUCTION
SECTION
D
SECTION
E
INTERNAL QUALITY CONTROL
Power On Self Test (POST)
When the ThinPrep 2000 processor is powered on (refer to page 2.9), the system goes through a selfdiagnostic test. The electrical, mechanical and software/communications subsystems are tested to
confirm that each performs properly. The operator is alerted to malfunctions by a message on the
LCD display and audible beeps.
THINPREP 2000 HAZARDS
The ThinPrep 2000 system is intended to be operated in the manner specified in this manual. Be sure
to review and understand the information listed below in order to avoid harm to operators and/or
damage to the instrument.
If this equipment is used in a manner not specified by the manufacturer, then the protection provided
by the equipment may be impaired.
Warnings, Cautions and Notes
The terms
WARNING
A
death.
A
CAUTION
inaccurate data or invalidate a procedure, although personal injury is unlikely.
A
Note
WARNING, CAUTION
advises against certain actions or situations that could result in personal injury or
advises against actions or situations that could damage equipment, produce
provides useful information within the context of the instructions being provided.
and
Note
have specific meanings in this manual.
Symbols Used on the Instrument
The following symbols are used on this instrument:
1.16
ThinPrep 2000 Processor Operator’s Manual
Page 44

INTRODUCTION
1
Attention, refer to accompanying
documents.
Protective Conductor Terminal
(internal use only , not accessible
to operators).
Waste Electrical and Electronic
Equipment - contact Hologic for
disposal of the instrument.
ThinPrep 2000 Processor Operator’s Manual
1.17
Page 45
1
INTRODUCTION
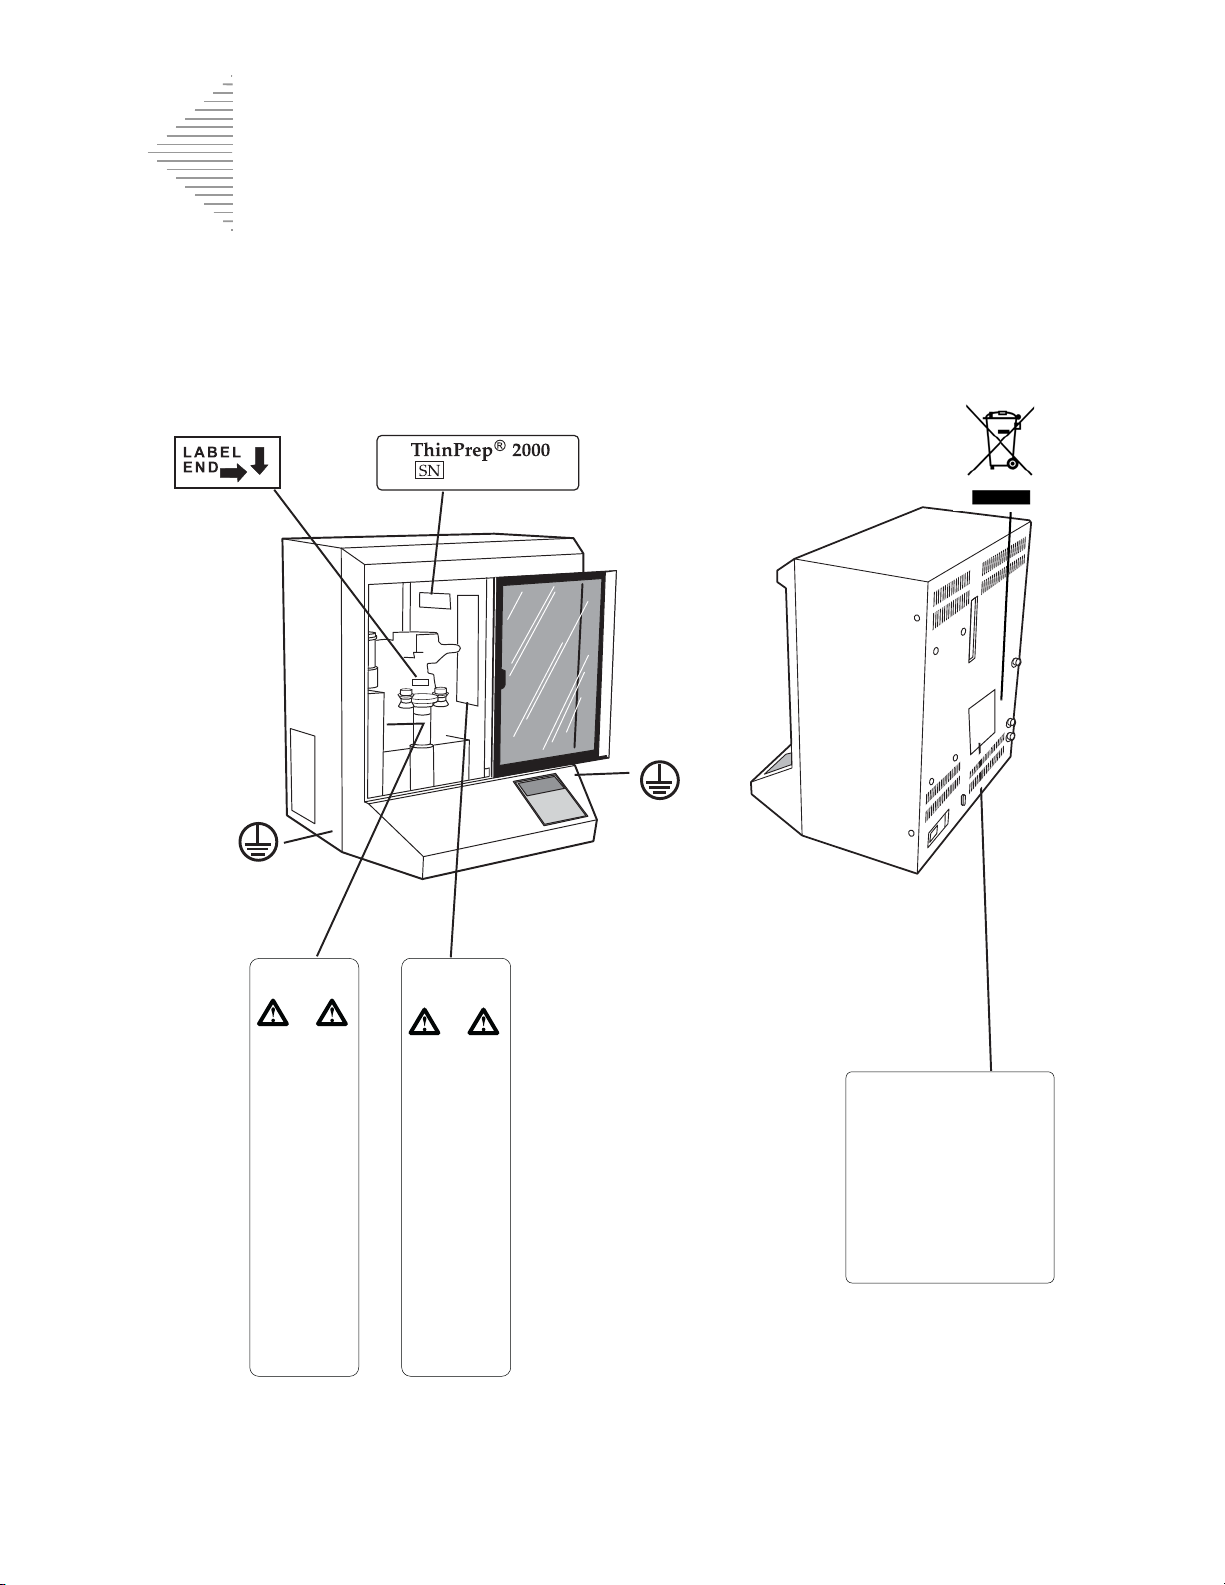
Do not dispose symbolSlide insertion label Serial number label
Model/rating label
Moving parts
label
Flammable liquids
label
(Internal)
(Internal)
Location of Labels Used on the Instrument
Figure 1-7 Location of Labels Used on the Instrument
1.18
ThinPrep 2000 Processor Operator’s Manual
Page 46

1
Warnings Used in this Manual:
SECTION
F
INTRODUCTION
WARNING:
The instrument contains moving parts. Keep hands, loose clothing, jewelry, etc., clear.
WARNING:
To ensure safe operation of the instrument, use a three-wire grounded outlet. Disconnection from the
power supply source is by removal of the power cord.
WARNING:
The instrument uses microscope slides, which have sharp edges. In addition, the slides may be
broken in their storage packaging or on the instrument. Use caution when handling glass slides and
cleaning the instrument.
WARNING:
Flammable liquid. Keep away from fire, heat, sparks and flame. Evaporating alcohol could create a
fire hazard.
WARNING:
PreservCyt Solution contains methanol. Danger. Poison. Vapor harmful. Refer to Material Safety
Data Sheet (MSDS) for safety and handling instructions. Wear protective laboratory gear.
Moving Parts
Grounded Outlet
Glass
Flammable Liquid
Poisonous Substance
DISPOSAL
Disposal of Consumable Items
•
Fix Reagent. Follow local, state, provincial and federal or county guidelines. Dispose of
all solvents as hazardous waste.
•
Waste Bottle Contents. Dispose of all solvents as hazardous waste. Follow local, state,
provincial and federal or county guidelines. As with all laboratory procedures, universal
precautions should be followed.
•
PreservCyt Solution. Follow local, state, provincial and federal or county guidelines.
Dispose of all solvents as hazardous waste.
•
Used Filters. Dispose of as regular waste.
•
Base Liners (Absorbent Pads). Dispose of as regular waste. (If dripping wet, dispose of as
hazardous waste.)
•
Used Filter Seal O-Rings and Filter Caps. Dispose of as regular waste.
ThinPrep 2000 Processor Operator’s Manual
1.19
Page 47

1
INTRODUCTION
•
Waste Filter. Dispose of as regular waste.
•
Pinch Valve Tubing. Dispose of as regular waste.
•
CytoLyt Solution. Dispose of as hazardous waste. Follow local, state, provincial and
federal or county guidelines. Dispose of all solvents as hazardous waste.
•
Broken Glass. Dispose of in a Sharps container.
Disposal of the Equipment
Waste Electrical & Electronic Equipment (WEEE)
Hologic is dedicated to meeting country specific requirements associated with the environmentally
sound treatment of our products. Our objective is to reduce the waste arising from our electrical and
electronic equipment. Hologic realizes the benefits of subjecting such WEEE equipment to potential
reuse, treatment, recycling or recovery to minimize the amount of hazardous substances entering the
environment.
Your Responsibility
As a Hologic customer, you are responsible for ensuring that devices marked with the symbol shown
below are not placed into the municipal waste system unless authorized to do so by the authorities in
your area. Please contact Hologic (see below) prior to disposing any electrical equipment provided
by Hologic.
Symbol Used on the Instrument
The following symbol is used on this instrument:
Do not dispose in municipal waste.
Contact Hologic (see below) for information
regarding proper disposal.
Reclamation
Hologic will provide for the collection and proper reclamation of electrical devices we provide to our
customers. Hologic strives to reuse Hologic devices, subassemblies, and components whenever
possible. When reuse is not appropriate, Hologic will ensure the waste material is properly disposed
of.
1.20
ThinPrep 2000 Processor Operator’s Manual
Page 48

1
Contact Information
Corporate Headquarters
Hologic, Inc.
250 Campus Drive
Marlborough, MA 01752 USA
Tel: (USA and Canada)
1-800-442-9892
Fax: 1-508-263-2967
Authorized European Representative
Hologic UK Ltd.
Unit 2, Link 10
Napier Way
Crawley, West Sussex RH10 9RA
United Kingdom
Tel: +44 1293 522 080
INTRODUCTION
Fax: +44 1293 528 010
ThinPrep 2000 Processor Operator’s Manual
1.21
Page 49

1
INTRODUCTION
This page intentionally left blank.
1.22
ThinPrep 2000 Processor Operator’s Manual
Page 50

2. ThinPrep 2000
Installation
Installation
2. ThinPrep 2000
Page 51

THINPREP 2000 INSTALLATION
2
SECTION
A
SECTION
B
Chapter Two
ThinPrep 2000 Installation
GENERAL
This section provides information for unpacking and installing your ThinPrep® processor.
Please
and system operation.
completely
follow the installation procedure, step by step, to ensure proper installation
ACTION UPON DELIVERY
Inspect the packing cartons for damage. Report any damage immediately to the shipper
and/or Hologic Technical Support as soon as possible. (Refer to Service Information at the
back of this manual.)
If the instrument will not be unpacked right away, store the equipment in a suitable
environment until installation: cool, dry, vibration-free area.
Before proceeding with the installation of the ThinPrep 2000 processor, compare the contents
of the shipping container(s) with the checklist below. If any items are missing or damaged,
contact Hologic Technical Support. For customers outside of the USA, please contact your
Hologic distributor.
Checklist for contents of shipping container and accessory kit.
•
ThinPrep 2000 processor
•
ThinPrep 2000 Operator’s Manual
•
Program Memory Card
•
Power cord, 6 feet (1.8 m)
•
2 filter caps
•
2 spare filter seal O-rings
•
Waste bottle assembly — includes bottle, bottle cap,
tubing set, fittings, waste filter
•
10 fixative vials
•
#1 tip (small) Phillips head screwdriver
•
#2 tip (large) Phillips head screwdriver with string attached
ThinPrep 2000 Processor Operator’s Manual
2.1
Page 52

2
THINPREP 2000 INSTALLATION
SECTION
C
SECTION
D
•
High-vacuum silicone grease
•
Base liners (absorbent pads)
•
Replacement tubing for evacuation system
•
Waste bottle cap for bottle transport
•
Sealed cylinder for testing
•
Dispenser pump
•
ThinPrep microscope slides 100-pack
Caution:
idate your warranty.
Turning the power on before instructed to do so can damage the instrument and inval-
PREPARATION PRIOR TO INSTALLATION
Location Selection Information
Locate the ThinPrep 2000 processor near a 3-prong grounded power outlet that is free of voltage
fluctuations and power surges. As with most laboratory equipment, it may be necessary to install a
line voltage stabilizer to eliminate power fluctuations and minimize interference from other systems.
During operation the ThinPrep 2000 Processor is sensitive to vibrations. It should be placed on a
sturdy bench that can support the 41 lbs (18.6 kg) that the instrument weighs. The bench should be
away from centrifuges, vortexors, or any other equipment that may cause vibrations. If the location
of the instrument must be in proximity to one of these devices, it should not be operating at the same
time as any of these other devices.
Allowing for adequate clearances, the following space is required for the ThinPrep Processor: H =
22.5"/59 cm W = 24"/61 cm D = 18"/46c m. (Refer to Figure 1-6.)
The waste bottle may be placed either on the bench with the processor or below the processor. The
waste bottle will occupy an area approximately a 6"/15 cm square by 17"/43 cm high.
INTERNAL PACKAGING REMOVAL
The inside mechanism of the ThinPrep 2000 processor is secured for shipment in two areas. A formed
foam insert secures the rotating plate in a vertical position, and a small foam block secures the slide
handler. These internal securements must be removed before operating the instrument. Do not turn
on the power of the processor until instructed to do so.
2.2
ThinPrep 2000 Processor Operator’s Manual
Page 53

THINPREP 2000 INSTALLATION
2
Caution:
idate your warranty.
Rotating Plate Packaging Removal:
1. Open the door of the ThinPrep 2000 processor by sliding it to the right.
2. Grasp the foam shipping insert and pull it straight forward, out of the instrument.
Note:
Turning the power on before instructed to do so can damage the instrument and inval-
The foam insert fits very tightly in the instrument. Use care when removing it to pull straight
outward and not dislodge any of the mechanisms.
ThinPrep 2000 Processor Operator’s Manual
2.3
Page 54

2
THINPREP 2000 INSTALLATION
Foam shipping insert
Rotating plate
Grasp and pull the foam
insert straight forward, out of
the instrument
Figure 2-1 Removing the Rotating Plate Packaging
3. The rotating plate can be turned clockwise into a horizontal position.
2.4
ThinPrep 2000 Processor Operator’s Manual
Page 55

THINPREP 2000 INSTALLATION
2
Location of the slide handler when packaged
Remove the foam block
4. Save the foam insert for subsequent instrument packaging.
Slide Handler Packaging Removal:
1. Locate the orange foam block securing the slide handler. The slide handler is secured in
the upper left-hand corner of the instrument. Refer to Figure 2-2.
Figure 2-2 Removing the Slide Handler Packaging
2. Carefully remove the foam block that is between the slide handler and the four horizontal ejector pins. The foam block may still be between the four ejector pins in the upper
left-hand corner of the unit. The slide handler may be rotated to a horizontal position to
remove the foam block.
3. Close the door by sliding it to the left.
4. Save the foam block for subsequent instrument packaging.
ThinPrep 2000 Processor Operator’s Manual
2.5
Page 56

2
THINPREP 2000 INSTALLATION
SECTION
E
Sensor tubing
Waste tubing
Vacuum tubing
Blue
Yellow
CONNECTING THE WASTE BOTTLE
Caution:
ThinPrep Processor. Refer to Chapter 7, “Maintenance” for details regarding the use of bleach.
1. The waste bottle should be placed at the same height or below the ThinPrep processor. Do not
place the waste bottle above the instrument.
2. Ensure that the waste bottle cap is tightly secured. The waste bottle must rest in an upright position. Do not allow the waste bottle to lay on its side.
3. Locate the three waste bottle connections at the rear of the ThinPrep processor. Refer to Figure 2-
3. Ensure that the buttons of the connectors are in the down/inward position.
At no time should bleach be present in the waste bottle while it is connected to the
Figure 2-3 Waste Tubing Connections
4. Connect the color-coded waste tubing connectors to the corresponding connectors located in the
rear of the instrument. When the proper connection has been established, the buttons on the connectors pop up/outward with a click sound. It may be necessary to push the button in before
placing the waste tubing connector into the instrument connector.
2.6
ThinPrep 2000 Processor Operator’s Manual
Page 57
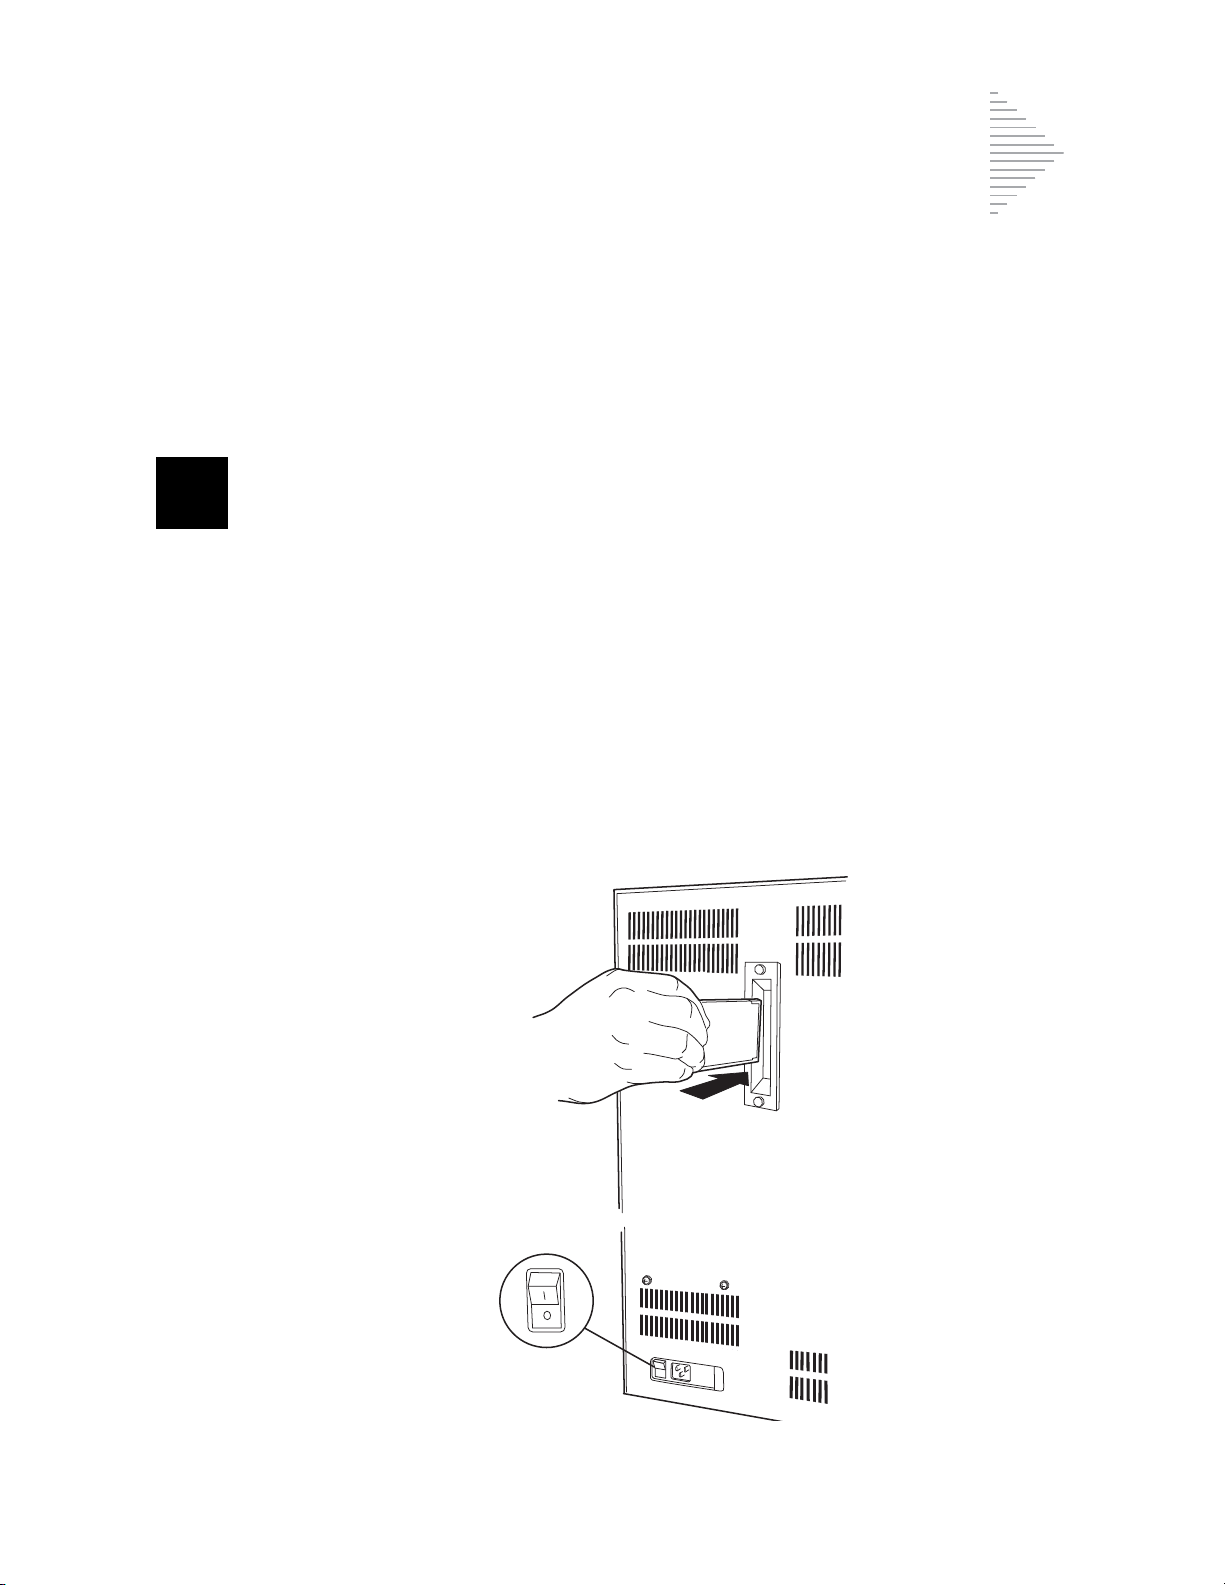
THINPREP 2000 INSTALLATION
2
SECTION
F
Confirm that
the power is
OFF
Caution:
cessor.
Caution:
the procedure in Chapter 7, “Maintenance”.
Do not attempt to mismatch tubing connection. This may result in damage to your pro-
Always empty the waste bottle before it reaches the maximum liquid level line. Follow
INSERTING THE PROGRAM MEMORY CARD
1. Confirm the power to the unit is off.
Caution:
2. Locate the receptacle for the Program Memory Card (PMC) in the center of the rear panel of the
ThinPrep 2000 processor.
3. Orient the PMC as indicated by the arrows on the label of the card.
4. Insert the PMC into the unit as shown in Figure 2-4. Continue to insert the card until the small
black button at the top of the receptacle snaps out. If the PMC does not enter the unit smoothly,
do not force it into the ThinPrep 2000 processor socket.
ALWAYS turn off the power before inserting or removing the Program Memory Card.
Figure 2-4 Inserting the Program Memory Card
ThinPrep 2000 Processor Operator’s Manual
2.7
Page 58

2
THINPREP 2000 INSTALLATION
SECTION
G
5. To remove the PMC, simply depress the black button at the top of the receptacle and gently
remove the PMC.
CONNECTING THE POWER CORD
Caution:
idate your warranty.
1. Ensure that the power switch, located on the rear of the ThinPrep 2000 Processor, is in the “O”
(Off) position. For “Off,” the top half of the toggle power switch is in the “out” position (protrudes).
2. Insert the power cord into the power receptacle located on the rear of the ThinPrep 2000 processor next to the power switch. Refer to Figure 2-5.
3. Connect the power cord to a 3-prong grounded outlet.
Turning the power on before instructed to do so can damage the instrument and inval-
Figure 2-5 Connecting the Power Cord
4. The ThinPrep 2000 processor is designed with an automatic line voltage detection feature. This
feature eliminates the need to manually change the system line voltage setting to meet your specific requirements. The instrument will automatically adapt to any line voltage between 100–
120 VAC and 220–240 VAC.
Caution:
tor is available for diagnostic purposes only.
Caution:
2.8
ThinPrep 2000 Processor Operator’s Manual
Do not attach a cable to the 9-pin connector on the rear of the instrument. This connec-
The ThinPrep 2000 processor is fused internally. No user accessible fuse is available.
Page 59

THINPREP 2000 INSTALLATION
2
SECTION
H
CYTYC ThinPrep
Version V#.##
Computed CRC: ####
Firmware CRC: ####
CYTYC ThinPrep
Initializing System
Press STOP to Cancel
TURNING ON YOUR THINPREP 2000 PROCESSOR
1. Confirm that the internal securements have been removed from the instrument before proceeding with this procedure. Refer to Section “INTERNAL PACKAGING REMOVAL” on page 2.2,
for more information.
2. With the door to the ThinPrep 2000 processor closed, turn the toggle power switch, located on the
right rear of the instrument, to the “1” (ON) position. For “On,” the top half of the toggle power
switch is in the “in” position.
3. As the power is applied to the instrument, the control panel will display the following sequence
of messages. If a different message appears in the display, follow the instructions on the control
panel display or refer to Chapter 6, “Instrument Troubleshooting”, of this manual.
This message will appear for approximately four seconds:
At this point the system initializes all mechanisms while displaying this message for approximately
four seconds:
ThinPrep 2000 Processor Operator’s Manual
2.9
Page 60

2
THINPREP 2000 INSTALLATION
Pressure Sensor
calibration in
progress.
Please wait.
Main Menu: Select
1-SUPER 4-GYN
2-FLU/FNA
3-MUCOID
↓- MORE
After initialization, the system calibrates all pressure sensors while displaying this message for
approximately twenty seconds:
If the system initialization and calibration were successful, the control panel display will read:
The above message indicates that the system is in idle mode.
4. Leave the power to the ThinPrep processor on all the time. It is not necessary to turn it off unless
instructed to do so for troubleshooting or maintenance procedures.
5. The ThinPrep processor pressure sensor calibration occurs several times while the power is on:
•
at power up
•
15 minutes after power up
•
2 hours after power up
•
every 8 hours thereafter.
2.10
ThinPrep 2000 Processor Operator’s Manual
Page 61

THINPREP 2000 INSTALLATION
2
SECTION
I
COMPLETE: NOTE
Sample is dilute
Please press ENTER
COMPLETE
Remove Filter
Remove Fix Bath
RUN A BLANK SAMPLE
When operating the ThinPrep 2000 processor for the first time, it is important to run a sequence
using a blank PreservCyt Solution vial (no cells) to ensure that the system is fully functional. Read
Chapter 5A, “Operating Instructions”, of this manual before proceeding with the procedure below.
1. Load a PreservCyt Solution vial (no cells) into the processor.
2. Attach a ThinPrep Pap test filter to the filter cap and load this assembly into the processor.
3. Load a ThinPrep slide into the processor.
4. Load an empty fixative vial into the processor.
5. Close the door.
6. Press key 4 to start the GYN sequence.
7. The instrument will now process the blank PreservCyt Solution vial.
8. Upon successful completion of the sequence, the slide will be in the fixative vial and the display
will read:
If any other message is displayed, record the message and refer to Chapter 6, “Instrument
Troubleshooting”, of this manual.
9. Press the ENTER key and following message appears:
10. Open the door.
11. Remove the filter cap and ThinPrep Pap test filter.
12. Remove the fixative vial containing the slide.
13. Remove the PreservCyt Solution vial.
ThinPrep 2000 Processor Operator’s Manual
2.11
Page 62

2
THINPREP 2000 INSTALLATION
SECTION
J
SECTION
K
14. The installation of the instrument is complete. The ThinPrep 2000 Processor is now ready for
slide preparations. Read Chapter 7, “Maintenance”, of this manual before proceeding with additional slide preparations.
STORAGE AND HANDLING - POST INSTALLATION
During operation the ThinPrep 2000 processor is sensitive to vibrations. It should be placed on a
sturdy bench away from centrifuges, vortexors or any other equipment that may cause vibrations.
Warning:
The fixative vial must be removed. Evaporating alcohol could create a fire hazard.
TURNING OFF THE THINPREP 2000 PROCESSOR
Turning the Instrument Off
If the instrument is to be turned off, unload any items in it (refer to page 5A.18.)
Press the power switch to the off position (“O” position).
Taking the Instrument Out of Service (Extended Shutdown)
If the instrument is to be shut down for an extended time, follow the instructions for turning off the
Processor.
Completely remove power to the instrument by unplugging the power cord from the wall outlet.
2.12
ThinPrep 2000 Processor Operator’s Manual
Page 63

3. PreservCyt
Solution
Solution
3. PreservCyt
Page 64

PRESERVCYT SOLUTION
3
SECTION
A
Chapter Three
PreservCyt Solution
INTRODUCTION
The following sections describe the function and specifications of the cytologic preservative fluid,
®
PreservCyt
Solution.
ThinPrep 2000 Processor Operator’s Manual
3.1
Page 65

3
PRESERVCYT SOLUTION
SECTION
B
WARNING:
PreservCyt Solution contains methanol. Danger. Poison. Vapor harmful.
May be fatal or cause blindness if swallowed. Cannot be made non-poisonous. Keep
away from fire, heat, sparks, and flame. Other solutions cannot be substituted for
PreservCyt Solution.
PRESERVCYT® SOLUTION
PreservCyt Solution is a methanol-based, buffered solution designed to preserve cells during transport and slide preparation on the ThinPrep 2000 processor.
The ThinPrep processor slide preparation process also requires PreservCyt Solution for transporting
and storing samples prior to processing. PreservCyt Solution is optimized for the ThinPrep processor
slide preparation process and cannot be substituted with any other reagents.
Packaging
Please refer to the Ordering Information in this manual for part numbers and detailed information
regarding the ordering of solutions and supplies for the ThinPrep 2000 system.
• Vials(20 mL) of PreservCyt Solution are contained in each ThinPrep Pap test.
Composition
PreservCyt Solution contains buffered methanol. It contains no reactive ingredients. It contains no
active ingredients.
Storage Requirements
• Store PreservCyt Solution between 15°C (59°F) and 30°C (86°F). Do not use beyond the expiration date printed on the container.
with
• Store PreservCyt Solution
15°C (59°F) and 30°C (86°F) for up to 6 weeks.
• Store PreservCyt Solution
Diagnostics COBAS AMPLICOR CT/NG test between 4°C (39°F) and 25°C (77°F) for up to
6 weeks.
• Storage requirements for quantities of PreservCyt Solution are dependent on local regulations
regarding the size and configuration of your facility. Please refer to the Solutions Storage
Guide at the end of this chapter.
3.2
ThinPrep 2000 Processor Operator’s Manual
cytologic sample intended for ThinPrep Pap testing between
with
cytologic sample intended for CT/NG testing using the Roche
Page 66

PRESERVCYT SOLUTION
3
WARNING: See Package Insert Before
SPecimen Collection.
NAME:
ID#:
3256723-46
Line on cap and
line on vial should
meet or slightly
overlap. If the cap
on the vial does
not have a line,
ensure the cap is
tightened
securely.
Transportation
When transporting a PreservCyt Solution vial containing cells, make sure the vial is tightly sealed.
Align the mark on the cap with the mark on the vial to prevent leakage as shown in Figure 3-1.
Figure 3-1 Aligning the Vial Cap
The shipping category for PreservCyt Solution is:
“flammable liquids, n.o.s. (methanol)” (USA only)
“flammable liquids, toxic, n.o.s. (methanol) (outside the USA)
The shipping category for PreservCyt Solution containing cells is “diagnostic sample.”
Please refer to the Shipping Requirements and Recommendations guide at the end of this chapter.
Stability
Do not use PreservCyt Solution after the expiration date on the container label. If making multiple
slides from the same sample vial, be sure to make the slides before the expiration date marked on the
sample vial. Expired vials should be discarded using appropriate laboratory procedures. Also, refer
to storage requirements (page 3.2) for cell preservation limits.
Handling/Disposal
Handle all chemical-containing materials carefully in accordance with safe laboratory practices.
When required by reagent composition, additional precautions are marked on the reagent containers
or in the instructions for use.
Dispose of PreservCyt Solution according to the guidelines for disposing of hazardous waste.
PreservCyt Solution contains methanol.
PreservCyt Solution was challenged with a variety of microbial and viral organisms. The following
table presents the starting concentrations of viable organisms and the number of viable organisms
found after 15 minutes in the PreservCyt Solution. The log reduction of viable organisms is also presented. As with all laboratory procedures, universal precautions should be followed.
ThinPrep 2000 Processor Operator’s Manual
3.3
Page 67

3
PRESERVCYT SOLUTION
Organism Initial Concentration
Candida albicans
Aspergillus niger*
Escherichia coli
Staphylococcus aureus
Pseudomonas aeruginosa
Mycobacterium tuberculosis**
Rabbitpox virus
HIV-1
* After 1 hour >4.7 log reduction
** After 1 hour >5.7 log reduction
*** Data is for 5 minutes
5.5 x 10
4.8 x 10
2.8 x 10
2.3 x 10
2.5 x 10
9.4 x 10
6.0 x 10
1.0 x 10
5
CFU/mL
5
CFU/mL
5
CFU/mL
5
CFU/mL
5
CFU/mL
5
CFU/mL
6
PFU/mL
7.5
TCID50/mL
Log Reduction after
15 min.
>4.7
2.7
>4.4
>4.4
>4.4
4.9
5.5***
7.0***
Interfering Substances
The use of lubricants (e.g., KY Jelly) should be avoided prior to specimen collection. Lubricants can
adhere to the filter membrane and may cause poor cell transfer to the slide. If its use is unavoidable,
the lubricant should be used in minimum amounts.
3.4
ThinPrep 2000 Processor Operator’s Manual
Page 68

ThinPrep®Solutions
(1)
StorageGuide
(2)
The National Fire Protection Association (NFPA) is the expert aut hority that local fire departments and fire safety code
enforcement authorities look to for fire safety standards and codes. Their codes are developed through a consensus standards
development process approved by the American National Standards Institute. The NFPA codes are used as guidelines by most
fire code enforcement agencies. Since these codes are guidelines, your local Authority Having Jurisdiction (AHJ) for fire code
enforcement may make the final determination. The summary chart below is based upon guidelines for facilities protected by
standard sprinkler systems.
Use this chart to help you determine your maxi mum storage limits for flammable and combustible liquids.
Maximum Quantities of Flammable and Combustible Liquids in Laboratory Units Outside of Inside Liquid Storage Areas
Lab Unit
Fire
Hazard
Class
A (High)
(6)
B
(Moderate)
(7)
C
(Low)
(7)
D
(Minimal)
Flammable
&
Combustible
Liquid Class
I 45-2011 10 38 1900 480 1820 91,000 20 76 3800 480 1820 91,000
I, II, IIIA 45-2011 20 76 3800 800 3028 151,400 40 150 7500 1600 6060 303,000
I 45-2011 5 20 1000 300 1136 56,800 10 38 1900 480 1820 91,000
I, II, IIIA 45-2011 10 38 1900 400 1515 75,750 20 76 3800 800 3028 151,400
I 45-2011 2 7.5 375 150 570 28,500 4 15 750 300 1136 56,800
I, II, IIIA 45-2011 4 15 750 200 757 37,8520 8 30 1500 400 1515 75,750
I 45-2011 1 4 200 75 284 14,200 2 7.5 375 150 570 28,500
I, II, IIIA 45-2011 1 4 200 75 284 14,200 2 7.5 375 150 570 28,500
Maximum Quantities of PreservCyt Solution (Class IC) That Can Be Stored per Fire Area
General Warehouse
Liquid Warehouse
(10)
30-2012 660 2500 124,900
(3,11)
30-2012 Unlimited Unlimited Unlimited
Office, to include Exam Rooms 30-2012 10 38 1890
Maximum allowable storage per ft2 in an inside storage room that is smaller than 150ft2 in size. 30-2012 5 19 946
Maximum allowable storage per ft2 in an inside storage room that is larger than 150ft2 and less than
(1) Solution classifications: PreservCyt – Class IC; CytoLyt – Class II; CellFyx – Class IB
(2) This information is Hologic’s summary of the various regulations. To view the codes in their entirety, please refer to NFPA 30 and NFPA 45.
(3) A Liquid Warehouse shall have a sprinkler system that complies with the appropriate system indicated in NFPA 30.
(4) An Inside Liquid Storage Area is a storage room totally enclosed within a building and having no exterior walls.
(5) A Laboratory Unit is the area surrounded by firewalls per NFPA 30 Flammable and Combustible Liquids Code.
(6) Reduce quantities by 50% for B laboratory units located above the 3rd floor.
(7) Reduce quantities by 25% for C and D laboratory units located on the 4th-6th floors of a building and reduce quantities by 50% for C and D laboratory units above the 6th floor
(8) 20ml PreservCyt vials.
(9) A Fire Area is the area of a building separated from the remainder of the building by construction having a fire resistance of at least 1-hour and having all communicating openings properly protected by an
assembly having a fire resistance rating of at least 1-hour per NFPA 30 Flammable and Combustible Liquids Code.
(10) Allowable quantities in a warehouse can be increased with a sprinkler system rated higher than standard systems.
(11) A Liquid Warehouse is a separate, detached building or attached building used for warehousing-type operations for liquids.
(3)
Quantities in Use Quantities in Use and Storage
NFPA
Code
Max per 100ft2 of Lab
Unit
(5)
Gallons Liters Vials
Max Quantity per Lab
Unit
(8)
Gallons Liters Vials
Max per 100ft
(8)
Gallons Liters Vials
(9)
Outside a Safety Flammable Cabinet
Unit
2
(5)
of Lab
(8)
Gallons Liters Vials
Location NFPA Code Gallons Liters Vials
Allowable Quantities of PreservCyt Solution That Can Be Stored in a Liquid Storage Room
Location NFPA Code Gallons Liters Vials
500ft
2
in size.
30-2012 10 38 1892
(4)
Max Quantity per Lab
Unit
(8)
(8)
(8)
AW-05451-001 Rev. 002
Page 69

Hologic Shipping Recommendations
Scope:
These recommendations include shipping:
Biological specimens (patient specimens) in ThinPrep® solutions
Biological specimens in solutions other than ThinPrep
Biological specimens not in solutions
ThinPrep
ThinPrep
®
PreservCyt™ Solution without biological specimens
®
CytoLyt™ Solution without biological specimens
A. Shipping Biological Specimens in Solutions or Without Solutions
Notes:
1. When biological specimens are shipped in a solution of a quantity of 30 ml or less and are
packed in accordance with these guidelines, no further requirements in the Hazardous
Materials (Dangerous Goods) Regulations need be met. These requirements include
training requirements. However, training is recommended.”
2. These recommendations for shipping biological specimens are valid, with the exception of
private courier, for all modes of domestic and international transportation.
Definitions:
Biological Substance, Category B: Materials containing or suspected to contain
infectious substances that do not meet Category A criteria. IATA Dangerous Goods
regulations were revised on January 1, 2007. Note: The term “diagnostic specimen” has
been replaced with “biological substance, Category B”
Exempt specimens: specimens that with the minimal likelihood that pathogens are
present (fixed tissue, etc.)
Shipping Requirements Category B or Exempt2 – Ambient Temperature:
1. Packaging must consi st of three comp onents:
a. a primary receptacle, leak proof
b. secondary packagin g, leak proof
c. a rigid outer packaging
NOTE: FedEx will not accept clinical samples or diagnostic specimens packaged in FedEx
envelopes, FedEx tubes, FedEx Paks, or FedEx Boxes.
2. The primary receptacle cannot contain more that 1L of a liquid substance (500 ml if using
FedEx).
3. If multiple fragile primary receptacles are placed in a single secondary packaging, they must be
either individually wrapped or separated to prevent contact between them.
* These instructions are Hologic’s interpretation of the various regulations as of the effective date.
However, Hologic will not be responsible for any non-conformance to the actual regulations.
Page 1 P/N 85272-001 Rev G
®
solutions
1
3
Page 70

4. Absorbent material must be placed between the primary receptacle and the secondary
packaging. The absorbent material (cotton balls, cellulose wadding, absorbent packets, paper
towels) must be in sufficient quantity to absorb the entire contents of the primary receptacle(s)
so that any release of the liquid substance will not compromise the integrity of the cushioning
material or the outer packaging.
5. The outer packaging must not contain more than 4L or 4kg of material. This quantity excludes
ice, dry ice, or liquid nitrogen when used to keep specimens cold.
6. An itemized list of contents must be enclosed between the secondary packaging and the outer
packaging.
7. The packaging must successfully pass a 4 ft. drop test (Section 6.6.1 IATA regulations).
8. The UN3373 mark must be displayed on the external surface of the outer packaging (one
surface of the outer packaging must have a minimum dimension of 100 mm x 100 mm FedEx
minimum is 7”x 4”x 2”) on a background of a contrasting color and must be clearly visible and
legible. The mark must be in the form of a diamond with each side having a length of at least 50
mm. Lettering must be at least 6mm high.
9. The proper shipping name “Biological Substance, Category B” in letters at least 6mm high must
be marked on the outer package adjacent to the diamond shaped UN3373 mark.
10. If using FedEx, the FedEx USA Airbill, Section 6, Special Handling must be completed with
Does this shipment contain dangerous goods?
Shipping Requirements Category B or Exempt
NOTE: FedEx defers to IATA regulations for the shipping of refrigerated or frozen diagnostic specimens.3
Follow all packaging directions for Category B or Exempt – Ambient Temperature plus:
1. Place ice or dry ice outside of the secondary packaging. Interior supports must be provided to secure
dangerous goods/dry ice information:
YES- Shipper’s Declaration not required
11. The outer container of all diagnostic/clinical specimen packages must display the following:
a. Sender’s name and ad dress
b. Recipient’s name and address
c. The words “Biological Substance, Category B”
d. The UN 3373 label
2
– Frozen or Refrigerated Specimens:
the secondary packaging in the original position after the ice or dry ice has dissipated. If ice is used,
the outside packaging or overpack must be leak proof. If dry ice is used, the packaging mu st be
designed and constructed to permit the release of CO
2
gas to prevent a buildup of pressure that could
rupture the packaging.
Page 2 P/N 85272-001 Rev G
Page 71

2. Always affix the Class 9, UN 1845 dry ice label as well as the UN 3 373, Biological Substance,
Category B label to these shipments
3. If using FedEx, the FedEx USA Airbill, Section 6, Special Handling must be completed with
dangerous goods/dry ice information:
Does this shipment contain dangerous goods?
YES- Shipper’s Declaration not required
Enter kg of dry ice used (if applicable)
4. The outer container of all diagnostic/clinical specimen packages must display the following:
a. Sender’s name and ad dress
b. Recipient’s name and address
c. The words “Biological Substance, Category B”
d. The UN 3373 label
e. Class 9 label, including UN 1845, and net weight if packaged with dry ice
B. Shipping ThinPrep
®
PreservCyt™ Solution Only (such as from a laboratory to a physician)
Domestic Ground Shipments - Limited Quantities:
Notes:
ThinPrep
®
PreservCyt™ Solution is classified as a Class 3 Flammable liquid, assigned to Packing
Group III (PG III).
49 CFR 173.150 (Limited Quantities) allows ThinPrep
®
PreservCyt™ Solution in vials to be shipped
in Limited Quantities when shipped via ground transportation in a sturdy box. The total volume in
a package cannot exceed 5 liters or weigh more than 30 kg (66 lbs). Limited Quantities are
exempt from labeling requirements.
Limited Quantity domestic ground shipping recommendations:
1. ThinPrep
®
PreservCyt™ Solution must be shipped in the vials.
2. Place the vials in a good quality cardboard box, such as the ThinPrep® box that holds 250 vials.
Pack vials in a manner (adding protective packing material as necessary) as to limit movement of
individual vials.
3. Mark the package as “Flammable liquids, n.o.s., (M ethanol Solution), 3, UN1993, Ltd. Qty.” and
add orientation arrows on the ends.
4. Print “UN1993, Flammable liquids, n.o.s., (Methanol Solution), 3, PGIII, Ltd. Qty.” on the Shipping
papers.
Domestic Ground Shipments - Other than Limited Quantities:
When shipping packages in excess of “Limited Quantity” amounts:
1. Do not include “Ltd Qty” in the wording on the package or on the Shipping papers as indicated in
c and d above.
2. Affix a Class 3 “Flammable Liquid” h azard label to the outer package in close proximity of the
wording described in “c” above. See the example of the label on the last page of these
recommendations.
Page 3 P/N 85272-001 Rev G
Page 72

Domestic Air Shipments:
In addition to 1 and 2 above in Domestic Ground Shipments – Other than Limited Quantities, the
following are recommendations for domestic air shipments:
3. Maximum allowable package sizes are:
i. Sixty (60) liters (3000-vials) for passenger aircraft, and
ii. Two hundred twenty (220) liters (11,000-vials) for cargo aircraft.
4. Single packages contai ning more than sixty (60) liters (3000-vials) of total product must be
clearly marked “FOR CARGO AIRCRAFT ONLY”.
5. The vials must be shipped in United Nations (UN) certified 4G packaging for any quantity in
an aircraft. (e.g., ThinPrep
®
PreservCyt™ Solution 250-vial box or equivalent.)
6. A Class 3 “Flammable Liquid” label must be affixed to the outer package near the words
“Flammable liquids, n.o.s., (Methanol Solution)”.
7. It is voluntary to place an “Air Eligibility” label (an airplane in a circle) adja ce nt to the words
“Flammable liquids, n.o.s., (Methanol Solution)”.
All Domestic Shipments:
The following are recommendations for all domestic ground and air shipments:
1. If the ThinPrep
material, the hazardous material must be listed first, or be printed in a contrasting color (or
highlighted) to differentiate it from the non-hazardous material.
2. The total volume of ThinPrep® PreservCyt™ Solution and the number of vials must appear on
the shipping papers.
International Ground Shipments - Limited Quantities:
When shipping internationally, ThinPrep
Class 3 (Flammable Liquid), and with a secondary hazard of Class 6.1 (Toxic). It is assigned to PG
III.
The reference used for the international ground recommendations is the ADR - European Agreement
Concerning the International Carriage of Dangerous Good by Road (United Nations). A “Limited
Quantity” is defined as a package containing a maximum net quantity of 5-liters and not weighing
more than 20 kg (40 lbs). The recommendations for international ground shipments are as follows:
1. ThinPrep® PreservCyt™ Solution must be shipped in the vials.
2. Place the vials in a good quality cardboard box, such as the Cytyc box that holds 250 vials.
Pack vials in a manner (adding protective packing material as necessary) as to limit
movement of individual vials.
3. Mark the package with “UN1992, Flam mable liquids, toxic, n.o.s., (Methanol Solution), 3, 6.1,
PGIII Ltd. Qty” and add orientation arrows on the ends.
4. The shipping papers should include all the information indicated in “3” above.
International Ground Shipments – Other then Limited Quantities:
1. Do not include “Ltd Qty” in the wording on the package or on the Shipping papers as
indicated in c and d above.
2. Affix both a Class 3 “Flammable Liquid” label and a secondary Class 6.1 “Toxic” label to the
package adjacent to the markings indicated in paragraph “3” above. Copies of the labels ca n
be found on the last page of these recommendations.
Page 4 P/N 85272-001 Rev G
®
PreservCyt™ Solution is shipped in a package also containing non-hazardous
®
PreservCyt™ Solution is classified with a primary hazard of
Page 73

International Air Shipments:
The references used for the International Air recommendations are: In addition to a and b above in
International Ground Shipments, the following are the recommendations for international air
shipments:
1. Maximum allowable package sizes are:
i. Sixty (60) liters (3000-vials) for passenger aircraft, and
ii. Two hundred twenty (220) liters (11,000-vials) for cargo aircraft.
2. Packages containing more than sixty (60) liters of product must be clearly marked “FOR
CARGO AIRCRAFT ONLY”
3. The vials must be shipped in United Nations (UN) certified 4G packaging for any quantity in
an aircraft. (e.g., ThinPrep
®
PreservCyt™ Solution 250-vial box or equivalent.) Pack vials in a
manner (adding protective packing material as necessary) as to limit movement of individual
vials.
4. Limited Quantity exemption can only be used if the package has a maximum net quantity of
2-liters.
5. Packaging manufacturer’s specifications markings are not required when shipping Limited
Quantity.
6. It is optional to place an ”Air Eligibility” label (an airplane in a circle) adjacent to the words
“Flammable liquids, toxic, n.o.s. (Methanol Solution)”.
7. When a “Cargo Aircraft Only” marking is required, it must be affixed on the same package
surface and near the hazard labels.
8. The shipper is responsible for the completion of a “Shipper’s Declaration for Dangerous
Goods” form.
C. Shipping ThinPrep® PreservCyt™ Solution With Patient Sample (e.g. physician to a laboratory)
Notes:
1. This method of shipping patient samples is an alternative method to the method detailed in
Section A of this document.
2. US DOT Hazard Material Employee training (49 CFR 172.700) is required if you use this
method of shipment.
Risk Group 1 samples are those which contain pathogens under such conditions that their ability to
produce disease is very low to none. An independent laboratory challenged ThinPrep
®
PreservCyt™
Solution with a variety of microbial and viral organisms. The organisms became non-viable after 15minutes in the solution. This challenge allows you to place a patient sample in ThinPrep
PreservCyt
Domestic (U.S.) Shipments:
™
Solution into the Risk Group 1 classification.
Follow the appropriate U.S. DOT regulations for shipping Risk Group 1 Biological Substances,
Category B (49 CFR 173.134).
These regulations do not apply when the specimens are transported by a private or contract
carrier in a motor vehicle used exclusively to transport diagnostic specimens.
International Shipments:
Follow the appropriate IATA, ADR, or country specific regulations for shipping Risk Group 1
D. Shipping ThinPrep® CytoLyt™ Solution Only (such as from a laboratory to a physician)
diagnostic specimens.
Domestic Ground Shipments:
ThinPrep® CytoLyt™ Solution has a flash point of 109° F. For domestic ground transportation only, a
flammable liquid with a flashpoint at or above 100° F that does not meet the definition of any other
hazard class may be reclassed as a combustible liquid. As such, ThinPrep
shipped via ground, is exempt from the requirements of the DOT Hazardous Materials Regulations.
®
CytoLyt™ Solution,
Page 5 P/N 85272-001 Rev G
®
Page 74

Domestic Air Shipments:
When shipping ThinPrep® CytoLyt™ Solution via air, follow the Domestic Air Shipments
recommendations for Shipping ThinPrep
®
PreservCyt™ Solution Only that can be found in Section B
of this document.
International Ground and Air shipments:
When shipping ThinPrep® CytoLyt™ Solution via ground or air, follow the International Ground or Air
®
Shipments recommendations for Shipping ThinPrep
be found in Section B of this document.
PreservCyt™ Solution Only guidelines that can
E. Shipping ThinPrep® CytoLyt™ Solution With Patient Sample (such as from a physician to a
laboratory)
Domestic Shipments:
ThinPrep® CytoLyt™ Solution containing a patient sample is classified as a Biological Substance,
Category B. Follow the recommendations in Section A of this document.
International Shipments:
ThinPrep® CytoLyt™ Solution containing a patient sample is classified as a Biological Substance,
Category B. Follow the recommendations in Section A of this document.
Class 3 “Flammable liquid” primary hazard label.
Class 6.1 “Toxic” secondary hazard label.
References:
49 CFR 100 to 185, Transportation
International Air Transport Association’s (IATA’s) Dan gerous Good Regulations, 49
th
Edition, 2008, International Air Transportation Association (IATA)
International Civil Aviation Organization’s (ICAO’s) Technical Instructions for the Safe
Transport of Dangerous Goods by Air),
Foot Notes:
1. www.IATA.org/whatwedo/cargo/dangerous_goods/faq.htm
2. IATA Packing Instruction 650, http://www.iata.org/NR/rdonlyres/C993126E-9AAF-4498-B76E-
583B3D774F90/0/DGR_48_PI650.pdf
3. Pointers on Shipping: Clinical Samples, Diagnostic Specimens, and Environmental Test Samples,
Document 3489FE, FedEx
Page 6 P/N 85272-001 Rev G
Page 75

Sample Preparation
4. Gynecologic
4. Gynecologic
Sample Preparation
Page 76
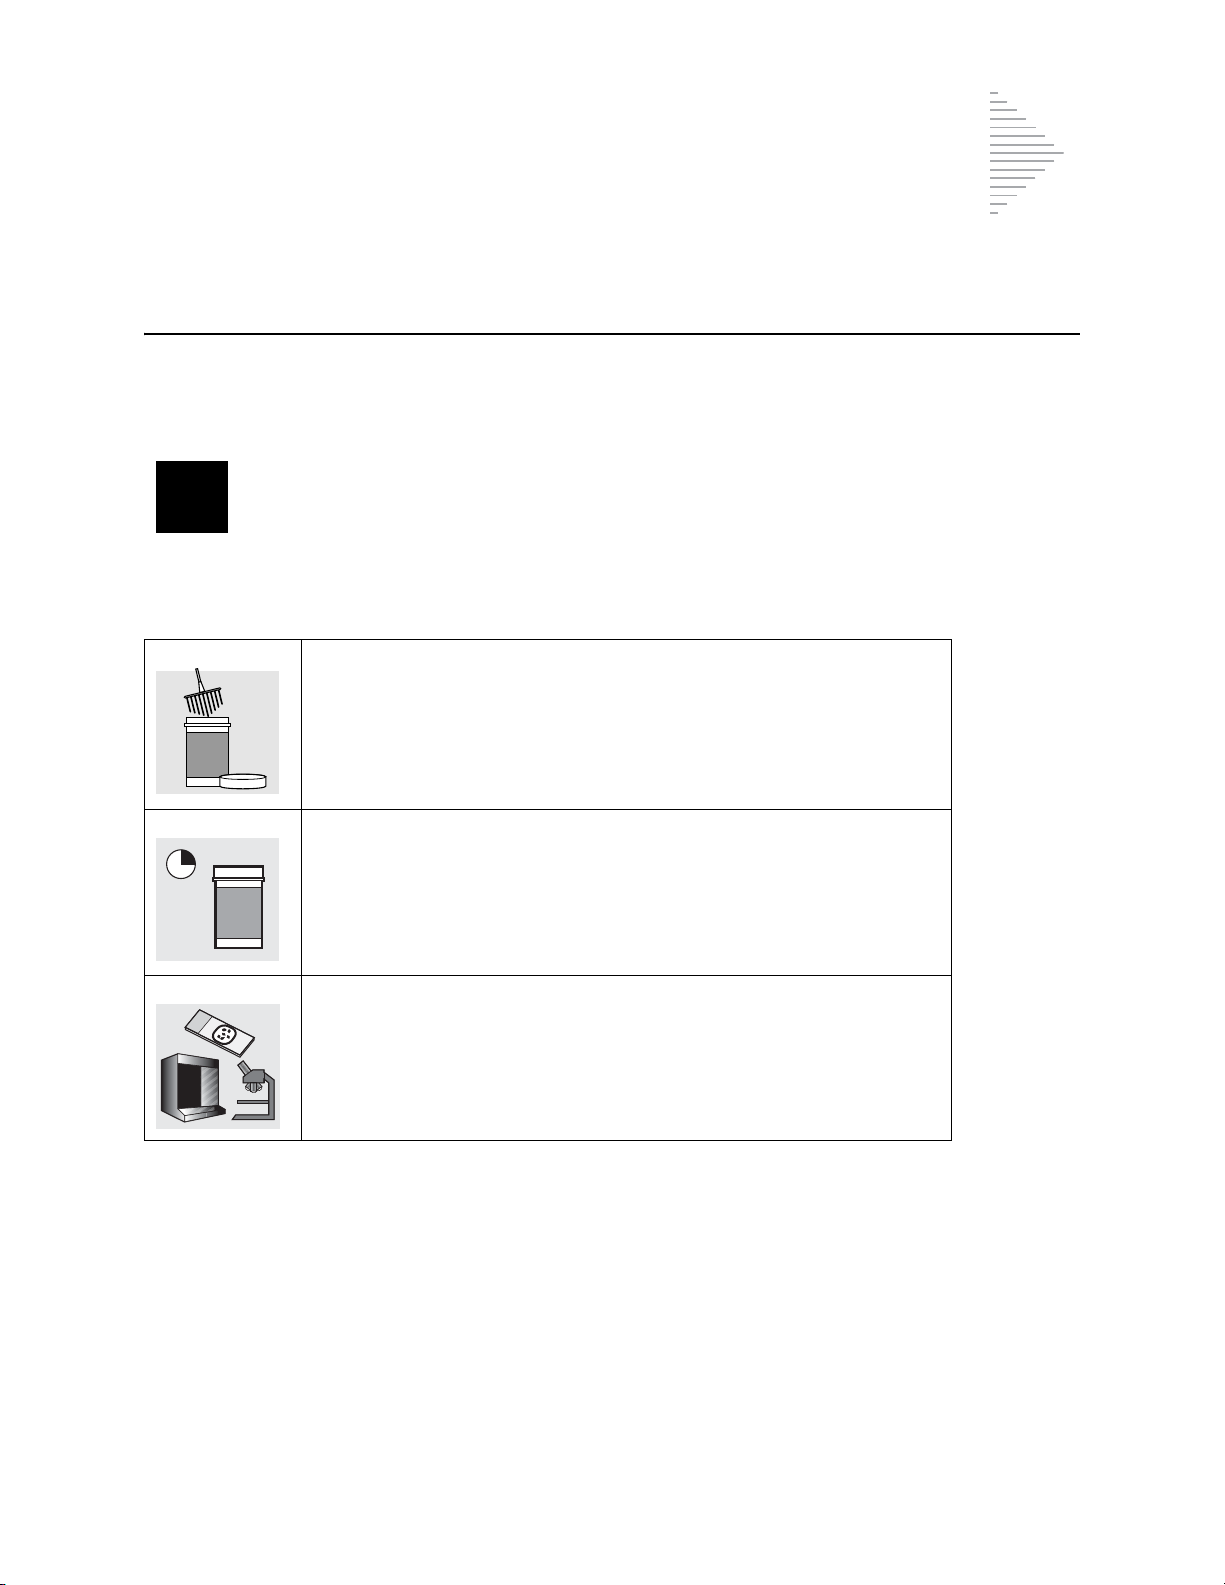
GYNECOLOGIC SAMPLE PREPARATION
4
SECTION
A
ThinPr
ep
Chapter Four
Gynecologic Sample Preparation
INTRODUCTION
Includes cell samples from the ectocervix and the endocervix.
1. Collection: Deposit the specimen directly into a PreservCyt
Solution vial.
®
2. Allow to stand in PreservCyt Solution for 15 minutes
®
3. Run on ThinPrep
and Evaluate
2000 processor using Sequence 4, Fix, Stain,
ThinPrep 2000 Processor Operator’s Manual
4.1
Page 77

4
GYNECOLOGIC SAMPLE PREPARATION
SECTION
B
COLLECTION PREPARATION
ThinPrep Collection Techniques
The detection of cervical cancer and its precursors as well as other gynecologic abnormalities is
the primary purpose of obtaining a cervical cell sample. The following guidelines are referenced
1
from NCCLS Document GP15-A3
a ThinPrep Pap Test (TPPT) specimen. In general, the guidelines state that it is important to
obtain a specimen that is not obscured by blood, mucus, inflammatory exudate or lubricant.
Patient Information
• The patient should be tested 2 weeks after the first day of her last menstrual period, and
definitely not when she is menstruating.
Even though the TPPT reduces obscuring blood, clinical studies have demonstrated that
excessive amounts of blood may still compromise the test and possibly lead to an unsat-
isfactory result.
2
and are recommended in the collection process for obtaining
• The patient should not use vaginal medication, vaginal contraceptives, or douches
during the 48 hours before the exam.
Specimen Collection Preparation
• Lubricant jellies should not be used to lubricate the speculum.
Even though lubricant jellies are water soluble, excessive amounts of jelly may compromise the test and possibly lead to an unsatisfactory result.
• Remove excess mucus or other discharge present before taking the sample. This should
be gently removed with ring forceps holding a folded gauze pad.
The excess cervical mucus is essentially devoid of meaningful cellular material and
when present in the sample vial may yield a slide with little or no diagnostic material
present.
• Remove inflammatory exudate from the cervical canal before taking the sample.
Remove by placing a dry 2 x 2 inch (5 x 5 cm) piece of gauze over the cervix and peeling
it away after it absorbs the exudate or by using a dry proctoswab or scopette.
The excess inflammatory exudate is essentially devoid of diagnostic cellular material
and when present in the sample vial may yield a slide with little or no diagnostic material present.
• The cervix should not be cleaned by washing with saline or it may result in a relatively
acellular specimen.
• The sample should be obtained before the application of acetic acid.
1. Papanicolaou Technique Approved Guidelines (NCCLS Document GP15-A3)
2. Lee et al. Comparison of Conventional Papanicolaou Smears and Fluid-Based, Thin-Layer
System for Cervical Cancer Screening. Ob Gyn 1997; 90: 278-284.
4.2
ThinPrep 2000 Processor Operator’s Manual
Page 78
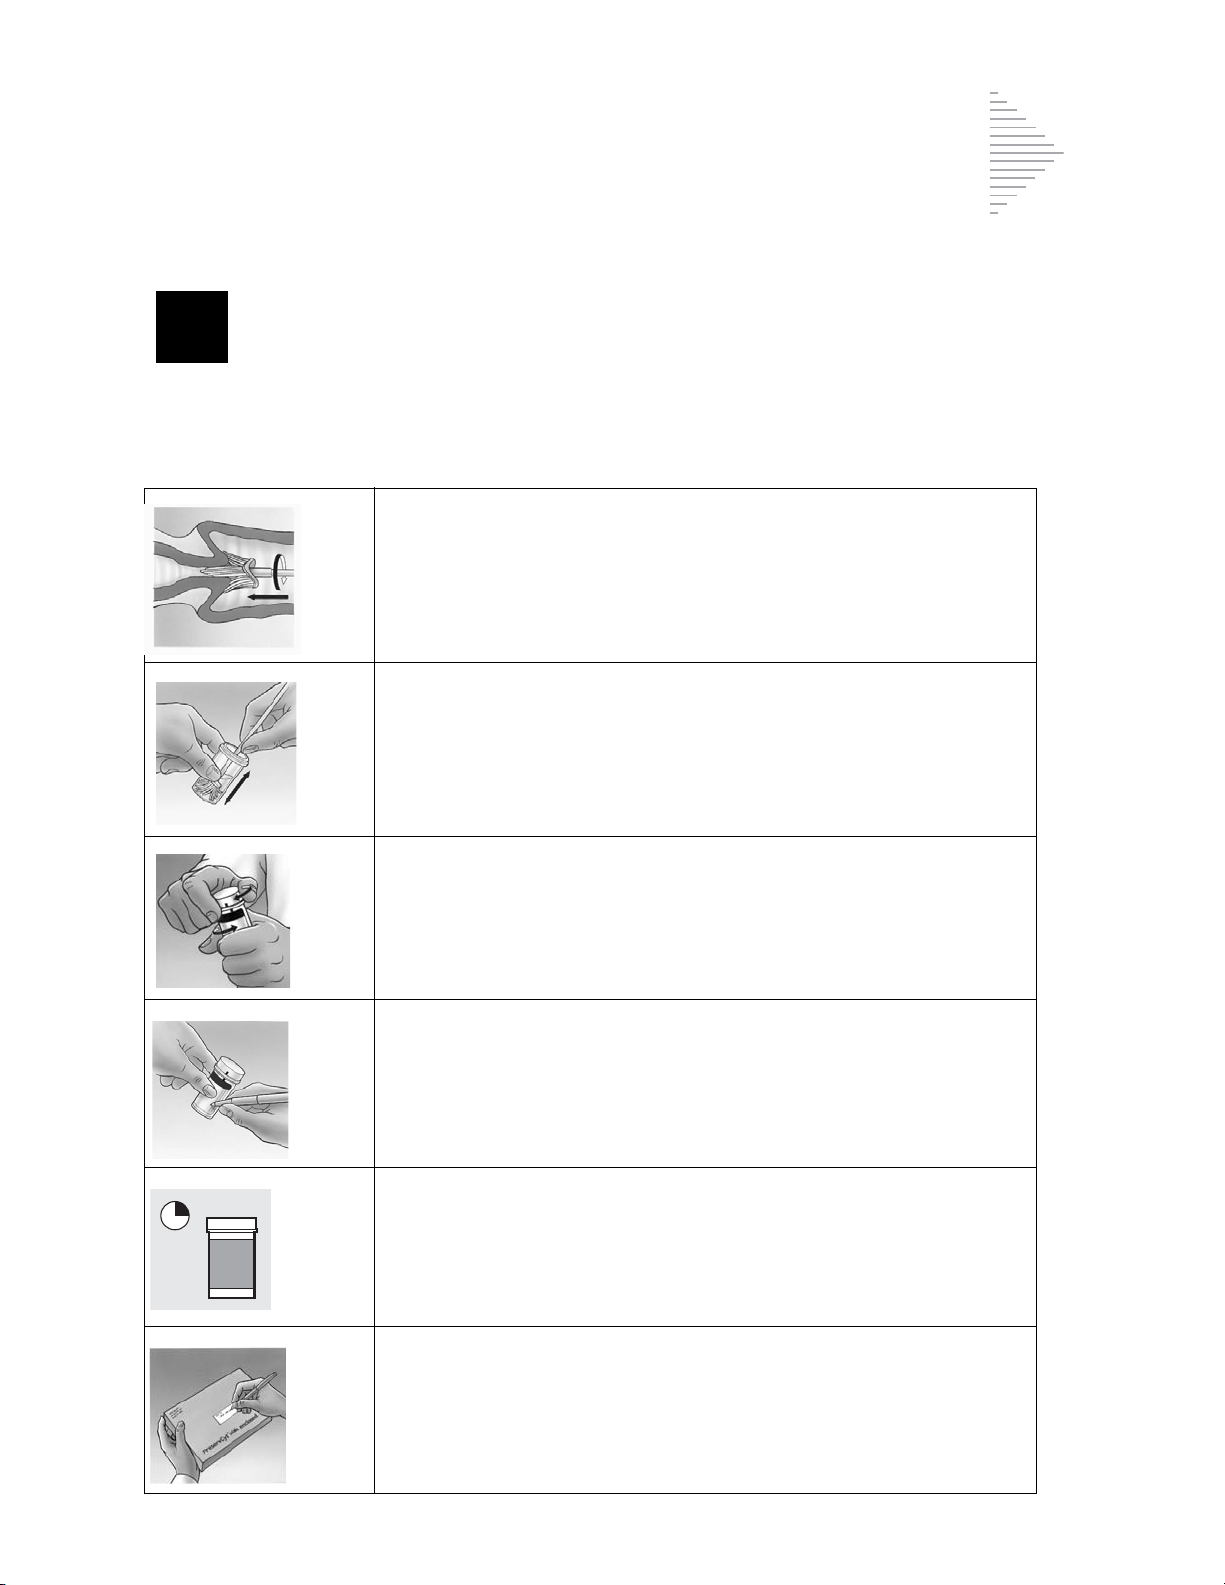
GYNECOLOGIC SAMPLE PREPARATION
4
SECTION
C
SPECIMEN COLLECTION
Collect Gynecologic Sample Using the Broom-Like Device
Physician/clinician instructions for collecting gynecologic samples.
1.
Obtain
device. Insert the central bristles of the broom into the endocervical canal deep enough to allow the shorter bristles to fully contact the ectocervix. Push gently, and rotate the broom in a
clockwise direction five times.
2.
Rinse
tion vial by pushing the broom into the bottom of the vial
10 times, forcing the bristles apart. As a final step, swirl the
broom vigorously to further release material. Discard the collection device.
an adequate sampling from the cervix using a broom-like
the broom as quickly as possible into the PreservCyt Solu-
3.
Tighten
torque line on the vial.
Record
4.
Record
ogy request form.
Note:
5.
Place
the laboratory.
the cap so that the torque line on the cap passes the
the patient’s name and ID number on the vial.
the patient information and medical history on the cytol-
If the sample is to be processed immediately, allow the sample to stand in the PreservCyt Solution vial for at least
15 minutes before processing.
If the sample is to be sent elsewhere for processing, continue
with the next step.
the vial and requisition in a specimen bag for transport to
ThinPrep 2000 Processor Operator’s Manual
4.3
Page 79
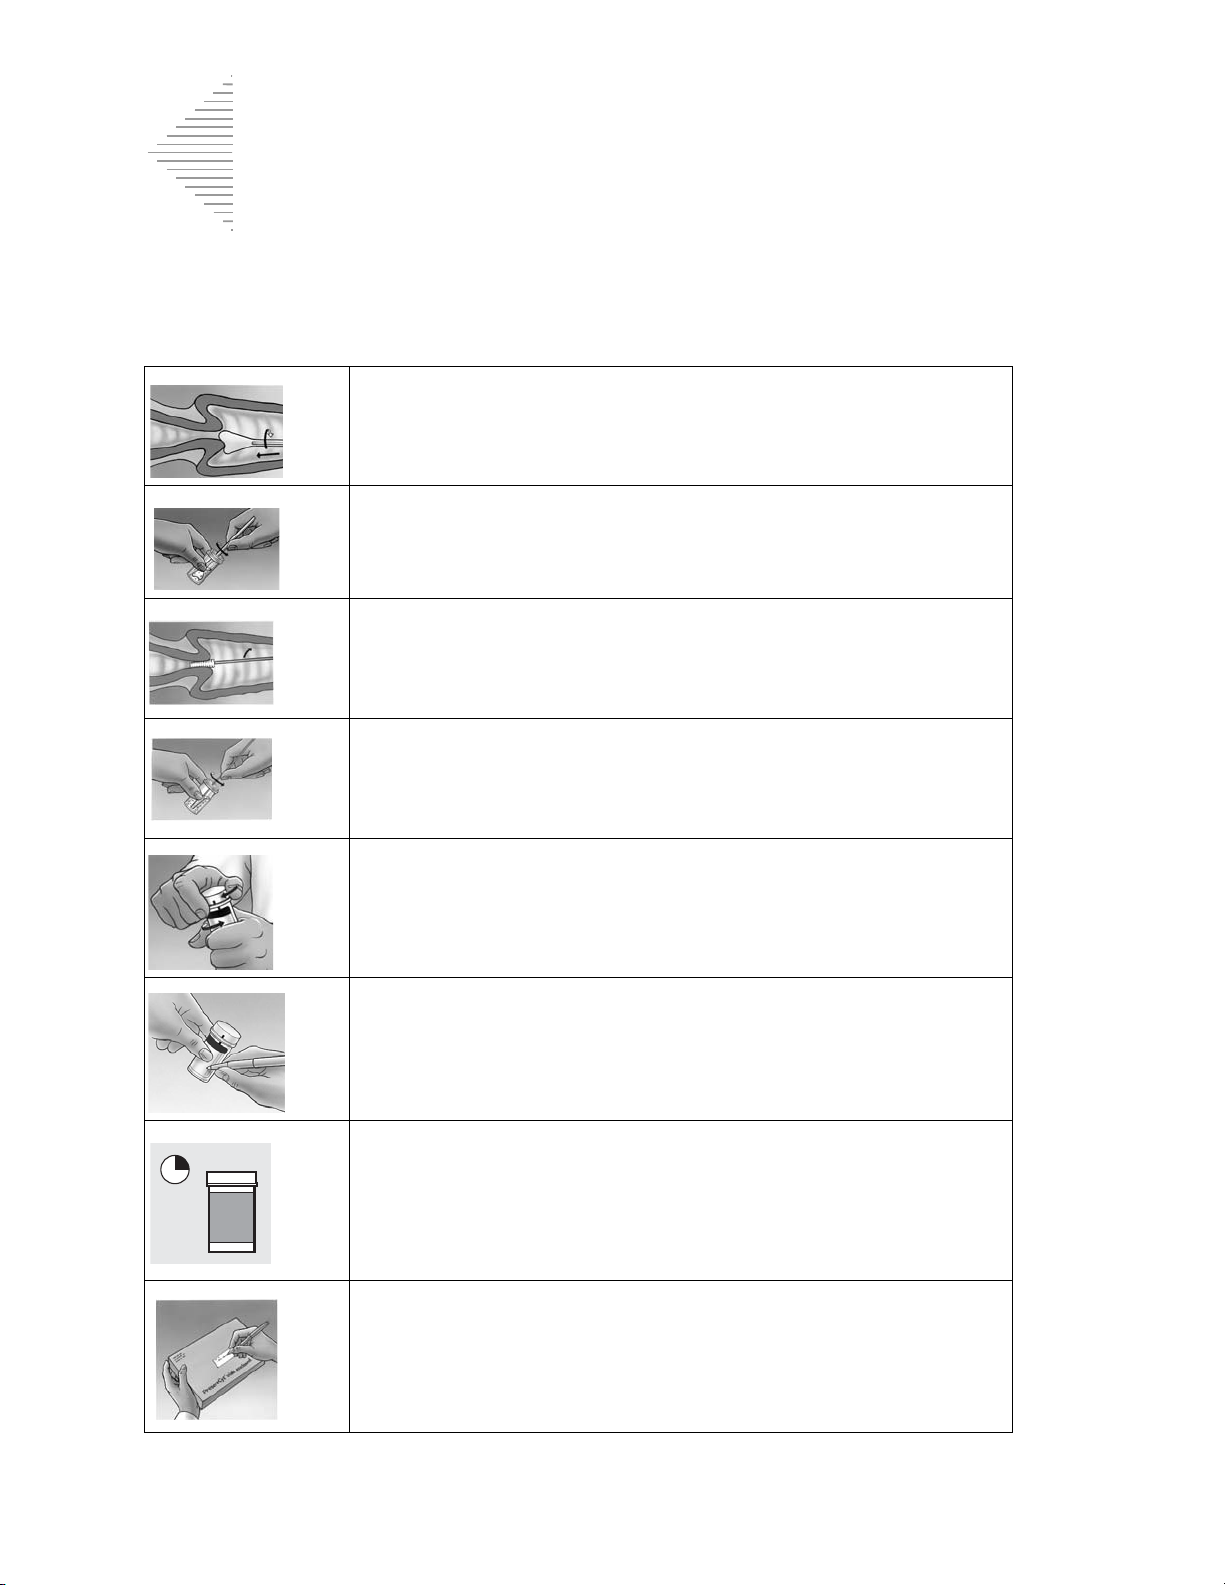
4
GYNECOLOGIC SAMPLE PREPARATION
Collect Gynecologic Sample, Using the Endocervical Brush/Spatula Device
Physician/clinician instructions for collecting gynecologic samples.
1.
Obtain
spatula.
2.
Rinse
Solution vial by swirling the spatula vigorously in the vial
10 times. Discard the spatula.
an adequate sampling from the ectocervix using a
the spatula as quickly as possible into the PreservCyt
plastic
Obtain
3.
endocervical brush device. Insert brush into the cervix until only
the bottom-most fibers are exposed. Slowly rotate 1/4 or
1/2 turn in one direction. DO NOT OVER-ROTATE.
Rinse
4.
by rotating the device in the solution 10 times while pushing
against the PreservCyt vial wall. Swirl vigorously to further
release material. Discard the brush.
Tighten
5.
torque line on the vial.
Record
6.
Record
ogy requisition form.
Note:
an adequate sampling from the endocervix using an
the brush as quickly as possible in the PreservCyt Solution
the cap so that the torque line on the cap passes the
the patient’s name and ID number on the vial.
the patient information and medical history on the cytol-
If the sample is to be processed immediately, allow the sam-
ple to stand in the PreservCyt Solution vial for at least
15 minutes before processing.
If the sample is to be sent elsewhere for processing, continue
with the next step.
7.
Place
the vial and requisition in a specimen bag for transport to
the laboratory.
4.4
ThinPrep 2000 Processor Operator’s Manual
Page 80

4
SPECIAL PRECAUTIONS
SECTION
D
PreservCyt Solution
After sample transfer to the PreservCyt Solution vial, the sample
should stand for at least 15 minutes before processing.
GYNECOLOGIC SAMPLE PREPARATION
For more information on PreservCyt Solution, refer to Chapter 3, “PreservCyt Solution”
.
Interfering Substances
The Clinical and Laboratory Standard Institute Guidelines (formerly NCCLS) recommend
that no lubricant be used during Pap testing.
ACOG recommends that care be taken not to contaminate the specimen with lubricant
because this may lead to unsatisfactory results.
and liquid-based cytology.
If you are using a plastic speculum, or in instances where a lubricant must be used, take care
not to contaminate the cervix or collection devices with the lubricant. A tiny amount of lubricant may be used, just enough to sparingly coat the speculum with a gloved finger, avoiding
the tip of the speculum.
The Clinical and Laboratory Standard Institute Guidelines and ACOG recommend that you
not take a Pap during menses.
For samples to be processed on the ThinPrep 2000 processor, lubricants can adhere to the filter membrane and may cause poor cell transfer to the slide. If its use is unavoidable, the
lubricant should be used in minimum amounts.
1-2
1
2
This applies to both conventional Pap testing
1.
Papanicolaou Technique Approved Guidelines (CLSI Document GP15-A3,
third edition, 2008)
2.
ACOG Practice Bulletin, no. 45, August 2003
ThinPrep 2000 Processor Operator’s Manual
4.5
Page 81

4
GYNECOLOGIC SAMPLE PREPARATION
SECTION
E
ID#
00001168
Frosted area
Handling/Disposal
Handle all chemical-containing materials carefully in accordance with safe laboratory practices.
When required by reagent composition, additional precautions are marked on the reagent
containers.
Dispose of PreservCyt Solution according to your guidelines for disposing of hazardous waste.
PreservCyt Solution contains methanol.
SPECIMEN PROCESSING
Materials Required
Refer to Materials Required sections on page 1.5 and page 5A.4 for a list and explanation of materials
provided and materials required but not provided.
Specimen Preparation
• The gynecologic sample should be deposited in the PreservCyt Solution immediately upon
collection.
• The PreservCyt Sample vial fluid level should be within the frosted area of the sample vial.
Figure 4-1 PreservCyt Sample Vial Fluid Level
• Store PreservCyt Solution
15°C (59°F) and 30°C (86°F) for up to 6 weeks.
with
cytologic sample intended for ThinPrep Pap testing between
4.6
ThinPrep 2000 Processor Operator’s Manual
Page 82

GYNECOLOGIC SAMPLE PREPARATION
4
ThinPr
ep
SECTION
F
Run On ThinPrep 2000 Processor Using Sequence 4, Fix, Stain, and Evaluate
The operator loads the instrument and selects sequence number 4 for
the sample to be processed as described in Chapter 5A, “Operating
Instructions”. At the completion of the process, the operator fixes
and stains the slide according to the procedure in Chapter 8, “Fixation, Staining, and Coverslipping”.
Stability
Store PreservCyt Solution
(59°F) and 30°C (86°F) for up to 6 weeks.
with
cytologic sample intended for ThinPrep Pap testing between 15°C
Sample Processing Troubleshooting
REPROCESSING A THINPREP PAP TEST SAMPLE VIAL FOLLOWING AN UNSATISFACTORY
RESULT
Laboratory personnel may reprocess ThinPrep Pap test specimens where slides have been interpreted as inadequate (“Unsatisfactory for Evaluation”) for diagnosis following cytotechnologist
screening. The instructions below must be followed in order to properly reprocess these specimens:
Note:
Note:
Reprocessing a ThinPrep Pap test specimen may only be performed once.
Good laboratory practices should be followed to avoid introducing contaminants into the
PreservCyt Solution sample vial.
ThinPrep 2000 Processor Operator’s Manual
4.7
Page 83

4
GYNECOLOGIC SAMPLE PREPARATION
30 ml
Reprocessing Protocol
1 Prepare a wash solution of sufficient volume to add 30 mL to every
ThinPrep Pap test specimen being reprocessed. The wash solution is
made by mixing 9 parts CytoLyt Solution with 1 part glacial acetic
acid.
2 Prior to performing this step, assure there is sufficient volume in the
ThinPrep Pap test specimen to result in a pellet, following centrifugation. Pour the contents of the ThinPrep Pap test specimen into a
centrifuge tube appropriately labeled to maintain chain of custody.
Retain the vial.
3 Pellet the contents of the centrifuge tube by centrifugation at 1200 x
for 5 minutes.
Note:
Once centrifugation is complete, the cell pellet should be
clearly visible but the cells may not be tightly packed
together (the pellet may appear fluffy).
4 a. Carefully pour off the supernatant from the centrifuge tube to
avoid loss of cells. Dispose of according to local regulations.
b. Vortex the centrifuge tube briefly.
c. Pour 30 mL of the CytoLyt Solution and 10% glacial acetic acid
mixture into the centrifuge tube and cap securely.
d. Invert the centrifuge tube by hand several times to mix.
g
5 Pellet the cells again by centrifugation — 1200 x
for 5 minutes.
g
4.8
ThinPrep 2000 Processor Operator’s Manual
Page 84

GYNECOLOGIC SAMPLE PREPARATION
4
6 a. Carefully pour off the supernatant from the centrifuge tube to
avoid loss of cells. Dispose of according to local regulations.
b. Vortex the centrifuge tube briefly.
7 a. Using the volume markings on the centrifuge tube, pour the nec-
essary quantity of unused (i.e., containing no patient specimens)
PreservCyt Solution to the cells and fill to a final volume of
20 mL. Secure the cap tightly.
b. Invert the centrifuge tube several times to mix and transfer the
sample back into the retained specimen vial.
8 Process the specimen using a ThinPrep 2000 processor according to
the procedure for running gynecologic specimens. Evaluate the
resultant slide according to
Vaginal Cytologic Diagnosis
from specimen do not fit with the clinical impression, a new specimen may be necessary.
The Bethesda System for Reporting Cervical/
. If after reprocessing, negative results
ThinPrep 2000 Processor Operator’s Manual
4.9
Page 85

4
GYNECOLOGIC SAMPLE PREPARATION
This page intentionally left blank.
4.10
ThinPrep 2000 Processor Operator’s Manual
Page 86

5. Operating
Instructions
Instructions
5. Operating
Page 87

5A
Chapter Five A
SECTION
A
Operating Instructions
OPERATING INSTRUCTIONS
Note:
Specific processing steps must be followed before and during use of the ThinPrep®
2000 processor if planning to perform
testing, using the Roche Diagnostics COBAS
ual specimen after a slide has been prepared using the ThinPrep 2000 processor. Follow the procedures found in Chapter 5B of the ThinPrep 2000 Operator's Manual.
Chlamydia trachomatis
AMPLICOR™ CT/NG test, on the resid-
and
Neisseria gonorrhoeae
INTRODUCTION
This section provides instructions for operating the ThinPrep® 2000 processor.
The following topics are covered in this section:
SECTION B:
SECTION C:
SECTION D:
SECTION E:
SECTION F:
Optional Instructions for Ancillary Testing 5A.2
Material Requirements 5A.4
Pre-Operation Checklist 5A.5
Overview of Loading the
ThinPrep 2000 Processor 5A.6
Loading the PreservCyt® Sample Vial 5A.7
SECTION G:
SECTION H:
SECTION I:
SECTION J:
SECTION K:
SECTION L:
SECTION M:
SECTION N:
Loading the ThinPrep Pap Test Filter 5A.8
Loading the ThinPrep Microscope Slide 5A.11
Loading the Fixative Vial 5A.14
Closing the Door 5A.15
Selecting and Initiating a Sequence 5A.16
Unloading the ThinPrep 2000 Processor 5A.18
Interrupting the Slide Preparation Process 5A.20
Status, Maintenance, and Test Screens 5A.21
ThinPrep 2000 Processor Operator’s Manual
5A.1
Page 88

5A5A
OPERATING INSTRUCTIONS
SECTION
B
OPTIONAL INSTRUCTIONS FOR ANCILLARY TESTING
Testing for certain sexually transmitted diseases (STD) and for Human Papilloma Virus (HPV) in
conjunction with cytology may be performed using the residual specimen remaining in the PreservCyt sample vial after preparation of the ThinPrep Pap test slide. Such testing may also be enabled by
the removal of an aliquot of up to 4 mL (Aliquot Removal) from the PreservCyt sample vial before
preparing the ThinPrep Pap test slide.
Laboratory personnel must follow the specific instructions in this section to appropriately remove
the desired aliquot volume and prepare the PreservCyt sample vial for the ThinPrep Pap test. Adherence to these instructions must be maintained to ensure there is no adverse effect on the ThinPrep
Pap test result.
Because cytology/HPV testing and STD testing address different clinical questions, Aliquot Removal
may not be suitable for all clinical situations. Physicians and other persons responsible for ordering
clinical tests should be familiar with the following:
• There is no evidence of degradation of cytology results by Aliquot Removal, however, this
cannot be ruled out for all specimens. As with any subsampling step in anatomic pathology,
chance misallocation of diagnostic cells may occur if they are very rare. If negative results
from the specimen do not fit with the clinical impression, a new specimen may be necessary.
• Aliquot Removal from low-cellularity specimens may leave insufficient material in the
PreservCyt sample vial for preparation of a satisfactory ThinPrep Pap test slide.
• Aliquot Removal may leave insufficient material in the PreservCyt sample vial for performance of ancillary testing (e.g., reflexive HPV testing) using the residual specimen following
preparation of a ThinPrep Pap test slide.
• Co-collection of separate samples for the ThinPrep Pap test and STD testing may be considered in lieu of Aliquot Removal.
• When opting for concurrent cytologic and STD testing, providers should consider risk and
clinical history (e.g., disease prevalence, patient age, sexual history or pregnancy) as well as
specimen suitability (e.g., exudates or bleeding) that can impact diagnostic reliability.
Sexually Transmitted Diseases Treatment Guidelines 2002 (Centers for Disease Control and Prevention, MMWR 2002: 51(No. RR-6)) provides clinical guidance for the management and treatment of
individual patients, including use of Pap testing.
It is essential that the instructions in Chapter 5B be followed if the Roche Diagnostics COBAS
AMPLICOR™ CT/NG test will be performed using the residual specimen after
prepared using the ThinPrep 2000 processor.
a slide has been
5A.2
ThinPrep 2000 Processor Operator’s Manual
Page 89

OPERATING INSTRUCTIONS
5A
Removing an Aliquot (of up to 4 mL) from the PreservCyt Sample Vial prior to performing the ThinPrep Pap Test
Note:
Only one aliquot may be removed from the PreservCyt sample vial prior to performing the
ThinPrep Pap test, regardless of the volume of the aliquot (maximum aliquot volume = 4 mL).
Note:
1. Vortex the vial at high speed for 8 to 12 seconds.
CAUTION:
homogeneity of the sample.
2. Carefully remove the vial cap.
3. Using a pipetting device, withdraw an aliquot of up to 4 mL from the vial. Take care to avoid
4. Dispense the aliquot into a suitably sized and labeled polypropylene tube and close tightly to
5. Store the aliquot under conditions appropriate for ancillary test(s). Refer to manufacturer or lab-
6. Dispose of the pipetting device in accordance with local, state, and federal regulations.
7. Using a new pipetting device, withdraw a quantity of unused Preservcyt Solution from its con-
8. Transfer the volume of unused PreservCyt Solution to the vial from which the aliquot was
9. Secure the vial cap. (The line on the cap and line on the vial should meet or slightly overlap.)
10. Dispose of the pipetting device in accordance with local, state, and federal regulations.
11. Refer to the remaining steps in this chapter to complete the ThinPrep Pap test.
Good laboratory practices should be followed to avoid introducing contaminants into either
the PreservCyt sample vial or the aliquot. It is recommended to use powder-free gloves and
an individually wrapped, disposable pipetting device with an aerosol barrier tip that is sized
appropriately for the volume being withdrawn and dispensed. You should not use serological
pipettes. In order to minimize the potential for cross-contamination, aliquot removal should
be performed in an appropriate location outside an area where amplification is performed.
The desired aliquot must be removed immediately after vortexing the vial to ensure
contaminating gloves with solution. If gloves should become contaminated, replace with a clean
pair before proceeding to the next specimen.
prevent leakage/evaporation.
oratory instructions for performing ancillary test(s) on the aliquot.
tainer that is equal in volume to that of the aliquot removed from the vial in step 3.
removed in step 3.
ThinPrep 2000 Processor Operator’s Manual
5A.3
Page 90

5A5A
OPERATING INSTRUCTIONS
SECTION
C
PreservCyt
Solution
Fixative
vial
Operator’s manual
Gloves
Lint-free wipes
Filter cap
ThinPrep
microscope slide
Sta ining rack
and alcohol bath
ThinPrep Pap
test filter
MATERIAL REQUIREMENTS
Figure 5A-1 The Required Materials
The
PreservCyt Solution
that preserves cells from all body sites for up to three weeks at room temperature. For more information on PreservCyt Solution, refer to Chapter 3, “PreservCyt Solution”.
The
ThinPrep Pap test tilter
membrane bonded onto the other end. The filter membrane has a flat, smooth, porous surface.
The
filter cap
the ThinPrep Pap test filter into the processor.
fixative vial
The
the ThinPrep processor transfers cells onto the slide, it automatically ejects the slide into the fixative
vial.
The
ThinPrep microscope slide
screening area and a larger labeling area. The slide is specifically designed for use with the ThinPrep
processor.
Supplies
for the ThinPrep 2000 processor. These include PreservCyt Solution vials for use with the ThinPrep
5A.4
ThinPrep 2000 Processor Operator’s Manual
is a plastic cap that fits onto the open end of the ThinPrep Pap test filter and mounts
is a plastic vial that should be filled with standard laboratory fixative alcohol. After
used in the ThinPrep 2000 system are those designed and supplied by Hologic specifically
vial is a plastic vial that contains an alcohol-based preservative solution
is a disposable plastic cylinder that is open at one end and has a filter
is a high-quality, pre-cleaned glass microscope slide with a defined
Page 91

OPERATING INSTRUCTIONS
5A
SECTION
D
Pap test, Gyn ThinPrep Pap test filters (clear), and ThinPrep microscope slides. For gynecologic use,
these supplies are required for proper performance of the system and cannot be substituted with any
other items. Product performance will be compromised if other supplies are used. After use, supplies
should be disposed of in accordance with local, state, and federal regulations.
The
ThinPrep 2000 System Operator’s Manual
ThinPrep 2000 System, such as the principles of operation, operating instructions, specifications, and
maintenance information. The manual also contains information on the solutions and materials
required to prepare slides with the ThinPrep 2000 Processor.
contains detailed information about the
Disposable laboratory gloves
Lint-free wipes
Alcohol bath
with slide staining rack and standard laboratory fixative alcohol.
— non-powdered gloves are recommended.
PRE-OPERATION CHECKLIST
The following conditions should be checked before preparing a slide on the ThinPrep 2000 processor.
• Waste bottle — Make sure the fluid level of the waste bottle is below the “MAX” fill line of the
bottle. Refer to “EMPTYING WASTE BOTTLE” on page 7.2, for emptying instructions.
• Idle mode — Confirm that the instrument is powered on and in idle, or Main Menu, mode. If
the Main Menu is not displayed, follow the instructions on the display until the idle mode
appears. If the system’s power is off, refer to Chapter 2, “ThinPrep 2000 Installation”, for turning system power on.
• Filter seal O-rings — Make sure that the two O-rings at the base of the filter cap are not dry,
cracked, or in need of lubrication. Refer to Chapter 7, “Maintenance”, for lubrication and/or
replacement instructions.
• Disposable laboratory gloves — Always wear disposable laboratory gloves and other lab
safety garments when operating the ThinPrep processor.
Note
: Once sample has been added to a PreservCyt
PreservCyt sample vial
.
Solution
ThinPrep 2000 Processor Operator’s Manual
vial, the vial is then designated as a
5A.5
Page 92
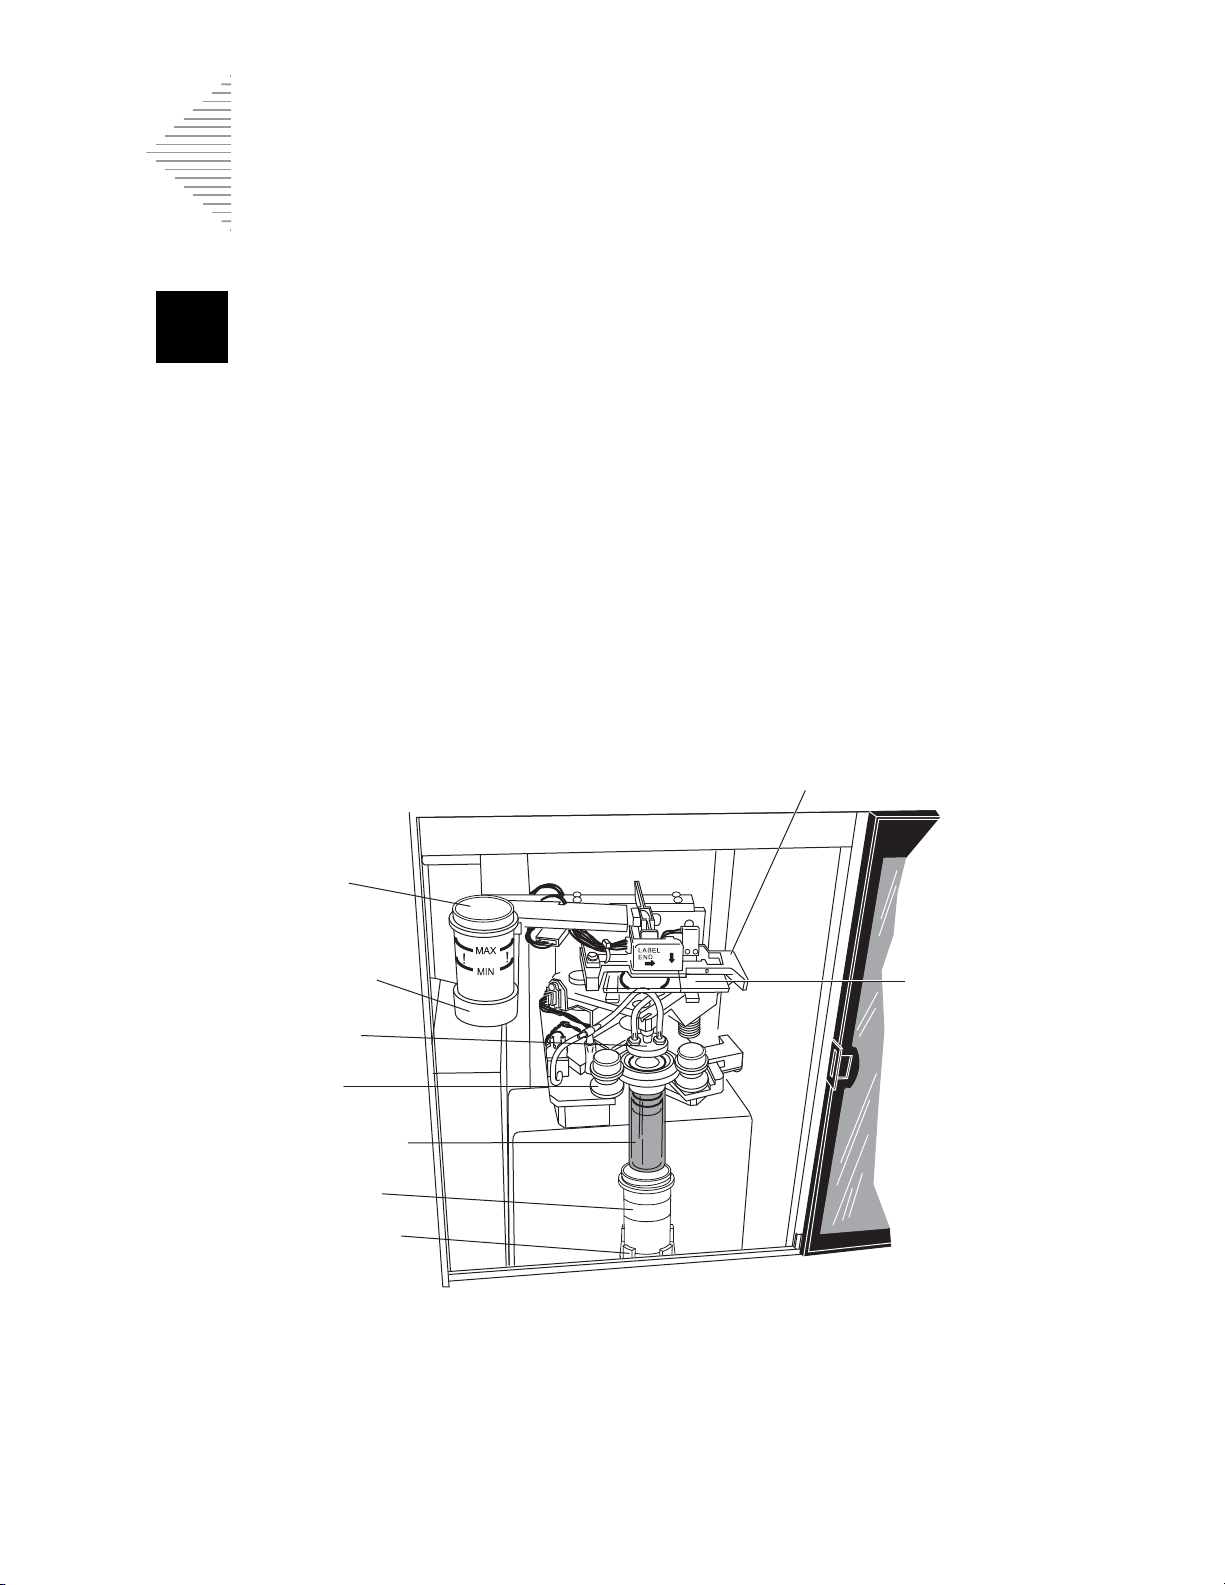
5A5A
OPERATING INSTRUCTIONS
SECTION
E
Slide handler/ejector
Fixative
vial
Fixative
bath holder
Cap seal
Bobbins
Filter assembly
PreservCyt
sample vial
Sample vial
holder
Slide
OVERVIEW OF LOADING THE THINPREP® 2000 PROCESSOR
The next four sections describe in detail the methods for loading the ThinPrep 2000 processor. The
following supplies must be loaded into the processor before initiating a sample run:
• PreservCyt sample vial
• ThinPrep Pap test filter
• ThinPrep microscope slide
• Fixative vial
The figure below shows the ThinPrep 2000 processor after loading of the supplies is complete.
Figure 5A-2 ThinPrep 2000 Processor Loaded with Supplies
5A.6
ThinPrep 2000 Processor Operator’s Manual
Page 93
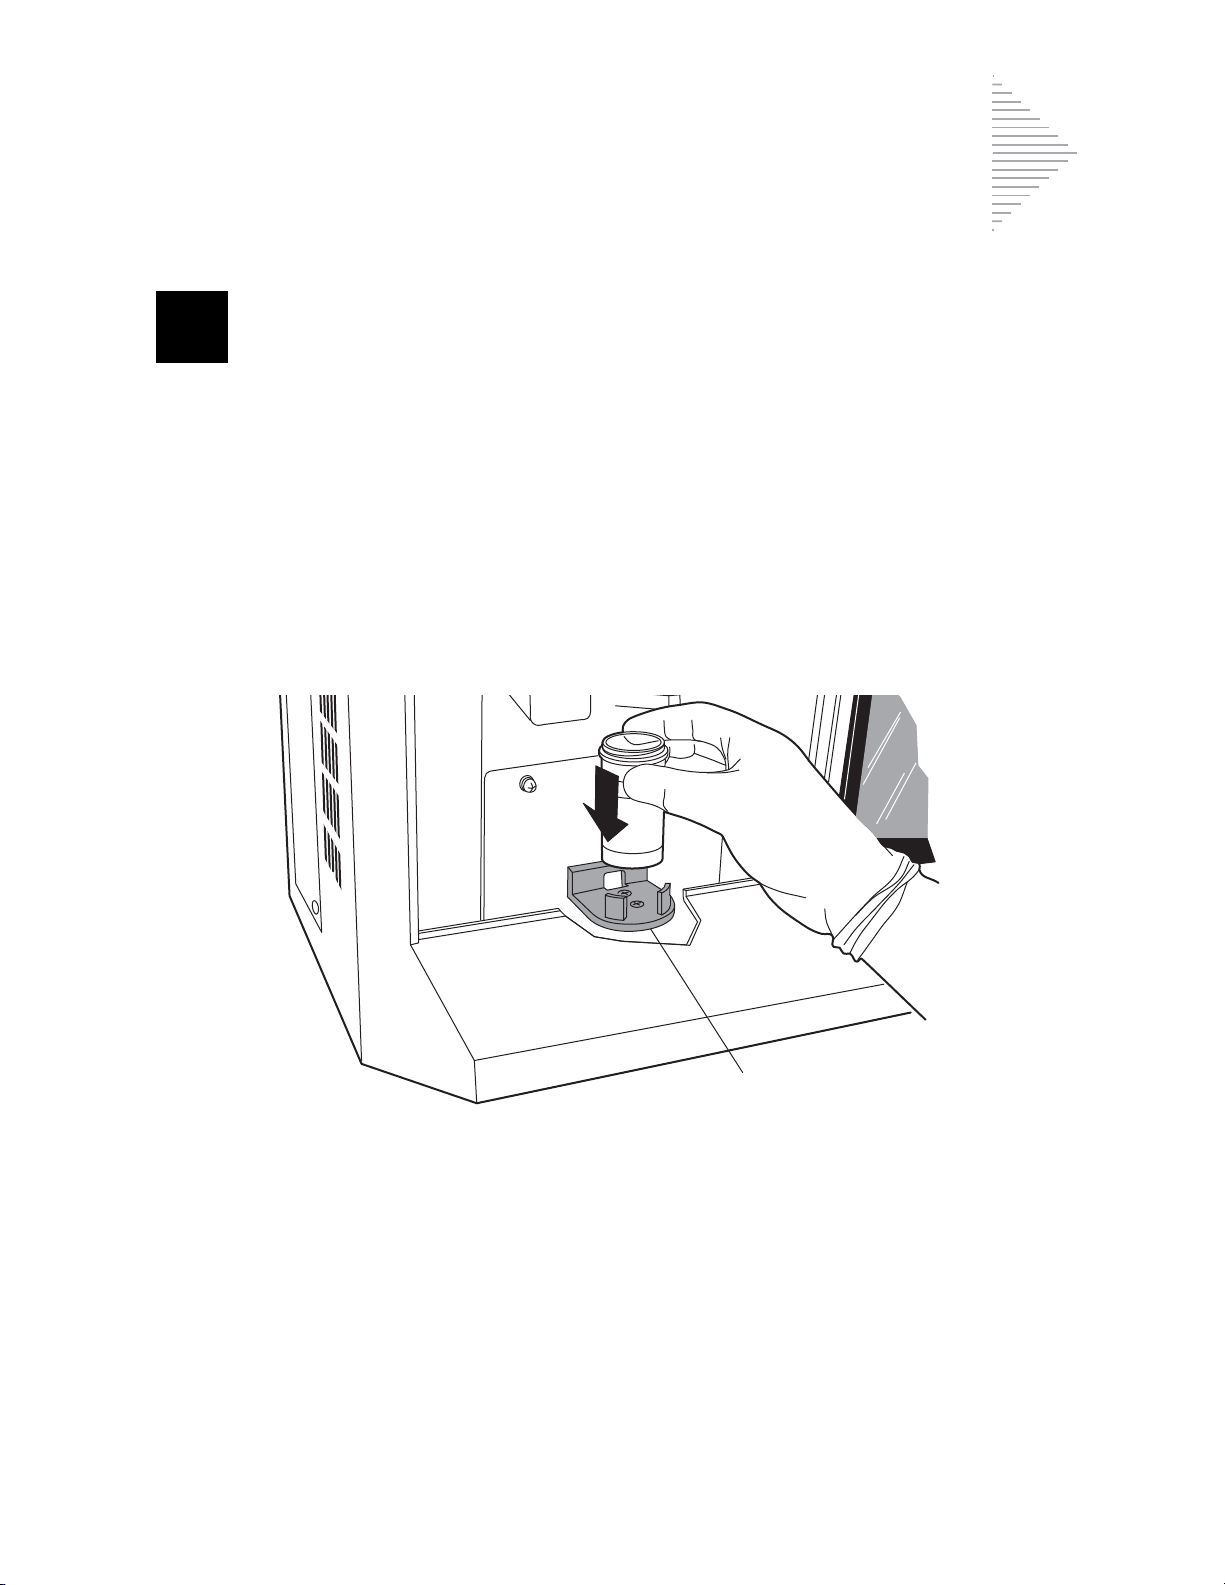
OPERATING INSTRUCTIONS
5A
SECTION
F
Sample holder
LOADING THE PRESERVCYT SAMPLE VIAL
1. Open the ThinPrep 2000 processor door by gripping the door tab and sliding it gently to the right
until it is completely open.
2. Confirm that the sample holder, fixative vial holder, and slide handler are empty.
3. Remove the cap from the PreservCyt sample vial.
4. Gently place the PreservCyt sample vial into the sample holder until the bottom of the vial rests
on the sample holder base. Refer to Figure 5A-3.
5. The vial will remain loose in the sample holder until the process begins. The instrument will
automatically grasp the vial during processing.
Figure 5A-3 Loading the PreservCyt Sample Vial
ThinPrep 2000 Processor Operator’s Manual
5A.7
Page 94

5A5A
OPERATING INSTRUCTIONS
SECTION
G
Method B
Method A
LOADING THE THINPREP PAP TEST FILTER
1. Remove a new ThinPrep Pap test filter from the storage tray by grasping the sides of the cylinder.
Caution:
2. There are two different techniques for mating the ThinPrep Pap test filter and filter cap. This configuration of the two parts is called a filter assembly.
Note:
Handle the filter cap gently. Do not hit it against hard surfaces.
Never touch the filter membrane of the ThinPrep Pap test filter.
Method A:
Hold the filter cap in the palm of one hand and the ThinPrep Pap test filter in the other hand as
shown in Figure 5A-4. Insert the ThinPrep Pap test filter.
Method B:
Place the filter cap on the bench and hold the ThinPrep Pap test filter in one hand. Insert the ThinPrep Pap test filter.
Using a slight twisting motion with either method will prevent unwanted O-ring roll. The filter seal
O-rings should be lightly greased. Refer to “FILTER CAP O-RING LUBRICATION” on page 7.5.
Figure 5A-4 Assembling the Filter Cap and Filter
3. Ensure there is no visible gap between the ThinPrep Pap test filter and the filter cap as shown in
Figure 5A-5.
The ThinPrep Pap test filter must seat against the filter cap lip.
5A.8
ThinPrep 2000 Processor Operator’s Manual
Page 95

5A
Figure 5A-5 Correct Filter Cap-to-Filter Assembly
Correct Incorrect
No gap
Gap
ThinPrep Pap
test filter
4. Insert the filter assembly into the instrument.
OPERATING INSTRUCTIONS
Hold the filter assembly by the ThinPrep Pap test filter cylinder and place the angled edges of the
filter cap against the two front bobbins as shown in Figure 5A-6.
Figure 5A-6 Positioning the Filter Cap in the Bobbins
5. Keeping the filter assembly level, push it straight into the instrument. The right bobbin will move
to the right as the filter assembly is inserted. The filter assembly is completely seated when the
right bobbin moves back to the left and the two front bobbins hold the filter assembly in the processor. Refer to Figure 5A-7.
When properly loaded, the filter cap is level inside the instrument and the filter cylinder is above
the PreservCyt sample vial and slightly to the left. If the positioning of the filter assembly does
ThinPrep 2000 Processor Operator’s Manual
5A.9
Page 96

5A5A
OPERATING INSTRUCTIONS
Bobbins
not correspond to this description, remove it and try again. The filter assembly will easily rotate
in the bobbins when properly seated.
Figure 5A-7 Loading the Filter Assembly
5A.10
ThinPrep 2000 Processor Operator’s Manual
Page 97

OPERATING INSTRUCTIONS
5A
SECTION
H
Clamps
Slide
LOADING THE THINPREP MICROSCOPE SLIDE
1. Label the ThinPrep slide with patient’s identification information. Use the frosted area of the
slide. When using an adhesive label, ensure that the label is completely adhered to the slide and
that there are no overhanging edges.
2. Using two hands, hold the slide by the two front corners with your index fingers and thumbs as
shown in Figure 5A-8. Be sure not to touch the slide within the defined screening area. Place the
label end to the right and facing down.
3. Insert the slide. Using the slide to push the spring-loaded clamps down, insert the slide halfway
under the upper guide block and over the spring-loaded clamps, then release the slide. Refer to
Figure 5A-8.
Figure 5A-8 Inserting the Slide onto the Clamps
LABE
N
E
L
D
ThinPrep 2000 Processor Operator’s Manual
5A.11
Page 98

5A5A
OPERATING INSTRUCTIONS
LABEL
END
LABEL
END
LABEL
END
Slide properly
placed
Slide skewed to left Slide skewed to right
4. The slide should now rest on top of the two clamps and under the upper guide block as shown in
Figure 5A-9.
Figure 5A-9 Correct/Incorrect Slide Insertion
5A.12
ThinPrep 2000 Processor Operator’s Manual
Page 99

OPERATING INSTRUCTIONS
5A
Slide
5. To fully insert the slide, place your index fingers against the exposed edge of the slide and push
the slide in until it does not go any further, as shown in Figure 5A-10. The slide handler clamps
grasp the slide when the slide is seated correctly and the slide moves up slightly behind the
upper guide block.
Figure 5A-10 Inserting the Slide Fully
LABEL
D
EN
Note:
To remove a slide, press down on the front edge of the slide. Gently pull the slide toward you.
ThinPrep 2000 Processor Operator’s Manual
5A.13
Page 100

5A5A
OPERATING INSTRUCTIONS
SECTION
I
FROSTED
END
MAX
!
!
LOADING THE FIXATIVE VIAL
1. Fill a fixative vial with standard laboratory fixative alcohol until the fluid level is between the
“MIN” and “MAX” marks on the vial.
If the staining protocol requires alternative fixation methods, leave the fixative vial empty or fill
it with the appropriate fixative solution.
Change the contents of the fixative vial at least every 100 slides or daily, whichever occurs first.
2. Place the fixative vial into the fixative bath holder until the bottom of the vial rests on the base of
the holder. Refer to Figure 5A-11. Ensure that the fixative vial is completely seated.
Figure 5A-11 Loading the Fixative Vial
5A.14
ThinPrep 2000 Processor Operator’s Manual
 Loading...