

Page 1

90 INDUSTRIAL PARK ROAD, SACO, ME/U.S.A. 04072
(207) 282-1589 800-225-3958 FAX (207) 282-6283
OPERATORS MANUAL
HOLMAN FINAL TOUCH FINISHING OVENS (MODEL FT1(W), FT2(W)
HEAT AND HOLD OVENS (MODELS HH1(W), HH2(W)
AND GARLIC BREAD TOAST AND HOLD OVEN (MODEL FT2BH(W)
(For Service Information Call: 800-225-3958)
TABLE OF CONTENTS
UNCRATING AND INSPECTION PAGE 1
ASSEMBLY PAGE 1
WALL MOUNTING INSTRUCTIONS PAGE 1
ELECTRICAL INSTALLATION PAGE 1
COOKING PROCEDURES PAGE 2
CLEANING (DAILY) PAGE 2
TROUBLE SHOOTING GUIDE PAGE 3 & 4
MAINTENANCE PROCEDURES PAGE 5
PARTS LIST PAGE 7
DRAWINGS
LEFT SIDE EXPLODED VIEW PAGE 6
HEATER TUBE INSTALLATION PAGE 5
WIRING DIAGRAMS
FT1, FT2 PAGE 8
FT2BH PAGE 9
HH1, HH2 PAGE 10
F\USERS\BOB\MANUAL\VAMANUAL\FT2VA.DOC REV 07/20/00 RRD
HGO107
Page 2
PAGE 1
OPERATORS MANUAL
HOLMAN FINAL TOUCH FINISHING OVENS (MODEL FT1(W), FT2(W)
HEAT AND HOLD OVENS (MODELS HH1(W), HH2(W)
AND GARLIC BREAD TOAST AND HOLD OVEN (MODEL FT2BH(W)
UNCRATING AND INSPECTION
Unpack unit and components from container. Remove all visible packing tapes and
inspect unit for damage. If damage is discovered, file a claim immediately with
carrier that handled the shipment.
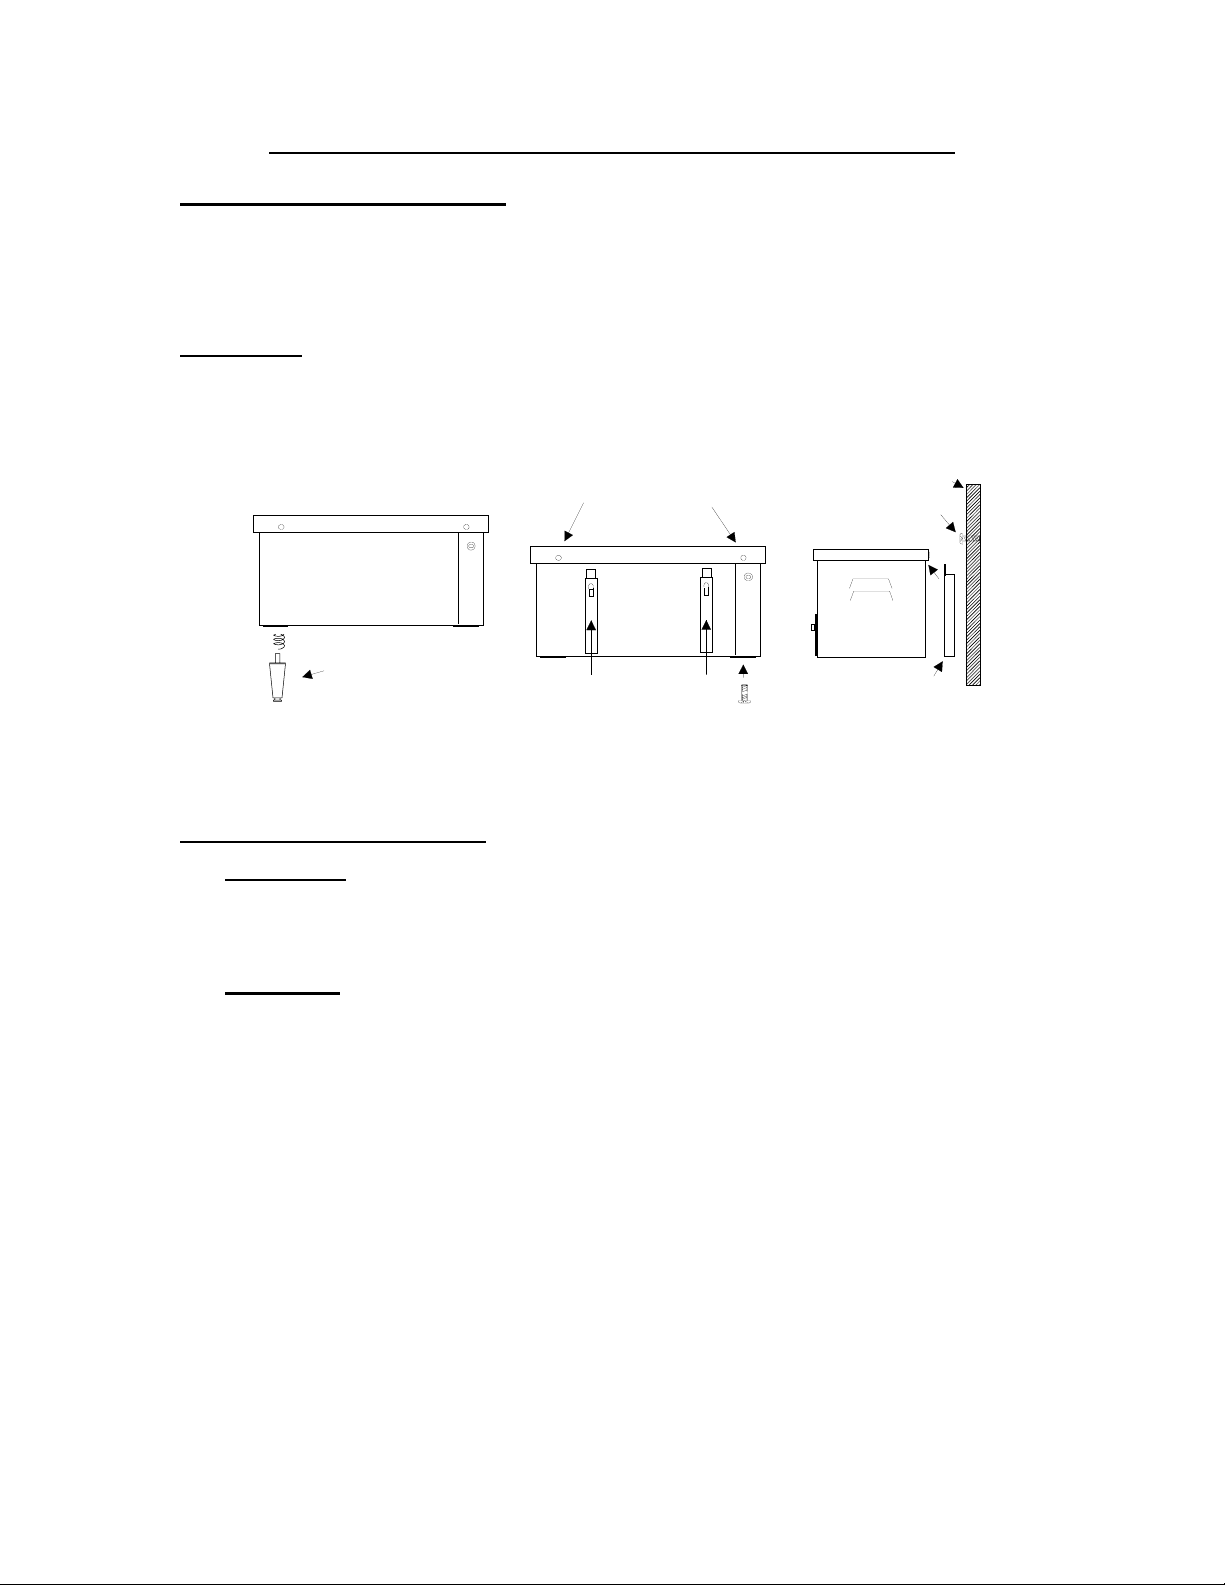
ASSEMBLY
If the unit is to be installed on a counter If the unit is to be wall mounted
attach legs as shown. attach wall mounting brackets as shown.
WALL
STUD
BACK OF UNIT
LOOSEN SCREWS IN TOP COVER TO
ALLOW WALL MOUNTING BRACKETS
TO SLIDE BENIETH BACK EDGE OF
TOP COVER.
MOUNTING
BOLT. MOUNTING
BRACKET SLIDES OVER
HEAD OF BOLT.
LEG SCREWS INTO
WELD NUT ON BOTTOM
OF UNIT FOR COUNTER
MOUNTING.
LEAVE APPROXIMATELY
1/8" OF BOLT HEAD
EXPOSED FOR MOUNTING
WALL MOUNT BRACKET
TO WALL.
MOUNTING BRACKET SLIDES
BENIETH BACK OF TOP COVER
If unit is to be stacked, use the non-slip pads supplied with legs.
CAUTION - THE USE OF NON-SLIP PADS IS NOT N.S.F. APPROVED.
ELECTRICAL INSTALLATION
WARNING:
NEVER PLUG A 120 VOLT UNIT INTO 208 VOLTS OR 240 VOLTS.
NEVER PLUG A 208 VOLT UNIT INTO 240 VOLTS OR A 240 VOLT UNIT INTO
208 VOLTS. CHECK WITH POWER COMPANY TO DETERMINE ACTUAL
VOLTAGE AT THE JOB SITE BEFORE INSTALLING UNIT.
WARNING:
BE ABSOLUTELY SURE THE GROUND CONNECTION FOR THE
RECEPTACLE IS PROPERLY WIRED. NEVER CONNECT UNIT TO POWER
WITHOUT PROPER GROUND CONNECTIONS. IMPROPER GROUND
CONNECTION MAY RESULT IN SEVERE INJURY OR FATALITY.
Models FT1, FT2, HH1, and HH2 , are furnished with a 4 foot cord and standard
NEMA 5-15 plug for plug in installation in a grounded 120 Volt outlet. Model FT2BH
is furnished with a 4 foot cord and NEMA 6-20 plug. Your HOLMAN oven should be
the only appliance connected to the electrical line and should have its own fuse or
breaker in the electrical box. Wall mounted models FT1W, FT2W, HH1W, and
HH2W, are furnished with a 18" cord and standard NEMA 5-15 plug for plug in
installation in a grounded 120 Volt outlet. Model FT2BHW is furnished with a 18"
cord and NEMA 6-20 plug.
*In Canada, models FT2 and HH2 are furnished with a 4 foot cord and NEMA 5-20
plug for plug-in installation in a 5-20R 20 amp receptacle. Model FT2BH is furnished
with a 4 foot cord and NEMA 6-20 plug. Wall mounted models FT2W, and HH2W
are furnished with a 18" cord and NEMA 5-20 plug for plug-in installation in a 5-20R
20 amp receptacle. Model FT2BHW is furnished with a 18" cord and NEMA 6-20
plug.
REV 07/20/00 RRD
Page 3

PAGE 2
OPERATORS MANUAL
HOLMAN FINAL TOUCH FINISHING OVENS (MODEL FT1(W), FT2(W)
HEAT AND HOLD OVENS (MODELS HH1(W), HH2(W)
AND GARLIC BREAD TOAST AND HOLD OVEN (MODEL FT2BH(W)
OPERATION
A. Turn switch on. Panel light comes on; fan motor is activated; inferred radiant
heaters are now at 1/4 power (total of 300 watts in FT1 and HH1; 400 watts in
FT2 and HH2; 600 watts in FT2BH at 208 volts and 650 watts in FT2BH on 240
volts).
B. Turn timer to 3 minutes to pre-heat the oven. Heaters glow and are now at full
heat ( total of 1200 watts in FT1 and HH1; 1600 watts in FT2 and HH2; 2400
watts in FT2BH on 208 volts and 2600 watts on 240 volts).
C. In models FT1, FT2 position slide shelf in one of the five shelf positions. Product
should be placed on either a plate, tray or a sizzle platter, etc. In model FT2BH
product can be set dirrectly on the cooking rack.
There a five shelf positions in the FT1 and FT2. Since there are only two top
heaters in these units, the intensity of heat can be varied by changing the
position of the shelf. For example, place the shelf in the top position for quick
melting of butter or cheese on breads or sandwiches. For baking fresh fish in a
sizzle platter, place the shelf in the center position or in the lower position
depending on the degree of baking required.
The HH1, HH2 and the FT2BH have two heaters above and two heaters below the pullout rack (rack has one position).
D. Set timer for desired cooking/heating time. The FT1 and FT2 have a 15 minute
timer and the HH1, HH2 and FT2BH have a 6 minute timer. It takes only 10-15
seconds for the unit to go from HOLD to FULL POWER.
E. When cooking/heating time has elapsed, timer shuts off and the oven
automatically returns to HOLD mode.
F. Product then can be removed or held warm for up to 10 minutes.
CLEANING (DAILY)
A. Turn switch off. When oven has cooled;
1. Remove shelf or rack. Clean with hot soapy water.
2. Wipe interior and exterior surfaces with a damp cloth.
REV. 07/20/00 RRD
Page 4
PAGE 3
OPERATORS MANUAL
HOLMAN FINAL TOUCH FINISHING OVENS (MODEL FT1(W), FT2(W)
HEAT AND HOLD OVENS (MODELS HH1(W), HH2(W)
AND GARLIC BREAD TOAST AND HOLD OVEN (MODEL FT2BH(W)
TROUBLE SHOOTING GUIDE
CAUTION
- ALWAYS DISCONNECT UNIT FROM POWER SOURCE BEFORE
SERVICING
A. UNIT WILL NOT HEAT, PANEL LIGHT DOES NOT COME ON.
1. Be sure main circuit breaker is switched to the on position.
2. Check if oven is plugged in.
B. PANEL LIGHT COMES ON, HEATERS DO NOT GET HOT.
1. DISCONNECT UNIT FROM POWER SOURCE.
2. Check if heaters are properly installed as shown.
SOCKET FOR UPPER HEATER TUBES ON
MODELS : FT1, FT2, HH1, HH2, FT2BH
METAL CONTACTS IN SOCKET FACE SHOULD ALIGN
WITH METAL FLANGE AT EACH END OF HEATER TUBE
SOCKET FOR LOWER HEATER TUBES ON
MODELS : HH1, HH2, FT2BH
.
WHILE INSERTING ONE END OF HEATER TUBE INTO SOCKET,
GENTLY PUSH HEATER TUBE AND INSERT OTHER END
INTO REMAINING SOCKET
3. Press heat limit switch on back of unit as shown on page 4. If this
reactivates the heaters, see HEAT LIMIT SWITCH (Section C).
Trouble Shooting Guide Continues On Page 4 REV. 10/28/94 MJC
Page 5

Page 4
OPERATORS MANUAL
HOLMAN FINAL TOUCH FINISHING OVENS (MODEL FT1(W), FT2(W)
HEAT AND HOLD OVENS (MODELS HH1(W), HH2(W)
AND GARLIC BREAD TOAST AND HOLD OVEN (MODEL FT2BH(W)
TROUBLESHOOTING GUIDE
(CONTINUED)
C. HEAT LIMIT SWITCH
Your Holman oven is equipped with an automatically activated temperature
(heat) limit switch which interrupts the heater tube connections if the air
temperature in the control box exceeds 190 degrees (F), 38 degrees (C). This
heat limit switch can be reset manually by pushing a button located at the rear
of the unit as shown below.
RESET LOCATED AT REAR
OF UNIT
BACK OF UNIT
AIR INTAKE LOCATED
ON SIDE OF UNIT
THIS HEAT LIMIT SWITCH IS ACTIVATED WHEN THERE IS NOT A PROPER
AMOUNT OF AIR FLOW BEING GENERATED BY THE COOLING FAN. IF THIS
OCCURS:
1. DISCONNECT UNIT FROM POWER SOURCE.
2. Check to see if the air intake area (louvers in left side
panel) is free of dust, grease or other obstructions.
3. If no obstruction to the air intake can be found, call the Holman Cooking
Equipment Department for assistance (the toll free number is on the unit).
D. NO HEAT IN STANDBY MODE, ONE HEATER GLOWS WHEN OVEN IS
SET FOR COOK OR HEAT MODES.
1. DISCONNECT UNIT FROM POWER SOURCE.
2. Check if a heater tube is burnt out and , if so, replace it.
E. PANEL LIGHT AND HEATER WORK, FAN DOES NOT COME ON.
1. DISCONNECT UNIT FROM POWER SOURCE.
2. Call Holman cooking Equipment Department for assistance as fan motor
must be checked and replaced if necessary. The toll free number is on the
unit.
REV. 10/31/94 MJC
Page 6

OPERATORS MANUAL
HOLMAN FINAL TOUCH FINISHING OVENS (MODEL FT1(W), FT2(W)
HEAT AND HOLD OVENS (MODELS HH1(W), HH2(W)
AND GARLIC BREAD TOAST AND HOLD OVEN (MODEL FT2BH(W)
MAINTENANCE PROCEDURES
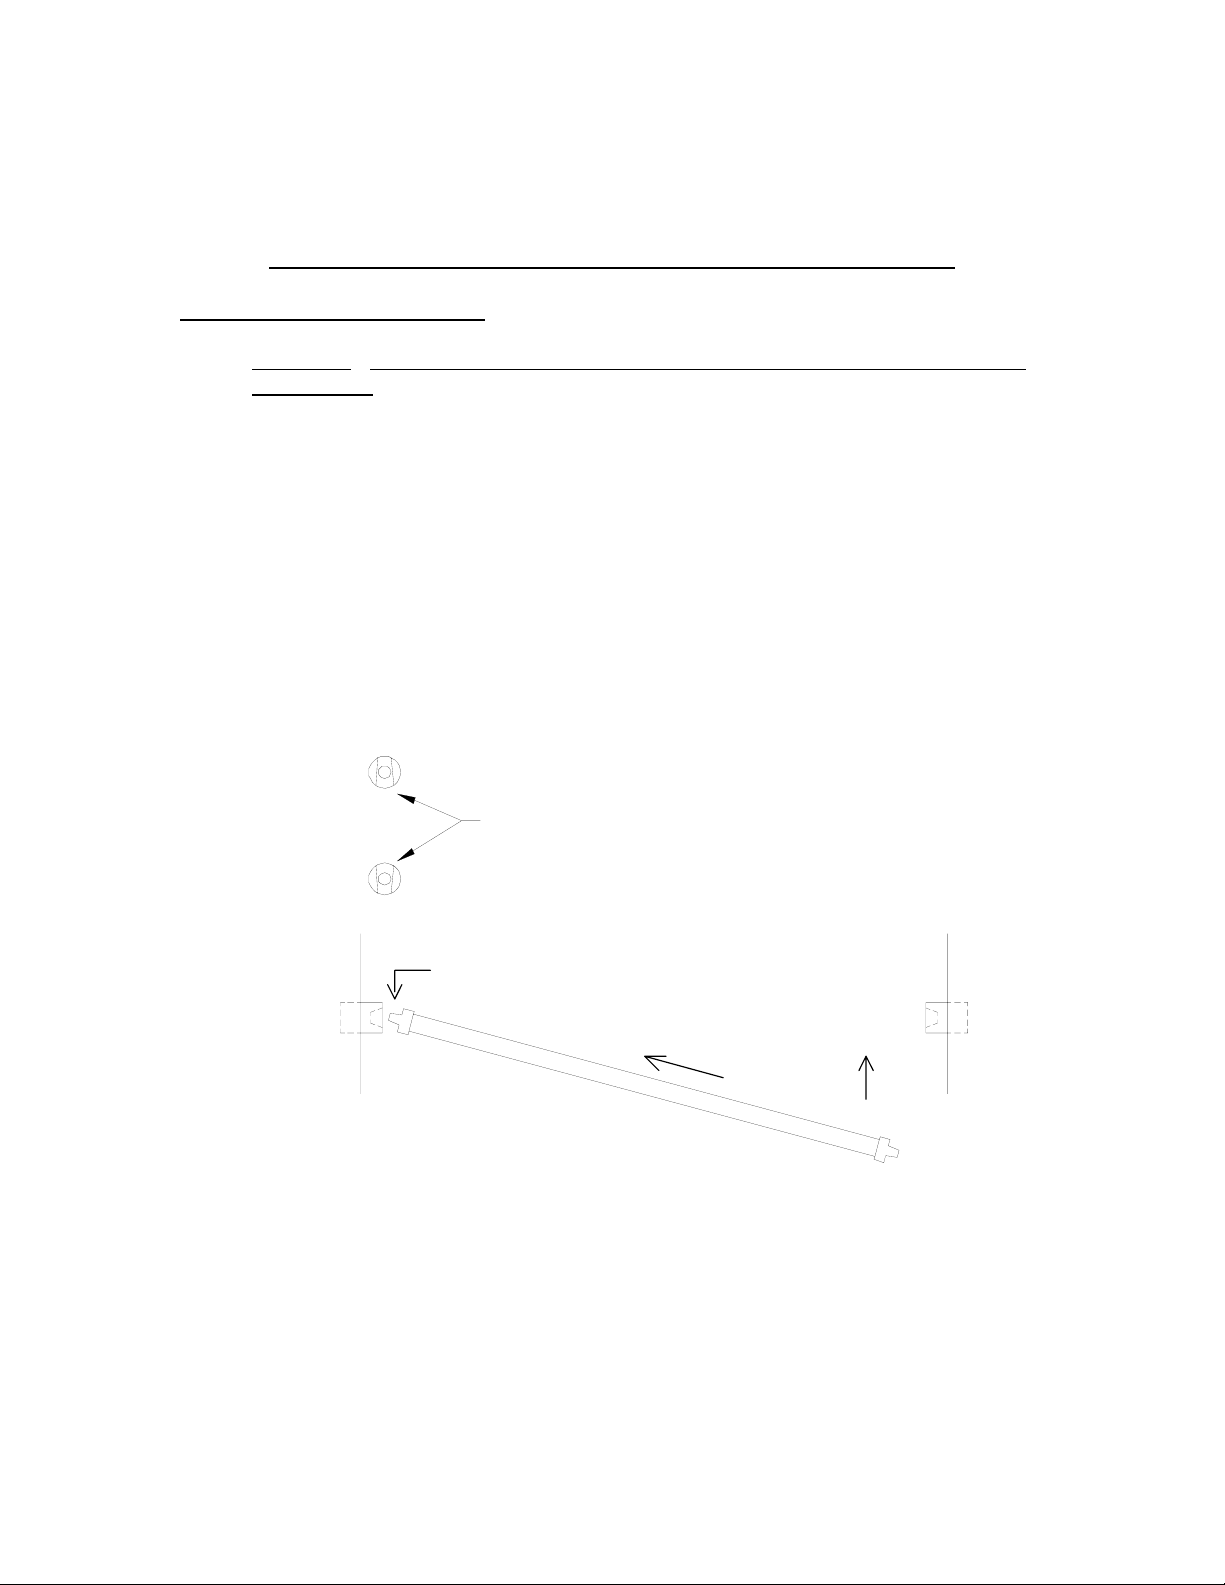
A. REPLACING HEATER TUBES
(See below)
1. DISCONNECT UNIT FROM POWER SOURCE.
2. Gently
pull old heater tube out of unit by pushing from left to right, then
slowly guiding tube out of unit.
3. Gently
put new heater tube into unit by placing tube
end into socket and pushing into the spring loaded socket.
Guide opposite end into other socket.
SOCKET FOR UPPER HEATER TUBES ON
MODELS : FT1, FT2, HH1, HH2, FT2BH
METAL CONTACTS IN SOCKET FACE SHOULD ALIGN
WITH METAL FLANGE AT EACH END OF HEATER TUBE
PAGE 5
SOCKET FOR LOWER HEATER TUBES ON
MODELS : HH1, HH2, FT2BH
.
WHILE INSERTING ONE END OF HEATER TUBE INTO SOCKET,
GENTLY PUSH HEATER TUBE AND INSERT OTHER END
INTO REMAINING SOCKET
B. REPLACING FAN MOTOR
1. DISCONNECT UNIT FROM POWER SOURCE.
2. Remove screws from rear of top cover.
3. Remove top cover by lifting rear of cover and sliding forward as shown
on page 6.
4. Carefully remove side panel with fan motor attached by lifting up and out
from unit.
5. Unplug fan motor lead from fan motor.
6. Remove motor from side panel by removing four screws which hold motor
and fan grill.
Maintenance Procedures Continued On Page 6.
REV. 10/31/94 MJC
Page 7

PAGE 6
(
)
OPERATORS MANUAL
HOLMAN FINAL TOUCH FINISHING OVENS (MODEL FT1(W), FT2(W)
HEAT AND HOLD OVENS (MODELS HH1(W), HH2(W)
AND GARLIC BREAD TOAST AND HOLD OVEN (MODEL FT2BH(W)
(Maintenance procedures cont.)
7. Using the same four screws, secure new fan motor to side panel and fan
grill in the same manner as the old motor.
8. Reconnect fan motor lead to new motor in the same manner as old motor.
9. Keeping fan motor lead tucked away from fan blade, insert side panel on
side of unit.
10. Replace top cover and secure with two screws.
TOP COVER MOUNTING
SCREWS
BACK OF UNIT
FAN MOTOR
SIDE PANEL
FAN GRILL
FAN CORD
TO REMOVE TOP COVER :
A). REMOVE TWO SCREWS AT REAR OF COVER.
B). LIFT REAR OF COVER AND PULL TOWARD FRONT OF OVEN.
1
21(SEE BELOW)
1). MOUNTING SCREW
2). LIMIT SWITCH
MOTOR MOUNTING BOLTS
4ea.
ON / OFF
TOGGLE MOUNTING NUT
PILOT LIGHT
TIMER
TIMER MOUNTING SCREW
TIMER KNOB
MOUNTING NUT
CONTACTOR / RELAY
MOUNTING SCREW
REV. 10/28/94 MJC
Page 8

PAGE 7
OPERATORS MANUAL
HOLMAN FINAL TOUCH FINISHING OVENS (MODEL FT1(W), FT2(W)
HEAT AND HOLD OVENS (MODELS HH1(W), HH2(W)
AND GARLIC BREAD TOAST AND HOLD OVEN (MODEL FT2BH(W)
PART #
QTY. PAGE # DESCRIPTION
200543 1 6 ON/OFF Switch
200731 1 6 Timer, 6 minute
HH1, HH2, FT2BH
200730 1 6 Timer, 15 minute
FT1, FT2
200410 1 6 Panel Light
200409 4 Not Shown Heater Tube Socket
187721 2 5 Heater Tube, FT1 (120V)
187719 2 5 Heater Tube FT2BH (208v)
187722 4 5 Heater Tube FT2BH (240v)
187723 2 5 Heater Tube, FT2 (120V)
187726 4 5 Heater Tube, HH1 (120V)
187728 4 5 Heater Tube, HH2 (120V)
200559 1 6 Fan Motor, FT1, FT2
200561 1 6 Fan Motor, FT2BH
200531 1 6 Contactor/Relay
FT1, FT2, HH1, HH2
200533 1 6 Contactor/Relay, FT2BH
400757 1 Not Shown Sliding Shelf, FT1
400766 1 Not Shown Sliding Shelf, FT2
100701 1 Not Shown Rack, FT2BH, HH2
100700 1 Not Shown Rack, HH1
115146 1 6 Temperature Limit Switch
200562 1 6 Fan Grill
200387 1 6 Fan Cord
140034 1 Not Shown Cord & Plug (120V)
HH1, HH2, FT1, FT2
140035 1 Not Shown Cord & Plug (208/240V)
FT2BH
REV 07/21/00 RRD
Page 9

ORG
115383
RED
BLU
135021
YEL
RED
BLK
BLK
YELYEL
WHT
BLK
PUR
PUR
BLK
BLK
BLK
RED
WHTWHT
WHT
PUR
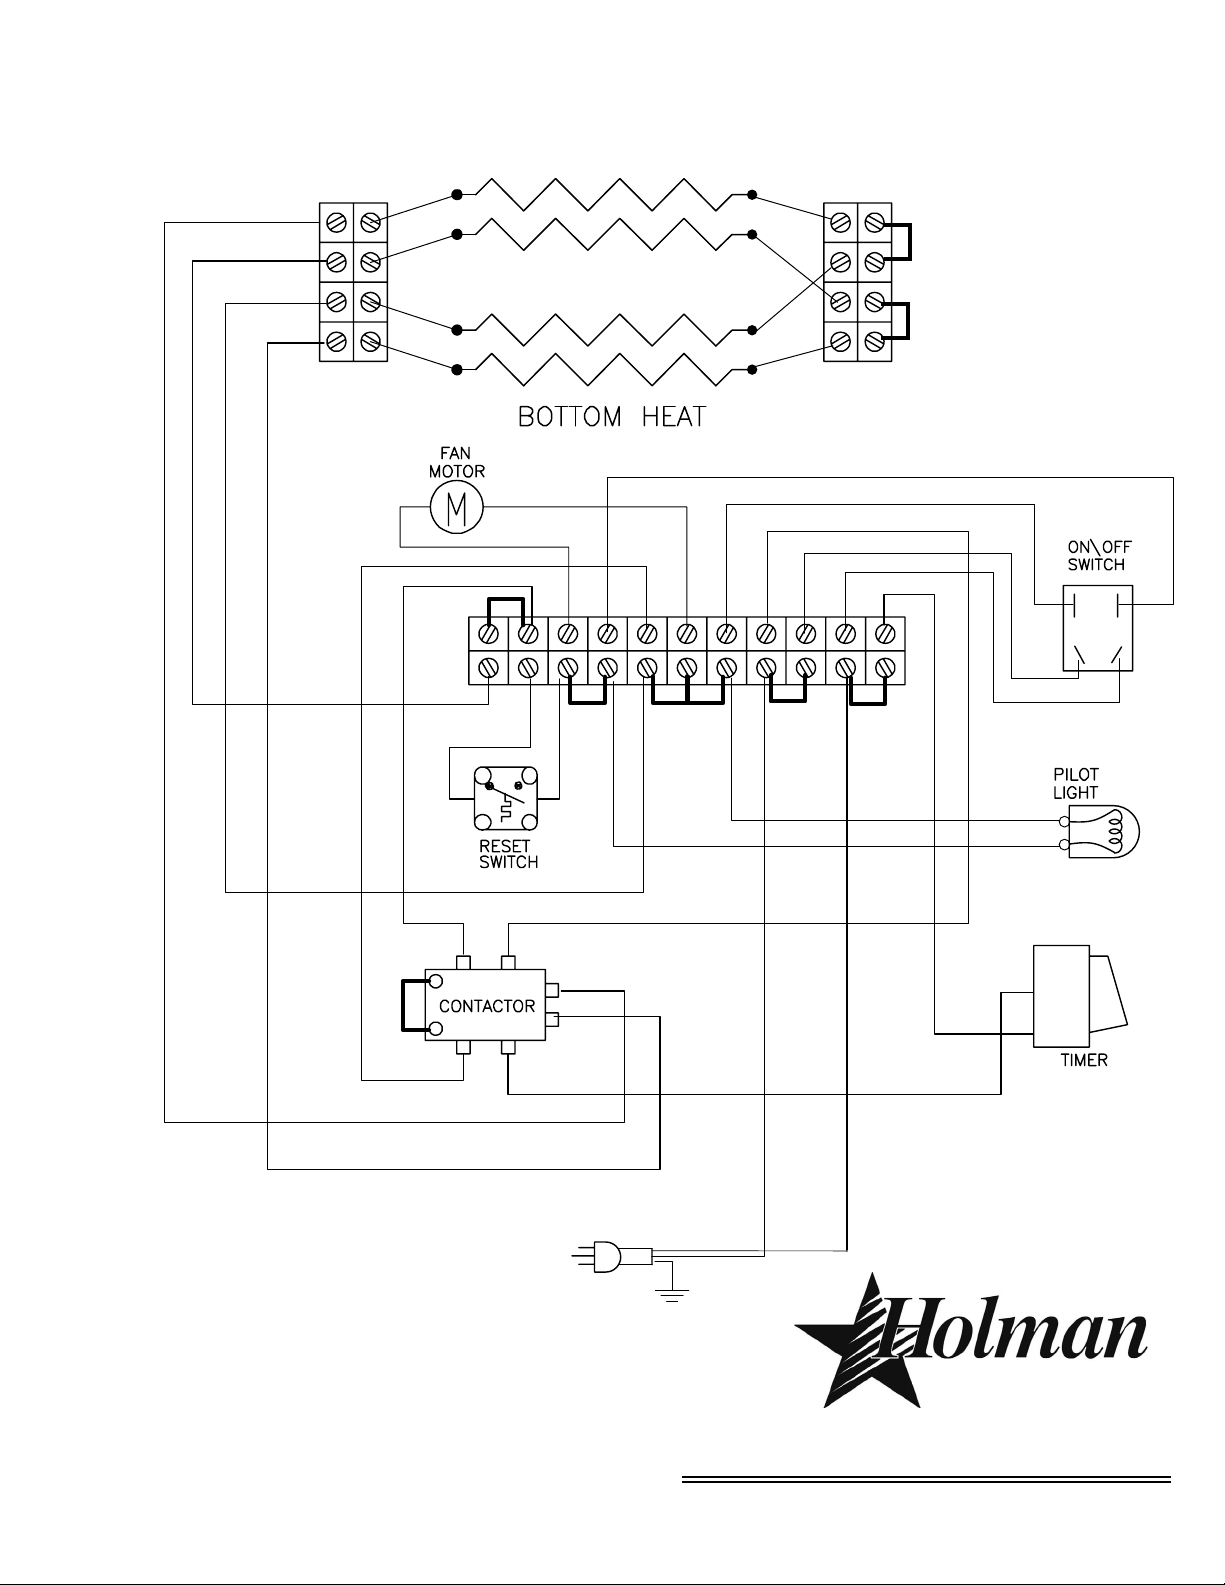
CONTACTOR MUST BE FIXTURED AND WIRED AS SHOWN
MODELS:
FT1 120/220/240V, 60Hz, 2 Tube
FT2 120/220/240V, 60Hz, 2 Tube
THIS DRAWING CONTAINS INFORMATION CONFIDENTIAL TO STAR MFG. INT'L. INC.
NO REPRODUCTION OR DISCLOSURE OF ITS CONTENTS IS PERMITTED.
¸
STAR MANUFACTURING INTERNATIONAL INC.
030037 Rev -
4/05/2000
Page 10
ORG
ORG
TOP HEAT
BLU
BLU
YEL
PUR
BLU
BLK
BLK
YEL
YEL
WHT
BLU
BLK
PUR
PUR
BLK
BLK
BLK
WHT
WHT
WHT
MODELS:
FT1 240V, 50Hz, 4 Tube, w/Timer
FT2BH 208/240V, 60Hz, 4 Tube, w/Timer
FT2BH 220V, 50Hz, 4 Tube, w/Timer
HH1, 220V, 60Hz, 4 Tube, w/Timer
HH2, 208/220/240V, 60Hz, 4 Tube, w/Timer
HH2, 220V, 50Hz, 4 Tube, w/Timer, CE
THIS DRAWING CONTAINS INFORMATION CONFIDENTIAL TO STAR MFG. INT'L. INC.
NO REPRODUCTION OR DISCLOSURE OF ITS CONTENTS IS PERMITTED.
¸
STAR MANUFACTURING INTERNATIONAL INC.
030103 Rev -
4/18/2000
Page 11

ORG
115383
RED
BLU
135021
YEL
RED
BLK
BLK
YELYEL
WHT
BLK
PUR
PUR
BLK
BLK
BLK
RED
WHTWHT
WHT
PUR
CONTACTOR MUST BE FIXTURED AND WIRED AS SHOWN
MODELS:
FT2NT, FT2WNT 120/, 60Hz, 2 Tube, NO TIMER
THIS DRAWING CONTAINS INFORMATION CONFIDENTIAL TO STAR MFG. INT'L. INC.
NO REPRODUCTION OR DISCLOSURE OF ITS CONTENTS IS PERMITTED.
¸
STAR MANUFACTURING INTERNATIONAL INC.
030065 Rev -
4/05/2000
Page 12

STAR MANUFACTURING
10 Sunnen Drive, St. Louis, MO 63143 U.S.A.
(800) 807-9054 (314) 781-2777
Parts & Service (800) 807-9054
www.star-mfg.com
 Loading...