

HOLEMAKER PRO 100 Operator's Manual

HOLEMAKER PRO 110
Holemaker Portable Magnetic Drilling Machine
OPERATOR’S MANUAL
WARNING!
BEFORE USE, ENSURE EVERYONE USING THIS MACHINE READS AND UNDERSTANDS
ALL SAFETY AND OPERATING INSTRUCTIONS IN THIS MANUAL
.
EYE PROTECTION
REQUIRED
HEARING PROTECTION
REQUIRED
NEVER PLACE
FINGERS NEAR
CUTTING AREA OR
MACHINE ARBOR
LINE VOLTAGE
PRESENT
BEWARE OF
ROTATING
MACHINE PARTS
VER: 1.10 14/08/15
esahcruP fo etaD # laireS

Holemaker PRO 110 Portable Magnetic Drilling Machine
Congratulations on the purchase of your Holemaker Pro 110 portable magnetic drilling machine.
Holemaker drilling machines are designed to deliver fast, efficient hole drilling performance in portable applications.
TABLE OF CONTENTS
Important Safety Instructions . . . . . . . . . . . . . . . . . . . . . . . . . . . . . . . . . . .3 -4
Power Supply Requirement . . . . . . . . . . . . . . . . . . . . . . . . . . . . . . . . . . . . . .5
Technical Data . . . . . . . . . . . . . . . . . . . . . . . . . . . . . . . . . . . . . . . . . . . . . . . . . 6
Special Instructions . . . . . . . . . . . . . . . . . . . . . . . . . . . . . . . . . . . . . . . . . . . .7
Contents of Package . . . . . . . . . . . . . . . . . . . . . . . . . . . . . . . . . . . . . . . . . . .7
Machine Operation . . . . . . . . . . . . . . . . . . . . . . . . . . . . . . . . . . . . . . . . . .8-10
Maintenance and Service . . . . . . . . . . . . . . . . . . . . . . . . . . . . . . . . . . . . . . .11
Basic Troubleshooting . . . . . . . . . . . . . . . . . . . . . . . . . . . . . . . . . . . . . . . . .12
Machine Parts Breakdown. . . . . . . . . . . . . . . . . . . . . . . . . . . . . . . . . . . 13 - 22
Electrical Diagram . . . . . . . . . . . . . . . . . . . . . . . . . . . . . . . . . . . . . . . . . . . .23
LIMITED WARRANTY
Industrial Tool & Machinery Sales (hereinafter refered to as ITMS) will, within twelve (12) months from the
original date of purchase, repair or replace any goods found to be defective in materials or workmanship.
This warranty is void if the item has been damaged by accident, neglect, improper service or other causes
not arising out of defects in materials or workmanship.
This warranty does not apply to machines and/or components which have been altered, changed, or
modified in any way, or subjected to overloading or use beyond recommended capacities and specifications.
Worn componentry due to normal wear and tear is not a warranty claim.
Goods returned defective shall be returned prepaid freight to ITMS or agreed repair agent, which shall be
the buyer’s sole and exclusive remedy for defective goods. ITMS accepts no additional liability pursuant to
this guarantee for the costs of travelling or transportation of the product or parts to and from ITMS or the
service agent or dealer, such costs are not included in this warranty.
Our goods come with guarantees which cannot be excluded under the Australian Consumer Law.
You are entitled to replacement or refund for a major failure and to compensation for other reasonably
foreseeable loss or damage. You are also entitled to have the goods repaired or replaced if the goods
fail to be of acceptable quality and the failure does not amount to a major failure.
THE MANUFACTURER RESERVES THE RIGHT TO MAKE
IMPROVEMENTS AND MODIFICATIONS TO DESIGN WITHOUT PRIOR NOTICE.
Imported And Distributed By
INDUSTRIAL TOOL & MACHINERY SALES
18 BUSINESS ST, YATALA, QLD AUSTRALIA 4207
PHONE 07 3287 1114 FAX 07 3287 1115
sales@industrialtool.com.au www.industrialtool.com.au
2

IMPORTANT SAFETY INSTRUCTIONS
WARNING!
WHEN USING ELECTRICAL TOOLS,BASIC SAFETY PRECAUTIONS SHOULD ALWAYS BE FOLLOWED
TO REDUCE RISK OF FIRE
,
ELECTRIC SHOCK AND PERSONAL INJURY
READ AND SAVE ALL INSTRUCTIONS FOR FUTURE REFERENCE.
1. Keep Work Area Clean
• Cluttered areas and benches increase risk of injuries.
2. Consider Work Area Environment
• Do not expose power tools to rain.
• Do not use power tools in damp or wet locations.
• Keep work area well lit.
• Do not use tool in presence of flammable liquids or gases.
3. Guard Against Electric Shock
• Prevent body contact with grounded surfaces. For example: pipes, radiators, ranges and refrigerator enclosures.
.
4. Keep Children Away
• Do not let visitors contact tool or extension cord.
• All visitors should be kept away from work area.
5. Store Idle Tools
• When not in use, tools should be stored in a dry, high and locked-up place, out of reach of children.
6. Do Not Force Tool
• It will do the job better and safer at the rate for which it was intended.
7. Use Right Tool
• Do not force a small tool or attachment to do the job of a heavy-duty tool.
• Do not use tool for unintended purpose. For example: Do not use a circular saw for cutting tree limbs or logs.
8. Dress Properly
• Do not wear loose clothing or jewellery. They can be caught in moving parts.
• Rubber gloves and non-skid footwear are recommended when working outdoors.
• Wear protective hair covering to contain long hair.
• Always wear safety glasses
• Use face or dust mask if necessary
• Use hearing protection
9. Do Not Abuse Electrical Cord
• Never carry tool by cord or yank it to disconnect from receptacle.
• Keep cord away from heat, oil and sharp edges.
10. Secure Work
• Use clamps or a vise to hold work. It’s safer than using your hand and it frees both hands to operate tool.
11. Do Not Overreach
• Keep proper footing and balance at all times.
3

IMPORTANT SAFETY INSTRUCTIONS
12. Maintain Tools With Care
• Keep tools sharp and clean for better and safer performance.
• Follow instructions for lubricating and changing accessories.
• Inspect tool cords periodically and if damaged, have repaired by authorized service facility.
• Inspect extension cords periodically and replace if damaged.
• Keep handles dry, clean, and free from oil and grease.
13. Disconnect Tools
• Unplug when not in use, before servicing, and when changing accessories, such as cutters.
14. Remove Adjusting Keys And Wrenches
• Form habit of checking to see that keys and adjusting wrenches are removed from tool before turning it on.
15. Avoid Unintentional Starting
• Do not carry a plugged-in tool. Always disconnect from power source before moving.
• Be sure switches are off before connecting to a power source.
16. Outdoor Use Of Extension Cords
• When tool is used outdoors, use only extension cords intended for use outdoors and so marked.
17. Stay Alert
• Watch
• Do not use when taking medications that may cause drowsiness.
what you are doing. Use common sense. Do not operate tool when you are tired.
18. Check Damaged Parts
• Before further use of the tool, any damaged parts should be repaired and performance verified prior to operation.
• Check alignment of moving parts, binding of parts, breakage of parts, mounting, and any other conditions
that may affect its operation. Any part that is damaged should be properly repaired or replaced
by an authorized service center.
• Do not use this tool if switches do not turn it on and off. Have defective switches replaced by authorized
service center.
19. Use Cutter Guard
Always use cutter guard supplied with machine to reduce the risk of injury. (refer fig. 1)
•
Fig. 1
4
POWER SUPPLY REQUIREMENTS
Prior to use check condition of the power cord, which has to be free of any cuts, or similar damages.
Attention!: This unit has a class one of insulation and
absolutely requires the power source
to be equipped with a protection circuit.
Power source should be protected with the difference-current circuit cut-out and protected with a 10A fuse - for 230V.
At building sites, power should be supplied from a separation transformer such as Type AVM, with minimum power of
2000 VA and with second class protection.
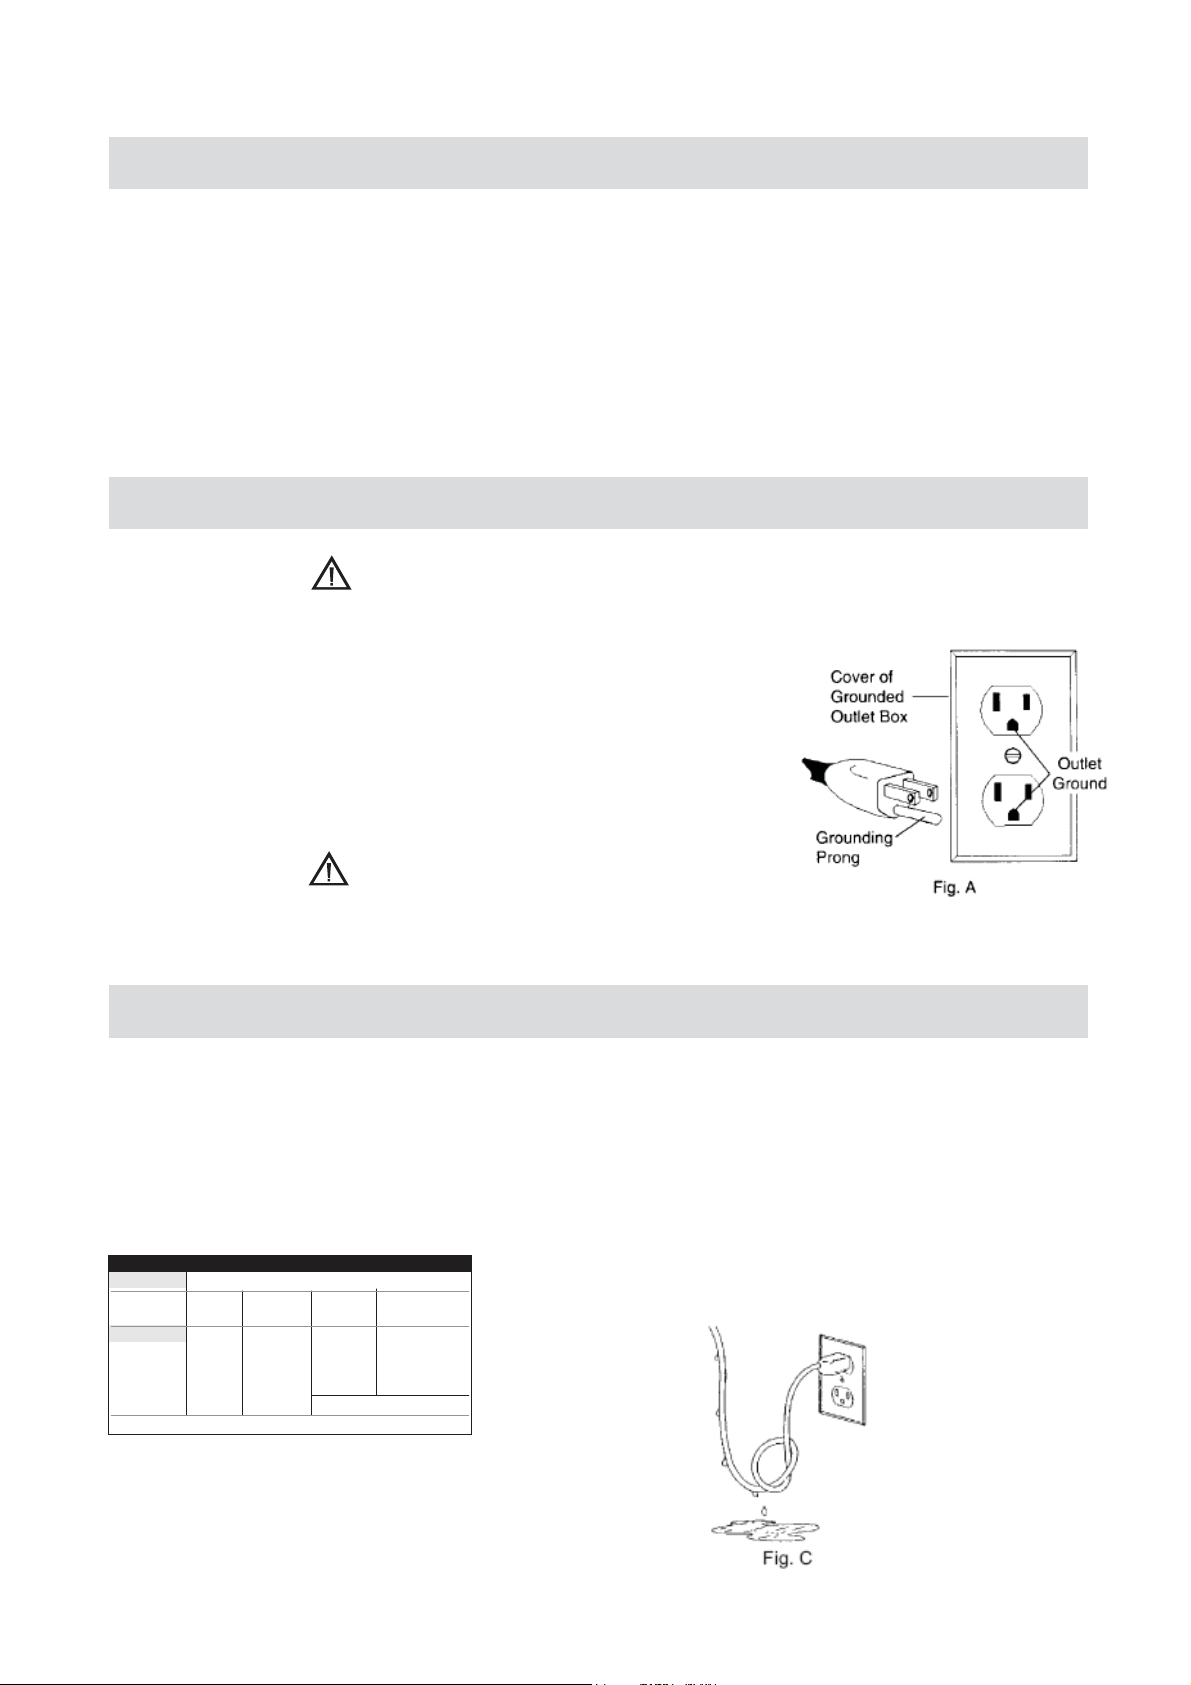
GROUNDING INSTRUCTIONS
WARNING!
Improperly connecting the grounding wire can result in the risk of electrical shock.
Check with a qualified electrician if you are in doubt as to whether the outlet
is properly grounded. Do not modify the plug provided with tool. Never remove
the grounding prong from the plug. If the cord or plug is damaged, have it
repaired before using. If the plug will not fit the outlet, have a proper outlet
installed by a qualified electrician. The Holemaker must be plugged into an
appropriate outlet, properly installed and grounded in accordance with all codes
and ordinances. The plug and outlet should look similar to those in Figure A.
If in doubt of proper grounding, call a qualified electrician.
WARNING!
DO NOT USE HOLEMAKER DRILLING MACHINES ON SURFACES OR MATERIALS BEING
WELDED
. DOING SO CAN RESULT IN DAMAGE TO THE DRILLING MACHINE.
EXTENSION CORDS
Use only 3-wire extension cords that have 3-prong grounding-type plugs and 3-pole receptacles that accept the
tool’s plug. Replace or repair damaged cords. Make sure your extension cord is in good condition. When using
an extension cord, be sure to use one heavy enough to carry the current your product will draw. An undersized cord
will cause a drop in line voltage resulting in loss of power and overheating. See table for the correct size to use
depending on cord
gauge number, the heavier the cord.
MINIMUM GAUGE FOR EXTENSION CORDS
VOLTS
240V
AMPERAGE
0-6
6-10
10-12
12-16
TOTAL LENGTH OF CORD IN METRES
0 - 15 15 - 30 30 - 60 60 - 90
18 16 16 14
18 16 14 12
16 16 14 12
14
12
RECOMMENDED WIRE GAUGE
and nameplate amperage rating. If in doubt, use the next heavier gauge. The smaller the
length
DRIP LOOP: To help prevent cutting fluids from traveling
along power cord and contacting power source, tie a drip
loop in power cord as shown in Figure C.
NOT RECOMMENDED
5
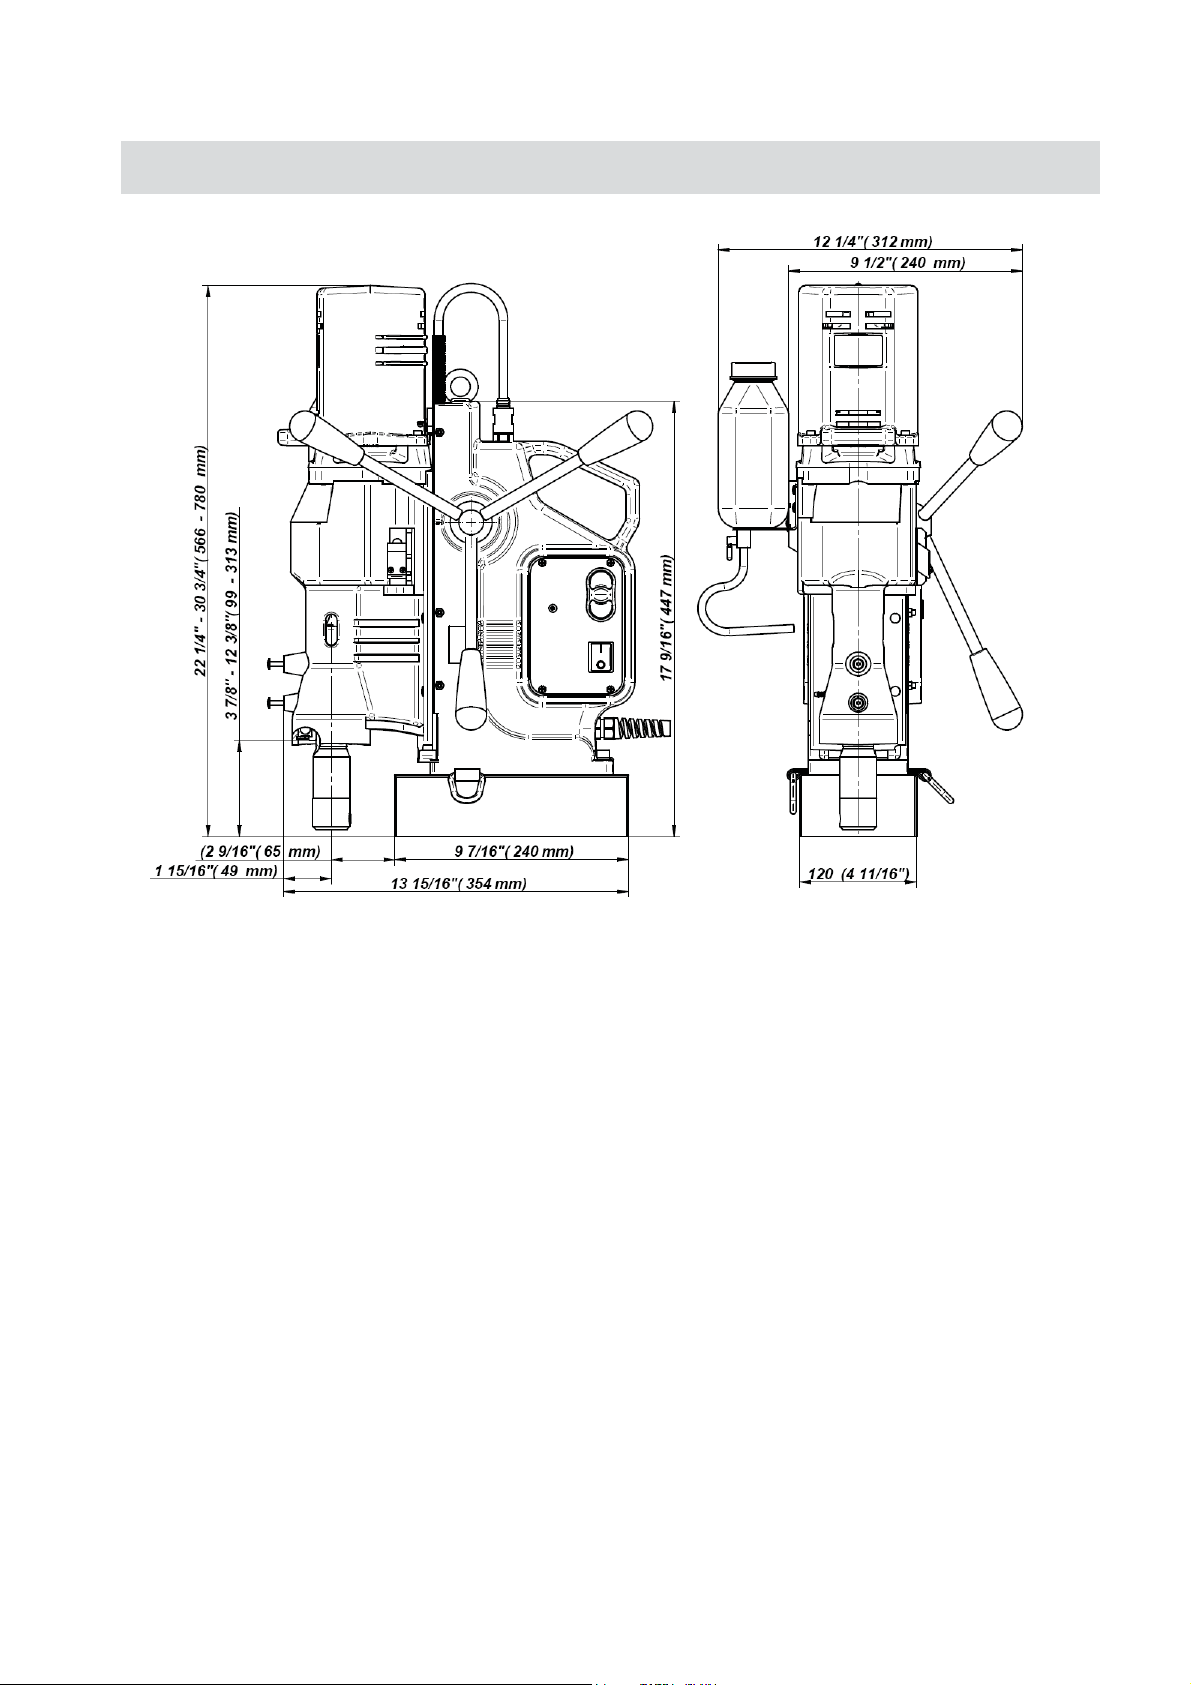
TECHNICAL DATA
Supply voltage: ………………………………… 220-240V/ 50-60 Hz.
Motor power ……………………………………………………. 1650 W
Total power …………………………………………………….. 1800 W
Machine speeds (under load): ………………..... 85/135/160/250 rpm
Insulation class ………………………………………………….. First
Arbor bore ………………………………………………………. MT 4
Tool holder …………………………………. (
Capacities: max. slugger cutter diameter …………............... 110 mm
Magnet Dead Lift (on 25 mm plate) ………....................... 22000 N
Dimensions:
electromagnetic base …......................................... 120x240x63 mm
Length of the power cord ……………………............................... 3 m
Total weight ………………………………...…...................... 31.0 kg
Noise level ……………………………………………...………….. 85 dB
3
/4" Weldon) 19,05 mm
max. drilling depth with standard arbor ………...... 75mm
max. drilling depth with optional arbor ………...... 110mm
6

SPECIAL INSTRUCTIONS
1. Read and follow operator’s manual thoroughly. If you cannot locate your operator’s manual, contact
ITMS
for an additional copy.
2. DO NOT touch rotating cutter or parts.
3. Always stop machine completely and unplug from power source before changing cutters, clearing swarf,
refilling lubrication or performing adjustments.
4. Never wear loose clothing or gloves when working near cutting area or machine arbor.
5. Always wear eye protection. Any tool can shatter.
6. Always use safety chain or strap provided with machine.
7. Always use proper tooling. Keep cutters securely fastened.
8. DO NOT use dull or broken cutters.
9. Beware of ejected slugs at end of cut. They become HOT during the cut.
10. Keep all safety features functioning and working properly.
11. Keep bottom of magnet burr free and clear of chips and debris.
12. To reduce the risk of electrical shock, DO NOT remove or alter electrical panels or use machine in damp
areas.
13. Use only authorized service centers for repairs.
Remove all contents from packaging and inspect to ensure no damage was incurred during shipping.
Your Holemaker package should include the following:
NOITPIRCSEYTQD
HOLEMAKER PRO110 MACHINE
METAL CARRY CASE
SAFETY CHAIN WITH CLIP
SAFETY GUARD
8MM FLAT WRENCH
HEX WRENCH 2.5
HEX WRENCH 4
HEX WRENCH 5
HEX WRENCH 6
SPOKE HANDLE WITH KNOBS
#4MT ARBOR ASSEMBLY
COOLANT BOTTLE ASSEMBLY
DRILL DRIFT
OPERATORS MANUAL
1
1
1
1
1
1
1
1
1
3
1
1
1
1
Assemble three spoke handles to feed hub. NOTE: Feed hub assembly
is mounted on right side of machine frame – if necessary, it can be reversed
for lefthand operation by simply removing the fastener and hub from frame.
Remove hub pinion shaft from right side of frame and insert it into left side of
frame. Replace hub and fastener into frame and tighten securely. Install the
arbor into the drill motor by inserting the arbor body into the spindle. By turning
the arbor while inserting, the arbor tang will properly line up in the spindle.
Turn the arbor until it bottoms out in the spindle and then tap lightly with a
plastic hammer to secure.
WHAT YOU SHOULD KNOW BEFORE YOU DRILL
1. Type of material to be drilled, Brinnell or Rockwell hardness, material thickness and position should all be
determined to ensure proper selection of cutting tools.
2. Remove any excessive mill scale or rust from surface to be drilled.
3. When drilling thin materials,
magnet area to increase magnetic holding force.
4. Material that has been flame cut may become heat treated and therefore difficult to drill. Avoid drilling near such
areas whenever possible.
5. Special cutter lubricant is available for using the Holemaker and annular cutters in the horizontal
position. Consult you distributor for more information.
Caution: Do not drill on material where welding is also simultaneously being performed. Drilling machine will
be damaged.
Caution: Powering drilling machine from generator without proper surge protection device between
generator
and drilling machine may cause damage to the Printed Circuit Board in machine.
The Holemaker Pro 110 is not designed for use on steel thinner than 3/8” or 10mm, as the magnet’s adhesive
power would be significantly reduced which can cause machines failure or individuals injury.
The machines built in “Smart Magnet Technology” will detect insufficient magnetic adhesion, and will
cause the machines motor on/off button to not engage. Although it is not recommended, this feature can
be bypassed by following the attached “Smart Magnet Technology Bypass” instruction leaflet.
recommend
it is
ed that you
place a steel plate under the work piece and Holemaker
7
 Loading...