

Page 1
TM
Instruction Manual•Bedienungsanleitung•Manuel d’utilisation•Manuale di Istruzioni
®
Page 2

2
NOTICE
NOTICE
All instructions, warranties and other collateral documents are subject to change at the sole discretion of Horizon Hobby, Inc. For up-to-date product
literature, visit www.horizonhobby.com and click on the support tab for this product.
Meaning of Special Language:
Meaning of Special Language:
The following terms are used throughout the product literature to indicate various levels of potential harm when operating this product:
NOTICE: Procedures, which if not properly followed, create a possibility of physical property damage AND little or no possibility of injury.
CAUTION: Procedures, which if not properly followed, create the probability of physical property damage AND a possibility of serious injury.
WARNING: Procedures, which if not properly followed, create the probability of property damage, collateral damage, and serious injury OR create a high
probability of superfi cial injury.
WARNING: Read the ENTIRE instruction manual to become familiar with the features of the product before operating. Failure to operate the product
correctly can result in damage to the product, personal property and cause serious injury.
This is a sophisticated hobby product. It must be operated with caution and common sense and requires some basic mechanical ability. Failure to operate this Product in a safe and responsible manner could result in injury or damage to the product or other property. This product is not intended for use
by children without direct adult supervision. Do not attempt disassembly, use with incompatible components or augment product in any way without the
approval of Horizon Hobby, Inc. This manual contains instructions for safety, operation and maintenance. It is essential to read and follow all the instructions
and warnings in the manual, prior to assembly, setup or use, in order to operate correctly and avoid damage or serious injury.
EN
Age Recommendation: Not for children under 14 years. This is not a toy.
Safety Precautions and Warnings
As the user of this product, you are solely responsible for operating in a manner that does not endanger yourself and others or result in damage to the product or
the property of others.
• Always keep a safe distance in all directions around your model to avoid collisions or injury. This model is controlled by a radio signal subject to interference
from many sources outside your control. Interference can cause momentary loss of control
• Always operate your model in open spaces away from full-size vehicles, traffi c and people.
• Always carefully follow the directions and warnings for this and any optional support equipment (chargers, rechargeable battery packs, etc.).
• Always keep all chemicals, small parts and anything electrical out of the reach of children.
• Always avoid water exposure to all equipment not specifi cally designed and protected for this purpose. Moisture causes damage to electronics.
• Never place any portion of the model in your mouth as it could cause serious injury or even death.
• Never operate your model with low transmitter batteries.
Firebird Stratos
Page 3

EN
3
Included in the Box
Transmitter
Battery and Charger
Number Decal Sheet
42.0 inch (1070 mm)
Your HobbyZone® Firebird Stratos™ aircraft includes everything you need to enjoy the adventure
and excitement of Radio Control fl ight. Even if
you’ve never been at the controls of a quality
hobby-grade aircraft, state-of-the-art electronic
assistance from the on-board Virtual Instruc-
™
tor
technology will help you quickly master the
controls to soar into the sky. Advanced features
allow you to progress gradually into aerobatics
and perfect three-point landings.
Completely designed and developed in the
United States, the easy-to-fl y HobbyZone Firebird
Stratos is the creation of multi-national and World
RC Aerobatic Champion Quique Somenzini, in
cooperation with Mirco Picorari of Aircraft Studio
Design and George Hicks, renowned aeronautical
engineer. Their painstaking infl uence and expertise
means that you can expect performance even an
RC expert can appreciate.
Table of Contents
Specifi cations ...........................................3
Charging the Flight Battery .......................4
Transmitter ...............................................5
Installing the Flight Battery ......................9
Tail Control Surface .................................10
Installing the Wing .................................11
Choose a Flying Field ..............................12
Range Test .............................................12
Flying Tips ..............................................13
Advanced User Setup ..............................15
Binding ...................................................17
Service and Repairs ................................17
Trouble Shooting Guide ...........................19
AMA National Model aircraft Safety Code 20
Limited Warranty ....................................21
Contact Information ................................22
FCC Information ......................................22
Compliance Information for the
European Union ......................................22
Parts Contact Information .......................85
Replacement Parts ..................................85
Optional Parts .........................................85
30.0 inch (765mm)
17.0 oz (482 g)
To register your product online, visit www.hobbyzonerc.com
Specifi cations
Motor: (2) 180 brushed
Battery: 2S 1300mAh Li-Po
Battery Charger: DC powered 2S
balancing fast charger
Transmitter:
2.4 GHz Transmitter
Instruction Manual
Page 4

4
Charging the Flight Battery
Your aircraft comes with a DC Flight Battery
charger that is specifi cally designed to charge
the included 2S Li-Po battery.
1. Insert charger into car outlet.
2. Connect battery to charger.
3. Charge battery for approximately 1 hour
(LED solid red).
4. Disconnect battery after charging (LED off).
CAUTION: When connecting the battery to the
battery charger, make sure the two connectors
are correctly oriented. Failure to do so could
cause the battery terminals to short, resulting
in fi re, which could lead to property damage
and injury.
Charger Specifi cations
• Input power: 10–14V
• Max output voltage: 8.4V
• Fixed charge current: 1.5A
• Balances and charges 2S Li-Po cells with a
minimum capacity of 1300mAh
Charging Warnings
EN
1
2
• By handling, charging or using the included
Li-Po battery, you assume all risks associated
with lithium batteries.
• If at any time the battery begins to balloon or
swell, discontinue use immediately. If charging
or discharging, discontinue and disconnect.
Continuing to use, charge or discharge a battery that is ballooning or swelling can result
in fi re.
• Always store the battery at room temperature
in a dry area for best results.
• Always transport or temporarily store the
battery in a temperature range of 40–120º F
(5–49º C). Do not store battery or aircraft in a
car or direct sunlight. If stored in a hot car, the
battery can be damaged or even catch fi re.
• Always charge batteries away from fl ammable
materials.
• Always inspect the battery before charging and
never charge dead or damaged batteries.
• Always disconnect the battery after charging,
and let the charger cool between charges.
• Always constantly monitor the temperature of
the battery pack while charging.
• ONLY USE A CHARGER SPECIFICALLY DESIGNED TO CHARGE LI-PO BATTERIES. Failure
to charge the battery with a compatible charger may cause fi re resulting in personal injury
and/or property damage
• Never discharge Li-Po cells to below 3V under
load.
• Never cover warning labels with hook and loop
strips.
• Never leave charging batteries unattended.
• Never charge batteries outside recommended
levels.
• Never attempt to dismantle or alter the charger.
• Never allow minors under the age of 14 to
charge battery packs..
• Never charge batteries in extremely hot or cold
places (recommended between 40–120° F or
5–49° C) or place in direct sunlight.
3
1 hr
4
CAUTION: All instructions and warnings must
be followed exactly. Mishandling of Li-Po
batteries can result in a fi re, personal injury,
and/or property damage.
Firebird Stratos
Page 5

EN
5
Transmitter
Installing the Transmitter Batteries
2
1
3
4
Insert included batteries in the transmitter as
shown.
CAUTION: If using rechargeable batteries, charge only rechargeable batteries.
Charging non-rechargeable batteries may
cause the batteries to burst, resulting in injury to persons and/or damage to property.
CAUTION: Do not pick up the transmitter by the antenna. Do not alter or put
weight on the antenna. Damage to antenna
parts can decrease transmitter signal
strength, which can result in loss of aircraft
control, injury or property damage.
Throttle
Throttle
Trim
Power
Switch
Elevator
Elevator
Trim
Mode 2
Mode 1
Elevator/
Steering
(Rudder)
Steering
(Rudder)
Trim
Elevator
Trim
LED
Throttle/
Steering
(Rudder)
Steering
(Rudder)
Trim
Throttle
Trim
Understanding the Controls of the
Transmitter
The diagram to the left shows the transmitter
controls for Mode 2 and Mode 1 transmitters.
Power
Switch
LED
Instruction Manual
Page 6
6
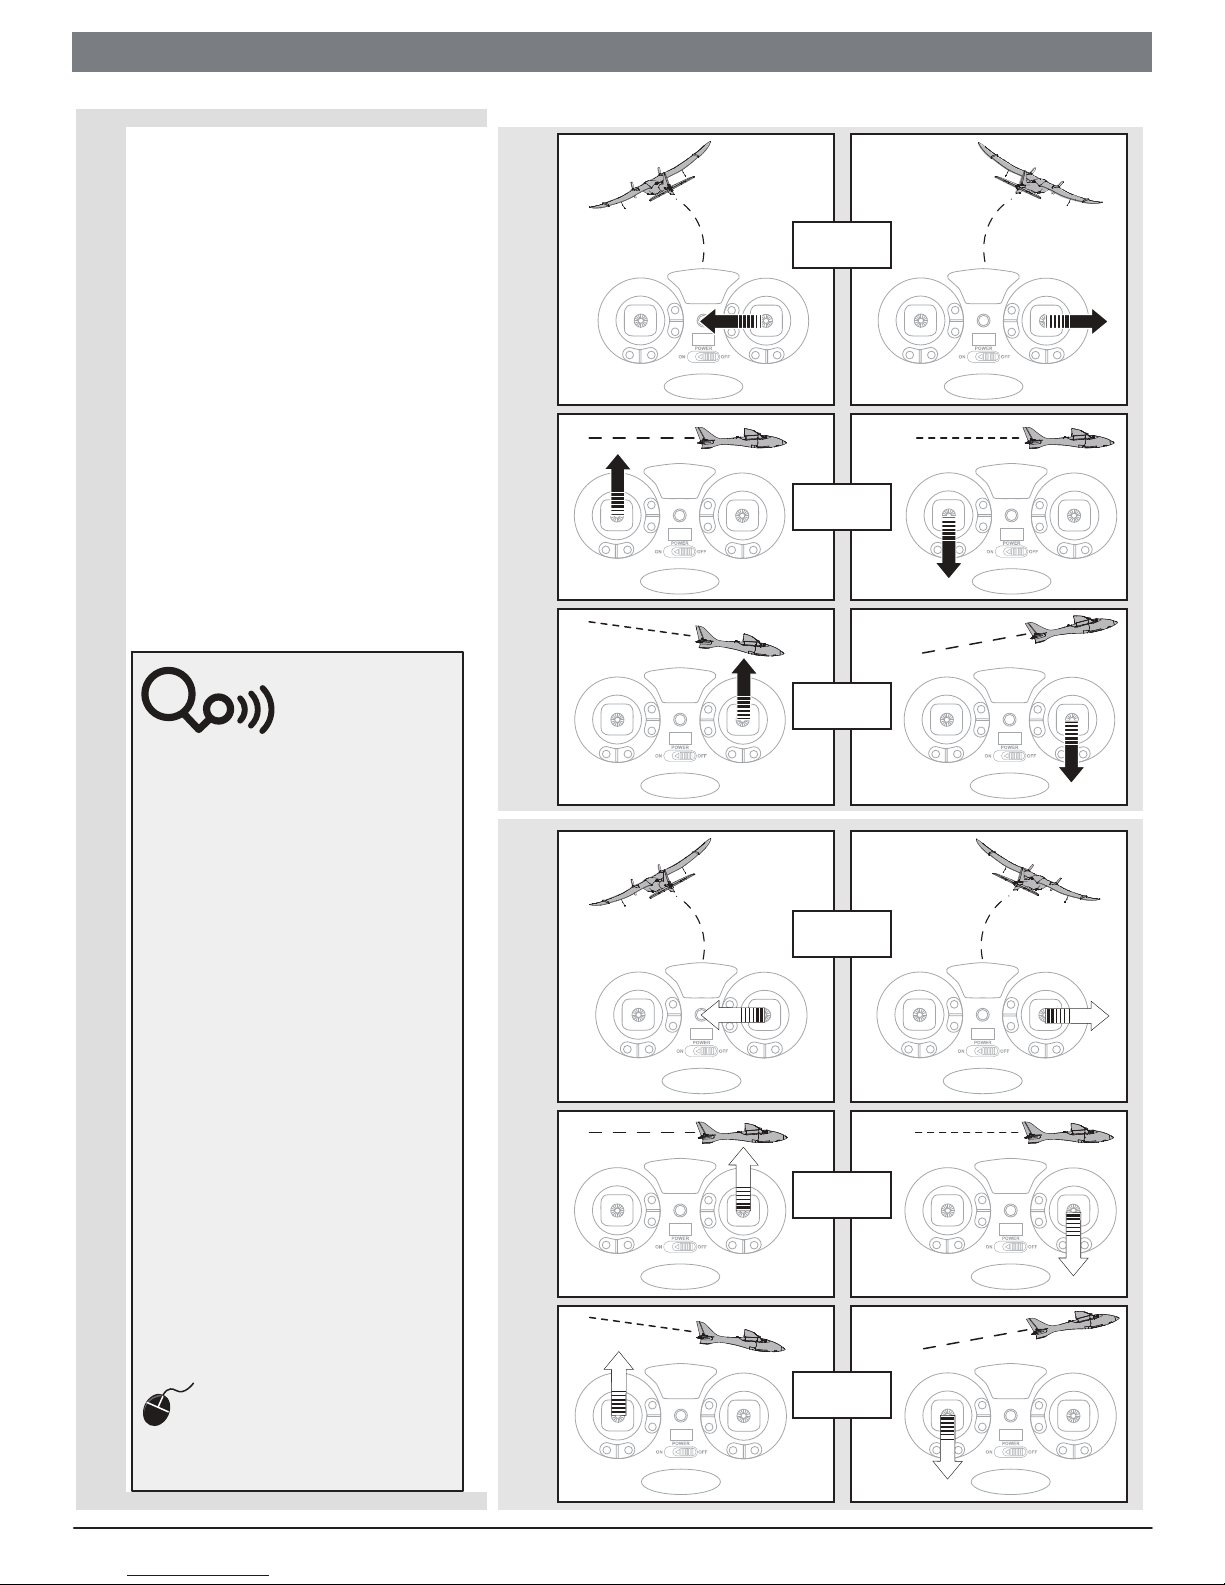
Flight Control
For smooth control of your aircraft, always make
small control moves. All directions are described
as if you were sitting in the aircraft.
For example, when the aircraft’s nose is pointing toward you, left steering (rudder) will turn
the aircraft left (your right while holding the
transmitter).
• Flying faster or slower: When your aircraft
is stable in the air, push the throttle stick up
to make the aircraft go faster, and pull the
throttle stick back to slow down. The aircraft
will climb when the throttle is increased.
• Elevator up and down: Push the elevator
stick forward to make the aircraft go down
and pull the elevator stick back to go up.
• Steering right and left: Move the steering stick
right to make the aircraft go right and move
the steering stick left to go left (as if you are
seated in the cockpit).
For the fi rst fl ights, make sure the transmitter is
set in low rate (LED slowly blinking).
Mode 2Mode 1
EN
Steering
(Rudder)
Speed
(Throttle)
Virtual Instructor™
Technology
The Virtual Instructor™ technology
features 4 assisting systems:
Wing Leveling–Uses a stabilization
sensor to keep the wings level during
normal fl ight.
What you will see...after the throttle is
increased above 50%, the propellers
will turn when rudder is applied or the
aircraft is moved.
Rudder to Elevator Mixing–Assists with
stability during turns.
What you will see...the elevator moves
when the rudder is moved.
Throttle to Elevator Mixing–Aids in
control during descending and landing.
What you will see...the elevator moves
when the throttle stick is moved
below 50%.
Rudder to motor (differential thrust)
mix–Supports wing leveling to make
more powerful corrections.
What you will see...after the throttle is
increased above 50%, the propellers
will turn when rudder is applied or the
aircraft is moved.
Elevator
Steering
(Rudder)
Speed
(Throttle)
These automatic systems work together
to help prevent the kind of situations
experienced by new pilots, such as overcorrection, that can lead to accidents.
Online
For ADVANCED Flying tips go online and visit
www.hobbyzonerc.com to see Quique’s Tips.
Firebird Stratos
Elevator
Page 7

EN
7
Flight Trimming
Steering (Rudder) Trim
Elevator Trim
Steering (Rudder) trim:
• When the aircraft drifts left or right while
the steering stick is at the neutral position
(centered), push the steering trim button by
one “beep” increments OPPOSITE the direction of drift.
• Adjust trim so the aircraft fl ies straight when
the control stick is neutral.
Elevator trim:
Only trim the aircraft at half throttle. When
trimmed correctly, your aircraft climbs steadily at
full throttle and will fl y level at half throttle.
• When the aircraft’s nose drifts up or down
while the elevator stick is at neutral (centered)
position, push the elevator trim button by
one or two “beep” increments OPPOSITE the
direction of drift.
• Adjust trim so the aircraft fl ies straight and
level when the elevator stick is neutral.
You can return any trim setting to neutral by
holding down the opposite trim button until
the neutral (3 beep tone) occurs.
Tip!
A
The LED Indicator
The LED (A) on the transmitter displays two
functions.
Function 1: Indicates the transmitter is in High
or Low Rate (for more information see the Dual
Rates section). The transmitter’s default Dual
Rate position is low rate.
LED Slow Blinking – Indicates that the transmitter is in low rate.
LED Solid – Indicates that the transmitter is in
high rate.
Function 2: LED fl ashing with beeps indicates
that the transmitter has been put into bind mode
(for further explanation see Binding section).
Instruction Manual
Page 8

8
Installing the Tail
To install the tail onto the fuselage of your
aircraft, start by following the two easy steps
below:
1. Insert the tail into the slot of the fuselage.
Center it by using the centering guides (A)
located on the top side of the tail.
2. Once the tail is in place and centered, apply
8 pieces of tape (included) to secure it into
position, four on top and four on the bottom.
EN
1
2
A
Attaching the Clevis to the
Control Horn.
Finish the installation of the tail by connecting
the control rod with the clevis on the tail
control horn.
1. Open the clevis and put the pin in the top
hole of the control horn.
2. If adjustment of length is needed, hold the
connector with pliers or hemostats and turn
the clevis clockwise or counterclockwise on
the connector.
3. Close the clevis onto the control horn and
slide the tube towards the horn to tighten
the clevis.
Clevis
Control Horn
1
2
Firebird Stratos
3
 Loading...