

Page 1
HBZ2615
HobbyZone® products are distributed exclusively by
Horizon Hobby, Inc.
4105 Fieldstone Road
Champaign, IL 61822
©2005 Horizon Hobby, Inc.
7827
Instruction Manual
Page 2

Crash damage is not covered
under the warranty.
Be sure to read the warranty
on page 28 and "Warnings and
Safety" on page 25 before you
proceed to Step 1.
Congratulations! You have the world’s first radio control airplane that
can take you from a complete beginner, all the way to Air Combat—
the Firebird Commander® 2 from HobbyZone®. The Commander 2 is
equipped with revolutionary software: Anti-Crash Technology™ (ACT).
This exclusive technology helps to protect your aircraft from the crashes
that are often caused by new pilots over-controlling the plane. Your
Commander 2 has optical sensors that can see the horizon, and know
how your plane should fly. If the sensors see your plane is entering a
severe dive, the software will “take over” by reducing the throttle and
making corrective directional control to help prevent the plane from
crashing to the ground.
Once you’re more experienced, you can enter Expert Mode, which
allows you to have full control at all times for tighter turns and spirals,
as well as other dramatic maneuvers. This extra maneuverability comes
in handy when using X-port™ accessories. This HobbyZone-exclusive
port allows users to attach exciting accessories, including the Sonic
Combat Module™ (SCM) for air-to-air and air-to-ground fighting, the
Aerial Drop Module™ (ADM), which allows items such as parachutes and
streamers to be dropped, and the Night Flight Module™ (NFM), which
allows users to successfully fly at night when using the white wing.
Our mission at HobbyZone is to make sure you have success when you
fly your Firebird Commander 2, while ensuring you have safe fun and
learn a few things along the way.
Page 3
4
Step 2
5
Step 1
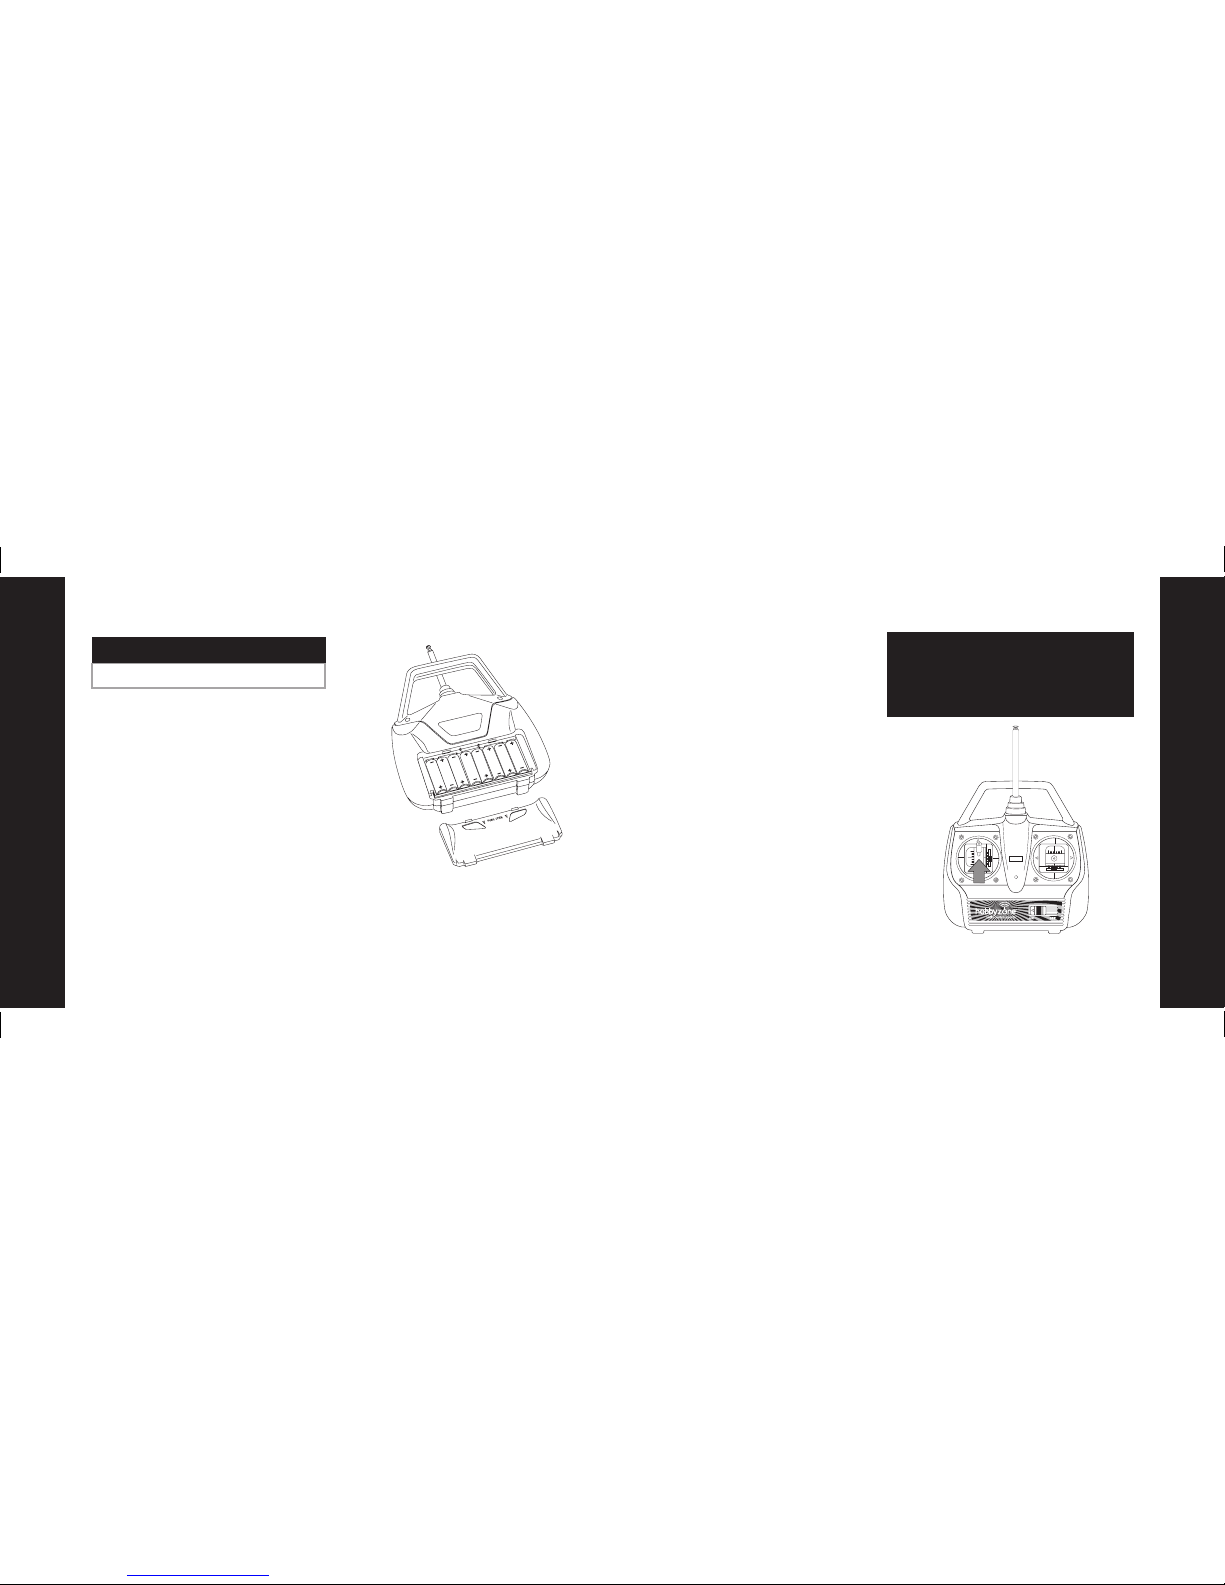
1. Turn on the transmitter.
2. Install the battery in the fuselage slot and
plug it into the connector.
3. Move the transmitter’s left stick all the
way down and hold for one second. This
will arm the motor.
4. Move the transmitter’s left stick up. Since
most batteries come partially charged,
the prop should spin at high speed when
you move the left stick up. (If the motor
does not run, proceed to charging
the battery.)
5. You need to discharge the battery before
you recharge it. In order to fully discharge
the battery, run the motor at high speed
until it shuts off. If there is not enough
charge in the battery to power the
propeller, then proceed to Step 3.
6. When finished with the motor test, be
sure to disconnect the battery first then
turn off the transmitter.
1. Remove the transmitter back cover by
pushing down with thumbs, as indicated
by the arrows.
2. Install the batteries. Use fresh 1.5V “AA”
batteries only.
3. Be sure to observe proper polarity when
installing the batteries, and then replace
the cover.
4. To test, switch on the transmitter. The
LED should glow brightly.
5. Replace the batteries when you hear the
low battery alarm (beeping sound).
Needed for Step 1
“AA” Heavy-Duty Batteries (x8 included)
Transmitter Motor Test and Battery Discharging
Adult Supervision Required
WARNING: Keep everything clear of the
propeller AT ALL TIMES and hold the plane
securely. A moving propeller can cause
severe injury.
Page 4
Step 4
7
Wing and Landing Gear Attachment
Step 3
6
Mounting the Landing Gear
Insert the landing gear into the slot on the
bottom of the fuselage and push it in until it
snaps into place.
Note: When flying without X-port™ modules
and landing on grass, it is not necessary to
have the landing gear installed.
Attaching the Wing
1. Center the wing on the fuselage by
aligning the center dot on the wing with
the top seam on the fuselage, and by
centering the half circle on the wing’s
trailing edge over the fuselage center.
2. Secure the wing in place by attaching two
rubber bands across the middle and one
on each side as shown. Locate the rubber
bands on the peg hooks as close as
possible to the sides of the fuselage.
3. Before each flight, make sure the front
and trailing edges of the wing are exactly
centered on the fuselage.
Charging the Aircraft Battery
Note: Never charge a hot battery or a
battery that is already charged. Always
discharge the battery before every charge.
See Step 2 for instructions on discharging.
See “Warnings and Safety” on page 25.
1. The charger supplied with the Firebird
Commander® 2 has a built-in timer. Plug
the battery into the charger, and then
plug the charger into the wall. The LED
indicator should glow constantly. After
about 3 hours, the LED will turn off. At
this time, the battery is charged and
ready to use.
2. To charge another battery, the charger
must first be unplugged from both the
wall and the battery to reset the timer.
Rubber Bands (x4)
Main Landing Gear
Needed for Step 4
You can purchase the variable rate DC peak
charger (HBZ1026) and safely peak charge
your battery pack in as little as 40 minutes.
(see page 34)
IMPORTANT: Charge the battery shortly
before flying. If you charge the battery more
than 24 hours before flying, charge again for
30 minutes right before you fly. Stop charging
immediately when the battery becomes warm,
indicating it is fully charged.
Page 5
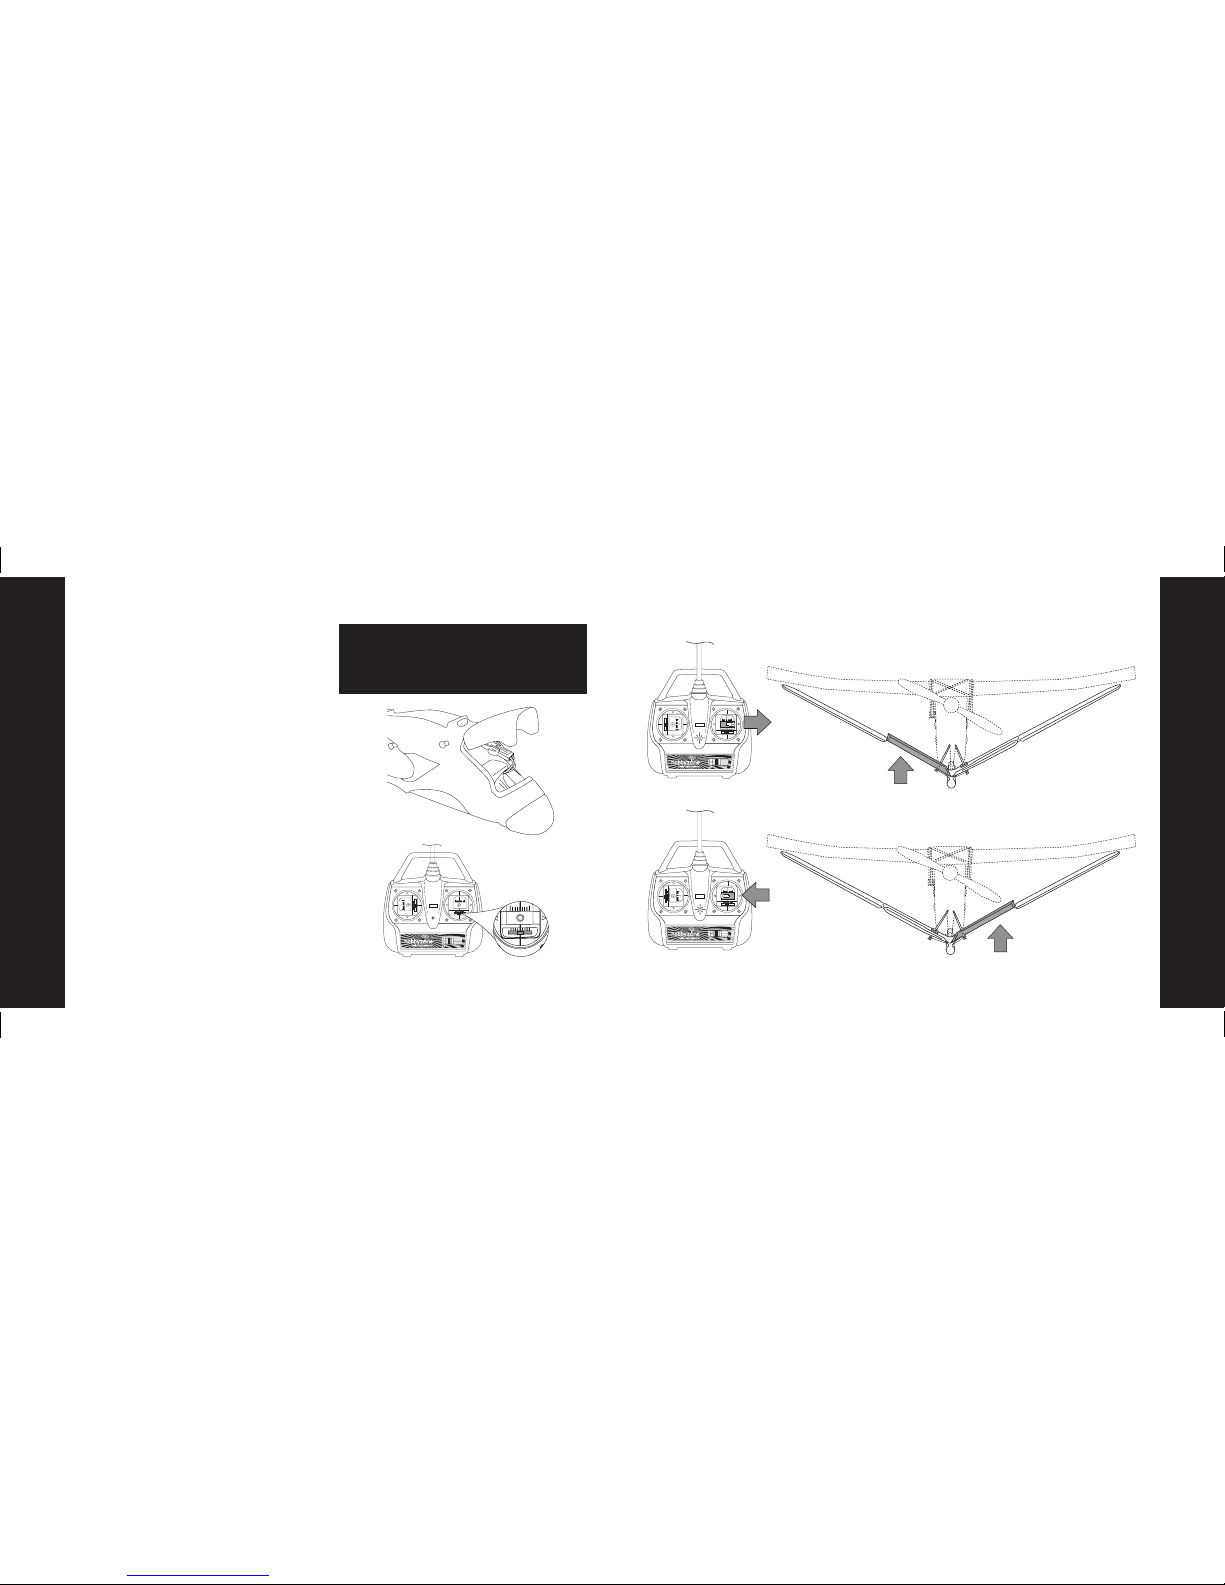
View from
Rear
Moves Up
Moves Up
View from
Rear
Step 5
9
Tail Control Test (continued)
Step 5
8
Tail Control Test
1. Switch on the transmitter. Check the LED.
Do not touch the sticks for 2 seconds
while the transmitter automatically
calibrates the controls.
2. Install the battery in the fuselage slot and
plug in the connector.
3. Move the right stick side to side. The
flaps should move as shown on the
following page. If each flap is not level
with the rest of the tail surface when
the right stick and trim lever are centered,
adjust the control lines so they are level
(see page 20).
Note: The small levers under or beside the
control sticks are called trim levers and are
used to adjust the “neutral” points of your
control sticks. It’s very important that these
levers are centered when switching on the
transmitter and performing the control test.
WARNING: Be sure to keep everything
clear of the propeller when the tail control
test is performed in the event that the
motor is accidentally engaged.
Page 6
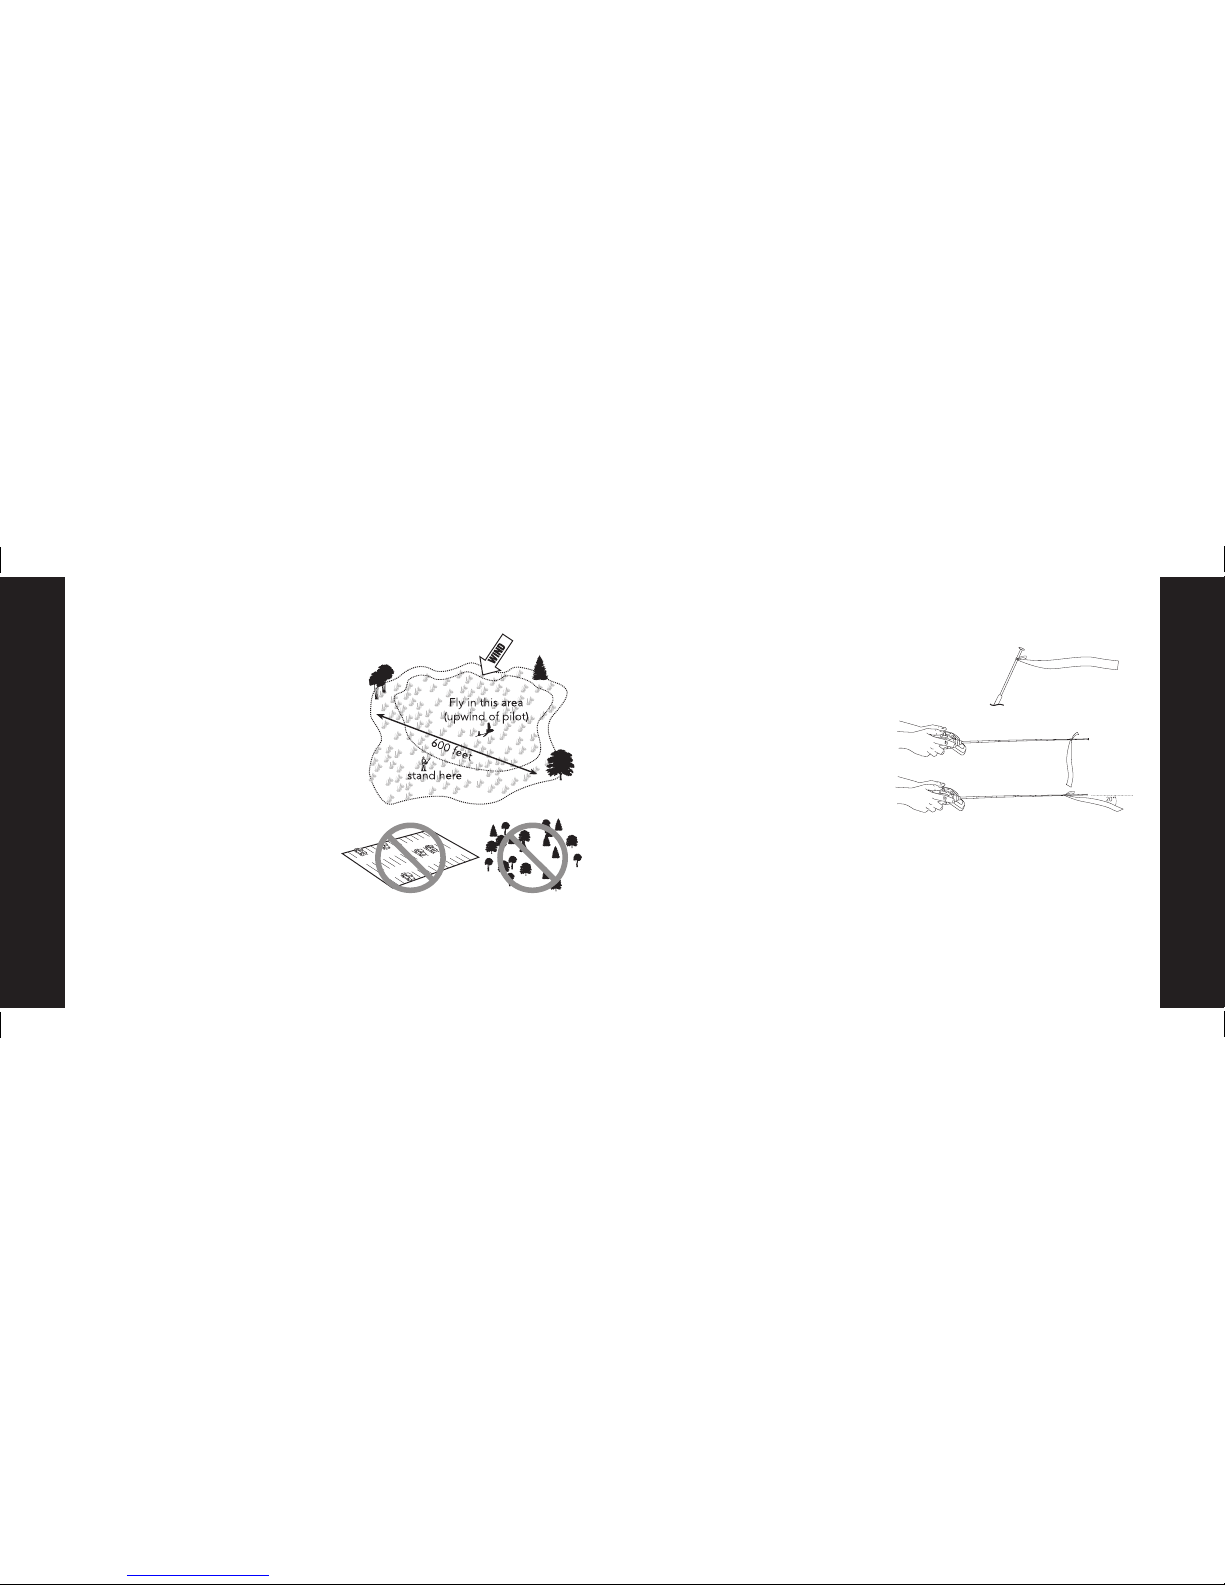
You want to fly! If you wait until the conditions are right, you will have successful
flight. On your first flights, do not fly if the
wind is more than 5 mph!
1. Tie the included red ribbon to the end of
your transmitter antenna.
2. Hold the transmitter flat so the antenna
is parallel to the ground, and note how
much the flag moves in the wind. If the
flag hangs down, the conditions are ones
that will allow you to fly successfully. If
the angle between the antenna and the
ribbon is less than 20°, it’s too windy for
beginning pilots to fly.
SUCCESS TIP: Be smart! Follow this tip and
protect your Firebird Commander® 2—you’ll
be glad you did. For beginners, flying in
too much wind is by far the reason for the
majority of crashes and/or lost planes.
Step 7
11
Step 6
10
Choose a Calm Day
Choose a Large, Open Grass Field
A large, open grass field is required for safe,
successful flight. Your Firebird Commander®
2 can fly at speeds in excess of 20 mph, so
it covers ground fast. The bigger the field,
the better!
It is absolutely essential to have a minimum
of 600 feet of clear space in all directions
from the pilot. If you ignore this direction,
you will regret it.
IMPORTANT: Do not fly over or near people,
buildings, power lines, highways, train
tracks, vehicles, trees, water, pavement,
gravel, any hard surface or any object you
don’t want to crash into. Please take this
warning seriously to keep people, property
and your Firebird Commander 2 safe. Crash
damage is NOT covered by the warranty.
Page 7

Step 9
13
Step 8
12
Hand Launch
IMPORTANT: Before launching, determine
the wind direction by watching which way
the red transmitter ribbon is blowing.
1. During your first few flights, have a
second person (adult recommended)
launch the Firebird Commander® 2
while the pilot controls the plane with
the transmitter. Adult assistance is always
recommended with pilots 12 years of age
or younger.
2. Make sure the battery is fully charged.
3. While holding the transmitter in one
hand, push the throttle (left stick) to full
on (up) with thumb.
4. Take a couple of steps and launch the
model directly into the wind. Keep the
wings level and use medium force. Do
not throw it up or down. Point it level
with the ground when releasing. Think
of it as a javelin that you are throwing 20
feet away.
Range Test
You will need two people to do the range
test—one to hold the transmitter and one to
hold the airplane.
1. One person holds the transmitter while
the other person walks 100 paces away
with the airplane.
2. Extend the transmitter antenna completely
and turn on the transmitter.
3. Plug in the airplane battery and close
the hatch cover.
4. Pull the throttle stick back to arm
the motor.
5. As the first person moves both of the
transmitter controls at the same time,
the other person watches to be sure
the airplane’s motor and tail controls
operate smoothly.
6. If an X-port™ accessory is attached, test
it by pulling down on the left stick to
check that it operates correctly.
WARNING: The person holding the airplane
should hold it so that the propeller does
not come near any part of their body.
If your Firebird Commander 2 does not
range test correctly, do not fly it. Call
Horizon Hobby Product Support Staff
toll-free at 1-877-504-0233 for directions
on how to proceed.
WARNING: Keep the spinning propeller
away from your hair, head, and hands or
injury may occur.
Page 8

Step 11
15
Step 10
14
Runway Takeoff (ROG)
Not recommended for inexperienced pilots.
1. Make sure your landing gear is properly
installed and is securely in the slot on
the fuselage before you attempt takeoff.
2. Stand behind the Firebird Commander® 2
and point it directly into the wind on
smooth asphalt or concrete.
3. Apply full power and adjust the right
control stick as necessary to keep the
Firebird Commander 2 headed directly
into the wind.
4. If the battery is fully charged, the Firebird
Commander 2 should lift off the ground
in approximately 25 feet.
Important: Be careful when holding the
right stick full over right or left for extended
amounts of time. In some cases, this can
cause the model to spiral dive, and if it does
not have sufficient altitude, it could crash.
If you see the Commander
®
2 beginning to
enter a spiral, release the right stick.
1. After launching, the model will begin
climbing. Keep the throttle full on.
2. Make right and left adjustments of the
right control stick to keep it flying straight
into the wind. Don’t attempt a turn until
model reaches 50 feet of altitude.
3. Control range is 2500 feet. Don’t let
the model fly too far away. Keep upwind,
especially if the wind is over 10 mph, or
the wind may carry it away.
Turning
Hold the right stick in the direction you want
the model to turn.
Trimming
If the model always turns one direction, use
the trim control lever below the control stick
to correct (see below). The model should fly
straight with the control stick at neutral. See
page 20 if additional adjustment is needed.
Flying
Page 9

Step 11
17
Flying (continued)
Step 11
16
Anti-Crash Technology (ACT)
Your Firebird Commander® 2 comes
equipped with exclusive Anti-Crash
Technology.™ This software helps to prevent
crashes due to over-control of pilots. The
sensors included in the fuselage “see” the
horizon. One sensor is above the canopy
and faces forward. The other is at the bottom
of the fuselage and faces backward.
These sensors “look” to see the sky and the
horizon, and the electronic system that is
connected to them knows that the airplane
• There will be a noticeable change in
the movement of the aircraft if you give
it extreme input, and the diameter of
turns will be larger.
• The nose of the airplane will only be
allowed to reach a limited angle, and
then will rise up in order to prevent too
much speed from being generated.
• Once the ACT software has taken over,
you will not be able to give control input
until you have released the steering stick,
allowing it to return to neutral. In most
cases, you will want to release both
sticks in order to allow the plane to
recover completely.
When you experience your Firebird
Commander 2 doing any of the above
actions, the exclusive ACT system is warning
you that you have made some transmitter
inputs that could put your plane in jeopardy.
You can work to correct it by reducing throttle and putting the right stick back toward
neutral (or reversing the last input).
should not be allowed to enter a steep dive.
If you give transmitter input that causes the
plane to enter into a spiral dive that may
threaten your aircraft, the ACT software will
override your input to help prevent the
aircraft from crashing to the ground. The
ACT will intervene for you when the aircraft
is in jeopardy by reducing throttle and
changing the directional control as well.
The ACT software will only interrupt flight in
extreme situations, allowing you to enjoy as
much control of the airplane as you need.
Your Firebird Commander 2 comes with the
ACT on as the default setting. If you enter a
severe dive while flying, you will notice the
following things take place:
• You will hear the motor speed reduce as
the ACT programming overrides your
input. This slows the decent of the aircraft
to help prevent a crash.
• The ACT software will give reverse steering
input to the aircraft’s electronics to help
pull the plane out of a dive.
Once you have gained more experience,
and feel more comfortable flying, you can
turn the ACT software off to enter “Expert
Mode.” To do this:
• Turn on your transmitter
• Place the flight battery into the fuselage
and plug it into the battery connector
• Pull down on the left (throttle) stick for
approximately 3 seconds. You will hear
two beeps that signal that you have
turned off the ACT software and now have
full control at all times.
• To reenter the default mode, where ACT
is “on”, repeat the steps listed above in
this section. You will hear one beep when
you repeat these steps, which indicates
that the ACT software has been turned
back on.
• It is possible to change flight modes in
the air, but sufficient altitude is required!
Flying (continued)
Page 10

Step 2
Step 2
IMPORTANT: Even with the ACT activated,
it is very important to fly at a sufficient
altitude. The system may not save your
airplane from over-control if you are too
close to the ground.
ALWAYS maintain an altitude of at least 200
feet so that the ACT software has sufficient
altitude to work properly to save your
aircraft if you enter a severe dive, especially
when attempting maneuvers that are more
aggressive. Make certain at launch that
you climb to a safe altitude prior to more
aggressive flight. If, when flying and with
the ACT activated, you still feel that your
aircraft may be spiraling down too fast,
release BOTH sticks until the plane becomes
horizontal again. This will allow you to regain
control of your aircraft and lessen the chance
of a crash.
Because your Firebird Commander® 2 uses
sensors that look for the horizon, there could
be times when the sensors may not work as
effectively as they could. This may be
especially true when the sun is shining
brightly and/or is low in the horizon. Do
not fly aggressively until you have become
very comfortable with flying your Firebird
Commander 2. Because of changes in
atmospheric conditions, especially the ones
mentioned above, do not assume that the
ACT software will always save your plane
from crashing. Always fly with caution and
have patience as you learn the input levels
that are necessary for you to safely keep
your Firebird Commander 2 in the air.
Since the ACT sensors register information
via light, NEVER fly over water, snow or
light-colored sand that can confuse the input
being received from the sensors to the ACT
software system. If you choose to fly in these
conditions, you will need to disable the ACT
system. We recommend that you always
begin flight with the ACT activated before
attempting to fly with the ACT in the “off”
mode.
Note: Flying too low, especially over
reflective surfaces, such as rooftops or
asphalt, can also place your Firebird
Commander 2 in jeopardy.
If you are flying with an X-Port™ accessory,
always make sure the ACT software is turned
off. However, you should never attempt to
fly with an X-Port accessory until you have
become more experienced at flying and do
not need the ACT to successfully keep you
flying.
Remember, the purpose of the ACT software
is to teach you to fly smoothly. When the
ACT software is engaged and overrides your
input, it means that you have placed the aircraft in jeopardy. Keeping the steering stick
more in the middle and less to the corners
will allow you to fly more smoothly and prevent the ACT software from engaging.
Flying (continued) Flying (continued)
Step 11
18
Step 11
19
If you encounter any questions regarding the
Firebird Commander 2 and the ACT software,
immediately contact Product Support at
1-800-504-0233.
Page 11

Throttle Adjustment
Step 12
20
1. Climb to an altitude of 150–200 feet
with full throttle.
2. To achieve a level “cruising” altitude,
reduce power by moving the throttle stick
down to approximately 50% of full on.
3. To reduce altitude, reduce throttle.
4. To increase altitude, increase throttle.
Note: If you’re flying with the motor off or at
a low speed, allow the Firebird Commander®
2 a bit more area for turns.
Step 13
21
Landing
When you notice that the Firebird
Commander® 2 no longer climbs well under
full power (normally after approximately 12
to 16 minutes), the battery is getting low,
and it’s time to land. Line the model up
directly into the wind toward the desired
landing spot. At 10 feet of altitude, gradually reduce the throttle stick to turn off the
motor. The Firebird Commander 2 will glide
in for a landing.
Auto Cutoff Feature: When your motor
battery gets low enough, this feature will
automatically shut off the motor and save
enough battery to power the radio and tail
control so you can land safely. If the motor
cuts off, prepare to land immediately.
Expert tip: As you get more experienced at
flying, try adding a small “blip” of power
just before touchdown. With some practice,
you’ll be able to land it right on target.
WARNING: Do not attempt to catch the
airplane or injury may result. Turn the motor
off prior to touchdown in order to prevent
damage to the wing and/or propeller.
Note: If you are planning on flying over
grass (and landing on grass as well), you
can remove the landing gear. This allows
you to simply "slide" in for a safe landing.
Reduce power at 10 feet
Page 12

Step 14
22
Leveling the Tail Control Flaps
Before making your first flight, if tail control
flaps are not level with rest of tail surface,
adjust them so they are level by doing the
following:
1. Turn the transmitter on, plug in aircraft
battery and center the right control stick
and trim lever.
2. Use your fingers or a small flat screwdriver
to turn the slotted spool on the control
horn. Depending on the direction you
turn, this will lengthen or shorten the
control line.
3. While applying some tension to the control
lines, adjust until the control surfaces are
level with the rest of the surface.
Step 15
23
Making Adjustments: Plane Turns to the Left or Right
If the airplane keeps turning to the left and
adjusting the trim control lever (page 15)
does not correct the situation enough to fly
straight with the stick at neutral:
1. Adjust the control line so that the left
tail flap is 1/16” above the rest of the
tail surface.
2. Test fly.
3. If it still flies to the left, repeat the above
procedure, adding 1/16” each time until
it flies straight.
If the airplane keeps turning to the right and
adjusting the trim control lever (page 15)
does not correct the situation enough to fly
straight with the stick at neutral:
1. Adjust the control line so that the right
tail flap is 1/16” above the rest of the
tail surface.
2. Test fly.
3. If it still flies to the right, repeat the above
procedure, adding 1/16” each time until
it flies straight.
IMPORTANT: If there is a bend (even a
small one) in the tail or wing or a tear near
the flap areas, it will be impossible to have
correct flight control. Replace the damaged
part immediately!
Page 13

Step 16
24
Adjusting the Climb Rate
If the airplane, with a fully charged battery,
does not climb fast enough with full throttle,
you can adjust the climb rate by:
1. Tightening the front tail screw by one full
turn and loosening the rear tail screw by
one full turn.
2. Test fly.
3. Repeat the above procedure if necessary
until the Firebird Commander® 2 climbs
adequately under full power.
Screw In Screw Out
Screw InScrew Out
Adding the Wing Shim
25
If the climb rate is still too steep after
making the tail screw adjustments on the
previous page, add the included wing shim.
1. Place the wing shim on top of the fuselage
at the rear of the wing saddle as shown.
2. Then, place the wing over the wing shim
and rubber band the wing to the fuselage
as normal.
Adding the wing shim will cause the Firebird
Commander® 2 to climb less steeply and
reduce the tendency to repeatedly climb
and stall. Add the wing shim when the wind
is gusting more than 10 mph.
IMPORTANT: Adding the wing shim will
cause the Firebird Commander 2 to fly
faster, due to the wing’s reduced incidence
angle.
Step 17
Needed for Step 17
1mm Wing Shim
If the airplane climbs too fast with full throttle,
by climbing at a steep angle, stalling and
repeating climbing sharply and stalling, do
the following:
1. Loosen the front tail screw by one full turn
and tighten the rear screw by one full turn.
2. Test fly.
3. Repeat the above procedure if necessary
until your Firebird Commander 2 climbs
at a steady rate.
4. If, after making maximum adjustments,
your Firebird Commander 2 still climbs
too steeply, add the wing shim
(see page 23).
Page 14

26
If a Crash Occurs
If you happen to crash and part of the foam
wing or tail breaks, it can be repaired using
packing tape to cover missing pieces.
If damage is severe or if the wing or tail is
bent, replace damaged parts immediately.
See page 30 for a complete replacement
parts list.
IMPORTANT: Control alignment tail flaps
must be level or nearly level with no slack
in the control lines or the plane will not fly
well. See pages 20 and 21 if adjustment
is necessary.
27
Warnings and Safety Checklist
1. Follow the instructions in this manual and
included video completely, observing all
directions. Otherwise, serious injury and/
or damage can occur. Think safety first.
2. Keep the propeller away from body
parts, even when it isn’t spinning, as it
could be turned on by accident. Beware
of hair becoming entangled in the
propeller, especially while launching the
Firebird Commander® 2 on a windy day
or injury may occur.
3. Do not fly when it’s too windy (as described
in STEP 7) or you may lose control and
crash, causing injury or damage. Never
fly the Firebird Commander 2 near
people, vehicles, train tracks, buildings,
power lines, water, hard surfaces or trees.
Never allow anyone to attempt to catch
the Firebird Commander 2 while it’s in
flight or serious injury can result.
4. Adult supervision is recommended for
pilots ages 12 and under.
5. Only use a battery charger intended for
use with the Firebird Commander 2
battery. Never leave a charger unattended
while charging a battery. This will help
prevent overcharging. While charging,
place the battery on a heat-resistant
surface. Do not lay it on carpet or
upholstery while charging. Never charge
the battery with the included charger for
more than 3 hours.
6. Never cut into the battery charger or
airplane wires or serious injury can occur.
Causing the battery to “short out”
(crossing negative and positive bare wires)
can cause fire, serious injury and damage.
7. Hold the plane securely, and keep all
body parts away from the propeller when
the flight battery is plugged in. When
you finish flying the Firebird Commander
2, always unplug the battery before you
turn off the transmitter.
8. Never fly on the same frequency as another
RC vehicle in your area. The frequency of
the Commander 2 is shown on stickers on
the back of the transmitter.
Page 15

28
Troubleshooting
Unit does not operate 1. Transmitter "AA"batteries are depleted
or installed incorrectly as indicated by a
dim or unlit LED on transmitter or the low
battery alarm
2. No electrical connection
3. Aircraft battery is not charged
4. Crash has damaged the radio inside
the fuselage
1. Check polarity installation or replace with
fresh “AA” batteries
2. Push connectors together until they click
3. Charge battery fully
4. Replace the fuselage
Aircraft keeps turning in
one direction
1. Tail flaps need adjustment
2. Wing is not centered over the fuselage
1. Adjust stick trim lever (see page15) or adjust
tail flap position (see page 20–21)
2. Center the wing before each flight
Aircraft is difficult
to control
1. Tail flaps aren't adjusted properly
2. Wing or tail is damaged
1. Adjust tail flaps (see pages 20–21)
2. Repair or replace tail
Aircraft keeps pitching
up steeply
1. Tail incidence needs adjustment
2. Wing incidence needs adjustment
3. Wind is too gusty or strong
1. Adjust tail screw (see page 22)
2. Add wing shim (see page 23)
3. Postpone flying until wind is more calm
Aircraft won't climb 1. Battery isn't fully charged
2. Tail needs adjustment
1. Charge battery shortly before flying
2. Adjust tail screws (see page 22)
PROBLEM
POSSIBLE CAUSE
SOLUTION
Success Tips
1. Beginners should not fly in winds over
7 mph! By doing so, you could cause
severe damage to plane or injure
someone if you lose control.
2. It is important to choose a flying field
carefully—grass and soft ground with
600-foot diameter is optimal to fly
and will lengthen the life of your Firebird
Commander® 2.
3. Holding the right stick full over for too
long may cause the Firebird Commander
2 to spiral dive and it could crash. At the
very first sign of the Firebird Commander
2 beginning to spiral down, immediately
release the stick and give the opposite
control to level the wings.
4. Purchase an extra battery pack and a
variable rate DC peak charger to extend
your flying time at the flying field. You can
charge one battery in your car while you
fly with another.
5. If you’re gliding with the motor off, which
will extend your flight time by using less
battery power, allow the Firebird
Commander 2 a little more area for turns.
6. Position yourself at your flying field to
keep the sun at your back and out of your
eyes. Wear sunglasses on bright days.
7. Keep the Firebird Commander 2 upwind,
especially on windy days, to prevent it
from “flying away.” The wind is normally
stronger at higher altitudes than it is on
the ground.
8. Keep your plane in front of you so you
don’t have to turn in circles as you fly. Try
to avoid flying directly overhead.
9. Don’t attempt to fly or do combat
maneuvers beyond your flying abilities.
To learn more about flying RC model
airplanes, locate your nearest AMA club,
learn the AMA safety code and frequency
guidelines, and much more, we highly
recommend that you contact:
The Academy of Model Aeronautics
5161 East Memorial Drive
Muncie, Indiana 47302
Toll-Free (800) 435-9262
www.modelaircraft.org
29
Page 16

30
Horizon Hobby, Inc. guarantees your Firebird
Commander® 2 to be free from defects in material and
workmanship at the date of purchase. This warranty
does not cover any component parts, or damage by
use or modification. In no case shall Horizon Hobby’s
liability exceed the original purchase cost. Further,
Horizon Hobby reserves the right to change or modify
this warranty without notice.
This warranty covers only those products purchased
from an authorized Horizon Hobby dealer. Third party
transactions are not covered by this warranty. Proof of
purchase is required for warranty claims. Due to the
nature and operation of your Firebird Commander 2
and other HobbyZone
®
products, the warranty does
not extend beyond the initial pre-use testing. Carefully
check the parts and operation BEFORE your first use.
If you discover defects during pre-use testing, call our
Product Support Team toll-free at 877-504-0233 for
technical support.
In that Horizon Hobby has no control over the final
assembly, or material used for final assembly, no
liability shall be assumed nor accepted for any
damage resulting from use by the user of the final
user-assembled product. By the act of using the userassembled product, the user accepts all resulting
Warranty and Follow-Up Procedures
liability. Please note that once assembly has been
started, you must contact Horizon Hobby, Inc. directly
regarding any warranty questions. Please do not
contact your local hobby shop regarding warranty
issues. This will enable Horizon to better answer your
questions and service you in the event you need
warranty assistance.
Horizon Hobby, Inc. reserves the right to inspect any
and all equipment involved in a warranty claim. Repair
or replacement decisions are at the sole discretion of
Horizon Hobby, Inc. Collateral damage is not covered
under this warranty. If you, as the buyer or owner, are
not prepared to accept the liability associated with the
use of your Firebird Commander 2, you are advised to
return it immediately in new and unused condition to
the place of purchase.
If you have any questions concer ning the operation
of your Firebird Commander 2, please contact our
Product Support staff toll free at 1-877-504-0233.
If your product requires inspection, please follow these
steps in order to return it to us:
1. Call our Product Support team for retur n
authorization.
31
2. Use the “Service and Repair Checklist” from
www.horizonhobby.com under the support tab or
write a detailed letter that includes:
• Your name, address, home phone number,
and daytime phone number;
•
A list of the products being shipped for
inspection or repair;
•
A detailed account of the type of problems
you are incurring; and
•
The payment method you wish to use for any
purchases or charges, including credit card
type, number, expiration date and your name
as it appears on the card.
3. Submit proof of purchase, including purchase
date and retailer infor mation.
4. Make sure that the batteries are
unplugged and
removed. Please use packing material to separate
them from product.
5. Pack all components and accessories in the original
box, and then pack it in a sturdy box with packing
materials for safe shipping.
6. For inspection and/or repair, please ship your
product to:
Horizon Service Center
Attn: HobbyZone Department
4105 Fieldstone Road
Champaign, IL 61822
We suggest you ship your product back to us via a
carrier that provides package tracking and/or signature
required services. Horizon Hobby, Inc. is only respon
sible for product once it arrives and is accepted at
our facility. Most carriers require optional insurance to
cover damage or loss in transit, so please consider this
when shipping merchandise.
Warranty Service
Providing all warranty conditions have been met,
if there are defective parts, they will be repaired
or replaced without charge and shipped to you via
ground freight prepaid. Again, crash or other collateral
damage or expense is not covered under warranty.
Proof of purchase date and location is required for all
warranty service.
Non-Warranty Service
If our inspection finds the repair cost exceeds $50 or
more than 50% of the value of your product, we will
contact you with a repair estimate and advise you of
the available options.
If you have any warranty questions that have not
been answered by the information listed above,
please call our Product Support staff at
1-877-504-0233.
Page 17
Keep that Firebird
Commander® 2 flying! Spare parts are available from your dealer or
from Horizon Hobby direct (www.horizonhobby.com). Please check with your dealer first—
by supporting your dealer, they’ll be there when you need them. To locate your local dealer,
go to www.hobbyzonesports.com.
32
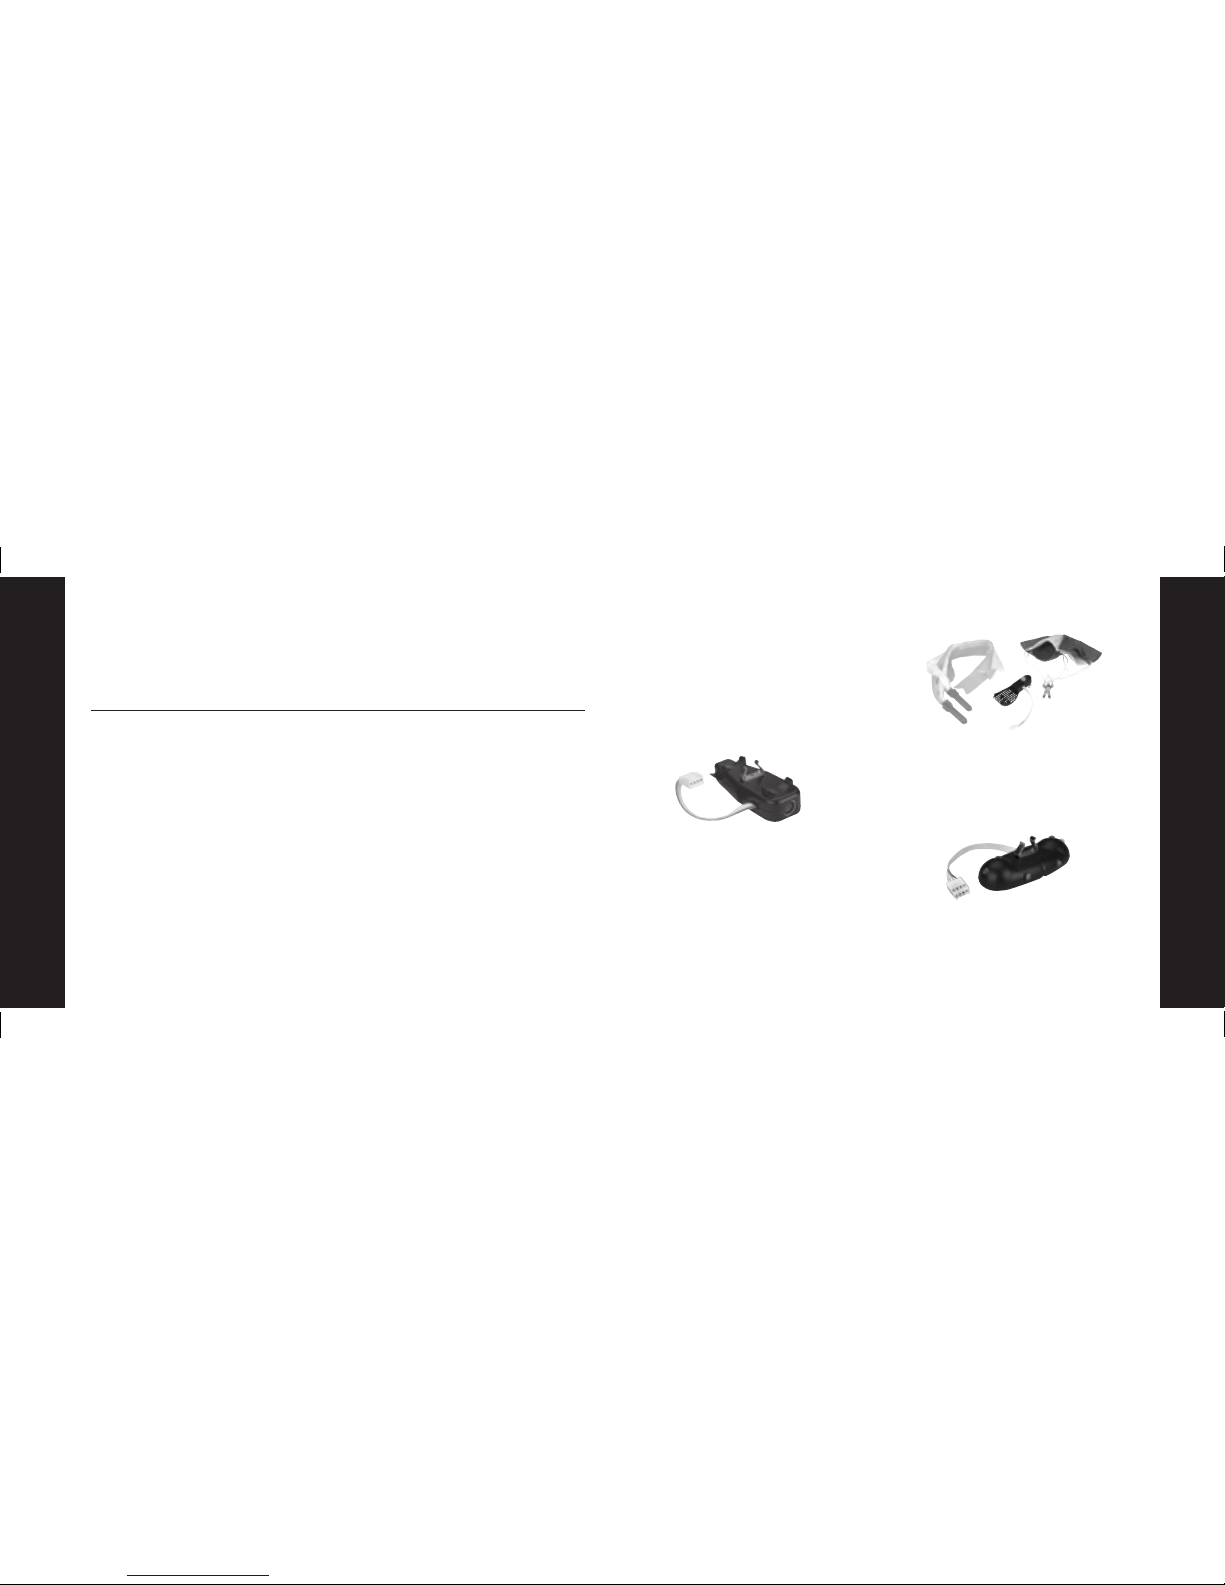
Replacement and Optional Parts
PART# DESCRIPTION MSRP PART# DESCRIPTION MSRP
HBZ2610 Standard Decal Sheet $4.99
HBZ2615 Instruction Manual $0.99
HBZ2616 Instructional Video CD $2.99
HBZ2617 Canopy Cover with Hardware $2.49
HBZ2618 Black Nose Piece $1.69
HBZ2631 White Tail with Accessories $9.99
HBZ2661 Fuselage (ACT): CH 1, 26.995 $49.99
HBZ2662 Fuselage (ACT): CH 2, 27.045 $49.99
HBZ2663 Fuselage (ACT): CH 3, 27.095 $49.99
HBZ2664 Fuselage (ACT): CH 4, 27.145 $49.99
HBZ2665 Fuselage (ACT): CH 5, 27.195 $49.99
HBZ2666 Fuselage (ACT): CH 6, 27.255 $49.99
HBZ1012 7.2V 900mAh Battery $24.99
HBZ1085 Motor Screws (5) $0.99
HBZ2519 Wall Charger w/Timer: 6-cell $9.99
HBZ2521 White Wing $14.99
HBZ2004 Propeller $2.99
HBZ2010 2 Wing Hold-Down Rods w/Caps $1.49
HBZ2016 Landing Gear $3.99
HBZ1058 Tx Antenna $4.99
HBZ1059 Red Tx Ribbon $0.79
HBZ1060 Tx Battery Cover $2.49
HBZ2011 White Rubberbands (5) $0.99
HBZ4060 Wing Shim, 1mm $0.99
HBZ2012 Tail V-Brace (White $1.49
HBZ2013 Tail Screws, White (2) $0.99
HBZ6035 Tail Horn/Kpr (2) $0.89
HBZ3351 Tx: CH 1 $24.99
HBZ3352 Tx: CH 2 $24.99
HBZ3353 Tx: CH 3 $24.99
HBZ3354 Tx: CH 4 $24.99
HBZ3355 Tx: CH 5 $24.99
HBZ3356 Tx: CH 6 $24.99
Optional Parts and Accessories
HBZ1026 Variable Rate DC Peak Charger $19.99
HBZ1013 8.4V 900mAh Battery $29.99
HBZ6023 Aerial Drop Module $19.99
HBZ6060 Streamer Bombs for ADM (2) $3.99
HBZ6061 Parachute Jumper for ADM (1) $3.99
HBZ4020 Sonic Combat Module $23.99
HBZ3510 Night Flight Module $19.99
HBZ4025 Stealth Target $23.99
33
X-port Accessories
Your Firebird Commander® 2 comes with
the ability to add to the excitement of flying.
HobbyZone’s exclusive X-Port
™
technology allows
for such things as air-to-air combat, dropping
bombs, and even night flight. These items (sold
separately) instantly add fun and excitement to XPort-equipped aircraft.
Rule the air with the Sonic Combat Module
(HBZ4020). You can take on other X-Port-equipped
aircraft by attaching this to your aircraft and shoot
ing down your buddy’s aircraft. When you “hit”
his/her aircraft, a high-pitched sound can be heard
that signals you have hit his/her aircraft, leaving the
motor disabled for about 8 seconds. He/she will
still maintain the ability to steer for a safe landing
or position himself/herself for a counter attack.
Parachute drops and streamer bombs are included
with the Aerial Drop Module (HBZ6023). See
who can come the closest to a selected target
site, or simply have fun watching the parachutists
fall slowly back to the earth with the easy-to-use
release mechanism of the electro magnetic latch
that is released via the transmitter.
Fly at night with the Night Flight Module
(HBZ3510). Recommended for experienced
pilots, this module uses super-bright LED’s to
illuminate the wing and tail of the selected X-Portequipped aircraft. There are 4 different light modes
from which you can choose.
Replacement and Optional Parts (continued)
Page 18

Step 2
Step 2
34 35
Once you’ve mastered flying your Firebird
Commander® 2, we recommend that you
try a 3-channel plane from HobbyZone® for
the most successful transition to using a 3channel airplane. The Aerobird Challenger™
is a great next step, but you could also try
the Aerobird Xtreme.™ Both of these aircraft
are X-Port equipped, so you’ll still be able
to have fun with the X-Port™ accessories
you use with your Firebird Commander 2.
Be warned, however, that the Aerobird
Xtreme is much larger and heavier, and will
therefore fly much faster than the Aerobird
Challenger. If you choose to go from flying
the Firebird Commander 2 to flying the
Aerobird Xtreme, we recommend that you
have a very experienced RC pilot with you
for your first flights until you get comfortable
flying a larger, faster airplane. Reacting
to difficult situations with the Firebird
Commander 2 will be much different than
with the Aerobird Challenger and Aerobird
Xtreme since you use a 3-channel transmitter
and the airplanes are bigger and faster.
We hope you enjoy flying your new Firebird
Commander 2, and thank you for supporting
HobbyZone. Please let us know how we
can help you in the future. We hope your
flights with this plane are just the beginning
of a long and positive RC experience. Best
wishes in the hobby.
Sincerely,
The HobbyZone Team
Future RC Flight
Optional Parts and Accessories
There are many optional parts and accessories that
you can buy to make your flying experience more
fun. In addition to X-Port
™
items, you can also
purchase additional battery packs and a variable
rate DC peak charger.
The battery pack that comes with your Firebird
Commander® 2 is a 7.2V 900mAh Ni-MH battery
pack (HBZ1012). It is helpful to have an extra one
or two of these on hand while you’re flying so that
one can be charging while you’re using the other
ones.
For even more power, you can purchase the 8.4V
900mAh Ni-MH battery pack (HBZ1013).
To charge these packs when you’re out flying,
you
will need the variable rate DC peak charger
(HBZ1026) that plugs into the cigarette lighter
in any vehicle. The advantage to having this
charger is that it will charge your battery packs in
40 minutes or fewer when you’re out at the flying
field or park, as compared to the 3-hr wall charger
that comes with your Firebird Commander 2.
Replacement and Optional Parts (continued)
 Loading...