

Page 1
HobbyZone
®
products are distributed exclusively by
Horizon Hobby, Inc.
4105 Fieldstone Road
Champaign, IL 61822
©2003 Horizon Hobby, Inc.
5611
hobbyzonesports.com
6
05482 16024 4
HBZ2515
Instruction Manual
™
5611_5(fbcmdr manual) 3/12/03 2:16 AM Page 36
Page 2
W
elcome
to the World of
Crash damage is not covered
under the warranty.
Be sure to read the warranty
on page 30 and "Warnings and
Safety" on page 27 before you
proceed to Step 1.
Once you’re more experienced, you can enter Expert Mode,
allowing you to have full control at all times for tighter turns
and spirals, as well as other dramatic maneuvers. This extra
maneuverability comes in handy when using the X-port. This
HobbyZone exclusive port allows the attachment of exciting
accessories, including the Sonic Combat Module (SCM) for
air-to-air and air-to-ground fighting, and the Aerial Drop
Module (ADM), which allows items such as parachutes and
streamers to be dropped.
Our mission at HobbyZone is to make sure you have success
with the Firebird Commander-to have safe fun and learn a few
things along the way.
Congratulations! You have the world's first radio control air-
plane that can take you from a complete beginner, all the way
to Air Combat—the Firebird Commander™ from HobbyZone.
The Firebird Commander is equipped with revolutionary soft-
ware: Smart-Trak™. When Smart-Trak is in Standard Mode, it
automatically recognizes mistakes beginners make (such as
over-control,) and compensates for them, while also in-
creasing control during gliding with the motor off to maintain
positive control. This software makes the Firebird Commander
one of the easiest planes to fly.
5611_5(fbcmdr manual) 3/12/03 2:16 AM Page 2
Page 3
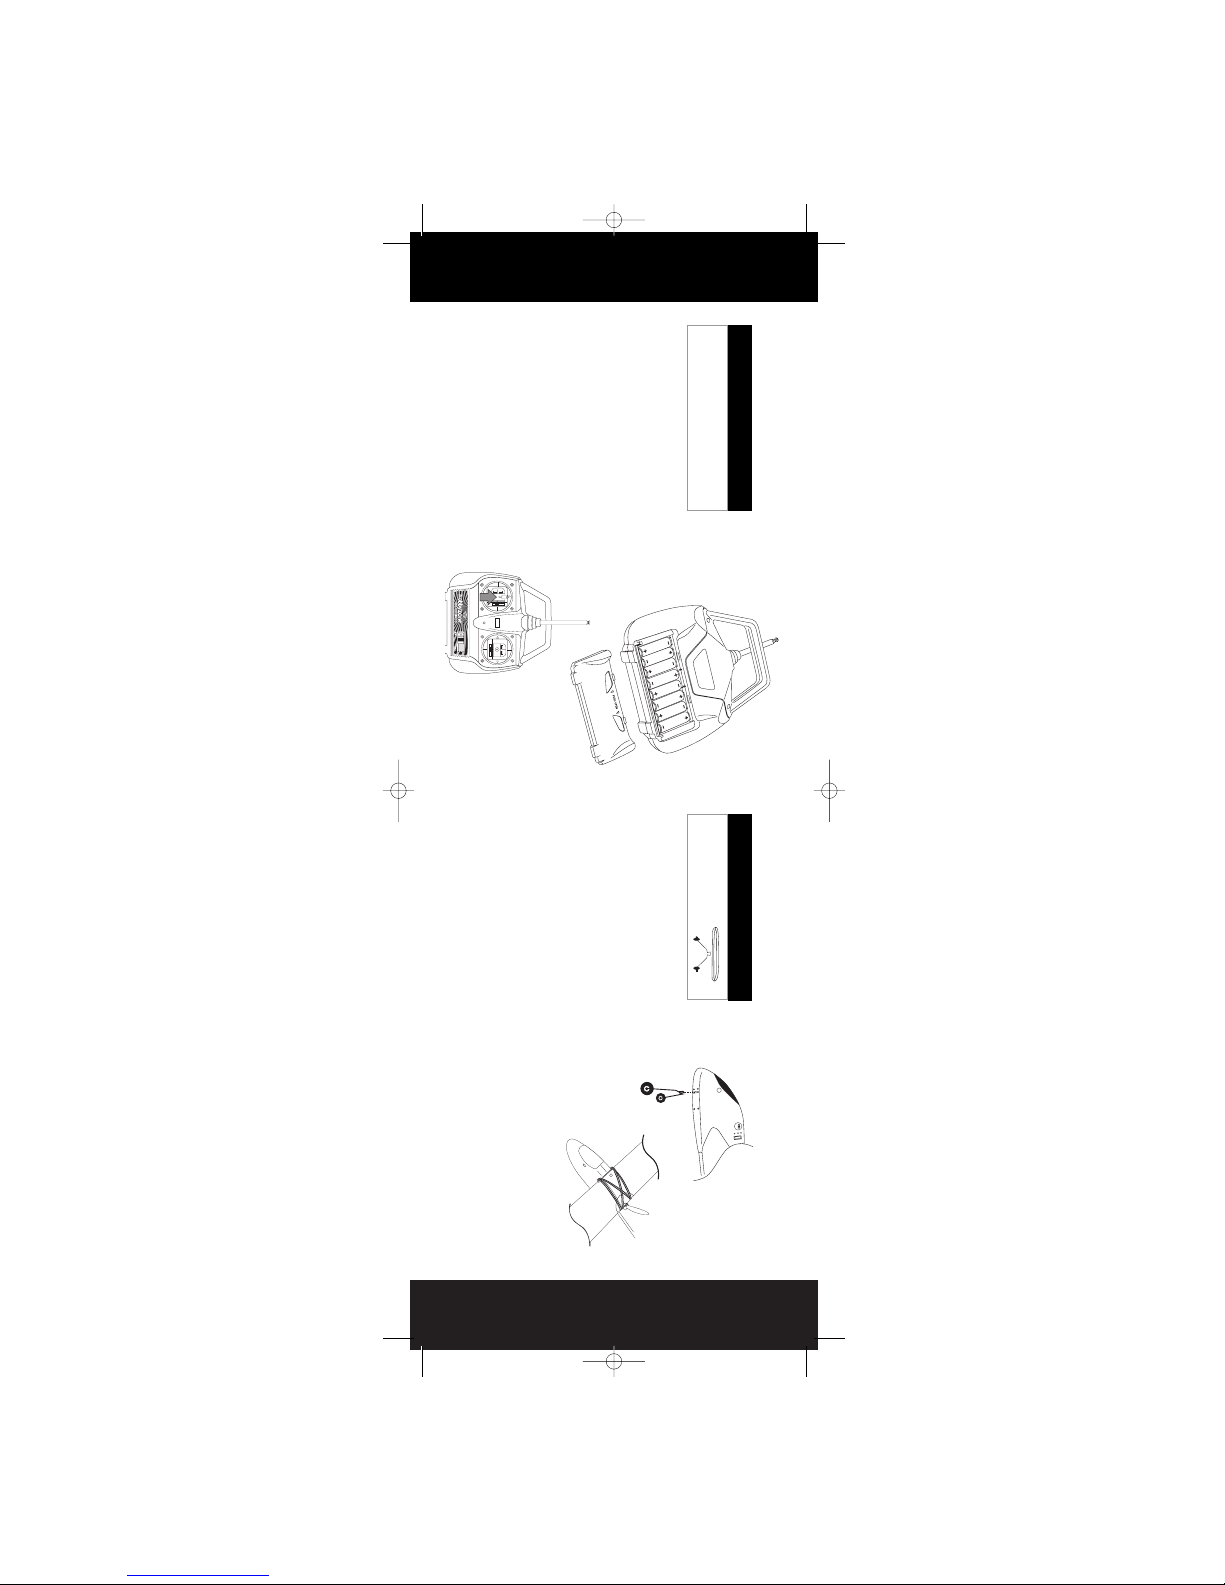
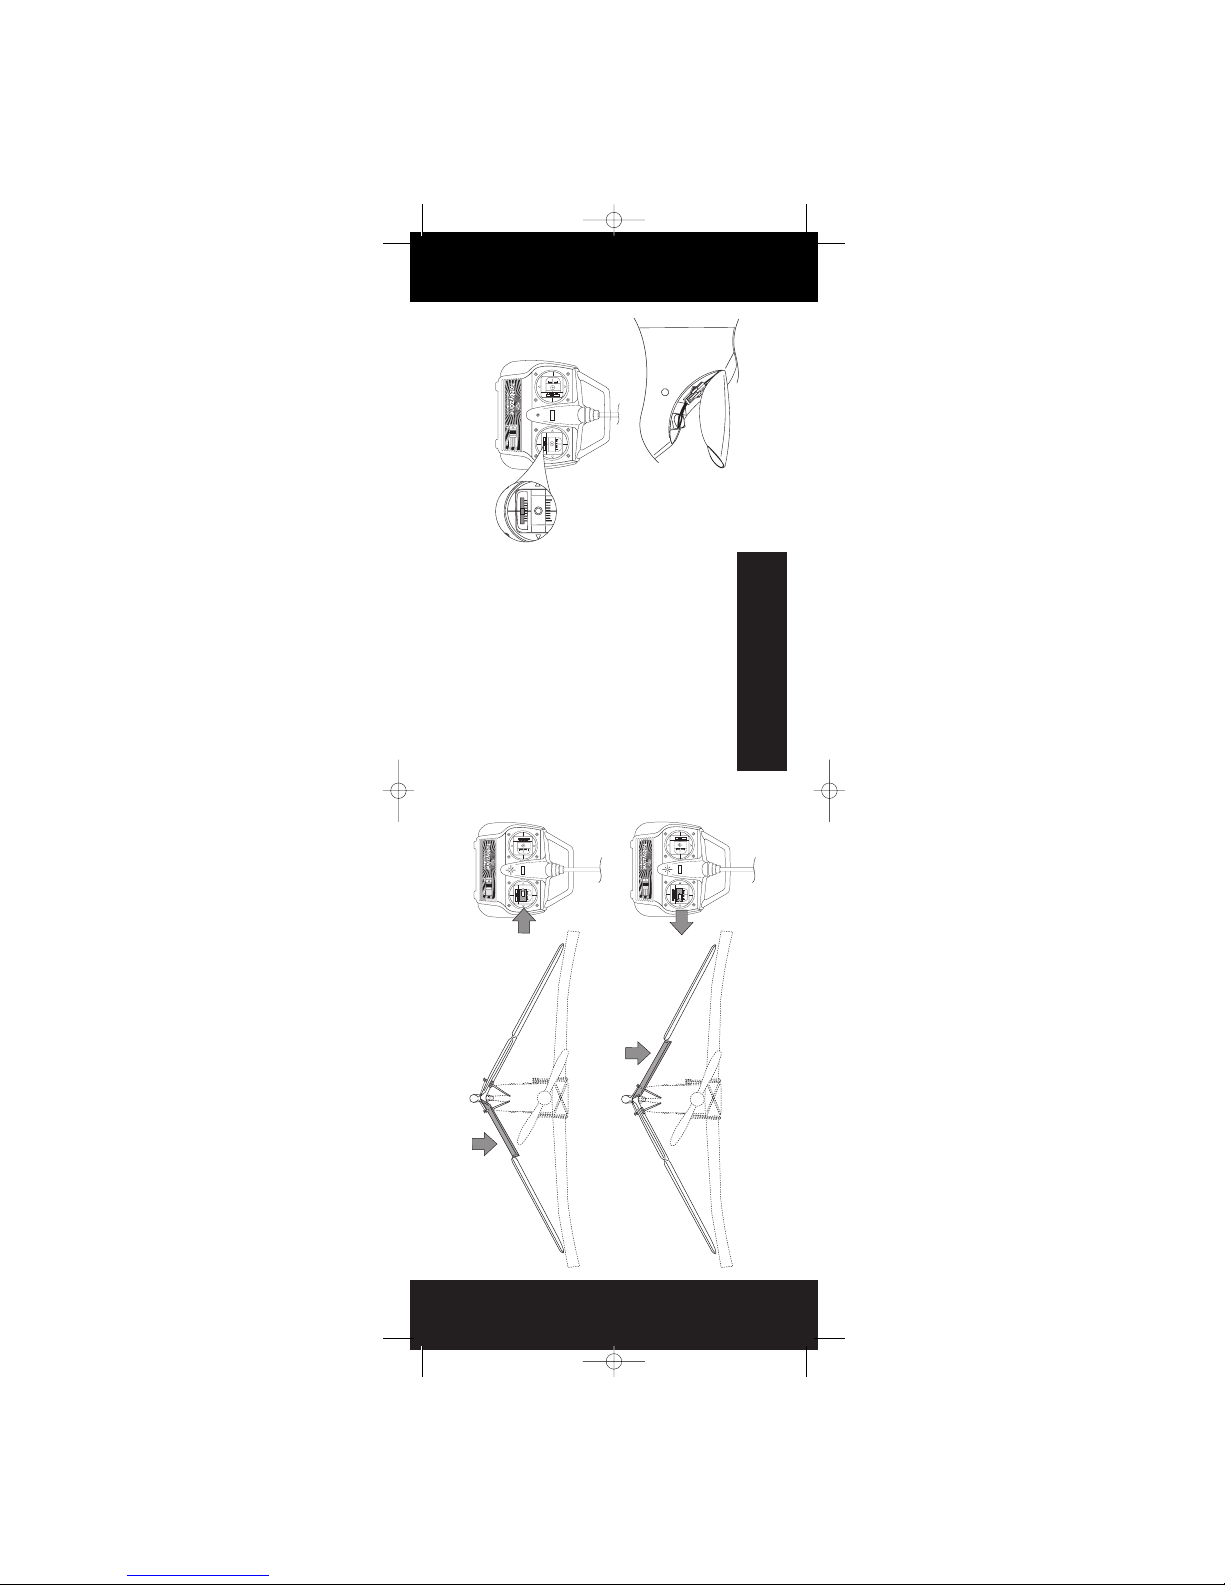
2. Secure the wing in place by attaching two
rubber bands across the middle and one on
each side as shown. Locate the rubber bands
on the peg hooks as close as possible to the
fuselage sides.
3. Before each flight, make sure the front and
trailing edges of the wing are exactly centered
on the fuselage.
Step 2
5
Step 1
4
Mounting the Landing Gear
1. Insert the landing gear into the slot on bottom
of the fuselage.
Note: When flying without X-port modules and
landing on grass, it is not necessary to have the
landing gear installed.
Attaching the Wing
1. Center the wing on the fuselage by aligning
the center dot on the wing with the fuselage
top seam and by centering the half circle on
the wings trailing edge over the fuselage
center.
1. Remove the transmitter back cover by pushing
down with thumbs, as indicated by the arrows.
2. Install the batteries. Use fresh 1.5V "AA"
batteries only.
3. Watch polarity. Replace the cover.
4. To test, switch on the transmitter. The LED
should glow brightly.
5. Replace the batteries when you hear the low-
battery alarm (beeping sound).
ON
OFF
Needed for Step 1
"AA" Heavy-Duty Batteries
(x8 - included)
Transmitter
Needed for Step 2
Rubber Bands (x4)
Main Landing Gear
Wing and Landing Gear Attachment
5611_5(fbcmdr manual) 3/12/03 2:16 AM Page 4
Page 4
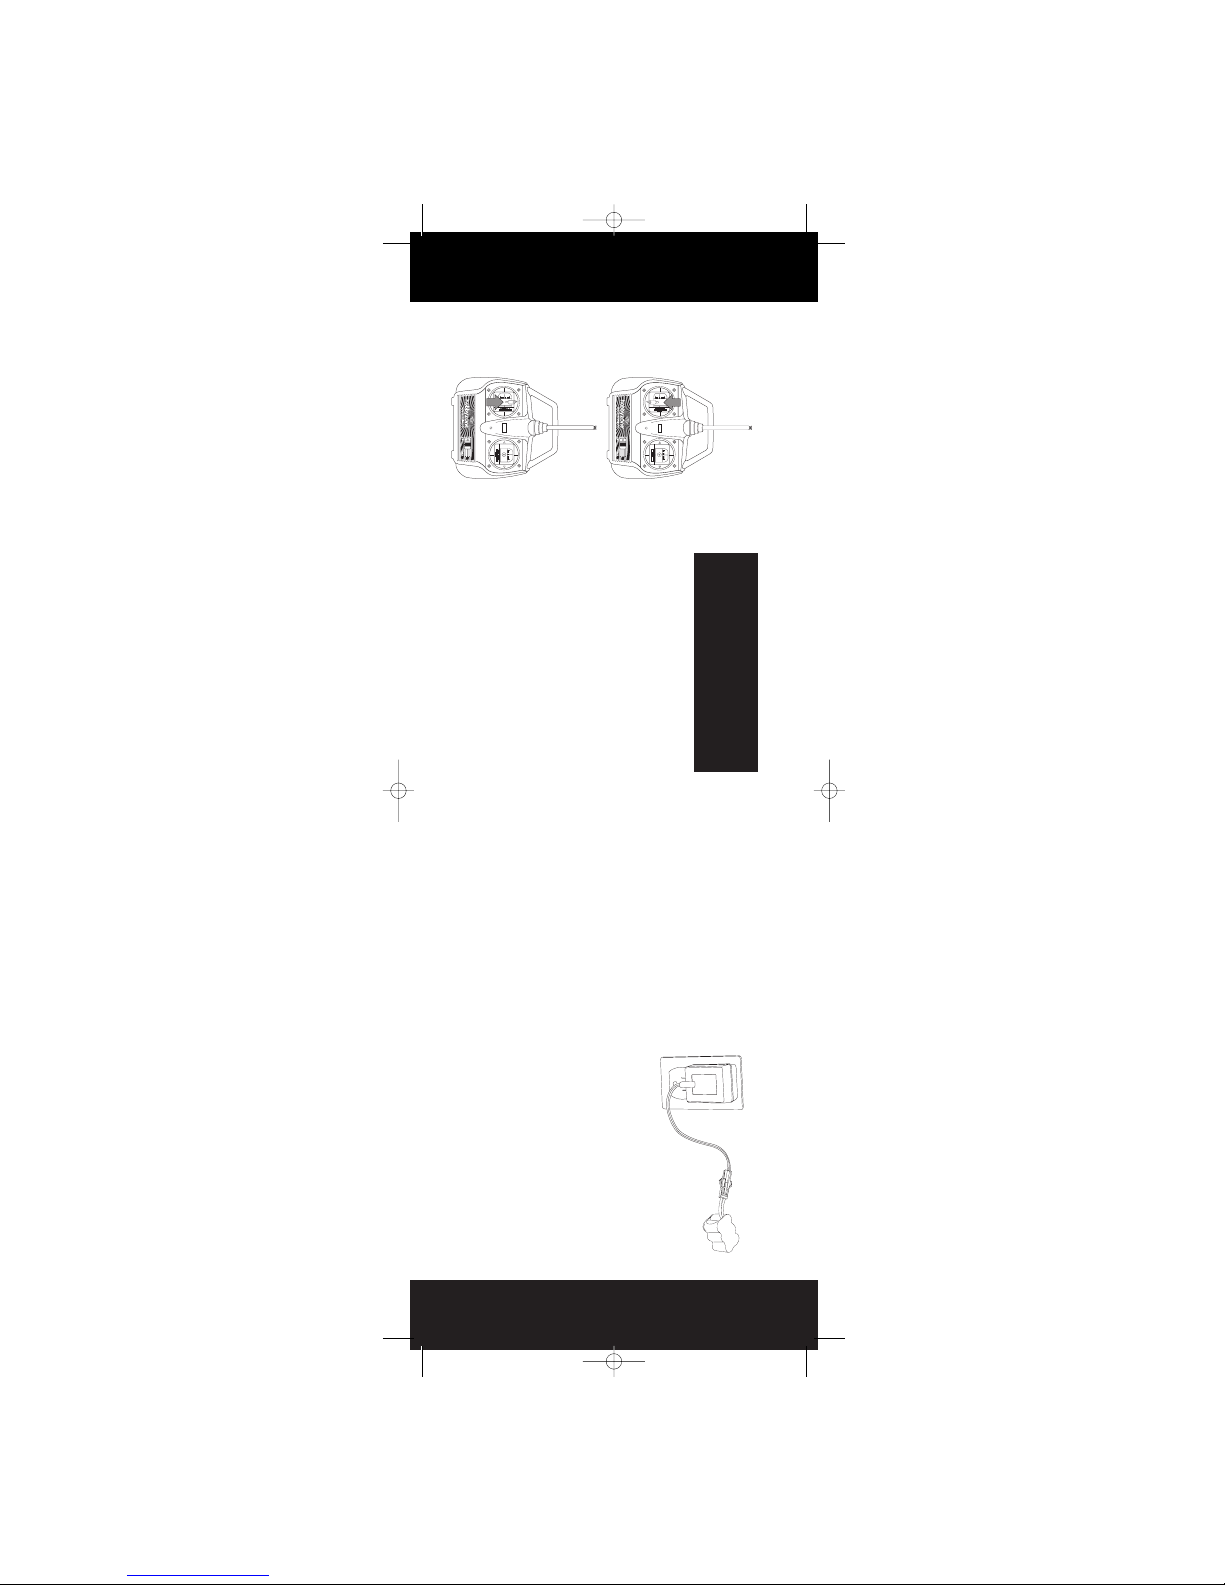
Important: Charge the battery shortly before
flying. If you charge the battery 12–48 hours
before flying, charge again for 30 minutes right
before you fly. Stop charging immediately when
the battery becomes warm, indicating it is fully
charged.
Step 4
7
Charging the Aircraft Battery
Step 3
6
Note: Never charge a hot battery or a battery
that is already charged. Always discharge before
every charge. See Step 3 for instructions on
discharging.
See "Warnings and Safety" on page 27.
1. The charger supplied with the Firebird
Commander has a built-in timer. Plug the
battery into the charger, and then plug the
charger into the wall. The LED indicator should
glow constantly. After about 3 hours, the LED
will turn off. At this time, the battery is charged
and ready to use.
2. To charge another battery, the charger must
first be unplugged from both the wall and the
battery to reset the timer.
ON
OFF
ON
OFF
Adult Supervision Required
WARNING: Keep everything clear of the propeller
and hold the plane securely. A moving propeller
can cause severe injury.
1. Turn the transmitter on.
2. Install the battery in the fuselage slot and plug
in the connector.
3. Move the transmitter's left stick all the way
down and hold for one second. This will arm
the motor.
4. Move the transmitter's left stick up. Since most
batteries come partially charged, the prop
should spin at high speed. (If the motor does
not run, proceed to charging the battery.)
5. In order to fully discharge the battery, run the
motor at high speed until it shuts off. If there is
not enough charge in the battery to power the
propeller, then proceed to Step 4.
6. When finished with the motor test, be sure to
disconnect the battery first then turn off the
transmitter.
Motor Test and Battery Discharging
5611_5(fbcmdr manual) 3/12/03 2:16 AM Page 6
Page 5
Step 5
9
Tail Control Test continued
Step 5
8
Tail Control Test
WATCH OUT! Be sure to keep everything clear of
the propeller before starting the control test, in
the event that you accidentally turn on the motor.
1. Switch on the transmitter. Check the LED.
Do not touch the sticks for 2 seconds while
the transmitter automatically calibrates the
controls.
2. Install the battery in the fuselage slot and plug
in the connector.
3. Move the right stick side to side. The flaps
should move as on the following page. If each
flap is not level with the rest of the tail surface
when the right stick and trim lever are cen-
tered, adjust the control lines so they are level
(see page 20).
Note: The small levers under or beside the con-
trol sticks are called trim levers and are used to
adjust the "neutral" point of your control stick. It's
very important that these levers are centered
when switching on the transmitter and performing
the control test.
View from Rear
Moves Up
Moves Up
View from Rear
5611_5(fbcmdr manual) 3/12/03 2:16 AM Page 8
Page 6
Step 7
11
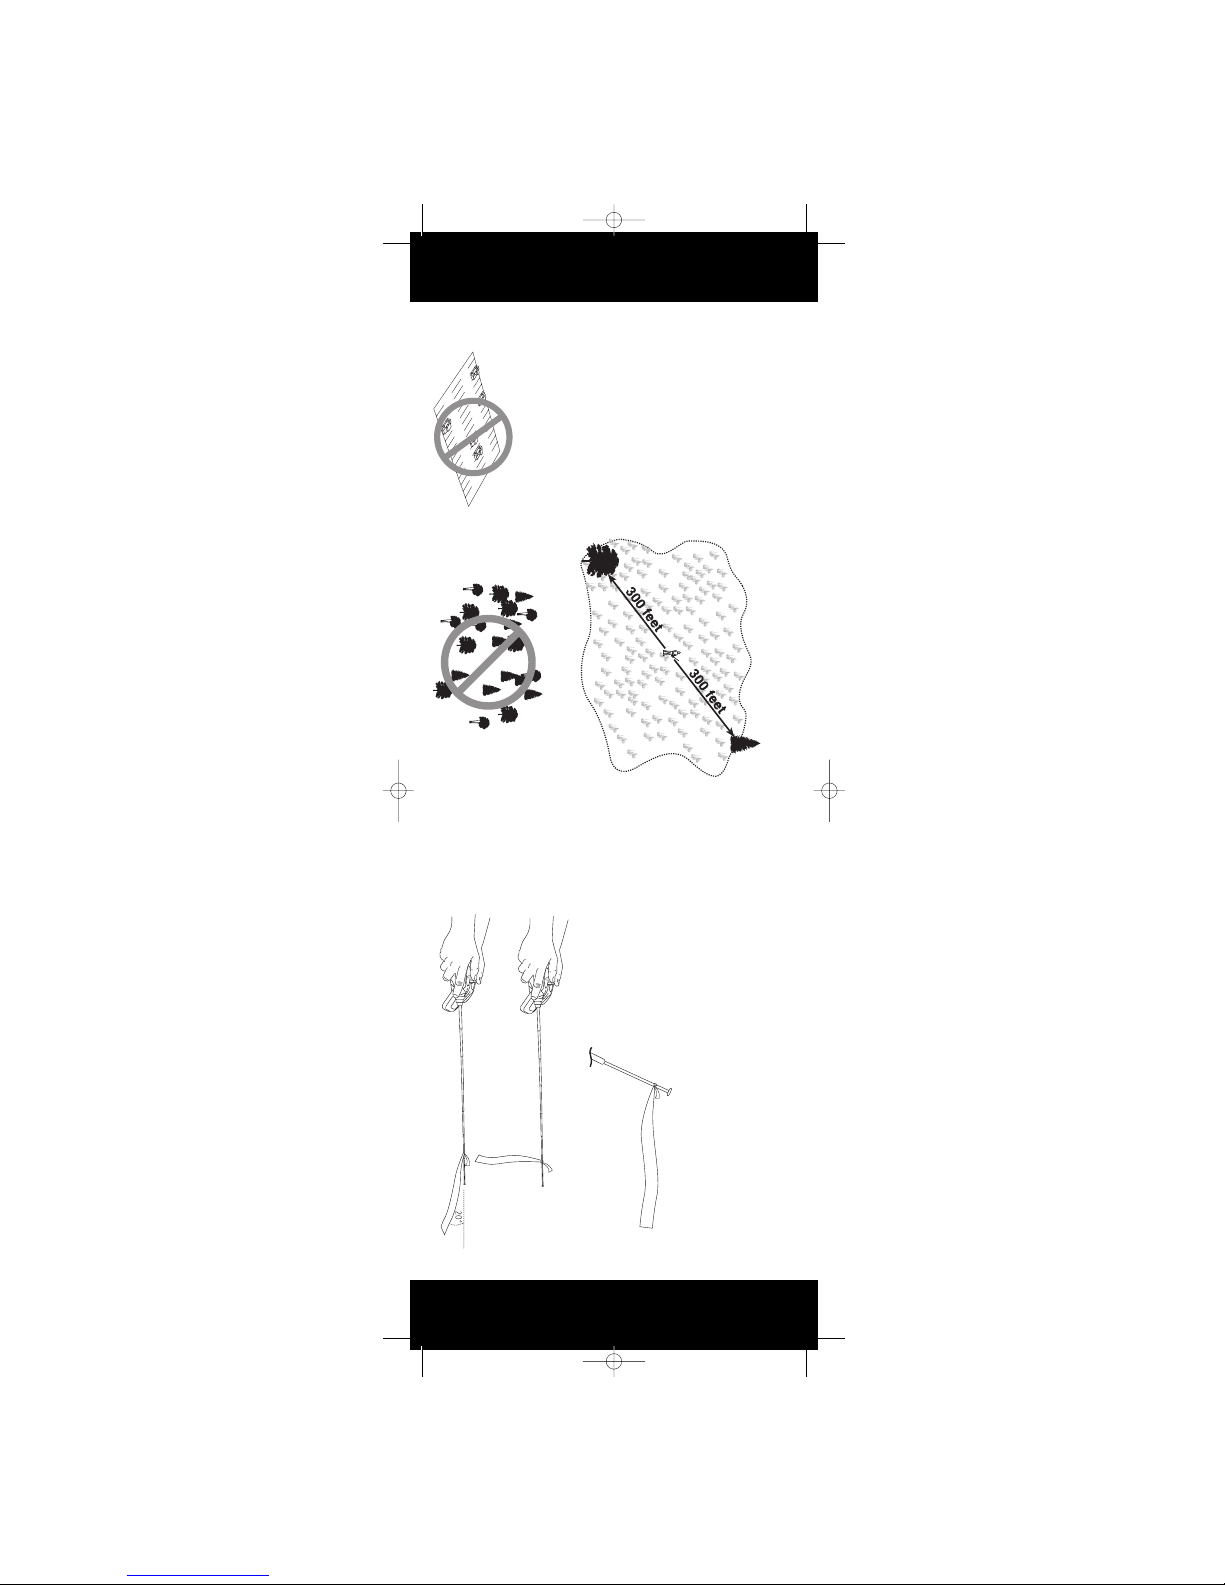
Choose a Calm Day
Step 6
10
Choose a Large, Open Grassy Field
You want to fly! If you wait until the day is right,
you will have a successful flight. On your first
flights, do not fly if the wind is more than 5 mph!
1. Tie the included red flag to the end of your
transmitter antenna.
2. Hold the transmitter flat so the antenna is
parallel to the ground and note how much the
flag moves in the wind. If the flag hangs down,
you're good to fly. If the angle between the
antenna and the flag is less than 20˚, it's too
windy for beginning pilots to fly.
•A large, open grass field is required. Your
Firebird Commander flies approximately
20 mph, so it covers ground fast. The bigger
the field, the better!
• It is absolutely essential to have a minimum of
600 feet of clear space in all directions from
the pilot. If you ignore this direction, you will
regret it.
IMPORTANT: Do not fly over or near people,
buildings, power lines, highways, train tracks,
vehicles, trees, water, pavement, gravel, any hard
surface or any object you don't want to crash into.
Please take this warning seriously to keep people,
property and your Firebird Commander safe. Crash
damage is NOT covered by the warranty.
SUCCESS TIP: Be smart! Follow this tip and pro-
tect your Firebird Commander—you'll be glad you
did. For beginners, flying in too much wind is by
far the #1 reason for crashes and/or lost planes.
5611_5(fbcmdr manual) 3/12/03 2:16 AM Page 10
Page 7

Step 8
13
Range Test continued
Step 8
12
Range Test
You will need two people to do the range test:
one to hold the transmitter and one to hold the
airplane.
1. One person holds the transmitter; the other
person walks 100 paces away with the air
plane.
2. Extend the transmitter antenna completely and
turn the transmitter on.
3. Plug in the airplane battery and close the hatch
cover.
4. Pull the throttle stick back to arm the motor.
5. As the first person moves both of the trans-
mitter controls at the same time, the other
person watches to be sure the airplane's motor
and tail controls operate smoothly.
6. If an X-port accessory is attached, test it by
pulling down on the left stick to check that it
operates correctly.
WATCH OUT! The person holding the airplane
should hold it so that the propeller does not come
in contact with any part of their body.
If model does not range test correctly, do not fly.
Call Horizon Hobby Product Support Staff toll-
free at 1-877-504-0233 for directions on how
to proceed.
5611_5(fbcmdr manual) 3/12/03 2:16 AM Page 12
Page 8

Step 9
15
Runway Takeoff
Step 9
14
Hand Launch
Hand Launch
1. On first flights, have a second person
(adult recommended) launch the Firebird
Commander™ while the pilot controls with the
transmitter. Adult assistance is always recom
mended with pilots 12 years of age or younger.
2. Make sure the battery is fully charged.
3. While holding transmitter in one hand, push
throttle stick to full on (up) with thumb.
4. Take a couple of steps and launch the model
directly into the wind. Keep the wings level.
Use medium force. Do not throw it up or down.
Point it level with the ground when releasing.
Think of it as a javelin that you are throwing
20 feet away.
Runway Takeoff
(Not recommended for inexperienced pilots)
1. Stand behind the Firebird Commander™
and point it directly into wind on smooth
asphalt or concrete.
2. Apply full power and adjust the right control
stick as necessary to keep the Firebird
Commander headed directly into the wind.
3. If the battery is fully charged, the Firebird
Commander should lift off the ground in
approximately 35 feet.
WATCH OUT! Keep the spinning propeller away
from your hair, head and hands or injury may
occur.
IMPORTANT: Before launching, determine the
wind direction by watching which way the red
transmitter ribbon is blowing.
5611_5(fbcmdr manual) 3/12/03 2:16 AM Page 14
Page 9

Step 10
17
Flying
Step 10
16
Flying
Important: Be careful when holding the right
stick full-over right or left for extended amounts
of time. In some cases, this can cause the model
to spiral dive, and if it does not have sufficient
altitude, to crash. If you see the Firebird
Commander™ beginning to enter a spiral, release
the right stick.
1. After launching, the model will begin climbing.
Keep the throttle full on.
2. Make right and left adjustments of the right
control stick to keep it flying straight into the
wind. Don't attempt a turn until model reaches
50 feet of altitude.
3. Control range is 2500 feet. Don't let the model
fly too far away. Keep upwind, especially if the
wind is over 10 mph, or the wind may carry
it away.
Turning
Hold the right stick in the direction you want the
model to turn.
Trimming
If the model always turns one direction, use the
trim control lever below the control stick to cor-
rect (see below). The model should fly straight
with the control stick at neutral. See page 20 if
additional adjustment is needed.
5611_5(fbcmdr manual) 3/12/03 2:16 AM Page 16
Page 10

Step 12
19
Landing
Step 11
18
Throttle Adjustment
Full Throttle
Full Throttle
Approx. 50% Throttle
Reduced Throttle
1. Climb to an altitude of 100 feet or more with
full throttle.
2. To achieve a level "cruising" altitude, reduce
power by moving the throttle stick down to
approximately 50% of full-on.
3. To reduce altitude, reduce throttle.
4. To increase altitude, increase throttle.
WATCH OUT! If you're flying with the motor off
or at a low speed, allow the Firebird Commander a
bit more area for turns.
When you notice that the Firebird Commander™
no longer climbs well under full power (normally
after approximately 12 to 16 minutes), the battery
is getting low, and it's time to land. Line the
model up, heading directly into the wind toward
the desired landing spot. At 10 feet of altitude,
gradually reduce the throttle stick to turn off the
motor. The Firebird Commander will glide in for a
landing.
Auto Cut-Off Feature: When your motor battery
gets low enough, this feature will automatically
shut off the motor and save enough battery to
power the radio and tail control so you can land
safely. If the motor cuts off, prepare to land
immediately.
WARNING: Do not attempt to catch the airplane
or injury may result. Also, be sure to turn motor
off before you touch down or damage can occur
to your wing and propeller. Remember to always
land directly into the wind.
Expert tip: As you get more experienced at flying,
try adding a small "blip" of power just before
touchdown. With some practice, you'll be able to
land it right on target.
Reduce power at 10 feet
5611_5(fbcmdr manual) 3/12/03 2:16 AM Page 18
Page 11

Step 13
21
Making Adjustments— Plane Turns to the Left or Right
Step 13
20
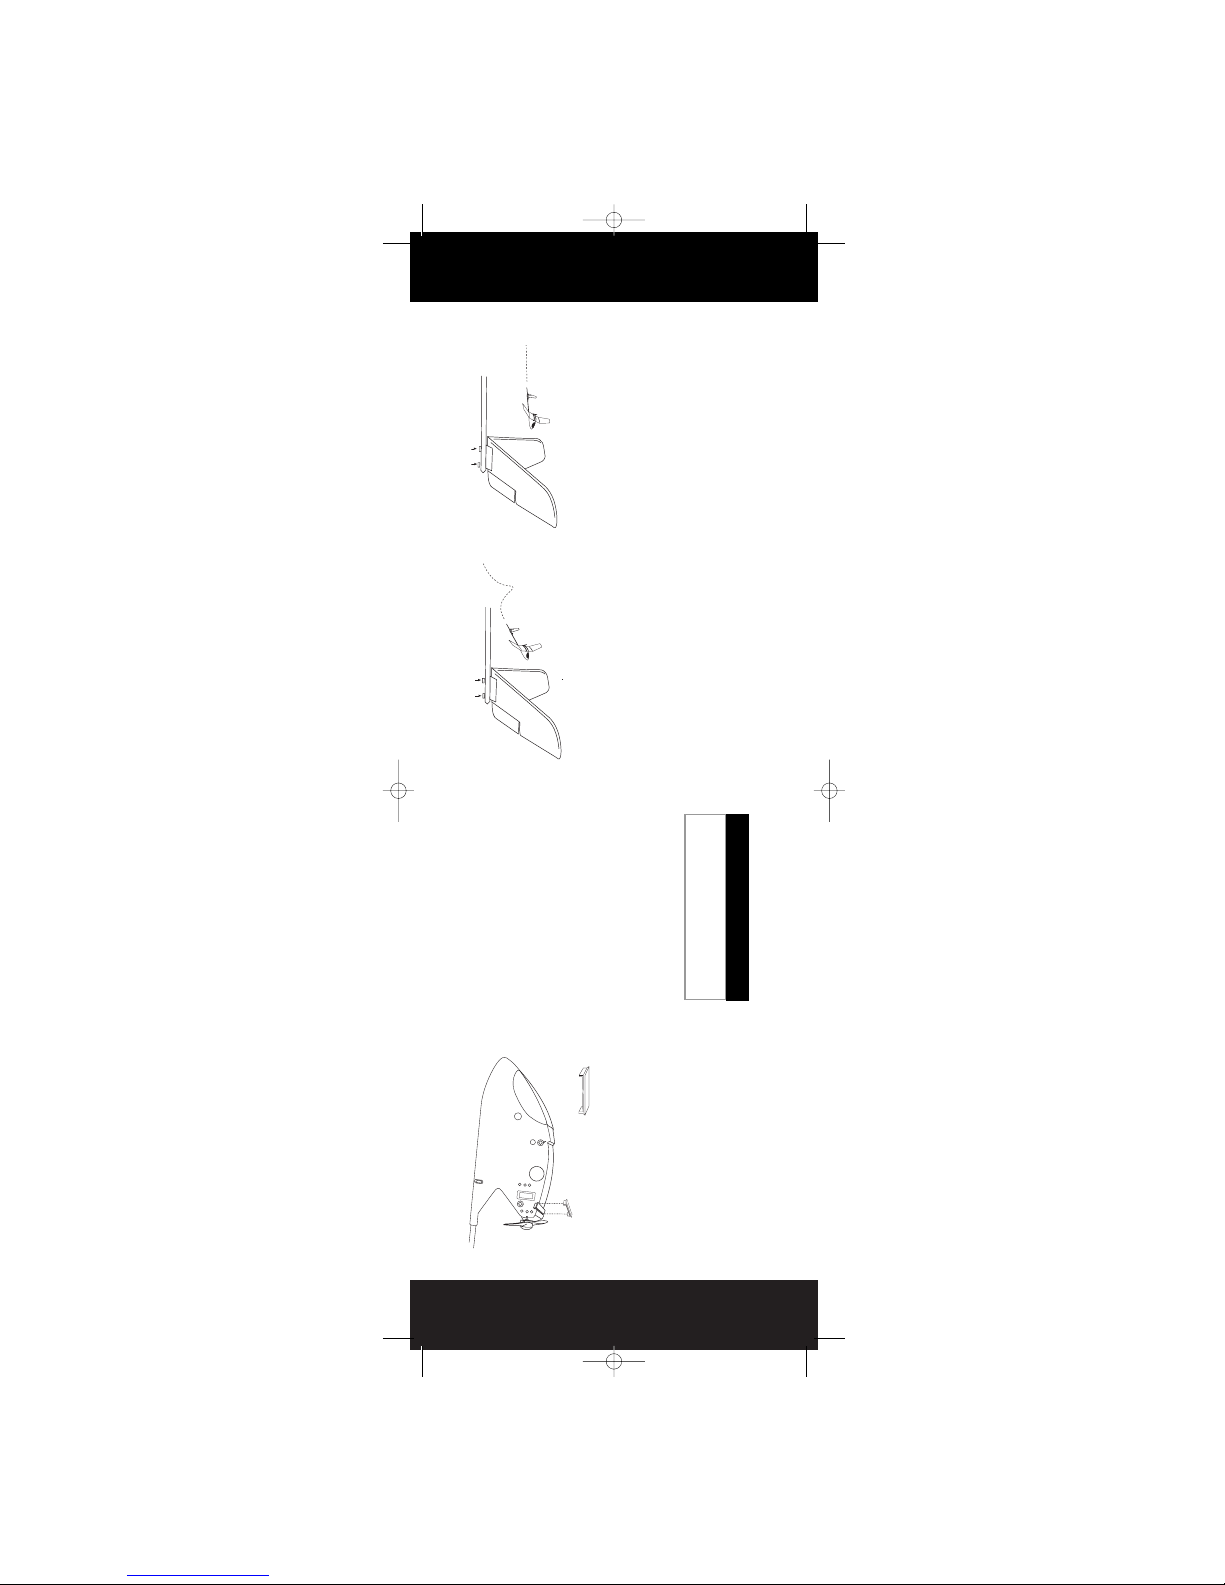
Making adjustments— Leveling the Tail Control Flaps
Before making your first flight, if tail control flaps
are not level with rest of tail surface, adjust them
so they are level by doing the following:
1. Turn the transmitter on, plug in aircraft battery
and center the right control stick and trim lever.
2. Use your fingers or a small flat screwdriver to
turn the slotted spool on the control horn.
Depending on the direction you turn, this will
lengthen or shorten the control line.
3. While applying some tension to the control
lines, adjust until the control surfaces are level
with the rest of the surface.
A. If the Firebird Commander keeps turning to
the left and adjusting the trim control lever
(page 17) does not correct enough to fly
straight with the stick at neutral:
1. Adjust the control line so that the left tail flap
is 1/16" above the rest of the tail surface.
2. Test fly.
3. If it still flies to the left, repeat the above
procedure, adding 1/16" each time until it
flies straight.
B. If the Firebird Commander keeps turning to the
right and adjusting the trim control lever (page
17) does not correct enough to fly straight with
the stick at neutral:
1. Adjust the control line so that the right tail flap
is 1/16" above the rest of the tail surface.
2. Test fly.
3. If it still flies to the right, repeat the above pro-
cedure, adding 1/16" each time until it flies
straight.
IMPORTANT: If there is a bend (even a small one) in the tail or wing or a tear near the flap areas, it is
impossible to have correct flight control. Replace the damaged part immediately!
5611_5(fbcmdr manual) 3/12/03 2:16 AM Page 20
Page 12
Step 15
23
Step 14
22
Making Adjustments to the Climb Rate
A. If the Firebird Commander™ (with a fully
charged battery) does not climb fast enough with
full throttle, you can adjust the climb rate by:
1. Tightening the front tail screw in one full turn
and loosening the rear tail screw one full turn.
2. Test fly.
3. Repeat the above procedure if necessary until
the Firebird Commander climbs adequately
under full power.
B. If the Firebird Commander climbs too fast with
full throttle by climbing at a steep angle, stalling
and keeps repeating climbing sharply and stalling,
do the following:
1. Loosen the front tail screw one full turn and
tighten the rear screw one full turn.
2. Test fly.
3. Repeat the above procedure if necessary until
your Firebird Commander climbs at a steady
rate.
4. If after making maximum adjustments your
Firebird Commander still climbs too steeply,
add the wing shim (see page 23.)
Screw In Screw Out Screw InScrew Out
Adding the Wing Shim—To Adjust Climb Rate and Speed
If the climb rate is still too steep after making
the tail screw adjustments on page 22, add the
included wing shim.
1. Place the wing shim on top of the fuselage at
the rear of the wing saddle as shown.
2. Place the wing over the wing shim and rubber
band the wing to the fuselage as normal.
This will cause the Firebird Commander to
climb less steeply and reduce the tendency
to repeatedly climb and stall. Add the wing shim
when the wind is gusting more than 10 mph.
IMPORTANT: Adding the wing shim will cause
the Firebird Commander to fly faster, due to the
wing's reduced incidence angle.
CH
Needed for Step 15
1mm wing shim (included)
5611_5(fbcmdr manual) 3/12/03 2:16 AM Page 22
Page 13
Step 16
25
Entering Expert Mode continued
Step 16
24
Once you have mastered the Smart-Trak™
Standard Mode of the Firebird Commander™, you
can activate the Expert Mode to disable the soft-
ware portion of Smart-Trak. In this mode, you will
have full control at all times. The Firebird
Commander will turn tighter and easily enter a
spiral. This is great for combat and experienced
pilots, but not for beginners!
Note: The expert mode is recommended but
not required when using X-port accessories.
The Smart-Trak Standard Mode is calibrated for
use with the standard 6-cell battery. The optional
7-cell battery is only recommended for experts
using the Expert Mode.
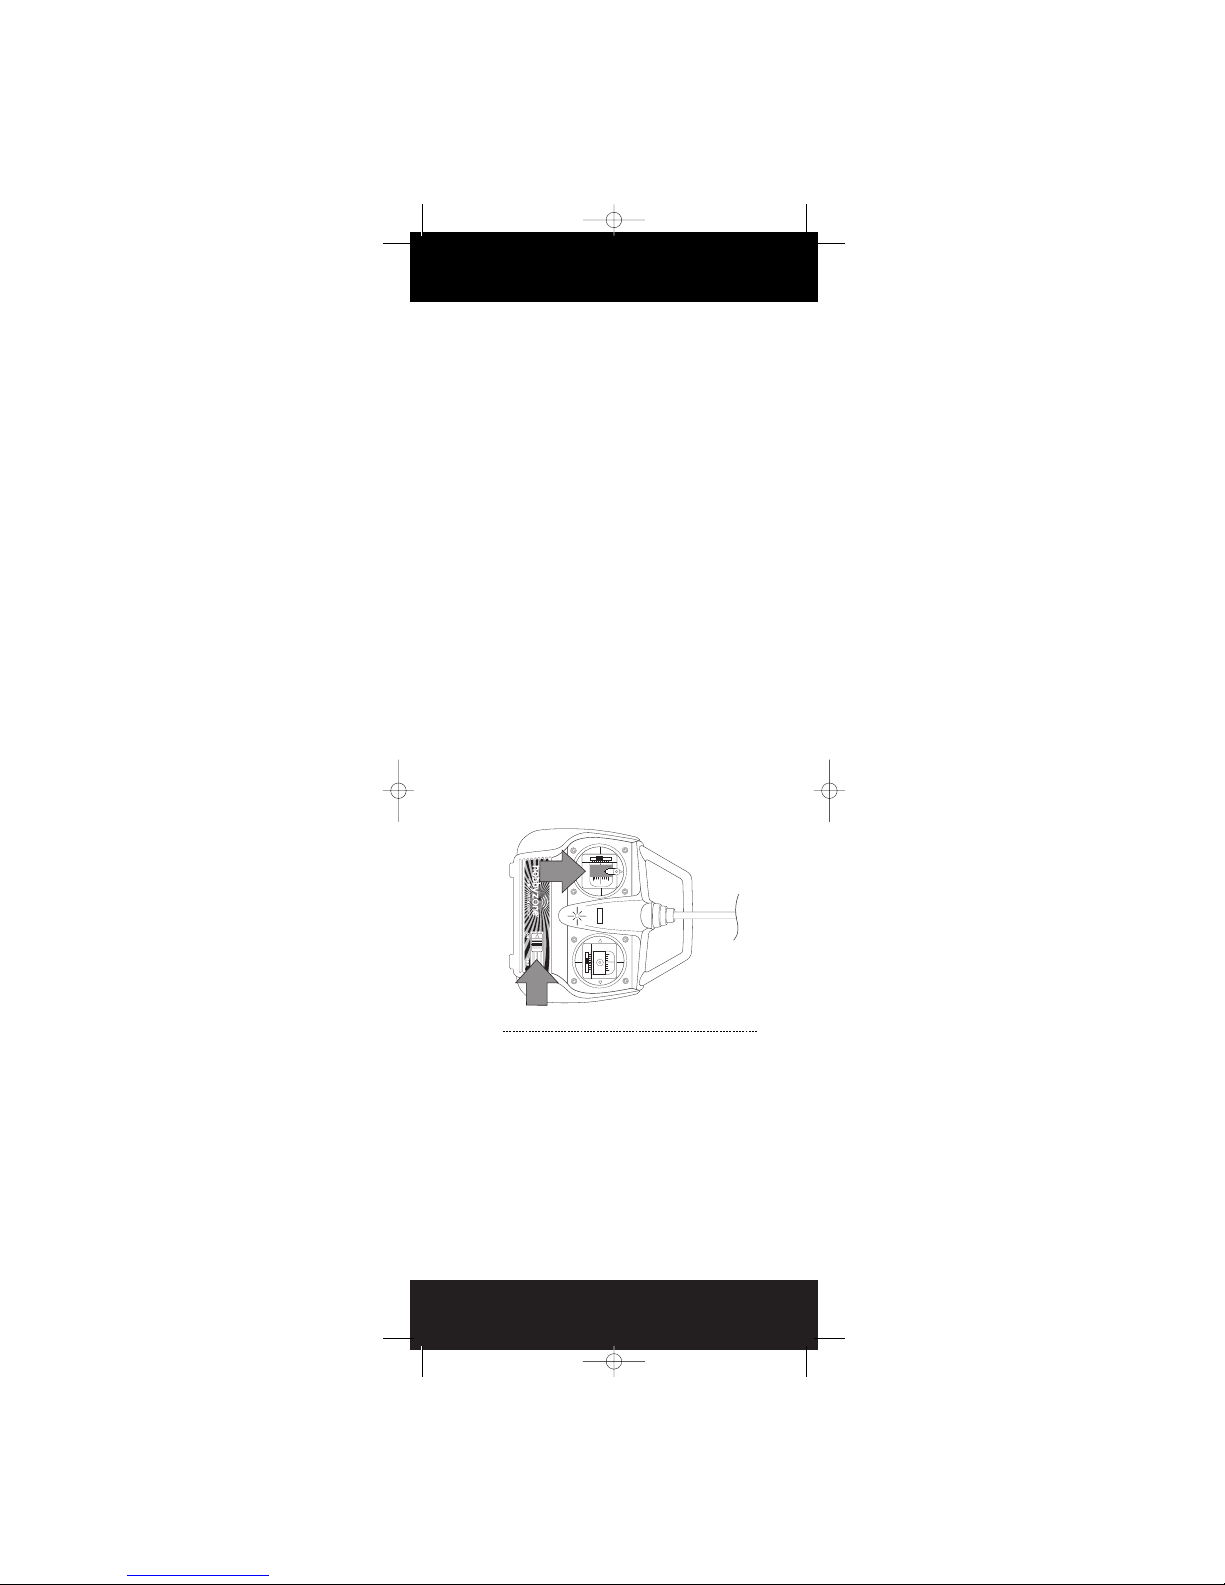
1. Start with the transmitter off and the battery
out of the plane.
2. Always hold the plane securely with all body
parts away from the propeller when the flight
battery is installed or being installed.
3. Install and plug in the flight battery.
4. While holding the throttle stick full forward,
switch on the transmitter continue holding full
throttle for 3 seconds, then release the throttle
stick. You are now in Expert Mode!
5. Before launching, pull the throttle stick back all
the way to arm the motor. Test the motor with
a blip of power before launching.
6. Repeat this procedure if expert mode is desired
every time you install a flight battery.
Entering Expert Mode
Testing the Mode (Optional)
You may check to see what mode you are in after
power up, but before pulling the throttle back to
arm the motor.
1. Push and hold the throttle stick forward. (The
motor should not run since it is not armed.)
2. While holding the throttle stick forward, push
the right stick all the way to the right and hold
it there.
• If the left control surface deflects up, holds for
about half a second, then reduces to about half
way up, you are in Smart-Trak Standard Mode.
• If the left control surface deflects up and stays
up the same amount continuously, you are in
Expert Mode.
5611_5(fbcmdr manual) 3/12/03 2:16 AM Page 24
Page 14

27
Warnings and Safety
26
If a Crash Occurs
1. Read and follow this manual and included
video completely, observing all instructions and
safety directions. Otherwise, serious injury and
damage can occur. Think safety first.
2. Keep propeller away from body parts, even
when it isn't spinning as it could be turned on
by accident. Beware of hair becoming entan-
gled in the propeller, especially while launching
the Firebird Commander™ on a windy day or
injury may occur.
3. Do not fly when it's too windy (as described in
STEP 7) or you may lose control and crash,
causing injury or damage. Never fly the Firebird
Commander near people, vehicles, train tracks,
buildings, power lines, water, hard surfaces or
trees. Never allow anyone to attempt to catch
the Firebird Commander while it's in flight or
serious injury can result.
4. Adult supervision is recommended for ages
12 and under.
5. Battery Charging: Only use a batter y charger
intended for use with the Firebird Commander
battery. Never leave charger unattended while
charging. This will help prevent overcharging.
While charging, place the battery on a heat-
resistant surface. Do not lay it on carpet or
upholstery while charging. Never charge the
battery with the included charger for more than
3 hours.
6. Never cut into the battery charger or airplane
wires or serious injury can occur. Causing the
battery to "short out" (crossing negative and
positive bare wires) can cause fire, serious
injury and damage.
7. Hold the plane securely, and keep all body
parts away from the propeller when the flight
battery is plugged in. When you finish flying
the Firebird Commander, always unplug the
battery before you turn off the transmitter.
8. Never fly on the same frequency as another
RC vehicle in your area. The frequency of the
Commander is shown on stickers on the back
of the transmitter.
1. If you happen to crash and part of the foam
wing or tail breaks, it can be repaired using
packing tape to cover missing pieces.
2. If damage is severe or if wing or tail is bent,
replace damaged parts immediately. See pages
31–32 for a complete replacement parts list.
IMPORTANT: Control Alignment
Tail flaps must be level or nearly level with no
slack in the control lines or the plane will not
fly well. See pages 20 and 21 if adjustment
is necessary.
5611_5(fbcmdr manual) 3/12/03 2:16 AM Page 26
Page 15
Unit does not operate 1. Transmitter "AA" batteries are depleted
or installed incorrectly by a dim or unit
LED on transmitter or the low battery
alarm
2. No electrical connection
3. Firebird Commander battery not charged
4. Crash has damaged the radio inside the
Firebird Commander
1. Check polarity Installation or replace with
fresh "AA" batteries
2. Push connectors together until they "click"
3. Charge battery fully
4. Replace the fuselage
Aircraft keeps turning in
one direction
1. Tail flaps need adjustment
2. Wing is not centered over the fuselage
1. Adjust stick trim lever (see page 17) or
adjust tail flap position (see page 20–21)
2. Center the wing before each flight
Aircraft is difficult to
control
1. Tail flaps aren't adjusted properly
2. Wing or tail is damaged
1. Adjust tail flaps (see pages 20–21)
2. Repair or replace
Aircraft keeps pitching
up steeply
1. Tail incidence needs adjustment
2. Wing incidence needs adjustment
3. Wind is too gusty or strong
1. Adjust tail screws (see page 22)
2. Add wing shim (see page 23)
3. Postpone flying until wind is more calm
Aircraft won't climb 1. Battery isn't fully charged
2. Tail needs adjustment
1. Charge battery shortly before flying
2. Adjust tail screws (see page 22)
29
Success Tips
28
Troubleshooting
1. A "must" for beginners: Don't fly in winds over
7 mph!
2. Important: Choose a flying field carefully—
grass and soft ground with 600-foot diameter
is optimal to fly and will lengthen the life of the
Firebird Commander™.
3. Watch out! Holding the right stick full-over for
too long may cause the Firebird Commander to
spiral dive and crash. At the very first sign of
the Firebird Commander beginning to spiral
down, immediately release the stick and give
the opposite control to level the wings.
4. Purchase an extra battery pack for added fun at
the flying field.
5. If you're gliding with the motor off, allow the
Firebird Commander a little more area for
turns.
6. Position yourself at your flying field to keep
the sun at your back and out of your eyes.
Wear sunglasses on bright days.
PROBLEM
POSSIBLE CAUSE
SOLUTION
7. Keep the Firebird Commander upwind,
especially on windy days, to prevent it from
"flying away." The wind is normally stronger
at higher altitudes than it is on the ground.
8. Keep your plane in front of you so you don't
have to turn in circles as you fly. Try to avoid
flying directly overhead.
9. Don't attempt to fly or do combat maneuvers
beyond your flying abilities.
To learn more about flying RC model airplanes,
location of the nearest AMA club, AMA safety
code, frequency guidelines and much more we
highly recommend that you contact:
Academy of Model Aeronautics
5161 East Memorial Drive
Muncie, Indiana 47302
Toll-Free (800) 435-9262
www.modelaircraft.org
5611_5(fbcmdr manual) 3/12/03 2:16 AM Page 28
Page 16

31
Replacement Parts
30
Warranty and Follow-Up Procedures
Keep that Firebird Commander flying! Spare parts are available from your dealer or from Horizon Hobby direct (www.hori-
zonhobby.com). Please check with your dealer first—by supporting your dealer, they'll be there when you need them. To
locate your local dealer, go to www.hobbyzone.com
Due to the nature and operation of this product,
the warranty does not extend beyond the initial
preflight testing. Carefully check the parts and
operation BEFORE your first flight. Damage
incurred during flying combat, landing, crashing
or modification is not covered under the warranty.
Warranty: Horizon Hobby, Inc. guarantees this
product to be free of defects in material and work-
manship. If you discover defects during the very
first preflight testing (Steps 1–8, & 13), please
call our Product Support staff toll-free at
1-877-504-0233 for technical support. If you are
directed by them to return the product to our
Service Center, you will be provided with a RA
(Return Authorization) number. If, in our opinion,
after inspecting the product, we determine it to
be defective, we will repair or replace it at our
discretion.
Item # Description Retail
HBZ1012 7.2v 900 mAh NiMH Battery $24.99
HBZ2510 Standard Decal Sheet: FB Commander $4.99
HBZ2515 Instruction Manual: FB Commander $0.99
HBZ2516 Commander Instructional VideoCD $2.99
HBZ2517 Canopy cover w/Hardware: FB Commander $2.49
HBZ2519 3 Hour Wall Charger for 7.2v 900mAh $9.99
HBZ2521 White Standard Wing: FB Commander $14.99
HBZ2531 White Tail w/accessories: FB Commander $9.99
HBZ2004 Propeller: Commander, XL, FTB, AB $2.99
HBZ2010 2 Wing Hold-Down Rods w/Caps:
FB Commander, XL $1.49
HBZ2016 Main Landing Gear with Wheels $3.99
HBZ1058 Transmitter Antenna $4.99
HBZ1059 Ribbon for Tranmitter Antenna $0.79
HBZ1060 Transmitter Battery Cover $2.49
HBZ2011 White Rubber Bands (5): FB Commander, XL $0.99
HBZ2008 White Wing Cap (4): FB Commander $1.29
If you are directed by our Product Support staff to
return the Firebird Commander™, please follow
these instructions.
1. Unplug the battery from the airplane.
2. Pack the complete Firebird Commander (all
components in the original box) and put into a
sturdy shipping carton for protection.
3. Include your complete name and address in-
formation inside the carton, as well as clearly
writing it on the outer label/return address
area. Include detailed information explaining
the nature of the problem(s) encountered.
4. Please date your correspondence and be sure
your complete name, address and daytime
phone number appear on this enclosure.
Please include your original dated sales receipt.
Mail to the address below.
Horizon Service Center
Attn: HobbyZone Dept.
4105 Fieldstone Rd.
Champaign, IL 61822
Item # Description Retail
HBZ4060 1mm Wing Shim $0.99
HBZ2012 White Tail V-Brace: FB Commander, XL $1.49
HBZ2013 White Tail Screws (2): FB Commander, XL $0.99
HBZ6035 Tail Horn and Keeper (2) $0.89
HBZ2561 FB Commander Fuselage:CH 1 $49.99
HBZ2562 FB Commander Fuselage:CH 2 $49.99
HBZ2563 FB Commander Fuselage: CH 3 $49.99
HBZ2564 FB Commander Fuselage: CH 4 $49.99
HBZ2565 FB Commander Fuselage: CH 5 $49.99
HBZ2566 FB Commander Fuselage: CH 6 $49.99
HBZ3351 Transmitter: CH 1, ZZR, FBC $24.99
HBZ3352 Transmitter: CH 2, ZZR, FBC $24.99
HBZ3353 Transmitter: CH 3, ZZR, FBC $24.99
HBZ3354 Transmitter: CH 4, ZZR, FBC $24.99
HBZ3355 Transmitter: CH 5, ZZR, FBC $24.99
HBZ3356 Transmitter: CH 6, ZZR, FBC $24.99
5611_5(fbcmdr manual) 3/12/03 2:16 AM Page 30
Page 17

3332
More Fun with the Firebird Commander
™
1. Limbo
2. Pylon
3. Spot Landing
4. Duration
Item # Description Retail
HBZ1026 12V DC Peak Charger $19.99
HBZ1013 8.4V 900mAh Ni-MH Battery
(Requires HBZ1026 Charger) $29.99
HBZ6023 Aerial Drop Module $19.99
HBZ4020 Sonic Combat Module $23.99
HBZ4025 Stealth Target
(works with Sonic Combat Module) $23.99
HBZ2520 Silver Wing - FB Commander $14.99
HBZ2522 Yellow Wing - FB Commander $14.99
HBZ2523 Red Wing - FB Commander $14.99
HBZ2530 Silver Tail w/accessories: FB Commander $9.99
HBZ2532 Yellow Tail w/accessories: FB Commander $9.99
HBZ2533 Red Tail w/accessories: FB Commander $9.99
Item # Description Retail
HBZ1509 Yellow Wing Cap (4): FB Commander $1.29
HBZ4070 Silver Wing Cap (4): FB Commander $1.29
HBZ4071 Red Wing Cap (4): FB Commander $1.29
HBZ1055 Yellow Tail V-Brace: FB Commander $1.49
HBZ4051 Silver Tail V-Brace: FB Commander $1.49
HBZ4050 Red Tail V-Brace: FB Commander $1.49
HBZ1056 Yellow Tail Screws (2): FB Commander $0.99
HBZ4054 Silver Tail Screws (2): FB Commander $0.99
HBZ4055 Red Tail Screws (2): FB Commander $0.99
HBZ2511 Space Explorer Decal Sheet $4.99
HBZ2512 Nebula Squadron Decal Sheet $4.99
HBZ2513 USAF Decal Sheet $4.99
After a little practice with your Firebird Commander you’ll be ready to take on the added challenge of the
games shown below. Test your own skills or challenge your family and friends to some competition.
Commander Options
5611_5(fbcmdr manual) 3/12/03 2:16 AM Page 32
Page 18

Let the Dogfighting Begin
Have from 2–6 Firebird Commanders (or other
X-port equipped Hobbyzone aircraft,) flying on
different frequencies and engage in air combat
with the Sonic Combat Module (SCM).
HBZ6023 Aerial Drop Module (ADM)
Plug in the Aerial Drop Module and you can drop a
streamer bomb or parachute, both of which are included.
HBZ4025 Stealth Target
An optional Stealth fighter ground target with "hit" sensor
is available so you can practice with the Sonic Combat
Module or take on friends in a target shooting contest.
HBZ1026 DC Peak Charger
Charge your battery from your car in about 40 minutes
with our DC Peak Charger, including adapter to charge
most HobbyZone Aircraft and ZigZag Boat batteries.
HBZ4020 Sonic Combat Module (SCM)
Plug in the Sonic Combat Module and take on similarly
equipped HobbyZone planes in aerial combat. When
“hit”, the SCM temporarily disables your motor while
allowing you to steer.
35
HobbyZone
®
Accessories
34
Fun Games with the Target
1. See how many hits you can get in a measured
time, such as 3 minutes.
2. See how many hits you can get in one
battery pack.
3. Attack the target with two or more Fighterbirds
at the same time. See who can time their
attack runs properly and get the most hits in
5 minutes.
Be sure to turn off the power switch on the
bottom when you are done. If the target fails
to register hits, you may need to replace the
9V battery.
Firebird Commander Combat Options
5611_5(fbcmdr manual) 3/12/03 2:16 AM Page 34
 Loading...