

Page 1
Instruction Manu
a
™
™
™
Page 2

Welcome to the
HobbyZone
™
world of fun!
Hey, nice move! You just snagged the
world’s neatest radio control aircraft —
the Firebird from HobbyZone. Our
mission at HZ is to make sure you have
a great experience with your ‘Bird—
to have safe fun and learn a few things
along the way.
You’re going to be surprised how
easy it is to fly a radio control airplane.
There’s one catch, though. You gotta’
read and FOLLOW THE DIRECTIONS.
Try it our way first —then you can get
creative!
Ready to get started? So are we.
Let’s go!
WHOA, THERE.
READ THIS!
2
Page 3
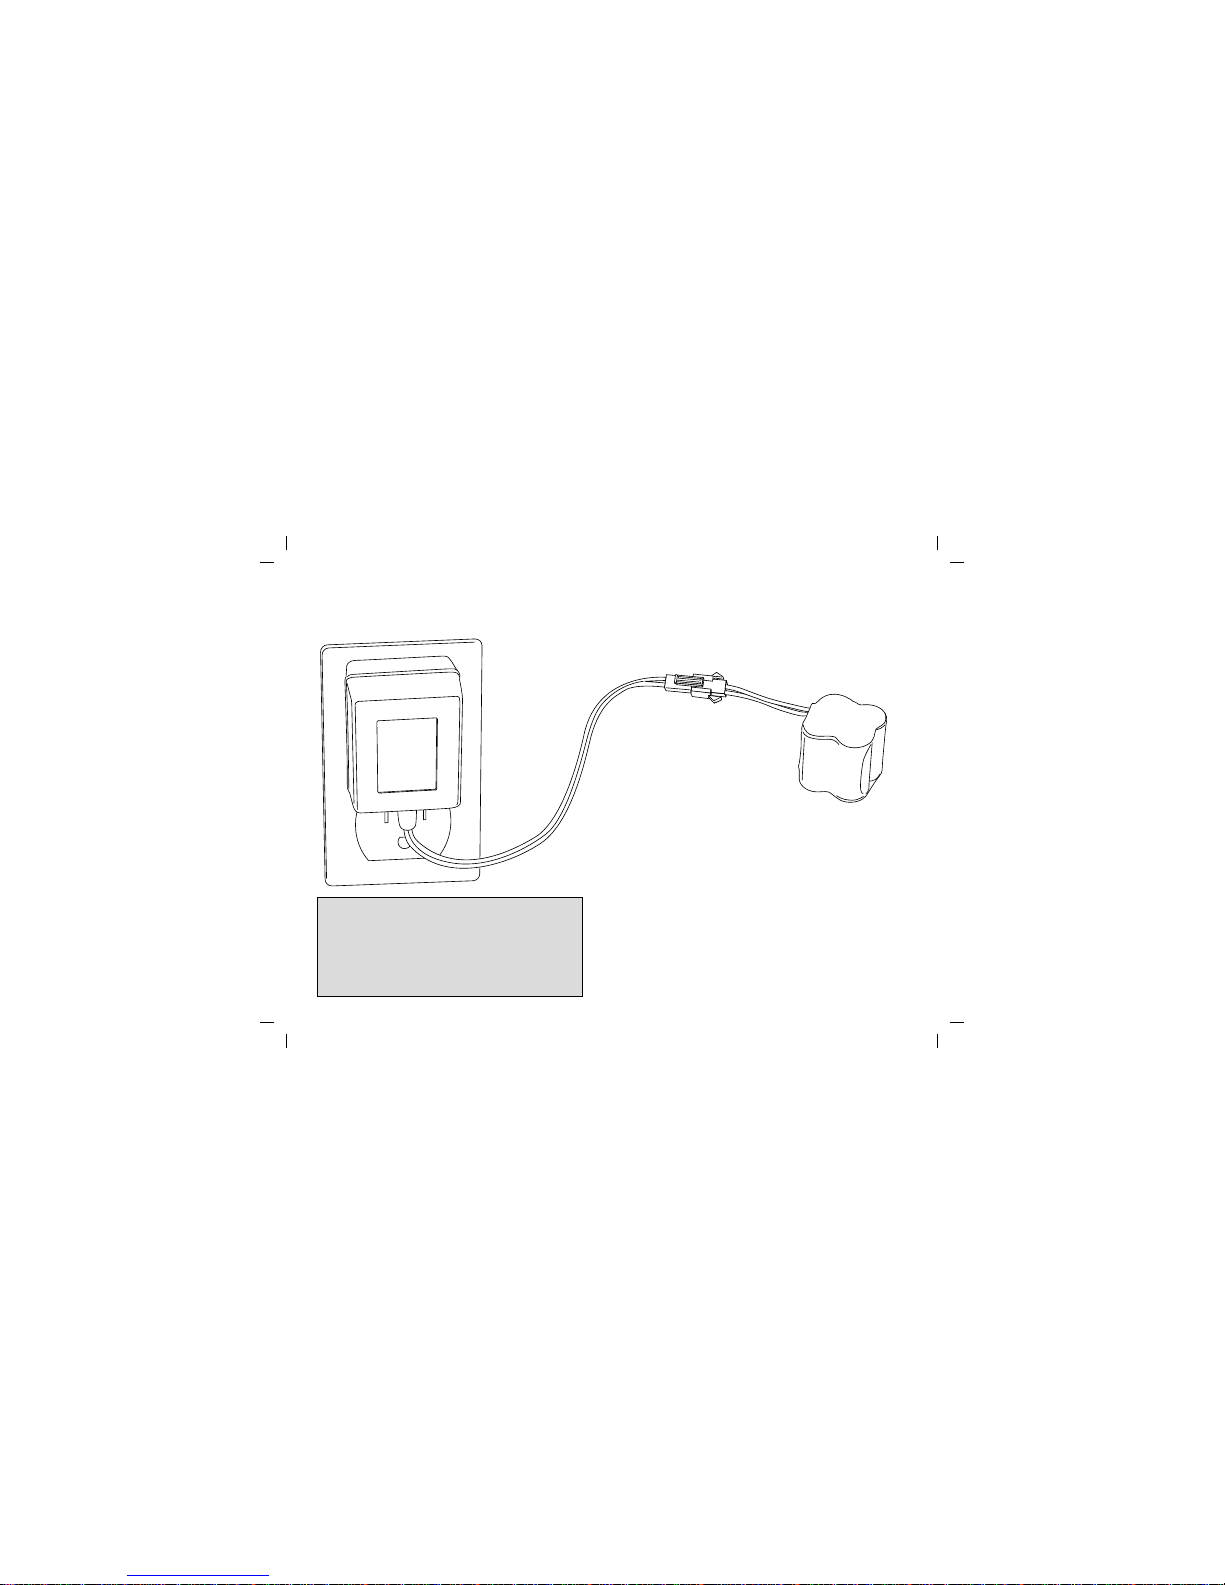
STEP 1. Charge Aircraft Battery
• Attach the connector—push until
you feel a “click.” Plug charger into
a 110V AC wall outlet.
• Charge battery for 2 hours.
DO NOT OVERCHARGE.
• See “Warnings and Safety”
on page 24.
OPTIONAL ACCESSORY
The FireBird Fast Field Charger charges your
FireBird’s aircraft battery in just 20-30 minutes
from a car’s cigarette lighter. Please contact
your retailer for availability.
Stock no. HBZ1020 Suggested Retail $17.95
3
Page 4
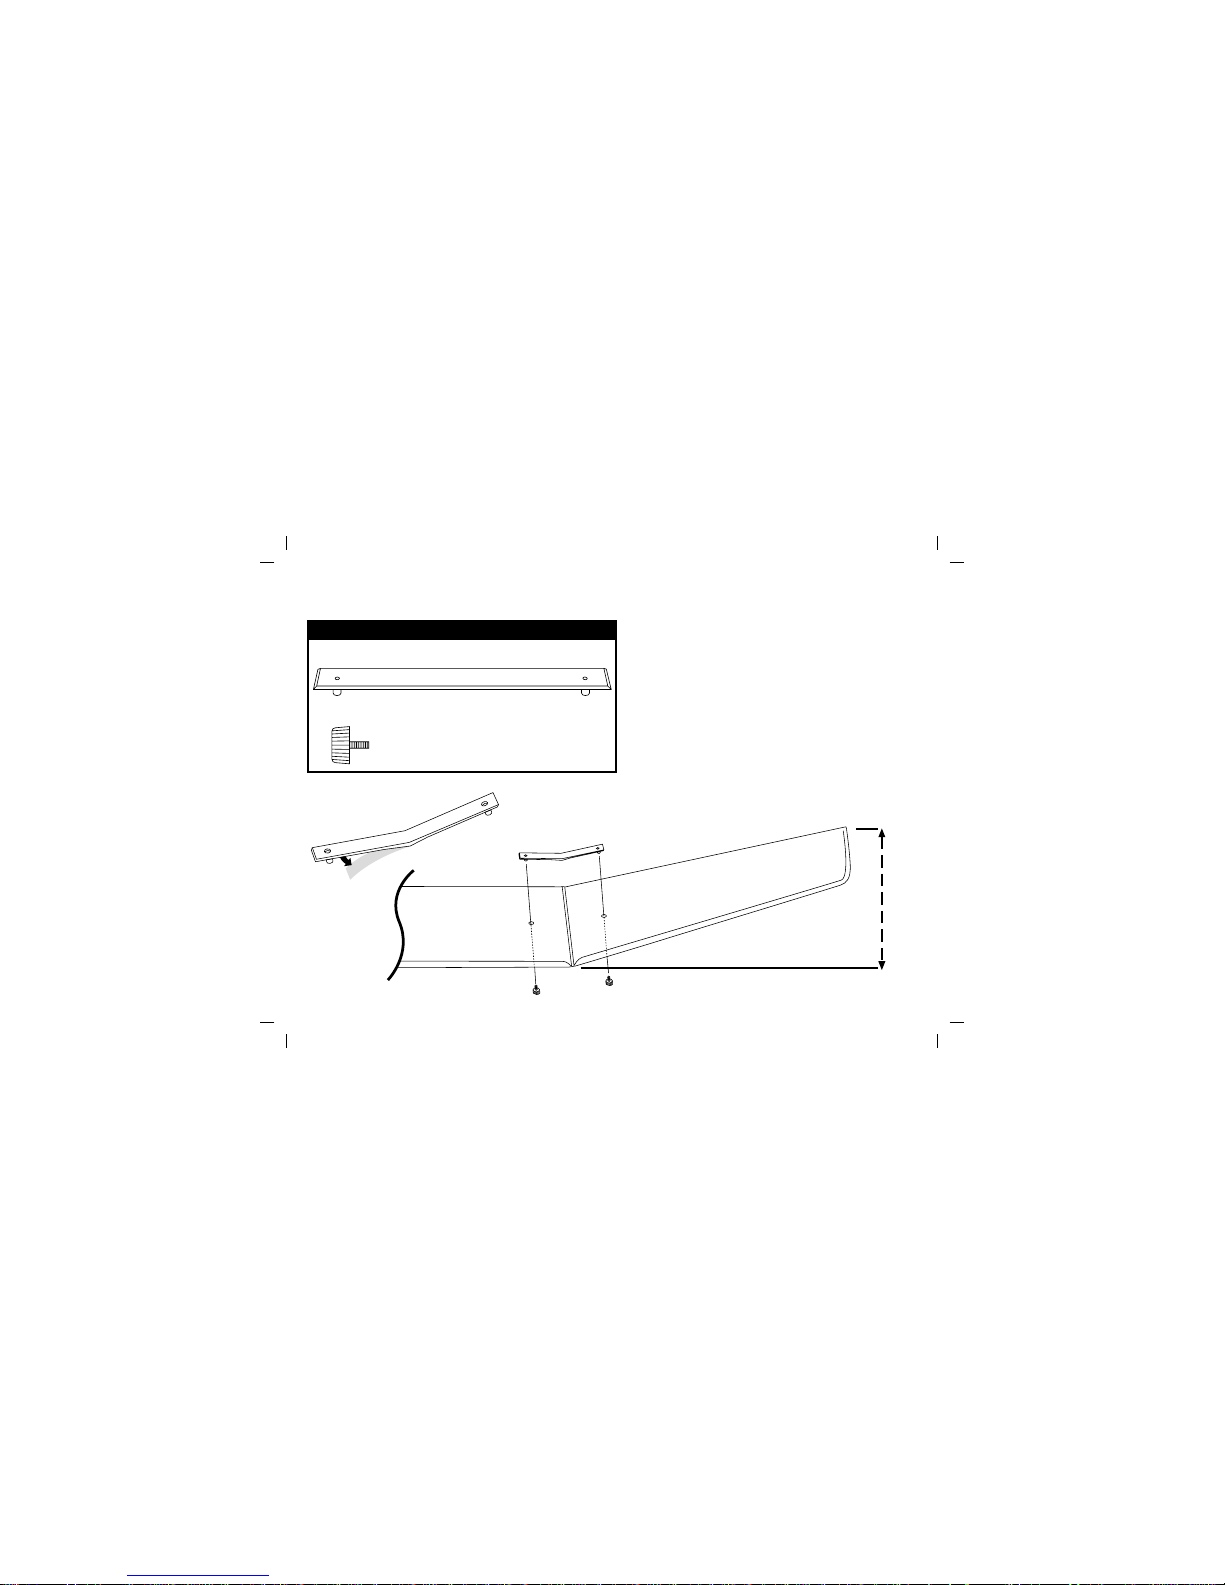
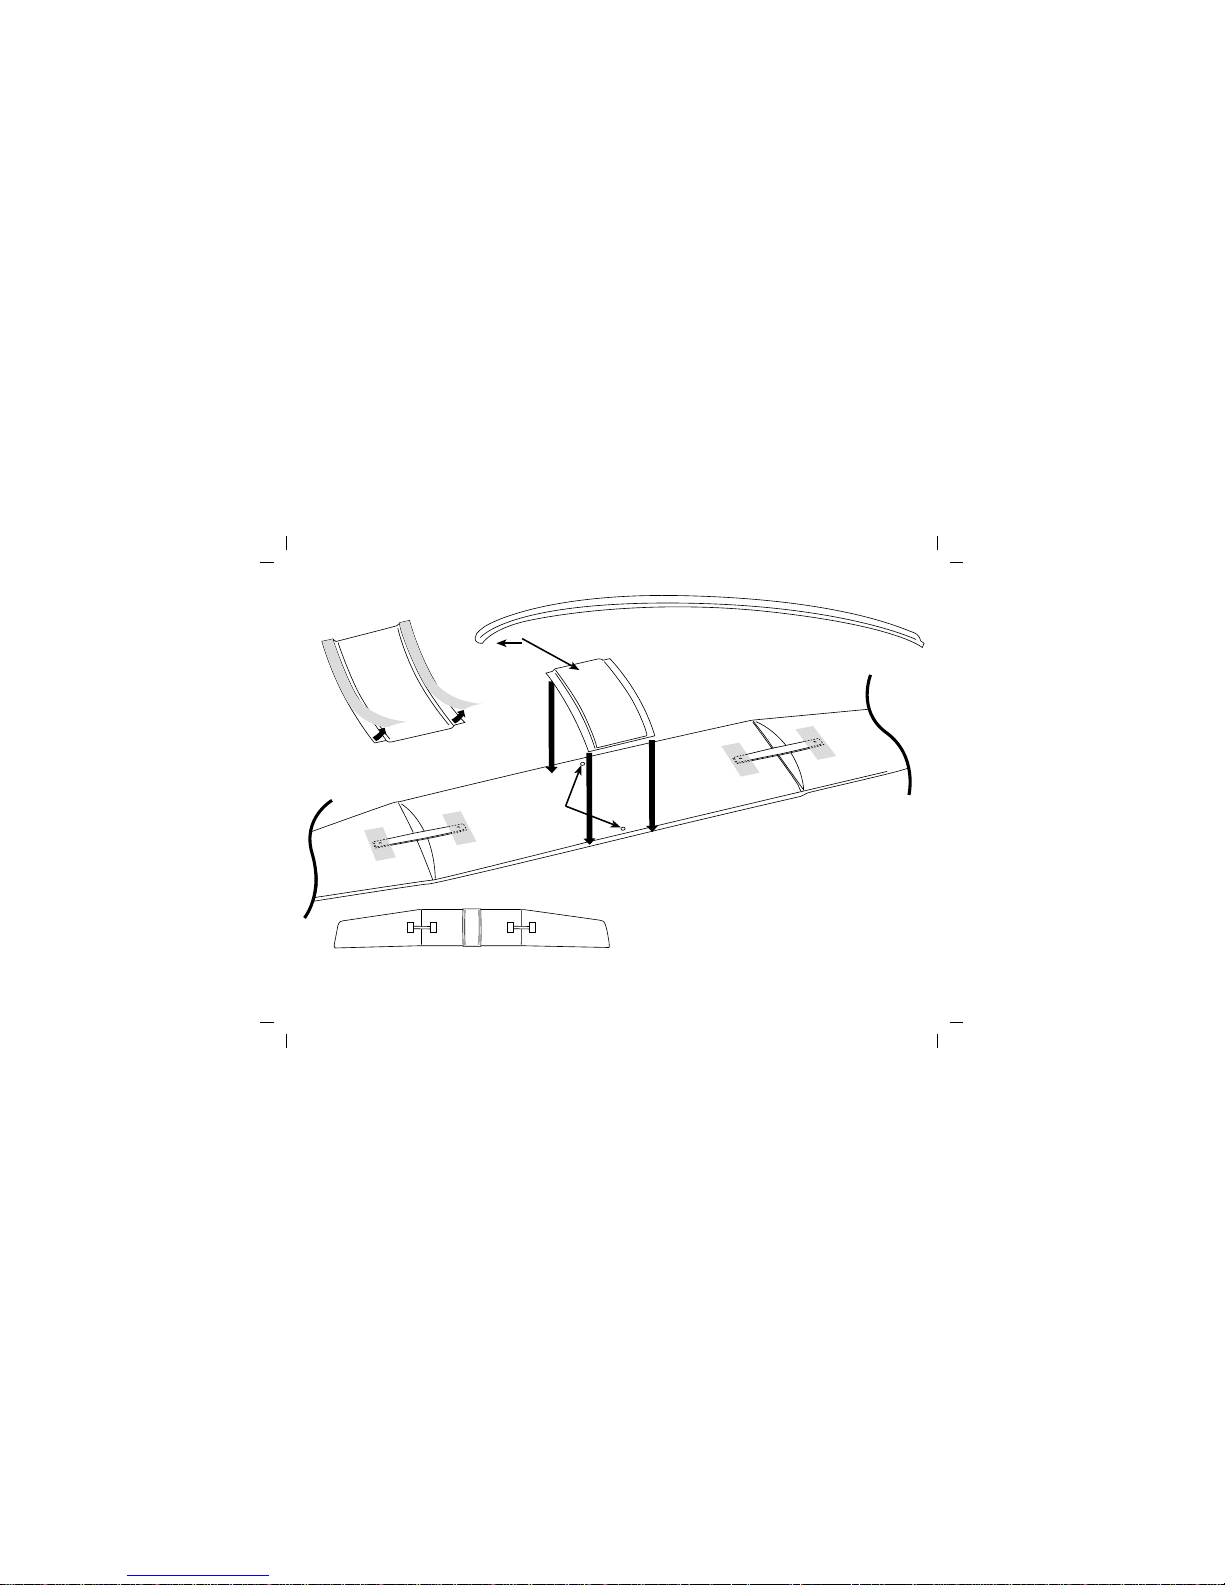
STEP 2. Wing Assembly
Wing Brace (x2)
Wing Screw (x4)
Needed for STEP 2
• Lay wing flat on table, place book on center
section to hold it flat.
• Position wing tip 2" above table top by
placing transmitter under wingtip.
• Remove sticky tape backing from wing
brace and attach as shown.
• Insert wing screws and fasten very tightly
until screw stops.
• Repeat with other wing brace
• It is VERY IMPORTANT to secure wing
braces so both wing tips are the same
2" height.
4
2"
Page 5
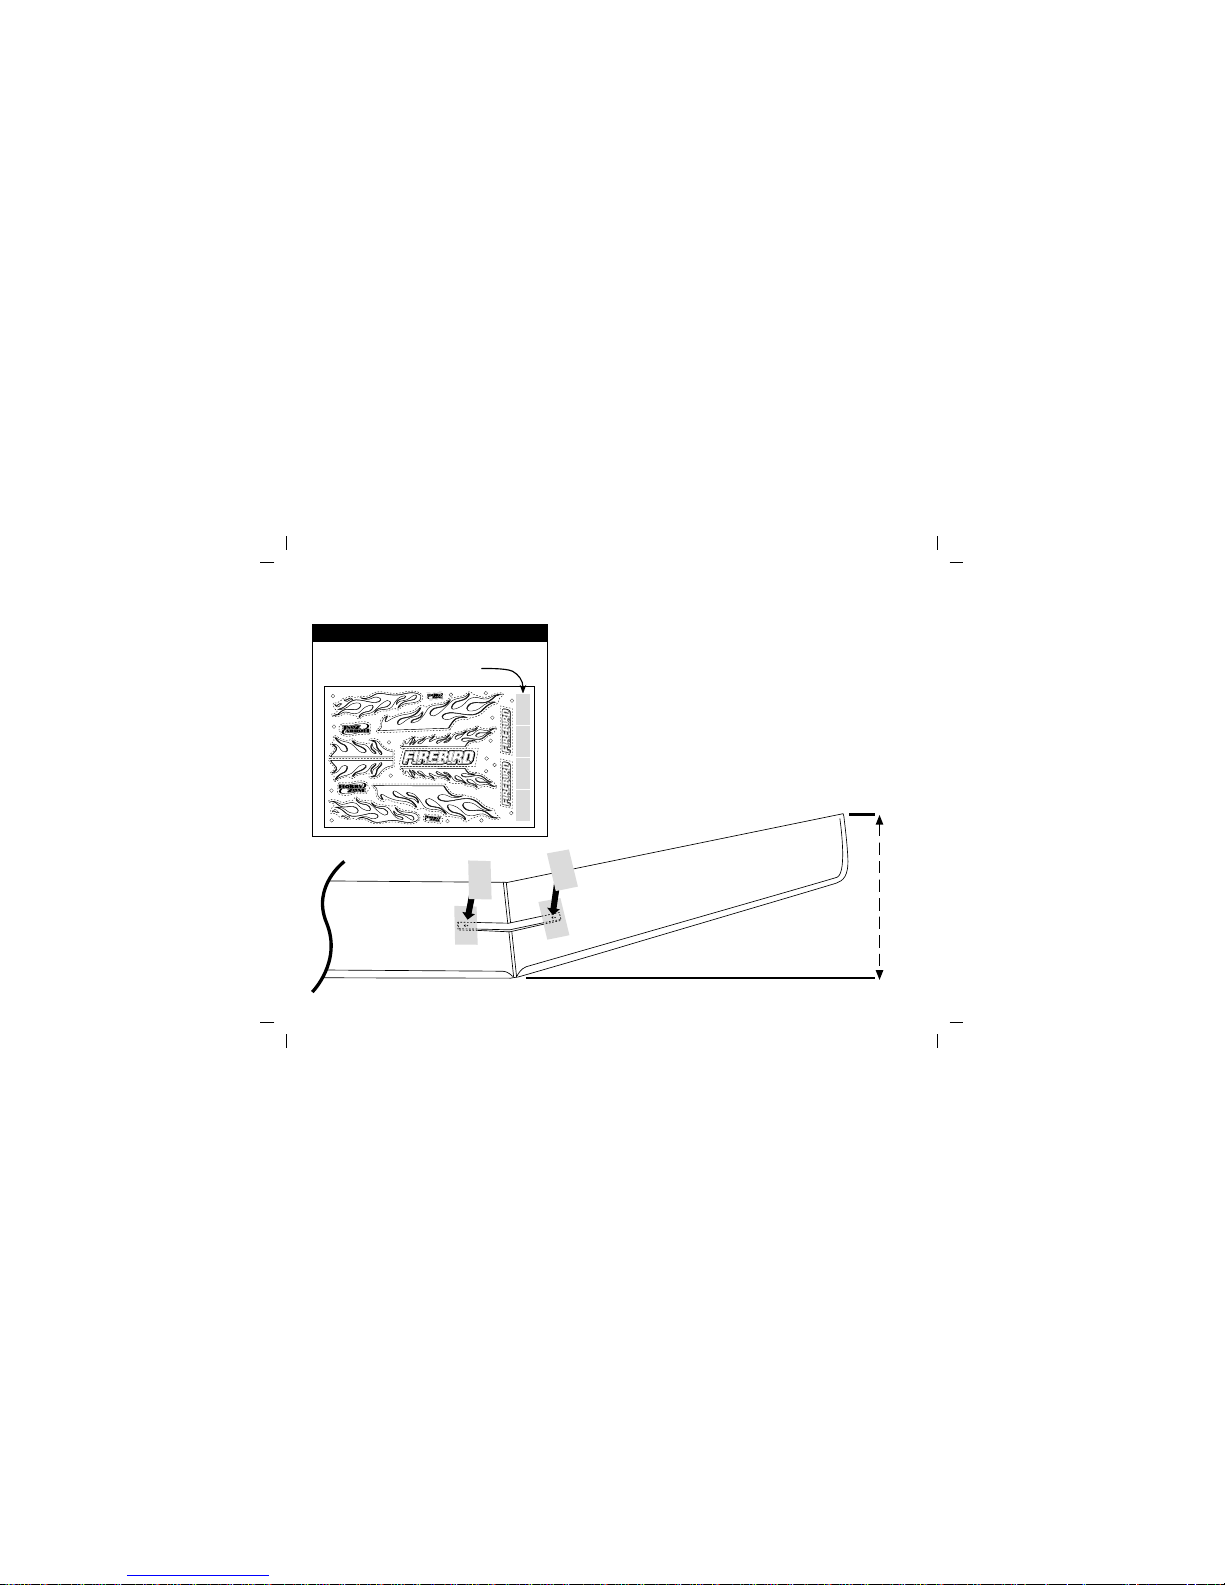
STEP 3. Wing Brace Tape
Brace tape (x4) - located on decal sheet
as shown, labeled #1
Needed for STEP 3
• MAKE SURE wing tip is positioned at
2" height.
• Add wing brace tape (4 yellow rectangles
located on decal sheet) directly over
wing brace. Press firmly.
• Repeat with other wing brace.
1
1
4
4
7
™
9
3
3
8
™
™
8
5
2
2
™
6
™
6
™
5
7
™
5
2"
Page 6
STEP 4. Wing Cap
• Locate wing center marked by molded “dots.”
• Determine front of wing.
• Locate front of wing cap (see above).
• Remove sticky tape backing from wing cap.
• Align wing cap evenly over the wing
center. Be sure it’s centered.
Press firmly.
FRONT EDGE
Wing cap, full-size side view. Note
that front edge has more “curve.”
IMPORTANT: Make sure the front of the center
cap is over the front of the wing. The angled edge is
the front.
FRONT
6
Wing
Center
Wing
Cap
Page 7

STEP 5. Propeller
Propeller
Needed for STEP 5
• Push prop firmly into place
on motor shaft.
7
Page 8
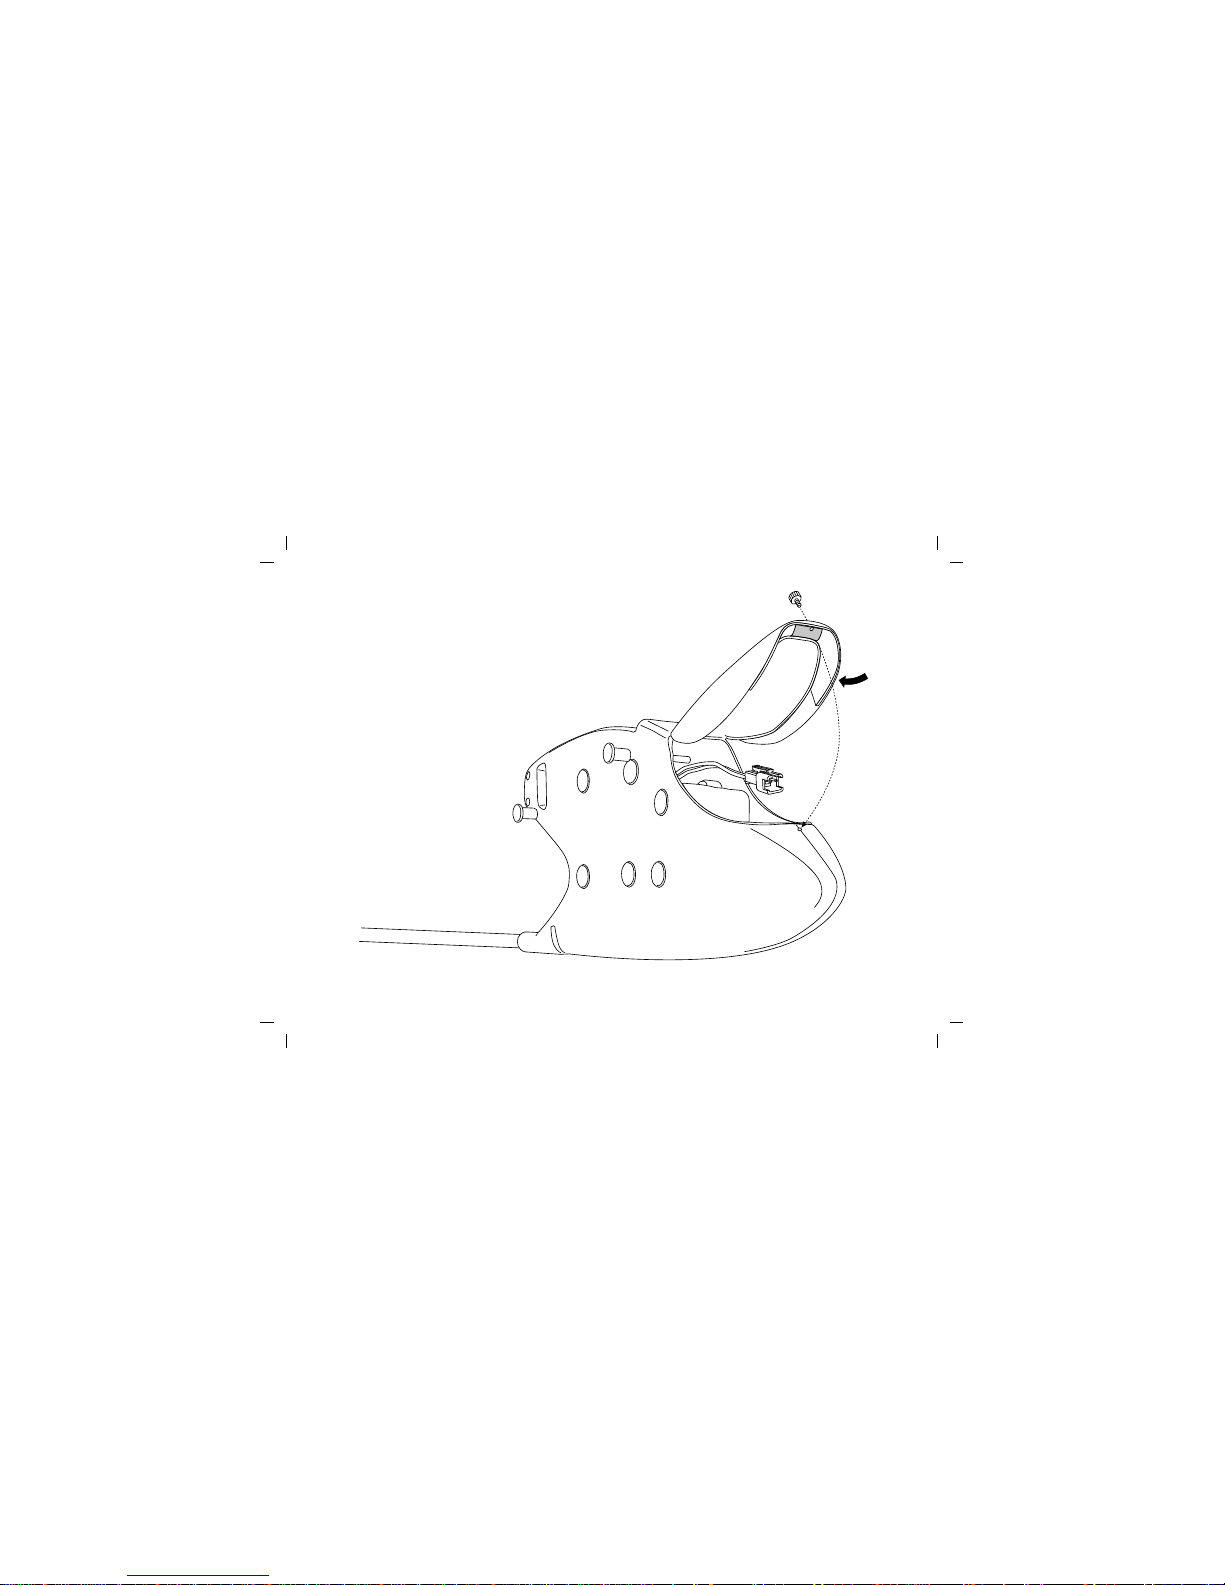
STEP 6. Hatch Cover Fastener
• Remove thumbscrew installed in front
top of fuselage
• Install thumbscrew in canopy hole as
shown in order to secure canopy.
8
Page 9
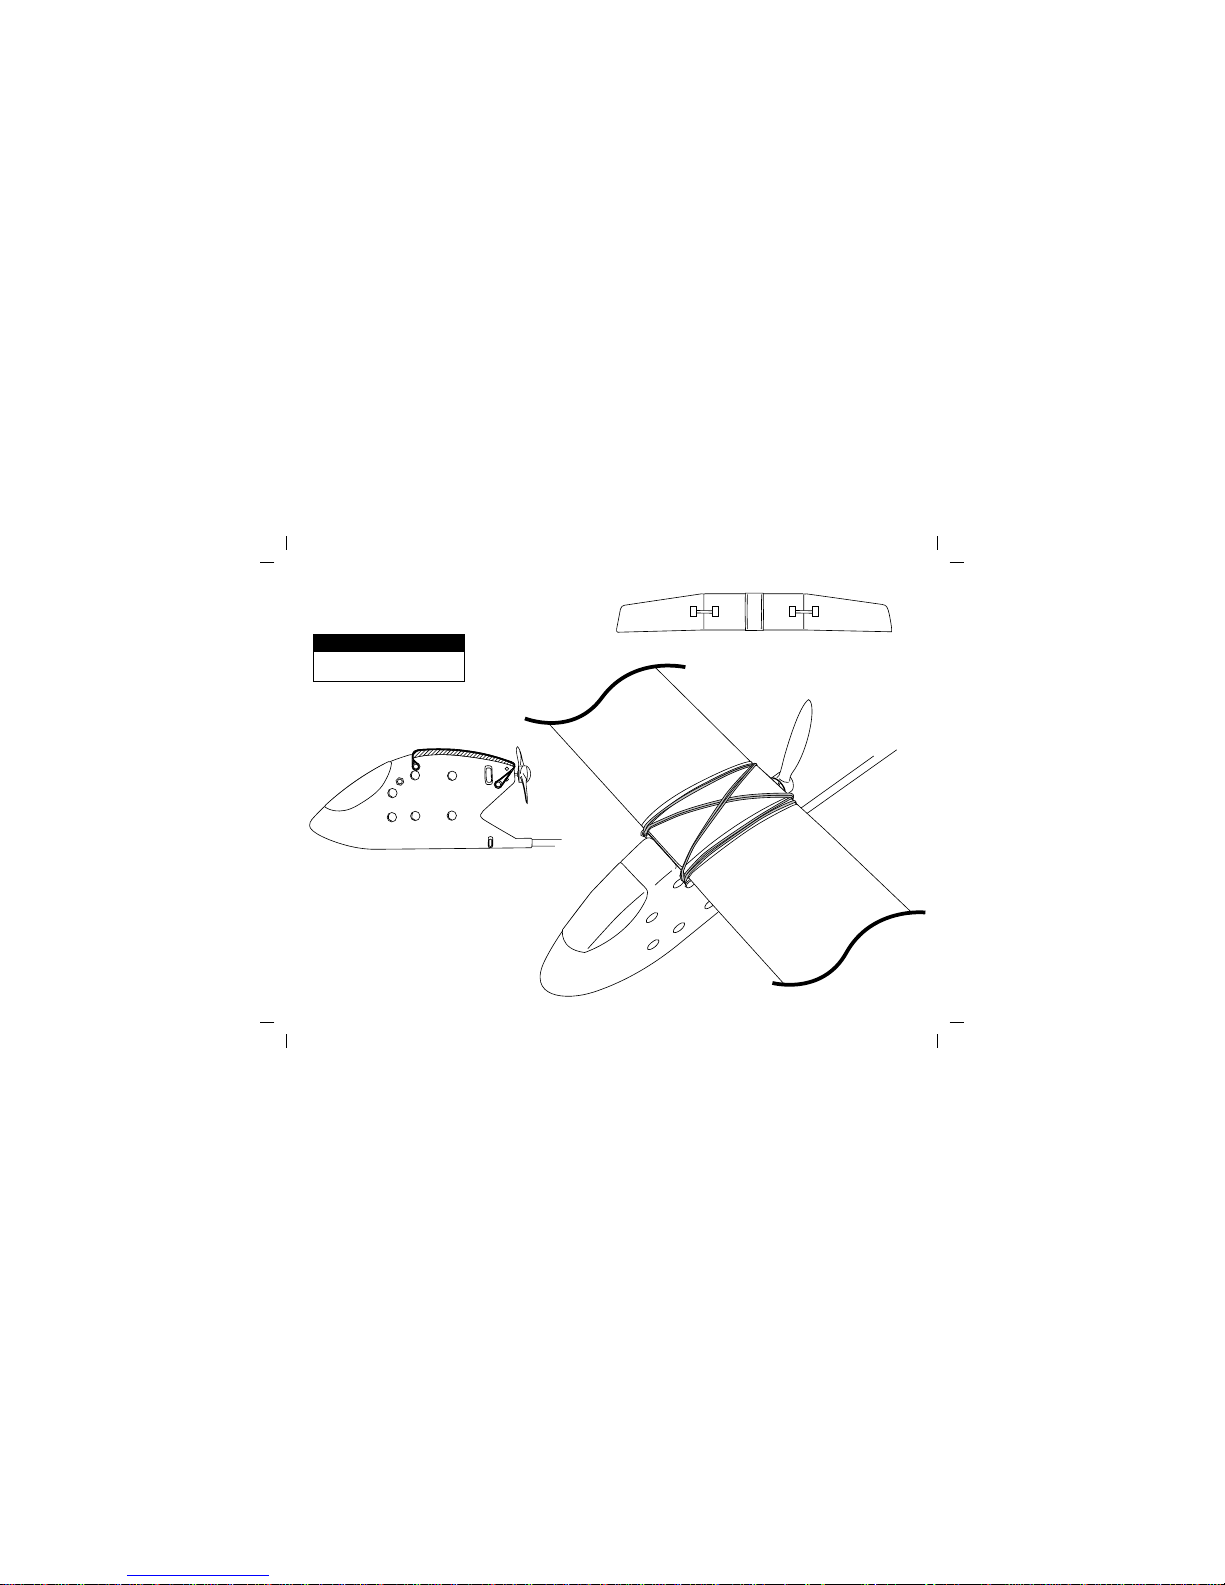
STEP 7. Wing Mounting
Needed for STEP 7
IMPORTANT
• Center wing on fuselage EXACTLY.
• Secure wing in place with at least
4 rubberbands (1 per side and
2 crossing) or poor flying will result.
Rubber bands (x4)
Remember: straight edge is rear!
9
Page 10

STEP 8. Decals
7
2
Decal Sheet - the numbers on this page
refer to the corresponding number on
the decal sheet.
Needed for STEP 8
1
1
4
4
7
™
9
3
3
8
™
™
8
5
2
2
™
6
™
6
™
5
7
™
Fuselage (repeat on both sides)
NOTE: Decals wrap around to underside of fuselage.
4
9
3
4
3
Main Wing
6
5
Tail
5
10
™
™
Page 11

STEP 9. Transmitter
“AA” Alkaline Batteries (x8 - not included)
Needed for STEP 9
• Remove transmitter back cover by
pushing down with thumbs as arrows
show.
• Install batteries. Use fresh 1.5V “AA”
alkalines only.
• WATCH POLARITY. Replace cover.
• To test, switch on transmitter— LED
should glow brightly.
• Replace batteries when
you hear low battery alarm
11
Page 12

STEP 10. Tail Control Test
• Switch on transmitter– check LED.
• Install battery in fuselage and plug it in.
• View Firebird from rear.
• Move the right stick side to side. The tail flaps
should move as shown on the following page.
• If each flap is not exactly level with the rest
of the tail surface, turn to page 23 to make
adjustments before and after flying.
WATCH OUT! Be sure to keep everything clear
of the propeller before starting the control test in
the event that you accidentally turn on the motor.
NOTE: The small lever under the tail stick is
called a trim lever and is used to adjust the
“neutral” point of your control stick. It’s very
important that this lever is centered when
performing the control test.
12
Page 13

Moves Up
Moves Up
13
Page 14

11. Motor Test
• Make sure the throttle “offset”
switch is in down (off) position.
• Turn on the transmitter.
• Push the start button on the side
of the plane and move the
transmitter’s left stick up. The prop
should spin at high speed.
• When finished with motor test,
be sure to disconnect the battery
first, then turn off transmitter.
WARNING: KEEP EVERYTHING CLEAR OF THE PROPELLER
14
NOTE: Make sure
throttle offset switch is in
the down (off) position
Page 15

1,000 Feet
12. Choose a Field
• A LARGE open, tall-grass field is best.
Your Firebird flies approx. 20 mph, so it
covers ground fast. The bigger the field,
the better!
VERY IMPORTANT: DO NOT fly over or
near people, buildings, vehicles, trees, water,
pavement, gravel, any hard surface, or any object
you don’t want to crash into. Please take this
warning seriously to keep people, property, and
your Firebird safe. Crash damage is NOT
covered by the warranty.
15
Page 16

STEP 13. Choose a Day
You want to fly! If you wait until the
day is right, you will have a successful
flight. No wind is best.
• Attach the included red flag to the
end of your transmitter antenna.
• Hold the transmitter flat so the antenna
is parallel to the ground and note how
much the flag moves in the wind.
If the flag hangs down,
you’re good to fly.
If the flag hangs at 45°
or more, it’s too windy.
DO NOT FLY.
SUCCESS TIP: In our tests, new pilots
attempting to fly in wind more than 5 mph had
lots more trouble than those who flew in no
wind. Be smart, follow this tip and protect
your Firebird— you’ll be glad you did.
16
Page 17

STEP 14. Range Test
100 paces
• One person holds the transmitter; the other
person walks 100 paces away with the airplane.
• Turn on transmitter.
• Plug in airplane battery and close hatch cover.
• Push start button on side of fuselage.
• Extend transmitter antenna completely.
• As the first person moves the transmitter
controls, the other watches to be sure the
airplane’s controls operate smoothly.*
• Adjust the throttle trim lever (located to the right
of the throttle stick) to the point where the motor
stops with the throttle stick positioned at neutral.
* If model does not range test
correctly, DO NOT FLY. Send
the unit back to the Horizon
Service Center (see page 27).
You will need two people to do the
range test—one to hold the transmitter
and one to hold the airplane.
WATCH OUT! The person holding
the airplane should hold it in such a way
that the propeller does not come in
contact with any part of their body.
17
Use the throttle trim
switch to adjust the
neutral point of the
throttle stick.
Page 18

STEP 15. Launch
• MAKE SURE wing is centered EXACTLY
on fuselage
• While holding transmitter in one hand, push
throttle stick to FULL on (up) and hold on
with thumb.
• Take a couple of steps and launch model
DIRECTLY INTO THE WIND. KEEP WINGS
LEVEL. Use medium force. Do not throw it up
or down. Throw it level. Think of it as a spear
that you are throwing 20 feet away.
IMPORTANT
Before launching, you’ll need to determine
the wind direction by dropping some grass
and watching which direction it falls.
WATCH OUT! Keep spinning
propeller away from your hair, head
and hands or injury may occur.
WIND
IMPORTANT
On first flights, have a second person (adult recommended) launch the
Firebird while the pilot controls with the transmitter. Adult assistance is
always recommended with pilots 12 years of age or younger.
18
Page 19

STEP 16. Flying
• After launching, model will gently climb.
Keep throttle full on. Begin turn at 50 ft
altitude. Keep upwind so wind will not
take it too far away.
TURNING –Hold the right stick in the direction
you want the model to turn.
TRIMMING –If the model always turns one
direction or the other, first follow adjustments
on p.23, then use the trim control lever below
the stick to correct (see below).
The model should fly
straight with the stick
at neutral.
19
IMPORTANT Don’t hold the right
stick full-over for more than a couple
of seconds. This can cause the model
to spiral dive and crash.
Page 20

STEP 17. Throttle Adjustment
• Climb to an altitude of 100 feet or more with
full throttle
• To achieve a level “cruising” altitude, reduce
power by moving the throttle stick down a
small amount (to approx. 85–90% of full on).
• To reduce altitude, reduce throttle.
• To increase altitude, increase throttle.
20
Approx. 85–90%
Throttle
Full
Throttle
Reduced
Throttle
Full
Throttle
WATCH OUT! If you’re flying with the
motor off or at low speed, allow your
Firebird more area for turns.
Page 21

STEP 18. Landing
• Line the model up, heading directly into the wind, toward the desired landing spot. At 20 feet of
altitude, release the throttle stick to turn off motor. Firebird will glide in for landing.
Expert Tip: As you get more experienced at flying, try adding a small “blip” of power just before touchdown.
With some practice, you’ll be able to land it right on target.
Turn OFF power
at 20 feet
WARNING DO NOT attempt to catch the airplane or injury may result. Also, be sure
to turn motor off before you touch down or damage can occur to your wing and propeller.
21
Page 22

If a Crash Occurs
IMPORTANT:
Control Alignment
Tail flaps must be level
or model will not fly
well. See page 23 if
adjustment is necessary.
• If you happen to crash and part
of the foam wing or tail breaks,
it can be repaired using packing
tape to cover missing pieces.
• If damage is severe, replacement
parts are available. See page 27
of this manual.
View from Rear
View from Rear
22
Page 23

Making Adjustments
• Pinch or pull apart the U-bend in the control wires to adjust the
control flaps up or down to make your plane fly straight.
• If plane flies to right, pull apart U-bend so the right control flap is
1/16” above rest of tail. Test fly again. If it still flies to the right, repeat
the procedure, adding 1/16” each time until the plane flies straight.
• If plane flies to left, pinch the U-bend so the left control flap is
1/16” above rest of tail. Repeat if necessary, until plane flies straight.
23
Normal
Shorten
Lengthen
Page 24

Warnings and Safety
1.Read and follow this manual completely, observing
all instructions, Warnings, Importants, Watch Outs!,
and safety directions; otherwise serious injury and
damage can occur. Think: SAFETY FIRST.
2.Keep propeller away from body parts, even when
it isn’t spinning, as you or someone else might turn
it on by accident. Beware of hair becoming entangled
in the propeller, especially during launching the
Firebird on a windy day, or injury may occur.
3.DO NOT fly when it’s too windy (as described in
STEP 13) or you can lose control and crash, causing
injury or damage. Never fly your Firebird near people,
vehicles, buildings, power lines, water, hard surfaces,
or trees. Never allow anyone to attempt to catch
the Firebird while it is in flight or serious injury can
result. Please remember: CRASH DAMAGE
IS NOT COVERED BY THE WARRANTY.
4.Adult supervision is recommended for ages 12
and under.
5. Batter y Charging: Only use a battery charger
intended for use with the Firebird battery. Never
leave charger unattended while charging. Before
charging, always be sure to deplete the power from
the battery by running it in the Firebird until the
propeller stops. This will help prevent overcharging.
While charging, place the battery on a heat-resistant
surface. DO NOT lay it on carpet while charging.
NEVER charge the battery with the included char ger
for more than 2 hours, as overcharging may cause
excessive heat in the battery, causing injury, damage,
and poor battery life and performance —voiding
the warranty.
6.Never cut into the battery, charger, or airplane wires
or serious injury can occur. Causing the battery to
“short out” (crossing negative and positive bare
wires) can cause a fire, serious injury and damage.
7.When operating your Firebird, ALWAYS tur n on
the transmitter BEFORE you plug the battery into
the Firebird. When you finish flying your Firebird,
ALWAYS unplug the battery BEFORE you turn off
the transmitter.
8.Never fly on the same frequency as another flyer
in your area. The frequency of your Firebird is shown
on stickers on the back of the transmitter and on
the bottom of the tail.
24
Page 25

Troubleshooting
Unit doesn’t operate 1. Transmitter “AA” batteries are depleted
or installed incorrectly, indicated by a
dim or unlit LED on transmitter or the
low battery alarm
2. No electrical connection
3. Firebird battery not charged
4. Airplane receiver is not activated
5. Crash has damaged the radio inside
the Firebird
1. Check polarity installation or replace
with fresh AA alkaline batteries
2. Push connectors together until they “click”
3. Charge battery for 2 hour s
4. Don’t forget to push the start button
on side of fuselage just before flight
5. Send to Horizon Service Center or
contact your retailer to replace
the fuselage.
Aircraft doesn’t climb 1. Tail angle needs adjustment
2. Throttle isn’t 100%
1. Tighten foreward tail screw 2 turns, and
loosen rear screw 2 turns.
2. Push trim lever (lever the to right of
throttle stick) full up before launching.
Aircraft is difficult to control or flies in circles 1. Tail flaps aren’t adjusted properly
2. Foam or “skin” near tail flap is torn or
damaged
3. Two wing angles are different
1. Follow adjustments on pg. 23
2. Best Choice: replace tail
Second Choice: repair with glue and tape
3. Adjust wing braces and tape securely so
wing angles are the same
PROBLEM POSSIBLE CAUSE SOLUTION
25
Aircraft repeatedly climbs steeply, stalls,
then dives
1. Tail angle needs adjustment 1. Tighten rear tail screw 2 turns, and
loosen foreward screw 2 turns.
Page 26

1. A “MUST” FOR BEGINNERS: Don’t fly in winds over 5 mph!
2. IMPORTANT: Choose your flying field carefully— tall grass and soft ground with 500 ft radius to fly is
optimal and will lengthen the life of your Firebird.
3. WATCH OUT! Holding the right stick full-over for too long can cause the Firebird to spiral dive and
crash. At the very first sign of your Firebird beginning to spiral or banking steeply, immediately release the
stick or give the opposite control to level the wings.
4. Purchase an extra batter y pack for added fun at the flying field. A Firebird Fast Charger
(HBZ1020, $17.95) can also be purchased at your local retailer to charge your packs from the
cigarette lighter of a vehicle.
5. If you’re gliding with the motor off, allow your Firebird more area for turns.
6. Position yourself at your flying field to keep the sun at your back and out of your eyes.
7. If it has been more than 36 hours since you charged your battery, charge again before flight for 15 minutes
with slow charger included with your Firebird.
8. Before each flight, make sure that the wing braces are taped securely in place and that each wing angle is
the same, or your plane may fly erratically or in circles.
26
Success Tips
Page 27

27
HBZ1000 Complete Firebird w/radio, battery, & charger $129.95
HBZ1005 Wing (with accessories) $11.95
HBZ1006 Tail (with accessories) $9.95
HBZ1007 Propeller $2.95
HBZ1008 Decal Sheet $3.95
HBZ1010 4.8V NiMh Battery Pack $17.95
HBZ1015 Battery Charger (2 hours) $ 9.95
HBZ1049 Wing Hold-Down Rods w/ caps (2) $0.95
HBZ1051 Wing Braces (2) w/o screws $1.50
HBZ1052 Thumbscrews for wing and canopy(2) $0.75
HBZ1053 Wing Center Cap $1.50
HBZ1054 Rubberbands (10) $0.95
HBZ1055 Tail V-Brace w/o screws $1.50
HBZ1056 Screws for tail (2) $0.95
HBZ1057 Canopy w./ backing tape $1.95
HBZ1058 Transmitter Antenna $4.95
HBZ1060 Transmitter Battery Cover $2.50
Firebird fuselage w/radio & transmitter
(w/o battery, charger, wing or tail) $49.95
HBZ1061 Channel 1 $49.95
HBZ1062 Channel 2 $49.95
HBZ1063 Channel 3 $49.95
HBZ1064 Channel 4 $49.95
HBZ1065 Channel 5 $49.95
HBZ1066 Channel 6 $49.95
Firebird Transmitter $24.95
HBZ1071 Channel 1 $24.95
HBZ1072 Channel 2 $24.95
HBZ1073 Channel 3 $24.95
HBZ1074 Channel 4 $24.95
HBZ1075 Channel 5 $24.95
HBZ1076 Channel 6 $24.95
Optional
HBZ1020 DC Fast Charger (20-30 minutes) $17.95
Replacement Parts
Keep that Firebird flying! Spare parts are
available from your dealer or from Horizon
Hobby direct (horizonhobby.com).
Please check with your dealer first—
by supporting your dealer, he’ll be there
when you need him.
SUGGESTED
PART # RETAIL
SUGGESTED
PART # RETAIL
Page 28

™
©2000 Horizon Hobby, Inc.
HobbyZone products are exclusively distributed by Horizon Hobby, Inc.
4105 Fieldstone Road, Champaign, IL, 61822 horizonhobby.com
HBZ1035
Warranty: Horizon Hobby, Inc. guarantees
this airplane kit to be free of defects in
material and workmanship at the date of
purchase. This warranty does not cover
any parts damaged by use, crashes or
modification.
In the event that you’re requesting Horizon
to replace Firebird parts, please follow the
instructions below.
1. Make sure the battery is unplugged
from the Firebird. Please pack the
complete Firebird (all components)
in the original box and put into a
sturdy shipping carton for protection.
Include complete name and address
information inside the carton, as well
as clearly writing it on the outer label/
return address area.
2. Include detailed information explaining
the nature of the problem(s)
encountered. Please date your
correspondence and be sure your
complete name and address appear
on this enclosure.
Warranty Parts Replacement.
Providing that warranty conditions have
been met, defective par ts will be replaced
without charge. Sorry, crash damage is not
covered under warranty. To receive warranty
service include your original dated sales
receipt.
Non-Warranty Parts Replacemen
t
Should your parts replacement costs
exceed $50, you will be provided an
estimate advising you of your options.
Within your letter, advise us of the payment
method you prefer to use. The Horizon
Service Center accepts VISA or Mastercard,
or you can pay cash in advance with a
cashier's check or money order. If you
prefer to use a credit card, please include
your card number and expiration date.
Mail your Firebird to:
Horizon Service Center
ATTN: HobbyZone Dept.
4105 Fieldstone Road
Champaign, IL 61822
Phone: (217) 355-9511
Warranty & Non-Warranty Replacement Parts
 Loading...