

Page 1
Instruction Manual
HobbyZone®products are distributed exclusively by
Horizon Hobby, Inc.
4105 Fieldstone Road
Champaign, IL 61822
©2004 Horizon Hobby, Inc.
www.hobbyzonesports.com
6293
HBZ6515
6 05482 14265 3
5723_HBZ Aerobird X manual 12/15/03 1:55 PM Page 42
Page 2

Welcome
to the World of
Crash damage is not covered
under the warranty.
Be sure to read the warranty on
page 38 and "Warnings and
Safety" on page 35 before you
proceed to Step 1.
The Aerobird Xtreme™ is equipped with some exciting features,
including a Multi-Mode Flight Control system. The default Sport
Mode is great for pilots transitioning from 2-channel planes and for
those who want a more relaxed flying experience. The Pro Mode
changes the Aerobird Xtreme’s flying characteristics,and allows
more aggressive maneuvers for those who want it.
The Aerobird Xtreme is also equipped with HobbyZone’s exclusive
X-Port™ feature. X-Port lets you add exciting plug-n-play accessories like the Sonic Combat Module™ (HBZ4020) for aerial combat
and the Aerial Drop Module™ (HBZ6023) that includes a parachute
jumper and two streamer bombs you can carry aloft and release.
Your Aerobird Xtreme™ adventures are about to begin.In order
to have a safe and successful experience, we’d like you to do a
couple of things first: watch the instructional Video CD and read
and follow the directions carefully.While easy to fly, the Aerobird
Xtreme may be more than the first-time pilot can handle. If you
haven’t flown one of HobbyZone’s Zone 1 or 2 airplanes or any
other radio controlled aircraft, we recommend you seek the help
of an experienced radio control pilot for your first few flights.
5723_HBZ Aerobird X manual 12/15/03 1:55 PM Page 2
Page 3
Step 2
5
Step 1
4
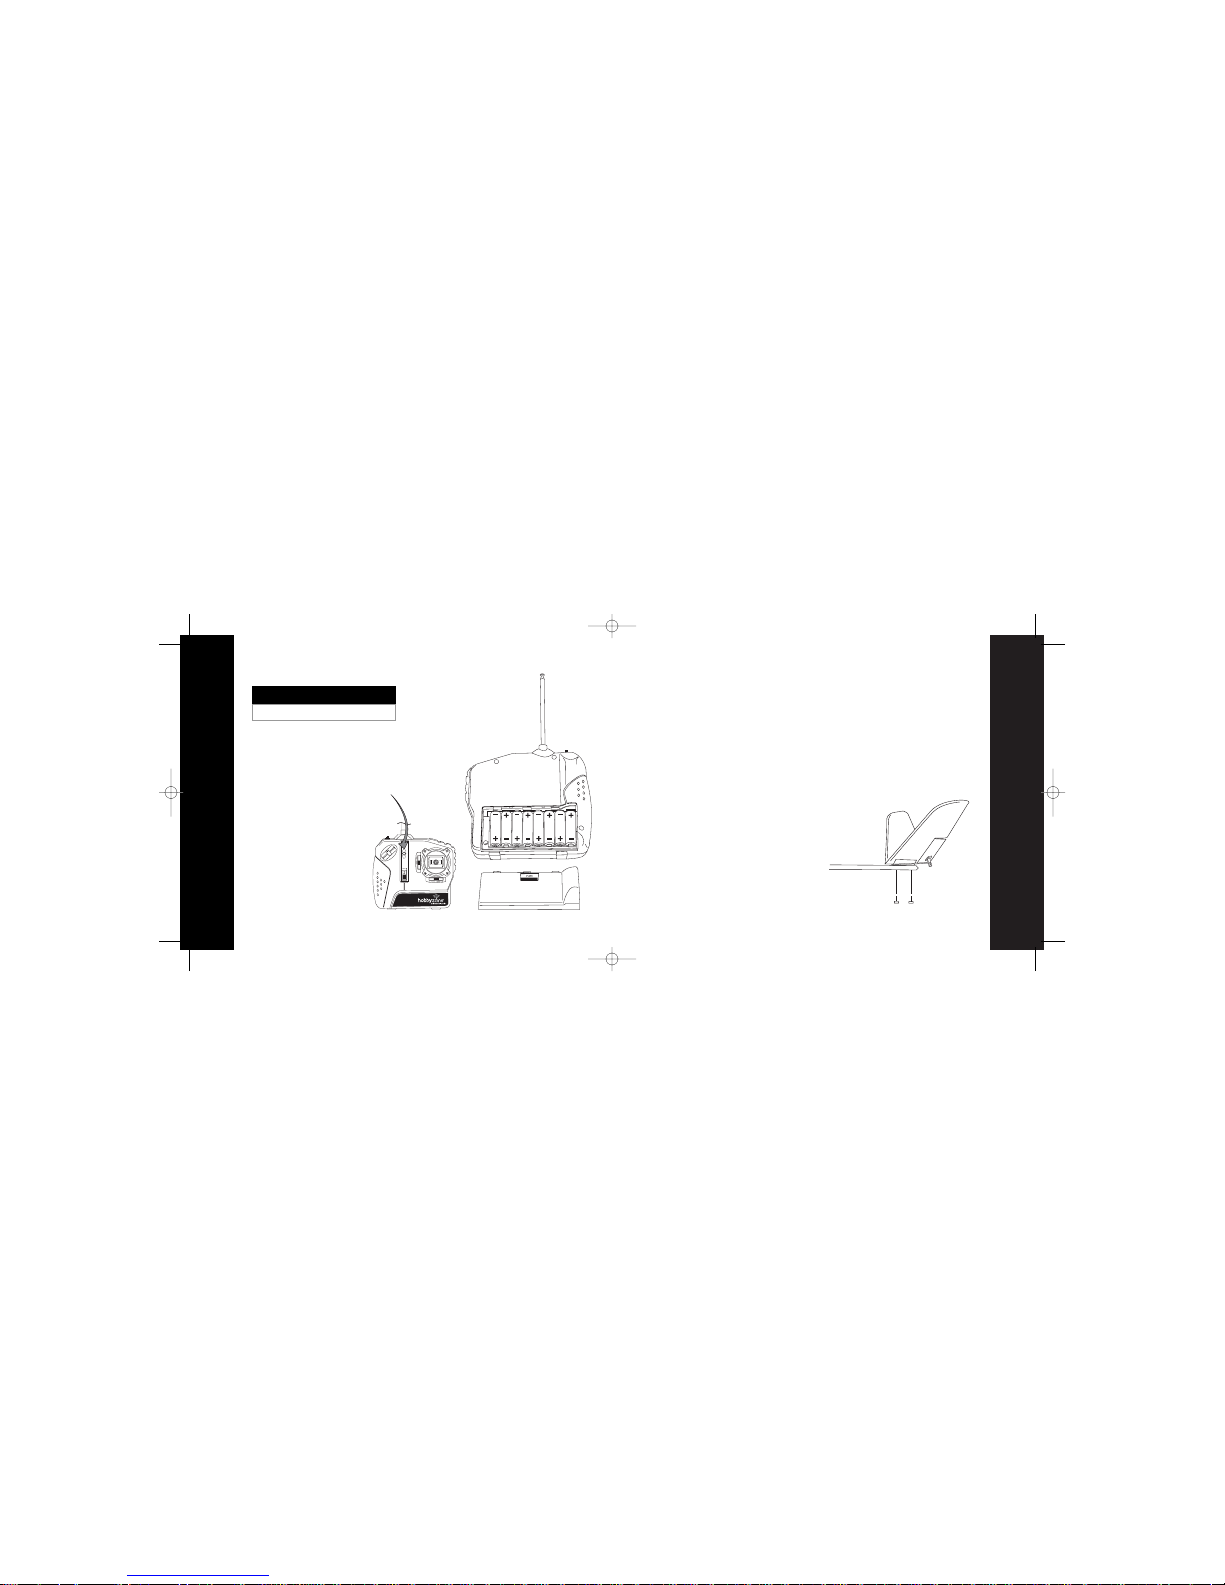
1. Remove the transmitter back cover by pushing down
with your thumbs, as indicated.
2. Install the included “AA”batteries according to the
diagram in the battery compartment.
3. Replace the cover.
4. To test, switch on the transmitter—the LED should
glow brightly.
5. Replace the batteries when you hear
the low-battery alarm (beeping sound).
Needed for Step 1
8 "AA" Batteries (included)
Transmitter
Attaching the Tail
Your Aerobird Xtreme™ comes nearly ready to fly.You
simply need to attach the tail, wing, and landing gear
prior to flight.
To attach the tail:
1. Locate the fuselage and carefully remove from the packing carton. Use caution when removing the fuselage. (Note:The tail is not mounted on the fuselage, but the control lines that exit the fuselage are
attached to the control surfaces of the tail).
2. Locate the two included screws that will mount the tail to the tail boom.
3. Be sure lines are not twisted and hold the tail in place.
4. Secure the tail as shown in diagram (a) using the two screws.Attach rubber bands on bottom of tail as
shown.
5.Turn on the transmitter and install the fully charged flight battery pack.
6. Make certain the control stick and trim levers on the transmitter are centered as shown in the diagram
on page 10.
7.With the radio system on and the transmitter stick a t neutral,both tail
control surfaces should be level with the rest of the tail.
8. Give transmitter input.The control surfaces should react as illustrated
in the diagrams on page 11.
9. If you find that the control surfaces are not functioning properly (ie. too
much slack in the line, not level with the tail in neutral position) DO
NOT FLY. Instead, perform the following procedure:
a.Turn the transmitter on, plug in flight battery and center the right
control stick and trim levers.
b. Use your fingers or a small flat screwdriver to turn the slotted spool
on the control horn. Depending upon which direction you turn the
spool, this will lengthen or shorten the control line.
c.While a pplying some tension to the control line,adjust until the
control surfaces are level with the rest of the surface.
d. If the control surfaces react the exact opposite as shown in the dia-
gram on page 11, the lines have been reversed and will need to be
corrected.
a.
5723_HBZ Aerobird X manual 12/15/03 1:55 PM Page 4
Page 4

Step 4
7
Step 3
6
FASTER
O
FF
F
U
L
L
O
N
Motor Test
1. Be sure throttle slider is in the Off position.
2. Turn the transmitter on.
3. Install the batter y and plug in the connector.
4. The Aerobird Xtreme’s built-in throttle-arming
feature will not allow the prop to spin until
the throttle slider has been moved to the Off
position first.
5. Keep all objects clear of the propeller, advance the
throttle forward and the propeller will start to turn.
The throttle arming feature will need to be
activated each time the battery pack is plugged
into the airplane. (If the motor does not run,
proceed to Step 5: “Charging the Aircraft Battery”)
6. When finished with the motor test,disconnect the
battery before turning off the transmitter.
During the motor test, make sure to keep everything
clear of the propeller and hold the plane securely.A moving propeller can cause severe injury.Adult super vision is
strongly recommended for those 14 and under.
Mounting the Landing Gear
1. Insert the landing gear into the slot on bottom
of the fuselage.
Rc
Attaching the Wing
1. Center the wing onto the fuselage by
aligning the molded dimples on the trailing edge
of the wing symmetrically with the top of the
fuselage when it is attached.
2. Once you're satisfied that the wing is centered,
attach it to the fuselage using the 6 rubber
bands provided. Stretch two of the rubber
bands from the front to the rear attach points.
Stretch the next two diagonally across the
middle. Stretch the last two rubber bands from
the front to the rear attach points as you did with
the first two. Once the rubber bands are in
place, confirm the wing is securely attached.
Needed for Step 2
Wing
Rubber Bands (x6)
Main Landing Gear
Wing and Landing Gear Attachment
Before each flight, make sure the front and trailing edges
of the wing are exactly centered on the fuselage. If the
wing is not centered properly,it is impossible to have
correct flight control.
Success Tip:
Safety First!!
5723_HBZ Aerobird X manual 12/15/03 1:55 PM Page 6
Page 5
Step 5
9
Step 5
8
Charging the Aircraft Battery continued
Charging HobbyZone®Battery Packs
1. When charging a stock Ni-Cd battery pack (HBZ6510),
completely discharge the battery prior to charging.
This will ensure that your battery will get a full
charge and will help prevent it from false peaking.
2. Using the dial indicator on the side of the charger,set
the charge rate as indicated in the chart below.
Success Tip
The Aerobird Xtreme™ battery should be charged
shortly before flying. If the battery sits for more than
12 hours prior to flying, you will need to “re-peak”
the battery before you fly by repeating the steps on
on this page. This will ensure you get the maximum
amount of flying time per charge.
Safety First!!
Do not leave the battery and charger unattended while in
use.While charging, place the battery on a hea t resistant
surface and constantly monitor the temperature of the battery pack. Do not allow children to charge batteries unless
they are supervised by a responsible adult.
Battery Capacity Maximum Typical
Charge Rate Charge Time
Stock Aerobird Xtreme Battery
1700mAh 7.2V Ni-Cd 1.8 amps 55 minutes*
Optional Xtreme Battery
3000mAh 7.2V Ni-MH 1.8 amps 105 minutes*
*charge times are only estimates. Actual charge times may vary.
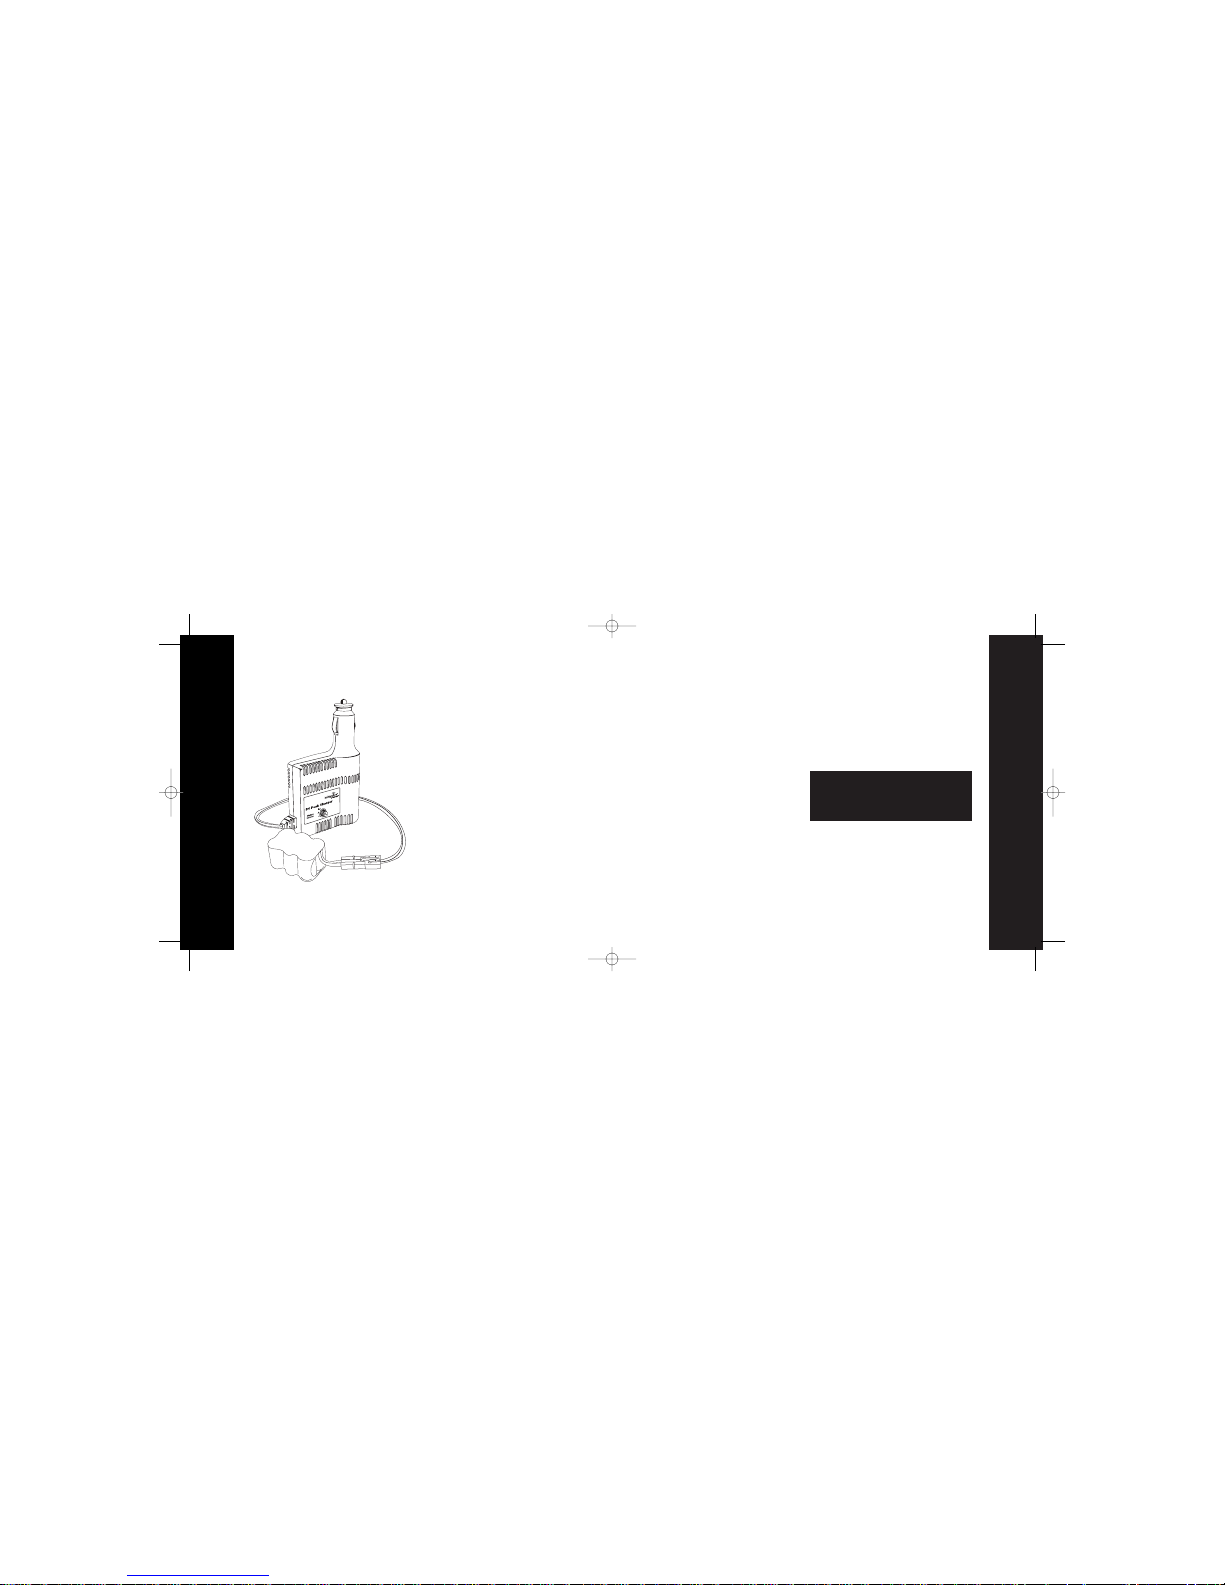
Charging HobbyZone Ni-CD and Ni-MH Battery Packs
The Aerobird Xtreme’s charger uses unique peak detection
circuitry that ensures an accurate charge every time and
protects your Ni-Cd and Ni-MH batteries from the dangers
of over-charging. During the charge cycle,it continuously
monitors the battery’s charge curve and automatically
stops charging when the peak charge is detected.
DC Peak Detect Charger Features:
• Variable charge rate from 0.5–1.8 amp charge rate
• Trickle charge
• Automobile 12V power outlet DC adapter
(with alligator clip adaptor)
• Tamiya-style connector
• Charges 6- and 7-cell Ni-Cd and Ni-MH battery packs
• LED charge indicator
1
.6
1
.8
1
.8
.5
A
-
1
.8
A
H
B
Z
6
5
1
9
.5
1
.2
1.4
3. Connect the battery pack to the charger.
4. Connect the charger to the 12V power outlet in
your automobile. The LED will continually blink
slowly while the battery charges.
5. Charging is finished when the LED indicator
glows steadily.
NOTE: Your Aerobird Xtreme also comes with a
special adapter so you can power your charger with
a 12V power supply, or an automobile battery.
5723_HBZ Aerobird X manual 12/15/03 1:55 PM Page 8
Page 6
Step 6
11
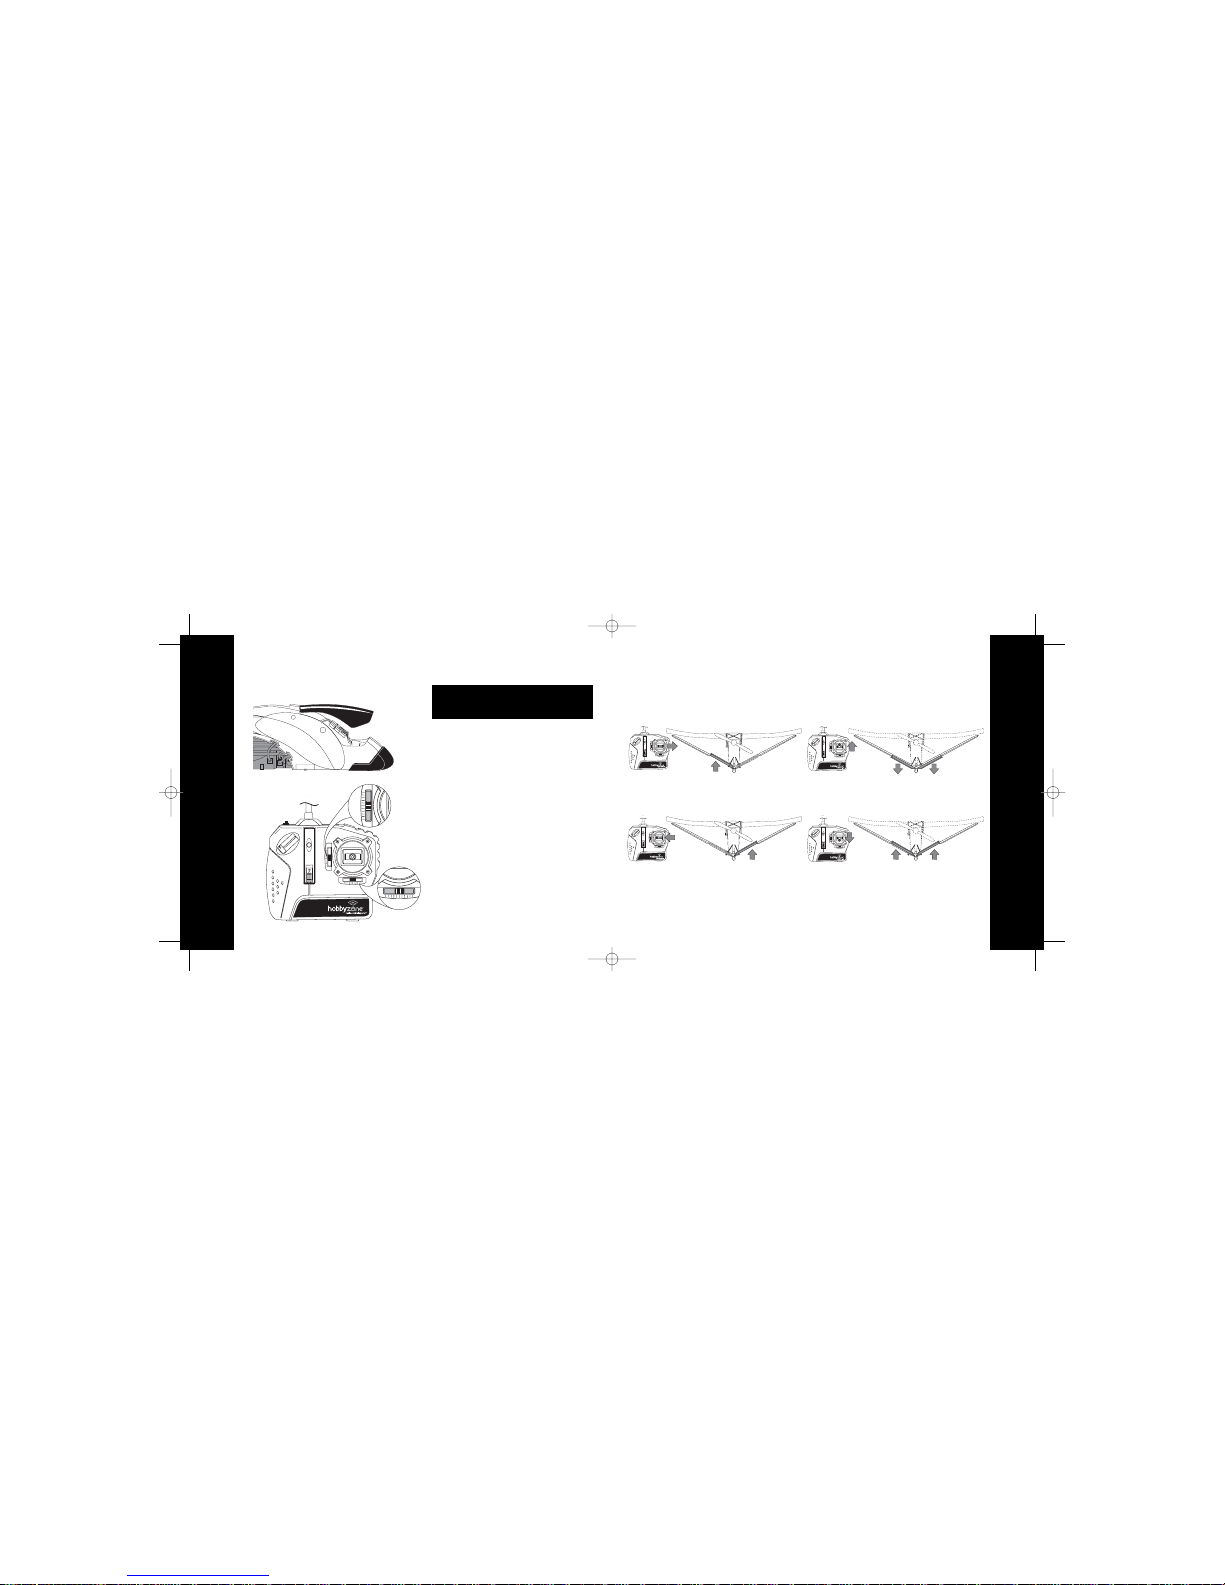
Tail Control Test continued
Step 6
10
Moves Up
Moves Up
Moves Down
Moves Up
Pull Back for
“Up” Elevator
Push Forward for
“Down” Elevator
Tail Control Test
Keep everything clear of the propeller before
starting the control test in the event that you
accidentally turn on the motor.
1. Be sure the throttle slider is in the Off position.
2. Switch on the transmitter–check to make sure the
LED is lit, indicating the transmitter has power.
3. Install battery in fuselage and plug in
connector.
4. Move the stick side to side.The tail flaps
should move as shown on the following page.
5. Move the stick up and down.The tail fla ps
should move as shown on the following page.
6. The small lever under and to the side of the
control stick are the trim levers and are used to
adjust the “neutral” point of your control stick.
It’s very important that this lever is centered
when performing these control tests.
7. Each flap must be level with the rest of the tail
surface when the trim levers are centered. Adjust
the control lines until they are level.
Safety First!!
Elevator Trim
Rudder Trim
5723_HBZ Aerobird X manual 12/15/03 1:55 PM Page 10
Page 7

Step 8
13
Step 7
12
Choose a Large, Open Grassy Field
•A large, open grass field is required. The
Aerobird Xtreme™flies approximately
30 mph, so it covers ground fast.The bigger
the field, the better!
• It is absolutely essential to have a minimum
of 300 feet of clear space in all directions from
the pilot. If you ignore this direction, you will
regret it.
IMPORTANT:Do not fly over or near people, buildings,
power lines, highways, train tracks,vehicles, trees,
water,pa vement,gravel, any hard surface or any
object you don't want to crash into. Please take this
warning seriously to keep people, property and your
Aerobird Xtreme safe.
Crash damage is not covered by the warranty.
Choose a Calm Day
To ensure success on your first flights, DO NOT FLY in
winds of more than 8 mph.
To check wind conditions:
1. Tie the included red flag to the end of the
transmitter antenna.
2. Hold the transmitter flat so the antenna is
parallel to the ground and note how much
the flag moves in the wind.
• If the flag hangs down,
it’s good to fly.
• If the angle between the antenna and
the flag is less than 20˚, it’s too windy
for your first flights.
SUCCESS TIP: Flying in too much wind is by
far the #1 reason for crashes and/or lost planes.
Follow these guidelines to protect the
Aerobird Xtreme™—you’ll be glad you did.
5723_HBZ Aerobird X manual 12/15/03 1:55 PM Page 12
Page 8

Step 10
15
Step 9
14
Range Test
1. One person holds the transmitter; the other
person walks 100 paces away with the airplane.
2. Be sure the throttle slider is in the Off position.
3. Extend transmitter antenna completely and turn
transmitter on.
4. Plug in airplane battery and close hatch cover.
5. As soon as you move the throttle slider forward,
the propeller should spin quickly.
6. As the first person moves the transmitter
controls at the same time, the other person
watches to be sure the airplane’s motor and
tail controls operate smoothly.
WARNING: The person holding the airplane should
hold it so that the propeller does not come in contact
with any part of their body.
You will need two people to do the range test:one to
hold the transmitter and one to hold the airplane.
If model does not range test correctly,do not fly. Call
Horizon Hobby Product Support staff toll-free at
1-877-504-0233 for directions on how to proceed.
Seek Assistance from an Experienced
Radio Control Pilot
VERY IMPORTANT
The 3-channel control system is designed for the experienced
radio control pilot and is not intended for the first-time flyer.
If you can successfully fly the HobbyZone®Firebird XL™,
Firebird Commander™, or Aerobird Challenger™,then you
should be ready for the Aerobird Xtreme™.The Aerobird
Xtreme can be controlled in a similar manner as a 2-channel
plane, such as the Firebird XL or Firebird Commander,by
simply limiting control stick movements to the left or the right
and using the throttle to ascend or descend. However,firsttime pilots of the Aerobird Xtreme should seek the assistance
of an experienced RC flyer until they’ve mastered the pitch
function. Once again, crash damage is not covered under
the warranty.
The flying characteristics of the Aerobird Xtreme should not
be altered for your first flights. Once you are comfortable flying
the plane in the standard “out-of-the- box” configuration,only
then should you attempt to change the flying characteristics
of the Aerobird Xtreme by changing hole positions in the
control horns.
5723_HBZ Aerobird X manual 12/15/03 1:55 PM Page 14
Page 9

Step 11
16
Hand Launch
1. On first flights, have an experienced second
person (adult recommended) launch the Aerobird
Xtreme™while the pilot controls with the
transmitter.Adult assistance is always recommended with pilots 14 years of age or younger.
2. Make sure the batter y is fully charged.
3. While holding transmitter in one hand, push
throttle slider to full on (up) with thumb.
4. Take a couple of steps and launch the model
directly into the wind. Keep the wings level.
Launch firmly. Do not throw it up or down.
Point it level (parallel) with the ground when
releasing. Think of it as a javelin that you are
throwing 20 feet away.
Keep the spinning propeller away from your hair,
head and hands or injury may occur.
Step 12
17
Safety First!!
Runway Takeoff
(Not recommended for inexperienced pilots)
1. Stand behind the Aerobird Xtreme™ and point it
directly into the wind on smooth asphalt or concrete.
2. Apply full power and adjust the right control
stick as necessary to keep the Aerobird Xtreme
headed directly into the wind.
3. If batter y is fully charged,your Aerobird Xtreme
should lift off the ground in approximately 35 feet.
Apply some UP elevator by pulling the stick back,
and the plane will lift off the ground in a
shorter distance.
5723_HBZ Aerobird X manual 12/15/03 1:55 PM Page 16
Page 10

Step 13
19
Step 13
18
Flying
Turning
Gently move the stick in the direction you want the model
to turn. Avoid holding full right or full left for more than
two seconds as this can cause the plane to spiral dive
and crash.
Sharp Turns
Move the stick in the direction you want to turn and
pull the stick back at the same time. The plane will
make a sharper banking turn. This is an advanced
maneuver and shouldn’t be attempted until you’ve
mastered the use of pitch.
Once you’ve reached a safe altitude, make right and
left adjustments of the control stick to keep it flying
straight into the wind. Never attempt a turn until the
Aerobird Xtreme reaches at least 50 feet of altitude.
Control range is 2500 feet. Don’t let the plane fly too
far away. Keep it upwind from you or the wind may
carry it away from you and out of sight and/or control
range.
Success Tip:
Flying continued
Rudder Trim
If the Aerobird Xtreme™ seems to drift in one direction when the control stick is in the neutral (centered)
position, gradually move the trim control lever below
the control stick in the OPPOSITE direction of the drift
until the plane flies straight with the control stick at
neutral. See page 23 if additional adjustments are
needed.
Elevator Trim
The Aerobird Xtreme should have a steady, shallow climb at full throttle with the control stick in
the neutral (centered) position. If, however,the
Aerobird Xtreme seems to drift up or down when
attempting straight and level flight at reduced
throttle settings, gradually move the trim control
lever on the left side of the control stick in the
SAME direction of the drift until the plane flies
level with the control stick at neutral. See page 23
if additional adjustments are needed.
With the throttle stick set at low or off
(gliding), the plane will not turn as fast as
when the throttle is set on high.
Success Tip:
5723_HBZ Aerobird X manual 12/15/03 1:55 PM Page 18
Page 11

Step 13
20
Step 13
21
Throttle Adjustment
1. Climb to an altitude of 100 feet or more with
full throttle.
2. To achieve a level "cruising" altitude, reduce
power by moving the throttle stick down to
approximately 50% of full-on.
3. To reduce altitude, reduce throttle.
4. To increase altitude, increase throttle.
WATCH OUT! If you're flying with the motor off or at
a low speed, allow the Aerobird Xtreme
™
a bit more area for turns.
Using Elevator
The Aerobird Xtreme™ is equipped with a third channel
for elevator (pitch) control. Pulling back on the stick provides UP elevator that allows for shorter takeoffs, better
flares for landing, a better climb rate and more effective
turns. Trying to climb too quickly will cause the airspeed
to slow down and stall the airplane. To avoid crashing
from a stall, always maintain enough altitude to recover
from it.
In a stall, the nose of the plane will go down (looks like
the plane is diving). To recover from the stall,pull the
stick back slowly (UP elevator) once the nose of the
plane goes down and plane has built up airspeed. Exit
the stall to straight and level flight. Be careful, since
pulling the stick back too abruptly or for too long will
cause the Aerobird Xtreme to enter another stall.
Effectively avoiding and recovering from stalls requires
experience. Always seek the help of an experienced radio
control pilot if you are not familiar with pitch control.
When using DOWN elevator (pushing stick forward),
make sure to always have enough altitude to avoid
crashing into the ground. DOWN elevator is especially
effective when landing in small areas or over obstacles.
5723_HBZ Aerobird X manual 12/15/03 1:55 PM Page 20
Page 12

Step 13
22
Landing
When you notice that the Aerobird Xtreme™ no longer
climbs well under full power (normally after approximately 15-20 minutes with stock Ni-Cd battery pack),
the battery is getting low, and it's time to land. Line the
model up, heading directly into the wind toward the
desired landing spot. At 10 feet of altitude,gradually
reduce the throttle stick to turn off the motor.The
Aerobird Xtreme will glide in for a landing.
Auto Cut-Off Feature:When the flight batter y gets
low enough, this feature will automatically shut off the
motor and save enough battery power for the radio and
tail control so you can land safely.If you are high
enough and have some time to rest the battery, you
may re-arm the motor by moving the throttle slider
back to Off. This may give you a little extra bit of power
to adjust your landing. Do not re-arm more than once
or twice, or you may lose your control power.
Do not attempt to catch the airplane or injury may result. Also,
be sure to turn motor off before you touch down or damage
can occur to your wing and propeller.Remember to always
land directly into the wind.
As you gain experience, try adding a bit of gentle backpressure on the stick just before touchdown to ”flare”
the plane. With some practice,your landings will be
expertly smooth and on target.
Reduce power at 10 feet
Step 14
23
Safety First!!
Success Tip:
A. If the Aerobird Xtreme™keeps turning to
the left and adjusting the trim control lever
(page 19) does not correct enough to fly
straight with the stick at neutral:
1. Adjust the control line so that the left tail flap
is 1/16" above the rest of the tail surface.
2. Test fly.
3. If it still flies to the left, repeat the above
procedure, adding 1/16" each time until it
flies straight.
B. If the Aerobird Xtreme keeps turning to the
right and adjusting the trim control lever (page
19) does not correct enough to fly straight with
the stick at neutral:
1. Adjust the control line so that the right tail flap
is 1/16" above the rest of the tail surface.
2. Test fly.
3. If it still flies to the right, repeat the above procedure, adding 1/16" each time until it flies
straight.
IMPORTANT:If there is a bend (even a small one) in the tail or wing or a tear near the flap areas, it is impossible
to have correct flight control. Replace the damaged part immediately!
Making Adjustments—Plane Turns to the Left or Right
5723_HBZ Aerobird X manual 12/15/03 1:55 PM Page 22
Page 13

Step 16
25
Step 15
24
Making Adjustments to the Climb Rate
A. If the Aerobird Xtreme™ does not climb fast
enough with a fully charged battery at full throttle,
do the following:
1. Tighten the front tail screw in one full turn
and loosen the rear tail screw one full turn.
2. Test fly.
3. Repeat the above procedure if necessar y until
the Aerobird Xtreme climbs adequately
under full power.
B. If the Aerobird Xtreme climbs too fast with full
throttle by climbing at a steep angle, stalling and
keeps repeating climbing sharply and stalling, do
the following:
1. Loosen the front tail screw one full turn and
tighten the rear screw one full turn.
2. Test fly.
3. Repeat the above procedure if necessar y until
your Aerobird Xtreme climbs at a steady rate.
Screw In Screw Out
Screw InScrew Out
Note: Only use this option if you do not have enough travel with
the trim lever to the left of the control stick or if you would like
to fine-tune the flight characteristics with the trim levers and
controls in the neutral position.
Multi Mode Flight Control System
The Aerobird Xtreme™ includes two ways to
fly.The mode is selected by the way you
“boot up” the system each time you plug in a
flight battery.
Sport Mode
Sport Mode is the default mode. It offer HobbyZone’s
Flight-Trak™system with the addition of pitch control. In
this mode, steering input only raises one of the control
surfaces. This movement is similar to a mix of steering
plus UP elevator.
Sport Mode also increases the control throw when the
throttle is reduced for more positive control when gliding.
These features make flying the plane smoother and easier
for less experienced pilots, or those seeking a more relaxing flight. All pilots should master Sport Mode before
going into Pro Mode.
Entering Sport Mode
1. Move the throttle slider down to the off position.
2. Turn on the transmitter and leave the stick
centered.
3. Plug the battery into the plane.You are now in
Sport Mode.
5723_HBZ Aerobird X manual 12/15/03 1:55 PM Page 24
Page 14

26
Step 16
Step 17
27
Multi Mode Flight Control System continued
Pro Mode
Pro Mode turns off Flight-Trak™,and changes the tail controls
into a standard V-tail mixer.In this mode, steering input moves
one control surface up, and the other one down.This causes
more pure yaw control. The plane will not tend to keep its nose
up or climb when steering is input.Secondly, Pro Mode increases the control throws all of the time.This allo ws for faster,more
aggressive control response.
Pro Mode is great for aerobatics and engaging friends in aerial
combat with the Sonic Combat Module™. It’s easier to keep the
nose down and the speed up, and you can cross over onto an
opponent’s tail much faster.
Success Tip:
We strongly recommend you spend your first few flights in Pro
Mode at higher altitudes where there is a greater margin of
safety.
Entering Pro Mode
1. Move the throttle slider down to the Off position.
2. Make sure the flight battery has been unplugged
from the plane for several seconds and that the
transmitter is off.
3. Plug the battery into the plane (Keep head away
from propeller).
4. Push the control stick forward (DOWN elevator)
and hold it there.Turn the transmitter power on,
and after about 2 seconds, release the control
stick.You are now in Pro Mode.
Confirm Pro Mode
1. Move the control stick directly to the right.
2. If the left surface moves up and the right surface moves down,
you are in Pro Mode. (If left surface moves up and the right
surface stays level, you are in Sport Mode.Disconnect the
battery and turn the transmitter off and try again.)
Note: The system is reset each time you disconnect the flight battery.If you do not follow the steps to enter Pro Mode, the system
defaults to Sport Mode.
Aerobatic Flight
The Aerobird Xtreme™ comes out of the box with the controls
set for beginning pilots. By adjusting the control lines to holes on
the control horns that are closer to the control surfaces, you will
give the Aerobird Xtreme more control response for aerobatic
maneuvers like loops and tail slides (good for experienced
pilots). Moving the control lines further from the control surfaces
will soften the Aerobird Xtreme responsiveness and make it
easier to fly (good for beginning pilots).
Moving the control line to adjust the control response:
Note: Only adjust one control surface at a time so you don’t
accidentally mix them up. Use your fingers or a small,straightblade screwdriver to turn the control horn spool.There is also a
small stainless steel tool included to help turn the spool.
Do not turn the small Phillips screw that holds the spool
in place.
1.Remove the control line from the horn by turning the spool
to unwrap the line and pull the line out of the horn.
2.Thread the line through the desired control horn hole, then
through the hole in the spool.
3.With the elevator in the do wn position as shown,pull the
excess line through the horn so the control line to the
fuselage is nearly tight.
4.Turn the spool to take up slack in the line until the control
surface is even with the rest of the tail.
To mechanically adjust the trim of each individual control
surface and fine-tune handling, turn the spool in the desired
direction by either taking up line and raising the control surface or letting out line and lowering the surface. Gently pull
out any slack in the control line if you let out line to lower
the control surface.
After making any adjustments, always turn on the transmitter
and center the transmitter trim levers, making sure the control surfaces are adjusted evenly,and the surfaces move in
the proper directions before you fly (see pages 10–11).
NOTE: By making the controls more responsive, the Aerobird
Xtreme will also become less forgiving, increasing your
chances of a crash. If you do not have prior experience with
a 3-channel or higher airplane, you should seek the
assistance of an experienced radio control pilot before you
fly,as crash damage is not covered by the warranty.
5723_HBZ Aerobird X manual 12/15/03 1:55 PM Page 26
Page 15

2928
Aerobatic Flight continued
Loop: From a high altitude,push forward on the stick to build up
speed in a medium dive (about 30° angle to ground), then
steadily pull back on the stick and hold it until the aircraft goes
over the top of the loop. Exit the maneuver straight and level by
returning the stick to the neutral position as the plane nears the
bottom of the loop.
Tail Slide:Push forward on stick to build up speed in a dive
(about 30° angle with ground), then pull back on stick and hold
until plane is heading up vertically.
Using slight inputs of elevator and rudder,keep plane in vertical
position until airspeed bleeds off. Slide the throttle to the Off
position.The plane will halt forward momentum and then swivel
to head nose first down.This is the completion of the move.
Move the throttle slider to full-on and pull out to straight and
level flight by pulling back on the control stick.
Chandelle: Gradually pull back on the control stick until the
plane is going vertical. Once on a vertical heading,add right or
left rudder.Once the nose of the plane is heading toward the
ground, gradually pull back on the stick to exit the maneuver in
straight and level flight.
Step 17
CHARGER
CAPACITY
MAX. CHARGE RATE *CHARGE TIME
HBZ6519 DC Peak Charger 1.8 1700mAh NiCd pack 1.8 amp 55 minutes
3000mAh NiMH pack 1.8 amp 105 minutes
EFLC2010 Summit DC Variable 1700mAh NiCd pack 4.0 amps 25 minutes
Rate Peak Charger 3000mAh NiMH pack 4.0 amps 45 minutes
*charge times are approximations only
Chargers and Charge Times
EFLC2010
DYN4048
You may also purchase an optional charger to allow for faster charging.The E-flite Summit™ (EFLC2010) is a DC
powered variable rate (.250 mA–4.5 amps) peak charger ideal for charging 4–7 cell Ni-Cd and Ni-MH battery packs.
The Prophet Pro™ (DYN4048) 7.5 amp 12V power supply powers the Summit charger.
E-flite Summit DC Peak Charger
Dynamite®Prophet Pro
12V 7.5 amp Power Supply
5723_HBZ Aerobird X manual 12/15/03 1:55 PM Page 28
Page 16

31
Adding X-Port Accessories
The Aerobird Xtreme™ is equipped with
HobbyZone’s exclusive X-Port™ feature,
which will allow you to add exciting plug-nplay accessories like the Sonic Combat Module™ and
Aerial Drop Module™ (both sold separately). You activate
attached X-Port accessories by pressing the button on the
top left corner of the transmitter.
Sonic Combat Module
The Sonic Combat Module (HBZ4020) allows you to engage
in pulse-pounding aerial combat with up to five other SCM
equipped HobbyZone® aircraft. When you successfully
"hit" the other SCM equipped aircraft, you will disable their
motor for approximately 10 seconds, leaving them with
only the use of the tail controls during this time.
No one to fly against? You can still take part in air-toground combat with the purchase of the SCM and the
Stealth Ground Target (HBZ4025).With the SCM attached to
your aircraft you can fly in low and hit the Stealth Ground
Target, causing it to emit a loud pitch tone that lets you
know you’ve scored a "kill".
Aerial Drop Module
The Aerial Drop Module (HBZ6023) attaches to your
fuselage and allows you to drop one or both of the
included streamer bombs on ground targets.A parachute jumper is also included, offering the opportunity
to practice dropping in "behind enemy lines."
For more information regarding these HobbyZone
accessories, as well as all Hobby Zone products, please
visit www.hobbyzonesports.com.
30
Fun Games with the Target
1. See how many hits you can get in a measured
time, such as 3 minutes.
2. See how many hits you can get in one
battery pack.
3. Attack the target with two or more Aerobirds
at the same time. See who can time their
attack runs properly and get the most hits in
5 minutes.
Be sure to turn off the power switch on the
bottom when you are done. If the target fails
to register hits, you may need to replace the
9V battery.
Let the Dogfighting Begin
Engage in an aerial free-for-all with 2 to 6 other
X-Port™ equipped HobbyZone
®
planes using
the Sonic Combat Module™.
Aerobird Xtreme™Combat Options
5723_HBZ Aerobird X manual 12/15/03 1:55 PM Page 30
Page 17

33
32
HobbyZone®Accessories
HBZ6512 3000mAh Ni-MH Battery Pack
More flight time for your Aerobird Xtreme™,
almost twice as much as the included battery pack!
HBZ4020 Sonic Combat Module™ (SCM)
Plug in the Sonic Combat Module and take on similarly
equipped HobbyZone planes in aerial combat. When
“hit”, the SCM temporarily disables your motor while
allowing you to steer.
HBZ4025 Stealth Target
An optional Stealth fighter ground target with
"hit" sensor is available so you can practice with
the Sonic Combat Module or take on friends in a
target-shooting contest
HBZ6023 Aerial Drop Module™ (ADM)
Plug in the Aerial Drop Module and you can drop
streamer bombs or a parachute jumper,which
are included.
5723_HBZ Aerobird X manual 12/15/03 1:55 PM Page 32
Page 18

34 35
Warnings and Safety
1. Avoid damage to property and injury.Read and
follow this manual and included video completely,
observing all instructions and safety directions.
Think safety first.
2. Keep clear of the propeller,even when it isn't
spinning, as it could be turned on by accident.
Beware of hair becoming entangled in the propeller,
especially while launching the Aerobird Xtreme™
on a windy day, or injury may occur.
3. Do not fly when it's too windy or you may lose
control and crash, causing injury or damage. Never
fly the Aerobird Xtreme near people, vehicles,train
tracks, buildings, power lines,wa ter,hard surfaces
or trees. Never allow any one to attempt to catch
the Aerobird Xtreme while it's in flight or serious
injury can result.
4. Adult supervision is recommended for ages 14
and under.
5. Battery Charging: Only use a battery charger
intended for use with the Aerobird Xtreme battery.
Never leave charger unattended while charging.
This will help prevent overcharging. While
charging, place the battery on a heat resistant
surface. Do not lay it on carpet or upholstery while
charging. Never charge the battery for more than
three hours.
6. Never cut into the wires on the battery charger or
airplane as serious injury can occur. Causing the
battery to "short out" (crossing negative and
positive bare wires) can cause fire, serious injury
and damage.
7. Hold the plane securely,and keep all body parts
away from the propeller when the flight battery is
plugged in. When you finish flying the Aerobird
Xtreme, always unplug the battery before you turn
off the transmitter.
8. Never fly on the same frequency as another RC
vehicle in your area. The frequency of the Aerobird
Xtreme is shown on stickers on the back of the
transmitter.
1. If you happen to crash and part of the foam
wing or tail breaks, it can be repaired using
packing tape to cover missing pieces.
2. If damage is severe or if wing or tail is bent,
replace damaged parts immediately. See
page 39 for a complete replacement parts list.
3. If the soft nose is dislodged, it can be re-attached
with silicone glue, or two sided tape.
IMPORTANT:Control Alignment
Tail flaps must be level or nearly level with no slack
in the control lines or the plane will not
fly well. See pages 10-11 if adjustment
is necessary.
If a Crash Occurs
5723_HBZ Aerobird X manual 12/15/03 1:55 PM Page 34
Page 19

3736
1. Avoid damage to property and injury.Read and follow this manual and included video completely, observing all
instructions and safety directions. Think safety first.
2. Keep clear of the propeller,even when it isn't spinning as it could be turned on by accident. Beware of hair
becoming entangled in the propeller,especially while launching the Aerobird Xtreme™ on a windy day or
injury may occur.
3. Do not fly when it's too windy or you may lose control and crash, causing injury or damage. Never fly the
Aerobird Xtreme near people, vehicles, train tracks,buildings, power lines, water, hard surfaces or trees. Never
allow any one to attempt to catch the Aerobird Xtreme while it's in flight or serious injury can result.
4. Adult supervision is recommended for ages 14 and under.
5. Battery Charging: Only use a battery charger intended for use with the Aerobird Xtreme battery.Never leave
charger unattended while charging. This will help prevent overcharging.While charging, place the battery on a
heat resistant surface. Do not lay it on carpet or upholstery while charging.
6. Never cut into the wires on the battery charger or airplane as serious injury can occur.Causing the ba ttery to
"short out" (crossing negative and positive bare wires) can cause fire, serious injury and damage.
7. Hold the plane securely,and keep all body parts away from the propeller when the flight batter y is plugged in.
When you finish flying the Aerobird Xtreme, always unplug the battery before you turn off the transmitter.
8. Never fly on the same frequency as another RC vehicle in your area.The frequency of the Aerobird Xtreme is
shown on stickers on the back of the transmitter.
Success Tips
Unit does not operate 1.Transmitter "AA" batteries are depleted or
installed incorrectly indicated by a dim or
unlit LED on transmitter or the low battery
alarm
2. No electrical connection
3.Aerobird Xtreme™ ba ttery not charged
4. Crash has damaged the radio inside the
Aerobird Xtreme
1. Check polarity installation or replace with
fresh "AA" batteries
2. Push connectors together until they "click"
3. Charge battery fully
4. Replace the fuselage
Aircraft keeps turning in
one direction
1. Tail flaps need adjustment
2. Wing is not centered over the fuselage
3. Stickers (decals) not stuck down
1. Adjust stick trim lever (see page 19) or
adjust tail flap position (see page 23)
2. Center the wing before each flight
3. Properly rub down stickers or tape down
Aircraft is difficult to
control
1. Tail flaps aren't adjusted properly
2. Wing or tail is damaged
1. Adjust tail flaps (see pages 19, 23)
2. Repair or replace
Aircraft keeps nosing
down sharply
1.Tail boom dislodged from notch 1.Fix by re-installing tail boom into housing and
secure with tie-wrap or similar product.
Aircraft won't climb 1. Battery isn't fully charged
2. Tail needs adjustment
1. Charge battery shortly before flying
2. Adjust tail screws (see page 24)
or trim lever (page 19)
Troubleshooting
PROBLEM
POSSIBLE CAUSE
SOLUTION
5723_HBZ Aerobird X manual 12/15/03 1:55 PM Page 36
Page 20

3938
Replacement and Optional Parts
PART# DESCRIPTION SUGGESTED
RETAIL
HBZ3553 TX: CH 3,27.095 ABX, ABC 29.99
HBZ3554 TX: CH 4,27.145 ABX, ABC 29.99
HBZ3555 TX: CH 5,27.195 ABX, ABC 29.99
HBZ3556 TX: CH 6,27.255 ABX, ABC 29.99
HBZ6057 TX Battery Cover ABX,ABC 2.50
HBZ1058 TX Antenna 4.99
HBZ6537 Main Wheel Axle Caps (4) 1.49
HBZ6035 Tail Horn + Keeper (2) .89
Optional Parts
HBZ6512 3000mAh 7.2V Ni-MH Battery 41.99
Optional Charger
EFLC2010 E-Flite Summit Variable Rate DC Peak Charger 69.99
This variable rate DC powered peak charger comes with 3 charge leads,
BEC, universal RX,and Tamiya-style connector. Select charge rates from
.250mA–4.5A to safely peak charge your 4-7 cell Ni-Cd and Ni-MH battery packs. (see page 29)
DYN4048 Dynamite 12V 7.5A Switching Power Supply 59.99
Use this to supply AC power to your E-flite Summit™ Peak Charger.
Plugs into any standard 110/120V wall outlet. (see page 29)
Keep your Aerobird Xtreme™ flying with spare parts available from your local retailer or from Horizon Hobby (www.horizonhobby.com).
Please check with your retailer first—by supporting your local hobby shop, they’ll be there when you need them.
Warranty and Follow-Up Procedures
Due to the nature and operation of this product, the
warranty does not extend beyond the initial preflight
testing. Carefully check the parts and operation
BEFORE your first flight. Damage incurred during
flying combat, landing, crashing or modification
is not covered under the warranty.
Warranty: Horizon Hobby, Inc. guarantees this
product to be free of defects in material and workmanship. If you discover defects during the very first
preflight testing (Steps 1–6, & 9), please
call our Product Support staff toll-free at
1-877-504-0233 . If you are directed by them to
return the product to our Service Center, you will be
provided with a Return Authorization (RA) number.If,
in our opinion, after inspecting the product, we determine it to be defective, we will repair or replace it at
our discretion.
If you are directed by our Product Support staff to
return the Aerobird Xtreme
™
, please follow these
instructions.
1. Unplug the batter y from the airplane.
2. Pack the complete Aerobird Xtreme™ (all
components in the original box) and put into
a sturdy shipping carton for protection.
3. Include your complete name and address information inside the carton, as well as clearly
writing it on the outer label/return address
area. Include detailed information explaining
the nature of the problem(s) encountered.
4. Please date your correspondence and be sure
your complete name, address and daytime
phone number appear on this enclosure.
Please include your original dated sales receipt.
Mail to the address below.
Horizon Service Center
Attn: HobbyZone Dept.
4105 Fieldstone Rd.
Champaign, IL 61822
Replacement Parts
PART# DESCRIPTION SUGGESTED
RETAIL
HBZ6502 Standard Decal Sheet ABX 5.99
HBZ6507 Propeller ABX 3.29
HBZ6509 Landing Gear with wheels 4.49
HBZ6510 7.2V 1700mAh Ni-Cd Battery 29.99
HBZ6513 Alligator Clip to 12V lighter adapter ABX 3.99
HBZ6515 Instruction Manual ABX .99
HBZ6516 Instruction Video CD ABX 7.99
HBZ6518 Canopy w/Hinge ABX 3.99
HBZ6519 1.8 Amp DC Peak Charger 24.99
HBZ6520 Yellow Standard Wing ABX 19.99
HBZ6530 Tail w/Accessories ABX 14.99
HBZ6532 Replacement Motor ABX 19.99
HBZ6534 Trailing Edge Cap (2) ABX 1.49
HBZ6536 Wing Hold Down Rods w/caps(2) ABX 1.49
HBZ6538 Yellow Rubber Bands(6) ABX .99
HBZ6539 Yellow Tail V-Brace ABX 1.49
HBZ6540 Yellow Tail Screws ABX .99
HBZ6541 ABX Fuselage: CH 1,26.995 59.99
HBZ6542 ABX Fuselage: CH 2,27.045 59.99
HBZ6543 ABX Fuselage: CH 3,27.095 59.99
HBZ6544 ABX Fuselage: CH 4,27.145 59.99
HBZ6545 ABX Fuselage: CH 5,27.195 59.99
HBZ6546 ABX Fuselage: CH 6,27.255 59.99
HBZ6548 ABX Bare Fuselage 19.99
HBZ3551 TX: CH 1,26.995 ABX, ABC 29.99
HBZ3552 TX: CH 2,27.045 ABX, ABC 29.99
5723_HBZ Aerobird X manual 12/15/03 1:55 PM Page 38
 Loading...