

Page 1

Introduction
CAUTIONS
Thank you for purchasing this HOBBYWING product! For avoiding
any possible troubles that you may have in use, please take time to
read through this manual before the use. In addition, please note
the use conditions and technical parameters of this product.
ATTENTION
01
Specifications:
02
03
Applications
04
Features
06
Explanations for LED Status
07
Factory Reset
USER MANUAL
How to power on the WiFi Express
2
• Tri-color(White /Red/Black) cable: to connect the programming port on the ESC or
one end of the Y harness.
• Grey color line: it's the antenna to enhance the WiFi signals.
• LED light: to indicate the working status ofW iFi Express.
• RESET button: to factory reset this WiFi Express module.
The WiFi Express module works with the following products of HOBBYWING.
• XERUN series & EZRUN series of car ESCs.
• PLATINUM series of aircraft ESCs.
• Other ESCs which are compatible with HOBBYWING multifunction LCD program box.
RESET Button
Grey Color Line
LED Light
Tri-color
WiFi Express is a module which adopted the W iFi communication technology for
transferring data between an ESC and a smart device (Android phone, tablet,
and etc). It makes the wireless communication between ESC and smart device
possible; user can easily program and upgrade ESC, and monitor data
transferring via this unit.
• Working Voltage: 5V-12.6V.
• WiFi Protocol: IEEE802.11 b/g/n
• WiFi Signal Effective Range: 0-10m (Open Field).
• Size: 25.7x25.7x8.8mm (LxWxH).
• Weight: 11.3g.
Connect the ESC to a battery after it’s connected to the WiFi module, and then turn it on. The Red LED will come on solidindicating the WiFi Express is entering the
working mode.
How to build the wireless connection between a smart phone and the WiFi Express
3
(1) Check all available WLANs shown on your smart device.
(2) Find out the SSID (the WiFi name) named HW-WIFILINK, enter the initial password “12345678” and then click “connect”.
You must change the SSID name after the very first successful connection. Because the SSID and password of all the HOBBYWING WiFi modules are the
same, connection failure or misconnection issue may happen if multiple WiFi modules function at the same time.
LED turns on solid RED indicating the WiFi Express is successfully powered on and it functions well.
LED blinks indicating the WiFi Express is building the connection or transferring data between the ESC and the smart device.
Keep holding the RESET button with a thin and sharp thing like toothpick or something for about 15 seconds, then you can reset all parameters of the WIfi Express to factory
default values.
05
User Guide
How to Connect WiFi Express to Different ESCs
1
The way to connect WiFi Express to ESC may vary because of different ESC hardware design. The following are the ways to connect WiFi Express to different ESCs, about
which way you should take, please refer to the user manual of your ESC. In some case, the special Y harness (As shown picture 1: with three female connectors not two
female connectors and one male connector) included in the package may be needed for connecting the WiFi Express to ESC.
1. For ESC with the throttle cable and programming cable multiplexed.
1.1 For ESC with built-in BEC: in this case, a piece of Y harness is needed to connect the WiFi module and ESC. To be specific, connect the ESC throttle cable and W iFi
tri-color cable to connector A and connector B of the Y harness respectively (as shown picture 3).
1.2 For ESC without built-in BEC (so-called OPTO version): in this case, a piece of Y harness is also needed to connect the WiFi module and ESC. To be specific,
connect the ESC throttle cable and WiFi tri-color cable to connector A and connector B of the Y harness respectively. And connect the remaining end
(/connector C) of the Y harness to an UBEC to power the WiFi module (as shown picture 3).
2. For ESC that the fan port (on the ESC) is also the programming port
In this case, please unplug the fan wire first, and then plug the tri-color cable on the WiFi Express to the fan/programming port (as shown picture 2).
3. For ESC with a separate programming cable
3.1 For ESC with the programming cable which has the output voltage of 5-12.6V: in this case, a piece of Y harness is needed to connect the WiFi module and ESC.
To be specific, connect the ESC throttle cable and WiFi tri-color cable to connector A and connector B of the Y harness respectively (as shown picture 3).
3.2 For ESC with the programming cable which has no output voltage: in this case, a piece of Y harness is needed to connect the WiFi module and ESC. To be
specific, connect the ESC programming cable and W iFi tri-color cable to connector A and connector B of the Y harness respectively. And an UBEC is needed to
power the WiFi module, connect the remaining end (/connector C) to the battery (as shown picture 3).
4. For ESC with a separate port for programming
Plug the WiFi module directly into the programming port on ESC(as shown picture 2).
Note: An extra battery(5-12.6V) can replace the UBEC mentioned above.
A B
C
Connect to the
programming cable
Connect an UBEC only
in the following
circumstances(1.2 & 3.2)
Picture1 Picture 2 Picture 3
UBEC
CAUTIONS
How to make change to ESC & WiFi Express via the Hobbywing WiFi Express App software installed on your smart device
4
Start the Hobbywing WiFi Link App software on your smart device after it’s connected to the
WiFi Express, then the following interface will show up.
Users can program or upgrade their ESCs via the App. (For detailed information, please refer
to the user manual of HOBBYWING WiFi Link App).
1. WiFi Connection Status
The ESC icon (at the top right corner on the user interface of the App) will
turn Black if the the smart device is successfully connected to the to the
ESC. Otherwise, it will stay Grey (as shown right).
2.How to change the factory-default SSID (the WiFi name) & password
• Click the “Settings” icon and get into the “Setting page” (as shown right) .
• Click “WiFi Module Setting” and get into the “WiFi Setting” page, input the new WiFi
name, new password and then click“Save”.
Disconnected
Connected
Page 2
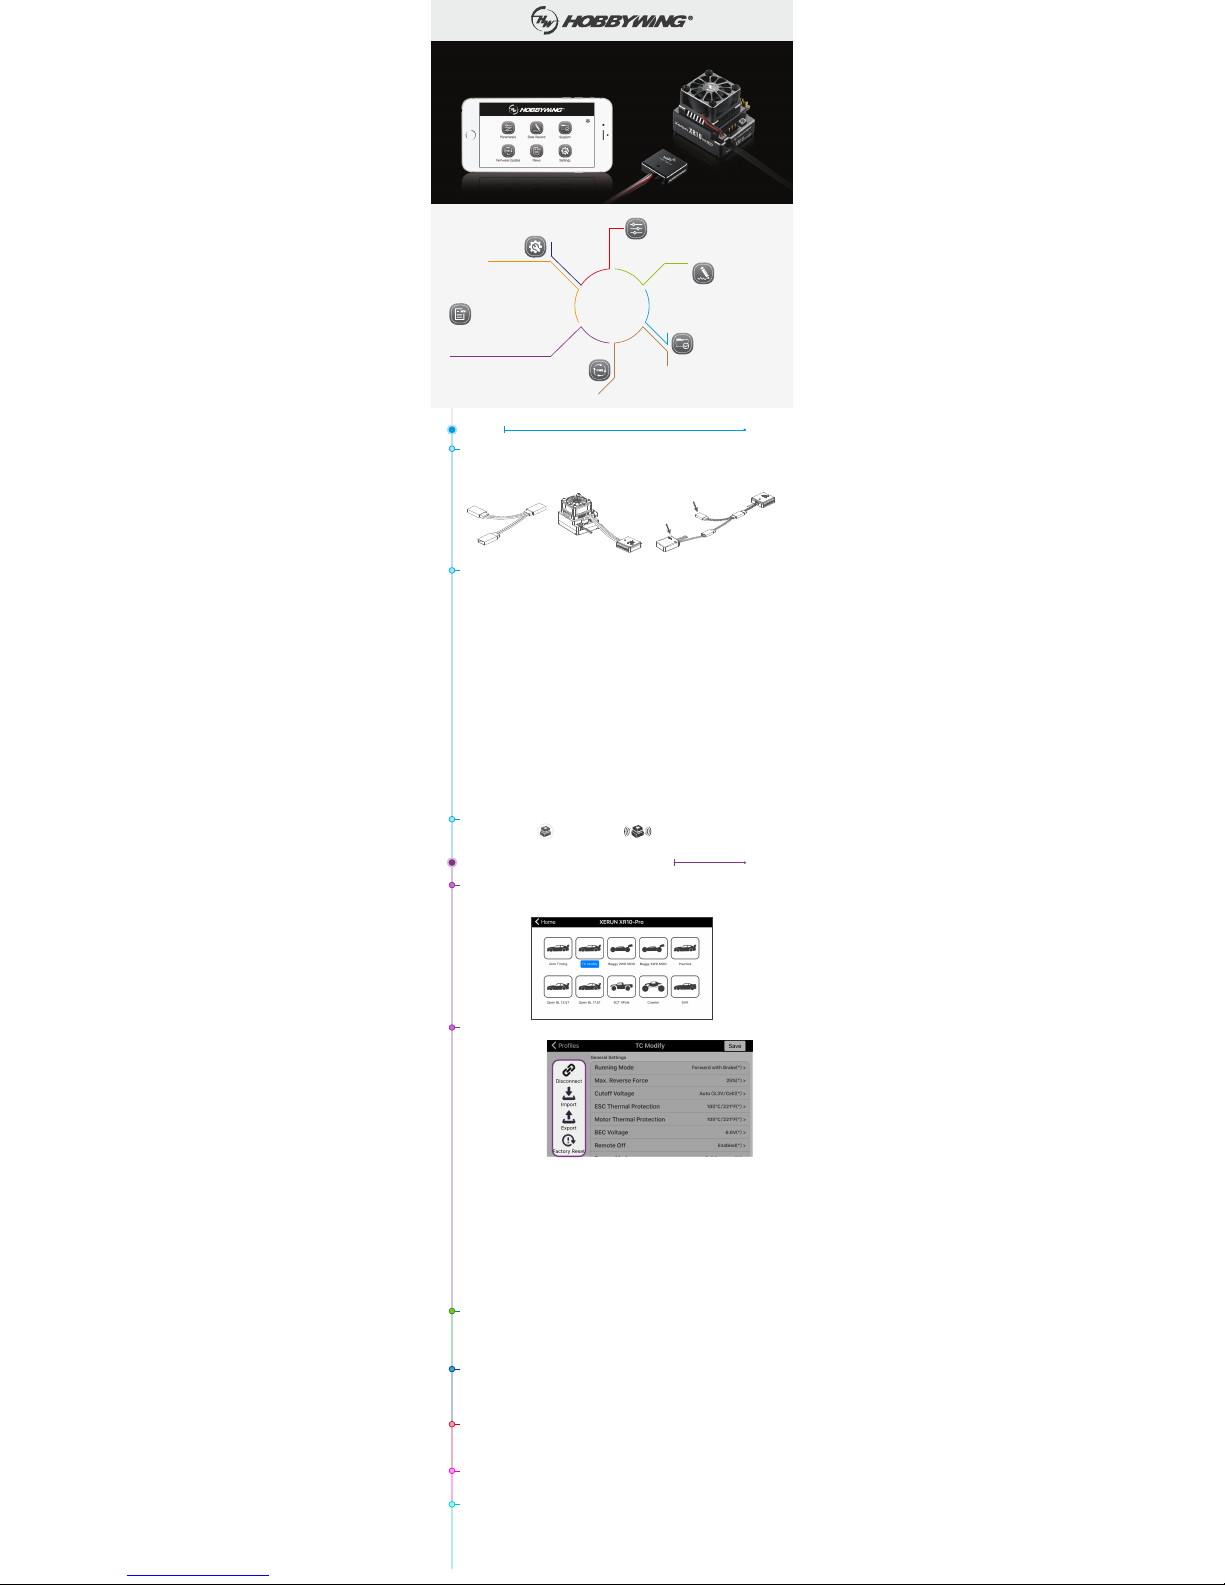
Icons
It’s mainly for setting language,
running mode, WiFi module settings,
and checking the user guide for this APP.
It records the maximum ESC and motor temps,
the minimum batteryvoltage, and the maximum
motorspeed on the condition that bothyour ESC
and motor have the data transmission function.
It's for checking the User Manuals of all HOBBYWING
products and Profile Management.
It’s for firmware upgrade.
It’s for checking the latest information at
HOBBYWING; you can read the information only
after you disconnect your iPhone from the WiFi
module and then connect it to the Internet.
It’s mainly for adjusting parameters on your ESC.
WIFI LINK APP
User Guide
Connections
Let’s take XERUN XR10 Pro as an example, click the “Parameters” icon and select one out of the
following ten preset modes as needed. (You may need to select one preset profile (out of ten) due to the
chassis you're using or the class you're competing at, please select or set the preset profile as per the
actual situation)
Disconnect: disconnect your ESC from the WiFi module.
Import: Import all the parameters (you previously set) from the memory of your iPhone to “Settings”.
Select and import the relevant file can restore all the parameters you previously set if you have made
a backup earlier. It will be blank if there is no backup.
Export: export all the parameters (you previously set) to the memory of your iPhone. The parameters
can be exported in file or photo format.
File format: easy to edit the file on a PC (enter a name for the parameter file in the pop-out box
after you select this "file" format).
Photo format: convenient to share the photo with other people on Wechat, FACEBOOK or other
social networks (fill in the blanks as requested and click "export" after you select
this "photo" format).
Factory Reset: factory reset all the parameters on your ESC.
Data Record
Click the ”Data Record” icon to enter the data recording interface. It records the maximum ESC and
motor temps, the minimum battery voltage, and the maximum motor speed on the condition that both
your ESC and motor have the data transmission function. (20 records can be stored in the APP,
and the older data will be automatically removed in order if the records exceed 20.)
You will see the following page after you select the “TC Modify” mode.
UBEC
Connect to the
programming cable
Connect an UBEC only
in the following
circumstances(1.2 & 3.2)
01
Click the ESC icon in the upper right corner on the home screen to “connect” your ESC to the WiFi
module. You will see the icon radiates like this if the connections are succeeded.
Support
Click the “Support” icon, you will see the "User Manual" & "Profile Management" options pop out.
User Manual: It’s for checking the user manuals of Car, Aircraft, Boat and Drone Power systems (only
after you disconnect your iPhone from the WiFi module andthen connect it to the Internet).
Profile Management: Click the icon to check the parameter file you’ve exported.
Firmware Upgrade
Click the “Firmware Upgrade” icon to check the current version and targeted version (of the ESC
firmware). When the targeted version is newer than the current version, you can decide whether to
upgrade or not. If both versions are the same, then there is no need to upgrade.
News
Click the “News”icon to check the latest information at HOBBYWING (only after you disconnect your
iPhone from the WiFi module and then connect it to the Internet).
Settings
Click the “Settings” icon, you will see the following information pops out.
Language: select between English and Chinese.
Running mode: switch between ESC-connected Mode and Demo Mode.
WiFi Module Settings: change the WiFi name and password if you want.
About: check the APP version and the database version.
Help: check the user guide for this APP.
WiFi Module
Detailed Information about Different Icons
02
Data
Record
Support
Parameters
Firmware Update
Settings
News
Introductions
about Different
“Disconnect/Import/
Export/Factory Reset”
four main options are
displayed on the left.
Items displayed on
the right are
programmable, you
can click the relevant
items and select the
corresponding
options as needed.
The way to connect WiFi Express to ESC may vary because of different ESC hardware design.
The following are the ways to connect WiFi Express to different ESCs, about which way you should take,
please refer to the user manual of your ESC. In some case, the special Y harness (As shown picture 1:
with three female connectors not two female connectors and one male connector) included in the pack-
age may be needed for connecting the WiFi Express to ESC.
1. For ESC with the throttle cable and programming cable multiplexed.
• For ESC with built-in BEC: in this case, a piece of Y harness is needed to connect the WiFi module
and ESC. To be specific, connect the ESC throttle cable and WiFi tri-color cable to connector A
and connector B of the Y harness respectively (as shown picture 3).
• For ESC without built-in BEC (so-called OPTO version): in this case, a piece of Y harness is also
needed to connect the WiFi module and ESC. To be specific, connect the ESC throttle cable and
WiFi tri-color cable to connector A and connector B of the Y harness respectively. And connect the
remaining end (/connector C) of the Y harness to an UBEC to power the WiFi module (as shown
picture 3).
2. For ESC that the fan port (on the ESC) is also the programming port.
In this case, please unplug the fan wire first, and then plug the tri-color cable on the WiFi Express to
the fan/programming port (as shown picture 2).
3. For ESC with a separate programming cable.
• For ESC with the programming cable which has the output voltage of 5-12.6V: in this case, a piece
of Y harness is needed to connect the WiFi module and ESC. To be specific, connect the ESC
throttle cable and WiFi tri-color cable to connector A and connector B of the Y harness respectively
(as shown picture 3).
• For ESC with the programming cable which has no output voltage: in this case, a piece of Y harness
is needed to connect the WiFi module and ESC. To be specific, connect the ESC programming
cable and WiFi tri-color cable to connector A and connector B of the Y harness respectively.
And an UBEC is needed to power the WiFi module, connect the remaining end (/connector C) to
the battery (as shown picture 3).
4. For ESC with a separate port for programming.
Plug the WiFi module directly into the programming port on ESC(as shown picture 2).
Note: An extra battery(5-12.6V) can replace the UBEC mentioned above.
A B
C
Picture1 Picture 2 Picture 3
 Loading...