

Page 1
Introduction
CAUTIONS
Thank you for purchasing this HOBBYWING product! For avoiding
any possible troubles that you may have in use, please take time to
read through this manual before the use. In addition, please note
the use conditions and technical parameters of this product.
ATTENTION
01
Specifications:
02
03
Applications
04
Features
06
Explanations for LED Status
07
Factory Reset
USER MANUAL
How to power on the WiFi Express
2
• Tri-color(White /Red/Black) cable: to connect the programming port on the ESC or
one end of the Y harness.
• Grey color line: it's the antenna to enhance the WiFi signals.
• LED light: to indicate the working status ofW iFi Express.
• RESET button: to factory reset this WiFi Express module.
The WiFi Express module works with the following products of HOBBYWING.
• XERUN series & EZRUN series of car ESCs.
• PLATINUM series of aircraft ESCs.
• Other ESCs which are compatible with HOBBYWING multifunction LCD program box.
RESET Button
Grey Color Line
LED Light
Tri-color
WiFi Express is a module which adopted the W iFi communication technology for
transferring data between an ESC and a smart device (Android phone, tablet,
and etc). It makes the wireless communication between ESC and smart device
possible; user can easily program and upgrade ESC, and monitor data
transferring via this unit.
• Working Voltage: 5V-12.6V.
• WiFi Protocol: IEEE802.11 b/g/n
• WiFi Signal Effective Range: 0-10m (Open Field).
• Size: 25.7x25.7x8.8mm (LxWxH).
• Weight: 11.3g.
Connect the ESC to a battery after it’s connected to the WiFi module, and then turn it on. The Red LED will come on solidindicating the WiFi Express is entering the
working mode.
How to build the wireless connection between a smart phone and the WiFi Express
3
(1) Check all available WLANs shown on your smart device.
(2) Find out the SSID (the WiFi name) named HW-WIFILINK, enter the initial password “12345678” and then click “connect”.
You must change the SSID name after the very first successful connection. Because the SSID and password of all the HOBBYWING WiFi modules are the
same, connection failure or misconnection issue may happen if multiple WiFi modules function at the same time.
LED turns on solid RED indicating the WiFi Express is successfully powered on and it functions well.
LED blinks indicating the WiFi Express is building the connection or transferring data between the ESC and the smart device.
Keep holding the RESET button with a thin and sharp thing like toothpick or something for about 15 seconds, then you can reset all parameters of the WIfi Express to factory
default values.
05
User Guide
How to Connect WiFi Express to Different ESCs
1
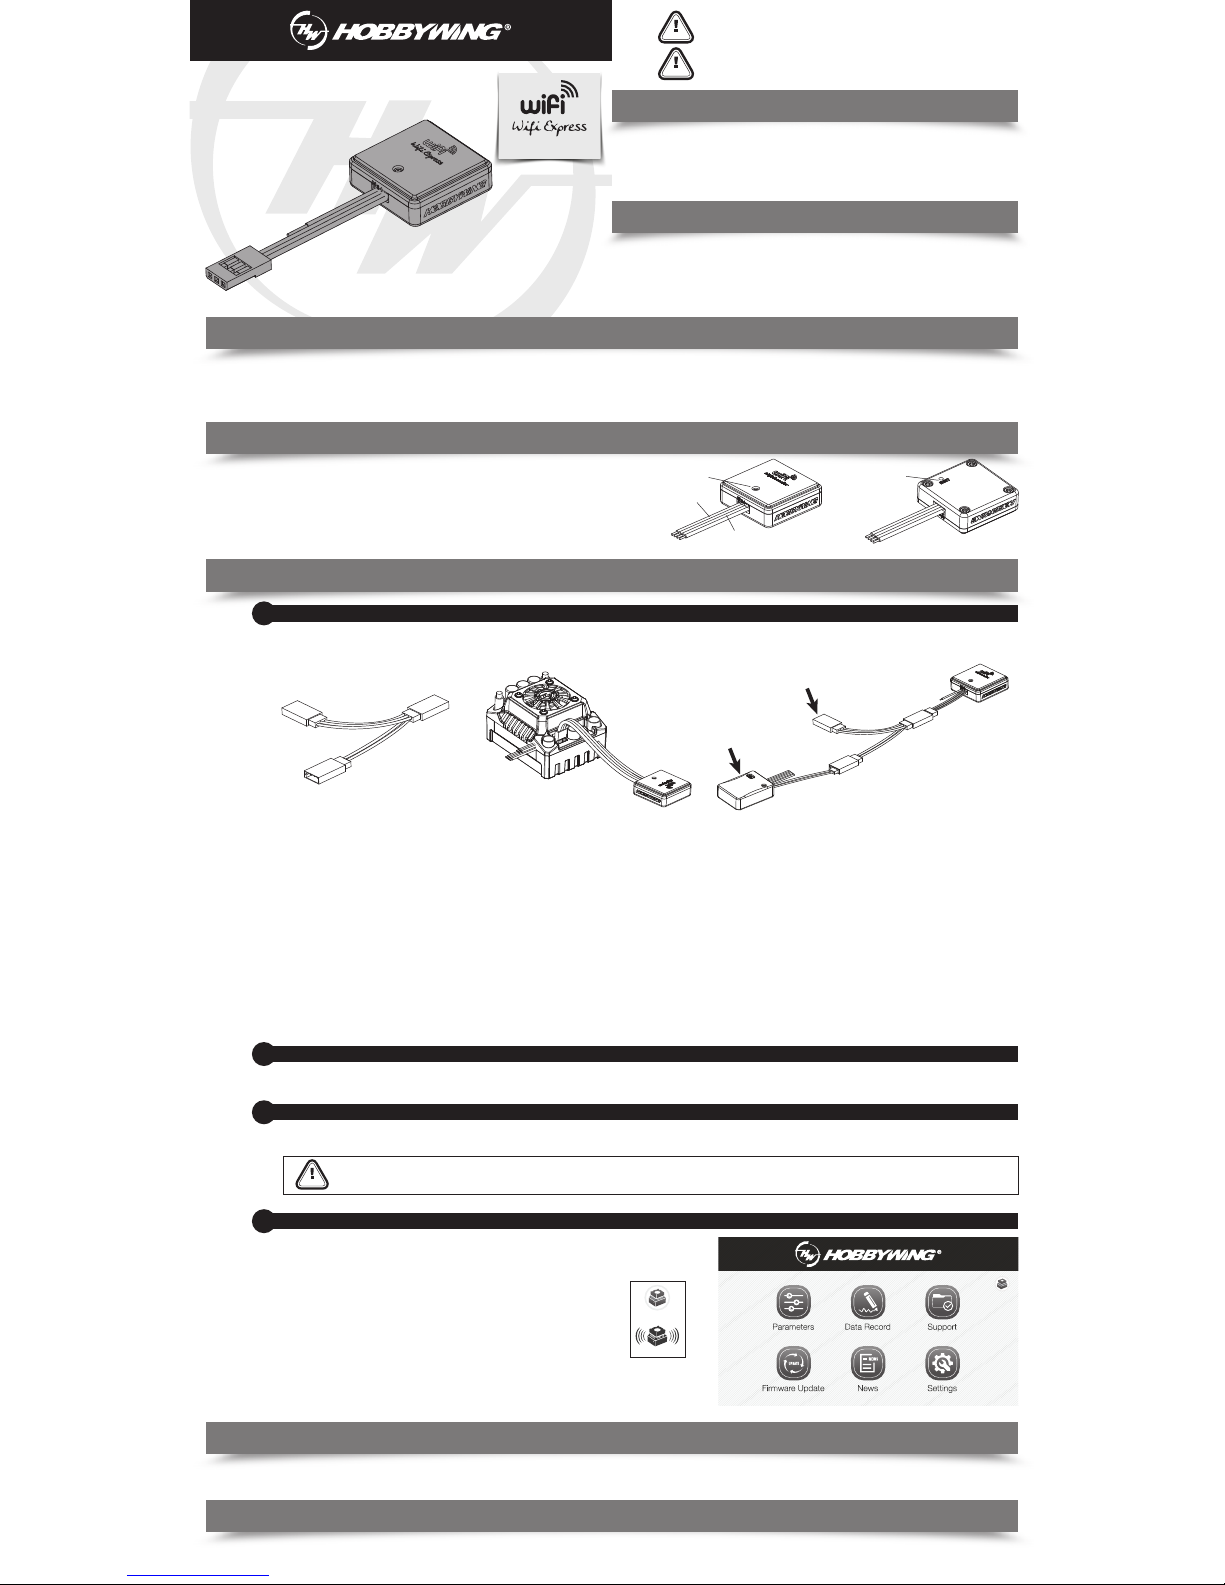
The way to connect WiFi Express to ESC may vary because of different ESC hardware design. The following are the ways to connect WiFi Express to different ESCs, about
which way you should take, please refer to the user manual of your ESC. In some case, the special Y harness (As shown picture 1: with three female connectors not two
female connectors and one male connector) included in the package may be needed for connecting the WiFi Express to ESC.
1. For ESC with the throttle cable and programming cable multiplexed.
1.1 For ESC with built-in BEC: in this case, a piece of Y harness is needed to connect the WiFi module and ESC. To be specific, connect the ESC throttle cable and W iFi
tri-color cable to connector A and connector B of the Y harness respectively (as shown picture 3).
1.2 For ESC without built-in BEC (so-called OPTO version): in this case, a piece of Y harness is also needed to connect the WiFi module and ESC. To be specific,
connect the ESC throttle cable and WiFi tri-color cable to connector A and connector B of the Y harness respectively. And connect the remaining end
(/connector C) of the Y harness to an UBEC to power the WiFi module (as shown picture 3).
2. For ESC that the fan port (on the ESC) is also the programming port
In this case, please unplug the fan wire first, and then plug the tri-color cable on the WiFi Express to the fan/programming port (as shown picture 2).
3. For ESC with a separate programming cable
3.1 For ESC with the programming cable which has the output voltage of 5-12.6V: in this case, a piece of Y harness is needed to connect the WiFi module and ESC.
To be specific, connect the ESC throttle cable and WiFi tri-color cable to connector A and connector B of the Y harness respectively (as shown picture 3).
3.2 For ESC with the programming cable which has no output voltage: in this case, a piece of Y harness is needed to connect the WiFi module and ESC. To be
specific, connect the ESC programming cable and W iFi tri-color cable to connector A and connector B of the Y harness respectively. And an UBEC is needed to
power the WiFi module, connect the remaining end (/connector C) to the battery (as shown picture 3).
4. For ESC with a separate port for programming
Plug the WiFi module directly into the programming port on ESC(as shown picture 2).
Note: An extra battery(5-12.6V) can replace the UBEC mentioned above.
A B
C
Connect to the
programming cable
Connect an UBEC only
in the following
circumstances(1.2 & 3.2)
Picture1 Picture 2 Picture 3
UBEC
CAUTIONS
How to make change to ESC & WiFi Express via the Hobbywing WiFi Express App software installed on your smart device
4
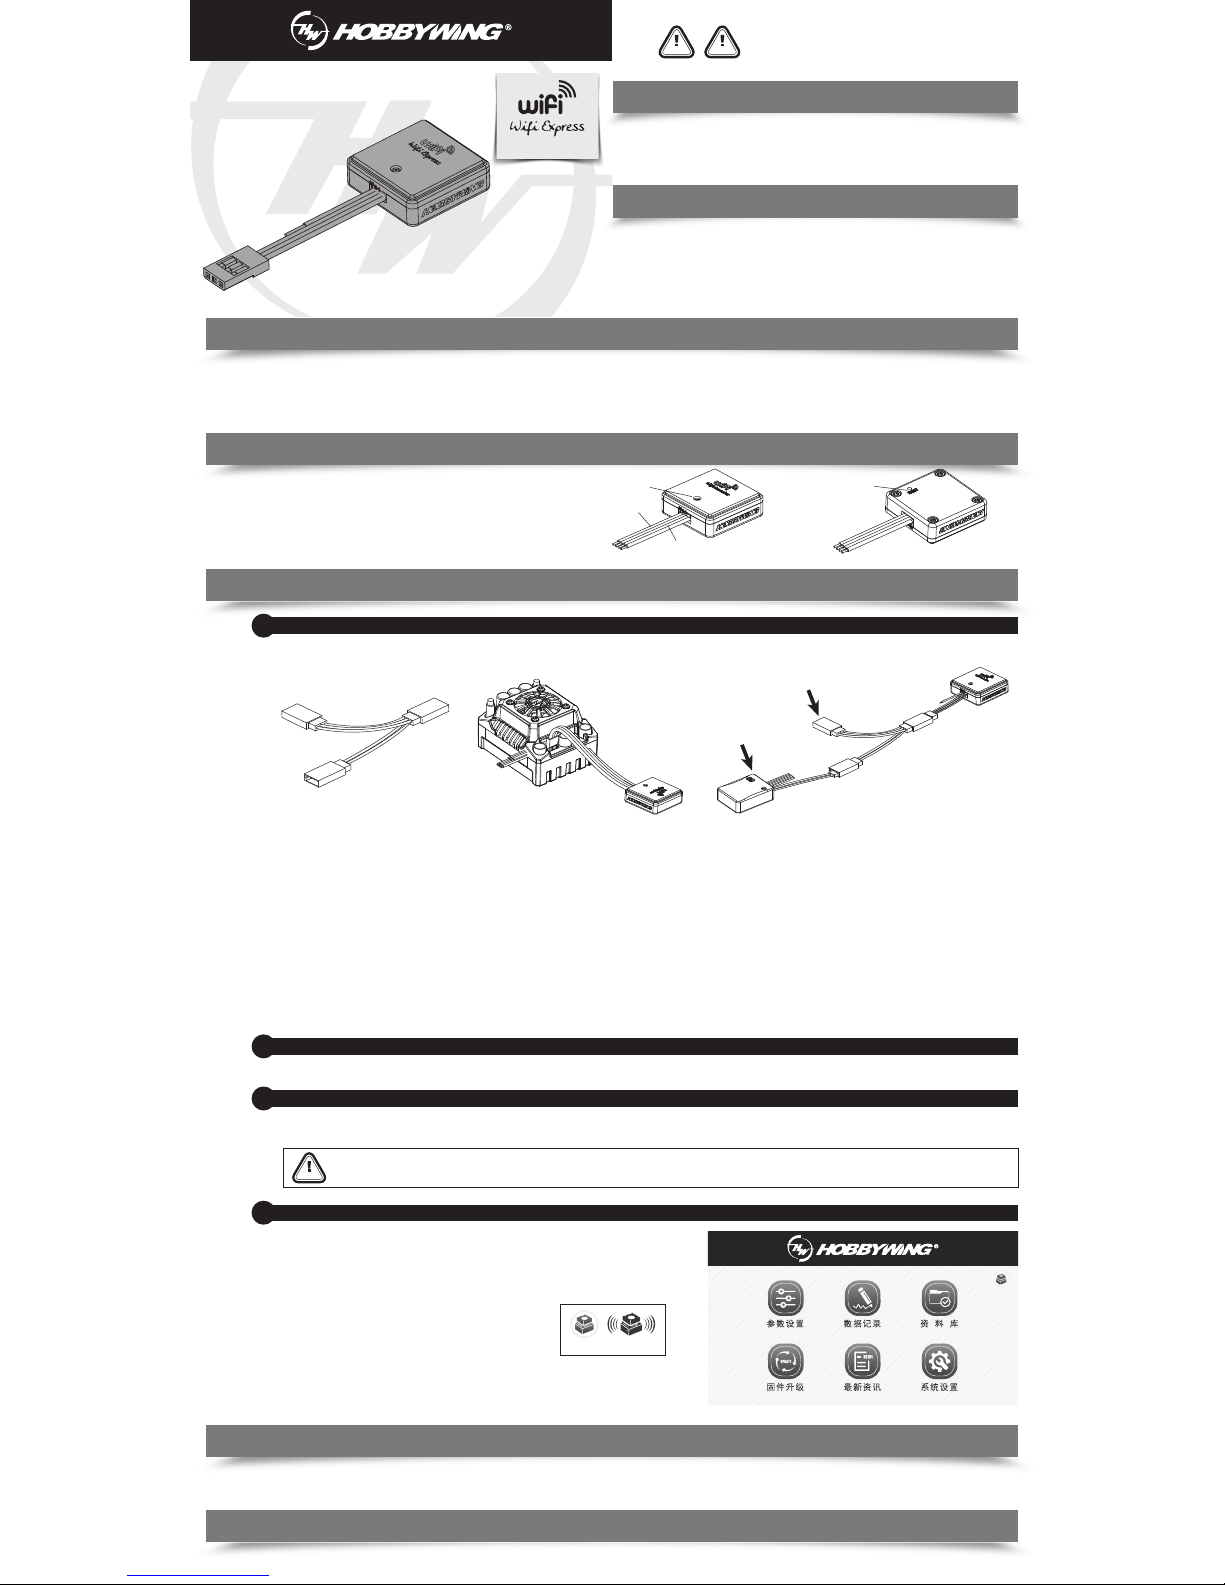
Start the Hobbywing WiFi Link App software on your smart device after it’s connected to the
WiFi Express, then the following interface will show up.
Users can program or upgrade their ESCs via the App. (For detailed information, please refer
to the user manual of HOBBYWING WiFi Link App).
1. WiFi Connection Status
The ESC icon (at the top right corner on the user interface of the App) will
turn Black if the the smart device is successfully connected to the to the
ESC. Otherwise, it will stay Grey (as shown right).
2.How to change the factory-default SSID (the WiFi name) & password
• Click the “Settings” icon and get into the “Setting page” (as shown right) .
• Click “WiFi Module Setting” and get into the “WiFi Setting” page, input the new WiFi
name, new password and then click“Save”.
Disconnected
Connected
Page 2
CAUTIONS
感谢您购买HOBBYWING产品!为避免使用中遇到任何
使用问题,请认真阅读此说明书;另外请注意此产品的
使用条件及技术参数。
ATTENTION
CAUTIONS
01
产品简介
02
产品规格
03
产品适用范围
04
产品功能说明
05
使用方法说明
06
LED指示灯说明
07
恢复出厂设置
USER MANUAL
1)白红黑排线:用于插入电调的参数编程口。
2)灰色天线:用于为了增强WiFi Express的信号
3)LED指示灯:WiFi Express 工作状态指示。
4)RESET按键:用于将WiFi模块的参数恢复为出厂默认设置。
该模块适用于好盈科技有限公司生产的以下产品:
· XERUN(速龙)、EZRUN(一狼)系列车用无刷电调;
· PLATINUM(铂金)系列空模无刷电调;
· 可支持多功能LCD编程盒的其他电调。
电调与WiFi Express连接
1
因各电调参数编程接口不同,电调与WiFi Express的连接方法也不同,请查看电调说明书对参数编程口的详细说明,再使用相应的接法即可,连接方法有
以下几种。另有些电调连接时需用到包装盒内的特制的Y线(如图一所示:Y线为3个母头,非2母1公)。
1、电调编程线与油门线复用:
1.1 若电调有BEC输出:需通过Y线连接,即电调油门线、WiFi模块插头分别插入Y线的A、B接口,如图三所示。
1.2 若电调无BEC输出(即OPTO 类型的电调):需通过Y线连接,即电调油门线、WiFi模块插头分别插入Y线的A、B接口;此外,还须用额外的
UBEC给WiFi模块供电,电池插入Y线的C接口,如图三所示。
2、电调编程口与风扇接口共用:
把风扇线拨出,然后把WiFi Express线上的JR插头插入电调的风扇接口即可,如图二所示。
3、电调具有独立的编程线:
3.1 若电调编程线有电压(5-12.6V)输出:需通过Y线连接,即电调编程线、WiFi模块插头分别插入Y线的A、B接口,如图三所示。
3.2 若电调编程线无电压输出:需通过Y线连接,即电调编程线、WiFi模块插头分别插入Y线的A、B接口;此外,还须用额外的UBEC给WiFi模块供电,
电池插入Y线的C接口,如图三所示。
4、电调具有独立的编程口:
WiFi模块直接插入编程口即可,如图二所示。
备注:以上所述额外的UBEC,也可以用电池(5-12.6V)给代替!
开启WiFi Express
2
所有连接完成后,将电调接上电池,打开电调开关。WiFi Express上电后,工作指示灯红色恒亮表示其进入工作模式
使用无线智能终端设备连接WiFi Express
3
1)进入智能终端设备的WLAN搜寻功能;
2)找到SSID(WiFi设备名称)HW-WIFILINK,然后输入初始密码“12345678”后连接;
WiFi Express 第一次连接成功后,请务必更改SSID名称,因出厂时所有WiFi Express的SSID及密码皆为一样,多个WiFi Express开启时,
会遭成连接不成功,或连接错误的WiFi Express.
LED常亮:表示WiFi Express上电成功,模块工作正常;
LED闪烁:表示WiFi Express此时正在连接或是数据通讯中。
使用尖细物(镊子、牙签等)长按此按键15秒左右,即可清除WiFi Express中的用户密码等相关设置,恢复出厂默认设置。
RESET按键
灰色天线
LED指示灯
白红黑排线
A B
C
使用Hobbywing WiFi Link APP对电调及WiFi Express进行相关操作
4
1、WiFi连接状态指示:
若智能终端设备与电调连接正常,APP界面右上角的
电调图标为动态的黑色,否则为灰色,如图所示。
2、WiFi Express SSID(WiFi名称)及密码修改:
· 点击“系统设置”图标,进入设置页面;
· 点击“WiFi模块设置”,进入WiFi设置页面,输入新名称、新密码后点击确定即可。
· 智能终端设备连上WiFi Express后,打开智能终端设备的Hobbywing WiFi
Link APP应用程序,显示图界面;
· WiFi Link APP可以对电调进行参数设置、固件升级等操作(具体详情请查看
Hobbywing WiFi Link APP软件说明书)
接电调编程线
图一 图二 图三
WiFi Express模块使用WiFi通信技术,实现手机或平板电脑等设备和电调
的通信连接,随后客户即可用手机等设备上的Hobbywing WiFi Link
APP程序实现对电调的参数设定、固件升级、运行数据监测等功能。
· 工作电压:5-12.6V
· WiFi协议:IEEE802.11 b/g/n
· WiFi信号有效距离:0-10m (空旷地带)
· 尺寸:25.7x25.7x8.8mm (长x宽x高);
· 重量:11.3g。
仅下方1.2、3.2情况时,
要接此UBEC。
UBEC
未连接 已连接
 Loading...