

Page 1
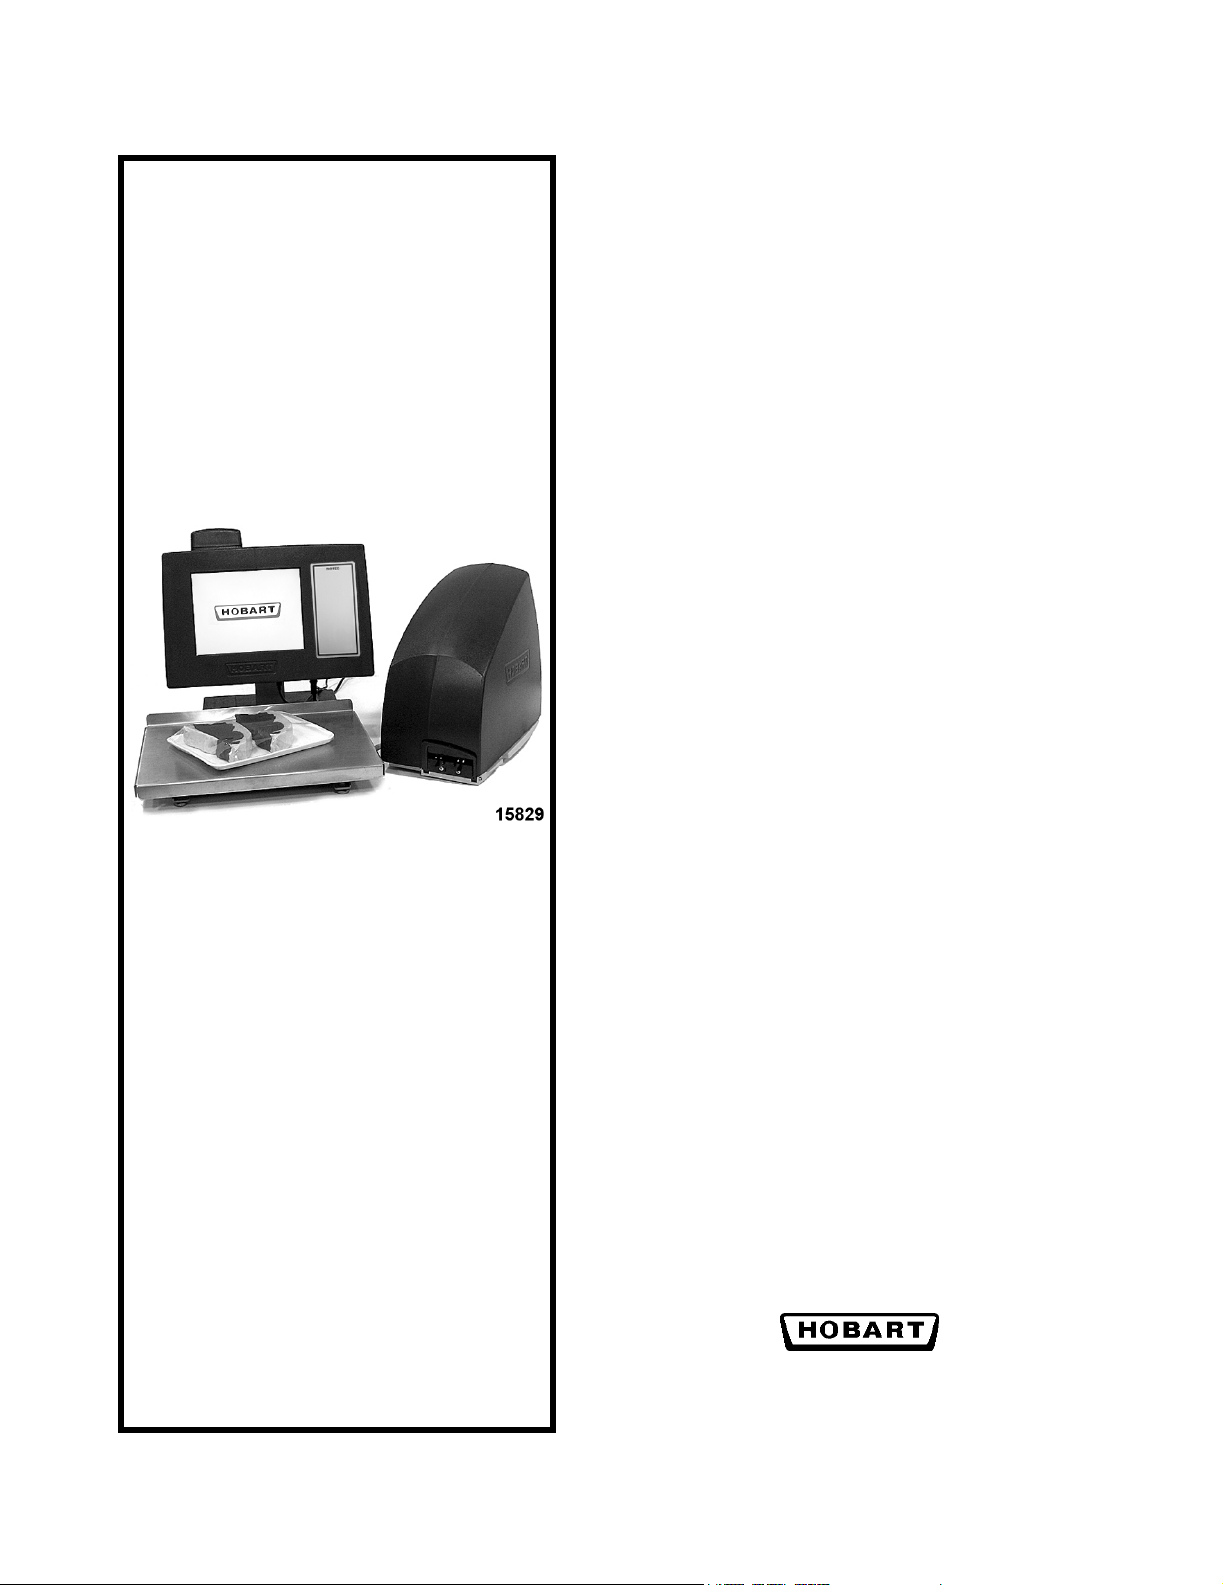
Access PrePack System
Operator Manual
ML-29268 EPP Printer
ML-29269 EPCP Console
701 S. RIDGE AVENUE
TROY, OHIO 45374
www.hobartcorp.com
F-35512 (Mar. 2006)
Page 2

Page 3

Access PrePack System Operator Manual
TABLE OF CONTENTS
Chapter 1: Introduction. . . . . . . . . . . . . . . . . . . . . . . . . . . . . . . . . . . . . . . . . . . . . . . . . . . . . . . . . . . . . . .1-1
Welcome. . . . . . . . . . . . . . . . . . . . . . . . . . . . . . . . . . . . . . . . . . . . . . . . . . . . . . . . . . . . . .1-1
FCC Note . . . . . . . . . . . . . . . . . . . . . . . . . . . . . . . . . . . . . . . . . . . . . . . . . . . . . . . . . . . . .1-1
Verify Correctness of Weight and Price. . . . . . . . . . . . . . . . . . . . . . . . . . . . . . . . . . . . . .1-1
Operator Manual Terminology. . . . . . . . . . . . . . . . . . . . . . . . . . . . . . . . . . . . . . . . . . . . .1-2
Chapter 2: Understanding the System . . . . . . . . . . . . . . . . . . . . . . . . . . . . . . . . . . . . . . . . . . . . . . . . . . .2-1
Electrical Connections . . . . . . . . . . . . . . . . . . . . . . . . . . . . . . . . . . . . . . . . . . . . . . . . . . .2-1
Console Communication Connections . . . . . . . . . . . . . . . . . . . . . . . . . . . . . . . . . . . . . . .2-1
Using the Console. . . . . . . . . . . . . . . . . . . . . . . . . . . . . . . . . . . . . . . . . . . . . . . . . . . . . . .2-1
Chapter 3: Using the Access PrePack System . . . . . . . . . . . . . . . . . . . . . . . . . . . . . . . . . . . . . . . . . . . . .3-1
Power Up the System . . . . . . . . . . . . . . . . . . . . . . . . . . . . . . . . . . . . . . . . . . . . . . . . . . . .3-1
Logging onto the System . . . . . . . . . . . . . . . . . . . . . . . . . . . . . . . . . . . . . . . . . . . . . . . . .3-1
Shutting Down the System . . . . . . . . . . . . . . . . . . . . . . . . . . . . . . . . . . . . . . . . . . . . . . . .3-2
Operator Main Menu Screen Softkeys and Flashkeys . . . . . . . . . . . . . . . . . . . . . . . . . . .3-3
Run Screen . . . . . . . . . . . . . . . . . . . . . . . . . . . . . . . . . . . . . . . . . . . . . . . . . . . . . . . . . . . .3-4
Modifying the Run Screen . . . . . . . . . . . . . . . . . . . . . . . . . . . . . . . . . . . . . . . . . . . . . . . .3-5
Automatic Settings . . . . . . . . . . . . . . . . . . . . . . . . . . . . . . . . . . . . . . . . . . . . . . . . . . . . . .3-6
Using Automatic Mode . . . . . . . . . . . . . . . . . . . . . . . . . . . . . . . . . . . . . . . . . . . . . . . . . .3-6
Manual Mode . . . . . . . . . . . . . . . . . . . . . . . . . . . . . . . . . . . . . . . . . . . . . . . . . . . . . . . . .3-10
Running a Product . . . . . . . . . . . . . . . . . . . . . . . . . . . . . . . . . . . . . . . . . . . . . . . . . . . . .3-11
Using the Operator Main Menu Screen Drop-Down Menus . . . . . . . . . . . . . . . . . . . . .3-12
Product Drop-Down Menu . . . . . . . . . . . . . . . . . . . . . . . . . . . . . . . . . . . . . . . . . . . . . . .3-13
Settings Drop-Down Menu. . . . . . . . . . . . . . . . . . . . . . . . . . . . . . . . . . . . . . . . . . . . . . .3-18
Help Drop-Down Menu . . . . . . . . . . . . . . . . . . . . . . . . . . . . . . . . . . . . . . . . . . . . . . . . .3-22
Chapter 4: Maintenance & Cleaning . . . . . . . . . . . . . . . . . . . . . . . . . . . . . . . . . . . . . . . . . . . . . . . . . . . .4-1
Removing Labels . . . . . . . . . . . . . . . . . . . . . . . . . . . . . . . . . . . . . . . . . . . . . . . . . . . . . . .4-1
Loading Labels . . . . . . . . . . . . . . . . . . . . . . . . . . . . . . . . . . . . . . . . . . . . . . . . . . . . . . . . .4-3
Setting the Label Size Plate . . . . . . . . . . . . . . . . . . . . . . . . . . . . . . . . . . . . . . . . . . . . . . .4-6
Cleaning the Printhead . . . . . . . . . . . . . . . . . . . . . . . . . . . . . . . . . . . . . . . . . . . . . . . . . . .4-7
Troubleshooting . . . . . . . . . . . . . . . . . . . . . . . . . . . . . . . . . . . . . . . . . . . . . . . . . . . . . . . .4-8
Index . . . . . . . . . . . . . . . . . . . . . . . . . . . . . . . . . . . . . . . . . . . . . . . . . . . . . . . . . . . . . . . . . . . . . . . . . . . . I-1
F-35512 (Mar. 2006) i Table of Contents
Page 4

Access PrePack System Operator Manual
Table of Contents ii F-35512 (Mar. 2006)
Page 5
Access PrePack System Operator Manual
Chapter 1: Introduction
Introduction
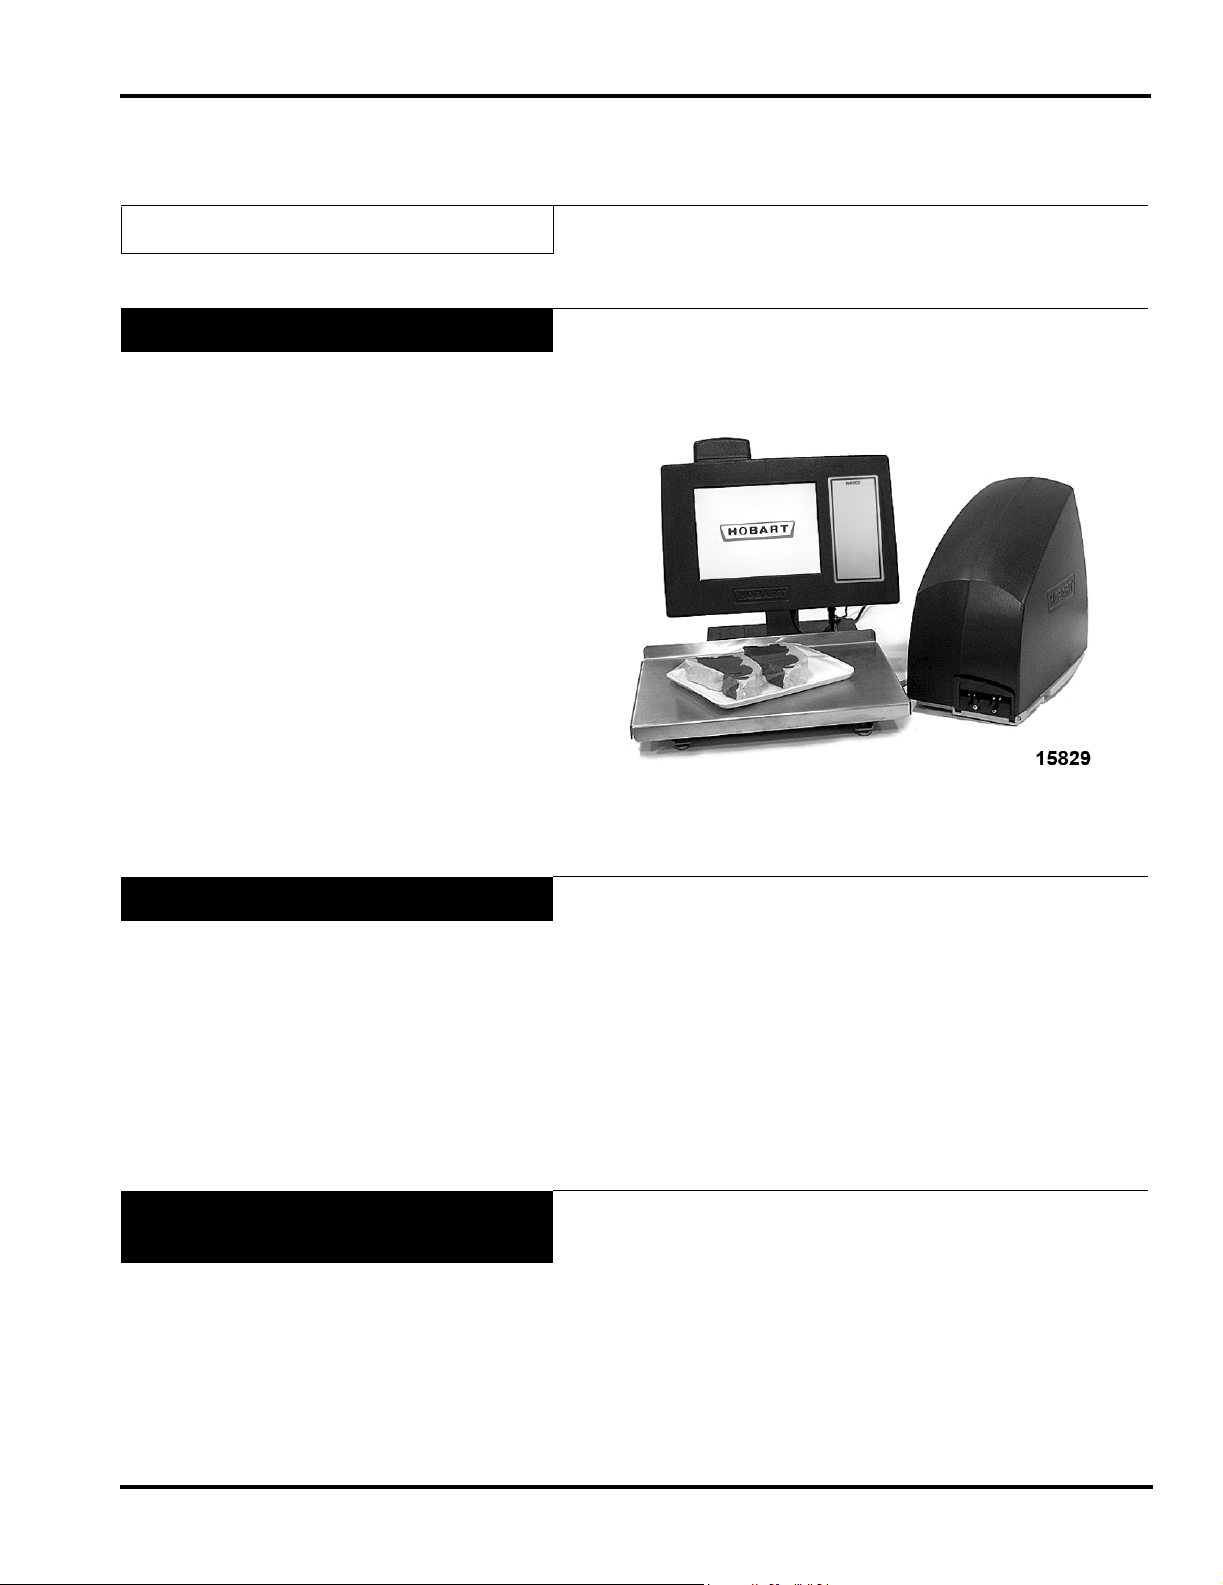
Welcome The Access PrePack System was designed as a meat room or pro-
duce back room scale. It gives you merchandising capabilities
with multiple fonts, graphics, and label types.
FCC Note
Verify Correctness of
Weight and Price
Access PrePack System
All necessary operator data appears on the touch screen.
This equipment has been tested and found to comply with the
limits for a Class A digital device, pursuant to Part 15 of the FCC
rules. These limits are designed to provide reasonable protection
against harmful interference when the equipment is operated in a
commercial environment. This equipment generates, uses and can
radiate radio frequency energy and, if not installed and used in
accordance with the instruction manual, may cause harmful interference to radio communications. Operation of this equipment in
a residential area is likely to cause harmful interference; in which
case, the user will be required to correct the interference at their
own expense.
Routinely verify label information. Check the multiplication of
price per pound times weight, and check the scale weight against
printed label weight. Weigh the same package several times to
verify outcome consistency. Packages that weigh near the middle
of the 0.01 lb. increment will normally vary up or down by
0.01 lb. Greater variation than 0.01 lb indicates the system needs
adjustment. In such a case, or whenever necessary, contact your
local Hobart Representative.
F-35512 (Mar. 2006) 1-1 Introduction
Page 6
Access PrePack System Operator Manual
Operator Manual Terminology
This manual uses the following terminology for keystrokes and
data manipulation procedures:
• The word TYPE means to touch a series of keys on the Operator Screen Numeric Keypad or the Operator Screen Alpha
Keyboard.
• The word TOUCH means to activate an entry shown on the
Operator Display screen.
• The word SELECT means to activate one item from a list
brought up on the Operator Screen.
The following special instructions are used in the manual:
Note
A Note is information that you need to know, but is not an actual
step in the process.
Tip
A Tip is additional information that may be useful when you are
using the system.
Look At This
Look At This is information to alert you that you may be doing
something that will permanently alter your system.
Introduction 1-2 F-35512 (Mar. 2006)
Page 7

Chapter 2: Understanding the System
Understanding the System
Access PrePack System Operator Manual
The Access EPP Scale System can store information on thousands of products. Retail store information required for product
handling and processing, such as PLU number, UPC number,
Pricing, Tare, and Self Life is included. Consumer information
describing products, such as NutriFacts, Safe Handling,
Expanded Text, Health Tips, Meal Planners, Recipes, Cooking
Instructions, and Merchandising Graphics is also included.
The scale should be installed and moved only by qualified Hobart
Service Technicians. The system can operate in a temperature
range from 32°F to 104°F (0°C to 40°C).
The following topics are discussed in this chapter:
Electrical Connections
Console Communication Connections
Using the Console
Electrical Connections
Console Communication
Connections
Using the Console
A power cord is located on the back of the printer. Electric power
of 120 or 208/240 volts, 50 or 60 Hz, 1 phase (2-wire plus
ground) is required.
On the Access PrePack System, in addition to the electrical connections, there are several ports that can be configured:
• RJ-45 Jack for an Ethernet Connector (TCP/IP)
–OR–
• Wireless TCP/IP (located on the top of the console).
• 2 Type A USB Ports
Console features:
• Operator Main Menu Screen - a touch-activated screen that
provides access to product data and displays information to
the user.
F-35512 (Mar. 2006) 2-1 Understanding the System
Page 8
Access PrePack System Operator Manual
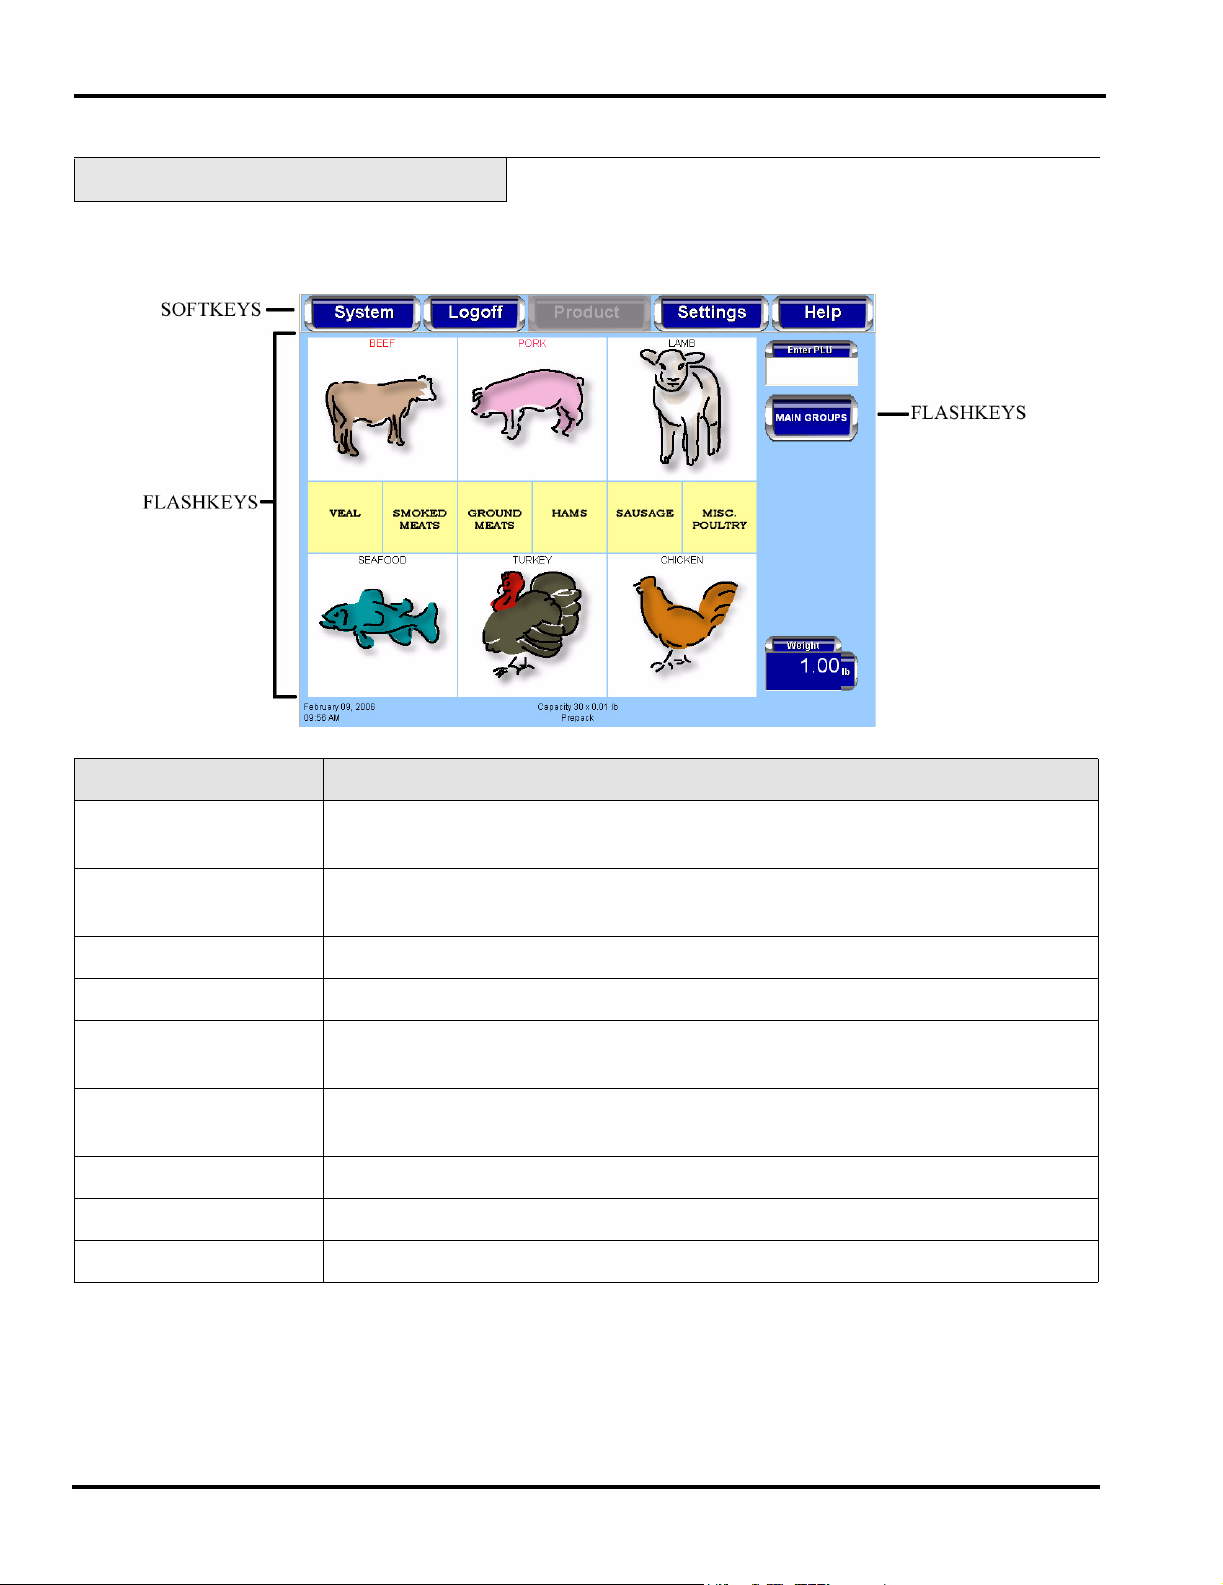
Operator Main Menu Screen
The Operator Main Menu Screen is a touch screen that enables
you to enter information and move through the display screens.
Attributes Functions
Softkeys The softkeys on the Operator Main Menu Screen are used to access the drop-down
menus, which show the subcategories of data available for selection.
Check Box A check box enables or disables optional functions. A check mark or circle appears in
the box when a function is enabled.
Text Box A text box is a field into which you enter data.
Grayed Field A grayed field indicates the field is not available for the current screen or transaction.
Flashing Cursor The flashing cursor in a text box indicates that the field is currently activated and is
available for data entry.
Light Blue Highlighted
Drop-Down Menu
A drop-down menu subcategory shown in light blue indicates the drop-down menu
subcategory has been activated and can be selected.
Flashkeys The Flashkeys provide quick access to frequently used products and functions.
Numeric Keypad The numeric keypad appears on the screen when numeric data is to be entered.
Alpha Keyboard The alpha keyboard appears on the screen when alpha data is to be entered.
Understanding the System 2-2 F-35512 (Mar. 2006)
Page 9
Chapter 3: Using the Access PrePack System
Using the Access PrePack System
Access PrePack System Operator Manual
Chapter 3:
Power Up the System
Logging onto the System
To power up the Access PrePack System, use the on/off switch
located on the back of the printer.
The Access PrePack System may require each operator to login
before use. Not all system are setup to have operator’s login.
The instructions for using this system are detailed in this chapter.
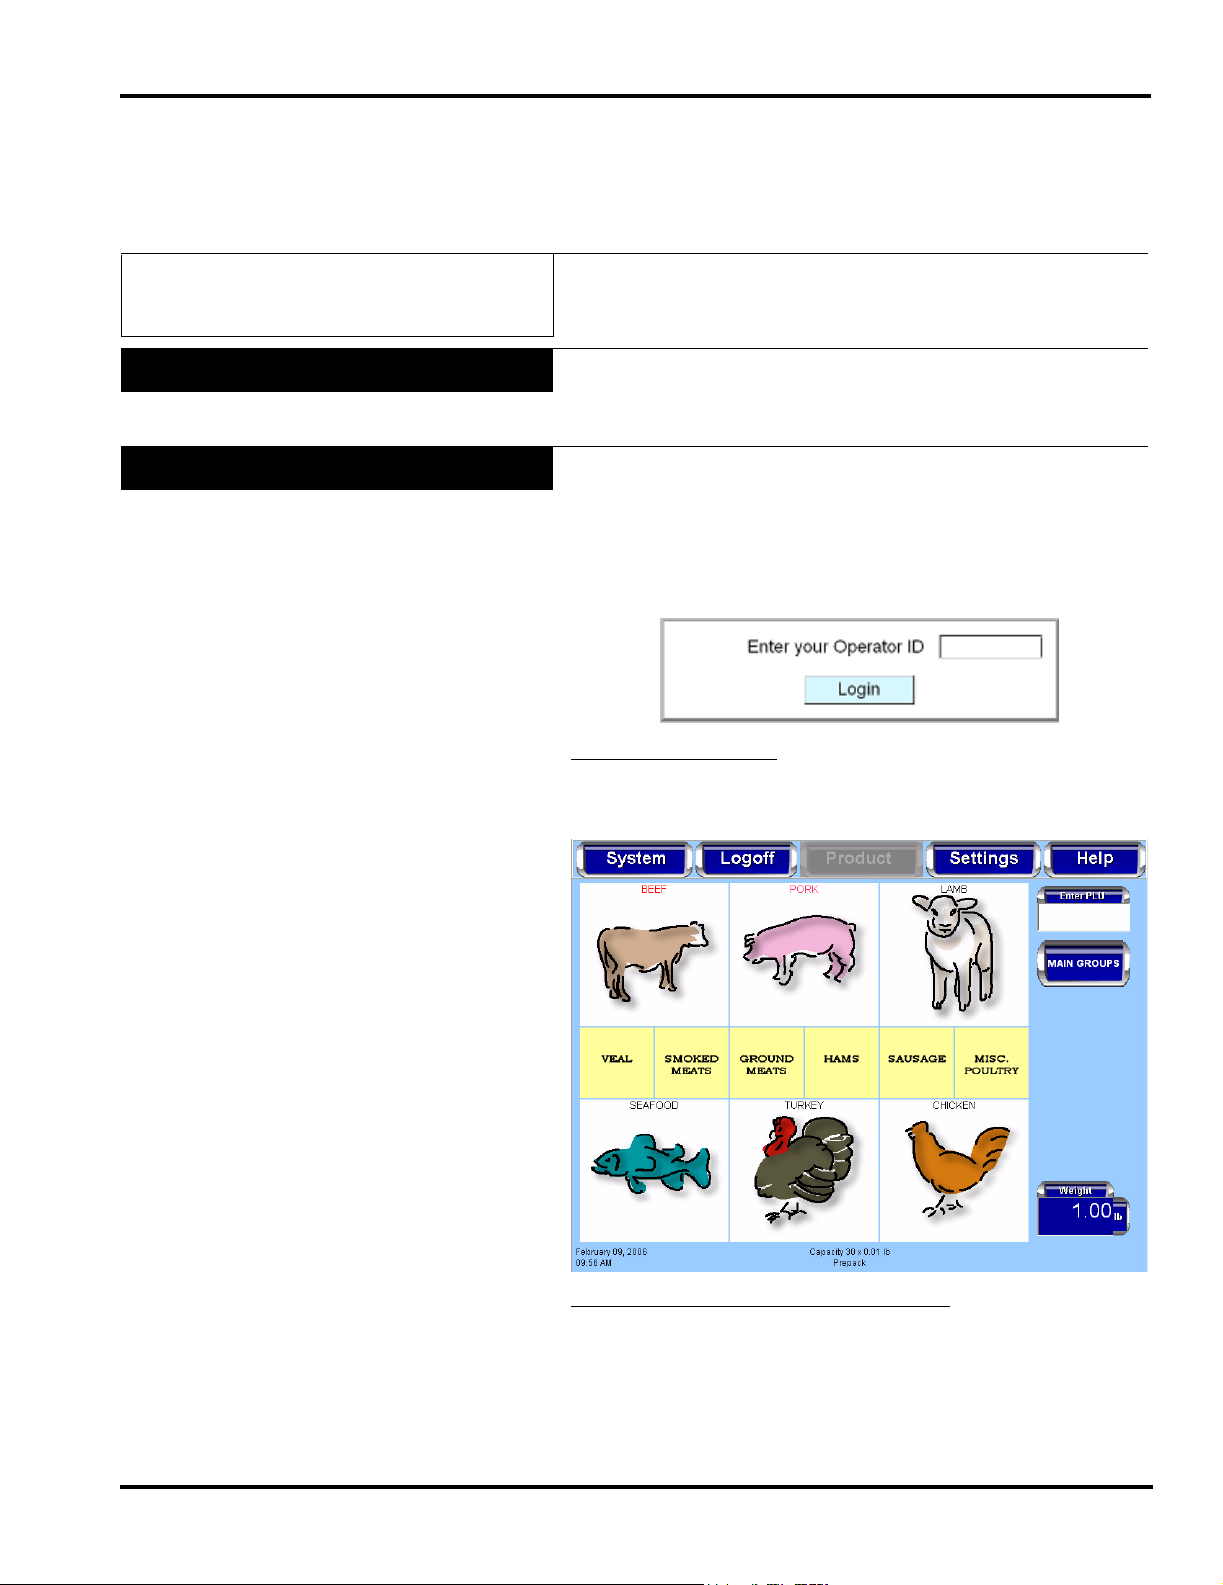
To login to the system you should be at the Operator Login
Screen shown below.
To Login to the System
TYPE your Operator ID. You should now be on the Operator
Main Menu Screen.
: TOUCH the Operator ID field and
To Logoff the Operator Main Menu Screen
the Operator Main Menu Screen. No further action is required.
The Operator Login Screen will be displayed.
F-35512 (Mar. 2006) 3-1 Using the Access PrePack System
: TOUCH Logoff on
Page 10
Access PrePack System Operator Manual
Shutting Down the System
The Shutdown feature is designed to stop all internal functions.
Shutdown is required before power can be disconnected from the
system.
To Shutdown the System:
1. From the Operator Main Menu Screen, TOUCH System.
2. From the System Menu, TOUCH Shutdown. A screen will
appear and ask, “Are you sure you want to shutdown?”
3. TOUCH OK. A screen will appear and say, “The scale is
shutting down. Please wait....”
Look At This
Shutdown may take a few minutes to complete depending on the
size of the database in the scale. DO NOT disconnect power to
the system during shutdown.
4. When the shutdown is complete, a screen will appear and
say, “The scale has been shutdown. You may remove power
from the scale.
–OR–
Press REBOOT to reboot now.”
5. Remove power by using the on/off switch on the back of the
printer.
Look At This
Do not remove power from the system by unplugging it. Always
use the on/off switch on the back of the printer to power down
the system.
Using the Access PrePack System 3-2 F-35512 (Mar. 2006)
Page 11
Access PrePack System Operator Manual
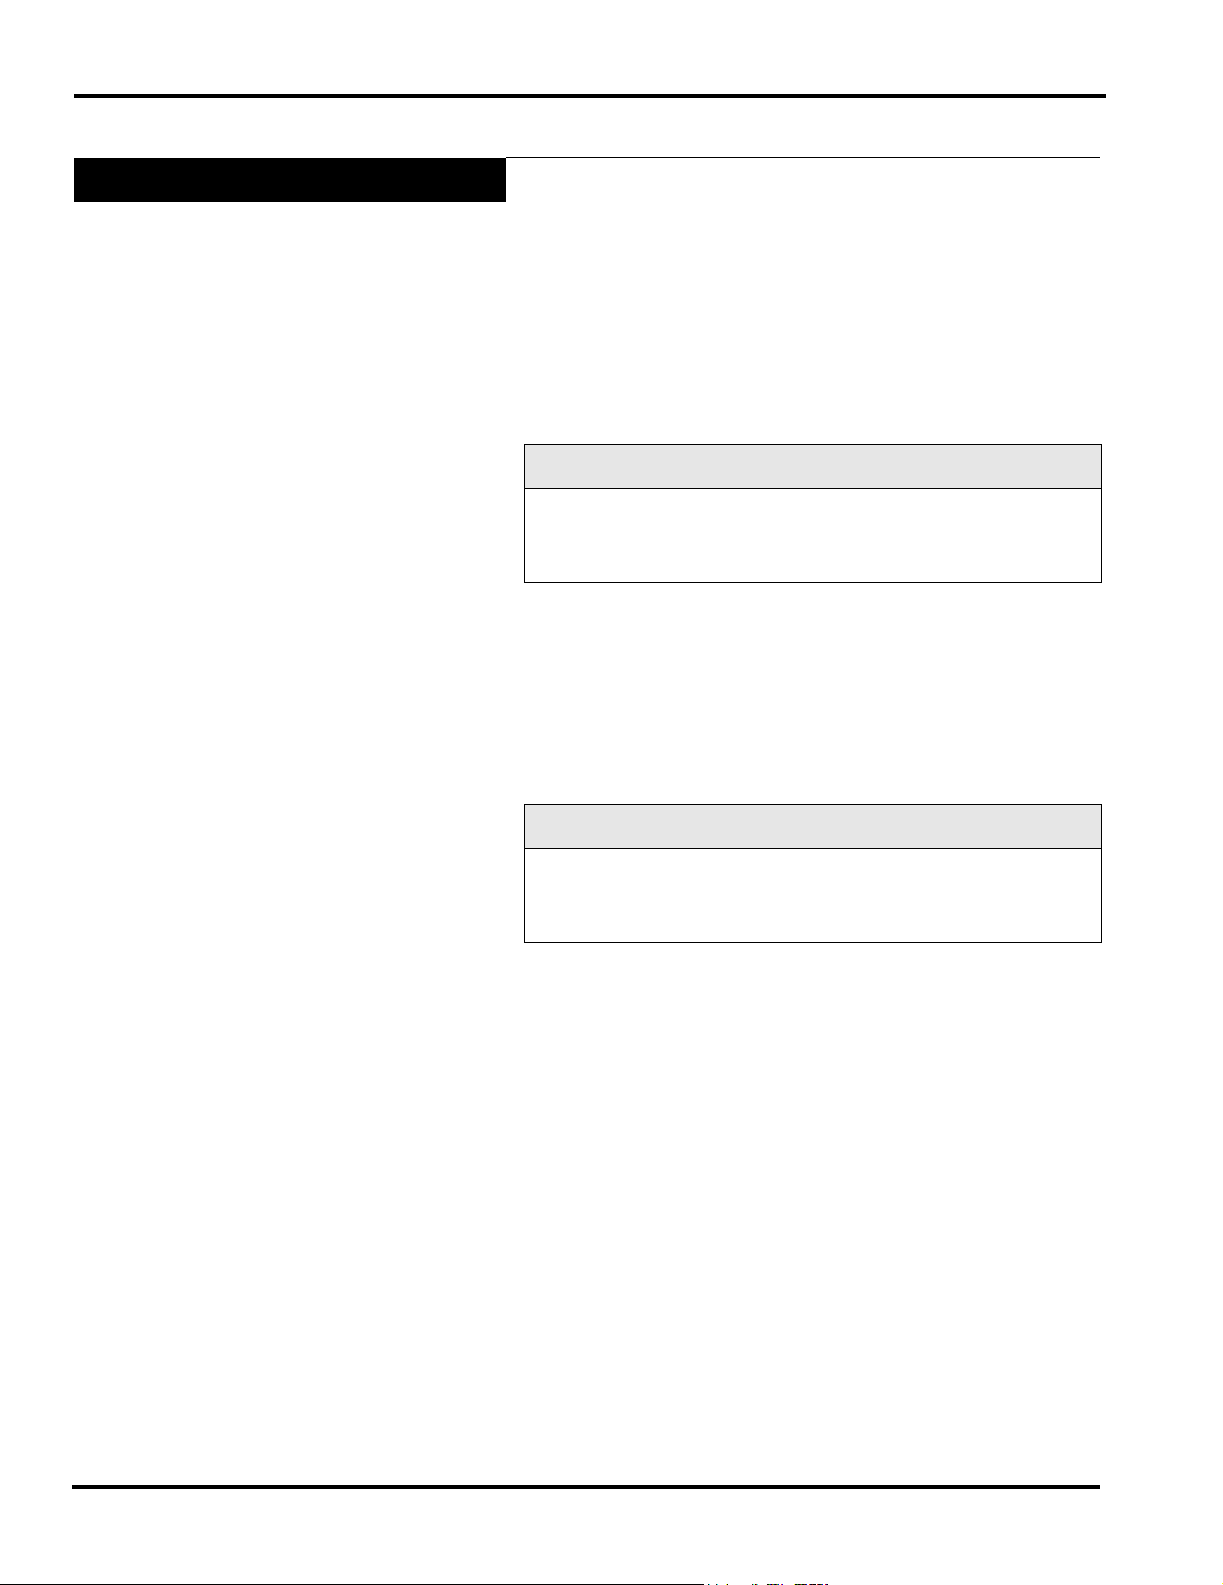
Operator Main Menu Screen
Softkeys and Flashkeys
The Operator Main Menu Screen Softkeys provide access to
drop-down menus showing available functions. The use of these
keys, the screens accessed, and the functions performed through
these keys are described in next section of this manual.
Note
The Product Softkey will only be available when a PLU is
entered.
Flashkeys are the keys located below the Operator Main Menu
Screen softkeys. These keys are configured individually for each
system to provide quick access to products and functions
frequently used.
F-35512 (Mar. 2006) 3-3 Using the Access PrePack System
Page 12
Access PrePack System Operator Manual
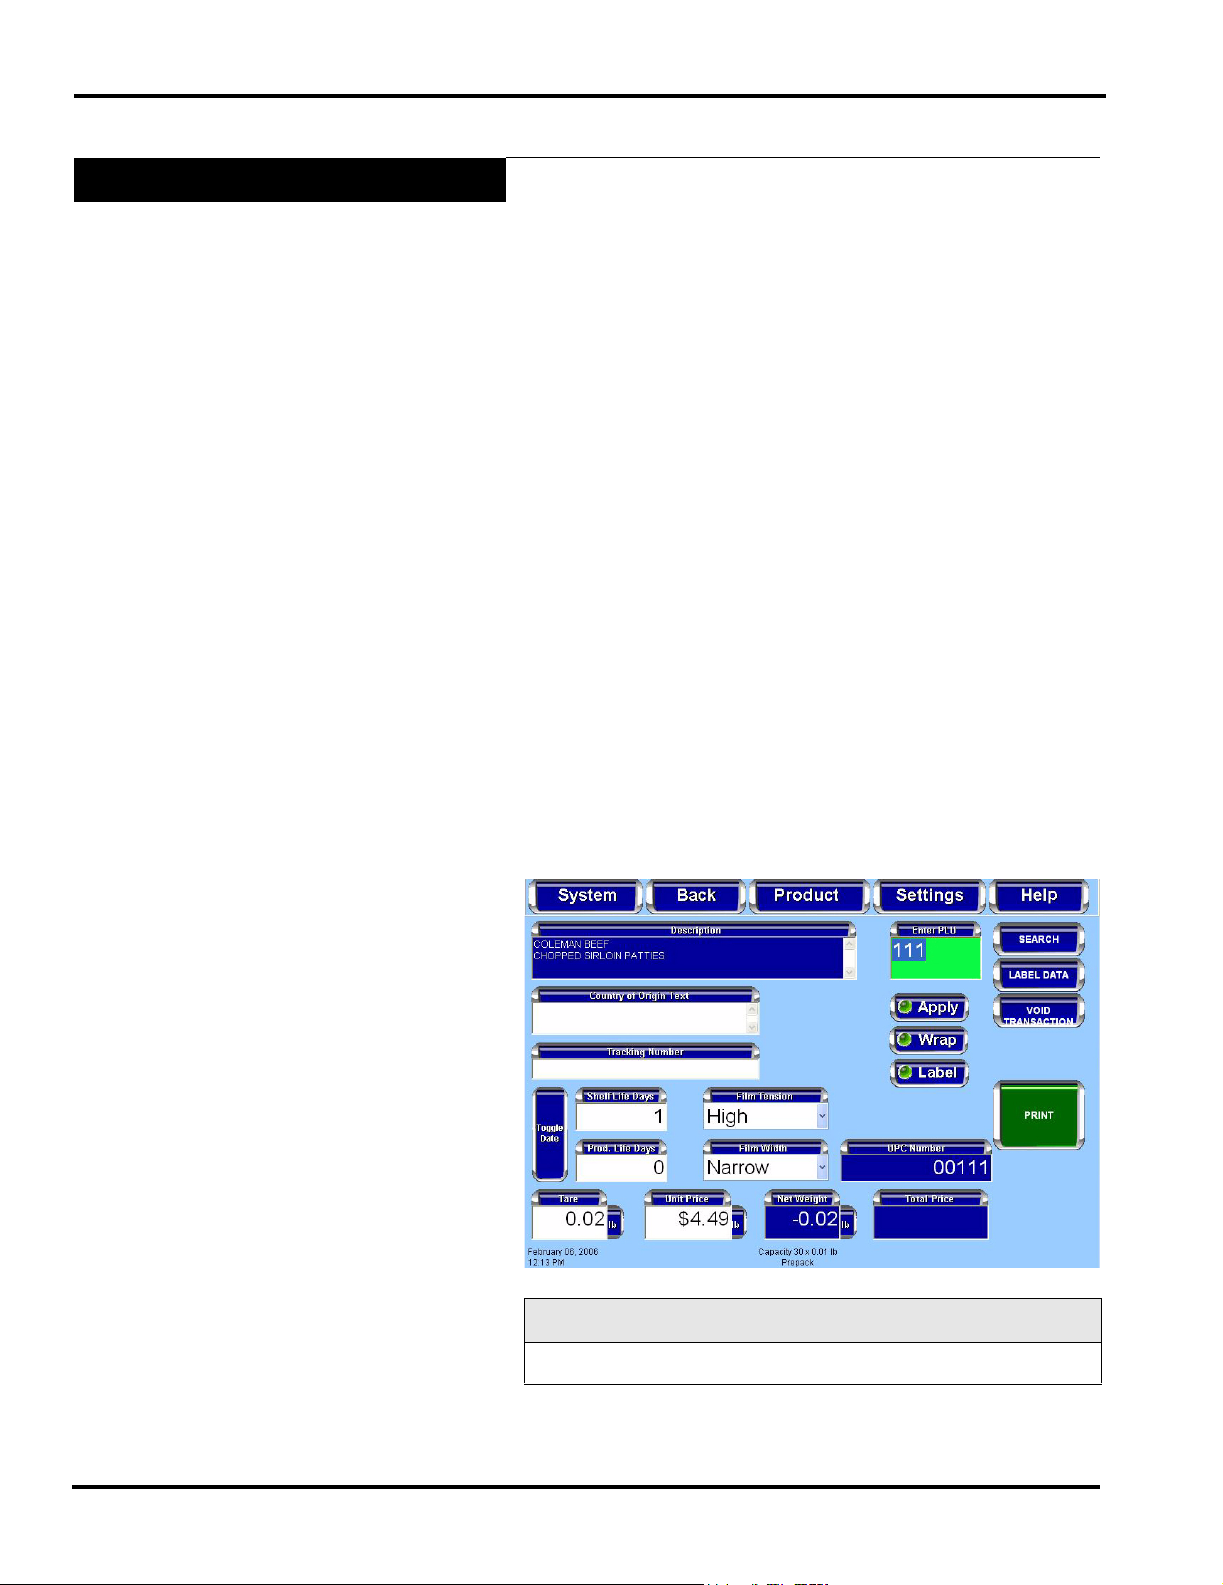
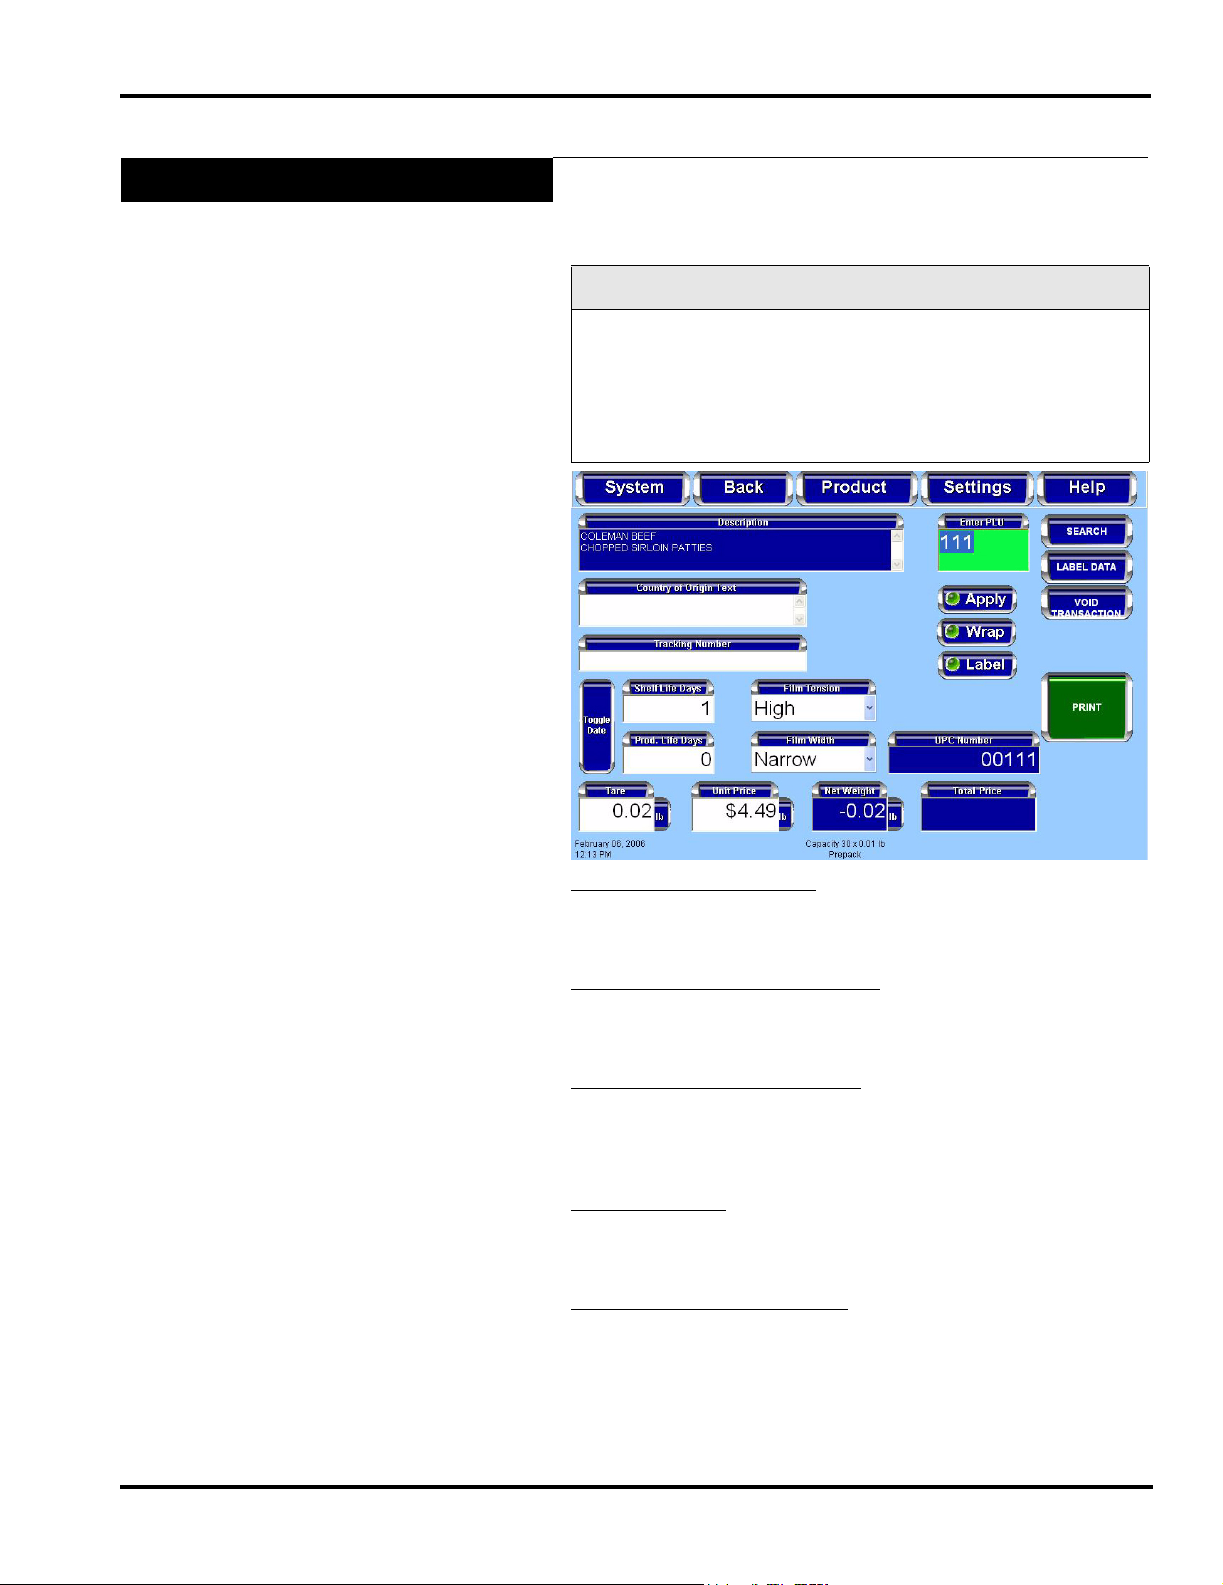
Run Screen
The Run Screen displays product information for the PLU that is
entered. The type of data displayed depends upon the product
weigh type of the PLU.
The Run Screen displays the following product information, if
applicable:
• Enter PLU Number
• Product Description
• Shelf Life Days (toggles to Sell By Date)
• Product Life Days (toggles to Best Before Date)
• Country of Origin Text (COOL)
•Tracking Number
• Product Image (optional)
•UPC Number
•Net Weight
•Total Price
•Print
• Film Tension (wrapper)
• Film Width (wrapper)
• Automatic Label Apply (toggles on/off)
• Automatic Wrap (toggles on/off)
• Automatic Label Print (toggles on/off)
• Tare (if applicable)
• Unit Price (if applicable)
• By Count (if applicable)
• Exception Price (if applicable)
• Volume (if applicable)
Note
System configuation may show different options.
Using the Access PrePack System 3-4 F-35512 (Mar. 2006)
Page 13
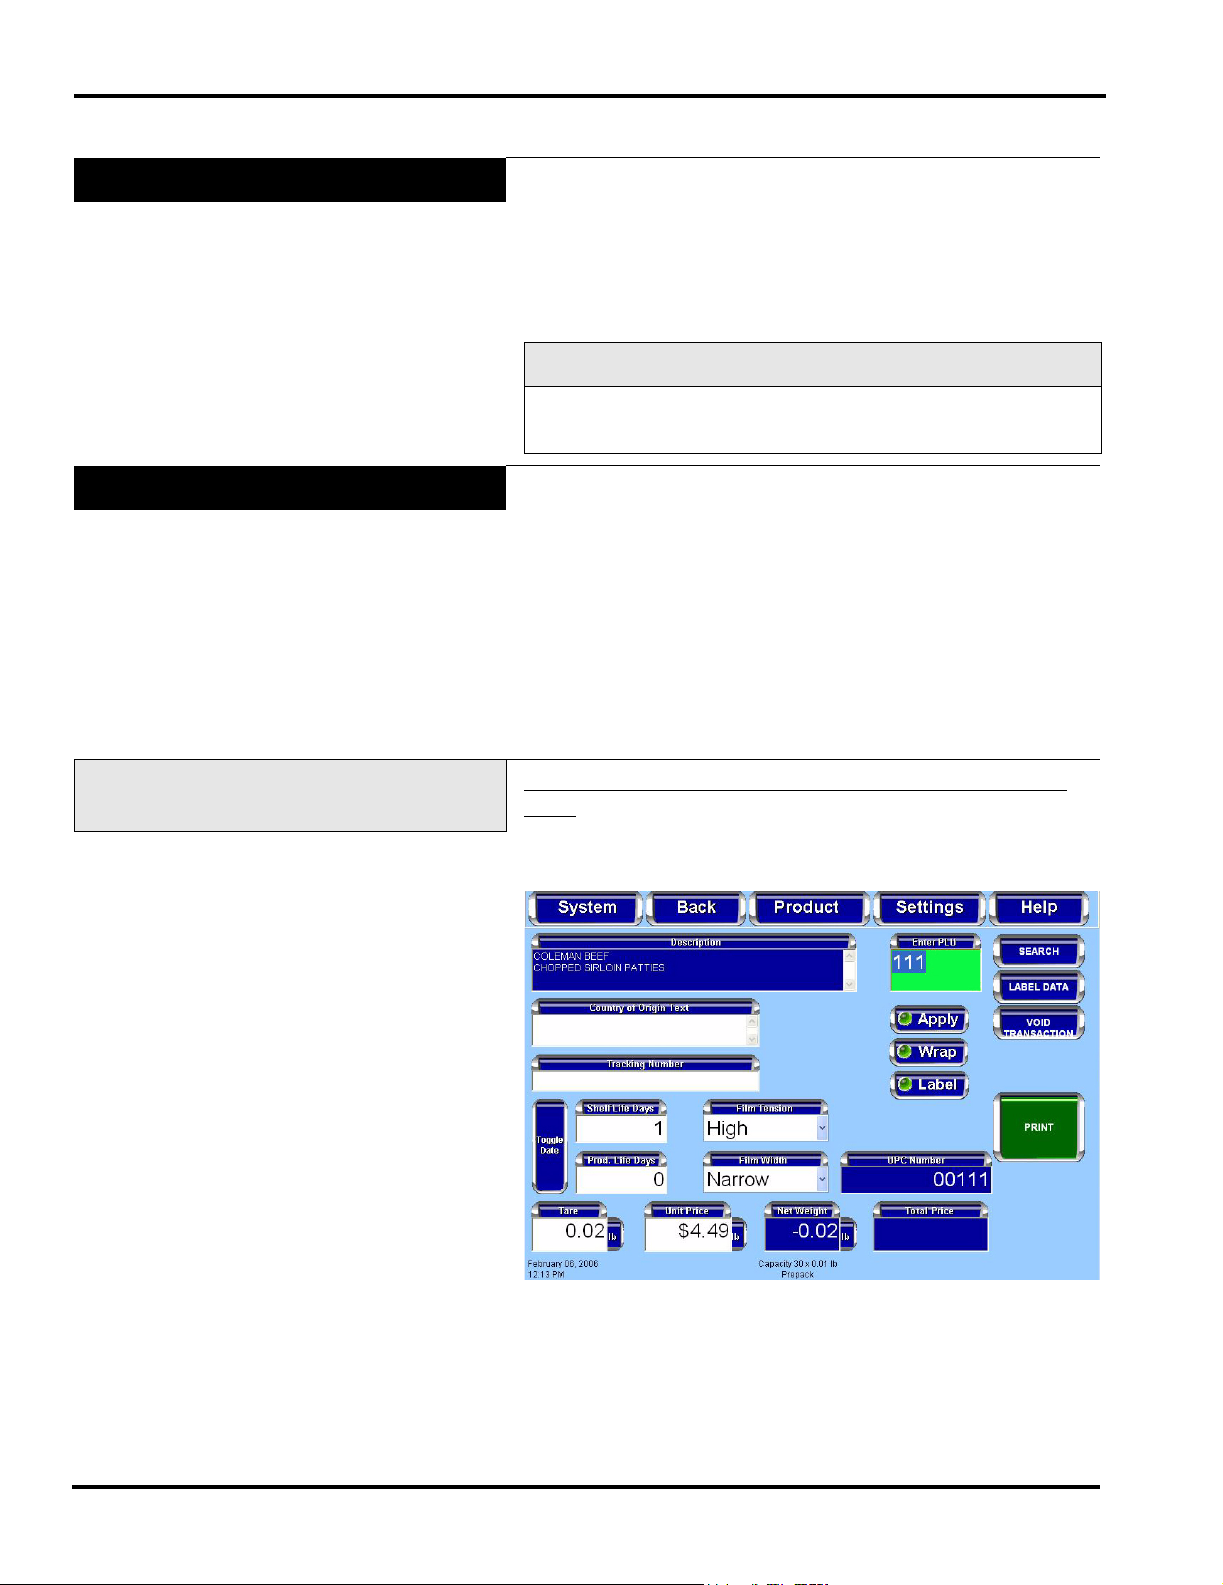
Modifying the Run Screen
Access PrePack System Operator Manual
The operator can modify certain settings that display on the Run
Screen. Only text fields with a white background can be
modified. Text fields with a blue background cannot be edited
and provide information only.
Note
• Changes made at the Run Screen will be in effect for the
current product only. The scale will revert to the system
default settings when a different PLU is entered.
• The Apply button, Wrap button, and Wrapper settings are
only displayed on the Run Screen when a wrapper is
attached to the system.
To change Text Field values: TOUCH the text field and SELECT
the setting from the list –OR– TYPE the change on the pop-up
Numeric Keypad or Alpha Keyboard. TOUCH Enter. The value
change will be displayed in the text field.
To change the Film Tension setting
: TOUCH the Film Tension
field. The settings of High, Medium, and Low will be displayed.
SELECT the desired setting. The setting selected will be
displayed in the Film Tension field.
To change the Film Width setting
: TOUCH the Film Width field.
The settings of Narrow, Wide, and Automatic will be displayed.
SELECT the desired setting. The setting selected will be
displayed in the Film Width field. In the Automatic setting the
system will sense the film width needed.
To change COOL
: TOUCH the Country of Origin Text field. You
should now be on the COOL Screen. See Product Drop-Down
Menu - COOL Screen for information about modifying COOL.
The setting changes made will be displayed on the Run Screen.
To change Automatic functions
: TOUCH the automatic buttons
on the screen to turn them on or off. If the indicator is green, then
it is in automatic mode. If the indicator is red, then it is in manual
mode. See Automatic Settings for more information about the
automatic functions available on the Access PrePack System.
F-35512 (Mar. 2006) 3-5 Using the Access PrePack System
Page 14
Access PrePack System Operator Manual
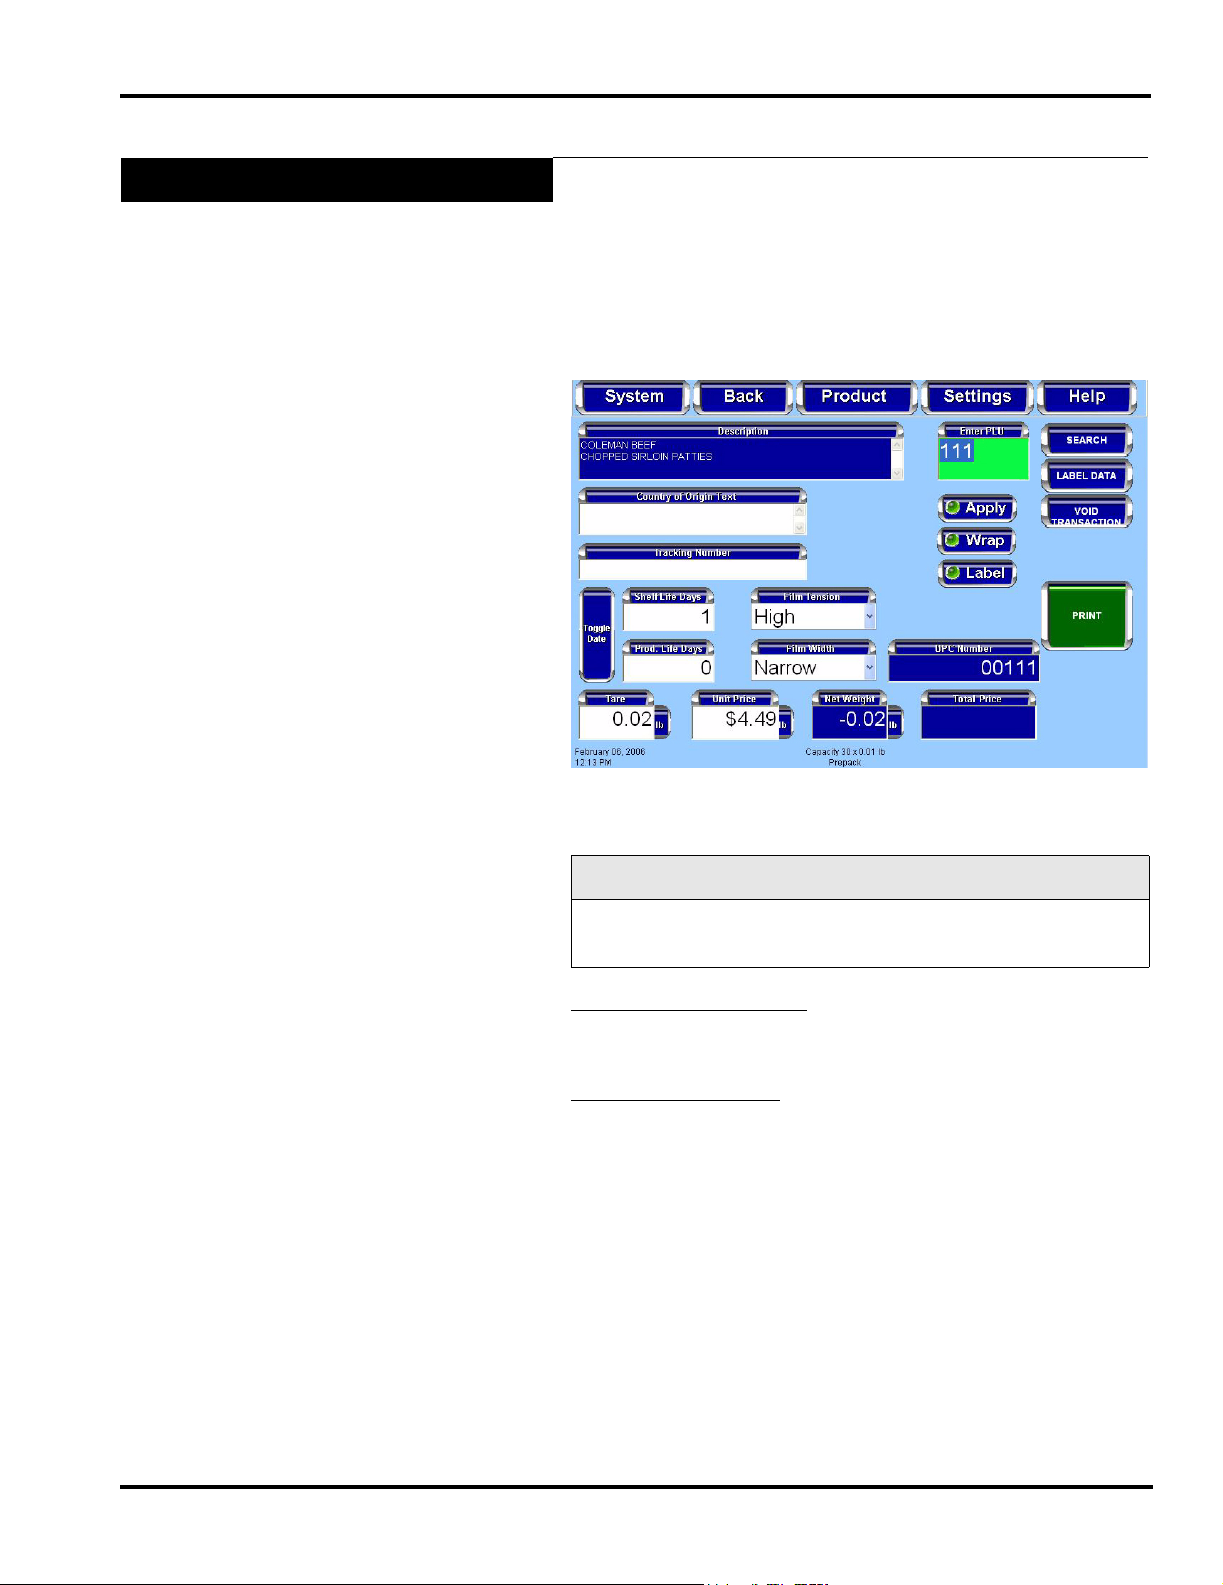
Automatic Settings
The Run Screen has settings for automatic or manual modes. In
Automatic Mode the operation will be performed without the
operator touching PRINT, as is required in Manual Mode. Automatic Mode is changed with the Apply, Wrap, and Label buttons.
The button is in the Automatic Mode when the indicator is green
and in Manual Mode when the indicator is red.
Note
The Apply and Wrap buttons are only displayed on the Run
Screen when a wrapper is included in the system configuration.
Using Automatic Mode
Automatically Wrap, Print and
Apply Label
There are different automatic modes available for use with the
Access PrePack System. If your system is attached to an
automatic wrapper you will have more functions available.
The automatic functions are:
Automatically Wrap, Print and Apply Label
Automatically Print Label Only
Automatically Print and Apply Label, No Wrap (Prepackaged
Products)
Automatically Wrap Only
To wrap the product and print and apply a label in Automatic
Mode: TOUCH the Apply, Wrap, and Label buttons until the
indicators are green. The Enter PLU text background color is
green.
A product is placed on the wrapper scale. The product will run
through the wrapper and will be wrapped. A label will be printed
when a stable weight has been sensed by the scale. The label will
be applied to the product as the product emerges from the
wrapper.
Using the Access PrePack System 3-6 F-35512 (Mar. 2006)
Page 15

Automatically Print Label Only
Access PrePack System Operator Manual
To print a label without applying the label in Automatic Mode:
TOUCH the Label button until the indicator is green. TOUCH the
Apply and Wrap buttons until the indicators are red. The Enter
PLU text background color is white.
Place the product on the wrapper scale. A label will print
automatically when a stable weight has been sensed by the scale.
The label will not be applied to the product. Manually remove the
label from the printer and apply to the product.
F-35512 (Mar. 2006) 3-7 Using the Access PrePack System
Page 16

Access PrePack System Operator Manual
Automatically Print and Apply
Label, No Wrap (Prepackaged
Products)
To print and apply a label to the product in Automatic Mode:
TOUCH the Apply and Label buttons until the indicators are
green. TOUCH the Wrap button until the indicator is red. The
Enter PLU text background is yellow.
Place the product on the wrapper scale. A label will print
automatically when a stable weight has been sensed by the scale.
The product will travel through the wrapper and the label will be
applied. The product will not be wrapped.
Using the Access PrePack System 3-8 F-35512 (Mar. 2006)
Page 17

Automatically Wrap Only
Access PrePack System Operator Manual
To wrap a product without printing or applying a label in
Automatic Mode: TOUCH the Wrap button until the indicator is
green. TOUCH the Apply and Label buttons until the indicators
are red. The Enter PLU text background color is white.
A product is placed on the wrapper scale. The product will run
through the wrapper and will be wrapped.
F-35512 (Mar. 2006) 3-9 Using the Access PrePack System
Page 18

Access PrePack System Operator Manual
Manual Mode
To use Manual Mode: TOUCH the Apply, Wrap, and Label
buttons until the indicators are red. The enter PLU text
background color is white.
A product is placed on the wrapper scale. TOUCH Print to print a
label.
Using the Access PrePack System 3-10 F-35512 (Mar. 2006)
Page 19
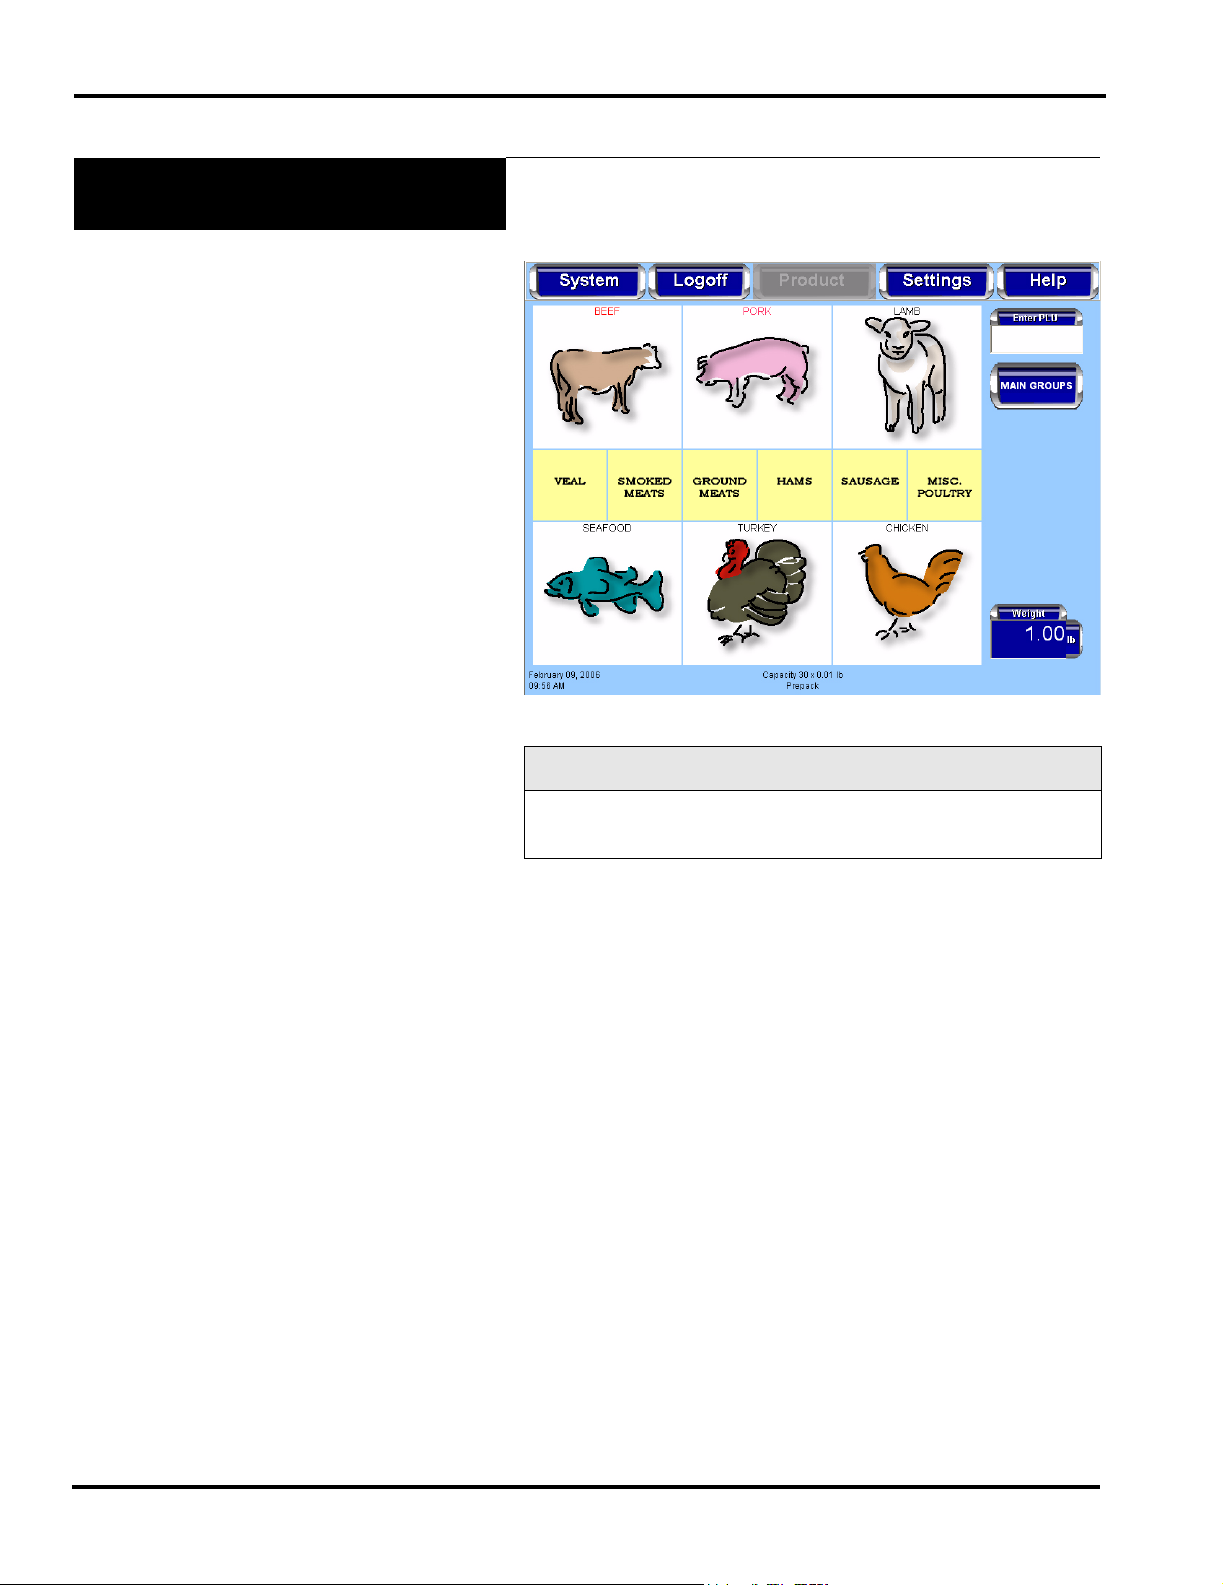
Running a Product
Access PrePack System Operator Manual
Running a product is the basic function of the operator. This
function allows the operator to select the PLU, weigh, wrap,
print, and apply the label.
From the Operator Main Menu Screen, TOUCH a Flashkey
–OR– TOUCH the Enter PLU field and TYPE the product
number on the Numeric Keypad. TOUCH Enter. You should now
be on the Run Screen.
Select the automatic setting for this run. See Using Automatic
Mode.
Note
Make sure the product settings are correct before starting a run.
To modify product settings, see Modifying the Run Screen.
To run in Automatic Mode
label will print automatically when a stable weight has been
sensed by the scale.
To run in Manual Mode
Print to print a label. The label will print when a stable weight has
been sensed by the scale.
: Place the product on the scale. The
: Place the product on the scale. TOUCH
F-35512 (Mar. 2006) 3-11 Using the Access PrePack System
Page 20
Access PrePack System Operator Manual
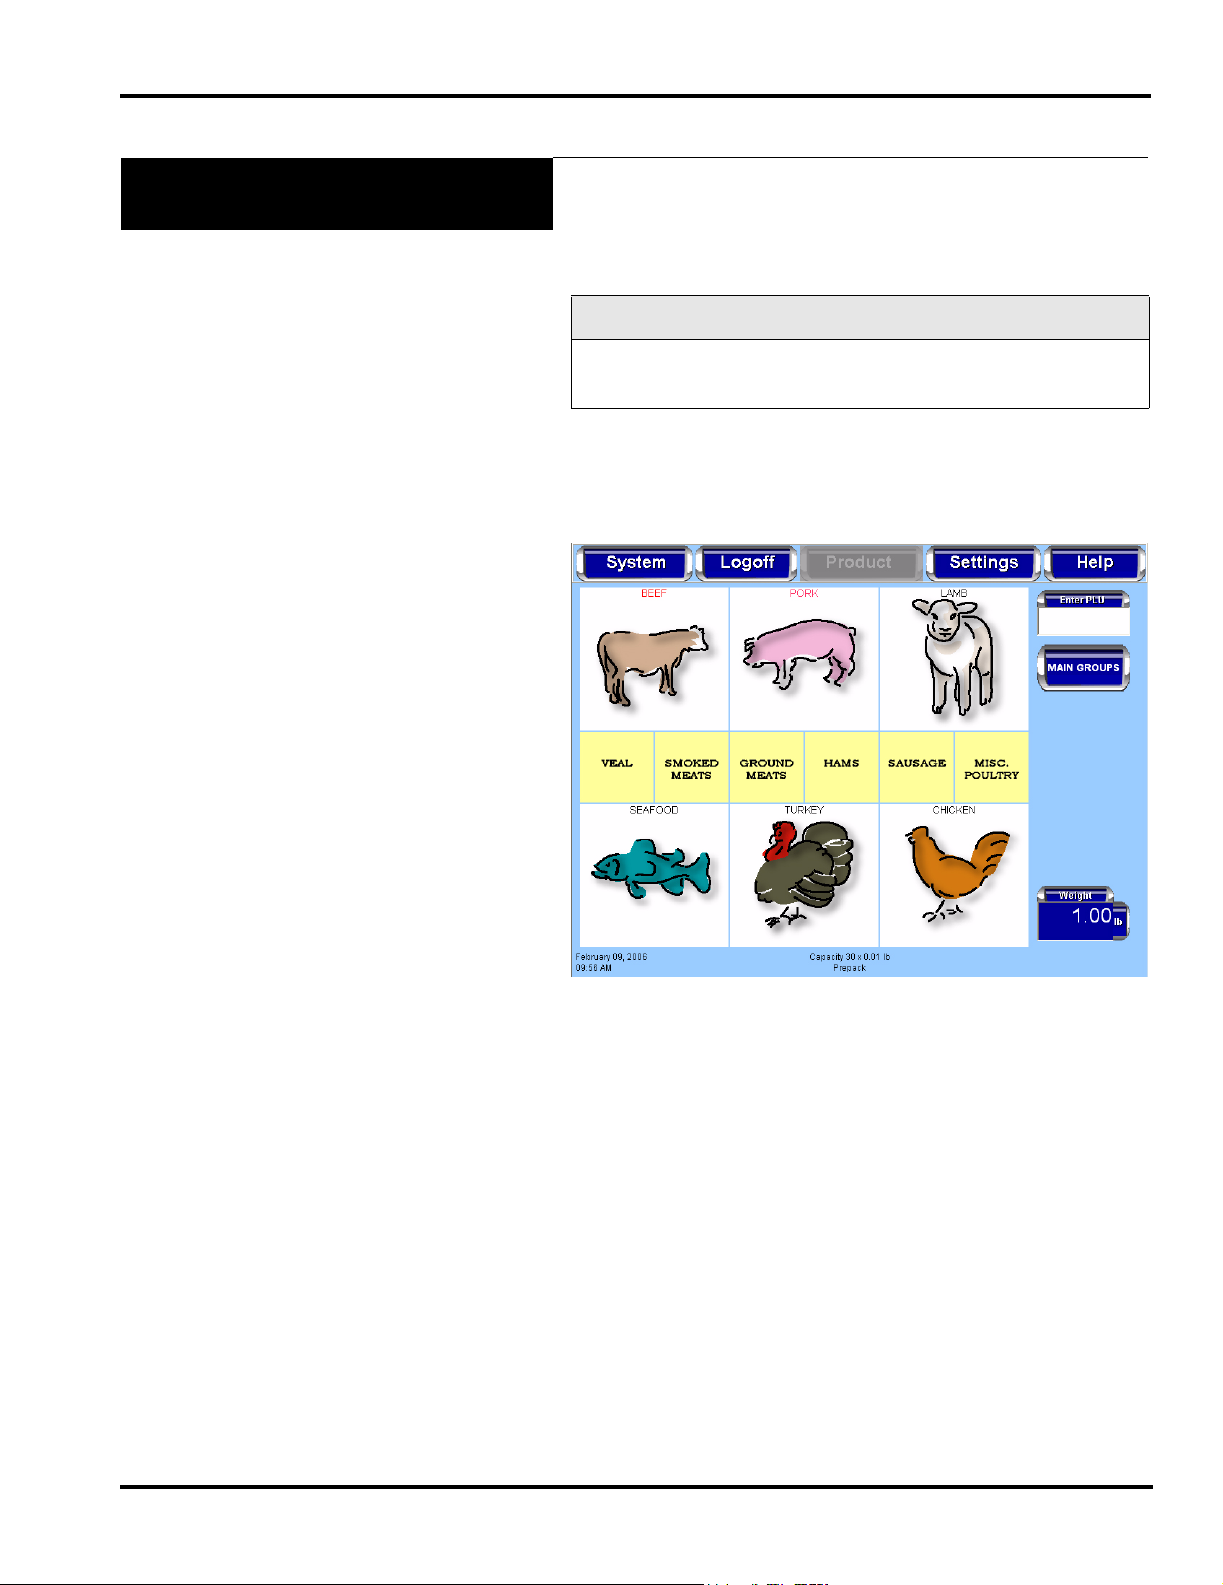
Using the Operator Main Menu
Screen Drop-Down Menus
Additional information is available through the softkeys Product,
Settings, and Help located on the Operator Screen menu bar as
shown on the Operator Main Menu Screen.
The Operator Main Menu Screen drop-down menus include:
Note
The Product Softkey will only be available when a PLU is
entered.
For Product
•Label Data
• Label Placement
• Product Note
• Product & Shelf Life
• COOL
• Void Transaction
For Settings
• Wrapper Settings
• Printer Settings
• Date and Time
• Total Types
• Rezero Weigher
For Help
•Search
• Describe this Page
• Questions
• Operator Note
• Weights & Measures
• About Access
Using the Access PrePack System 3-12 F-35512 (Mar. 2006)
Page 21

Product Drop-Down Menu
Access PrePack System Operator Manual
The Product Drop-Down Menu has the following selections:
Label Data Screen
Label Placement Screen
Product Note Screen
Product & Shelf Life Screen
COOL Screen
Void Transaction
Product Drop-Down Menu Label Data Screen
From the Operator Main Menu Screen, TOUCH Product.
TOUCH Label Data. You should now be on the Label Data
Screen.
To change the Label Type
Numeric Keypad will be displayed. TYPE the label number or
TOUCH clear to delete the label number and enter another one,
then TOUCH enter to complete the label number entry. The width
and length of the label will automatically be displayed below the
Label Type text box.
: TOUCH the Label Type text box. The
Note
If in manual mode, TOUCH Print.
To change the Graphic
from the list.
To exit this screen
F-35512 (Mar. 2006) 3-13 Using the Access PrePack System
: TOUCH the graphic field and SELECT
: TOUCH Back.
Page 22
Access PrePack System Operator Manual
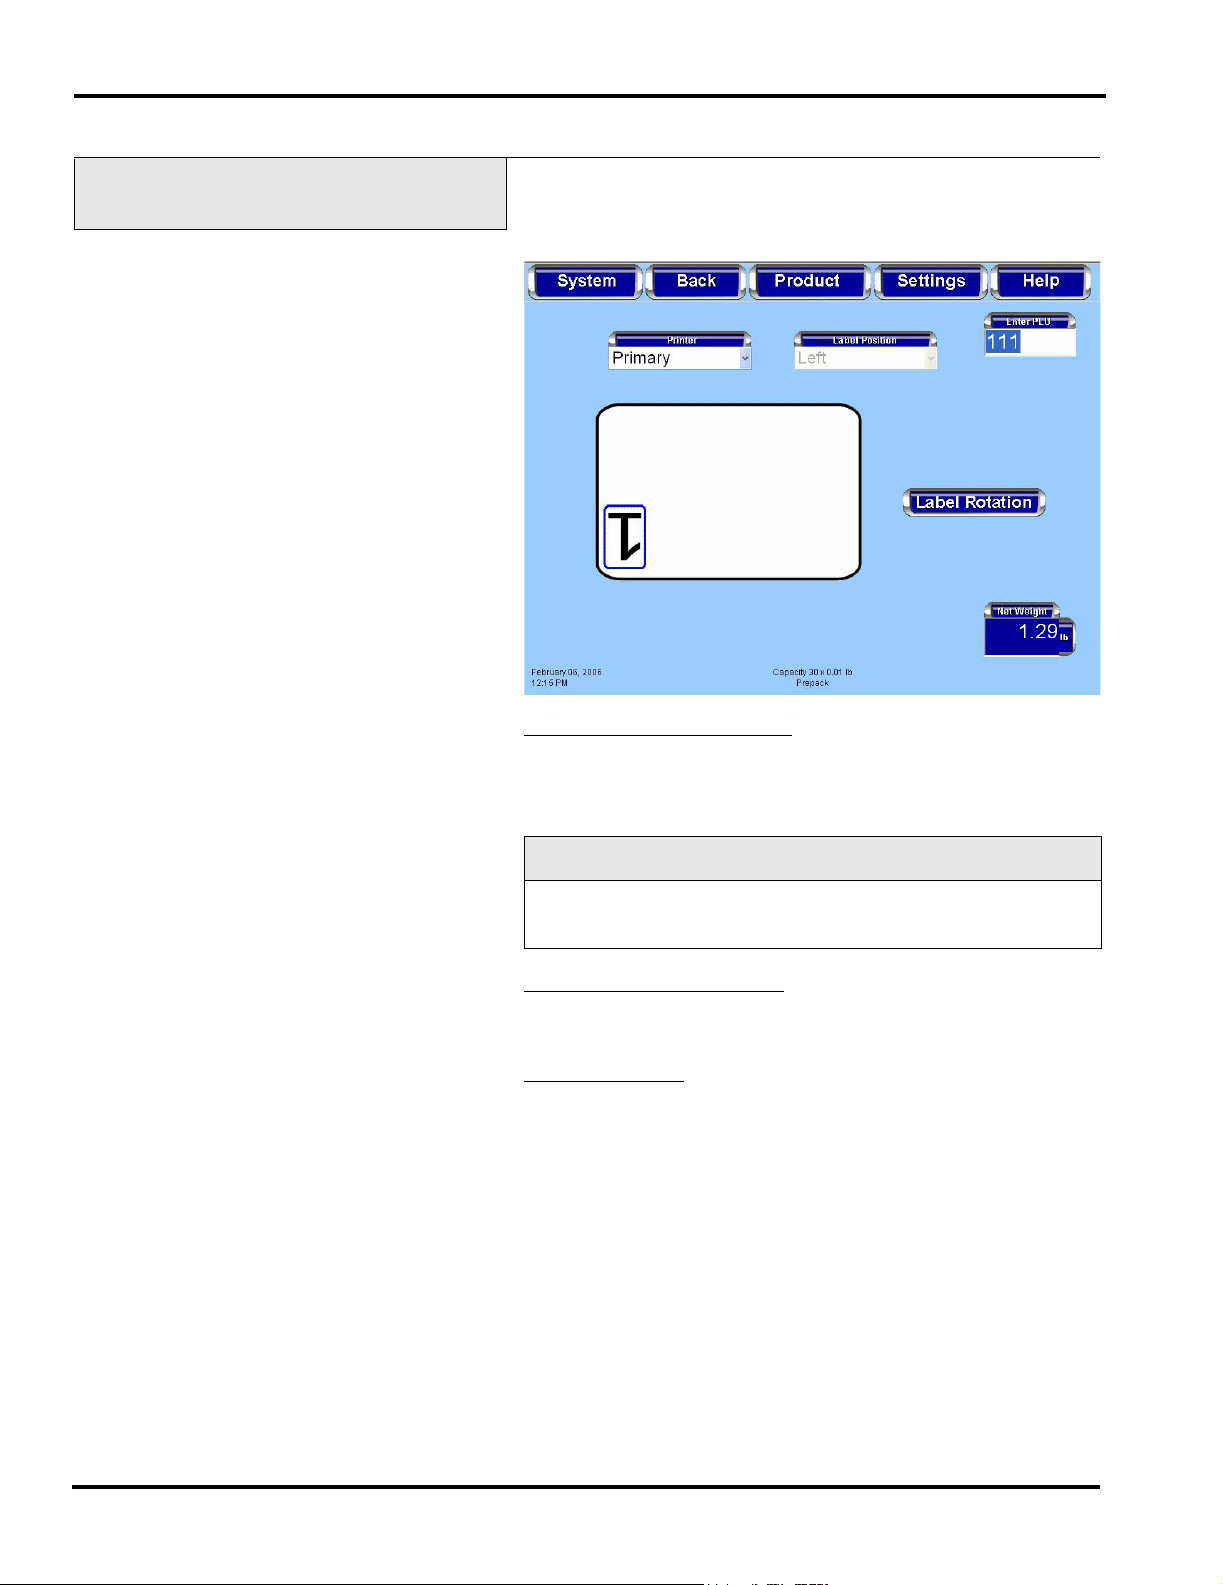
Product Drop-Down Menu Label Placement Screen
From the Operator Main Menu Screen, TOUCH Product.
TOUCH Label Placement. You should now be on the Label
Placement Screen.
To change the Printer Selected
: TOUCH the Printer field. The
printer drop-down selections of Primary and Secondary will be
displayed. SELECT the printer. The default settings for the
selected printer will be displayed.
Note
If only a Primary printer is available the Primary printer text box
will be disabled.
To change the Label Rotation
button until the label shown on the screen is in the desired
orientation.
To exit this screen
: TOUCH Back.
: TOUCH the Label Rotation
Using the Access PrePack System 3-14 F-35512 (Mar. 2006)
Page 23
Product Drop-Down Menu Product Note Screen
Access PrePack System Operator Manual
From the Operator Main Menu Screen, TOUCH Product.
TOUCH Product Note. You should now be on the Product Note
Screen.
Note
Not all PLU’s have an associated Product Note.
To exit this screen
: TOUCH Back.
F-35512 (Mar. 2006) 3-15 Using the Access PrePack System
Page 24
Access PrePack System Operator Manual
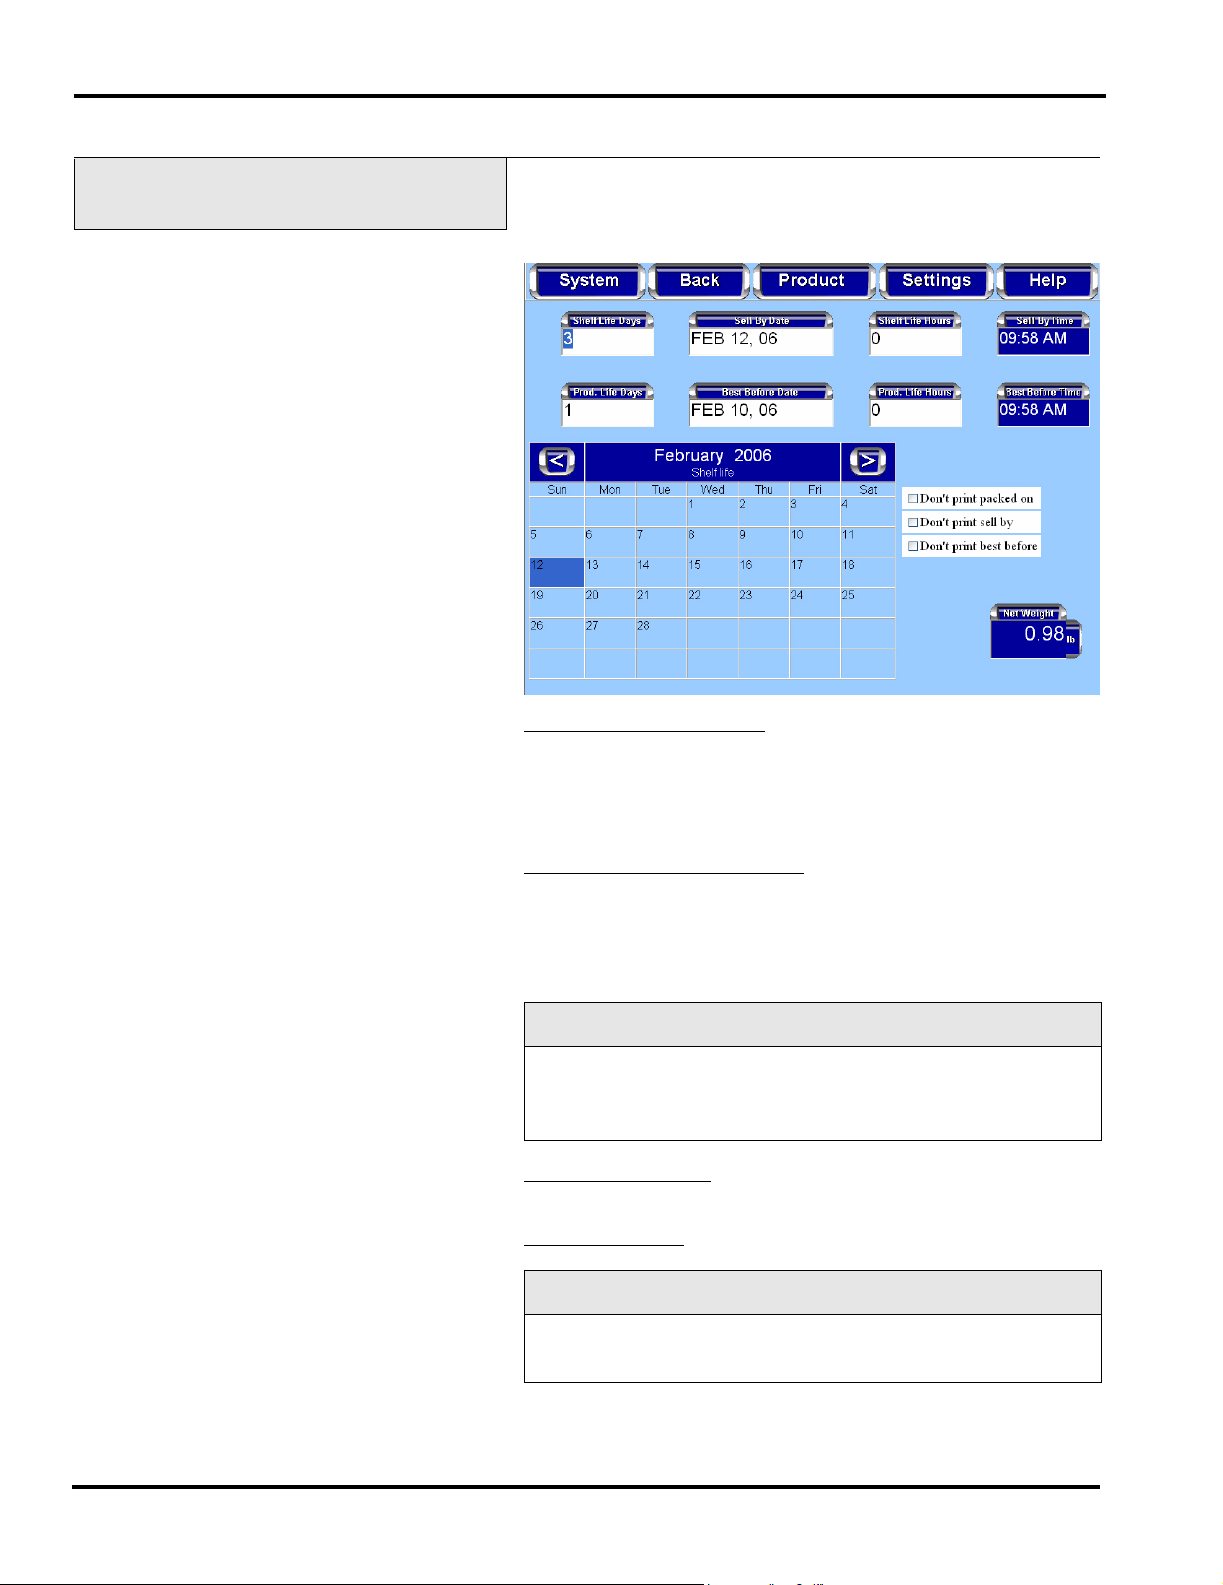
Product Drop-Down Menu Product & Shelf Life Screen
From the Operator Main Menu Screen, TOUCH Product.
TOUCH Product & Shelf Life. You should now be on the
Product & Shelf Life Screen.
To change the Sell By Date
: TOUCH the Sell By Date box to
activate it. The numeric keypad will be displayed. TYPE in the
date using two digits each for the day, month, and year. TOUCH
enter on the keypad. The new date will appear in the Sell By Date
box as well as be highlighted in the calendar.
To change the Best Before Date
: TOUCH the Best Before Date
box to activate it. The numberic keypad will be displayed. TYPE
in the date using two digits each for the day, month, and year.
TOUCH enter on the keypad. The new date will appear in the
Best Before Date box as well as be highlighted in the calendar.
Look At This
You can also use the calendar to change the best before or sell
by date. TOUCH the sell by or best before date field. TOUCH
cancel, then SELECT the date on the calendar.
To change the Month
: TOUCH the arrow keys to the right and
left at the top of the calendar.
To exit this screen
: TOUCH Back.
Note
The Best Before Date changes reflect a change in the Sell By
Date.
Using the Access PrePack System 3-16 F-35512 (Mar. 2006)
Page 25
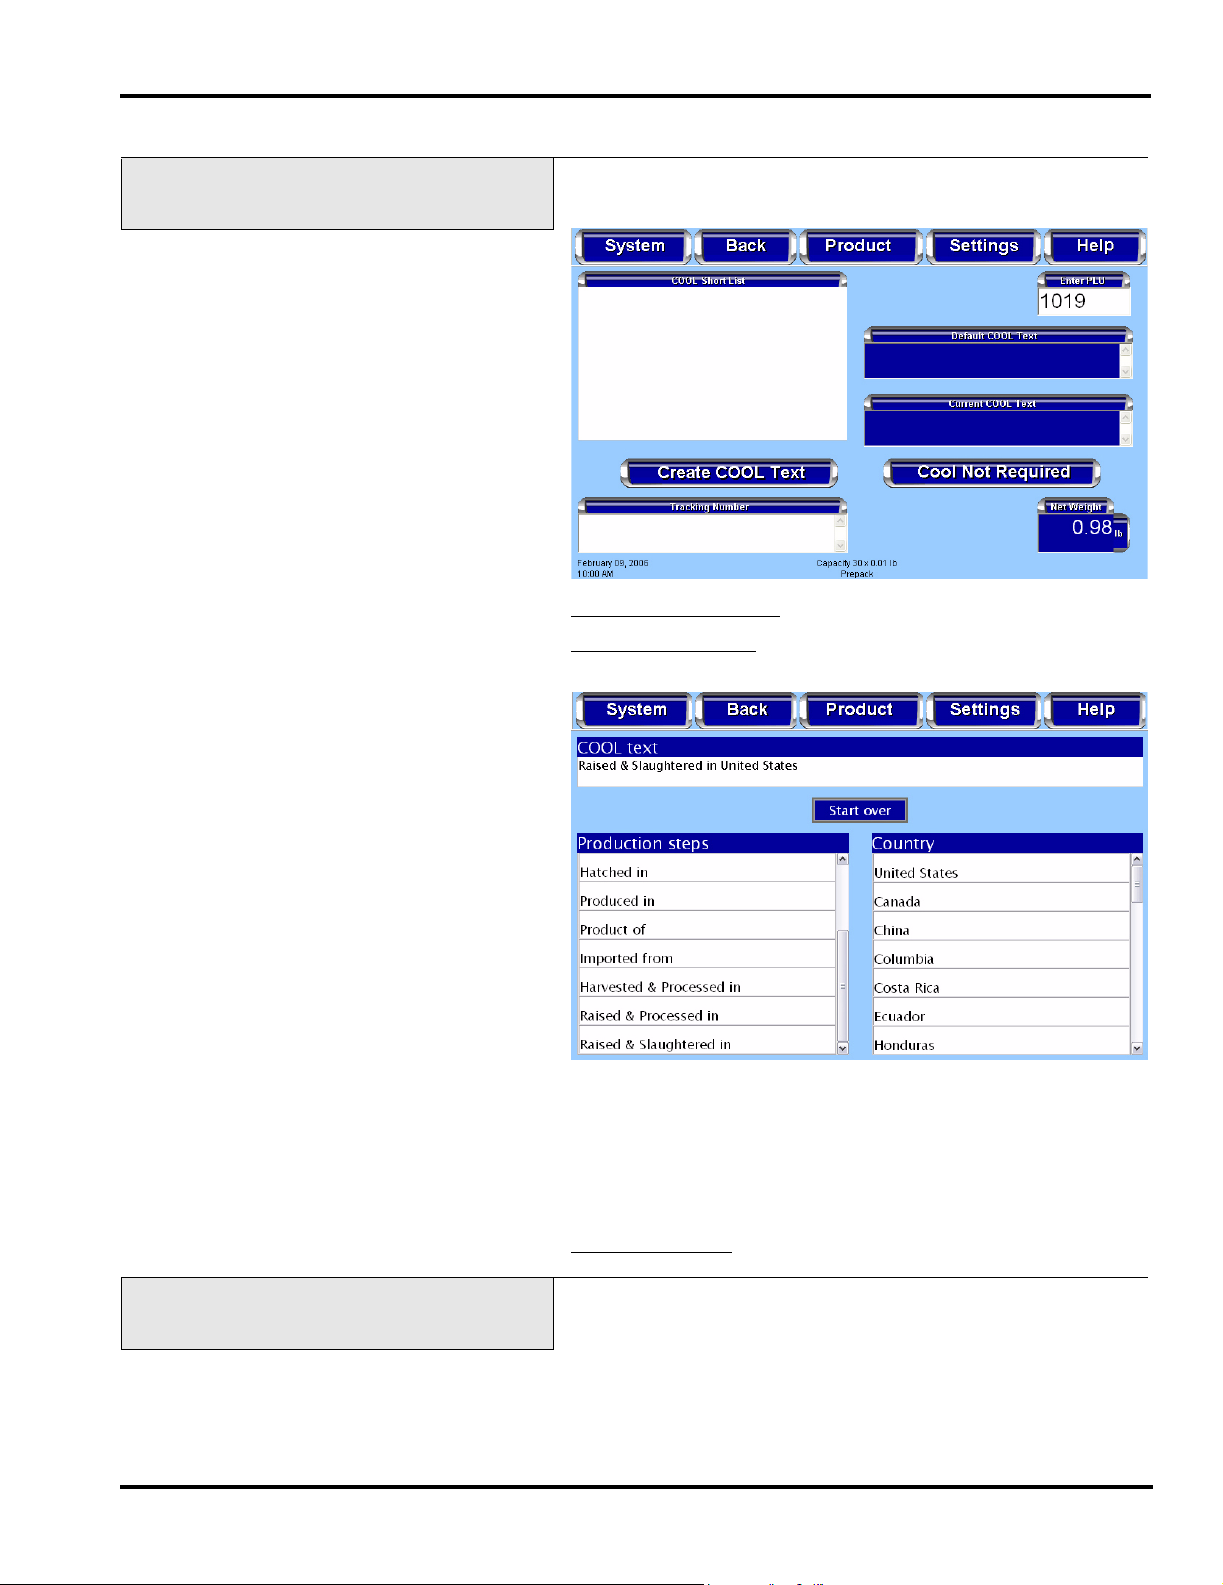
Product Drop-Down Menu COOL Screen
Access PrePack System Operator Manual
From the Operator Main Menu Screen, TOUCH Product.
TOUCH COOL. You should now be on the COOL Screen.
To exclude COOL Data
To create COOL text
: TOUCH the Cool Not Required button.
: TOUCH the Create COOL Text button.
You should now be on the Create COOL Text Screen.
SELECT the appropriate production step from those listed in the
Production Steps box. Repeat this procedure to SELECT the
country from the list in the Country box in which the production
step was performed. The production step and country selected
will be displayed in the COOL Text box. If needed, TOUCH the
Start Over button to delete the COOL text.
: TOUCH Back.
Product Drop-Down Menu Void Transaction
To exit this screen
From the Operator Main Menu Screen, TOUCH Product.
TOUCH Void Transation.
The current transaction will be voided. There will be no further
indication on the screen that the transaction has been completed.
F-35512 (Mar. 2006) 3-17 Using the Access PrePack System
Page 26

Access PrePack System Operator Manual
Settings Drop-Down Menu
The Setting Drop-Down Menu has the following selections:
Wrapper Screen
(only available when system connected to UWS)
Printer Settings Screen
Date and Time Screen
Total Type Screen
Rezero Weigher Screen
Settings Drop-Down Wrapper Screen
From the Operator Main Menu Screen, TOUCH Settings.
TOUCH Wrapper. You should now be on the Wrapper Screen.
To change the Intake Mode
bring up the Intake Mode drop-down selections either Normal,
Default, or Gentle.
: TOUCH the Intake Mode field and
To turn on/off the Sealer Belt
SELECT either On or Off.
To change the Belt Temperature
Setting field. The Numeric Keypad will be displayed. TYPE the
Belt Temperature Setting on the Numeric Keypad. TOUCH Enter.
To change Film Tension
SELECT either High, Medium, or Low.
To change the Film Width
SELECT either Narrow, Wide, or Automatic.
To load Wide Film
To load Narrow Film
To cut the Film
To exit this screen
Using the Access PrePack System 3-18 F-35512 (Mar. 2006)
: TOUCH the Load Wide Film button.
: TOUCH the Load Narrow Film button.
: TOUCH the Cut Film button.
: TOUCH Back.
: TOUCH the Sealer Belt field and
: TOUCH the Belt Temperautre
: TOUCH the Film Tension field and
: TOUCH the Film Width field and
Page 27

Settings Drop-Down Menu Printer Settings Screen
Access PrePack System Operator Manual
From the Operator Main Menu Screen, TOUCH Settings.
TOUCH Printer Settings. You should now be on the Printer
Settings Screen.
To change the Printer Type
: TOUCH the Printer Type field and
SELECT Primary, Second, Third, or None.
To change the Printer Contrast
: TOUCH the Printer Contrast
field and SELECT a number from 0-7. TOUCH the Apply
Changes & Print Label button to save changes and print a sample
label.
Note
Use the lowest contrast level that allows for acceptable print.
To change Label Width
SELECT the desired width. TOUCH the Apply Changes & Print
Label button to save changes and print a sample label.
To change the Horizontal Print Position
Right buttons on either side of the Horizontal Print Position field
to move the print to the left or the right on the label. TOUCH the
Apply Changes & Print Label button to save changes and print a
sample label.
To change the Vertical Print Position
buttons on either side of the Vertical Print Position field to move
the print up or down on the label. TOUCH the Apply Changes &
Print Label button to save changes and print a sample label.
: TOUCH the Label Width field and
: TOUCH the Left or
: TOUCH the Up or Down
To exit this screen
F-35512 (Mar. 2006) 3-19 Using the Access PrePack System
: TOUCH Back.
Page 28

Access PrePack System Operator Manual
Settings Drop-Down Menu Date and Time Screen
The current date and time set for the Access PrePack System is
shown on the Operator Main Menu Screen in the lower left hand
corner.
From the Operator Main Menu Screen, TOUCH Settings.
TOUCH Date and Time. You should now be on the Date and
Time Screen.
To change the Month
month.
To change the Year
: TOUCH the year field and SELECT the
year.
To change the Day
To change the Hour
: TOUCH the day on the calendar.
: TOUCH the HH field and TOUCH the up or
down arrow.
To change the Minute
up or down arrow.
To change AM/P M
: TOUCH the AM/PM field to toggle between
AM and PM.
To exit this screen
: TOUCH Back.
: TOUCH the month field and SELECT the
: TOUCH the MM field and TOUCH the
Using the Access PrePack System 3-20 F-35512 (Mar. 2006)
Page 29

Settings Drop-Down Menu Total Type Screen
Access PrePack System Operator Manual
From the Operator Main Menu Screen, TOUCH Settings.
TOUCH Total Type. You should now be on the Tota l Type
Screen.
Settings Drop-Down Menu Rezero Weigher Screen
To select a Total Type
: TOUCH the Total Type field and
SELECT a Total Type.
To exit this screen
: TOUCH Back.
Ensure that nothing is on the scale. From the Operator Main
Menu Screen, TOUCH Settings. TOUCH Rezero Weigher. A
process box will appear briefly; no other action is required.
F-35512 (Mar. 2006) 3-21 Using the Access PrePack System
Page 30

Access PrePack System Operator Manual
Help Drop-Down Menu
The Help Drop-Down Menu has the following selections:
Search Screen
Describe this Page Screen
Questions Screen
Operator Note Screen
About Access Screen
Weights & Measures Screen
Help Drop-Down Menu Search Screen
From the Operator Main Menu Screen, TOUCH Help. TOUCH
Search. You should now be on the Search Screen.
A search can be performed by a product number or by a product
description. TOUCH either the check box Search by character to
perform a search by product description or Search by PLU to
perform a search by product number.
To perform a Search by character
by Character. TOUCH the text field to the left of the check boxes
to activate it for data entry. The Alpha Keyboard will be
displayed on the screen. TYPE the letters on the keyboard
describing the product. If the search does not begin automatically,
TOUCH Done.
Using the Access PrePack System 3-22 F-35512 (Mar. 2006)
: TOUCH the check box Search
Page 31

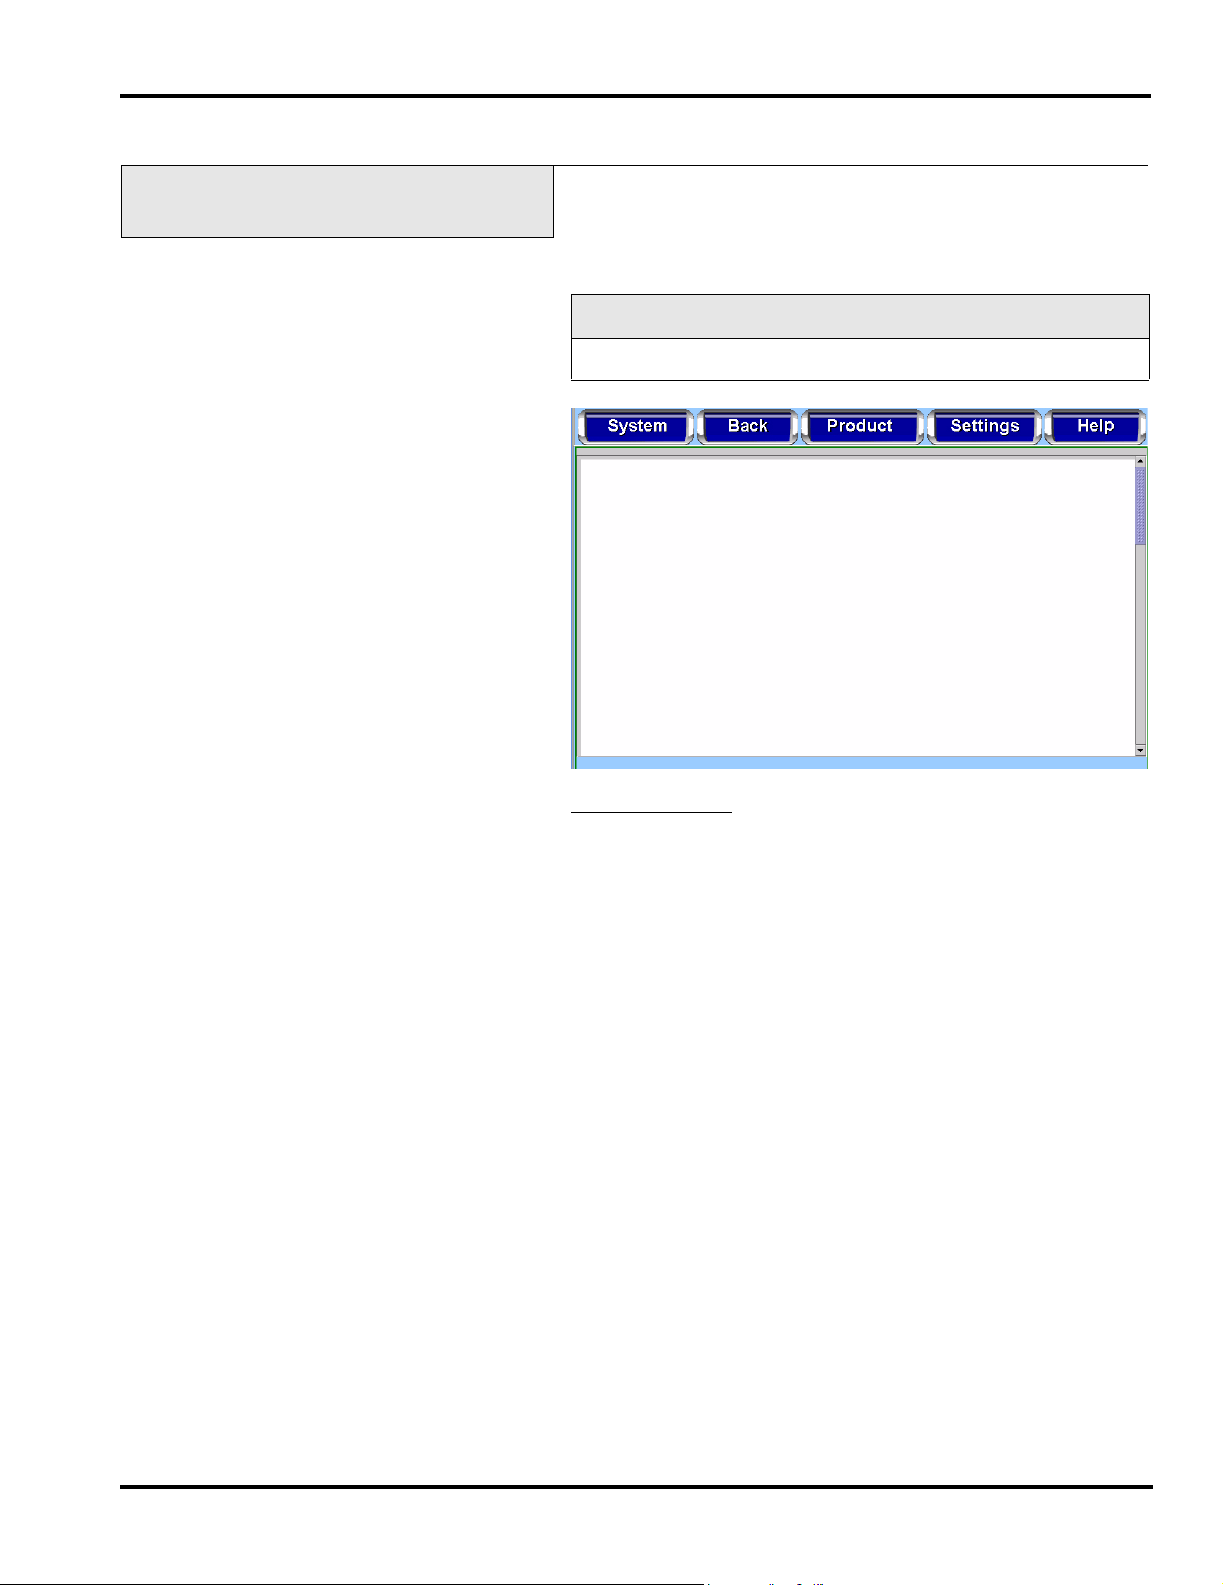
Access PrePack System Operator Manual
As shown on the screen below, a list of products is displayed.
TOUCH the scroll bar arrows to the right of the box containing
the product list to scroll up or down and view all of the products
listed. TOUCH the scroll bar arrows below the box to view list
entries that are wider than the box.
SELECT the desired product on the list. The Run Screen for the
selected product will be displayed.
To perform a Search by PLU Range
: TOUCH the check box
Search by PLU. TOUCH the text field to the left of the check
boxes to activate it for data entry. The Numeric Keypad will be
displayed on the screen. TYPE the product number. If the search
does not begin automatically, TOUCH Enter.
F-35512 (Mar. 2006) 3-23 Using the Access PrePack System
Page 32

Access PrePack System Operator Manual
As shown on the screen below, a list of products is displayed.
TOUCH the scroll bar arrows to the right of the box containing
the product list to scroll up or down and view all of the products
listed. TOUCH the scroll bar arrows below the box to view list
entries that are wider than the box.
Help Drop-Down Menu Describe this Page Screen
SELECT the desired product on the list. The Run Screen for the
selected product will be displayed.
The Describe this Page Screen will give you tips about the current
screen.
From the Operator Main Menu Screen, TOUCH Help. TOUCH
Describe this Page. You should now be on the Describe this Page
Screen.
To exit this screen
: TOUCH Back.
Using the Access PrePack System 3-24 F-35512 (Mar. 2006)
Page 33
Help Drop-Down Menu Questions Screen
Access PrePack System Operator Manual
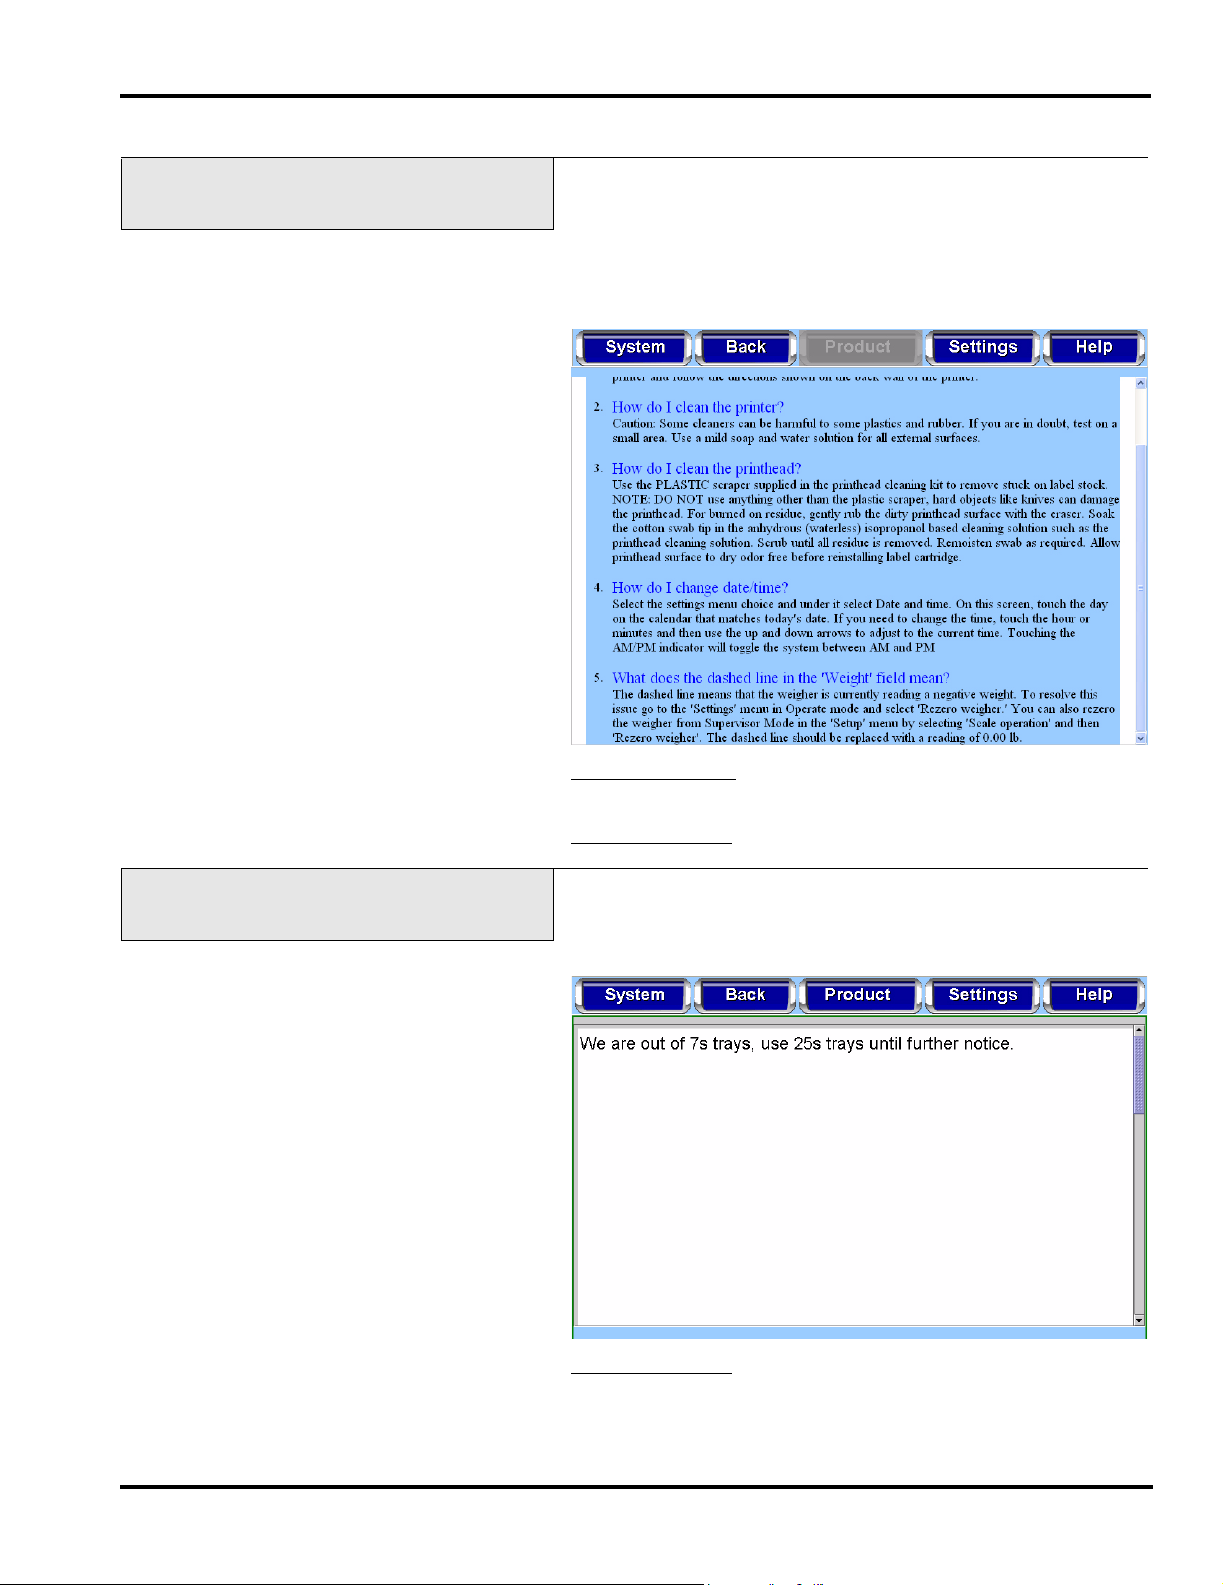
The Questions Screen will show a list of frequently asked
questions regarding the Access PrePack System operation and
maintenance.
From the Operator Main Menu Screen, TOUCH Help. TOUCH
Questions. You should now be on the Questions Screen.
Help Drop-Down Menu Operator Note Screen
To view Questions
: TOUCH the scroll bar on the right of the list
of questions to scroll up and the down the list of questions.
To exit this screen
: TOUCH Back.
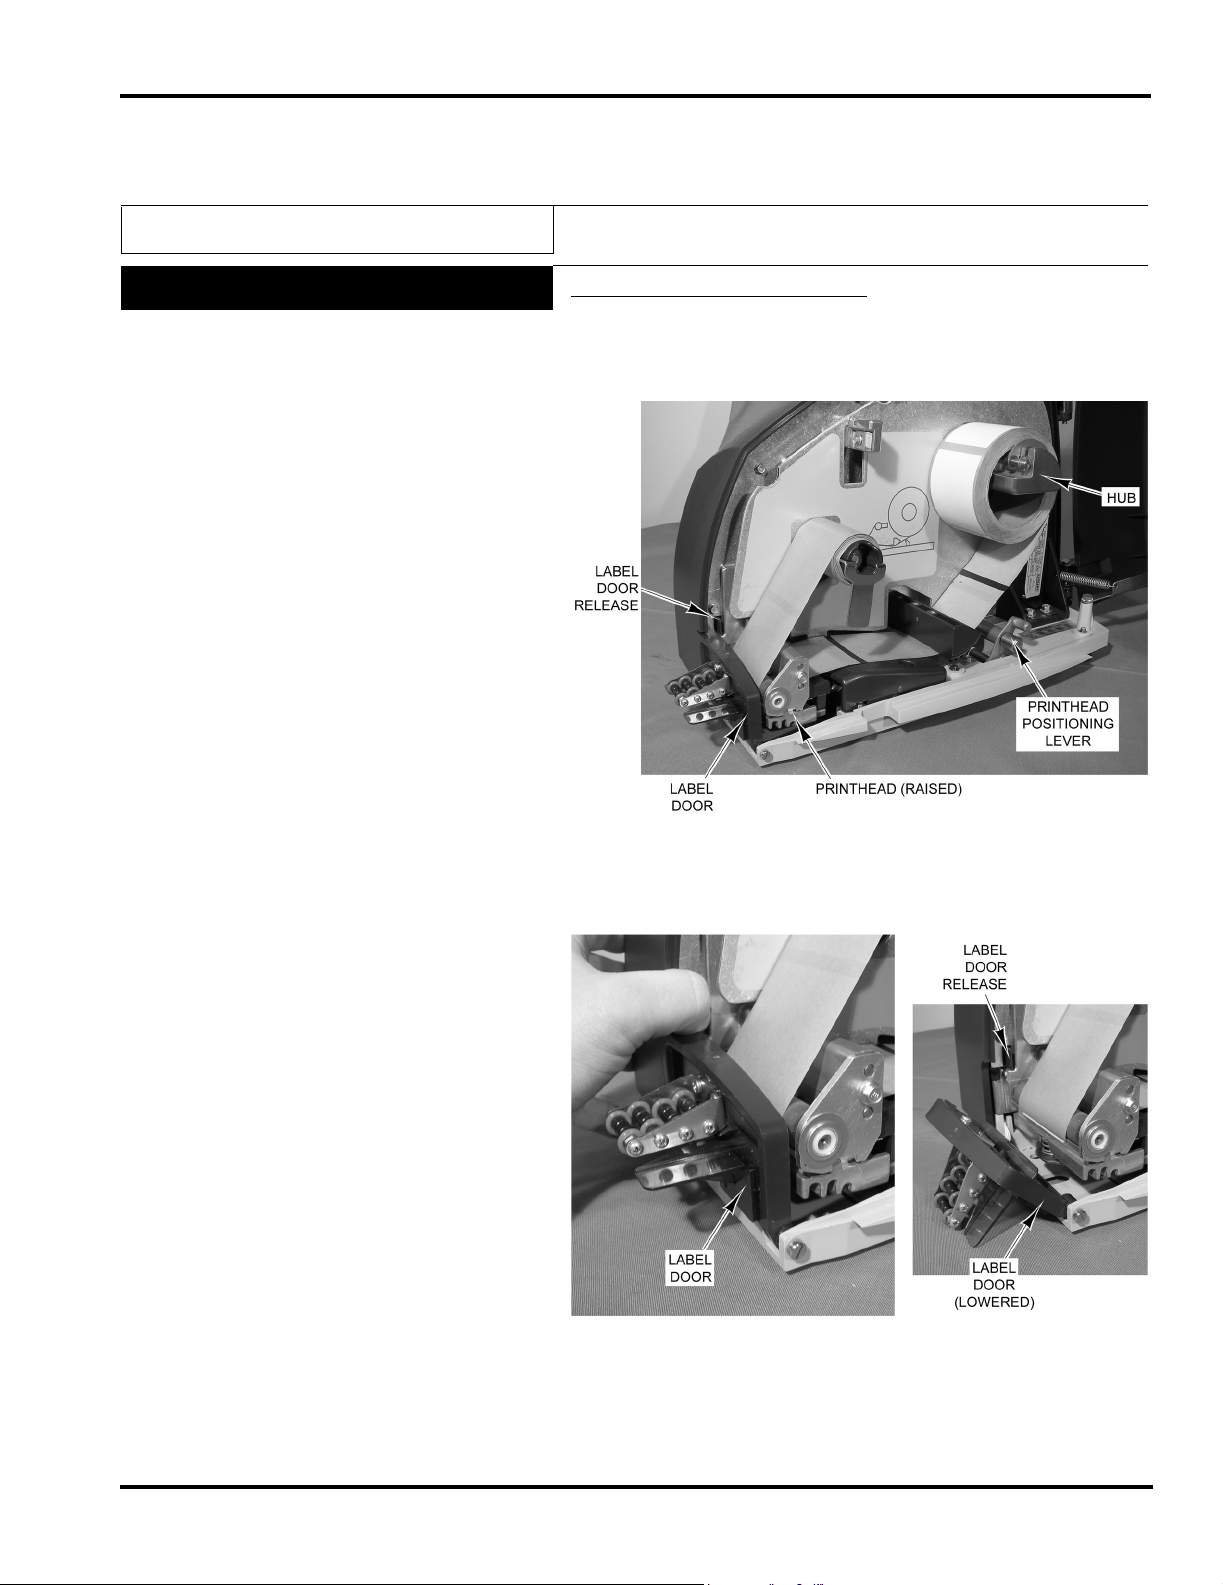
From the Operator Main Menu Screen, TOUCH Help. TOUCH
Operator Note. You should now be on the Operator Note Screen.
This is only available if there is a note.
To exit this screen
F-35512 (Mar. 2006) 3-25 Using the Access PrePack System
: TOUCH Back.
Page 34

Access PrePack System Operator Manual
Help Drop-Down Menu About Access Screen
From the Operator Main Menu Screen, TOUCH Help. TOUCH
About Access. You should now be on the About Access Screen.
Help Drop-Down Menu Weights & Measures Screen
To exit this screen
: TOUCH Back.
From the Operator Main Menu Screen, TOUCH Help. TOUCH
Weights & Measures. You should now be on the Weight s &
Measures Screen.
Note
The information on this screen will vary depending on the
peripherals attached.
To exit this screen: TOUCH Back.
Using the Access PrePack System 3-26 F-35512 (Mar. 2006)
Page 35
Chapter 4: Maintenance & Cleaning
Maintenance & Cleaning
Access PrePack System Operator Manual
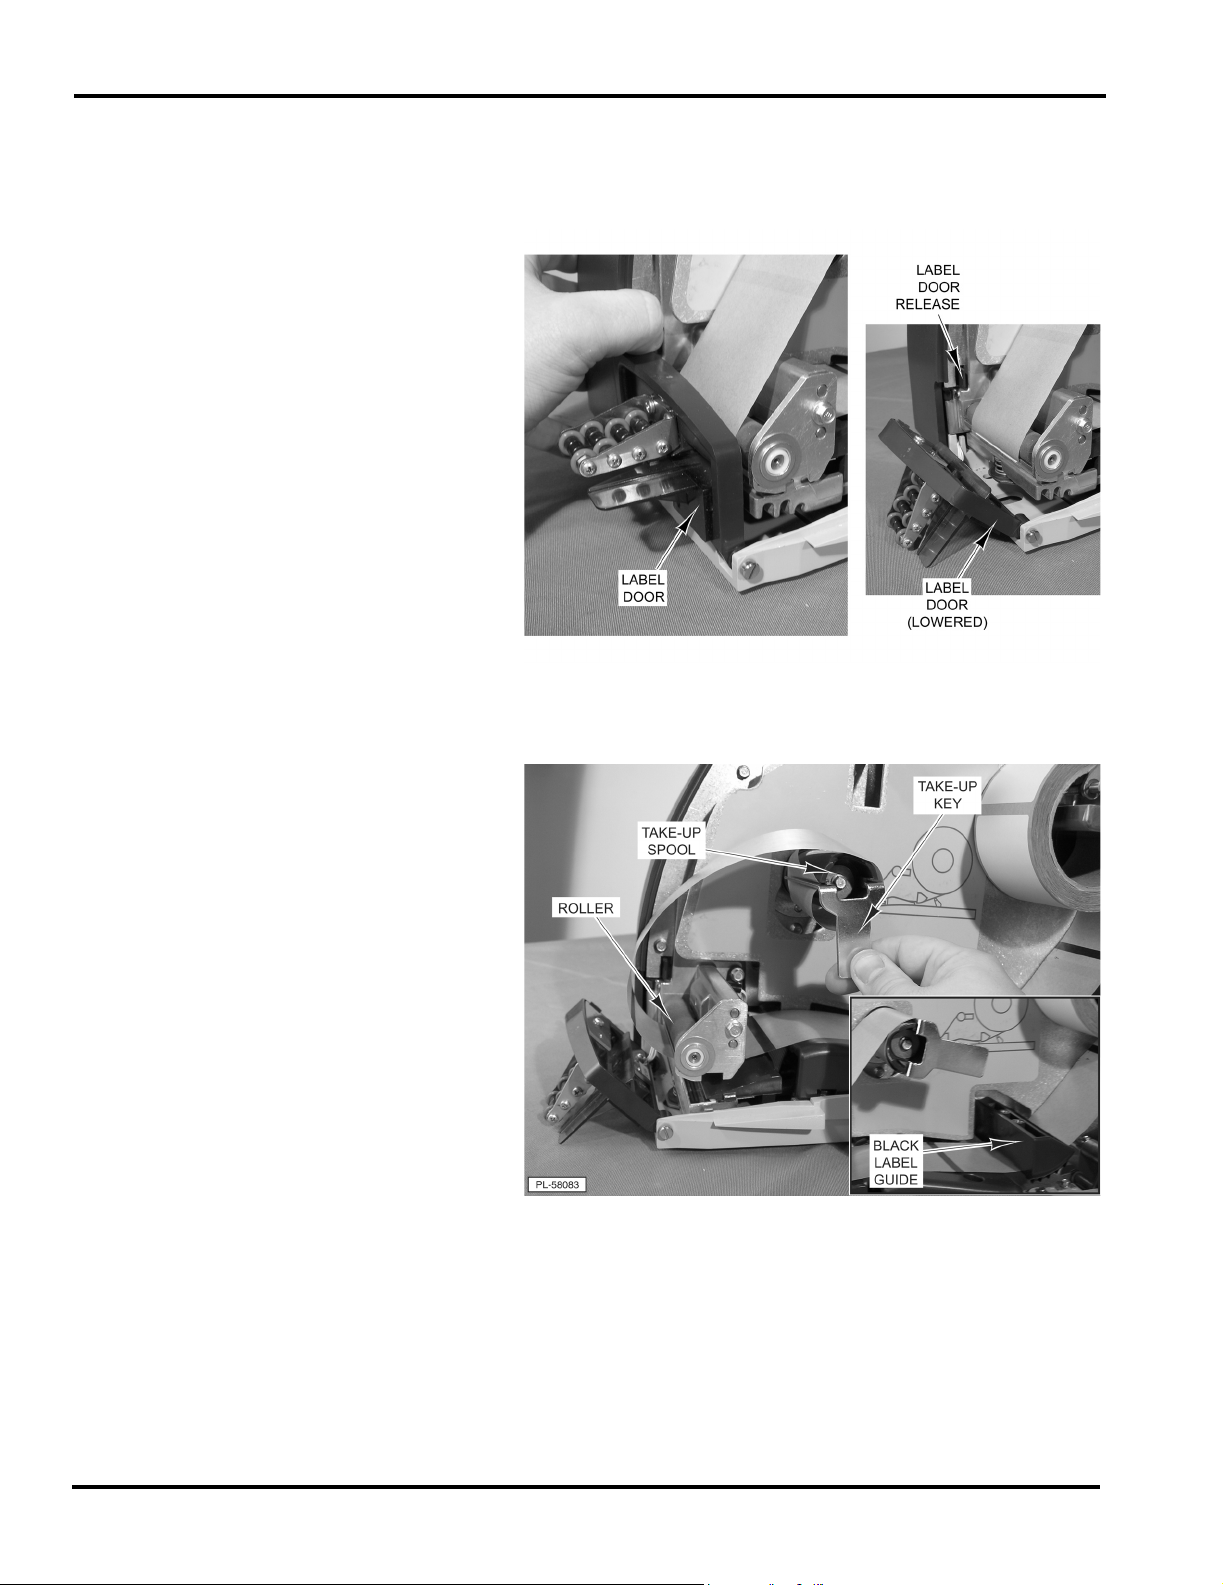
Removing Labels
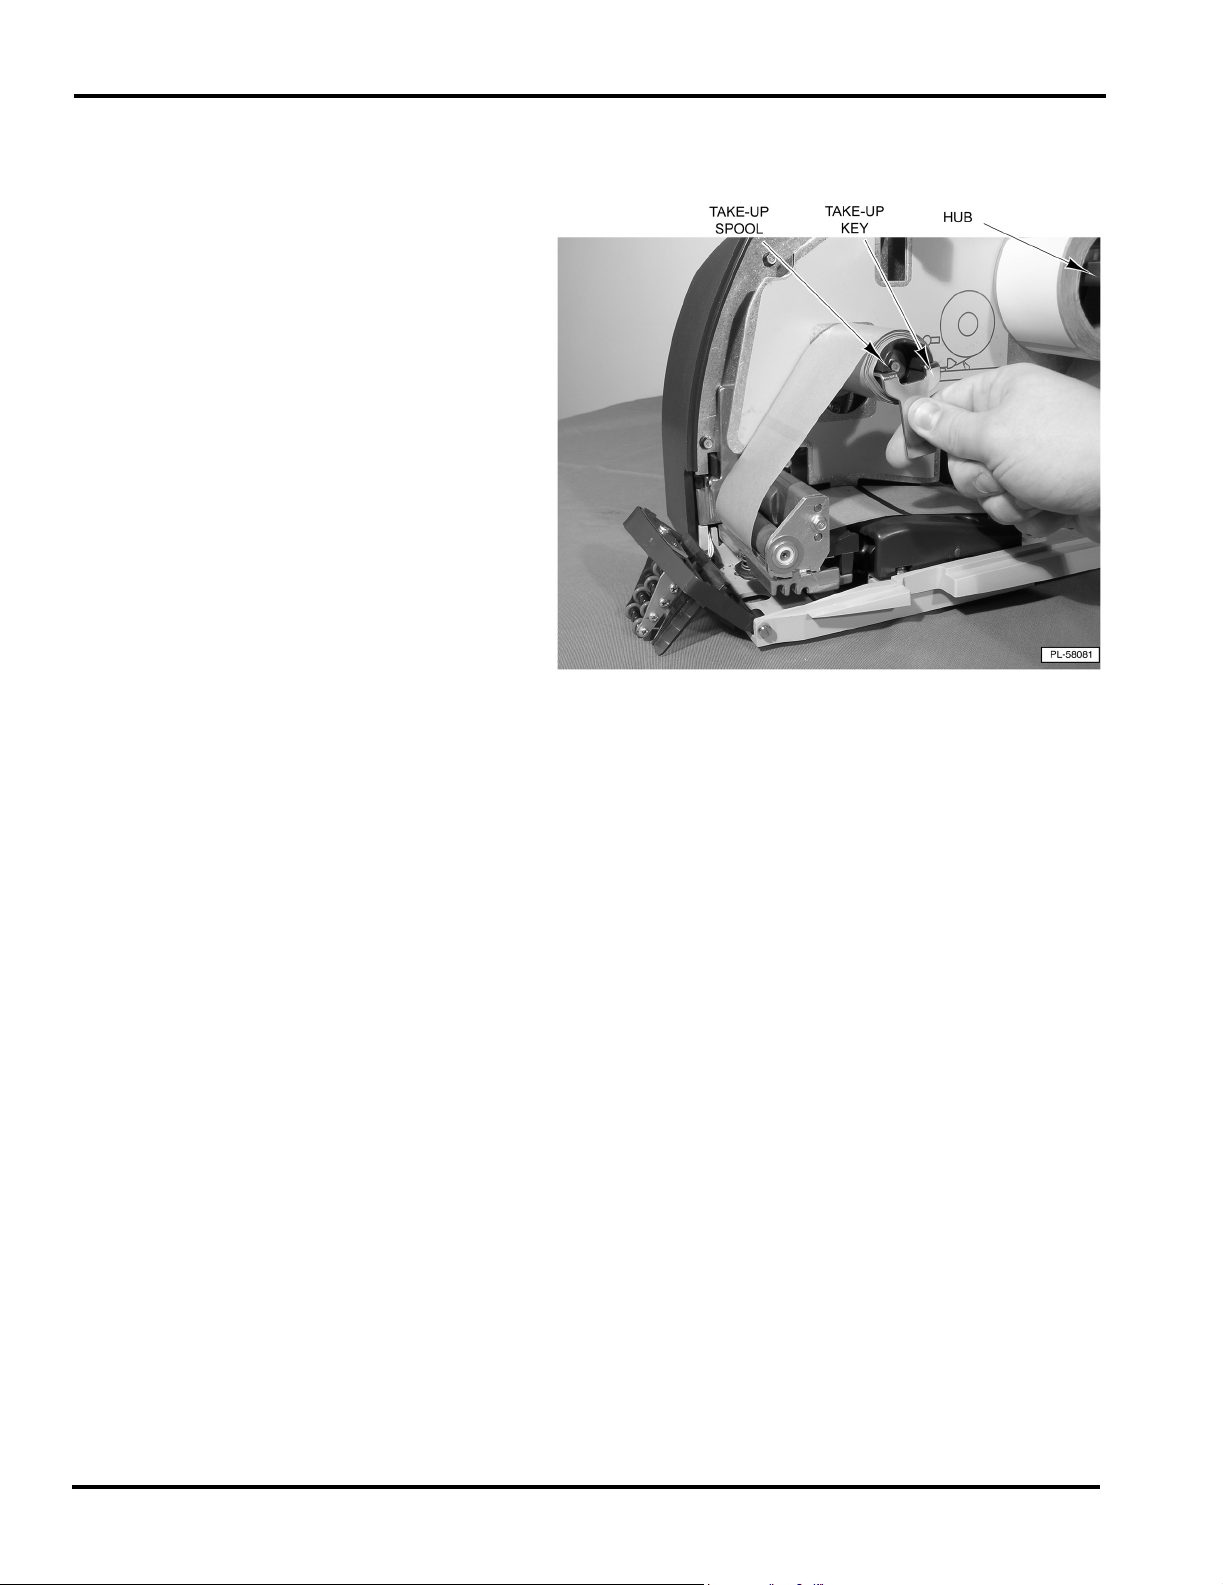
To remove labels from the printer:
1. Open the printer label access door.
2. Pull the printhead positioning lever toward the printhead to
lower the printhead.
3. Push and hold in the label door release located on the interior
back wall behind the roller and lower the label door.
F-35512 (Mar. 2006) 4-1 Maintenance & Cleaning
Page 36
Access PrePack System Operator Manual
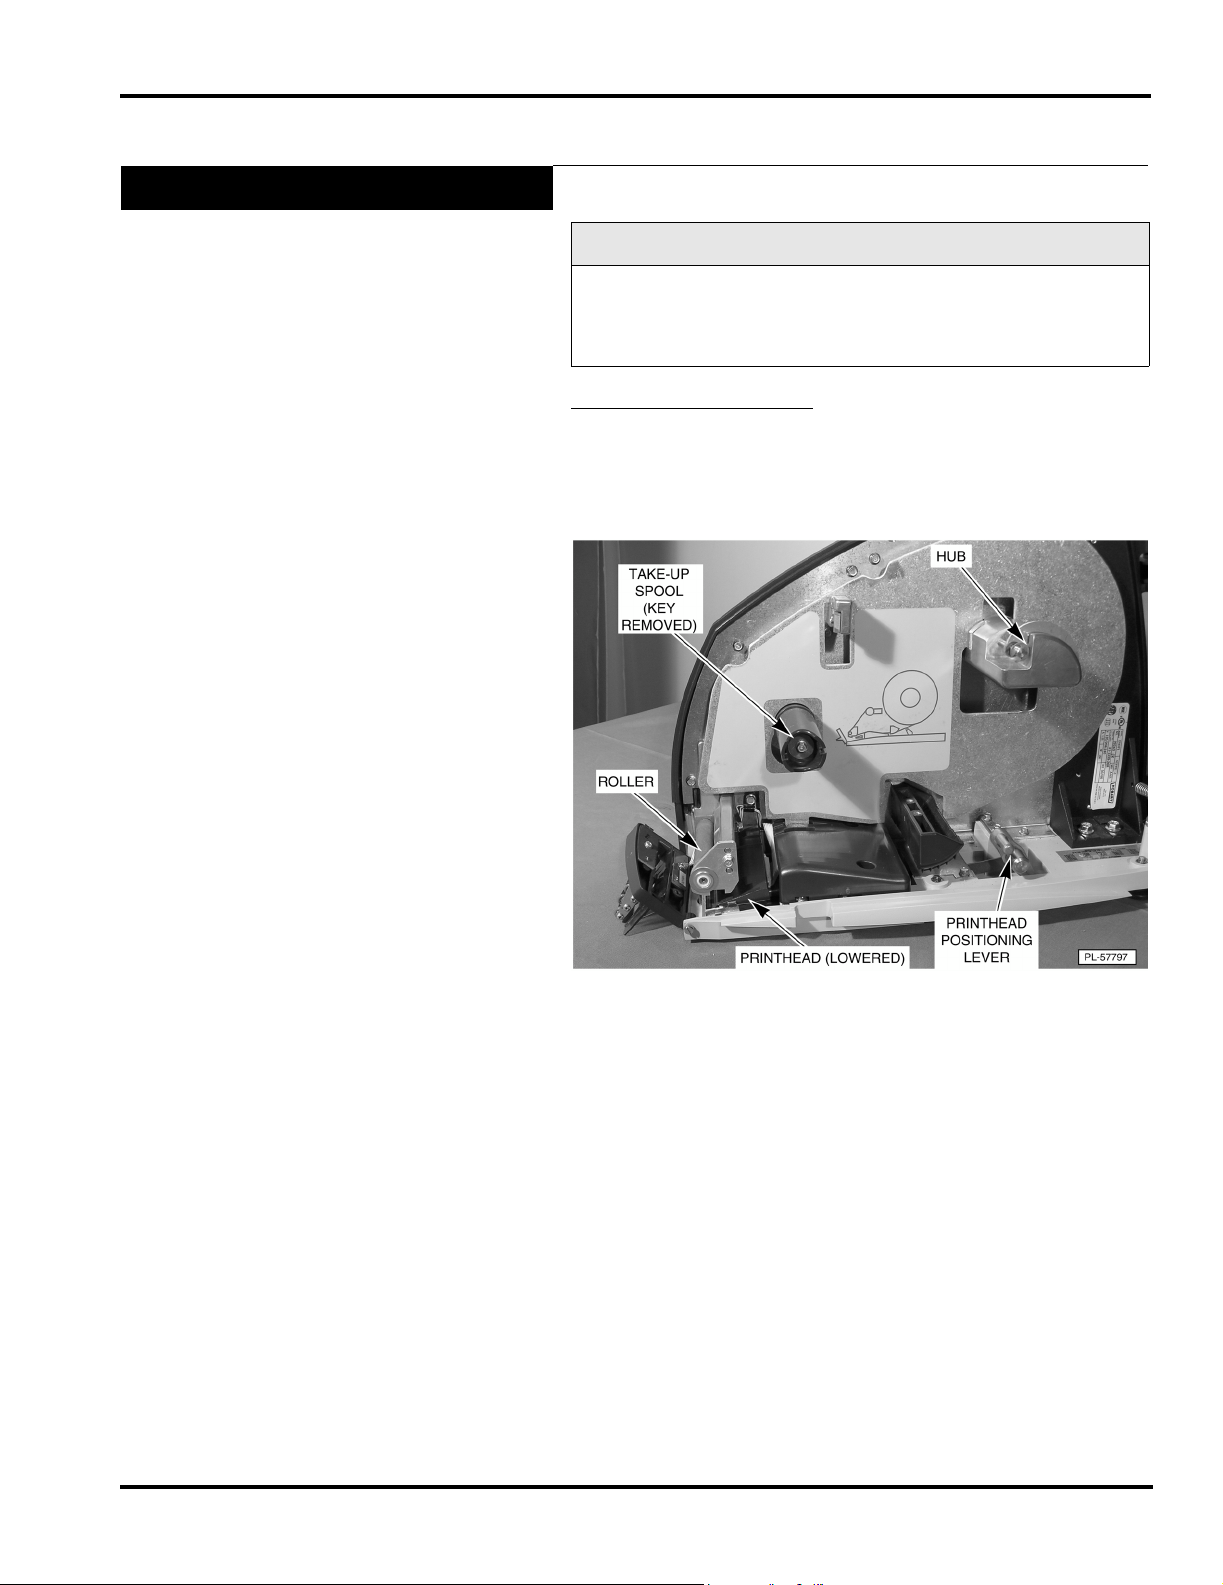
4. Remove the take-up spool key.
5. Remove the label backing paper from the take-up spool and
the label roll from the hub.
Maintenance & Cleaning 4-2 F-35512 (Mar. 2006)
Page 37
Loading Labels
Access PrePack System Operator Manual
Note
Before loading labels:
•See Cleaning the Printhead.
•See Setting the Label Size Plate.
To load labels in the printer
:
1. Remove labels from the first 12 inches of the new label roll.
This will create a leader to attach to the take-up spool.
2. Pull the printhead positioning lever toward the printhead to
lower the printhead.
F-35512 (Mar. 2006) 4-3 Maintenance & Cleaning
Page 38
Access PrePack System Operator Manual
3. Push and hold in the label door release located on the interior
back wall behind the roller and lower the label door.
4. Place the label roll on the hub. The leader feeds from the
bottom of the roll in a clockwise direction.
5. Remove the take-up spool key.
6. Wrap the leader under the black label guide, around the roller
and the take-up spool and insert the take-up spool key. Insert
the short side of the key first and catch the leader under the
long side of the key.
7. Take up the leader slack and align the leader on the spool.
Maintenance & Cleaning 4-4 F-35512 (Mar. 2006)
Page 39

Access PrePack System Operator Manual
8. Close the label door on the front of the printer.
9. Pull the printhead positioning lever away from the printhead
to raise the printhead into position. The printer will
automatically advance the labels through the printhead
setting the labels in the ready position.
10. Close the printer label access door.
F-35512 (Mar. 2006) 4-5 Maintenance & Cleaning
Page 40
Access PrePack System Operator Manual
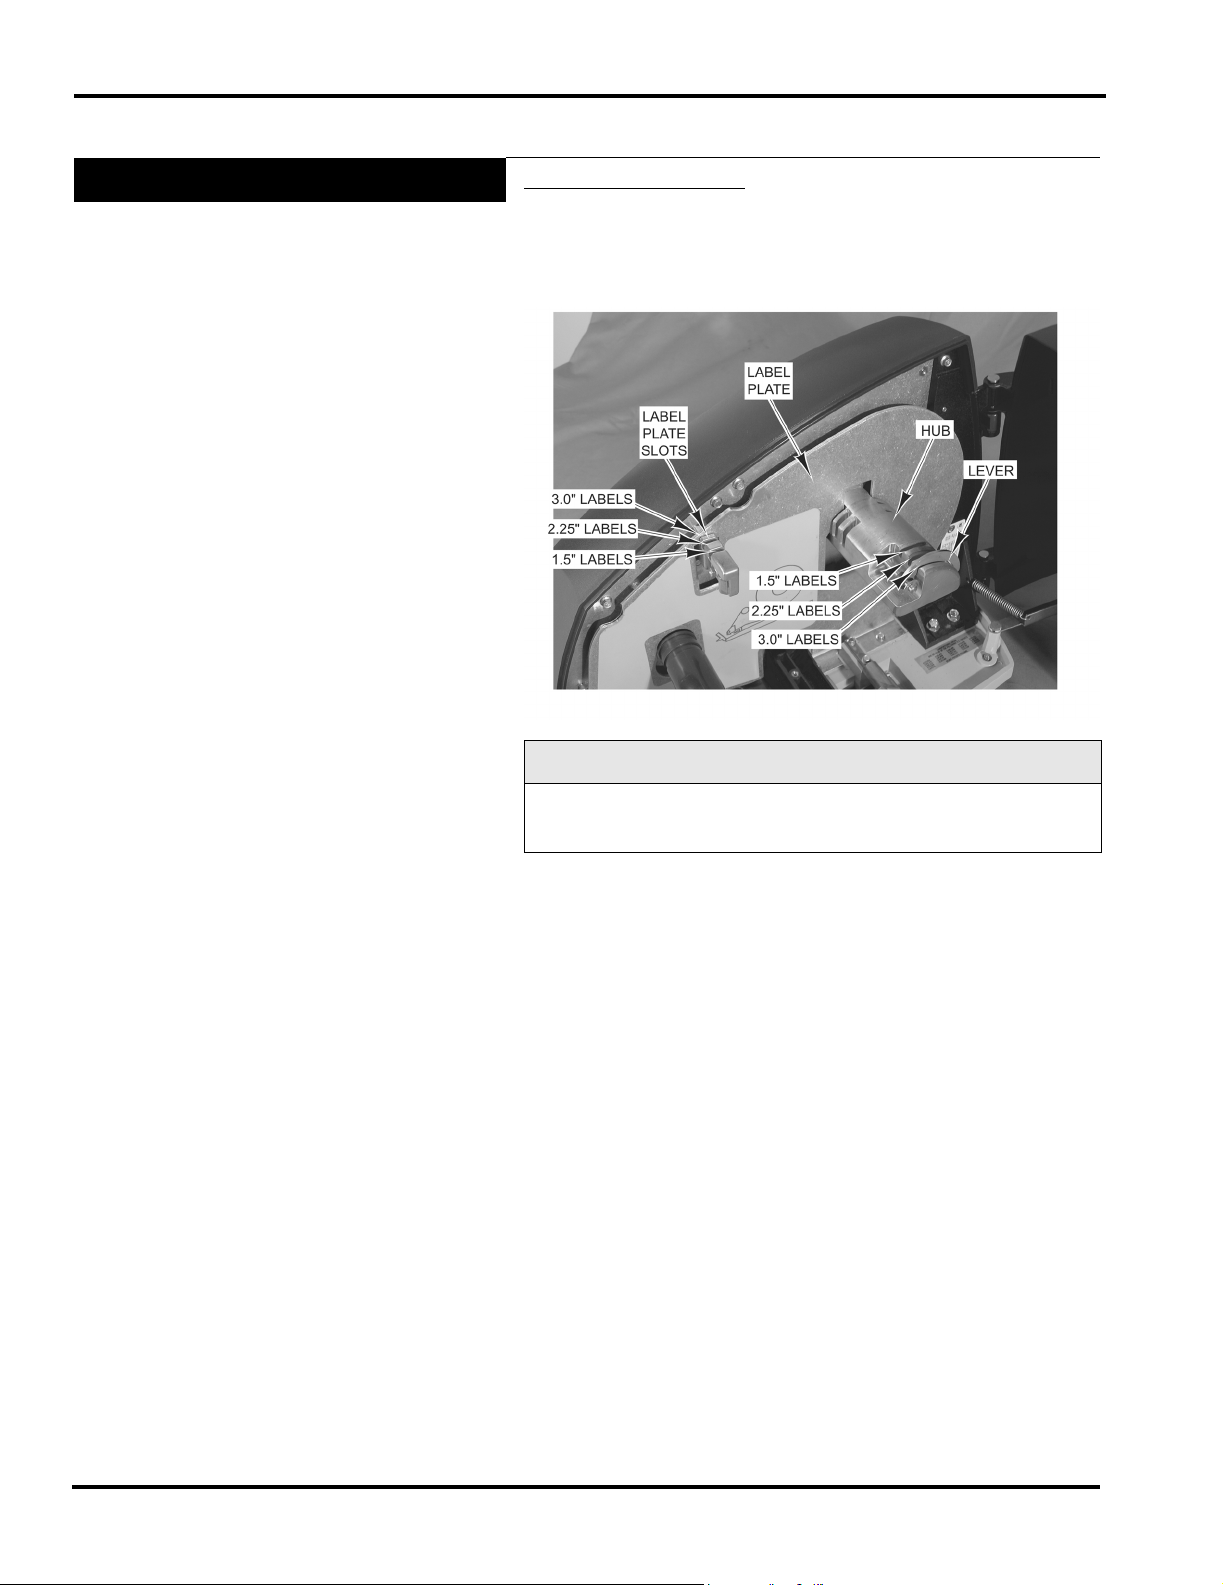
Setting the Label Size Plate
To set the label size plate:
1. Lift the label plate and set it in the slots for the size labels
being used.
2. Move the lever on the hub to the slot for the size labels being
used.
Note
If you change the label size, make sure to adjust the printer settings (see Printer Settings Screen).
Maintenance & Cleaning 4-6 F-35512 (Mar. 2006)
Page 41

Access PrePack System Operator Manual
Cleaning the Printhead
The printhead of your Access PrePack System Printer should be
cleaned approximately once each week, or whenever labels are
obstructed due to a residue buildup on the printhead and/or roller.
It is a good idea to clean the printhead roller whenever a new
roll of labels is installed. To obtain a Printhead Cleaning Kit,
contact your local Hobart Representative; request
Part Number 00-184326.
Look At This
Do not use a metal tool on the printhead. This could scratch or
break the printhead. In addition, monitor the printer to look for
labels stuck on the printer parts. If found, remove these labels at
once following the instructions given below.
To clean the printhead
:
1. With the label door lowered, the labels removed and the
printhead in the lowered position, check to see if the printhead is clean and free of label stock and label adhesive.
2. Use the scrapper from the Printhead Cleaning Kit to remove
stuck-on label stock.
3. To remove burnt-on adhesive, gently rub the printhead surface with the eraser from the Printhead Cleaning Kit.
4. Using the cleaner and a swab from the Printhead Cleaning
Kit, scrub the printhead until all of the residue is removed.
5. Clean the roller with the cleaner and swabs.
6. Allow the printhead and roller to dry before loading the
labels.
F-35512 (Mar. 2006) 4-7 Maintenance & Cleaning
Page 42

Access PrePack System Operator Manual
Troubleshooting
Problem Possible Cause Action/Solution
In the event that your Access PrePack System does not operate as
expected, please reference the following troubleshooting steps
before calling for service.
If you are experiencing problems with the system, the following
scenarios may be of help.
There is no display on the
display unit.
The Operator ID was not
accepted.
Product number was not
found.
System prompts you to take
a label. No label is present.
You may not have power running to the
system.
Verify the following connections:
• Power cord is plugged into a working electrical outlet.
• Power cord is plugged into the
rear of the printer.
• Display unit power cord is plugged
into the printer.
• Display unit power cord is plugged
into the display unit.
• USB cable is plugged into the
printer.
• USB cable is plugged into the
display unit.
You may have entered the wrong ID. Verify that you are entering the proper
ID. If correct, have your supervisor
check the ID number.
You may have entered an invalid prod-
Verify the product number.
uct number.
A portion of the label may be ‘hidden’
Make sure that the label exit is clear.
in the label exit.
Partial non-printed label is
exposed.
System prints blank labels or
partially printed labels.
The labels may be improperly
threaded.
The labels may be improperly threaded
or the printhead or roller may be dirty.
Verify that labels are properly
threaded.
Check to see that labels are threaded
properly. If the problem persists,
clean the printhead using the Hobart
Printhead Cleaning Kit.
Maintenance & Cleaning 4-8 F-35512 (Mar. 2006)
Page 43

Index
Access PrePack System Operator Manual
A
About Access Screen, 3-26
Alpha Keyboard, 2-2
Automatic Settings, 3-6
Automatically Print and Apply Label, No Wrap
(Prepackaged Products), 3-8
Automatically Print Label Only, 3-7
Automatically Wrap Only, 3-9
Automatically Wrap, Print and Apply Label, 3-6
C
Cleaning the Printhead, 4-7
Console Communication Connections, 2-1
COOL Screen, 3-17
D
Date and Time Screen, 3-20
Date, Best Before, 3-16
Date, Sell By, 3-16
Describe This Page Screen, 3-24
E
Electrical Connections, 2-1
F
FCC Note, 1-1
Flashkeys, 2-2
G
Grayed Field, 2-2
O
Operator Main Menu Screen, 2-2
Operator Main Menu Screen Softkeys and Flashkeys, 3-3
Operator Manual Terminology, 1-2
Operator Note Screen, 3-25
P
Power up the scale system, 3-1
Printer Settings Screen, 3-19
Printhead Cleaning Kit, 4-7
Printhead cleaning kit part number, 4-7
Product & Shelf Life Screen, 3-16
Product Drop-Down Menu, 3-13
Product Note Screen, 3-15
Q – R
Questions Screen, 3-25
Removing Labels, 4-1
Rezero Weigher Screen, 3-21
Run Screen, 3-4
Running a Product, 3-11
S
Search by character, 3-22
Search by PLU Range, 3-23
Search Screen, 3-22
Select a Total Type, 3-21
Setting the Label Size Plate, 4-6
Settings Drop-Down Menu, 3-18
Shutting Down the System, 3-2
Softkeys, 2-2
H
Help Drop-Down Menu, 3-22
L
Label Data Screen, 3-13
Label Placement Screen, 3-14
Label Type, 3-13
Loading Labels, 4-3
Logging onto the System, 3-1
M
Maintenance & Cleaning, 4-1
Manual Mode, 3-10
Modifying the Run Screen, 3-5
N
Numeric Keypad, 2-2
F-35512 (Mar. 2006) I-1 Index
Text Box, 2-2
To Login to the System, 3-1
Total Type Screen, 3-21
Troubleshooting, 4-8
Understanding the System, 2-1
Using Automatic Mode, 3-6
Using the Access PrePack Service Counter System, 3-1
Using the Console, 2-1
Using the Operator Main Menu Screen Drop-Down Menus, 3-12
Verify Correctness of Weight and Price, 1-1
Void Transaction, 3-17
Weights & Measures Screen, 3-26
Wrapper Screen, 3-18
T
U
V – W
Page 44

Access PrePack System Operator Manual
Index I-2 F-35512 (Mar. 2006)
 Loading...