

Page 1

#12 TIN CHOPPER ATTACHMENT
WITH ROUND PAN
AFC
12 TIN-C/EPAN 295746
701 S. RIDGE AVENUE
TROY, OHIO 45374-0001
937 332-3000
www.hobartcorp.com
FORM 37017 (July 2012)
Page 2
Assembly, Care, and Operation of
Chopper Attachment with Round Pan
SAVE THESE INSTRUCTIONS
GENERAL
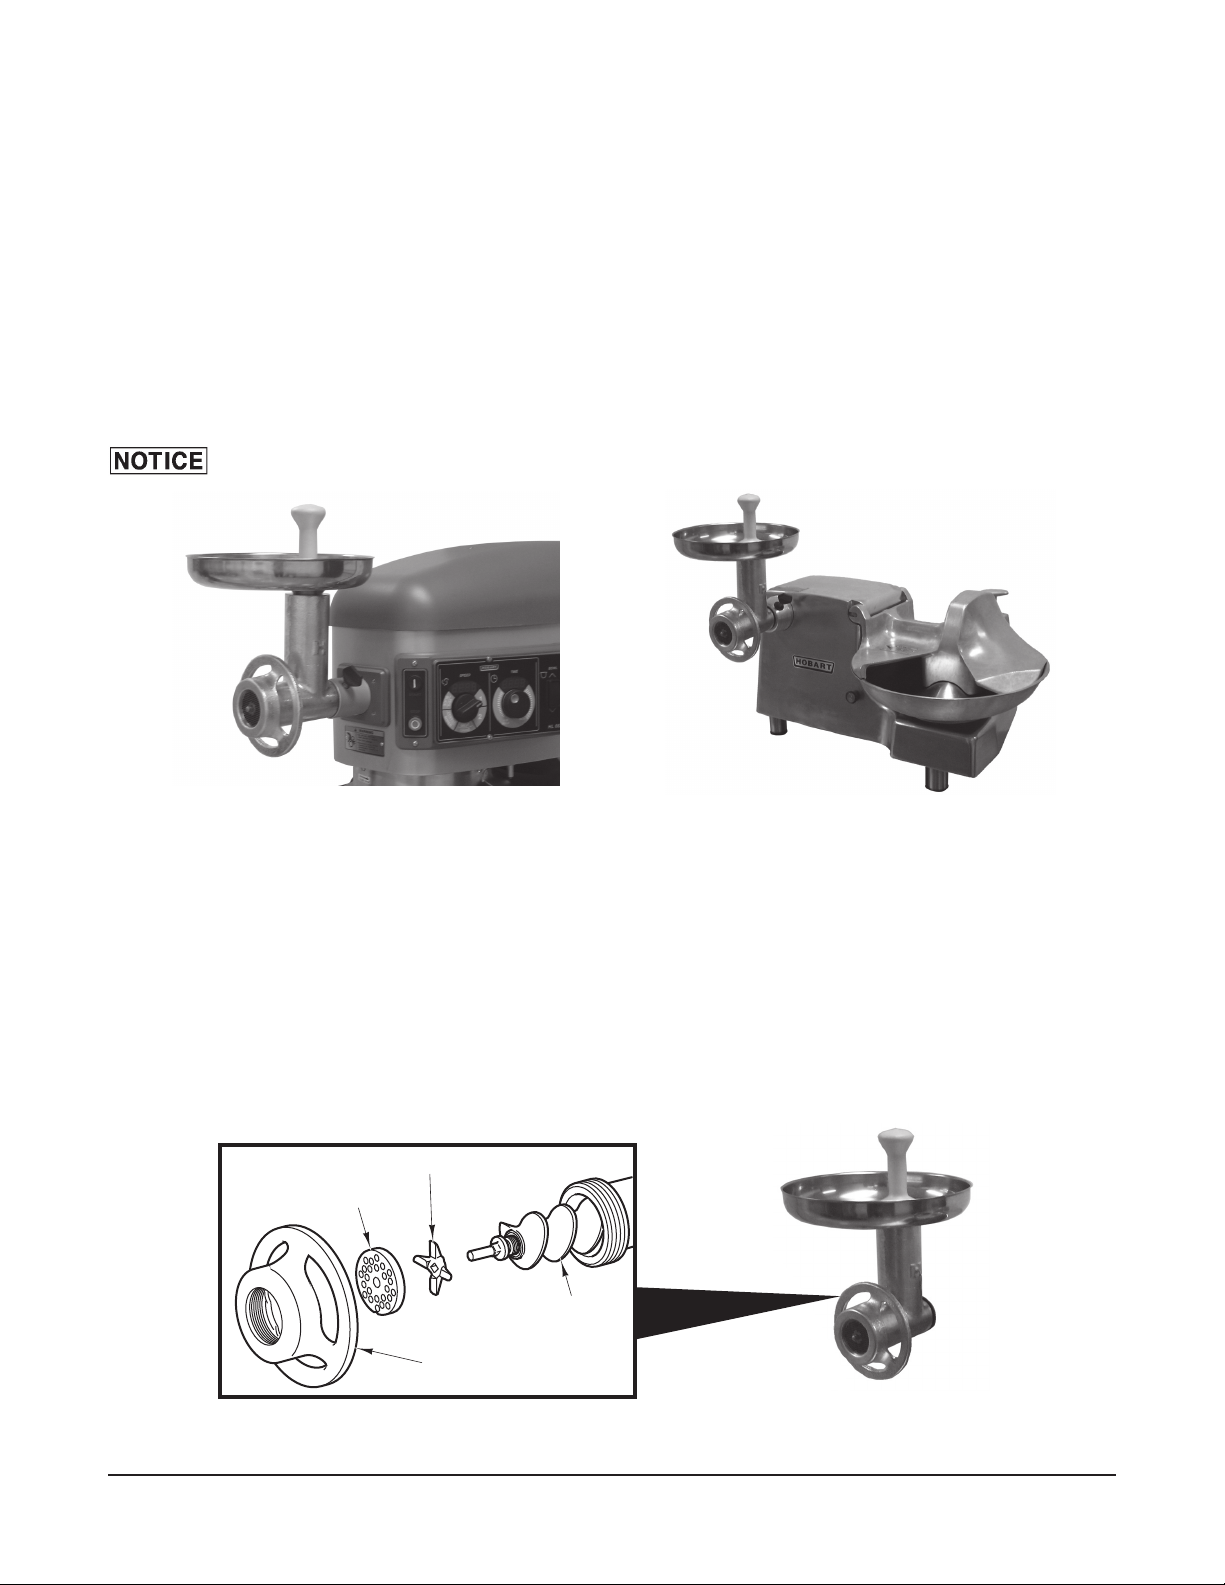
The Chopper Attachment allows you to prepare many additional foods with your Hobart Mixer (Fig.1) or
Food Cutter (Fig. 2). The #12 Tin Chop End is designed to use a #12 size knife and plate. The knife and
plate (which has
plates are available with hole sizes
This product must not be used for preparation of bread crumbs.
1
/8" holes) come with the Chopper Attachment when shipped from the factory. Other
5
/64, 3/16, 1/4, 3/8, 1/2, 5/8 and 11/16" for ne to coarse chopping.
CHOPPER ATTACHMENT on a MIXER
Fig. 1
CHOPPER ATTACHMENT on a FOOD CUTTER
Fig. 2
ASSEMBLY
UNPACKING
Immediately after unpacking, check for possible shipping damage. If the Chopper Attachment is found to
be damaged, save the packaging material and contact the carrier within 15 days of delivery.
The Chopper Attachment must be thoroughly cleaned and sanitized before assembly and operation. Refer
to the cleaning section.
KNIFE
PLATE
WORM
ASSEMBLY
ADJUSTING RING
© HOBART, 2012
Fig. 3
– 2 –
Page 3

CYLINDER
Check to ensure the hub and hub drive are clean and clear of any obstruction. Insert the cylinder assembly
with a slight twisting motion toward the left. The cylinder stop pin will contact the side of the hole that
receives it. Tighten the thumb screw.
NOTE: Upon disassembly it is only necessary to loosen the thumb screw about three turns.
WORM, KNIFE, & PLATE
Slide the worm into the cylinder and rotate until the square shank of the worm locks into the hub drive.
Install the knife with cutting edges facing out, and the plate, making sure the notch aligns with the pin in
the bottom of the cylinder.
ADJUSTING RING, FEED PAN, & FEED STOMPER
Thread the adjusting ring on hand tight. Do not adjust the hand wheel too tight; if the knife and plate
are both sharp, only a moderate pressure will be needed. Knives and plates must be sharp and true for
proper cutting action. Rub a little fat or a light coating of food grade mineral oil over newly-sharpened
plates before use.
The knife and plate depend on meat for lubrication. Therefore, the chopper attachment must
never be operated without meat or some type of lubrication.
Install the feed pan and feed stomper.
OPERATION
USING THE CHOPPER ATTACHMENT
The feed pan should be kept in place in the cylinder for ease of feeding. Cut meat into strips and feed
it into the Chopper Attachment using the feed stomper only as needed. If the strips are cut to proper
size, they will feed without assistance from the feed stomper. When running meat through the Chopper
Attachment a second time, more speed is attained by feeding small quantities at a time. Do not try to force
large amounts through with the feed stomper. Substances that could become packed tight in the chopper
like bread crumbs are not recommended. If material in the cylinder stalls the Mixer or Food Cutter, stop
machine at once. Do not attempt to restart. Remove the adjusting ring, knife, plate and worm and clear
the obstruction.
MIXER SPEEDS
For the Classic Series Mixers: Use 2nd or 3rd speeds.
(A120, A200, D300, D330, D340,
H600, P660, & L800 Mixers)
For the Legacy Series Mixers: Use 3rd speed for 3 speed mixers.
Use 2nd speed for 4 speed mixers.
– 3 –
Page 4

CLEANING
Unplug the electrical cord.
Before using the Chopper Attachment, wash each component thoroughly with mild soap and water.
Sanitize with a solution consisting of one tablespoon of sodium hypochlorite bleach (5.25%) to one gallon
of water. Rinse with clean water. Apply tasteless food grade mineral oil to the bare metal areas of the
worm assembly, cylinder, and adjusting ring. The knife and plate need some preliminary lubrication; rub
fat or a light coating of tasteless food grade mineral oil over the cutting faces of these parts.
MAINTENANCE
Unplug the electrical cord.
MIXER & FOOD CUTTER ATTACHMENT HUB DRAINS
Always keep the Mixer attachment hub drain slot and the Food Cutter attachment hub drain hole clean,
clear, and free of obstruction. Refer to their respective product catalogs for further instruction.
CYLINDER DRAIN
A drain hole at the bottom end of the cylinder (Fig. 4) allows
any meat juices to drain. This hole should be inspected
periodically to make sure that it is free of obstructions.
A small wire can be used to remove any material which
may have accumulated.
SERVICE
Contact your local Hobart-authorized Service Ofce for
any repairs or adjustments needed on this equipment.
Fig. 4
TROUBLESHOOTING
SYMPTOM POSSIBLE CAUSE
Chopper Attachment will not operate. Electrical power not connected.
Circuit Breaker tripped or fuse blown.
If the above suggestions do not remedy the situation,
contact Service.
Product has poor appearance,
comes out soft and mushy.
Damaged Knife and/or Plate Adjusting Ring is too tight - only moderate pressure
Knife and/or Plate worn, replace Knife and Plate or
Adjusting Ring loose, tighten end ring, hand tight
only.
is needed.
FORM 37017 (July 2012) PRINTED IN U.S.A.
– 4 –
 Loading...