


Action Camera User Manual
Model Name:Explorer
FCC Statment
This device complies with part 15 of the FCC Rules. Operation is
subject to the following two conditions:
(1) This device may not cause harmful interference, and
(2) this device must accept any interference received, including
interference that may cause undesired operation.
Note: The manufacturer is not responsible for any radio or TV
interference caused by unauthorized modifications to this
equipment. such modifications could void the user’s authority to
operate this equipment. Any Changes or modifications not
expressly approved by the party responsible for compliance
could void the user's authority to operate the equipment.
This equipment has been tested and found to comply with the

limits for a Class B digital device, pursuant to part 15 of FCC
Rules. These limits are designed to provide reasonable
protection against harmful interference in a residential
installation. This equipment generates and can radiate radio
frequency energy and, if not installed and used in accordance
with the instructions, may cause harmful interference to radio
communications. However, there is no guarantee that
interference will not occur in a particular installation. If this
equipment does cause harmful interference to radio or television
reception, which can be determined by turning the equipment off
and on, the user is encouraged to try to correct the interference
by one or more of the following measures:
--Reorient or relocate the receiving antenna.

--Increase the separation between the equipment and receiver.
--Connect the equipment into an outlet on a circuit different from
that to which the receiver is connected.
--Consult the dealer or an experienced radio/TV technician for
help.
RF warning statement
The device has been evaluated to meet general RF exposure
requirement. The device can be used in Portable exposure
condition without distance restriction.
Co-location statement
This device and its antenna(s) must not be co-located or
operating in conjunction with any other antenna or transmitter.

Warning
1,Keep it safe from falling and dropping
2,Keep it distance from any strong magnetic interference objects
like electrical machine to avoid strong radio waves that might be
damaging the product and affect the sound or image quality.
3,Don’t expose the product directly to high temperatures and strong
sunlight
4,We recommend using high quality Micro SD Card for the best
results.
5,Don’t place your Micro SD card near strong magnetic objects to
avoid data error.
6,In case of overheating, unwanted smoke or unpleasant smell from
the device, unplug it immediately from the power outlet to prevent
hazardous fire.
7,Keep it safety from children while on charging.

8,Stored the device in a cool, dry and dust free location.
Product features
With a water proof casing, allowing you to film 30 meters
under water scene.
HD screen display for convenient videos and image playback
Detachable battery for easy replacement and help extend
product lifespan
Record videos while charging
HD 16 Megapixel wide angle lens
HDMI Output
Web Camera
Supports SD card memory expandable up to 64GB
(Maximum)
Supports multiple video recording formats:
4K/2K/1080P/720P/ WVGA
Supports MOV recording format
Supports multiple photo shooting modes: Single shot &
Snapper
Video encryption enabled
Super lightweight, small in size and available in 8 colors
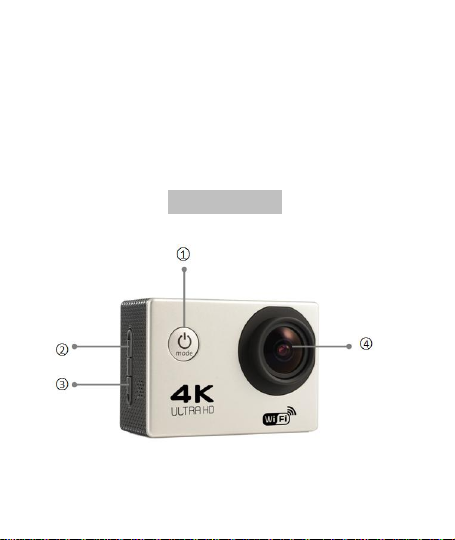
Product structure
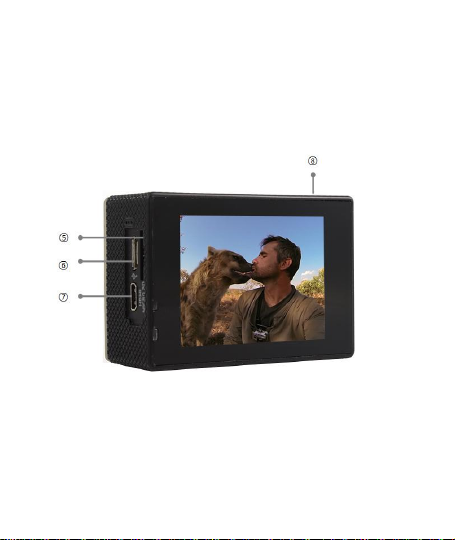
1.Power/Mode 2.UP/WI-FI
3.DOWN 4.LENS
5.TF card slot 6.USB slot
7.HDMI 8.OK

9.Battery Door 10.Battery Door Latch

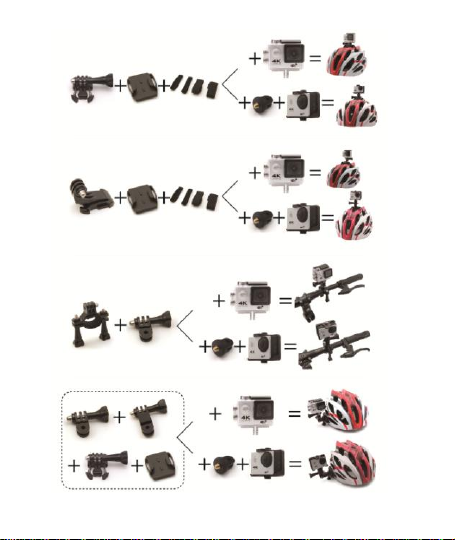
Accessories combination schemes
GETTING STARTED
To power ON:
Press the Power/Mode Button.
To power OFF:
Press and hold the Power/Mode Button.
OVERVIEW
Turn camera ON and repeatedly press the Power/Mode Button to
cycle through camera modes and settings.The modes will appear in
following order:
Video Record Video
Photo Capture a single photo
Time-lapse Time-lapse video
Play back playback Video and photo
Settings Adjust camera settings
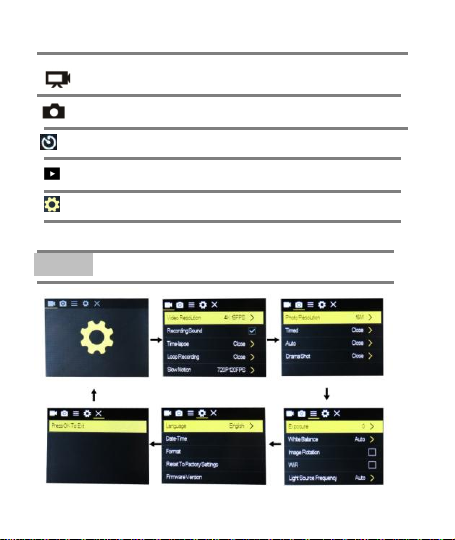
SETTINGS

Press the OK Button to enter the settings menu.
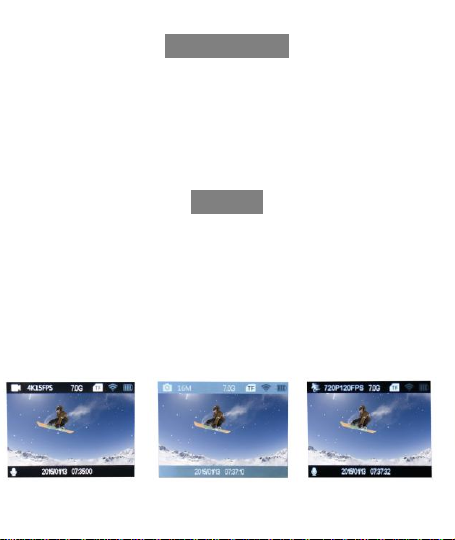
Video
Resolution
4K@15FPS/2.7K@30FPS/1080P@60F
PS/1080P@30FPS/720P@120FPS
Video sound
ON/OFF
Time-lapse
OFF/0.5S/1S/2S/5S/10S/30S/60S
Loop Recording
OFF/2min/3 min /5 min
Slow motion
1080P@60FPS/720P@120FPS
Repeatedly press the Power/Mode Button to cycle through
options and press the OK Button to select desired option.
Video setting

Pixel set
16M/12M/8M /5M/2M
Timed
3S/5S/10S/20S/OFF
Auto
3S/10S/15S/20S/30S/OFF
Drama shot
3P/S、5P/S、10P/S、20P/S、OFF
Exposure
-2---+2
White balance
Auto/Sunny/Cloudy/Incandescent
light/Fluorescent light
Image Rotation
ON/OFF
WIFI
ON/OFF
Light source
frequency
Auto/50HZ/60HZ
Photo

LED indicator
light
ON/OFF
Auto
screensaver
10S/20S/30S/OFF
Auto shutdown
1min/3min/5min/OFF
Time
watermark
ON/OFF
Language
English/German/French/Spanish/Itali
an/Portuguese/traditionalChinese,sim
plifiedChinese/Japanese/Russian
language
SETTINGS

Date-time
2015/01/01 12:00:00
Format
Confirmation/cancel
Reset
Confirmation/cancel
Firmware
Version
*******
Micro
SD
4K@15FPS/108
0P@60FPS
1080P@30
FPS
720P@60
FPS
32GB
120min
240min
320min
16GB
60min
120min
160min

Video mode
1,To record video,Verify the camera is in Video mode.
2,If the Video icon” ” on screen is showing, press the OK key to
start video, at the same time also has “a red icon” flashing.
3,Click the OK button again to stop the video, also the red icon
disappear.
Picture mode
1,To take picture,Verify the camera is in picture mode.
2, If the picture icon ” ” on screen is showing, press the OK key
to take pictures.
Slow motion
1,To record slow motion video,Verify the camera is in slow motion
mode.
2, If the slow motion Video icon” ” on screen is showing,
press the OK key to start video, at the same time also has “a red

icon” flashing.
Time-lapse
1,Enter the setting menu, open this function, return to video mode.
2, If the slow motion Video icon” ” on screen is showing, press
the OK key to start video, at the same time also has “a red icon”.
Playback
Playing back video and photos
1,verify the camera is in playback menu
2,press up or down button to select file,press OK button to playback
video
Battery
1, install and remove the battery
a. down upon battery cover can be open it.
b. according to the battery label plus or minus sign and the direction
of the arrow, right put the battery into the camera, until the

installation in position.
c. take out battery, push away the battery cover can take out the
battery
2, charge
a. connect the computer or the power adapter can be recharged.
b. directly to the car charger can be recharged in the car.
c. can charge while video function.(inside the function table Settings
required to open the car mode)
d. power off can be charged.
CAMERA WIFI APP
1,Download the APP client and install it to the smart phone, which
displays the “XDV” application icon after installation. Apple WLAN,
direct search “XDV”, click install. After the installation of the mobile
phone interface will appear a APP application icon. Click to enter the

APP "XDV" interface .
2,The open WIFI function
a. Select the "WIFI" menu, press "OK" button to enter, select "open",
the screen will show the WIFI icon, SSID:********,
PWA2:********.
b. click the UP button to return. At this time to open the phone to
set the WIFI function, to find a new set of WIFI name of the
network,
c. The connection after entering the new WIFI password and
confirm the connection, the connection after the success of the LCD
on the Connected/ display MAC:************.
d. At this time to open the phone has been installed “XDV” APP
client, and search to add the camera ID code, after the completion
of the camera and video operations can be performed.

Parameter
LCD
2.0LTPS
LENS
170 degree A + high resolution wide Angle
lens
Language
English/German/French/Spanish/Italian/Po
rtuguese/traditional
Chinese,simplifiedChinese/Japanese/Russia
n language
video
4K(3840*2160) 15FPS
2.7(2688*1520) 30FPS
1080P (1920*1080 ) 60FPS
720P (1280*720) 120FPS
video format
MOV

compression
format
H.264
Photo
16M/14M/12M/8M/5M
Memory
Micro SD UP TO 64GB
Picture mode
Single/timer /(2S/5S/10S) / Continuous
shot
Light source
frequency
50Hz/60Hz
USB
USB2.0
Power
5V 1A
Battery
1050mAh
Video time
1080P/ 90min
Charge time
About 3 hours
System
Windows XP/VistaorAbove/Win7/Mac os

size
59.27*41.13*29.28
WIFI
support
 Loading...