

Page 1
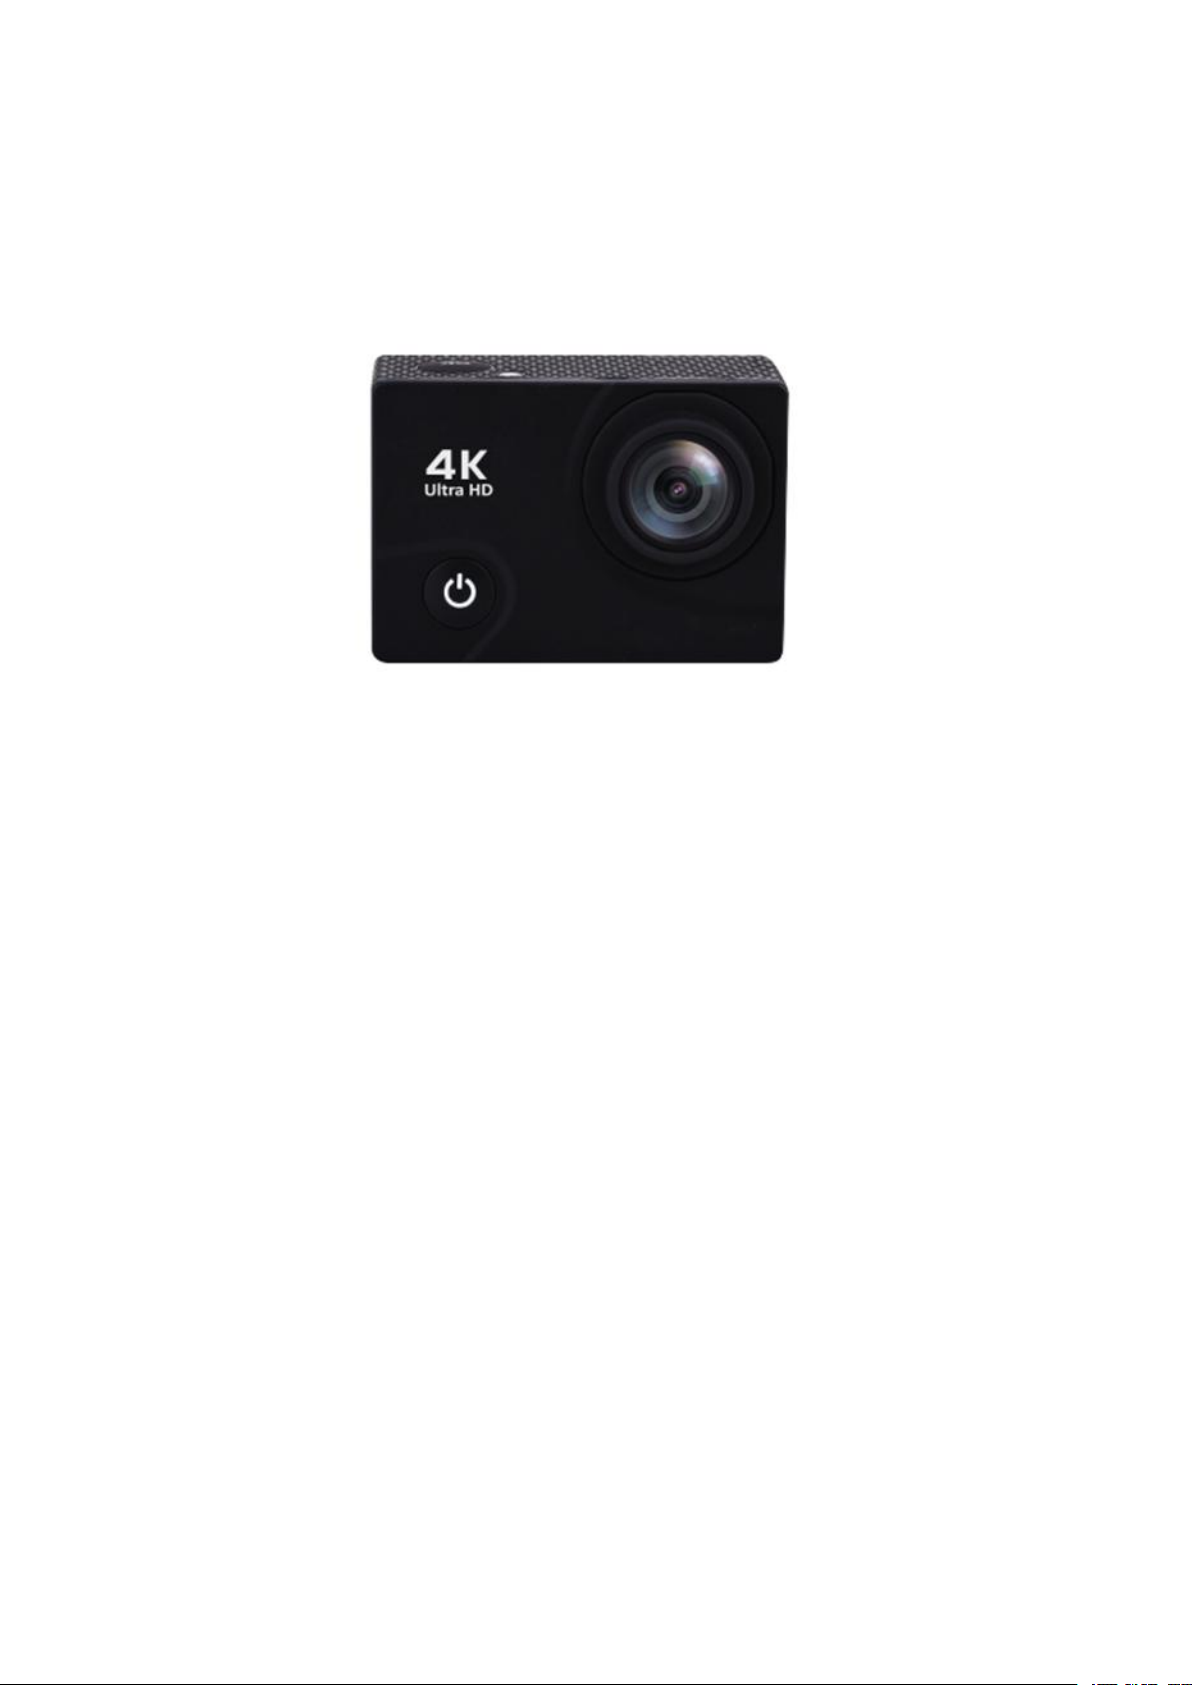
Function
Thank you for choosing this camera. Please carefully read the manual before using, and
keep it at a safe place for future reference.
The compilation of the manual refers to the latest information. The manual quotes
captured screen displays and graphics, with the aim to introduce the digital camera
through detailed and direct methods. Due to the differences of technical R&D and
production batch, those captured screen displays and graphics indicated un the manual
may be different from that of actual digital camera.
Page 2
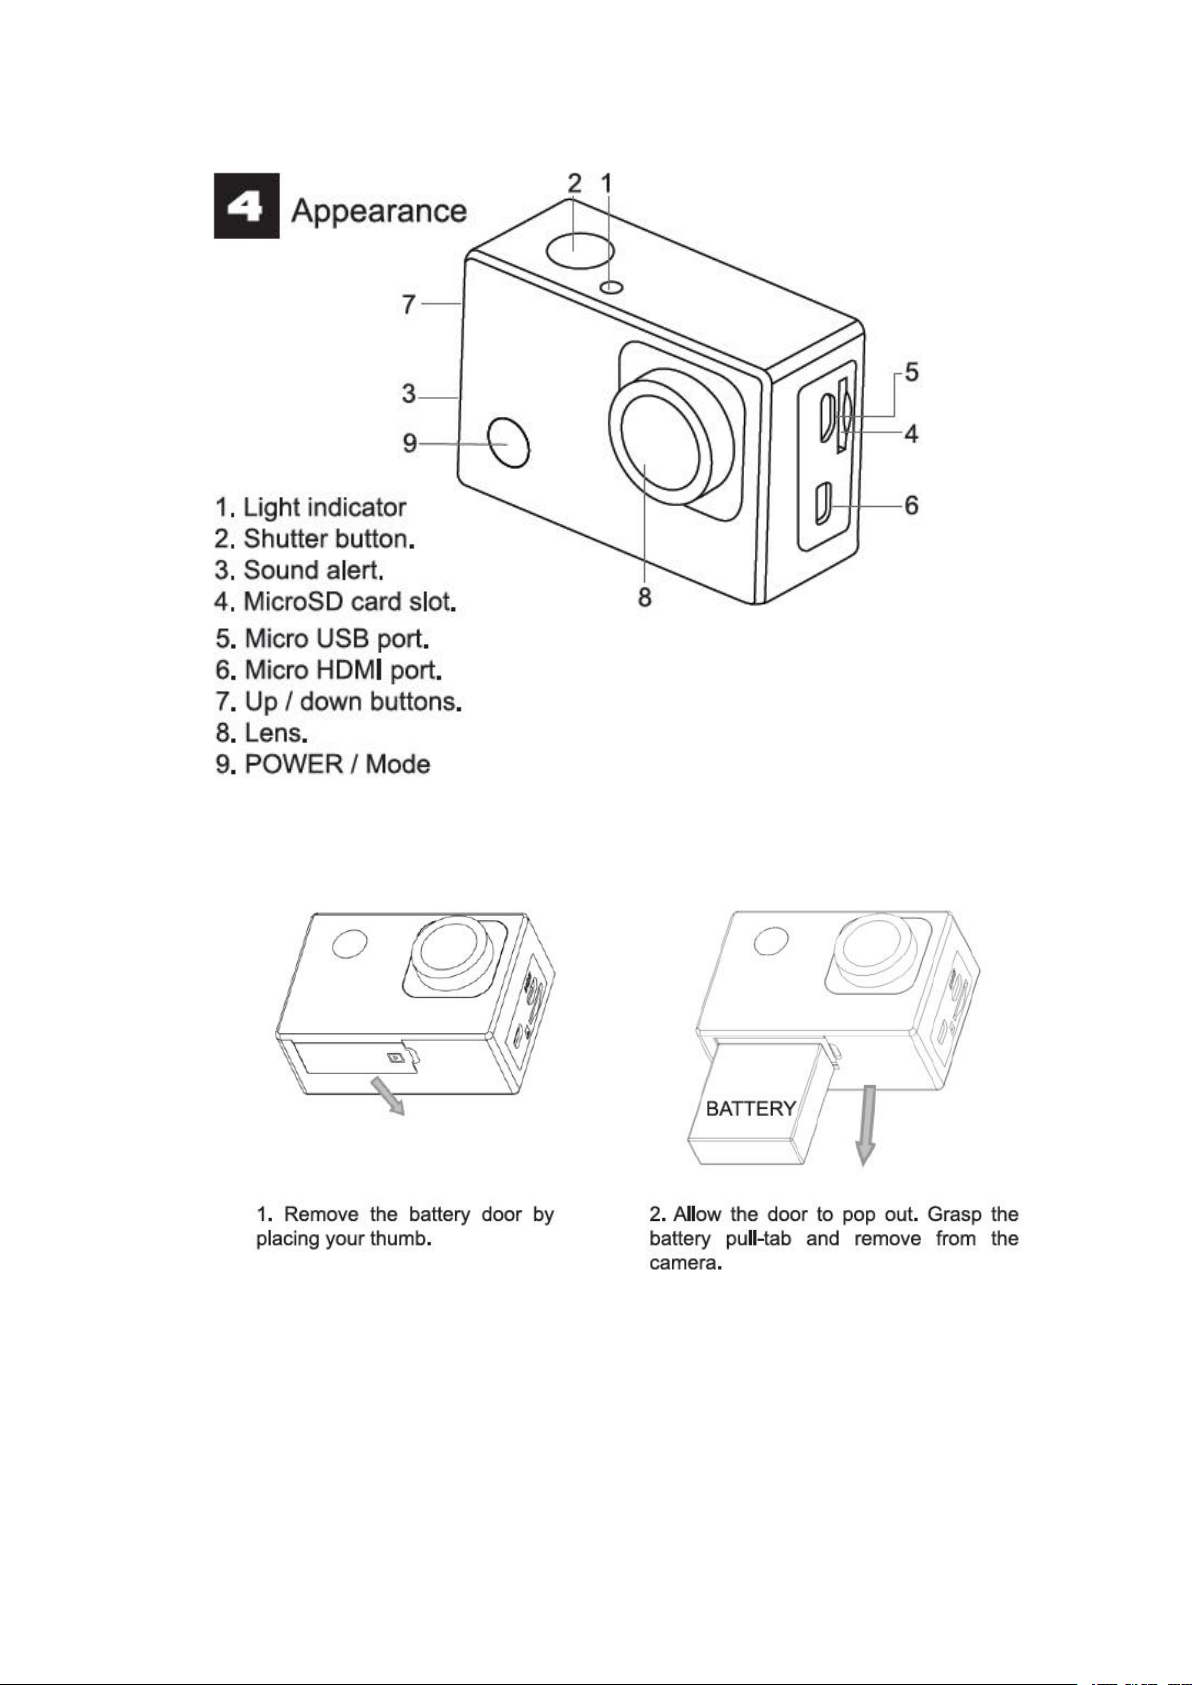
Removing the battery from the camera
1. Charge the built-in lithium battery
Start to use
The camera is equipped with built-in 3.7V lithium battery. Please ensure power available
for the camera and timely charge it in case of low battery.
Page 3
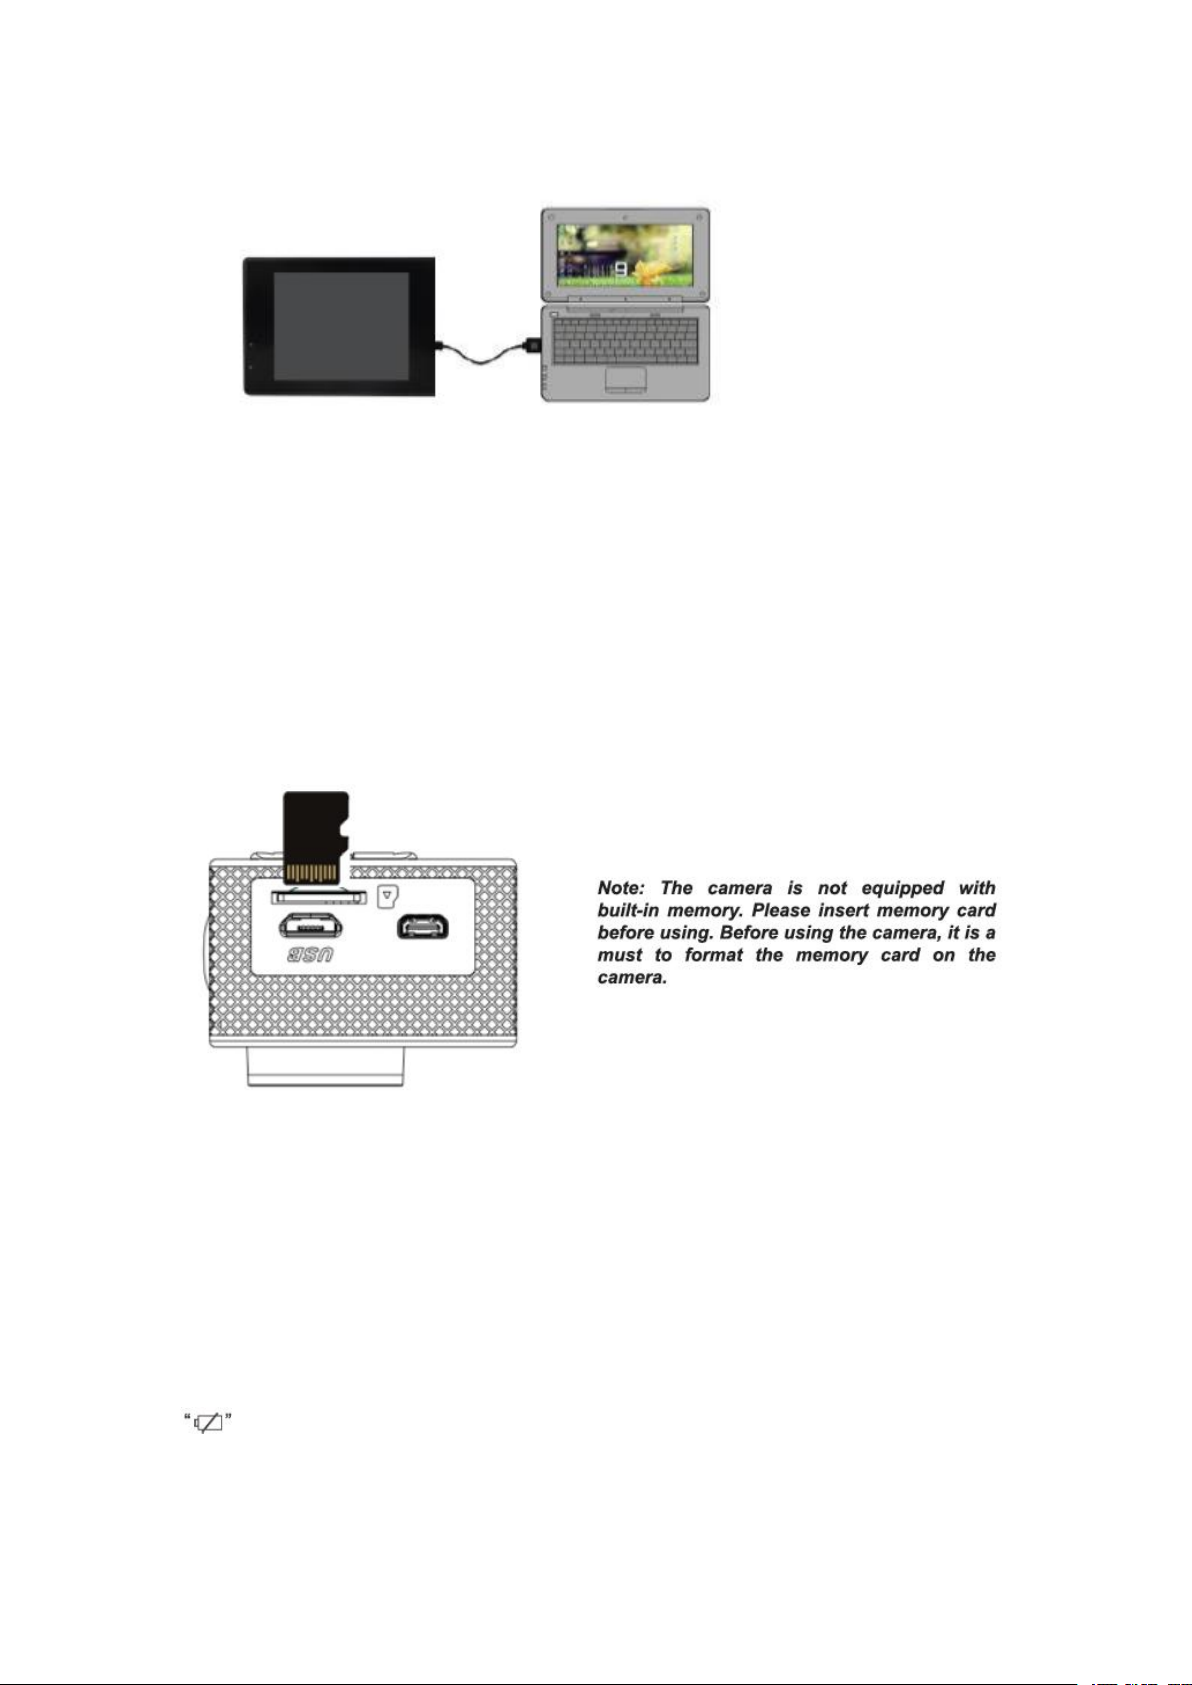
Connect the camera to computer for charging. Camera must be “Power off”. The charging
2. How to use the memory card
2.1.Properly insert the MicroSD card into the card holder as per the instructions indicated
2.2.To remove the MicroSD card, press the end of memory card gently, the card will be
indicator will be on when charging, and will be off when the battery is fully charged.
Generally, the battery can be fully charged after about 4 hours.
Note: when the DV is on, it will not charge until the DV turn off.
near the card holder.
ejected.
Startup and shutdown
3.1 Startup: press the POWER key for 3 second, the camera will show startup screen and
enters into POWER ON state;
3.2 Shutdown: press the POWER key for 3 second when the camera is under idle mode to
shut down;
3.3 Auto shutdown: the camera will be shut down automatically when the camera is under
idle mode for a certain time to save power. The default time for auto shutdown is 3 min.
3.4 Shutdown under low power: when the battery is under low power, the LCD will indicate
. Please charge the battery timely. When the screen display “low battery”, the
camera will be shutdown automatically.
Page 4
3. Function modes switching
The camera has 4 modes: recording mode, photo mode, movement mode and playback
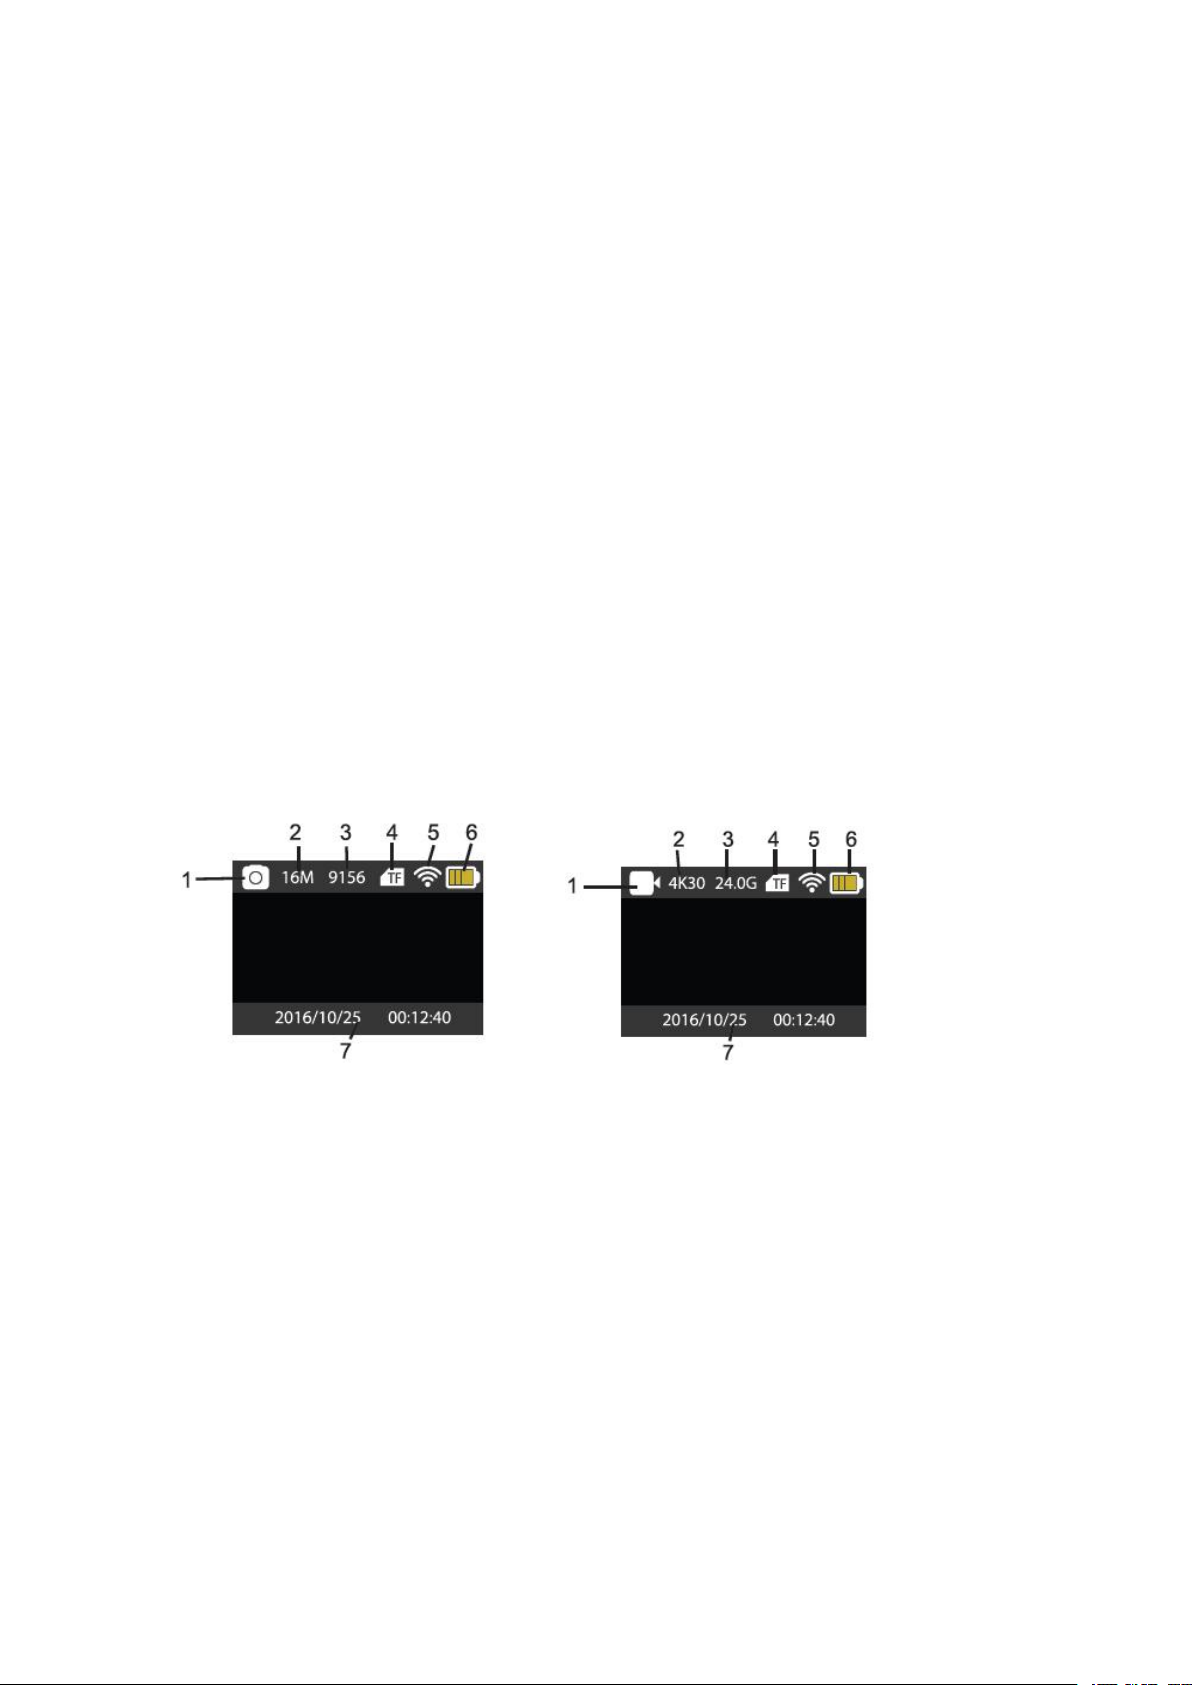
4. Indicators
5. Photo/recording/vehicle-mounted/mode
1. Photo Mode. 1. Recording mode.
2. Resolution. 2.Resolution and fps.
3. Photos available. 3.Storage available.
4. Micro SD card 4. Micro SD card.
5. WIFI 5. WIFI.
6. Battery. 6.Battery
7. Date and time. 7. Date and time.
mode. Press the Mode key to switch the modes after starting up.
• Recording mode: video can be recorded;
• Photo mode: for taking photos;
• Movement mode: Special for videos in movement; • Playback mode: for playing back the
current video/photo from the SD Card.
5.1 BUSY indicator: when the camera is working (e.g. recording, photographing, etc.), the
indicator will light;
5.2 Charging indicator: when power is off, the lightened indicator means the user is
charging the camera.
It enters automatically into recording mode.
Press shutter to start recording, and press shutter again to stop recording.
Press mode key to photo mode.
Press mode key to movement mode.
Press shutter to start recording, and press shutter again to stop recording.
6.1 Screen display in photo mode 6.2 Screen display in recording mode
Note: when using the 4k, FHD size or HD video, you must use the MicroSD card at
class 10 or above.
Page 5
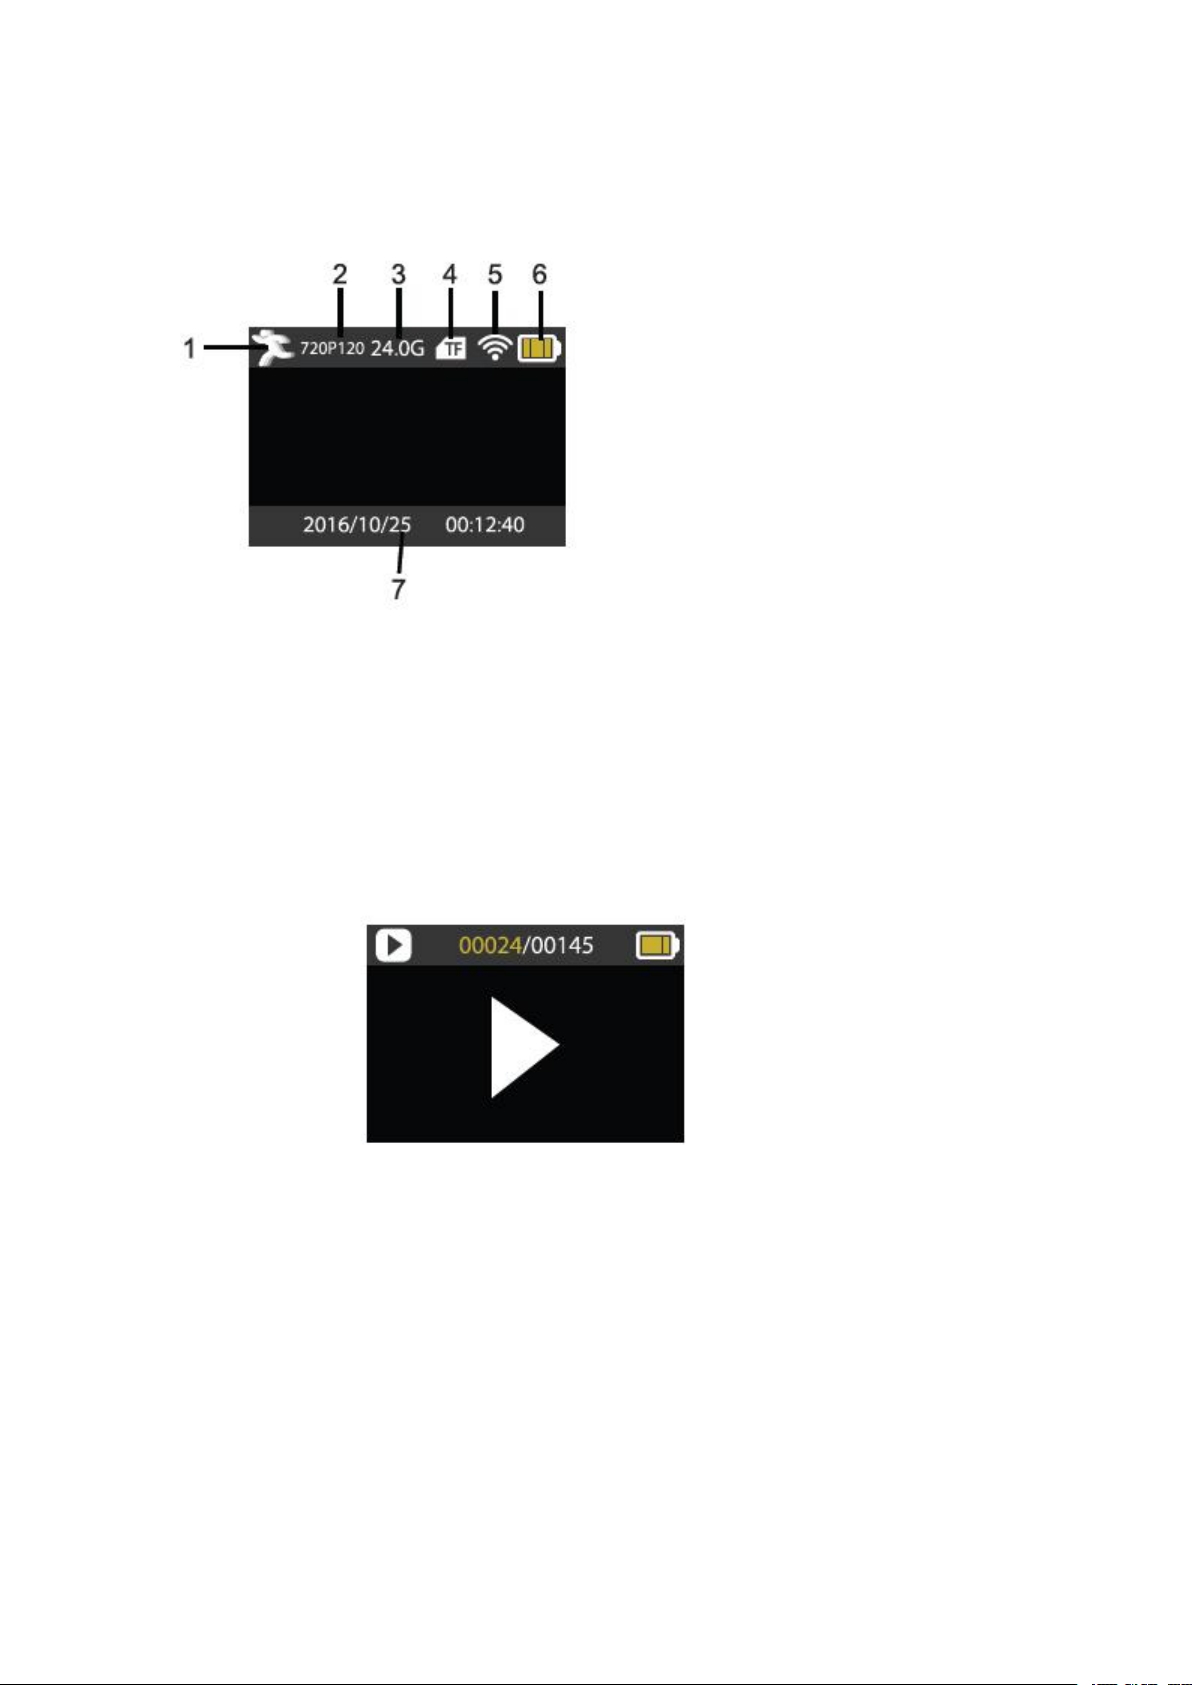
6.3 Screen display in movement mode
1. movement mode
2. resolution and fps.
3. Storage available.
4. Micro SD card.
5. WIFI.
6. Battery.
7. Date and time.
7.Playback mode
Turn on the camera, you can press the mode key to enter playback mode. You can press
the up/down key to choose the photo or video you want to play, then press the shutter key
to enter preview.
Press mode key to enter playback mode to browse photo/video, play the video recorded
by this camera.
Play movie: press the shutter key to start/pause play video, press the Up/Down key to
restart quickly/ fast forward playback, press the power key to stop play video.
8.Menu setting mode
8.1 menu display
Press mode key until enter in options display. Here you can select the different options to
configure your recording or photo.
Page 6

Recording and photo menu:
8.2 System Configuration menu
After opening the menu by pressing power key, press mode key to switch over to setting
main menu. Press up/down key to select menu, and after that to press shutter key for
confirming to enter the submenu. In the submenu, press up or down key to select menu,
and press shutter to confirm. After returning to the main menu, go to the “X” icon to return
to main menu.
System menu mode:
8.3 setting data and time
Press mode key to open the menu, press mode key again until arrive to the grain icon and
press shutter to enter. Press up/down key to select “date and time” and then press shutter
to enter.
In setting window, press mode key to select items(date/time) to be adjusted, and then
press up key or down key to make adjustment, press shutter key for conformation at
Page 7
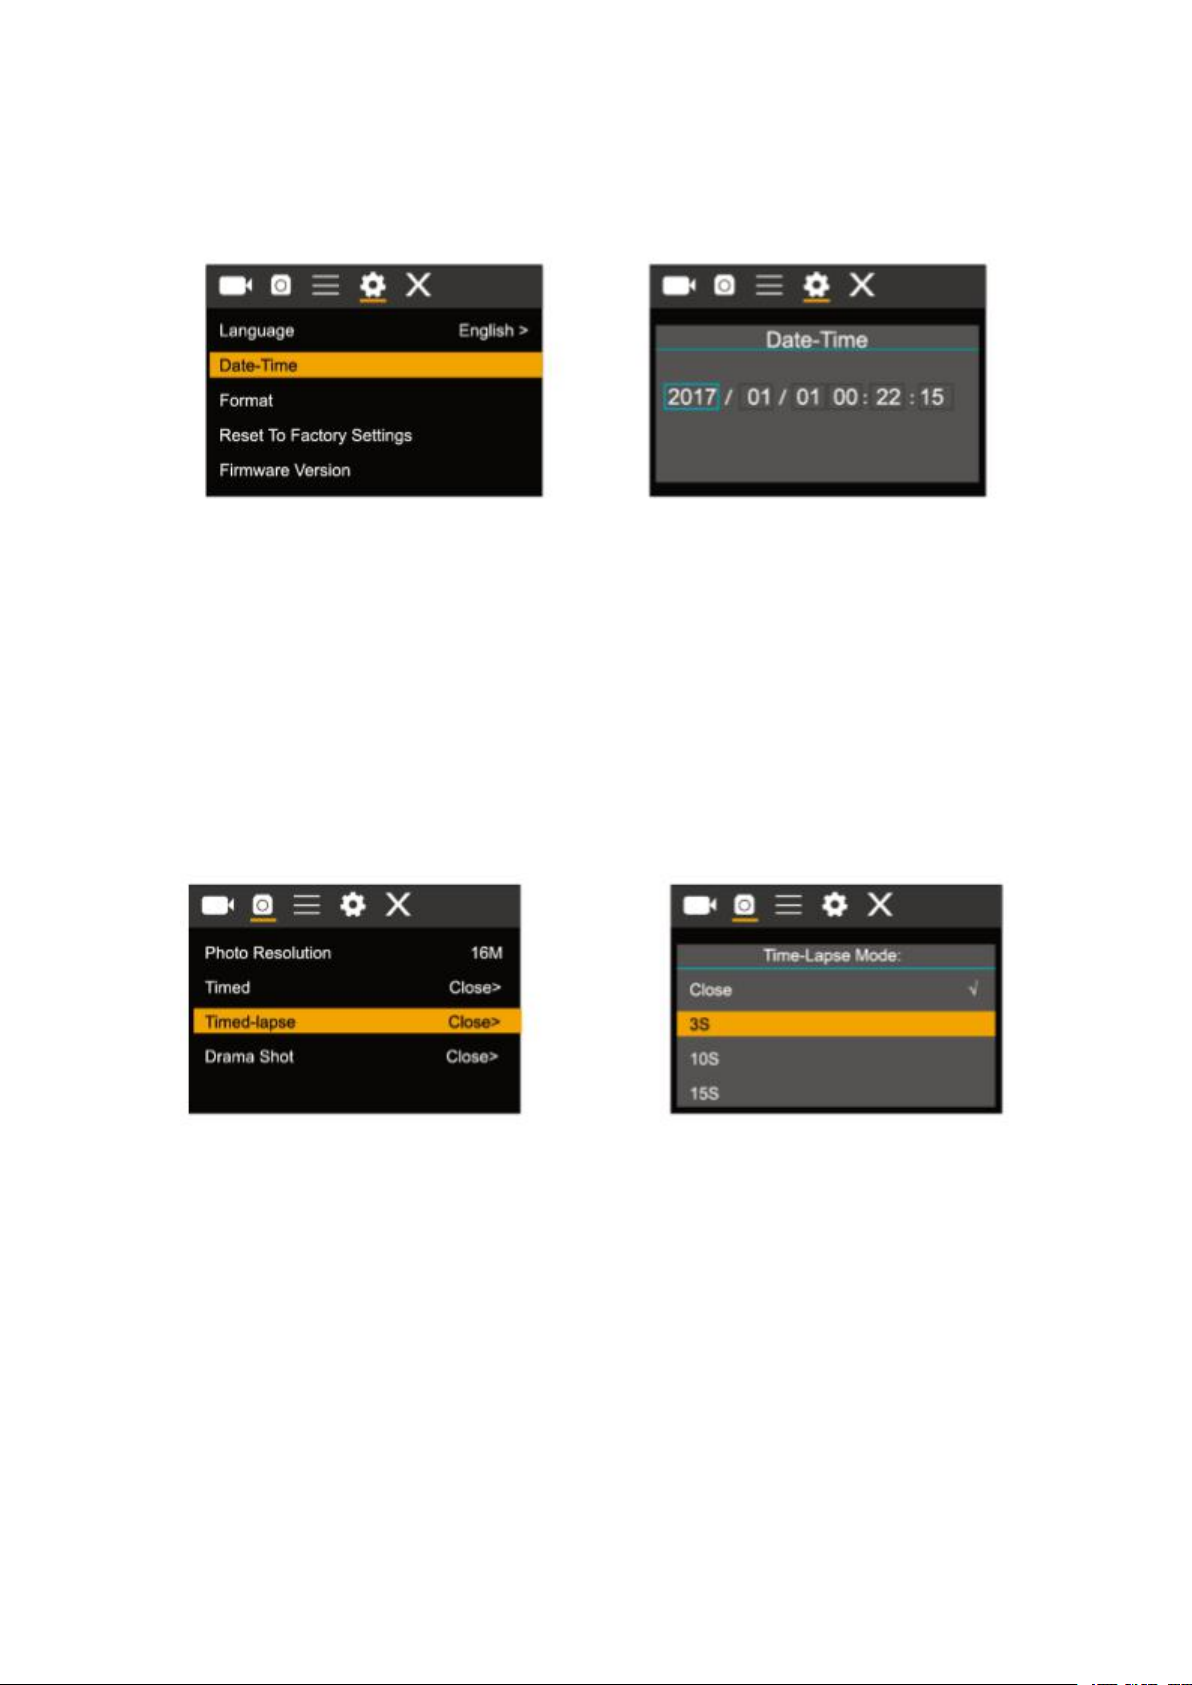
completion of adjustment or press power key to cancel setting and exit. Finally, press
power key to exit from setting mode
8.4 Time-lapse mode settings
To configure the camera into time-lapse mode, enter in setting menu and then select
photo settings. Enter in time-lapse submenu and adjust the shutting time for each photo.
Keep in mind that in PAL-DV mode, to get 1 second in video you will need take 24 photos;
and in HD mode 30 photos.
To configure photo’s resolution, return to previous mode (photo) and enter in resolution’s
submenu. To start taking pictures, enter in photo mode, put the camera in position and
press shutter key. Please, notice that to get a good time-lapse you shouldn’t move the
camera
Once you will get all pictures, import them in your video editor software as “frame
sequence”. Depending of the software that you will use, you should import the pictures in
a special way; please, check your software’s manual to know how to do it. Maybe you’ll
have to rename the photo files to allow your software identify them correctly.
9.Connecting to HDTV
9.1 Connect the DV to HDTV via HDMI cable (optional)
If you need to transfer the image and audio to an HDTV for playback, insert the com end
of the HDMI cable to the DV, and the other end (output) to the HD input of the HDTV, as
shown in the following figure:
Page 8

When the camera is connected with the HDTV successfully, the camera display is
synchronizing with HDTV display.
Note: before connecting or removing the HDMI cable, please stop video recording
and disconnect WI-FI first.
10. Connect to PC
10.1 When the camera is connected with the computer and entering removable disk mode,
there will be a removable disk added in the window of “my computer”. The photo or video
file may be stored in the catalogue of “DCIM\CAR, JPG, VIDEO” in the removable disk.
You may enter this catalogue to copy files on to hard disk of your computer.
Note: during file downloading, it is prohibited to disconnect USB connection, and
plugging out the memory card when USB connected is also prohibited to avoid loss
of data.
10.2 in U-disk mode (MSDC mode), press the shutter key to switch to web cam mode
(PCCAM) the LCD will display: PCCAM.
Now you can start the web cam through application. To return to U-disk mode (MSDC
mode), press the power key again.
Note: Driver is not required for web cam mode (PCCAM mode) on Windows XP(SP3)
version or above.
11.APP (Support Android and ISO)
11.1. How to install an APP
1. Search for “XDV”in Google play (for Android OS) to find the APP and install it according
to the instruction.
2. Search for “XDV” in APP Store (for IOS) to find the APP and install it according to the
instruction.
Page 9
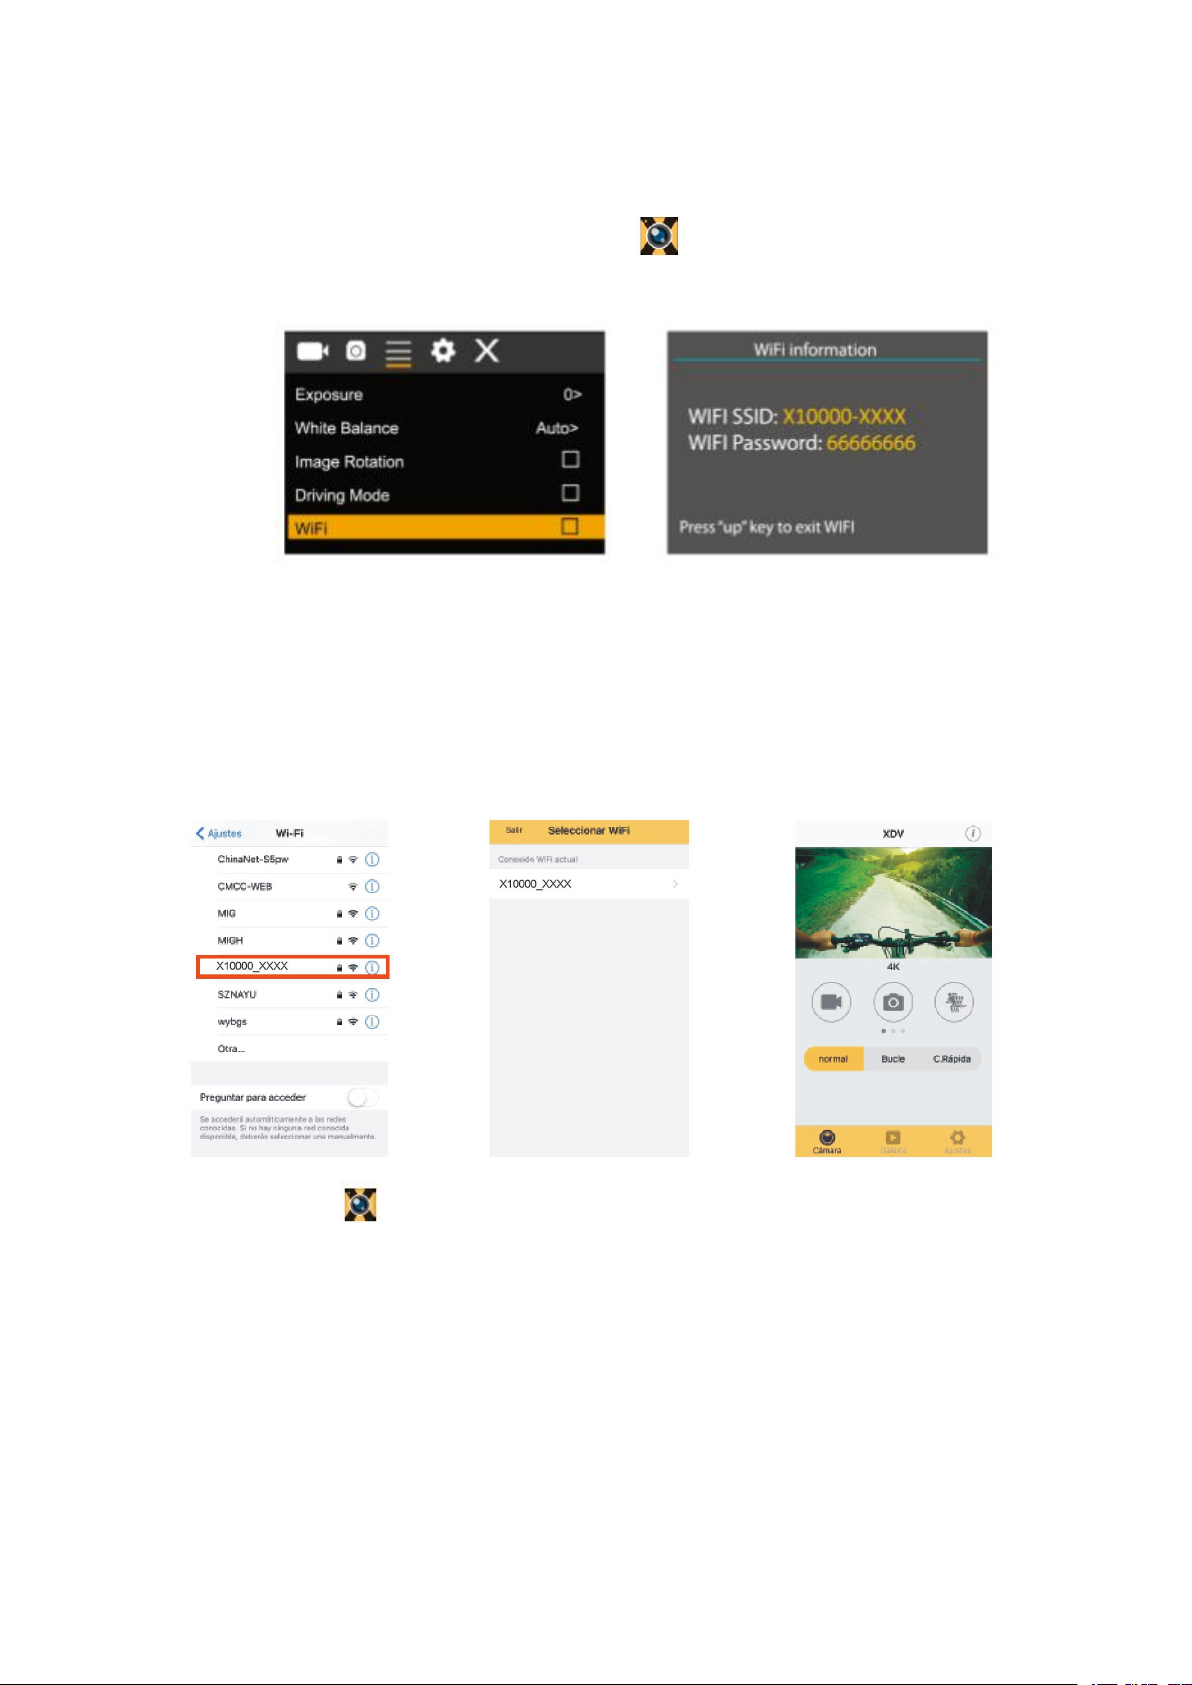
11.2. Android APP
1. Install “XDV”APP (provided by dealer or via internet) on smartphone or tablet. When
installation completes, the LCD will display icon: .
2. Insert the MicroSD card and turn on the DV. Enter in menu and turn on WIFI:
3. Enable WI-FI on smartphone or tablet and search for wireless AP signal
“X10000_XXXX”, then connect it to DV, until the system displays “Connected
successfully”.
Note: the first time connecting to DV, you need to enter password “66666666”.
4. Click the icon in the App list of the smartphone or tablet to open it. Now you can
preview the image sent by the DV on the phone or tablet and start some operating. The
operation interface on terminal is shown in above-right position figure.
Page 10

This app shows in the main display 3 options: video, photo and movement. In the bottom
Image sensor
SONY 179
Function mode
Recording, movement, photo, playback
LCD screen
2.0’’ LCD Screen
Picture
resolution
16M(4608*3456) 12M(4000*3000), 8M(3264*2448). 5M(2560*1920),
2M(1600*1200)
Video
resolution
4K(3840*2160 30fps), 2.7K(30fps), FHD(1920*1080 30fps),
FHD(1920*1080 60fps) HD(1280*720 30fps) HD(1280*720 30fps)
HD(1280*720 60fps) HD(1280*720 120fps)
Storage
medium
MicroSD
Card (Maximum supporting 64GB)
File format
JPEG H.264(MOV)
USB Port
USB2.0
Power supply
Built- in3.7V rechargeable lithium battery
Menu
English
side you can see other 3 options: main display, gallery and options
In “options mode” you will be able to configure the camera presets before recording. As in
right position image.
11.3. IOS APP
1. Install “ XDV” APP ( provided by dealer or via internet) on iOS phone or tablet. When
installation completes, the LCD will display icon .
2.Enable Wi-Fi on iOS phone or table and search for wireless AP signal “X10000_XXXX”,
then connect it to DV, until the system displays “Connected successfully”.
3.Click the icon in the APP list of the iOS phone or tablet to open it. Now you can
preview the image sent by the DV on the phone or tablet and start some operating.
7. Technical parameters
Page 11

language
Power save
1min/3min/5min/OFF
Operation
system
requirements
Windows XP/Vista/7/8/10 or higher and Mac 10.8 or higher
Dimensions
61*41*30mm
Page 12

FCC STATEMENT :
This device complies with Part 15 of the FCC Rules. Operation is subject to the following
two conditions:
(1) This device may not cause harmful interference, and
(2) This device must accept any interference received, including interference that may
cause undesired operation.
Warning: Changes or modifications not expressly approved by the party responsible for
compliance could void the user's authority to operate the equipment.
NOTE: This equipment has been tested and found to comply with the limits for a Class B
digital device, pursuant to Part 15 of the FCC Rules. These limits are designed to provide
reasonable protection against harmful interference in a residential installation.
This equipment generates uses and can radiate radio frequency energy and, if not
installed and used in accordance with the instructions, may cause harmful interference to
radio communications. However, there is no guarantee that interference will not occur in a
particular installation. If this equipment does cause harmful interference to radio or
television reception, which can be determined by turning the equipment off and on, the
user is encouraged to try to correct the interference by one or more of the following
measures:
Reorient or relocate the receiving antenna.
Increase the separation between the equipment and receiver.
Connect the equipment into an outlet on a circuit different from that to which the
receiver is connected.
Consult the dealer or an experienced radio/TV technician for help.
RF warning statement:
The device has been evaluated to meet general RF exposure requirement. The device
can be used in portable exposure condition without restriction.
 Loading...