

Page 1

G3
Armorer's Manual
Instructions for Maintenance and Repair
Cal. 7.62 mm x 51
Page 2

Page 3

TABLE OF CONTENTS
Section 1. Maintenance Instructions……………………………………………………………………. 1
Checking the rifle before shooting – Safety engaged, rifle unloaded…………………………………... 1
Sighting-in of the rifle…………………………………………………………………………………... 3
Adjusting the rear sight…………………………………………………………………………………. 4
Checking the Head Space………………………………………………………………………………. 5
Replacing the flash hider and checking the rifle grenade for its proper seat on the rifle
Replacing the cap……………………………………………………………………………………….. 6
Cleaning the barrel, cocking lever housing and magazine release lever and checking all assemblies
and subassemblies for proper seat………………………………………………………………………. 7
Removing dents in receiver and cocking lever housing………………………………………………… 8
Viewing the bore for powder residues and checking the bore diameter………………………………... 9
Checking the rear and front sight, replace, if necessary………………………………………………... 10
Checking the cocking device, replace, if necessary…………………………………………………….. 11
Checking the magazine catch, replace, if necessary……………………………………………………. 12
Stripping, cleaning and checking the bolt assembly……………………………………………………. 13
Checking the firing pin protrusion………………………………………………………………………
Checking the shape of firing pin
Checking the extractor protrusion………………………………………………………………………. 15
Replacing bolt components……………………………………………………………………………... 16
Replacing the locking rollers…………………………………………………………………………… 17
Replacing the bolt head locking lever…………………………………………………………………... 18
Cleaning and checking the grip assembly………………………………………………………………. 19
Cleaning and checking back plate and butt stock………………………………………………………. 20
Replacing back plate, butt stock and buffer…………………………………………………………….. 21
Replacing the recoil spring (spare parts set for back plate)…………………………………………….. 22
Checking the magazine…………………………………………………………………………………. 23
Checking the magazine housing………………………………………………………………………... 24
Checking the handguard………………………………………………………………………………… 25
Checking the carrying sling…………………………………………………………………………….. 26
Stripping the retractable butt stock……………………………………………………………………... 27
Replacing the recoil spring (spare parts set for back plate)…………………………………………….. 28
Assembling the retractable butt stock…………………………………………………………………... 29
Section 2. Spare parts…………………………………………………………………………………… 30
Section 3. Special tools, gauges and fixtures…………………………………………………………… 39
1) These instructions apply to the G3 Rifle with Fixed and Retractable butt stock.
2) These instructions contain information relating to the car, servicing and field maintenance of the
weapon.
3) Unless otherwise detailed, assembly or fitting of components or component groups is carried out in
the reverse order analogue to the relevant stripping or dismantling instructions.
4) Index number in illustrations and the text are identical to the serial numbers in the spare parts list.
14
Page 4

G3 Armorer’s Manual___________________________________________________________________________HECKLER & KOCH, INC.
HECKLER & KOCH
OBERNDORF/NECKAR
Designation of operation (s):
Maintenance
Instructions
Part:
Rifle, complete
Checking the rifle before shooting – Safety engaged, rifle unloaded
Description of operation (s):
¾ Check the rifle for cleanness and proper condition.
¾ Check the rifle assemblies for proper seat.
¾ Clean the rifle (see “Technical Description of the G3 Rifle”, Sheet no. 2.2).
Weapon:
G3
Tools:
Gauges:
Auxiliaries:
Weapons cleaning kit, 7.62 mm
Sheet
No.:
1.1
Maintenance Instructions 1
Page 5

G3 Armorer’s Manual___________________________________________________________________________HECKLER & KOCH, INC.
HECKLER & KOCH
OBERNDORF/NECKAR
Designation of operation (s):
Maintenance
Instructions
Part:
Rifle, complete
Checking the rifle before shooting – Safety engaged, rifle unloaded
Description of operation (s):
¾ Check function of cartridge feed and ejection, trigger mechanism and safety:
Pull back cocking lever which must smoothly engage in the recess in the cocking lever
housing. A friction-free rearward motion of the bolt must be ensured.
When releasing the cocking lever, a practice cartridge must be properly chambered.
When pulling back the cocking lever, a practice cartridge must be properly ejected.
With the safety lever in positions “E” (single fire) and “F” (burst fire) it must be possible to
squeeze the trigger and to overcome the let-off pressure without any restriction.
The safety lever must securely engage the positions “S” (safe); “E” (single fire and “F”
(burst fire).
Weapon:
G3
Tools:
Gauges:
Auxiliaries:
Use practice cartridges or deactivated cartridges
Sheet No.:
1.2
Maintenance Instructions 2
Page 6

G3 Armorer’s Manual___________________________________________________________________________HECKLER & KOCH, INC.
HECKLER & KOCH
OBERNDORF/NECKAR
Designation of operation (s):
Maintenance
Instructions
Part:
Rifle, complete
Sighting-in of the rifle
Description of operation (s):
¾ Rifle to be sighted-in with the rear sight in position “2” at a range of 100 m.
¾ Rectify point of impact, if necessary.
¾ Elevation adjustment:
Insert elevation adjustment tool into the rear sight cylinder so that the wedges of the tool
engage the two slots in the cylinder which contain the catch bolts. Press Phillips-head
screwdriver downward into the adjustment tool and hold firm. Turn rear sight cylinder
manually in the desired direction. Turning clockwise lowers the point of impact 3.3 cm (1.29
in.) per click at 100 m (109 yds.), turning counter-clockwise raises is correspondingly. After
correction withdraw Phillips-head screwdriver and remove elevation adjustment tool. The
catch will then re-engage in the slots. After performing the elevation set the desired
aperture again.
¾ Windage adjustment:
Point of impact, left: Loosen clamping screw on top of sight base. Turn adjusting screw on
the right side counter-clockwise in accordance with the required correction. Then retighten
clamping screw.
Point of impact, right: Loosen clamping screw. Turn adjusting screw clockwise until the
required correction has been performed. Then retighten clamping screw.
Note: Each revolution of the adjusting screw moves the mean point of impact 13.2 cm
(5.19 in.) to the left or right at a range of 100 m (109 yds.).
Weapon:
G3
Tools:
Rear sight adjusting tool 1013 W4
Gauges:
Auxiliaries:
Sheet No.:
1.3
Maintenance Instructions 3
Page 7
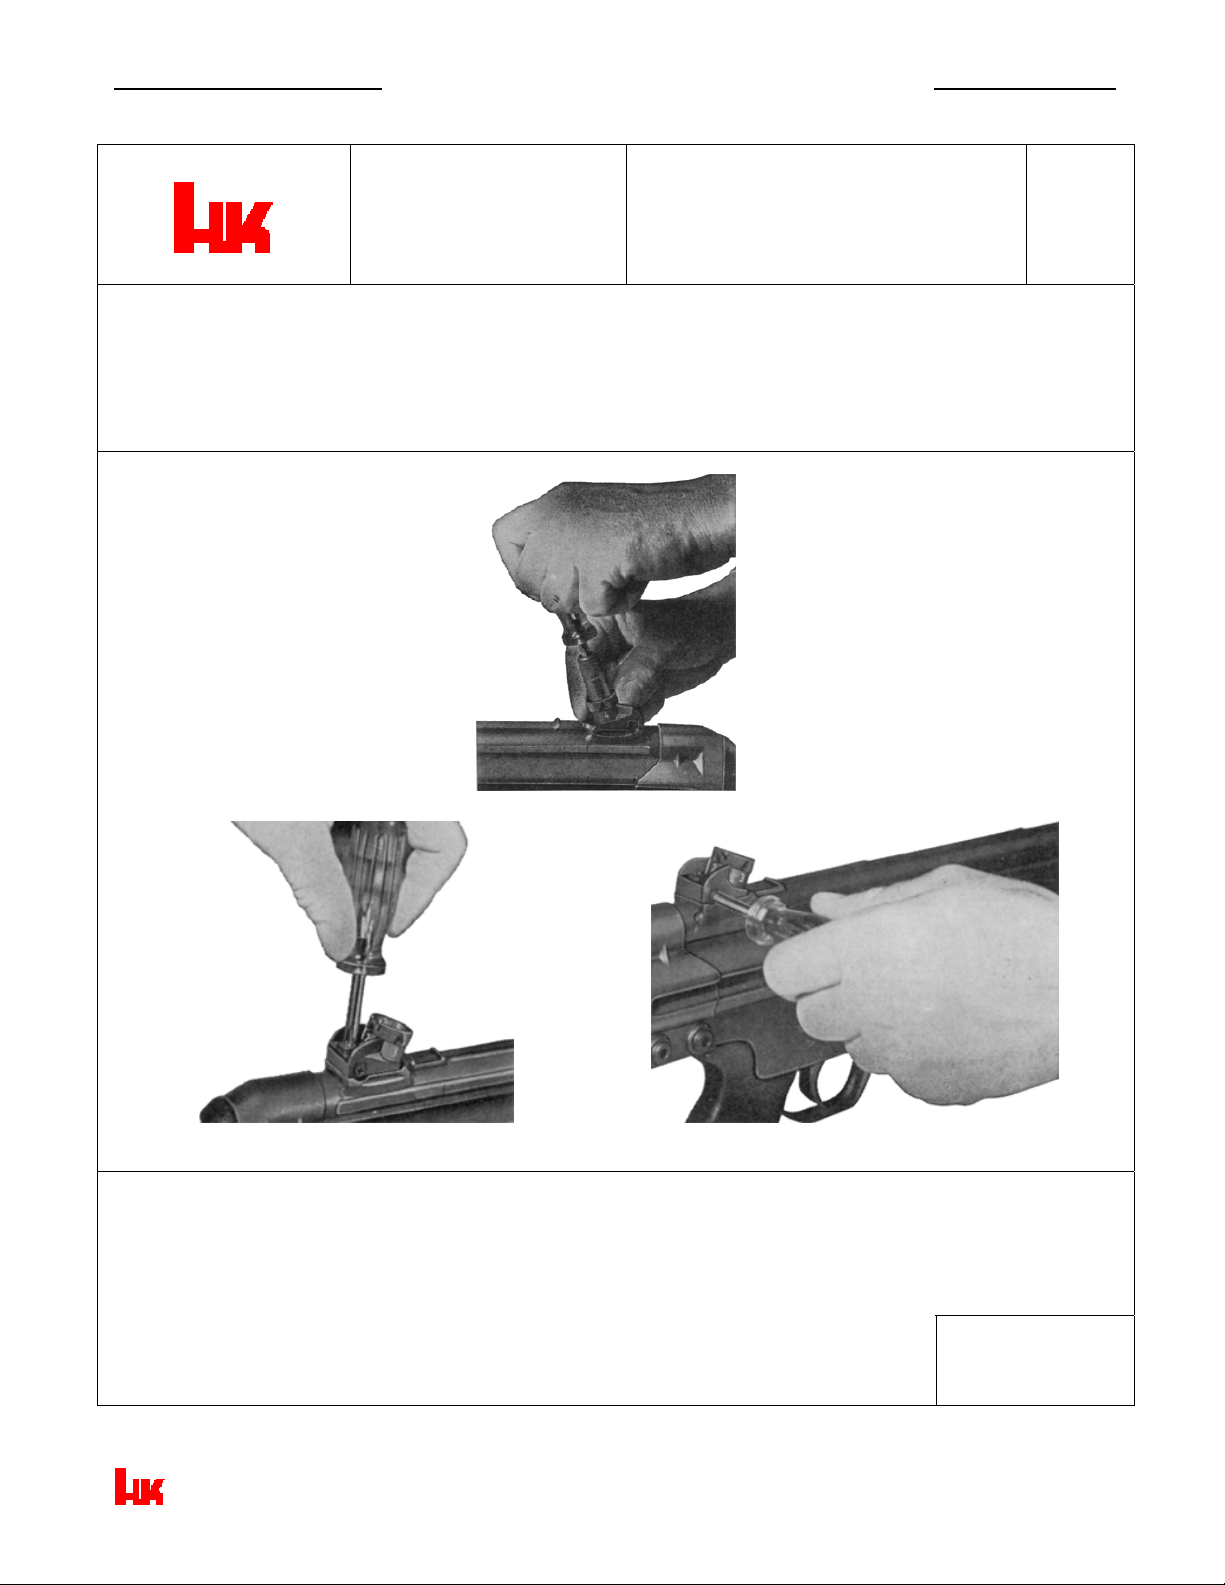
G3 Armorer’s Manual___________________________________________________________________________HECKLER & KOCH, INC.
HECKLER & KOCH
OBERNDORF/NECKAR
Designation of operation (s):
Adjusting the rear sight
Description of operation (s):
Maintenance
Instructions
Part:
Rifle, complete
Weapon:
G3
Tools:
Loosening the clamping screw
Gauges:
Auxiliaries:
Elevation adjustment
Turning the adjusting screw
Sheet No.:
1.4
Maintenance Instructions 4
Page 8

G3 Armorer’s Manual___________________________________________________________________________HECKLER & KOCH, INC.
HECKLER & KOCH
OBERNDORF/NECKAR
Designation of operation (s):
Maintenance
Instructions
Part:
Rifle, complete
Checking the head space
Description of operation (s):
¾ Engage safety. Remove magazine.
Head space is correct when the gap between bolt head and bolt head carrier amounts to
0.1—0.5 mm (0.004—0.020 in.).
It may not be possible to introduce the feeler size 0.5.
Weapon:
G3
Tools:
Gauges:
Feeler gauge 1013 L3
Auxiliaries:
Sheet No.:
1.5
Maintenance Instructions 5
Page 9

G3 Armorer’s Manual___________________________________________________________________________HECKLER & KOCH, INC.
HECKLER & KOCH
OBERNDORF/NECKAR
Designation of operation (s):
Maintenance
Instructions
Part:
Receiver with barrel, cocking
lever housing and magazine
release lever
Weapon:
G3
Replacing the flash hider and checking the rifle grenade for its proper seat on the rifle
Replacing the cap
Description of operation (s):
¾ Loosen flash hider (2) by means of the universal spanner and remove. Screw new flash
hider onto the barrel and tighten securely.
¾ Slide control gauge over flash hider and spring ring up to limit stop at the front sight holder.
¾ Check flash hider for symmetrical seat as well as spring ring for secure seat on the barrel.
¾ Press in pressure bolt on the right side of the front sight holder and remove cap (11).
Tools:
Universal spanner 1013/41 W7
Gauges:
Control gauge 1013-100 L1
Auxiliaries:
Sheet No.:
2.1
Maintenance Instructions 6
Page 10

G3 Armorer’s Manual___________________________________________________________________________HECKLER & KOCH, INC.
HECKLER & KOCH
OBERNDORF/NECKAR
Designation of operation (s):
Maintenance
Instructions
Part:
Receiver with barrel, cocking
lever housing and magazine
release lever
Cleaning the barrel, cocking lever housing and magazine release lever and checking all
assemblies and subassemblies for proper seat
Description of operation (s):
¾ Clean and oil receiver, barrel extension and barrel.
Note: When cleaning the barrel, the flash hider must be screwed onto the barrel.
Weapon:
G3
Tools:
Cleaning rod 1013-101.49 W24
Chamber cleaning kit 1013 W3/1
Gauges:
Auxiliaries:
Gun oil, pull-throughs
Sheet No.:
2.2
Maintenance Instructions 7
Page 11

G3 Armorer’s Manual___________________________________________________________________________HECKLER & KOCH, INC.
HECKLER & KOCH
OBERNDORF/NECKAR
Designation of operation (s):
Maintenance
Instructions
Part:
Receiver with barrel, cocking
lever housing and magazine
release lever
Weapon:
G3
Removing dents in the receiver and cocking lever housing
Description of operation (s):
¾ Remover dents in the receiver and cocking lever housing with straightening mandrels and
plastic hammer.
¾ Clamp barrel with receiver into vice and check guide in the receiver for smooth operation of
bolt assembly by means of “GO” and symmetry gauge.
Tools:
Straightening mandrel for receiver 1013-100 W6
Straightening mandrel for cocking lever housing 1013-100 W5
Gauges:
“GO” and symmetry gauge 1013-01.72 L1
Auxiliaries:
Sheet No.:
2.3
Maintenance Instructions 8
Page 12

G3 Armorer’s Manual___________________________________________________________________________HECKLER & KOCH, INC.
HECKLER & KOCH
OBERNDORF/NECKAR
Designation of operation (s):
Maintenance
Instructions
Part:
Receiver with barrel, cocking
lever housing and magazine
release lever
Weapon:
G3
Viewing the bore for powder residues and checking the bore diameter
Description of operation (s):
¾ Remove flash hider. Use bore scope to view barrel bore for powder residues, damages and
rust formation.
¾ Use caliber plug gauge to determine changes in bore diameter.
¾ The barrel is unserviceable if the 7.69 mm caliber plug gauge can be introduced into the
bore to a depth of more than 387 mm from the rear of the receiver.
Tools:
Gauges:
Bore scope ST 510115 – Caliber plug gauge 1013-01.89 L11/1 with barrel
cleaning rod L11/2 – “NO GO” gauge for barrel 1013-01.89 L11
Auxiliaries:
Sheet No.:
2.4
Maintenance Instructions 9
Page 13

G3 Armorer’s Manual___________________________________________________________________________HECKLER & KOCH, INC.
HECKLER & KOCH
OBERNDORF/NECKAR
Designation of operation (s):
Maintenance
Instructions
Part:
Receiver with barrel, cocking
lever housing and magazine
release lever
Weapon:
G3
Checking the rear and front sight, replace, if necessary
Description of operation (s):
¾ Check rear sight cylinder for smooth operation and secure seat.
¾ Figures must be clearly legible.
¾ If necessary, replace rotary rear sight (3) (spare parts set 4).
¾ Check if front sight (21) is securely seated in the front sight holder, if necessary, replace
front sight.
Note: After replacing rear sight components, the rifle has to be sighted-in (see sheets 1.3
and 1.4).
Tools:
Pin punch, dia. 3.5
Clamping sleeve retaining tool 1013-101.53 W1
Rear sight adjusting tool 1013 W4
Gauges:
Auxiliaries:
Sheet No.:
2.5
Maintenance Instructions 10
Page 14

G3 Armorer’s Manual___________________________________________________________________________HECKLER & KOCH, INC.
HECKLER & KOCH
OBERNDORF/NECKAR
Designation of operation (s):
Maintenance
Instructions
Part:
Receiver with barrel, cocking
lever housing and magazine
release lever
Checking the cocking device, replace, if necessary
Description of operation (s):
¾ Check cocking device for damages.
¾ Check serviceability of cocking lever (17) and cocking lever support (18).
¾ Check locking lever elbow spring (19) for distortion and spring resistance.
¾ Replace components, if necessary.
Weapon:
G3
Tools:
Pin punch, dia. 5
Gauges:
Auxiliaries:
Sheet No.:
2.6
Maintenance Instructions 11
Page 15

G3 Armorer’s Manual___________________________________________________________________________HECKLER & KOCH, INC.
HECKLER & KOCH
OBERNDORF/NECKAR
Designation of operation (s):
Maintenance
Instructions
Part:
Receiver with barrel, cocking
lever housing and magazine
release lever
Checking the magazine catch, replace, if necessary.
Description of operation (s):
¾ Check magazine catch (12) for smooth operation.
¾ Replace components, if necessary.
Weapon:
G3
Tools:
Pin punch, dia. 2.5
Clamping sleeve retaining tool 1013-101.53 W4
Gauges:
Auxiliaries:
Sheet No.:
2.7
Maintenance Instructions 12
Page 16

G3 Armorer’s Manual___________________________________________________________________________HECKLER & KOCH, INC.
HECKLER & KOCH
OBERNDORF/NECKAR
Designation of operation (s):
Maintenance
Instructions
Part:
Bolt assembly
Weapon:
G3
Stripping, cleaning and checking the bolt assembly.
Description of operation (s):
¾ Strip the bolt assembly.
¾ Clean the bolt components.
¾ Check bolt components (23-26) for damages, dents and wear, replace, if necessary
(see sheet 3.4).
¾ Oil bolt components.
¾ Reassemble bolt assembly.
Tools:
Gauges:
Auxiliaries:
Gun oil
Sheet No.:
3.1
Maintenance Instructions 13
Page 17

G3 Armorer’s Manual___________________________________________________________________________HECKLER & KOCH, INC.
HECKLER & KOCH
OBERNDORF/NECKAR
Designation of operation (s):
Maintenance
Instructions
Part:
Bolt assembly
Weapon:
G3
Checking the firing pin protrusion
Checking the shape of firing pin
Description of operation (s):
¾ To measure the firing pin protrusion, both firing pin (24) and locking piece (23) must be
introduced entirely into the bolt head (26) so that the firing pin protrudes at the bolt face.
¾ The “GO” side of the gauge is place on the firing pin. The front measuring flat side must
rest on the bolt face.
¾ The firing pin protrusion is correct if the “GO” size is 1.14—1.60 mm.
¾ Check the shape of the firing pin as shown in the figure below.
Tools:
Gauges:
Limit gauge for firing pin protrusion 1013-02 L3
Auxiliaries:
Sheet No.:
3.2
Maintenance Instructions 14
Page 18

G3 Armorer’s Manual___________________________________________________________________________HECKLER & KOCH, INC.
HECKLER & KOCH
OBERNDORF/NECKAR
Designation of operation (s):
Maintenance
Instructions
Part:
Bolt assembly
Weapon:
G3
Checking the extractor protrusion
Description of operation (s):
¾ Introduce extractor protrusion gauge into bolt head below extractor claw.
¾ The extractor protrusion is correct when the “GO” side of the gauge can smoothly be turned
under the extractor claw.
Tools:
Gauges:
Extractor protrusion gauge 1013-02.06 L2
Auxiliaries:
Sheet No.:
3.3
Maintenance Instructions 15
Page 19

G3 Armorer’s Manual___________________________________________________________________________HECKLER & KOCH, INC.
HECKLER & KOCH
OBERNDORF/NECKAR
Designation of operation (s):
Maintenance
Instructions
Part:
Bolt assembly
Weapon:
G3
Replacing bolt components
Description of operation (s):
¾ Strip bolt assembly.
¾ Assemble new bolt components (see 3.5 and 3.6).
Note: To remove the extractor spring, insert a pointed metallic object into the opening, using
the metallic object to slightly lift and press forward the extractor spring.
Removing extractor spring Fitting extractor spring
Tools:
Gauges:
Auxiliaries:
Sheet No.:
3.4
Maintenance Instructions 16
Page 20

G3 Armorer’s Manual___________________________________________________________________________HECKLER & KOCH, INC.
HECKLER & KOCH
OBERNDORF/NECKAR
Designation of operation (s):
Maintenance
Instructions
Part:
Bolt assembly
Weapon:
G3
Replacing the locking rollers
Description of operation (s):
¾ Punch out clamping sleeve (31) from bolt head (26)
¾ Remove holder for locking rollers (30) and locking rollers (29) from bolt head.
¾ Insert locking rollers and holder into bolt head.
¾ Place bolt head in assembly fixture so that the face of the bolt head comes to rest at the
clamping sleeve.
¾ Insert new clamping sleeve into bolt head and drive in.
Tools:
Assembly fixture 1013-02.06 V1
Clamping sleeve retaining tool 1013-02.06 W2, pin punch, dia. 2
Gauges:
Auxiliaries:
Hammer
Sheet No.:
3.5
Maintenance Instructions 17
Page 21

G3 Armorer’s Manual___________________________________________________________________________HECKLER & KOCH, INC.
HECKLER & KOCH
OBERNDORF/NECKAR
Designation of operation (s):
Maintenance
Instructions
Part:
Bolt assembly
Replacing the bolt head locking lever
Description of operation (s):
¾ Punch out cylindrical pin (34) from bolt head carrier.
¾ Remove bolt head locking lever (32) and its compression spring (33).
¾ Insert new components.
Weapon:
G3
Tools:
Backing-out punch, dia. 4
Pin punch, dia. 4
Gauges:
Auxiliaries:
Sheet No.:
3.6
Maintenance Instructions 18
Page 22

G3 Armorer’s Manual___________________________________________________________________________HECKLER & KOCH, INC.
HECKLER & KOCH
OBERNDORF/NECKAR
Designation of operation (s):
Maintenance
Instructions
Part:
Grip assembly
Cleaning and checking the grip assembly
Description of operation (s):
¾ Remove trigger housing (40) from pistol grip.
¾ Take off grip (36), by removing screw (37) and washer (38).
¾ Clean trigger housing and pistol grip.
¾ Check components for damages, dents and wear.
¾ Replace components, if necessary.
¾ Oil components.
¾ After reassembly, check trigger mechanism and safety for smooth operation.
Weapon:
G3
Tools:
Screwdriver, 7 x 140
Gauges:
Auxiliaries:
Sheet No.:
4.1
Maintenance Instructions 19
Page 23

G3 Armorer’s Manual___________________________________________________________________________HECKLER & KOCH, INC.
HECKLER & KOCH
OBERNDORF/NECKAR
Designation of operation (s):
Maintenance
Instructions
Part:
Back plate with butt stock
Cleaning and checking back plate and butt stock
Description of operation (s):
¾ Clean back plate with butt stock.
¾ Check for damages, dents and wear.
¾ Check recoil spring guide rod for secure seat.
¾ Check recoil spring stop pins and rivets for secure seat.
¾ Check recoil spring guide ring for smooth operation.
¾ Check buffer for secure fastening in the back plate and butt stock.
¾ Check butt plate for secure seat.
¾ Oil operational components.
Weapon:
G3
Tools:
Gauges:
Auxiliaries:
Gun Oil
Sheet No.:
5.1
Maintenance Instructions 20
Page 24

G3 Armorer’s Manual___________________________________________________________________________HECKLER & KOCH, INC.
HECKLER & KOCH
OBERNDORF/NECKAR
Designation of operation (s):
Maintenance
Instructions
Part:
Back plate with butt stock
Replacing back plate, butt stock and buffer
Description of operation (s):
¾ Remove butt plate (50) and replace, if necessary.
¾ Unscrew buffer (44) and replace, if necessary.
¾ Replace, if necessary, back plate (43) and /or butt stock (42).
Weapon:
G3
Tools:
Gauges:
Auxiliaries:
Sheet No.:
5.2
Maintenance Instructions 21
Page 25

G3 Armorer’s Manual___________________________________________________________________________HECKLER & KOCH, INC.
HECKLER & KOCH
OBERNDORF/NECKAR
Designation of operation (s):
Maintenance
Instructions
Part:
Back plate with butt stock
Weapon:
G3
Edition:
1a/TD2312
Replacing the recoil spring
(Spare parts set for back plate)
Description of operation (s):
¾ Punch out rivets (55) of the recoil spring guide rod which is part of the back plate (43).
¾ Remove stop pin (53), recoil spring guide ring (54) and recoil spring (51).
¾ Slide new recoil spring with its guide ring onto recoil spring guide rod.
¾ Insert back plate in the assembly fixture.
¾ Slide compression tube onto recoil spring guide rod and clamp compression tube.
¾ Fit stop pin and both rivets into recoil spring guide rod.
¾ Swivel down recoil spring guide rod so that is comes to rest on center and punch-in rivets.
Tools:
Assembly fixture 1013-04.21 V2
Center punch, dia. 10
Hammer
Gauges:
Auxiliaries:
Sheet No.:
5.3
Maintenance Instructions 22
Page 26

G3 Armorer’s Manual___________________________________________________________________________HECKLER & KOCH, INC.
HECKLER & KOCH
OBERNDORF/NECKAR
Designation of operation (s):
Maintenance
Instructions
Part:
Magazine
Weapon:
G3
Checking the magazine
Description of operation (s):
¾ Clean and oil magazine.
¾ Check for damages, dents, serviceability of the follower, correct position of cartridges in the
magazine lips, floor plate for secure seat, if magazine is securely seated in the magazine
catch.
Tools:
Gauges:
Auxiliaries:
Gun Oil
Sheet No.:
6.1
Maintenance Instructions 23
Page 27

G3 Armorer’s Manual___________________________________________________________________________HECKLER & KOCH, INC.
HECKLER & KOCH
OBERNDORF/NECKAR
Designation of operation (s):
Maintenance
Instructions
Part:
Magazine
Weapon:
G3
Checking the magazine housing
Description of operation (s):
¾ Strip and clean magazine.
¾ Check free travel of follower and resistance of follower spring.
¾ Check magazine housing with calibrating mandrel and remove dents.
¾ Oil magazine housing and magazine components.
Note: The use of the appropriate calibrating mandrel depends on the design of the magazine
housing (steel or aluminum).
Tools:
Calibrating mandrel for magazine housing 1015-11 W3 (Aluminum)
1015-10 W3 (Steel)
Gauges:
Auxiliaries:
Sheet No.:
6.2
Maintenance Instructions 24
Page 28

G3 Armorer’s Manual___________________________________________________________________________HECKLER & KOCH, INC.
HECKLER & KOCH
Maintenance
OBERNDORF/NECKAR
Designation of operation (s):
Checking the handguard
Description of operation (s):
¾ Check the handguard.
¾ Check for damages and cracks.
¾ Check locking pin for secure seat.
¾ Check handguard for secure seat.
Instructions
Part:
Handguard
Weapon:
G3
Tools:
Gauges:
Auxiliaries:
Sheet No.:
7.1
Maintenance Instructions 25
Page 29

G3 Armorer’s Manual___________________________________________________________________________HECKLER & KOCH, INC.
HECKLER & KOCH
OBERNDORF/NECKAR
Designation of operation (s):
Maintenance
Instructions
Part:
Carrying sling
Checking the carrying sling
Description of operation (s):
¾ Clean the carrying sling.
¾ Check sling for damages, brittleness and function.
Weapon:
G3
Tools:
Gauges:
Auxiliaries:
Sheet No.:
8.1
Maintenance Instructions 26
Page 30

G3 Armorer’s Manual___________________________________________________________________________HECKLER & KOCH, INC.
HECKLER & KOCH
OBERNDORF/NECKAR
Designation of operation (s):
Maintenance
Instructions
Part:
Retractable butt stock
Weapon:
G3
Replace the recoil spring
Stripping the retractable butt stock
Description of operation (s):
Stripping the retractable butt stock.
¾ With the butt stock in retracted position, remove snap ring (6), locking ring (5) and clamping
lever (4).
¾ Remove butt stock (7), protective cover (3) and gripping lever (2) from the back plate (1).
Tools:
Screwdriver
Gauges:
Auxiliaries:
Sheet No.:
9.1
Maintenance Instructions 27
Page 31

G3 Armorer’s Manual___________________________________________________________________________HECKLER & KOCH, INC.
HECKLER & KOCH
OBERNDORF/NECKAR
Designation of operation (s):
Maintenance
Instructions
Part:
Retractable butt stock
Weapon:
G3
Replacing the recoil spring
(Spare parts set for back plate)
Description of operation (s):
¾ Punch out rivets (4) of the recoil spring guide rod
¾ Remove stop pin (1), recoil spring guide ring (2) and recoil spring (3).
¾ Slide new recoil spring with guide ring onto recoil spring guide rod.
¾ Insert back plate (5) in the assembly fixture.
¾ Slide compression tube onto recoil spring guide rod and clamp compression tube.
¾ Fit stop pin and both rivets into recoil spring guide rod.
¾ Swivel down recoil spring guide rod so that it comes to rest on center points and punch-in
the rivets.
Tools:
Assembly fixture 1013-40.09 V7
Hammer
Pin punch dia. 3.5, Center punch dia. 10
Gauges:
Auxiliaries:
Sheet No.:
9.2
Maintenance Instructions 28
Page 32

G3 Armorer’s Manual___________________________________________________________________________HECKLER & KOCH, INC.
HECKLER & KOCH
OBERNDORF/NECKAR
Designation of operation (s):
Maintenance
Instructions
Part:
Retractable butt stock
Weapon:
G3
Replacing the recoil spring
Assembling the retractable butt stock
Description of operation (s):
Assembling the retractable butt stock.
¾ Slide protective cover (3) onto butt stock (7).
¾ Insert gripping lever (2) in the recesses of the guide rails and push butt stock to half length
into the back plate.
¾ Press protective cover into the back plate.
¾ Attach clamping lever (4) to the buffer housing so that the two lugs engage properly in the
gripping lever.
¾ Insert locking ring (5) so that the end of the tension spring engages in the bore of the
locking ring.
¾ Insert snap ring (6).
Pre-tensioning the spring in the clamping lever
Retract butt stock all the way up to stop.
Swivel clamping lever to the left.
Swivel back clamping lever all the way to stop.
Press ratchet into the notch of the locking ring and swivel back clamping lever.
Repeat this process until clamping lever is under spring tension.
Tools:
Gauges:
Auxiliaries:
Sheet No.:
9.3
Maintenance Instructions 29
Page 33

This page left blank intentionally…
Section 2 Spare Parts 30
Page 34

Section 2 Spare Parts 31
Page 35

HECKLER & KOCH
G3 Rifle
Spare Parts
Version: Fixed butt stock
Page 32
OBERNDORF/NECKAR
Item Parts Designation Part No. Ident. No.
Qty of parts
Per 100
arms/devices
Remarks
1 2 3 4 5 7
Barrel with receiver, cocking lever housing and
1
magazine release lever
100229/5-1111.491/1 206 731 3 Marking acc. To contract
2 Flash hider, complete 1013-101.100 200 368 3
3 Rotary rear sight 100229/5-101.05 206 495 2
4 Spare parts set to rotary rear sight, comprising: St 1013-300 200 988 5
5 Clamping screw 1013-101.29 200 372 10
6 Windage adjusting screw 1013-101.30 200 384
7 Washer 1013-101.28 200 371
8 Toothed lock washer A 5,3 DIN 6798 922 617
9 Compression spring for ball catch x2 1013-101.09 200 383
10 Balls x2 3 III-6 DIN 5401 929 897
11 Cap, complete 100229/5-01.14 206 497 2
12 Magazine catch, complete 1013-01.20/1 205 618 5
13 Compression spring for magazine catch 1013-01.25 200 393 20
14 Contact piece for magazine catch 1013-01.26 200 394 5
15 Push button for magazine catch 1013-01.27 200 396 5
16 Clamping sleeve 2,5 x 10 DIN 1481 922 608 30
17 Cocking lever 100229-01.43 224 886 5
18 Cocking lever support 1013-01.36 200 402 5
19 Cocking lever elbow spring 1013-01.42 200 404 10
20 Cocking lever axle 1013-01.37 200 403 20
21 Front sight 1013-101.51 200 415 5
22 Clamping sleeve 4 x 12 DIN 1481 922 609 20
23 Locking piece 1013-02.01 200 439 3
24 Firing ping 1013-02.04 200 440 5
Section 2 Spare Parts 32
Page 36

Section 2 Spare Parts 33
Page 37

HECKLER & KOCH
G3 Rifle
Spare Parts
Version: Fixed butt stock
Page 34
OBERNDORF/NECKAR
Item Parts Designation Part No. Ident. No.
Qty of parts
Per 100
arms/devices
Remarks
1 2 3 4 5 7
25 Firing pin spring 1013-02.05 200 441 5
26 Bolt head, complete 1013-02.06 200 442 3
27 Extractor 1013-02.08 200 444 10
28 Extractor spring 1013-02.09 200 445 10
29 Locking roller 1013-01.100 200 447 10 Oversize 0,02 mm
30 Holder for locking rollers 1013-02.11 200 449 5
31 Clamping sleeve 2 x 6.9 1013-02.12 200 450 15
32 Bolt head locking lever 1013-02.15 200 452 2
33 Compression spring for bolt head locking lever 1013-02.16 200 453 5
34 Cylindrical pin 1013-02.18 200 454 5
35 Pistol grip 3
Part # acc. to contract
concerned
36 Grip 1013-03.08 200 462 3
37 Lens head cylindrical screw M 5 x 10 DIN 85-8G 922 613 10
38 Toothed lock washer J 5,3 DIN 6797 922 616 20
39 Fire selector lever, complete 1013-03.14/1 205 621 5
40 Trigger housing, complete 100229/5-03.30 206 571 3
41 Locking pin for pistol grip and handguard 1013-03.01 200 459 15
42 Butt stock 100229-041.21 206 577 3
43 Back plate, complete 1013-04.40/1 205 633 3
44 Buffer 1013-04.550 200 555 2
45 Countersunk screw, self-locking 1013-041.31 200 543 30
46 Toothed lock washer V 5,3 DIN 6798 922 615 50
47 Buffer screw, self-locking 1013-041.17 200 531 3
48 Toothed lock washer J 8,4 DIN 6798 922 614 50
Section 2 Spare Parts 34
Page 38

Section 2 Spare Parts 35
Page 39

HECKLER & KOCH
G3 Rifle
Version: Fixed butt stock
Spare Parts
Page 36
OBERNDORF/NECKAR
Item Parts Designation Part No. Ident. No.
Qty of parts
Per 100
arms/devices
Remarks
1 2 3 4 5 7
49 Spring washer A 8 DIN 127 928 147 10
50 Butt plate 1013-041.12 200 527 2
51 Recoil spring 1013-04.08 200 525 10
52 Spare parts set to pack plate, comprising St 1013-200 200 992 10
Also applies to retractable butt
stock
53 Recoil spring stop pin 1013-04.09 200 523
54 Recoil spring guide ring 1013-04.10 200 524
55 2 rivets 1013-04.11 200 526
56 Butt stock locking pin 1013-04.01 200 520 5
57 Hand guard 100229/1-1691.16 205 977 3
58 Magazine 1015-10 205 554 5
59 Sling 100229/1-860 205 638 2
Parts differing from the standard version
(subject to contract concerned)
70 Bayonet mount 100313 200 768 2 Replaces Item 11, Cap
71 Handguard with mount 100229/2-1691.16 206 263 3
72 Multipurpose carrying sling R 3/1 100229/3-800 205 501 2
Replace Item 57, but only in
connection with item 72
Only in connection with Item
71
Section 2 Spare Parts 36
Page 40

Section 2 Spare Parts 37
Page 41

HECKLER & KOCH
G3 Rifle
Version: Retractable butt stock
Spare Parts
Page 38
OBERNDORF/NECKAR
Item Parts Designation Part No. Ident. No.
Qty of parts
Per 100
arms/devices
Remarks
1 2 3 4 5 7
Back plate with recoil spring guide tube, recoil spring
1
and buffer
1013-40.09 200 974 3
2 Gripping lever 1013-40.32 200 951 3
3 Protective cover with locking pins 1013-40.20 200 964 5
4 Clamping lever with ratchet and tension spring 1013-40.23 200 955 3
5 Locking ring with stop ring 1013-40.29 200 952 5
6 Snap ring H 19 x 1.2 922 622 5
7 Retractable butt stock with butt cap 1013-401.50 200 967 3
Spare parts set for back plate, consisting of:
St 1013-200 200 992 10
Also applies to fixed butt
stock
Stop pin 1013-04.09 200 523
Guide ring 1013-04.10 200 524
Rivets x2 1013-04.11 200 526
Section 2 Spare Parts 38
Page 42

Section 3 Special tools, gauges and fixtures 39
Page 43

HECKLER & KOCH
G3 Rifle Special tools, gauges and fixtures
Page 40
OBERNDORF/NECKAR
Item Parts Designation Part No. Ident. No.
Qty of parts
Per 100
arms/devices
Remarks
1 2 3 4 5 7
1 Straightening mandrel for cocking lever housing 1013-100 W5 300 573 1
2 Control gauge 1013-100 L1 300 577 1
3 Straightening mandrel for receiver 1013-100 W6 300 574 1
4 GO and symmetry gauge 1013-01.72 L1 300 834 1
5 Chamber cleaning kit 1013 W3/1 300 007 3
6 Spare brush 1013 W3/2 300 008 50
7 NO GO gauge for barrel 1013-01.89 L11 307 713 2
8 Rod for 1013-01.89 L11/1 1013-01.89 L11/2 300 345 2
9 Cleaning rod 1013-101.49 W24 300 751 20
Section 3 Special tools, gauges and fixtures 40
Page 44

Section 3 Special tools, gauges and fixtures 41
Page 45

HECKLER & KOCH
G3 Rifle Special tools, gauges and fixtures
Page 42
OBERNDORF/NECKAR
Item Parts Designation Part No. Ident. No.
Qty of parts
Per 100
arms/devices
Remarks
1 2 3 4 5 7
10 Pin punch, dia. 5 957 315 5
11 Pin punch, dia. 4 958 215 5
12 Pin punch, dia. 3.5 957 942 5
13 Pin punch, dia. 2.5 958 214 5
14 Pin punch, dia. 2 958 213 5
15 Center punch, dia. 10 957 323 5
16 Backing-out punch, dia. 4, conically ground 952 227 5
17 Rear sight adjusting tool 1013 W4 300 009 5
18 Spring pin retaining tool 1013-101 W4 300 591 5
19 Spring pin retaining tool 1013-101.53 W1 300 767 5
20 Spring pin retaining tool 1013-02.06 W2 301 105 5
21 Feeler gauge 962235 329 830 5
22 Universal spanner 1013/41 W7 312 387 3
23 Limit gauge for firing pin protrusion 1013-02 L3 322 164 3
24 Extractor protrusion gauge 1013-02.06 L1 312 040 3
25 Bore scope St 510115 954 610 2
26 Caliber plug gauge (set) 1013-01.89 L11/1 300 344 1
Section 3 Special tools, gauges and fixtures 42
Page 46

Section 3 Special tools, gauges and fixtures 43
Page 47

HECKLER & KOCH
G3 Rifle Special tools, gauges and fixtures
Page 44
OBERNDORF/NECKAR
Item Parts Designation Part No. Ident. No.
Qty of parts
Per 100
arms/devices
Remarks
1 2 3 4 5 7
27 Assembly fixture 1013-04.21 V2 301 988 1
28 Screwdriver 1013-041 W1 314 875 3
29 Calibrating mandrel for magazine housing
1015-11 W3
1015-10 W3
302 390
316 896
1
Aluminum
Steel (as required)
30 Assembly fixture 1013-02.06 V1 301 101 1
31 Screwdriver, 7 x 140 52 734 050 952 656 5
32 Plastic hammer, dia. 27 mm 51 208 027 957 422 2
33 Assembly fixture 1013-40.09 V17 323 828 1
For retractable butt stock
(without illustration)
Section 3 Special tools, gauges and fixtures 44
Page 48

This page left blank intentionally…
Section 3 Special tools, gauges and fixtures 45
Page 49

Page 50

 Loading...