

Page 1

H&K DALLAS INC.
“Our Quality Shines Through”
HOT DOG COOKER
AND
BUN CABINET
MODEL CST059
H&K DALLAS INC., 1343 S.HENDERSON AVE., DALLAS, TX 75223.
Page 2

TABLE OF CONTENTS
INTRODUCTION................................................................ 2
WARRANTY STATEMENT ............................................... 2
SERVICE INFORMATION ................................................. 3
POWER REQUIREMENTS ................................................ 3
INSTALLATION.................................................................. 4
OPERATING PROCEDURE............................................... 5
MAINTENANCE................................................................. 6
TROUBLESHOOTING ....................................................... 7
UNIT PRINT ........................................................................ 8
ELECTRICAL SCHEMATIC ............................................. 9
REPLACEMENT PARTS .................................................... 10
H&K DALLAS INC., 1343 S.HENDERSON AVE., DALLAS, TX 75223.
Page 3

INTRODUCTION
The hot dog cooker is designed to cook and hold hot dogs at a temperature of 165°F. The
bun cabinet is designed to hold buns at 120-130°F temperature.
WARRANTY STATEMENT
H&K Dallas makes the following limited warranties to the original purchaser only for this
equipment and replacement parts:
H&K warrants all components to be free of defects in material and workmanship, if properly
installed, operated and maintained, for a period of one (1) year from the date of the delivery.
H&K’s obligation under this warranty is limited to repairing or replacing any part or parts of
the equipment determined to be defective by an authorized representative of H&K.
H&K reserves the privilege of determining if such repairs are to be made in the field or at
the H&K Dallas factory.
H&K assumes no liability for expenses or repairs made by other parties except by written
consent.
Corrections of such defects by repair or replacement shall constitute fulfillment of H&K’s
obligations to the purchaser.
2
H&K DALLAS INC., 1343 S.HENDERSON AVE., DALLAS, TX 75223.
Page 4

H&K shall not be liable for loss, damages or expenses arising from misuse, abuse, alteration, accident or improper installation of the equipment such as:
• Improper or unauthorized repair;
• Failure to follow proper installation instruction;
• Improper maintenance;
• Damage in shipment;
• Abnormal use;
• Improper power supply;
• Natural disaster.
This warranty does not cover:
•
Transportation or travel over 100 miles (160 km) or travel time over two (2) hours;
•
Overtime or holiday charges;
•
Consequential damages (the cost of repairing or replacing other property which is
damaged), loss of time, profits, use of any other incidental damages of any kind.
SERVICE INFORMATION
If you experience any technical problems with this product, please call
H&K DALLAS
1-800-877-7782
POWER REQUIREMENTS
All electrically operated appliances must be electrically grounded in accordance with
local codes, or in the absence of local codes, with National Electric Code, ANSI/NFPA
No. 70-1990.
Electrical Panel
Voltage = 120/208V
Phase = 3 Phase
Frequency = 60 Hz
H&K DALLAS INC., 1343 S.HENDERSON AVE., DALLAS, TX 75223.
3
Page 5

INSTALLATION
1. Inspection: Upon receipt, examine the equipment carefully for any damage. Notify the
carrier and H&K immediately if damage has occurred.
2. Unpacking: Remove the unit from the packaging. H&K recommends that the unit remain crated until it has reached the installation location.
3. Storage: Store the unit in a weather proof enclosure on a level surface.
CAUTION: If the unit was on it’s side for more than one hour, it should be allowed to
rest in the upright position for at least six hours before starting the refrigeration unit.
This will allow the oil level to stabilize.
4. Location: Allow enough clearance around the refrigerator to facilitate easy closing and
opening of the doors.
The condensing units must have an adequate air supply for cooling purposes to ensure
optimum performance. Therefore, do not block the front and side louvered panels of the
self-contained and remote condensing units.
5. Leveling: It is imperative that the unit be level to allow proper condensate drainage.
The unit should be located on a level floor.
6. Plumbing: Connect the water supply line to the water inlet at the rear of the cabinet.
Provide floor drain near the equipment for drainage.
7. Power Source: Connect the main 3 phase power supply to the electrical panel provided.
The electric panel layout is provided later in this manual.
H&K DALLAS INC., 1343 S.HENDERSON AVE., DALLAS, TX 75223.
4
Page 6

OPERATING PROCEDURE
1. Initial Start-Up: Turn all the breakers and switches to the OFF position before turning
the main power ON. Turn all the breakers ON. The refrigerator will start operating as
soon as the refrigerator breaker is turned ON.
Daily Start-Up: Close the drains and open the faucets; fill the wells 1/2-2/3 full (5”
deep). Turn the individual switch for each well to the ON position and close the sliding
lid. Load with product after 30 minutes. If during operation the water level in the well
falls below the water level sensor, the red warning light above the switch will come ON.
The operator should refill the well with water to the proper level.
2. Temperature Setting: The refrigerators have been tested at the factory and the thermo-
stat have been set to maintain a temperature between 33-40°F. Do not set the temperature of the refrigerator thermostat below 33°F. Setting the temperature below 33°F may
lead to the freezing up of the coil and cause improper operation of the refrigeration system.
The temperature of the hot dog cookers has been preset to 175°F. The thermostats are
located in a high voltage area. Temperature adjustments to the well thermostats should
only be performed by a Certified Electrician.
3. Thermostat Adjustment Procedure:
The following steps must be taken to change the temperature setting on the Ranco ther-
mostats.
Step 1- Press the SET key once to select Fahrenheit or Celsius mode.
Step 2- Press the SET key again to access the set point. Use the UP and DOWN arrow
keys to adjust the set point to the desirable temperature.
Step 3- Press the SET key again to access the differential. Use the UP and DOWN ar-
row keys to adjust the differential to the desired setting.
WARNING: CHANGING THE DIFFERENTIAL MAY LEAD TO IMPROPER OP-
ERATION OF THE UNIT.
Step 4– Press the SET key again to access the cooling or heating mode. This setting
should be C1 for the refrigerator thermostat and H1 for the wells and bun warmer ther-
mostat. Press the SET key once more to complete the programming.
H&K DALLAS INC., 1343 S.HENDERSON AVE., DALLAS, TX 75223.
5
Page 7

MAINTENANCE
1. Exterior Cleaning: The exterior of the unit should be cleaned with a soap and water
mixture. Do not use abrasive cleaners to clean the exterior of the cabinet as this
might damage the stainless steel finish. Do not use steel wool.
2. Refrigerator Interior Cleaning: The anodized aluminum interior of the refrigerators
can be cleaned using a soft sponge and a soap-water mixture. DO NOT USE ABRASIVE PADS.
3. Condenser: For proper operation of the condensing unit the condenser fins and fans
should be cleaned and vacuumed every 3 months. The front grill is designed to be
removable for this purpose.
H&K DALLAS INC., 1343 S.HENDERSON AVE., DALLAS, TX 75223.
6
Page 8

TROUBLESHOOTING
PROBLEM CAUSE SOLUTION
Compressor will not start 1. No power.
2. Breaker off.
3. Thermostat stuck in open
position.
Refrigerator short cycles 1. Differential set too close. 1. Increase differential.
1. Connect power.
2. Turn breaker on.
3. Replace thermostat.
Refrigerator runs continuously
1. Undercharge.
2. Bad thermostat.
3. Dirty condenser.
Condensation 1. Leak in Gasket.
2. Condensate drain blocked.
Temperature too high. 1. Temperature setting too
high
2. Undercharge.
3. Condenser fins blocked.
4. Restricted air flow.
Hot well not heating 1. Breaker OFF.
2. Low water level as indicated by front warning
light.
3. Faulty water level relay.
1. Add refrigerant.
2. Replace thermostat.
3. Clean condenser fins.
1. Reinstall gasket properly.
2. Clean condensate drain.
1. Reset temperature
2. Fix charge size.
3. Clean Fins.
4. Ensure air can circulate
around the compressor.
1. Turn breaker ON.
2. Add water until warning
light is OFF.
3. Replace water level relay.
H&K DALLAS INC., 1343 S.HENDERSON AVE., DALLAS, TX 75223.
7
Page 9
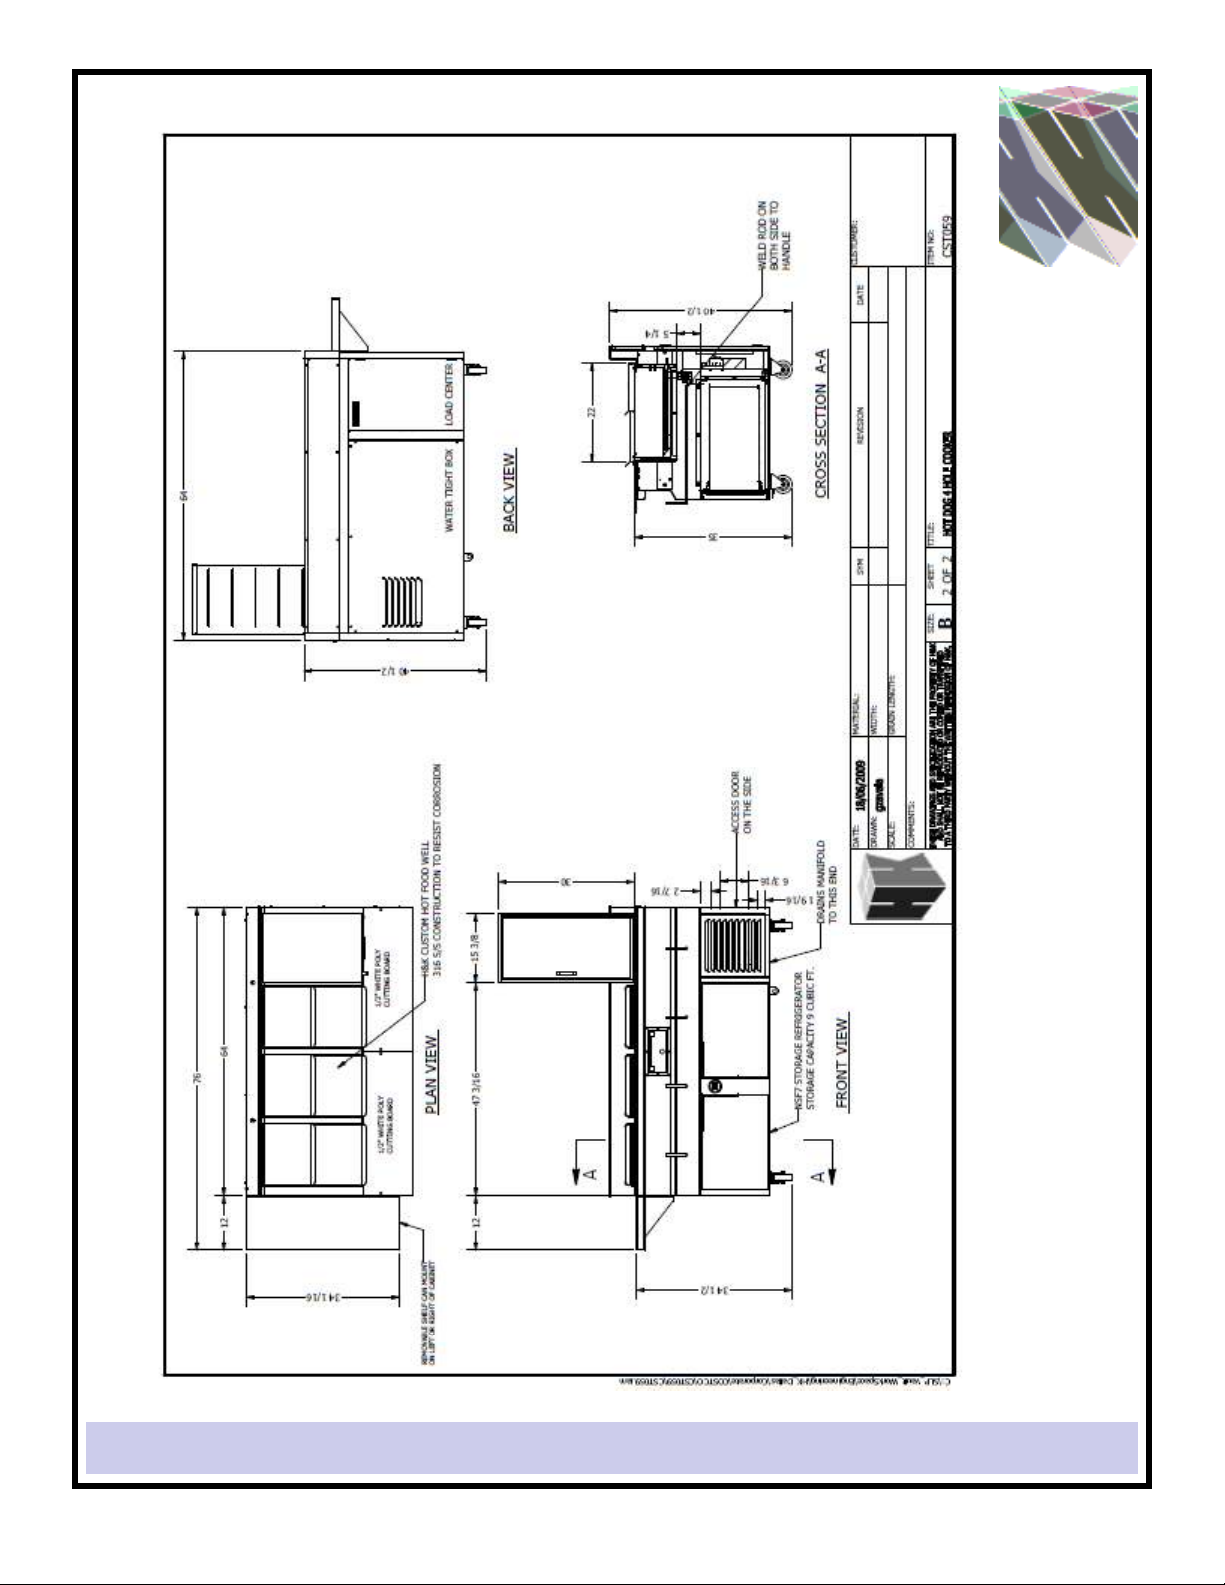
H&K DALLAS INC., 1343 S.HENDERSON AVE., DALLAS, TX 75223.
8
9
Page 10

ELECTRICAL SCHEMATIC
H&K DALLAS INC., 1343 S. HENDERSON AVE., DALLAS, TX 75223.
Page 11

REPLACEMENT PARTS
DESCRIPTION H&K PART NO.
CONDENSING UNIT P-1-298
EXPANSION VALVE
SWITCH
P-1-12-6
E-1-19-09
HOT WELL HEATING ELEMENT E-5-30-10Z
TEMPERATURE CONTROL P-1-18-9
WATER LEVEL RELAY E-4-24-0
WATER LEVEL SENSOR E-4-92
H&K DALLAS INC., 1343 S.HENDERSON AVE., DALLAS, TX 75223.
10
 Loading...