


P510S

HiTi P510S/P510Si
User’s Manual
EN
1
ENGLISH

General Information
= Copyrights =
All rights reserved. The information contained in this user’s manual is subject t o change without notice. HiTi
Digital Inc. makes no warr anty with regard to the material, including, but not limited to, the imp lied warranties
of merchantability and fitness for a particular purpose. HiTi Digital Inc. will not liable for errors contained
herein or for incidental or consequential damages in connection with the f urnishing, performance, or use of the
material.
= Safety Precautions =
1. Never attempt to disassemble for modify the printer. Doing so may lead to electric shock or malfunction.
2. Do not allow liquids near the printer, which may lead to electric shock or fire.
3. Do not use the printer if the printer body is damaged.
4. Avoid plugging in the printer into a jack being used by couple appliances.
5. Do not put the printer on an unstable cart, stand, or table.
6. Make sure the printer is operated under the type of power indicated on the marking label. If you are not
sure the type of power, please consult your dealer or local power company for detail.
7. Do not block air vents protecting the printer from overheating.
8. Do not disable the safety purpose of grounding type plug. Use the p ower supply cord only in combination
with an earthed socket-outlet.
9. The socket-outlet shall be installed near the equipment and shall be easily accessible.
10. The equipment shall be used at maximum 40°C ambient temperature.
11. An approved power cord greater or equal (e.g . H03V V-F (for EUT weight 3kg), H05VV-F (for EUT weight
> 3kg), 2X or 3G, 0.75mm
= FCC Notice =
Do not make any changes or modifications to the equipment unless specified in the instruction. This
equipment has been tested and found to comply with the limits for a Class B digital device, pursuant to P art 15
of the FCC Rules. These limits are designed to provide reasonable protection against harmful interference in
a residential installation. This equipment gener ates, uses, and can radiate r adio fr equency energy and, if not
installed and used in accordance with the instructions, may cause harmful interference to radio
communications. However, there is no guarantee that interference will not occur in a particular installation.
If this equipment does cause harmful interference to r adio or television reception, which can be determined by
turning the equipment off and on, the user is encouraged to try to correct the interference by one or more of
the following measures:
1. Reorient or relocate the receiving antenna.
2. Increase the separation between the equipment and receiver.
3. Never push objects into this equipment through cabinet openings, which may touch dangerous voltage
points or short out parts that could lead to a fire or electric shock.
4. Never spill liquid on this equipment.
5. Connect the device into an outlet on a circuit difference from that to which the receiver is connected.
2
) must be used.
2

General Information
= Trademarks =
Microsoft, MS-DOS, and Windows are r egistered trademarks of Microsoft Corporation. Adobe and Acrobat are
registered trademarks of Adobe Systems I ncorporated. Mac, Macintosh, and Mac OS are tr ademarks of Apple
Computer, Inc., registered in the U.S. and other countries. Pentium is a U.S. trademark of Intel Corporation.
All other trademarks or registered trademarks are properties of their respective companies.
3

Table of Content
1. Checking Package Contents
2. Getting the Latest Update
3. Introduction of P510S Series
z Top
z Front
z Rear
z Sides
4. Making P510S Ready to Print
z Installing the ribbon cartridge
z Installing the paper box
a. Assembling the paper roll and flange
b. Putting the paper roll into paper box
c. Inserting the paper box to the printer
z Powering up the printer
5. Introduction of Standalone Function
6. Printing Out Photo(s) By Standalone
z Correctly insert the memory card
z Photo finishing by Quick Print
z Photo finishing by Multiple Print: Selected Print
z Photo finishing by Multiple Print: Batch Print
7. Printing Out Photo(s) With eFrame On
z Photo finishing with eFrame on by the print mode: Event Photo
z Photo finishing with eFrame on by the print mode: Personalized Photo
8. Printing Out Passport/ID Photo(s) By Standalone
9. How to Manage My Photo eFrame or ID Format
10. How to Use ID Creator to Make New ID Formats
11. How to Edit My Photo(s) – Photo Enhancement
12. What Is Color Filter
13. PC-Link Printing
z System requirement
z Connecting the printer to a PC
z Installing the printer driver
14. Photo Finishing By PC-Link Printing
15. Specification
16. How to Do Direct Wireless Printing By P510Si (P510Si only)
4
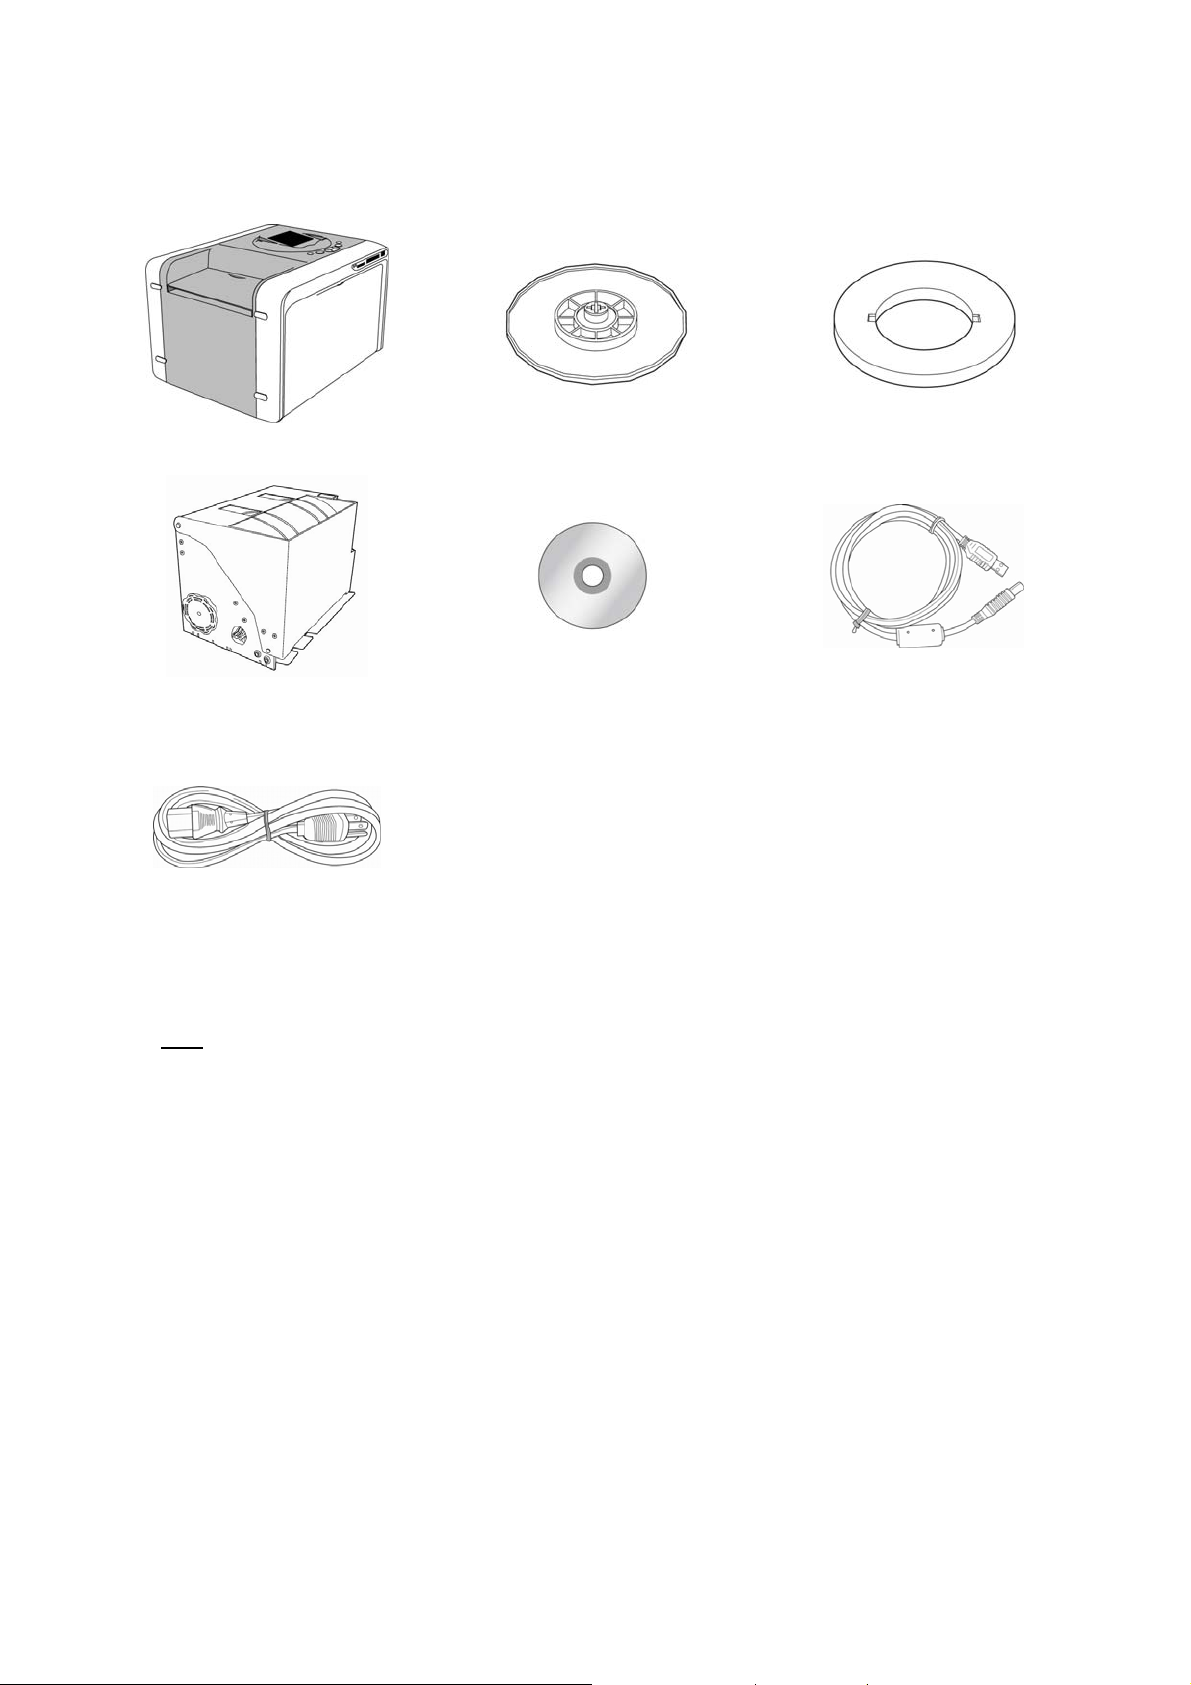
Checking Package Contents
HiTi Photo Printer P510S/P510Si Paper Roll Flange x2 Paper Roll Spacer x2
Paper Box P510S/P510Si Application Suite USB Cable
Power Cord
Note
1. If something missed f rom the package, please contact your local dealer or Hi Ti service center nearest
to you.
2. Paper roll spacer is NECESSARY only for 5x7 size paper roll installation.
3. Consumables ar e EXCLUDED.
5 6

Getting the Latest Update
HiTi Digital Inc. website provides the latest driver, application, user’s manual, printer firmware, and so on for
users to download. Please visit our website at www.hiti.com for more information.
Any questions toward HiTi product(s), please contact your local service center for detail.
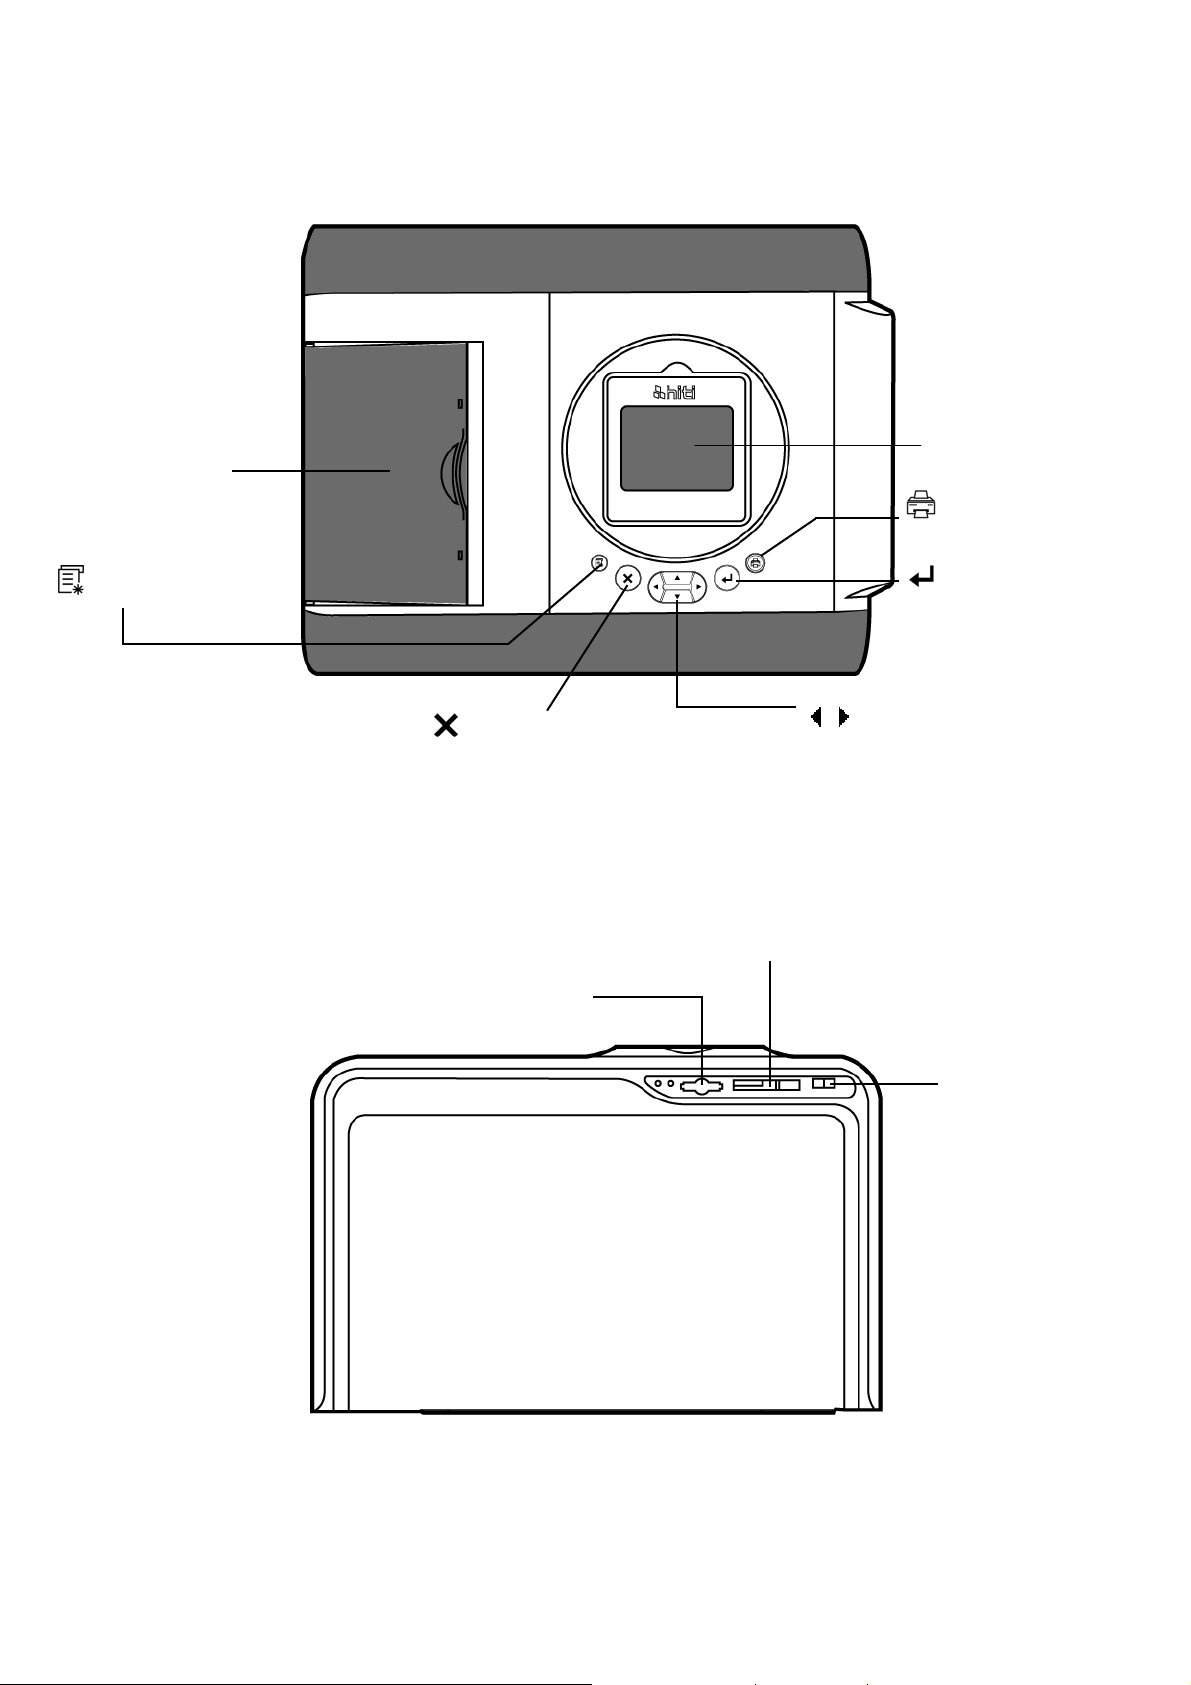
Introduction of P510S
z Top
Output Tray
3.6-inch LCD [Tilt-able]
= PRINT
= Edit
z Front
= Exit/Cancel
For use of CF / Micro Drive memory card
For use of SD / MMC / MS / MS Pro memory card
= OK/Set/
Save/Execute
= Directional button
For the use of
USB Pen Drive or
USB HDD (FAT
Formats only).
7
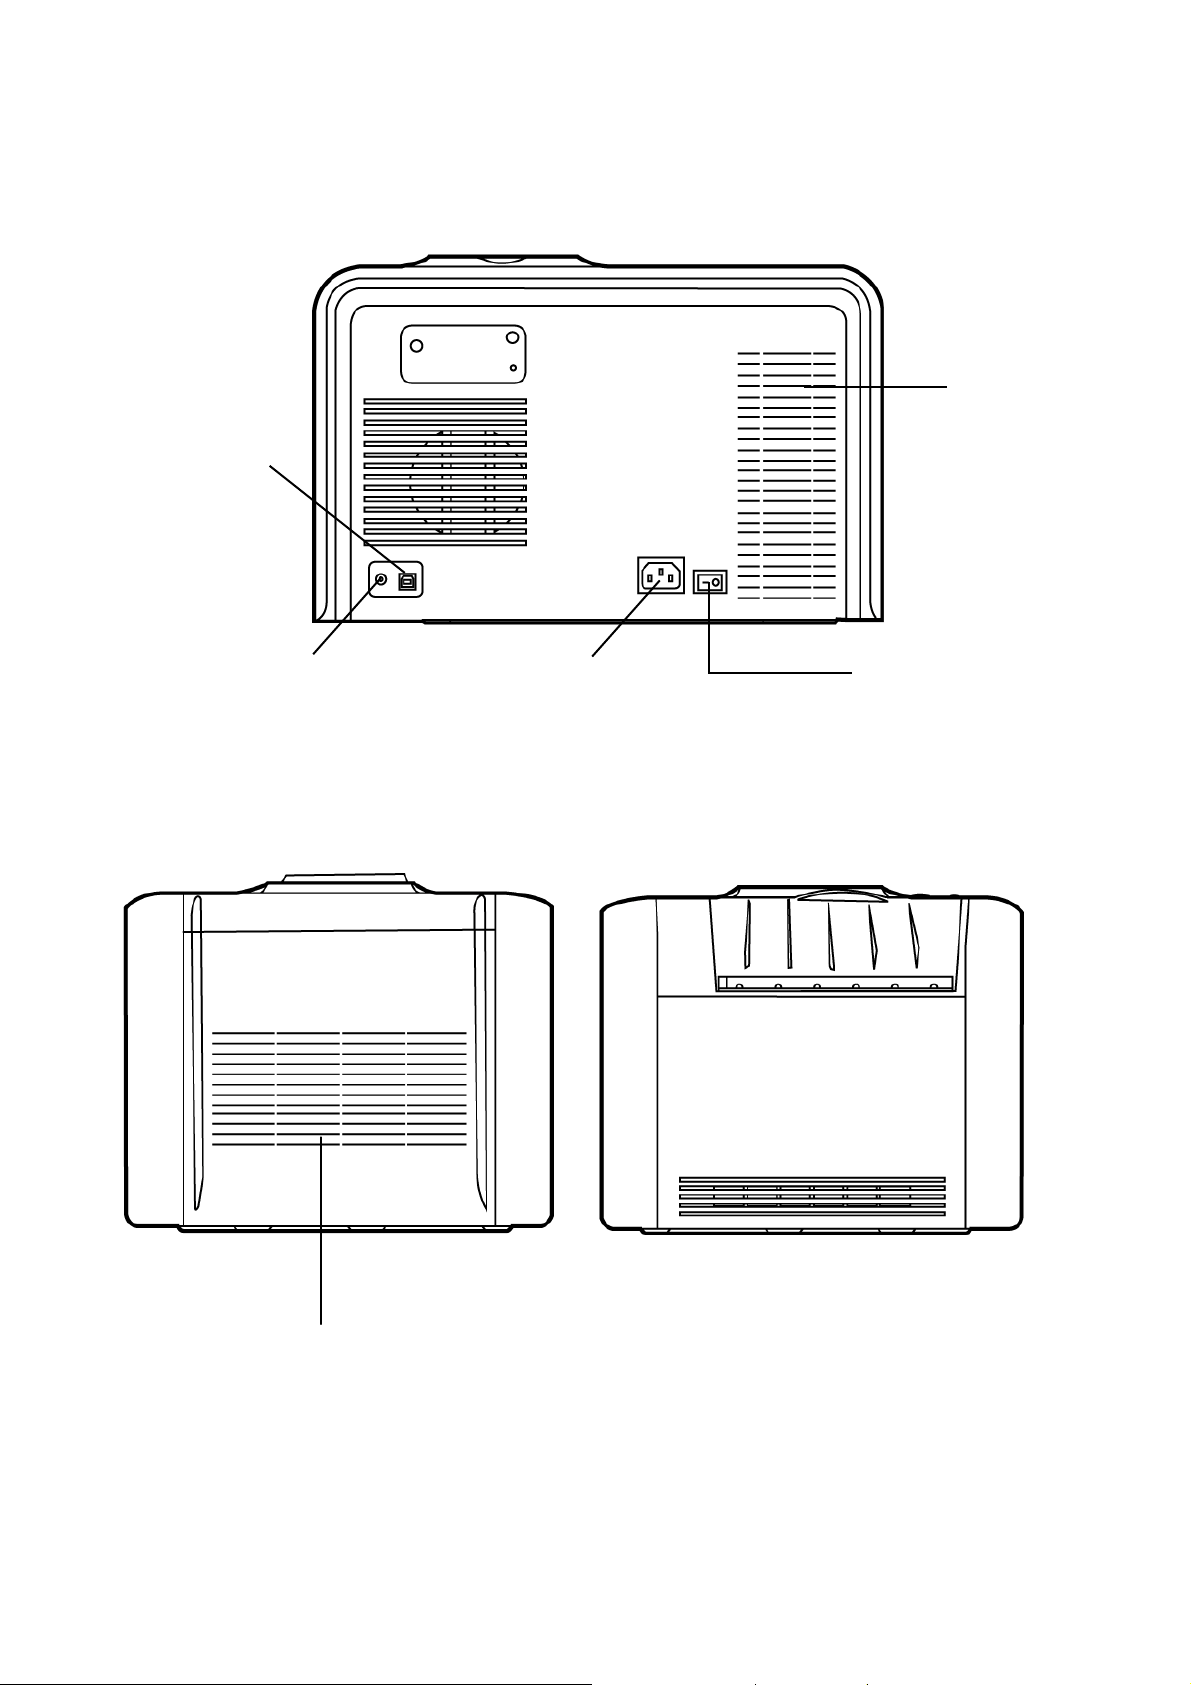
Introduction of P510S
z Rear
USB Device Socket
Vents
Video-Out Socket
z Sides
Power Cord Socket
Power Switch
Vents
8

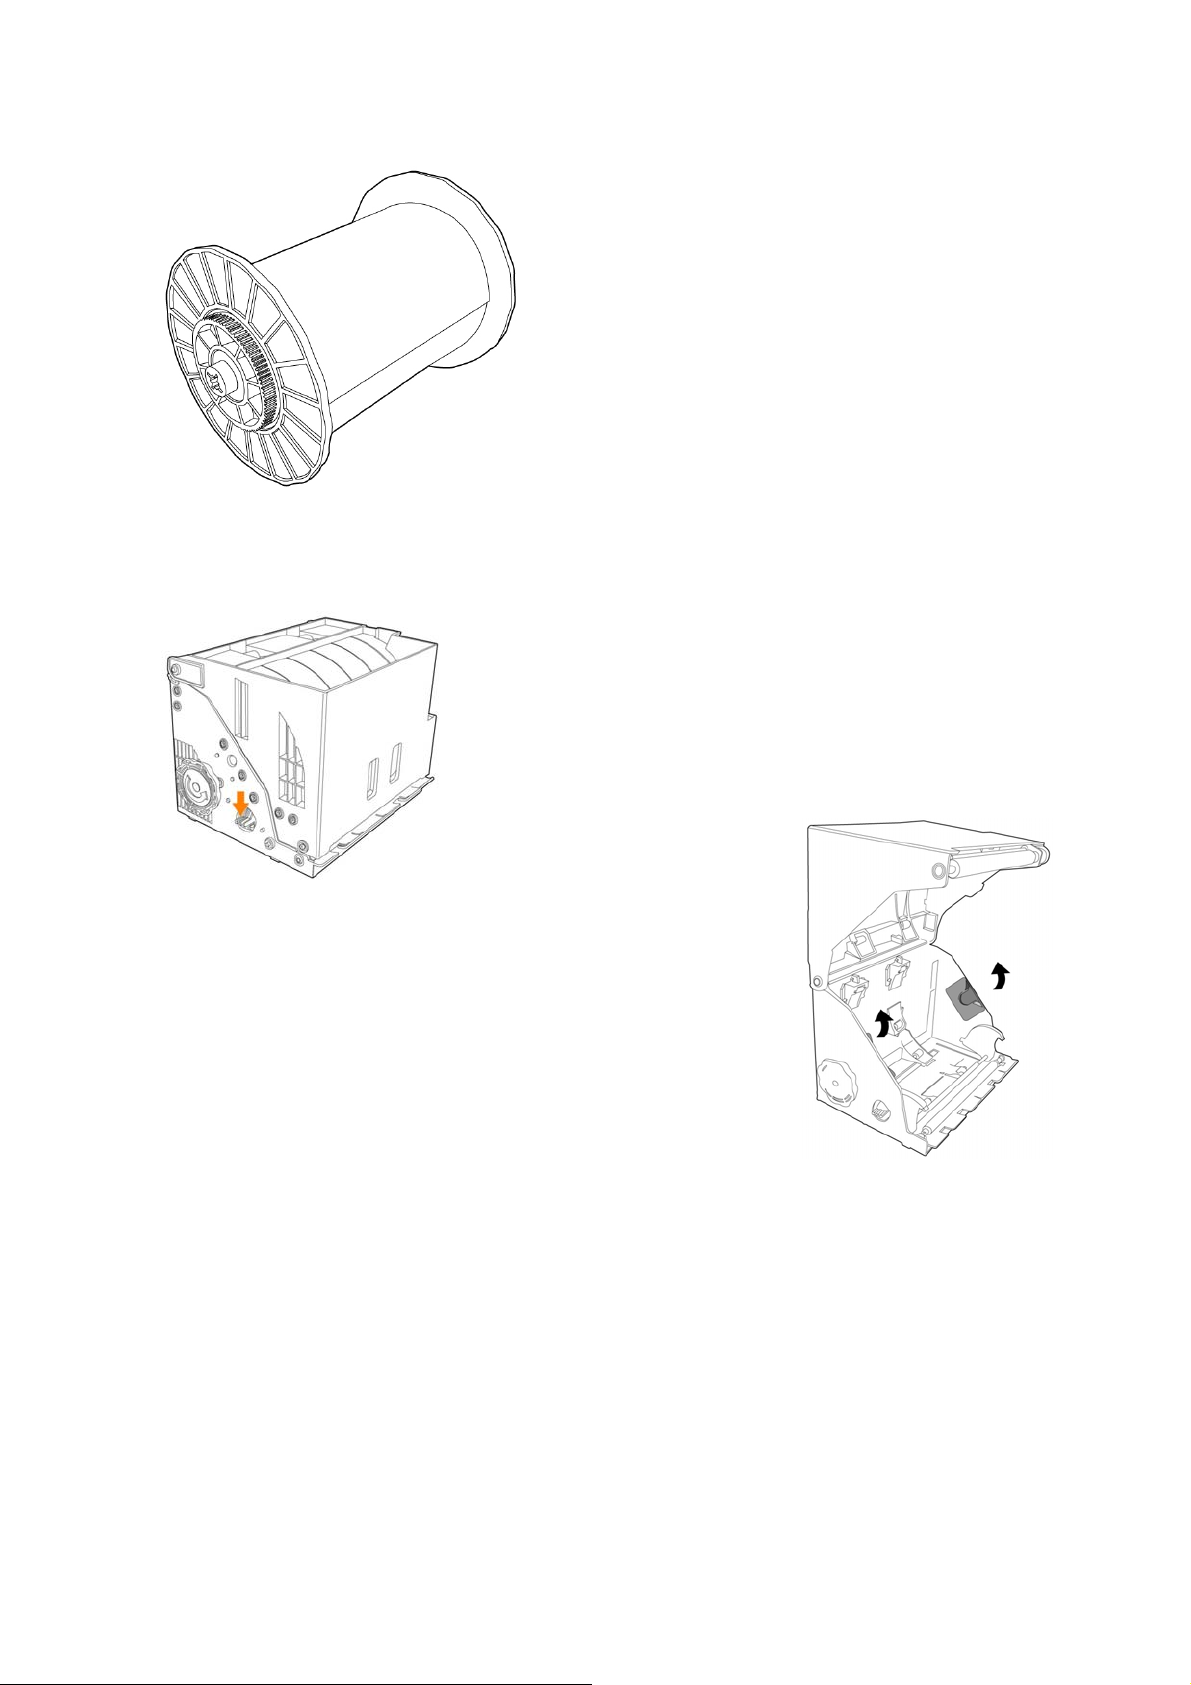
Making P510S Ready to Print
z Installing the ribbon cartridge
z Installing the paper box
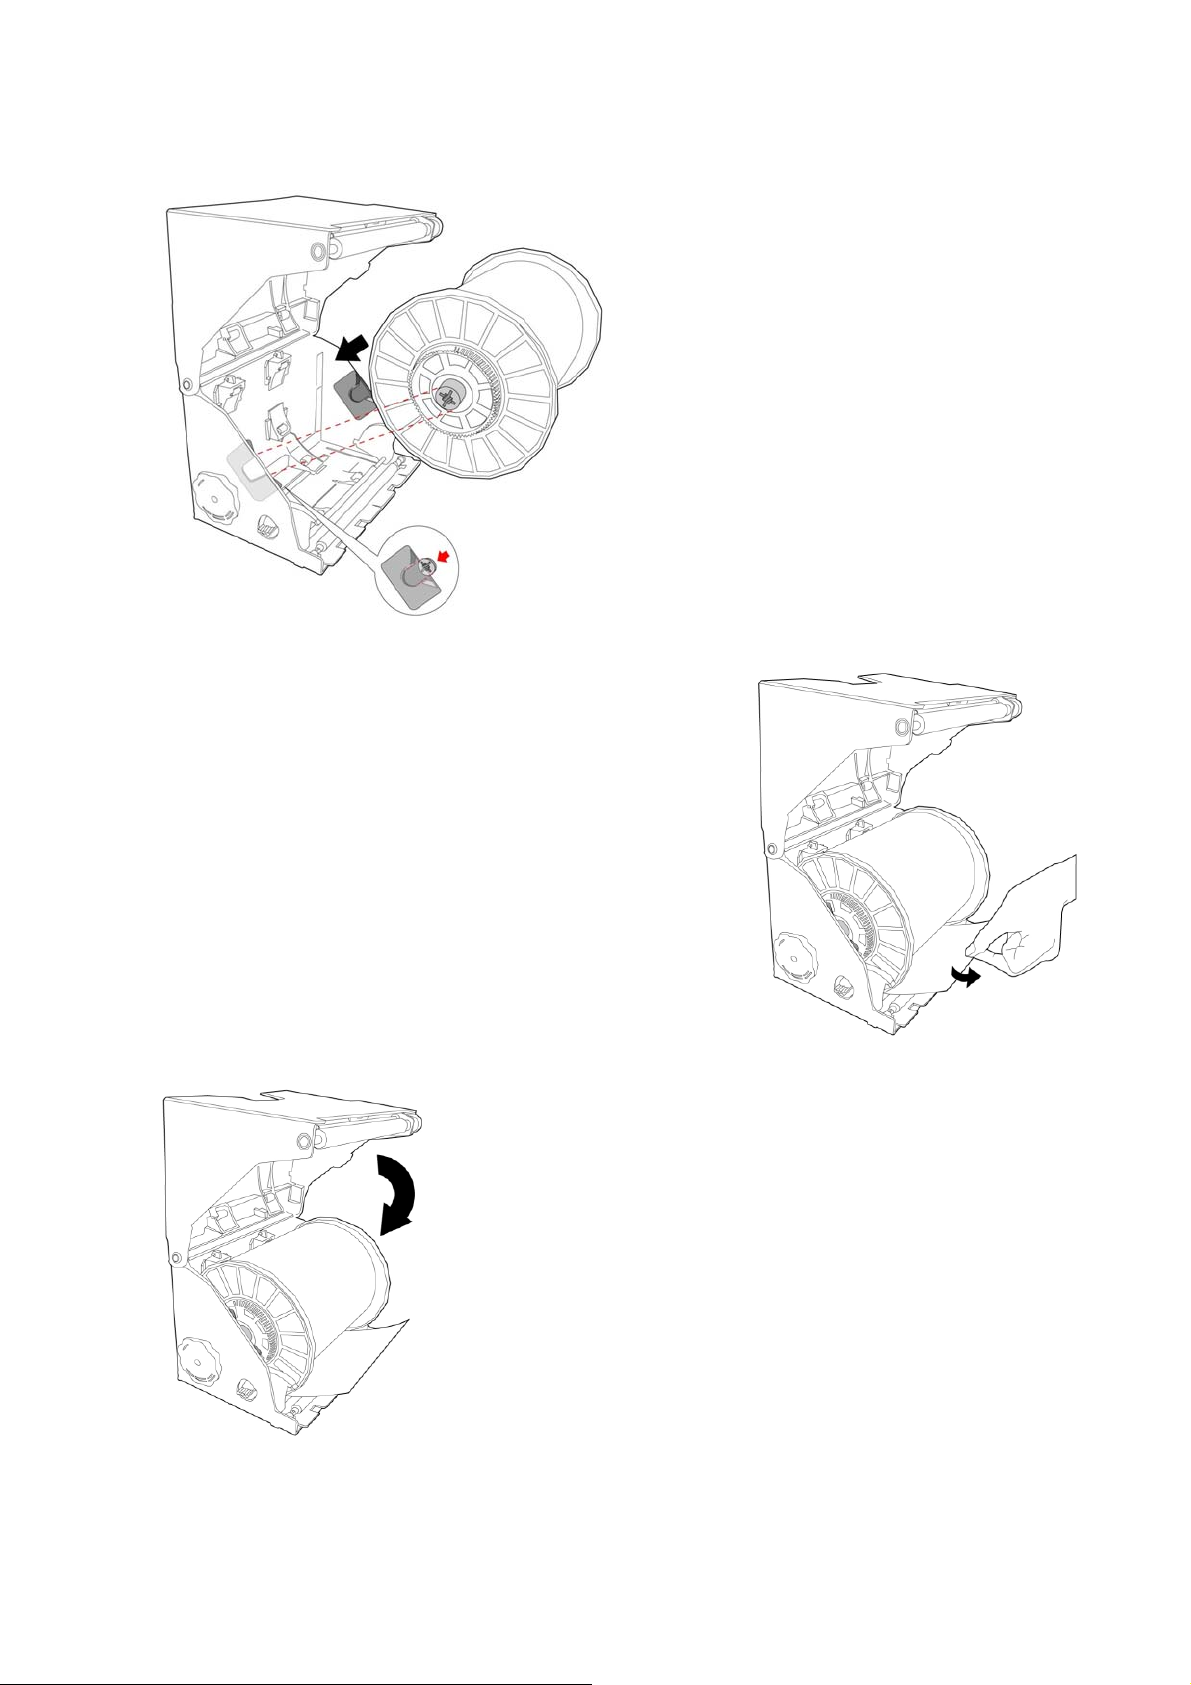
a. Assembling the paper roll and flange
❶ ❷
Paper Core
❸
Paper roll
❶ = Flange (Two colors)
❷ = Spacer (Necessary only on 5x7 size paper roll installation)
❸ = Paper roll
Upon assembly, please install the spacers in the paper flange (green) and paper flange (orange) first
when using 5x7 size paper roll. The two spacers are identical.
Match the notch of paper flange and the notch of paper core. Note that one side of paper core has 2
notches, and the other has 3 notches.
9
Making P510S Ready to Print
b. Putting the paper roll into paper box
(After assembly)
❶
Flip the paper box as shown, and then press the box button to
open the box.
(Open the box)
10
Making P510S Ready to Print
❸
Remove the seal from the paper after setting
the paper roll, and then pull out the paper so
that it comes out across the box edge.
❷
Place the paper roll into the box as shown, make
sure the color of paper roll flange is in consistency
with same color of flange holder inside the box.
❹
Close the box
11
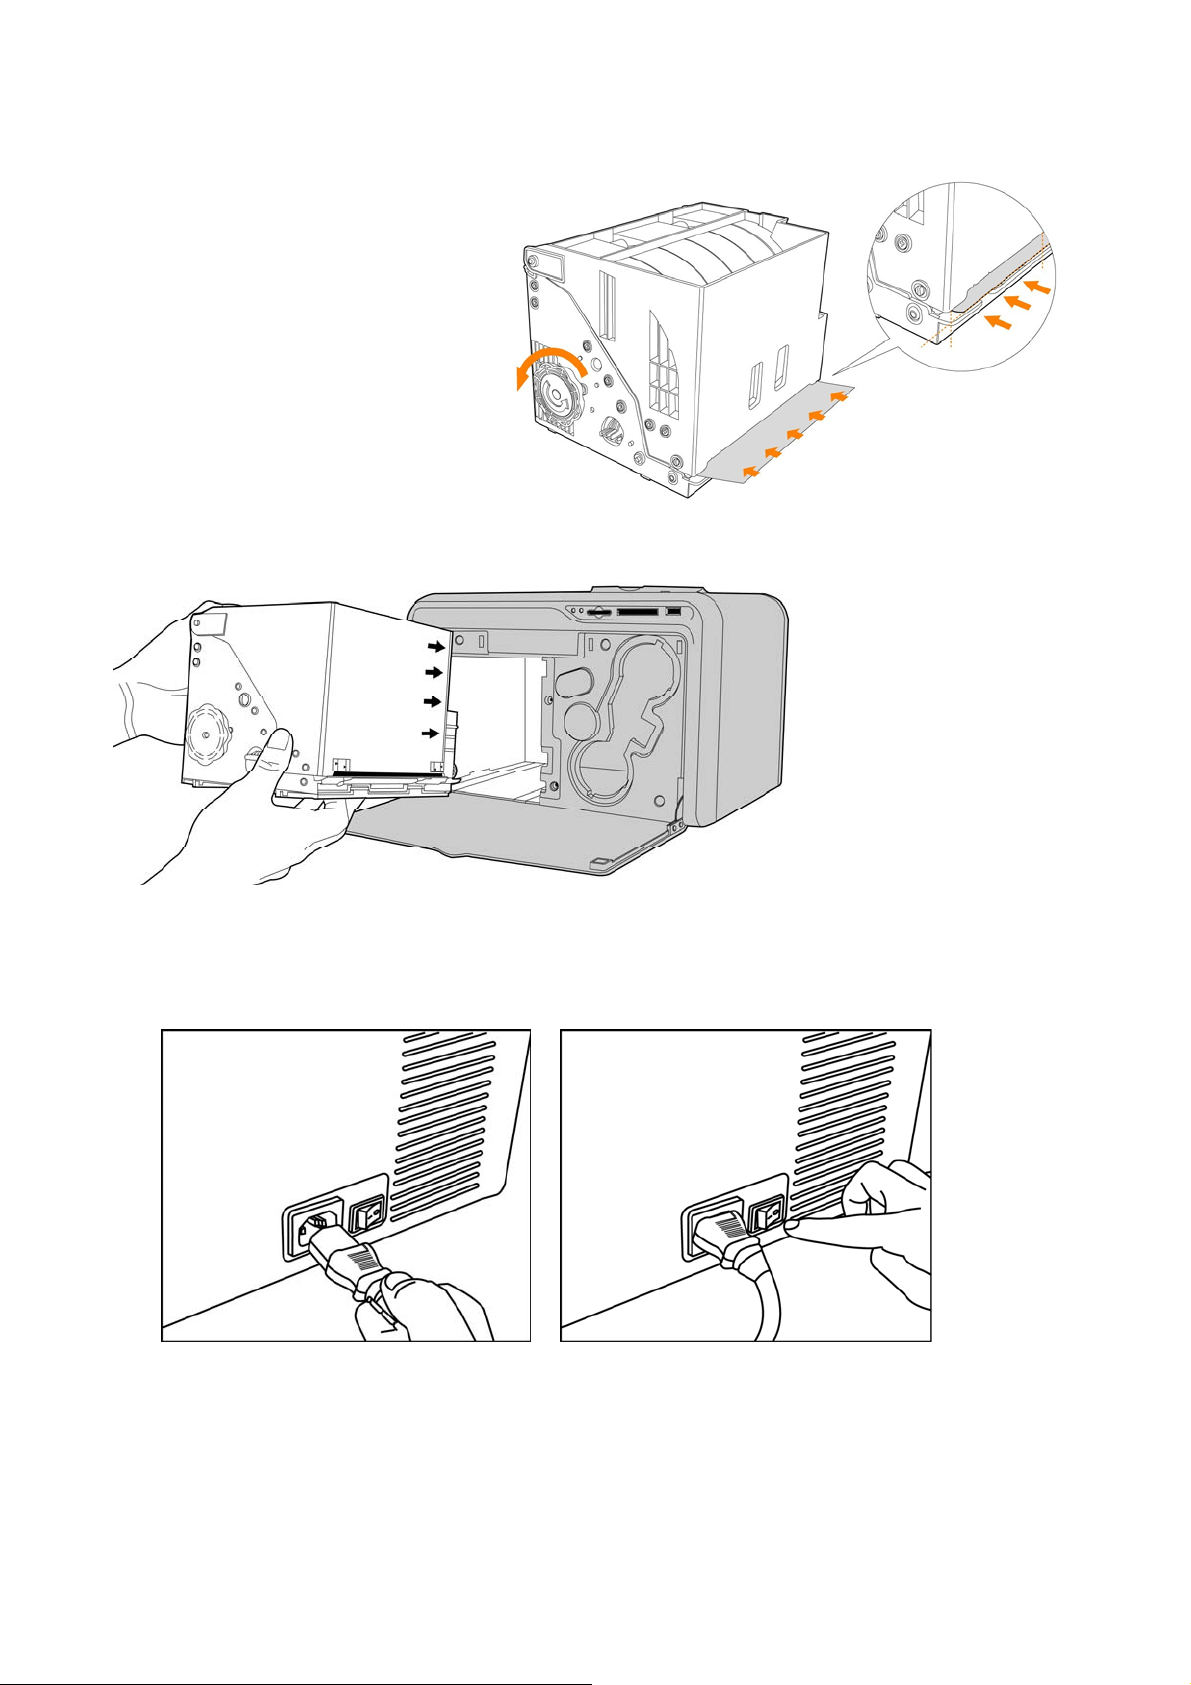
Making P510S Ready to Print
❺
Rotate the knob counterclockwise to
draw back protruding paper until it’s
straight and aligns with paper box
bottom edge as shown.
❻
Load the paper box into the
printer and then close the
front door to finalize the
installation.
z Powering up the printer
After the printer is turned on, your P510S is ready for use.
12
 Loading...