


Hi-Ti 640 DL Photo Printer
User Manual
June 21, 2002

HiTi 640 DL Photo Printer User Manual
Copyright 2002 Hi-Touch Imaging Technologies Company
All rights are reserved. The information contained in this document is subject to change without notice.
Reproduction, adaptation, or translation of this manual is prohibited without prior written permission of Hi-Touch Imaging
Technologies, except as allowed under the copyright laws.
Hi-Touch Imaging Technologies makes no warranty of any kind with regard to this material, including, but not limited to, the
implied warranties of merchantability and fitness for a particular purpose.
Hi-Touch Imaging Technologies shall not be liable for any errors or for incidental or consequential damages in connection with
the furnishing, performance, or use of this material.
Trademarks Notice
Microsoft, MS, MS-DOS and Windows are registered trademarks of Microsoft Corporations.
Pentium is a U.S. registered trademark of Intel Corporation.
TrueType is a U.S. trademark of Apple Computer, Inc.
Adobe and Acrobat a registered trademarks of Adobe Systems Incorporated.
Mr. Photo is a trademark of Newsoft Technologies Corporation.
Brands and product names are trademarks or registered trademarks of their respective companies.
Hi-Touch Imaging Technologies, HiTi, HiTi company logo, PhotoDésirée, "Digital mini-lab just for you", HiTi name (written in
Simplified Chinese or Traditional Chinese), are trademarks or registered trademarks in Taiwan, China and other countries of
Hi-Touch Imaging Technologies
ii
www.hi-ti.com

Customer Service
We're delighted that you choose HiTi Printer. In order to provide you the best service, HiTi Imaging Technologies, Inc.
provides a full-year of free customer support service worldwide. If you need help or just have a question, you may
reach our customer representatives via phone, fax, or email. We also welcome your comments.
Online Support
Visit HiTi website if you try to find out what you can do to solve a problem that is not documented in this user
manual-24 hours a day, 7 days a week. Except the continuously updated online support database, visit the web site
for the latest version of driver software or application updates. More templates for your photos are available, too.
http://www.hi-ti.com
Customer Support Center
If your HiTi products cannot operate normally, contact our customer support representatives for help. HiTi provides
free one-year support service from the time you purchased the product. To save your time and cost, we'd like to ask
you to do check the following before placing a call:
• You have followed the procedures documented in your Quick Install Guide to set up the printer.
• You have reviewed this User Manual for troubleshooting tips.
• You have visited the support database hosted on the HiTi website for help.
• If you buy your product from distributors, you need to contact them directly for help.
Hi-Ti 640 DL Photo Printer User Manual
www.hi-ti.com iii

HiTi 640 DL Photo Printer User Manual
To provide you better and fast service, please record the following information of your printer:
• Printer Serial Number
• Printer Model Number
• The version of Printer driver. You can get it by choosing Control Panel > Printer > HiTi 640 DL photo printer. Click
Properties > About on the Printer dialogue box.
• The version of the PhotoDésirée MiniLab Edition you are using
• The Windows version installed on the PC you're using, e.g. Windows 98 se
• The brand name/model/system configuration of your PC
• The name/version of any application you're running on the machine while you're using the HiTi printer
Contact Information
Hi-Touch Imaging Technologies, Inc.
3F, 31, Shuang-Shih Rd. Sec.3
Pan-Chiao City,
Taipei County 220, Taiwan
Tel: +886-2-82583060
FAX: +886-2-82583062
Contact us: http://www.hitouchimaging.com/contactus.asp
iv
www.hi-ti.com

Hi-Ti 640 DL Photo Printer User Manual
Contents
Customer Service .................................................................................................... iii
Online Support .................................................................................................iii
Customer Support Center ................................................................................iii
Contact Information ..........................................................................................iv
Chapter 1 Introduction .............................................................................................. 1
Features ...........................................................................................................1
Maintenance .....................................................................................................2
Chapter 2 Setting up Your Printer ........................................................................... 3
Unpacking Your Printer ....................................................................................4
Setting up Your Printer .....................................................................................5
Installing or Replacing Ribbon Cartridges ........................................................6
Loading Paper ..................................................................................................7
Installing Printer Driver .....................................................................................9
Chapter 3 Using PhotoDésirée to Print Your Photos ............................................. 11
Working Flow ....................................................................................................12
Setting Display Resolution ...............................................................................13
Application in a View ........................................................................................14
Installing PhotoDésirée MiniLab Edition ...........................................................15
Opening PhotoDésirée MiniLab Edition ...........................................................16
Opening Photos ................................................................................................17
www.hi-ti.com v

HiTi 640 DL Photo Printer User Manual
Pricing Your Photos ................................................................................................22
Chapter 4 Introducing ImagEnhancer ..................................................................... 27
Chapter 5 Frequently Asked Questions .................................................................. 35
Chapter 6 Troubleshootings .................................................................................... 43
Chapter 7 Specification, Regulatory and Warranty ................................................ 51
Editing Photos ..................................................................................................18
Choosing Print Formats and Amounts .............................................................19
Printing Your Photos ........................................................................................20
Sending Print Jobs to Multiple Printers ............................................................21
Viewing Prices ..................................................................................................23
Modifying Prices ...............................................................................................24
Adding/Editing Customer Data .........................................................................26
Assigning Templates ........................................................................................28
Adjusting Colors ...............................................................................................29
Adding Texts ....................................................................................................30
Adding Calendars .............................................................................................31
Rotating Images ...............................................................................................32
Adjusting Image Layouts ..................................................................................33
LED Signal Lights .............................................................................................44
Error Messages ................................................................................................47
Specifications ...................................................................................................51
Package Contents ............................................................................................52
vi
www.hi-ti.com

Hi-Ti 640 DL Photo Printer User Manual
System Requirements ......................................................................................53
Limited Warranty Statement .............................................................................54
Safety Instructions ............................................................................................56
FCC Information ...............................................................................................57
Appendix Printer Driver Details ............................................................................... 59
Installing Printer Driver ............................................................................................60
In Windows 98 environment .............................................................................60
In Windows 2000 environment .........................................................................67
Configuring Driver Settings .....................................................................................70
In Windows 98 environment .............................................................................70
In Windows 2000 environment .........................................................................79
Uninstalling Printer Driver .......................................................................................83
In Windows 98 environment .............................................................................83
In Windows 2000 environment .........................................................................84
www.hi-ti.com vii

HiTi 640 DL Photo Printer User Manual
viii
www.hi-ti.com

Chapter 1 Introduction
Thanks you for purchasing HiTi 640 DL Photo Printer, the best companion for your digital photo business. You take
the shots and HiTi Photo Printer brings quality prints in less than 70 seconds, making it easier than ever to print your
digital photos for your customers. What is more, the PhotoDésirée MiniLab Edition software, the companion software
to HiTi 640 DL Photo Printer, seamlessly integrates with your customer database and pricing system, allowing you to
deliver the best quality of service to your customers. The software provides friendly graphic user interface for your
ease of use to customize and preview the photos before printing. With HiTi 640 DL Photo Printer, running a business
is just simple as it is.
Features
• D2T2 40 3dpi True Color Continuous-Tone Printing
• High-Speed 4 X 6 Inches Borderless Printing
• Economical Printing Capacity up to 100 Prints (ideal for running business)
• Parallel Printing (Up to 8 Printers)
• Fuzzy Printing Media Management
• Automatic Temperature and Humidity Detection
• Heavy-Duty Printing (30 sheets continuous printing)
www.hi-ti.com 1

HiTi 640 DL Photo Printer User Manual Maintenance
Maintenance
Printer
• To clean the printer, use a clean soft dry cloth to wipe the printer. If stronger cleaning is required, moisten the
cloth with neutral solvent, then wipe the printer again with a soft dry cloth.
• Always keep the air vents clean and free of dust. Dust that enters the printer through the vents will cause poor
print quality, like resulting in light spots on the prints.
Ribbon Cartridge and Photo Paper
• Always use the ribbon cartridge and photo paper of HiTi supplies. Use non-HiTi supplies will cause printer
errors.
• Keep the ribbon cartridge and photo paper in room temperature before using. Leave the cartridge and photo
paper in sealed foil package before installation. High temperatures may cause deformation of the photo paper.
• If there are dusts or scratches on the image outputs, use the HiTi Clean Kit to clean possible dusts. For
information about using clean kit to clean the printer, see the instruction inside the Clean Kit package. If the
problem remains, contact HiTi dealers or HiTi customer representatives for assistance.
• Never re-use the photo paper. Re-use the photo paper will cause a paper jam error.
2 www.hi-ti.com

Chapter 2 Setting up Your Printer
This chapter contains the following topics for setting up your printer:
• Unpacking Your Printer
• Setting up Your Printer
• Installing or Replacing Ribbon Cartridges
• Loading Paper
• Installing Printer Driver
www.hi-ti.com 3

HiTi 640 DL Photo Printer User Manual Unpacking Your Printer
Unpacking Your Printer
Before you begin to install your printer, check if you have the following items:
printer
documentation
software CD
USB cord
4 www.hi-ti.com
paper cassette
power cord
HiTi 640 DL Photo Printer User Manual Setting up Your Printer
Setting up Your Printer
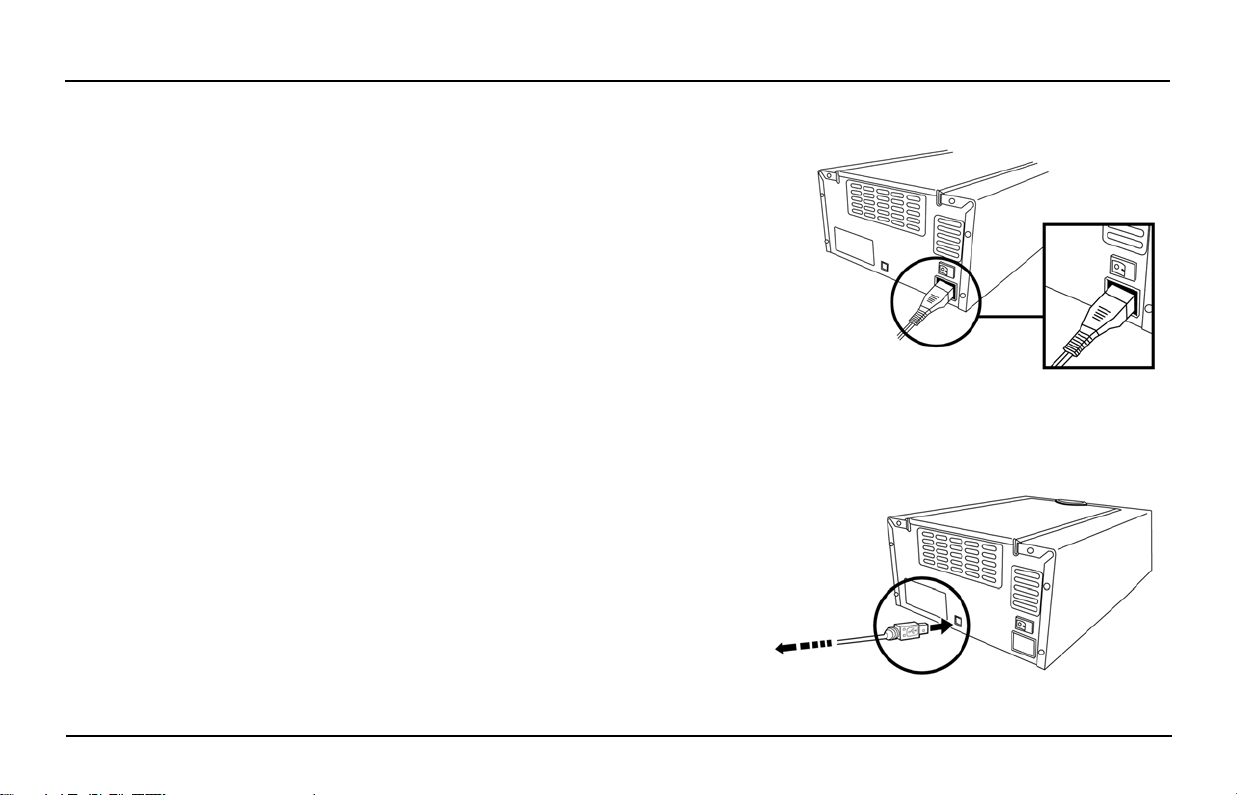
1. Connect the power cord to the power connection.
2. Connect the printer to your computer using the USB cord.
3. Insert the ribbon cartridge into the printer. For more
information, see Installing or Replacing Ribbon Cartridges
on Page 6 of the user guide.
4. Place paper into the paper cassette. For more information
regarding how to load the paper, see Loading Paper on
Page 7 of the user guide.
5. Turn the printer power switch on. The green led light
blinks and becomes stable after 5 seconds. Before you
turn on the power switch, make sure the printer driver
software is installed in your personal computer.
6. The New Hardware Found message box appears on the
screen of your computer. Windows starts to install the
printer driver software by copying files to your computer.
For more information about installing printer driver, see
Printer Driver Details on Page 59 of the user guide.
to power connection
to computer
www.hi-ti.com 5
Installing or Replacing Ribbon Cartridges HiTi 640 DL Photo Printer User Manual
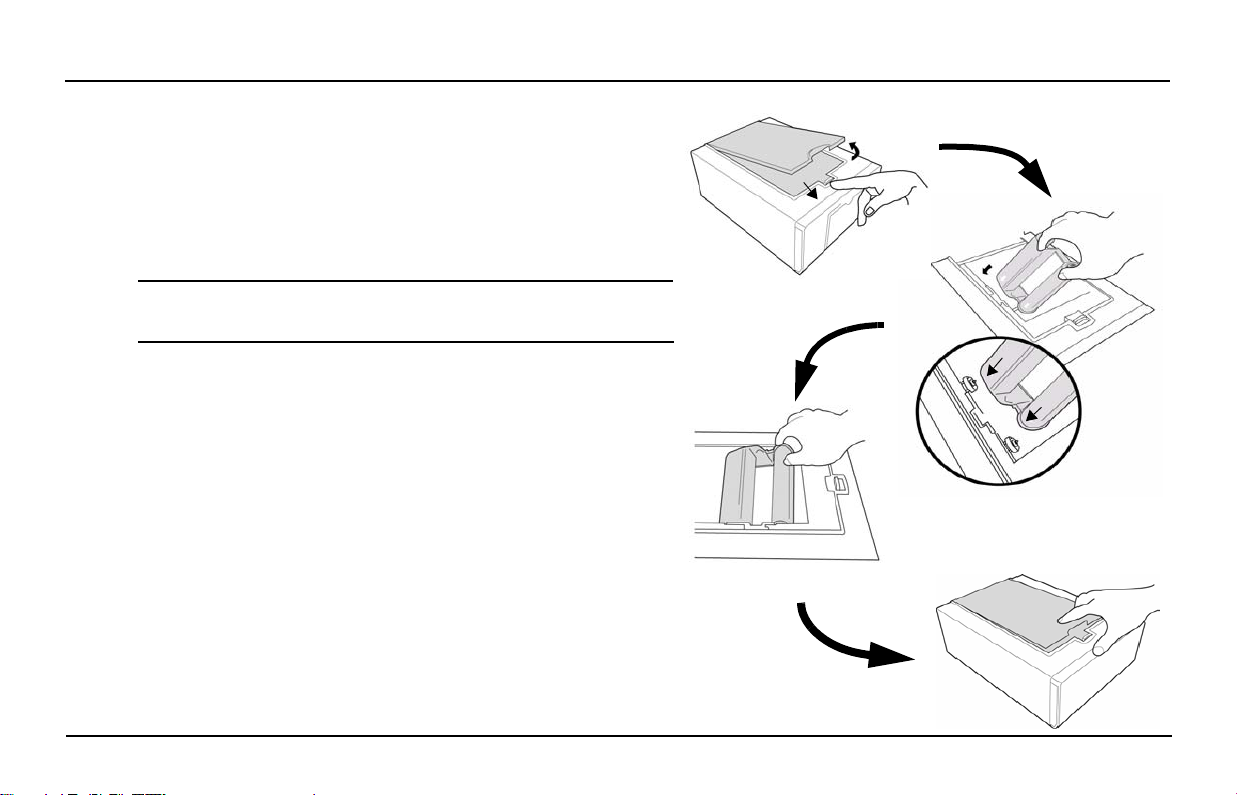
Installing or Replacing Ribbon Cartridges
HiTi 640 DL photo printer simplifies the steps of installing or
replacing ribbon cartridges to three steps only. To avoid
unexpected error messages, you must use genuine HiTi
supplies. Using other company's ribbon cartridges may
result in serious damage to your printer.
Warning: The HiTi ribbon cartridges can be purchased
from HiTi dealers.
1. Move the slider to open the top cover of the printer.
If you're replacing a ribbon cartridge, lift the old one out
and discard it.
2. Hold the ribbon cartridge as the figure illustrated. Be sure
to point the arrow sign towards the left-hand side of the
printer.
3. Insert the cartridge all the way into the printer until it is
completely installed.
4. Close the top cover.
1.
2.
3.
4.
6 www.hi-ti.com
HiTi 640 DL Photo Printer User Manual Loading Paper
Loading Paper
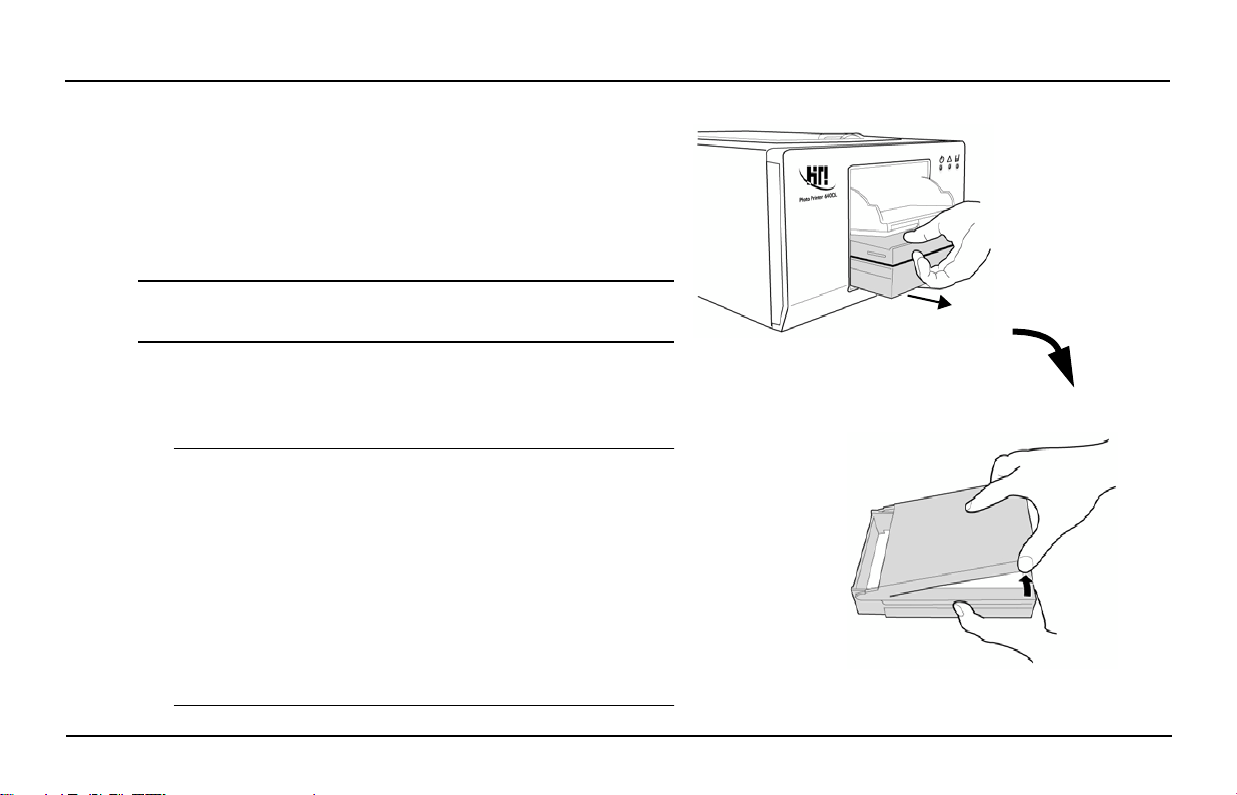
Hi-Ti 640 DL photo printer allows you to print different types
of paper and sticker for your digital photos. Again, to avoid
unexpected error message, you must use genuine HiTi
photo paper. Using other company's photo paper will result
in paper jam and color shift errors.
Warning: The HiTi paper can be purchased from HiTi
dealers.
1. Pull out the paper cassette from the printer. Open the
cover of the paper cassette.
Note: HiTi provides different paper cassettes for
loading photo paper and sticker paper. The
photo paper cassette is the standard
accessory item when you purchase the HiTi
photo printer while the sticker paper cassette
is not. Although the photo paper cassette is
able to load with sticker paper, it is
recommended that you purchase the sticker
paper cassette to prevent unnecessary paper
jam errors.
1.
2.
www.hi-ti.com 7
Loading Paper HiTi 640 DL Photo Printer User Manual
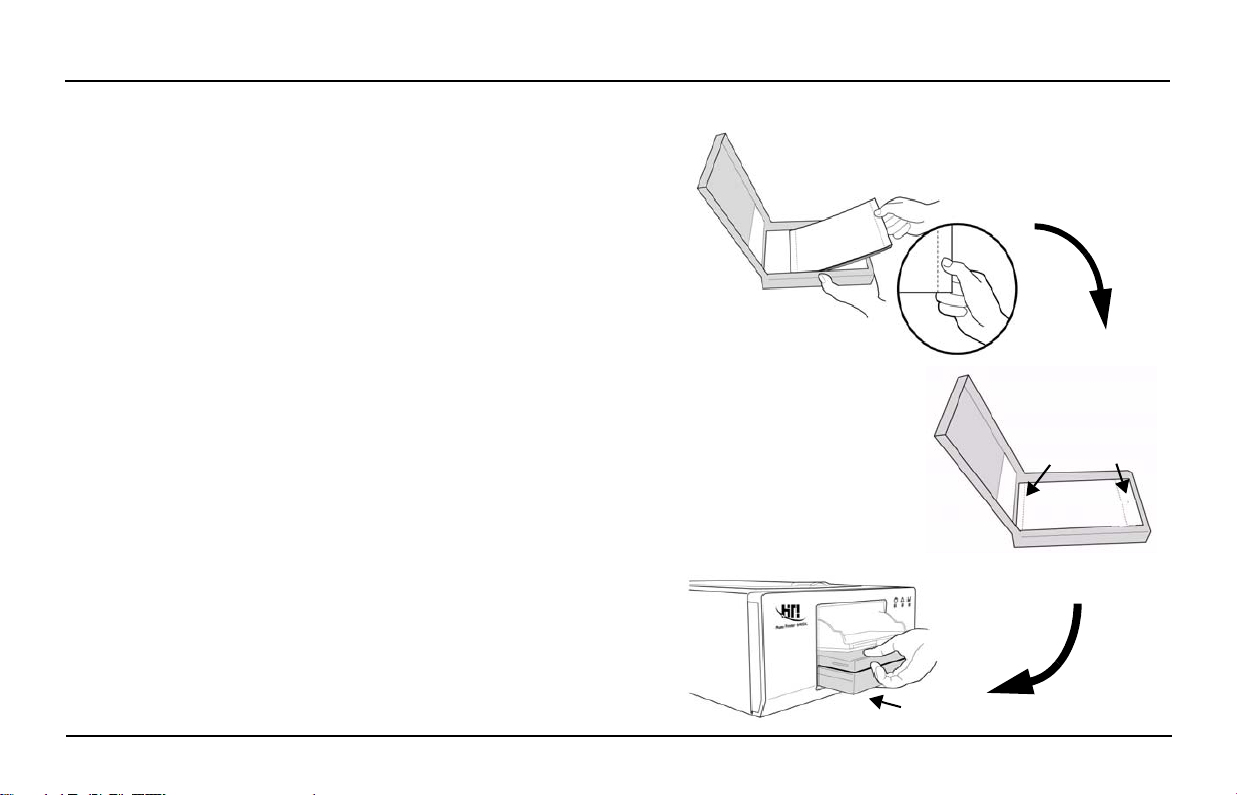
2. Place a stock of paper into the paper cassette. The printer
allows you to load 100 sheets at a time in maximum.
• Load the paper with print side (glossy) face-up; the
printed photo faces up in the output tray. Be sure the
paper is in the direction with the narrow edge side
sitting at the inner side of the paper cassette.
• Do not touch the print (glossy) side of the paper with
your fingers. Always hold the paper along the edges
(outside the perforated border).
• Do not bend or tear off perforated edges on the paper
before printing.
• Never print on a sheet of paper more than once. The
coating applied to the paper. Reused paper will stick to
the ink sheet, resulting in damage to the printer.
• Use one kind and one size of paper at a time. Do not
mix paper types or sizes in the paper cassette.
3. Make sure the paper fits close to the edges of the paper
cassette. This helps the paper to feed into the printer
correctly.
4. Insert the paper cassette back into the printer.
3.
4.
widenarrow
5.
8 www.hi-ti.com
HiTi 640 DL Photo Printer User Manual Installing Printer Driver
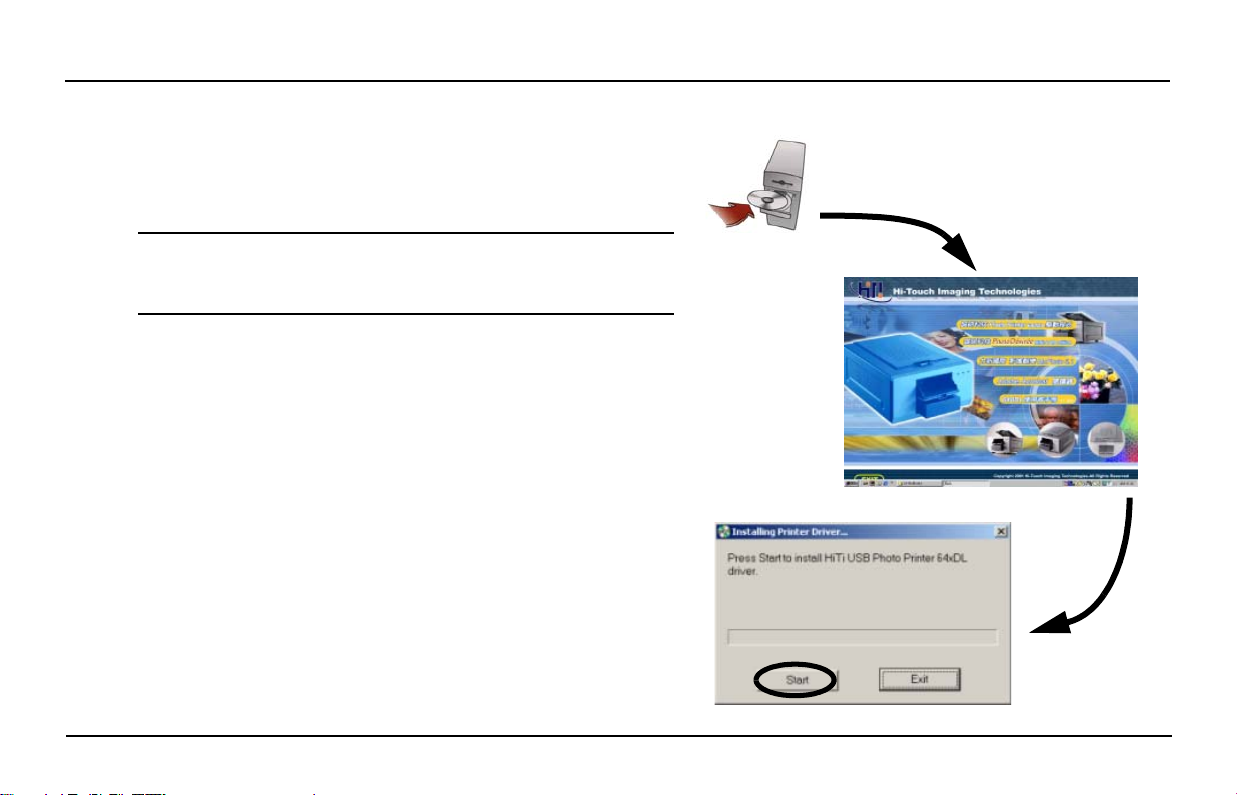
Installing Printer Driver
Before you can use HiTi photo printer to print your digital
photos, you first need to install the printer driver to the
computer with which the printer is connected.
Note: When you set up the printer for the first time, be
sure to turn off the printer before you begin to install
printer driver software.
1. Insert "Software CD" into CD-ROM drive. The Software
CD can be found in the package that is shipped with the
printer.
2. The HiTi Welcome window appears on the screen.
Choose Install HiTi Photo Printer 640 DL Driver.
3. The Installing Printer Driver message box appears on the
screen. Click Start to begin installing the printer driver or
click Exit to quit the installation process.
4. On the Set Default Printer message box, click Yes to set
HiTi Photo Printer as the default printer.
www.hi-ti.com 9

Installing Printer Driver HiTi 640 DL Photo Printer User Manual
Note: Hi-Ti provides three ways for installing printer driver.
For detailed descriptions, refer to the Appendix,
Driver Management section in this user manual.
10 www.hi-ti.com

Chapter 3 Using PhotoDésirée to Print Your Photos
After you have successfully set up the printer and installed the printer driver, let's print an image from HiTi
PhotoDésirée where you can customize digital images into calendars, poster or greeting cards. The PhotoDésirée’s
ease-of-use user interface lets you easily adjust the saturation, contrast, sharpness, brightness or hues of your
photos in any way you like. With PhotoDésirée, creating a photo with studio quality right at your home is not a dream
anymore.
In this section, you will learn basic operations using PhotoDésirée, including:
• Installing PhotoDésirée MiniLab Edition
• Opening PhotoDésirée MiniLab Edition
• Opening Photos
• Editing Photos
• Choosing Print Formats and Amounts
• Printing Your Photos
• Sending Print Jobs to Multiple Printers
• Pricing Your Photos
• Adding/Editing Customer Data
www.hi-ti.com 11
HiTi 640 DL Photo Printer User Manual Working Flow
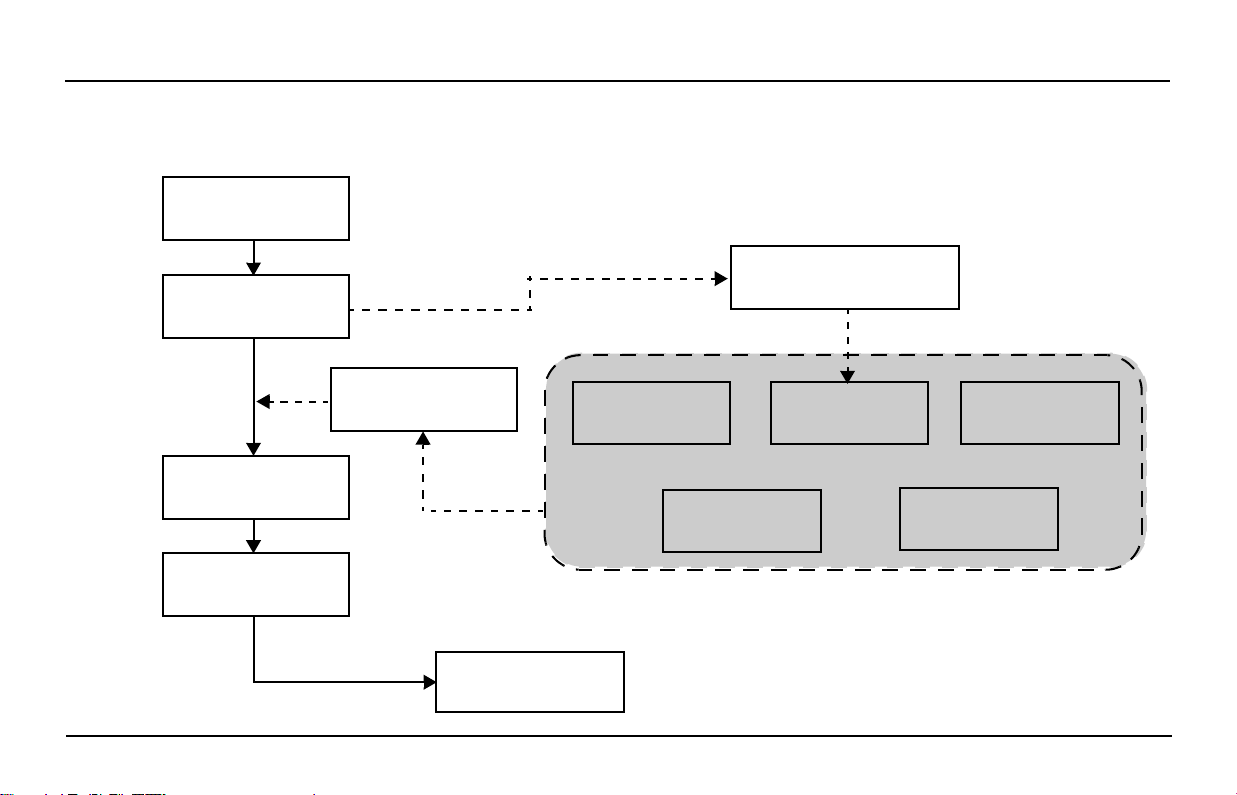
Working Flow
The following figure illustrates basic working flows of using PhotoDésirée software to print your digital images.
Open PhotoDésirée
MiniLab edition
Edit images
Open images
(Invoke ImagEnhancer)
Set prices
Set paper type
Set print amounts
Print
12 www.hi-ti.com
Apply templates
Adjust color
settings
Enter texts
Choose calendars
Modify layouts
HiTi 640 DL Photo Printer User Manual Setting Display Resolution
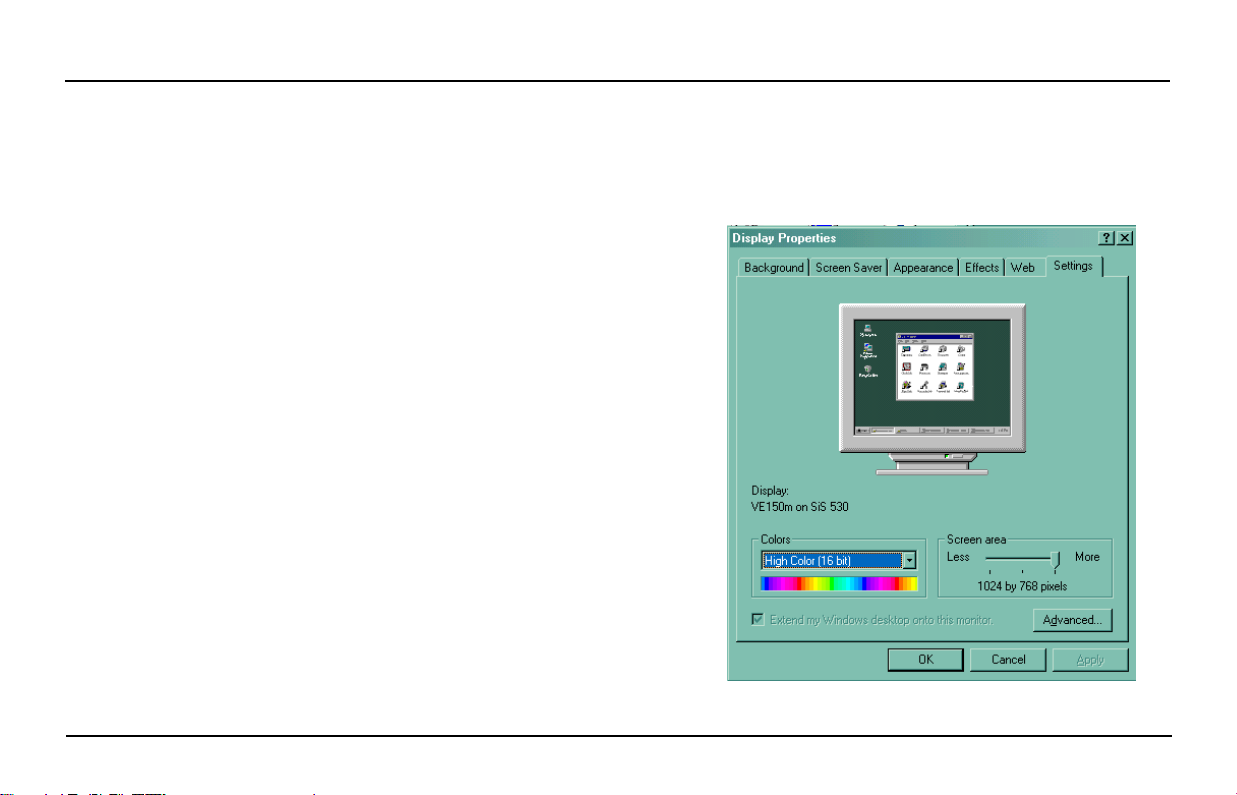
Setting Display Resolution
Before running PhotoDésirée, make sure the monitor display
resolution is set to 1024 x 768 pixels or higher, and the color
setting is set to the Hi Color (16 bit) or True Color (24 bit)
mode.
To set the display resolution:
1. Select Start > Settings > Control Panel from Windows
start menu. Select Display from the Control Panel. The
Display Properties window is then appeared on the
screen.
2. Choose High Color from the Colors drop-down menu.
Move the Screen area slider to 1024 by 768 pixels or
higher. Then click OK.
www.hi-ti.com 13
HiTi 640 DL Photo Printer User Manual Application in a View
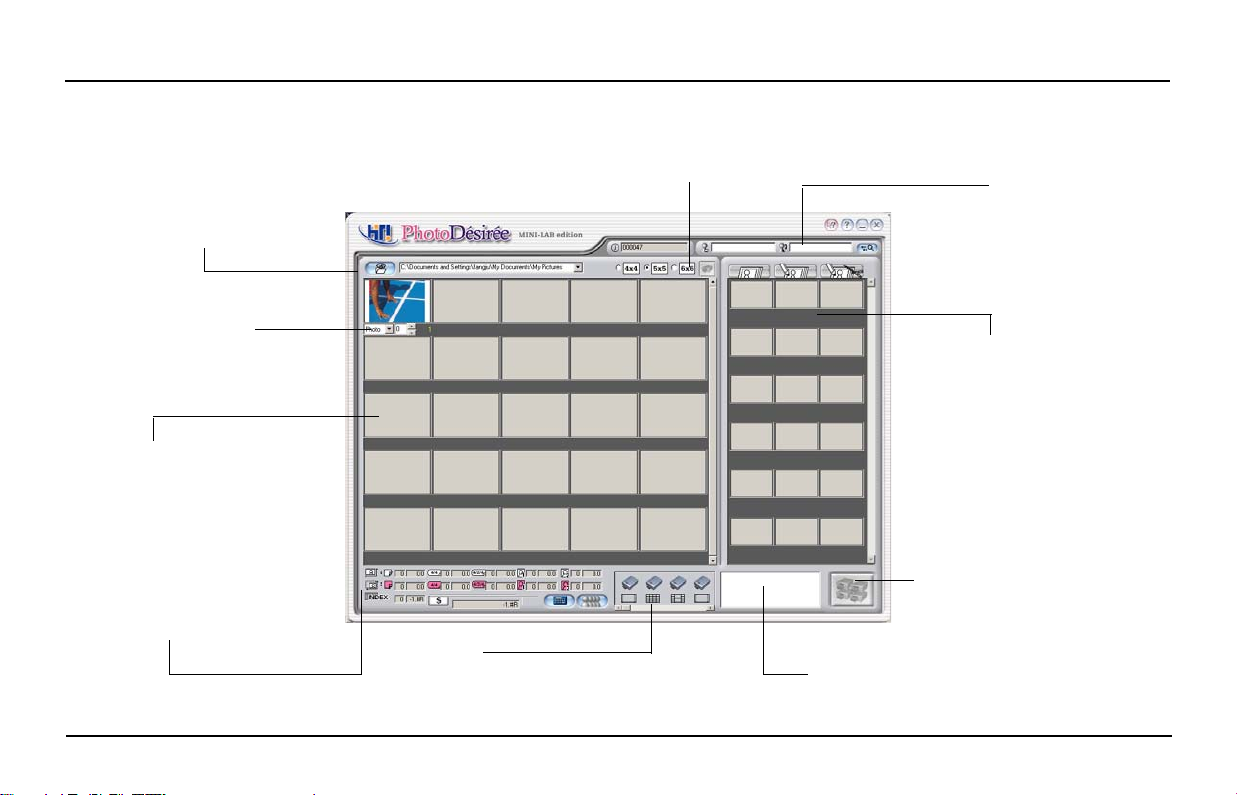
Application in a View
Open Images
Open images for print
Print Formats
Show print formats
and amounts
Image Index Area
Place images that
are opened
Price Calculation Area
Show prices of a printing
job
Image Index
Choose and print image
indexes in vary formats
Printers
Show printers connected. Up to 8
printers can be installed.
Customer Data
Show customer name
and photo number and
job ID number
Special Handling Area
List the images that are
edited. The editing levels
are: low, medium and
high, defined by price.
Print
Print images
Print Queue
Show printing jobs in the queue.
14 www.hi-ti.com
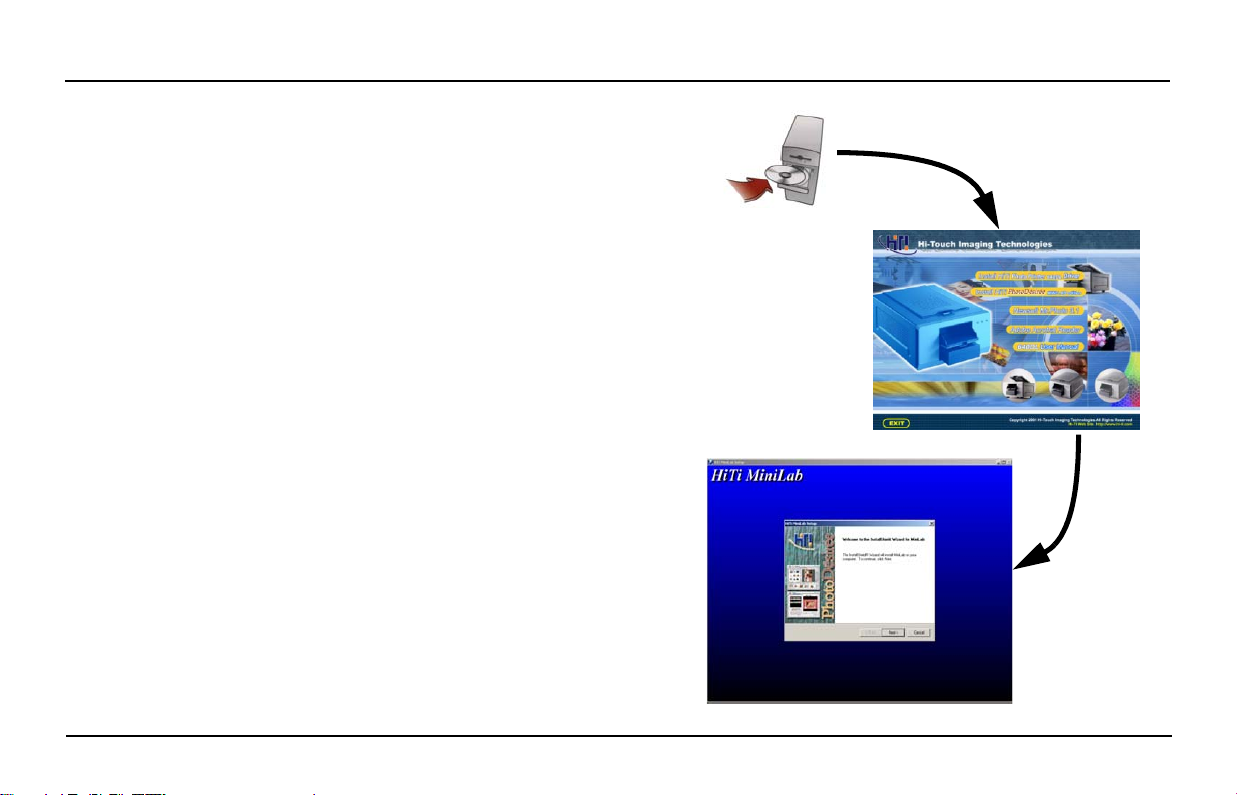
HiTi 640 DL Photo Printer User Manual Installing PhotoDésirée MiniLab Edition
Installing PhotoDésirée MiniLab Edition
PhotoDésirée is the application where you can edit photos
for print.
1. Insert "Software CD" into CD-ROM drive. The Software
CD can be found in the package that is shipped with the
printer.
2. The HiTi Welcome window appears on the screen.
Choose Install HiTi PhotoDésirée MiniLab Edition.
3. Windows starts to copy files from the CD-ROM to the
machine. On the message box that pops up on the
screen, click Yes to place the "PhotoDésirée MiniLab
Edition" icon to be placed on the Windows Desktop.
Otherwise, click No to ignore this option.
4. To this step, the HiTi PhotoDésirée MiniLab Edition
application is installed successfully.
www.hi-ti.com 15
Opening PhotoDésirée MiniLab Edition HiTi 640 DL Photo Printer User Manual
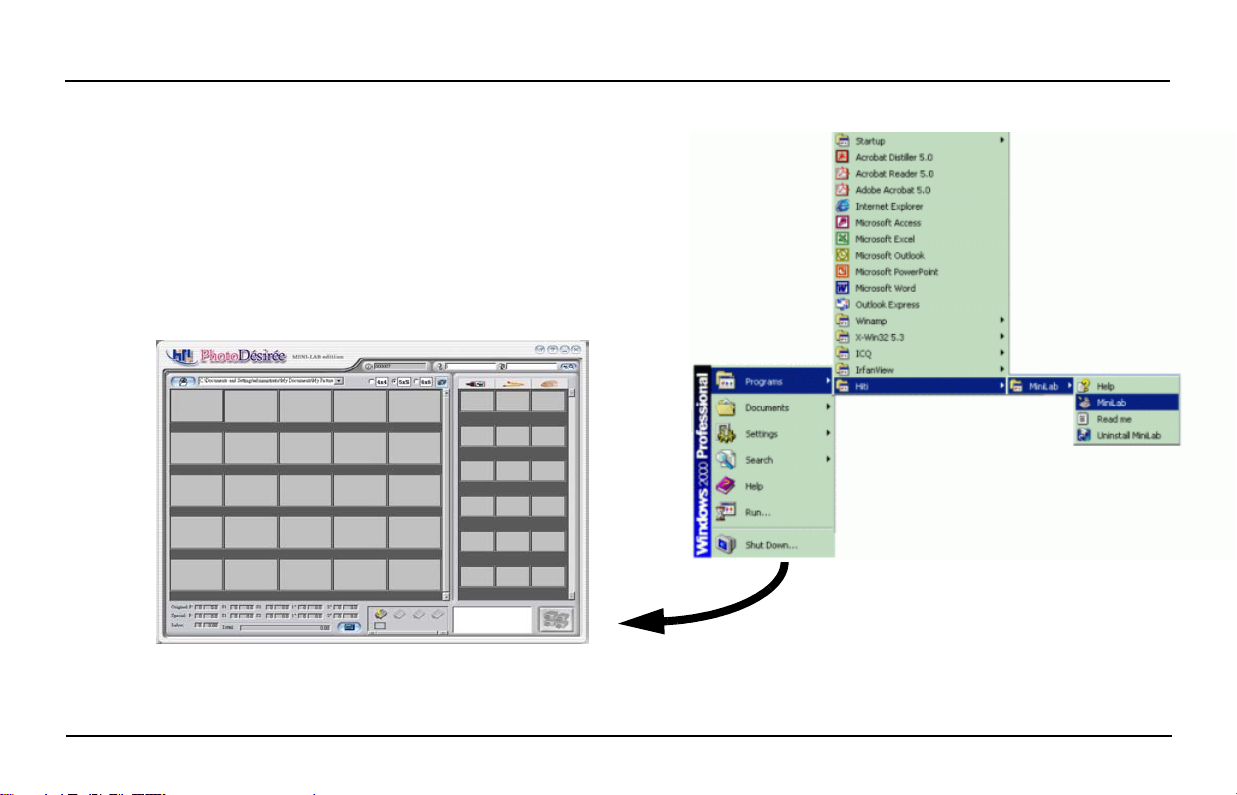
Opening PhotoDésirée MiniLab Edition
1. Select Start > Programs > HiTi > MiniLab > MiniLab from
Windows start menu.
2. The main window of PhotoDésirée MiniLab edition opens
on the screen.
16 www.hi-ti.com

HiTi 640 DL Photo Printer User Manual Opening Photos
Opening Photos
1. Click the Add Image button.
2. On the Add Images window that opens, select the
image(s) you want to print.
• Select All: Choose this when you want to select all
images in the folder. If there is any sub-folder under this
folder, check the Include Subfolder selection item.
• Select Multiple: Choose this if you only want to add
certain images in this folder.
• Preview: Check this if you want to preview the images
before adding.
• Append to Image Holders: Leave the image in the
index area after printing.
3. Click OK. The images you select will appear in the index
area (left-hand side of the window). To select more
images, repeat the above steps.
www.hi-ti.com 17
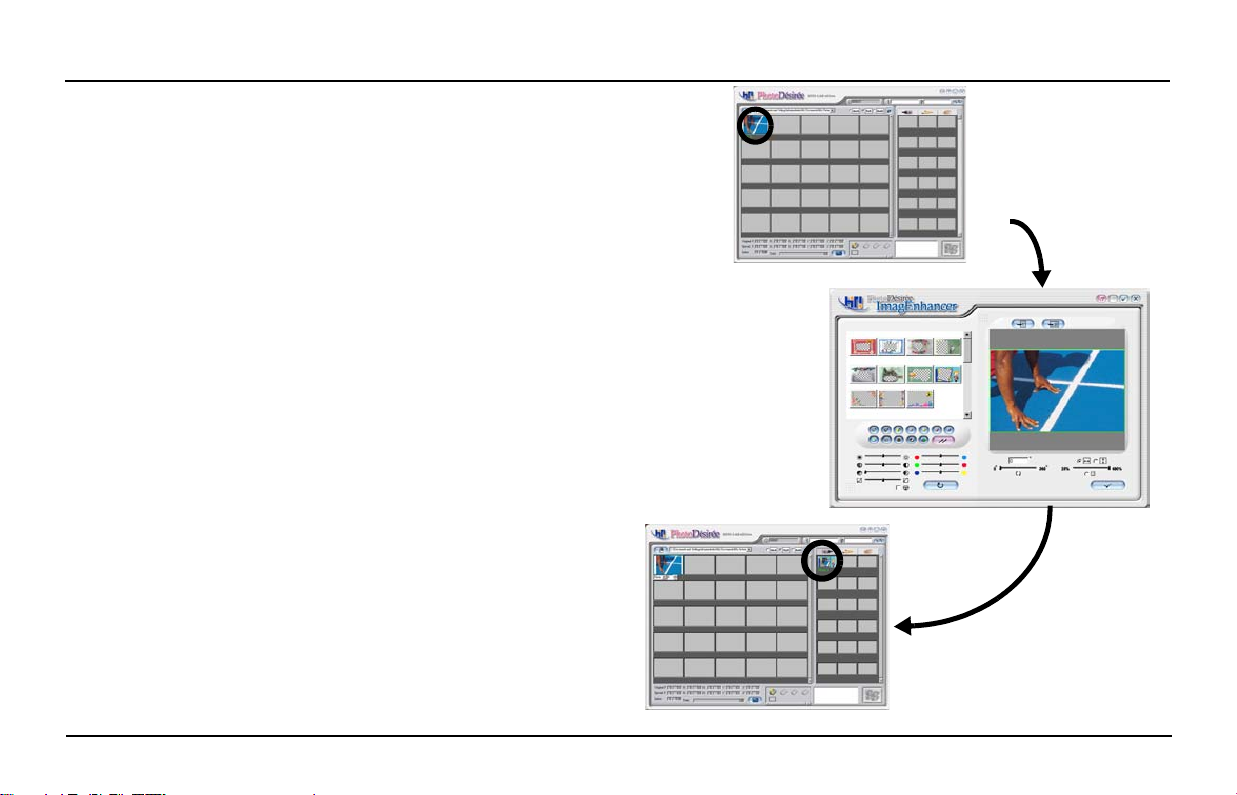
Editing Photos HiTi 640 DL Photo Printer User Manual
Editing Photos
To edit a photo you add into the PhotoDésirée application,
do the following:
1. Double-click the image you want to edit. The
ImagEnhancer opens on the screen.
2. Edit the image in the ImagEnhancer. For detailed
descriptions, see Introducing ImagEnhancer starting on
Page 27.
3. Once the editing is done, the Send Special Area Dialog
Box displays on the screen, asking you which price level
the editing should be charged for. An editing job can set
to three different pricing levels: Low, Medium and High.
For more information about pricing, see Pricing Your
Photos starting on Page 25.
4. Click OK. The image edited will show in the Special
Handling area on the right side of the window.
18 www.hi-ti.com
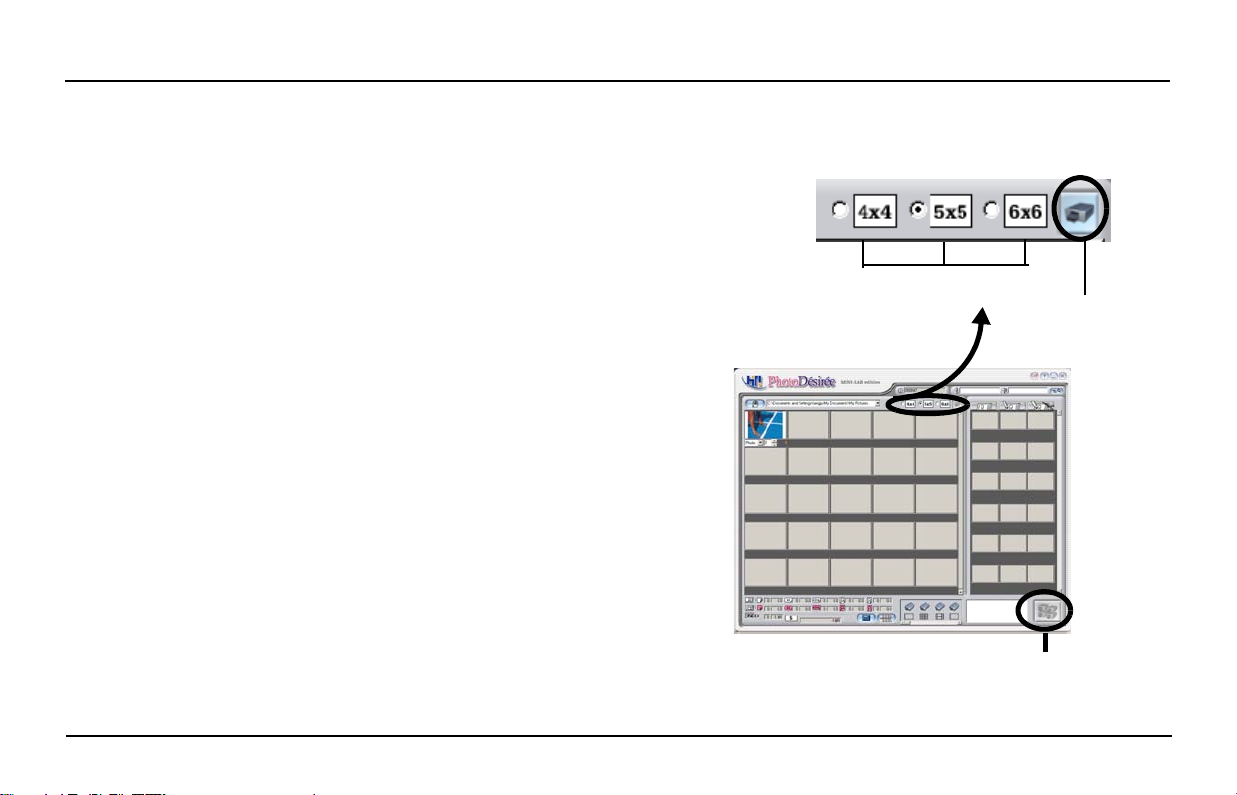
HiTi 640 DL Photo Printer User Manual Choosing Print Formats and Amounts
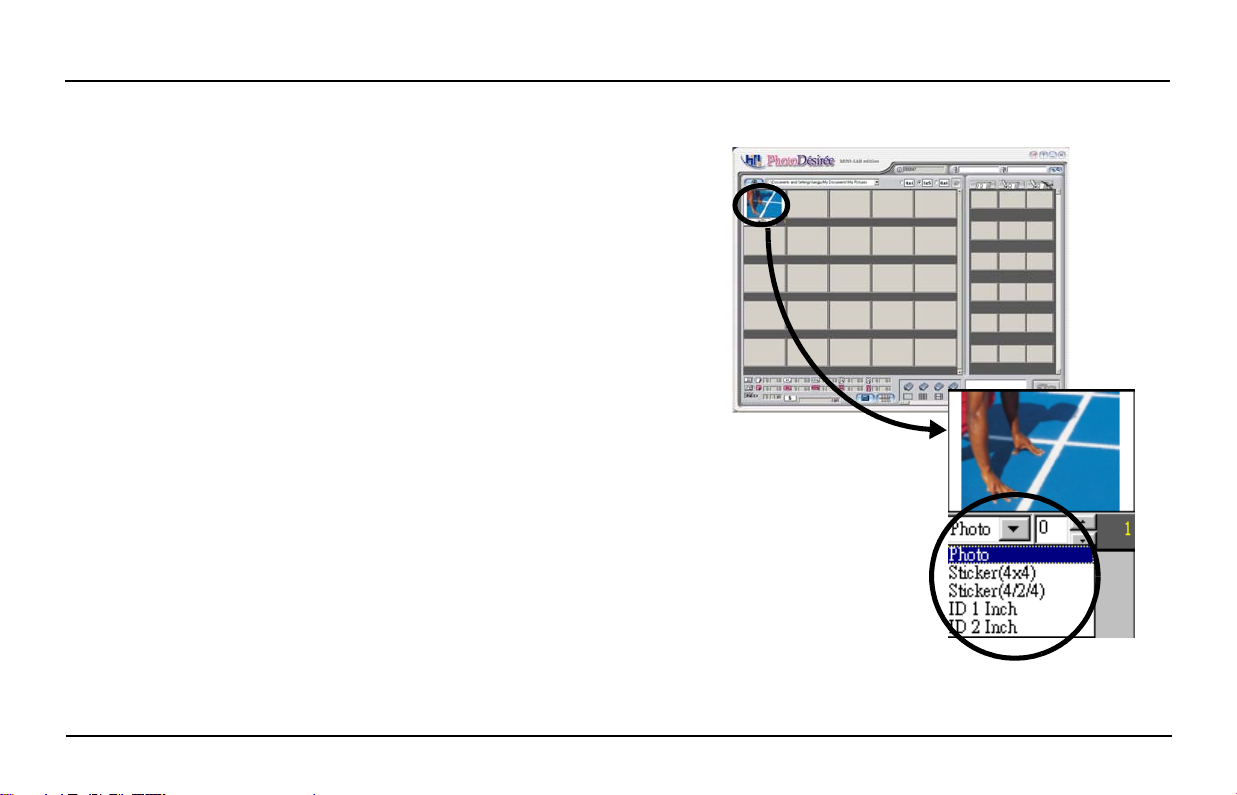
Choosing Print Formats and Amounts
You can choose to print your digital photos in different
formats and specify the amounts you want to print for each
type. The available print formats are:
• 4 x 6 inch photo
• 4 x 4 sticker
• 4 x 2 x 4 sticker
• 1 inch ID photo
• 2 inch ID photo
To choose a print type:
1. Move your mouse over the image you want to specify.
The print formats and amounts drop-down lists appears.
2. Choose a format from the format pull-down menu.
3. Specify the amount of prints for this format. PhotoDésirée
allows you to print 99 prints in maximum.
4. Repeat the above steps for another format if needed. To
reset to default settings, click the right button on the
mouse while mouse over an image. Select Reset on the
pop-up menu.
www.hi-ti.com 19
Printing Your Photos HiTi 640 DL Photo Printer User Manual
Printing Your Photos
Printing Index Card for Selected Photos
1. Select the format of the index card you want to print.
2. Click the Index Print button.
index card format
print index button
Printing Photos
1. Click to select the image you want to print.
2. If you want to print multiple images at a time, hold the shift
key while keep clicking other images to select them.
3. Click the Print button.
print button
20 www.hi-ti.com

Sending Print Jobs to Multiple Printers Hi-Ti 640 DL Photo Printer User Manual
Sending Print Jobs to Multiple Printers
HiTi 640 DL printer now enables you to work more efficientlly by allowing you to send print jobs to multiple printers at
the same time. When you hit the Print button, the printer automatically detects what type the photo paper is required
and sends the print job right to the printer with correct paper type/size installed.
At most, four printers can be connected to the PhotoDésirée MiniLab edition application. If any of the installed printer
is disconnected, a warning sign will be shown on the printer in the applcation, asking you to check the connection
status.
www.hi-ti.com 21

HiTi 640 DL Photo Printer User Manual Sending Print Jobs to Multiple Printers
Pricing Your Photos
One of the functions that empowers the PhotoDésirée MiniLab edition to be your best business partner is its
embedded price and customer database system. The pricing system in the PhotoDésirée MiniLab edition is able to
automatically calculate the price of all printing jobs in your store, letting you hassle-free from all those calculation
works.
PhotoDésirée MiniLab edition also includes a built-in database system, allowing you to easily manage your customer
data. The PhotoDésirée MiniLab edition is definitely the only one application you need to run your digital-photo
processing business.
22 www.hi-ti.com

Viewing Prices Hi-Ti 640 DL Photo Printer User Manual
Viewing Prices
Once you have selected and edited the photos for print, PhotoDésirée MiniLab edition automatically calculates how
much these photos should be charged for right away.
To view the price, check the Price Area located at the bottom of the PhotoDésirée window.
sticker 4x4x2
price for photos
without editing
price for photos
with editing
price for index
card printed
photo
sticker 4x4
total amount
1 inch ID photo
2 inch ID photo
open Valuation System
open Data System
www.hi-ti.com 23

Modifying Prices HiTi 640 DL Photo Printer User Manual
Modifying Prices
You can always modify the price of how you will charge for
processing digital photos. For instance, you can assign
different prices for processing different types or sizes of
photos, e.g., stickers, 4 x 6 photos or ID photos. For those
which require editing efforts, like adding texts or calendars,
assign prices for Low/Middle/High levels.
1. Click the Valuation System button to open the Valuation
System dialog box.
To modify a print job:
You can modify the number of prints of a specific print
job when the volumn of prints after processing turns
to be different from the the volumn specified before
processing.
2. To edit or delete a print job, click a Job ID in the list
and click the Edit or Delete button. To query a print
job, enter the Job ID or customer name you want
to query and click the Query button. The jobs that
match your query criteria will display in the dialog
box.
24 www.hi-ti.com

HiTi 640 DL Photo Printer User Manual Modifying Prices
3. Click the OK button to apply the changes and close the
dialog box.
To modify the prices:
1. Click the Price Setting button.
2. The options available are:
• Normal Price: Modify the price for original prints
without editing efforts
• Special Process Price: Modify the
price for prints with editing efforts
3. Modify the fields you want to change.
4. Click OK to apply the changes and close
the window.
www.hi-ti.com 25

Adding/Editing Customer Data HiTi 640 DL Photo Printer User Manual
Adding/Editing Customer Data
You can always add, edit or delete a customer’s data entry
from the Valuation and Data System window. You can also
query a customer’s information by his/her telephone number
or his first/last names.
1. Click the Data System button to open the Data System
window. The contact information of the customer
displays.
2. Do the options by clicking the appropriate buttons. Click
OK when you’re done with the changes.
26 www.hi-ti.com

Chapter 4 Introducing ImagEnhancer
The ImagEnhancer window is the place where you can customize your digital photos by taking advantages provided
in the ImagEnhancer. The available functions are:
• Assigning Templates
• Adjusting Colors
• Adding Texts
• Adding Calendars
• Rotating Images
• Adjusting Image Layouts
www.hi-ti.com 27

Assigning Templates HiTi 640 DL Photo Printer User Manual
Assigning Templates
1. Double click on the image that you want to customize with
a template. The ImagEnhancer window opens.
2. To assign a template:
• Double click on the template that you want to assign to
the image.
• Click on a template, then drag and drop it to the image
on the preview pane.
3. Check the result from the preview pane. If you don't like
the result, double click on another template to replace the
original one.
4. Click the Check button.
28 www.hi-ti.com

HiTi 640 DL Photo Printer User Manual Adjusting Colors
Adjusting Colors
1. Adjust the color setting of your photo to the way you like
by selecting either of the color setting items.
2. Or check the Mirabella checkbox to view the Mirabella
window where ImagEnhancer automatically creates 9
images with different settings in lightness and basic skin
tones.
3. On the Mirabella window, single click on the image you
would like to choose and to close the Mirabella window.
4. You can reset all settings to the default values and ignore
all the configurations you make.
5. Click the Check button to apply the changes.
Color Setting
Items
Open Mirabella
window
Reset to default settings
www.hi-ti.com 29

Adding Texts HiTi 640 DL Photo Printer User Manual
Adding Texts
1. Double click on the image to which you want to add text.
The ImagEnhancer window shall then open.
2. Click the Tex t Icon. When the Add Text dialog box
appears, type the words you want to add on the image.
• Select a font typeface and size
• Select the color of the text
• Select the degree of the transparency for text or text
block
3. Click the Check button to apply the changes.
4. Check the result from the preview pane. If you want to
modify the text, double click the text block from the
preview pane to make the changes. Repeat the above
steps until you're satisfied with the result.
30 www.hi-ti.com

HiTi 640 DL Photo Printer User Manual Adding Calendars
Adding Calendars
1. Double click on the image to which you want to add
calendar. The ImagEnhancer window shall then open.
2. Click the Add Calendar Icon to bring up the Add Calendar
dialog box.
3. On the Add Calendar dialog box, you should select the
following calendar properties:
• Select the year and month of the calendar
• Select a calendar style you want to apply
• Specify the color of the calendar
• Specify the degree of transparency of the calendar
4. Click the Check button to apply the changes to the image
and close the Add Calendar dialog box.
5. If you are not satisfied with the results and want to modify
the calendar, double click the calendar block on the
preview pane to re-open the Add Calendar dialog box for
editing.
www.hi-ti.com 31

Rotating Images HiTi 640 DL Photo Printer User Manual
Rotating Images
1. In the ImagEnhancer window, specify the degree of the
image rotation. You may also move the slider to set the
image rotation degree.
2. Check the result from the Preview pane.
3. Click the Check button to apply the change to the image
and close the ImagEnhancer window.
32 www.hi-ti.com

HiTi 640 DL Photo Printer User Manual Adjusting Image Layouts
Adjusting Image Layouts
1. Double click on the image which you would like to adjust
its layout. Then, the ImagEnhancer window shall open up
on the screen.
2. Choose to position the image by the width or height of the
print paper. Or you can choose to manually scale the
image. By moving the slider, you can manually set the
image size.
3. Click the Check button to apply the changes and close
the ImagEnhancer window.
www.hi-ti.com 33

HiTi 640 DL Photo Printer User Manual Adjusting Image Layouts
34 www.hi-ti.com

Chapter 5 Frequently Asked Questions
This section documents possible solutions to questions that are frequently asked. If the problem you encounter is not
listed, visit HiTi corporate web site for the most updated solutions or contact HiTi customer service representatives.
Table 5-1. Paper Jams/LEDs
Problem Possible Cause Solution
The orange LED light blinks. • Ribbon door open
• Ribbon missing
• Out of ribbon
• Out of paper
• Paper jam
• Paper type mismatched
• Memory run-out
Printing stops in the middle of
processing.
The ribbon cartridge is not
installed correctly.
The paper is not loaded or
Different blinkings indicate different problems. See
LED Signal Lights on page 38 for detailed descrip-
tions.
Install the ribbon cartridge correctly.
Load the paper or paper cassette correctly.
feeding correctly.
Paper jammed Remove the jammed paper. If this does not work,
turn off the printer and restart it after 1 minute. The
printer will automatically eject the jammed paper.
www.hi-ti.com 35

HiTi 640 DL Photo Printer User Manual
Problem Possible Cause Solution
Table 5-1. Paper Jams/LEDs
While printing, I accidentally
opened the ribbon door. The
paper is jammed and I could not
remove it from the printer.
When you open the cover of
the ribbon cartridge, the printer
will stop itself, as well as the
roller that is used to move the
Turn off the printer and close the cover of the ribbon cartridge. Then turn the printer back on. The
printer will try to eject the jammed paper.
paper out.
Table 5-2. USB Connections
Problem Possible Cause Solution
Windows cannot find the printer,
The printer is off. Turn on the printer.
but I have already connected the
USB cord from the computer to
the printer.
The USB cable used is unqual-
ified. Some unqualified USB
Use the cable shipped with the HiTi package.
cables might cause "Unknown
device" and thus the PnP func-
tion will not work properly.
The driver of the add-on USB
Install the driver for the Add-on USB card.
card is not installed.
The USB hub is using by other
devices.
36 www.hi-ti.com
From our testing, we recommend you use the first
row of the USB hub.

Hi-Ti 640 DL Photo Printer User Manual
Table 5-2. USB Connections
Problem Possible Cause Solution
The USB host device on Moth-
erboard is not installed cor-
rectly.
For Via or Intel chipset Motherboard, you need to
install the "Inf updator" and "chipset driver."
Windows 98 does not install it correctly unless you
update the driver to correct versions. You can
download the drivers from Via or Intel websites:
Intel chipset software:
http://support.intel.com/support/chipsets/
Via chipset driver:
http://www.via.com.tw/jsp/en/dr/driver.jsp
Printer driver is not installed
correctly.
Uninstall the printer driver and re-install the Motherboard chipset driver. Then re-install printer
driver.
The operating system is Win-
dows 95.
Windows 2000 installs a uni-
versal USB printer driver
instead of HiTi printer driver.
www.hi-ti.com 37
Upgrade your operation system to Windows
98/ME or 2000.
Remove the Windows 2000 universal USB printer
driver, and re-install the HiTi printer driver for Windows 2000.

HiTi 640 DL Photo Printer User Manual
Problem Possible Cause Solution
Table 5-2. USB Connections
No "New Hardware wizard" dialog box appears on the screen
even though the USB cable
between the printer and PC is
sure to be connected.
The operating system of your
printer is not either Windows
98 or 2000.
USB cable may not be con-
nected properly.
The USB function is not
enabled.
Upgrade the operating system to Windows 2000
or Windows 98/ME.
Make sure it is securely connected.
In Windows 2000 or 98, choose Start > Setting >
Control Panel > System > Device Manager.
Enable the "USB host" and "USB root hub."
When I connect the USB cord
between computer and printer,
an "Unknown device" message
appears on the screen.
Static electricity problem Unplug the USB cable and plug it back in after 30
seconds.
The USB cable is defective. Use the USB cable shipped with the HiTi package.
Unqualified USB cable The USB cable is shorter than 1.5 meter.
Table 5-3. Printing Results
Problem Possible Cause Solution
White dots on the printed photos There might be dust particles
Use the Clean Kit to clean the printer.
on the thermal printing head,
ribbon cartridge, or print paper.
38 www.hi-ti.com

Hi-Ti 640 DL Photo Printer User Manual
Problem Possible Cause Solution
The skin color on the printed
photos seems incorrect.
Vertical scratch lines on the photos
Strange slash lines on the photos
Wave-like vertical lines on the
photos
The jitters (the horizontal lines)
occur on the printed photos.
Fingerprints found on the printed
photos
The color table setting in the
driver is damaged.
This is rarely to happen. If it is happened, uninstall
the printer driver and then re-install it. The latest
version of the driver can be downloaded from the
HiTi website (http://www.hi-ti.com).
There might be dust particles
Use the Clean Kit to clean the printer.
on the thermal printing head of
the printer.
The ribbon of the cartridge is
curved or twisted
Scroll the ribbon to the next "black-print-start bar"
or simply replace the ribbon cartridge with a new
one.
Note: Do not re-use the used ribbon. Otherwise, a
ribbon jam error may occur.
The ribbon surface is twisted or
is not curled.
Scroll the ribbon to the next "black-print-start bar,"
or replace the ribbon cartridge.
The AC voltage is not stable. Use another power connections.
You may directly touch the
print side of the photo paper or
Hold the tear line side of the photo printer while
loading the photo paper.
the ribbon.
www.hi-ti.com 39

HiTi 640 DL Photo Printer User Manual
Problem Possible Cause Solution
The printed photo has horizontal
wave marks, especially the
Cyan and Yellow colors.
The printed photo quality is not
good.
The USB connection between
the printer and computer is disconnected, causing data
underrun.
Print to photo printer and other
printer at the same time.
The image resolution is too
low.
The photo itself is not correctly
adjusted.
Close unnecessary applications on your computer
to avoid memory insufficiency while printing.
Avoid running multi-tasks applications at the same
time, e.g., Word and PowerPoint.
While printing photos, assign printing jobs to the
photo printer only. Otherwise, an error in printing
queue management conflict may occur.
Adjust your photo to be 1600 x 1200 pixels or
higher for printing. For better image quality, it is
recommend your digital camera supports over 2
million pixels.
If resolution is too low, avoid setting your image to
be printed in "fit to width" or "fit to height" in the
ImagEnhancer.
Use ImagEnhancer to adjust the photo qualities.
40 www.hi-ti.com

Hi-Ti 640 DL Photo Printer User Manual
Table 5-4. Software Related
Problem Possible Cause Solution
The software is not install correctly.
The software conflicts with
your virus protection program.
The software conflicts with
another software program.
The software conflicts with a
Uninstall the printer software.
Close all software programs (including virus pro-
tection programs) that are running while printing.
Disconnect the peripheral device or cables.
peripheral device connected to
the printer.
Printer driver or PhotoDésirée
Re-install the printer software.
is not installed properly.
www.hi-ti.com 41

HiTi 640 DL Photo Printer User Manual
42 www.hi-ti.com

Chapter 6 Troubleshootings
This chapter contains tips that can help you identify and solve problems if HiTi photo printer is not working properly.
However, before you go over the lists, we would like to suggest that you should:
1. Make sure that cable connections are secured; or
2. Make sure that you are using the correct cable for your operating system.
If you are still unable to solve the problem, visit the Support section in HiTi corporate web site for the most up-to-date
solutions to all known problems. Or you can contact your venders from where you purchase the printer or contact HiTi
customer service representatives. For more information on support issues, refer to Customer Support Center on
Page iii in this user guide.
www.hi-ti.com 43

HiTi 640 DL Photo Printer User Manual LED Signal Lights
LED Signal Lights
The LED signal lights on the front of the printer are designed to blink when there is something wrong with the printer.
If the printer stops operating and a LED signal light is on or blinking, check the following procedure to see what
problem the printer may have.
Green Signal Light
Indicate that the printer is processing a printing job.
Signals Reason Solutions
Stable Normal operation Printer is ready for processing a printing job.
Blinking Normal operation Printer is processing a printing job or is initializing.
Orange Signal Light
Indicate the status of the photo paper supply.
Signals Reason Solutions
OFF Normal operation The volume of the photo paper in the paper cassette is sufficient.
ON Running out of the photo
paper.
44 www.hi-ti.com
The printer is running out of the photo paper to execute a print
job.

LED Signal Lights Hi-Ti 640 DL Photo Printer User Manual
Red Signal Light
Indicate problems and notify users a problem occurs on the printer. Different blinking times indicate different
problems.
Blinking Times Reason Solutions
1 Ribbon door is opened. Close the top cover of the printer.
2 No ribbon cartridge installed. Install a ribbon cartridge.
3 Run out the ribbon cartridge. Replace the old ribbon cassette with a new one.
4 No paper left in the paper
Place more paper to the paper cassette.
cassette.
5 Paper jammed. Remove the paper jammed. If you can’t remove the paper,
turn off the printer and then turn it on about 1 minute later. The
printer will move it out automatically.
Note: The Ribbon Door has to be closed.
6 Paper type mismatching. Modify the paper type setting by choosing Control Panel >
Printer > HiTi 640DL > Properties > Paper type. Choose
PhotoDésirée as paper type if you are printing using the
PhotoDésirée application.
www.hi-ti.com 45

HiTi 640 DL Photo Printer User Manual LED Signal Lights
Blinking Times Reason Solutions
7 Under run a. Check if too many applications are opened on your com-
puter. If so, close other applications to release memory for
printing. If the problem remains, restart the computer.
b. Avoid assigning printing jobs to 2 different printers (multitasking) at the same time.
c. Clean up the temp directory on your machine. The temp
directory is under C:\windows\temp for Windows 98 and
C:\Document and Settings\Administrator\My documents\temp\ for Windows 2000.
d. Check your USB status (especially Intel 815 or Via 694x
chip motherboard). You must obtain and install the updates of
the correct Intel/Via INF. Otherwise, your USB port cannot distinguish a USB printer and will slow down the transfer speed.
Intel chipset software:
http://support.intel.com/support/chipsets/
Via chipset driver:
http://www.via.com.tw/jsp/en/dr/driver.jsp
e. Turn off the printer and PC and restart them after 1 minute.
If the problem remains, contact your venders for help.
46 www.hi-ti.com

Error Messages Hi-Ti 640 DL Photo Printer User Manual
Error Messages
When the printer is not running properly, an error message will pop up on the screen as recorded in the following
section.
Error Message Cause Solutions
No Printer Printer driver is not installed
successfully.
Printers are off-line or
paused.
Paper jam Paper jammed during print-
ing.
www.hi-ti.com 47
Reinstall the driver. The newest version of driver software
can be downloaded from the HiTi web site
http://www.hi-ti.com
Be sure the power cable and the USB cable are connected correctly. If they are, unplug the cables from the
printer and then plug them back in.
Remove the jammed papers. Turn off the printer, and then
turn it on again. The printer should automatically eject the
jammed sheet. If the printer fails to eject the paper, contact HiTi customer service representatives for assistance.

HiTi 640 DL Photo Printer User Manual Error Messages
Error Message Cause Solutions
No paper
No paper left in the paper
cassette.
Paper is incorrectly loaded in
the paper cassette.
Paper cassette is incorrectly
installed.
No Ribbon Cartridge No ribbon cartridge in the
printer.
The ribbon cartridge is not
installed correctly.
Thermal Print Head
Overheated
This is caused by continuous
printing over a certain page
number (about 5~10 papers).
Door opened The cover to ribbon cartridge
is opened.
Allocating Memory
Memory allocation problem. Close unnecessary applications including PhotoDésirée
Failure
Load paper into the paper cassette.
Load paper correctly into the paper cassette.
Load the paper cassette correctly.
Load a ribbon cartridge.
Load the ribbon cartridge correctly.
Please wait a moment for the Thermal Print Head cool
down. The printer will resume printing automatically.
Close the cover of the ribbon cartridge.
and restart it.
48 www.hi-ti.com

Error Messages Hi-Ti 640 DL Photo Printer User Manual
Error Message Cause Solutions
Creating DC failure Memory allocation problem. Upgrade the memory of your PC to 64 MB RAM or above.
The Resolution of
the Monitor Setting
Monitor resolution is set to
lower than 800 x 600 pixels.
Set your monitor resolution to be 800 X 600 or higher.
is Too Low.
When using PhotoDésirée in Windows 2000/XP environment
Error Message Solutions
You have no privilege to create a folder. If the PhotoDésirée is installed in the Windows 2000 environment, your
access right to folders is limited by privilege setting. To solve the problem, use a log-in ID with administrator-equivalent rights to log in.
You have no privilege to save temporary
files.
www.hi-ti.com 49
If the PhotoDésirée is installed in the Windows 2000 environment, your
access right to folders is limited by privilege setting. To solve the problem, use a log-in ID with administrator-equivalent rights to log in.

HiTi 640 DL Photo Printer User Manual Error Messages
50 www.hi-ti.com

Hi-Ti 640 DL Photo Printer User Manual
Chapter 7 Specification, Regulatory and Warranty
Specifications
Print Model HiTi 640 DL
Print Method Dye Diffusion Thermal Transfer
Color YMCO 4 Passes
Continuous-tone output,
256-level each color
Resolution 403x403 dpi, equal to inkjet 6400
dpi
Print Pixel 1612x2436 pixels
Print Size 4x6 inches
Paper Size 4x7 inches with detachable
boundary
Paper Cassette 100 sheets
Ribbon Cartridge 100 images
www.hi-ti.com 51
I/O Interface USB 1.1
Dimension (mm) 264 (W) x148.9 (H) x 368.2 (L)
Weight 8 Kgw

HiTi 640 DL Photo Printer User Manual Package Contents
Package Contents
• HiTi Photo Printer 640 DL x1
• Photo Paper Cassette x1
• Software CD-Rom x1
• User Manual x1
• Quick Installation Guide x1
• USB Cable x1
• Power Cord x1
52 www.hi-ti.com

System Requirements Hi-Ti 640 DL Photo Printer User Manual
System Requirements
• Operation System: Windows 98/ME/2000/XP
• Pentium PC designed to run Windows 98/ME/2000/XP
• 128 MB DRAM or greater
• 100 MB hard disk space or greater
• USB port
www.hi-ti.com 53

HiTi 640 DL Photo Printer User Manual Limited Warranty Statement
Limited Warranty Statement
Ver. 1.1. October 2002, revised by Hi-Touch Imaging Technologies.
HiTi products warranty period
Photo printer 1 year
A. Extent of Limited Warranty
1. Hi-Touch Imaging Technologies (HiTi) warrants to the end-user customer that the HiTi products specified above
will be free from defects on materials and workmanship for the duration specified above, which duration begins on
the date of purchase by the customer. Customer is responsible for maintaining proof of date of purchase.
2. For software products, HiTi's limited warranty applies only to a failure to execute programming instructions. HiTi
does not warrant that the operation of any product will be uninterrupted or error free. The other concerned with
software warranties, please refer to declaration of "License Agreement" during installation.
3. HiTi's limited warranty covers only those defects, which arise as a result of normal use of the product, and do not
apply to any:
a. Improper or inadequate maintenance or modification.
b. Software, interfacing, media, parts, ribbons, photo papers, stickers, or other supplies not provided or
supported by HiTi.
c. Bundled software or elements. Their warranties and services should be supported by the original
manufactures.
54 www.hi-ti.com

Limited Warranty Statement Hi-Ti 640 DL Photo Printer User Manual
d. Operation outside the product's specifications. Such as use the personal photo printer to be a
commercial mass printing, and make defect of parts, HiTi would not responsible for the services.
4. For HiTi printer products, the use of a non-HiTi ribbon cartridge, or a refilled ribbon cartridge, non-HiTi photo paper
or sticker. HiTi will charge its standard time and materials charges to service the printer for the particular failure of
damage.
5. If HiTi receives, during the applicable warranty period, notice of a defect in any software, media, or ink cartridge
product, which is covered by HiTi's warranty, HiTi shall replace the defective product. If HiTi receives, during the
applicable warranty period, notice of a defect in any hardware product, which is covered by HiTi's warranty, HiTi
shall either repair or replace the defective product, at HiTi's option.
6. If HiTi is unable to repair or replace, as applicable, a defective product which is covered by HiTi's warranty, HiTi
shall within a reasonable time after being notified of the defect, refund the purchase price for the product.
B. Limitations of Warranty
1. TO THE EXTENT ALLOWED BY LOCAL LAW, NEITHER HiTi NOR ITS THIRD PARTY SUPPLIERS MAKE ANY
OTHER WARRANTY OR CONDITION OF ANY KIND, WHETHER EXPRESS OR IMPLIED, WITH RESPECT TO
THE HiTi PRODUCTS, AND SPECIFICALLY DISCLAIM THE IMPLIED WARRANTIES OR CONDITIONS OF
MERCHANTABILITY, SATISFACTORY QUALITY, AND FITNESS FOR A PARTICULAR PURPOSE.
C. Limitations of Liabilities
1. To the extent allowed by local law, the remedies provided in this Warranty Statement are the customer's sole and
exclusive remedies.
www.hi-ti.com 55

HiTi 640 DL Photo Printer User Manual Limited Warranty Statement
2. To the extent allowed by local law, except for the obligations specifically set forth in this warranty statement, in no
event shall HiTi or its third party suppliers be liable for direct, indirect, special, incidental, or consequential
damages, whether based on contract, tort, or any other legal theory and whether advised of the possibility of such
damages.
D. Local Law
1. To the extent that this Warranty Statement is inconsistent with local law, this Warranty Statement shall be deemed
modified to be consistent with such local law. Under such local law, certain disclaimers and limitations of this
Warranty Statement may not apply to the customer.
Safety Instructions
1. Read these instructions carefully. Save these instructions for future reference. Follow all warnings and instructions
marked on the product.
2. Unplug this product from the wall outlet before cleaning. Do not use liquid cleaners or aerosol cleaners. Use a
damp cloth for cleaning.
3. Do not use this product near water.
4. Do not place this product on an unstable cart, stand, or table. The product may fall, causing serious damage to the
product.
5. Openings in the cabinet and the bottom are provided for ventilation; to ensure reliable operation of the product and
to protect it form overheating, these openings must not be blocked or covered. Placing the product on a bed, sofa,
56 www.hi-ti.com

Limited Warranty Statement Hi-Ti 640 DL Photo Printer User Manual
rug, or other similar surface should never block the openings. Theirs products should never be placed near or over
a radiator or heat register, or in a built-in installation unless proper ventilation is provided.
6. This product should be operated from the type of power indicated on the marking label. If you are not sure of the
type of power available, consult your dealer or local power company.
7. If an extension cord is used with this product, make sure that the total ampere rating of the equipment plugged into
the extension cord does not exceed the extension cord ampere rating. Also, make sure that the total rating of all
products plugged into the wall outlet does not exceed the fuse rating.
8. Do not attempt to service this product yourself, as opening or removing covers may expose you to dangerous
voltage points or other risks. Refer all servicing to qualified service personnel.
FCC Information
The Federal communication Commission Radio Frequency Interference Statement includes the following paragraph:
This equipment has been tested and found to comply with the limits for a Class B Digital Device, pursuant to Part 15
of the FCC Rules. These limits are designed to provide reasonable protection against harmful interference in a
residential installation. This equipment generates, use and can radiate radio frequency energy and, if not installed
and used in accordance with the instruction, may cause harmful interference to radio communication. However, there
is no guarantee that interference will not occur in a particular installation. If these equipment doses cause harmful
interference to radio or television reception, which can be determined by interference by on or more of the following
measures:
1. Reorient or relocate the receiving antenna.
www.hi-ti.com 57

HiTi 640 DL Photo Printer User Manual Limited Warranty Statement
2. Increase the separation between the equipment and receiver.
3. Never push objects of any kind into these products through cabinet openings as they may touch dangerous
voltage points or short out parts that could result in a fire or electric shock. Never spill liquid of any kind on the
product.
4. Connect the equipment into an outlet on a circuit different from that to which the receiver is connected.
5. The users should not modify or change this equipment without written approval from this company. Modification
could void authority to use this equipment.
58 www.hi-ti.com

Appendix Printer Driver Details
This appendix provides extensive information on how you can adjust your printer settings and functions to meet your
printing expectation, including installing printer driver and configuring printer settings. The topics covered in this
appendix are:
• Installing Printer Driver
• Configuring Driver Settings
• Uninstalling Printer Driver
www.hi-ti.com 59

Installing Printer Driver HiTi 640 DL Photo Printer User Manual
Installing Printer Driver
In Windows 98 environment
Although there are three methods available for installing
printer driver, we recommend you use the first one as it is
the most straight-forward and easy to follow. The three
methods are:
• Install printer driver, then plug in the USB cable cord
(Recommended)
• Plug in the USB cable cord, then Install Driver
• Install by using the "Add Printer Wizard"
60 www.hi-ti.com

HiTi 640 DL Photo Printer User Manual Installing Printer Driver
Method 1. Install driver, then plug in USB cable cord (Recommended)
1. Please insert the "Software CD" into the CD-ROM drive.
If CD-ROM does not start automatically, you can initiate it
by double-clicking the CD-ROM drive from Windows
Explorer or by double-clicking the My Computer icon.
2. Select Install HiTi Photo Printer 640DL Driver from the
Welcome window.
3. The Installing Printer Driver message box appears. Click
Start to start the installation process.
4. When done, the Installation Program prompts to ask if
you want to set HiTi photo printer as the default printer for
the computer. Click Yes if you like to; otherwise, click NO.
5. The installation is complete.
6. If you want to check your printer device, select Control
Panel > System > Device Manager to open the System
Properties window.
www.hi-ti.com 61

Installing Printer Driver HiTi 640 DL Photo Printer User Manual
Method 2. Plug in the USB cable cord, then install the printer driver
1. Plug in the USB cable cord to the USB ports of the printer
and your personal computer.
Note: Be sure to switch off the printer before you proceed
the following steps.
2. The New Hardware Found message box appears and so
does the Install From Disk dialog box. Select the path to
your CD-ROM drive, e.g., d:\. Click OK.
3. The Add Printer Wizard dialog box displays. Select HiTi
Photo Printer 640 DL as the printer. Click Next.
4. To this step, you can turn the power of the printer on.
Once the power is switched on, a message box saying
the USB connection is connected will display on the
screen.
5. Choose USB001-HiTi-640DL as the port for use with the
printer. Note that the port status should be "connected."
Click Next.
62 www.hi-ti.com

HiTi 640 DL Photo Printer User Manual Installing Printer Driver
6. Select if you want to set the printer as the "default
printer." Choose Yes if you’re sure only photo printing will
be processed from this computer. Click Finish.
7. The installation is complete.
www.hi-ti.com 63

Installing Printer Driver HiTi 640 DL Photo Printer User Manual
Method 3. Using the Add Printer Wizard
1. Choose Control Panel > Printer from Windows Start
menu. Double-click on the Add Printer icon.
2. The Add Printer Wizard is invoked. Click Next to begin the
installation process.
3. Choose if the printer is a local printer or is connected to a
network system, e.g., LAN. Choose Local printer if the
printer does not belong to a network system. Click Next.
64 www.hi-ti.com

HiTi 640 DL Photo Printer User Manual Installing Printer Driver
4. Choose HiTi and HiTi 640 DL Photo Printer as the
manufacture and model of the printer driver. Click Next.
If you can’t find them in the scroll-down list, click Have
Disk to locate them from the CD-ROM. Usually, you can
simply type "D:\" if your CD-ROM is on the D drive.
5. If you have installed the driver on the computer before,
choose Replace existing driver. Click Next.
www.hi-ti.com 65

Installing Printer Driver HiTi 640 DL Photo Printer User Manual
6. Choose USB001-HiTi-640DL as the port for use with the
printer. Note that the port status should be "connected."
Click Next.
7. Select if you want to set the printer as the "default
printer." Choose Yes if you’re sure that only photo
printings will be processed on this computer. Click Finish.
8. The installation is complete.
66 www.hi-ti.com

HiTi 640 DL Photo Printer User Manual Installing Printer Driver
In Windows 2000 environment
1. Insert the "Software CD" into the CD-ROM drive.
If CD-ROM does not start automatically, you can initiate it
by double-clicking the CD-ROM drive from Windows
Explorer or by double-clicking the My Computer icon.
2. Select Install HiTi Photo Printer 640 DL Driver from the
Welcome window.
3. The Installing Printer Driver message box appears. Click
Start to start the installation process.
www.hi-ti.com 67

Installing Printer Driver HiTi 640 DL Photo Printer User Manual
4. The Windows 2000 system will display a warning
message, saying "Digital Signature Not Found." Click Yes
to continue the installation process.
5. The system starts to copy driver files from the CD-ROM.
When done, click OK.
6. Then, connect the USB cable cord to the printer and your
personal computer. Switch on the power of the printer.
The Windows 2000 PnP system will find the driver
automatically.
7. The installation is complete.
68 www.hi-ti.com

HiTi 640 DL Photo Printer User Manual Installing Printer Driver
8. If you want to check your printer device, select Control
Panel > System Properties > Hardware from Windows
Start menu. Click Device Manager to open the Device
Manager window.
www.hi-ti.com 69

Configuring Driver Settings HiTi 640 DL Photo Printer User Manual
Configuring Driver Settings
In Windows 98 environment
To configure driver settings, first open the Printers windows
by choosing Control Panel > Printers from Windows Start
menu. Click the HiTi USB Printer icon and right-click
Properties from the pop-up menu. The Printer Property
window displays on the screen.
The printer property window is divided into the following
categories:
• General
• Details
• Color Management
• Sharing
• Setting
• Tools
• About
70 www.hi-ti.com

HiTi 640 DL Photo Printer User Manual Configuring Driver Settings
General
This General category contains printer’s general information,
like printer name or descriptions. You can also choose what
separator page to use when printing from this printer.
• Click Print Test Page if you want to test if the printer
works properly.
• Click Apply to apply the changes you make. Or click OK
to apply the changes and close the Printer Properties
window.
For more detailed information, click Help to view Windows
online help file.
www.hi-ti.com 71

Configuring Driver Settings HiTi 640 DL Photo Printer User Manual
Details
The Details category contains information about the port and
printer driver version used by this printer. You can add,
delete or capture ports connected to this printer by selecting
from the drop-down list.
• The default time-out setting is also included in this
category. Click Spool Settings to modify the spooling
settings; click Port Settings to modify the port used by
this printer.
• Click Apply to apply the changes you make. Or click OK
to apply the changes and close the Printer Properties
window.
For more detailed information, click Help to view Windows
online help file.
72 www.hi-ti.com

HiTi 640 DL Photo Printer User Manual Configuring Driver Settings
Color Management
The Color Management category allows you to choose a
color setting profile associated with the photo printer.
• Choose Automatic to allow Windows automatically to
select a color setting profile. Choose Manual if you want
to specify a profile to use.
• Click Apply to apply the changes you make. Or click OK
to apply the changes and close the Printer Properties
window.
For more detailed information, click Help to view Windows
online help file.
www.hi-ti.com 73

Configuring Driver Settings HiTi 640 DL Photo Printer User Manual
Sharing
The Sharing category is ONLY available when you install
Microsoft Networks function on the computer connected with
the photo printer. This also means that the printer is located
in a local LAN environment and you can share it as a public
printer.
• Assign the Sharing Name and Comment for this printer.
You can assign a password for assessing this printer if
necessary.
• Click Apply to apply the changes you make. Or click OK
to apply the changes and close the Printer Properties
window.
For more detailed information, click Help to view Windows
online help file.
74 www.hi-ti.com

HiTi 640 DL Photo Printer User Manual Configuring Driver Settings
Setting
The Setting category provides you the choices of specifying
output format settings on each paper type.
• Select a paper type from the scroll-down list and modify
the settings if necessary. The paper types available are:
photo, sticker 4/2/4 and sticker 4x4.
The format settings available are:
• Orientation: Set the output format as portrait or
landscape.
• Tiles: Set the output image to be in the full page of the
print paper or to be tiled as 2" ID photo.
• Printer mode: Set the printing mode as speed,
standard or optimum.
• Copies: Select the number of copies to print.
• Check Preview if you want to open the Preview window to
modify the output formats in the Preview window. See
Preview Function on Page 76 for more information.
• Click Apply to apply the changes you make. Or click OK
to apply the changes and close the Printer Properties
window.
For more detailed information, click Help to view Windows
online help file.
www.hi-ti.com 75

Configuring Driver Settings HiTi 640 DL Photo Printer User Manual
Preview Function
The Preview function allows you to preview the output
format and do the final check before printing. You can
always invoke the Preview window for checking before you
hit the Print button.
The options available are:
1. Adjust color settings, e.g., brightness, contrast, and
sharpness. Define if the image to be centralized on the
photo paper. Click Reset to ignore the changes you
make;
2. Set Scale number if you’re not satisfied with the printing
size;
3. Specify the copies to print;
4. Change the measurements unit in "mm" or "inches;" and
5. Set the actual page to print in specified pages.
Click Print to start printing. Click Reset All to ignore the
changes you make and restore the default settings. Click
Cancel to close the Printer Properties window without saving
the changes you make.
For more detailed information, click Help to view Windows
online help file.
76 www.hi-ti.com

HiTi 640 DL Photo Printer User Manual Configuring Driver Settings
Tools
Position Calibrating
1. According to the result of your print output, specify a
number that fits best to the sticker dimension.
2. You must fill in the number of Area A and Area B in order
to adjust the horizontal and vertical margins.
Color Preference Setting
This option gives you a natural look of your skin tone in the
photo. For making your selection process easier, you may
select from 9 different images of pre-toned photos from the 9
images listed in AREA C.
Note: Color matching can also be conducted by clicking
the circle on the color matching selection.
If you wish to do no configuration changes, don’t
make any selections.
Click Apply to apply the changes you make. Or click OK to
apply the changes and close the Printer Properties window.
For more detailed information, click Help to view Windows
online help file.
www.hi-ti.com 77

Configuring Driver Settings HiTi 640 DL Photo Printer User Manual
About
This section shows the copyright information of the driver
software installed on this machine. The corporate web site
address is also listed for your reference.
Click OK to apply the changes and close the Printer
Properties window. For more detailed information, click Help
to view Windows online help file.
78 www.hi-ti.com

HiTi 640 DL Photo Printer User Manual Configuring Driver Settings
In Windows 2000 environment
To configure the driver settings, first open the Printers
windows by choosing Control Panel > Printers from
Windows Start menu. Click the HiTi USB Printer icon and
right-click Properties from the pop-up menu. The Printer
Property window displays on the screen.
Because the settings in Windows 2000 are almost similar
with those in Windows 98, we only document what is
different when your operation system is Windows 2000. For
parts that are not documented in this section, refer to In
Windows 98 environment on Page 70.
www.hi-ti.com 79

Configuring Driver Settings HiTi 640 DL Photo Printer User Manual
General
This General category contains printer’s general information,
like printer name or descriptions. You can add or modify the
location and comment of the printer.
• Click Print Test Page to test if the printer works properly.
• Click Printing Preference to configure options on printing.
See Printer Preferences on Page 81.
• Click Apply to apply the changes you make. Or click OK
to apply the changes and close the Printer Properties
window.
For more detailed information, click Help to view Windows
online help file.
80 www.hi-ti.com

HiTi 640 DL Photo Printer User Manual Configuring Driver Settings
Printer Preferences
To open the Printer Preference window:
• Choose Printing Preference from the Printer Properties
window (see General on Page 80). For options available
in this category, refer to the Setting on Page 75 of the In
Windows 98 environment section.
• Click Apply to apply the changes you make. Or click OK
to apply the changes and close the Printer Properties
window.
For more detailed information, click Help to view Windows
online help file.
www.hi-ti.com 81

Configuring Driver Settings HiTi 640 DL Photo Printer User Manual
Ports
The HiTi photo printer creates a "virtual printer port" for
printing through the USB port when you install the printer
driver. Make sure the HiTi USB Photo Printer 640 DL is
checked and the status is Connected.
Click Apply to apply the changes you make. Or click OK to
apply the changes and close the Printer Properties window.
For more detailed information, click Help to view Windows
online help file.
82 www.hi-ti.com

HiTi 640 DL Photo Printer User Manual Uninstalling Printer Driver
Uninstalling Printer Driver
In Windows 98 environment
You should uninstall the printer driver if: you want to
re-install with a new version of printer driver, or you want to
remove the printer driver from your machine.
1. Choose Control Panel > Printers > Uninstall HiTi USB
Photo Printer 640DL from Windows Start menu. Click
Add/Remove.
2. Click Start to uninstall the driver software from the
machine.
3. The uninstallation program starts to remove related
program files. When done, the uninstallation program
prompts you to restart Windows to complete the
installation. Click OK.
www.hi-ti.com 83

Uninstalling Printer Driver HiTi 640 DL Photo Printer User Manual
In Windows 2000 environment
1. Choose Control Panel > Add/Remove Programs from
Windows Start menu. Choose Uninstall HiTi USB Photo
Printer.
2. Click Start to uninstall the driver software from the
machine.
3. The uninstallation is complete.
Note: You don’t need to restart your machine to complete
the uninstallation.
84 www.hi-ti.com
 Loading...