

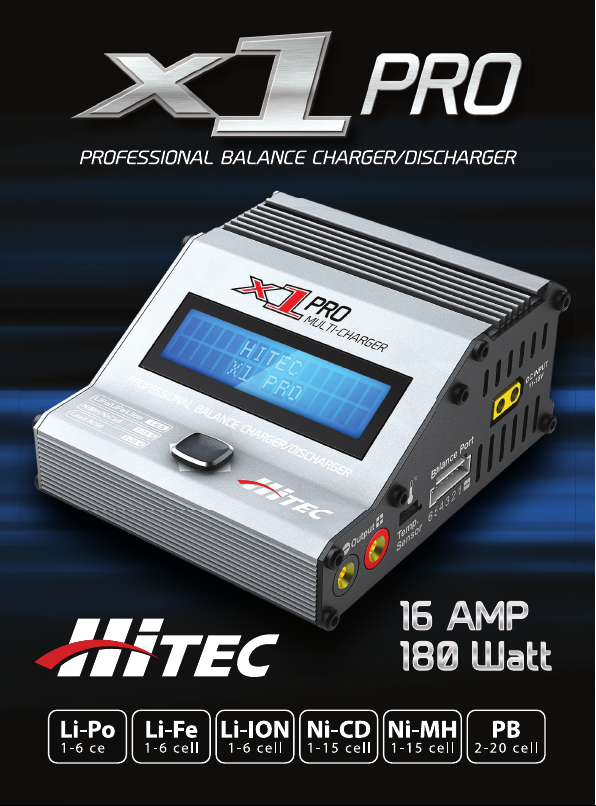
Page 1
Page 2

TABLE OF CONTENTS
Introduction .............................................................................. 3
Warnings and Safety Notes ......................................................4
Charger Layout .......................................................................10
Specications ..........................................................................11
Features ...................................................................................12
Power Supply Connections ....................................................15
Battery Connections ...............................................................16
Operating the X1 Pro ..............................................................17
Lithium ....................................................................................18
Charge Mode ................................................................................... 18
Balance Charge Mode .................................................................. 20
Fast Charge Mode .......................................................................... 22
Storage Mode .................................................................................. 24
Discharge Mode ............................................................................. 26
NiCd/NiHM ..............................................................................29
Charge Mode ................................................................................... 29
Auto Charge Mode ........................................................................ 30
Discharge Mode ............................................................................. 31
Re-Peak Mode ................................................................................. 32
Cycle Mode ....................................................................................... 33
Pb (Lead Acid) .........................................................................35
Charge Mode ................................................................................... 35
Discharge Mode ............................................................................. 37
Charge Master .........................................................................38
Battery Memory ...................................................................... 39
Lithium Battery Meter ............................................................41
System Setup ..........................................................................42
Warnings and Error Messages ...............................................45
Warranty and Service .............................................................46
2
Page 3

INTRODUCTION
We are excited that you have selected the Hitec X1 Pro battery balance charger and discharger. Capable of charging all battery types
including Lithium, NiCd/NiMH and Lead-Acid chemistries with a
tremendous 230-watt charge amperage rate, this professional charger is innovatively designed and engineered, providing a safe and
reliable performance. Take charge of your hobby with Hitec!
Please read this entire operating manual before using the X1 Pro
Charger. If you are unsure of its proper operation after reading the
manual, please seek advice from an experienced hobbyist or someone familiar with proper battery charging procedures.
THE CHARGING AND DISCHARGING OF RC HOBBY
BATTERIES CAN BE DANGEROUS. FAILURE TO FOL
Warning
LOW THESE EXPLICIT WARNINGS CAN RESULT IN
PROPERTY DAMAGE AND/OR LOSS OF LIFE.
A NEVER LEAVE YOUR CHARGER UNATTENDED WHILE IN OPERA-
TION.
A NEVER CHARGE ON OR AROUND COMBUSTIBLE MATERIALS.
A NEVER CHARGE A DAMAGED BATTERY PACK.
A LOW COST, NO-NAME BATTERY PACKS POSE THE MOST DAN-
GER. WE RECOMMEND YOU ONLY USE BATTERY PACKS THAT
ARE SOLD AND WARRANTIED BY A REPUTABLE COMPANY.
A IT IS HIGHLY RECOMMENDED THAT YOU UTILIZE A SAFETY DE-
VICE SUCH AS A STEEL CASE OR LiPo SACK™ WHILE CHARGING
LITHIUM CHEMISTRY BATTERIES.
A IT IS HIGHLY RECOMMENDED THAT YOU KEEP AN OPERABLE
“CLASS A” FIRE EXTINGUISHER IN THE CHARGING AREA.
3
Page 4
INTRODUCTION (cont.)
FAILURE TO FOLLOW THESE WARNINGS CAN BE CONSID
ERED NEGLIGENCE BY THE OPERATOR AND MAY NEGATE
ANY CLAIMS FOR DAMAGES INCURRED.
Hitec RCD USA will not be held responsible for any damages or
injuries that may occur by persons who fail to follow these warnings or who fail to properly follow the instructions in this manual.
WARNINGS AND SAFETY NOTES
Warning: Be sure to read this section for
your own safety.
Warning
Tip
Caution: Be sure to read this section to pre-
vent accidents and damage to your charger.
Tip: This section will help you maximize the
performance of your charger.
Note
Caution
Note: This section will provide more detailed
explanations.
These warnings and safety notes are of the utmost importance.
You must follow these instructions for maximum safety. Failure to
do so can damage the charger and the battery and, in the worst
cases, may cause a re.
NEVER LEAVE THE CHARGER UNATTENDED WHEN
IT IS CONNECTED TO ITS POWER SOURCE. IF ANY
Warning
MALFUNCTION IS FOUND, TERMINATE THE PRO
CESS IMMEDIATELY AND REFER TO THE OPERA
TION MANUAL.
4
Page 5

WARNINGS AND SAFETY NOTES
A The allowable DC input voltage is 11-18V DC.
A Keep the charger away from dust, damp, rain, heat, direct
sunlight and excessive vibration.
A If the charger is dropped or suers any type of impact, it
should be inspected by an authorized service station before
using it again.
A This charger and the battery should be put on a heat-resis-
tant, non-ammable and non-conductive surface.
A Never place a charger on a car seat, carpet or similar surface.
Keep all ammable, volatile materials away from the operating area.
A Verify the specications of the battery to be charged or dis-
charged to ensure it meets the requirements of this charger.
If the program is set up incorrectly, the battery and charger
can be damaged.
A Fire or explosion can occur due to overcharging.
A To avoid a short circuit between the charge lead, always con-
nect the charge cable to the charger before connecting the
battery. Reverse the sequence when disconnecting.
A Never attempt to charge or discharge the following types of
batteries:
• A battery tted with an integral charge circuit or a
protection circuit
5
Page 6

WARNINGS AND SAFETY NOTES (cont.)
• A battery pack which consists of dierent types of cells
(including dierent manufacturer’s cells)
• A battery that is already fully charged or just slightly
discharged
• Any non-rechargeable batteries (these pose an explo-
sion hazard)
• A faulty or damaged battery
• Batteries installed in a device or which are electrically
linked to other components
• Batteries that are not expressly stated by the manufac-
turer to be suitable for the currents the charger delivers
during the charge process
PLEASE BEAR IN MIND THE FOLLOWING POINTS BEFORE
YOU COMMENCE CHARGING:
• Did you select the appropriate program suitable for the type
of battery you are charging?
• Did you set up the adequate current for charging or discharg-
ing?
• Have you checked the battery voltage? Lithium battery packs
can be wired in parallel and in series, i.e. a 2-cell pack can be
3.7V (in parallel) or 7.4V (in series).
• Have you checked that all connections are rm and secure?
• Make sure there are no intermittent contacts at any point in
the circuit.
6
Page 7

WARNINGS AND SAFETY NOTES (cont.)
Standard Battery Parameters
Nominal Voltage
Max. Charge Voltage
Storage Voltage
Min. Discharge Voltage
Warning
LiPo LiIon LiFe N iCd NiMH Pb
3.7V/cell 3.6V/cell 3.3V/cell 1.2V/cell 1.2V/cell 2.0V/cell
4.2V/cell 4.1V/cell 3.6V/cell 1.5V/cell 1.5V/cell 2.46V/cell
3.8V/cell 3.7V/cell 3.3V/cell n/a n/a n/a
3.0-3.3V/cell 2.9-3.2V/cell 2.6-2.9V/cell 0.1-1.1V/cell 0.1-1.1V/cell 1.8V/cell
WHEN ADJUSTING YOUR X1 PRO CHARGING
PARAMETERS, BE SURE YOU SELECT THE PROPER
BATTERY TYPE AND CELL VOLTAGE FOR THE TYPE
OF CELL YOU ARE CHARGING. CHARGING BATTER
IES UNDER THE WRONG SETTINGS MAY CAUSE THE
CELLS TO BURST, CATCH FIRE OR EXPLODE.
Charging
Before charging your batteries, it is critical that you determine
the maximum allowable charge rate for your batteries. The X1 Pro
is capable of charging at high rates that may not be suitable or
safe for your particular batteries. For example, Lithium cells are
typically safe to charge at 1C, or the total mAh÷1000. A 1200mAh
battery would have a 1C charge rate of 1.2 amps. A 4200mAh battery would have a 1C charge rate of 4.2 amps. Some manufacturers are oering Lithium cells that can be charged at greater than
1C but this should ALWAYS be veried before charging a Lithium
battery at rates higher than 1C. Voltage is just as critical as the
charging amperage rate and this is determined by the number of
cells in series, or “S”. For example, a 3S LiPo is rated at 11.1 volts (“S”
multiplied by a single LiPo cell with a nominal voltage of 3.7 volts
DC. 3 cells x 3.7 volts each equals 11.1 volts DC).
Connect the battery’s main leads to the charger output: red is
positive and black is negative. Keep in mind that the gauge or
thickness of your charging leads from the X1 Pro to your battery
must be of an acceptable current rating to handle the applied
7
Page 8

WARNINGS AND SAFETY NOTES (cont.)
charge current. For maximum safety and charging eectiveness,
always match or exceed the main battery lead rating when assembling or selecting your charging leads. If you charge a battery
at a high current rate (amperage) with a charging lead not rated
for the chosen amperage, the wire could get hot, catch re, short
out and/or potentially destroy your battery and the charger. When
in doubt, always use a higher gauge wire (lower AWG number). It
is common to see charging leads constructed of 14AWG, 16AWG
or 18AWG wire.
Always refer to recommendations from your battery manufacturer
for your specic battery type and size before initiating a charge or
discharge process.
Do not attempt to disassemble or modify Lithium or LeadAcid battery packs.
8
Page 9

WARNINGS AND SAFETY NOTES (cont.)
Discharging
The X1 Pro discharging functions have two specic purposes:
• Refreshing the capacity of a Nickel-based battery that has lost
capacity over time (NiMH or NiCd).
• Reducing the voltage of a Lithium battery for safe storage.
LITHIUM CHEMISTRY BATTERY PACKS SHOULD
ONLY BE DISCHARGED TO THEIR MINIMUM SAFE
VOLTAGE, NO LOWER. DEEP DISCHARGING A
Warning
LiPo Charge/Discharge Cycling
Lithium batteries are known to reach full capacity after a break-in
period of about 10 charge/discharge cycles. We do not recommend you use the X1 Pro Charger to do this, normal use and
recharging will achieve the same results. If you wish to perform
a Lithium break-in on the bench with the X1 Pro, discharging to
minimum acceptable voltages and performing a balance charge
at 1C maximum rate is recommended. If you choose to break in
your Lithium batteries under normal use, charging at only 1C for
the rst ten cycles will help ensure full performance and service
life from your Lithium cells.
LITHIUM CELL WILL DO PERMANENT DAMAGE.
REFER TO THE STANDARD BATTERY PARAMETERS
TABLE ON PAGE 7 OF THIS MANUAL FOR MINIMUM
DISCHARGE VOLTAGES.
9
Page 10
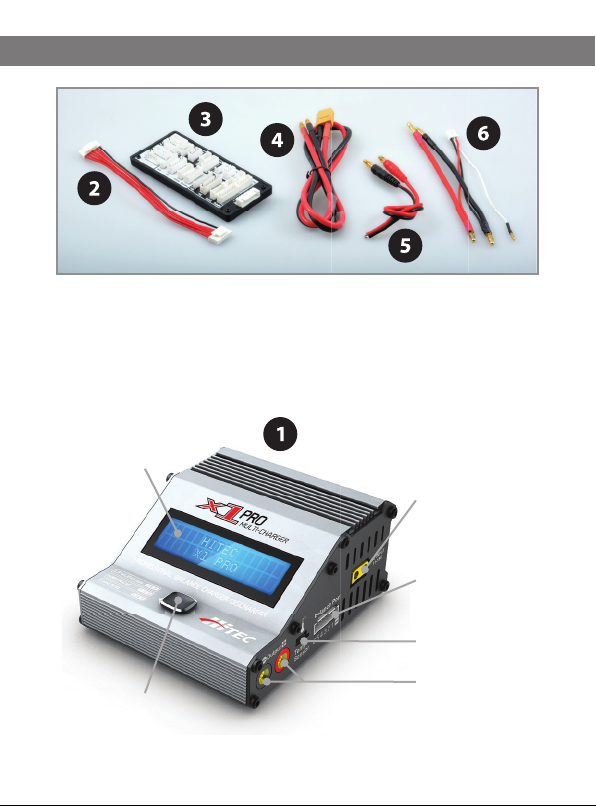
CHARGER LAYOUT
1. X1 Pro Charger
2. Balance Adaptor
3. Balancing Board
LCD Display
Joystick
10
4. DC Input Power Cable
5. 18AWG Wire Charging Cable
6. 2S LiPo Hardcase Charging Lead
DC Input 11-18V
(XT60 Type)
Balance Socket
Temp. Sensor
Charging Output
Page 11
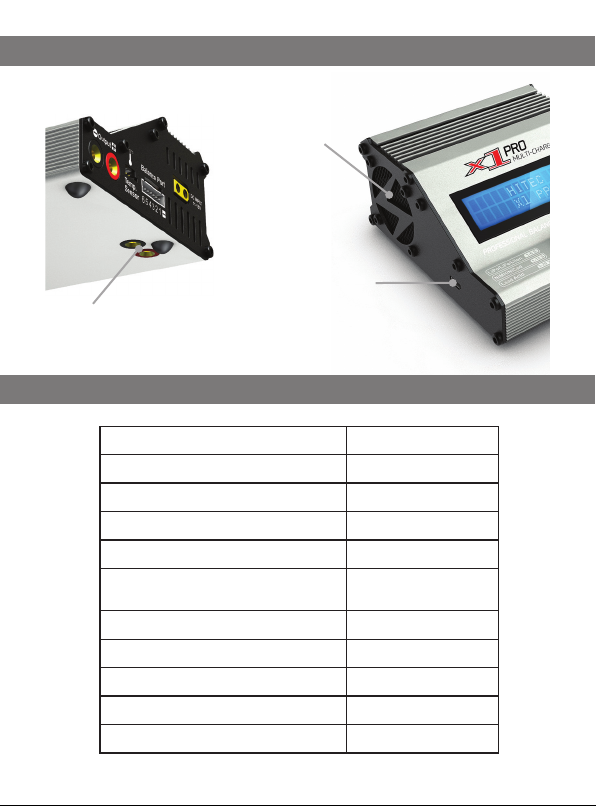
CHARGER LAYOUT
Smart
Cooling Fan
Micro USB Port
DC Input 11-18V
for PC Control and
Firmware Upgrade
SPECIFICATIONS
Input Voltage Range 11~18 Volts DC
Charge Circuit Power 180 Watts
Disharge Circuit Power 30 Watts
Charge Current Range 0.1-16.0 Amps
Discharge Current Range 0.1-8.0 Amps
LiPo, LiFe & LiIon Balancing
Current Drain
LiPo, LiFe & LiIon Cell Count 1 - 6 Cells
Maximum NiCd/NiMh Cell Count 1 - 15 Cells
Lead Acid (Pb) Cells / Voltage 2 - 20 Volts
Dimensions (W x D x H) 3.6 x 4.4 x 2.0 Inches
Weight 14.3 Ounces
200mA per Cell
11
Page 12

FEATURES FEATURES (cont.)
Compact and Unique Design
The X1 Pro is a super-compact, portable charging system with a
unique design that incorporates a joystick input device for very
simple operation.
Two DC Inputs
There are two DC inputs, one located on the right side of the charger and the other on the bottom for docking into the ePowerBox
17A (230W 13.8V Switch DC Power Supply - Part No. 44216).
Optimized Operating Software
The X1 Pro “AUTO” feature sets the charge and discharge current
for you automatically, preventing overcharging which can damage
your battery. In the event of an error, the X1 Pro instantly disconnects the circuit and sounds an alarm. This feature can be set by
the user and controlled through the two-way link for maximum
safety.
Internal Independent Lithium Battery Balancer
The X1 Pro features a built-in cell voltage balancer eliminating the
fuss of external balancers while charging.
Balancing Individual Cells During Discharging
The X1 Pro also monitors and balances each cell in the pack
individually while discharging. If the voltage of any single cell is
abnormal, the X1 Pro will display an error message and the process will end automatically.
Adaptable to Various Types of Lithium Batteries
The X1 Pro will charge and discharge a variety of Lithium batteries
such as Li-ion, LiPo and the new LiFe series of batteries.
12
Page 13

FEATURES (cont.)
Fast and Storage Mode of Lithium Batteries
The X1 Pro features two styles of charging. “Fast” charge reduces
the charge duration while “Store” controls the nal voltage of
your battery to optimize your packs for long term storage and
maximum lifespan.
Cyclic Charging/Discharging
A battery can be cycled 1 to 5 times consecutively. This process is
good for refreshing and balancing your battery.
Battery Memory
For your convenience, the X1 Pro will store the data pertaining
to a specic charge program for up to 10 batteries. The ability to
save and load these settings for a specic battery saves the user
lots of time.
Terminal Voltage Control (TVC)
The charger allows the user to set the charge/discharge end voltage.
THIS IS FOR ADVANCED USERS ONLY. NEVER
EXCEED THE BATTERY MANUFACTURER'S
Warning
RECOMMENDATIONS.
LiPo Battery Meter
The user can check a battery’s total voltage, the highest voltage,
the lowest voltage and each cell’s voltage.
Re-Peak Mode of NiMH/NiCd Battery
In Re-Peak Charge mode, the charger can peak charge the battery 1-3 times consecutively. This is good for making certain the
battery is fully charged and for checking how well the battery
receives fast charges.
13
Page 14

FEATURES (cont.) POWER SUPPLY CONNECTIONS
Delta-Peak Sensitivity for NiMH/NiCd
This automatic charge termination program is based on the principle of delta-peak voltage detection. When the battery’s voltage
exceeds the threshold, the charging process will be terminated
automatically.
Automatic Charging Current Limit
The charging current can be set by the user when charging NiCd
or NiMH batteries. The "AUTO" charging mode, however, is recommended when charging NiMH batteries with low impedance and
capacity.
Capacity Limit
The charging capacity is always calculated as the charging current
multiplied by time. The charging process will terminate automatically if the charging capacity exceeds the limit set by the user.
Temperature Threshold
The battery’s internal chemical reaction will cause the temperature of the battery to rise. The charging process will terminate
automatically if the charger’s temperature exceeds the limit set by
the user.
Processing Time Limit
Protect your battery by setting a maximum time limit for charging
and discharging.
PC Control Software “Charge Master”
The free “Hitec Charge Master” software gives you unparalleled
ability to operate the charger through your PC. You can monitor
pack voltage, cell voltage and other data during charging and
view charge data in real-time graphs. You can also initiate processes, control charging and update rmware .
14
Page 15
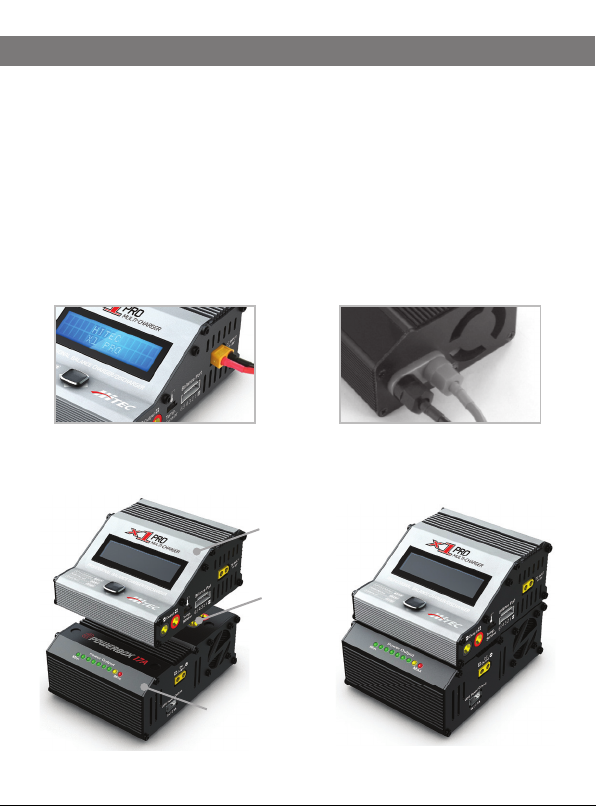
POWER SUPPLY CONNECTIONS
This charger is powered by an 11-18V DC power source. There are
two pairs of DC input sockets: one is used for the connection of a
DC power cord (XT60 type connector) and is located on the right
side of the charger, while the other is used for docking into the
ePowerBox 17A Power Supply and is located on the bottom of
the charger. This socket accepts banana plug type connectors. To
utilize the charger’s absolute maximum power capabilities, the DC
power source must be capable of delivering at least 17 amps while
maintaining 12V DC.
XT60 Connector plugged
directly into charger
Bullet connectors plugged
directly into power supply.
X1 Pro
Dual
Banana
Plugs
ePowerBox 17A
15
Page 16

BATTERY CONNECTIONS (cont.)
CONNECTING THE BATTERY
Before connecting a battery, it is absolutely essential to
check one last time that you have set the parameters correctly.
If the settings are incorrect, the battery may be damaged and
could even burst into ames or explode. To avoid short circuits
between the banana plugs, always connect the charge leads
to the charger rst, and only then to the battery. Reverse the
sequence when disconnecting the pack.
BALANCE SOCKET:
The balance wire attached to the battery must be connected to
the charger with the black wire aligned with the negative symbol
(▬). Take care to always maintain correct polarity! This im-
age shows the correct way to connect your battery to the X1
Pro while charging with the use of a balance adaptor. This is the
recommended method for charging and discharging.
16
Page 17

OPERATING THE X1 PRO CHARGER
The joystick feature makes operating the X1 Pro very easy. Simply
toggle the joysick up, down, right or left to scroll through the various programs and change program settings. Detailed descriptions
of how to locate and edit each program feature is given in the
following sections.
Toggle the joystick up or down to scroll
through the various programs/modes or
to increase/decrease program settings.
Toggle the joystick to the right to select/
set a parameter or to start the charging
process.
Toggle the joystick to the left to return to
the previous screen or to stop the charging process.
17
Page 18

LITHIUM CHEMISTRY BATTERIES
This program is only suitable for charging/discharging lithium
(LiPo/LiIon/LiFe) batteries.
LITHIUM CHARGE MODES
The X1 Pro oers the following lithium charge modes: Charge, Balance Charge, Fast Charge, Storage and Discharge.
BEFORE SELECTING A CHARGE MODE, IT IS CRITI
CAL THAT YOU SELECT THE CORRECT TYPE OF
Warning
LITHIUM BATTERY TO BE CHARGED. FAILURE TO DO
SO CAN RESULT IN DAMAGE TO THE BATTERY AND
POSSIBLE EXPLOSION.
Selecting a Battery Type
PROGRAM SELECT
operation“
LiPo BATT
PROGRAM SELECT” screen. If the battery type you wish
to use is dierent than what is displayed, toggle up (▲) or down
(▼) until you see the type of Lithium battery you wish to charge.
LiPo BALANCE
0.8A 22.2V(6S)
screen. The default charge mode will be “
or down (▼) to cycle through the dierent charge modes. Toggle
right (►) once to select the desired charge mode.
When you power on the X1 Pro, you will
automatically be taken to the last used
Once you have selected the battery, toggle
right (►) once to enter the “
BALANCE,” toggle up (▲)
LiPo” program
LITHIUM CHARGE MODE
BEFORE YOU BEGIN CHARGING YOUR BATTERY,
MAKE SURE YOU HAVE READ AND UNDERSTAND
Warning
ALL OF THE WARNINGS AND SAFETY INFORMATION
CONTAINED ON PAGES 49.
18
Page 19

LITHIUM CHARGE MODE (cont.)
IN THE CHARGE MODE, LITHIUM BATTERIES CAN
BE CHARGED WITHOUT THE USE OF A BALANCE
Note
ADAPTOR. A BALANCE ADAPTER CAN BE USED, BUT
IT IS NOT REQUIRED. BALANCE CHARGE MODE IS
ALWAYS RECOMMENDED FOR ANY BATTERY WITH A
BALANCE LEAD.
See page 16 for the appropriate charging connections setup for
this operation.
LiPo CHARGE
8.1A 22.2V(6S)
First, select the correct battery type by following the instructions on page 18. Once you
have set the correct battery type, toggle up (▲) or down (▼) until
you see the “
LiPo CHARGE
0.8A 22.2V(6S)
LiPo CHARGE” screen.
Toggle right (►) once and the amp rate value will begin ashing. Toggle up (▲) or down
(▼) to adjust the value to the desired rate. Follow the instructions
provided with your battery when setting the amp rate.
LiPo CHARGE
0.8A 11.1V(3S)
Toggle right (►) again and the cell count
value will begin ashing. Toggle up (▲) or
down (▼) to adjust the cell count. This will automatically change
the voltage value to the correct setting for the selected cell count.
The cell count should match the battery label exactly.
Toggle and hold the joysick to the right (►) for three seconds and
you will see “
FIRM
R:3SER S:3SER
CONFIRM(ENTER)
detected by the processor as “
BATTERY CHECK WAIT...” followed by the “CON-
/CANCEL“ screen.
This screen displays the number of cells
you set up as ”
R” and the number of cells
S”. If both numbers are identical, you
may toggle right (►) once to conrm and begin charging. If the
19
Page 20

LITHIUM CHARGE MODE cont.
cell count does not match, toggle left (◄) once to return to the
previous screen and carefully check the number of cells of the battery pack before proceeding.
Li3s 1.2A 12.69V
CHG 022:43 00682
Once charging has commenced, the charger
will display the following real-time information: battery type/cell count, charging current, battery voltage,
charging time and charged capactiy.
DURING CHARGING, THE BATTERY SHOULD BE
PLACED INSIDE A FIREPROOF/RETARDANT BAG
Caution
AND ON A FIREPROOF SURFACE, AWAY FROM
OTHER COMBUSTIBLE OBJECTS.
4.09 4.09V 4.09V
0.00 0.00V 0.00V
If you are using a balance adaptor, during
charging you may toggle up (▲) once to
view the voltage of each individual cell.
Once the battery is fully charged, the screen will read
“
[END:FINISH]” and the charger will emit a chiming sound.
Toggle left (◄) once to stop charging. You may toggle left (◄) at
any time during the charging process to stop charging.
LITHIUM BALANCE CHARGE MODE
This function is for balancing the voltage of individual lithiumpolymer battery cells while charging. In order to use the Balance
Mode, the battery must have a balance lead. Charging in this mode
is dierent from the normal mode because the built-in processor
monitors the voltage of each individual cell and controls the input
current fed into each cell in order to equalize the voltage. Use of
a balance adaptor with any battery that has a balance lead will
improve the performance and lifespan of the battery.
20
Page 21

LITHIUM BALANCE CHARGE MODE (cont.)
BEFORE YOU BEGIN CHARGING YOUR BATTERY,
MAKE SURE YOU HAVE READ AND UNDERSTAND
Warning
ALL OF THE WARNINGS AND SAFETY INFORMATION
CONTAINED ON PAGES 49.
See page 16 for the appropriate charging connections setup for
this operation.
LiPo BALANCE
0.8A 22.2V(6S)
First, select the correct battery type by fol-
lowing the instructions on page 18. Once you
have set the correct battery type, toggle up (▲) or down (▼) until
you see the “
LiPo BALANCE
0.8A 22.2V(6S)
LiPo BALANCE” screen.
Toggle right (►) once and the amp rate val-
ue will begin ashing. Toggle up (▲) or down
(▼) to adjust the value to the desired rate. Follow the instructions
provided with your battery when setting the amp rate.
LiPo BALANCE
0.8A 11.1V(3S)
Toggle right (►) again and the cell count
value will begin ashing. Toggle up (▲) or
down (▼) to adjust the cell count. This will automatically change
the voltage value to the correct setting for the selected cell count.
The cell count should match the battery label exactly.
Toggle and hold the joysick to the right (►) for three seconds and
you will see “
FIRM
R:3SER S:3SER
CONFIRM(ENTER)
detected by the processor as “
BATTERY CHECK WAIT...” followed by the “CON-
/CANCEL“ screen.
This screen displays the number of cells
you set up as ”
R” and the number of cells
S”. If both numbers are identical, you
may toggle right (►) once to conrm and begin charging. If the
cell count does not match, toggle left (◄) once to return to the
previous screen and carefully check the number of cells of the battery pack before proceeding.
21
Page 22

LITHIUM BALANCE CHARGE MODE cont.
Li3s 1.2A 12.69V
BAL 022:43 00682
Once charging has commenced, the charger
will display the following real-time information:
battery type/cell count, charging current, battery voltage, charging
time and charged capactiy.
DURING CHARGING, THE BATTERY SHOULD BE
PLACED INSIDE A FIREPROOF/RETARDANT BAG AND
Caution
ON A FIREPROOF SURFACE, AWAY FROM OTHER
COMBUSTIBLE OBJECTS.
4.09 4.09V 4.09V
0.00 0.00V 0.00V
During charging you may toggle up (▲) once
to view the voltage of each individual cell.
Once the battery is fully charged, the screen will read
“
[END:FINISH]” and the charger will emit a chiming sound.
Toggle left (◄) once to stop charging. You may toggle left (◄) at
any time during the charging process to stop charging.
LITHIUM FAST CHARGE MODE
BEFORE YOU BEGIN CHARGING YOUR BATTERY,
MAKE SURE YOU HAVE READ AND UNDERSTAND
Warning
ALL OF THE WARNINGS AND SAFETY INFORMATION
CONTAINED ON PAGES 49.
IN THE FAST CHARGE MODE, LITHIUM BATTERIES
CAN BE CHARGED WITHOUT THE USE OF A BAL
Note
ANCE ADAPTOR. A BALANCE ADAPTER CAN BE
USED, BUT IT IS NOT REQUIRED. BALANCE CHARGE
MODE IS RECOMMENDED FOR ANY BATTERY WITH
A BALANCE LEAD.
See page 16 for the appropriate charging connections setup for
this operation.
22
Page 23

LITHIUM FAST CHARGE MODE (cont.)
LiPo FAST CHG
0.8A 22.2V(6S)
First, select the correct battery type by fol-
lowing the instructions on page 18. Once you
have set the correct battery type, toggle up (▲) or down (▼) until
you see the “
LiPo FAST CHG
0.8A 22.2V(6S)
LiPo FAST CHG” screen.
Toggle right (►) once and the amp rate val-
ue will begin ashing. Toggle up (▲) or down
(▼) to adjust the value to the desired rate. Follow the instructions
provided with your battery when setting the amp rate.
LiPo FAST CHG
0.8A 11.1V(3S)
Toggle right (►) again and the cell count
value will begin ashing. Toggle up (▲) or
down (▼) to adjust the cell count. This will automatically change
the voltage value to the correct setting for the selected cell count.
The cell count should match the battery label exactly.
Toggle and hold the joysick to the right (►) for three seconds and
you will see “
FIRM
R:3SER S:3SER
CONFIRM(ENTER)
detected by the processor as “
BATTERY CHECK WAIT...” followed by the “CON-
/CANCEL“ screen.
This screen displays the number of cells
you set up as ”
R” and the number of cells
S”. If both numbers are identical, you
may toggle right (►) once to conrm and begin charging. If the
cell count does not match, toggle left (◄) once to return to the
previous screen and carefully check the number of cells of the battery pack before proceeding.
Li3s 1.2A 12.69V
FAS 022:43 00682
Once charging has commenced, the charger
will display the following real-time information: battery type/cell count, charging current, battery voltage,
charging time and charged capactiy.
23
Page 24

LITHIUM FAST CHARGE MODE cont.
DURING CHARGING, THE BATTERY SHOULD BE
PLACED INSIDE A FIREPROOF/RETARDANT BAG
Caution
AND ON A FIREPROOF SURFACE, AWAY FROM
OTHER COMBUSTIBLE OBJECTS.
4.09 4.09V 4.09V
0.00 0.00V 0.00V
If you are using a balance adaptor, during
charging you may toggle up (▲) once to
view the voltage of each individual cell.
Once the battery is fully charged, the screen will read
“
[END:FINISH]” and the charger will emit a chiming sound.
Toggle left (◄) once to stop charging. You may toggle left (◄) at
any time during the charging process to stop charging.
LITHIUM STORAGE MODE
This function is for charging/discharging batteries that will not be
used immediately. The program is designed for charging/discharging batteries up-to or down-to safe storage levels. The program will
automatically begin to discharge if the current state of the battery
exceeds the voltage level for storage.
BEFORE YOU BEGIN CHARGING YOUR BATTERY,
MAKE SURE YOU HAVE READ AND UNDERSTAND
Warning
ALL OF THE WARNINGS AND SAFETY INFORMATION
CONTAINED ON PAGES 49.
IN THE STORAGE MODE, LITHIUM BATTERIES CAN
BE CHARGED WITHOUT THE USE OF A BALANCE
Note
ADAPTOR. A BALANCE ADAPTER CAN BE USED, BUT
IT IS NOT REQUIRED. BALANCE CHARGE MODE IS
RECOMMENDED FOR ANY BATTERY WITH A BAL
ANCE LEAD.
24
Page 25

LITHIUM STORAGE MODE (cont.)
LiPo STORAGE
8.1A 22.2V(6S)
First, select the correct battery type by fol-
lowing the instructions on page 18. Once you
have set the correct battery type, toggle up (▲) or down (▼) until
you see the “
LiPo STORAGE
0.8A 22.2V(6S)
LiPo STORAGE” screen.
Toggle right (►) once and the amp rate val-
ue will begin ashing. Toggle up (▲) or down
(▼) to adjust the value to the desired rate. Follow the instructions
provided with your battery when setting the amp rate.
LiPo STORAGE
0.8A 11.1V(3S)
Toggle right (►) again and the cell count
value will begin ashing. Toggle up (▲) or
down (▼) to adjust the cell count. This will automatically change
the voltage value to the correct setting for the selected cell count.
The cell count should match the battery label exactly.
Toggle and hold the joysick to the right (►) for three seconds and
you will see “
FIRM
This screen displays the number of cells you set up as ”
number of cells detected by the processor as “
R:3SER S:3SER
CONFIRM(ENTER)
BATTERY CHECK WAIT...” followed by the “CON-
/CANCEL“ screen.
R” and the
S”. If both numbers
are identical, you may toggle right (►) once
to conrm and begin charging. If the cell
count does not match, toggle left (◄) once
to return to the previous screen and carefully check the number of
cells of the battery pack before proceeding.
Once charging has commenced, the charger will display the following real-time information: battery type/cell count, charging current,
Li3s 1.2A 12.69V
STO 022:43 00682
battery voltage, charging time and charged
capactiy.
25
Page 26

LITHIUM STORAGE MODE cont.
DURING CHARGING, THE BATTERY SHOULD BE
PLACED INSIDE A FIREPROOF/RETARDANT BAG
Caution
AND ON A FIREPROOF SURFACE, AWAY FROM
OTHER COMBUSTIBLE OBJECTS.
4.09 4.09V 4.09V
0.00 0.00V 0.00V
During charging you may toggle up (▲)
once to view the voltage of each individual
cell.
Once the battery charge has reached storage level, the screen will
read “
[STORAGE FINISHED]” and the charger will emit a chiming
sound. Toggle left (◄) once to stop charging. You may toggle left
(◄) at any time during the charging process to stop charging.
LITHIUM DISCHARGE MODE
If you plan to discharge your battery to reach safe storage levels
we strongly recommend that you use Storage Mode. In very few
instances should discharging become necessary with LiPo batteries. One such instance may include preparing a battery for disposal,
in which case the battery should not be completely discharged. Be
sure to follow the discharging instructions provided by the battery
manufacturer. Over-discharging a battery can severly damage
the battery and may cause a re or explosion.
DISCHARGING LITHIUM CHEMISTRY BATTERIES
CAN CAUSE PERMANENT DAMAGE TO THE BAT
Warning
TERY AND IT IS NOT RECOMMENDED AT ANYTIME
OTHER THAN THE DISPOSAL OF THE BATTERY. IF
YOU CHOOSE TO DISCHARGE YOUR LITHIUM BAT
TERIES, MAKE SURE TO PAY CLOSE ATTENTION TO
THE MINIMUM VOLTAGE SETTING. IF YOU WANT
TO STORE YOUR BATTERY FOR A LONG PERIOD OF
TIME, YOU SHOULD UTILIZE THE STORAGE MODE
26
Page 27

LITHIUM DISCHARGE MODE cont.
CHARGE PROGRAM AS THIS IS THE SAFEST METHOD
OF STORING YOUR LITHIUM CHEMISTRY
BATTERIES.
IN DISCHARGE MODE, LITHIUM BATTERIES CAN
BE DISCHARGED WITH OR WITHOUT THE USE OF A
Note
BALANCE ADAPTOR. THE USE OF A BALANCE ADAP
TOR IS RECOMMENDED FOR DISCHARGING ANY
BATTERY THAT HAS A BALANCE LEAD.
BEFORE YOU BEGIN DISCHARGING YOUR BATTERY,
MAKE SURE YOU HAVE READ AND UNDERSTAND
Warning
ALL OF THE WARNINGS AND SAFETY INFORMATION
CONTAINED ON PAGES 49.
See page 16 for the appropriate charging connections setup for
this operation.
LiPo DISCHARGE
8.1A 22.2V(6S)
First, select the correct battery type by fol-
lowing the instructions on page 18. Once you
have set the correct battery type, toggle up (▲) or down (▼) until
you see the “
LiPo DISCHARGE
0.8A 22.2V(6S)
LiPo DISCHARGE” screen.
Toggle right (►) once and the amp rate val-
ue will begin ashing. Toggle up (▲) or down
(▼) to adjust the value to the desired rate. Follow the instructions
provided with your battery when setting the amp rate.
LiPo DISCHARGE
0.8A 11.1V(3S)
Toggle right (►) again and the cell count
value will begin ashing. Toggle up (▲) or
down (▼) to adjust the cell count. This will automatically change
the voltage value to the correct setting for the selected cell count.
The cell count should match the battery label exactly.
27
Page 28

LITHIUM DISCHARGE MODE cont.
Toggle and hold the joysick to the right (►) for three seconds and
you will see “
FIRM
R:3SER S:3SER
CONFIRM(ENTER)
detected by the processor as “
BATTERY CHECK WAIT...” followed by the “CON-
/CANCEL“ screen.
This screen displays the number of cells
you set up as ”
R” and the number of cells
S”. If both numbers are identical,
you may toggle right (►) once to conrm and begin discharging.
If the cell count does not match, toggle left (◄) once to return to
the previous screen and carefully check the number of cells of the
battery pack before proceeding.
Li3s 1.2A 12.69V
DSC 022:43 00682
Once discharging has commenced, the
charger will display the following real-time
information: battery type/cell count, discharging current, battery
voltage, discharging time and discharged capactiy.
DURING DISCHARGING, THE BATTERY SHOULD
BE PLACED INSIDE A FIREPROOF/RETARDANT
Caution
BAG AND ON A FIREPROOF SURFACE, AWAY FROM
OTHER COMBUSTIBLE OBJECTS.
4.09 4.09V 4.09V
0.00 0.00V 0.00V
During discharging you may toggle up (▲)
once to view the voltage of each individual
cell.
Once the battery is discharged, the screen will read “
FINISHED]
” and the charger will emit a chiming sound. Toggle
[DISCHARGE
left (◄) once to stop discharging. You may toggle left (◄) at any
time during the discharging process to stop discharging.
28
Page 29

NiCd/NiMH
This program is only suitable for charging/discharging NiCd/NiMH
batteries.
NICD/NIMH CHARGE MODES
The X1Pro oers the following NiCd/NiMH charge modes: Charge,
Auto Charge, Discharge, Re-Peak and Cycle.
BEFORE SELECTING A CHARGE MODE, IT IS CRITI
CAL THAT YOU SELECT THE CORRECT TYPE OF
Warning
LITHIUM BATTERY TO BE CHARGED. FAILURE TO DO
SO CAN RESULT IN DAMAGE TO THE BATTERY AND
POSSIBLE EXPLOSION.
Selecting a Battery Type
PROGRAM SELECT
SELECT
NiMH BATT
” screen. Toggle up (▲) or down (▼) until you see the
battery type you wish to charge. Now, toggle right (►) once to
enter the “
be “
NICD/NIMH CHARGE MODE
NiMH” or “NiCd” Program The default charge mode will
CHARGE”.
BEFORE YOU BEGIN CHARGING YOUR BATTERY,
MAKE SURE YOU HAVE READ AND UNDERSTAND
Warning
ALL OF THE WARNINGS AND SAFETY INFORMATION
CONTAINED ON PAGES 49.
NiMH CHARGE
CURRENT 1.6A
(▼) to adjust the value to the desired rate. Follow the instructions
provided with your battery when setting the amp rate.
When you power on the X1 Pro you will
automatically be taken to the “
PROGRAM
Toggle right (►) once and the amp rate value
will begin ashing. Toggle up (▲) or down
29
Page 30

NiCd/NiMH CHARGE MODE (cont.)
Toggle and hold the joysick to the right (►) for three seconds to
begin charging.
NiMH 1.6A 5.96V
CHG 003:43 00090
Once charging has commenced, the charger
will display the following real-time information: battery type, charging current, battery voltage, charging time
and charged capactiy.
Once the battery is fully charged, the screen will read
“
END:FINISHED” and the charger will emit a chiming sound.
Toggle left (◄) once to stop charging. You may toggle left (◄) at
any time during the charging process to stop charging.
NiCd/NiMH AUTO CHARGE MODE
In this program, the charger detects the condition of the battery
connected to the output and automatically charges the battery. In
this mode, you should set up the upper limit of the charge current
to avoid damage by feeding excessive current. Some batteries of
low resistance and capacity can lead to higher current in the Auto
Charge mode.
BEFORE YOU BEGIN CHARGING YOUR BATTERY,
MAKE SURE YOU HAVE READ AND UNDERSTAND
Warning
ALL OF THE WARNINGS AND SAFETY INFORMATION
CONTAINED ON PAGES 49.
Select the correct battery type by following the instructions on
page 29. Once you have set the correct battery type, toggle up (▲)
or down (▼) until you see the “
NiMH Auto CHARGE
CURRENT 5.0A
Toggle right (►) once and the amp rate value
will begin ashing. Toggle up (▲) or down
NiMH Auto CHARGE” screen.
(▼) to adjust the value to the desired rate. Follow the instructions
provided with your battery when setting the amp rate.
30
Page 31

NiCd/NiMH AUTO CHARGE MODE (cont.)
Toggle and hold the joysick to the right (►) for three seconds to
begin charging.
NiMH 1.6A 5.96V
AUT 003:43 00090
Once charging has commenced, the charger
will display the following real-time information: battery type, charging current, battery voltage, charging time
and charged capactiy.
Once the battery is fully charged, the screen will read
“
END:FINISHED” and the charger will emit a chiming sound.
Toggle left (◄) once to stop charging. You may toggle left (◄) at
any time during the charging process to stop charging.
NiCd/NiMH DISCHARGE MODE
BEFORE YOU BEGIN DISCHARGING YOUR BATTERY,
MAKE SURE YOU HAVE READ AND UNDERSTAND
Warning
ALL OF THE WARNINGS AND SAFETY INFORMATION
CONTAINED ON PAGES 49.
Select the correct battery type by following the instructions on
page 29. Once you have set the correct battery type, toggle up (▲)
or down (▼) until you see the “
NiMH DISCHARGE
0.1A CUT: 1.0V
Toggle right (►) once and the amp rate value
will begin ashing. Toggle up (▲) or down
NiMH DISCHARGE” screen.
(▼) to adjust the value to the desired rate. Follow the instructions
provided with your battery when setting the amp rate.
Toggle right (►) once again and the nal voltage value will begin
ashing. Toggle up (▲) or down (▼) to adjust the value to the
desired rate. The discharge current ranges from 0.1 to 8.0A and the
nal voltage ranges from 0.1 to 25.2V.
31
Page 32

NICD/NIMH - DISCHARGE MODE (cont.)
Toggle and hold the joysick to the right (►) for three seconds to
begin discharging.
NiMH 1.0A 5.96V
DSC 001:43 00030
Once disharging has commenced, the charger
will display the following real-time information: battery type, discharging current, battery voltage, discharging
time and discharged capactiy.
Once discharging is complete, the screen will read “
FINISHED]
” and the charger will emit a chiming sound. Toggle left
[DISCHARGE
(◄) once to stop discharging. You may toggle left (◄) at any time
during the discharging process to stop discharging.
NICD/NIMH REPEAK MODE
In Re-Peak Charge mode, the charger can automatically peak
charge the battery 1-3 times consecutively. This is good for
conrming that the battery is fully charged and for checking how
well the battery receives fast charges. A ve minute cool-o delay
occurs after each re-peak charge.
BEFORE YOU BEGIN CHARGING YOUR BATTERY,
MAKE SURE YOU HAVE READ AND UNDERSTAND
Warning
NiMH RE-PEAK
ALL OF THE WARNINGS AND SAFETY INFORMATION
CONTAINED ON PAGES 49.
Select the correct battery type by following
1
the instructions on page 29. Once you have
set the correct battery type, toggle up (▲) or down (▼) until you
see the “
NiMH RE-PEAK” screen.
Toggle right (►) once and the number of re-peak cycles will begin
ashing. Toggle up (▲) or down (▼) to change the number of repeak cycles you want the X1 Pro to execute. The X1 Pro can re-peak
32
Page 33

NiCd/NiMH REPEAK MODE (cont.)
charge the battery a maximum of 3 times consecutively.
The X1 Pro will use the amperage value entered in Charge Mode
for this operation.
Toggle and hold the joysick to the right (►) for three seconds to
begin charging.
NiMH 1.6A 5.96V
RPC 002:51 00090
Once charging has commenced, the charger
will display the following real-time information: battery type, charging current, battery voltage, charging time
and charged capactiy.
Once charging is complete, the screen will read “
END:FINISHED”
and the charger will emit a chiming sound. Toggle left (◄) once
to stop charging. You may toggle left (◄) at any time during the
charging process to stop charging.
NiCd/NiMH CYCLE MODE
The X1 Pro makes cycling of NiCd/NiMH batteries easy. The process
of discharging and recharging (cycling) can be achieved automatically with one simple step and will improve the performance of
NiCd/NiMH batteries. We strongly recommend cycling any battery
that has been discharged and stored for a preiod of time. This will
increase battery life and improve performance.
BEFORE YOU BEGIN CYCLING YOUR BATTERY, MAKE
SURE YOU HAVE READ AND UNDERSTAND ALL OF
Warning
THE WARNINGS AND SAFETY INFORMATION CON
TAINED ON PAGES 49.
33
Page 34

NiCd/NiMH CYCLE MODE (cont.)
Select the correct battery type by following the instructions on
page 29. Once you have set the correct battery type, toggle up (▲)
or down (▼) until you see the “
NiMH CYCLE
DCHG>CHG 1
“
DCHG>CHG“ option will rst discharged the battery and then
The Cycle Mode gives you two cycling
options: “
charge the battery. The “
NiMH CYCLE” screen.
DCHG>CHG“ or “CHG>DCHG“. The
CHG>DCHG“ option will rst charge the
battery and then discharge the battery. If this screen does not currently show the cycling option you desire, toggle right (►) once
and this setting will begin ashing. Toggle up (▲) or down (▼) to
change this setting.
NiMH CYCLE
DCHG>CHG 1
Toggling right (►) once will cause the
number of cycles option to begin ashing.
Toggle up (▲) or down (▼) to change this to the number of cycles
you want the X1Pro to execute. The X1 Pro can cycle the battery a
maximum of 5 times consecutively.
Toggle and hold the joysick to the right (►) for three seconds to
begin cycling.
NiMH 0.1A 5.21V
D>C 015:42 00026
Once cycling has commenced, the charger
will display the following real-time information: battery type, charging/discharging current, battery voltage,
charging time and charged capactiy. You will also see “
“
C>D“. This will indicate which cycling order you have chosen. Either
“
D“ or “C“ will be ashing. This ashing indicates which part of the
D>C“ or
cycle is currently being executed.
DCHG 1 1314mAH
CHG 1 1430mAH
Once the cycling process is complete, the
X1 Pro will display the charge/discharge
capacity for each cycle. By toggling up (▲) or down (▼) , you can
scroll through this data for each cycle.
34
Page 35

Pb LEADACID
This program is only suitable for charging Pb (lead-acid) batteries with nominal voltages of 2 to 20V. A Pb (lead-acid) battery is
signicantly dierent from NiCd/NiMH batteries. Pb batteries can
only deliver lower currents than in comparison to their capacity.
The same restriction applies to the charging process. Consequently,
the optimum charge current can only be 1/10 of the capacity. A Pb
battery cannot be used for fast charging. Please follow the instructions provided by the battery manufacturer.
Pb CHARGE MODES
The X1 Pro oers the following NiCd/NiMH charge modes: Charge
and Discharge.
BEFORE SELECTING A CHARGE MODE, IT IS CRITI
CAL THAT YOU SELECT THE CORRECT TYPE OF
Warning
BATTERY TO BE CHARGED. FAILURE TO DO SO CAN
RESULT IN DAMAGE TO THE BATTERY.
Selecting the Battery Type
When you power on the X1 Pro, you will automatically be taken
to the “
LiPo BALANCE” screen. Toggle left (◄) once to enter the
“
PROGRAM SELECT” screen. Toggle up (▲) or down (▼) until you
see the battery type you wish to charge. Now, toggle right (►)
PROGRAM SELECT
once to enter the “
Pb
charge mode will be “
Pb” program The default
CHARGE”.
Pb CHARGE MODE
BEFORE YOU BEGIN CHARGING YOUR BATTERY,
MAKE SURE YOU HAVE READ AND UNDERSTAND
Warning
ALL OF THE WARNINGS AND SAFETY INFORMATION
CONTAINED ON PAGES 49.
35
Page 36

Pb CHARGE MODE (cont.)
Pb CHARGE
0.1A 2.0V(1P)
up (▲) or down (▼) to select the “
Pb CHARGE
0.7A 2.0V(1P)
After selecting the correct battery type, if
the screen does not read “
CHARGE“ mode.
CHARGE”, toggle
Toggle right (►) once and the amp rate
value will begin ashing. Toggle up (▲) or
down (▼) to adjust the value to the desired rate. Follow the instructions provided with your battery when setting the amp rate.
The amp rate should be set to 1/10 of capacity.
Pb CHARGE
0.7A 12.0V(6P)
Toggle right (►) once and the voltage rate
value will begin ashing. Toggle up (▲) or
down (▼) to set the voltage and number of cells.
Toggle and hold the joysick to the right (►) for three seconds to
begin charging.
Pb-6 0.4A 14.70V
CHG 003:10 00029
Once charging has commenced, the
charger will display the following realtime information: battery type, charging current, battery voltage,
charging time and charged capactiy.
Once charging is complete, the screen will read “
END:FINISHED”
and the charger will emit a chiming sound. Toggle left (◄) once
to stop charging. You may toggle left (◄) at any time during the
charging process to stop charging.
36
Page 37

PB DISCHARGE MODE
Pb DISCHARGE MODE
BEFORE YOU BEGIN DISCHARGING YOUR BATTERY,
MAKE SURE YOU HAVE READ AND UNDERSTAND
Warning
ALL OF THE WARNINGS AND SAFETY INFORMATION
CONTAINED ON PAGES 49.
Pb DISCHARGE
0.1A 2.0V(1P)
toggle up (▲) or down (▼) to select the “
Pb DISCHARGE
0.7A 2.0V(1P)
After selecting the correct battery type,
if the screen does not read “
DISCHARGE“ mode.
DISCHARGE”,
Toggle right (►) once and the amp rate
value will begin ashing. Toggle up (▲) or
down (▼) to adjust the value to the desired rate. Follow the instructions provided with your battery when setting the amp rate.
The amp rate should be set to 1/10 of capacity.
Pb DISCHARGE
0.7A 12.0V(6P)
Toggle right (►) once and the voltage rate
value will begin ashing. Toggle up (▲) or
down (▼) to set the voltage and number of cells.
Toggle and hold the joysick to the right (►) for three seconds to
begin discharging.
Pb-6 0.4A 14.70V
DSC 003:10 00029
Once discharging has commenced, the
charger will display the following realtime information: battery type, charging current, battery voltage,
charging time and charged capactiy.
Once discharging is complete, the screen will read “
” and the charger will emit a chiming sound. Toggle left (◄)
VOL
END:CUTOFF
once to stop charging. You may toggle left (◄) at any time during
the charging process to stop charging.
37
Page 38

The free “Hitec Charge Master” software gives you unparalleled
ability to operate the charger through the computer. You can
monitor pack voltage, cell voltage and other data during charging
and discharging. Hitec Charge Master also allows you to graph
process data in real-time and you can control charging and update
the X1 Pro’s rmware all from the software interface.
In order to connect the X1 Pro to the computer and use the
software, you will need a USB-A to USB Mini-B cable that is not
included in this package.
You can download your copy of the Hitec Charge Master software
from http://www.hitecrcd.com. Refer to the help le in the Hitec
Charge Master software if you need more assistance to use this
software program.
Charge Setup Screen
Allows you to choose battery
type and charge mode.
38
Charge Status Screen
Monitors real time information
about your battery and the
charging process.
Page 39

BATTERY MEMORY
The X1 Pro can store up to 10 dierent battery proles. This allows
you to easily recall stored proles without having to go through
the setup process each time you charge a battery.
When you power on the X1 Pro, toggle down (▼) repeatedly until
you see “
MEMOR
BATT MEMORY”. Toggle right (►) once to enter the “BATT
Y” program.
[ BATT MEMORY 1]
ENTER SET->
Battery Memory Number
When you enter the “BATT MEMORY” p rogram, the battery prole number will be ashing. Toggle up (▲) or
down (▼) to select the battery prole (1-10) you wish to create/edit.
BATT TYPE
LiPo
” screen. Toggle right (►) once and the battery type will
TYPE
Battery Typ e
Toggle right (►) once to enter the “BATT
begin ashing. Toggle up (▲) or down (▼) to select the battery
type. Toggle right (►) once to enter the battery type.
BATT VOLTS
VOLTS
7.4V(2S)
” screen. Toggle right (►) once and the voltage value will
Battery Voltage/Cell Type
Toggle up (▲) once to enter the “BATT
begin ashing. Toggle up (▲) or down (▼) to change the voltage
value. The cell count will change automatically to correspond to
the voltage selected. Toggle right (►) once to set the voltage.
CHARGE CURRENT
CURRENT
” screen. Toggle right (►) once and the amperage value
Charge Current Setting
4.9A
Toggle up (▲) once to enter the “CHARGE
will begin ashing. Toggle up (▲) or down (▼) to change the
amperage value. Toggle right (►) once to set the amperage.
39
Page 40

BATTERY MEMORY cont.
DSCH CURRENT
CURRENT
” screen. Toggle right (►) once and the amperage value
Discharge Current Setting
2.2A
Toggle up (▲) once to enter the “DSCH
will begin ashing. Toggle up (▲) or down (▼) to change the
amperage value. Toggle right (►) once to set the amperage.
DSCH VOLTAGE
VOLTAGE
3.0V/CELL
” screen. Toggle right (►) once and the voltage value will
Discharge Voltage Setting (3.0-3.3v per cell)
Toggle up (▲) once to enter the “DSCH
begin ashing. Toggle up (▲) or down (▼) to change the voltage
value. Toggle right (►) once to set the voltage. Refer to page 7 for
recommended discharge voltages.
TVC=YOUR RISK!
4.20V
Terminal Voltage Setting
(Use At Your Own Risk)
Toggle up (▲) once to enter the “TVC=YOUR RISK!” screen.
Toggle right (►) once and the voltage value will begin ashing.
Toggle up (▲) or down (▼) to change the voltage value. Toggle
right (►) once to set the voltage.
TEMPERATURE
CUT-OFF 50C
SAVE PROGRAM
[ BATT MEMORY 1]
LiPo 7.4V(2S)
ENTER
Temperature Cut-O
(when using optional temp sensor)
Toggle up (▲) once to enter the “TEM-
PERATURE CUT-OFF
” screen. Toggle right
(►) once and the temperature value will
begin ashing. Toggle up (▲) or down (▼)
to change the temperature value. Toggle
right (►) once to set the temperature. The temperature can be set
between 20ºC and 80ºC.
Toggle up (▲) once to enter the “
SAVE PROGRAM” screen. Toggle
right (►) once to save all of the settings previously entered.
40
Page 41

BATTERY MEMORY cont.
Once the prole has been saved, the “
BATT MEMORY” screen will
appear. The second line on this screen will automatically scroll
through the various parameters that have been set for this battery
prole.
To load a preset battery prole enter the “
BATT MEMORY” screen
and toggle up (▲) or down (▼) to nd the prole number you
wish to use. Toggle and hold the joysick to the right (►) for three
seconds and the prole will be loaded.
LITHIUM BATTERY METER
The X1 Pro allows you to check a battery’s total voltage, the highest voltage, the lowest voltage and each cell’s voltage.
Connect the battery in the same manner as you would for charging.
PROGRAM SELECT
LI BATT METER
4.09 4.09V 4.09V
0.00 0.00V 0.00V
MAIN 12.52V
H4.190V L4.160V
When you power on the X1 Pro you will be
at the “
PROGRAM SELECT” screen. Toggle
up (▲) until you see “
LI BATT METER”.
Toggle right (►) once and the screen will
displaly the voltage of each cell.
Toggle up (▲) or down (▼) once and the
screen will display the total voltage, highest
voltage and the lowest voltage.
41
Page 42

SYSTEM SET UP
When the X1 Pro is powered on for the rst time, all system settings
will be set to default. Each parameter can be adjusted by the user,
allowing for greater control of the charge process for the specic
battery being charged.
When you power on the X1 Pro you will be at the “
” screen. Toggle up (▲) until you see “SYSTEM SET->”.
LECT
PROGRAM SE-
Rest Time
During the charge>discharge or discharge>charge cycle, batteries
increase in temperature. The Rest Time program allows the user to
specify the time delay between cycles, allowing time for the battery
to cool.
Rest Time
CHG>DCHG 8Min
Toggle right (►) once and you will see the
“
REST TIME” screen. Toggle right (►) once
and the timer value will begin ashing. Toggle up (▲) or down (▼)
to adjust the timer value. The timer can be set at 0 to 60 minutes.
Toggle right (►) once to set the Rest Time.
Safety Timer
When the charge process starts, the integrated safety timer starts
to run simultaneously. If an error occurs or the termination circuit
cannot detect whether the battery is fully charged, the X1 Pro is
programmed to prevent overcharging and will terminate the charging process.
Safety Timer Calculation
When charging NiCd or NiMH batteries, divide the capacity by the
current, then divide the result by 11.9. Set this number of minutes
as the setting for the safety timer setting. If the charger stops at this
time threshold, about 140% of the capacity will have been fed into
the battery.
42
Page 43

SYSTEM SET UP (cont.)
SAFETY TIMER
ON 120Min
“
ON“ or “OFF” will begin ashing. Toggle up (▲) or down (▼) once to
Toggle up (▲) until you see the “
” screen. Toggle right (►) once and
TIMER
SAFETY
change this setting. Toggle right (►) once and the timer value will
begin ashing. Toggle up (▲) or down (▼) to adjust the timer value.
Toggle right (►) once to set the Safety Timer.
Capacity Cut-O
This program provides a maximum capacity protection function.
If the delta-peak voltage cannot be detected or the Safety Timer
times out, the charge process will stop automatically when the
user-set maximum charge capacity is reached in order to prevent
accidental overcharging.
Capacity Cut-Off
ON 5000mAh
(►) once and “
Toggle up (▲) once and you will see the
“
CAPACITY CUT-OFF” screen. Toggle right
ON“ or “OFF” will begin ashing. Toggle up (▲) or
down (▼) once to change this setting. Toggle right (►) once and
the amperage value will begin ashing. Toggle up (▲) or down (▼)
to adjust the amperage value. Toggle right (►) once to set the the
Capacity Cut-O.
Key Beep & Buzzer
A beep sounds to conrm the user’s operation every time a button
is pressed. The buzzer or melody sounds at various times during an
operation to conrm a dierent mode change.
Key Beep ON
Buzzer ON
and (Key Beep) “
down (▼) once to change this setting. Toggle right (►) once and
(Buzzer) “
ON” or “OFF” will begin ashing. Toggle up (▲) or down
(▼) once to change this setting. Toggle right (►) once to set the
Key Beep and Buzzer settings.
Toggle up (▲) once and you will see the “
BEEP BUZZER
ON” or “OFF” will begin ashing. Toggle up (▲) or
”screen. Toggle right (►) once
KEY
43
Page 44

SYSTEM SET UP (cont.)
Input Power Low Cut-O
This function monitors the voltage of the input source used to
power the charger. If the voltage drops below the user setting, the
program will end immediately to protect the input source.
Input Power Low
Cut-off 10.0V
Toggle up (▲) once and you will see the
“
INPUT POWER LOW CUT-OFF” screen.
Toggle right (►) once and the voltage value will begin ashing.
Toggle up (▲) or down (▼) to adjust the voltage value. Toggle
right (►) once to set the Input Power Low Cut-O.
External and Internal Temperature
Ext. Temp 0C
Int. Temp 20C
Toggle up (▲) once and you will see the “
Temp and Int. Temp.
” screen. This screen shows the
Ext.
external temperature of the battery and the internal temperature of
the charger. The battery temperature reading requires a temperature sensor that is sold seperately.
Load Factory Set
LOAD FACTORY SET
ENTER
This screen shows the external temperature
of the battery and the internal temperature
of the charger. The battery temperature reading requires a temperature sensor that is sold seperately.
Toggle and hold the joysick to the right (►) for three seconds to
load the factory settings.
Version
VERSION
This screen shows the version number.
1.00
44
Page 45

WARNINGS AND ERROR MESSAGES
REVERSE POLARITY
CONNECTION BREAK
CONNECT ERROR
CHECK MAIN PORT
BALANCE CONNECT
ERROR
DC IN TOO LOW
DC IN TOO HIGH
CELL ERROR
LOW VOLTAGE
CELL ERROR
HIGH VOLTAGE
CELL ERROR
VOLTAGE INVALID
CELL NUMBER
INCORRECT
INT. TEMP.TOO
HIGH
EXT. TEMP.TOO
HIGH
The battery/charger connections (red/black)
are reversed.
The battery connection has been discon-
nected.
The battery connection is wrong.
The balance connection is wrong.
The input voltage is less than 11V.
The input voltage is higher than 18V.
The voltage of one cell in the battery pack is
too low.
The voltage of one cell in the battery pack is
too high.
The voltage of one cell in the battery pack is
invalid.
The cell count is wrong.
The internal temperature of the charger is too
high.
The external temperature of the charger is
too high.
45
Page 46

WARNINGS AND ERROR MESSAGES (cont.)
OVER CHARGE
CAPACITY LIMIT
OVER TIME LIMIT
The battery capacity is higher than the maxi-
mum set by the user.
The charging time is higher than the maxi-
mum set by the user.
BATTERY WAS FULL
In balance mode, the battery voltage is higher
than the maximum set by the user.
WARRANTY AND SERVICE
LIABILITY EXCLUSION
This charger is designed and approved exclusively for use with
the types of batteries stated in this Instruction Manual. Hitec RCD,
USA accepts no liability of any kind if the charger is used for any
purpose other than that stated. We are unable to ensure that you
follow the instructions supplied with the charger, and we have no
control over the methods you employ for using, operating and
maintaining the device. For this reason, we are obliged to deny all
liability for loss, damage or costs which are incurred due to any
misuse or operation of our products. Unless otherwise prescribed
by law, our obligation to pay compensation, regardless of the legal
argument employed, is limited to the invoice value of Hitec RCD,
USA products which were immediately and directly involved in the
event in which the damage occurred.
ONE YEAR LIMITED WARRANTY
For a period of one year from the date of purchase, HITEC RCD USA,
INC. shall REPAIR OR REPLACE, at our option, defective equipment
covered by this warranty. Otherwise, the purchaser and/or consumer is responsible for any charges for the repair or replacement
of the charger. This warranty does not cover cosmetic damages
46
Page 47

WARRANTY AND SERVICE (cont.)
and damages due to acts of God, accident, misuse, abuse, negligence, improper installation, or damages caused by alterations by
unauthorized persons or entities. This warranty only applies to the
original purchaser of this product and for products purchased and
used in the United States of America, Canada and Mexico. Plastic
cases are not covered by this warranty.
THIS WARRANTY IS IN LIEU OF ANY AND ALL OTHER WAR
RANTIES, WHETHER FOR MERCHANTABILITY OR FITNESS
FOR A PARTICULAR PURPOSE AND WHETHER EXPRESS OR
IMPLIED. REPAIR OR REPLACEMENT AS PROVIDED UNDER
THIS WARRANTY IS THE EXCLUSIVE REMEDY. HITEC RCD,
INC. SHALL NOT BE LIABLE FOR ANY INCIDENTAL OR CON
SEQUENTIAL DAMAGES FOR BREACH OF ANY EXPRESS OR
IMPLIED WARRANTY RELATING TO THIS PRODUCT, EXCEPT
TO THE EXTENT PROHIBITED BY APPLICABLE LAW. ANY IM
PLIED WARRANTY OF MERCHANTABILITY OR FITNESS FOR
A PARTICULAR PURPOSE ON THIS PRODUCT IS LIMITED TO
THE DURATION OF THIS WARRANTY, REPAIR AND SERVICE.
STATE OF CALIFORNIA PROPOSITION 65 WARNING:
This product contains chemicals known to the State of California to
cause cancer. Use caution when handling this product and avoid
exposure to any electronic components or internal assemblies.
47
Page 48

WARRANTY AND SERVICE (cont.)
SERVICE AND REPAIR INFORMATION
To have your Hitec charger serviced:
1. Visit the Hitec website at www.hitecrcd.com and download
the service request form (under Support section).
2. Fill out the service request form completely and include a
copy of your original receipt showing the purchase date.
3. Package your product in its original packaging or use a
suspension-type packaging (foam peanuts or crumpled
newspaper). Hitec RCD shall not be responsible for goods
damaged in transit.
4. Ship prepaid (COD or postage-due returns will not be ac-
cepted) via a traceable common courier (UPS, insured parcel
post, FedEx, etc.) to:
Hitec RCD USA, Inc., Customer Service Center,
12115 Paine St., Poway CA 92064
www.hitecrcd.com
 Loading...