

Page 1

HTS-SS HTS-SS
2.4Gz Telemetry Product Installation Guide 2.4Gz Telemetry Product Installation Guide
Introduction
Beginning with the Ver. 1.07 software Aurora transmitters will be fully capable of advanced 2.4G downlink data telemetry.
When using a combination of sensors and Hitecs micro “Sensor Station”, all of the following functions can be displayed on
the Aurora screen during the ight, and viewed on a PC in real time!
- On-Board Battery Voltage, (this is displayed without the use of sensors when the Auroras SPC function is used).
- Up to four dierent temperatures
- Measure RPM with either magnetic or optical encoders.
- Monitor liquid fuel usage
- Gather GPS data to see speed, altitude and location information
This installation guide will cover the physical installation of the Sensor Stations and sensors in airplanes and helicopters
including the related Aurora software screens and their features.
At the end of this manual is a description of how the HPP-22 PC interface can be used to display in real time, record and
play data collected during a ight.
Contents
3 - - - - - - - - - -
3 - - - - - - - - - 4 - - - - - - - - - 5 - - - - - - - - - 6 - - - - - - - - - 8 - - - - - - - - - -
9 - - - - - - - - - 10 - - - - - - - - 13 - - - - - - - - 13 - - - - - - - - -
1) Are You Updated?
2) On-Board Battery Voltage
3) Sensor Station
4) Temperature Sensor
5) RPM Sensor
6) Fuel Level Sensor
7) GPS Sensor
8) HPP-22 Interface
9) Trouble Shooting
10) Product Support
1. Are You Updated?
One of the great features of the Aurora transmitter, Spectra 2.4 module and the Optima receivers is their ability to “be
up-dated” with new software. The HTS-SS sensor station now joins the product line with its software up-date capability.
To take advantage of the sensor telemetry we need to be sure your equipment has the latest software.
Step 1.
Does your Aurora have Software V 1.07 or greater? Check in the Aurora system menu – info menu screen, for your Aurora
software version. If not, You will need to update the Aurora software using the HPP-22 device.
Step 2.
Does your Spectra 2.4 module have Software V 2.00 or greater? If not, You will need to update the module software using
the HPP-22 device.
Step 3.
Does your Optima receiver have Software V 2.00 or greater? If not, You will need to update the Aurora software using the
HPP-22 device.
2. On-Board Battery Voltage
A key advantage to electric aircraft pilots is knowing the voltage of their on-board motor battery. This is done by using the
Auroras SPC function. When the SPC is connected, the motor battery voltage is shown on the Auroras home screen and in
the Cockpit mode.
Please note the SPC connection directions as found in the Aurora manual.
The voltage of your on-board battery can be viewed in real time on the Aurora’s screen three ways;
1. The rst is on the home screen.
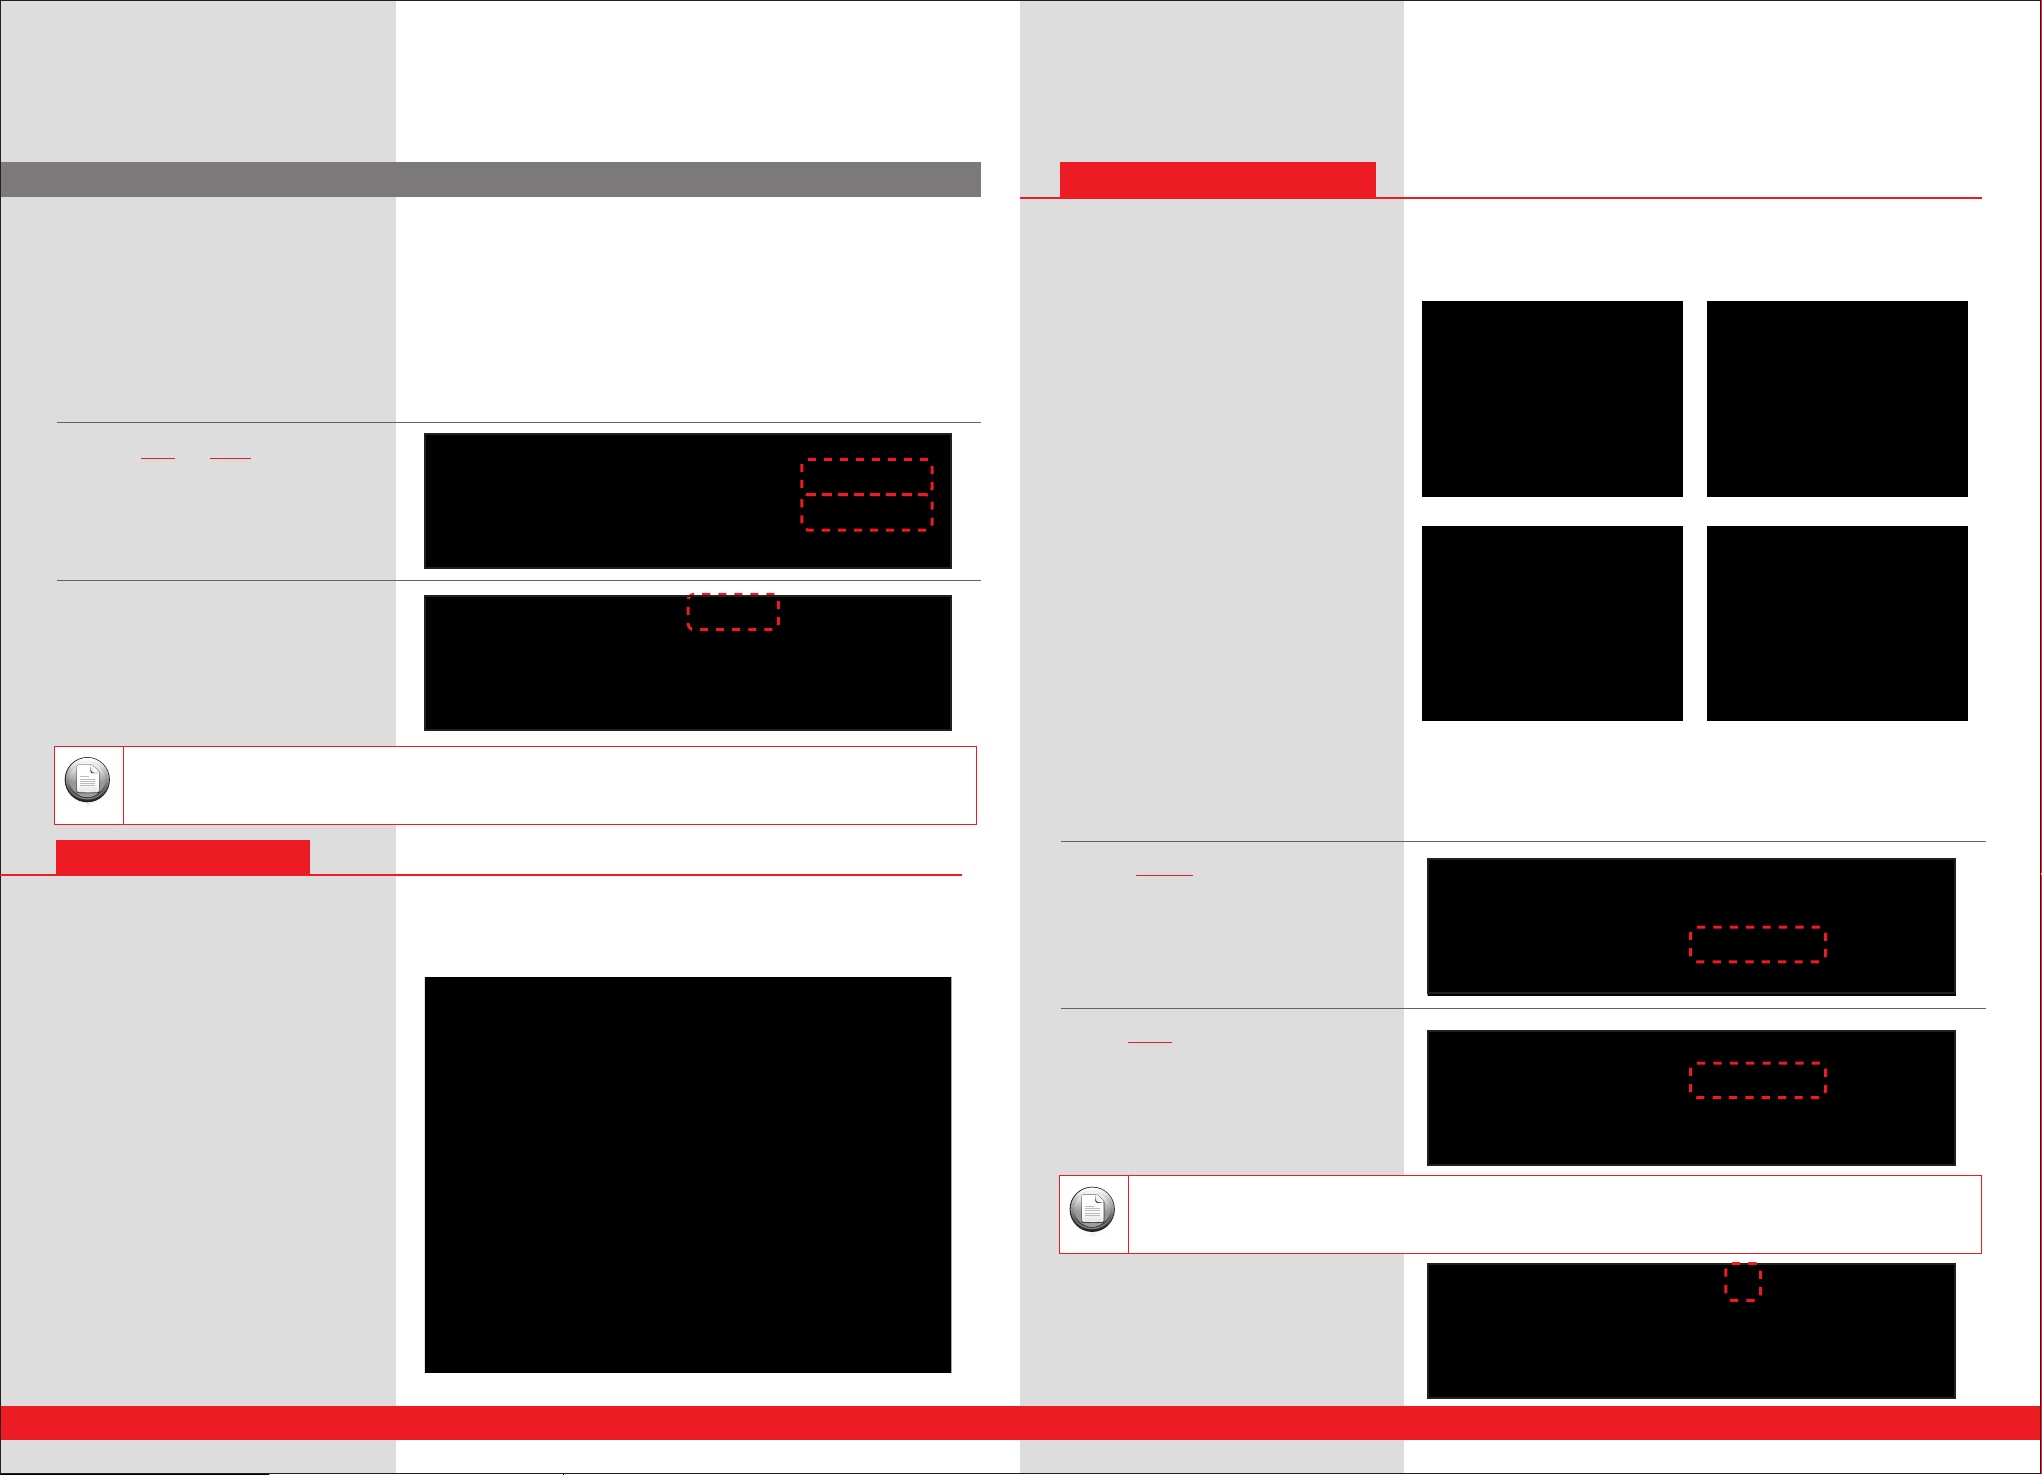
Available Telemetry Products:
Stock# 55830
Stock# 55831
Stock# 55845
Stock# 55832
Stock# 55833
Stock# 55842
Stock# 55834
Stock# 55835
Stock# 55836
Nitro Full Combo:
- Includes Sensor Station, two RPM Sensors (Optical & Magnetic), four Temp.
Sensors, GPS and Fuel Sensor
Nitro ORPM Combo:
- Includes Sensor Station, Optical-RPM Sensor & two Temp. Sensors
Nitro MRPM Combo:
- Includes Sensor Station, Magnetic RPM Sensor & two Temp. Sensors
Sensor Station:
- HTS-SS
Optical RPM Sensor:
- HTS-ORPM
Magnetic RPM Sensor:
- HTS-MRPM
Temperature Sensor:
- Includes two Temp Sensors HTS-TEMP
Fuel Level Sensor:
- HTS-FUEL
GPS Sensor:
- HTS-GPS
2 3
2. The second is to Select the Sensor icon at
the System menu and press Battery.
Page 2
HTS-SS HTS-SS
2.4Gz Telemetry Product Installation Guide 2.4Gz Telemetry Product Installation Guide
2. On-Board Battery Voltage
3. The adjustable function on this screen is
the ability to set a Low Voltage Warning.
Depending on the number of cells used in
the on-board battery, use the +RST- icon to
set a low voltage warning point. It is not
good practice to allow each Lipo cell to fall
below 3 volts. That’s 6 volts for a 2 cell, 9
volts for 3 cell pack etc.
4. Note the MIN and MAX values of the
battery voltage shown on this screen.
5. The third way to view the battery voltage
is on the Cockpit screen.
The 3rd method is active even if the Sensor Station is NOT used.
Note
4. Temperature Sensor
The Temperature Sensors (HTS-TEMP) can measure temperatures from -40 to 392 degrees Fahrenheit(-40 to 200 degrees
Celsius). Up to four temp sensors can be used. These will most commonly be used in combination to read the temperatures
of the following model accessories;
Electric motor
ESC
Glow and Gas engine cylinder head
Battery
Muer
Voltage regulator
B.E.C.
Tailpipe
Ambient air
Installation
Installation will vary on the dierent applications. Note it is important to have the loop of
the sensor wire held tightly against the
device. Consider using zip ties, a piece of tape
and/or small dabs of silicone to hold the wire
in place.
Aurora transmitter interface
To access the temp screen menu the aircraft must be turned “on” and the temp sensors installed in the Sensor Station
properly attached to the receiver.
a. Access the System menu
3. Sensor Station
The on-board Sensor Station (HTS-SS) - collects all the data from each sensor, sending it back to your transmitter via the
Optima 7 or Optima 9 receivers.
Installation
Don’t install the Sensor Station right away. It
is best to t the sensors you will use into the
aircraft rst. Take the length of the sensor
wire leads into consideration before
permanently mounting. Then, install the
Sensor Station in your model using the
supplied double-sided tape.
4 5
b. Select “Sensor”
c. Press “TEMP”
The temp reading for any “unconnected” temp sensor will show -40.
Note
d. Press ▶ (arrow) to select between
F(Fahrenheit) and C (Celsius) readings.
Page 3

HTS-SS HTS-SS
2.4Gz Telemetry Product Installation Guide 2.4Gz Telemetry Product Installation Guide
4. Temperature Sensor 5. RPM Sensor
e. To customize the name of the temp sensor,
press Temp-1, then the Rename icon.
f. Use the keyboard to rename the sensor to
reect its purpose. Repeat this process for the
other temp sensors used.
g. To view the minimum, average and
maximum temp readings for any of your
installed temp sensors, note the numbers
when any one of the sensors is selected on
the screen.
h. Exit this screen using the door icon in the
upper left of the screen.
Optic Sensor Installation
A. For heli applications, note the shaped case
of the sensor. Install around the tail boom of
your heli using the supplied zip ties. Point it
straight up at the rotor disk avoiding any y
bar paddles that will skew the results.
B. For prop driven aircraft, use double sided
tape to attach
the sensor in the airfame with the front of the
sensor aimed at the revolving propeller.
i. To view all the sensor data in real time,
press Cockpit
5. RPM Sensor
There are two dierent RPM sensors available for use on the Hitec telemetry system.
1. Optical RPM Sensor (HTS-ORPM) - provides RPM information using a optic sensor. This is used for outdoor heli head speed
and prop plane RPM values.
Indoor lighting and outdoor lighting variations can aect the readings of the optic sensor.
Note
2. Magnetic RPM Sensor (HTS-MRPM) - provides RPM information using a magnetic sensor. This is used for aircraft with
propellers, ducted fans, heli tail rotors and main gears.
The edit function as described at the end of this document in the HPP-22 data display. To use the Magnetic
Note
There are two slots in the Sensor Station for RPM sensors. Any combination of optical or magnetic sensors can be used.
sensor with heli main gear / head speed ratios
Magnetic Sensor Installation
A. The magnetic sensor consists of two main parts, the sensor and magnet. Three small magnets are supplied with the unit.
B. The typical installation will have the sensor mounted on the motor mount or airframe, and one magnet attached to the
spinner backing plate or prop hub in such a way as to “trigger” a signal every time the rotating magnet passes in front of the
stationary sensor.
C. It is suggested a small hole be drilled in the spinner backing plate, or prop hub into which one of the magnets is set ush
using hobby CA.
D. Note the tolerances here are very tight, the distance between the sensor and spinning magnet need to be 1mm.
Each magnet has a X mark to identify polarity, please make sure the X mark to be faced out.
Note
Otherwise the sensor cannot detect the magnet.
6 7
Page 4

HTS-SS HTS-SS
2.4Gz Telemetry Product Installation Guide 2.4Gz Telemetry Product Installation Guide
5. RPM Sensor 6. Fuel Level Sensor
Aurora transmitter interface
a. Access the System menu and select Sensor
b. Press RPM to enter the RPM sensor menu
c. Press the RPM-1 icon and then RENAME to
give the RPM-1 value a custom name.
Repeat to change the RPM-2 name.
d. When using an optic sensor, you must
select the number of prop or heli blades.
Select, O / Prop-2 (arrow) to scroll through
the choices. When using the magnetic
sensor, select the “Prop-M” choice.
(Example of M-RPM sensor installed on Heli.)
6. Fuel Level Sensor
Fuel Level Sensor (HTS-FUEL) - provides an accurate 5-step reading of your remaining fuel level when simply attached to the
outside of the fuel tank.
Installation
1. Three dierent sensing lm are included
for small, medium and large tanks. Select
the appropriate lm for your tank.
3. Gently press the ivory locking tabs into place securing the sensor in the circuit board.
4. Use the double sided tape to attach the circuit board to the tank or other structure.
5. Use the re-applied sticky tape on the lm to attach the sensor to the tank.
Special use instructions:
A. The fuel tank MUST be empty at the start of this process for the sensor to accurately read the fuel quantity.
B. Turn on transmitter and select transmit
C. Power-up the aircraft
If power to the aircraft is lost or interrupted prior to the ight, the fuel meter will not operate accurately. De-fuel
Note
Note
Aurora transmitter interface
The single display of the fuel level sensor is shown as graphic bars on the “fuel dispenser” icon in the Cockpit display found
in the System / Sensor / Cockpit menu.
and start the fueling process over.
Current version fuel sensor can detect Nitro fuel only.
7. GPS Sensor
GPS Sensor (HTS-GPS) – feeds variable directional information such as: altitude, position and airspeed to the Aurora
transmitter. This information is displayed in real time on the Auroras Cockpit screen.
2. Conrm the sensor orientation is correct
with the sensors four “bars” being “stacked”
from top to bottom of the tank and install
the sensor into the circuit board by gently
lifting the ivory colored tab on each side of
the port, inserting either sensor tab, “circuit
side” “up” or towards you. Which sensor tab
you use is dependent on the circuit board
placement, either one will work.
Installation
Install the GPS sensor using the supplied double side tape on any appropriate surface of the airframe.
Up right position is recommended
Note
4
as picture shown.
98
Page 5

HTS-SS HTS-SS
2.4Gz Telemetry Product Installation Guide 2.4Gz Telemetry Product Installation Guide
7. GPS Sensor
Aurora transmitter interface
a. As with most all sensor data, the Speed
and Altitude information derived from the
GPS is shown on the Auroras Cockpit screen.
This is reached in the System > Sensor >
Cockpit menu.
b. The specic Latitude and Longitude
position data is only shown in the System >
Sensor > GPS menu. Along with this
information is other pertinent data, GPS
strength bars, date, time, altitude and speed
are available.
c. To change the date, Unit of measurement
and to select ABSOLUTE, (above-groundlevel) or RELATIVE, (above sea level) altitude
values, press the Setting icon
d. Pressing the +RST- icon will change the
time values. Select the door icon to exit the
menu.
8. HPP-22 PC Interface
6. Launch the HPP-22 PC program
7. Under the Product menu, select “etc”
8. As the target select SPECTRA 2.4 Module
9. Select Yes when prompted for “Sensors data display?”
10. At the sensor display screen note all the
information displayed.
11. Use the record and play functions to
record ight data.
1. The rst time the system boots during a ying session, the GPS acquisition time will be slower than on
Note
subsequent boot-ups during any 4 hour period.
2. GPS signal may be lost during extreme 3D maneuvers.
3. For the most accurate altitude information select the ABSOLUTE setting.
8. HPP-22 PC Interface
The HPP-22 PC interface device is a handy accessory to have. In addition to updating the Aurora, Spectra 2.4 module,
Optima receivers and the HTS-SS sensor station, the HPP-22 when ported to the Spectra 2.4 module can display the ight
telemetry data on a PC. This ight data can be recorded and played back at a later date.
Using the HPP-22 to display, record and playback ight data
1. Install the HPP-22 software from the Hitec website at www.hitecrcd.com
2. Plug the device into an empty USB port on your PC.
3. Plug an S connecter cable into the HPP-22’s P1 port and the other end into the Spectra 2.4 module.
4. Turn on Aurora and select “OK” to transmit.
5. Turn on aircraft with sensors connected
10
11
Page 6

HTS-SS HTS-SS
2.4Gz Telemetry Product Installation Guide 2.4Gz Telemetry Product Installation Guide
8. HPP-22 PC Interface
12. Select Edit / Set-up to customize the data
formats
13. Note the option in the RPM section allowing the use of a gear ratio capability to derive an RPM value. This is used when
the magnetic sensor is employed to measure the heli head speed when mounted on the main gear.
9. Trouble Shooting
They must have the HPP-22 which will tell them their version #.
If the module is not updated, there will be no battery icon with the telemetry on the screen
If the RX is not updated the sensor station will not work, but battery will.
10. Product Support
Hitec Customer Service
Help is available from the Hitec oce through phone support and e-mail inquiries. The U.S. oce is generally open
Monday thru Friday, AM 8:00 to PM 4:30 PST. These hours and days may vary by season. Every attempt is made to answer
every incoming service call. Should you get voice mail, leave your name and number and a sta member will return
your call.
Hitec Web Site
Make plans to visit the Hitec web site on a regular basis, www.hitecrcd.com or www.hitecaurora.com. It is full of specs
and other information about the entire Hitec product line, and our FAQ pages will eventually hold valuable information
about the Aurora.
The On-Line Community
One of the benets of the extensive R/C online community is the vast wealth of archived knowledge available. Hitec
sponsors forums on most of the popular R/C web sites where a Hitec sta member or representative tries to
answer all manner of product related questions. Bringing together strangers with common interests is proving to be
one of the greatest gifts of the internet. If past history is any guide to the future, we are certain forums will be started
about the Aurora and several are sure to stand out as valuable archives of information.
Warranty and Non-Warranty Service
All Hitec products carry a two year from date of purchase warranty against manufactures defects. Our trained and
professional service representative will determine if the item will be repaired or replaced. You say the 4 year old kid
knocked your Aurora o a table? Hitec has an in-house service department to x our products quickly.
To provide all the necessary information we need to administrate your repair, visit our web site at, www.hitecrcd.com
and download the repair form, ll it out and send in your item for repair.
Hitec Service
12115 Paine St.
Poway CA 92064
1-858-748-6948
E-mail, service@hitecrcd.com
10
11
 Loading...