

Page 1
HITEC SPECTRA 2.4J
Warning!
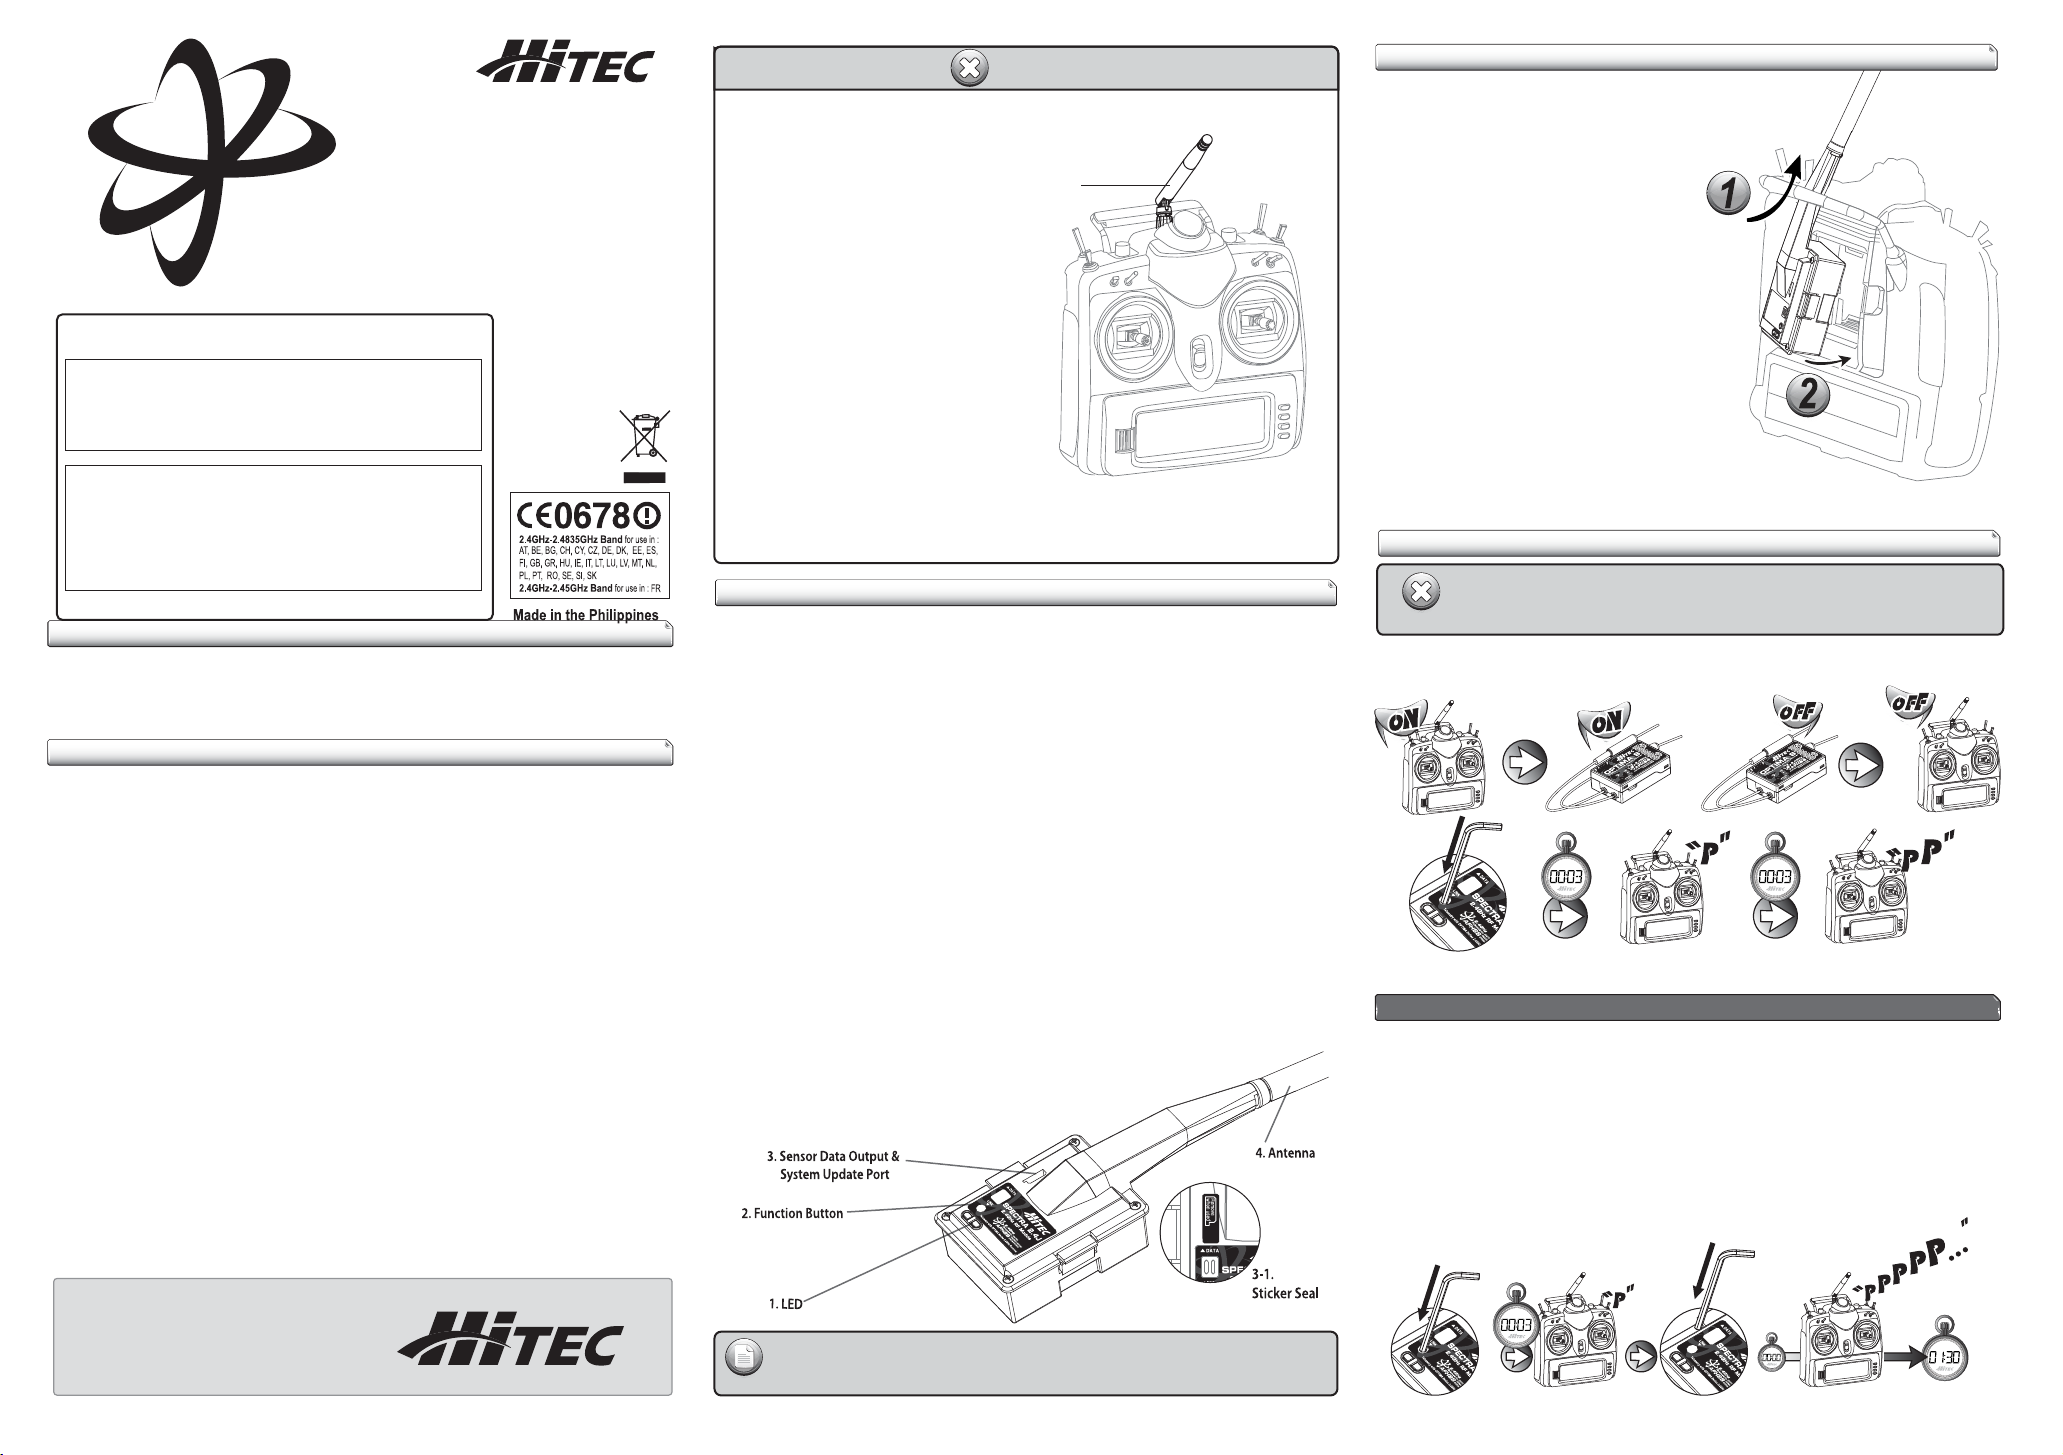
1. For maximum performance, we recommend positioning the antenna at a 90 degree
angle as shown below.
Recommended Position
Spectra 2.4J Module Installation
- Installing Spectra 2.4J module to your JR* transmitter is as easy
as one, two, three. simply slide the module through the carrying
handle bar and slide-in the module to the module slot of the
transmitter, until you hear the ‘click’ sound. Turn the power
on of the transmitter and the receiver, wait until the
Spectra 2.4J moudle and Optima receiver get connected.
AFHSS Module Instruction
version 1.3
• Risk of explosion if battery is replaced by an incorrect type.
Dispose of used battery according to the instructions.
European CE notice to users and product statements.
This product is CE marked according to the provisions of the R&TTE Directive(99/5/EC).
Hereby, HITEC RCD Inc. declares that this product is in compliance with the essential
requirements and other relevant provisions of Directive 1999/5/EC.
For further information, please contact http://www.hitecrcd.co.kr
FCC notice to users and product statements:
THIS DEVICE COMPLIES WITH PART 15 OF THE FCC RULES.
Operation is subject to the following two conditions: (1) this device may not
cause harmful interference, and (2) this device must accept any interference received,
including interference that may cause undesired operation.
CAUTION: Changes or modications not expressly approved by the party
responsible for compliance could void the user’s authority to operate the equipment.
• FRANCE Frequency Range : 2.4056GHz~ 2.4482GHz
Introduction
Thank you for your purchase of the Hitec Adaptive Frequency Hopping Spread Spectrum or AFHSS, 2.4GHz
module and receiver system. This manual contains the complete directions on how to use the Optima series
receivers and Spectra 2.4GHz module. We encourage you to review the entire manual before using these
products.
Service & Support
Hitec Customer Service
Help is available from Hitec customer service through phone support and e-mail inquiries.
Our US oce is open Monday thru Friday, 8:00AM to 4:30PM PST. These hours and days may vary by season. We
make every attempt to answer all incoming service calls; should you reach our voicemail, please leave your
name and number and a sta member will promptly return your call.
Hitec Website
We invite you to regularly visit our website at www.hitecrcd.com for specication information and descriptions
of our entire product line. Our FAQ pages provide valuable information as well as program updates on the
Spectra 2.4GHz module and Optima series of receivers.
The On-Line Community
One of the benets of the extensive RC on-line community is the vast wealth of archived information available.
Hitec sponsors forums on most of the popular RC websites where a Hitec sta member or representative
answers product-related questions. Bringing together strangers with common interests is proving to be one of
the greatest gifts of
about
the Hitec 2.4GHz system creating valuable archived information for future access.
the internet. If past history is any guide to the future, we are certain forums will be started
2. The receiver antenna should not be placed near
the engine, metal parts or high current batteries.
3. When using a large number of high-power digital
servos, we recommend using the SPC feature to
insure the receiver gets the power it needs in
high-load conditions.
4. Depending on ying conditions, you may possibly
experience a time delay in receiving telemetry
data from the HTS-SS (Sensor Station).
* Above image is dierent than the actual transmitter used. JR* transmitter is required to work this module properly.
*JR is a registered trademark of Japan Remote Control Corporation of Japan
Spectra 2.4 Module Features
AFHSS 2.4GHz Telemetric Module
Stock # 28315
1. Dual Blue and Red Status Indicator LEDs
- Indicates the set-up process codes and current status of the module.
2. Function Button
- Used for linking the module to a receiver, entering the “power down” mode for range checks and switching
system to the Scan / Normal Mode set-up.
3. Sensor Data Output and System Update Connector Port
- A three-pin servo connector port is featured on the Spectra 2.4GHz module allowing you to upgrade the
device software as well as download any information recorded when using Hitec's AFHSS 2.4GHz optional
on-board sensors. This port also interfaces with our new Telemetry System Sensor Station, allowing real-time
data display on the ground when ying with the Aurora 9 transmitter.
4. Adjustable Omnidirectional Antenna
- The Spectra 2.4GHz antenna is an omnidirectional antenna which can transmit and receive the transmitter
and receiver data.
For the best reception, refer to the set-up example picture in the above Warning box.
5. Compatible Transmitters
- The Spectra 2.4GHz module and antenna can be used with the following Hitec transmitters:
Eclipse 7, Optic 6, Aurora 9 and all future Hitec module-type transmitters.
- In all cases, any transmitter using the Spectra 2.4GHz module will be compatible only with
Hitec AFHSS 2.4GHz series receivers.
Now you are ready to y, and you can experience Hitec’s AFHSS 2.4GHz telemetry system, which will teach you
the whole new way of enjoy your R/C.
General Use Guidelines
* When the Spectra 2.4J module is used for JR* radios, the PPM mode is required to be
Warning
General Use Guidelines
To turn the system on and o, use the following sequence at all times.
activated for proper work.
www.hitecrcd.comwww.hitecrcd.com
Range Check ModePress & Hold Button Scan/Normal Mode
Range Check Function
Before each ight, it is critical that you perform a range check to conrm the signal between the receiver and
transmitter is appropriate. Unlike the FM/PPM or PCM signal radios, 2.4GHz systems use a xed, shorter
transmitter antenna commonly called a "rubber duck" antenna. Therefore, the traditional method of range
check, lowering the transmitter antenna, is not applicable.
Warranty and Non-Warranty Service
All Hitec products carry a two-year warranty against manufacturing defects from date-of- purchase.
professional service representative will determine if the item will be repaired or replaced. Please complete and
include the repair form at www.hitecrcd.com when you return your item so that we may administer your repair
promptly.
Our trained,
Hitec Service
12115 Paine St. Poway CA 92064
1-858-748-6948
E-mail: service@hitecrcd.com
With the exception of the Aurora 9 and future Hitec 2.4GHz models, all other transmitter
modules should be set up as PPM.
Note
The Hitec 2.4GHz system uses a “power down” mode to reduce the transmitter signal strength.
Once the “power down” mode is activated, it runs for about 90 seconds eectively shortening the range to 30
meters or 100 feet. During this "power down" mode, you should walk away from the secured aircraft carrying the
transmitter to a minimum distance of approximately 30 meters or 100 feet in order to test the eective range.
How to use "Power Down"
www.hitecrcd.com
www.hitecrcd.com
www.hitecrcd.com
Page 2
- Before each ying session to conrm the radio system is working properly.
Warning
- Before the engine or motor is started, turn on the system as explained above.
Then make sure all the servos and control surfaces are working properly.
If any control surface is not moving properly, do not y the aircraft until the problem is solved.
- If you are unable to accomplish a successful range check of 30 meters(100 feet),
DO NOT ATTEMPT TO FLY.
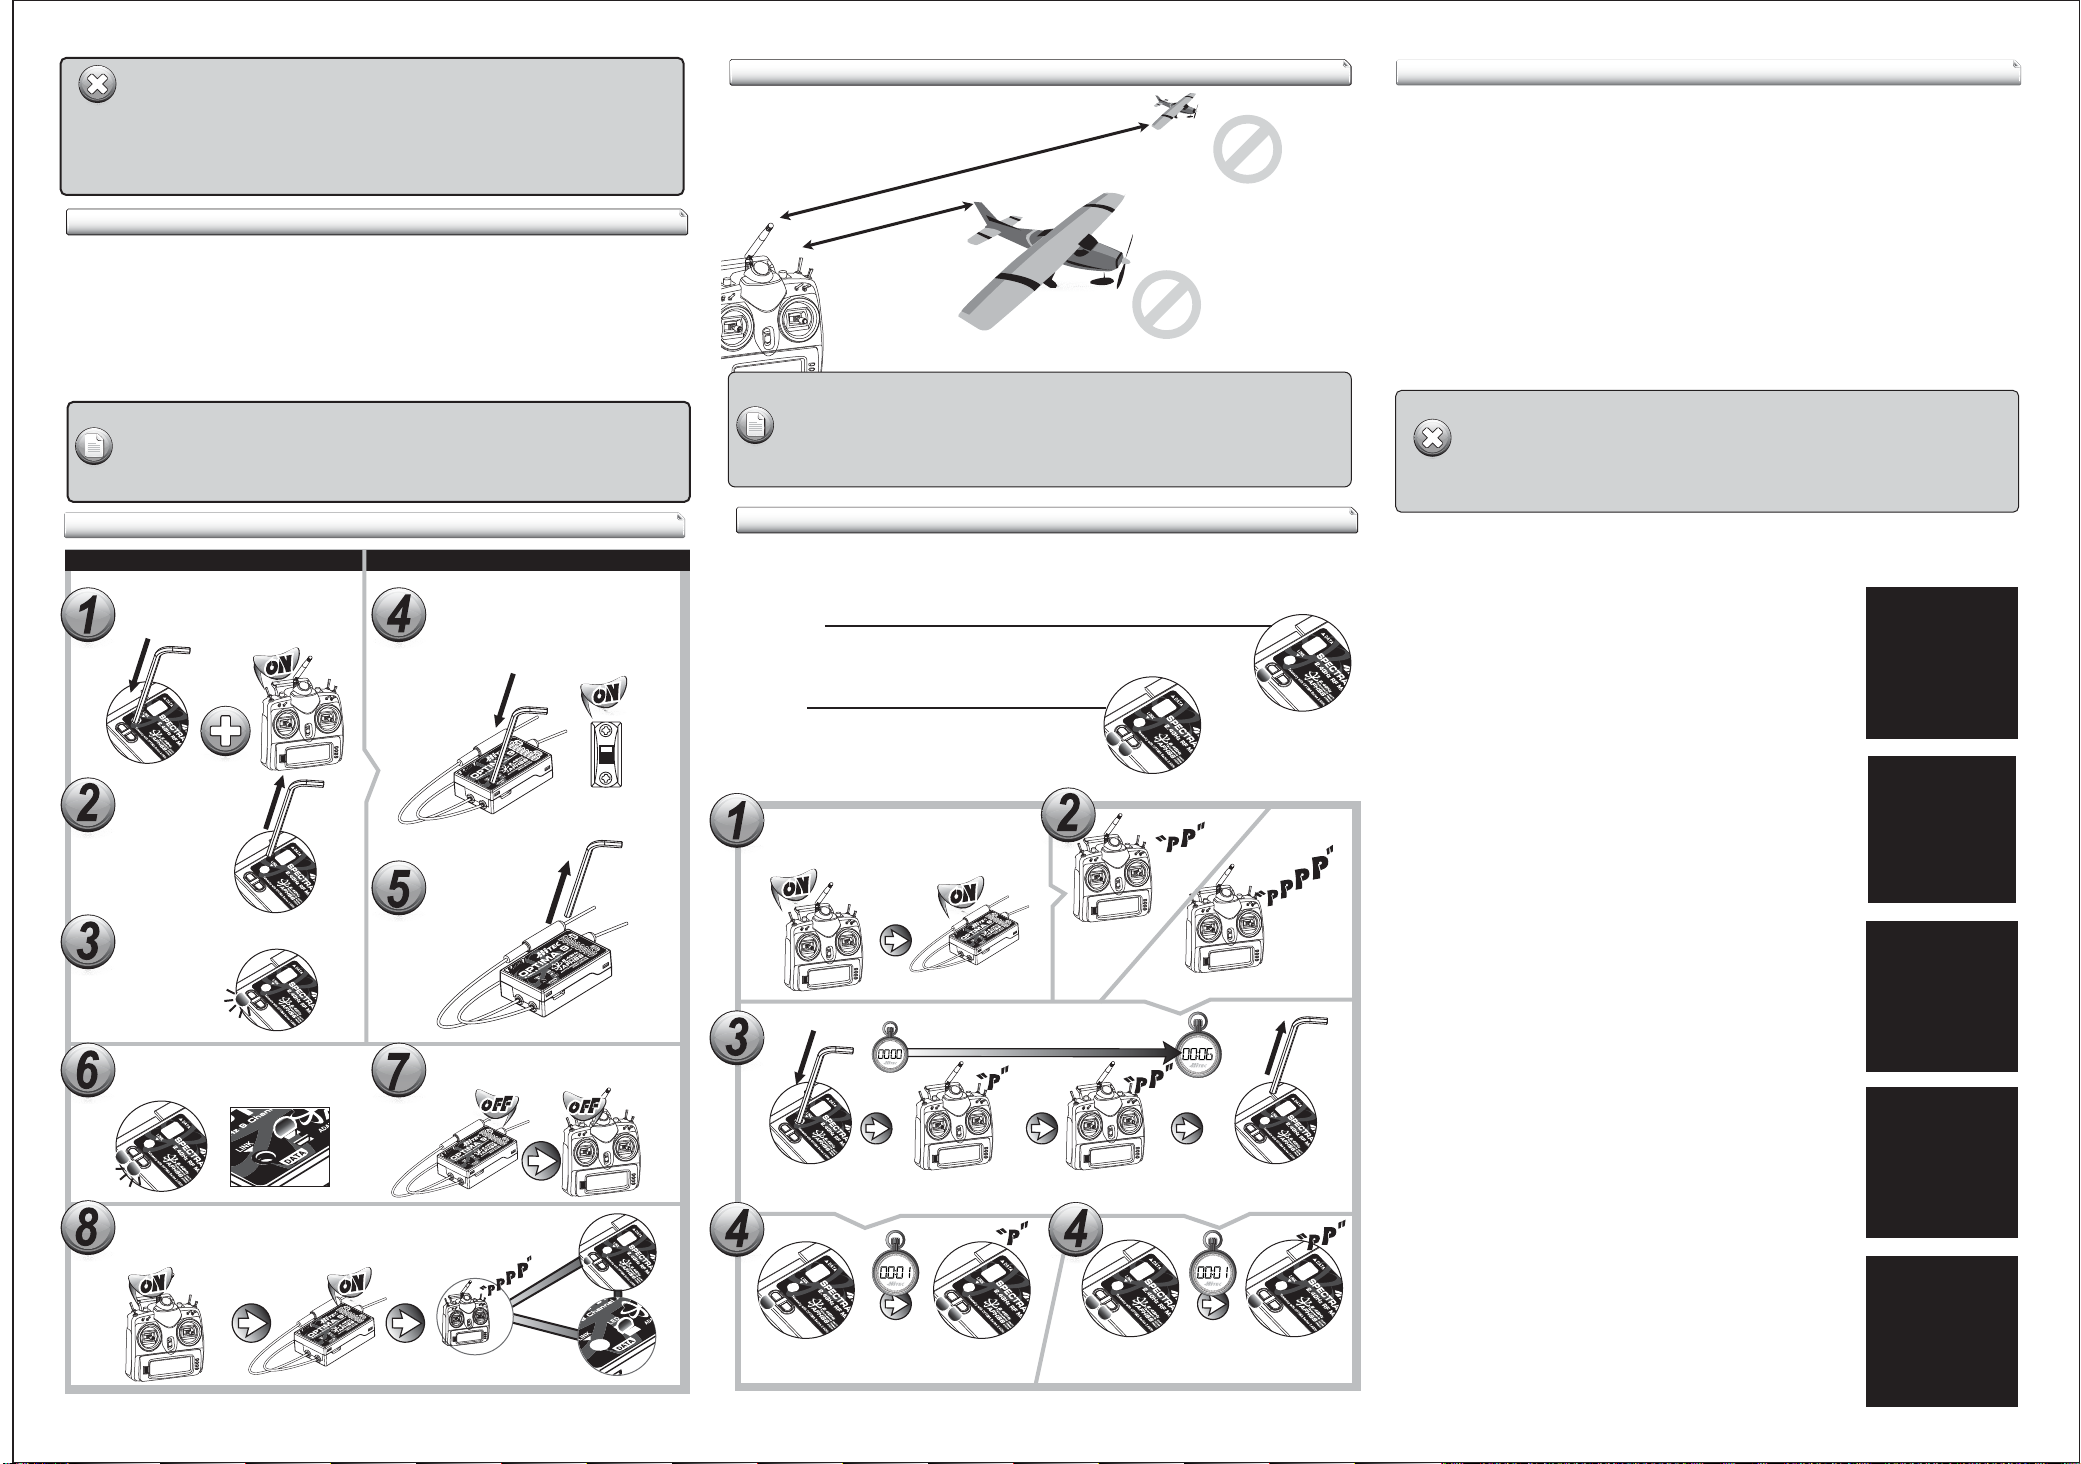
Link (ID-Setting)
Your Hitec AFHSS 2.4GHz system uses a communication protocol that links and binds the Optima receiver to
your transmitter. Once the receiver and module are “bound,” no other transmitter can interfere with your
receiver during its operation. In the case of multiple model memory transmitters, you can bind as many
Optima receivers to your transmitter as necessary, one per model memory.
Each module and receiver set is paired at the factory in Normal Mode for your convenience. To change the
transmitter to Scan Mode see page 2 (Scan and Normal Mode Information).
- When both red and blue LEDs are "on" and both module and receiver are powered up and bound
together, the Scan Mode is active. Two beeps will be heard when the system is turned on.
- When the red LED is "on"and both module and receiver are powered up and bound together,
Note
the Normal Mode is active. Four quick beeps will be heard when the system is on.
How to Link (ID-Setup or Bind in Normal Mode)
Module Receiver
Press and hold the button on the module
and turn on the transmitter.
Release the button.
Press and hold the button on Optima 6,
and turn on the power.
Release the button.
Link Guidelines
Too Far: More than 5M(15ft)
Too Close: Less than 50Cm(18in)
- Link must be established within 15 feet of the transmitter and receiver.
- Transmitter and receiver need to be at least 18 inches from each other to link properly.
- In the Scan Mode, if the transmitter or receiver has been shut o or disconnected
Note
for more than one second, both module and receiver need to be rebooted (turn the
power o and back on).
Scan and Normal Mode Information
Hitec’s Spectra AFHSS 2.4GHz systems can be operated with two dierent modes
Each mode selection can be controlled only from the Spectra 2.4GHz module; however, you can view the
current system status from the receivers.
Normal Mode
- The single LED will light up to indicate the system is in Normal Mode.
Scan Mode
- Both LEDs will light up to indicate the system is in Scan Mode.
Turn on the transmitter rst, then the receiver
: Normal Mode or Scan Mode.
Telemetry System
The Hitec Spectra 2.4GHz module and Optima series receivers feature full telemetry capabilities (except for the
Optima 6) and include a Low Receiver Battery Warning as a basic function.
I. Basic Function: Low On-board Battery Warning - for All Optima Receivers
- When the Optima series receiver is powered up, it will automatically detect the battery voltage level and
recognize between 4-cell or 5-cell NiMH and NiCd batteries (4-cell < 5.8V <5-cell).
If a 2-cell LiPo battery is being used, you can customize the battery warning level by using our HPP-22
program.
- When battery level is safe (4-cell > 4.5V, 5-cell > 5.6V), no changes will appear to the LED lights.
- When battery level is low (4-cell < 4.5V, 5-cell < 5.6V), the blue LED glows constantly and the red LED blinks
fast. Three continuous beeps from the module serve as a low receiver battery warning. Upon hearing the
alarm, we advise you to land at once.
II. Optional Functions: GPS, FUEL, TEMP, O-RPM, M-RPM Sensors - Applicable for Optima 7 & 9 Only
- More devices will be available in the future. Check the Hitec website at www.hitecrcd.com for more
up-to-date informatio
- Low Battery Warning function is only for reference. The actual battery level may dier.
Be aware that lazy battery eect or battery memory eects could impact the Low Battery
Warning
II. Optional Functions: GPS, FUEL, TEMP, O-RPM, M-RPM Sensors - Applicable for Optima 7 & 9 Only
- There are more devices available in the future. Check the Hitec website at www.hitecrcd.com for more
up-to-dated information.
HTS-GPS (GPS Sensor)
Hitec’s GPS sensor is specially designed for R/C application, unlike conventional
single dimension GPS sensor, such as car navigation, the ve dimension cube
Antenna has been implemented to cover dynamic movement of R/C aircraft.
As a result, it could receive stable GPS information, even during 3D ight.
- When the system boots up for the rst time, the position recognition time is
usually slower, depending on the area you are in. Once it connects, it memorizes its
last location for about 4 hours. When the system reboots at the same location within
that four hour time period, the position recognition time will be signicantly shortened.
- During extreme 3D ight, the signal can be lost, if this happens try to stabilize the
aircraft until the connection is restablished.
HTS-MRPM (RPM Sensor)
M-RPM sensor has been developed for indoor aircraft and for applications where the
O-RPM sensor is too big to be installed. Furthermore, it will give you a much more
accurate reading. For optimum performance, make sure the distance between the
magnet and the sensor is less than 1mm.
Warning function from operating properly.
- When 2.4GHz system and HV servos are used together, we strongly recommend using a large
capacity battery pack in a fully charged condition. You must constantly monitor the battery status.
Red LED will blink to indicate it’s
searching for a
receiver.
When the link is completed, the red LED glows
solid and the blue LED ashes on the module.
To save the setting, turn the power o for
both the receiver and transmitter.
Turn the power on for both the transmitter and receiver. When you hear four
continuous beep sounds with LED status as indicated in the drawing below,
the system is in Normal Mode.
www.hitecrcd.com
Press and Hold the button
for about six second
Power Down
Activation Mode
www.hitecrcd.com www.hitecrcd.com
From Normal Mode
it switches to Scan Mode in one second
Scan Mode
Normal Mode
www.hitecrcd.com
Normal/Scan
Selection Mode
Release the button
From Scan Mode
it switches to Normal Mode in one second
HTS-ORPM (RPM Sensor)
The Optical RPM sensor was made to be used with larger, outdoor, use helicopters.
Installation is simple, attach it to the boom and connect it to the sensor station.
It can read from 0 to 50,000 RPM.
- The readout can be inaccurate and inuenced by the weather condition
- For a more accurate reading, install the sensor as far away from the y bar paddles
as possible.
HTS-FUEL (Fuel Level Sensor)
This fuel level sensor indicates ve steps of fuel level (Full, 3/4, 1/2, 1/4, Empty) to the
yer. Installation is easy, simply stick the sensor outside of the fuel tank and y. It can
even read the values during inverted ight
Power-up the system prior to fueling.
- During extreme 3D ight, the reading can be inaccurate, if this happens try to hover
(for Heli), and atten out (for Acro) for a few seconds to re-establish an accurate reading.
The fuel sensor is only made to be used with glow fuel.
HTS-TEMP (Temperature Sensor)
HTS-SS can measure up to four dierent temperature locations, using the HTS-TEMPs,
the temperature sensors. These specially designed temperature sensors are wrapped
with high temp resistant shrink tubing and can read temperatures
from -40°C to 200°C (-40°F to 392°F).
These sensors can be used almost anywhere.
 Loading...