

Page 1
HIGH-POWER, DUAL PORT
AC/DC CHARGER
Balance Charger/Discharger/Power Supply
WARNING: THE CHARGING AND DISCHARGING OF RC HOBBY BATTERIES CAN BE DANGEROUS. FAILURE TO FOLLOW
THE INSTRUCTIONS AND WARNINGS IN THIS MANUAL MAY RESULT IN PROPERTY DAMAGE AND/OR LOSS OF LIFE.
1
1
1
Page 2

Table of Contents
Introduction.............................................................................................................................................3
Warnings and Safety Notes.......................................................................................................................4
Contents of Charger Package.....................................................................................................................7
Charger Layout/Speci cations..................................................................................................................8
Features....................................................................................................................................................9
Charger Connections...............................................................................................................................11
Getting Started.......................................................................................................................................12
Operating the Charger.............................................................................................................................14
NiMH Battery Program............................................................................................................................17
Pb-Lead Acid Battery Program................................................................................................................22
DC Power Supply....................................................................................................................................24
Battery Memory Set & Call Out...............................................................................................................25
System Settings......................................................................................................................................28
Battery Voltage Meter.............................................................................................................................30
Battery Resistance Meter........................................................................................................................31
Warning & Error Messages......................................................................................................................32
Regulatory Information..........................................................................................................................34
Disposal and Proposition 65 Warning......................................................................................................34
Warranty and Service..............................................................................................................................35
2
Page 3

Introduction
Congratulations on purchasing Hitec’s RDX2 Pro Dual Balance Charger. The RDX2 Pro features independent
circuits allowing you to charge two batteries simultaneously, regardless of chemistry or capacity. The
RDX2 Pro also features integrated balancing for six-cell Lithium-Polymer (LiPo), Lithium-Ferrite (LiFe) and
Lithium-Ion (Li-Ion), as well as the latest high voltage Lithium-Polymer (LiHV) batteries.
Although simple to use, the RDX2 Pro does require some basic knowledge for successful
and safe operation. The operating instructions included here are designed to ensure that you quickly
become familiar with its functions. It is important that you read through the Operating Instructions,
Warning and Safety Notes attentively and in full before attempting to use your new charger for the rst
time.
Please read this entire operating manual before using the RDX2 Pro Charger. If you are
unsure of its proper operation after reading the manual, please seek advice from an
experienced hobbyist or someone familiar with proper battery charging procedures.
THE CHARGING AND DISCHARGING OF RC HOBBY BATTERIES CAN BE DANGEROUS.
FAILURE TO FOLLOW THESE EXPLICIT WARNINGS CAN RESULT IN PROPERTY DAMAGE
Warning
AND/OR LOSS OF LIFE.
A NEVER LEAVE YOUR CHARGER UNATTENDED WHILE IN OPERATION.
A NEVER CHARGE ON OR AROUND COMBUSTIBLE MATERIALS.
A NEVER CHARGE A DAMAGED BATTERY PACK.
A LOW COST, NO-NAME BATTERY PACKS POSE THE MOST DANGER. WE RECOMMEND YOU ONLY
USE BATTERY PACKS THAT ARE SOLD AND WARRANTIED BY A REPUTABLE COMPANY.
A IT IS HIGHLY RECOMMENDED THAT YOU UTILIZE A SAFETY DEVICE SUCH
AS A STEEL CASE OR LIPO SACK™ WHILE CHARGING LITHIUM CHEMISTRY BATTERIES.
A IT IS HIGHLY RECOMMENDED THAT YOU KEEP AN OPERABLE “CLASS A” FIRE EXTINGUISHER IN
THE CHARGING AREA.
FAILURE TO FOLLOW THESE WARNINGS CAN BE CONSIDERED NEGLIGENCE BY THE OPERATOR
AND MAY NEGATE ANY CLAIMS FOR DAMAGES INCURRED.
3
Page 4

Warnings and Safety Notes
Hitec RCD will not be held responsible for any damages or injuries that may occur by persons who fail to
follow these warnings or who fail to properly follow the instructions in this manual.
Be sure to read this section for your own safety.
Warning:
Caution: Be sure to read this section to prevent accidents and damage to your charger.
Warning
Note
These warnings and safety notes are of the utmost importance. You must follow these instructions for
maximum safety. Failure to do so can damage the charger and the battery and in the worst cases, may
cause a re.
Warning
Tip
Tip: This section will help you maximize the performance of your charger.
Note: This section will provide more detailed explanations.
Caution
NEVER LEAVE THE CHARGER UNATTENDED WHILE IT IS CONNECTED TO ITS POWER
SOURCE. IF ANY MALFUNCTION IS FOUND, TERMINATE THE PROCESS AT ONCE AND
REFER TO THE OPERATION MANUAL.
A The allowable AC input voltage is 100 - 240V AC
A The allowable DC input voltage is 11-18V DC.
A Keep the charger away from dust, damp, rain, heat, direct sunlight and exces-
sive vibration.
A If the charger is dropped or su ers any type of impact, it should be inspected by
an authorized service station before using it again.
A This charger and the battery should be put on a heat-resistant, non- ammable
and non-conductive surface.
A Never place a charger on a car seat, carpet or similar surface. Keep all ammable
volatile materials away from the operating area.
A Make sure you know the speci cations of the battery to be charged or dis-
charged to ensure it meets the requirements of this charger. If the program is
set up incorrectly, the battery and charger can be damaged.
A Fire or explosion can occur due to overcharging.
A Never attempt to charge or discharge the following types of batteries:
• A battery tted with an integral charge circuit or a protection circuit
4
• A battery pack which consists of di erent types of cells (including di erent manufacturer’s
cells)
Page 5

Warnings and Safety Notes
• A battery that is non-rechargeable (these pose an explosion hazard)
• A faulty or damaged battery
• Batteries installed in a device or which are electrically linked to other components
• Batteries that are not expressly stated by the manufacturer to be suitable for the currents
the charger delivers during the charge process
PLEASE BEAR IN MIND THE FOLLOWING POINTS BEFORE YOU COMMENCE CHARGING:
• Did you select the appropriate program suitable for the type of battery you are charging?
• Did you set up the adequate current for charging or discharging?
• Have you checked the battery voltage? Lithium battery packs can be wired in parallel and in
series, i.e. a 2-cell pack can be 3.7V (in parallel) or 7.4V (in series).
• Have you checked that all connections are rm and secure?
• Make sure there are no intermittent contacts at any point in the circuit.
Standard Battery Parameters
Nominal
Vol ta ge
Max. Charge
Vol ta ge
Storage
Vol ta ge
Allowable Fast
Charge
Min. Discharge
Vol ta ge
LiPo LiPo HV LiIon LiFe NiCd NiMH Pb
3.7V/cell 3.8V/cell 3.6V/cell 3.3V/cell 1.2V/cell 1.2V/cell 2.0V/cell
4.2V/cell 4.35V/cell 4.1V/cell 3.6V/cell 1.5V/cell 1.5V/cell 2.46V/cell
3.8V/cell 3.85V/cell 3.7V/cell 3.3V/cell n/a n/a n/a
≤ 1C ≤ 1C ≤ 1C ≤ 4C ≤ 1-2C ≤ 1-2C ≤ 0.4C
3.0-3.3V/cell 3.1-3.4V/cell 2.9-3.2V/cell 2.6-2.9V/cell 0.1-1.1V/cell 0.1-1.1V/cell 1.8V/cell
Warning
WHEN ADJUSTING YOUR RDX2 PRO CHARGING PARAMETERS, BE SURE YOU
SELECT THE PROPER BATTERY TYPE AND CELL VOLTAGE FOR THE TYPE OF CELL
YOU ARE CHARGING. CHARGING BATTERIES WITH THE WRONG SETTINGS MAY
CAUSE THE CELLS TO BURST, CATCH FIRE OR EXPLODE.
5
Page 6

Warnings and Safety Notes
Charging
Before charging your batteries, it is critical that you determine the maximum allowable charge rate for
your batteries. The RDX2 Pro is capable of charging at high rates that may not be suitable or safe for your
particular batteries. For example, Lithium cells are typically safe to charge at 1C, or the total mAh÷1000.
A 1200mAh battery would have a 1C charge rate of 1.2 amps. A 4200mAh battery would have a 1C charge
rate of 4.2 amps. Some manufacturers are o ering Lithium cells that can be charged at greater than 1C but
this should ALWAYS be veri ed before charging a Lithium battery at rates higher than 1C. Voltage is just
as critical as the charging amperage rate and this is determined by the number of cells in series, or “S”. For
example, a 3S LiPo is rated at 11.1 volts (“S” multiplied by a single LiPo cell with a nominal voltage of 3.7
volts DC. 3 cells x 3.7 volts each equals 11.1 volts DC).
Connect the battery’s main leads to the charger output: red is positive and black is negative. Keep in
mind that the gauge or thickness of your charging leads from the RDX2 Pro to your battery must be of
an acceptable current rating to handle the applied charge current. For maximum safety and charging
e ectiveness, always match or exceed the main battery lead rating when assembling or selecting your
charging leads. If you charge a battery at a high current rate (amperage) with a charging lead not rated for
the chosen amperage, the wire could get hot, catch re, short out and/or potentially destroy your battery
and the charger. When in doubt, always use a higher gauge wire (lower AWG number). It is common to see
charging leads constructed of 14AWG, 16AWG or 18AWG wire.
Always refer to recommendations from your battery manufacturer for your speci c battery type and size
before initiating a charge or discharge process.
Do not attempt to disassemble or modify ANY battery packs.
Discharging
The RDX2 Pro discharging functions are for two speci c purposes:
• Refreshing the capacity of a Nickel-based battery that has lost capacity over time (NiMH or NiCd).
• Reducing the voltage of a Lithium battery for safe storage.
LITHIUM CHEMISTRY BATTERY PACKS SHOULD ONLY BE DISCHARGED TO THEIR
MINIMUM SAFE VOLTAGE, NO LOWER. DEEP DISCHARGING A LITHIUM CELL WILL DO
PERMANENT DAMAGE. REFER TO THE STANDARD BATTERY PARAMETERS TABLE ON
Warning
PAGE 5 OF THIS MANUAL FOR MINIMUM DISCHARGE VOLTAGES.
LiPo & LiHV Charge/Discharge Cycling
Lithium batteries are known to reach full capacity after a break-in period of about 10 charge/discharge
cycles. We do not recommend you use the RDX2 Pro charger to do this; normal use and recharging will
achieve the same results. If you wish to perform a Lithium break-in on the bench with the RDX2 Pro,
discharging to minimum acceptable voltages and performing a balance charge at 1C maximum rate is
6
recommended. If you choose to break in your Lithium batteries under normal use, charging at only 1C for
the rst ten cycles will help ensure full performance and service life from your Lithium cells.
Page 7
Contents of Charger Package
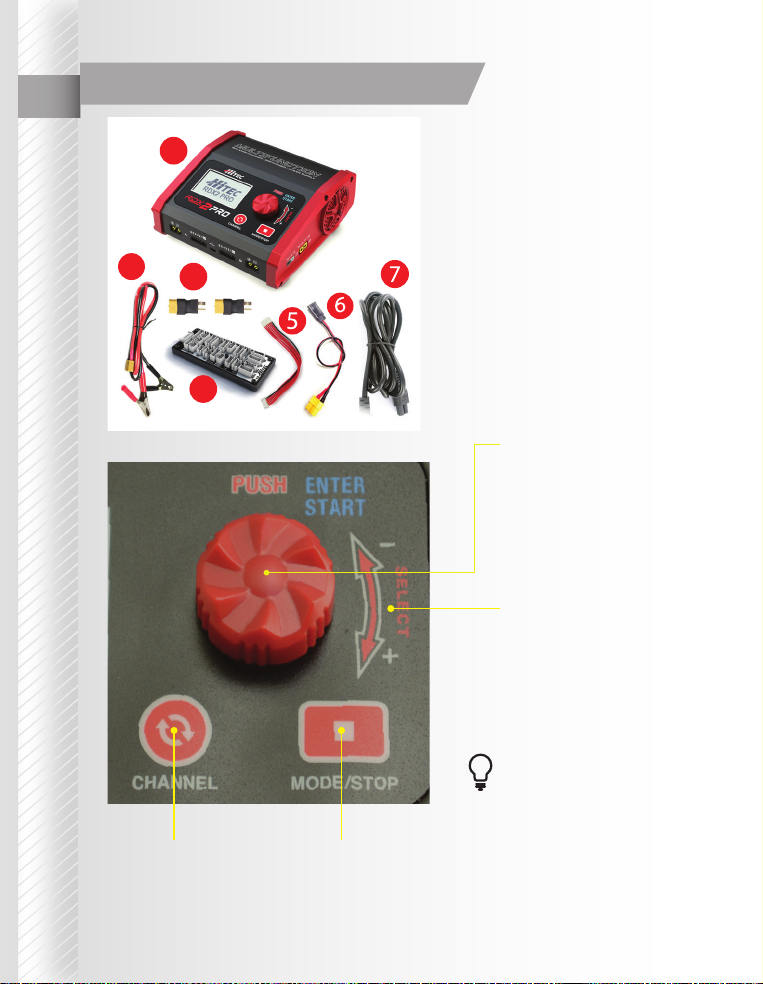
1
1. RDX2 Pro Charger
2. DC Cable with Clips
3. XT60 to T-Type Adapter x 2
2
3
4
Input Buttons
4. Universal Balance Board
5. Balance Board Lead
6. XT60 to RX Battery Adapter
7. AC Cable
ENTER/START
Push the Jog Dial to ENTER a menu
or store a setting. Push and hold the
Jog Dial for 3 seconds to START a
charge process, activate the Power
Supply or to reset to Factory Default
in System Settings.
INCREASE/DECREASE
Turn the Jog Dial to SCROLL
through the menus, increase
or decrease a value, or change
a parameter as needed.
Tip: For a more detailed
description of using the
Jog Dial, refer to “Charger
Tip
Operations” on page 14.
CHANNEL MODE/STOP
Switch from Channel A to B
or from Channel B to A.
Stop the progress of the
current action or cycle back
to the previous step / screen.
7
Page 8
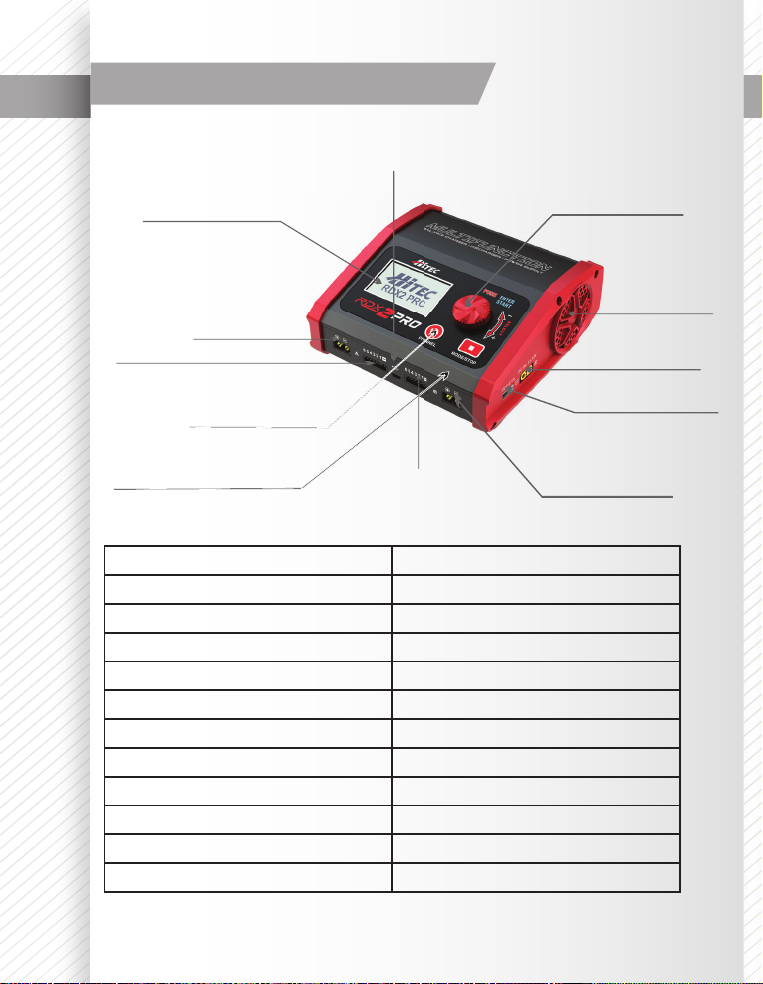
Charger Layout | Speci cations
M
ICRO USB PORT FOR PC LINK
AND
FIRMWARE UPGRADE
JOG DIAL (PUSH TO ENTER/START
& I
LCD DISPLAY (128
X64)
OUTPUT SOCKET
XT60 PLUG
ALANCE LEAD SOCKET
B
CHANNEL BUTTON (SWITCH FROM
CHANNEL A TO B & B TO A)
M
HARGE
C
NY
A
TOP
/ S
ENU
M
P
ROCESS
)
BALANCE LEAD SOCKET
AIN
M
HROUGH
T
CROLL
(S
UTTON
B
TOP
/S
ODE
Input Voltage AC 100-240V/DC 11-18V
Charge Circuit Power 130W x 2 (260 Watts total)
Discharge Circuit Power 10W x 2
Charge Current Range 0.1-14A x 2
Discharge Current Range 0.1-2A x 2
Current Drain for Balancing Port
Max. 500mA/cell
DC Power Supply Output 5-25V/130W x 2
LiPo/LiFe/Lilon/LiHV Battery Cell Count 1-6S
Pb Battery Voltage 2-20V
NiMH/NiCd Battery Cell Count 1-15S
Dimension 6.1 x 5.9 x 2.7 in.
Net Weight 2.13 lbs.
8
NC. OR DEC. PARAMETERS)
C
DC INPUT: 11-18V
OUTPUT SOCKET
XT60 PLUG
OOLING FAN
USB PORT
Page 9

Features
Battery Memory (Data Store/Load):
The RDX2 Pro can store up to 10 di erent charge pro les per por t for your convenience. Users can keep
the data pertaining to any program setting for any battery to facilitate seamless charging or discharging.
Saved pro les can be accessed and recalled, as necessary.
Terminal Voltage Control (TVC):
For experienced users ONLY, the charger’s end voltage can be reset up to 0.05v/cell higher.
Default setting is recommended. ONLY change in a controlled environment.
ALWAYS monitor the battery during the charge process.
Warning
Twin-Channel Charger:
Hitec’s RDX2 Pro allows you to plug two batteries into the charger simultaneously. The batteries being
charged do not need to have the same con guration. You can connect di erent battery chemistries (NiMH/
NiCd/LiPo/LiFe/Lilo/LiHV/Pb) into any of the charging ports.
Internal Independent Lithium Battery Balancer:
The RDX2 Pro employs an individual-cell-voltage balancer. It is not necessary to connect an external
balancer for balance charging.
Independent Cell Balancing While Discharging:
During the discharge process, the RDX2 Pro can monitor and balance each cell of the battery individually. If
the voltage of any single cell reads abnormally, an error message will display and end the process automatically.
Adaptable to Various Types of Lithium Batteries:
The RDX2 Pro will charge a variety of Lithium batteries such as LiPo, LiFe, LiIo and the new higher
voltage LiHV batteries.
Multiple Lithium Battery Charge Modes:
Balance Charge:
In this mode, each cell is monitored and if some are at higher voltages than the others, they are
discharged to equalize the voltage between all the cells and keep the pack in optimum condition. We highly
recommend using Balance Charge as it is the safest and best way to charge Lithium batteries.
Charge:
This mode charges the pack without balancing the cells. Connecting the balance lead is still recommended
so you can monitor each cells voltage manually by scrolling to the left with the Jog Dial. Note: If the cells are
more than 0.02v o from each other, Balance Charge should be used to equalize the pack.
Fast Charge:
This mode reduces the charge time by approximately 25% as the charge process stops after the terminal
voltage is reached. This will provide about 85% -90% of the rated capacity.
Storage:
This mode charges or discharges the pack to 50% capacity so that it can be safely stored when not in
normal use. If you do NOT plan on using your Lithium pack within 24-48 hours of being fully charged or fully
discharged, Storage Mode is recommended to optimize maximum lifespan and performance and reduce the
risk of the gasses forming, causing the pack to pu .
9
Page 10

Features
Re-Peak Mode of NiMH/NiCd Batteries:
In Re-Peak charge mode, the charger can peak charge the battery once, twice, or three times in a
row automatically. This function is useful for ensuring a full battery charge.
Cyclic Charging / Discharging:
A battery can be cycled 1 to 5 times consecutively. This process is normally used for NiCd or NiMH
packs that have lost capacity over time. It is not recommended for Lithium packs.
NiMH / NiCd Auto Charging:
Charging current is determined by the charger up to the maximum set by the user by evaluating the
internal resistance of the pack so as not to charge at too high of a rate. This mode is recommended
when charging NiMH or NiCd batteries where you are unsure of the optimal rate at which to charge.
Delta-Peak Sensitivity for NiMH/NiCd:
This function determines the amount of voltage drop in MV that must be achieved for the Delta-Peak
algorithm to automatically terminate the charge process. This can be raised for packs that have a
tendency to “False Peak” at the default setting.
Battery Meter:
The user can check not only the MAIN pack voltage, but the highest and lowest voltage is also stored,
as well as each individual cell.
Battery Resistance:
The user can also check the battery’s total internal resistance and the internal resistance of each cell.
This is helpful when determining the health of a pack.
Capacity Cut-O Limit:
This feature allows the user to set a limit for the maximum mAh’s that can be put into the pack. Once
this limit is reached, the charge process will automatically terminate, and “OVER CHARGE CAPACITY
LIMIT” will be displayed. Default is 5000mAh, so set this accordingly to the rated capacity of the
pack. To ensure the pack gets fully charged, this setting should be at least 10% higher than the rated
capacity on the pack or turned to o .
Safety Timer:
Protect your battery by setting a maximum time limit for charging. Once this limit is reached, the
charge process will automatically terminate, and “OVER TIME LIMIT” will be displayed. Default is 120
minutes, so adjust as needed depending on the charge rate and capacity of the pack.
USB Power 5V/2.1A:
You can charge your phone, tablet or any other USB-powered devices using the built-in USB port.
Battery Charge Percentage:
The battery charge percentage is displayed in real time once you are charging. To view, SCROLL to the
left with the Jog Dial to monitor.
Power Supply:
With the built in Power Supply function, you can power devices with up to 25V @130W.
NOTE: IF THE POWER SUPPLY FUNCTION IS ACTIVATED, CHARGING IS DISABLED.
Note
10
Page 11

Charger Connections
1.) Connecting to a power source
The Hitec RDX2 Pro features a built-in switching power supply. You can connect the AC power cord
directly to an AC socket (100-240V AC) or use an 11-18V DC power source (such as an automotive
battery or 12 Volt power supply).
2.) Connecting the battery
NOTE: Before connecting any battery, it is absolutely essential to check one last time
that the parameters were set correctly. If the settings are incorrect, the battery may
Note
be damaged and, in worse case scenarios, could even burst into ames or explode.
3.) Balance Socket
The balance wire attached to the battery must be connected to the charger, with the black wire
aligned with the negative marking. Take care to maintain correct polarity. (See photo below)
This photo shows the correct way to connect your battery to the Hitec RDX2 Pro when charging in the
balance charge program mode.
FAILURE TO CONNECT AS SHOWN IN THIS
PHOTO WILL DAMAGE YOUR CHARGER.
TO AVOID A SHORT CIRCUIT BETWEEN
THE CHARGE LEAD, ALWAYS CONNECT THE
Warning
CHARGE CABLE TO THE CHARGER FIRST,
THEN CONNECT THE BATTERY. REVERSE THE
SEQUENCE WHEN DISCONNECTING.
THE NEGATIVE BLACK LEADS SHOULD
ALWAYS BE JUSTIFIED TO THE RIGHT OF THE
Note
CONNECTION.
11
Page 12

Getting Started
Initial Setup of the Charger
After connecting the battery you are now ready to setup the charger to charge your speci c type of
battery. When the charger is rst powered on, the last program selected will be displayed. If this
is not the battery you plan on working with then you will need to make changes to the operation
programming based on the following instruction.
BEFORE SELECTING AN OPERATION, IT IS CRITICAL THAT YOU KNOW THE
TYPE OF BATTERY YOU ARE WORKING WITH AND WHAT THE MANUFACTUR
Warning
Available Operations
Depending on battery type, di erent operations will be available. This chart shows which operations
are available for the di erent types of batteries the RDX2 Pro is capable of working with.
Battery Type Operation Operation Description
LiPo
Lilon
LiFe
LiHV
ER RECOMMENDATIONS ARE FOR CHARGING OR DISCHARGING. FAILURE
TO FOLLOW THE MANUFACTURERS RECOMMENDATIONS CAN RESULT IN
DAMAGE TO THE BATTERY AND POSSIBLE EXPLOSION.
CHARGE
DISCHARGE
STORAG E
FAST CHG
BAL CHARGE
The charge mode is for charging LiPo/LiFe/LiIon/LiHV
batteries in normal mode.
This mode is f or discharging
LiPo/LiFe/LiIon/LiHV batteries.
This progr am is for charging or disc harging a lithium
batter y which will not be used a gain for an extended
period of time.
A fast char ge will result in a smaller tha n usual charging
capacit y but will reduce the tot al charge time.
This mode is f or balancing the voltage o f LiPo battery cells
while charging.
12
Page 13

Getting Started
Available Operations (continued)
Battery Type Operation Operation Description
NiMH
NiCd
Lead
Acid
Pb
CHARGE
AUTO CHG
DISCHARGE This mode is for discharging a NiMH/NiCd battery
RE-PEAK
CYCLE
CHARGE This mode is for charging a Pb battery.
AGM CHARGE
COLD CHARGE
DISCHARGE This mode is for discharging a Pb battery.
The charger will charge NiMH and NiCd batteries using
the charge current set by the user.
In this program, the charger detects the condition of the
connected battery and automatically charges the battery.
Note: You should set the upper limit of the charge current
to avoid damage by excessive charging current. The RDX2
Pro may not be able to detect the charge capacity of low
resistance batteries.
In re-peak charge mode, the charger can peak charge the
battery once, twice, or three times in a row automatically.
This is good for con rming the battery is fully charged and
for checking how well the battery receives fast charges.
Automatically charges/discharges the battery up to 5
times. This process can restore the performance of NiMH/
NiCd batteries.
This mode is for charging an Absorbent Glass Mat (AGM)
battery.
This mode is for charging a Pb battery at low
temperatures(<-32
o
F/0oC).
13
Page 14

Operating the Charger
First, familiarize yourself with the Jog Dial which is the main way you will interact with the charger and
its programming. Turning the Jog Dial allows you to “SCROLL” through the main menus, functions, and to
change parameters. Pushing the Jog Dial in the center allows you to “ENTER” the menu you are choosing.
Once you are in a menu, turn the Jog Dial to SCROLL through to di erent functions. When you want
to select a function, press the Jog Dial again to ENTER. Once you come upon a value that needs to be
changed, push the Jog Dial to highlight it. The value will now start blinking. To change the value, simply
turn the Jog Dial clockwise to increase, or counterclockwise to decrease. Once you have the proper setting,
press it to store the value. When you are ready to charge, push and hold the Jog Dial down for 3 seconds
to start the charge process.
The MODE/STOP button allows you to “go back.” Before you begin charging your rst battery, it is recommended that you SCROLL through all the menus and then enter them one by one to get a feel for how the
interface works. Do not forget you will use the MODE/STOP button to revert back. Remember, you can
always reload the factory settings in the System Setting menu under “Load Factory Settings” by pushing
and holding the Jog Dial for 3 seconds. We will use the term “SCROLL” when you will turn the Jog Dial, and
“ENTER” when you will push the Jog Dial. Now… Let’s get charging!
BEFORE YOU BEGIN CHARGING YOUR BATTERY, MAKE SURE
YOU HAVE READ AND UNDERSTOOD ALL OF THE WARNINGS
Warning
AND SAFETY INFORMATION CONTAINED ON PAGES 4-6.
Selecting the Battery Type: After powering on the RDX2 Pro, the
charger will display the last charging mode used. Press the MODE/
STOP button to get to the BATT/PROGRAM menu and SCROLL with
the Jog Dial until you reach the battery type you wish to charge.
Press the Jog Dial to access the charge programs.
Lithium Battery Charging: The RDX2 Pro can charge all Lithium
battery types and the programming procedures are identical for
them all. These instructions will use the most common LiPo BATT
(Lithium Polymer) program to walk you through step by step, the set
up for charging Lithium packs.
BATT/PROGRAM LiPo BATT: Battery Type Select: Use the Jog dial
to SCROLL through until you nd LiPo BATT. Once there, press the Jog
Dial (ENTER) to select the battery type and access the charging mode
programming.
Press the MODE/STOP button twice
14
if you are stuck in another menu.
Tip
BATT/PROGRAM
A
A
LiPo BATT
LiPo BALANCE
2.0A 11.1v (3S)
Page 15

Operating the Charger
LiPo BALANCE
A
2.0A 11.1v (3S)
LiPo BALANCE
A
2.0A 11.1v (3S)
LiPo BALANCE
A
2.0A 11.1v (3S)
LiPo BALANCE
A
2.0A 11.1v (3S)
BATTERY CHECK
A
.............
*FLASHING
Charge MODE Select: Once you have selected the proper
battery type, SCROLL through the charge modes which include
Balance, Charge, Fast Charge, Storage & Discharge. It is highly
recommended to use the Balance mode to keep your packs
in the best condition. Instruction on how to use the most
common LiPo Balance mode is described below. If you plan to
use a di erent mode, the programming is identical.
BATTERY Setting: Once you have selected the Charge mode,
the amperage and voltage will be shown on the lower line.
These values will be what was entered previously or defaulted.
Tip: If you are recharging the same pack, you
will not have to re-do these settings.
Tip
The rst step is to set the amperage. Push the Jog Dial to
“ENTER” and the setting will start to blink. SCROLL clockwise
to increase or counterclockwise to decrease the value and
press “ENTER” to con rm your setting. Note: As a general rule,
this value should be set to a 1C rate, meaning “1” multiplied
by the Capacity (I.E.: 2000mah = 2A). Once you con rm the
amperage setting, the cell count next to the voltage will start
to blink. SCROLL to change the value to the exact voltage/cell
count of your pack and press “ENTER” to con rm.
Program Start: Verify that these settings match the ratings on your
pack (I.E. 2000Mah =2A 11.1V = 3 Cells). Once con rmed, press and hold
the Jog Dial for 3 seconds to start. The charger will perform a quick check
to detect the number of cells. R shows the number of cells detected by the
charger while S is the number of cells set by the user. If the numbers are
not identical, press STOP to go back to the previous screen and recheck the
number of cells in the battery pack before proceeding. If correct, press the
Jog Dial “ENTER” to con rm and start the charging process.
R:3SER S:3SER
A
CONFIRM (Enter)
R:3SER S:3SER
A
CANCEL (STOP)
15
Page 16

Operating the Charger
Charging Status Monitor: Once the charge process is started, the realtime status will be shown which includes: Cell Count, Amperage, Voltage,
Timer, mAh of Charged Capacity. SCROLL to view a variety of other useful
information. Scrolling counterclockwise will display the FUEL=% & Cell
Voltage.
This shows how full the pack is from 0% - 100% and the Average Cell
voltage. Continue scrolling to show each individual cell voltage. This is
helpful in determining how well balanced the pack is.
These should be no more than .02v from each other. A signi cant disparity
is a sign that there are one or more bad cells.
Further scrolling will show the settings for:
Capacity CUT-OFF
Safety Timer
Internal Temperature of the Charger
Input Power Voltage
LP3s 2.0A 12.14V
A
BAL 000:50 00022
FUEL = 90%
A
Cell = 4.07V
4.07 4.06 4.07 V
A
0.00 0.00 0.00 V
CAPACITY CUT-OFF
A
ON 5000MAH
SAFETY TIMER
A
ON 120 MIN
Int. Temp 94
A
IN POWER VOLTAGE
A
0
F
15.8V
End Voltage
A
END VOLTAGE
12.60V (3S)
Charge Process Complete: Once the battery is fully charged,
the screen will read “END: FINISH” and the charger will emit
an audible “ring” sound. Battery voltage, mAh capacity and
[END FINISH]
A
12.60V 2000mAh
elapsed time will be displayed.
Program Stop: You can press the MODE/STOP at any time
16
throughout the charge or discharge process to stop the
process.
[TIME: 00:45:32]
A
12.60V 2000mAh
Page 17

NiMH/NiCd Battery Program
The RDX2 Pro can charge NiMH and NiCd battery packs. The programming procedures are identical for
both. These instructions refer to the most common NiMH (Nickel Metal Hydride) battery packs and
provide step by step set up directions for charging NiMH or NiCd packs. These programs are only suitable
for charging discharging NiMH/NiCd batteries.
WARNING: NEVER CHARGE A LITHIUM BATTERY IN THIS MODE FOR ANY REASON,
Warning
AS THEY MAY CATCH FIRE AND EXPLODE.
BATT/PROGRAM
A
NiMH Charge
A
Current 2.0A
NiMH Charge
A
Current 2.0A
*FLASHING
BATTERY CHECK
A
.............
NiMH 2.0A 9.36V
A
CHG 001:50 000525
[END FINISH]
A
9.65V 00980mAh
[TIME: 00:45:32
A
9.65V 00980mAh
NiMH
Selecting the Battery Type:
After powering on the RDX2 Pro, press the MODE/STOP button
and SCROLL with the Jog Dial until you reach the appropriate
program for the battery type you wish to charge. Press the Jog
Dial ENTER button to enter the Charge Mode menu.
Selecting the Charge Mode:
The RDX2 Pro o ers the following NiMH/NiCd charge modes:
Charge, Auto Charge, Discharge, Re-Peak and Cycle.
NiMH Charge:
This is the most common mode as the amperage is selected
by the user. The rst step is to set the amperage. Push the Jog
Dial to ENTER and the setting will start to blink. SCROLL clockwise to increase or counterclockwise to decrease the value and
press Jog Dial ENTER to con rm your setting.
Now, press and hold the Jog Dial ENTER button for 3 seconds
to start charging.
Once charging has commenced, the charger will display
the following real-time information: battery type, charging
current, battery voltage, ”CHG (Charging)”, elapsed time and
charged capacity.
Once the battery is fully charged, the screen will read “END:
FINISHED” and the charger will emit an audible “ring” sound.
You can press the STOP button at any time during the charging
process to stop charging.
17
Page 18

NiMH/NiCd Battery Program
NiMH AUTO CHARGE : After selecting the correct battery
type, SCROLL to select the ‘AUTO CHARGE’ mode. Press the Jog
Dial ENTER and the amp rate value will begin ashing. SCROLL
NiMH Auto Charge
A
Current 1.3A
to adjust the value to the desired rate. In the ‘AUTO CHARGE’
mode, you are selecting the highest amperage that you feel
should be the maximum. The charger will then calculate
the highest amperage appropriate, based on the internal
resistance of that pack and will set the rate accordingly.
Press and hold the START button for 3 seconds to start
charging.
Once charging has commenced, the charger will display
the following real-time information: battery type, charging
current, battery voltage, CHG, elapsed time and charged
NiMH Auto Charge
A
Current 1.3A
*FLASHING
BATTERY CHECK
A
.............
NiMH 1.3A 5.42V
A
AUT 002:22 00106
capacity.
Once the battery is fully charged, the screen will read “END:
FINISHED” and the charger will emit an audible “ring” sound.
[END FINISH]
A
6.75V 01980mAh
It will also display the nal voltage, and charged capacity. You
can press the STOP button at any time during the charging
process to stop charging.
NiMH Discharge: After selecting the correct battery type,
SCROLL to select the ‘DISCHARGE’ mode. Press the Jog Dial
to ENTER and the amp rate value will begin ashing. SCROLL
[TIME:00:45:32]
A
6.75V 01980mAh
NiMH DISCHARGE
A
1.3A CUT: 5.0V
to adjust the value to the desired discharge rate. Press Jog
Dial ENTER again, and the voltage cut-o will begin to ash.
SCROLL to adjust the value to the desired rate.
NOTE: 1V/CELL IS SUGGESTED I.E. 5V CUT
OFF FOR A 5CELL PACK.
Note
Now, press and hold the Jog Dial ENTER button for 3 seconds
NiMH DISCHARGE
A
1.3A CUT: 5.0V
NiMH DISCHARGE
A
1.3A CUT: 5.0V
*FLASHING
to start discharging.
Once discharging has commenced, the charger will display
the following real-time information: battery type, discharging
current, battery voltage, “DCH (Discharging)”, elapsed time
18
and discharged capacity in mAh.
BATTERY CHECK
A
.............
NiMH 1.3A 6.25V
A
DCH 002:22 00106
Page 19

NiMH/NiCd Battery Program
[END: CUTOFF-VOL]
A
5.00V 01980mAh
[TIME: 01:04:04]
A
5.00V 01980mAh
NiMH RE-PEAK
A
1
NiMH RE-PEAK
A
1
*FLASHING
BATTERY CHECK
A
.............
NiMH 1.3A 6.42V
A
RPC 004:04 00686
Once the battery is fully discharged, the screen will read
“END: CUTOFF-VOL” and the charger will emit an audible “ring”
sound. It will also display the Time Elapsed, End Voltage and
Capacity in mAh that was removed.
You can press the STOP button at any time during the
discharging process to stop discharging.
NiMH/NiCd Re-Peak Mode:
Applicable to NiMH and NiCd batteries only, in Re-Peak Mode,
the charger can top o the battery once, twice, or three times
in a row automatically. This process is good for con rming
that the battery is fully charged after it had been previously
charged and sitting for a while. A ve-minute cool-down
delay occurs after each Re-Peak Charge.
NOTE: IN RE-PEAK MODE, THE RDX2 PRO
USES THE CHARGE AMPERAGE AND VOLTAGE
Note
SETTINGS ENTERED IN CHARGE MODE.
After selecting the correct battery type, SCROLL to select the
‘RE-PEAK’ mode. Press the Jog Dial ENTER and the Re-Peak
cycle number 1 begins to ash on the screen. SCROLL to adjust
the cycle count between 1 and 3.
Press and hold the START button for 3 seconds to start the
Re-Peak process.
Once the Re-Peak process has begun, the charger will display
the following real-time information: battery type, charging
current, battery voltage, RPC (Re-Peak Charge mode), elapsed
time and charged capacity.
[END: RE-PEAK]
A
6.75V 00980mAh
[TIME:00:05:32]
A
6.75V 00980mAh
Once the Re-Peak process is completed, the screen will read
“END: RE-PEAK” and the charger will emit an audible “ring”
sound.
It will also display the nal voltage, and charged capacity.
19
Page 20

20
NiMH/NiCd Battery Program
NiMH/NiCd Cycle Mode: The RDX2 Pro makes cycling of NiMH/NiCd batteries easy. The process of
charging, discharging and recharging (cycling) can be performed automatically with one simple step
and will improve the performance of NiMH/NiCd batteries. We strongly recommend cycling any battery
that has been discharged and stored for a long period of time or has lost capacity over time. This will
increase the remaining usable battery life and improve the batteries performance.
Note: Since the Cycle mode uses the Charge and Discharge settings
from those modes, make sure you have them set to correlate with the
Note
batteries you are planning to cycle.
TIP: TAKE NOTE OF THE CAPACITY. ONCE THE NEXT CYCLE BEGINS, IT WILL
DISAPPEAR.
Tip
After selecting the correct battery type, SCROLL to select the
“CYCLE” mode. The Cycle Mode gives you two cycling options:
“DCHG>CHG” or “CHG>DCHG.” The “DCHG>CHG” option
will rst discharge the battery and then recharge the battery.
The ‘CHG>DCHG’ option will rst charge the battery and
then discharge the battery. Press the Jog Dial ENTER and this
setting will begin ashing. SCROLL to change this setting to
the option you want.
Press Jog Dial ENTER again and the cycle count begins
ashing. SCROLL to change this to the number of cycles you
want, up to a maximum of 5 times consecutively.
Press and hold the START button for 3 seconds to start the
Cycle Mode.
Once cycling has commenced, the charger will display the
following real-time information: battery type, charging/
discharging current, battery voltage, working mode, elapsed
time and charged/discharged capacity in mAh.
The working mode is displayed as either ‘D>C’ or ‘C>D.’ This
will indicate which cycling order you have chosen. Either ‘D’
or ‘C’ will be ashing. This ashing Indicates which part of the
cycle is currently being executed.
Once the battery is fully charged or discharged, the screen
will read “END: CYCLE” and the charger will emit an audible
“ring” sound. It will also display the Time Elapsed, End Voltage
and Capacity in mAh that was removed. You can press the
STOP button at any time during the charging process to stop
charging.
NiMH CYCLE
A
DCHG > CHG 2
NiMH CYCLE
A
CHG > DCHG 2
NiMH CYCLE
A
CHG > DCHG 2
*FLASHING
BATTERY CHECK
A
.............
NiMH 0.5A 6.65V
A
D > C 004:04 00034
[END: CYCLE]
A
5.00V 00980mAh
[TIME:00:45:32]
A
5.00V 00980mAh
Page 21

NiMH/NiCd Battery Program
Additional NiMH/NiCd Process Information:
During the NiMH/NiCd battery charging/discharging process, the RDX2 PRO can display a variety of
information. SCROLL to view the following information on these screens:
NiMH Sensitivity
A
D.PEAK 4MV/CELL
A
Int. Temp 94
SAFETY TIMER
A
ON 120MIN
Delta peak voltage
Sensitivity setting
Internal temperature
0
F
Safety Timer setting
IN POWER VOLTAGE
A
15.8V
CAPACITY CUT-OFF
A
ON 5000MAH
Input power voltage
Capacity Cut-O
21
Page 22

Pb Lead-Acid Battery Program
Pb Lead-Acid Battery Program: This program is only suitable for charging Pb (Lead-Acid) batteries
with nominal voltage ranging from 2 to 20V, which are signi cantly di erent from NiMH/NiCd
batteries. Pb batteries are suggested to charge with a low current of 0.1C and cannot be used for fast
charging.
Selecting the Battery Type: After powering on the RDX2 Pro, press the MODE/STOP button and
SCROLL with the Jog Dial until you reach the Pb BATT program for the battery type you wish to charge.
Press the Jog Dial ENTER button to enter the Charge Mode menu.
Selecting the Charge Mode: The RDX2 Pro o ers the following Pb charge modes: Normal, AGM, Cold
Mode, and Discharge.
PLEASE FOLLOW THE INSTRUCTIONS PROVIDED BY THE BATTERY MANUFACTURER.
Note
22
Pb Normal/ AGM Mode: These two modes program the
same. AGM mode is referred to below. After selecting the
correct battery type, turn the dial to change it to the ‘AGM
CHARGE’ mode. Press the ENTER button and the amp rate
value will begin ashing. Turn the dial to adjust the value to
the desired charge rate. The amp rate should be set to 1/10th
of capacity. For example, if you are charging a 15Ah battery,
the charge rate should be set to 1.5A. Follow the instructions
provided on your battery when setting the amp rate.
Press the ENTER button again and the nominal battery pack
voltage will begin ashing. Turn the dial to set the voltage
and the number of cells.
Press and hold the ENTER button for 3 seconds to start
charging.
Once charging has commenced, the charger will display the
following real-time information: battery type with cell count,
charging current, battery voltage, working mode, elapsed
time and charged capacity.
When charging is complete, the screen will read “END: FINISH”
and the charger will emit an audible “ring” sound. It will also
display the nal voltage, and charged capacity.
BATT/PROGRAM
A
A
A
A
A
A
A
A
Pb BATT
Pb AGM CHG
1.5A 12.0V(6P)
Pb AGM CHG
1.5A 12.0V(6P)
Pb AGM CHG
1.5A 12.0V(6P)
BATTERY CHECK
.............
P-6 1.5A 13.56V
CHG 002:22 00106
[END: FINISH]
13.56V 14260mAh
[TIME:04:45:32]
13.56V 14260mAh
*FLASHING
Page 23

Pb Lead-Acid Battery Program
Pb COLD CHG
A
1.5A 12.0V (6P)
Pb COLD MODE: Press the ENTER button and the amp value
will begin ashing. Turn the dial to the desired charge rate.
*FLASHING
Pb COLD CHG
A
1.5A 12.0V (6P)
Press the ENTER button again and the nominal battery pack
voltage will begin ashing. Turn the dial to set the voltage
and the number of cells.
BATTERY CHECK
A
.............
P-6 1.5A 12.56V
A
CHG 055:10 01464
Press and hold the Jog Dial ENTER for 3 seconds to start
charging.
Once charging has commenced, the charger will display the
following real-time information: battery type, cell count,
charging current, battery voltage, elapsed time and charged
capacity.
[END: FINISH]
A
13.56V 14260mAh
[TIME:04:45:32]
A
13.56V 14260mAh
When charging is complete, the screen will read “END: FINISH”
and the charger will emit an audible “ring” sound.
Additional Pb Process Information:
During the Pb battery charging/discharging process, the RDX2 Pro can display a variety of
information. Turn the Jog Dial and you can also view the following information:
CAPACITY CUT-OFF
A
ON 15000mAh
Capacity cuto setting
IN POWER VOLTAGE
A
A
A
15.8V
SAFETY TIMER
ON 300MIN
INT. TEMP 94
Input voltage
Safety timer setting
0
F
Internal temperature
23
Page 24

DC Power Supply
POWER SET
To use the RDX2 Pro as a power supply, it can be connected to either an AC or DC power source. Output voltage
and current are selectable, with voltage at 5.0-25.0V and current at 0.1-14.0A. (130W Max.). The user can set
appropriate voltage and current based on the device you plan to power.
WARNING: IF SELECTING A VOLTAGE OVER 12V, MAKE SURE THE DEVICE YOU
Warning
Press the MODE/STOP button to exit any charging programs
you are currently in and then SCROLL to the DC POWER SUPPLY
program. Press the Jog Dial ENTER to enter the program. Press
the Jog Dial ENTER again and the Output Voltage will begin
to ash. SCROLL to adjust to the desired voltage (See Warning
above.) Once set, press ENTER to accept, and the Amperage
will ash. SCROLL to adjust to the desired Amperage for the
DC charger or other devices you are planning to power. After
selecting the setting, press and hold ENTER to activate the
power supply.
Once activated, the charger will display the following real-time
information: Output Voltage, Amp Draw, & POWER in Watts Out.
PLAN TO POWER CAN ACCEPT IT. APPLYING HIGHER VOLTAGE CAN DAMAGE OR
DESTROY A DEVICE NOT RATED TO OVER 12V.
NOTE: THE DC OUTPUT IS ONLY FOR TEMPORARY USAGE; WE DID TEST THE DC
OUTPUT TO POWER TIRE WARMERS, ENGINE WARMER, LED PIT LIGHT, MINI
FAN, AND DCPOWERED SOLDERING IRON. BUT WE CAN NOT GUARANTEE IT
Note
CAN WORK WELL ON ALL THE DCPOWERED ACCESSORIES IN THE MARKET.
Shown here is an example of an engine head
heater used to warm a nitro engine.
BATT/PROGRAM
A
DC POWER SUPPLY
A
U=12.0V I=10.0A
A
U=12.0V I=10.0A
U=12.0V I=10.0A
A
POWER = 120W
POWER SET
*FLASHING
POWER SET
24
Note
NOTE: ONCE THE POWER SUPPLY IS ACTIVATED, YOU WILL NO LONGER BE
ABLE TO CHARGE ON THE OTHER PORT.
Page 25

Battery Memory Set and Call Out
The RDX2 Pro charger can store up to 20 di erent charge/discharge pro les (10 per channel). The stored
pro les can be recalled quickly without having to go through the setup process.
[BATT MEMORY 1]
A
ENTER SET ->
BATT TYPE
A
A
LIPo
BATT VOLTAGE
22.2V (6S)
*FLASHING
CHARGE CURRENT
A
DISCHG CURRENT
A
DISCHG VOLTAGE
A
TVC=YOUR RISK!
A
A
SAVE PROGRAM
A
SAVE....
3.0V/CELL
SAVE PROGRAM
5.0A
2.0A
4.20V
ENTER
Lithium Packs: (LiPo, LiFe, LiIon, LiHV)
Press the MODE/STOP button to exit any charging programs
you are currently in and then SCROLL to the BATT MEMORY
program. Press the Jog Dial ENTER to enter the program.
SCROLL to select the memory #. Once set, the battery type and
voltage will be displayed. If not set, it will read ENTER SET.
Press the Jog Dial ENTER to set up a new memory. BATT TYPE
will be displayed, press ENTER to make it blink and then
SCROLL to select the Lithium battery you want to charge. Once
selected, press ENTER to store.
SCROLL to the right for BATT VOLTAGE, press ENTER to make
it blink and SCROLL to adjust. Once selected, press ENTER to
store. SCROLL to the right for CHARGE CURRENT, press ENTER
to make it blink and SCROLL to adjust. Once selected, press
ENTER to store.
SCROLL to the right for DISCHG CURRENT, press ENTER to make
it blink and SCROLL to adjust. Once selected, press ENTER to
store.
SCROLL to the right for DISCHG VOLTAGE, press ENTER to make
it blink and SCROLL to adjust. Once selected, press ENTER to
store.
SCROLL to the right for TVC=YOUR RISK!, press ENTER to make
it blink and SCROLL to adjust. Once selected, press ENTER to
store.
Warning: Setting the TVC (Terminal Voltage
Cut O ) higher than the default is not
recommended. While it will increase the
Warning
output power slightly, the di erence is
negligible, and it will degrade the life of
the pack.
[BATT MEMORY 1]
A
LiPo 22.2V (6S)
Finally, SCROLL to the right for SAVE PROGRAM, press ENTER to
store this memory.
25
Page 26

Battery Memory Set and Call Out
NiMH/NiCd: Press the MODE/STOP button to exit any
charging programs you are currently in and then SCROLL to the
BATT MEMORY program.
Press the Jog Dial ENTER to enter the program. SCROLL to
select the memory #. Once set, the battery type and voltage
will be displayed. If not set, it will read ENTER SET.
Press the Jog Dial ENTER to set up a new memory. BATT
TYPE will be displayed, press ENTER to make it blink and
then SCROLL to select the battery you want to charge. Once
selected, press ENTER to store.
SCROLL to the right for BATT VOLTAGE, press ENTER to make
it blink and SCROLL to adjust. Once selected, press ENTER to
store.
SCROLL to the right for CHARGE CURRENT, press ENTER to make
it blink and SCROLL to adjust. Once selected, press ENTER to
store.
SCROLL to the right for TRICKLE, press ENTER to make it blink
and SCROLL to adjust. Once selected, press ENTER to store.
SCROLL to the right for PEAK DELAY, press ENTER to make it
blink and SCROLL to adjust. Once selected, press ENTER to
store.
SCROLL to the right for DISCHG CURRENT, press ENTER to make
it blink and SCROLL to adjust. Once selected, press ENTER to
store.
SCROLL to the right for DISCHG VOLTAGE, press ENTER to make
it blink and SCROLL to adjust. Once selected, press ENTER to
store.
Finally, SCROLL to the right for SAVE PROGRAM, press ENTER to
store this memory.
[BATT MEMORY 1]
A
ENTER SET ->
BATT TYPE
A
NiMH
BATT VOLTAGE
A
7.2V (6S)
CHARGE CURRENT
A
TRICKLE
A
PEAK DELAY
A
DISCHARE CURRENT
A
DISCHG VOLTAGE
A
A
A
A
1.0V/CELL
SAVE PROGRAM
SAVE PROGRAM
SAVE....
[BATT MEMORY 1]
NiMH 7.2V (6S)
*FLASHING
5.0A
100MA
1MIN
2.0A
ENTER
26
[BATT MEMORY 1]
A
C:2.0A D:1.0A
Page 27

Battery Memory Set and Call Out
[BATT MEMORY 1]
A
ENTER SET ->
BATT TYPE
A
Pb
BATT VOLTAGE
A
12.0V (6P)
*FLASHING
CHARGE CURRENT
A
DISCHG CURRENT
A
DISCHG VOLTAGE
A
SAVE PROGRAM
A
SAVE PROGRAM
A
SAVE...
2.0A
2.0A
1.8V/CELL
ENTER
PB: Press the MODE/STOP button to exit any charging
programs you are currently in and then SCROLL to the BATT
MEMORY program.
Press the Jog Dial ENTER to enter the program. SCROLL to
select the memory #. Once set, the battery type and voltage
will be displayed. If not set, it will read ENTER SET.
Press the Jog Dial ENTER to set up a new memory. BATT TYPE
will be displayed, press ENTER to make it blink and then
SCROLL to select PB. Once selected, press ENTER to store.
SCROLL to the right for BATT VOLTAGE, press ENTER to make
it blink and SCROLL to adjust. Once selected, press ENTER to
store.
SCROLL to the right for CHARGE CURRENT, press ENTER to make
it blink and SCROLL to adjust.Once selected, press ENTER to
store.
SCROLL to the right for DISCHG CURRENT, press ENTER to make
it blink and SCROLL to adjust. Once selected, press ENTER to
store.
SCROLL to the right for DISCHG VOLTAGE, press ENTER to make
it blink and SCROLL to adjust. Once selected, press ENTER to
store.
Finally, SCROLL to the right for SAVE PROGRAM, press ENTER to
store this memory.
[BATT MEMORY 1]
A
Pb 12.0V (6P)
[BATT MEMORY 1]
A
C:2.0A D:1.0A
27
Page 28

System Settings
The RDX2 Pro will be operated with the default value for the essential user settings when it is powered on for
the rst time. The screen displays the following information in sequence and the user can change the parameter value of each screen. To change a parameter value in the system program, press START/ENTER to make
it blink then change the value with the dial button. The value will be stored by pressing START/ENTER once.
ITEM SELECTION DESCRIPTION
28
POWER SET
A
U=0.0V I=0.0A
SAFETY TIMER
A
ON 120 MIN
CAPACITY CUT-OFF
A
ON 5000mAh
TEMPERATURE UNIT
A
A
REST TIME
CHG > DCHG 10 Min
CELSIUS
U: 5.0-25.0V
I: 0.1-14.0A
OFF/ON
(1-720 Min)
OFF/ON
(100-50000 mAh)
Celsius
Fahrenheit
1-60 Min
130W rated power for both Channel A and
Channel B. Power supply function is available
under AC/DC mode.
When you start a charge process, the integral
safety timer automatically starts running at the
same time. This is programmed to prevent overcharge the battery if it proves to be faulty, or if the
termination circuit cannot detect the battery full.
The value for the safety timer should be generous
enough to allow a full charge of the battery.
This program sets the maximum charge capacity
that will be supplied to the battery during charge.
If the delta peak voltage is not detected nor the
safety timer expired for any reason, this feature
will automatically stop the process at the selected
capacity value.
You can choose the temperature displayed by
Celsius or Fahrenheit as you like.
A rest time allowing the battery to cool down
between charging/discharging cycle.
Page 29

System Settings
ITEM SELECTION DESCRIPTION
NIMH SENSITIVITY
A
D. PEAK 4MV
NICD SENSITIVITY
A
D. PEAK 4MV
KEY BEEP ON
A
BUZZER ON
DC INPUT LOW:
A
CUT-OFF 11.0V
LOAD FACTORY SET
A
A
HW: 1.00 SW: 1.00
VERSION
ENTER
Default: 4mV/Cell
3-15mV/Cell
OFF/ ON
10.0-12.0V
This program is for NiMH/NiCd battery only.
When the charger detects the delta peak
value reaches the value you set, the charger
will say the battery is fully charged.
This program allows you to select whether or
not the RDX2 Pro beeps when you push buttons,
and if the buzzer sounds to alert you when a
charge/discharge operation is complete.
This program monitors the voltage of input
battery. If the voltage drops below the value you
set the operation is forcibly terminated to protect
the input battery.
Press and hold ENTER for 3 seconds to load
factory default settings.
It indicates the hardware and rmware version.
29
Page 30

Battery Voltage Meter
The user can check the battery’s total voltage, the highest voltage, the lowest voltage and each cell’s voltage.
Connect the battery via the charger’s main battery lead to the battery socket; and the balance wires to the
balance socket as shown below.
The display below indicates the current Main Voltage, Percentage of Charge, Individual Cell Voltage, and the
Highest and Lowest voltages of the pack’s cells.
This photo shows the correct
way to connect your battery to
check the voltage.
30
Press the ENTER/START to enter the Lithium Battery Meter program.
The screen indicates each cell’s voltage.
The screen indicates the total voltage, the highest voltage and the lowest
voltage.
BATT PROGRAM
A
A
A
BATT METER
4.20 4.19 4.19V
4.18 4.18 4.19V
MAIN:25.13V
H:4.200V L:4.182V
Page 31

Battery Resistance Meter
The user can check each cell’s resistance as well as the battery’s total resistance. Connect the battery
via the charger’s main battery lead to the battery socket; and the balance wires to the balance socket
as shown below.
This photo shows the correct
way to connect your battery to
check the resistance.
BATT/PROGRAM
A
BATT RESISTANCE
BATTERY CHECK
A
.............
4.7 5.9 4.7mΩ
A
0.0 0.0 0.0mΩ
A
MAIN: 15.3mΩ
Press ENTER to start the Lithium
Battery Resistance program.
This screen indicates each cell’s resistance.
PRESS ENTER for the total resistance.
31
Page 32

Warning and Error Messages
In case of an error the screen will display the cause of error and emit an audible sound.
REVERSE POLARITY
Incorrect polarity connected.
A
The battery is interrupted.
The battery connection is wrong.
Input voltage less than 11V.
Input voltage higher than 18V.
Cell setting is wrong, or the voltage of one cell in the battery is invalid.
CONNECTION BREAK
A
CONNECT ERROR
A
CHECK MAIN PORT
DC IN TOO LOW
A
DC IN TOO HIGH
A
CELL ERROR
A
32
Page 33

Warning and Error Messages
Charging is disabled if the charger entered into DC power supply mode.
The voltage dierence is higher than 300mV between the highest and the lowest one.
The internal temperature of the unit goes too high.
The battery capacity is more than the maximum
capacity which the user has set.
The charging time is longer than the maximum
charging time which the user has set.
DC MODE DISAGREE
A
CHARGE
BLANCE VOLT DIFF
A
TOO HIGH
INT. TEMP. TOO HI
A
OVER CHARGE
A
CAPACITY LIMIT
OVER TIME LIMIT
A
The battery voltage is higher than the maximum voltage which the
user sets when charging in balance mode.
BATTERY WAS FULL
A
33
Page 34

Regulatory Information/Compliance
FCC Note:
This device complies with Part 15 of the FCC rules. Operation is subject to the following two conditions:
(1) this device may not cause harmful interference, and (2) this device must accept any interference received, including
interference that may cause undesired operation. The manufacturer is not responsible for any radio or TV interference
authority to operate the equipment.
This equipment has been tested and found to comply with the limits for a Class B digital device, pursuant to part 15 of the
FCC Rules. These limits are designed to provide reasonable protection against harmful interference in a residential installation. This equipment generates, uses and can radiate radio frequency energy and, if not installed and used in accordance
with the instructions, may cause harmful interference to radio communications. However, there is no guarantee that
interference will not occur in a particular installation. If this equipment does cause harmful interf
interference by one or more of the following measures:
– Reorient or relocate the receiving antenna.
– Increase the separation between the equipment and receiver.
– Consult the dealer or an experienced radio/TV technician for help.
To maintain compliance with FCC’s RF exposure guidelines, this equipment should be installed and operated with a
minimum distance of 20cm between the radiator and your body.
Hitec’s RDX2 Pro complies with FCC Part 15 Subpart B: 2019.
erence to radio or televi-
34
Warranty, Service, Disposal and Prop 65 Warning
LIABILITY E XCLUSION
This charger is designed and approved exclusively for use with the types of batteries stated in this Instruction Manual. Hitec RCD accepts no liability of any kind if the charger is used for any purpose other than
that stated. We are unable to ensure that you follow the instructions supplied with the charger, and we
have no control over the methods you employ for using, operating and maintaining the device. For this
reason, we are obliged to deny all liability for loss, damage or costs which are incurred due to any misuse
or operation of our products. Unless otherwise prescribed by law, our obligation to pay compensation,
regardless of the legal argument employed, is limited to the invoice value of Hitec RCD products which
were immedi
ately and directly involved in the event in which the damage occurred.
Page 35

ONE YEAR LIMITED WARRANTY
For a period of one year from the date of purchase, HITEC RCD shall REPAIR OR REPLACE, at our option,
defective equipment covered by this warranty. Otherwise, the purchaser and/or consumer is responsible
for any charges for the repair or replacement of the charger. This warranty does not cover cosmetic
damages and damages due to acts of God, accident, misuse, abuse, negligence, improper installation,
or damages caused by alterations by unauthorized persons or entities. This warranty only applies to the
original purchaser of this product and for products purchased and used in the United States of America,
Canada and Mexico. Plastic cases are not covered by this warranty.
THIS WARRANTY IS IN LIEU OF ANY AND ALL OTHER WARRANTIES, WHETHER FOR MERCHANTABILITY OR
FITNESS FOR A PARTICULAR PURPOSE AND WHETHER EXPRESS OR IMPLIED. REPAIR OR REPLACEMENT AS
PROVIDED UNDER THIS WARRANTY IS THE EXCLUSIVE REMEDY. HITEC RCD, INC. SHALL NOT BE LIABLE FOR
ANY INCIDENTAL OR CONSEQUENTIAL DAMAGES FOR BREACH OF ANY EXPRESS OR IMPLIED WARRANTY
RELATING TO THIS PRODUCT, EXCEPT TO THE EXTENT PROHIBITED BY APPLICABLE LAW. ANY IMPLIED
WARRANTY OF MERCHANTABILITY OR FITNESS FOR A PARTICULAR PURPOSE ON THIS PRODUCT IS LIMITED
TO THE DURATION OF THIS WARRANTY, REPAIR AND SERVICE.
SERVICE AND REPAIR INFORMATION
To have your Hitec charger serviced:
1. Visit the Hitec website at www.hitecrcd.com and download the service request form (under Support
section).
2. Fill out the service request form completely and include a copy of your original receipt showing the
purchase date.
3. Package your product in its original packaging or use a suspension-type packaging (foam peanuts or
crumpled newspaper). Hitec RCD shall not be responsible for goods damaged in transit.
4. Ship prepaid (COD or postage-due returns will not be accepted) via a traceable common courier
(UPS, insured parcel post, FedEx, etc.) to:
Hitec RCD Customer Service Center, 9320 Hazard Way, Suite D. San Diego, CA 92123
This symbol indicates that when this type of electronic device reaches
the end of its service life, it cannot be disposed of with normal
household waste and must be recycled. To nd a recycling center near
you, refer to the internet or your local phone directory for electronic
waste recycling centers.
STATE OF CALIFORNIA PROPOSITION 65 WARNING:
This product contains chemicals known to the State of California to cause
cancer. Use caution when handling this product and avoid exposure to any
electronic components or internal assemblies.
www.hitecrcd.com
35
Page 36

Hitec RCD | 9320 Hazard Way Suite D, San Diego, CA 92123 | www.hitecrcd.com
 Loading...