

Page 1
User’s Manual
VZ-HD4000A
VZ-HD4900A
Introduction
Installation and
Connection
Direct Remote
Control Function
Conguration via
Menus Function
Appendix
Thank you for purchasing this Hitachi camera.
Please read this User's Manual thoroughly and use the camera as instructed.
After reading the User's Manual, store it safely.
Page 2
Important Information
For Your Safety
WARNING: TO PREVENT FIRE OR SHOCK HAZARD, DO NOT
EXPOSE THIS UNIT TO R AIN OR MOISTURE.
The camera and AC adapter have the
following caution marks.
CAUTION
RISK OF ELECTR IC
SHOCK DO NOT OPEN
CAUTION: TO REDUCE THE RISK OF
ELECTRIC SHOCK, DO NOT OPEN.
NO USER-SERVICE ABLE PARTS
INSIDE. REFER SERVICING TO
QUALIFIED SERVICE PERSONNEL.
Identications of caution marks
This symbol warns the user that
uninsulated voltage within the unit
may have sufcient magnitude to
cause electric shock. Therefore,
it is dangerous to make any kind
of contact with any inside part of
this unit.
This symbol aler ts the user that
important literature concerning the
operation and maintenance of this
unit has been included. Therefore,
it should be read carefully to avoid
any problems.
2
Page 3

IMPORTANT SAFETY INSTRUCTIONS
In addition to the careful attention devoted to quality standards in the
manufacture of your camera, safety is a major factor in the design of every
instrument. But, safety is your responsibility too. This page lists important
information that will help to assure your enjoyment and proper use of the camera
and accessory equipment.
Read these instructions.
1
Store these instructions for convenient accessibility.
2
Heed all warnings.
3
Observe all instructions.
4
Do not use the camera near water.
5
Clean the camera using only a dry cloth.
6
Do not block any ventilation openings. The camera should be placed in accordance
7
with the manufacturer’s instructions.
Do not place the camera near heat sources such as radiators, heat-registering
8
areas, stoves, or other heat- generating apparatus (including ampliers).
Protect the power cable and cord from being stepped on or pinched, particularly at
9
the plugs, power outlets, and where it connects to the camera.
Only use the attachments and accessories specied by the manufacturer.
10
Use the camera only with a cart, stand, tripod, bracket, or table
11
specied by the manufacturer or sold with the camera.
When using a cart to move the camera, use caution to avoid
injury from tip-over.
Unplug the camera during lightning storms or when unused for
12
long periods of time.
Refer all servicing to qualied servicing personnel. Servicing is required if the
13
camera is damaged in any way, such as if the power cable, cord, or plug is
damaged, liquid is spilled or foreign objects fall onto the camera, or if the camera is
exposed to rain or moisture, does not operate normally, or is dropped.
Do not drip or splash liquids onto the camera or place the camera near objects lled
14
with liquid such as vases.
Use the equipment (AC adapter) near a power outlet with easy accessibility.
15
Page 4

Cautions on Use of this Product
- Be sure to read this information -
lCautions on use
Do not subject the camera to impact.
• This camera is a precision machine. Take great care that you do not strike
it against a hard object or let it fall.
Do not point directly at the sun.
• If direct sunlight strikes the lens, the camera could malfunction or a re
could occur.
No sand or dust!
• If sand or dust gets inside the camera or the AC adapter, it may cause
damage and/or malfunction.
Heat on surface of product
• The surfaces of the camera and AC adapter will be slightly warm, but this
does not indicate a fault.
Be careful of ambient temperature.
• If the temperature of this camera is too high or too low, normal image
output may not be possible.
Be careful of moisture condensation.
• When you move the camera between places where the difference in
temperatures is great condensation (vapor in air warmed or cooled to water
droplets) could occur on the lens and/or inside the camera. If condensation
occurs on the lens, wipe it off with a soft, dry cloth. Even if the external
surface of camera has dried, condensation may remain inside. Therefore,
turn the camera off and leave it in a dry place for at least 1–2 hours before
using it again.
Do not use the camera near strong radio waves or magnetism.
• If the camera is used near strong radio waves or magnetism, such as a
radio wave tower or electric appliances, noise may be present in the picture
and the camera may not operate normally.
At worst the camera could malfunction.
4
Page 5

lCautions on Storage
Do not store the camera in a very humid or dusty place.
• If dust gets inside the camera, it may malfunction. Under high humidity, the
lens may become moldy, and the camera could become inoperable. We
recommend storing the camera in a box with dessicant when storing in a
closet, etc.
Do not store the camera in a place subject to strong magnetism or
intense vibrations.
• This could cause malfunctions.
lCleaning
Be sure to turn the power off before cleaning the camera.
Cleaning the lens
• Wipe dirt off the lens with a soft, dry cloth.
Cleaning the surface of the camera
• Use soft cloth to gently wipe dirt off the surface of the camera.
Do not use benzene or thinner to clean the surface of the camera.
• The coating of the case could peel off or the case could deteriorate. Wipe
off dirt on the case with a dry soft cloth which has been completely wrung
out. When using a chemical cleaning cloth, follow instructions for use.
lWarnings about Transport
• This camera is a precision device. Transporting the device without using
the packing materials we specify may cause damage to it. If you wish to
transport it again, please use the packing box it was shipped in.
lDisposal of Batteries
• When disposing of batteries, insulate them from each other, such as by
putting Electrical tape on their terminals, and then dispose of them at a
designated location. If you dispose of them with any other conductive
things, such as pieces of metal, it may cause them to short and result in a
re or explosion.
Page 6

Regulatory Notice
FCC Statement Warning
This device complies with part 15 of the FCC Rules. Operation is subject
to the following two conditions: (1) This device may not cause harmful
interference, and (2) this device must accept any interference received,
including interference that may cause undesired operation.
Note: This equipment has been tested and found to comply with the limits for
a Class A digital device, pursuant to part 15 of the FCC Rules. These limits
are designed to provide reasonable protection against harmful interference
when the equipment is operated in a commercial environment. This
equipment generates, uses, and can radiate radio frequency energy and, if
not installed and used in accordance with the instruction manual, may cause
harmful interference to radio communications. Operation of this equipment
in a residential area is likely to cause harmful interference in which case the
user will be required to correct the interference at his own expense.
CAUTION: Changes or modications not expressly approved by the party
responsible for compliance could void the user’s authority to operate the
equipment.
6
Page 7

Table of Contents
Important Information 2
Cautions on Use of this
Product
- Be sure to read this
information - ........................... 4
Regulatory Notice ..................... 6
Introduction 9
Features .................................... 9
Checking Accessories ............ 10
Names of Parts ....................... 12
Installation and Connection 18
Installation ............................... 18
Installing it on a Desk or
Table ................................ 19
Mounting on a Tripod (Sold
Separately) ....................... 19
Install with Mounting
Screws
(Sold Separately) .............. 19
Ceiling Installation ................ 20
Connections ............................ 22
Connecting to an Electrical
Outlet ................................ 22
Connecting to a Monitor
with an Analog
Component IN Terminal .... 23
Connecting to a Monitor
with an Analog RGB
IN Terminal ....................... 23
Connecting to a Monitor
with a DVI IN Terminal ...... 24
Connecting to a Monitor
with an HD-SDI IN
Terminal ........................... 24
Connecting to a Monitor
with a 3G-SDI IN
Terminal ............................ 25
Connecting to an External
Device with an
RS-232C .......................... 25
Connecting Multiple
Cameras to an External
Device ............................... 26
Direct Remote Control Function
Before Use .............................. 28
Selecting Remote Control
Codes ............................... 28
Turning the Power ON ............. 28
Screen Display ........................ 29
Panning, Tilting and
Zooming ............................... 31
Panning and Tilting .............. 31
Zooming ............................... 31
Adjusting the Camera ............. 32
Adjusting the Focus
Manually
(Manual Focus) ................. 32
Adjusting the Brightness of
the Image (Exposure) ....... 33
Compensating for
backlight ............................ 34
Returning Changed
Settings to their Defaults
(Full Auto) .......................... 34
Making Camera Presets ......... 35
28
7
Page 8

Conguration via Menus Function
Operating Menus and
Understanding Screens ....... 37
Camera Functions Setup ........ 39
Selecting a Shooting Mode
to Match the Conditions
(Program AE) .................... 39
Setting the white balance..... 41
Setting the digital zoom ....... 43
Image Setup ............................ 44
This sets the depth of color
(Saturation) ....................... 44
Setting Outline Intensity
(Enhancement) .................44
Setting the Black Level
(Pedestal) ......................... 44
Setting the Gamma Level
(Gamma) ........................... 44
Reducing Noise
(NR Setup) ........................ 44
Swivel Setup ...........................45
Reversing Pan/
Tilt Movement ................... 45
Limiting the Pan/
Tilt Range ......................... 45
Setting the Pan/Tilt Speed ... 45
Initial Setup ............................. 46
Setting the Output Format
(Color System) .................. 46
Reverting All Menu
Settings to their Initial
Setup (Reset) .................... 46
37
Preset Items and Retained
Settings ................................ 53
Software License
Information ........................... 54
Main Specications ................. 60
Dimensional Drawing ........... 61
VIDEO OUT (DVI-I)
terminal ............................ 63
RS-232C IN terminal ............ 64
RS-232C OUT terminal ........ 64
RS-422 terminal ................... 64
RS-422 Connection Wiring
Diagram ............................ 65
Using RS-422 terminal
block connectors .............. 66
Warranty And After-Service .... 67
Appendix 47
Troubleshooting ....................... 47
Menu Structure ....................... 51
8
Page 9

Introduction
Features
Equipped with a High Resolution HD CMOS Image
Sensor
As it is equipped with a Hi-Vision 1/2.8 type 2 megapixel CMOS image
sensor, the camera can shoot in Hi-Vision.
Optical 25x Zoom (300x with Digital Zoom)
The zoom lens has a horizontal FOV angle ranging from 62° at Wide to 2.8°
at Tele, allowing it to shoot over a wide range, from wide-angle to telephoto.
Its digital zoom function lets it take telephoto shots at 300x.
Multiple Video Output Interfaces
The VZ-HD4000A has an HD-SDI interface, which is suitable for long
distance transmission. (HD-SDI: complies with SMPTE292M serial digital
interface standards)
The VZ-HD4900A has a standard video output DVI-I interface, as well as the
latest 3G-SDI interface, and it supports both digital and analog video output
at 1080p/59.94 or 1080p/50. (3G-SDI: complies with SMPTE424M serial
digital interface standards)
Introduction
Pan / Tilt Mechanism
A direct drive motor powers the pan/tilt mechanism, which allows quick and
quiet pan/tilt operation.
Equipped with 32 Presets
The system can remember multiple congurations, such as pan, tilt and
zoom positions, as well as various camera function settings. Up to 32
presets can be saved and recalled using the remote control, or up to 127
presets when using the external control function.
External Control Function
Various camera functions can be controlled externally via a serial interface,
either an RS-232C or for long distance connection, an RS-422.
Page 10
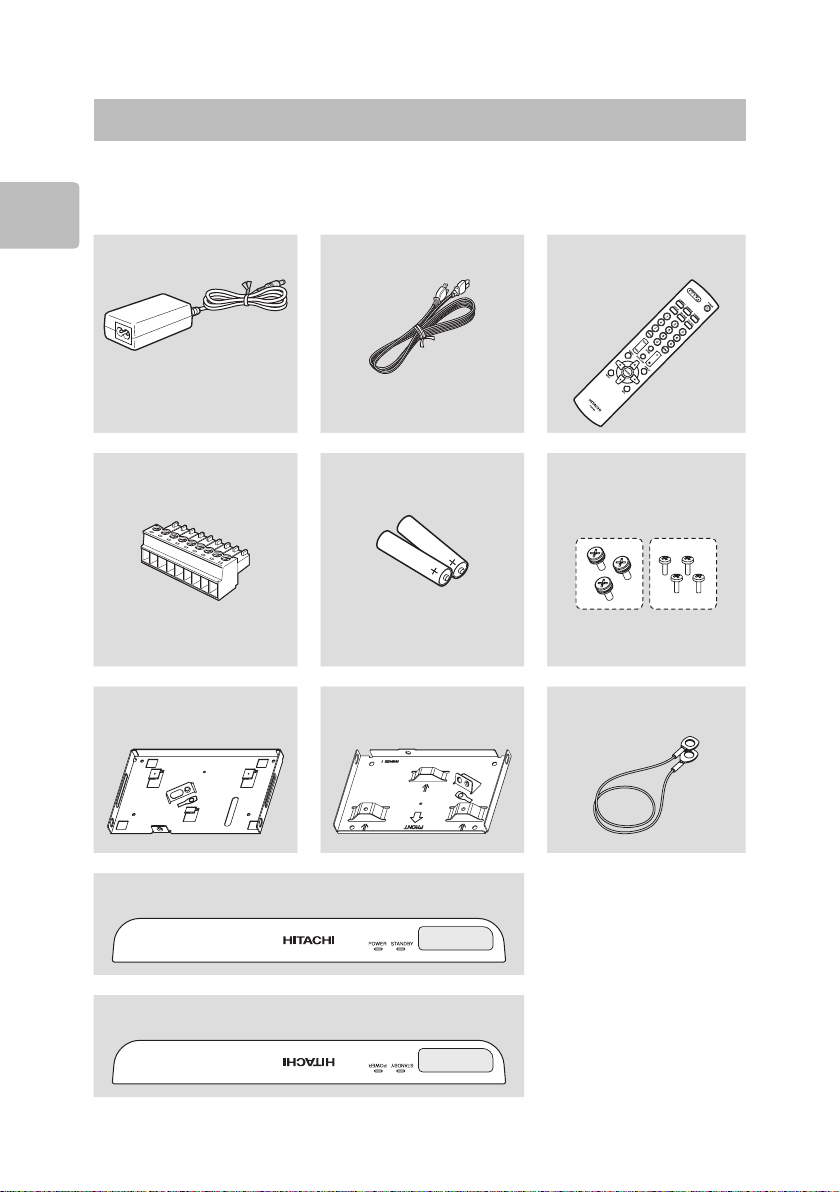
Checking Accessories
After you open the package be sure to check that the following accessories
are inside.
AC adaptor
Introduction
Connects to the
camera.
RS-422 terminal block
connector
Used to make a
connection cable when
using RS- 422.
Ceiling mount xture
(Camera side)
Power cord
Connects the AC
adapter to an outlet.
Two AAA batteries
For the remote control.
Ceiling mount xture
(Ceiling side)
Remote control
Three M5 × 12 screws
Four M3 × 8 screws
Safety wire
Front panel (for desktop installation)
Front panel (for ceiling installation)
10
Page 11
Information on DVI-I and 3G-SDI/HD-SDI Cables
lDVI-I and 3G-SDI/HD-SDI cables do not come with the product. Please
purchase them separately to match the specications of your monitor or other
external device. Refer to pages 23, 24 and 25 for information on cable types.
Alternatively, refer to page 63 for the terminal specications for DVI-I cables.
Information on Serial Interface Cables
lAn RS-232C cable do not come with the product. If you wish to use an
RS-232C cable and control the camera via an external device, purchase
an RS-232C cable that conforms to the terminal specications on page 64.
lIf you wish to use an RS-422 cable, use the included RS-422 terminal block
connector and make connection cables. When making cables, refer to the wiring
diagrams on page 64 for pin layout and page 65 for the wiring diagram of RS-422
cables. Also, refer to page 66 for how to use RS-422 terminal block connector.
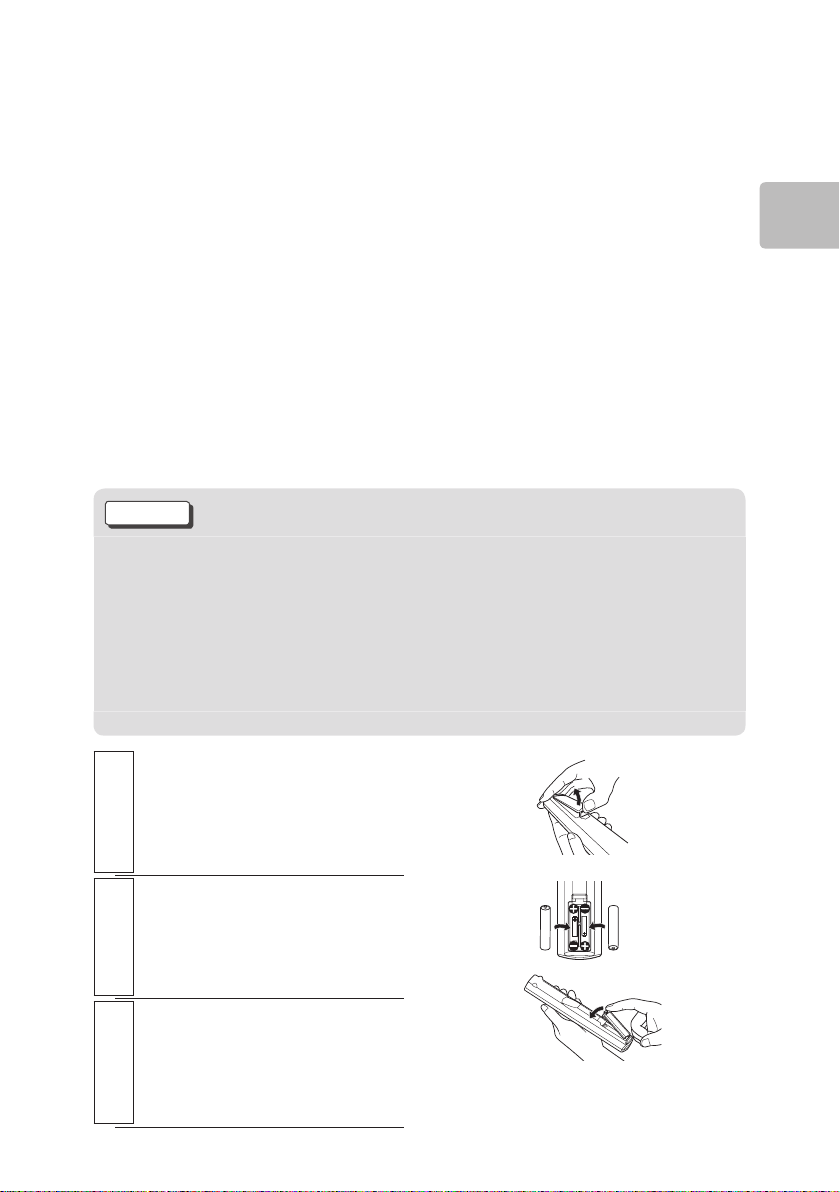
Getting the Remote Control Ready
Caution
Warnings about Using Dry Cell Batteries
Do not use any batteries in this device except those specied. Also, do
not mix old and new batteries. Doing so may cause re or injury due to
the batteries exploding or leaking.
Load the batteries as indicated on the device and make sure they are
facing correctly in terms of polarity. Incorrect polarity may result in injury or
staining of the surrounding area due to the batteries exploding or leaking.
Remove the battery-
chamber lid
1
Open the lid by pressing in
the direction of the arrow.
Introduction
Insert the batteries
Insert the included AAA
2
batteries with (+)(-) as
indicated.
Close the batterychamber lid
3
Press in the direction of the arrow
and put the lid back in place.
Page 12
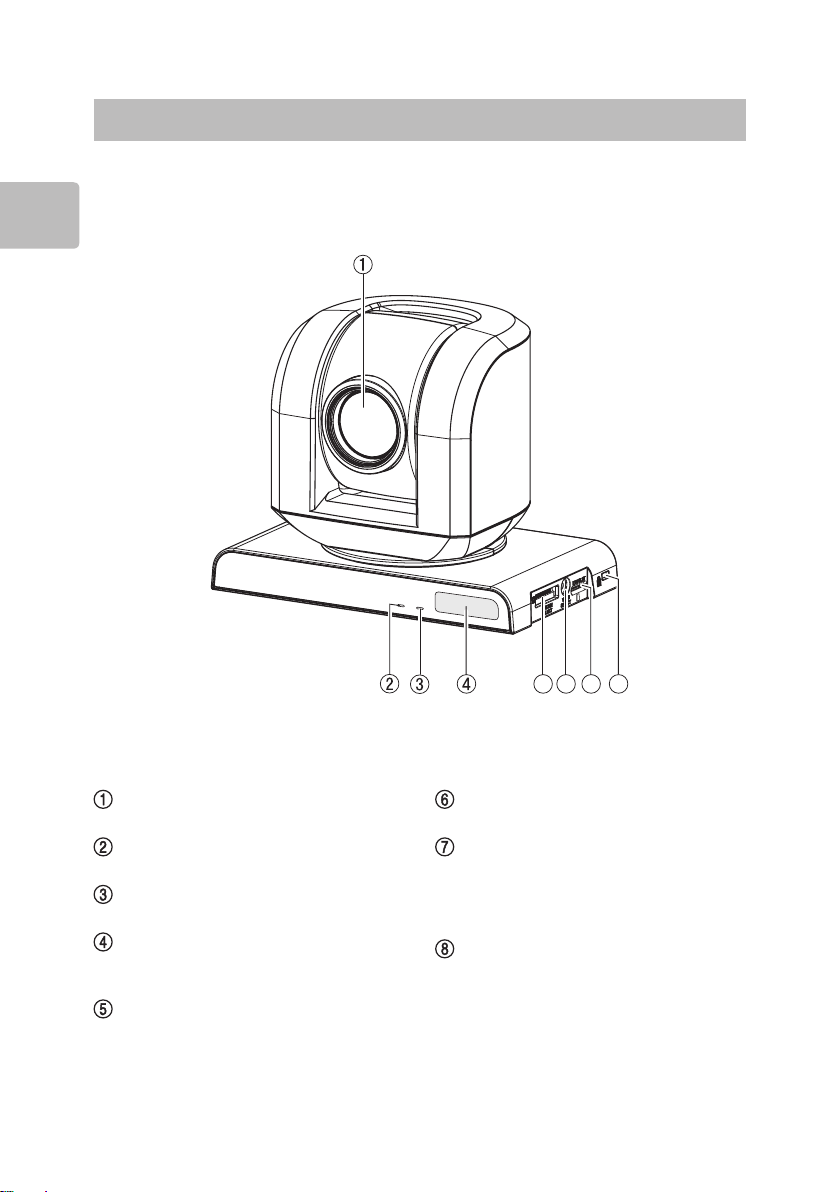
Names of Parts
Front / Side
Introduction
12
Lens
POWER lamp (P. 28)
STANDBY lamp (P. 28)
Remote receiver / IR sensor
(P. 28, 42)
SYSTEM SELECT switch (P. 15)
VIDEO SELECT switch (P. 14)
EXT SLOT
This is an extension slot for
maintenance and is not normally
used.
Anti-theft lock installation hole
Use a theft-prevention cable, sold
separately.
Page 13
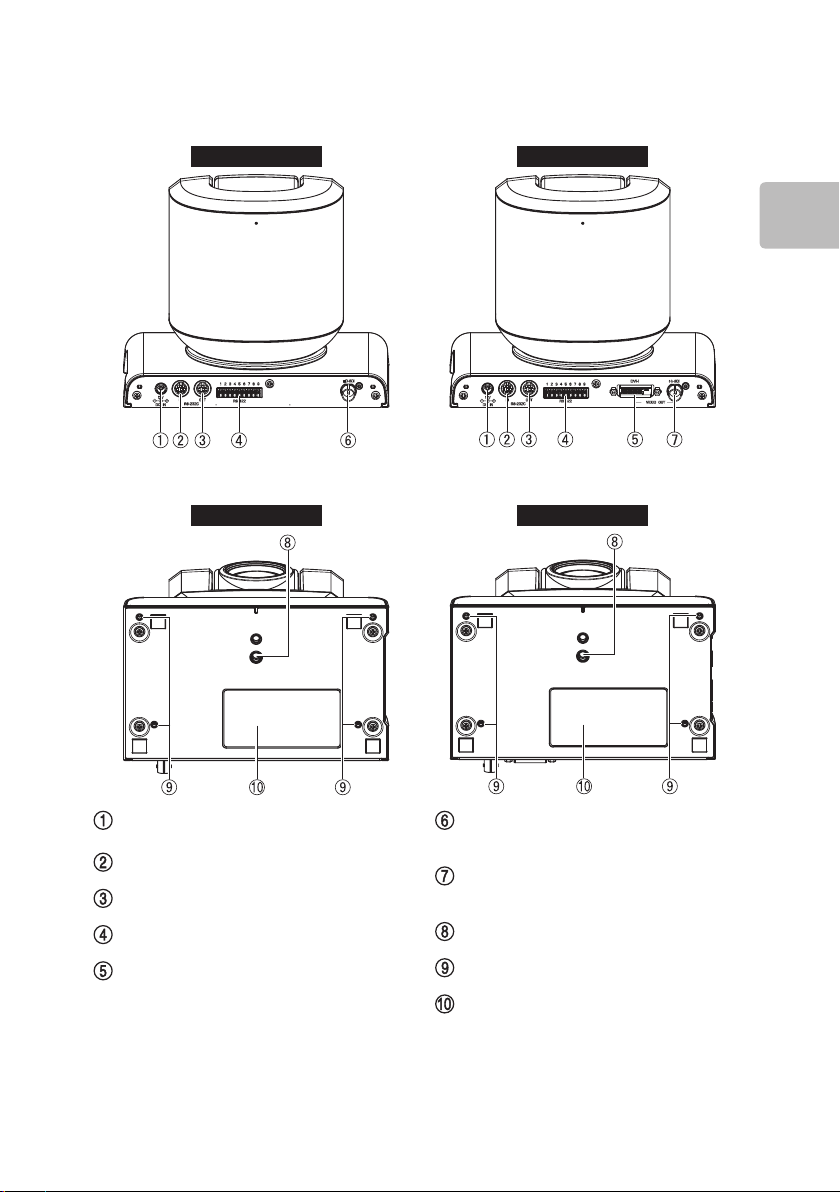
Rear
Base
VZ-HD4000A VZ-HD4900A
Introduction
VZ-HD4000A VZ-HD4900A
DC IN 12V terminal (P. 22)
RS-232C IN terminal (P. 25)
RS-232C OUT terminal (P. 26)
RS-422 terminal (P. 26)
VIDEO OUT (DVI-I) terminal
[VZ-HD4900A] (P. 23)
VIDEO OUT (HD-SDI) terminal
[VZ-HD4000A] (P. 24)
VIDEO OUT (3G-SDI) terminal
[VZ-HD4900A] (P. 25)
Tripod mounting hole (P. 19)
Screw mounting holes (P. 19)
Rating label
Page 14
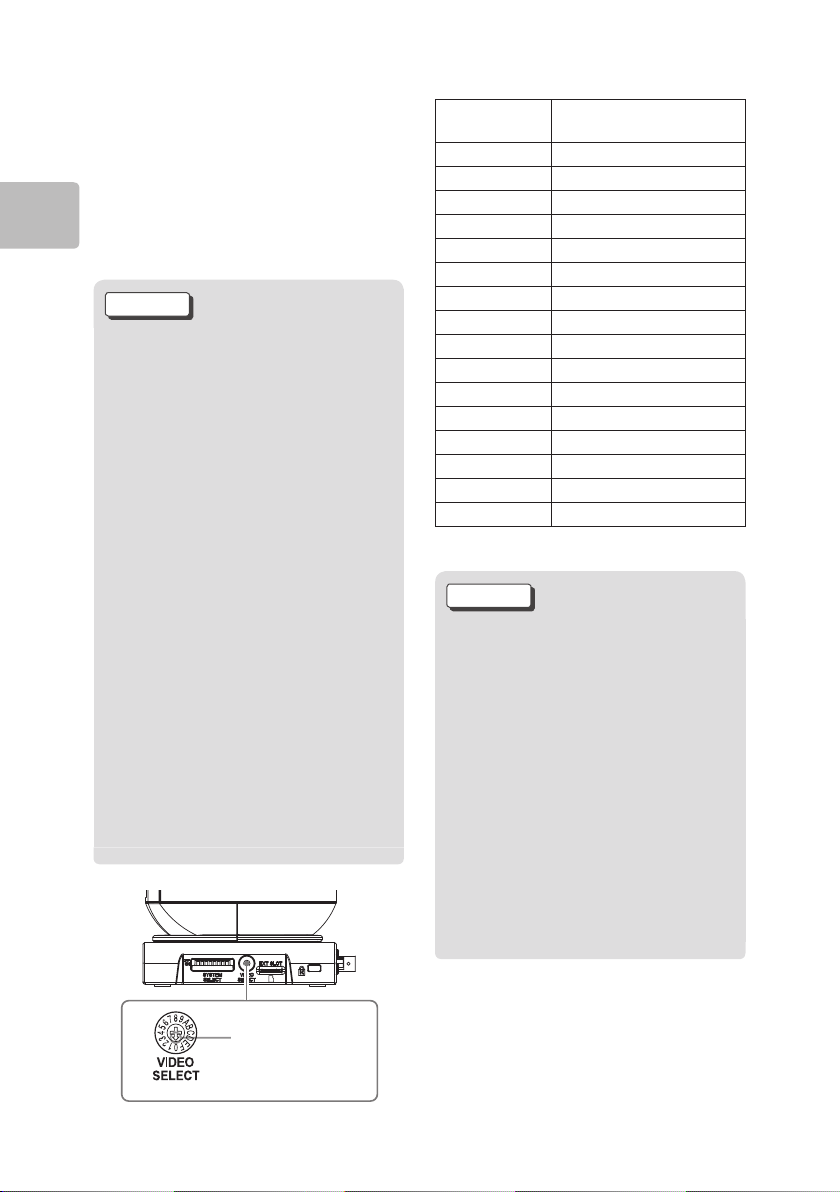
Setting the VIDEO SELECT
Switch
This switch allows you to select
the video format of the signal to
be output from the VIDEO OUT
terminals.
Introduction
Caution
Be sure to set this switch before
you turn on the camera. It can
also be set when in the standby
mode. (P. 29)
Be sure to use a Phillips driver
when changing the switch
position.
Using anything other than the
designated screwdriver may
damage the grooves.
This camera does not have
a function that automatically
matches the video output signal
to the connected monitor’s
resolution. Be sure to congure
the setting so it matches the
monitor's resolution.
The Hi-Vision video signal
outputs a distortion-free image
on monitors with an 16:9 aspect
ratio.
Switch
position
0* 1080 i/5 9.94
1
2 720p/59.94
3 1080 p/2 9.97
4 ―
5 ―
6 ―
7 Serial control
8 1080 i/5 0
9 108 0p/50 [ VZ- H D
A 720p/50
B 1080p/ 25
C ―
D ―
E ―
F ―
Video output format
1080p/59.94[VZ-HD4900A]
4900A
]
* This is the factory default setting.
Caution
VZ-HD4000A does not output
1080p/59.94 or 1080p/50.
The HD-SDI output does
not output 1080p/59.94 or
1080p/50.
When the video output format
is set to serial control (switch
position 7), the video output
format can be set using an
external device; however, the
video output format setting
is reected after the power is
turned back on.
14
Set it to the
desired video
format.
Page 15
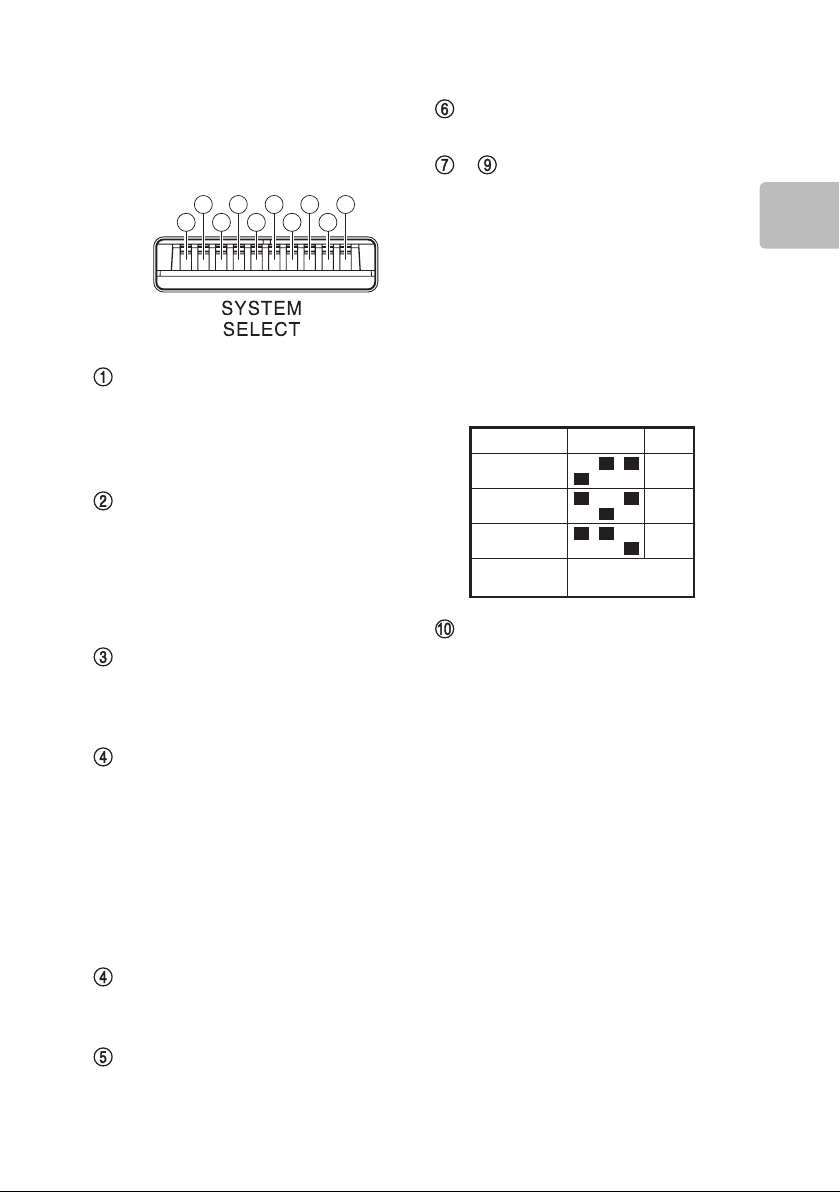
SYSTEM SELECT Switch
OFF
ON
6
123457
8
9
10
7
OFF
ON
OFF
ON
OFF
ON
RC.1*
RC.2
RC.3
RC OFF OTHERS
89
Settings
Switch 1 (Serial
communication baud rate
switch)
OFF* : 9,600 bps
ON : 38,400 bps
Switch 2 (IR OUT switch)
Allows the IR reception signal
from the remote control to be
output from the RS232C IN
terminal.
OFF* : Disables output
ON : Enables output
Switch 3 (RS-232C/RS-422
switch)
OFF* : Comm via RS-232C
ON : Comm via RS-422
Switch 4 (Video OUT Sync
switch) [VZ-HD4900A]
Switches the Sync signal on/off
for analog video signal output.
Set this to add a Sync signal,
especially when not connected to
Analog Horizontal Sync/Analog
Vertical Sync.
OFF : Does not add Sync
ON* : Adds Sync
Switch 6 (Not used)
Always set to OFF*.
– Switches 7-9 (remote
code switch)
Allows you to select the remote
control code (RC.1 to RC.3) to
receive in cases such as when
operating multiple cameras with
the same remote, or to avoid
interference from another remote
control for a nearby camera. To
prevent remote control operation
(RC OFF), set to anything other
than RC.1-RC.3.
Switch 10 (installation method
selection)
Select the camera installation
method.
OFF* : Desktop installation
ON : Ceiling installation
*
This is the factory default setting.
Introduction
Switch 4 (Not used)
[VZ-HD4000A]
Always set to ON*.
Switch 5 (Not used)
Always set to OFF*.
Page 16
Caution
The VIDEO OUT SYNC
option is for use with the
VZ-HD4900A. With the
VZ-HD4000A, always set to
Introduction
ON.
Make the settings for
Serial communication baud
Video OUT Sync
rate
switch[VZ-HD4900A] and
installation method prior to
turning the camera on. Do
not make these settings after
turning the power on.
If you switch the setting for the
installation method and then
turn the power on, it will erase
all the presets.
When connecting devices
in a daisy chain (P. 26), it is
necessary to make the
communication baud rate and
RS-232C/RS-422 selections
the same for all connected
cameras.
To change switch settings, use
a slender slotted screwdriver.
Serial
16
Page 17
Remote Control
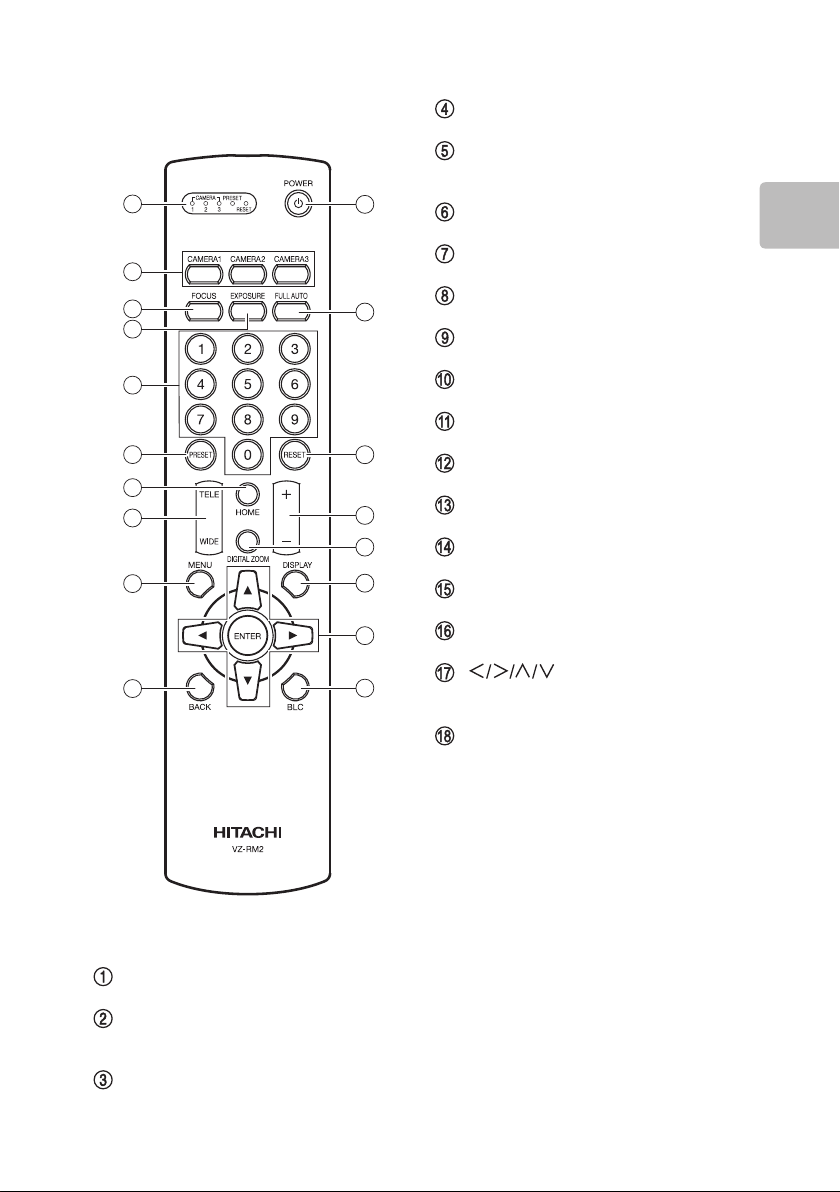
1
11
EXPOSURE Button (P. 33)
10-key Buttons (for presets)
(P. 35)
PRESET Button (P. 35)
2
3
4
5
6
7
8
9
10 18
12
13
14
15
16
17
HOME Button (P. 31)
TELE / WIDE Buttons (P. 31)
MENU Button (P. 37)
BACK Button (P. 38)
POWER Button (P. 28)
FULL AUTO Button (P. 34)
RESET Button (P. 35)
+ / - Buttons (P. 32, 33)
DIGITAL ZOOM Button (P. 32)
DISPLAY Button (P. 29)
Cursor Buttons /
ENTER Button (P. 31, 37, 38)
BLC (Backlight compensation)
Button (P. 34)
Introduction
Indicators (P. 36)
CAMERA SELECT Button
(P. 28)
FOCUS Button (P. 32)
Page 18
Installation and Connection
Installation
Introduction
When installing on a desktop, attach the included front panel (for desktop installation)
on the front of the device; for a ceiling installation, attach the front panel (for ceiling
installation). (P.10)
When installing on a desktop, set System Select Switch 10 (installation method
selection) to OFF (desktop installation) and for a ceiling installation, set System
Select Switch 10 (installation method selection) to ON (ceiling installation). (P.15)
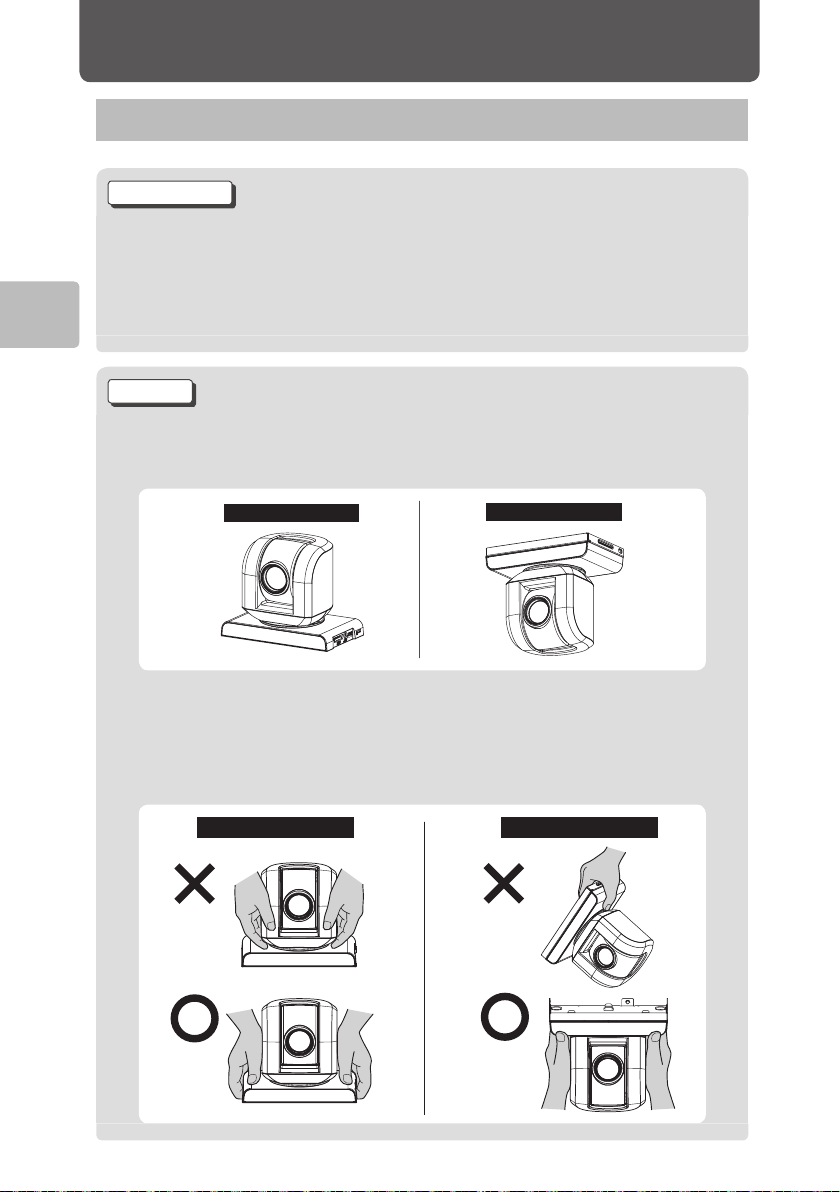
Installation and Connection
Caution
During installation, take steps as needed to prevent the camera from falling.
Install the camera so it is level.
Install it in a normal orientation.
Desktop Installation
When moving the device, hold the head of the camera in a xed position with both
hands and carry the device by the base.
Do not simply carry it by its base or just the camera head. Doing so may cause a
malfunction.
Do not apply force to the camera, such as by trying to make it pan or tilt manually.
Doing so may cause a malfunction.
Desktop Installation Ceiling Installation
Ceiling Installation
18
Page 19
Installing it on a Desk
or Table
Install it in a stable location where it
is unlikely to fall off.
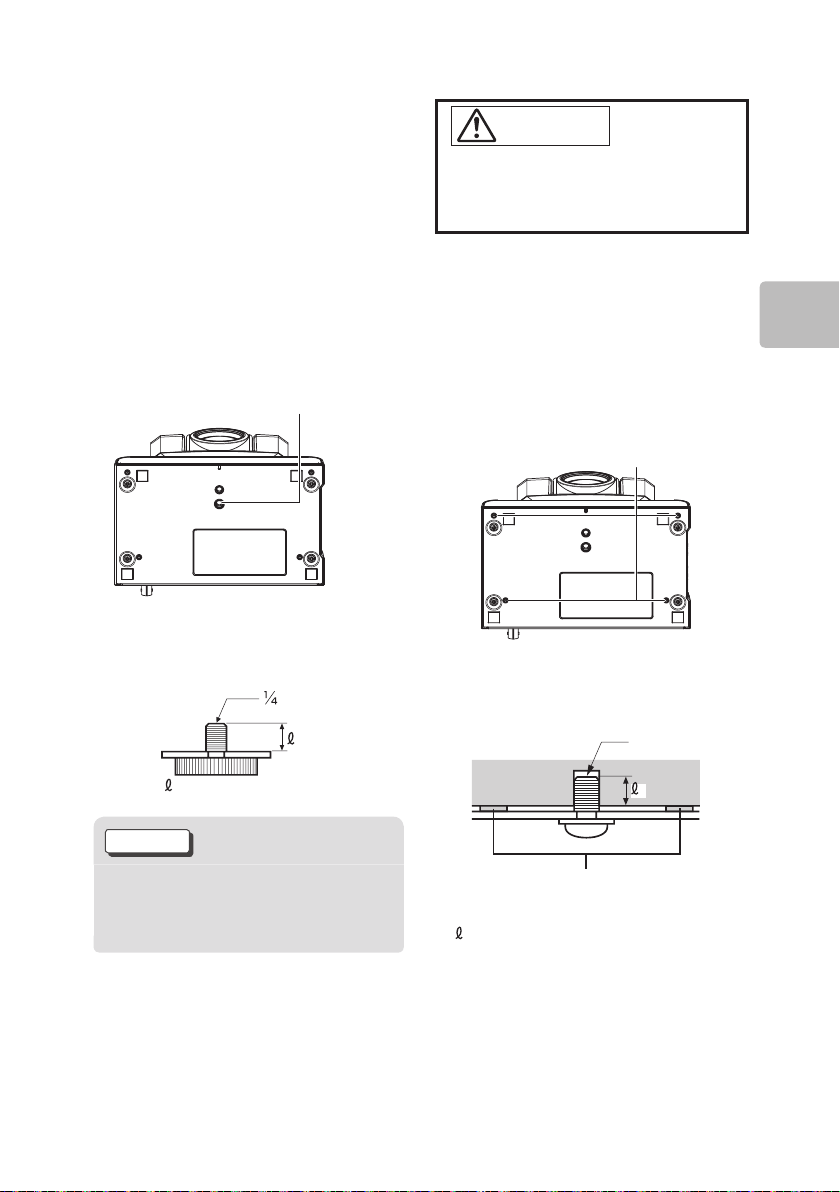
Mounting on a Tripod
(Sold Separately)
Attach the tripod to the tripod
mounting hole on the base of the
camera.
Tighten the screw securely by hand.
Tripod mount ing hole
Standard size of usable
tripod mounting screw
-20UNC
Warning
Do not mount the camera using
the tripod screw when installing it
in a high place.
Install with Mounting
Screws
(Sold Separately)
Install mounting screws in the four
screw mounting holes on the base.
Tighten the 4 screws securely.
Screw mounting holes
Standard size of mounting
screws
M3 screw
Installation and Connection
=4.5 mm ± 0. 2 mm
Caution
Set up the tripod according to its
user’s manual so it is steady and
will not fall over.
Rubber fo ot on base of camera
= 3 mm to 4 mm
Page 20
Ceiling Installation
Use the included ceiling mount
xtures (camera side and ceiling
side), along with the safety wire and
screws when mounting the camera
on the ceiling.
Warning
To mount the camera in a high
Installation and Connection
place, such as on the ceiling,
have an installer specialized in
such construction do the work.
When mounting the camera
in a high place, make sure the
location it will be mounted and
the materials used for mounting
it (other than the included
xture, etc.) are strong enough
to support a weight of at least
20kg and then mount the
camera securely. If materials
are not strong enough, it may
fall and cause an injury.
To prevent it from falling, be
sure to attach the safety wire.
Take all due care to prevent
the camera from falling during
installation.
If installed in a high place,
inspect once a year to make
sure the mount has not become
loose. Make more frequent
inspections if the conditions of
use call for it.
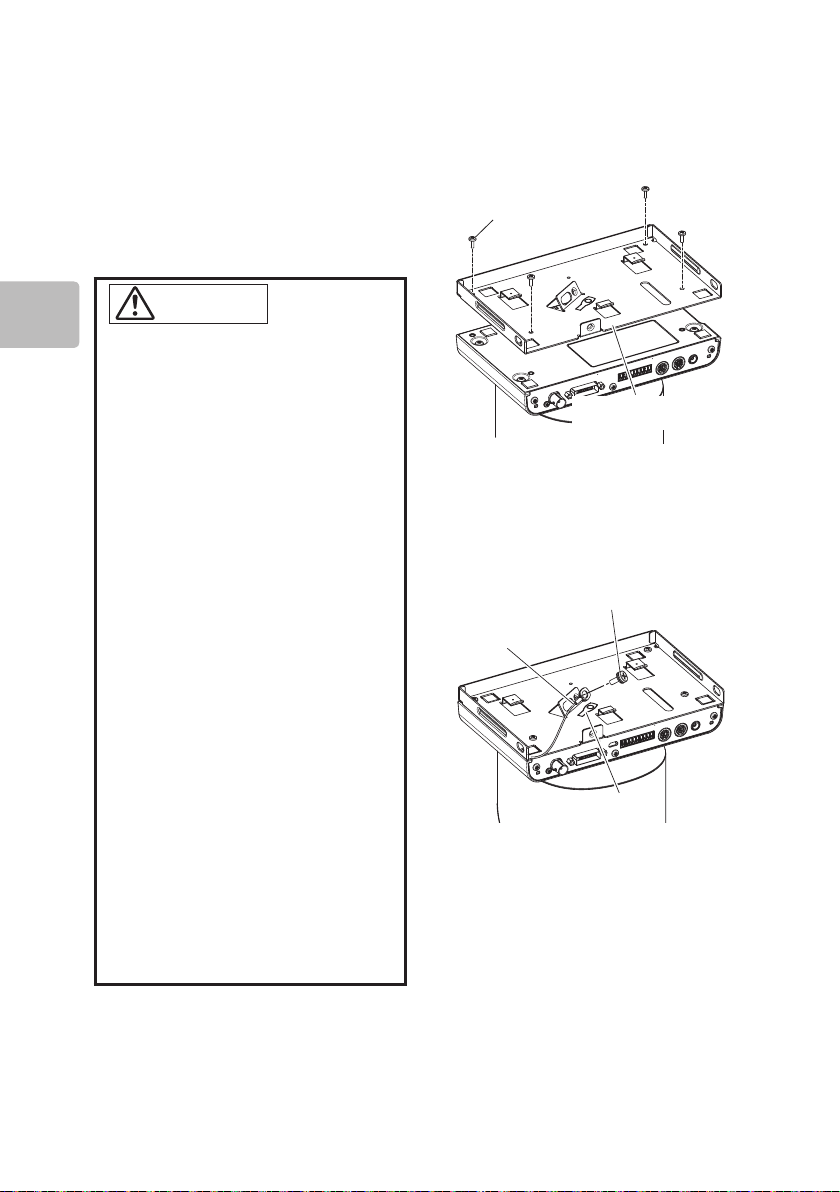
1 Mount the camera to the ceiling
mount xture (camera side) with
the included screws (M3 × 8).
Four screws included
(M3 × 8)
Ceilluig mount fixture
(Camera side)
2 Be sure to attach the safety wire
of the camera with the included
screw (M5 × 12).
Install the mounting hardware as
indicated by the mark.
Included screw (M5 ×12)
Safety wire
Mark
20
Page 21
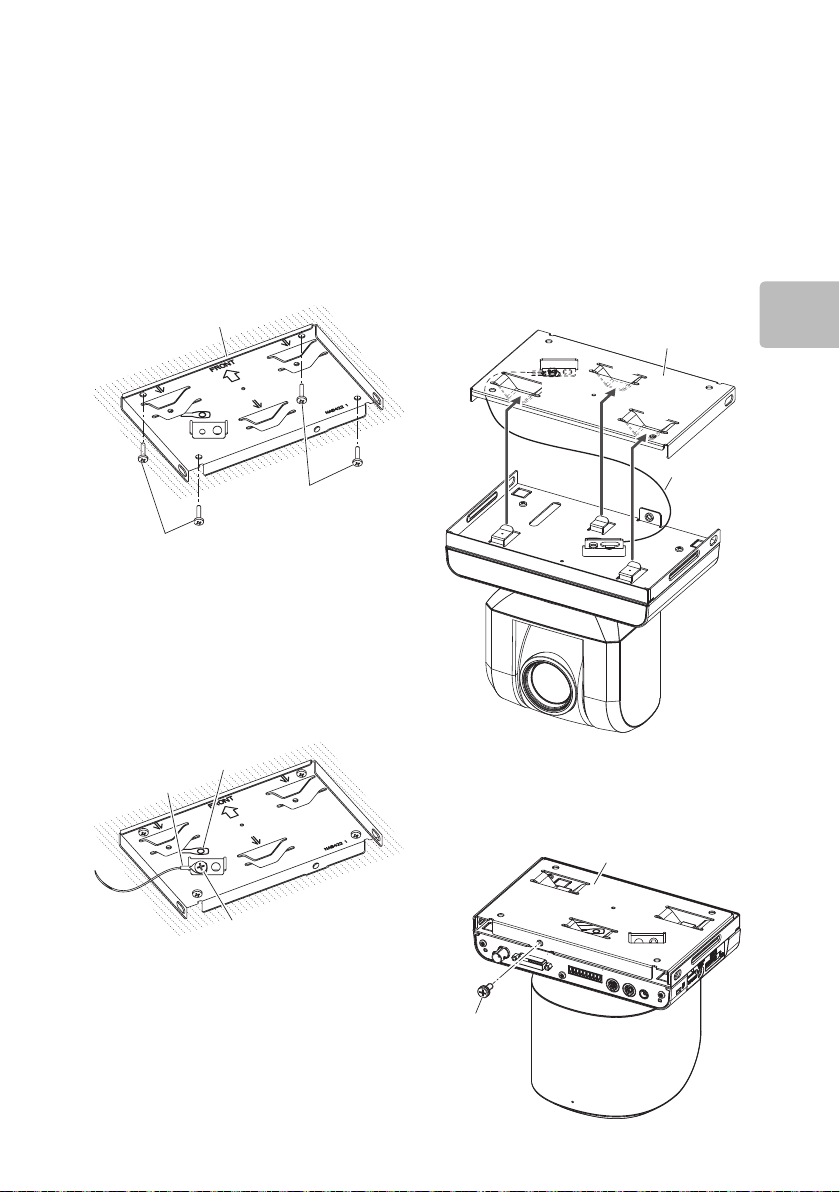
3 Mount the ceiling mount xture
Ceiling mount fixture
(ceiling side) to the ceiling.
Use screws that t in the screw
hole of the ceiling mount xture
(ceiling side). (not included)
To prevent them from loosening,
use a at or spring washer as
needed.
Ceiling mount fixture
(Celling side)
Separately purchased screw
Separately purchased screw
4 Attach the other end of the
safety wire you attached to the
camera in step 1 to the ceiling
mount xture (ceiling side) with
the included screws (M5 × 12).
Install the mounting hardware as
indicated by the mark.
Mark
Safety wire
5 Align the tabs (A) sticking up
on the ceiling mount xture
(camera side) with ceiling mount
xture's (ceiling side) holes (B)
and slide in so they are held in
position.
Tuck the extra length of the
safety wire inside the ceiling
mount xture.
Ceiling mount fixture
(B)
(B)
(B)
Safety wire
(A)
(A)
(A)
6 Fasten the camera to the ceiling
mount xture (ceiling side) with
the included screws (M5 × 12)
from the rear of the camera.
Installation and Connection
Included screw (M5 × 12)
Included screw
(M5 × 12)
Page 22
Connections
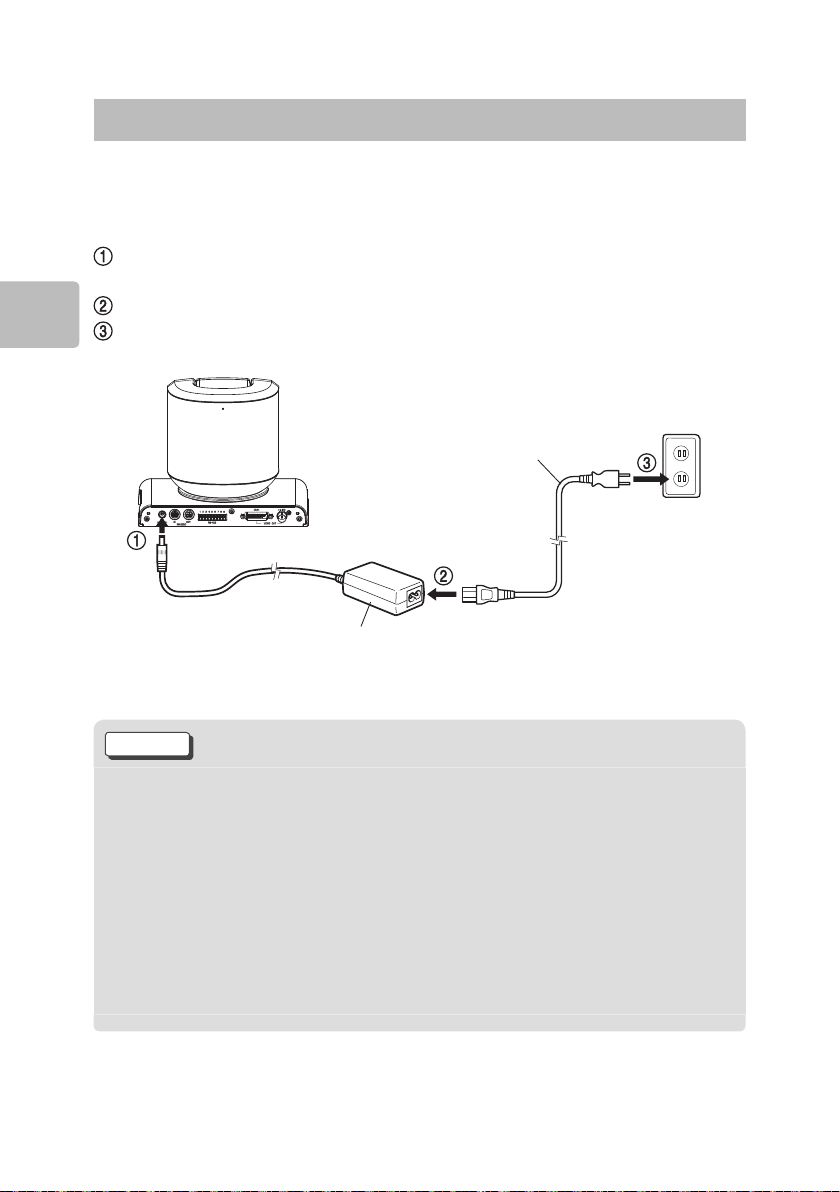
Connecting to an Electrical Outlet
Follow the steps below to connect the camera to an electrical outlet via the
included AC adapter and power cord.
Connect the wire from the AC adapter to the DC IN 12V terminal on the
camera.
Connect the power cord to the AC adapter.
Plug the power cord into the outlet.
Installation and Connection
Power cor d (included)
To DC IN 12V terminal
AC adapter (included)
To outlet
Caution
When the power is plugged in, the head of the camera will rst start to
move. Plug the power cord in after the device is installed.
Do not use any power cord or AC adapter other than those provided.
This device does not have a power switch.
When installing the device, either install a dedicated switch that is
hardwired and easily accessible or plug the power cord into a device
that is near the outlet and can easily be unplugged/plugged in during
use.
If something abnormal should happen, either turn off the dedicated
switch or unplug the power cord.
22
Page 23

Connecting to a
アナログ RGB
入力端子へ
VIDEOOUT
(DVI-I)端子へ
DVI- アナログ
RGB変換ケーブル*
HD ビデオモニターなど
Monitor with an
Analog Component
IN Terminal
VZ-HD4900A
Connecting to a
Monitor with an
Analog RGB
IN Terminal
VZ-HD4900A
Installation and Connection
To VIDEO OUT
(DVI- I) terminal
DVI-component
converter cable*
To component
IN terminal
HD video monitor, etc.
* See P. 63 for terminal specications.
Set to the video output format
(P. 14), output format (P. 46) or
Sync signal (P. 15) of the analog
video signal output, according to
the specications of the connected
monitor or external device.
To VIDEO OUT
(DVI- I) terminal
DVI-Analog RGB
converter cable*
To Analog RGB
IN terminal
HD video monitor, etc.
* See P. 63 for terminal specications.
Set to the video output format
(P. 14), output format (P. 46) or
Sync signal (P. 15) of the analog
video signal output, according to
the specications of the connected
monitor or external device.
Page 24

Installation and Connection
HD ビデオモニターなど
DVI入力
端子へ
VIDEOOUT
(DVI-I)端子へ
DVIケーブル*
HD ビデオモニターなど
HD-SDI
入力端子へ
VIDEOOUT
(HD-SDI/3G-SDI)
端子へ
HD-SDIケーブル
Connecting to a
Monitor with a DVI IN
Terminal
VZ-HD4900A
To VIDEO OUT
(DVI- I) terminal
Connecting to a
Monitor with an
HD-SDI IN Terminal
To VIDEO OUT
(HD- SDI) terminal
Set to the video output format
(P. 14), output format (P. 46) or
Sync signal (P. 15) of the analog
video signal output, according to
the specications of the connected
monitor or external device.
DVI cable*
To DVI IN
terminal
HD video monitor, etc.
* See P. 63 for terminal specications.
HD-SDI cable
To HD-SD I IN
terminal
HD video monitor, etc.
Set the video output format (P. 14)
according to the specications of
the connected monitor or external
device.
* Regardless of the output format
(P. 46) setting, the HD-SDI output
will be YPbPr.
24
Page 25

Connecting to a
Monitor with a 3G-SDI
IN Terminal
VZ-HD4900A
To VIDEO OUT
VIDEOOUT
(3G-SDI) terminal
(3G-SDI)端子へ
3G-SDI cable
3G-SDIケーブル
To 3G-SDI IN
3G-SDI
入力端子へ
terminal
Connecting to an
External Device with
an RS-232C
lUse an RS-232C to connect
the camera for control via an
external device.
1 Connect as follows with an
RS-232C cable.
RS-232C IN terminal
RS-232C cable*
Installation and Connection
HD video monitor, etc.
HD ビデオモニターなど
Set the video output format (P. 14)
according to the specications of
the connected monitor or external
device.
* Regardless of the output format
(P.46) setting, the 3G-SDI output
will be YPbPr.
To external device
* See P. 63 for terminal specications.
2 Select SYSTEM SELECT
SWITCH 1 (serial
communication baud rate) for
the connected external device
and set SYSTEM SELECT
SWTICH 3 (RS-232C/RS-422)
to RS-232C.
See P. 15 for how to make
settings.
Page 26

Connecting Multiple
Cameras to an
External Device
To control more than one
l
camera with an external
device via RS-232C or
RS-422 cables, connect them
in a daisy chain.
1 Using RS-232C or RS-422
Installation and Connection
cables, make the connections
as shown in the gures on P. 27.
2 To make connections with
RS-422 cables, use the included
RS-422 terminal block connector
and make connection cables.
When making cables, refer to
the wiring diagrams on P. 64 for
pin layout and P. 65 for the
wiring diagram for RS-422
cables.
Also, refer to P. 66 for how to
use RS-422 terminal block
connectors.
3 Select SYSTEM SELECT
SWITCH 1 (serial
communication baud rate) for
the connected external device
and select SYSTEM SELECT
SWTICH 3 (RS-232C/RS-422).
See P. 15 for how to make
settings.
26
Page 27

外部コントロール機器
外部コントロール機器
Connecting with RS-232C Cables
Connecting with RS-422 Cables
External Control Device External Control Device
RS-232 cable
RS-232ケーブル
カメラ1
RS-232 cable
RS-232ケーブル
RS-232ケーブル
RS-232 cable
Camera 1
カメラ2
Camera 2
カメラ3〜
Camera 3
カメラ1
Camera 1
カメラ2
Camera 2
カメラ3〜
Camera 3
RS-422
RS-422 Cables
ケーブル
Terminal
端子台
コネクター
block
connector
Installation and Connection
Caution
When connecting devices in a daisy chain, it is necessary to make the
selections the same for all the connected cameras, namely the SYSTEM
SELECT SWITCH 1 (serial communication baud rate) and SYSTEM
SELECT SWITCH 3 (RS-232C/RS-422).
Make the switch settings before turning the device on. Turn the power on
after making switch settings (P. 28).
To change SYSTEM SELECT SWITCH settings, use a slender slotted
screwdriver.
Do not set the switches to anything other than as instructed.
Doing so may cause a malfunction.
Page 28

Direct Remote Control Function
Before Use
lThis chapter describes the
functions that can operate the
camera directly via remote control.
Refer to P. 37 for functions that use
menu screens.
lRemote control buttons are
indicated as [Button Name].
For example, [POWER] refers to
the power button on the remote
control.
lWhen using the remote control,
point it at the remote control
Direct Remote Control Function
receiver (P. 12) on the camera.
Selecting Remote
Control Codes
Setting the camera’s
remote control codes
Set the remote control
codes with the SYSTEM
1
SELECT Switches
– (remote control code
selections) (P. 15).
Turning the Power ON
STANDBY lamp
POWER lamp
Press [POWER] on the
remote control
The power comes on.
(The POWER lamp lights
and the STANDBY lamp
1
goes off)
The camera automatically
goes through pan and tilt
movements and then returns
to the home position.
Turn on the devices
2
connected to the camera
Press the CAMERA
SELECT Button
(CAMERA*) on the remote
2
control and operate the
designated camera
Ex.: To operate CAMERA1, set the
SYSTEM SELECT Switches to
ON, OF F, OFF:RC1.
Refer to “Remote Control Indicators”
on P. 36 for the meaning of lighted
remote control indicators.
28
Hint
When the POWER lamp is lit,
pressing [POWER] shifts it into
standby mode.
(The POWER lamp goes out and
the STANDBY lamp lights)
If you press [POWER] again, the
power comes back on.
Caution
When the power is plugged in,
the head of the camera will rst
start to move.
Page 29

Screen Display
If you press [DISPLAY], the current settings of camera functions and zoom
operations, etc., are displayed as in the following example.
If you press [DISPLAY] again, the display turns off.
Direct Remote Control Function
Function
Zoom ● (P. 31)
Exposure ● (P. 33)
Program AE ● (P. 39)
White Balance ● (P. 41)
BLC (Backlight compensation)
Manual Focus ● (P. 32)
Full Auto ● (P. 34)
*Screenshot for explanation purposes. Actual displays will differ.
Direct Remote
Control Operation
● (P. 34)
Menu Operation
Page 30

Following are displays of settings that can be made for different functions,
shown by setting content.
(Default content shown rst)
Direct Remote Control Function
Zoom
Current zoom position
Digital Zoom: Off
Digital range
Maximum optical zoom
Digital Zoom: 100x
Maximum optical zoom
Digital Zoom: 200x
Maximum optical zoom
Digital Zoom: 300x
Digital range
Digital range
Program AE
No icon: Auto
: Manual
: Shutter
: Iris
: Spotlight
: White Board
White Balance
No icon: Auto
: Manual
: Set
: Outdoor
: Indoor1
: Indoor2
30
Exposure
No icon: Auto
Manual
BLC (Backlight compensation)
No icon: Off
: On
Manual Focus
No icon: Auto
: Manual
Page 31

Panning, Tilting
and Zooming
Panning and Tilting
Pans or tilts, thus adjusting the
orientation of the camera.
While looking at the
screen, press the
/ / / ] buttons
[
to pan and tilt the
camera
Press buttons quickly to
1
make slight movements
or press long to make
long ones.
The camera cannot be
panned or tilted while a
menu is displayed.
Zooming
The camera can zoom up to 25x
optically or 300x digitally.
(The digital zoom function is Off
when purchased.)
TELE/WIDE
While viewing the
screen press [TELE] or
[WIDE]
To zoom in and make the
1
subject appear larger,
press [TELE]; to show
a wider range, press
[WIDE].
Direct Remote Control Function
To return the camera to its
normal orientation (home
position)
press [HOME].
Page 32

To set the Digital Zoom
Press [DIGITAL ZOOM] repeatedly
to turn it On/Off.
The zoom can be set to 100x, 200x,
300x.
The digital zoom setting can also be
switched via the menu.
Caution
When operating zoom, the
focus may blur for a moment.
When digital zoom is added,
the image quality will become
Direct Remote Control Function
coarser.
Adjusting the
Camera
Adjusting the Focus
Manually (Manual
Focus)
If it is difcult to adjust the focus
automatically, you can adjust it
manually.
FOCUS
Press [FOCUS]
It changes to manual focus
1
mode.
32
Press [ + ] or [ - ] to
adjust the focus
To focus on a distant
2
subject, press [ + ] and to
focus on a near subject,
press [ - ].
Page 33

To Revert to Auto Focus
Press [FOCUS] again to return to
auto focus.
Focusing range
lT (telephoto) side: Approx.
1.5 m from the lens surface to
innity.
lW (wide-angle) side: Approx.
1 cm from the lens surface to
innity.
Adjusting the
Brightness of the
Image (Exposure)
Normally, the exposure is
automatically adjusted. However,
depending on the shooting
conditions, the exposure can be
adjusted manually.
Hint
When focusing manually, start
with the subject zoomed in
(Press [TELE] to take it to the
T side).
This prevents blurred images
when you switch to wide-angle
zooming.
If you wish to adjust exposure
while focusing manually, press
[EXPOSURE] (P. 33). The
exposure bar lights in orange.
To return to manual focusing,
press [FOCUS].
Auto Focus may not perform
well on subjects if:
Subjects are not in the center
of the frame, both near and
far subjects are within the
auto focus bracket at the
same time, subjects are
moving rapidly, subjects are
dark or low in contrast, etc.
EXPOSURE
Press [EXPOSURE]
1
Press [+] or [-] to adjust
2
the exposure
Hint
If you wish to adjust focus
manually while adjusting
exposure, press [FOCUS].
The manual focus icon lights in
orange. (P. 32)
To return to exposure adjustment,
press [EXPOSURE].
Caution
If the Program AE mode is
set to [Manual], the results of
adjusting the exposure are not
reected. When the Program AE
mode is set to anything other
than [Manual], the exposure
adjustments are reected.
Direct Remote Control Function
Page 34

Compensating for
backlight
When the subject is lit from the rear,
this function will compensate for
lighting so that the subject is not too
dark. (Backlight Compensation).
Returning Changed
Settings to their
Defaults (Full Auto)
The following settings can be
returned to their defaults with one
button.
Function Default Refer to
Focus Auto P. 32
Exposure Auto P. 3 3
Direct Remote Control Function
Press [BLC]
The image is backlight
compensation.
1
Pressing [BLC] again
cancels backlight
compensation.
Caution
If the Program AE mode is set to
[Manual], the results of backlight
compensation are not reected.
When the Program AE mode
is set to anything other than
[Manual], the results of backlight
compensation are reected.
BLC
BLC (Backlight
compensation)
Program AE Auto P. 3 9
White Balance Auto P. 41
Off P. 3 4
FULL
AUTO
Press [FULL AUTO]
[FULL AUTO] is displayed
onscreen for several
1
seconds and the settings
revert to their default.
34
Page 35

Making Camera
Presets
You can set up presets for different
camera settings, such as its pan, tilt
and zoom. Once presets are made,
they are retained even if the power
is turned off.
lPresets that can be accessed
from the remote control can
be made from 1 to 32.
To use presets from 33 up,
use the external control
function.
lOnce you save preset 1,
whenever you turn the power
on thereafter, the camera
starts under preset 1 settings.
lTo see what preset items can
be made, refer to “Preset
Items and Retained Settings”
(P. 53).
Preset number
buttons
PRESET
RESET
ENTER
When the camera is in
the state you wish to
save, press [PRESET]
1
and then press the
number you wish to
save (from [1] to [32])
Press [ENTER]
2
To Call up a Camera Preset
Press the number of the preset ([1]
to [32]) you wish to call up and then
press [ENTER].
To Delete a Preset (Reset)
Press [RESET] and then the
number of the preset ([1] to [32])
you wish to delete, and then press
[ENTER].
Entering Numbers
For presets 1 to 9:
Simply press [1] to [9] on the remote
control.
Ex.: For 3, simply press [3].
For presets 10 to 32:
Press the rst digit and then the
second.
Ex.: For 25, press [2] and then
press [5].
Caution
If the range of movement for pan/
tilt is limited by the swivel setting
(P. 45), if you move to a pan/tilt
position set up ahead of time, it
will be within the limited movement
range.
Direct Remote Control Function
Page 36

Remote Control Indicators
lWhenever you operate
a camera via the remote
control, the indicators of the
congured camera numbers
(CAMERA*) light up.
lWhile entering the number of
the camera whose preset is
being called up, the indicators
of the congured camera
numbers (CAMERA*) light up.
lWhen entering the number
of a preset, the PRESET
Direct Remote Control Function
indicator and the indicator
(CAMERA*) of the congured
camera number light up.
lWhen entering the number
to be reset, the (RESET)
indicator and the indicator
of the congured camera
number (CAMERA*) light up.
Caution
While trying to save, call up or
delete a camera preset, if you
enter a number other than from
[1] to [32], or if you press
another button, and you leave
the number entered as is
without pressing [ENTER] for a
certain period of time, the entry
is disabled and the indicators
(CAMERA*) of the camera
numbers that had been
congured with a (PRESET)/
(RESET) go off. If this happens,
start over what you were trying
to do from the beginning.
When saving a setting or
deleting content, other preset
numbers cannot be called up,
set or deleted.
While a menu is displayed
(P. 37), presets cannot be called
up, set or their content deleted.
Close the menu and then
perform the desired operation.
36
Page 37

Conguration via Menus Function
Operating Menus
and Understanding
Screens
With some functions, the camera
can be operated via onscreen
menus displayed on a monitor
connected to the camera.
lWithin explanation of
procedures, menu items are
indicated as being inside
quotes.
lFrom P. 39 on, the
explanations of operations
that can be achieved using
cursor buttons (
are simplied.
/ / / )
MENU
BACK
Press [MENU]
The menu opens.
Menu item on the top level,
its icon and description
Menu items on
the 2nd level,
current setting
Camera Functions Setup
Program AE
1
White Balance
Digital Zoom
Adjust the white balance and select
a shooting mode to match the situation.
ENTER
EXIT
/ /
/ /
ENTER
Auto
Auto
Off
Conguration via Menus Function
Remote control buttons
that work on this screen
To select another icon on
the top level, press [
].
or [
]
Page 38

Press [ ] or [ENTER]
Camera Functions Setup
Select the digital zoom setting.
Program AE
Digital Zoom
White Balance Auto
100x
Auto
ENTER
RETURN
to access menu
selections on the 2nd
level from the screen in
step 1
Camera Functions Setup
Program AE
2
White Balance
Digital Zoom
Select the shooting mode. Choose the
optimum mode for shooting conditions.
ENTER
RETURN
To go back to selections
on the top level, press
[BACK] or [
].
Auto
Auto
Off
Use [ ] or [ ] to
select the desired
setting and activate it
with [ENTER]
The sample screenshot is set
to 100x.
4
Conguration via Menus Function
3
38
Press [ ] or [ ] and
select the menu item of
the setting you wish to
change, and then press
either [
] or [ENTER]
to activate it
Setting items that can be
selected for the chosen
menu item are displayed.
The sample screenshot
is with Digital Zoom
selected and activated
Camera Functions Setup
Program AE
White Balance
Digital Zoom
Cancel the digital zoom.
ENTER
RETURN
To go back to menu
selections on the 2nd level,
press [BACK] or [
300x
200x
100x
Off
].
To close the menu
midstream
Press [MENU].
In step 1, pressing [BACK] also
closes the menu.
Page 39

Camera Functions
Setup
Selecting a Shooting
Mode to Match the
Conditions
(Program AE)
You can also select a shooting
mode that better suits the situation
for even clearer images.
Program AE Mode
Auto (No icon appears.)
Automatically adjust the
exposure.
Caution
A function to reduce ickering
operates when in Auto mode.
However, this reduction may not
work, depending on the subject,
lighting conditions, or the gain
limit setting.
In such case, setting the shutter
speed to 1/100 in the Shutter
mode can reduce the icker.
Manual
The settings for sensitivity
(gain), shutter speed, aperture
(iris) are adjusted manually.
Shutter
The shutter speed is adjusted
manually.
Iris
The aperture is adjusted
manually.
Spotlight
When a strong light is on the
subject, this prevents the
person’s face from washing
out.
White Board
Provides the ideal exposure
control for shooting a white
board.
If you select a Program AE
mode, new settings that can be
made in the selected mode are
displayed, from the following
settings.
Gain
This sets the sensitivity when
Manual is selected. Can be set
in a range from 0 to 30dB (31
steps).
Shutter Speed
This sets the shutter speed
when Manual or Shutter are
selected. You can select from
the values in the table below.
The values that can be
selected vary with the image
output format.
59.94/29.97 50/25
1/10000 1/10000
1/6000 1/6000
1/4000 1/350 0
1/3000 1/250 0
Conguration via Menus Function
Page 40

Conguration via Menus Function
59.94/29.97 50/25
1/2000 1/1750
1/1500 1/125 0
1/1000 1/1000
1/725 1/600
1/500 1/425
1/350 1/300
1/250 1/215
1/180 1/150
1/125 1/120
1/100 1/100
1/90 1/75
1/60 1/50
1/30 1/25
1/15 1/12
Iris
This sets the aperture when
Manual or Iris are selected.
You can choose from among
CLOSE, F16, F14, F11, F9.6,
F8.0, F6.8, F5.6, F4.8, F4.0,
F3.4, F2.8, F2.4, F2.0, F1.6
an d F1. 4.
Gain Limit
This sets the upper limit of
sensitivity (gain) when Auto,
Shutter, Iris, Spotlight or White
Board are selected. It can be
set in a range from 0 to 30dB
(31 steps).
Slow Shutter
This sets the minimum value
of the slow shutter speed
when Auto is selected.
When the image output format
is 59.94/29.97, you can select
from 1/60, 1/30 or 1/15.
When the image output format
is 50/25, you can select from
1/50, 1/25 or 1/12.
Aperture Limit
This sets the maximum
amount the aperture can be
opened when Auto is selected.
You can choose from F2.4,
F2.0, F1.6 and F1.4.
40
Page 41

Selecting Program AE
Modes
Press [MENU]
1
Setting the white
balance
When you wish to adjust the color,
you can change the white balance
setting.
Select [Camera
Function Setup]
2
[Program AE]
Program AE mode
Use the [cursor
buttons] to choose the
setting value in the
3
selected Program AE
mode
Press [ENTER] to exit
the [MENU]
The selected Program AE
4
mode (excluding Auto) is
displayed on screen (P. 29).
White balance mode
Auto (No icon appears.)
Manual
Select values for the R gain
(red gain) and the B gain (blue
gain) to set the white balance.
This can be set in a range
from -128 to + 127 (256 steps)
Set
You can manually adjust white
balance to match the light
source or situation.
Outdoor
To shoot in ne weather.
Indoor 1
To shot under incandescent
light, halogen light or soft
uorescent light.
Indoor 2
To shoot under bright
uorescent light.
Conguration via Menus Function
Page 42

Selecting a white
Setting the white
balance mode
Press [MENU]
1
Select [Camera
Function Setup]
2
[White Balance]
white balance mode
Press [ENTER] to exit
3
the [MENU]
Caution
Do not block the infrared sensor
Conguration via Menus Function
with your hand or other things
to obtain a good cast for your
shooting.
Further, if the lens is not facing
straight ahead, it may be difcult
to get a good color balance.
balance manually
(Set)
Prepare a white object such a thick
sheet of white paper that is not
translucent.
Point the camcorder at
the white object so that
it lls the screen.
Thick white paper, etc.
1
Press [MENU]
2
42
Infrared sensor
Select [Camera
Function Setup]
[White Balance]
3
At this point, [ ] will start
blinking on the screen.
Press [ENTER]
After a short wait, the
] will stop blinking and
[
4
remain lit to indicate that
white balance settings are
complete.
[Set]
Page 43

To close, press [MENU];
to redo the process,
go back to step 4 and
repeat
The white balance
congured in [Set] is
5
saved until the next time
it is congured.
In order to match
the coloring exactly,
recongure [Set] every
time the shooting
conditions change.
Setting the digital
zoom
Although the digital zoom setting
can be made using [Digital Zoom]
(P.32), it can also be done via the
menu.
Press [MENU]
1
Select [Camera
Function Setup]
2
[Digital Zoom]
[200x]/[100x]/[OFF]
[300x]/
Caution
It may be difcult to perform
this setting in dark places. Also
if the zoom bar is positioned
in the digital range (p. 30),
you may not be able to set
the white balance. If white
balance settings cannot
be accomplished, [
continue to ash.
If conguring [Set] is not
completed and the power is
turned off or a preset is saved,
] may ash on the screen.
[
Repeat the procedure from
step 1.
] will
Press [ENTER] to exit
3
the [MENU]
Conguration via Menus Function
Page 44

Image Setup
This sets the depth of
color (Saturation)
This allows you to set the color level.
It can be set in a range from 0 to 15
(16 steps).
The larger the setting value, the
stronger the color.
Setting Outline
Intensity
(Enhancement)
This allows you to set the intensity of
outline compensation for an image.
It can be set in a range from 0 to 15
Conguration via Menus Function
(16 steps).
The larger the setting value, the
more distinct and emphasized the
outline.
It can be set in a range from 0 to 16
(17 steps).
The smaller the setting value, the
more it corrects the brightness of the
intermediate level to the brighter side.
Reducing Noise
(NR Setup)
This allows you to reduce the level
of noise in the image. It can be set
in a range from 0 to 6 (7 steps).
The larger the setting value, the
greater the noise reduction effect.
Selecting Different
Settings in the Image
Setup
Press [MENU]
1
Setting the Black
Level (Pedestal)
This allows you to set the black level
of the image.
It can be set in a range from 0 to 79
(80 steps).
The smaller the setting value, the
more intense the black level.
Setting the Gamma
Level (Gamma)
This allows you to set the gamma
level of the image.
44
Select the desired
setting from the [Image
2
Setup] using
] and [ ]
[
[ ] [ ]
Press [ENTER] to open
the screen for making
3
the setting
Use [ ] or [ ] to
4
change the value of the
setting
Press [ENTER] to exit
5
the [MENU]
Page 45

Swivel Setup
Reversing Pan/Tilt
Movement
This allows you to reverse the pan/
tilt movement when the cursors
[
/ / /
To reverse left/right movement, set
Reverse Pan to ON; to reverse up/
down movement, set Reverse Tilt to
ON.
Caution
If System Select Switch 10
(installation method selection)
is changed to ON (ceiling
installation), both reverse pan
and reverse tilt go to ON; if
Switch 10 is turned OFF (desktop
installation), both reverse pan and
reverse tilt go to OFF. (P. 15)
Limiting the Pan/Tilt
Range
It is possible to limit the range that
the camera can pan or tilt.
To limit the range it can move, turn
the setting ON and then specify the
range for each parameter: left and
right edges for panning and up/down
edges for tilting.
The left and right edges can be set
in a range from -175° to +175°, while
the top/bottom limits can be set from
+90° to -30° (desktop installation) or
+30° to -90° (ceiling installation) and
can be set in 1° increments.
] are pressed.
Caution
If the System Select Switch 10
(installation method selection)
is changed, the limits of the
camera's movable range turn
OFF and the congured movable
range goes to the maximum
movable range.
• When installed on desktop: L
(-175°), R (+175°), Up (+90°),
Down (-30°)
• When installed on the ceiling:
L (-175°), R (+175°), Up (+30°),
Down (-90°)
Setting the Pan/Tilt
Speed
This allows you to set the pan/tilt
speed when the cursors [
] are pressed.
/
The speed can be set from mode 1
(slow) to mode 5 (fast).
Caution
The speed may not change even
though its setting is, due to the
range of movement.
/ /
Conguration via Menus Function
Page 46

Initial Setup
Setting the Output
Format (Color System)
VZ-HD4900A
This allows you to congure the
DVI-I image output format.
You can select from between RGB
and YPbPr to match the connected
monitor.
Reverting All Menu
Settings to their Initial
Setup (Reset)
Press [MENU]
1
Press [Initial Setup]
2
[Reset]
Press [ENTER]
The following screen opens.
Reset
1
Press [MENU]
Select [Initial Setup]
[Color System]
2
Conguration via Menus Function
[RGB]/[YPbPr]
Press [ENTER] to exit
3
the [MENU]
Caution
Regardless of the output format
setting, the HD-SDI/3G-SDI
output will be YPbPr.
3
ENTER
Use [ ] to select [Yes]
4
Reset?
Yes No
RETURN
and press [ENTER]
Caution
If you reset the settings, all of the
presets are lost as well. (P. 35,
P. 53)
46
Page 47

Appendix
Troubleshooting
Before requesting repairs, look at the following things. After doing so,
if there is still some problem in its operation and you cannot resolve it
yourself, please contact the store where you purchased it. Refer to P. 67 for
information on after sales service.
If this Happens Way to Resolve the Problem
The power won’t
turn on.
Power supply
The camera is
plugged in properly,
but it still won’t
come on.
When the power
is plugged in, the
head of the camera
moves around at
will.
The camera does
Pan/Tilt
not pan and/or tilt.
No image appears
Image Related
on the connected
monitor.
(Cont .)
Check and make sure the AC adapter
is securely plugged into the DC IN 12V
terminal of the camera and that the
power cord is plugged into both the AC
adapter and the outlet.
Has the camera been subject to a severe
shock?
The camera may be broken. Consult with
the store where you purchased it.
This is not a fault. When the power is
plugged in, the head of the camera will
rst start to move. It then returns to the
home position automatically.
Do not touch the head of the camera
when it is moving.
Is there something preventing it from
moving?
Remove it and turn the power on again.
Check and make sure the DVI-I cable
or HD-SDI/3G-SDI cable is properly
connected.
The video format of the camera OUT has to
match the video format of the monitor IN.
Check whether the Video Select switch is
set cor rectly.
Refer to
Page
P. 2 2
―
P. 28
Appendix
―
P. 2 3
P. 2 4
P. 14
Page 48

Appendix
48
If this Happens Way to Resolve the Problem
(Cont .)
The outline of the
subject is colored.
Image Related
The subject appears
distorted.
There are horizontal
stripes on the screen.
Bright spots appear
on the screen.
There is a green
stripe on the right
side of the screen.
Subjects end up
looking dark.
When not connected to a monitor with
an HD-SDI input terminal, the image is
not output at 1080p/59.94 or 1080p/50.
Change the Video Select switch and try
using a different image output format or
use the DVI-I OUT [VZ-HD4900A].
Is the input switch of the monitor set
correctly?
Check and make sure the input is set
for the connected DVI-I terminal or an
input compatible with an HD-SDI/3G-SDI
terminal.
This is not a fault. The area around the
outline of a subject may be colored.
Switching to the Program AE Auto mode
and changing the aperture limit may
improve this.
This is not a fault. The subject may
appear slightly distorted due to the nature
of the image sensor (CMOS).
This is not a fault. It may appear this way
under articial lighting.
This is not a fault. On rare occasions,
bright spots may appear on dark subjects.
A green stripe may appear on the right
side of the screen with some monitors
when using an analog video output
[VZ-HD4900A]. If this happens, use
the monitor’s function for adjusting the
horizontal position to correct the position
of the screen.
When you shoot with a bright object in
the background (such as a window, light,
the sun, etc.), subjects become dark,
so devise a way to shoot so there isn’t
anything bright in the background, or use
backlight compensation.
Refer to
Page
P. 14
P. 2 3
―
P. 4 0
―
―
―
―
P. 3 4
Page 49

If this Happens Way to Resolve the Problem
The brightness of
subjects end up
changing.
The area around
bright things and the
border of dark things
end up colored.
Image Related
Images are out of
focus.
The zoom doesn’t
work.
Communication with External Devices
Unable to use
external control
even when
connected to an
external device.
When the brightness of the background
changes, the brightness of your subject
will also change due to the auto exposure
adjustment of the camera.
This is not a fault. Devise a way to shoot,
such as changing the camera orientation,
so there is a smaller difference in
brightness. Switching to the Program AE
Auto mode and changing the aperture
limit may improve this.
Are you trying to shoot a subject that is
hard for the autofocus to bring into focus?
Try focusing manually.
Is the camera in the manual focus mode?
Focus the camera manually or cancel the
manual focus mode.
Is there a cell phone or radio nearby?
Move it away from the camera and turn
the power on again.
If none of the above apply, try turning the
power off and back on again.
Check and make sure the external device
is properly connected to the camera.
Make sure the camera is turned on. P. 2 6
Check and make sure that the
communication baud rate and
RS-232C/RS-422 selections are
correct on the System Select switch. If
devices are connected in a daisy chain,
the positions of the switch above must be
the same.
Refer to
Page
―
P. 4 0
P. 32
P. 32
P. 4
Appendix
―
P. 2 6
serial
P. 15
Page 50

If this Happens Way to Resolve the Problem
The remote control
doesn’t work.
Remote Control
Appendix
Are you pointing the remote control at the
receiver on the camera?
Point the remote at the receiver of the
camera and then operate it.
Is the receiver on the camera in direct
sunlight or under a bright light, such as
a uorescent one? When the receiver is
under a bright light, it will not work.
Adjust the location and/or the angle of the
device.
Are there batteries in the remote control?
Check the batteries are facing the right
way as well. The batteries may be dead.
Replace the batteries.
Is the camera number the same on the
camera and the remote control?
Set the camera number on the remote
control so it is the same as the camera’s
setting.
Is the camera turned on? Turn the camera
on.
Refer to
Page
P. 12
―
―
P. 17
P. 28
P. 28
50
Page 51

Menu Structure
The camera’s menus are structured as follows.
Menu Item
(Top Level)
Camera
Functions
Setup
Image Setup
Menu Item
(2nd Level)
Program AE
White Balance
Digital Zoom
Saturation
Enhancement
Pedestal
Gamma
NR Setup
Setting
Auto*
Manual
Shutter
Iris
Spotlight
White Board
Auto*
Manual
Set
Outdoor
Indoor 1
Indoor 2
300x
200x
100x
Off*
― P. 4 3
Refer
to
P. 3 8
P. 4 0
P. 4 2
Appendix
Page 52

Menu Item
(Top Level)
Swivel Setup
Initial Setup
* This is the factory default setting.
For information on settings when the camera starts up, refer to “Preset
Items and Retained Settings” (P. 53).
Menu Item
(2nd Level)
Pan Reverse
Tilt Reverse
Pan Tilt Limit
Speed Setup
Color System
[VZ-HD4900A]
Reset ― P. 4 5
Setting
On
Off*
On
Off*
On
Off*
Mode 1
Mode 2
Mode 3*
Mode 4
Mode 5
RGB*
YPbPr
Appendix
Refer
to
P. 4 5
P. 4 5
52
Page 53

Preset Items and Retained Settings
The following table shows the items that can be saved to presets (P. 35) and
the settings that are retained in the absence of anything registered to Preset 1.
lWhen settings have been registered to Preset 1, the camera starts
up with the settings of Preset 1.
lWhen settings have not been registered to Preset 1, the camera
starts up using the content of “Startup Settings when no Preset 1
is Registered”.
Startup Settings
Items that can be Preset
Pan Tilt Position
Zoom Position Wide end
Exposure:
Auto/Manual (Exposure value)
Focus:
Auto/Manual (Focus position)
BLC (Backlight compensation): On/Off Off
Program AE Settings
(including values for each setting)
White Balance Settings
(including values for each setting)
Digital Zoom Off
Saturation(Color Level) gain setting value
Enhancement setting value 8
Pedestal setting value 40
Gamma setting value 8
NR setting value 3
when no Preset 1 is
Registered
Home position
(front)
Auto
Auto
Auto
(Gain Limit: 30dB
Slow Shutter:
59.94/29.97Hz: 1/60
50/25Hz: 1/50
Aperture Limit: F1.4)
Auto
8
Appendix
Page 54

Software License Information
The software incorporated into this product is composed of multiple
independent software modules and the copyright for each of the individual
software modules belongs to Hitachi Industry & Control Solutions, Ltd. or a
third party.
These products incorporate software modules that were developed and/or
created by Hitachi Industry & Control Solutions, Ltd. itself, and the property
rights and/or intellectual property rights to this software and related
documentation belong to Hitachi Industry & Control Solutions, Ltd. These
rights are protected by the Copyright Act and other laws.
Furthermore, this product uses software modules licensed as free software,
based on the GNU GENERAL PUBLIC LICENSE Version 2 and/or GNU
LESSER GENERAL PUBLIC LICENSE Version 2.1 (hereafter referred to as
"the Software License Agreement"), established by the Free Software
Foundation, Inc. of the U.S.
Refer to the following table for information on subject software modules. If
you have questions about subject software modules, please contact the store
where you purchased it.
For details about said software modules, such as conditions of use, please
read the software license agreement of each software as listed later (As these
are stipulated by third parties other than Hitachi Industry & Control Solutions,
Ltd., we are including the original document (English).).
Parties other than Hitachi Industry & Control Solutions, Ltd. have copyrights
Appendix
and/or other rights to said software modules, and the software is licensed free
of charge, so it is provided as is and we make no guarantees whatsoever,
within the range of applicable laws (neither explicitly or implicitly). Further, we
shall bear no responsibility for any damages (including loss of data,
compromised accuracy, incompatibility with the interface of other software,
etc.) or expenses whatsoever that may arise due to the software modules
and/or the use thereof, within the range of applicable laws.
54
Subject
Software Modules
Linux Kernel
busybox
libgcc
lzo
U-Boot
glibc
Relevant Software License Agreement
GNU GENERAL PUBLIC LICENSE Version 2
GNU LESSER GENERAL PUBLIC LICENSE
Version 2.1
Page 55

Software License Information
GNU GENERAL PUBLIC LICENSE Version 2, June 1991
Copyright© 1989, 1991 Free Software Foundation, Inc.
51 Franklin St, Fifth Floor, Boston, MA 02110-1301 USA
Everyone is permitted to copy and distribute verbatim copies of this license document, but changing it is not allowed.
The licenses for most software are designed to take away your freedom to
share and change it. By contrast, the GNU General Public License is intended to
guarantee your freedom to share and change free software--to make sure the
software is free for all its users. This General Public License applies to most of
the Free Software Foundation's software and to any other program whose authors commit to using it. (Some other Free Software Foundation software is covered by the GNU Lesser General Public License inst
programs, too.
When we speak of free software, we are referring to freedom, n ot price. Our
General Public Licenses are designed to make sure that you have the freedom to
distribute copies of free software (and charge for this service if you wish), that
you receive source code or can get it if you want it, that you can change the software or use pieces of it in new free programs; and that you know you can do
these things.
To protect your rights, we need to make restrictions that fo
you these rights or to ask you to surrender the rights. T hese restrictions translate
to certain responsibilities for you if you distribute copies of the software, or if you
modify it.
For example, if you distribute copies of such a program, whether gratis or for
a fee, you must give the recipients all the rights that you have. You must make
sure that they, too, receive or can get the source code. And you must show them
these terms so they know their rights.
We protect your
you this license which gives you legal permission to copy, distribute and/or
modify the software.
Also, for each author's protection and ours, we want to make certain that everyone understands that there is no warranty for this free software. If the software is modified by someone else and passed on, we want its recipients to know
that what they have is not the original, so that any problems introduced by others
will not reflect on the
Finally, any free program is threatened constantly by software patents. We
wish to avoid the danger that redistributors of a free program will individually obtain patent licenses, in effect making the program proprietary. To prevent this,
we have made it clear that any patent must be licensed for everyone's free use
or not licensed at all.
The precise terms and conditions for copying, distribution and modification
follow.
TERMS AND CONDITION
0. This License applies to any program or other work which contains a notice
placed by the copyright holder saying it may be distributed under the terms of
this General Public License. T he "Program", below, refers to any such program
or work, and a "work based on the Program" means either the Program or any
derivative work under copyright law: that is to say, a work containing the Program or a portion of it, either verbatim or with modifications and/or tra
into another language. (Hereinafter, translation is in cluded without limitation in
the term "modification".) Each licensee is addressed as "you".
Activities other than copying, distribution and modification are not covered by
this License; they are outside its scope. The act of running the Program is n ot
restricted, and the output from the Program is covered only if its contents constitute a work based on the Program (independent of having been made by running the Program). Whether that is
1. You may copy and distribute verbatim copies of the Program's source code
as you receive it, in any medium, provided that you conspicuously and appropriately publish on each copy an appropriate copyright notice and disclaimer of
warranty; keep intact all the notices that refer to this License and to the absence
of any warranty; and give any other recipients of the Program a copy of this License along with the Program.
You may charge a fee for the physical act o
at your option offer warranty protection in exchange for a fee.
Preamble
ead.) You can apply it to your
rbid anyone to deny
rights with two steps: (1) copyright the software, and (2) offer
original authors' reputations.
GNU GENERAL PUBLIC LICENSE
DISTRIBUTION AND MODIFICATION
S FOR COPYING,
nslated
true depends on what the Program does.
f transferring a copy, and you may
2. You may modify your copy or copies of the Program or any portion of it,
thus forming a work based on the Program, and copy and distribute such modifications or work under the terms of Section 1 above, provided that you also
meet all of these conditions:
a) You must cause the modified files to carry prominent notices stating that
you changed the files and the date of any chang
b) You must cause any work that you distribute or publish, that in whole or in
part contains or is derived from the Program or any part thereof, to be licensed as a whole at no charge to all third parties under the terms of this
License.
c) If the modified program normally reads commands interactively when run,
you must cause it, when started running for such interactive use in the
most ordinary way, to print or display an announcement including an appropriate copyright notice and a not
saying that you provide a warranty) and that users may redistribute the
program under these conditions, and telling the user how to view a copy of
this License. (Exception: if the Program itself is interactive but d oes not
normally print such an announcement, your work based on the Program is
not required to print an announcement.)
These requirements apply to the modified work as a whole. If identifiable sections of that work are not derived from the Program, and can be
sidered independent and separate works in themselves, then this License, and
its terms, do not apply t o those sections when you distribute them as separate
works. But when you distribute the same sections as part of a whole which is a
work based on the Program, the distribution of the whole must be on the terms
of this License, whose permissions for other licensees extend to the entire
whole, and thus to each and every part regardless of who wrote it.
Thus, it is not the intent of this
to work written entirely by you; rather, the intent is to exercise the right to control
the distribution of derivative or collective works based on the Program.
In addition, mere aggregation of another work not based on the Program with
the Program (or with a work based on the Program) on a volume of a storage or
distribution medium does not bring the other work under the scope of this License.
3. You may copy and distribute the Program (or a wo
tion 2) in object code or executable form under the terms of Sections 1 and 2
above provided that you also do one of the following:
a) Accompany it with the complete corresponding machine-readable source
code, which must be distributed under the terms of Sections 1 and 2 above
on a medium customarily used for software interchange; or,
b) Accompany it with a written offer, valid for at least three years, to give any
third party, for a charge no more than your co
source distribution, a complete machine-readable copy of the corresponding source code, to be distributed under the terms of Sections 1 and 2
above on a medium customarily used for software interchange; or,
c) Accompany it with the information you received as to the offer to distribute
corresponding source code. (This alternative is allowed only for noncommercial distribution and only if you received the program in object code or
executable form with such an offer, in accor
The source code for a work means the preferred form of the work for making
modifications to it. For an executable work, complete source code means all the
source code for all modules it contains, plus any associated interface definition
files, plus the scripts used to control compilation and installation of the executable. However, as a special exception, the source code distributed need not include anything that is normally distributed (in either source or binary
the major components (compiler, kernel, and so on) of the operating system on
which the executable runs, unless that component itself acco mpanies the executable.
If distribution of executable or object code is made by offering access to copy
from a designated place, then offering equivalent access to copy the source code
from the same place counts as distribution of the source code, even though third
parties are not compelled to copy the source along with the object code.
4. You may not copy, modif
section to claim rights or contest your rights
y, sublicense, or distribute the Program except as
e.
ice that there is no warranty (or else,
reasonably con-
rk based on it, under Sec-
st of physically performing
d with Subsection b above.)
form) with
Appendix
Page 56

expressly provided under this License. Any attempt otherwise to copy, modify,
sublicense or distribute the Pro gram is void, and will au tomatically terminate
your rights under this License. However, parties who have received copies, or
rights, from you under this License will not have their licenses terminated so
long as such parties remain in full compliance.
5. You are not required to accept this License, since you have not signed it.
However, nothing else grants you permission to modify or distribute the Program or its derivative works. Th
accept this License. Therefore, by modifying or distributing the Program (or any
work based on the Program), you indicate your acceptance of this License to do
so, and all its terms and conditions for copying, distributing or modifying the
Program or works based on it.
6. Each time you redistribute the Program (or any work based on t he Program), the recipient automatically receives a license from the original licensor to
copy, distribute or modify the Pro
You may not impose any further restrictions on the recipients' exercise of the
rights granted herein. You are not responsible for enforcing compliance by third
parties to this License.
7. If, as a consequence of a court judgment or allegation of patent infringement or for any other reason (not limited to patent issues), conditions are imposed on you (whether by court order, agreement or otherwise) that cont radict
the conditions of this License, they do not excuse
License. If you cannot distribute so as to satisfy simultaneously your obligations
under this License and any other pertinent obligations, then as a consequence
you may not distribute the Program at all. For example, if a patent license would
not permit royalty-free redistribution of the Program by all those who receive
copies directly or indirectly through you, then the only way you could satisfy
both it and this License would be to refrain entirely from distribution
gram.
If any portion of this section is held invalid or unenforceable under any particular circumstance, the balance of the section is intended to apply and the section
as a whole is intended to apply in other circumstances.
It is not the purpose of this section to induce you to infringe any patents or
other property right claims or to contest validity of any such claims; this section
has the sole purpose of protecting the integrity of the free software distribution
ch is implemented by public license practices. Many people have
system, whi
made generous contributions to the wide range of software distributed through
that system in reliance on consistent application of that system; it is up to the
author/donor to decide if he or she is willing to distribute software t hrough any
other system and a licensee cannot impose that choice.
This section is intended to make thoroughly clear what is believed to be a consequence of the rest of this License.
8. If the distribu
tries either by patents or by copyrighted interfaces, the original copyright holder
Appendix
who places the Program under this License may add an explicit geographical distribution limitation excluding those countries, so that distribution is permitted
only in or among countries not thus excluded. In such case, this License incorporates the limitation as if written in the body of this License.
9. The Free Software Foundation may publish revised and/or
the General Public License from time to time. Such new versions will be similar
in spirit to the present version, but may differ in detail to address new problems
or concerns.
Each version is given a distinguishing version number. If the Program specifies a version number of this License which applies to it and "any later version",
you have the option of following the terms and conditions either of that version
or of any later version published by the Free Software Foundation. If the Program
ecify a version number of this License, you may choose any version
does not sp
ever published by the Free Software Foundation.
10. If you wish to incorporate p arts of the Program into other free programs
whose distribution conditions are different, write to the author to ask for permission. For software which is copyrighted by the Free Software Foundation, write
to the Free Software Foundation; we sometimes make exceptions for this. Our
decision will be guided by the two goals of preserving the free status of all d
atives of our free software an d of promoting the sharing and reuse of software
generally.
11. BECAUSE THE PROGRAM IS LICENSED FREE OF CHARGE, THERE IS NO
WARRANTY FOR THE PROGRAM, TO THE EXTENT PERMITTED BY APPLICABLE LAW. EXCEPT WHEN OTHERWISE STATED IN WRITING THE COPYRIGHT
HOLDERS AND/OR OTHER PARTIES PROVIDE THE PROGRAM "AS IS" WITHOUT WARRANTY OF ANY KIND, EITHER EXPRESSED OR IMPLIED, INCLUDING,
BUT NOT LIMITED TO, THE IMPLIE
AND FITNESS FOR A PARTICULAR PURPOSE. THE ENTIRE RISK AS TO THE
QUALITY AND PERFORMANCE OF THE PROGRAM IS WITH YOU. SHOULD THE
PROGRAM PROVE DEFECTIVE, YOU ASSUME THE COST OF ALL NECESSARY
SERVICING, REPAIR OR CORRECTION.
12. IN NO EVENT UNLESS REQUIRED BY APPLICABLE LAW OR AGREED TO
IN WRITING WILL ANY COPYRIGHT HOLDER, OR ANY OTHER PARTY WHO
ese actions are prohibited by law if you do not
gram subject to t hese terms and conditions.
tion and/or use of the Program is restricted in certain co un-
NO WARRANTY
D WARRANTIES OF MERCHANTABILITY
you from the conditions of this
of the Pro-
new versions of
eriv-
MAY MODIFY AND/OR REDISTRIBUTE THE PROGRAM AS PERMITTED ABOVE,
E LIABLE TO YOU FOR DAMAGES, INCLUDING ANY GENERAL, SPECIAL, IN-
B
CIDENTAL OR CONSEQUENTIAL DAMAGES ARISING OUT OF T HE USE OR INABILITY TO USE THE PROGRAM (INCLUDING BUT NOT LIMITED TO LOSS OF
DATA OR DATA BEING RENDERED INACCURATE OR LOSSES SUSTAINED BY
YOU OR THIRD PARTIES OR A FAILURE OF THE PROGRAM TO OPERATE WITH
ANY OTHER PROGRAMS), EVEN IF SUCH HOLDER OR OTHER PARTY HAS
BEEN ADVISED OF THE POSSIBILITY OF SUCH DAMAGES.
How to Apply These Terms to Your New Programs
If you develop a new program, and you wan t it to be of the greatest possible
use to the public, the best way to achieve this is to make it free software which
everyone can redistribute and change under these terms.
To do so, attach the following notices to the program. It is safest to attach
them to the start of each source file to most effectively convey the exclusion of
warranty; and each file should have at least the "co pyright" line and
where the full notice is found.
<one line to give the program's name and a brief idea of what it does.>
Copyright© <year> <name of author>
This program is free software; you can redistribute it and/or modify it under
the terms of the GNU General Public License as published by the Free Soft-
ware Foundation; either version 2 of the License, or (at your option) any later
version.
This program is distributed in the hope that it will be useful, but WITHOUT
ANY WARRANTY; without
or FITNESS FOR A PAR TICULAR PURPOSE. See the GNU General Public Li-
cense for more details.
You should have received a copy of the GNU General Public License along with
this program; if not, write to the Free Software Foundation, Inc., 51 Franklin
St, Fifth Floor, Boston, MA 02110-1301 USA
Also add information on how to contact you by electronic and paper mail.
If the program is interactive, make it output a short notice like this when it
nteractive mode:
starts in an i
Gnomovision version 69, Copyright© year name of author Gnomovision
comes with ABSOLUTELY NO WARRANTY; for details type `show w'. This is
free software, and you are welcome to redistribute it under certain conditions;
type `show c' for details.
The hypothetical commands `show w' and `show c' should show the appropriate parts of the General Public License. Of course, the commands you use
may be called something other than `show w' and `show c'; they could even be
mouse-clicks or menu items--whatever s
You should also get your employer (if you work as a programmer) or your
school, if any, to sign a "copyright disclaimer" for the program, if necessary. Here
is a sample; alter the names:
Yoyodyne, Inc., hereby disclaims all copyright interest in the program `Gno-
movision' (which makes passes at compilers) written by James Hacker.
<signature of Ty Coon>, 1 April 1989
Ty Coon, President of Vice
This General Public License does not permit incorporating your program into
proprietary programs. If your program is a
it more useful to permit linking proprietary applications with the library. If this is
what you want to do, use the GNU Lesser General Public License instead of this
License.
TERMS AND CONDITIONS
END OF
even the implied warranty of MERCHANTABILITY
uits your program.
subroutine library, you may consider
a pointer to
56
Page 57

Software License Information
GNU LESSER GENERAL PUBLIC LICENSE Version 2.1, February 1999
Copyright© 1991, 1999 Free Software Foundation, Inc. 51 Franklin St, Fifth Floor, Boston, MA 02110-1301 USA
Everyone is permitted to copy and distribute verbatim copies of this license document, but changing it is not allowed.
[This is the first released version of the Lesser GPL. It also counts as the successor of the GNU Library Public License, version 2, hence the version number 2.1.]
The licenses for most software are designed to take away your freedom to
share and change it. By contrast, the GNU General Public Licenses are intended
to guarantee your freedom to share and change free software--to make sure the
software is free for all its users.
This license, the Lesser General Public License, applies to some specially designated software packages--typically libraries-of the Free Software Foundation
and other authors who decide to use it. You can use it too, but we suggest you
first think carefully ab
cense is the better strategy to use in any particular case, based on the explanations below.
When we speak of free software, we are referring to freedom of use, not price.
Our General Public Licenses are designed to make sure that you have the freedom to distribute copies of free software (and charge for this service if you
wish); that you receive source code or can get it if you want it; that you can
change the software and use pieces of it in new free pro
informed that you can do these things.
To protect your rights, we need to make restrictions that forbid distributors to
deny you these rights or to ask you to surrender these rights. These restrictions
translate to certain responsibilities for you if you distribute copies of the library
or if you modify it.
For example, if you distribute copies of the library, whether gratis or for a fee,
you must give the recipients all the rights that we gave you. You must make sure
that
they, too, receive or can get the source code. If you link other code with the
library, you must provide complete object files to the recipients, so that they can
relink them with the library after making changes to the library and recompiling
it. And you must show them these terms so they know their rights.
We protect your rights with a two-step method: (1) we copyright the library,
and (2) we offer you this license, which gives you legal permission to copy, distribute and/or modify the
To protect each distributor, we want to make it very clear that there is no warranty for the free library. Also, if the library is modified by someone else and
passed on, the recipients should know that what they have is not the original version, so that the original author's reputation will not be affected by problems that
might be introduced by others.
Finally, software patents pose a constant threat to the existence of any free
program. We wish to make sure that a company cannot effectively
users of a free program by obtaining a restrictive license from a patent holder.
Therefore, we insist that any patent license obtained for a version of the library
must be consistent with the full freedom of use specified in this license.
Most GNU software, including some libraries, is covered by the ordinary GNU
General Public License. This license, the GNU Lesser General Public License, applies to certain designated libraries, and is quite different from the ordinary General Public License. We use this license f
linking those libraries into non-free programs.
When a program is linked with a library, whether statically or using a shared
library, the combination of the two is legally speaking a combined work, a derivative of the original library. The ordinary General Public License therefore permits such linking only if the entire combination fits its criteria of freedom. The
Lesser General Public License permits more lax criteria for linking other code
with the library.
We call this license the "Lesser"
to protect the user's freedom than the ordinary General Public License. It also
provides other free software developers Less of an advantage over competing
nonfree programs. These disadvantages are the reason we use the ordinary General Public License for many libraries. However, the Lesser license provides advantages in certain special circumstances.
For example, on rare occasions, there may be a special need to encourage the
widest possible use of a certain library, so that it becomes a de-facto standard.
To achieve this, non-free programs must be allowed to use the library. A more
frequent case is that a free library does the same job as widely used non-free libraries. In this case, there is little to gain by limiting the free library to free soft-
Preamble
out whether this license or the ordinary General Public Li-
grams; and that you are
library.
restrict the
or certain libraries in order to permit
General Public License because it does Less
ware only, so we use the Lesser General Public License.
In other cases, permission to use a particular library in non-free programs enables a greater number of people to use a large body of free software. For example, permission to use the GNU C Library in non-free programs enables many
more people to use th
GNU/Linux operating system.
Although the Lesser General Public License is Less protective of the users'
freedom, it does ensure that the user of a program that is linked with the Library
has the freedom and the wherewithal to run that program using a modified version of the Library.
The precise terms and conditions for copying, distribution and modification
follow. Pay close attention to the difference between a "work based on the library"
and a "work
brary, whereas the latter must be combined with the library in order to run.
0. This License Agreement applies to any software library or other program
which contains a notice placed by the copyright holder or other authorized party
saying it may be distributed under the terms of this Lesser General Public License (also called "this
A "library" means a collection of software functions and/or data prepared so as
to be conveniently linked with application programs (which use some of those
functions and data) to form executables.
The "Library", below, refers to any such software library or work which has
been distributed under these terms. A "work based on the Library" means either
the Library or any derivative work under copyright law: that is to say, a work containing the Library or a portion of it, eith
translated straightforwardly into another language. (Hereinafter, translation is
included without limitation in the term "modification".)
"Source code" for a work means the preferred form of the wo rk for making
modifications to it. For a library, complete source code means all the source
code for all modules it contains, plus any associated interface definition fi les,
plus the scripts used to control compilation and installation of the library.
Activities other
this License; they are outside its scope. The act of running a program using the
Library is not restricted, and output from such a program is covered only if its
contents constitute a work based on the Library (independent of the use of the
Library in a tool for writing it). Whether that is true depends on what the Library
does and what the program that uses the Library does.
1. You may copy and distribute verb
source code as you receive it, in any medium, provided that you conspicuously
and appropriately publish on each copy an appropriate copyright notice and disclaimer of warranty; keep intact all the notices that refer to this License and to
the absence of any warranty; and distribute a copy of this License along with the
Library.
You may charge a fee for the physical act of transferring a copy, and you may
at your option offer warranty protection in exchange for a f
2. You may modify your copy or copies of the Library or any portion of it, thus
forming a work based on the Library, and copy and distribute such modifications
or work under the terms of Section 1 above, provided that you also meet all of
these conditions:
a) The modified work must itself be a software library.
b) You mu st cause the files modified to carry prominent notices stating that
you changed the files and the date of any change.
c) You must cause the whole of the work to
third parties under the terms of this License.
d) If a facility in the modified Library refers to a function or a table of data to
be supplied by an application program that uses the facility, other than as
e whole GNU operating system, as well as its variant, the
that uses the library". The former contains code derived from the li-
GNU LESSER GENERAL PUBLIC LICENSE
TERMS AND CONDITIONS FOR COPYING,
DISTRIBUTION AND MODIFICATION
License"). Each licensee is addressed as "you".
er verbatim or with modifications and/or
than copying, distribution and modification are not covered by
atim copies of the Library's complete
ee.
be licensed at no charge to all
Appendix
Page 58

an argument passed when the facility is invoked, then you must make a
good faith effort to ensure that, in the event an application does not supply
such function or table, the facility still operates, and performs whatever
part of its purpose remains meaningful.
(For example, a function in a library to compute square roots has a purpose
that is entirely well-defined independent of the application. Therefore, Subsection 2d requires that any application-supplied function or table used by
unction must be optional: if the application does not supply it, the
this f
square root function must still compute square roots.)
These requirements apply to the modified work as a whole. If dentifiable sections of that work are not derived from the Library, and can be reasonably considered independent and separate works in themselves, then this License, and
its terms, do not apply t o those sections when you distribute them as separate
works. But when you distribute the same sections as part
work based on the Library, the distribution of the whole must be on the terms of
this License, whose permissions for other licensees extend to the entire whole,
and thus to each and every part regardless of who wrote it.
Thus, it is not the intent of this section to claim rights or contest your rights
to work written entirely by you; rather, the intent is to exercise the right to control
the distribution of derivative or collective works based on the Library.
In addition, mere
the Library (or with a work based on the Library) on a volume of a storage or
distribution medium does not bring the other work under the scope of this License.
3. You may opt to apply the terms of the ordinary GNU General Public License
instead of this License to a given copy of the Library. To do this, you must alter
all the notices that refer to this License, so that they refer to the ordinary GNU
General Public License, versio
than version 2 of the ordinary GNU General Public License has appeared, then
you can specify that version instead if you wish.) Do not make any other change
in these notices.
Once this change is made in a given copy, it is irreversible for that copy, so the
ordinary GNU General Public License applies to all subsequent copies and derivative works made from that copy.
This option is useful when you wish to copy part of the code of the Library into
a program
4. You may copy and distribute the Library (or a portion or derivative of it, under Section 2) in object code or executable form under the terms of Sections 1
and 2 above provided that you accompany it with the complete corresponding
machine-readable source code, which must be distributed under the terms of
Sections 1 and 2 above on a medium customarily used for software interchange.
If distribution of object code is made by offering access to copy from a desig-
ated place, then offering equivalent access to copy the source code from the
n
Appendix
same place satisfies the requirement to distribute the source code, even though
third parties are not compelled to copy the source along with the object code.
5. A program that contains no derivative of any portion of the Library, but is
designed to work with the Library by being compiled or linked with it, is called a
"work that uses the Library". Such a work, in isolation, is not a derivative work of
the Library, and therefore falls ou
However, linking a "work that uses the Library" with the Library creates an executable that is a derivative of the Library (because it contains portions of the Library), rather than a "work that uses the library". The executable is therefore
covered by this License. Section 6 states terms for distribution of such executables.
When a "work that uses the Library" uses material from a header fi le that is
part of the Library, the object code for the work may be a derivative work of the
Library even though the source code is not. Whether this is t rue is especially significant if the work can be linked without the Library, o r if the work is itself a library. The threshold for this to be true is not precisely defined by law.
If such an object file uses only numerical parameters, data structure layouts
and accessors, and small macros and small inline functions (ten lines or less in
length), then the use of the object file is unrestricted, regardless of whether it is
legally a derivative work. (Executables c
of the Library will still fall under Section 6.)
Otherwise, if the work is a derivative of the Library, you may distribute the object code for the work under the terms of Section 6. Any executables containing
that work also fall under Section 6, whether or not they are linked directly with
the Library itself.
6. As an exception to the Sect ions above, you may also combine or link a "work
that uses the Library" with the Library to produce a work containing
the Library, and distribute that work under terms of your choice, provided that
the terms permit modification of the work for the customer's own use and reverse engineering for debugging such modifications.
You must give prominent notice with each copy of the work that the Library is
used in it and that the Library and its use are covered by this License. You must
supply a copy of this License. If the work during execution d isplays copyright no-
aggregation of another work not based on the Library with
n 2, instead of to this License. (If a newer version
that is not a library.
tside the scope of this License.
ontaining this object code plus portions
of a whole which is a
portions of
tices, you must include the c
as a reference directing the user to the copy of this License. Also, you must do
one of these things:
a) Accompany the work with the complete corresponding machine-readable
source code for the Library including whatever changes were used in the
work (which must be distributed under Sections 1 and 2 above); and, if the
work is an executable linked with the Library, with the complete machinereadable "work that uses the Library", as object code and/or s
so that the user can modify the Library and then relink to produce a modified executable containing the modified Library. (It is understood that the
user who changes the contents of definitions files in the Library will not
necessarily be able to recompile the application to use the modified definitions.)
b) Use a suitable shared library mechanism for linking with the Library. A suit-
able mechanism is one that (1) uses at run time a copy of the library already
present on t
tions into the executable, and (2) will operate properly with a modified version of the library, if the user installs one, as long as the modified version
is interface-compatible with the version that the work was made with.
c) Accompany the work with a written offer, valid for at least three years, to
give the same user the materials specified in Subsection 6a, above, for a
charge no more than the cost of performing this distribution.
d) If distribu
ignated place, offer equivalent access to copy the above specified materials
from the same place.
e) Verify that the user has already received a copy of these materials or that
you have already sent this user a copy.
For an executable, the required form of the "work that u ses the Library" must
include any data an d utility programs needed for reproducing the executable
from it. However, as a special exception, the materials to be distributed need not
include anythin
with the major components (compiler, kernel, and so on) of the operating system on which the executable runs, unless that component itself accompanies the
executable.
It may happen that this requirement contradicts the license restrictions of other proprietary libraries that do not normally accompany the operating system.
Such a contradiction means you cannot use both them and the Library together
in an executable that you distribute.
may place library facilities that are a work based on the Library side-
7. You
by-side in a single library together with other library facilities not covered by this
License, and distribute such a combined library, provided that the separate distribution of the work based on the Library and of the other library facilities is otherwise permitted, and provided that you do these two things:
a) Accompany the combined library with a copy of the same work based on
the Library, uncombined with any other library facilities. This m
tributed under the terms of the Sections above.
b) Give prominent notice with the combined library of the fact that part of it is
a work based on the Library, and explaining where to find the accompanying uncombined form of the same work.
8. You may not copy, modify, sublicense, link with, or distribute the Library
except as expressly provided under this License. Any attempt otherwise to copy,
modify, sublicense, link with, or distribute the Library is void, and will automatically terminate
ceived copies, or rights, from you under this License will not have their licenses
terminated so long as such parties remain in full compliance.
9. You are not required to accept this License, since you have not signed it.
However, nothing else grants you permission to modify or distribute the Library
or its derivative works. These actions are prohibited by law if you do not accept
this License. Therefore, by modifying or distributing the Library (or any work
based on
the Library), you indicate your acceptance of this License to do so, and
all its terms and conditions for copying, distributing or modifying the Library or
works based on it.
10. Each time you redistribute the Library (or any work based on the Library),
the recipient automatically receives a license from the original licensor to copy,
distribute, link with or modify the Library subject to these terms and conditions.
You may not impose any further restrictions on the recipients' exercise of the
rights granted
parties with this License.
11. If, as a consequence of a co urt judgment or allegation of patent infringement or for any other reason (not limited to patent issues), conditions are imposed on you (whether by court order, agreement or otherwise) that contradict
the conditions of this License, they do not excuse you from the conditions of this
License. If you cannot distribute so as to satisfy simultaneously your obliga
under this License and any other pertinent obligations, then as a consequence
you may not distribute the Library at all. For example, if a patent license would
not permit royalty-free redistribution of the Library by all those who receive copies directly or indirectly through you, then the only way you could satisfy both it
opyright notice for the Library among them, as well
ource code,
he user's computer system, rather than copying library func-
tion of the work is made b y offering access to copy from a des-
g that is normally distributed (in either source or binary form)
ust be dis-
your rights u nder this License. However, parties who have re-
herein. You are not responsible for enforcing compliance by third
tions
58
Page 59

Software License Information
and this License would be to refrain entirely from distribution of the Library.
If any portion of this section is held invalid or unenforceable under any particular circumstance, the balance of the section is intended to apply, and the section as a whole is intended to apply in other circumstances.
It is not the purpose of this section to induce you to infringe any patents or
other property right claims or to contest validity of any such claims; this section
has the sole purpose of pr
system which is implemented by public license practices. Many p eople have
made generous contributions to the wide range of software distributed through
that system in reliance on consistent application of that system; it is up to the
author/donor to decide if he or she is willing to distribute software t hrough any
other system and a licensee cannot impose that choice.
This section is intended to make thoroughly clear what is believed to
sequence of the rest of this License.
12. If the distribution and/or use of the Library is restricted in certain countries
either by patents or by copyrighted interfaces, the original copyright holder who
places the Library under this License may add an explicit geographical distribution limitation excluding those countries, so that distribution is permitted only in
or among countries not thus excluded. In such case, this License incorporat es
the limitation as if written in the body of this
13. The Free Software Foundation may publish revised and/or new versions of
the Lesser General Public License from time to time. Such new versions will be
similar in spirit to the present version, but may differ in detail to address new
problems or concerns.
Each version is given a distinguishing version number. If the Library specifies
a version number of this License which applies to it and "any later version", you
have the option of following the terms and conditions either of that version or of
any later version published
not specify a license version number, you may choose any version ever published by the Free Software Foundation.
14. If you wish to incorporate parts of the Library into other free programs
whose distribution conditions are incompatible with these, write to the author to
ask for permission. For software which is copyrighted by t he Free Software
Foundation, write to the Free Software Foundation; we sometimes make exceptions for this. Our decision will be
status of all derivatives of our free software and of promoting the sharing and
reuse of software generally.
15. BECAUSE THE LIBRARY IS LICENSED FREE OF CHARGE, THERE IS NO
WARRANTY FOR THE LIBRARY, TO THE EXTENT PERMITTED BY APPLICABLE
LAW. EXCEPT WHEN OTHERWISE STATED IN WRITING THE COPYRIGHT
HOLDERS AND/OR OTHER PARTIES PROVIDE THE LIBRARY "AS IS" WITHOUT
WARRANTY OF ANY KIND, EITHER EXPRESSED OR IMPLIED, INCLUDING, BUT
NOT LIMITED TO, THE IMPLIED WARRANTIES OF MERCHANTABILITY AND
FITNESS FOR A PARTICULAR PURPOSE. THE ENTIRE RISK AS TO THE QUALITY AND PERFORMANCE OF THE LIBRARY IS WITH YOU. SHOULD THE LIBRARY PROVE D EFECTIVE, YOU ASSUME THE COST OF ALL NECESSARY
SERVICING, REPAIR OR CORRECTION.
16. IN NO EVENT UNLESS REQUIRED BY APPLICABLE LAW OR AGREED TO
IN WRITING WILL ANY COPYRIGHT HOLDER, OR ANY OTHER PARTY WHO
MAY M
ODIFY AND/OR REDISTRIBUTE THE LIBRARY AS PERMITTED ABOVE,
BE LIABLE TO YOU FOR DAMAGES, INCLUDING ANY GENERAL, SPECIAL, INCIDENTAL OR CONSEQUENTIAL DAMAGES ARISING OUT OF T HE USE OR INABILITY TO USE THE LIBRARY (INCLUDING BUT NOT LIMITED TO LOSS OF
DATA OR DATA BEING RENDERED INACCURATE OR LOSSES SUSTAINED BY
YOU OR THIRD PARTIES OR A FAILURE OF THE LIBRARY TO OPERATE WITH
ANY OTHER SOFTWARE), EVEN IF SUCH HOLDER OR OTHE
BEEN ADVISED OF THE POSSIBILITY OF SUCH DAMAGES.
otecting the integrity of the free software distribution
be a con-
License.
by the Free Software Foundation. If the Library does
guided by the two goals of preserving the free
NO WARRANTY
R PARTY HAS
END OF TERMS AND CONDITIONS
How to Apply These Terms to Your New Libraries
If you develop a new library, and you want it to be of the greatest possible use
to the public, we recommend making it free software that everyone can redistribute and change. You can do so by permitting redistribution under these terms
(or, alternatively, under the terms of the ordinary General Public License).
To apply these terms, attach the following notices to
attach them to the start of each source file to most effectively convey the exclusion of warranty; and each fi le should have at least the "copyright" line and a
pointer to where the full notice is found.
<one line to give the library's name and a brief idea of what it does.>
Copyright© <year> <name of author>
This library is free software; you can redistribute it and/or modify it under the
terms of the GNU Lesser General Public L icense as published by the Free Soft-
ware Foundation
version.
This library is distributed in the hope that it will be useful, but WITHOUT ANY
WARRANTY; without even the implied warranty of MERCHANTABILITY or FI T-
NESS FOR A PARTICULAR PURPOSE. See the GNU Lesser General Public Li-
cense for more details.
You should have received a copy of the GNU Lesser General Public License
along with this library; if not, write to the Free Software Foundation, Inc., 51
Franklin St, Fifth Floor, Boston,
Also add information on how to contact you by electronic and paper mail.
You should also get your employer (if you work as a programmer) or your
school, if any, to sign a "copyright disclaimer" for the library, if necessary. Here
is a sample; alter the names:
Yoyodyne, Inc., hereby disclaims all copyright interest in the library `Frob' (a
library for tweaking knobs) written by James Random Hacker.
<signature of Ty Coon>, 1 April 1990
Ty Coon, President of Vice
That's all there is to it!
; either version 2.1 of the License, or (at your option) any later
MA 02110-1301 USA
the library. It is safest to
Appendix
Page 60

Main Specications
Image Sensor
Lens F1.4- 4.0 f=4.4-110mm, 25x
Video Signal Formats
Zoom Optical 25x, combined with digital 300x
Closest shooting distance 10mm (Wide end), 1500mm (Tele end)
Horizontal Angle of View Approx. 62° at Wide end to 2.8° at Tele end
Minimum Subject Luminance
Shutter Speed
Pan & Tilt Functions
Video OUT Terminals
Appendix
Serial control terminal
Input Voltage DC 12V (DC 11.4 to 12.6V)
Current Consumption
(at DC12V)
Allowable Operating Temp (Humid)
Allowable Storage Temp (Humid)
Dimensions (W×H×D)
(Incl. protruding parts)
Weight
1/2.8 type CMOS sensor
Effective pixels: Approx. 2 megapixel
Switched via the Video Select switch
1080p/59.94*, 1080p /50*,
1080p/29.97, 1080p/25,
1080i/59.94, 1080i/50,
720p/59.94, 720p/50,
Serial control
*VZ-HD4900A
Auto 5 lux (electronic shutter 1/30)
1/15 to 1/10000 sec.
(at 1080p/59.94, 1080p/29.97, 1080i/59.94,
720p/59.94)
1/12 to 1/10000 sec.
(at 1080p/50, 1080p/25, 1080i/50, 720p/50 )
Horizontal ± 175°
Vertical -30° to+90° (Desktop Installation)
-90° to+30° (Ceiling Installation)
VZ-HD4000A: HD-SDI terminal ×1,
VZ-HD4900A: DVI-I terminal ×1,
3G-SDI terminal ×1
RS-232C: 8 -pin miniDIN terminal (IN × 1, OUT × 1)
RS-422: connect terminal block, 9 pin
2.5A (max)
1.0A (when pan/tilt stopped)
0 to 40°C (10 to 85%) , no condensation
- 20 to + 60°C (10 to 85%)
Approx. 198 × 161 × 132mm (Desktop Installation)
Approx. 198 × 177 × 132mm (Ceiling Installation)
Approx. 1.9kg (Desktop Installation)
Approx. 2.4kg (Ceiling Installation)
* In the interest of improving performance, the specications of these
devices are subject to change without notice.
60
Page 61

Dimensional Drawing
Top
Desktop Installation
Front
Base
4-M3
Ø5
1/4-20UNC
Side
Appendix
Unit: mm
Page 62

Dimensional Drawing
Ceiling Installation
Base
Front
4-Ø5.6 hole
Side
Appendix
62
Bottom
Unit: mm
Page 63

VIDEO OUT (DVI-I) terminal
DVI-I
(DVI 29 pin)
VZ-HD4900A
Pin No Function
1 TMDS Data 2–
2 TMDS Data 2+
3
4
5
6 DDC clock
7 DDC data
8
9 TMDS Data 1–
10 TMDS Data 1+
11
12
13
14 +5V
15 GND
16 Hot Plug Detect
17 TMDS data 0–
TMDS Data 2/4
shield
TMDS Data 4–
(Not used)
TMDS Data 4+
(Not used)
Analog Vertical
Sync
TMDS Data 1/3
shield
TMDS Data 3–
(Not used)
TMDS Data 3+
(Not used)
Pin No Function
18 TMDS data 0+
19
20
21
22 TMDS clock shield
23 TMDS clock+
24 TMDS clock–
C1 Analog Red/Pr *
C2 Analog Green/Y *
C3 Analog Blue/Pb *
C4
C5 Analog GND
* The analog video signal of pins
C1, C2 and C3 can be switched
via Color System from Menu
Initial Setup. (P. 46)
TMDS data 0/5
shield
TMDS data 5–
(Not used)
TMDS data 5+
(Not used)
Analog Horizontal
Sync
Appendix
Page 64

RS-232C IN terminal
IN
OUT
1 2 3 4 5 6 7 8 9
RS-422
RS-422 terminal
(8 -pin mini DIN, female)
Pin No Function
1 DTR IN
2 DSR IN
3 TxD IN
4 GND
5 RxD IN
6 GND
7 IR OUT *
8 Not used
* IR OUT of pin 7 can be switched
with the System Select switch.
(P. 15)
RS-232C OUT terminal
Appendix
(8 -pin mini DIN, female)
(connect terminal block, 9 pin)
Pin No Function
1 RxD OUT–
2 R x D O UT+
3 TxD OUT–
4 Tx D O UT+
5 GND
6 RxD IN–
7 RxD IN+
8 TxD IN –
9 TxD IN+
Pin No Function
1 DTR OUT
2 DSR OUT
3 TxD OUT
4 GND
5 RxD OUT
6 GND
7 Not used
8 Not used
64
Page 65

RS-422 Connection Wiring Diagram
External device terminal
TxD OUT+
TxD OUT–
RxD OUT+
RxD OUT–
GND
Camera1 RS-422 terminal
9 TxD IN+
8 TxD IN–
7RxD IN+
6RxD IN–
5GND
4 TxD OUT+
3 TxD OUT–
2RxD OUT+
1RxD OUT–
Camera2 RS-422 terminal
9 TxD IN+
8 TxD IN–
7RxD IN+
6RxD IN–
5GND
4 TxD OUT+
3 TxD OUT–
2RxD OUT+
1RxD OUT–
RS- 422 terminal of
Camera3 & thereafter
9 TxD IN+
8 TxD IN–
7RxD IN+
6RxD IN–
5GND
4 TxD OUT+
3 TxD OUT–
2RxD OUT+
1RxD OUT–
Appendix
Page 66

Using RS-422 terminal
block connectors
1 Insert the wire (AWG 28-18) into
the hole you wish to connect
and tighten the corresponding
screw with a slotted screwdriver.
When Unplugging
Connector Plugs
Grasp both ends of the RS-422
terminal block connector plug and
unplug it as shown in the diagram.
1 2 3 4 5 6 7 8
Slotted screwdriver
Wire (AWG 28-18)
2 Plug the RS-422 terminal block
connector into the RS-422
Appendix
terminal.
1 2 3 4 5 6 7 8
RS-422
RS-422
9
Caution
In order to stabilize the voltage
level of signals, cross ground
them.
When connecting via RS- 422,
connections via RS-232C
cannot be made.
9
66
Page 67

HITACHI
LIMITED WARRANTY
HD Color Video Camera Products
Limited Warranty
(VALID IN THE UNITED STATES AND PUERTO RICO ONLY.)
LIMITED WARRANTY TERMS AND CONDITIONS.
Subject to the conditions and limitations set forth below, this HITACHI® HD Color Video Camera
product (the “Product”) is warranted to be free from defects in materials and workmanship for a period
of 1 year starting from the original date of purchase (the “Limited Warranty Period”) by the original
purchaser (“Purchaser”). During the Limited Warranty Period, if the Product does not work properly
due to a defect in materials or workmanship, Hitachi will, at Hitachi’s option, either: (i) repair the
Product with new or refurbished parts, or (ii) replace the Product with a new or refurbished product with
equal or greater features and functions as the Product. If Purchaser rejects, refuses or otherwise does not
accept Hitachi’s repair or replacement oer, this Limited Warranty shall be void and of no further force
or eect. is Limited Warranty extends to the Purchaser only and is not transferable. To qualify for
coverage under this Limited Warranty, purchaser must notify Hitachi of a warranty claim during the
Limited Warranty Period by calling 800-HITACHI and must provide a dated sales receipt for the
Product.
PARTS AND LABOR: ere will be no charge for any replacement parts or labor required to correct a
qualifying defect that arises during the Limited Warranty Period. Any replacement part used to repair
the Product may be, at Hitachi’s option, a new or refurbished part, and such replacement part will be
warranted only for 90 days or the remainder of the original 1-year Limited Warranty Period, whichever
is later.
SERVICE LOCATIONS AND RETURNS: Products must be transported or shipped to a Hitachidesignated service center (call 800-HITACHI for more information). Hitachi will not be responsible for
any costs of transporting or shipping the Product to Hitachi-designated service center, but Hitachi will
be responsible for the cost of return-shipping repaired or replacement Products to Purchaser. Purchaser
must obtain pre authorization from Hitachi before shipping any Product to Hitachi for repair or
replacement, and Purchaser must ship the Product with all shipping charges prepaid using the
NOT VALID IN CANADA
Product’s original box and packaging, including all original parts, written materials and accessories.
U.S.A. ONLY
HITACHI AMERICA, LTD.
DIGITAL MEDIA DIVISION
PO BOX 99652
TROY, MI 48099
U.S.A Tel: 1-800-HITACHI
Page 68

HITACHI HD Color Video Camera WARRANTY pg 2
WARRANTY LIMITATIONS: is Hitachi Limited Warranty does not cover: (a) any
Product that has been modied or repaired in a manner not previously authorized by
Hitachi in writing; (b) any Product whose serial number (if any) has been removed, altered,
replaced, defaced or rendered illegible; (c) any defect, malfunction, or failure caused by or
resulting from non-authorized service, maintenance, repair or part replacements; (d)
damage resulting from abuse, misuse, mishandling, neglect or damage caused by exposure
to hostile or unstable operating environments, such as areas containing dust and/or smoke,
or in any manner other than those identied as acceptable in the Product’s User's Manual;
(e) damage caused by power surges, accidents, natural disasters/occurrences or any other
events or circumstances outside Hitachi’s control; (f) any Product used in any manner
inconsistent with the safe and proper set-up, usage and installation requirements and
congurations identied in the Product’s User's Manual; (g) improper opening, tampering
with, or modication of the Product or any Purchaser misadjustments of user-operated
controls; (h) any obligation related to the removal of Product from a custom cabinet or
other specialized product installation; (i) product knobs, buttons, switches, batteries or
accessories; (j) damage caused by cleaning Product in any manner other than as specied in
the Product’s User's Manual; (k) normal usage or ordinary wear and tear, including,
without limitation, scratches or marks on the Product’s exterior, including the camera lens
or monitor screen; (l) any damage to a Product returned to Hitachi or any Hitachidesignated facility for repair or replacement that is attributable to improper packaging,
mishandling or shipping by Purchaser; (m) any Product purchased or serviced outside the
United States (including Puerto Rico); or (n) any Product purchased in non-new or nonfactory-sealed condition, such as in “AS IS”, “refurbished”, “reconditioned”, or “previously
owned” condition or any other similar condition. NO PERSON, AGENT, DISTRIBUTOR,
DEALER, SERVICE FACILITY, OR COMPANY IS AUTHORIZED TO CHANGE,
MODIFY OR AMEND THE TERMS OF THIS LIMITED WARRANTY IN ANY
MANNER WHATSOEVER. EXCEPT AS PROVIDED IN THIS LIMITED WARRANTY,
HITACHI MAKES NO EXPRESS WARRANTY REGARDING THE PRODUCT.
FURTHER, ALL IMPLIED WARRANTIES RELATING TO ANY PORTION OF THE
PRODUCT, INCLUDING, WITHOUT LIMITATION, ANY WARRANTY OF
MERCHANTABILITY OR FITNESS FOR A PARTICULAR PURPOSE, ARE HEREBY
EXPRESSLY DISCLAIMED BY HITACHI TO THE MAXIMUM EXTENT PERMITTED
BY APPLICABLE LAW. HITACHI SHALL NOT BE LIABLE TO PURCHASER OR TO
ANY OTHER PERSON FOR ANY INDIRECT, INCIDENTAL OR CONSEQUENTIAL
DAMAGES OR FOR ANY LOSS OF PROFIT, LOSS OF DATA, OR DAMAGE TO THE
PRODUCT THAT IS ALLEGED TO HAVE RESULTED FROM ANY DEFECT IN, OR
MALFUNCTION OR FAILURE OF, THE PRODUCT. BECAUSE SOME STATES DO
NOT ALLOW LIMITATIONS ON HOW LONG AN IMPLIED WARRANTY LASTS
AND/OR THE EXCLUSION OF INDIRECT, INCIDENTAL OR CONSEQUENTIAL
DAMAGES, THE ABOVE LIMITATIONS MAY NOT APPLY TO EVERY PURCHASER.
THIS LIMITED WARRANTY CONFERS SPECIFIC LEGAL RIGHTS, INCLUDING
CERTAIN OTHER RIGHTS THAT MAY VARY DEPENDING ON PURCHASER’S
JURISDICTION. THIS LIMITED WARRANTY SHALL BE GOVERNED BY AND
CONSTRUED IN ACCORDANCE WITH THE LAWS OF THE STATE OF
PURCHASER’S RESIDENCE. FOR QUESTIONS ABOUT THE PRODUCT OR THIS
LIMITED WARRANTY, PLEASE CALL 800.HITACHI.
68
Page 69

Page 70

70
Page 71

Page 72

QR85801 ©Hitachi Industry & Control Solutions, Ltd. 2015 Printed in Japan (I)
 Loading...