

Page 1

LED LCD HDTV
OWNER’S GUIDE
For Model:
VZ506100
Page 2

Page 3
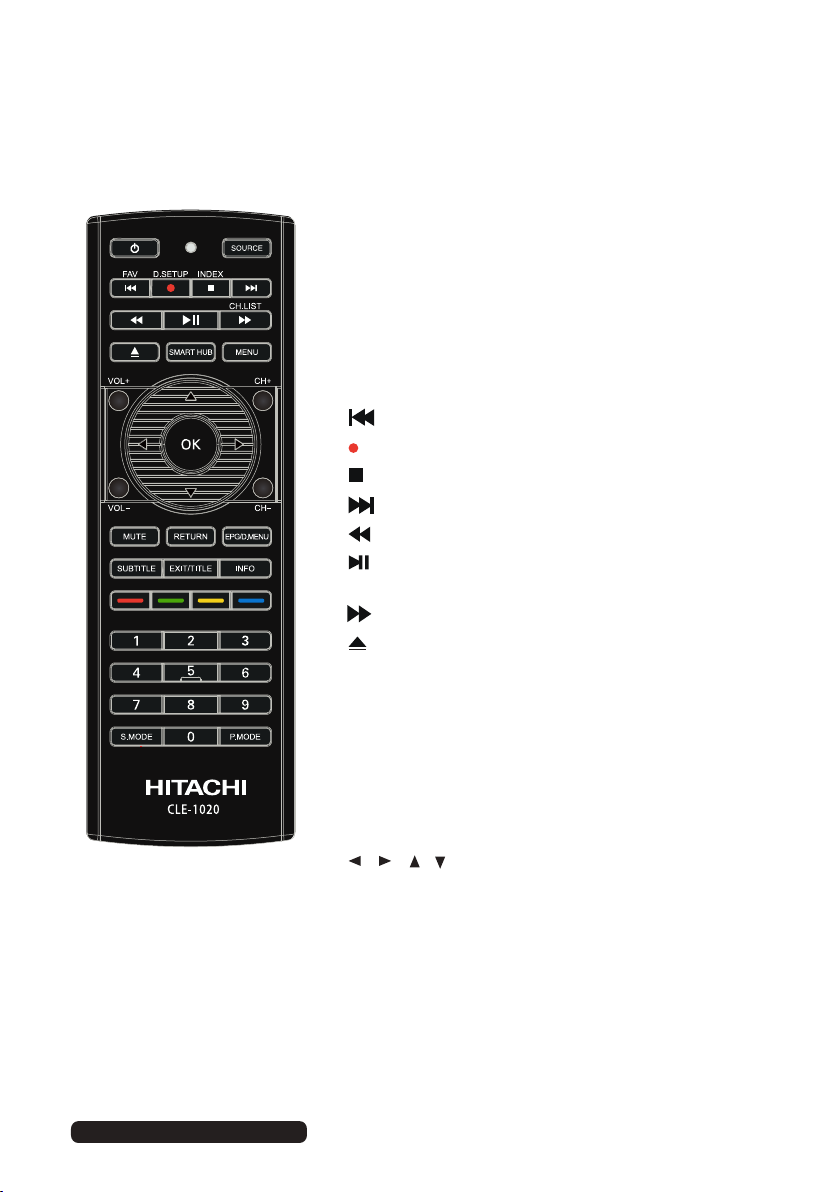
Remote Control
POWER: Set the unit in standby mode;
press it again to switch it on.
SOURCE: Switch the input source.
FAV: Press to display your favourite
channel in DTV mode.
D-SETUP:
INDEX:
CH. LIST :
: Play the previous file.
: Stop playback in TIMESHIFT and MEDIA modes.
: Play next file.
: Move fast backward
: PLAY/PAUSE in TIMESHIFT and MEDIA
modes.
: Move fast forward.
: Open or close the disc compartment
(DVD).
Display the main disc menu (DVD).
Access the list of recorded programs
Access the channel list.
Record program in DTV mode. RECORD:
.
After Sales Support
Telephone: 1300 886 649
Email: info@tempoaustralia.com.au
SMART HUB:
MENU: Display the main TV menu.
VOL +/-: Turn the volume up/down.
CH+/-: Press to play the next or pr evious
channel; press repeatedly to scan
through the channels.
Access the smart hub page.
/ / / : Press the UP/DOWN/
RIGHT/LEFT buttons to navigate
the on-screen menus and adjust the
system settings to your preference.
ii
Page 4
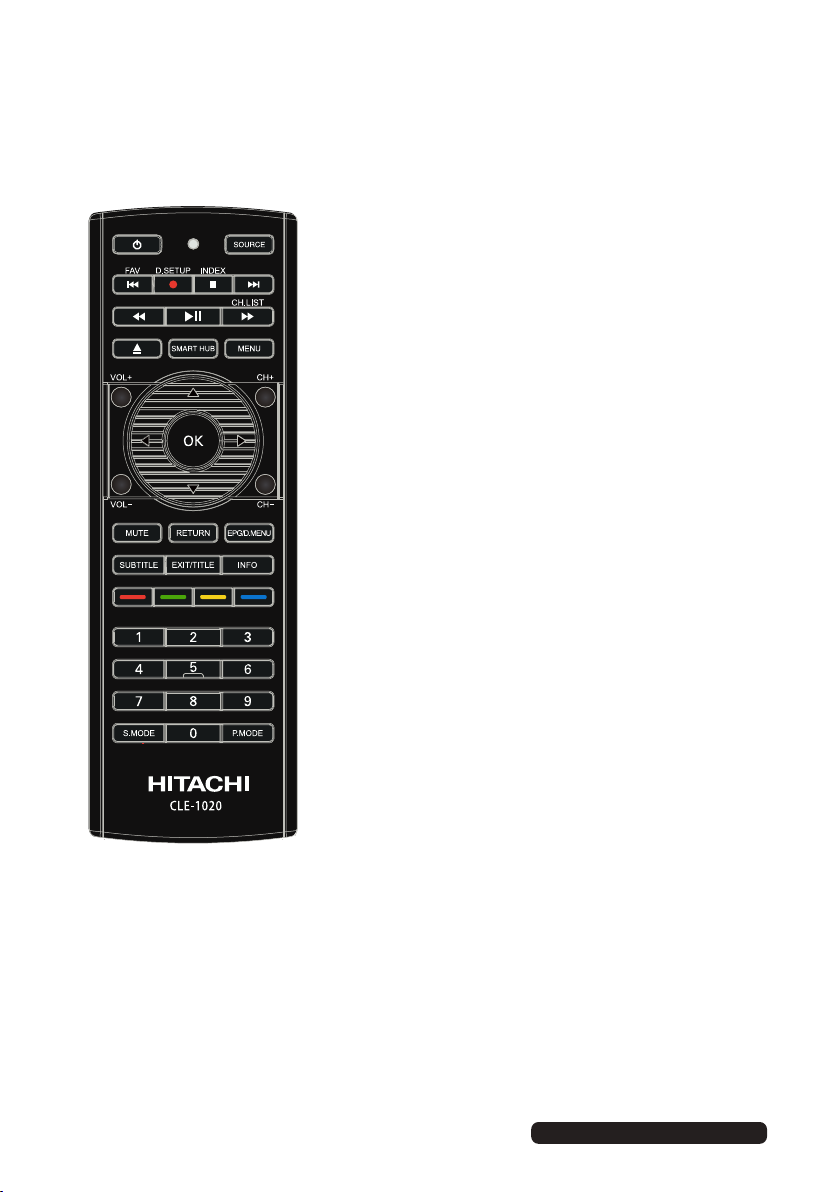
Remote Control
OK: Confirm selection.
MUTE: Mute the sound. Press again
ess V+ to restore the sound.or pr
RETURN:
EPG: Launch the Electronic Program
Guide (DTV)
D.MENU: ~ Display the main disc menu.
SUBTITLE: Enable/disable subtitles.
EXIT: Exit from the main TV menu displayed
on the screen.
TITLE: Display the DVD title menu (DVD).
INFO: Display information of the
current program.
NUMBER BUTTONS (0-9): Press
to select a TV channel directly when
watching TV. The channel changes
after 2 seconds.
Go back to previous page.
iii
COLOR BUTTON
to execute different functions according to
current prompt under FreeviewPlus app menu.
S.MODE: Cycle through the different
sound modes
PMODE: Cycle through the different
picture modes.
: Red, Green, Yellow, Blue keys
NOTE: DVD related functions are not available in VZ506100.
After Sales Support
Telephone: 1300 886 649
Email: info@tempoaustralia.com.au
Page 5
Remote Control
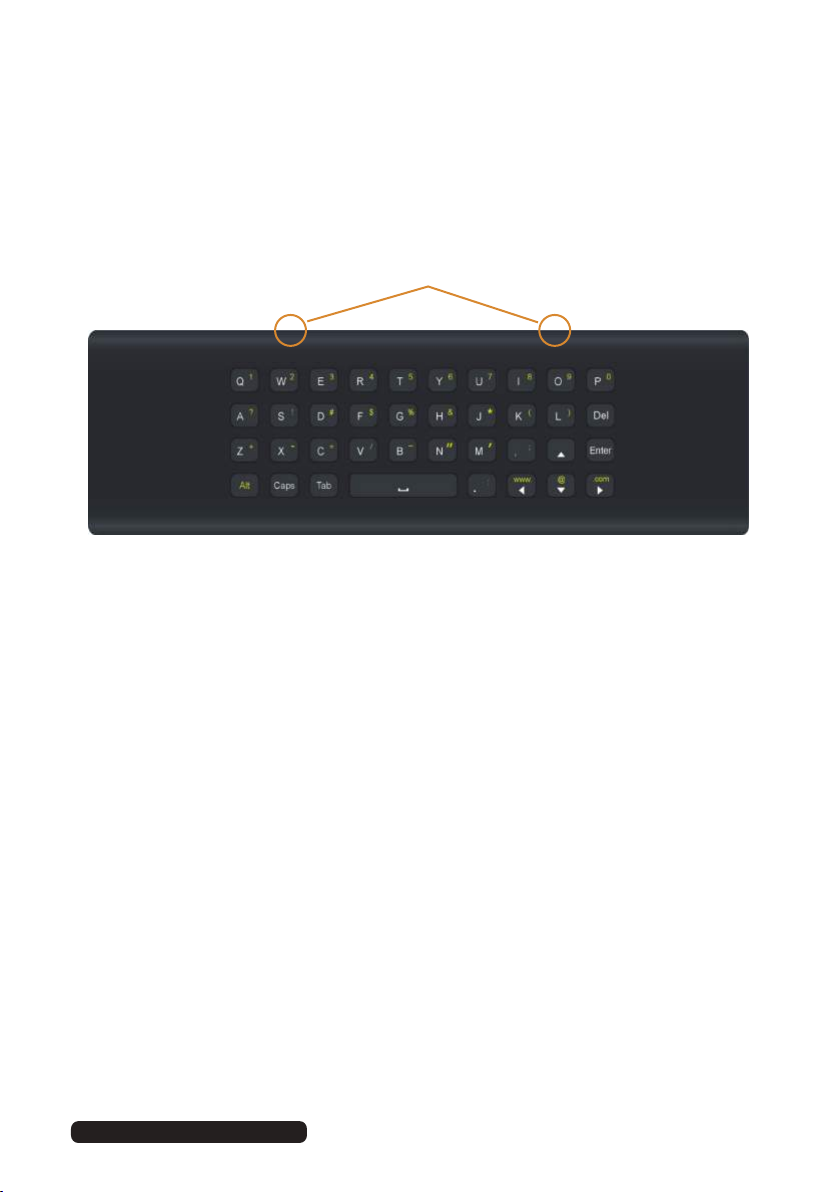
There is a built-in keyboard on Remote back for your easy operation
(for Smart Hub).
IR sensors
Tips:
• When using the QWERTY keyboard, do not cover the area where the IR
sensors are maked above.
• To enter UPPERCASE letters, press the ‘Caps’ button first.
• To enter numbers and characters shown on the keys in yellow, press the
‘Alt’ button first, followed by the chosen letter button.
• The ‘Del’ button on the keyboard performs the backspace function.
• As an alternative to the keyboard, you can use the on screen keyboard.
After Sales Support
Telephone: 1300 886 649
Email: info@tempoaustralia.com.au
iv
Page 6
After Sales Support
Telephone:
1300 886 649
Email: info@tempoaustralia.com.au
Remote Control (Cont.)
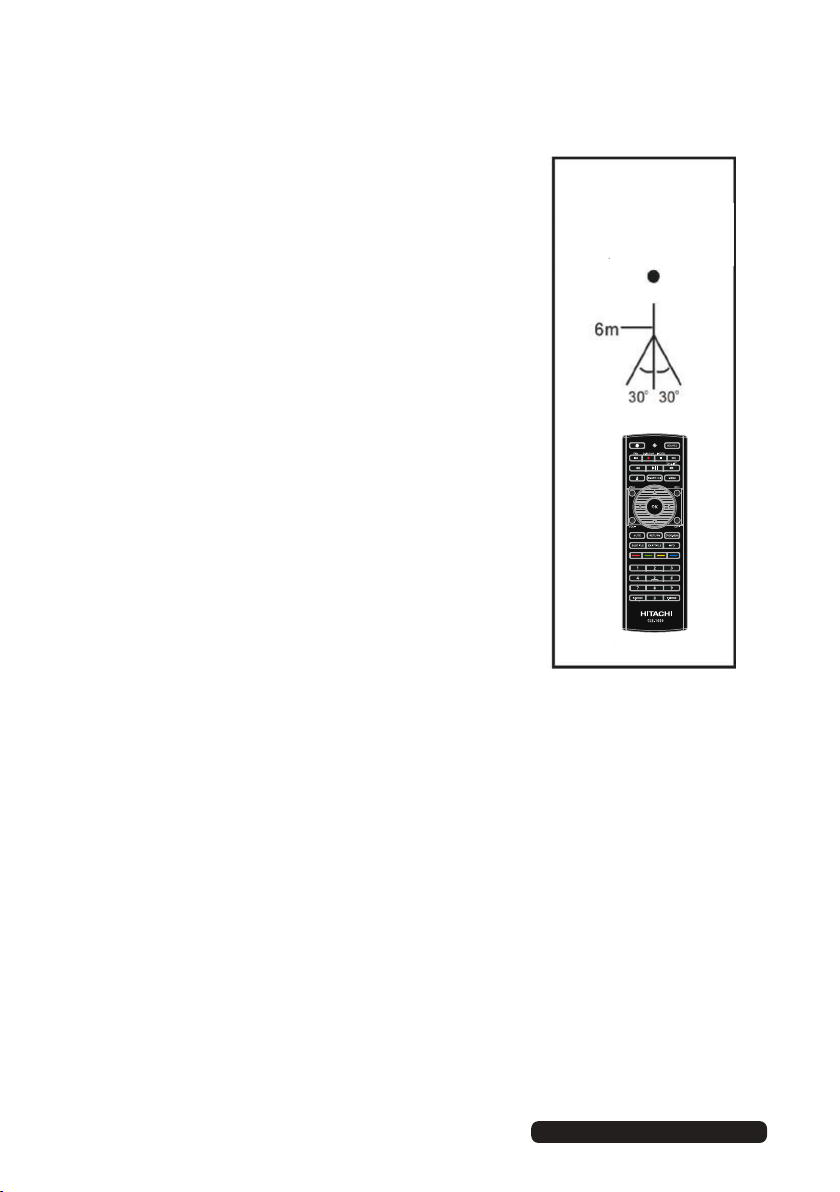
Using the remote control
To use the remote control, point it towards the
remote sensor at the front of the television.
The remote control has a range of up to
approximately six metres (6m) from the TV at an
angle of up to 30 degrees each to the right and
left of the sensor, as illustrated on the right.
The remote control will not operate if its path is
blocked.
NOTES:
• Do not drop, step on or otherwise impact the
remote control. This may damage the parts or
lead to malfunction
• The operating distance may vary according to
the brightness of the room.
• Do not point bright light at the remote control
sensor.
• Do not place objects between the remote
control and the remote control sensor.
• Do not use this remote control while
simultaneously operating a remote control of
other devices.
Remote Control
Sensor
v
Page 7

After Sales Support
Telephone:
1300 886 649
Email: info@tempoaustralia.com.au
Welcome
Congratulations on choosing to buy a HITACHI product. All products
brought to you by HITACHI are manufactured to the highest standards of
performance and safety and, as part of our philosophy of customer service
and satisfaction, are backed by our comprehensive 2 Year Warranty.
We hope you will enjoy using your purchase for many years to come.
vi
Page 8

After Sales Support
Telephone:
1300 886 649
Email: info@tempoaustralia.com.au
Contents
Remote Control ii
Welcome vi
General Safety Instructions 1
Installation
Controls and Connections 7
Getting Started 15
Basic Operations 19
Electronic Program Guide (EPG) 21
Recording 22
Media Mode 28
Menus 32
FAQs 51
Specifications 54
Warranty 55
5
25Smart Hub
5Maintenance and Recycling 3
vii
Page 9
After Sales Support
Telephone:
1300 886 649
Email: info@tempoaustralia.com.au
General Safety Instructions
Read this manual thoroughly before first use and keep it in a safe place for
future reference, along with the completed warranty card, purchase receipt
and carton. The safety precautions enclosed herein reduce the risk of fire,
electric shock and injury when correctly adhered to.
Follow all instructions and take notice of all the warnings.
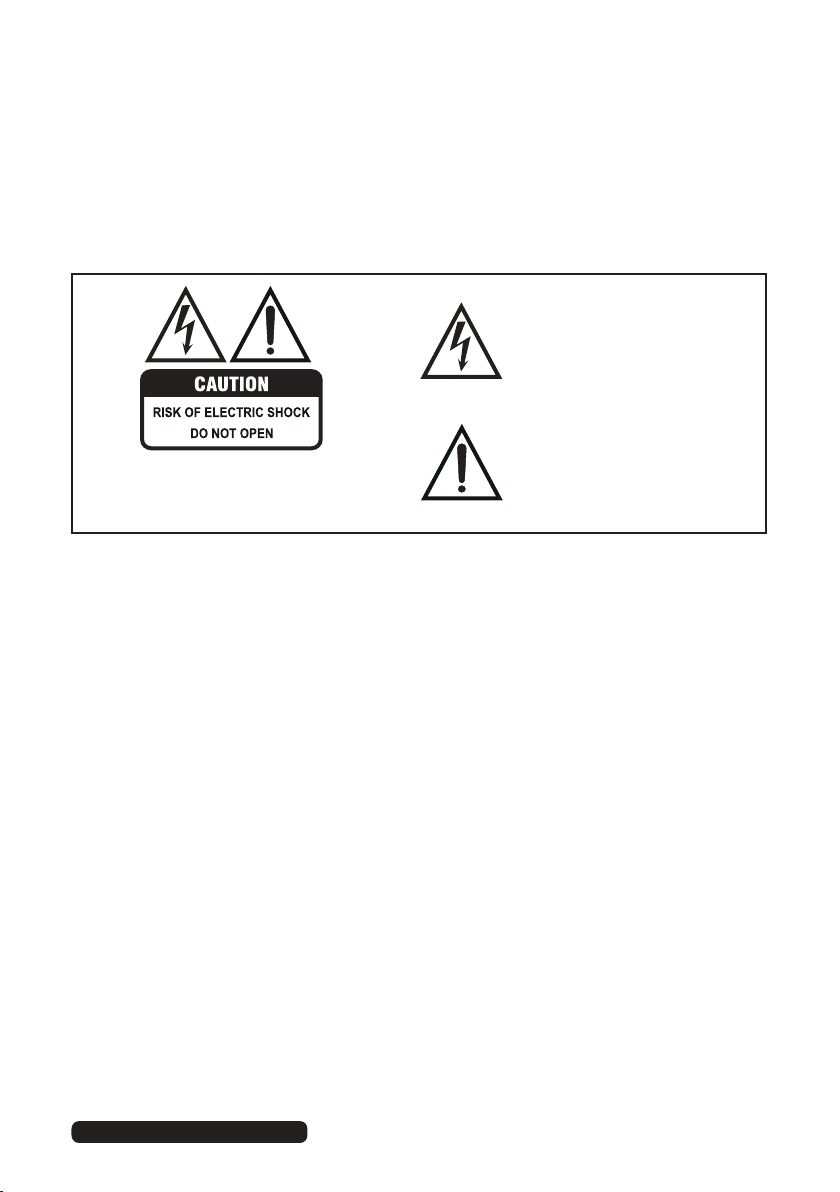
The lightning flash with an arrowhead
symbol within an equilateral triangle is
intended to alert you to the presence
of non-insulated dangerous voltage
within the product’s enclosure that
may be of sufficient magnitude to
constitute a risk of electric shock to
persons.
The exclamation point within an equi-
To reduce the risk of electric shock, do not remove
the cover (or back).
This unit contains no user-serviceable parts inside.
Refer all servicing to qualified service personnel only.
IMPORTANT WARNINGS AND CAUTIONS!
• Only connect this TV to a mains socket with a protective earthing connection.
• To prevent damage which may result in fire or an electric shock hazard, do not
expose this appliance to rain or moisture.
• Do not change or modify the appliance in any way.
• Only use the attachments/accessories specified by the manufacturer.
lateral triangle is intended to alert you
to the presence of important operating
and maintenance (servicing) instructions in the literature accompanying
the product.
IMPORTANT INFORMATION
•
If a television is not positioned in a sufficiently stable location, it can be
potentially hazardous du e to falling
can be avoided by
•
Using cabinets or stands recommended by the manufacturer of the television.
•
Only using furniture that can safely support the television.
•
Ensuring the television is not overhanging the edge of the supporting furniture.
•
Not placing the television on tall furniture (for example, cupboards or
bookcases) without anchoring both the furniture and the television to a
suitable support.
Not standing the televisions on cloth or other materials placed between the
•
television and supporting furniture.
Educating children about the dangers of climbing on furniture to reach the
•
television or its controls.
taking simple precautions such as:
. Many injuries, particularly to children,
1
Page 10

After Sales Support
Telephone:
1300 886 649
Email: info@tempoaustralia.com.au
General Safety Instructions (Cont.)
Installation
• Follow instructions: Only install this TV set in accordance with the
instructions in this manual. If a television is not positioned in a sufficiently
stable location, it can be potentially hazardous due to falling and causing
injury, particularly to children.
• This TV is equipped with standard wall-mounting points, and we recommend
that a wall bracket be installed between the TV and the wall to prevent
the TV from falling from a cabinet. (The bracket is not included.)
• To prevent injuries from your television falling, take a few simple precautions:
• Do not place the TV on tall furniture (e.g., on a cupboard or bookcase)
without anchoring both the furniture and the TV to a suitable support.
• Only use furniture that can safely support the television.
• Ensure the TV is not overhanging the edge of the supporting furniture.
• Educate children about the dangers of climbing on furniture to reach TV
controls.
• Do not place the TV on cloth or other materials.
• When deciding on where to put the TV set, make sure the place is:
• Well ventilated, and away from damp and cold.
• Protected from overheating and away from direct sunlight.
• Away from moisture drips or splashes.
• Protected from excessive dust or grease.
• Bookcase: Do not install this equipment in a confined space such as a
bookcase or similar unit.
• Heat: Do not install the TV set near heat sources such as radiators, stoves
or other audio visual equipment (including amplifiers) that produce heat.
• Water: Do not place containers with liquids (such as vases) or with small
metallic objects on top of the unit. If liquid enters the unit or any metal
object falls into the unit, it may result in short-circuit, fire or electric shock.
• Fire or explosion: Do not use or store flammable or combustible materials
near the unit. Doing so may result in fire or explosion. Do not place any
naked flame sources, such as lit candles, cigarettes or incense sticks on
top of the TV set.
Warning: To prevent the spread of fire, keep candles or other open
flames away from this product at all times.
• Antenna: Install the antenna away from high-voltage power lines and
communication cables and make sure it is installed securely. If the antenna
touches a power line, contact with the antenna could result in fire, electric
shock or serious injury.
• Ventilation: Install the unit at an adequate distance from the wall to ensure
sufficient ventilation. If the temperature inside the unit rises, it may result in fire.
2
Page 11

After Sales Support
Telephone:
1300 886 649
Email: info@tempoaustralia.com.au
General Safety Instructions (Cont.)
Electrical safety and cord handling
• Voltage: Before installing this TV set, make sure your outlet voltage
corresponds to the voltage stated on the appliance rating label.
• Protect from moisture: To reduce the risk of fire or electric shock, do
not expose this appliance to rain or moisture; do not use it anywhere near
water; do not touch the power plug with wet hands.
• Damage: Do not use a damaged power cord, plug or loose outlet. Doing so
may cause an electric shock.
• Power outlet: Do not plug several devices into the same outlet. Doing so
may cause the outlet to overheat and start a fire. Make sure the outlet is
readily accessible during operation of the equipment.
• Power plug: Make sure the plug is properly installed before inserting it fully
into the outlet. A loose or improperly inserted power plug may cause a fire.
Warning: The mains plug/appliance coupler is used as disconnect device,
the disconnect device shall remain readily operable.
• Protect the cord: Do not bend, twist or kink the power cord excessively.
Do not allow anything to rest on or roll over the power cord and antenna
cable. Doing so may cause a fire or an electric shock. Do not run the power
cord near heat-producing appliances such as radiators, stoves or irons. The
excessive heat could melt the insulation and expose live wires, resulting in
fire or electric shock.
• Disconnect: Always grasp the plug when disconnecting the power cord.
Pulling the cord can damage the internal wire and may cause a fire.
• Lightning storms: Unplug this TV during lightning storms or when unused
for long periods of time. Not doing so may result in fire or electric shock.
Usage conditions and restrictions
• Adjustments: Follow the instructions in this manual when installing and
adjusting the TV set. Only adjust those controls that are covered in this
manual, as improper adjustment of other controls may result in damage.
If this happens, unplug the TV set and have it serviced by appropriately
qualified personnel, or phone the after sales support line for advice.
• Ventilation: Do not cover the ventilation openings with items such as
newspapers, tablecloths, curtains etc. as this could impede ventilation.
• Cabinet slots: Do not insert objects of any kind into this unit through the
cabinet slots, as they could touch the current-carrying parts or short-circuit
parts, resulting in fire, electric shock or damage to the unit.
• Smoke or odour: If you notice any unusual odours or smoke around
the unit, immediately disconnect the unit from the outlet and contact the
service centre. Failure to do so may result in fire or electric shock.
3
Page 12

After Sales Support
Telephone:
1300 886 649
Email: info@tempoaustralia.com.au
General Safety Instructions (Cont.)
• When not in use: When not using the unit for long periods of time,
disconnect the power cord from the wall outlet. Dust could accumulate
over time on the unit and cause it to generate heat and ignite, or deteriorate
insulation, which in turn may result in an electrical fire.
• Moving: When moving the unit, be sure to turn it off and unplug it from the
wall outlet. Moving the unit with the power cord connected to the outlet
may cause damage to the cord, resulting in fire or electric shock.
• Batteries: When removing the batteries from the remote control, make sure
to keep them out of reach of infants and children. Seek medical attention
immediately if a child has swallowed a battery.
Warning: The battery (battery or batteries or battery pack) shall not be
exposed to excessive heat such as sunshine, fire or the like.
• Usage restriction: This product is not intended for use by persons (including
children) with reduced physical, sensory or mental capabilities, or lack of experience and knowledge, unless they have been given supervision or instructions concerning use of the product by a person responsible for their safety.
• Children: Supervise young children to ensure they do not play with the TV.
Cleaning and maintenance
• Unplug: To reduce the risk of fire and electric shock, always unplug the TV
before cleaning.
• Cleaning: Only use a soft, dry cloth for cleaning the TV; do not use a damp
cloth. Never clean with industrial strength polish, wax, benzene, paint
thinner, air freshener, lubricant, detergent or other chemicals. Wipe off any
moisture, dirt or dust on the power plug pins with a clean, dry cloth.
• Repair: If the unit requires repair, contact the after sales support line; never
disassemble or modify the unit or attempt to service it yourself.
• Service: Refer all servicing to qualified service personnel. Servicing is
required when the TV has been damaged in any way, such as when the
power supply cord or plug is damaged, liquid has been spilled or objects
have fallen into the TV, when the TV has been exposed to rain or moisture,
does not operate normally, or has been dropped.
This equipment is a Class II or double insulated electrical appliance. It has
been designed in such a way that it does not require a safety connection to
electrical earth.
4
Page 13
After Sales Support
Telephone:
1300 886 649
Email: info@tempoaustralia.com.au
Installation
Your TV is packaged with the stand and the cabinet separated. Before using
the TV, install the stand as described below, or if you want to mount it to a
wall, see page 6 for mounting advice; the wall mount itself is not supplied.
IMPORTANT!
• Make sure the TV set is unplugged from the power supply before
installing or removing the stand.
• The TV panel may be awkward to install on your own. We recommend
you ask someone to help with installation and/or removal of the stand.
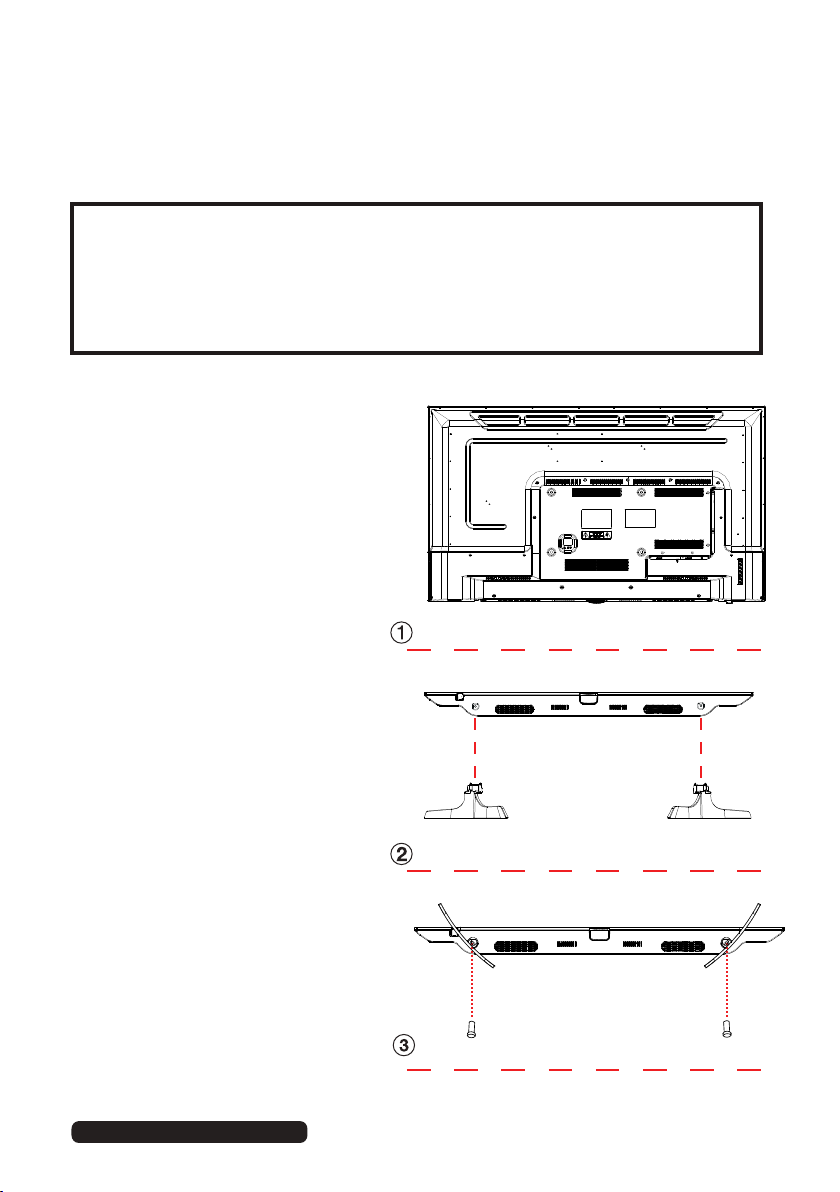
Attaching the stand
Step 1
Place a soft cushioned material
on top of a flat surface to prevent
damaging the screen panel. Then
place the TV monitor flat on top,
with the screen side facing down,
as illustrated on the right (1).
Step 2
Align the screw holes on the
stand and the bottom of the TV,
as illustrated on the right (2).
Step 3
Tighten the screws (supplied) with
a screwdriver to affix the stand
to the panel, as illustrated on the
right (3).
NOTE: Do not apply excessive
force as this may damage the
screw holes.
5
Page 14
Installation (Cont.)
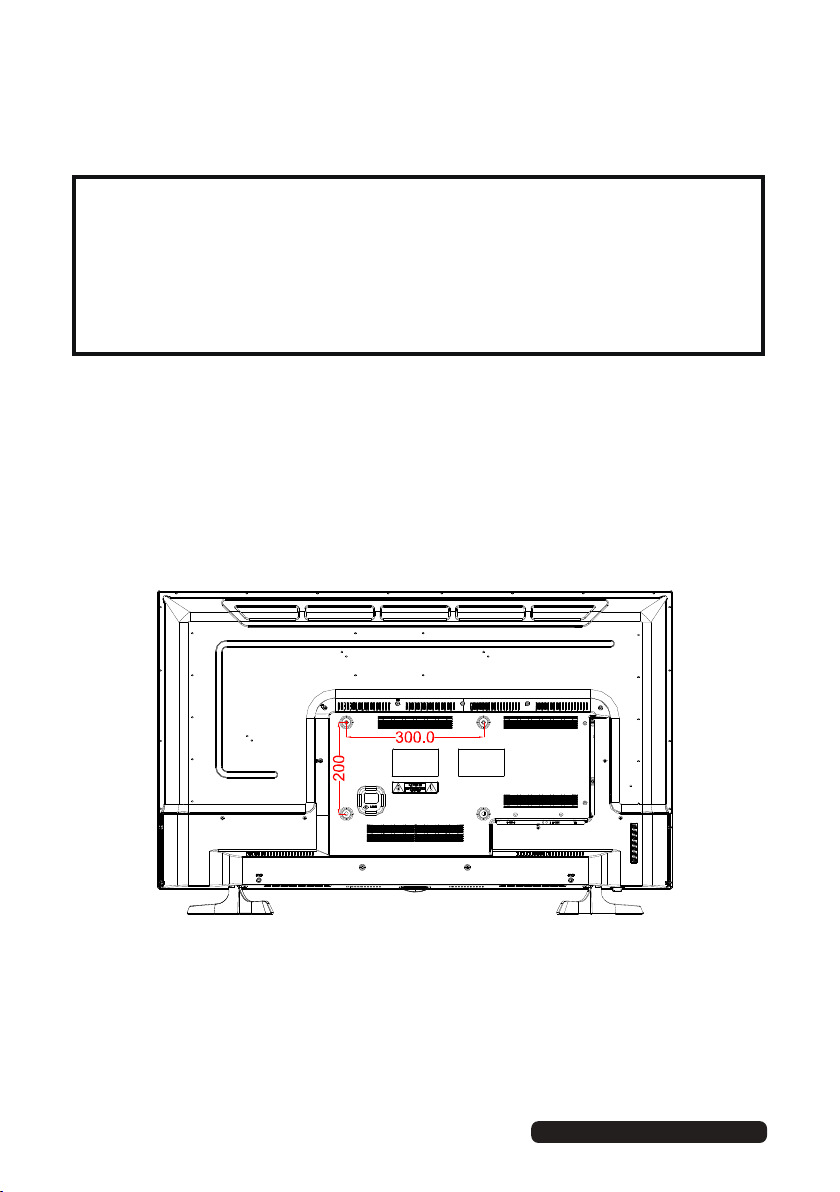
Wall-mounting instructions
IMPORTANT!
• Make sure the TV set is unplugged from the power supply before wallmounting it and removing the stand.
• We recommend you contact a professional for assistance when wallmounting the TV. We assume no liability for any eventual damage to the
product or injury to yourself if you mount the TV on your own.
• The TV set is equipped with holes on the back panel for use with wallmounting brackets (not included). Please use the illustration below as a
reference when buying wall-mounting brackets. Hole pattern is 200mm(H)
x 300mm(W).
• Use four standard M6*20mm screws (or longer, depending on the mounting
bracket) to mount this TV.
Back of the TV
NOTE: The screws in the package are for securing the TV stand only. If
you are wall-mounting the TV, please consult a qualified installer
for further instructions on bracket support and wall support.
After Sales Support
6
Telephone: 1300 886 649
Email: info@tempoaustralia.com.au
Page 15
After Sales Support
Telephone:
1300 886 649
Email: info@tempoaustralia.com.au
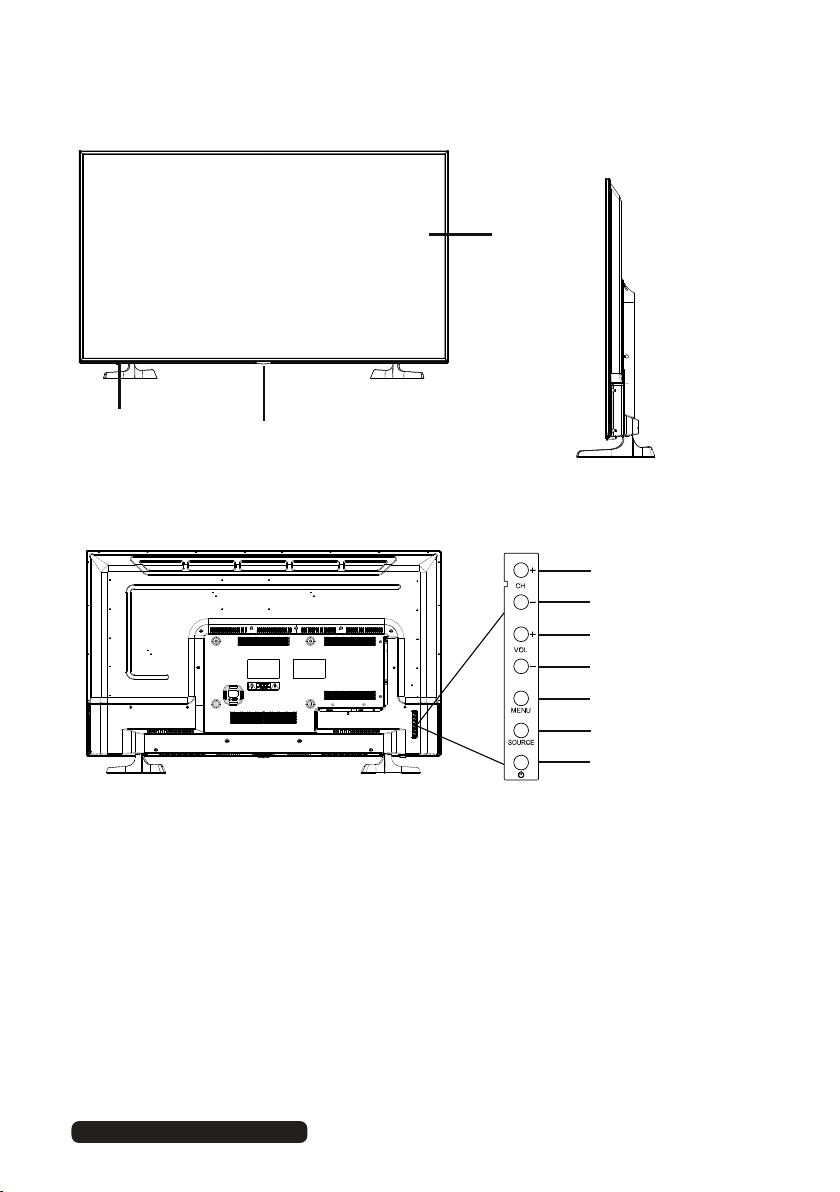
Controls and Connections
1
2
3
1 LED LCD display screen.
2 IR (infra-Blue) sensor for remote control.
3 Power indicator.
4 CHANNEL +: select the next channel or move up/down .
5
CHANNEL -: select the previous channel or move up/down.
6 VOLUME +: increase the volume level or move left/right.
7 VOLUME -: decrease the volume level or move left/right.
8
MENU: enter the settings menu.
9 SOURCE : select the input source.
10 POWER: turn the TV on/off.
4
5
6
7
8
9
10
NOTE: See page 8 for a detailed description of all sockets on the back panel.
Keypad may change model to model
7
Page 16
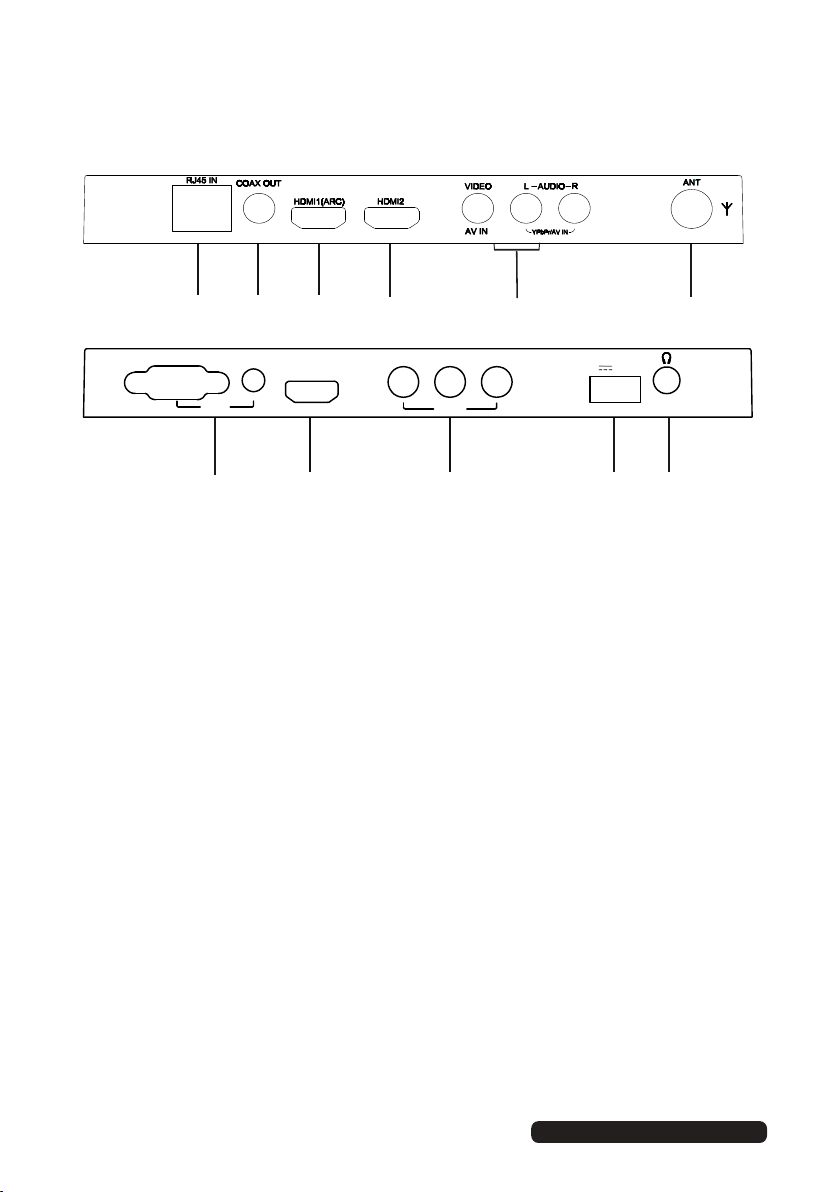
Controls and Connections (Cont.)
Main unit back view controls and sockets
VGA
1
PC IN
7
2
AUDIO IN
3
HDMI3
8 9 10
4
Y Pb Pr
YPbPr
5 6
USB
(5V 500mA)
11
1 RJ45 IN: Plug in network cable to connect to the internet
2 COAXIAL S/PDIF output
3 HDMI 1 (supports ARC function)
4 HDMI 2
5 AV IN
(Audio R/L input is share between YPbPr and AV inputs)
6 ANT input: for connection of the external antenna
7
PC AUDIO input /
VGA input (for PC connection)
8 HDMI 3
9 YPbPr (Component) input
USB input terminal: for multimedia file playback and
10
time-shift functions
11 EARPHONE output
Input / Output may change model to model
8
After Sales Support
Telephone: 1300 886 649
Email: info@tempoaustralia.com.au
Page 17
After Sales Support
Telephone:
1300 886 649
Email: info@tempoaustralia.com.au
Controls and Connections (Cont.)
IMPORTANT!
• Ensure all cables are disconnected from the main unit before
connecting the TV to an AC power source.
• Read through the instructions before connecting the TV to other
equipment.
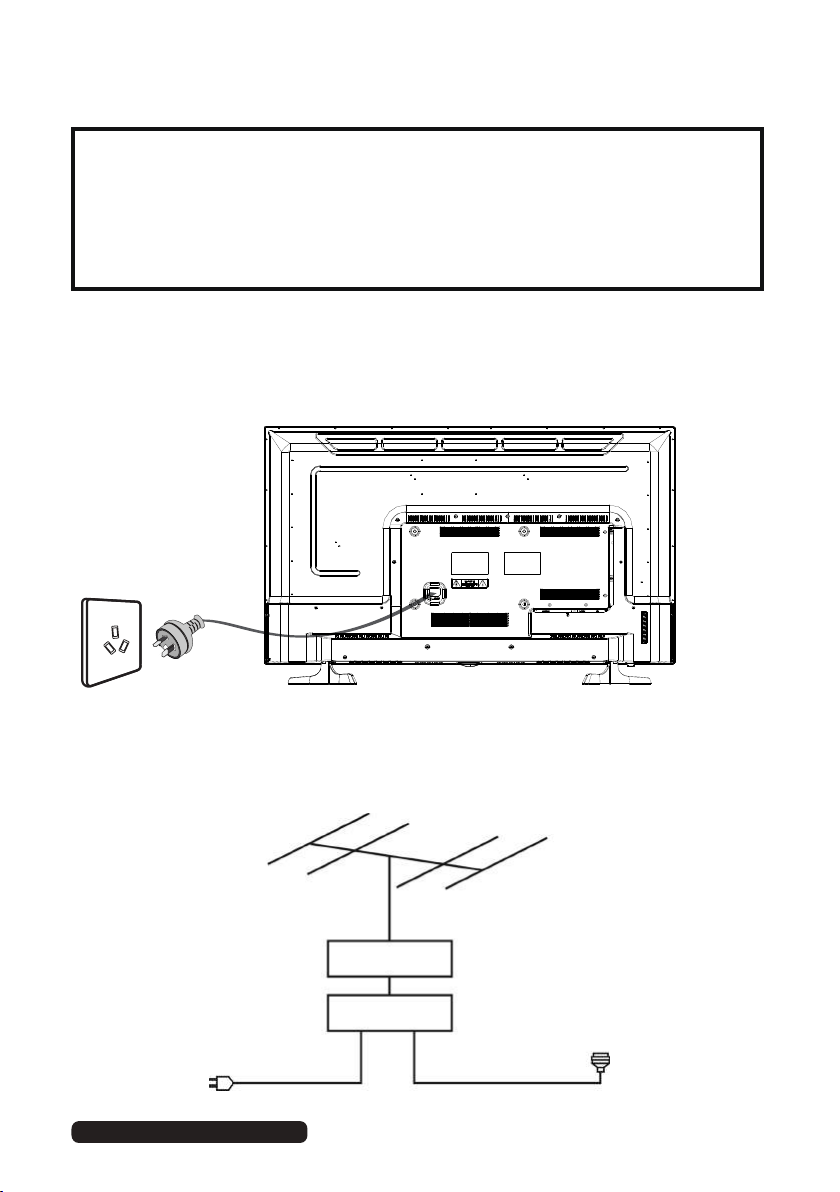
Connecting to an AC power source
To power outlet
Main unit
Connecting an external antenna
For best picture quality, we recommend connecting the TV set to an external antenna.
Power plug
of antenna
amplifier
Indoor
antenna
amplifier
Antenna
Outdoor
antenna
amplifier
75Ω
antenna
plug
9
Page 18
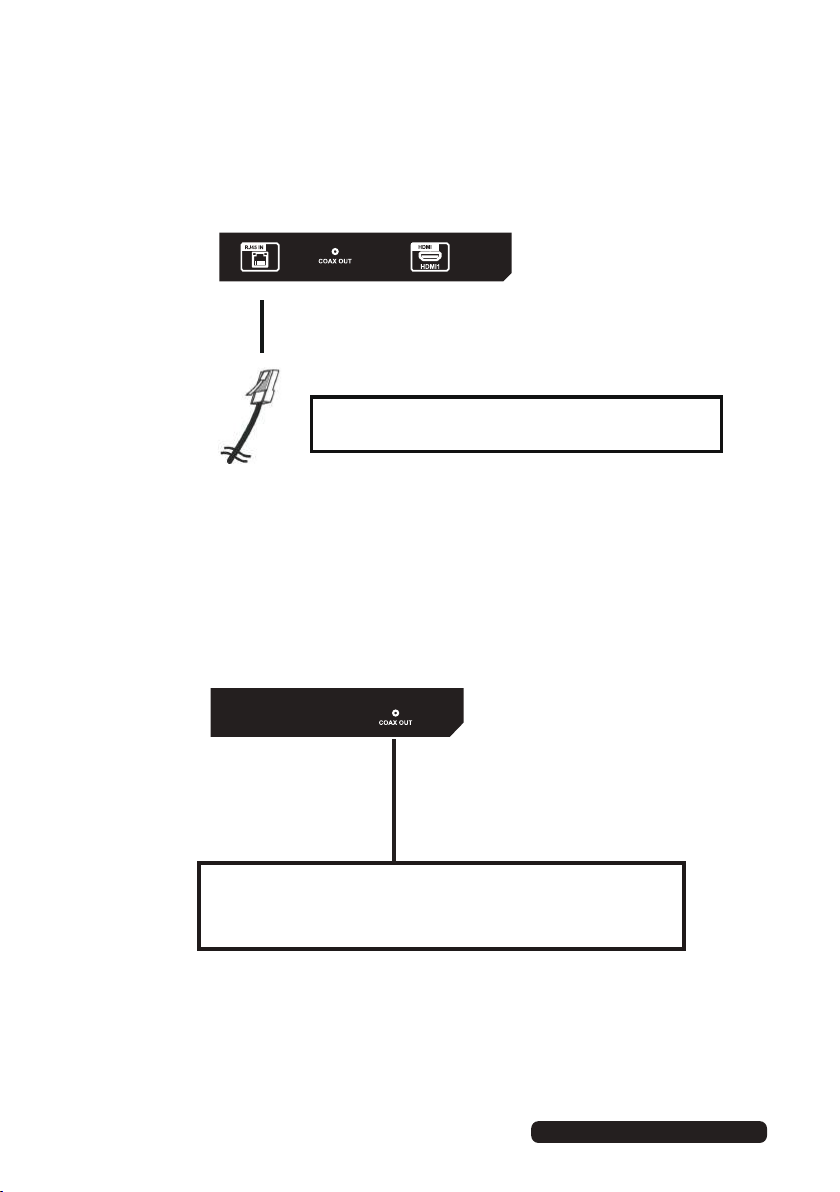
Controls and Connections (Cont.)
Internet connection
LAN cable
(not included)
Use a RJ45 LAN cable (not included) to connect this
Coaxial (S/PDIF) connection
Use a coaxial cable to connect the unit with an amplifier or other
audio decoding device for coaxial audio signal output.
(Coaxial cable is not included)
TV with available network
10
After Sales Support
Telephone: 1300 886 649
Email: info@tempoaustralia.com.au
Page 19
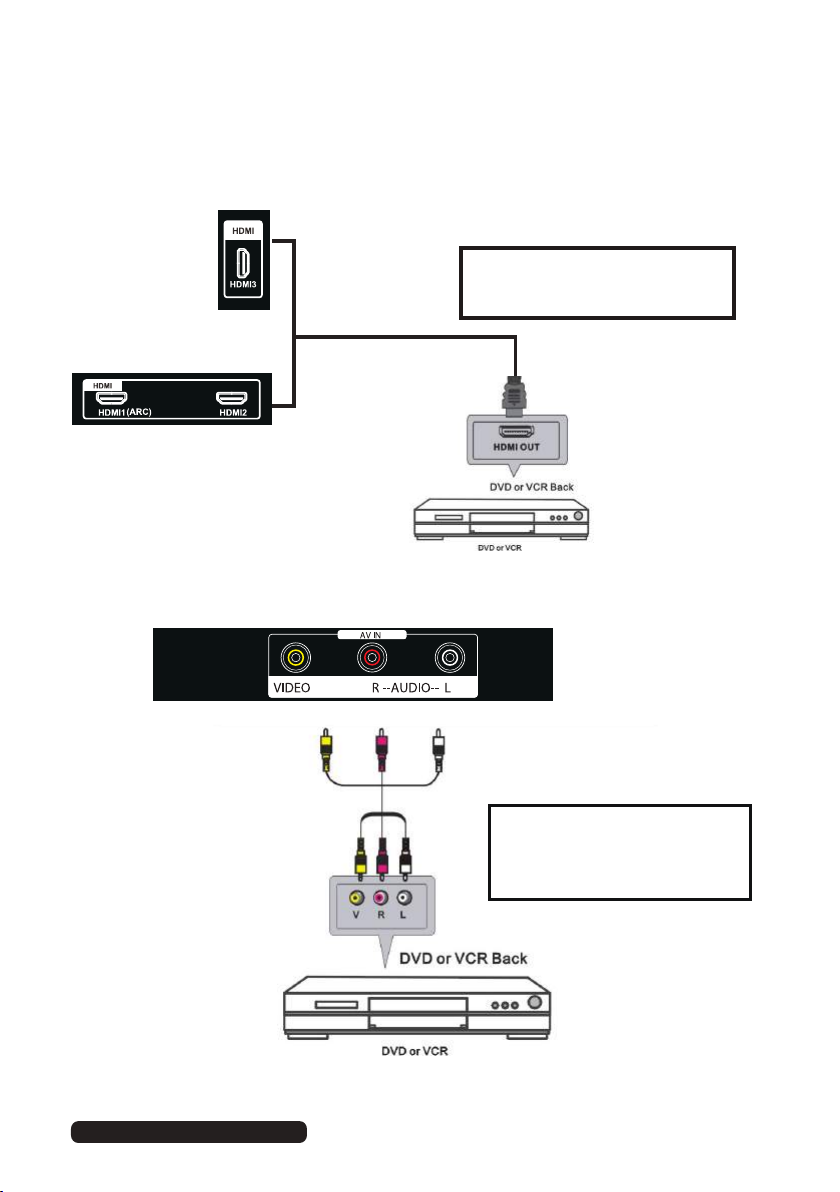
Controls and Connections (Cont.)
HDMI connection
Use HDMI cable to connect the unit
with other devices to receive high-
definition multimedia signal.
HDMI cable
(not included)
Composite video (AV) connection
AV cable
(not included)
NOTE: AV adapter cable’s L/R audio connections are shared between Y/Pb/Pr as well.
After Sales Support
Telephone:
Email:
info@tempoaustralia.com.au
1300 886 649
For basic connection, use the
composite Audio L/R (white/red)
and CVBS (yellow) cable to connect
the unit with other devices.
1
1
Page 20
Controls and Connections (Cont.)
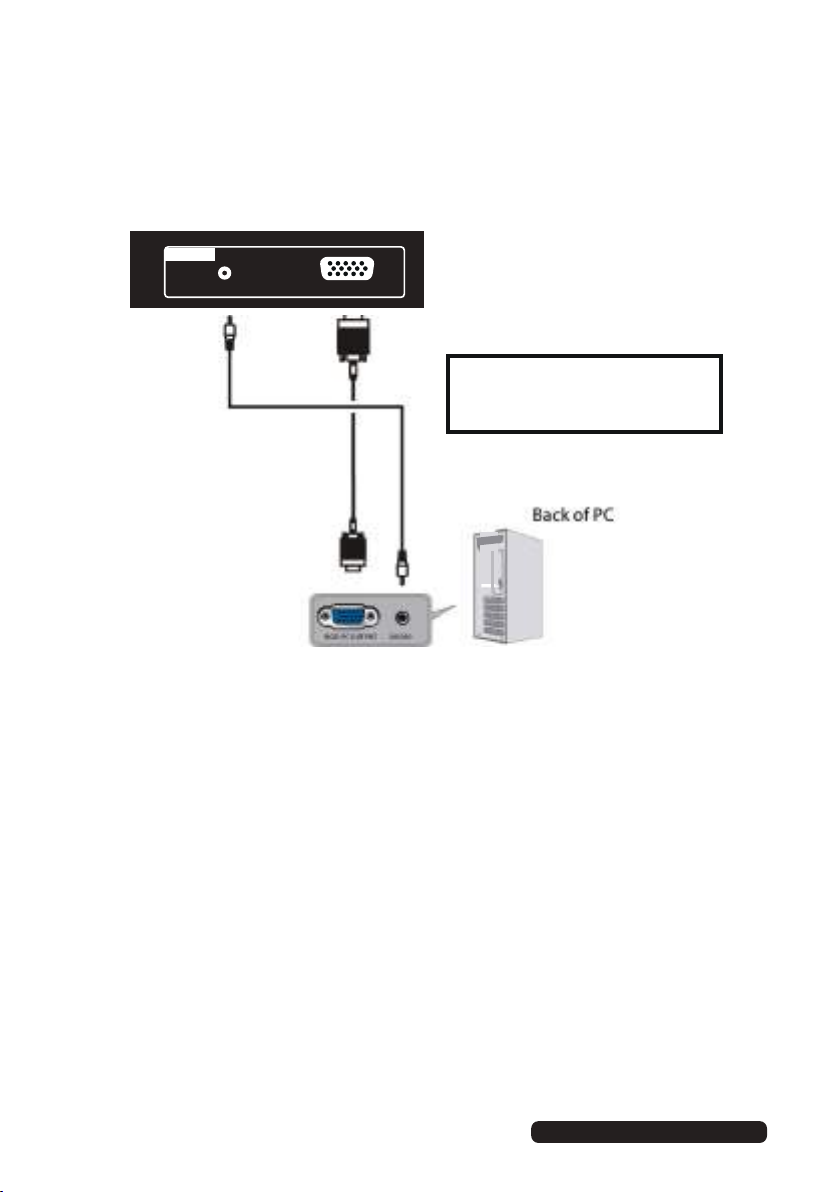
PC/VGA connection
PC IN
Audio cable
(not included)
AUDIO IN
(not included)
PC VGA
Use a VGA cable and Audio cable
to connect the unit with a TV or PC,
and use this product as a monitor.
VGA cable
After Sales Support
12
Telephone: 1300 886 649
Email: info@tempoaustralia.com.au
Page 21

Controls and Connections (Cont.)
Component (YPbPr) connection
AV IN
VIDEO
Audio cable
(not included)
YPbPr/AV IN
AUDIO
R L
YPbPr
Y
Pb Pr
YPbPr cable
(not included)
After Sales Support
Telephone: 1300 886 649
Email: info@tempoaustralia.com.au
3
1
Page 22

Controls and Connections (Cont.)
USB connection
Insert a USB memory device into the USB port for PVR recording,
time-shifting and playback of video/music/photo multimedia files.
USB
USB device
(not included)
Earphone connection
EARPHONE cable
(Not included)
USB
After Sales Support
14
Telephone: 1300 886 649
Email: info@tempoaustralia.com.au
Page 23

After Sales Support
Telephone:
1300 886 649
Email: info@tempoaustralia.com.au
Getting Started
IMPORTANT! Make sure all relevant equipment is properly connected (as
illustrated on the previous pages) before connecting the unit to a
wall socket and turning on the power.
Powering the TV
To turn the power on or off:
• Plug the power cord into a suitable power point, then turn on the power
at the outlet.
• Press the POWER button, on the lower side of the back panel (or on the
remote control, making sure to aim it at the sensor at the front of the TV);
the indicator will glow blue. Press it again to power off (standby mode);
the indicator will glow red.
Installation Guide
When you switch on the TV for the first time, the First Time Setup menu will be
displayed on the screen, as illustrated below.
Step one:
OSD language: Use the / buttons to select your OSD language and then
press the OK button to go to the next step.
1
5
Page 24

Getting Started
Step two:
Country: Use the / buttons to select the country you are living in and then use
the OK button to go to the next step. Press MENU button to go to previous step.
Step three:
Enviroment: Use the / buttons to select the environment of your new TV and then
use the OK button to go to the next step. Press the
previous step.
MENU button to go to the
After Sales Support
6
1
Telephone: 1300 886 649
Email: info@tempoaustralia.com.au
Page 25

Getting Started
Step four:
Network: Select “Start” and click OK to begin the network setup. Press key to
select “Skip” and press OK to cancel the network setup and move to next step. Press
MENU button to go to previous step.
Press </> to select Wired or Wi-Fi connectivity type. Press down to select your chosen
connectivity type and press OK to view IP settings. Press OK to save settings.
You can congure the network settings later via the TV’s menu. See page 36 for
detailed network setup instructions.
Step five:
Tuner: Use the / buttons to select the type of scan (ATV, DTV, DTV+ATV)
and then use the OK button to go to the next step. Press MENU button to go to
previous step.
After Sales Support
Telephone: 1300 886 649
Email: info@tempoaustralia.com.au
7
1
Page 26

After Sales Support
Telephone:
1300 886 649
Email: info@tempoaustralia.com.au
Getting Started
Settings confirmation page will be displayed on the screen, as illustrated below.
Press menu button to go back previous step.
Press OK button to begin scanning for TV stations. To exit channel tuning, press the
EXIT button. When auto searching is complete, your TV will show the first channel
found.
18
Page 27

Basic Operations
Selecting an input source
• Press the SOURCE button at the lower-left side of the back panel, or on the
remote control, to display the input source list.
• Press the / /left/right to select the desired input source, and then press OK to
confirm your selection from the following optio ns: DTV , ATV , AV , YPBPR , PC
HDMI1, HDMI2, HDMI3, MEDIA.
NOTE: When you switch on this TV for the first time, you need to go through the
First time installation wizard and auto-search for all the DTV programs in
your area.
Channel selection
• Press the CH+/- button to select the next/previous channel.
• Alternatively, press the number buttons to select a channel directly.
Volume contro
• Press the VOL+/- button to adjust the volume level.
• Press the MUTE button to mute the sound, press it again to restore sound.
Picture and sound mode
• Press the P-MODE button on the remote control repeatedly to select the
picture mode directly (available options: Standard, Movie, User, Eco, Dynamic).
The manufacture '\\';' 's recommended home viewing mode is Standard mode.
• Press the S-MODE button on remote control repeatedly to select the sound
mode directly (available options: Standard, Music, Movie, Sports, User).
Information display
• Press the INFO button to display information about the current program.
After Sales Support
Telephone: 1300 886 649
Email: info@tempoaustralia.com.au
19
Page 28

Basic Operations (Cont.)
Favourites List
• While viewing a channel, press the FAV
button on the remote control to enter the
Favourites List menu.
• Press the
and press OK to watch it.
• To add a channel to the Favourites List,
go to SMART HUB > select ‘Channel’ and
press OK > Select ‘Program Edit’ and press
OK > Press up/down arrow keys to select a
channel and press FAV key.
• Press FAV key again to remove a favourite
channel from the list.
Quick select
• While viewing a channel, press the CH.LIST
button to enter the Channels List directly.
• Press the
and press OK to watch it.
/ button to select the channel
/ buttons to select the channel
Subtitles
• Press the SUBTITLE button on the remote
control to enter the subtitle menu.
NOTE: The program you are watching must
support subtitles.
20
After Sales Support
Telephone: 1300 886 649
Email: info@tempoaustralia.com.au
Page 29

After Sales Support
Telephone:
1300 886 649
Email: info@tempoaustralia.com.au
Electronic Program Guide (EPG)
EPG TV Guide (for DTV mode only)
EPG stands for Electronic Program Guide. It is supplied by the program
providers and offers information about the programs to be broadcast. You can
access it in digital mode by pressing the EPG button on the remote control.
• Press the EPG button to display the EPG interface (above). The area at the
top will display information about the selected program or channel, and the
columns below will display the list of available channels and their programs
at various timeslots.
• Before you can view any EPG information, you have to ‘activate’ every
channel for which you want to view program information. To do this, use the
/ buttons to select a channel in the left column, then press OK to confirm.
• Press the / buttons to switch between columns.
• Press the / buttons to select a different channel/program in the list and
press OK to activate the channel.
• Press the button to display the TV guide of the previous day.
• Press the button to display the TV guide of the next day.
• Press the YELLOW button to enter the schedule list page.
• Press the GREEN button to schedule a reminder for the selected program
• Press the or RECORD button to schedule a recording for the selected
program.
• Press the INFO button to display full program information.
• Press EXIT to exit the EPG menu.
21
Page 30

After Sales Support
Telephone:
1300 886 649
Email: info@tempoaustralia.com.au
Recording
One-touch recording (in DTV mode only)
IMPORTANT!
Before you can record with this TV set (including time-shift recording), you
must have inserted a FAT32 formatted USB storage device into the USB port.
• First, insert your USB memory device into the USB port.
When watching a program in DTV mode:
• Press the RECORD button on the remote control to start recording directly.
Press the EXIT button to minimize the information bar at the bottom of the
screen. Press the RECORD button again to display information about the
current recording.
• Press the STOP button to display a dialogue box: select Yes to stop
recording, select No to dismiss the dialogue box.
To watch a recorded program:
• Press the INDEX button on the remote control to display the PVR Settings
page. (Alternatively, go to the Menu > PVR > Recorded List.)
• Use the / buttons to select a recorded file and press OK to start playback
in full screen mode.
Scheduled Recording (in DTV mode only)
See instructions under EPG on the previous page.
2
2
Page 31

After Sales Support
Telephone:
1300 886 649
Email: info@tempoaustralia.com.au
Recording (Cont.)
Time-shift recording and playback (in DTV mode only)
IMPORTANT!
Before you can record with this TV set (including time-shift recording), you
must have inserted a FAT32 formatted USB storage device into the USB port.
The time-shift function allows you to pause the live TV signal, then resume
playback at your convenience.
• First, insert your USB memory device into the USB port.
When watching a program in DTV mode:
• Press the button on the remote control to initiate time-shift mode and
pause the program; the tool bar pictured below will appear on the screen.
• Press the button again to resume playback.
• Use the / keys, then press OK to select a function such as Fast Forward
from the on-screen toolbar.
• To stop time-shift, press the STOP button on the remote control to display
a dialogue box, then select Yes to exit time-shift mode and return to live TV
signal, or select No to dismiss the dialogue box.
NOTE: The USB storage device will not retain recorded data after exiting the
time-shift function
3
2
Page 32

After Sales Support
Telephone:
1300 886 649
Email: info@tempoaustralia.com.au
Recording (Cont.)
Important notes
When using the USB/Media function, remember the following important points:
• We strongly recommend you back up all data in the USB storage device
to another storage device so you do not risk losing any data in case of an
unexpected device failure or accident. We do not assume liability for any
loss of data due to misuse or malfunction. Data backup is your personal
responsibility.
• You cannot change to a channel from another broadcaster or select
another function while in recording mode.
• If the signal is interrupted or removed while in recording mode, the recording will stop until the signal is established. This may cause you to lose
program content.
• Do not turn the TV off during recording, otherwise the TV will exit the
time-shift function and turn to standby mode.
• The file recorded can only be used in this TV. Do not copy it to any other
device.
• When you are in time-shift recording mode, you may experience some
difficulty with a scheduled recording at different times without removing
the USB recording device. You will need to remove the USB device as it is
required to reset after each recording to protect the device from damage.
If you see the message ‘DISK NOT READY’ displayed, remove the device,
reconnect and proceed with your recording.
• Some USB storage devices may not be compatible for smooth operation
with this TV.
• For large file sizes and large capacity storage devices, the loading speed
may be longer. The recognition speed of a USB storage device may vary
depending on the device.
• When connecting or disconnecting the USB storage device, ensure the TV
is not in USB mode, otherwise the USB device or the files stored in it may
be damaged.
• Only use a USB storage device formatted in a FAT32 file system provided
with the Windows operating system. If it is formatted by a different utility
program that is not supported by Windows, it may not be recognised.
• Ensure any USB devices connected to the TV do not use/exceed 500mA
power rating.
• If an “Unsupported File” message is displayed, the file format or codec is
unsupported or corrupted.
24
Page 33

Smart Hub
Press the SMART HUB key on the remote control, you can run the apps
installed, access input sources and menu options. Press [LEFT]/[RIGHT]/[UP]/
[DOWN] to select these functions
Applications
Input source
options
Quick Links
Smart TV applications
• AccuWeather
• Web Browser
• YouTube
• Facebook
• Twitter
• Picasa
• TerraTV
Input Source Options
(* Available options may change depending on the TV model)
• DTV
• ATV
• AV
• YPBPR
• PC
• HDMI 1/2/3
• USB (MEDIA)
• Miracast
• Hyperlink
After Sales Support
Telephone: 1300 886 649
Email: info@tempoaustralia.com.au
25
Page 34

After Sales Support
Telephone:
1300 886 649
Email: info@tempoaustralia.com.au
Smart Hub
Quick Links
• Recording – access the list of recorded programs (USB hard disk must be
connected)
• Settings – access TV general menu settings
• Movie – access the movie player in MEDIA mode
• Photo – access the photo player in MEDIA mode
• Music – access the music player in MEDIA mode
• Channel – access TV channel menu settings
• Program List – access the channel list
• Picture – access the picture menu settings
• TV Guide – access Electronic Program Guide (EPG)
• Sound – access the sound menu settings
Miracast
Miracast feature enables you to echo the display from a compatible device
like a smartphone or tablet on the TV screen by connecting your mobile
device directly to the TV wirelessly. In order to use this feature, your device
must support Wi-Fi Display technology.
• To start using Miracast feature, go to SMART HUB and press OK on
MIRACAST.
• Turn on Wireless Display (a.k.a. Wi-Fi Display, Wi-Fi Direct, Cast Screen)
function on your smart phone or tablet (Please refer to your device’s user
manual for information on how to turn on wireless display).
• Your mobile device will display a list of available devices. Choose ‘My TV-
My TV’ click on it to connect. If the mobile device prompts for a password,
enter HITACHI.
• Your mobile device will connect to the TV and will display the device screen
on the TV.
6
2
Page 35

Smart Hub
Hyperlink
Hyperlink feature allows you to share media files on your DLNA-enabled
media PC, smart phone or tablet on the TV.
• In order to use this function, your shared media PC or smart device and the
TV must be on the same network. Also your device must have built-in media
share capability or have a third-party DLNA/UPnP media server installed.
• To start using Hyperlink feature, start the DLNA/UPnP media server on your
device.
• Start HYPERLINK application on TV from the SMART HUB page.
• TV will automatically connect to shared media device. To choose a different
device, press the RED button. A list of available devices will be displayed.
• Select your preferred media device from the list and click OK.
• Then select from either Movie, Music or Photo and press OK to enter it. You
will only see supported media files under each category.
• Select the files you want to play and press PLAY button.
FreeviewPlus
FreeviewPlus is a new service provided by most of the free-to-air broadcast
networks to enable you access Catch Up services on the TV. In order to access
FreeviewPlus interactive applications, you are required to have a good broadband
connection.
Once you’re connected to the internet, press the;
• GREEN button on your remote to launch FreeviewPlus.
• RED button on your remote to launch broadcast network content and services.
Then follow the on-screen instructions to navigate through the applications.
NOTE:
• Your home network must have broadband Internet access. Contact your ISP if
you have problems maintaining a fast connection that is reliable.
• Accessing Internet content may incur access or data fees from third parties such
as your Internet service provider (ISP).
• Since all content is downloaded over the internet, there may be delay in loading
the content.
• If any of your other network connected devices such as computers, gaming
consoles and network hard drives are transferring large amounts of data across
your network (such as a file transfer, online gaming, or other instances of
streaming video), loading times of interactive applications, sound and picture
quality may be compromised.
To turn off FreeviewPlus, go to SMART HUB > Channels and set HbbTV setting to
OFF.
After Sales Support
Telephone: 1300 886 649
Email: info@tempoaustralia.com.au
7
2
Page 36

After Sales Support
Telephone:
1300 886 649
Email: info@tempoaustralia.com.au
Media Mode
Media playback
• First, insert a USB memory device into the USB port.
• Press the SOURCE button on the back panel, or on the remote control, to
switch the unit to MEDIA mode.
• Press the / / / buttons to move the cursor.
• Press the EXIT button to return to the previous menu page.
Press the RED button to change the device.
Photo
• Press the / buttons to select Photo in the main menu, then press OK to
enter it. Photos files can only be played in this menu category.
• Use the / / / buttons to select the desired folder or file, then press OK
to selecet files and press button to play files fullscreen.
When playing photo files:
• Press the MENU button on the remote control to hide/display the on-screen tool
bar.
Use the / keys, then press OK to select a function such as Previous,
Next, Rotate, Enlarge from the on-screen toolbar
Press STOP or EXIT buttons to exit playback & go back to file list page.
8
2
Page 37

After Sales Support
Telephone:
1300 886 649
Email: info@tempoaustralia.com.au
Media Mode
Music
• Press the / buttons to select Music in the main menu, then press OK to
enter it. Music files can only be played in this menu category.
• Use the / / / buttons to navigate to the desired folder or file, then
press OK to select and press PLAY button for playback.
When playing music files:
• Use the / buttons, then press OK to select a function such as NEXT,FAST
FORWARD and STOP from the on-screen toolbar.
9
2
Page 38

After Sales Support
Telephone:
1300 886 649
Email: info@tempoaustralia.com.au
Media Mode
Movie
• Press the / buttons to select Movie in the menu, then press OK to enter.
Movie files can only be played in this menu category.
• Use the / / / buttons to navigate to the folder or file, then press OK to
select and press PLAY button for playback.
When playing movie files:
• Press the MENU button on the remote control to hide/display the tool bar.
• Press the / buttons to select the preferred function, then press OK to
confirm.
Remote operations when playing multimedia files:
• Press the button to play or pause playing.
• Press the button to stop playing.
• Press the button to move fast backward.
• Press the button to move fast forward.
• Press the button to play the previous file.
• Press the button to play the next file.
NOTE: To play your multimedia files, make sure you have selected the correct
icon in the main media playback menu.
30
Page 39

After Sales Support
Telephone:
1300 886 649
Email: info@tempoaustralia.com.au
Media mode
This TV set contains different settings menus where you can program your
preferred settings. Once you have programmed any settings, the unit will
retain them in its memory until you change them, even when switching the
unit to standby mode. This means you can always operate the system under
the same conditions.
Menu navigation
• Press the MENU button on the back panel, or on the remote control, to display
the main menu.
• Press the / buttons to select different submenus.
• Press OK or to enter the submenu page.
• Press the / buttons to select the preferred option.
• Press the / buttons to adjust the value.
• Press the MENU button to return to the previous menu page.
• Press the EXIT button to exit the menu page.
31
Page 40

After Sales Support
Telephone:
1300 886 649
Email: info@tempoaustralia.com.au
Menus
Time:
3
2
Page 41

After Sales Support
Telephone:
1300 886 649
Email: info@tempoaustralia.com.au
Menus
Lock:
33
Page 42

Menus
Hotel Lock
Lock
Keypad
Hotel Lock Turn Hotel lock function on/off
Lock sources Turn off the input sources
Default sources Set default source
Max Volume Set maximum volume level
Default volume Set default volume level
Default channel Set default channel when default
source is set to DTV
Export settings Export all hotel lock settings to USB
drive
Import settings Import hotel lock settings from USB
drive
Turn on/off the functionalities of the
keypad on rear panel
After Sales Support
3
4
Telephone: 1300 886 649
Email: info@tempoaustralia.com.au
Page 43

After Sales Support
Telephone:
1300 886 649
Email: info@tempoaustralia.com.au
Menus
Option:
turn
5
3
Page 44

After Sales Support
Telephone:
1300 886 649
Email: info@tempoaustralia.com.au
Menus
Network Setting:
For a stable internet connection, it is recomnended to use a wired connection
or place the wireless router close to the TV.
Wired
For Wired network connection, make sure to connect the TV to your internet
router using RJ45 Ethernet cable before starting the setup process.
Press / keys and select “wired” network type. The press to highlight
“wired”, press ok and bellow screen will appear.
6
3
Page 45

After Sales Support
Telephone:
1300 886 649
Email: info@tempoaustralia.com.au
Menus
Press OK to save the settings. If the connection is successful , the ‘Wired
network is connected’ message will appear. Press Exit button to exit the
menu.
If the connection is unsuccessful, the ‘Wired network is not connected’
message will appear. Check the accuracy of information you have entered
and try again.
37
Page 46

After Sales Support
Telephone:
1300 886 649
Email: info@tempoaustralia.com.au
Menus
Wi-Fi
For ‘Wi-Fi Network Connection’, make sure to place your Wi-Fi Router close
to the TV
Press / key and select ‘Wi-Fi’ network type. Then press to highlight
‘Wi-Fi’, press OK and below screen will appear.
3
8
Page 47

After Sales Support
Telephone:
1300 886 649
Email: info@tempoaustralia.com.au
Menus
Press OK to save the settings. Enter the WAP password correctly using the
on-screen keypad and press connect. click OK to exit.
39
Page 48

After Sales Support
Telephone:
1300 886 649
Email: info@tempoaustralia.com.au
Menus
The TV will automatically begin searching for nearby Wi-Fi access Points
(WAP). This may take up to 2 minutes. If your WAP doesn't appear, move your
Wi-Fi router closer to the TV and press GREEN button to search again.
Select the WAP you wish to use by pressing / button to view detailed
information, press YELLOW button.
After selecting the WAP, press OK. If the WAP has a security password, enter
the password using on-screen keypad. and the press CONNECT.
40
Page 49

After Sales Support
Telephone:
1300 886 649
Email: info@tempoaustralia.com.au
Menus
If the connection is successful , the ‘Internet Connected Successfully!’
message will appears. Click OK to exit.
If the connection is unsuccessful, Click the security password of your WAP
and its security protocal settings and try again
1
4
Page 50

After Sales Support
Telephone:
1300 886 649
Email: info@tempoaustralia.com.au
Menus
PVR Menu Settings
• Recorded List - Shows the list of recorded programs (you can also use the
INDEX key on the remote to access this page)
• Record – schedule a program to be recorded.
42
Page 51

After Sales Support
Telephone:
1300 886 649
Email: info@tempoaustralia.com.au
Menus
• Remind – Schedule a reminder to watch your favourite program
• Schedule List – Shows the list of programs scheduled to be recorded
• PVR File System
Select Disk
:If you have multiple partitions on your disk, select the partition you wish
to use.
4
3
Page 52

After Sales Support
Telephone:
1300 886 649
Email: info@tempoaustralia.com.au
Menus
• Time Shift size
Press left/right buttons and change the size of the time shift buffer.
• Format start
Press OK and confirm to format your USB drive
• Speed Check
Press OK to check the speed of the USB drive
4
4
Page 53

After Sales Support
Telephone:
1300 886 649
Email: info@tempoaustralia.com.au
Menus
Channel Menu Settings
To access Channel menu, navigate to SMART HUB > Channel.:
The password default is 0000.
Auto Tuning
Press OK to enter. Then select your country, tuner type, LCN and press OK to
start scanning.
45
Page 54

After Sales Support
Telephone:
1300 886 649
Email: info@tempoaustralia.com.au
Menus
DTV Channel Tuning
Press OK to enter. Press left/right to select the channel. Press OK to start
scanning.
46
Page 55

Menus
Program Edit
Press OK to enter.
• Press RED button delete a channel from the channel list and EPG
• Press BLUE button to skip a channel when using CH+/- buttons
• Press FAV to add a channel to Favourites List; press the button again to
remove from the Favourites List.
HbbTV
Turn on/off HbbTV (FreeviewPlus).
After Sales Support
Telephone: 1300 886 649
Email: info@tempoaustralia.com.au
47
Page 56

After Sales Support
Telephone:
1300 886 649
Email: info@tempoaustralia.com.au
Menus
Signal Information
• This item is used to display signal details, such as Channel Number,
Frequency, Quality and Strength.
Software Update (USB)
• This item is used to update software through USB memory device.
4
8
Page 57

After Sales Support
Telephone:
1300 886 649
Email: info@tempoaustralia.com.au
Menus
Setting
Picture Menu Settings::
To access the picture menu, navigate to SMART HUB > Picture.
Noise Reduction
Back light
Auto > 4:3 > 16:9 > Zoom 1 > Wide Zoom
> Panorama
Natural > Warm > Cool
Off > Low > Middle > High
0 - 100
Picture mode selection. When “user” setting
is selected contrast, Brightness, Colour,
Sharpness. settings can be adjusted
Adjust the picture size
Adjust backlight intensity
49
Page 58

After Sales Support
Telephone:
1300 886 649
Email: info@tempoaustralia.com.au
Menus
Sound::
To access the sound menu, navigate to SMART HUB > SOUND
50
Displays audio codec information for
current program.
Page 59

After Sales Support
Telephone:
1300 886 649
Email: info@tempoaustralia.com.au
FAQs
If you experience any problems with your TV, check the list below and take
any necessary steps before calling for service. If none of the solutions help
you solve the problem, turn the power off and contact the after sales support
line for advice.
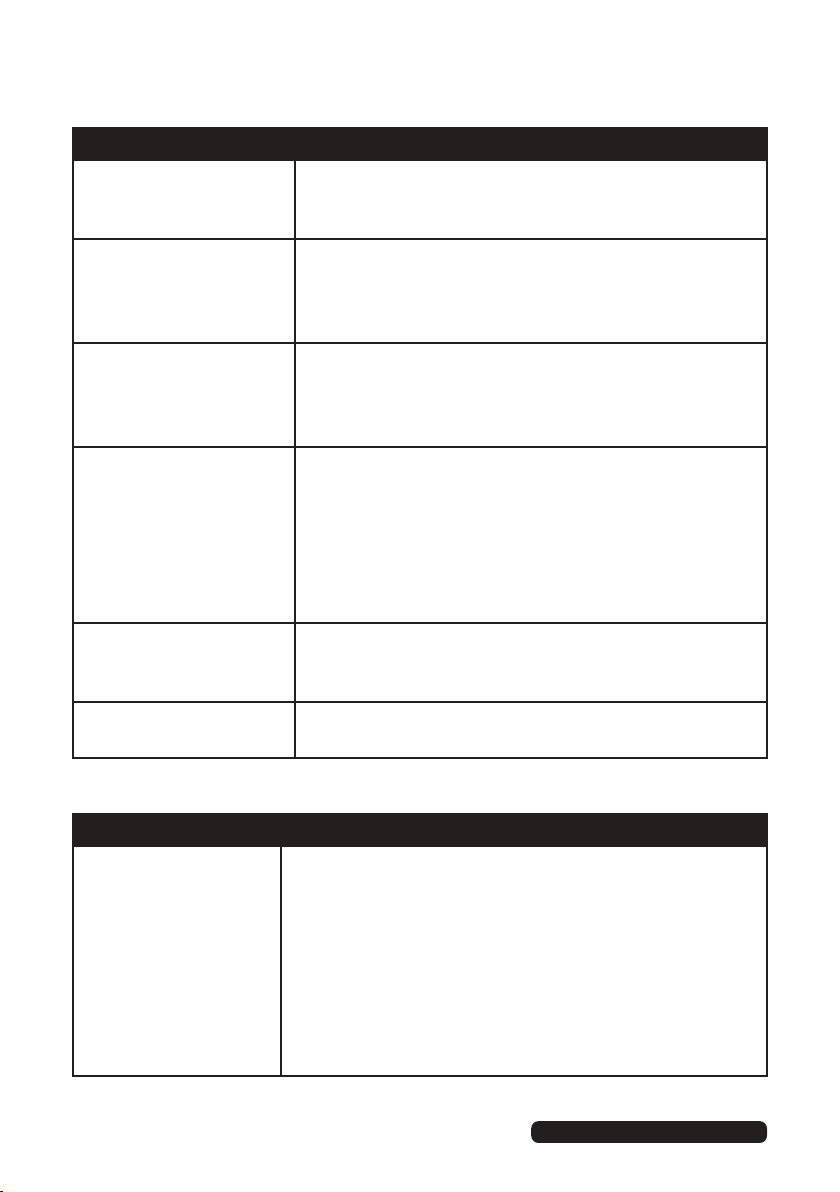
General problems with the TV set
Problem Solution
No power. Insert the power plug securely into the power outlet.
No picture. Ensure that the equipment is connected properly.
• Adjust the antenna or use an external antenna.
• Relocate the unit near a window (if inside a
building).
• Move the TV set away from any product that
causes interference.
• Auto-tune the unit again.
• Try another channel.
No sound or
distorted sound.
No operations can be
performed with the
remote control unit.
No key operation (by
the main unit and/or
the remote control) is
effective.
Noise or other
interface
• Ensure that the equipment is connected properly.
• Ensure that the input setting for the TV is correct.
• Ensure the audio settings are properly set.
• Ensure the volume is not muted. If it is, press the
MUTE button to restore the sound.
• If earphones are connected, unplug them.
• Adjust the volume to a suitable level by pressing
the VOL+/VOL- button.
• Check the batteries are correctly installed.
• The batteries may be exhausted: replace them.
• Make sure to point the remote control at the
remote control sensor and try it again.
• Make sure to use the remote control at a distance
of no more than 6m from the sensor.
• Remove any obstacles between the remote control
and remote control sensor.
Disconnect the power plug and then reconnect
it. (The unit may not be operating properly due to
lightning, static electricity or some other factors.)
Electronic equipment near the unit is causing interface.
Relocate the unit or move the equipment.
1
5
Page 60
After Sales Support
Telephone:
1300 886 649
Email: info@tempoaustralia.com.au
FAQs (Cont.)
Problem Solution
Play does not start,
even when title is
selected.
No subtitles are
displayed.
Audio soundtrack and/
or subtitle language
is not as per the initial
settings.
Alternative audio
soundtrack (or subtitle)
languages cannot be
selected.
Angle cannot be
changed.
No menu play (with
video CDs)
• Confirm the region code setting is correct.
• Subtitles appear only with discs that contain them.
Check whether your DVD has subtitles.
• Make sure to select Subtitles ON in the settings,
otherwise they will not be displayed.
• If the audio soundtrack and/or subtitle language
does not exist on the disc, the language selected
at the initial settings will not be seen/heard.
• Alternative languages can only be selected on
discs that contain more than one language. Check
and ensure your disc has more than one language.
• With some DVDs, an alternative language
cannot be selected with the LANG or SUBTITLE
button. Try selecting it from the DVD menu, if an
alternative language is available.
• This function is dependent on software availability.
Even if a disc has a number of angles recorded,
they may be recorded for specific scenes only.
• This function works only for video CDs with
playback control.
Problems relating to the USB device
Problem Solution
My TV does not
recognise my USB
device or my external
hard disk.
52
Please refer first to the instructions describing how
to use USB devices with this unit.
If the problem still occurs, your device may not be
compatible. This machine has been tested with
the majority of Flash memory-based devices and
hard disks (Music/Movie players with HDD) on the
market; however, it may not be compatible with
certain devices, in particular external self-powered
hard disks.
Page 61

After Sales Support
Telephone:
1300 886 649
Email: info@tempoaustralia.com.au
Maintenance and Recycling
Maintenance
Early malfunctions can be prevented. Careful and regular cleaning can extend
the amount of time you will have your new TV. Be sure to turn the power off
and unplug the power cord before you begin any cleaning.
Cleaning the screen
1. Here’s a great way to keep the dust off your screen for a while. Wet a soft
cloth in a mixture of lukewarm water and a little fabric softener or dish washing
detergent. Wring the cloth until it’s almost dry, and then used it to wipe the
screen.
2. Make sure the excess water is off the screen, and then let it air- dry before
you turn on your TV.
Cleaning the cabinet
To remove dirt or dust, wipe the cabinet with a soft , dry, lint-free cloth. Please
be sure not to use a wet cloth.
Extended Absence
If you expect to leave your TV dormant for a long time (such as a vacation), it’s
a good idea to unplug the power cord to protect against possible damage from
lightning or power surges.
Disposal of old electrical appliances
Correct Disposal of this product. This marking indicates that this
produc t should not be disposed with other household wastes.
To prevent possible harm to the environment or human health from
uncontrolled waste disposal, recycle it responsibly to promote the sustainable
reuse of material resources. To return your used device, please use the return
and collection systems or contact the retailer where the product was
purchased. They can take this product for environmental safe recycling.
3
5
Page 62

Specifications
Display Device
ResolutionH
Pixel Pitch
Luminance
Contrast Ratio
Aspect Ratio
Response Time
Viewing Angle ±85˚ max.
Multimedia Playback
Format under TV Mode
Operating temperature
Power Source 100 - 240V~, 50/60Hz
Power Consumption
Dimensions (mm)
Weight
50” (127cm) FHD LED TV
Display area: 1059.8 (H) 616.4 (
1920 x 1080
0.57 (H) 0.57 (V)
300 cd/m
2000 : 1
16 : 9
6.5ms
avi, mpeg, mpeg 4, dat, mkv, vob, rmvb,rm
5˚C - 35˚C
120 W
Unit: 1126.3 × 709.5 × 216.9 (with stand)
Boxed: 1231 x 798 x 175
13.
10.6 kg
x
2
4 kg (with box)
x
V)
5
4
Page 63

After Sales Support
Telephone:
1300 886 649
Email: info@tempoaustralia.com.au
Warranty
If your product is faulty or yo uare experiencing difficulties usingthis product andrequire assistancepleasecallour customer assistance helplineaslistedbelow:
Info@tempo.org
This producthas been manufactured to thehighestquality standards. This productiswarranted
to theoriginalpurchaser or gift recipientand is nottransferable.
Warranty
Theproduct is guaranteed to be free from defectsinworkmanship andparts foraperiod of 12
months from thedateofpurchase. Defects
useand care will be repaired, replaced or refunded with no charge forparts or labo ur.
Thebenefitsconferred by this warranty areinadditiontoall otherrightsand remedies of the
consumer underaCommonwealth, stateand territorylawsinrelationtothe goodsorservicesto
whichthiswarrantyrelates.
that occurwithinthiswarrantyperiod, undernormal
Ourgoods come with guarantees that cannot be excluded underthe Australian Consumer Law
(Schedule2of the
or refund foramajorfailure andcompensationfor anyother reasonably foreseeablelossor
damage.You are also entitled to have thegoods repaired or replaced if thegoods fail to be of
acceptable qualityand thefailure does not amount to amajor failure. If yourequire further
informationonthe Australian Consumer Law, please visitthe Australian Consumer Lawwebsite at
http://www.consumerlaw.gov.au.
spresented forrepairmay be replaced by refurbishedgoods of thesametyperatherthan
Good
beingrepaired. Refurbishedparts maybeusedtorepairthe goods.
ProofofPurchase
This warranty is validofthe original purchase only andisnot transferable.Pleasekeepyour
purchase docket or receiptasproof of purchase andasproof of thedateonwhich thepurchase
wasmade. Thepurchasedocketorreceipt must be presentedwiththe warranty when making a
claimunder this warranty.
Serviceduringthe warrantyperiod
Thefirst pointofcontact forALL product issuesisthe Tempo(Aust)Pty LtdAfter
SalesSupport Centre Ph:1300886 649(AUS) 0800 836761 (NZ) .Customermust
NOTtakeany productbacktothe storeunlesstheyhaveobtainedaReturn Authorisation(RA)
number from ourAfter SalesSupport Team
CompetitionandConsumerAc
t 2010
(Cth)). Youare entitled to areplacement
55
Page 64

After Sales Support
Telephone:
1300 886 649
Email: info@tempoaustralia.com.au
Warranty
–The productcan be personally returned to theoriginalplace of purchase forproduct
repair,replacement or refund.Pleaseensurethe productisproperlypackagedsoasto
ensure,thatnodamageoccurstothe productduringtransit.Alsomakesurethatyou
have included an explanationofthe problem.
In theevent of goodsrequiring repair underwarranty, theowner is responsiblefor the
cost of transportation.The productwillbeatowner’sriskwhilstintransit to or from the
TempoorAuthorisedService Centres. Should the goods be foundtobeinsound working
orderthe ownermight be chargedafee.
In theevent of repair underwarrantyongoods more than 30km away from theplace of
purchase,additionaltravelcosts will be billed to theowner.
ExtentofWarranty
This warranty is limitedtodefects in workmanshiporparts.All defectiveproductsorparts will be
repaired,replacedorrefunded. This warranty does notextendtoaccessories notsuppliedwith
theproduct or by Tempo. This warranty does notcover manualsand packaging. This warranty
does notcover batteriesorany otherconsumableitem.
NormalWear andTear
This warranty does notcover normal wear and tear of theproductsorparts.
Exclusions
This warranty does notcover:
Anydefectcausedby an accident, misuse, abuse, improper installation or operation, lack
of reasonable care,unauthorisedmodification, loss of parts, tamperingorattem pted
repair by apersonnot authorised by thedistributor.
Anyproduct that hasbeendamaged by a lightningstrikeeitherdirectlyorindirectlyora
main’spower surgeorliquidingress.
Anyproduct that hasnot been installed, operated or maintained in accordance with the
manufacturer’soperating instructions provided with theproduct.
Anyproduct that hasbeenusedfor purposes otherthandomesticuse.
If theproduct is locatedoutside Australia.
Anydamagecausedbyimpropermatchingofamplifier,improperpower inputor
improper cableconnection.
56
Page 65

 Loading...