

Page 1
Videorecorder
VTMX910EUK
Operating instructions
Page 2
&
OPERATING INSTRUCTIONS IN BRIEF
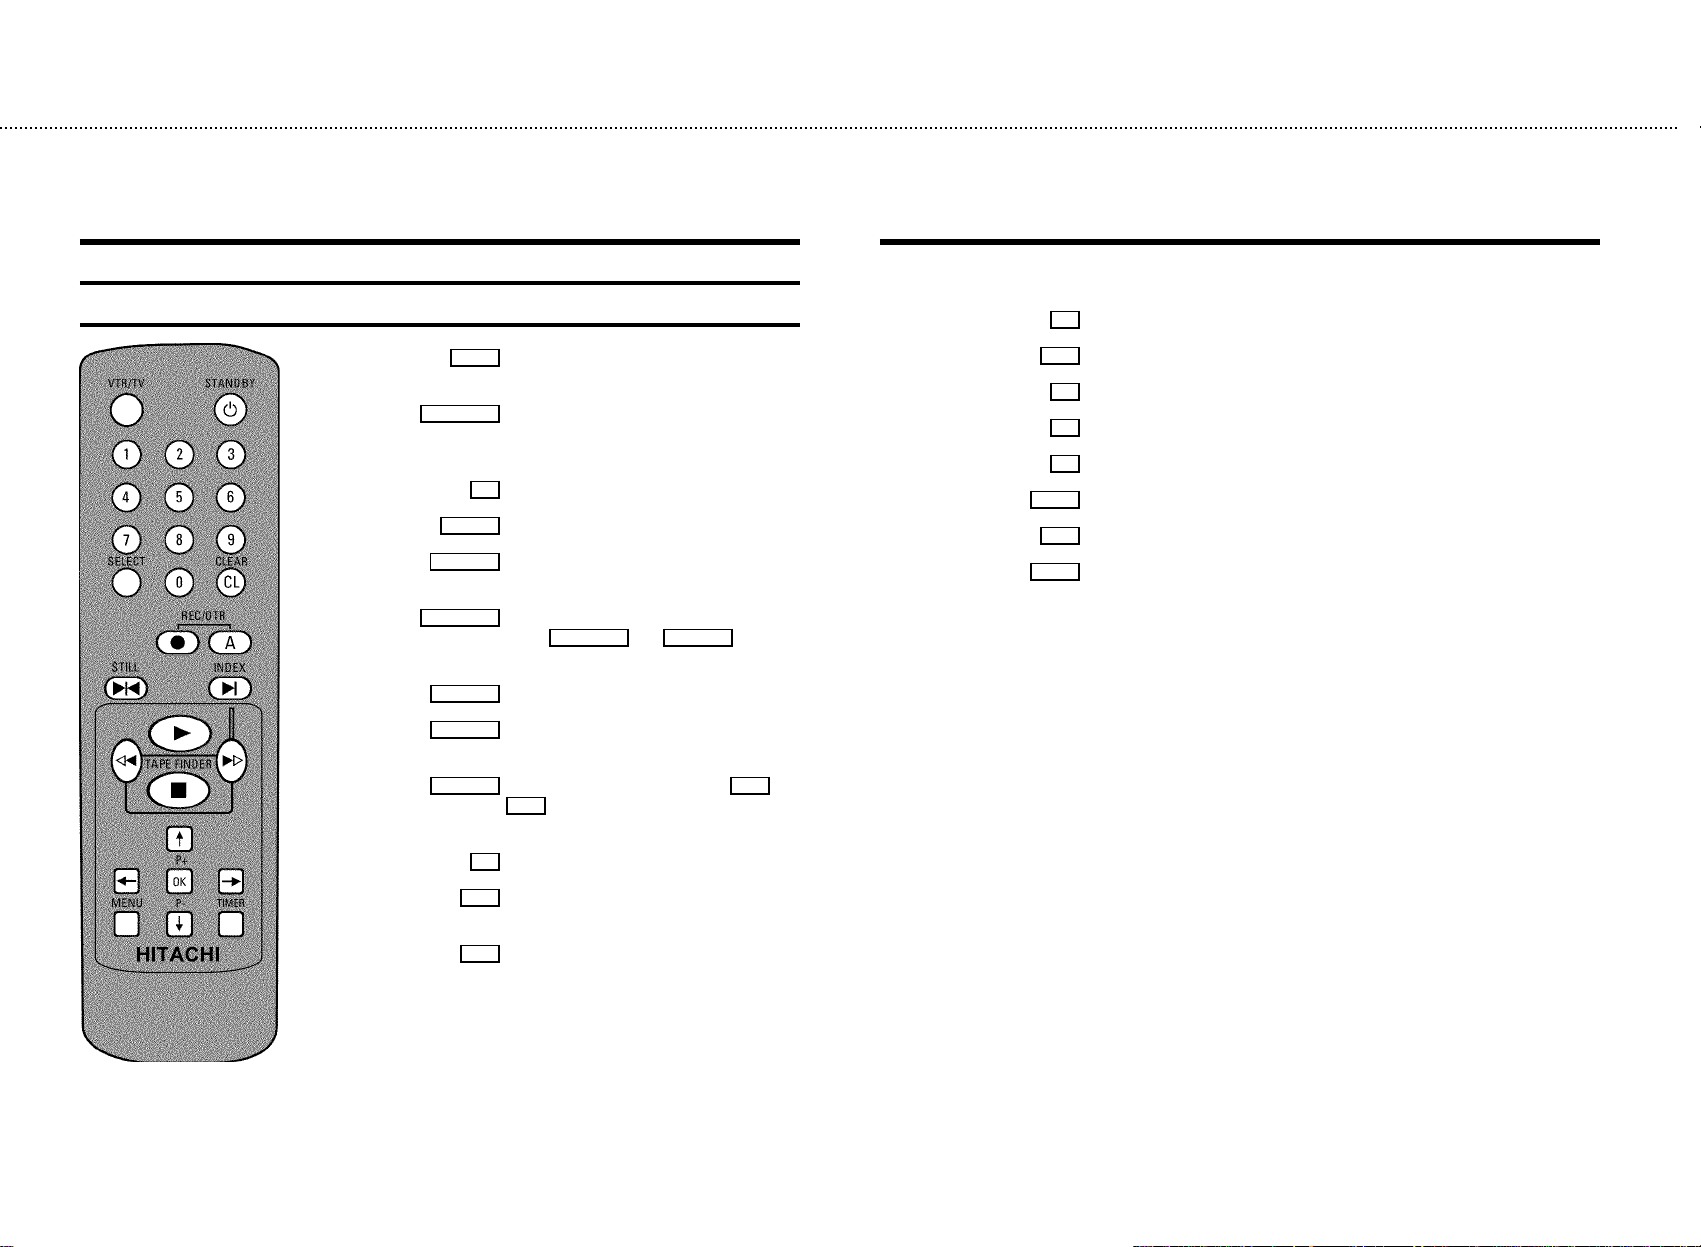
The remote control
VTR/TV TV monitor : To switch between TV reception
and VCR playback
STANDBY m Switch on or off : To switch set on or off,
interrupt menu function, interrupt a
programmed recording (TIMER)
0-9 Number buttons:0-9
SELECT Select: To select a function
CLEAR (CL) Delete : To delete last entry or clear a
programmed recording (TIMER)
REC/OTR n Record: To record the programme selected
Press REC/OTR n and REC/OTR A at the
same time
REC/OTR A Button to activate recording
STILL R Still picture : To stop the tape and show a still
picture
INDEX E Index search: In combination with H /
I : to search for previous or next
recording on the cassette
G Playback : To play a cassette
h Pause/Stop: To stop the tape, except during TIMER-recording
;P+ Select: To select the next line or programme number
Q Select: Cursor left
OK Store/Confirm: To store or confirm entry
P Select: Cursor right
MENU Menu : To call up or end main menu
P- = Select: To select the previous line or programme number
TIMER TIMER: To make a TIMER programming with VIDEO Plus+ or to alter or clear a
programmed TIMER
H Rewind : During STOP and STANDBY: rewind,
during PLAYBACK: reverse scanning
I Forward wind: During STOP and STANDBY:
forward wind, during PLAYBACK: forward
scanning
Page 3
&
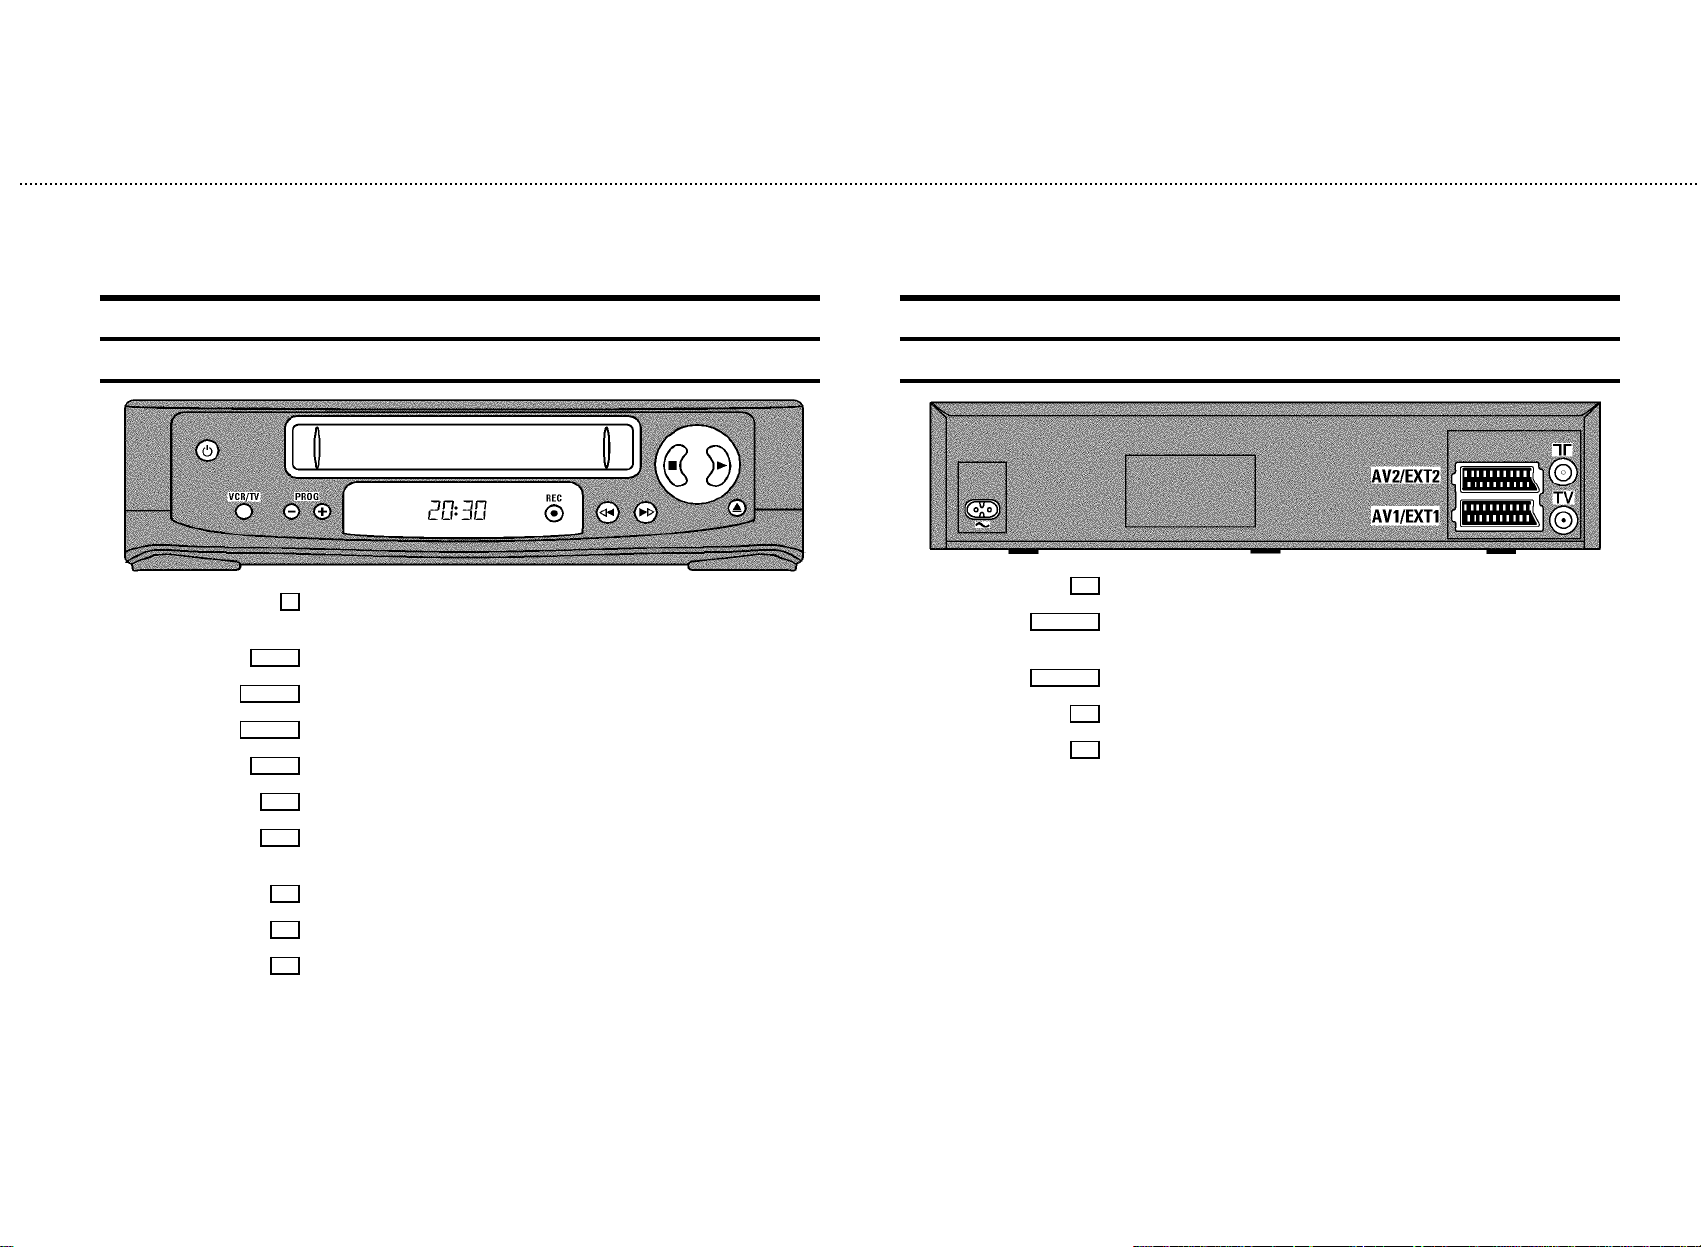
Front of the set
m Standby : To switch off or on, interrupt a function, interrupt a programmed recording
(TIMER)
VCR/TV TV monitor : To switch between TV reception and VCR playback
PROG r
PROG q
Select: One line or programme number down
Select: One line or programme number up
REC n
Record: To record the programme selected
H
Rewind : During STOP and STANDBY: rewind, during PLAYBACK:reverse scanning
I
Forward wind: During STOP and STANDBY: forward wind, during PLAYBACK: forward
scanning
h Pause/Stop, eject cassette: To stop the tape and eject the cassette
G
Playback : To play a cassette
Back of the set
4 Mains socket: To connect the mains cable
AV2 EXT2
AV1 EXT1
Scart socket 2: To connect a satellite receiver, decoder, video recorder, etc. (programme
E2’)
number ’
Scart socket 1: To connect the TV set (programme number ’E1’)
2
Aerial input socket: To connect the aerial cable
3
Aerial output socket: To connect the TV set
J
Eject: To eject a cassette
Page 4
OPERATING INSTRUCTIONS HITACHI VT-MX910EUK
Thank you for buying a HITACHI video recorder. The
VT-MX910EUK is one of the most sophisticated and
simple-to-use video recorders (VCR) on the market. With this
VCR you can record and play VHS-standard cassettes.
Please take the time to read this operating manual before
using your video recorder.
Safety instructions and other notes
ADanger: High voltage!
Do not remove the top cover as there is a risk of an electrical
shock!
AThe video recorder does not contain any components that can
be repaired by the customer. When the video recorder is
connected to the power supply there are some components that
are constantly operational. To switch off the video recorder
completely you must disconnect it from the power supply.
BMake sure that air can circulate freely through the ventilation
slots on the video recorder.
So that you can identify your machine in the event of theft,
enter the serial number (PROD.NO) here. The serial number is
printed on the type plate fixed at the rear of the set.
MODEL NO. VT-MX910EUK
PROD.NO: ......
This product complies with the requirements of the Directive
73/23/EEC + 89/336/EEC + 93/68/EEC.
Interference
The Department of Trade and Industry operates a Radio
Investigation Service to help TV licence holders improve
reception of BBC and ITC programmes where these are being
spoilt by interference.
If your dealer cannot help, ask at a Main Post Office for the
booklet ’How to Improve Television and Radio Reception’.
BMake sure that no objects or liquids enter the video recorder. If
liquid is spilt into it, disconnect the video recorder immediately
from the power supply and call the After-sales Service for
advice.
BThe video recorder should not be used immediately after
transportation from a cold to a hot area or vice versa, or in
conditions of extreme humidity.
After unpacking the video recorder, it should be allowed to
acclimatize for at least three hours before installation.
C This operating instruction has been printed on nonpolluting
paper.
C Deposit old batteries at the relevant collection points.
C Please make use of the facilities available in your country for
disposing of the packaging of the video recorder in a way that
helps to protect the environment.
C This electronic equipment contains many materials that can be
recycled. Please inquire about the possibilitiesfor recycling
your old set.
• VIDEO Plus+ and PlusCode are registered trademarks of
Gemstar Development Corporation. The VIDEO Plus+
system is manufactured under licence from Gemstar
Development Corporation.
Technical information
Voltage : 220-240V/50Hz
Power consumption : 12,5W
Power consumption (Standby) : less than 4W (clock display
off)
Winding time: approx. 100 seconds (Cassette E-180)
Measurements in cm (W / H / D): 38.0 / 9.3 / 26.0
Number of video heads:2
Recording/Playback time: 4 Hours (Cassette E-240)
8 Hours (LP) (Cassette E-240)
List of accessories
• Operating instructions
• Remote control and batteries
• Aerial cable
• Mains cable
• Quick install guide
1
Page 5

CONTENTS
1. CONNECTING YOUR VIDEO RECORDER 3..............
Placing the batteries in the remote control 3...........
Connecting your video recorder to the TV set 3.........
Connecting with a scart cable 3......................
Connecting without a scart cable 4...................
Connecting other equipment 4........................
2. INSTALLING YOUR VIDEO RECORDER 5...............
Initial installation 5..................................
Allocating a decoder 5..............................
Manual TV channel search 6.........................
Satellite receiver 6..................................
Special installation functions 7.......................
Automatic TV channel allocation (Follow TV) 7.........
Automatic TV channel search (Autoinstall) 7...........
Monitor function 8..................................
Sorting and clearing TV channels manually 8...........
Setting the time and date 8...........................
3. IMPORTANT NOTES FOR OPERATION 9...............
General information 9...............................
Saving energy 9....................................
Emergency interrupt 9...............................
The symbols on your video recorder display 10.........
Summary of user guide 11...........................
User guide (OSD) 11.................................
Switching ’Direct Record’ on or off 17.................
6. PROGRAMMED RECORDING (TIMER) 18...............
’VPS’ (Video Programming System) and ’PDC’
(Programme Delivery Control) 18.....................
Programming a recording (with ’VIDEO Plus+’) 18.......
Programming a recording (without ’VIDEO Plus+’) 19....
How to check or change a programmed recording
(TIMER) 20.........................................
How to clear a programmed recording (TIMER) 20......
7. ADDITIONAL FUNCTIONS 21.........................
Switching the TV system 21..........................
Child lock 21.......................................
Switching the on-screen display (OSD) off or on 21.....
Continuous playback 22.............................
Automatic switch-off 22.............................
Reducing picture disturbance - optimizing the
modulator 23.......................................
Switching off the modulator 23.......................
8. Before you call an engineer 24.......................
9. GLOSSARY 25......................................
Technical terms used 25.............................
4. PLAYBACK FUNCTIONS 12..........................
Playing a cassette 12................................
Playing NTSC cassettes 12...........................
Tape position indication 12...........................
Searching for tape position with the picture (picture
search) 13.........................................
Still picture 13......................................
Searching for tape position without the picture (wind
and rewind) 13.....................................
Easy View 13.......................................
Tape Finder 13.....................................
Automatic search for a tape position (index search) 13..
Automatic search for a blank space on the tape 13.....
Skipping commercials automatically 14................
Picture interference 14..............................
Tracking during playback 14.........................
Tracking during still picture 14.......................
5. MANUAL RECORDING 15............................
Recording without automatic switch-off 15............
Recording with automatic switch-off (OTR
one-touch-recording) 15.............................
Protecting your recordings 15........................
Auto-assembling 15.................................
Selecting the recording speed (SP or LP) 16............
Automatic recording from a satellite receiver (SAT
RECORDING) 16....................................
’Direct Record’ 17...................................
2
Page 6
1. CONNECTING YOUR VIDEO RECORDER
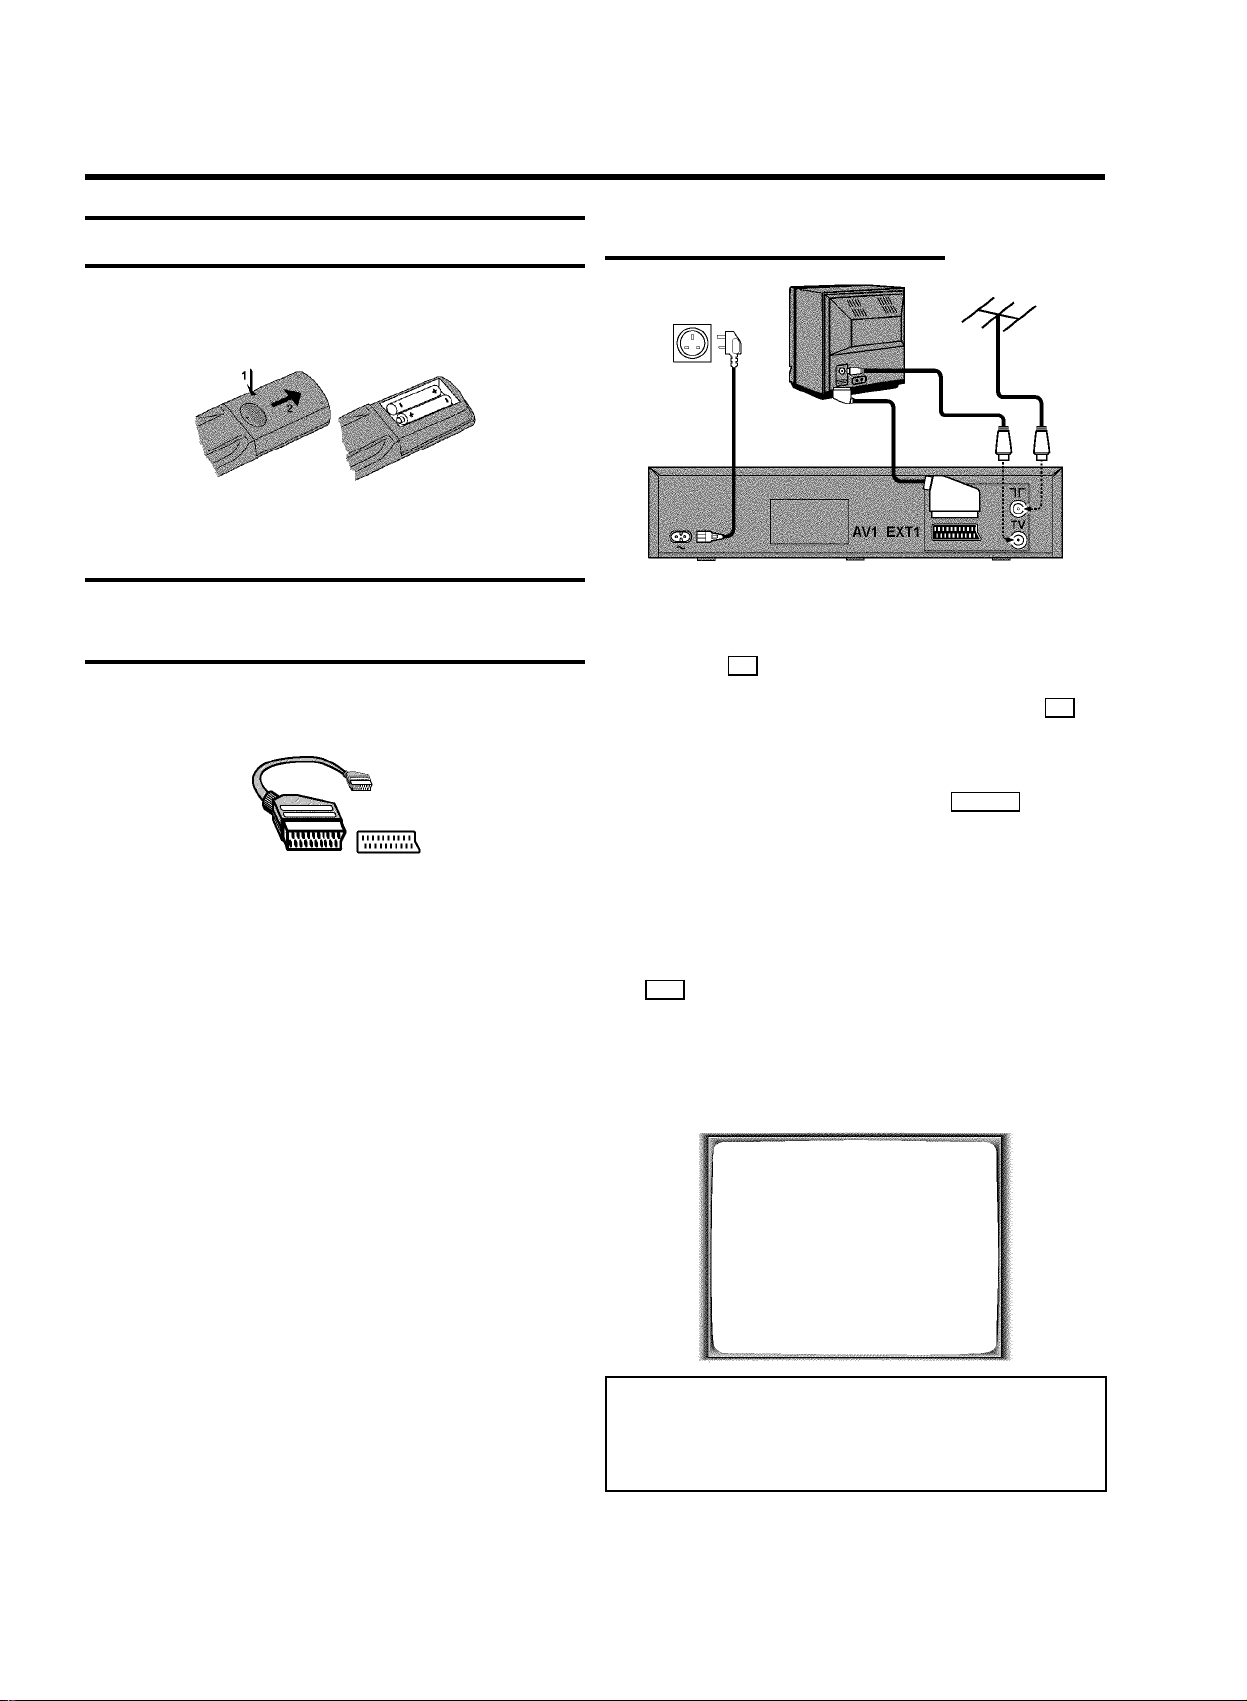
Placing the batteries in the remote control
1 Open up the battery compartment of your remote control
and place the batteries in it as shown in the picture.
2 Close the battery compartment.
Connecting your video recorder to the
TV set
We recommend the use of a scart cable. This will give you the
best picture and sound quality.
If you install your video recorder for the first time, select one of
the following options:
• ’Connecting with a scart cable’
If your TV set has a scart socket and you are using a scart
cable.
• ’Connecting without a scart cable’
If you are not using a scart cable.
Connecting with a scart cable
1 Switch off the TV set.
2 Remove the aerial cable plug from your TV set and insert
it into the 2 socket at the back of the video recorder.
3 Plug one end of the aerial cable provided into the 3
socket on the video recorder and the other end into the
aerial input socket on your TV set.
4 Plug one end of a scart cable into the AV1 EXT1 scart
socket at the back of the video recorder and the other
end into the suitable scart socket on your TV set (see
instruction manual TV set).
5 Switch on the TV set.
6 Insert one end of the mains cable into the mains socket
4 at the back of the video recorder and the other end
into the wall socket.
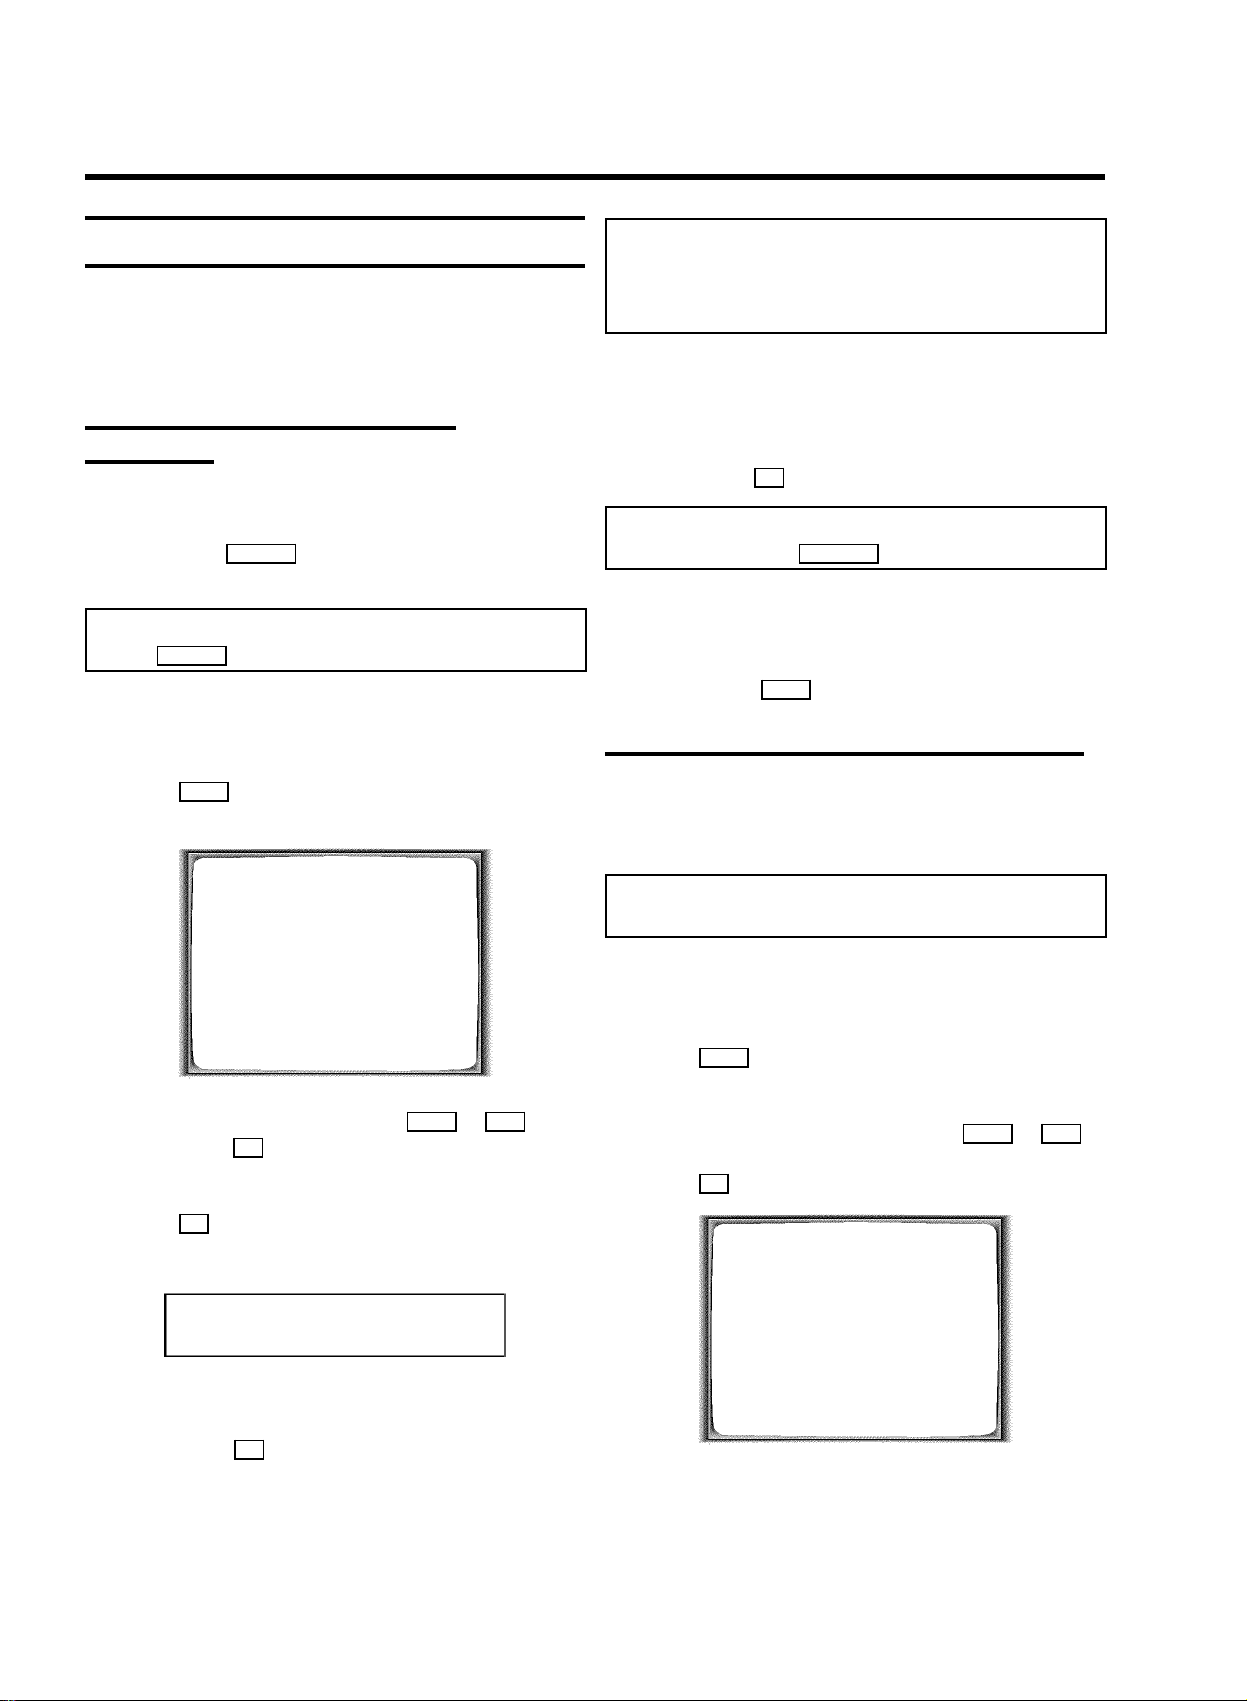
7 If your TV set automatically switches to programme
number e.g.: ’EXT’, ’0’, or ’AV’, this text will appear on the
TV screen:
CONGRATULATIONS
YOU NOW OWN A NEW
VIDEO RECORDER
CONTINUEpOK
Note: If your TV set does not switch to programme number
e.g.: ’EXT’, ’0’, or ’AV’ automatically, select the programme
number for the video recorder manually (see instruction
manual TV set).
8 Then, read the paragraph ’Initial installation’ in the
chapter ’INSTALLING YOUR VIDEO RECORDER’.
3
Page 7
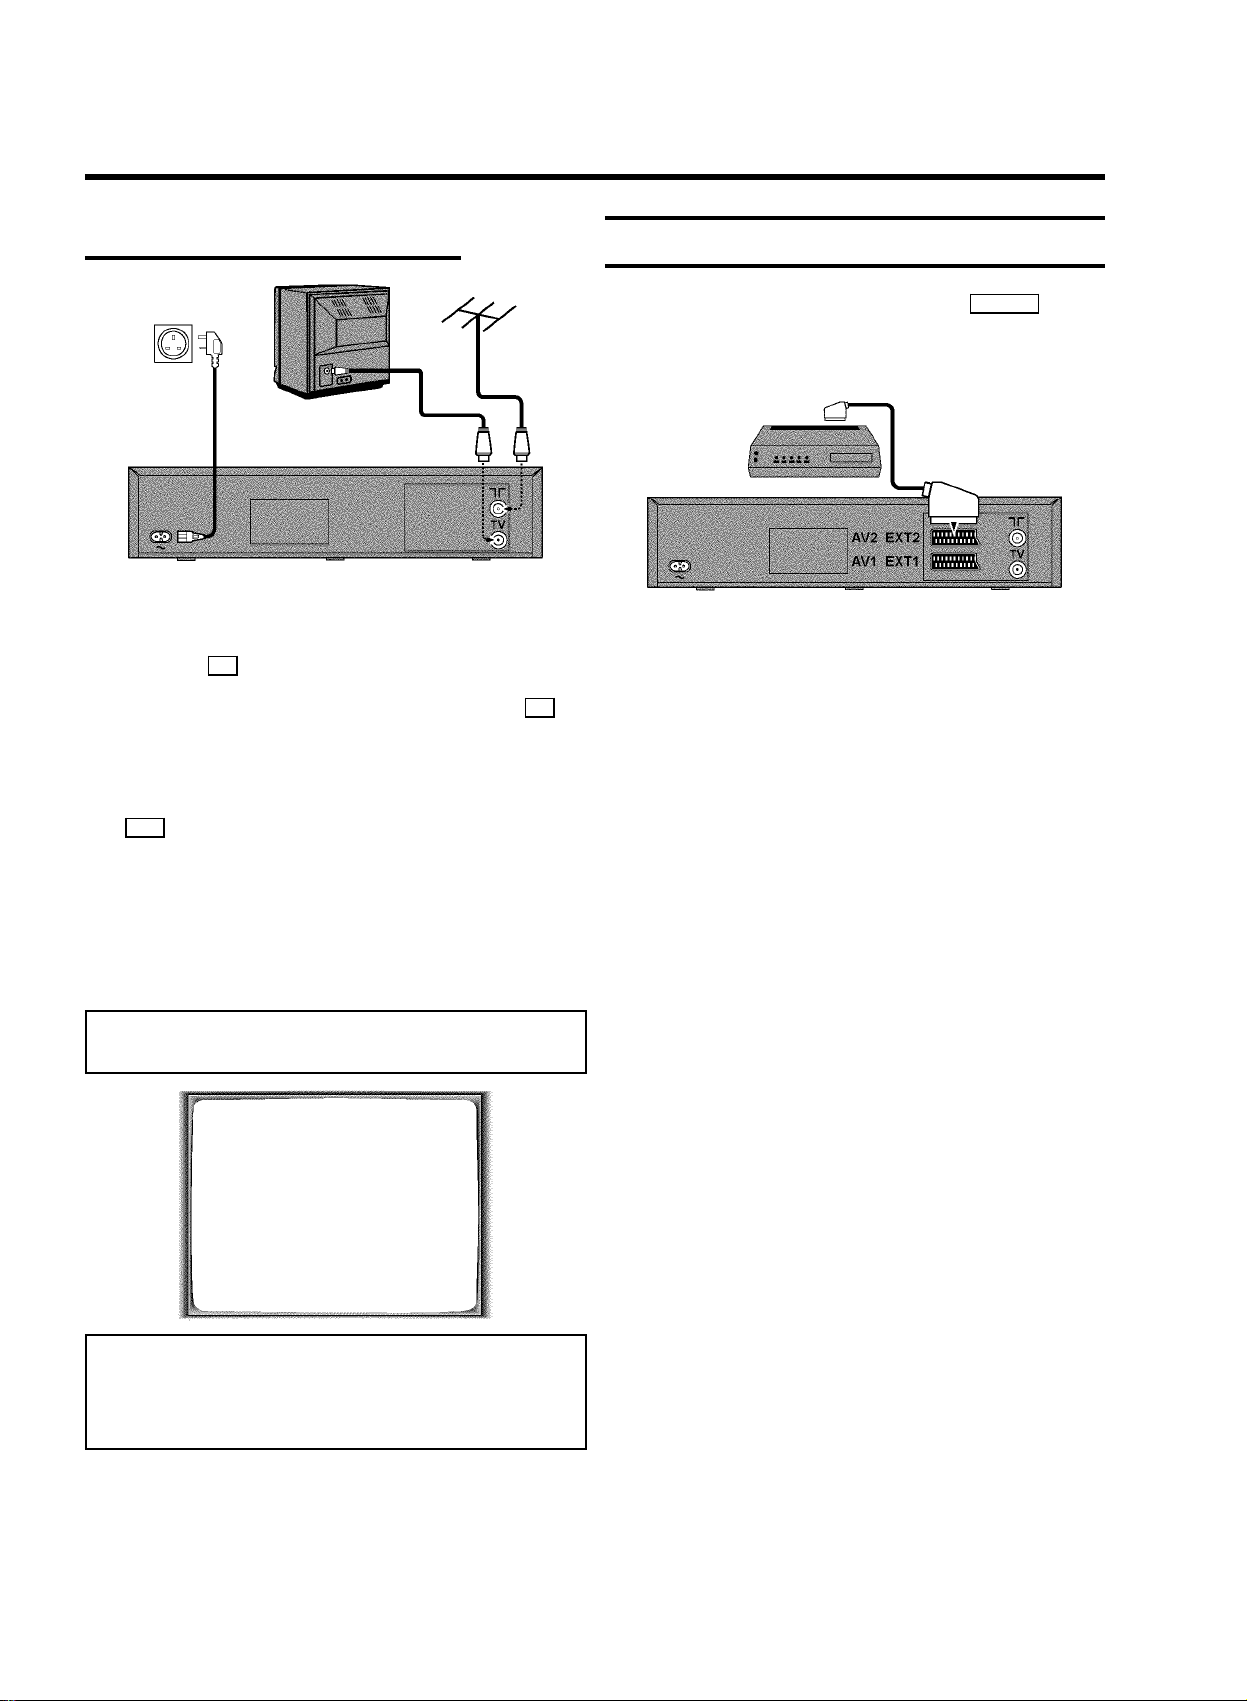
Connecting without a scart cable
1 Switch off the TV set.
2 Remove the aerial cable plug from your TV set and insert
it into the 2 socket at the back of the video recorder.
3 Plug one end of the aerial cable provided into the 3
socket on the video recorder and the other end into the
aerial input socket on your TV set.
4 Insert one end of the mains cable into the mains socket
4 at the back of the video recorder and plug the other
end into the wall socket.
Connecting other equipment
You can connect additional equipment to the AV2 EXT2 socket.
For example: a decoder, a satellite receiver or a camera
recorder.
5 Switch on your TV set and select the programme number
that you have chosen for video playback (see instruction
manual TV set).
6 Tune in the TV set until this picture appears.
Note: The video recorder will now transmit on channel 35 or
583MHz.
CONGRATULATIONS
YOU NOW OWN A NEW
VIDEO RECORDER
CONTINUEpOK
Note: If the picture quality of TV channels on your TV is
poor, please read the section ’Reducing picture disturbance
- optimizing the modulator’ in the chapter ’ADDITIONAL
FUNCTIONS’.
7 When the TV has been tuned read the paragraph ’Initial
installation’ in the chapter ’INSTALLING YOUR VIDEO
RECORDER’.
4
Page 8
2. INSTALLING YOUR VIDEO RECORDER
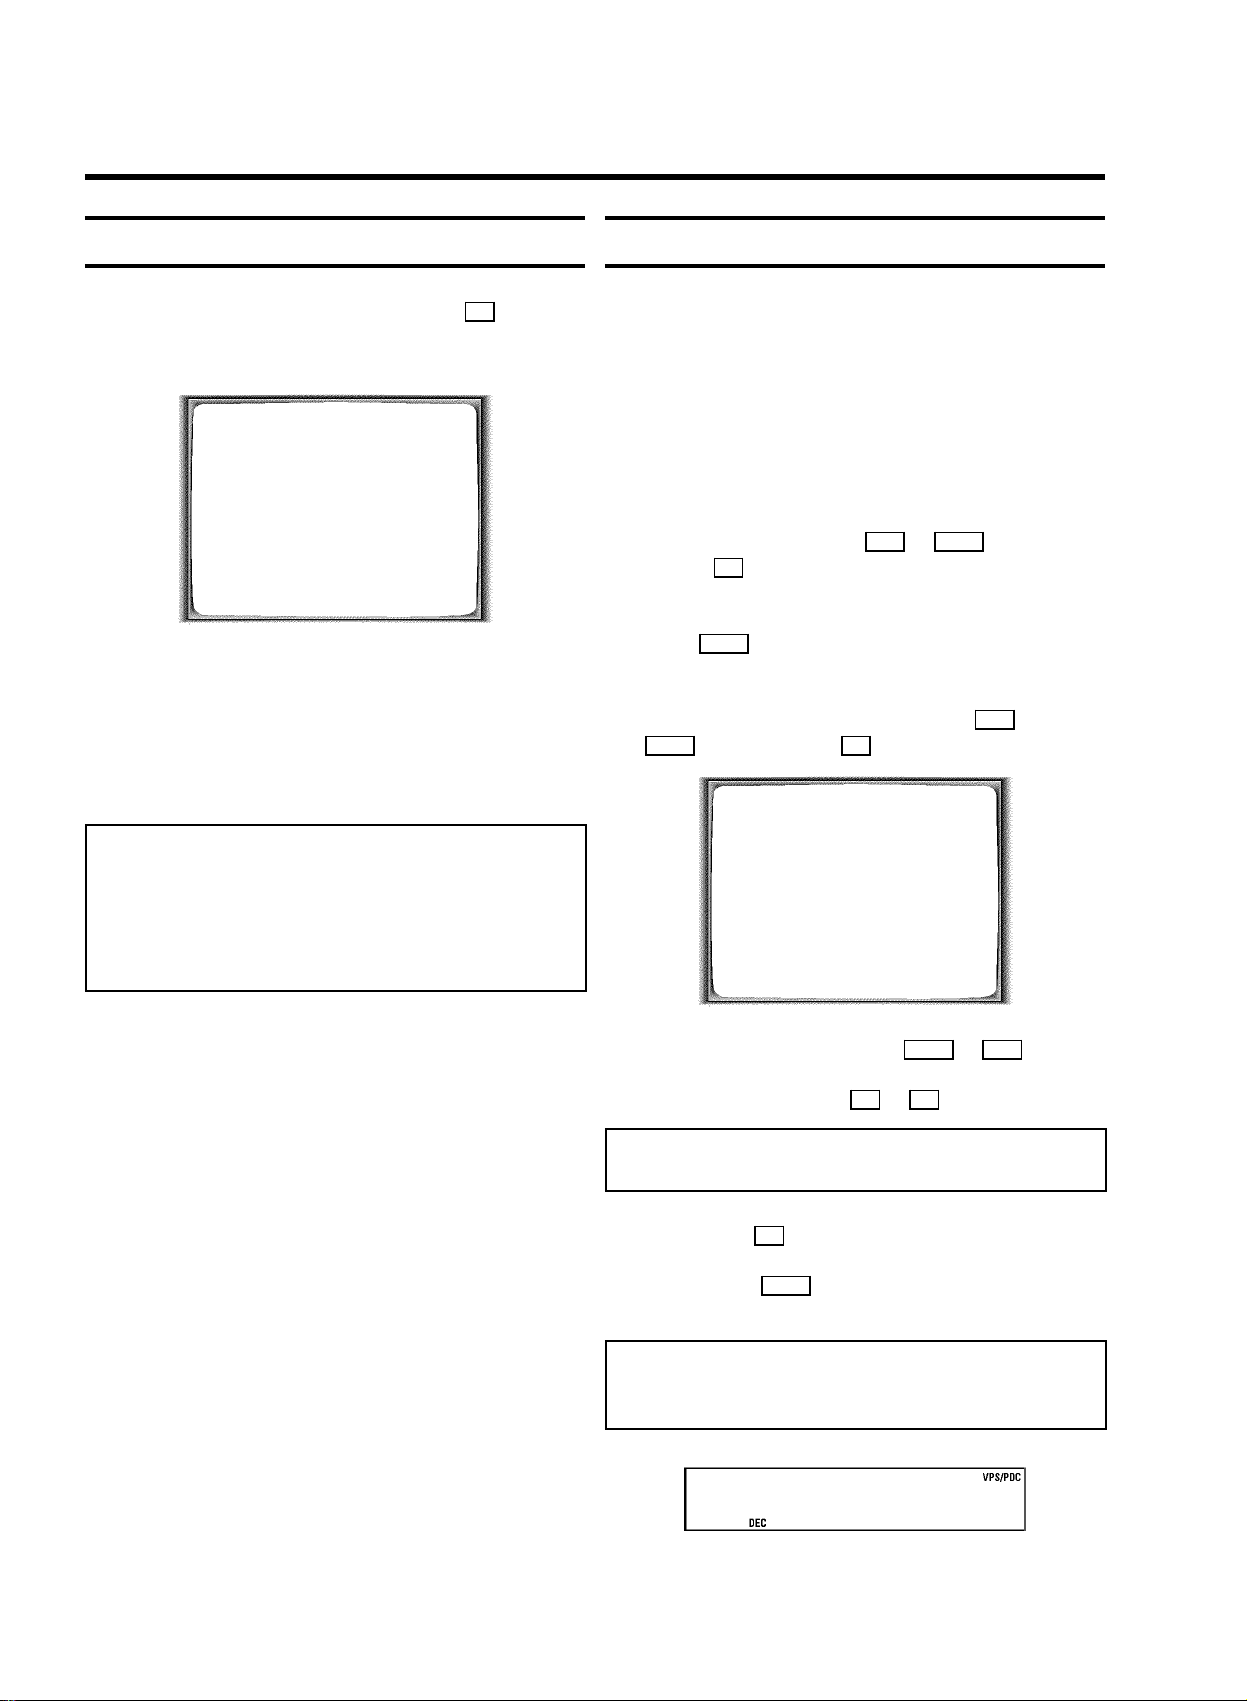
Initial installation
1 Confirm the picture on the TV screen with OK on the
remote control. ’Autoinstall’ starts. This message will
appear:
AUTO INSTALL
SEARCHING
00 TV CHANNELS FOUND
ƒƒƒƒƒƒƒ__________________
PLEASE WAIT...
Wait until all the TV channels have been found. This can
take several minutes.
2 When all TV channels have been found, ’STORED’ will
briefly appear.
The initial installation is now complete.
Allocating a decoder
Some TV stations will send coded TV channels, that you can
only watch when you use a decoder. You can connect such a
decoder (descrambler) to your video recorder. With the
following function, the connected decoder will automatically
be activated for the TV programme you want to watch.
1 Switch on the TV set. If required, select the programme
number for the video recorder.
2 On the video recorder, use ;P+ or P- = or number
buttons 0-9 on the remote control to select the
programme number you want to allocate the decoder to.
3 Press MENU on the remote control. The main menu will
appear.
4 Select the line ’MANUAL SEARCH’ with ;P+ or
P- = and confirm with OK .
MANUAL SEARCH
Note: Check the time and the date. Read the section ’setting
the clock and date’ in this chapter.
* If you have connected a satellite receiver, please read the
section ’Satellite receiver’.
* If you have connected a decoder, you must install it as
described in the next section.
PROGRAMME NUMBER è P01 p
S-CHANNEL NO
CHANNEL NUMBER 21
DECODER OFF
________________________________
EXITpMENU STOREpOK
5 Select the line ’DECODER’ with P- = or ;P+ .
6 Select function ’ON’ with Q or P .
Note: When you select ’OFF’, the decoder will not be
allocated.
7 Confirm with OK .
8 To end, press MENU .
Your decoder has now been allocated to this TV channel.
Note: When the function is switched on, ’DEC’ will appear in
the video recorder display for the TV channel you have
selected.
BBC1
5
Page 9
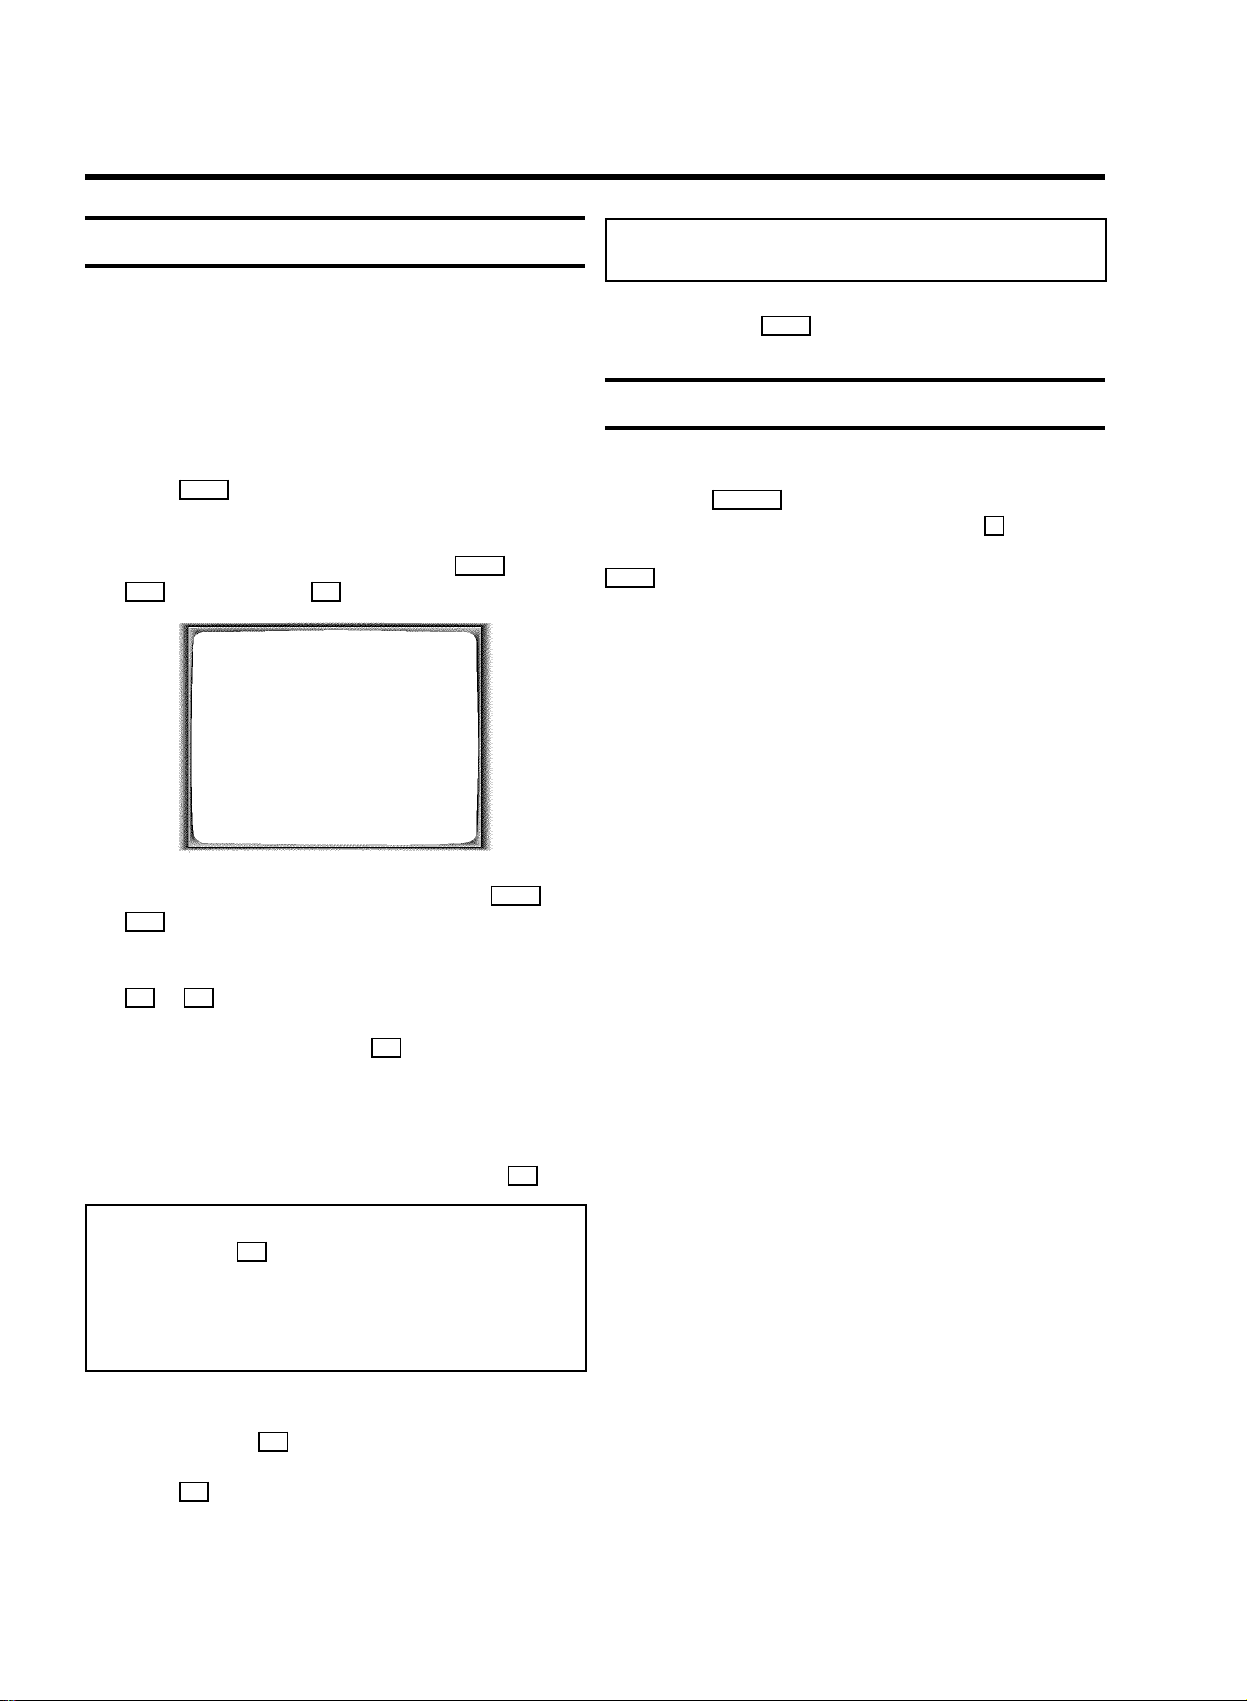
Manual TV channel search
Note: If you want to search for further TV channels, start
again at step 3.
In certain cases the ’Automatic TV channel search’ may not be
able to find all of the TV channels (e.g. coded TV channels). In
that case, use this manual method to set the channels.
1 Switch on the TV set. If required, select the programme
number for the video recorder.
2 Press MENU on the remote control. The main menu will
appear.
3 Select the line ’MANUAL SEARCH’ with P- = or
;P+ and confirm with OK .
MANUAL SEARCH
PROGRAMME NUMBER è P01 p
S-CHANNEL NO
CHANNEL NUMBER 21
DECODER OFF
________________________________
EXITpMENU STOREpOK
0 To end, press MENU .
Satellite receiver
You can receive channels from the satellite receiver via the
scart socket AV2 EXT2 .
To do this, select programme number ’E1’ with 0 on the
remote control and then select programme number ’E2’ with
P- = . You should select the satellite channels on the satellite
receiver itself.
4 Select the line ’PROGRAMME NUMBER’ with P- = or
;P+ .
5 Select the desired programme number (e.g.: ’P01’) with
Q or P .
6 In the line ’S-CHANNEL’, use P to select:
’NO’: To enter the channel
’YES’: To enter a special channel
7 Enter the channel of the desired TV channel in line
’CHANNEL NUMBER’ with the number buttons 0-9 .
Note: If you don’t know the channel number of the desired
TV channel, hold P in line ’CHANNEL NUMBER’ to start
the automatic search.
Repeat automatic search you until have found the desired
TV channel. A changing channel number will appear on the
TV screen.
8 If you want to allocate a decoder, in line ’DECODER’
select ’ON’ with P .
9 Press OK to store the TV channel. ’STORED’ will briefly
appear on the TV screen.
6
Page 10
Special installation functions
You can select one of the following installation functions in
order to adapt the video recorder to your own specific
requirements.
Note: When ’NOTV’ (no signal from TV set) appears in the
display, the TV channels can not be allocated automatically.
In this case, read paragraph: ’Manual TV channel
allocation’.
7 Wait until e.g.: ’TV02’ appears.
Automatic TV channel allocation
(Follow TV)
With this function, the video recorder stores the channels in
the same order as on the TV set. This only works if the video
recorder (socket AV1 EXT1 ) and the TV set are connected
with a scart cable.
Note: You must switch off any equipment connected to
socket AV2 EXT2 .
1 Switch on the TV set. If required, select the programme
number for the video recorder.
2 Press MENU on the remote control. The main menu will
appear on the screen.
MENU
CLOCK
AUTO INSTALL
MANUAL SEARCH
FOLLOW TV
TV CHANNEL ALLOC.
RECORD SPEED
AUTO STANDBY
TV SYSTEM
SPECIAL SETTINGS
________________________________
…OK
†
8 Select the next programme number, e.g.: ’2’ on the TV set.
9 Confirm with OK on the video recorder-remote control.
Note: If you have allocated the wrong TV channel, you can
go back one step with CLEAR (CL) .
0 Repeat steps 7to 9until all TV channels have been
allocated.
A To end, press MENU .
Automatic TV channel search (Autoinstall)
The video recorder will search for all TV channels. It stores TV
channels found in the following sequence: BBC 1, BBC 2, ITV,
CH 4, CH 5, SKY, others.
Note: If you want to start the automatic TV channel search
again, then follow the instructions below.
1 Switch on the TV set. If required, select the programme
number for the video recorder.
2 Press MENU on the remote control. The main menu will
appear.
3 Select the line ’FOLLOW TV’ with P- = or ;P+ and
confirm with OK . Take notice of the message on the TV
screen.
4 Press OK .’TV01’ will appear in the video recorder
display.
TV01
5 Select programme number ’1’ on the TV set.
6 Confirm with OK on the video recorder-remote control.
The video recorder compares the TV channels on the TV
set and the video recorder.
When the video recorder finds the same TV channel as
the TV set, then it stores it at ’P01’.
3 Select the line ’AUTO INSTALL’ with P- = or ;P+ .
4 Press OK . The ’Automatic TV channel search’ starts.
AUTO INSTALL
SEARCHING
00 TV CHANNELS FOUND
ƒƒƒƒƒƒƒ__________________
PLEASE WAIT...
Wait until all TV channels have been found. This can take
several minutes.
7
Page 11

5 When Autoinstall is complete, ’STORED’ will briefly
appear on the TV screen.
The time and date information have been set.
6 To end, press MENU .
Note: When you have assigned a programme number to the
last TV channel, you will automatically return to the main
menu when you confirm with SELECT . To end, press
MENU .
How to search for a TV channel manually, you can read in the
section ’Manual TV channel search’.
Monitor function
You can switch backwards and forwards between TV picture
and video recorder picture with VTR/TV . But this only works
when you use a scart cable to connect the video recorder to
your TV set and if your TV set responds to this switch-over.
You can also use VCR/TV on the video recorder.
Sorting and clearing TV channels manually
You can assign any programme number to a TV channel that
you have stored and you can also delete unwanted TV
channels.
1 Switch on the TV set. If required, select the programme
number for the video recorder.
2 Press MENU on the remote control. The main menu will
appear.
7 Repeat steps 5to 6until you have given a programme
number to all TV channels.
8 To end, press MENU .
Setting the time and date
Note: If a TV channel which transmits TXT/PDC is stored
under programme number ’P01’, time and date will
automatically be taken from the TXT/PDC information.
If the time in the video recorder display is not correct or if
’--:--’ appears in the display, please set the clock manually.
1 Switch on the TV set. If required, select the programme
number for the video recorder.
2 Press MENU on the remote control. The main menu will
appear.
3 Select the line ’CLOCK’ with P- = or ;P+ and confirm
with OK .
3 Select the line ’TV CHANNEL ALLOC.’ with P- = or
;P+ .
4 Confirm with OK .
TV CHANNEL ALLOC.
ALLOCATE ON P01
TV CHANNEL è BBC1 p
________________________________
ALLOCATEpSELECT EXITpMENU
5 With P or Q , select the TV channel you want to
assign a programme number to (starting with ’P01’).
Note: If you want to delete a TV channel, press CLEAR (CL) .
6 Confirm with SELECT . The following message will briefly
appear on the TV screen: e.g.: ’BBC1 ALLOCATED
ON P01’.
CLOCK
YEAR è 2000 p
MONTH 01
DATE 01
TIME 20:00
________________________________
EXITpMENU STOREpOK
4 Check the year in line ’YEAR’. If required, please change
the year with the number buttons 0-9 on the remote
control.
5 Select the next line with ;P+ or P- = .
6 Check ’TIME’, ’MONTH’ and ’DATE’ in the same way.
7 When all information is correct, confirm with OK .
This will appear in the display: ’STORED’
8 To end, press MENU .
8
Page 12

3. IMPORTANT NOTES FOR OPERATION
General information
Note: You can switch on with STANDBY m , the number
buttons 0-9 or by putting in a cassette.
* If you have not used the video recorder for a few minutes,
it will switch to standby automatically. For more information,
please read the section ’Automatic switch-off’ in chapter
’additional functions’.
* If you have switched the video recorder off with
STANDBY m , the time will show in the display, for instance ,
’18:00’.
If the clock has not been set, ’--:--’ will appear.
* When the video recorder is switched off and the time isn’t
shown in the video recorder display, the clock display may
be switched off. You will find more information in the
section ’Saving energy’.
* Keep your video recorder connected to the mains at all
times to ensure that programmed recordings can be made
and that the television works normally. Your video recorder
uses less than 4 Watts (with clock-display switched off).
* If the video recorder is not plugged into the mains, it will
usually store TV channels for one year and timer and date
information for three hours.
Saving energy
To save energy, you can switch off the clock display on the
video recorder. Programmed (TIMER ) recordings will take
place even if the clock display has been switched off.
1 Switch on the TV set. If required, select the programme
number for the video recorder.
2 Press MENU on the remote control. The main menu will
appear.
3 Select the line ’SPECIAL SETTINGS’ with P- = or
;P+ and confirm with OK .
SPECIAL SETTINGS
OSD è ON p
CLOCK DISPLAY OFF
COUNTER T.LEFT
SAT RECORDING OFF
REPEAT PLAY OFF
DIRECT RECORD OFF
________________________________
EXITpMENU STOREpOK
4 To switch off the clock display on the video recorder,
select ’OFF’ in line ’CLOCK DISPLAY’ with P .
Note: To switch the clock display on, select ’ON’.
5 Confirm with OK .
’STORED’ will briefly appear on the TV screen.
6 To end, press MENU .
Emergency interrupt
You can use STANDBY m on the video recorder or the remote
control to interrupt any function.
So if you are having operating problems, you can just interrupt
the function and start again.
And you can practise operating your set without any worries.
No matter which buttons you press, you cannot damage it.
9
Page 13

The symbols on your video recorder display
These symbols can light up on your video recorder display:
This is where the current operating mode is shown
as a symbol.
LP When you have switched on the LP (Long Play)
function or when you play a tape that has been
recorded in LP (Long Play).
When you have switched on the child lock.
When a satellite recording has been programmed.
DEC When a decoder has been allocated to the TV
channel you have currently selected.
When you are making a recording.
Display of programme number / tape position /
channel name / function.
Tape position in seconds, but only if the display
mode ’LINEAR’ has been selected.
k When you have programmed a recording or when
a programmed recording is being made.
D When you are programming daily recordings.
W When you are programming weekly recordings.
When you have put a cassette in the video
recorder.
DATE When the date of the programmed recording is
shown.
START When the start time of the programmed recording
is shown.
PROG. When the programme number of the programmed
recording is shown.
END When the end time of the programmed recording
is shown.
VPS/PDC Video Programming System / Programme Delivery
Control: when a VPS or PDC code is being
transmitted.
10
Page 14

Summary of user guide
The OSD menu offers the following functions. More details on each can be found in the appropriate chapter.
MENU
CLOCK
AUTO INSTALL
MANUAL SEARCH
FOLLOW TV
TV CHANNEL ALLOC.
RECORD SPEED
AUTO STANDBY
TV SYSTEM
SPECIAL SETTINGS
________________________________
…OK
†
Main menu
User guide (OSD)
The OSD (On-screen display) shows the various functions in
the form of a menu on the television screen. You can then
choose the settings you require. There is a summary of the
menus on this page. The main button functions are displayed
in a help line along the bottom of the screen.
• To call up or close the menu: with MENU .
• To select a line: with P- = or ;P+ .
• To enter or change your selection: with the number
buttons 0-9 or with Q or P .
• To cancel: with STANDBY m .
• To save or confirm: with OK .
• To close the main menu: with MENU .
CLOCK
YEAR è 2000 p
MONTH 01
DATE 01
TIME 20:00
________________________________
EXITpMENU STOREpOK
Chapter: INSTALLING YOUR VIDEO RECORDER-
’Setting the date and the time’
AUTO INSTALL
SEARCHING
00 TV CHANNELS FOUND
ƒƒƒƒƒƒƒ__________________
PLEASE WAIT...
Chapter: INSTALLING YOUR VIDEO RECORDER-
Automatic TV channel search
MANUAL SEARCH
PROGRAMME NUMBER è P01 p
S-CHANNEL NO
CHANNEL NUMBER 21
DECODER OFF
________________________________
EXITpMENU STOREpOK
Chapter: INSTALLING YOUR VIDEO RECORDER-
Manual TV channel search
TV CHANNEL ALLOC.
ALLOCATE ON P01
TV CHANNEL è BBC1 p
________________________________
ALLOCATEpSELECT EXITpMENU
Chapter: INSTALLING YOUR VIDEO RECORDER-
Sorting and clearing TV channels manually
Note: The summary of the OSD (On-screen display) menus on this page should help you select the various functions. The OSD
text shown on your TV screen may sometimes slightly differ from the OSD text shown in this manual.
11
Page 15

4. PLAYBACK FUNCTIONS
Playing a cassette
1 Put a cassette into the cassette slot. ’v’ will appear on
the display.
2 Press the G button.
This will, for example, appear in the display.
0:00:02
3 To stop, press the h button.
Tape position indication
When playing a tape, by pressing the OK button, you can
show the present tape position on the TV screen.
You have a choise of selecting ’LINEAR’or’T.LEFT’.
• ’LINEAR’ will show the tape position in hours, minutes
and seconds.
• ’T.LEFT’ will show the actual amount of
playing/recording time left on the tape in hours and
minutes.
Note: When you play an NTSC cassette, the video recorder
will only show ’LINEAR’.
1 Switch on the TV set. If required, select the programme
number for the video recorder.
2 Press MENU on the remote control. The main menu will
appear.
3 Select the line ’SPECIAL SETTINGS’ with ;P+ or
P- = and confirm with OK .
4 To eject the cassette, press J on the video recorder
when the video recorder is in STOP mode.
Note: Some hired cassettes may have a poor picture or poor
sound quality. This is not a fault in your machine. Please
read ’Eliminating picture interference’.
* Some functions switch off automatically after a while (for
example, pause, still picture, picture search). This helps to
protect the cassette and avoids wasting power.
* For playback, the correct recording speed will
automatically be selected. Please read the section
’Selecting the recording speed (SP or LP)’ in the chapter
’MANUAL RECORDING’.
Playing NTSC cassettes
With this set you can playback cassettes that have been
recorded on another video recorder in the NTSC standard (for
example, American cassettes). But this only works for
PAL-television sets which are suitable for a picture frequency
of 60 Hz.
Note: When you play an NTSC cassette ’60HZ’ will appear
on the display.
* Some special features (for example, still picture) are not
possible while you are playing an NTSC cassette.
SPECIAL SETTINGS
OSD è ON p
CLOCK DISPLAY OFF
COUNTER T.LEFT
SAT RECORDING OFF
REPEAT PLAY OFF
DIRECT RECORD OFF
________________________________
EXITpMENU STOREpOK
4 Select the line ’COUNTER’ with ;P+ or P- = .
5 Select ’LINEAR’or’T.LEFT’ with Q or P and
confirm with OK .
Note: The counter ’LINEAR’ will be set to ’0:00:00’ when
you put a cassette in the machine. You can also reset the
tape position to ’0:00:00’ when you press CLEAR (CL) .
* If you rewind a cassette from the tape position ’0:00:00’,
the counter ’LINEAR’ will show for instance, ’-0:01:20’
(the cassette will be rewound to 1 minute and 20 seconds
before ’0:00:00’).
* If there is an empty space on the tape, the counter
’LINEAR’ will stop running.
* The counter type ’T.LEFT’ will automatically recognise
the length of the tape.
12
Page 16

When you put in a cassette the video recorder must first
calculate the time played. Therefore, ’-:--’ appears first and
only after the tape has been running for a few seconds the
playing time will be shown.
Easy View
With this function you can switch to picture search during
wind and rewind.
6 To end, press MENU .
Searching for tape position with the picture
(picture search)
1 While a cassette is playing, press H (reverse) or
I (forward) once or several times.
This will, for example, appear in the display.
0:30:21
2 To stop a certain place on the tape, press G .
Note: During picture search, the picture quality may not be
so good and there will be no sound.
Still picture
1 Press STILL R . A still picture will appear on the
screen.
This will, for example, appear in the display.
1 If you hold H (rewind) or I (wind) during wind or
rewind, you will switch to picture search.
2 When you release the button, the video recorder will
automatically switch back to rewind or wind.
Tape Finder
Automatic search for a tape position
(index search)
At the start of each recording, the video recorder will write an
index code on the tape.
1 Press INDEX E and then I button to select the next
code mark or INDEX E and then H for the previous
code mark.
This will, for example, appear in the display for the next
index code.
0:30:02
0:00:21
2 Each time you press STILL R again, the picture will
move on one step.
Note: Interference stripes may appear on the screen during
still picture.
Searching for tape position without the
picture (wind and rewind)
1 Stop the tape with h .
2 Press H (reverse) or I (forward).
This will, for example, appear in the display.
0:30:02
3 To stop a certain place on the tape, press h .
2 When the video recorder finds the code mark, it will
automatically switch to play.
Automatic search for a blank space on the
tape
You can search for a space on the tape (at least 1 minute of
blank tape) for a new recording, for example, after an existing
recording on the tape.
1 Press INDEX E . Then press h .
This will, for example, appear in the display.
0:00:00
2 When the video recorder find a blank space, it will
automatically switch to ’pause’.
Note: If no empty space has been found when the end of the
tape is reached, the cassette will be ejected.
13
Page 17

Skipping commercials automatically
With this function you can skip 120 sec. on the tape.
1 Press G while the tape is playing.
2 The video recorder will wind the tape 120 seconds and
will then switch back to playback.
Note: If the commercial is still on, you can press G again.
* If you press G while you are winding the tape, the video
recorder will switch back to playback.
Picture interference
If the picture quality is poor when you play a cassette, please
follow these instructions.
Tracking during playback
1 While a cassette is playing, hold ;P+ until ’TRAC’
(TRACking) appears in the display.
2 Hold ;P+ or P- = until the playback quality is at its
best.
3 Wait a few seconds, until ’TRAC’ disappears from the
display. These picture settings will not change until you
eject the cassette.
Tracking during still picture
If the still picture vibrates vertically, you can improve the still
picture as follows:
1 During still picture, hold ;P+ or P- = until the picture
quality is at its best.
’JITT’ will appear in the display.
2 When you release the button, ’JITT’ will disappear. The
video recorder will store these settings automatically.
Note: Please note, however, that interference may still
occur with poor quality cassettes.
14
Page 18

5. MANUAL RECORDING
Use ’Manual Recording’ to make a spontaneous recording (for
example, a programme currently being shown).
• If you want to start and stop a recording manually, read
the section ’Recording without automatic switch-off’.
• If you want to start a recording manually but have it
stopped automatically, read the section ’Recording with
automatic switch-off’. This is important if you, for
instance, don’t want to record to the end of the cassette.
• Read the section ’Direct record’ if you want to record a
programme currently being shown.
• Read the section ’Automatic recording from a satellite
receiver’, if you want a recording to be controlled
automatically by a satellite receiver.
Recording without automatic switch-off
1 Insert a cassette.
2 Use ;P+ or P- = to select the programme number you
want to record, for example, ’P01’. This will appear on the
display:
BBC1
Recording with automatic switch-off
(OTR one-touch-recording)
1 Put a cassette in the machine.
2 Use ;P+ or P- = to select the programme number you
want to record.
3 Press REC/OTR n and REC/OTR A on the remote control
at the same time.
4 Each time you press REC/OTR n and REC/OTR A at the
same time you will add 30 minutes to the recording time.
Note: To cancel this information, press CLEAR (CL) .
Protecting your recordings
So that you don’t accidentally delete an important recording,
remove the special tab on the narrow side of the cassette with
a screwdriver or slide the special tab to the left. Later, if you
no longer want to protect your recording, you can seal the gap
again with sticky tape or slide the special tab to the right.
Note: When a TV channel transmits a channel name, it will
show on the video recorder display.
* Programme numbers ’E1’ and ’E2’ are for recording from
other sources (through scart sockets AV1 EXT1 and
AV2 EXT2 ).
3 To start recording, press REC/OTR n and REC/OTR A on
the remote control at the same time or REC n on the
video recorder. This will, for instance, appear in the
display.
BBC1
Note: With OK you can show the tape position in the
display.
4 Stop recording with the h button.
Auto-assembling
You can use the auto-assembling function to join individual
recordings without any major picture disturbance between
them.
1 While the cassette is playing, search for the correct
position on the tape.
2 Stop the cassette by pressing h .’9’ will appear in the
display.
3 Now start recording as usual by pressing REC/OTR n and
REC/OTR A on the remote control.
4 To stop recording, press h .
15
Page 19

Selecting the recording speed (SP or LP)
3 Select the line ’SPECIAL SETTINGS’ with P- = or
;P+ , and confirm with OK .
You can reduce the recording speed by half. This makes it
possible to record, for example, eight-hours instead of
four-hours on an ’E240’ (four-hour) cassette.
1 Switch on the TV set. If required, select the programme
number for the video recorder.
2 Press MENU on the remote control. The main menu will
appear.
3 Select the line ’RECORD SPEED’ with P- = or ;P+
and confirm with OK .
4 Select the required recording speed with Q or P .
Note: ’LP’: Long Play = half recording speed (double
recording time).
’SP’: Standard Play = normal recording speed.
5 Confirm with OK .
6 To end, press MENU .
SPECIAL SETTINGS
OSD è ON p
CLOCK DISPLAY OFF
COUNTER T.LEFT
SAT RECORDING OFF
REPEAT PLAY OFF
DIRECT RECORD OFF
________________________________
EXITpMENU STOREpOK
4 Select the line ’SAT RECORDING’ with P- = or
;P+ .
5 Select ’ON’ with Q or P .
Note: If you want to switch off the function, select ’OFF’.
6 Confirm with OK .
7 To end, press MENU .
8 Put a cassette in the machine.
Note: The picture quality will be adversely affected when
recording at half recording speed (’LP’).
* For playback, the correct recording speed will
automatically be selected.
Automatic recording from a satellite
receiver (SAT RECORDING)
You can only use this function, when you have a satellite
receiver which can control other equipment by a
’programming’ function.
1 Switch on the TV set. If required, select the programme
number for the video recorder.
2 Press MENU on the remote control. The main menu
appears.
9 Use a scart cable to connect scart socket AV2 EXT2 on
the video recorder to the corresponding scart socket on
the satellite receiver.
0 Programme the satellite receiver with the required
information (programme number of the TV channel, start
time, end time).
Note: The information on how to programme your satellite
receiver can be found in the instruction manual of your
satellite receiver.
A Switch off the video recorder with STANDBY m .
The video recorder is now ready to record. The beginning and
end of the recording is controlled via scart socket AV2 EXT2 .
Note: If this function is switched on ’x’ will appear on the
video recorder display.
16
Page 20

’Direct Record’
Switching ’Direct Record’ on or off
With this function is switched on and the video recorder
switched to standby, it will automatically record the
programme selected on the television by means of a scart
cable.
Note: You will find more information on how to switch
’Direct record’ on in the next section ’Switching ’Direct
Record’ on or off’.
1 On the TV set, select the programme number you want
make the recording from.
2 Press REC/OTR n and REC/OTR A at the same time with
the video recorder switched off.
Note: Don’t select another programme number on your TV
set, until the ’search symbol’ on the video recorder display
has disappeared. This can take up to one minute.
*If’NOTV’ appears on the video recorder display, this
means the video recorder cannot find this programme
number. In this case, read the section ’Recording without
automatic switch-off’.
3 If you want to stop recording, press h .
1 Switch on the TV set and select the programme number
for the video recorder.
2 Press MENU on the remote control. The main menu will
appear.
3 Select the line ’SPECIAL SETTINGS’ with P- = or
;P+ and confirm with OK .
SPECIAL SETTINGS
OSD è ON p
CLOCK DISPLAY OFF
COUNTER T.LEFT
SAT RECORDING OFF
REPEAT PLAY OFF
DIRECT RECORD OFF
________________________________
EXITpMENU STOREpOK
4 In line ’DIRECT RECORD’ select ’ON’ with Q or P .
Note: If you want to switch this function off, select ’OFF’.
5 Confirm with OK .
6 To end, press MENU .
7 Switch off with STANDBY m .
17
Page 21

6. PROGRAMMED RECORDING (TIMER)
Use programmed recording to automatically start and stop a
recording at a later date.
To make a programmed recording, your video recorder needs
to know:
* the date you want to make the recording;
* the programme number for the TV channel you want to
record;
* the start and stop time of the recording;
The video recorder stores all the information in a TIMER block.
You can programme up to 6 TIMER blocks a month in advance.
’VPS’ (Video Programming System) and
’PDC’ (Programme Delivery Control)
With ’VPS and PDC’, the TV station controls the start time and
the length of the recording. This means that the video recorder
switches itself on and off at the right time even if a TV
programme you want to record begins earlier or finishes later
than expected.
You must enter the start time exactly to the minute.
If you want to programme a time that is different from the VPS
or PDC time, you must switch off VPS or PDC.
Note: If you make a mistake, you can clear your instructions
with CLEAR (CL) .
VIDEO PLUS+
PLUSCODE NUMBER REP.
53124---- ONCE
________________________________
REP.pSELECT STOREpOK
TIMER LISTpTIMER
4 Use SELECT to select daily or weekly programming.
’ONCE’: Recording once
’MO-FR’: Recordings every day from Monday to Friday.
’WEEK.’: Recordings every week on the same day of the
week.
5 Confirm with OK . Your programming details will then
appear on the TV screen.
TIMER
DATE REP. PROG. START PDC END
21 MO-FR 01 20:00 ] 21:30
VPS
Programming a recording
(with ’VIDEO Plus+’)
All the information required for a programming is contained in
the PlusCode-programming number.
1 Switch on the TV set and select the programme number
for the video recorder.
2 Press TIMER on the remote control.
3 Enter the entire PlusCode programming number (up to 9
digits) printed in your TV guide next to the start time of a
TV programme.
For example, 5-234-89 or 5 234 89
Enter 523489 for the PlusCode programming number.
________________________________
STOREpOK
Note: If VIDEO Plus+ does not recognise the TV channel,
’SELECT PROG. NR.’ will appear on the TV screen.
Select the programme number (channel name) you want
with the number buttons 0-9 and confirm with the OK
button.
*If’PLUSCODE NUMBER NOT VALID’ appears on the
TV screen, this means you entered an incorrect PlusCode
number or the incorrect date for the recording. The start of
the programmed recording must be within the next 7 days.
Correct your instructions or end with TIMER .
*If’MO-FR PROGRAMMING NOT POSSIBLE FOR
WEEKEND’ appears on the TV screen, you have
programmed a the wrong day for the daily recording. Daily
programming can only be used for recordings to be made
from Monday to Friday.
* Under ’START’, use SELECT to switch ’VPS/PDC’ on or off.
If ’]’ appears on the screen, the function has been switched
on.
18
6 Confirm with OK when the information is correct.
Page 22

Note: The programming information has been stored in a
TIMER block.
7 Make sure that the cassette you have put in can be
recorded on.
8 Switch off with STANDBY m .
The programmed recording will only function when the
video recorder is switched off with STANDBY m .
Programming a recording
(without ’VIDEO Plus+’)
1 Switch on the TV set and select the programme number
for the video recorder.
2 Press TIMER on the remote control twice . The free
TIMER block will be highlighted.
Note: If any of the TIMER blocks are in use, ’k’ will light up
on the video recorder display.
* While a programmed recording is being made, you cannot
operate your video recorder manually. If you want to cancel
the programmed recording, press STANDBY m .
* If the video recorder is switched on a few minutes before
a programmed recording is supposed to begin, ’SWITCH
TO STANDBY- TIMER RECORDING’ will flash on the
TV screen.
* If you reach the end of the cassette during a recording,
the video recorder will automatically eject the cassette.
* If you forget to load a cassette, ’NO CASSETTE’ will
appear on the TV screen and ’k’ will flash on the video
recorder display.
* If you have put in a cassette which cannot be used for
recording, the video recorder will automatically eject it.
*If’ALL TIMERS OCCUPIED’ appears on the TV screen
when you press TIMER , you have used up all the available
TIMER blocks. If you want to clear or check a TIMER block,
select it with ;P+ or P- = .
* Programme numbers ’E1’ and ’E2’ are for recordings from
other sources (through scart socket AV1 EXT1 or AV2 EXT2 ).
3 Press TIMER . The information will appear on the
screen.
TIMER
DATE REP. PROG. START PDC END
21 MO-FR 01 20:00 ] 21:30
________________________________
4 With TIMER , P or Q you can select ’DATE’ (date),
VPS
STOREpOK
’PROG.’ (programme number), ’START’ (start time) and
’END’ (end time).
Enter or change your information with ;P+ or P- = ,or
with the number buttons 0-9 .
Note: Under ’DATE’, use the SELECT button to select daily
or weekly programming.
’ONCE’: Recording once
’MO-FR’: Recording from Monday to Friday.
’WEEK.’: Recording every week on the same day.
* Under ’START’, use SELECT to switch ’VPS/PDC’ on or off.
If ’]’ appears in the display, ’VPS/PDC’ has been switched
on.
5 Confirm with OK when the information is correct.
Note: The programming information has been stored in a
TIMER block.
6 Make sure that the cassette you have put in can be
recorded on.
7 Switch off with STANDBY m
The programmed recording will only function when the
video recorder is switched off with STANDBY m .
19
Page 23

Note: If any of the TIMER blocks are in use, ’k’ will light up
on the video recorder display.
* While a programmed recording is being made, you cannot
operate your video recorder manually. If you want to cancel
the programmed recording, press STANDBY m .
* If you reach the end of the cassette during a recording,
the video recorder will automatically eject the cassette.
* If you have put in a cassette that cannot be recorded on,
the cassette will be ejected. ’PROTECTED CASSETTE’
will briefly appear on the TV screen.
* If the video recorder is switched on a few minutes before
a programmed recording is to start, ’SWITCH TO
STANDBY- TIMER RECORDING’ will flash on the TV
screen.
* If you forget to put a cassette in the machine, ’NO
CASSETTE’ will appear on the TV screen. ’k’ will flash In
the video recorder display.
*If’ALL TIMERS OCCUPIED’ appears on the TV screen
when you press TIMER , you have used up all the available
TIMER blocks. If you want to clear or check a programmed
recording (TIMER block), select it with ;P+ or P- = .
*If’DATA ERROR’ briefly appears on the screen, this
means that the TIMER information has not been transferred.
Please check date, start time and end time of the
programmed recording
* Programme numbers ’E1’ and ’E2’ are for recordings from
other sources (through scart socket AV1 EXT1 or AV2 EXT2 ).
How to check or change a programmed
recording (TIMER)
1 Switch on the TV set and select the programme number
for the video recorder.
2 Press TIMER on the remote control twice.
3 Select the programmed recording (TIMER) you want to
check or change with P- = or ;P+ .
4 Press TIMER .
5 Select the entry field with Q or P .
6 Change any information with P- = or ;P+ or with the
0-9 number buttons.
7 Confirm with OK .
8 Make sure that the cassette you have put in can be
recorded on. Switch off with STANDBY m .
Note: The programmed recording will only function when
the video recorder is switched off with STANDBY m .
How to clear a programmed recording
(TIMER)
1 Switch on the TV set and select the programme number
for the video recorder.
2 Press TIMER on the remote control twice.
3 Select the programmed recording (TIMER) you want to
clear with P- = or ;P+ .
4 Press CLEAR (CL) .
The programmed recording (TIMER) has now been
deleted.
5 To end, press MENU .
20
Page 24

7. ADDITIONAL FUNCTIONS
Switching the TV system
If you play back recordings made on a different kind of tape,
the automatic TV system switch-over may lead to colour
distortion.
You can manually switch off the TV system for playback or
switch off the colour.
Note: You can also switch off the colour for recording.
1 Press MENU on the remote control before you start
recording or during playback. The main menu will
appear.
MENU
CLOCK
AUTO INSTALL
MANUAL SEARCH
FOLLOW TV
TV CHANNEL ALLOC.
RECORD SPEED
AUTO STANDBY
TV SYSTEM
SPECIAL SETTINGS
________________________________
…OK
†
1 With the video recorder switched on, press the
STANDBY m and the SELECT button on the remote control
at the same time .
’u’ will appear on the video recorder display.
Keep the remote control in a safe place.
2 If you want to switch off the child lock, press the
STANDBY m and the SELECT button again at the same
time , with the video recorder switched on.
’u’ will disappear from the video recorder display.
Note: If you press a button when the child lock is on, the
symbol ’u’ will flash on the video recorder display for a
few seconds.
Switching the on-screen display (OSD) off
or on
You can switch the on-screen display of the current operating
information on or off.
Switching off the on-screen display is necessary if you do not
want to record the screen-messages when copying cassettes.
2 Select the line ’TV SYSTEM’ with P- = or ;P+ and
confirm with OK .
3 Select the TV system with Q or P .
Note: Select ’B/W’ with P or Q to switch to black and
white picture.
4 Confirm with OK .
5 To end, press MENU .
Note: If you change the programme number, the TV-system
for recording will switch to ’AUTO’ (automatic switch-over)
again.
* If you eject the cassette, the TV-system for playback will
switch to ’AUTO’ (automatic switch-over) again.
Child lock
This function will prevent unauthorised use of your video
recorder. All button-functions will be locked.
Note: You can make programmed recordings while the child
lock is on.
1 Switch on the TV set and select the programme number
for the video recorder.
2 Press MENU on the remote control. The main menu will
appear.
3 Select the line ’SPECIAL SETTINGS’ with P- = or
;P+ and confirm with OK .
SPECIAL SETTINGS
OSD è ON p
CLOCK DISPLAY OFF
COUNTER T.LEFT
SAT RECORDING OFF
REPEAT PLAY OFF
DIRECT RECORD OFF
________________________________
EXITpMENU STOREpOK
4 In the line ’OSD’, select one of the options shown with
P .
’ON’: Shows the OSD for a few seconds only.
’OFF’: Switches off the OSD.
5 Confirm with OK .
6 To end, press MENU .
21
Page 25

Continuous playback
Automatic switch-off
You can automatically play a cassette again and again. When
the video recorder reaches the end of the tape or the end of
the recording, it will rewind and start again.
1 Press MENU on the remote control. The main menu will
appear.
2 Select the line ’SPECIAL SETTINGS’ with ;P+ or
P- = . Confirm with OK .
SPECIAL SETTINGS
OSD è ON p
CLOCK DISPLAY OFF
COUNTER T.LEFT
SAT RECORDING OFF
REPEAT PLAY OFF
DIRECT RECORD OFF
________________________________
EXITpMENU STOREpOK
3 Select the line ’REPEAT PLAY’ with ;P+ or P- = .
4 Select ’ON’ with Q or P .
If you haven’t used the video recorder for a few minutes in
certain modes (e.g.: STOP), it will switch to standby
automatically. You can cancel this function to use the video
recorder as a television receiver.
1 Switch on the TV set and select the programme number
for the video recorder.
2 Press MENU . The main menu will appear.
3 Select the line ’AUTO STANDBY’ with P- = or ;P+ .
4 Select ’OFF’ with Q or P .
Note: If you select ’ON’, the function will be switched on.
5 Confirm with OK .
This message will briefly appear: ’STORED’
6 To end, press MENU .
Note: A TIMER recording only works when the video
recorder is switched to standby.
Note: If you select ’OFF’, continuous playback will be
switched off.
5 Confirm with OK .
This will appear on the screen: ’STORED’
6 Press MENU .
7 Put a cassette in the machine.
8 Press G to start continuous playback.
22
Page 26

Reducing picture disturbance - optimizing
Switching off the modulator
the modulator
You may experience picture disturbance if you have not used
a scart cable to connect your video recorder and TV. This is
because another TV station in your reception area may
already be using UHF-channel CH35 or 583MHz. When the
video recorder is switched on, the picture quality of some TV
channels that you receive on the TV will be poor.
You may optimize the picture quality by changing the
modulator frequency (591MHz or UHF channel 36).
1 Switch on the TV set and select the programme number
for the video recorder playback (see your TV operating
manual).
2 Make sure that there is no cassette in the video recorder.
3 First press and continue to hold the h button on the
remote control, and then press and hold the h button
on the video recorder. Hold both in for several seconds
until, for example, ’M583’ appears on the video recorder
display.
The video recorder will transmit a test picture on
UHF-channel 35(or frequency 583Mhz).
If you cannot clear picture or sound interference, you can
switch off the built-in modulator. You can only switch off the
modulator if you have connected the video recorder to the TV
set with a scart cable. ’Connecting VCR without scart cable’ is
not possible when the modulator is switched off.
1 Switch on the TV set and select the programme number
for the video recorder.
2 Make sure that there is no cassette in the video recorder.
3 First press and continue to hold the h button on the
remote control, and the press and hold the h button on
the video recorder. Hold both in for several seconds until,
for example, ’M583’ appears on the video recorder
display.
OPTIMIZE MODULATOR
OPTIMIZE FREQUENCYè 583 p
MODULATOR ON
________________________________
EXITpMENU STOREpOK
OPTIMIZE MODULATOR
OPTIMIZE FREQUENCYè 583 p
MODULATOR ON
________________________________
EXITpMENU STOREpOK
4 Select the line ’OPTIMIZE FREQUENCY’ with ;P+ or
P- = . Enter the Modulator frequency with the number
buttons 0-9 .
Note: Press P . The automatic channel search starts.
When the video recorder finds a ’free’ channel, the
frequency of this channel will be shown in the display.
5 Tune in the TV set to the new modulator frequency shown
in the video recorder display.
6 Confirm with OK .
’OK’ will briefly appear in the video recorder display.
4 Select the line ’MODULATOR’ on the TV screen or ’MOD+’
in the display with ;P+ or P- = .
5 With Q , select the function ’OFF’ on the TV screen or
’MOD-’ (modulator off) in the display.
Note: If you want to switch the modulator on again, select
’MOD+’ (modulator on) in the video recorder display with
Q .
6 Confirm with OK .
7 To end, press MENU .
Optimizing the modulator is now complete.
23
Page 27

8. Before you call an engineer
If, contrary to expectation, you have any problems using this
video recorder, it may be caused by one of the reasons
mentioned below.
Your video recorder does not respond to any button being
pressed:
• There is no power supply: check the power supply.
• A programmed recording is currently being made: if desired,
cancel the programmed recording with
• Child lock is on: switch the child lock off.
• There is a technical problem: switch off the mains power supply
for 30 seconds, then switch it on again. If this does not have any
effect, you can:
1. Switch off the mains power supply again.
2. Then switch it on whilst holding down
recorder.
3. Release the button when ’
display. All the information stored (TV channels, time and date,
TIMER) will be cleared.
OSD’ appears in the video recorder
STANDBY m .
m on the video
Cassette is jammed in the video recorder:
• Don’t use force. Pull out the mains plug for a moment.
Remote control does not work:
• Remote control not pointed toward the video recorder: point it at
the video recorder.
• There is a technical problem: Take out the batteries, wait for 10
seconds and place them back.
• Batteries have run out: change the batteries.
programme number you want to record from:
1. Confirm the PlusCode programming number with
2. Press
3. Change the programme number displayed in the ’
entry field.
4. Confirm with
TIMER .
TIMER .
OK .
PROG.’
There is picture or sound interference on TV reception:
• Turn to chapter ’ADDITIONAL FUNCTIONS’ and read ’Reducing
picture disturbance - optimizing the modulator’ and ’Switching off
the modulator’.
• Have your aerial checked.
No picture when you play a cassette:
• There is no recording on the cassette: change the cassette.
• You have selected the wrong programme number on the TV for
playing cassette: on the TV, select the correct programme
number for the video recorder.
• The cable connecting the TV set and the video recorder has
come loose: check the cable.
Poor picture quality when you play a cassette:
• Your TV set is not properly adjusted.
• The cassette badly worn or of poor quality: use new cassette.
• Tracking is not properly adjusted: turn to chapter ’PLAYBACK
FUNCTIONS’ and read the section ’Tracking during playback’.
The video recorder will not record:
• The TV channel you want to record is not stored or you selected
the wrong programme number: check TV channels stored.
• You have loaded a cassette which cannot be recorded on: undo
the erase protection on the cassette.
Programmed recording does not work:
• You have not set the TIMER properly: check the TIMER blocks.
• You have programmed the wrong time or date: check time and
date.
• You have put in a cassette that cannot be recorded on: undo the
erase protection on the cassette.
• ’VPS/PDC’ switched on but ’VPS/PDCtime’ wrong: enter
’VPS/PDCtime exactly to the minute. Have your aerial checked.
• You have programmed a recording with ’VIDEO Plus+’, but the
programme number information of the TIMER block is not the
24
Page 28

9. GLOSSARY
Technical terms used
Current tape position
The part of the tape currently being played.
External source
A device connected via a socket (for example, scart socket)
which is transmitting audio/video signals to the video
recorder.
Index marking
A marking which is automatically made on the tape at the
beginning of every recording. This marking (recording ID) can
be searched for with the Index search function.
Scart cable
Also known as a Euro-AV cable. This standard cable is an
easy method of connecting various audio and video devices,
computer screens and televisions. Other signals in addition to
audio and video signals can be transmitted on it.
Modulator channel or frequency
This frequency or channel indicates the frequency or channel
on which the audio or video signal is transmitted.
UHF frequency range
Channels 21 to 69. The video recorder ’broadcasts’ on channel
35/frequency 583 MHz. This frequency or channel can be
changed. See the section ’Reducing picture disturbance ’optimizing the modulator’.
OSD (On-screen display)
The largest possible display area for the video recorder - the
screen on your television set.
TV system
There are various systems for transmitting television signals,
for example, PAL, SECAM, PAL BG, SECAM DK, SECAM L/L,
NTSC etc. The system used by your television depends on
which country you are in.
TXT
Also known as Teletext, Fasttext, Videotext, FLOF etc.
OTR
One touch recording (to start recording by pushing just one
button). This function enables you to select the switch-off time
in intervals of 30 minutes.
Modulator
An electronic component in a video recorder which allows
audio and video signals to be transmitted via the aerial cable.
Your television receives the signal in the same way as a signal
from a television station.
25
Page 29

HITACHI - YOUR GUARANTEE OF EXCELLENCE (for UK only)
For the period of 12 MONTHS from the date of purchase your product has the benefit of our FULL PARTS AND LABOUR
GUARANTEE as detailed below.
We undertake to replace or repare any part of the product which fails due to a manufacturing defect within 12 months of the
date of purchase provided that:
1) The product has been installed and used only in accordance with the instructions supplied with the product.
2) The product has not been repaired, maintained, or modified by any person other than our authorised Engineer.
3) The product serial number is not removed or altered.
This guarantee does not apply to products acquired second-hand or for commercial or communal use.
This guarantee does not extend to user control adjustments, battery replacement and aerial adjustment. Any parts replaced
under guarantee shall become the property of HITACHI HOME ELECTRONICS (EUROPE) LTD.
Please note that evidence of the date of purchase will be required before service under guarantee is carried out.
This guarantee does not affect your statutory rights. In all cases of difficulty consult your HITACHI dealer.
HITACHI HOME ELECTRONICS (EUROPE) LTD.
Dukes Meadow,
Millboard Road,
Bourne End,
Buckinghamshire
SL8 5XF
Tel: 01628-643000
(WwnnNNNwwnwNNnwnWwnNwNwNnnnNwW)
3103 166 25974
0364/614 VT-MX910EUK
26
Page 30

Hitachi, Ltd. Tokyo, Japan
International Sales Division
THE HITACHI ATAGO BUILDING,
No. 15 –12 Nishi Shinbashi, 2 – Chome,
Minato – Ku, Tokyo 105-8430, Japan.
Tel: 03 35022111
HITACHI EUROPE LTD,
Whitebrook Park
Lower Cookham Road
Maidenhead
Berkshire
SL6 8YA
UNITED KINGDOM
Tel: 01628 643000
Fax: 01628 643400
Email: consumer-service@hitachi-eu.com
HITACHI EUROPE GmbH
Munich Office
Dornacher Strasse 3
D-85622 Feldkirchen bei München
GERMANY
Tel: +49-89-991 80-0
Fax: +49-89-991 80-224
Hotline: +49-180-551 25 51 (12ct/min)
Email: HSE-DUS.service@hitachi-eu.com
HITACHI EUROPE srl
Via Tommaso Gulli N.39, 20147
Milano, Italia
ITALY
Tel: +39 02 487861
Tel: +39 02 38073415 Servizio Clienti
Fax: +39 02 48786381/2
Email: customerservice.italy@hitachi-eu.com
HITACHI EUROPE S.A.S
Lyon Office
B.P. 45, 69671 BRON CEDEX
FRANCE
Tel: 04 72 14 29 70
Fax: 04 72 14 29 99
Email: france.consommateur@hitachi-eu.com
HITACH EUROPE AB
Egebækgård
Egebækvej 98
DK-2850 Nærum
DENMARK
Tel: +45 43 43 6050
Fax: +45 43 60 51
Email: csgnor@hitachi-eu.com
Hitachi Europe Ltd
Bergensesteenweg 421
1600 Sint-Pieters-Leeuw
BELGIUM
Tel: +32 2 363 99 01
Fax: +32 2 363 99 00
Email: sofie.van.bom@hitachi-eu.com
www.hitachidigitalmedia.com
HITACHI EUROPE S.A.
364 Kifissias Ave. & 1, Delfon Str.
152 33 Chalandri
Athens
GREECE
Tel: 1-6837200
Fax: 1-6835964
Email: service.hellas@hitachi-eu.com
HITACHI EUROPE S.A.
Gran Via Carlos III, 101-1
08028 Barcelona
SPAIN
Tel: 93 409 2550
Fax: 93 491 3513
Email: atencion.cliente@hitachi-eu.com
HITACHI Europe AB
Box 77 S-164 94 Kista
SWEDEN
Tel: +46 (0) 8 562 711 00
Fax: +46 (0) 8 562 711 13
Email: csgswe@hitachi-eu.com
HITACHI EUROPE LTD (Norway) AB
STRANDVEIEN 18
1366 Lysaker
NORWAY
Tel: 67 5190 30
Fax: 67 5190 32
Email: csgnor@hitachi-eu.com
HITACHI EUROPE AB
Neopoli / Niemenkatu 73
FIN-15140 Lahti
FINLAND
Tel : +358 3 8858 271
Fax: +358 3 8858 272
Email: csgnor@hitachi-eu.com
HITACHI EUROPE LTD
Na Sychrove 975/8
101 27 Pr aha 10 – Bohdalec
CZECH REPUBLIC
Tel: +420 267 212 383
Fax: +420 267 212 385
Email: csgnor@hitachi-eu.com
Page 31

QUICK SET UP GUIDE
Hitachi video recorder VT-MX910E UK
Dear Hitachi Customer,
Congratulations on your choice of a Hitachi video
recorder. Welcome to our company-wide commitment to your complete statisfaction and viewing
enjoyment. Before using your Hitachi video recorder
for the first time, we suggest that you spend a few
minutes reading these setup instructions.
Even if you have never used a video recorder before,
you can probably get your video recorder connected
and preset quickly by following this quick set-up guide.
Accessories provided
Check and identify the accessories provided.
If any are missing or appear damaged, contact your
dealer immediately.
How to connect your video recorder
1 Unplug the aerial cable from your TV set and insert it into
the 2 socket at the back of the video recorder.
2 Insert one end of the aerial (RF) cable provided into the
3 socket on the video recorder and the other end into
the aerial input socket on your TV set.
Fitting the remote control batteries
3 If your television does not have a scart (AV-Euro) socket
(shown below) or if you do not want to use a scart cable
for the connection to your television, please proceed with
the next chapter ’Tuning your TV to your video recorder’.
4 Insert the plug of a scart cable into the scart socket
AV1 EXT1 at the back of your video recorder. Connect the
other plug to the TV set.
5 Insert the small plug of the mains cable into the mains
socket 4 at the back of the video recorder. Insert the
other end of the mains cable into the wall socket.
6 If your TV set automatically switches to programme
number e.g.: ’EXT’, ’0’, or ’AV’, a welcoming text appears
on the TV screen.
If your TV set does not switch automatically, select the
required programme number manually (see instruction
manual TV set).
7 Subsequently, read the paragraph ’Initial Installation’.
1
Page 32

TuningyourTVtoyourvideorecorder
InitialInstallation
1Insertthesmallplugofthemainscableintothemains
socket4 atthebackofthevideorecorder.Insertthe
otherendofthemainscableintothewallsocket.
2SwitchonyourTVsetandselecttheprogrammenumber
thatyouhavechosenforvideoplayback(seeoperating
manualforyourTVset).
3Thevideorecorderwillnowsendawelcomingtexton
UHF-channelCH35or583MHz.
4TuneintheTVsetuntilthispictureappears.
Note:Notethatifyouwereusingavideorecorderbefore,
youwillprobablyneedtoretunethe’videochannel’onyour
TVtoobtainthispicture.
CONGRATULATIONS
YOUNOWOWNANEW
VIDEORECORDER
CONTINUEpOK
ThevideorecorderwillsearchforallTVchannels.
ItstoresTVchannelsfoundinthefollowingsequence:BBC1,
BBC2,ITV,CH4,CH5,SKY,others.
1Iftheaerial(antenna)hasbeenconnected,pressthe
OK buttonontheremotecontrol.
2’AUTOINSTALL’starts.Thevideorecorderwillsearchfor
allTVchannels.
AUTOINSTALL
SEARCHING
00TVCHANNELSFOUND
ƒƒƒƒƒƒƒ__________________
PLEASEWAIT...
WaituntilallTVchannelshavebeenfound.Thiscantake
severalminutes.ThevideorecorderstorestheTV
channelsfoundinthefollowingsequence:BBC1,BBC2,
ITV,CH4,CH5,SKY,others.Theclockanddate
informationisalsosetduringtheAutoinstallprocess.
5WhentheTVhasbeentunedinreadtheparagraph
’InitialInstallation’.
Ifyouexperiencepictureinterference,pleaseread’Reducing
picturedisturbance(’optimizingthemodulator’) inthechapter
’ADDITIONALFUNCTIONS’intheoperatingmanual.
(WwnnNNNwwnwNNnwnWwnNwNwNnWnnwN)
3When’AUTOINSTALL’hasfinished,themessage’READY’
willbrieflyappearontheTVscreen.
3103 166 25981
0054/000 VT-MX910E UK
2
Page 33

Hitachi, Ltd. Tokyo, Japan
International Sales Division
THE HITACHI ATAGO BUILDING,
No. 15 –12 Nishi Shinbashi, 2 – Chome,
Minato – Ku, Tokyo 105-8430, Japan.
Tel: 03 35022111
HITACHI EUROPE LTD,
Whitebrook Park
Lower Cookham Road
Maidenhead
Berkshire
SL6 8YA
UNITED KINGDOM
Tel: 01628 643000
Fax: 01628 643400
Email: consumer-service@hitachi-eu.com
HITACHI EUROPE GmbH
Munich Office
Dornacher Strasse 3
D-85622 Feldkirchen bei München
GERMANY
Tel: +49-89-991 80-0
Fax: +49-89-991 80-224
Hotline: +49-180-551 25 51 (12ct/min)
Email: HSE-DUS.service@hitachi-eu.com
HITACHI EUROPE srl
Via Tommaso Gulli N.39, 20147
Milano, Italia
ITALY
Tel: +39 02 487861
Tel: +39 02 38073415 Servizio Clienti
Fax: +39 02 48786381/2
Email: customerservice.italy@hitachi-eu.com
HITACHI EUROPE S.A.S
Lyon Office
B.P. 45, 69671 BRON CEDEX
FRANCE
Tel: 04 72 14 29 70
Fax: 04 72 14 29 99
Email: france.consommateur@hitachi-eu.com
HITACH EUROPE AB
Egebækgård
Egebækvej 98
DK-2850 Nærum
DENMARK
Tel: +45 43 43 6050
Fax: +45 43 60 51
Email: csgnor@hitachi-eu.com
Hitachi Europe Ltd
Bergensesteenweg 421
1600 Sint-Pieters-Leeuw
BELGIUM
Tel: +32 2 363 99 01
Fax: +32 2 363 99 00
Email: sofie.van.bom@hitachi-eu.com
www.hitachidigitalmedia.com
HITACHI EUROPE S.A.
364 Kifissias Ave. & 1, Delfon Str.
152 33 Chalandri
Athens
GREECE
Tel: 1-6837200
Fax: 1-6835964
Email: service.hellas@hitachi-eu.com
HITACHI EUROPE S.A.
Gran Via Carlos III, 86, planta 5
Edificios Trade - Torre Este
08028 Barcelona
SPAIN
Tel: 93 409 2550
Fax: 93 491 3513
Email: atencion.cliente@hitachi-eu.com
HITACHI Europe AB
Box 77 S-164 94 Kista
SWEDEN
Tel: +46 (0) 8 562 711 00
Fax: +46 (0) 8 562 711 13
Email: csgswe@hitachi-eu.com
HITACHI EUROPE LTD (Norway) AB
STRANDVEIEN 18
1366 Lysaker
NORWAY
Tel: 67 5190 30
Fax: 67 5190 32
Email: csgnor@hitachi-eu.com
HITACHI EUROPE AB
Neopoli / Niemenkatu 73
FIN-15140 Lahti
FINLAND
Tel : +358 3 8858 271
Fax: +358 3 8858 272
Email: csgnor@hitachi-eu.com
HITACHI EUROPE LTD
Na Sychrove 975/8
101 27 Pr aha 10 – Bohdalec
CZECH REPUBLIC
Tel: +420 267 212 383
Fax: +420 267 212 385
Email: csgnor@hitachi-eu.com
 Loading...