

Page 1

R
Auto Installation Systemonly plug in all leads and
press the OPERATE button.
VIDEO CASSETTE RECORDER
VT-FX950E(UKN)
Instruction manual
VIDEO Plus+ and PlusCode are
registered trademarks of Gemstar
Development Corporation. The
VIDEO Plus+ system is
manufactured under licence from
Gemstar Development Corporation.
SETTING UPBASIC OPERATIONSADDITIONAL OPERATIONSSUBSIDIARY INFORMATION
PAL
QR 32431
FOR FURTHER INFORMATION
PLEASE CONTACT OUR
CUSTOMER HELP LINE ON
01628-643029
To obtain the best performance
please read this instruction manual completely.
Page 2

Dear Hitachi Customer
AC 230V, 50Hz
DECODER/CANAL PLUS
EURO. A/V
AERIAL
ANTENNE
RF OUT
SORTIE
RF
AUDIO OUT/
SORTIE SON
R/D. L/B.
Congratulations on your choice of a Hitachi Video Cassette Recorder (VCR).
And welcome to our company-wide commitment to your complete satisfaction and viewing enjoyment.
INFORMATION FOR YOUR SAFETY
Please read the following instructions carefully
before using this VCR.
The mains lead on this equipment is supplied
with a moulded plug incorporating a fuse, the
value of which is indicated on the pin face of
the plug. Should the fuse need to be
replaced, an ASTA or BSI approved BS1362
fuse must be used of the same rating.
If the fuse cover is detachable never use the
plug with the cover omitted.
If a replacement fuse cover is required,
ensure it is of the same colour as that visible
on the pin face of the plug. Fuse covers are
available from your dealer.
DO NOT cut off the mains plug from this
equipment. If the plug fitted is not suitable
for the power points in your home or the
cable is too short to reach a power point,
then obtain an appropriate safety approved
extension lead or consult your dealer.
If there is no alternative to cutting off the
mains plug, ensure that you dispose of it
immediately, having first removed the fuse,
to avoid a possible shock hazard by
inadvertent connection to the mains supply.
IMPORTANT
The wires in the mains lead are coloured in
accordance with the following code:
Blue = Neutral, Brown = Live
As these colours may not correspond with
the coloured markings identifying the
terminals in your plug, proceed as follows:
The wire coloured BLUE must be connected
to the terminal marked with the letter N or
coloured BLUE or BLACK. The wire coloured
BROWN must be connected to the terminal
marked with the letter L or coloured BROWN
or RED.
On no account connect either of these wires
to the terminal marked E or by the earth
symbol or coloured green or green and
yellow.
Mains supply: AC 230V, 50 Hz only
• The OPERATE button located
on the front of the VCR
switches the VCR on and off,
leaving the clock facility
unaffected.
• The OPERATE button is
labelled " / ", this button allows you to
select operate on or electrical power
standby.
• The OPERATE button is secondarily
connected and does not separate the
apparatus from the mains supply in the
switched-off position.
Safety
• Do not remove panel covers by
unscrewing.
There are no user serviceable parts inside.
Refer all servicing to qualified service
personnel.
• Should any solid object or liquid fall into
the cabinet, remove the mains lead and
have it checked by qualified personnel
before operating it any further.
• To disconnect the mains lead, pull out the
plug itself. Never pull the lead.
• If the unit is to be left unattended for a long
period and it is not intended to use the
timer recording function, it is
recommended that the VCR be switched
off and the plug removed. If you intend to
record during your absence, remember
there is no necessity for the TV receiver to
be switched on.
WARNING: To prevent fire or electric shock,
do not expose this equipment to
rain or moisture.
2
Cautions:
When the VCR is moved from a cold to a warm
place, dew condensation can occur on the
cylinder.
To avoid damaging the cylinder or tape do not
operate the set immediately. Allow it to dry by
leaving it powered on for 2 ~ 3 hours.
Page 3

CONTENTS
This instruction manual consists of the following four sections.
CAUTION:
AUTO INSTALLATION SYSTEM - Please ensure that all leads are connected as illustrated as in page 6 and 7,
otherwise auto installation will not work.
Section-1 Setting Up
This section tells you how to set up your
new VCR and how to use the VCR’s
controls.
Connection............................................................................... 6
Customer Controls .................................................................. 8
Customer Controls and Remote Operation .......................... 9
Auto Installation Function .....................................................10
Pre-tuning of Built-in TV Tuner ............................................ 12
Auto Clock Setting Using PDC Signal ................................. 18
Setting the Clock Manually .................................................. 19
Cassette Tapes....................................................................... 20
Section-2 Basic Operation
This section tells you how to playback a
tape and record a TV programme.
Playback ................................................................................. 22
Recording TV Programmes .................................................. 26
Timer Recording.................................................................... 29
Prepare Recording Using Satellite Decoder ........................37
Section-3 Additional Operations
This section tells you how to use the
additional functions.
Special Characteristics
• Linear Time Counter ..................................................... 39
• Automatic Rewind ........................................................ 39
• Rewind Shut Off............................................................ 39
• Rental Play..................................................................... 39
• Tape Finder Function.................................................... 40
Menu Features....................................................................... 42
Editing
• Tape Dubbing................................................................ 45
"Satellite or Cable box" Decoder Operation ....................... 47
Hi-Fi Sound ............................................................................ 49
Section-4 Subsidiary Information
Problem Guide....................................................................... 51
User Guide Display ................................................................52
Maintenance .......................................................................... 53
Specifications ........................................................................ 54
PDC (Programme Delivery Control) function ..................... 55
Battery Safety Guidelines..................................................... 56
Warranty Letter ......................................................................57
Some Do's and Don'ts .......................................................... 59
3
Page 4
FEATURES
142563
7 8 9
0
2 pcs.
• The VIDEO Plus+®programming
system allows you to programme
the VCR for timer recording by
simply entering a PlusCode
®
programming number.
• Tape Finder function allows you to
search for a programme you want
to view or the point from which you
want to start recording on tape with
one press.
•
Prepare Rec function allows you to
easily prepare the VCR to record
signals from a satellite/cable decoder.
• The built-in digital stereo sound
decoder permits the reception of
NICAM (Near Instantaneous
Compand Audio Multiplex)
broadcast.
• Setting the clock using a PDC signal
(Auto clock set).
• Dynamic picture equalizer.
• Up to 8 hours recording and
playback.
• High quality slow motion/still frame
pictures.
• Infrared remote control.
• Auto Install System (Plug and Play)
— tunes in stations, sorts into
correct order, sets clock and date.
• Auto Tuning — tunes in stations,
sorts correct order, sets clock.
• 2 Scart sockets.
• Fine slow motion.
• Phono audio outputs.
• Graphic OSD.
• Satellite or cable box decoder
socket provided.
• 8-programme/1-year preset
recording.
• NTSC Playback
• Stereo Sound — record and
playback.
• Automatic controls for easier
operation.
— Auto Programme Play
immediately starts to play a
recorded programme by simply
turning the VCR on after timer
recording was finished.
— Auto Tracking system
automatically adjusts the tracking
so the picture is optimized.
— Rental Play immediately starts to
play a tape without its safety tab,
rewinds the tape after play is
ended and ejects it, then turns the
VCR off .
— Auto Play immediately starts to
play a tape without its safety tab.
— Auto Eject & Auto Tape Canceller
ejects a cassette without its tab
when the REC button is pressed.
— Auto Operate On turns the VCR on
by simply inserting a cassette.
— Auto Rewind/Rewind Shut-off
automatically rewinds a tape at its
end and automatically shuts off at
its beginning if the VCR is
switched off into the standby
mode while rewinding.
• Easy preset tuning provides up to 49
programmes.
• PDC (Programme Delivery Control)
function — no chance of missing
your timer programme.
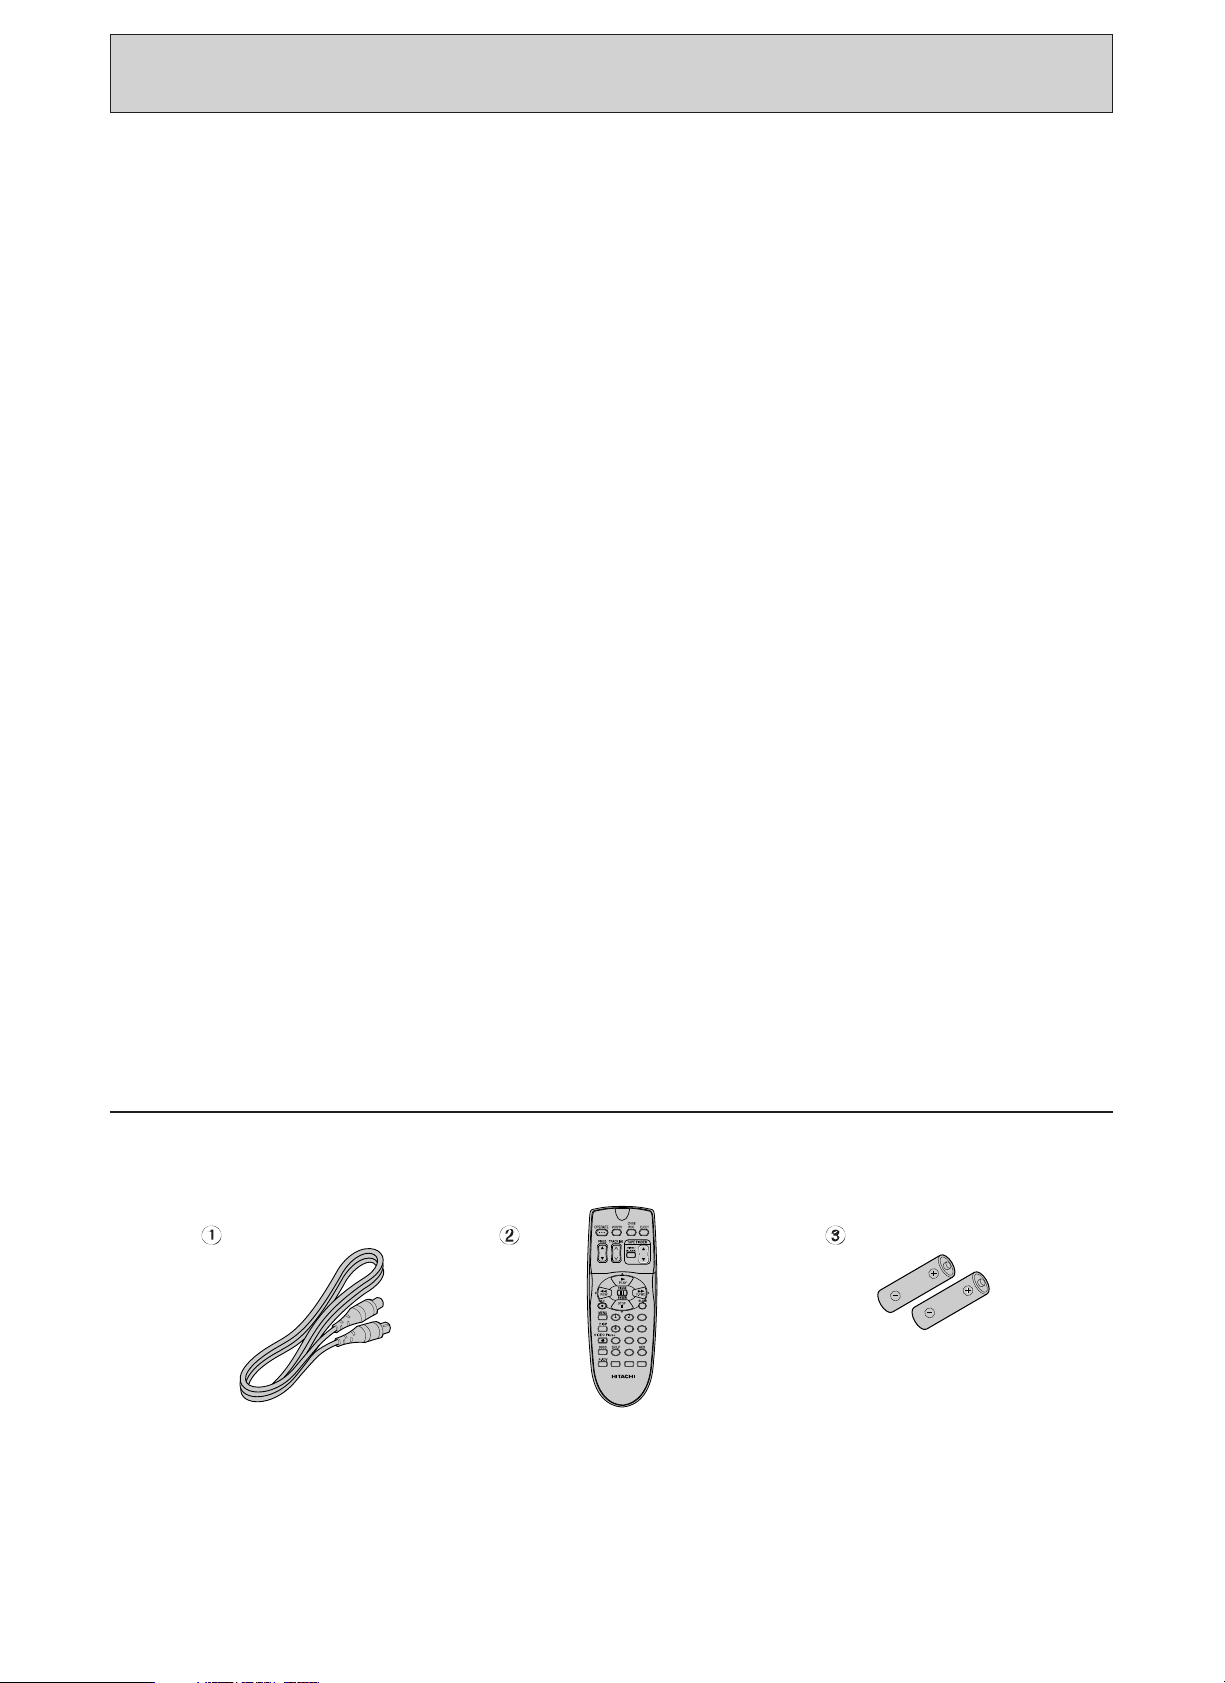
Accessories supplied Check and identify the accessories supplied.
If any are missing or appear damaged, consult your dealer.
12 3
4
Aerial Cable for
connecting this VCR
and a TV
Remote Control Handset
Batteries for remote
control handset (R6)
Page 5

Section-1 Setting Up
Connection Pages 6 — 7
This tells you how to connect your VCR to an aerial, TV, etc.
Customer Controls and Remote Operation Pages 8 — 9
This tells you the location and the detailed functions of the
switches, buttons, VCR’s display and connection terminals on
the VCR.
This also tells you how to insert batteries into the remote control
handset and how to operate your VCR remotely.
Auto Installation Function Pages 10-11
This tells you how to automatically tune in all broadcasted
channels and set the clock and date.
Pre-tuning of Built-in TV Tuner Pages 12 — 17
This VCR incorporates a complete TV tuner (just like your
normal TV) and can be pre-tuned to receive up to 49 TV
programmes.
Auto Clock Setting using PDC signal and
Setting the Clock Manually Pages 18 — 19
The clock display area in the VCR’s display panel will look like
"––:––" until you set the 24-hour clock. The clock must be set to
the correct time before you can programme the VCR for timer
recording.
This section explains the two clock setting methods.
A. Setting the VCR's clock automatically using a PDC signal.
B. Setting the VCR's clock on the TV screen.
Cassette Tapes Page 20
This tells you how to insert and remove a cassette, and how to
protect recordings from accidental erasure.
5
Page 6

CONNECTION
DECODER/CANAL PLUS
EURO. A/V
AERIAL
ANTENNE
RF OUT
SORTIE
RF
AUDIO OUT/
SORTIE SON
R/D. L/B.
Aerial
Aerial cable
(supplied)
TV set
To AC outlet
AC 230V/50Hz
AERIAL
RF OUT
Aerial socket
Basic Method
Do not connect to
the mains supply
socket before
connecting all leads,
refer to page 10.
For even better sound and picture quality we
recommend to use scart connection.
Please refer page 7 for scart connection.
PRECAUTIONS
On Installation
• Do not install the unit near heat
sources such as radiators or air
ducts or in a place subject to direct
sunlight, excessive dust,
mechanical vibrations or shocks.
• Never bring a magnet or
magnetized object near the VCR
because it will adversely affect the
performance of the VCR.
• Ensure the VCR is installed on a
flat surface.
The unit is designed for operation
in a horizontal position.
6
Page 7
DECODER/CANAL PLUS
EURO. A/V
AERIAL
ANTENNE
RF OUT
SORTIE
RF
AUDIO OUT/
SORTIE SON
R/D. L/B.
Aerial
Aerial cable
(supplied)
TV set
To AC outlet
AC 230V/50Hz
Scart connector lead
available from your dealer
(not supplied)
RF OUT
AERIAL
Scart
socket
Aerial socket
Satellite or cable box
Connecting your VCR to your television using a scart lead
Do not connect to
the mains supply
socket before
connecting all leads,
refer to page 10.
SETTING UP
Set your TV to its proper AV line (scart lead)
to receive signal via the scart connector lead.
This connection will improve the picture and
sound quality.
Make sure the indicator lights in the
VCR display to feed the audio and video
signals from the VCR to TV. If not, press the
VCR/TV button on the handset to display it.
On Operation
• Moisture condensation
Moisture condensation on the cylinder, one of
the most crucial parts of the VCR, will cause
damage to the tape.
The VCR should not be operated for at least 2
hours after being moved from a cold to a hot
environment to avoid condensation from
occurring on the cylinder.
This connection also allows you to record the
TV programme selected on the TV. To do
this, press the AUX button on the remote
control handset to display the "L1" indicator
in the VCR’s display instead of a VCR
programme number.
On Cleaning
• DO NOT use volatile agents such as benzine,
alcohol, thinner, or chemically processed cloth
to wipe the surface of the VCR case. These
agents may cause the surface finish to
deteriorate or peel off.
On Repacking
• It is wise for you to save the packing materials
and box in case you ever need to ship or store
your unit.
7
Page 8
CUSTOMER CONTROLS
9 8
7
6
1 2
3
54
DECODER/CANAL PLUS
EURO. A/V
AERIAL
ANTENNE
RF OUT
SORTIE
RF
AUDIO OUT/
SORTIE SON
R/D. L/B.
1110
14
13
12
21 1920
15 16 1817
VCR Customer Controls
Item No.
1 Cassette compartment 20
2 STOP/EJECT button 24
3 PLAY/STILL button 22
4 FAST FORWARD button 23
5 REWIND button 23
6 REC button 26
7 PROG (programme up/down) buttons 11
8 Remote control receiving window 9
9 OPERATE (Operate/Standby) button 2
10 Decoder socket 47
11 AUDIO OUT (L), (R) sockets for —
stereo system connection
12 AERIAL — signal input 6
13 RF OUT — signal out to TV 6
14 Scart socket 7
VCR Display
15 Time, 19
Time counter or 39
VCR mode indicator 22
PLAY — playback 22
SRCH— visual search 23
SLOW— slow play 22
REW — rewind 23
S:REW—high speed rewind 23
FF — fast forward 23
S:FF — high speed fast forward 23
STILL— play pause and frame advance 22
16 VCR, operate mode 22
17 Audio indicators 25
18 — record (flashes during 26
19 Tape-in indicator 20
20 TV programme number or 26
Auxiliary (L1/L2) 45
21 Timer indicator 29
Function
record pause)
Page
"–" appears
during reverse
direction
viewing
8
Page 9
142
56
3
7 8 9
0
2
3
4
5
6
7
8
9
10
13
21
20
11
14
17
1
25
24
16
18
19
15
22
23
12
Remote Control Handset Customer Controls
Item No.
1 Transmission window 9
2 OPERATE— switch between operate 29
3 TRACKING button 25
4
PROG (programme up /down ) button
5 These cursor buttons not used. —
6REW — rewind or search 23
7REC — record button 26
8MENU— to recall OSD menu 42
9 DISP — to recall on-screen display, 43
10 VIDEO Plus+ — VIDEO Plus+ 30
11 0000 — to correct an incorrect digit, 19
12 SP/LP — changes tape speed during 20
13 F. ADV button — advance the picture by 22
one frame during still playback
14 These buttons not used. —
15 AUX button — select L1 or L2 input 45
16 Number buttons 19
17 STOP — stops play/record function 24
18 SLOW button— press during playback 22
19 F.FWD —
20 PAUSE — pause or still 22
21 PLAY — playback 22
22 TAPE FINDER button used for Index 40
Search, Easy View and Blank search
function
REMOTE OPERATION
Power source of infrared remote control handset
23 CH1/2 button — for audio channel 25
selection in playback
PDC button — for PDC setting during 55
recording
24 EJECT button — press to eject a cassette 20
25 VCR/TV select button 22
Function
and standby mode
change VCR's display
programming
reset the time counter when it 39
appears in the VCR's display
record
fast forward or search
Page
12
23
SETTING UP
The infrared remote control handset is powered by
two batteries (size IEC standard R6). The life of the
batteries is about a year although this depends on the
number of times the handset is used.
Replace the batteries when operation is not possible
or when the operating distance becomes too small.
Note: When replacing the batteries, remove the used
batteries and press the OPERATE button and hold it
pressed for 10 seconds, then insert the new batteries
and replace the battery cover.
Remote operations
To operate this VCR with the remote control handset,
point the remote control handset at the receiver on the
front of the VCR.
9
Page 10
AUTO INSTALLATION FUNCTION
AUTO
M
ENU
=
Exit
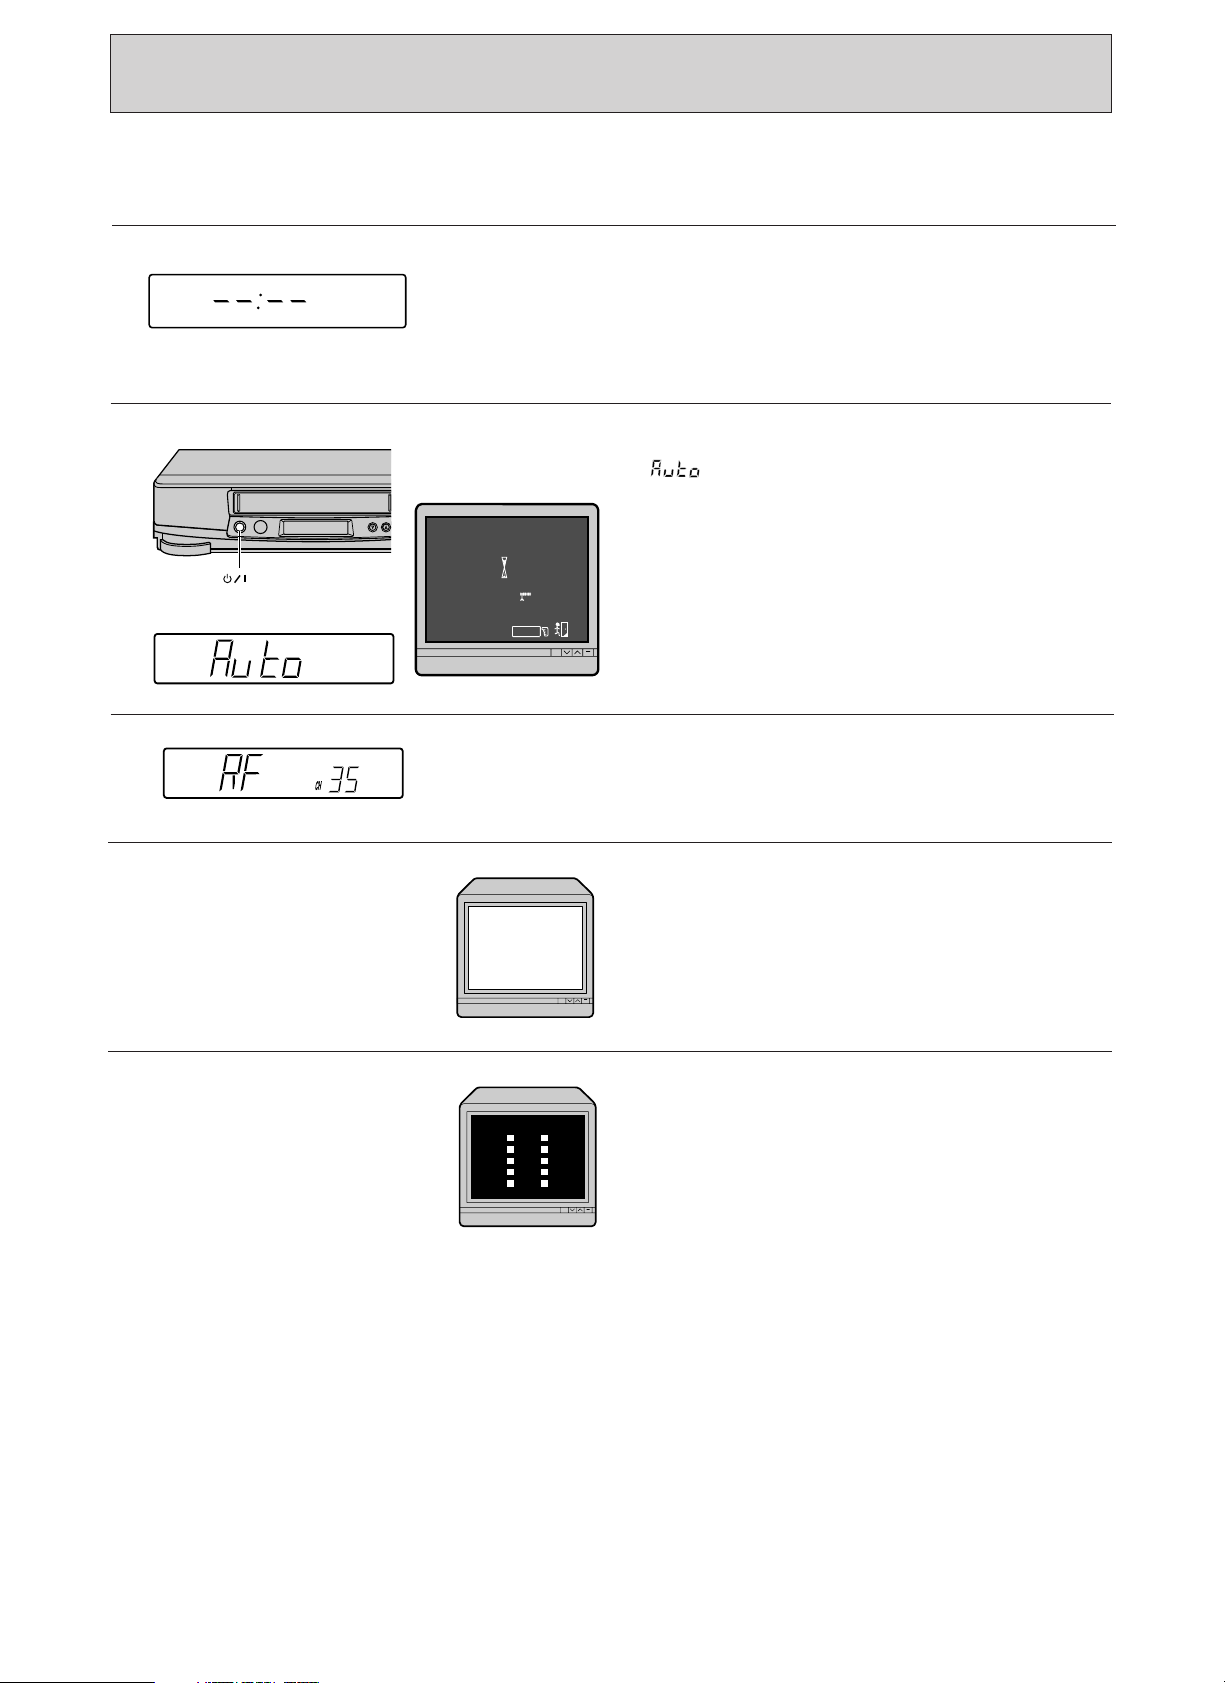
Auto Install (Plug & Play) function
This automatically tunes all broadcast channels, sets the clock and date.
VCR TV screen
1
2
3
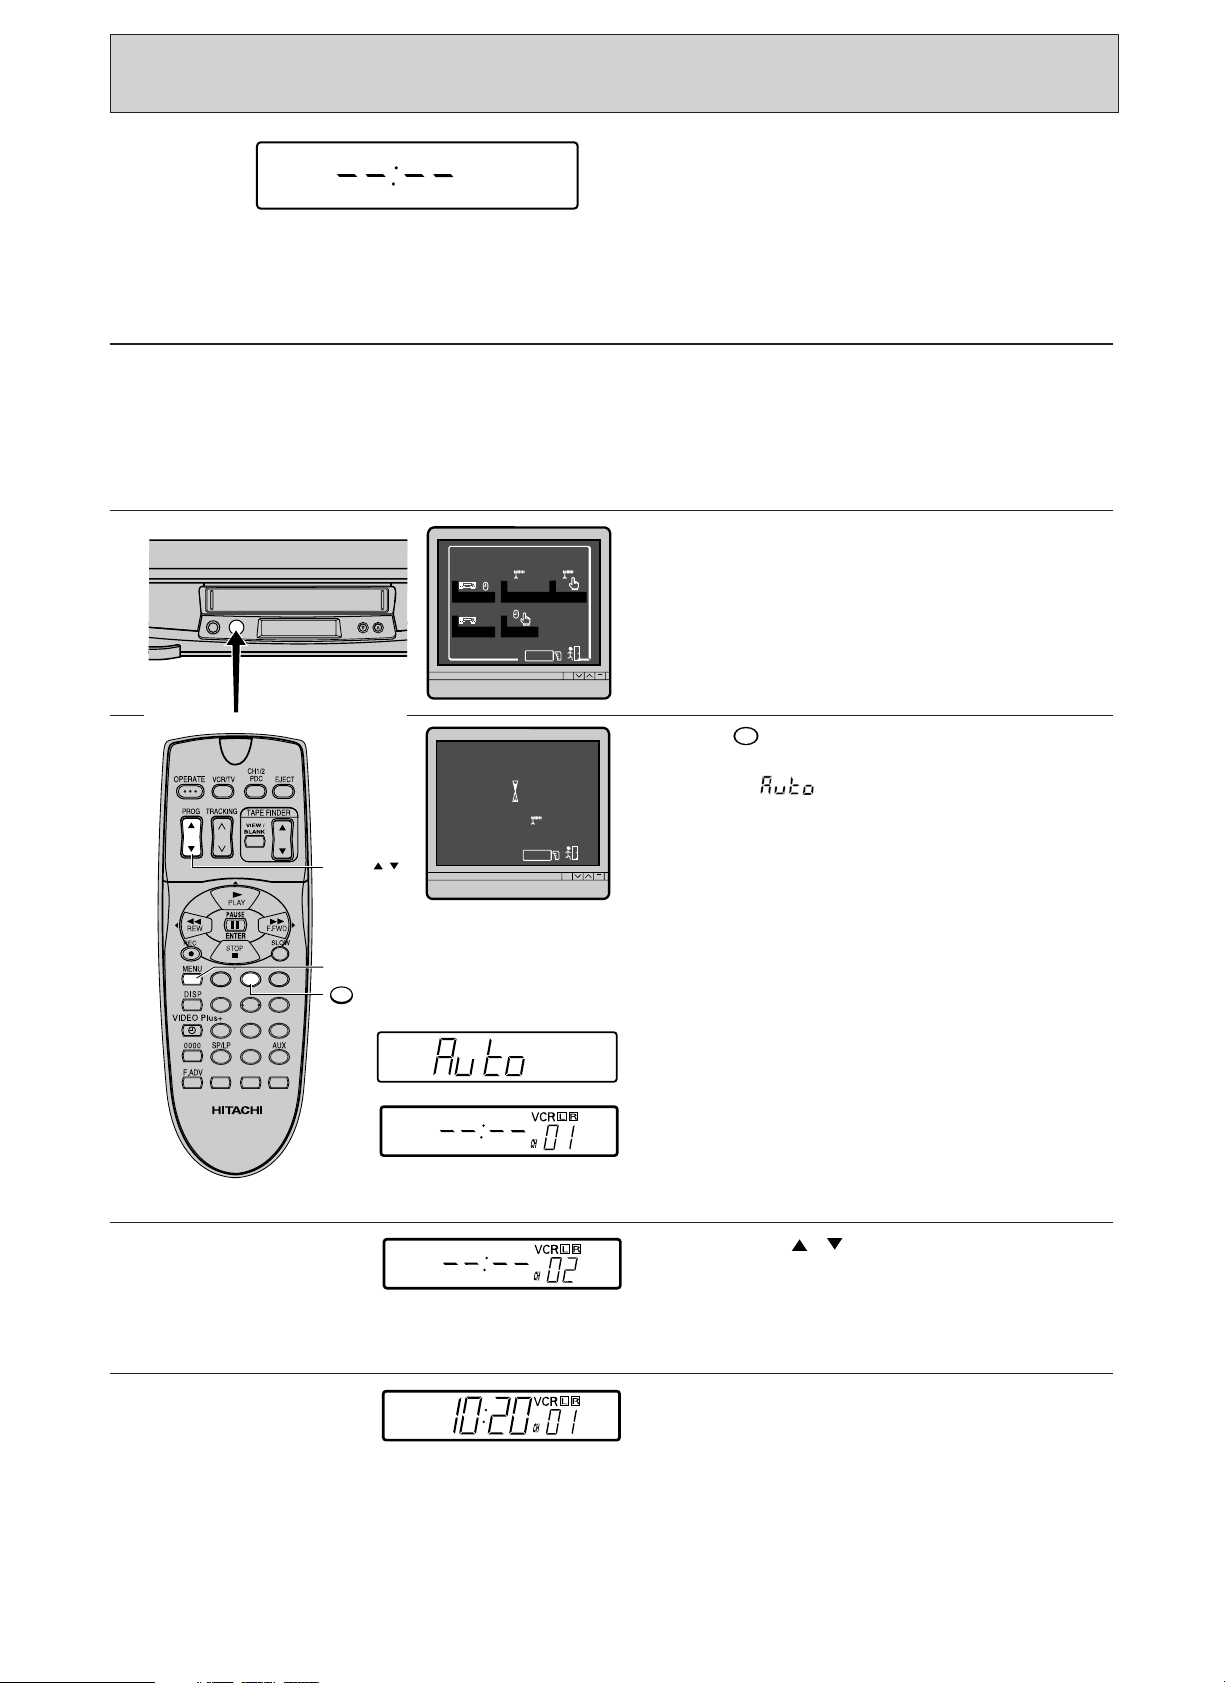
Switch on at the mains power supply after
completely connecting all leads (as described on
pages 6 and 7).
The VCR will be in the standby mode at this stage
and the VCR display will show "– –:– –".
Press OPERATE button.
" " will appear in the VCR display.
During this time, if your set-up include scart
connector and the TV is set to AV line, the TV
screen will display as shown.
(OPERATE)
After this process is complete, the RF output
channel will appear in the VCR display.
For example, RF output channel 35.
4
5
Switch on your TV and select an unused
programme number, i.e. one not used for BBC1, ITV,
etc. (Please consult your TV instruction manual as
your TV may have a special VCR programme
number which must be used.)
Note: This programme number will be your VCR
programme number from now on.
Tune your TV (consult your TV instruction
manual) until the test pattern shown appears.
The correct tuning position is when the picture is
clear. Ensure this programme is stored in your
TV.
10
Page 11
VCR TV
CH
CH
Safety Tab
CH 22
CH 35 CH 69
PROG
6
7
Press the
Note: If the VCR displays " " press the STOP
button on the remote control or on the VCR. The RF
channel data will appear in VCR display. Press the
PROG button to change the RF channel to
To stop the RF output, press STOP button on remote
control or on the VCR again.
If you cannot tune your TV correctly to the test
signal, or there is distortion in the signal, it may be
necessary to change the VCR’s RF out channel. In
this case, press the PROG select button (
on the VCR to change the VCR's RF channel. Then
re-tune your TV. If the test signal has not improved,
continue to change the VCR's RF channel and retune your TV each time, until a clear test pattern
received.
VCR's RF channel will change as follows:
PLAY/STILL
button.
or
.
)
SETTING UP
8
9
Press the PLAY/STILL button again. The test
pattern will disappear and the VCR will now come
out of the standby mode into the operate mode.
You should now be able to playback a prerecorded
cassette.
Insert the cassette carefully (see page 20 for
CASSETTE TAPES). If the safety tab is removed,
then playback will start immediately, if not press the
PLAY/STILL button and the picture will appear on
the screen.
11
Page 12
PRE-TUNING OF BUILT-IN TV TUNER
2
M
ODE C LO C
K
4VCR
5
REVI E
W
CHANNE L
1 2 AUTO 3
M
ENU
=
Exit
142
56
3
7 8 9
0
PROG /
2
MENU
AUTO
M
ENU
=
Exit
The VCR should display "– –:– –" in it's LCD panel
after the main supply is connected.
Controls TV Screen
1
2
3
Turn on the TV and the VCR, then tune the TV to
the video programme number.
If you connect the VCR and TV using a 21-pin Scart
connector lead, select the 21-pin Scart input of the
TV.
Press the MENU button.
The menu, as illustrated, appears on the TV
screen.
Press the button.
The display, as illustrated, appears on the TV
screen and " " appears in the VCR display.
The VCR will automatically store channels
received in your area. It takes about 3 minutes.
The following stations are stored in programme
numbers 01 — 05 automatically.
01 BBC1
02 BBC2
03 ITV
04 CH4 (or S4C)
05 CH5
Note: If the station does not transmit a signal
which identifies itself, the station name will not
appear.
You can watch the progress on the TV's screen —
when the channel numbers stop changing, pretuning is complete.
4
12
Press the PROG / button to check the
channels you can receive.
Note: If no channels have been set or a clear
picture does not appear, check the aerial or Scart
connection.
Note: When the pre-tuning of a channel is
completed, the current time may appear in the
VCR's display. This is because the auto clock
setting function has operated and the VCR's clock
has been set automatically. (See page 18 for
details.)
Page 13
3
Deleting Unwanted Preset Channels
MENU
REW
STOP
F.FWD
3
1
4
2
56
3
7 8 9
0
VCR's display
07 ––––– 20 –
06 –––––
0 –––––
–––––
19 –
5–
04 –
03 –
02 –
01
–
PROG CH DEC
47
––
ITV 23
BBC2 33
BBC1 26
=
NEXT
M
ENU
=
Exit
=CHANGE =
0~9,
07 ––––– 20 –
06 ––––– 1
–––––
9 –
05 47 –
04 CH4 42 –
03 I TV 23 –
02 BBC2 3 3 –
01
BBC1 26 –
PROG CH DEC
=
NEXT
M
ENU
=
Exit
=CHANGE =
0~9,
07 ––––– 20 –
06 –––––
–––––
19 –
05 –
04 –
03 –
02 –
01
–
PROG CH DEC
47
CH4 4 2
ITV 23
BBC2 33
BBC1 26
=
NEXT
M
ENU
=
Exit
=CHANGE =
0~9,
Controls TV Screen
1
2
Press the MENU button, and then button .
The programme number, station name and
channel number will appear in this display.
This is indicated by an arrow on the left of the
screen.
Note: If the station does not transmit a signal
which identifies itself, the station name will not
appear.
Press the F.FWD or REW button until an
unwanted channel is found.
For example, press the F.FWD button to select
channel 42 (programme number 04).
This is indicated by an arrow on the left of the
screen.
SETTING UP
3
4
5
Press the STOP button.
The channel number changes to "- -", indicating
that the channel has been deleted.
Repeat steps 2 and 3 until all unwanted channels
have been erased.
After deleting them, press the MENU button.
13
Page 14
(PRE-TUNING OF BUILT-IN TV TUNER)
3
MENU
REW
PLAY
F.FWD
3
142
56
3
7 8 9
0
07 ––––– 20 –
06 –––––
0 –––––
19 –
5 –
04 –
03 –
02 –
01
–
PROG CH DEC
47
CH4 4 2
ITV 23
BBC2 33
BBC1 26
=
NEXT
M
ENU
=
Exit
=CHANGE =
0~9,
=
– IN +
–––––
=DECOD
FE
ER
CH ––
=
ts
M
ENU
=
Exit
OK
42
–
04
=
– IN +
–––––
=DECOD
FE
ER
CH ––
=
ts
M
ENU
=
Exit
OK
42
–
04
07 ––––– 20 –
06 –––––
0 –––––
19 –
5 –
04 –
03 –
02 –
01
–
PROG CH DEC
47
CH4 4 2
ITV 23
BBC2 33
BBC1 26
=
NEXT
M
ENU
=
Exit
=CHANGE =
0~9,
07 ––––– 20 –
06 –––––
0 –––––
19 –
5 –
04 –
03 –
02 –
01
–
PROG CH DEC
47
CH4 4 2
ITV 23
BBC2 33
BBC1 26
=
NEXT
M
ENU
=
Exit
=CHANGE =
0~9,
Fine tuning of the picture of the received channel:
Controls TV Screen
1
2
3
Press the MENU button, and then button .
Press the F.FWD or REW button to tune to
select the channel with a poor picture.
For example, press the F.FWD button to select
channel 42 (programme number 04).
Press the PLAY button twice.
4
5
6
7
Press the F.FWD or REW button to adjust
the picture so it appears clearly.
After fine tuning for the best picture press the
PLAY button to store the channel.
Repeat steps 2 through 5 for other channels.
After fine tuning them, press the MENU button.
14
Page 15
To change the channel number manually
07 ––––– 20 –
06 –––––
0 –––––
19 –
5 –
04 –
03 –
02 –
01
–
PROG CH DEC
47
CH4 4 2
ITV 23
BBC2 33
BBC1 26
=
NEXT
M
ENU
=
Exit
=CHANGE =
0~9,
3
=
– CH +
–––––
=DECODER
CH ––
04
=
ttss
M
ENU
=
Exit
OK
44
–
07 ––––– 20 –
06 –––––
0 –––––
19 –
5 –
04 –
03 –
02 –
01
–
PROG CH DEC
47
CH4 4 2
ITV 23
BBC2 33
BBC1 26
=
NEXT
M
ENU
=
Exit
=CHANGE =
0~9,
=
– CH +
–––––
=DECODER
CH ––
04
=
ttss
M
ENU
=
Exit
OK
42
–
MENU
REW
PLAY
F.FWD
142
56
3
7 8 9
0
~
9
0
Controls TV Screen
You may do this if you have accidentally deleted a
channel or particular channel was not found.
1
2
3
Press the MENU button, and then button
.
Press the F.FWD or REW button to display
the channel to be changed on the VCR's display.
For example, press the F.FWD button to select
channel 42 (programme number 04).
This is indicated by an arrow on the left of the
screen.
Press the PLAY button.
SETTING UP
4
Press the F.FWD or REW button to start
searching for the broadcast TV channel you want.
F.FWD : Searches from low frequency to high
frequency.
REW : Searches in the reverse order.
At a channel that is broadcasting, a picture
appears on the TV screen. Press the PLAY button
twice to store the channel. If a channel that is not
required appears on the TV screen, press the
F.FWD or REW button again.
15
Page 16
(PRE-TUNING OF BUILT-IN TV TUNER)
07 ––––– 20 –
06 –––––
0 –––––
19 –
5 –
04 –
03 –
02 –
01
–
PROG CH DEC
47
CH4 4 2
ITV 23
BBC2 33
BBC1 26
=
NEXT
M
ENU
=
Exit
=CHANGE =
0~9,
=
– IN +
–––––
=DECOD
FE
ER
CH ––
=
ts
M
ENU
=
Exit
OK
42
–
03
=
– IN +
–––––
=DECOD
FE
ER
CH ––
=
ts
M
ENU
=
Exit
OK
42
–
04
07 ––––– 20 –
06 –––––
0 –––––
19 –
5 –
04 –
03 –
02 –
01
–
PROG CH DEC
47
ITV 23
CH4 4 2
BBC2 33
BBC1 26
0
~
9
,
=CHANGE
=
=
NEXT
Exit
M
ENU
=
3
0
07 ––––– 20 –
06 –––––
0 –––––
19 –
5 –
04 –
03 –
02 –
01
–
PROG CH DEC
47
CH4 4 2
ITV 23
BBC2 33
BBC1 26
=
NEXT
M
ENU
=
Exit
=CHANGE =
0~9,
3
MENU
PLAY
142
56
3
7 8 9
0
~
9
0
PROG /
To change the programme number.
Controls TV Screen
1
2
3
Press the MENU button, and then button
.
Press the F.FWD or REW button to display
the programme to be changed on the VCR’s
display.
For example, press F.FWD to select
programme number 04 (channel 42).
This is indicated by an arrow on the left of the
screen.
Press the PLAY button twice so the
programme number is selected, then press two
number or PROG / button to display the
desired programme number.
For example, button and .
4
5
16
After entering the programme number, press the
PLAY button to store it.
To end, press the MENU button.
Page 17
3
MENU
PAUSE
REW
PLAY
F.FWD
3
142
56
3
7 8 9
0
07 ––––– 20 –
06 –––––
0 –––––
19 –
5 –
04 –
03 –
02 –
01
–
PROG CH DEC
47
CH4 4 2
ITV 23
BBC2 33
BBC1 26
=
NEXT
M
ENU
=
Exit
=CHANGE =
0~9,
07 ––––– 20 –
06 –––––
0 –––––
19 –
5 –
04 –
03 –
02 –
01
–
PROG CH DEC
47
CH4 4 2
ITV 23
BBC2 33
BBC1 26
=
NEXT
M
ENU
=
Exit
=CHANGE =
0~9,
=
– CH +
–––––
=DECODER
CH ––
07
=
ttss
M
ENU
=
Exit
OK
20
–
To preset "satellite or cable box" programme (Refer to page 7 for installation) :
=
– CH +
–––––
=DECODER
CH ––
07
=
ttss
M
ENU
=
Exit
OK
20
07 ––––– 20
06 –––––
0 –––––
19 –
5 –
04 –
03 –
02 –
01
–
PROG CH DEC
47
CH4 4 2
ITV 23
BBC2 33
BBC1 26
=
NEXT
M
ENU
=
Exit
=CHANGE =
0~9,
Controls TV Screen
1
2
3
Press the MENU button, and then button .
SETTING UP
Press the F.FWD or REW button to display
the programme.
If the picture displayed is a “satellite or cable box"
programme, press the PLAY button.
4
5
6
Press the PAUSE button to change the
display from "DECODER (—)" to "DECODER (√)".
Press the PLAY button twice to store the
programme.
The DEC "—" display changes to "√", indicating
that the channel has been stored.
To end, press the MENU button.
17
Page 18
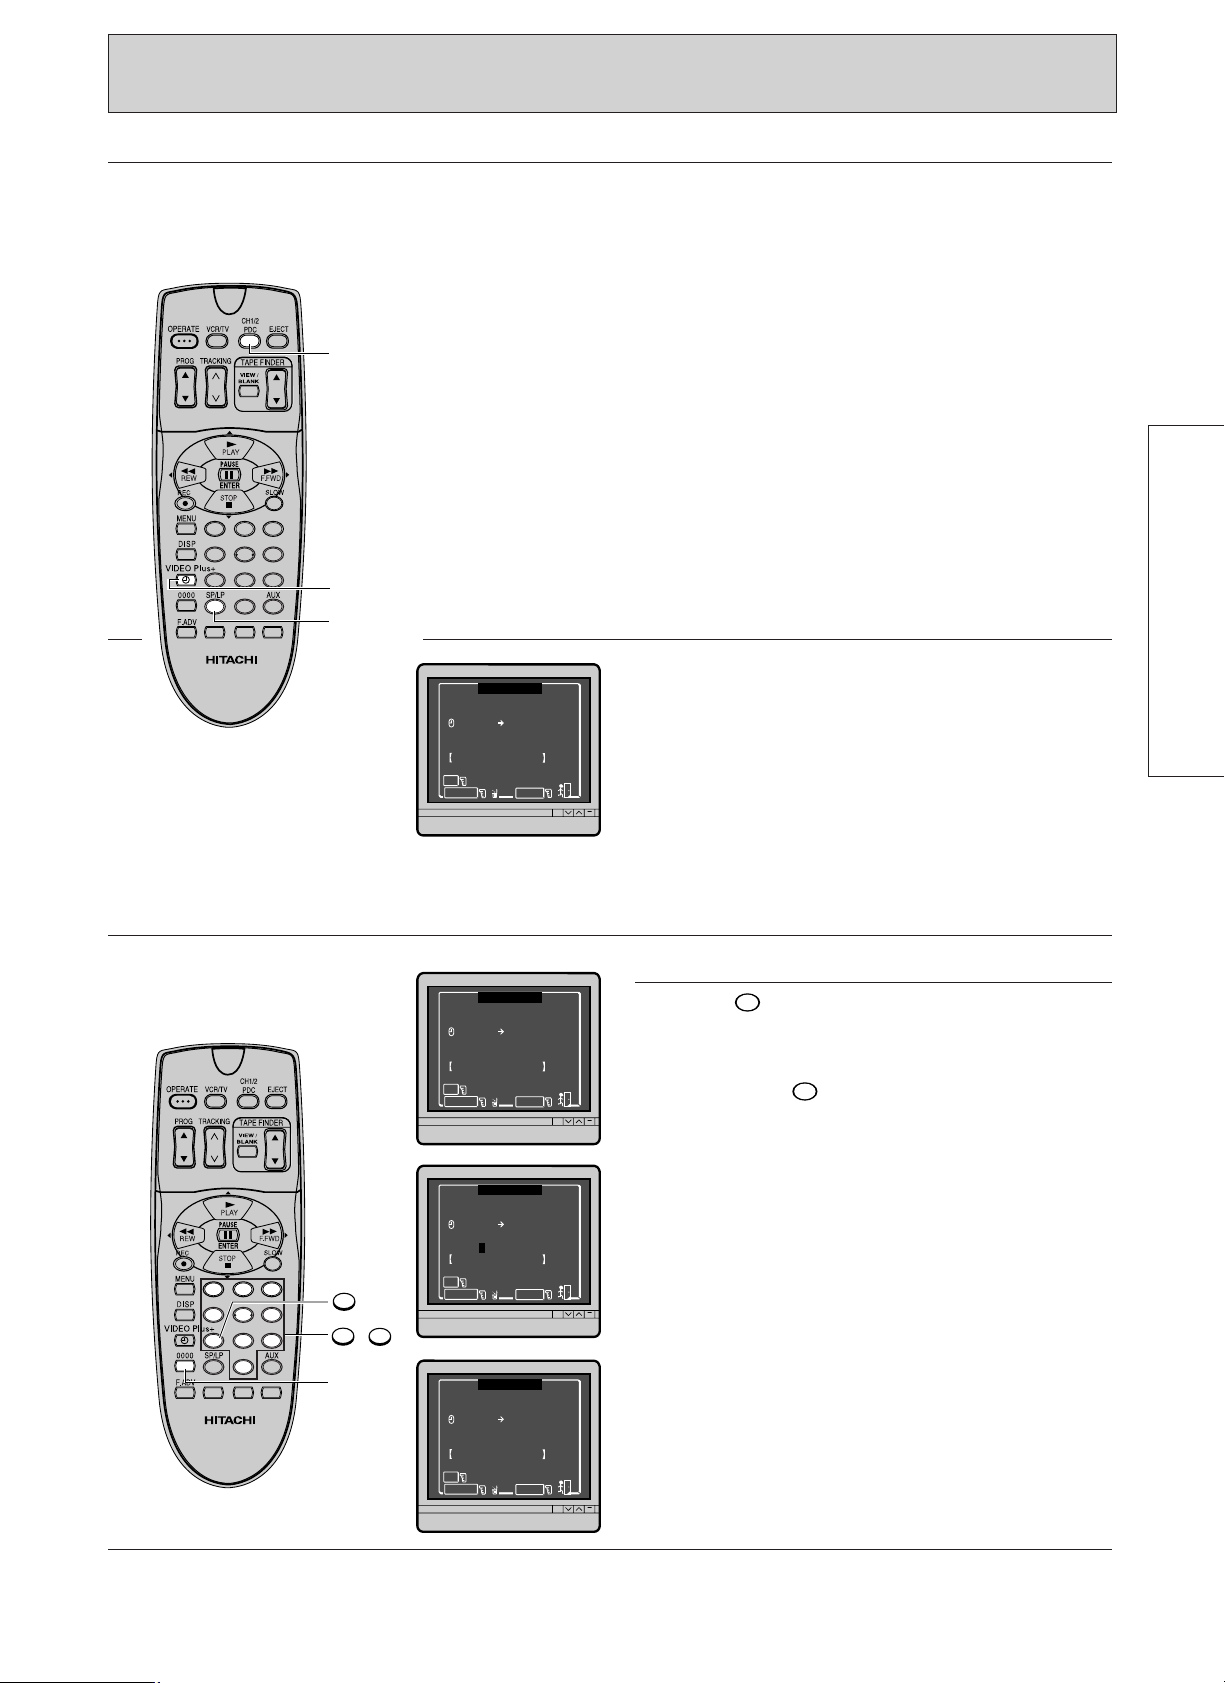
AUTO CLOCK SETTING USING PDC SIGNAL
3
4
M
ODE
CLOC
K
4VCR
5
REVI E
W
CHANNE L
1 2 AUTO 3
M
ENU
=
Exit
=
1
=AUTO
AUTO
BLUE
PROGRAM PLAY
PREPARE REC
=OSD
2
3
M
ENU
=
Exit
=
6
=
5
=NI–CA
M
4
MENU
3
4
142
56
3
7 8 9
0
Setting the clock using a PDC signal (Auto clock set)
This function engages when “AUTO clock √ (on)” is specified on the VCR MODE setting screen. To release
this function, specified “AUTO clock — (off)”.
To switch auto clock between set on or off;
Controls TV Screen
1
2
3
Turn the VCR and TV on, then tune the TV to the
video programmer number.
Press the MENU button.
Press the button for VCR MODE.
Then press the button to change the auto
clock setting.
Notes:
• If the PDC signal being broadcast by a station does not contain a time signal, the VCR's clock will not be
set automatically by pre-tuning the VCR to the channel. In this case, use the procedure on page 19 to set
the clock manually.
• The time which has been set automatically may drift from the correct time depending on the signal
condition or the programme being broadcast. In this case, use the procedure on page 19 to set the VCR’s
clock manually.
• If the VCR's clock has already been set manually, the function to set the clock using a PDC signal is
disabled automatically.
18
Page 19
SETTING THE CLOCK MANUALLY
MENU
142
56
3
7 8 9
0
~
9
0
5
0
5
020
1
0
050
2
1
M
ODE CL OC
K
4VCR5
REVI E
W
CHANNE L
1 2 AUTO 3
M
ENU
=
Exit
: ––
M
ENU
=
Exit
=
0000
––
CLOCK SET
:20
M
ENU
=
Exit
=
0000
10
CLOCK SET
DAY /
M
ONT H
––/ ––/ ––
/YEAR
:20
M
ENU
=
Exit
=
0000
10
CLOCK SET
DAY /
M
ONT H
12/05/00
/YEAR
F
R
Things to know before starting
• Turn the VCR and TV on, then set the TV to the
video programme number.
• While you are setting the clock, the display on
the TV screen will prompt you through the
procedure.
• Always press before a single-digit hour,
minute, day, month or year.
Controls TV Screen
1
2
3
• If you press the wrong digit during clock setting,
press the 0000 button repeatedly until the
incorrect digit changes to "–", then enter the
correct digit.
• The clock must be set to the correct time before
programming the timer for unattended
recording.
Turn the VCR and TV on, then tune the TV to the
video programme number.
Press the MENU button.
Press the button for clock setting.
SETTING UP
4
5
6
Notes:
• If you wish to correct the time in the VCR's
display, after setting the clock time and date,
perform steps 1 through 5 to correct the time
and date, again.
Set the time.
For example, press for 10:20.
(0:00 for midnight, 12:00 for noon)
Set the date.
For example, press
for the 12th of May, 2000.
The day of the week appears automatically.
After setting the date, press the MENU button.
The clock appears in the display of VCR.
• If the power is interrupted for more than 30
minutes, "– –:– –" will appear in the VCR's
display and the time and date will need to be
reset.
19
Page 20
CASSETTE TAPES
EJECT
142
56
3
7 8 9
0
SP/LP
STOP/EJECT
Insertion
Only use video cassettes with the mark in
this VCR.
1
Removal
1
Push the cassette through the door until the VCR
mechanism pulls it into the compartment.
The VCR automatically turns on and the indicator
turns on when the cassette is in place.
Press the STOP/EJECT button on the VCR or the
EJECT button on the remote control handset.
The cassette will come partially out of the
compartment so you can pull it out.
• The indicator turns off when the cassette is
ejected.
• The cassette can be ejected with operate on or
off.
Remember that:
— The VCR automatically enters the playback
mode when a cassette without its safety tab is
inserted.
— When you press the REC button and a cassette
without the safety tab is inserted, " " will
flash in the VCR display for several seconds and
the cassette will be ejected automatically.
— Be sure to check the safety tab before inserting
a cassette for the above reasons.
Type of video cassette
The table below shows the recording time of
different cassettes.
TYPE
E-30 30 minutes 60 minutes
E-60 60 minutes 120 minutes
E-120 120 minutes 240 minutes
E-180 180 minutes 360 minutes
E-240 240 minutes 480 minutes
• Press the SP/LP button on the remote control
• It is recommended to record in the SP mode for
20
handset to select the recording speed before
recording. It is set to the correct speed
automatically during play, so it is not necessary
to change it over.
higher quality picture and sound.
SPEED SELECT SWITCH
SP LP
To avoid erasing a
recording
Break off the safety tab
using a screwdriver or
similar tool.
To re-record on a cassette
which has its safety tab
removed
Cover the hole with
cellophane tape.
Page 21

Section-2 Basic Operations
Playback Pages 22 — 25
This tells you how to playback a recorded tape and how to view
a scene at variable tape speeds.
Recording TV Programmes Pages 26— 28
This tells you how to record a TV programme while viewing the
same TV programme or while viewing another TV programme.
Timer Recording Pages 29— 36
The built-in 24-hour timer permits unattended recording of up to
8 preselected programmes within a period of 1 year, including
daily and weekly programmes.
In additional to the conventional timer programming procedure,
this VCR incorporates a new programming procedure called
VIDEO Plus+.
Prepare Recording Using Satellite Decoder Page 37
Prepare Rec function allows you to easily prepare the VCR to
record signals from a satellite/cable decoder.
21
Page 22

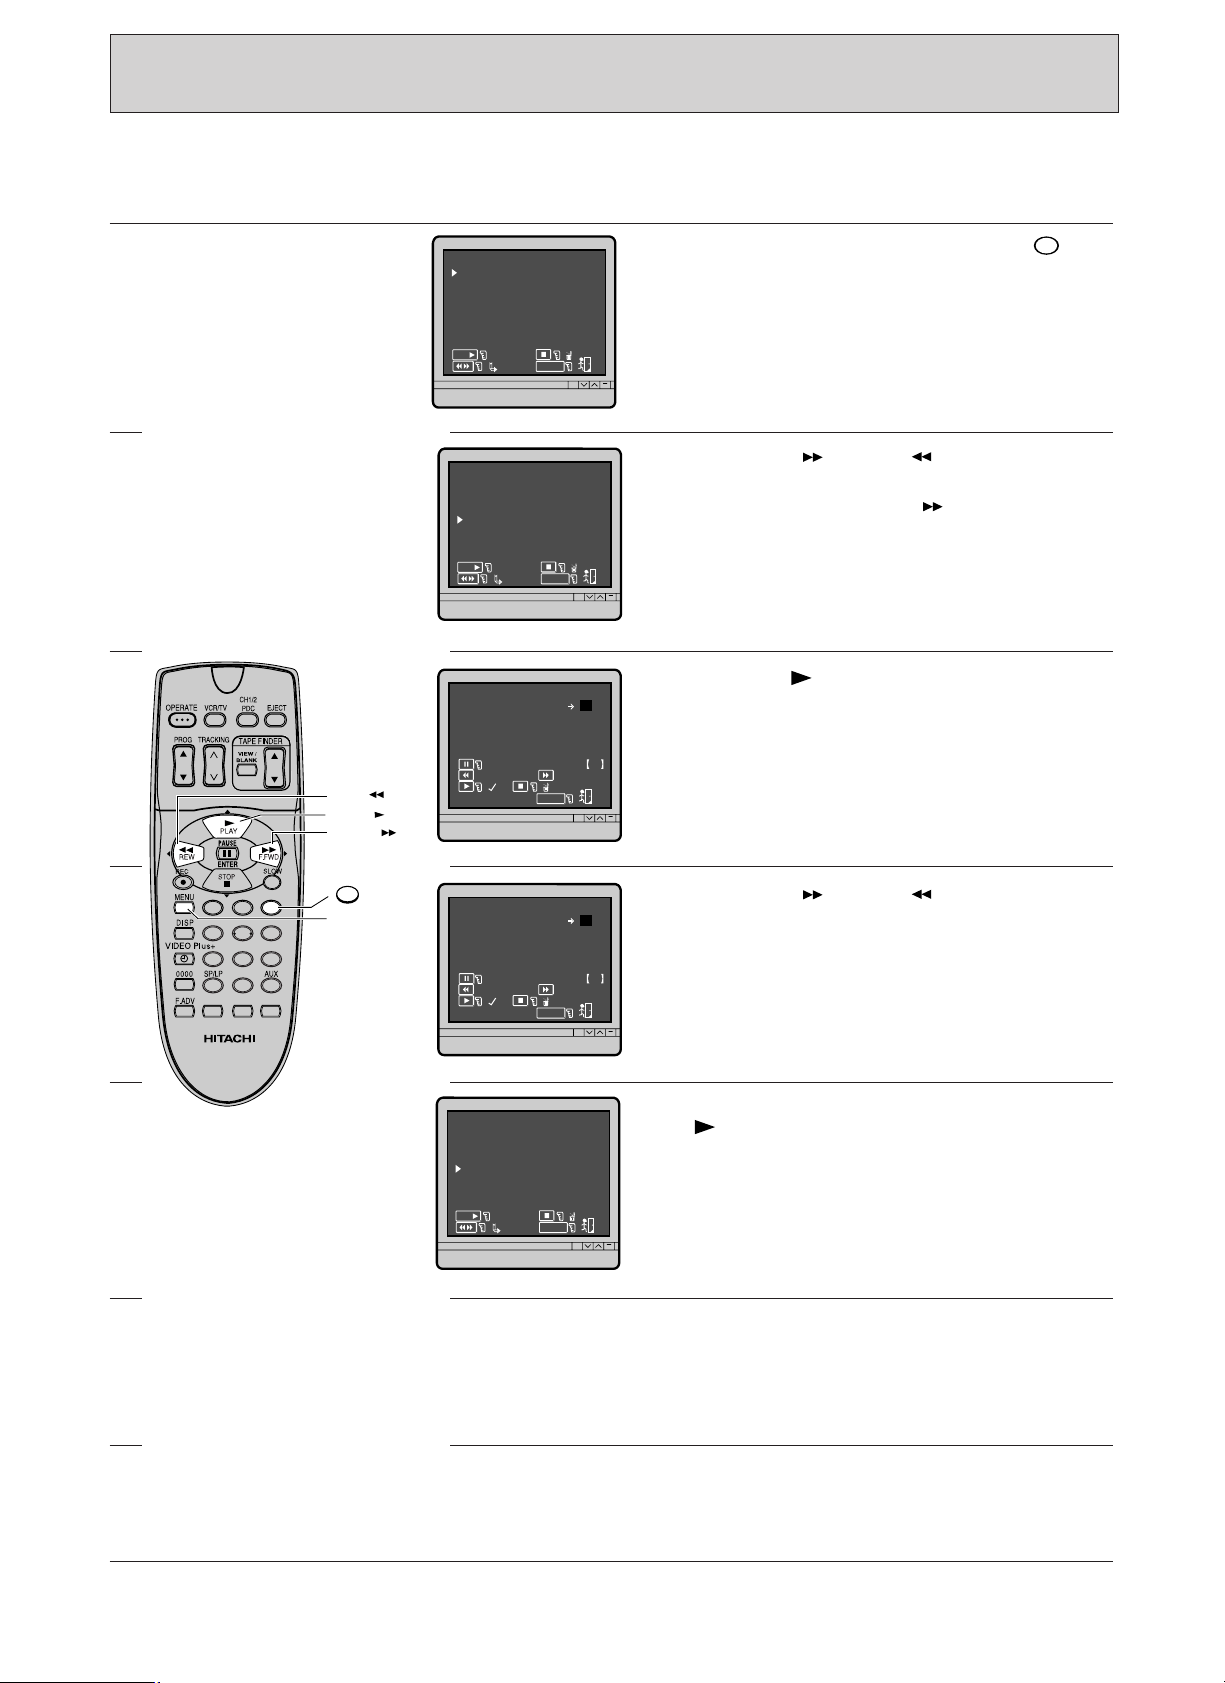
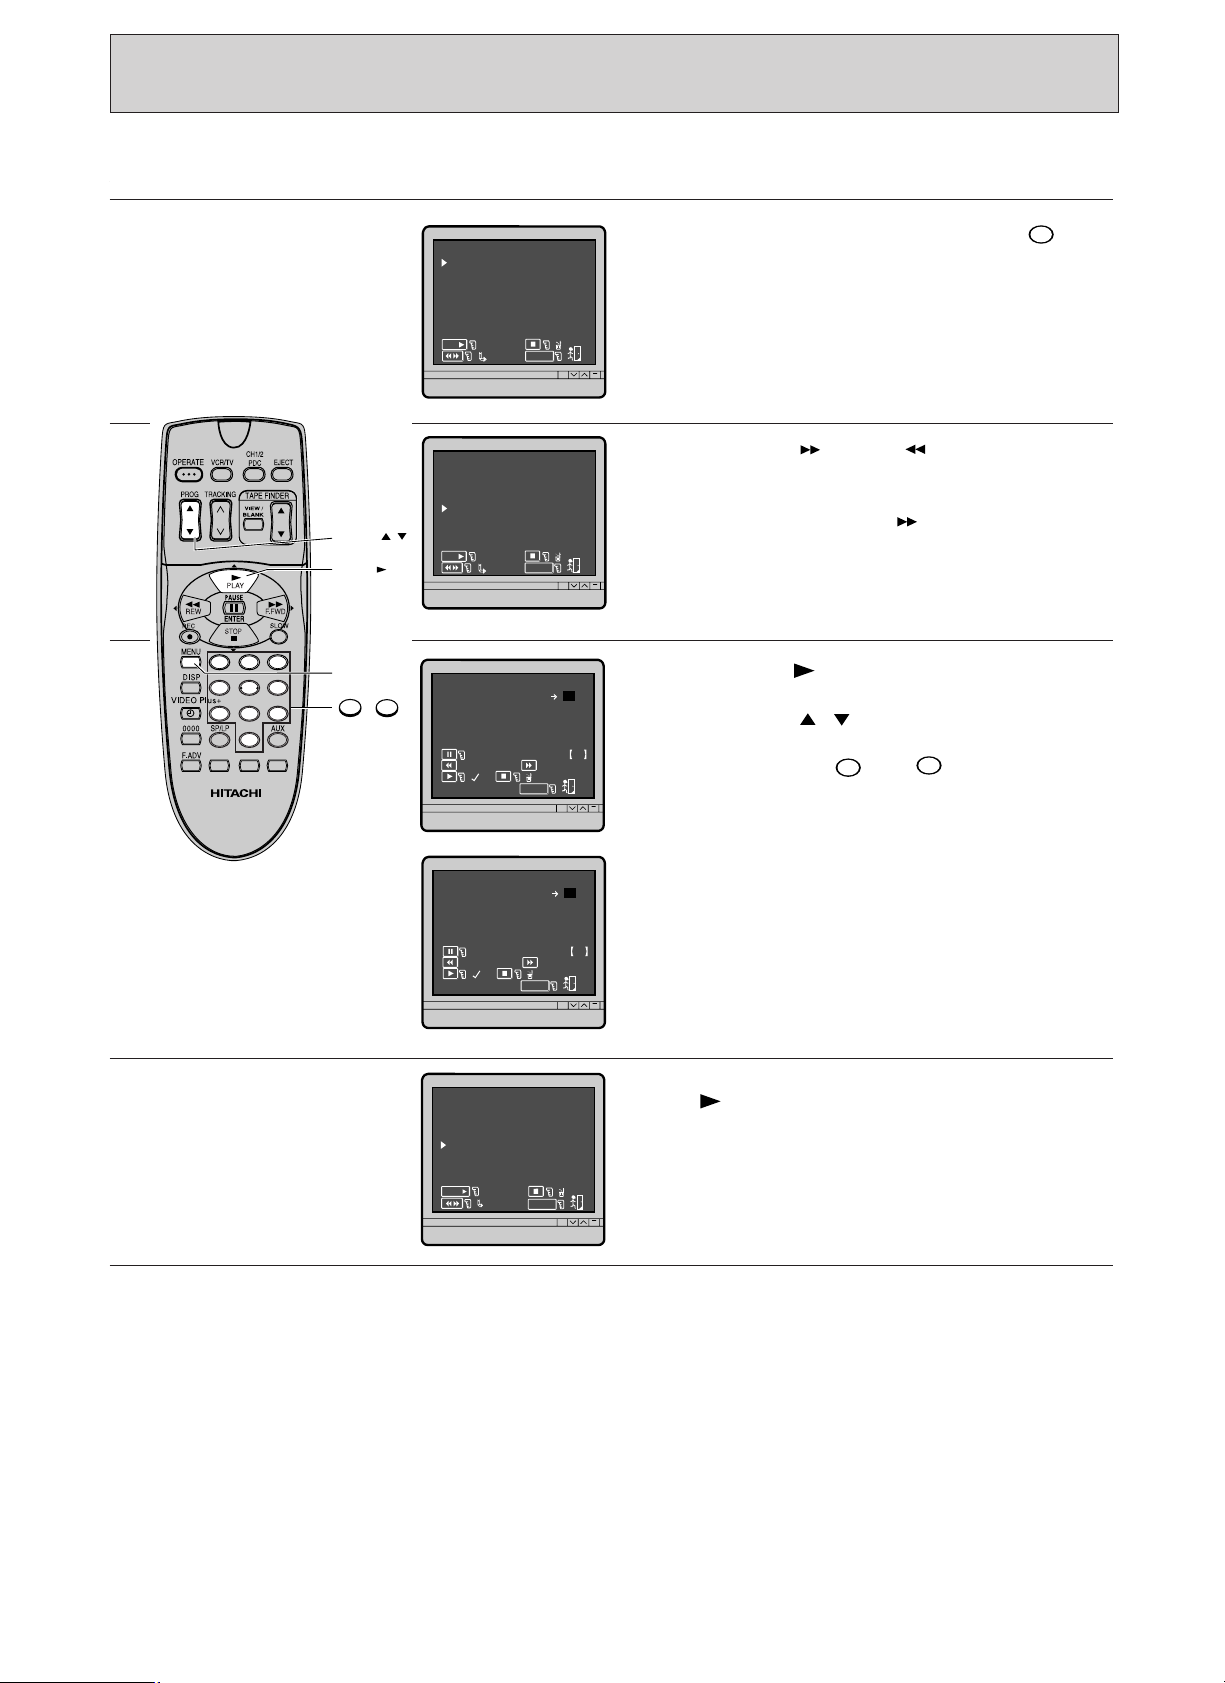
PLAYBACK
142
56
3
7 8 9
0
VCR/TV
/
TRACKING
F.ADV
SLOW
PLAY
PAUSE
PLAY/STILL
Controls VCR’s Display
Start point: Turn the TV set on and select the
video programme number.
1
Insert a cassette.
Note: When a cassette with its safety tab snapped
off is loaded, playback starts automatically.
2
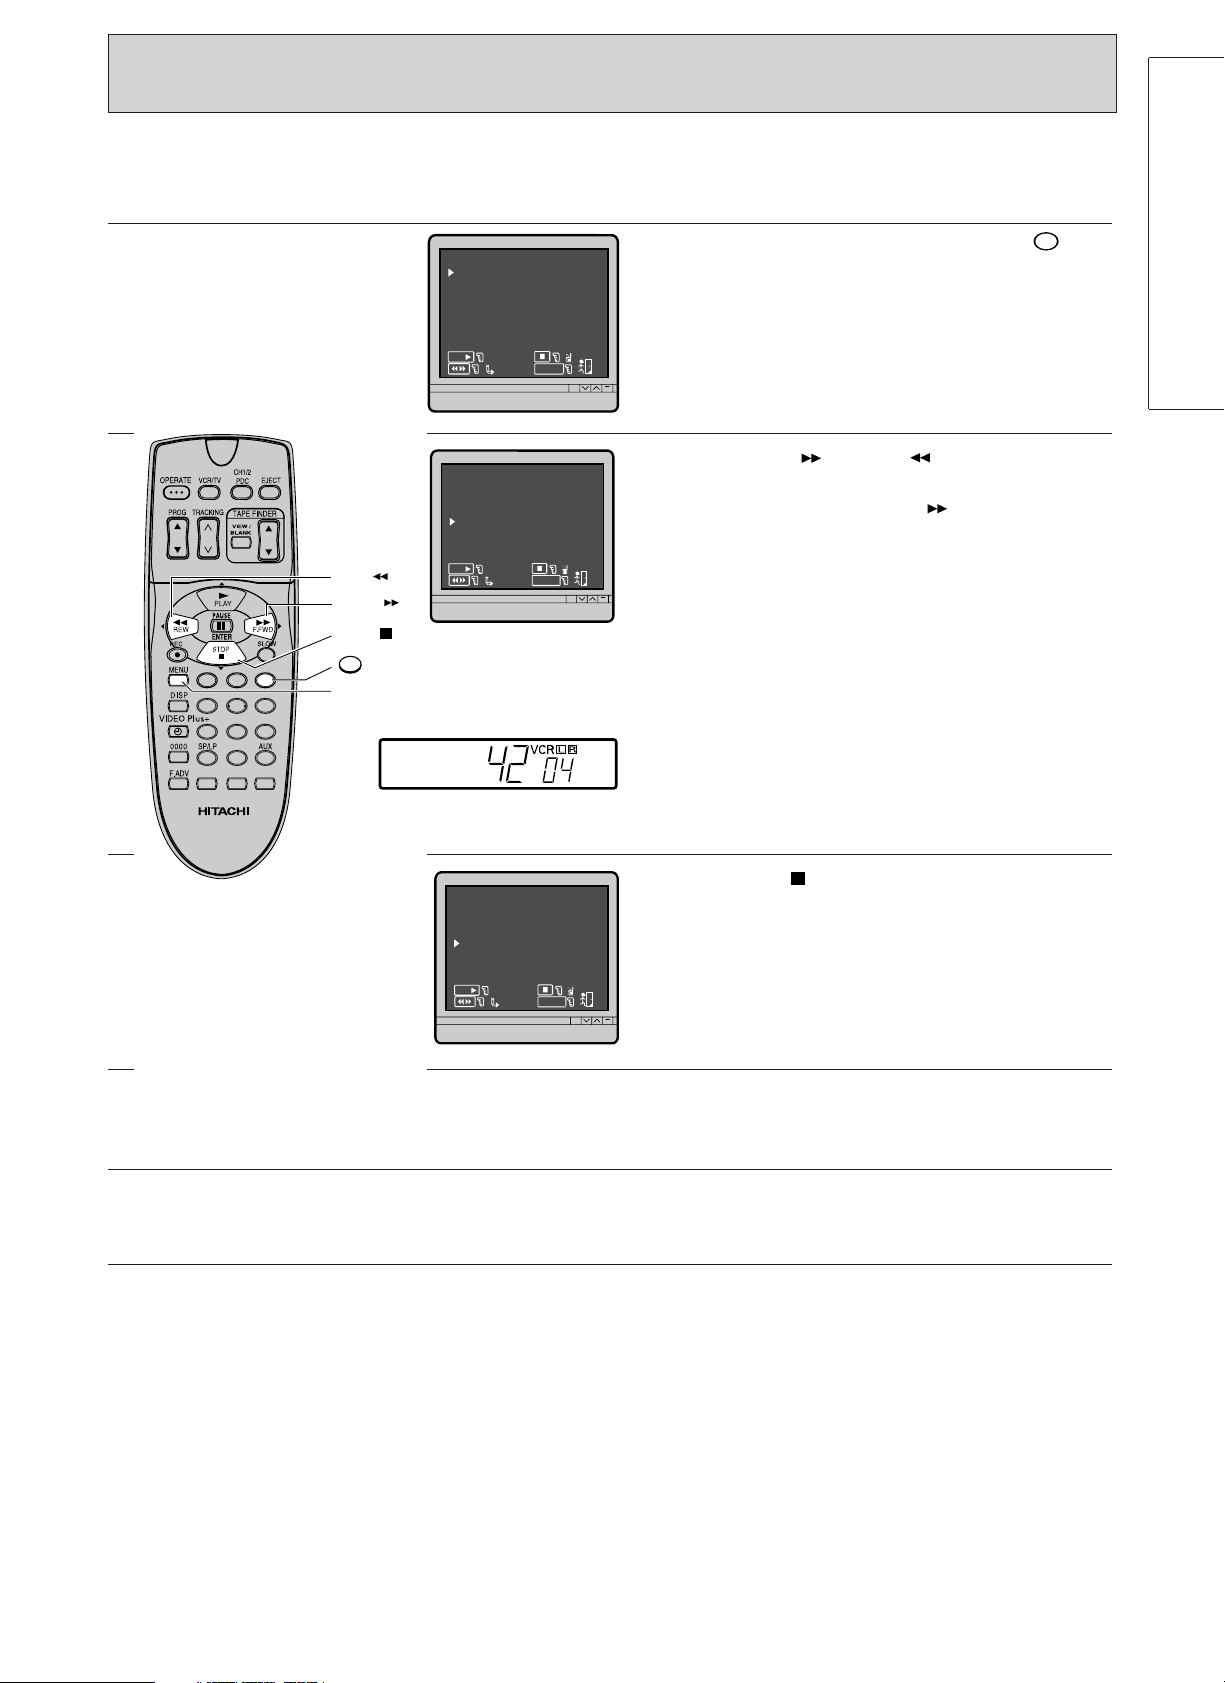
Press the PLAY button on the remote control unit
or PLAY/STILL button on the VCR.
Press the VCR/TV button on the remote control.
The letter “VCR” will appear in the display. This is
necessary for viewing the picture through the
scart connection.
Note: When you press the PLAY button and a
cassette has not been inserted, the " " will
flash in the VCR display to warn you.
During playback you can use the following
features.
Pause playback
Press the PAUSE button on the remote control or
PLAY/STILL button on the VCR to stop the picture
on the screen during playback.
Press the button again to reset to normal
playback.
If the screen "jitters" vertically, this can be
improved by pressing the TRACKING /
button.
Frame advance
Press the PAUSE button to still the picture.
Press the F. ADV button to advance the picture to
the next frame during still playback.
Pressing and holding the F. ADV button advances
the frames continuously.
Slow function
Press the SLOW button during playback.
Press the SLOW button on the remote control unit
during playback to view slow playback picture.
Press the SLOW or PLAY button again to reset to
normal playback.
Note: When the slow playback mode continues for
about 1 minute, the VCR switches to stop mode
automatically to prevent damage to the tape.
22
Page 23

Controls VCR’s Display
STOP
REW
F.FWD
PLAY
142
56
3
7 8 9
0
Visual search
Press either the REW or F.FWD button during
playback.
Pictures can be viewed at high speed in either the
forward or reverse direction. Press the button
again (or press the PLAY button) to return to
normal speed playback.
Notes:
• The playback picture will have some horizontal
noise bars during visual search.
• These noise bars may be much more noticeable
with tapes recorded in the LP mode.
Rewinding a tape during stop mode.
Press the REW button.
Note: When a cassette has not been inserted, the
" " will flash in the VCR display to warn you.
Rewinding a tape at high speed:
BASIC OPERATIONS
Press the REW button, then press it again.
To stop the tape, press the STOP button.
Note: During super rewind, there will be an interval
of 5 seconds between the time the STOP/EJECT
button is pressed and the tape actually stops. This
is designed to protect the tape.
Fast forwarding a tape
during stop mode.
Press the F.FWD button.
Note: When a cassette has not been inserted, the
" " will flash in the VCR display to warn you.
Fast forwarding a tape at high speed:
Press the F.FWD button, then press it again.
To stop the tape, press the STOP button.
23
Page 24

(PLAYBACK)
STOP/EJECT
PLAY
STOP
CH1/2
142
56
3
7 8 9
0
PLAY/STILL
Playing a NTSC tape.
Note: NTSC is different picture format, used in
North America.
If your TV has a PAL 60 system mode, you can play
a NTSC tape on the TV.
Insert a NTSC tape into the VCR and press the
PLAY button.
Note: Although this VCR can play both NTSC-SP
and EP tapes, the Hi-Fi sound in NTSC-EP tapes
may be noisy. In this case, press the CH1/2 button
to switch off the and indicators so the linear
sound mode is engaged.
3
Press either the STOP or STOP/EJECT button to
stop a tape.
Note: The quality of the playback picture in the LP
still/search/slow/frame advance modes is slightly
inferior and jitter (shaking), skew and/or
disappearance of colour may occur and with some
TVs, the picture also be vertically unstable.
24
Page 25

(PLAYBACK)
142
56
3
7 8 9
0
/
TRACKING
SLOW
CH1/2
PDC
142
56
3
7 8 9
0
CH1/2
Notes:
• If there is a noise bar in the picture during still
or slow motion play, press the SLOW button
and then press the TRACKING / button
until the noise is reduced.
• To prevent tape damage, the VCR will switch
from the still/slow mode to the stop mode after
about 1 minute.
Auto Tracking
When playback is started, the auto tracking
function operates and adjusts tracking
automatically so the picture is optimized.
• Auto tracking may not operate correctly when
the tape is scratched or the recorded condition
is poor. In this case, press the TRACKING
( / ) button to adjust tracking.
CH1/2 select button
BASIC OPERATIONS
■ When playing stereo or monoaural tapes
Press the CH1/2 select button on the remote
control handset so that both the and
indicators on the front panel of the VCR lights up.
• When only the (or ) indicator lights, only
the left (or right) audio channel of the Hi-Fi track
is heard.
• When both and indicators do not light,
the sound on the mono audio track is heard.
■ When playing back bilingual broadcasts
Select the required language by pressing the
CH1/2 select button.
• When only the indicator lights, the main
language is heard.
• When only the indicator lights, the sub
language is heard.
• When both and indicators light, the main
language and sub language are heard.
• When both or indicators do not light, the
mono audio track is heard.
25
Page 26
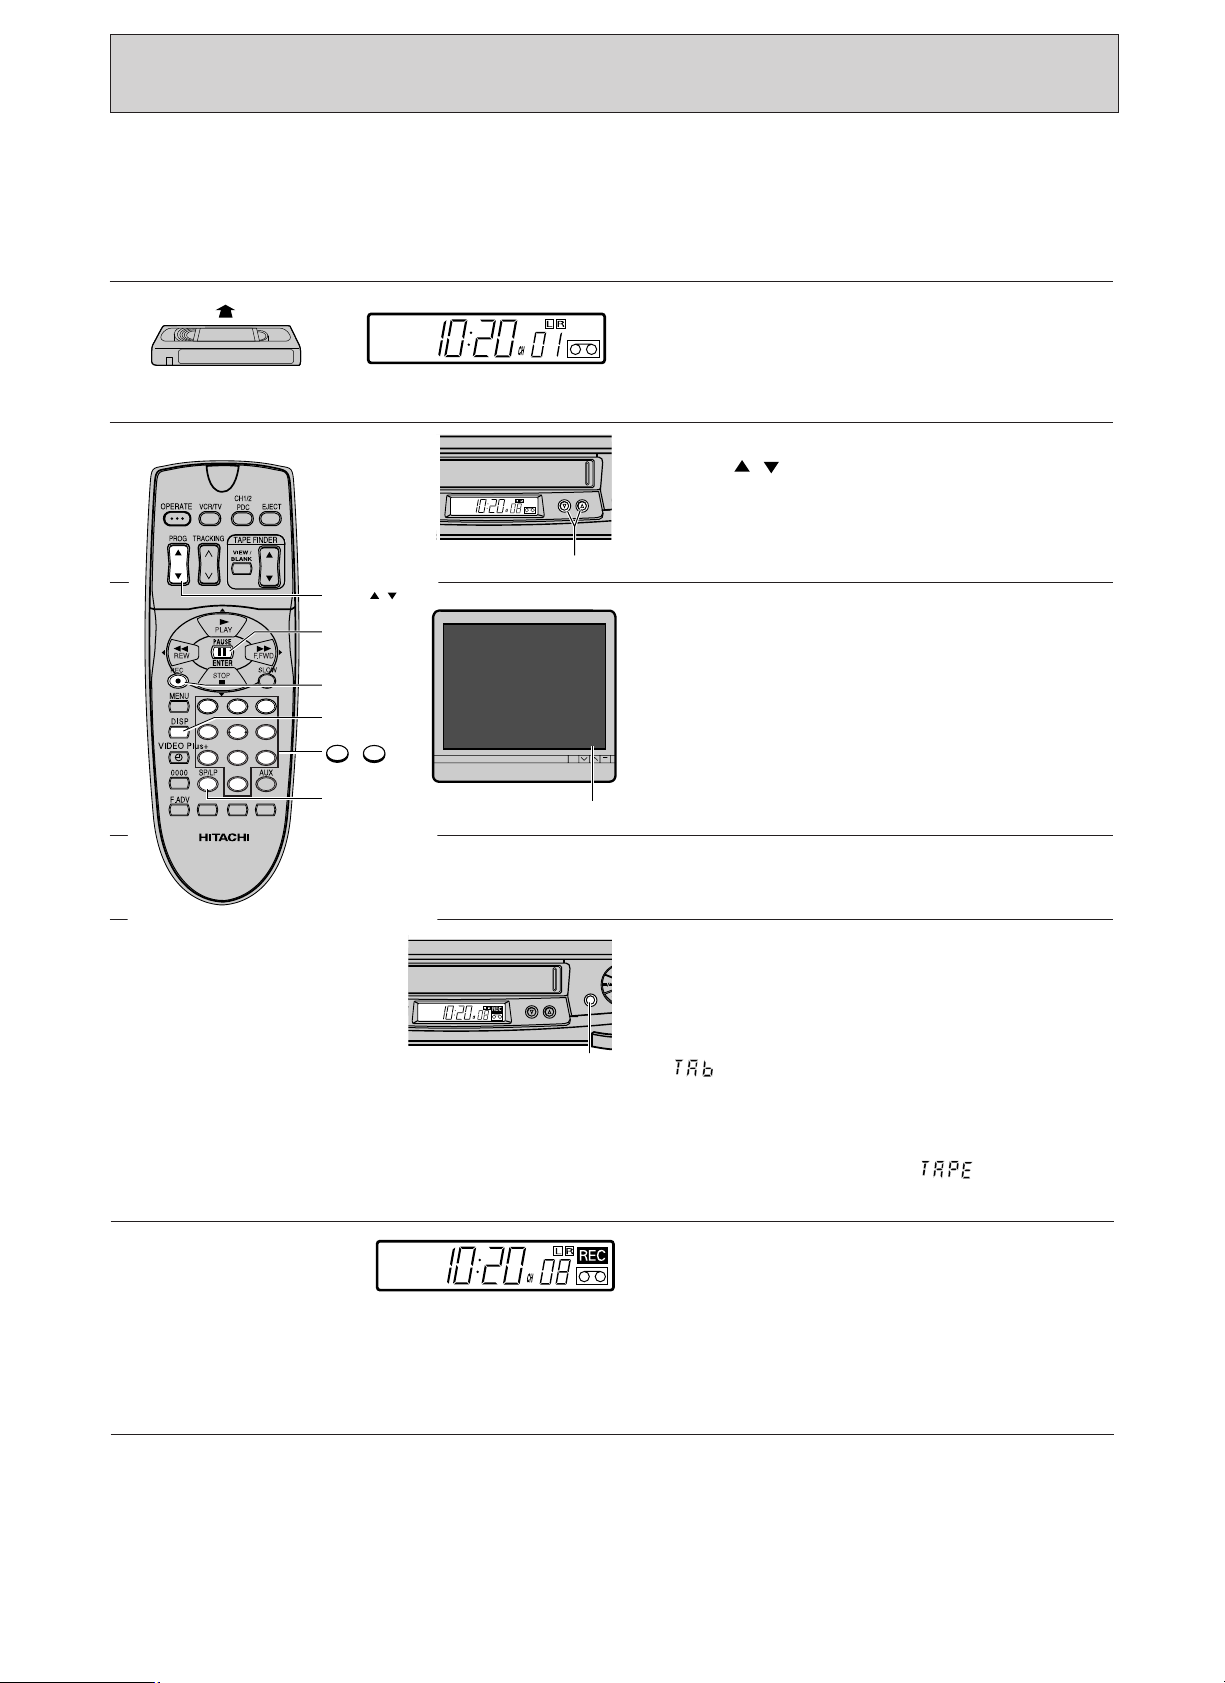
RECORDING TV PROGRAMMES
▲▲
▲▲
▲
▲
▲
▲
142
56
3
7 8 9
0
~
9
0
REC
PAUSE
PROG
SP/LP
DISP
/
REC
12/05/00FR10:20SP
STOP 0 8
recording speed
PROG
Start point: Turn the TV set on and select the
video programme number.
Controls VCR’s Display
1
2
3
4
Insert a cassette.
Note: Be sure to check that the safety tab is not
missing. If it is removed, the VCR is set to the
playback mode automatically.
Select the programme to be recorded by pressing
the PROG / button or two number buttons.
See the "NICAM" display on page 44 and the table
on page 28 for NICAM.
Press the DISP button.
The on-screen display will appear on the TV
screen.
Press the SP/LP button to select the recording
speed (SP or LP).
5
6
Press the REC button.
Now, recording starts.
Notes:
• When a cassette without a safety tab is inserted,
" " will flash in the VCR display for several
seconds and the cassette will be ejected
automatically.
• When you press the REC button and a cassette
has not been inserted, the " " will flash in
the VCR display to warn you.
If you want to avoid recording unwanted material,
press the PAUSE button. Press the button again
to continue recording.
To prevent tape damage, the VCR will
automatically switch from record/pause to the stop
mode after about 5 minutes.
26
Page 27

M1 M2
142
56
3
7 8 9
0
CH1/2
Controls VCR's display
CH1/2
PDC
VIDEO
PROGRAMME
NUMBER
142
56
3
STOP
7
8
9
To view a programme while recording it
You can view a programme while recording it by
selecting the video programme number on your
TV.
To record one programme while viewing another
You can record one programme while viewing
another by selecting the programme you want to
view on your TV. The recorded programme can be
viewed later at your convenience.
After the recording has been made press the STOP
or STOP/EJECT button.
STOP/EJECT
BASIC OPERATIONS
Recording a stereo broadcast
The basic procedure for recording a stereo
broadcast is the same as it is for normal recording.
The STEREO indicator will appear on the TV screen
for a few seconds if a programme being broadcast
in stereo is selected.
Recording a bilingual broadcast
The basic procedure for recording a bilingual
programme is the same as it is for normal
recording.
The M1 M2 (bilingual) indicator will appear on the
TV screen if a station broadcasting a bilingual
programme is selected.
Note: You can monitor the desired audio channel
with the CH1/2 select button on the remote control
handset. Press the CH1/2 select button until you
hear the desired audio channel. The selected
audio channel is shown on the VCR. During
bilingual broadcasts is the main language and
is the foreign language.
27
Page 28
(RECORDING TV PROGRAMMES)
Audio to be recorded according to the NICAM broadcast
Type of
broadcasting
audio
Standard
Standard +
NICAM mono
Standard +
NICAM stereo
Standard +
NICAM bilingual
Display on
TV screen
M1
STEREO
M1 M2
NICAM (√) or
(—) display
(see page 44)
Either
√ (on)
— (off)
√ (on)
— (off)
√ (on)
— (off)
Mono audio
track
Standard
Standard
Standard
Standard
Standard
Standard
Standard
Audio to be recorded
Hi-Fi audio track
L
Standard
NICAM mono
Standard
NICAM L
Standard
NICAM main
Standard
R
Standard
NICAM mono
Standard
NICAM R
Standard
NICAM sub
Standard
28
Page 29
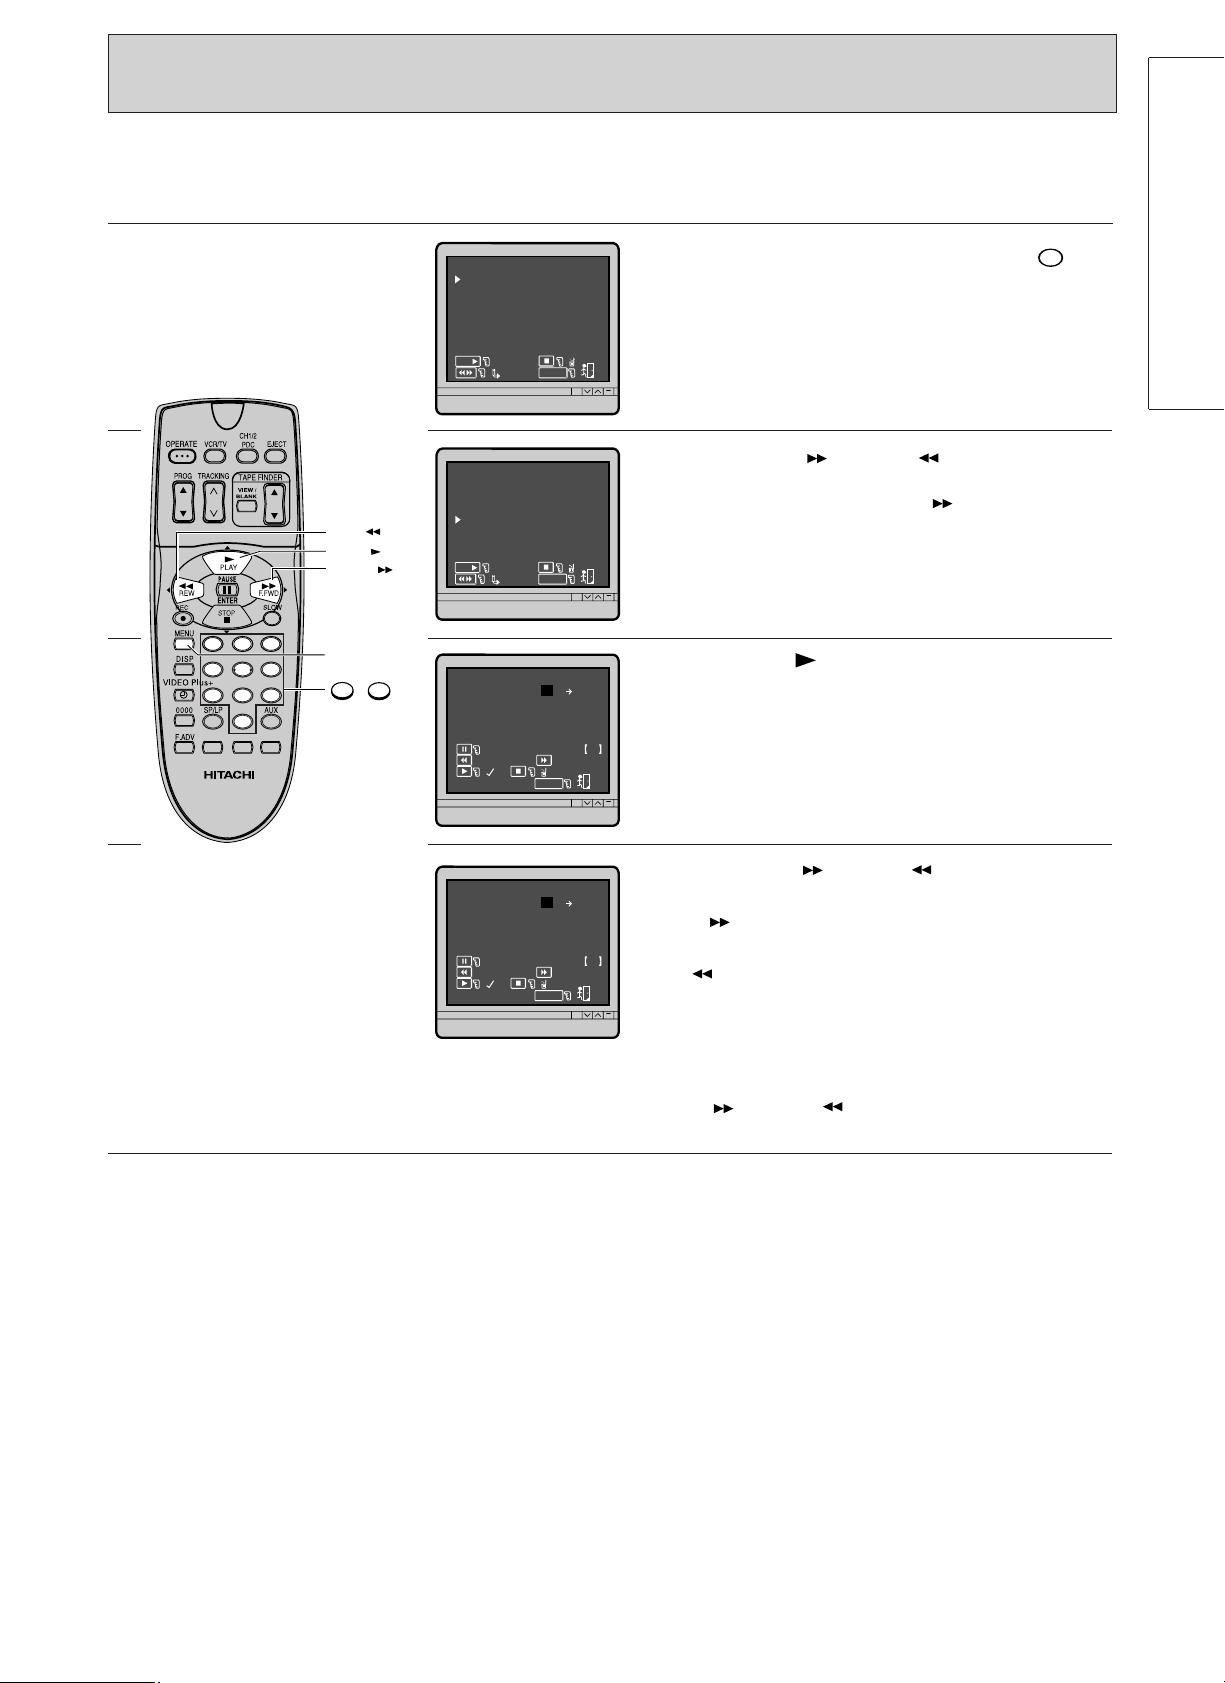
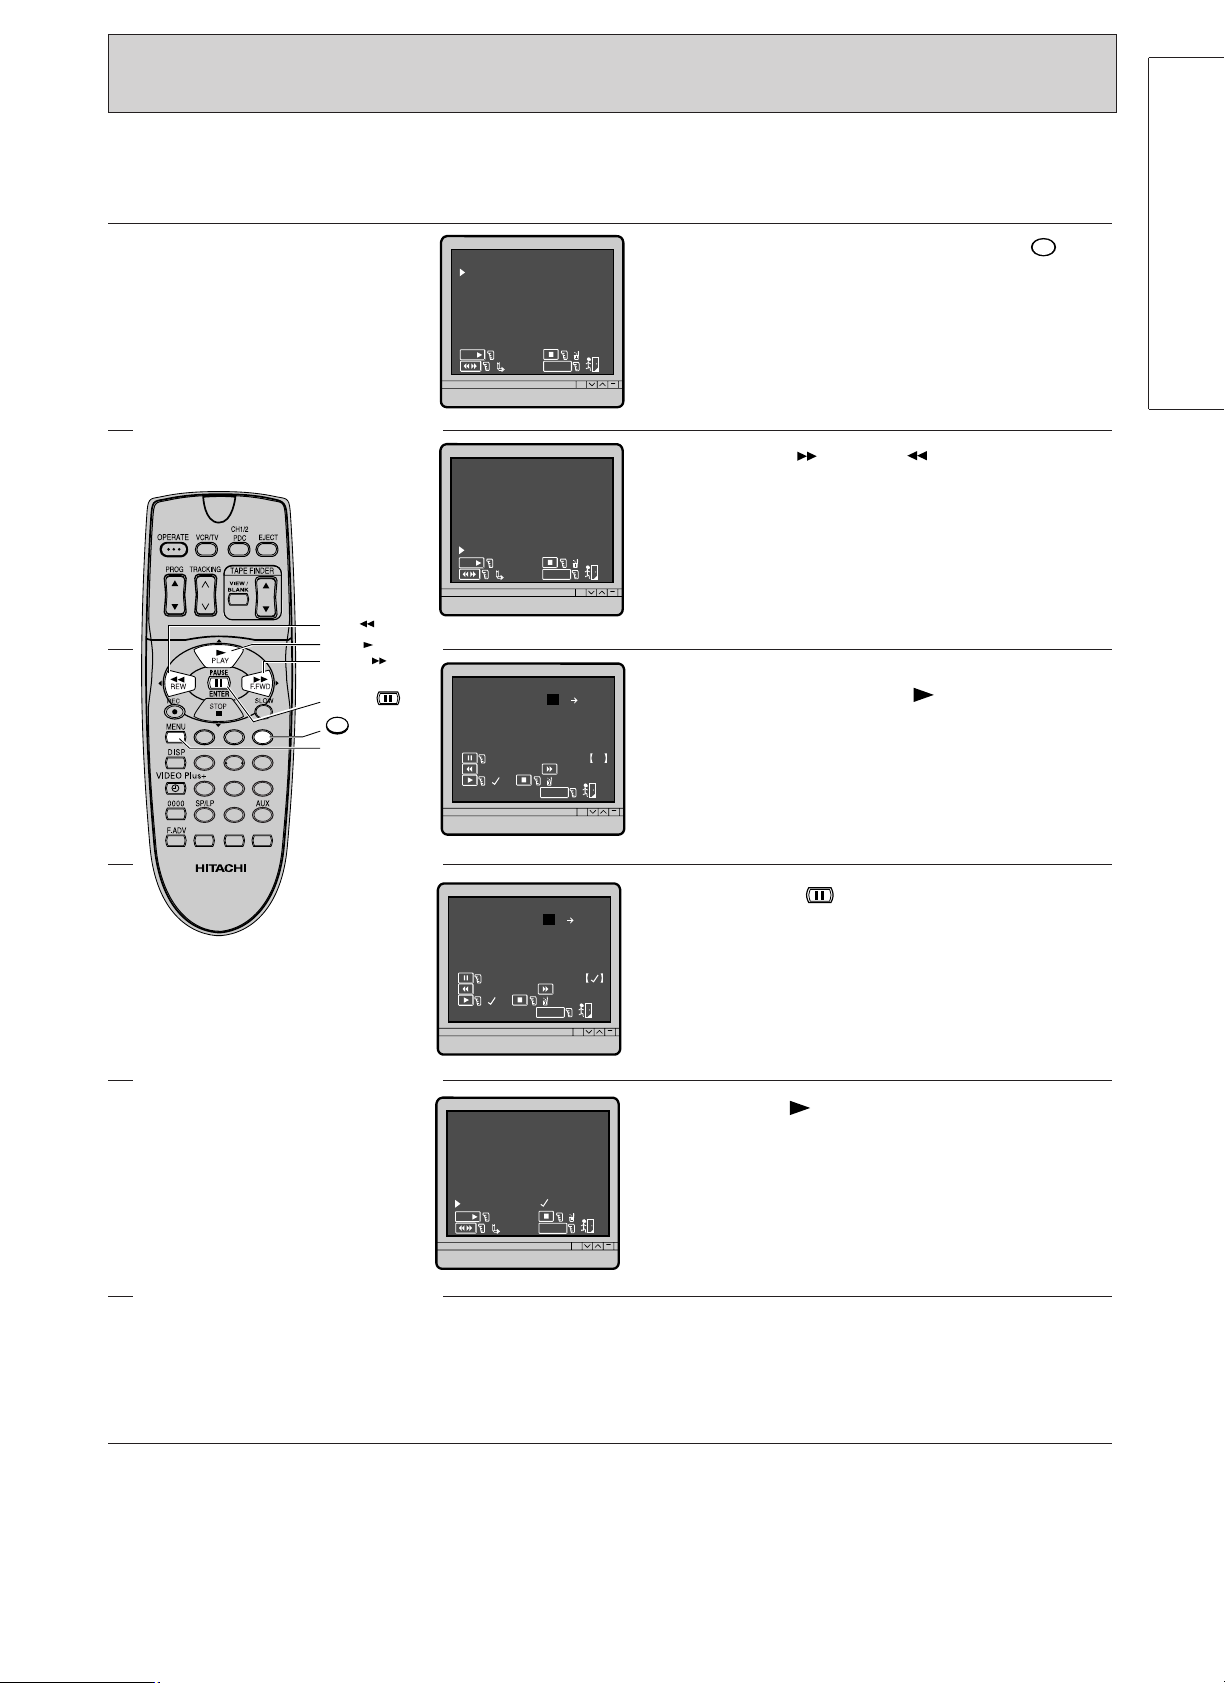
TIMER RECORDING
142
56
3
OPERATE
OPERATE
Controls VCR’s Display
Your TV does not have to be on to make a
recording because the VCR records TV
programmes without the aid of your TV. It is only
used for monitoring.
1
2
3
4
Make sure that the clock shows the present time
correctly.
Insert a cassette.
Be sure a cassettee which has an intact safety tab
must be inserted.
Programme the timer.
See pages 30 to 36 for details.
BASIC OPERATIONS
Press the OPERATE button to turn the VCR off.
To interrupt a recording after it starts, press the
OPERATE button and then the STOP or STOP/
EJECT button within 10 seconds.
If a cassette with its safety tab snapped off is
inserted, it will be ejected automatically and the
indicator in the VCR’s display will start flashing
when the VCR is turned off. In this case, insert a
cassette with its safety tab in place or cover the
hole with plastic tape.
Also, if a cassette is not loaded in the VCR, the
indicator starts flashing.
29
Page 30
(TIMER RECORDING)
VIDEO Plus+
0000
142
56
3
7 8 9
0
~
9
0
M
ENU
=
Exit
–
ENTE R THE P+LUSCODE
VIDEO PLUS PROGRA
MM
E
■
VIDEOPLUS
=MANUAL
FULL
M
ENU
=
Exit
ENTE R THE P+LUSCODE
VIDEO PLUS PROGRA
MM
E
■
123
=
0000
VIDEOPLUS
OK
=
CH0
M
ENU
=
Exit
=
0000
2
TI
M
ER ROPG
17/05/00 WE
DAY /
M
ONTH/ YEAR S P
7
19:30 20:00
=DLY /
W
KL
RREOR
CH
M
ENU
=
Exit
=
0000
2
TI
M
ER ROPG
17/05/00
WE
DAY /
M
ONTH/ YEAR SP
19:30 20:00
0
cursor
0
Programming the timer
This VCR incorporates two programming procedures for timer recording.
One is conventional, whereby the TV programme No., start time, stop time, recording date, etc., must be input,
and the other is called VIDEO Plus+ whereby up to 9 digits must be input.
Programming the timer using VIDEO Plus+ programming system
Things to know before starting programming
• Turn the VCR and TV on, then set the TV to the
video programme number.
• While you are programming the timer, the display
on the TV screen will prompt you through the
procedure.
Controls TV Screen
• To find the PlusCode number, look in the TV
section of most newspapers or TV guide
magazines.
• Check that the time and date are correct.
1
2
3
Turn the VCR and TV on, then set the TV to the
video programme number.
Press the VIDEO Plus+ button.
The VIDEO PLUS PROGRAMME display appears on
the TV screen.
Notes:
• If the clock has not been set, the CLOCK SET
display will appear.
• If the VIDEO Plus+ button is pressed when all the
programme numbers that the VCR can store are
occupied, a "FULL" indication will appear in the
VCR's display and on the TV screen.
When the memory is full, and you wish to input
further programmes, you must delete unwanted
programmes from the VCR's memory.
Press the button when the programme
information you want to clear is displayed. Refer to
page 36 for further information.
Enter the PlusCode programming number from the
TV guide or newspaper etc. for the programme you
want to record, by using the number buttons.
4
30
After entering the PlusCode number, press the
VIDEO Plus+ button.
The programmed details appear.
Note: If you have entered a non-existing number,
"ERROR" will appear on the TV screen.
If you wish to change the programme allocations, the
start time or end time, press the 0000 button to
■
display the cursor "
". Press the 0000 button
repeatedly until the cursor reaches the digit you want
to change, then enter the programme number, start
time or end time.
Page 31
Controls TV Screen
7
7
142
56
3
7 8 9
0
~
9
0
7
0000
142
56
3
7 8 9
0
VIDEO Plus+
SP/LP
PDC
CH0
M
ENU
=
Exit
=
0000
2
TI
M
ER ROPG
17/05/00WE
DAY /
M
ONTH/ YEAR S P
7
19:30 20:00
PDC
=DLY /
W
KL
CH
M
ENU
=
Exit
=
0000
2
TI
M
ER ROPG
17/05/00WE
DAY /
M
ONTH/ YEAR
DLY
SP
7
19:30 20:00
=DLY /
W
KL
0
CH
M
ENU
=
Exit
=
0000
2
TI
M
ER ROPG
17/05/00WE
DAY /
M
ONTH/ YEAR
DLY
SP
7
19:30 20:00
=DLY /
W
KL
0
CH
M
ENU
=
Exit
=
0000
2
TI
M
ER ROPG
20/05/00 S
A
DAY /
M
ONTH/ YEAR
DLY
SP
7
19:30 20:00
=DLY /
W
KL
0
Notes:
• If you change the TV programme number by the
above procedure, the TV programme number
will be automatically replaced by the new
programme number in subsequent
programming.
• Use of PlusCode numbers.
PlusCode numbers only record programmes at
the times shown in the TV guide.
The VCR timer will not follow the TV
programme if the time is changed for any
reason (e.g. delayed due to a previous
programme).
• If you intend to use the PDC function, press the
PDC button to switch on the PDC function.
The letter PDC will appear next to the channel
number on the screen.
For further information on PDC see page 55.
5
Press the SP/LP button to select the recording
speed (SP, LP, or no display).
Note: If you select no display, the VCR will record
BASIC OPERATIONS
at the speed displayed by the on-screen display.
Check the recording speed after programming the
timer. Press the SP/LP button to display the
recording speed.
If you are programming the timer for one time
recording only, skip step 6 and go straight to step
7.
6
To record at the same time every day of week
Press the button once.
"DLY" will appear next to the date on the TV
screen.
Note: When the button is pressed twice,
"DLY" will disappear and the screen will return to
the programming mode for one-time recording.
If you want to change the first recording date,
press the 0000 button repeatedly until the cursor
reaches the first digit of day. (If the cursor passes
the first digit of day, press the 0000 button
repeatedly again until the cursor reaches the first
digit of day.)
number buttons.
31
Then select the first recording date using the
Page 32

7
7
1 2 3
OPERATE
STOP
142
56
3
7 8 9
0
~
9
0
7
0000
MENU
VIDEO Plus+
CH
M
ENU
=
Exit
=
0000
2
TI
M
ER ROPG
17/05/00WE
DAY /
M
ONTH/ YEAR
W
KL
SP
7
19:30 20:00
=DLY /
W
KL
0
CH
M
ENU
=
Exit
=
0000
2
TI
M
ER ROPG
17/05/00WE
DAY /
M
ONTH/ YEAR
W
KL
SP
7
19:30 20:00
=DLY /
W
KL
0
CH
M
ENU
=
Exit
=
0000
2
TI
M
ER ROPG
20/05/00 S
A
DAY /
M
ONTH/ YEAR
W
KL
SP
7
19:30 20:00
=DLY /
W
KL
0
CH0
M
ENU
=
Exit
=
0000
2
TI
M
ER ROPG
17/05/00WE
DAY /
M
ONTH/ YEAR S P
7
19:30 20:00
PDC
=DLY /
W
KL
VCR's display
(TIMER RECORDING)
Must be lit.
Controls TV Screen
To record on a specified day at the same time
each week
Press the button twice.
"WKL" appears on the TV screen.
Note: When the button is pressed again,
"WKL" will disappear and the screen will return to
the programming mode for one-time recording.
If you want to change the first recording date,
press the 0000 button repeatedly until the cursor
reaches the first digit of day. (If the cursor passes
the first digit of day, press the button repeatedly
again until the cursor reaches the first digit of
day.)
Then select the first recording date using the
number buttons.
7
8
9
Press the MENU or VIDEO Plus+ button to end the
programming.
The VCR shows the timer programme number for
a few seconds.
If you want to programme another event, repeat
steps 2 to 7.
To activate the VCR’s timer and make a recording
at the preselected time, be sure to press the
OPERATE button to turn the VCR off.
Of course a cassette which has an intact safety tab
must be inserted.
32
To stop the timer recording press the OPERATE
and then STOP button within 10 seconds.
Note: See page 36 for recalling and clearing the
programming from the VCR memory and for
programme priority.
Page 33

4
0
Programming the timer without using VIDEO Plus+ programming system
0
142
56
3
7 8 9
0
~
9
0
PDC
VIDEO Plus+
AUX
CH
M
ENU
=
Exit
=
0000
–
TI
M
ER ROPG
SP
PDC–
FULL
CH
M
ENU
=
Exit
=
0000
4
TI
M
ER ROPG
SP
––: ––
0
L1
M
ENU
=
Exit
=
0000
TIMER ROPG
SP
––: ––
Things to know before starting programming
• Turn the VCR and TV on, then set the TV to the
video programme number.
• While you are programming the timer, the
display on the TV screen will prompt you
through the procedure.
Controls TV Screen
1
2
• Always press before a single-digit
programme number, hour and minute etc.
• You can correct an error in the programme any
time before the last step by pressing the 0000
button repeatedly until the digit to be corrected
changes to "–" and then enter the correct
number.
• Check time and date are correct.
Turn the VCR and TV on, then set TV to the video
programme number.
Press the VIDEO Plus+ button twice.
Notes:
• If the VIDEO Plus+ button is pressed when all
the programme numbers that the VCR can store
are occupied, a "FULL" indication will appear in
the VCR's display and on the TV screen.
• If you intend to use the PDC function, press the
PDC button to switch on the PDC function.
The letter PDC will appear next to the channel
number on the screen.
For further information on PDC see page 55.
BASIC OPERATIONS
3
Select the TV programme number to be recorded.
For example, press for TV channel 4.
Note: If you enter a TV programme number that
you have not preset in the VCR, you cannot
proceed to the next setting.
To record video and audio signals from external
equipment via the Scart socket on the back of the
VCR, press the AUX button so that "L1" is
displayed on the TV screen in place of a
programme number.
To record via the DECODER socket on the back of
the VCR, press the AUX button again to display
"L2".
33
Page 34

0
0
8
1
5
0
7
1
7
7
7
CH
M
ENU
=
Exit
=
0000
4
TI
M
ER ROPG
12/05/00
F
R
DAY /
M
ONTH/ YEAR SP
7
16:00 18:00
=DLY /
W
KL
0
CH
M
ENU
=
Exit
=
0000
4
TI
M
ER ROPG
12/05/00
F
R
DAY /
M
ONTH/ YEAR SP
7
16:00 18:00
=DLY /
W
KL
0
CH
M
ENU
=
Exit
=
0000
4
TI
M
ER ROPG
17/05/00 WE
DAY /
M
ONTH/ YEAR SP
7
16:00 18:00
=DLY /
W
KL
0
CH
M
ENU
=
Exit
=
0000
4
TI
M
ER ROPG
13/05/00 S
A
DAY /
M
ONTH/ YEAR
DLY
SP
7
16:00 18:00
=DLY /
W
KL
0
CH
M
ENU
=
Exit
=
0000
4
TI
M
ER ROPG
16/05/00 TU
DAY /
M
ONTH/ YEAR
W
KL
SP
7
16:00 18:00
=DLY /
W
KL
0
0
0
6
1
M
ENU
=
Exit
=
0000
TIMER ROPG
SP
16:00
CH0 4
––: ––
142
56
3
7 8 9
0
~
9
0
7
SP/LP
(TIMER RECORDING)
Controls TV Screen
4
5
6
Select the start time.
For example, press for 16:00
(4:00 p.m.).
0:00 for midnight and12:00 for noon
Select the stop time.
For example, press for 18:00
(6:00 p.m.).
Press the SP/LP button to select the recording
speed (SP, LP, or no display).
Note: If you select no display, the VCR will record
at the speed displayed by the on-screen display.
Check the recording speed after programming the
timer. Press the SP/LP button to display the
recording speed.
7
Select the date for recording.
To record on a single day up to one year ahead
For example, press to begin
recording on the 17th of May.
To record at the same time every day of the week
Select the first recording date using the number
buttons. Then press the button once to
display "DLY".
To record on a specified day at the same time
each week
Select the first recording date using the number
buttons.
Press the button twice to display "WKL".
Note: When the button is pressed again,
"WKL" will disappear and the screen will return to
the programming mode for one-time recording.
34
Page 35

Controls VCR's Display
CH
M
ENU
=
Exit
=
0000
4
TI
M
ER ROPG
17/05/00WE
DAY /
M
ONTH/ YEAR SP
7
16:00 18:00
=DLY /
W
KL
0
142
56
3
7 8 9
0
VIDEO Plus+
MENU
OPERATE
VCR's display
142
56
3
7 8 9
0
OPERATE
STOP
Must be lit.
8
9
10
Now, programming has been completed to record
one event.
Press the MENU or VIDEO Plus+ button.
The VCR shows the timer programme number for
a few seconds.
If you want to programme other programmes,
repeat steps 2 to 8.
BASIC OPERATIONS
To activate the VCR’s timer and make a recording
at the preselected time, be sure to press the
OPERATE button to turn the VCR off. Of course a
cassette which has an intact safety tab must be
inserted.
To stop the timer recording press the OPERATE
button and then the STOP button within 10
seconds.
35
Page 36

1
1
0
M
ODE CL OC
K
4VCR5
REVI E
W
CHANNE L
1 2 AUTO 3
M
ENU
=
Exit
CH
M
ENU
=
Exit
2
NO . 1
17/05/00
W
E
SP
1
19:30 20:00
=
0
=
NE
X
T
0
142
56
3
7 8 9
0
0
1
MENU
(TIMER RECORDING)
Recalling and clearing programmes from the VCR’s memory
Controls TV screen
1
2
3
4
Turn the VCR and TV on.
Be sure that the TV is set to the video programme
number.
Press the MENU button.
The OSD menu appears on the TV screen.
Press the button (REVIEW).
The TV screen will display the information you
entered for the lowest programme number.
Press again if you want to view the next
programme information immediately.
If no more programme information is stored, the
menu screen will be restored.
To clear a programme, press the button when
the programme information you want to clear is
displayed.
One event’s timer programme data is erased from
the VCR’s memory when the timer recording is
finished, but daily and weekly programmes
remain in the VCR’s memory even after the timer
recording is finished.
5
When you finish reviewing the programmes, press
the MENU button to switch off the on-screen
display.
Programme priority
Example 1: When the programme start time is the
same for more than one programme on the same
day, they are recorded in the following order of
programme 1, 2, 3 .... 8.
Programme 1
Programme 2
Programme 3
Programme 4
7:00 8:00 9:00 10:00 11:00 7:00 8:00 9:00 10:00 11:00
7:00 — 8:00 Programme 1
8:00 — 9:00 Programme 2
9:00 — 10:00 Programme 3
10:00 — 11:00 Programme 4
The actual programme recorded and the sequence is as shown in the shaded part of the diagram.
36
Example 2: When the programmes overlap, the
earlier programme has priority.
Programme 1
Programme 2
Programme 3
Programme 4
7:00 — 9:00 Programme 2
9:00 — 10:00 Programme 1
10:00 — 11:00 Programme 3
11:00 — Programme 4
Page 37

PREPARE RECORDING USING SATELLITE DECODER
142
56
3
7 8 9
0
STOP
OPERATE
VCR/TV
"PREPARE - REC" function allows you to easily prepare the VCR to record signals from a satellite/cable
decoder, without setting the timer programme. This avoids the necessity of doing timer programming
twice. (For the decoder and the VCR).
Controls VCR's Display
1
2
3
4
Connect your decoder to L2 (the blue socket
behind the set) as shown in page 7.
Then set the PREPARE REC mode in the menu to
on (√). See page 44.
Set the timer and channel on the satellite decoder
according to proper procedure of that decoder.
Insert a cassette with safety tab intact. Turn the
VCR to OPERATE off mode, then press VCR/TV
button for more than 3 seconds.
The VCR will display " ".
The VCR is now ready to receive and record signal
from the satellite decoder.
At the programmed start-time, the decoder will
activate your VCR to start recording.
Subsequently, the decoder will signal the VCR to
stop recording and to shut-off.
BASIC OPERATIONS
5
To cancel the PREPARE REC setting, you can do
one of the following:
a) Enter the OSD menu and turn PREPARE REC to
off (–).
b) Eject the tape.
c) If recording has not yet started, by pressing
VCR/TV for more than 3 seconds.
d) If recording has already started, by pressing the
OPERATE button, followed by STOP button
within 10 seconds.
Please Note:
Not all satellite receivers support this function.
37
Page 38

Section-3 Additional Operations
Special Characteristics Pages 39 — 41
This explains the following additional convenient features:
Linear Time Counter; shows the actual elapsed time in hours,
minutes, and seconds.
Automatic Rewind/Automatic Rewind Shut-Off; automatically
rewinds the tape at its end and automatically
shuts off at its beginning if the VCR is switched
to the standby mode.
Rental play; allows you to enjoy tapes without safety tab.
Tape Finder function: allows you to search for programme you
want to view or the point from which you want
to start recording on tape.
Menu Features Pages 42 — 44
Menu features; shows you various displays;
programme review, OSD feature on/off
selection, AUTO BLUE on/off selection, NICAM
on/off selection, AUTO CLOCK on/off selection,
PROGRAM PLAY on/off selection and
PREPARE REC on/off selection.
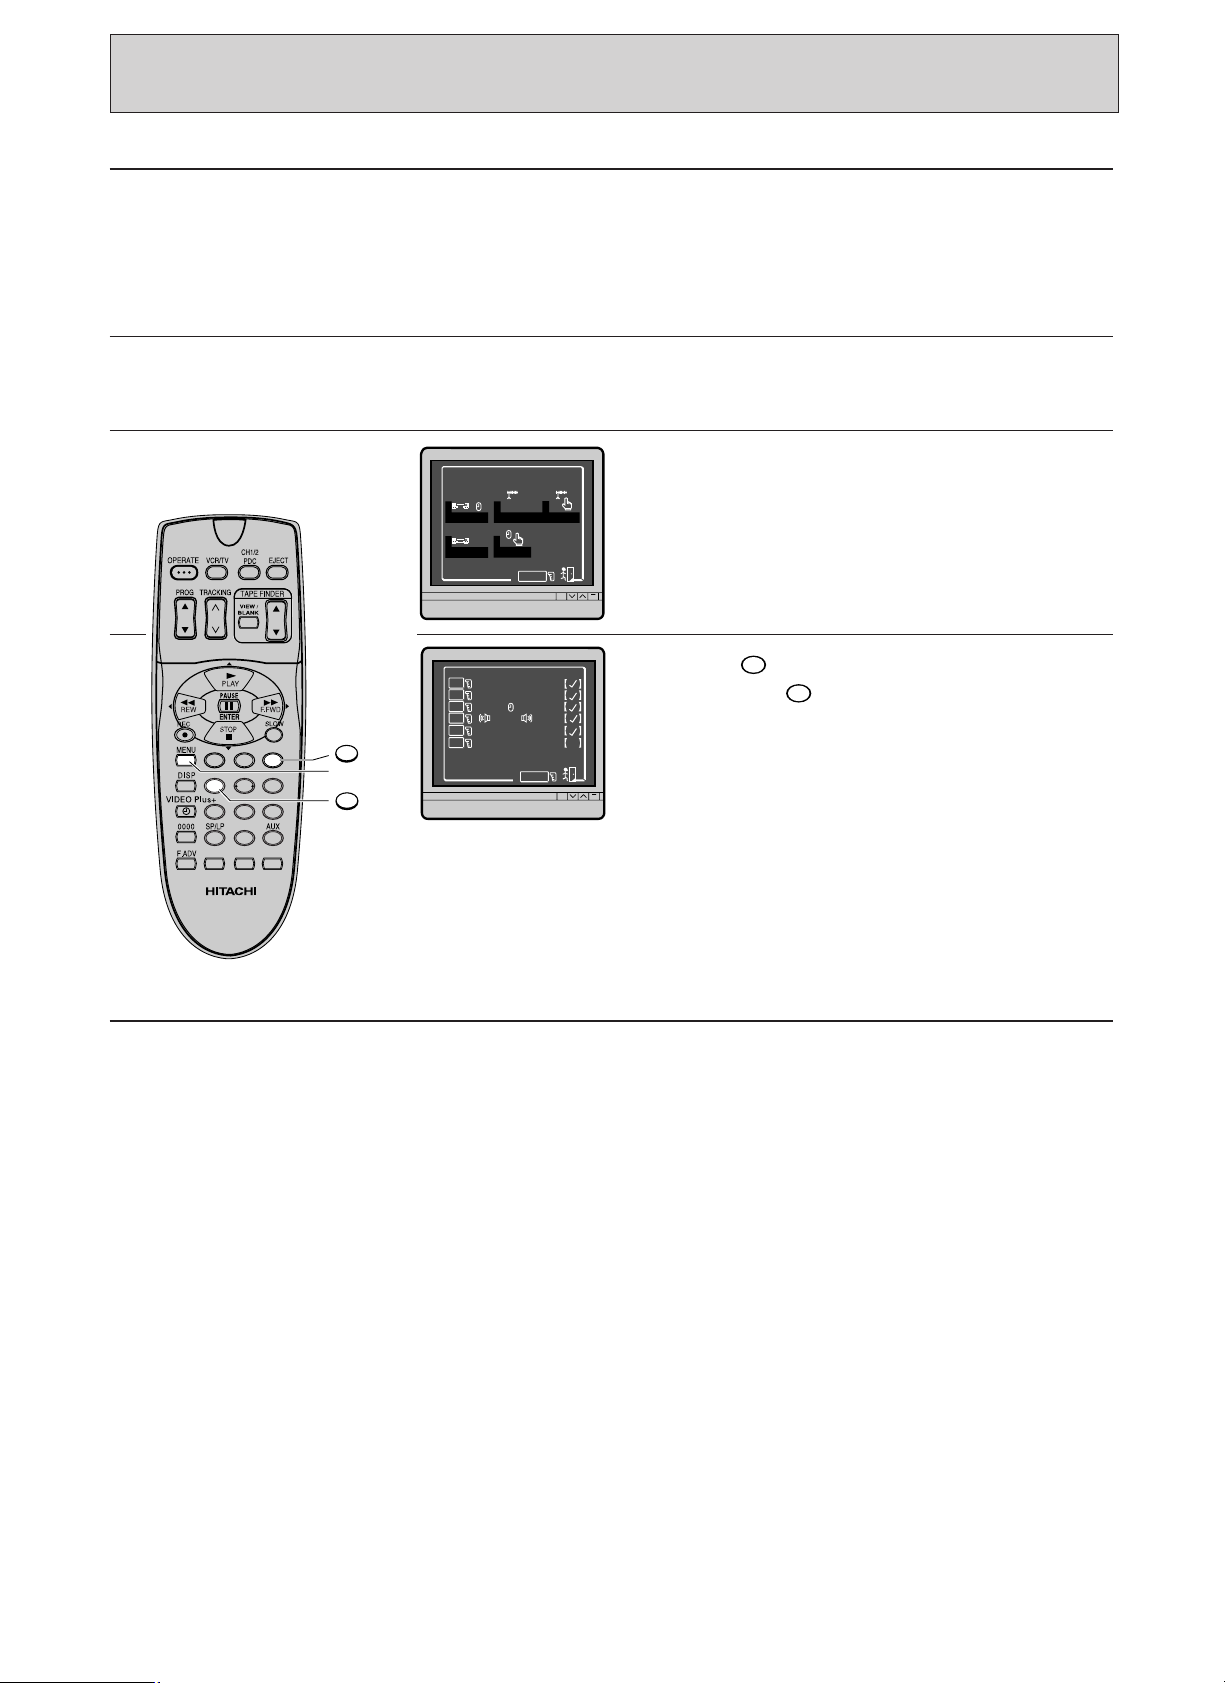
Editing Pages 45 — 46
Tape Dubbing; allows copying from another pre-recorded
tape.
“Satellite or Cable Box” Decoder Operation Pages 47 — 48
This tells you how to connect a "satellite or cable box" decoder
and record its programme.
Hi-Fi Sound Pages 49
This tells you the format and specifications for Hi-Fi sound.
38
Page 39

SPECIAL CHARACTERISTICS
142
56
3
7 8 9
0
DISP
0000
second
minute
hour
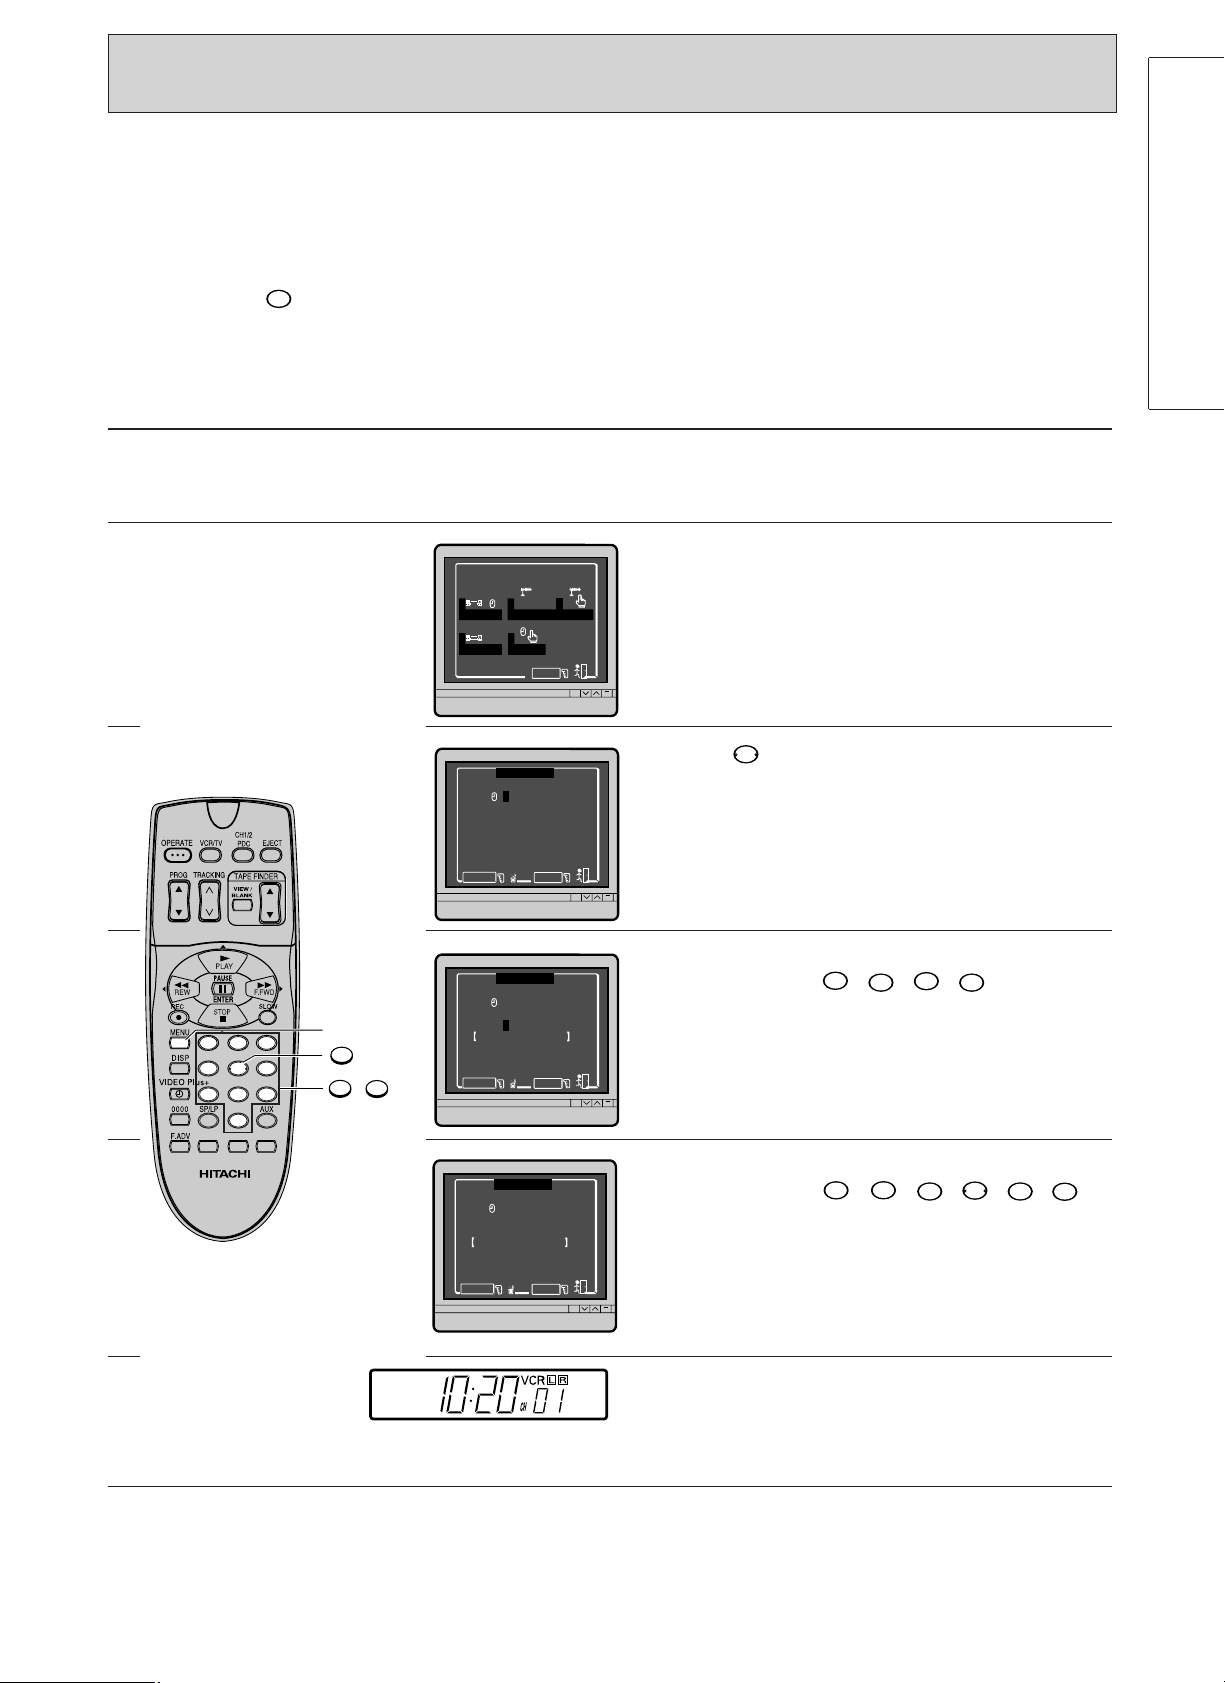
Linear time counter
Automatic rewind
Press the DISP button twice to select the linear
time counter display. Every time the button is
pressed, it changes the VCR’s display between the
clock time display and time counter display.
• The counter is reset to 0:00:00 when a tape is
ejected.
• When the tape starts, it counts up from 0:00:00
and the counter indicates the elapsed time.
• Pressing the 0000 button resets the time counter
to "0:00:00".
Notes:
• The linear time counter does not operate when
nothing is recorded on the tape.
• The counter may not be able to count the time
precisely with some types of tape and at
particular positions of the tape.
Rewind shut off
Rental Play
The VCR automatically rewinds the tape when the
end of tape is reached.
To prevent accidental erasure, the VCR does not
rewind the tape after timer recording.
If the OPERATE button is pressed during the
rewind operation, the VCR will be turned off
automatically after the tape has been completely
rewound.
ADDITIONAL OPERATIONS
The VCR will automatically start playback when a
cassette with its safety tab removed is inserted
into the VCR.
Then the VCR will enter the rewind mode when
the tape reaches its end or when the VCR plays the
non-recorded section for approximately 30
seconds, and then VCR will eject the cassette at
the beginning of tape and turn the power off.
39
Page 40

(SPECIAL CHARACTERISTICS)
I NDEX
I NDEX
142
56
3
7 8 9
0
PLAY
INDEX
FORWARD
INDEX
REWIND
TAPE FINDER function
TAPE FINDER function allows you to search for a programme you want to view or the point from which
you want to start recording on tape, with the following three functions:
• INDEX SEARCH: To locate the beginning of a recorded programme.
• BLANK SEARCH: To locate the beginning of a blank (non-recorded) section on tape.
• EASY VIEW: This switches fast forward or rewind to visual search so that you can search for a scene you
want to view while scanning the pictures.
Index function
The cassette tape may be recorded using the tape
indexing feature for the rapid location of any
section.
To record using the indexing feature
Record as usual. Each time you press the REC
button to begin recording, an index signal is
recorded on the tape.
The index signal is always recorded on the tape
when you begin to record. If you use the pause
feature between different recorded programmes
no new index signal will have been recorded.
Press the stop button and then record between
different recordings.
Note: An index signal is also recorded during
recording pause by pressing the PROG /
button to switch the channel to be recorded.
Controls TV Screen
1
To locate a programme using the index feature
The index function lets you view the first few
seconds of all recordings on the tape. This also
allows you to jot down details of all recordings on
the tape easily.
To locate a programme using the index feature,
turn the VCR on and insert a cassette which was
recorded using the tape indexing feature, then
operate as follows.
Press the Index forward or Index rewind when a
cassette is loaded and the VCR is in the stop
mode.
To rewind the tape, press the Index rewind button.
To fast forward the tape, press the Index forward
button.
The tape will be rewound or fast forwarded until
an index mark is detected.
2
3
40
When the VCR has located an index mark, it will
enter the playback mode for approximately 15
seconds. This is long enough for you to recognize
the programme. The VCR then winds the tape to
subsequent index marks in sequence.
When you see the programme you want to watch,
press the PLAY button to start playback.
The INDEX indicator will disappear from the TV
screen.
Page 41

142
56
3
7 8 9
0
VIEW/
BLANK
To locate the beginning of a blank section (BLANK SEARCH)
BLANK
12/05/00FR10:20SP
STOP 0 2
142
56
3
7 8 9
0
VIEW/
BLANK
This function searches for a non-recorded section of remaining tape, or unused tape, and stops the tape
when it locates such a section.
Notes:
• BLANK SEARCH cannot be operated with a cassette without a safety tab.
• BLANK SEARCH may not operate when a blank section lasts no more than five minutes.
• BLANK SEARCH will not be engaged in the following sections since they are not recognized as blanks:
— Sections with noise
— Sections where only sound has been recorded
— Sections where previous recordings have not been totally erased
Controls TV Screen
1
2
Press the (VIEW/BLANK) button in the STOP
mode.
The BLANK SEARCH screen will appear and the
tape will fast forward automatically.
• The blank which is the nearest the current tape
position is searched for.
• When a blank is detected, the tape will
automatically rewind to the beginning of the
blank.
Notes:
• When a cassette without a safety tab is inserted,
“” will flash in the VCR display for several
seconds and the cassette will be ejected
automatically.
• When a cassette has not been inserted, the
" " will flash in the VCR display to warn
you.
When the beginning of blank is located, the STOP
screen will appear for five seconds and the tape will
stop.
Note: Make sure that the tape is at the beginning of
blank before you start recording or editing.
Cautions: Ensure the tape recording area is enough
for your TV programme.
Switching rewind or fast forward to visual search (EASY VIEW)
ADDITIONAL OPERATIONS
Hold down the (VIEW/BLANK) button during
rewind (or fast forward), and the mode will switch
to visual search, so that you can search for a scene
you want to view while scanning pictures.
Hold down the (VIEW/BLANK) button during
rewind:
The tape will be visually scanned in the reverse
direction while the button is held.
Hold down the (VIEW/BLANK) button during
fast forward:
The tape will be visually scanned in the forward
direction while the button is held.
• When the button is released, the tape will rewind
or fast forward again.
41
Page 42
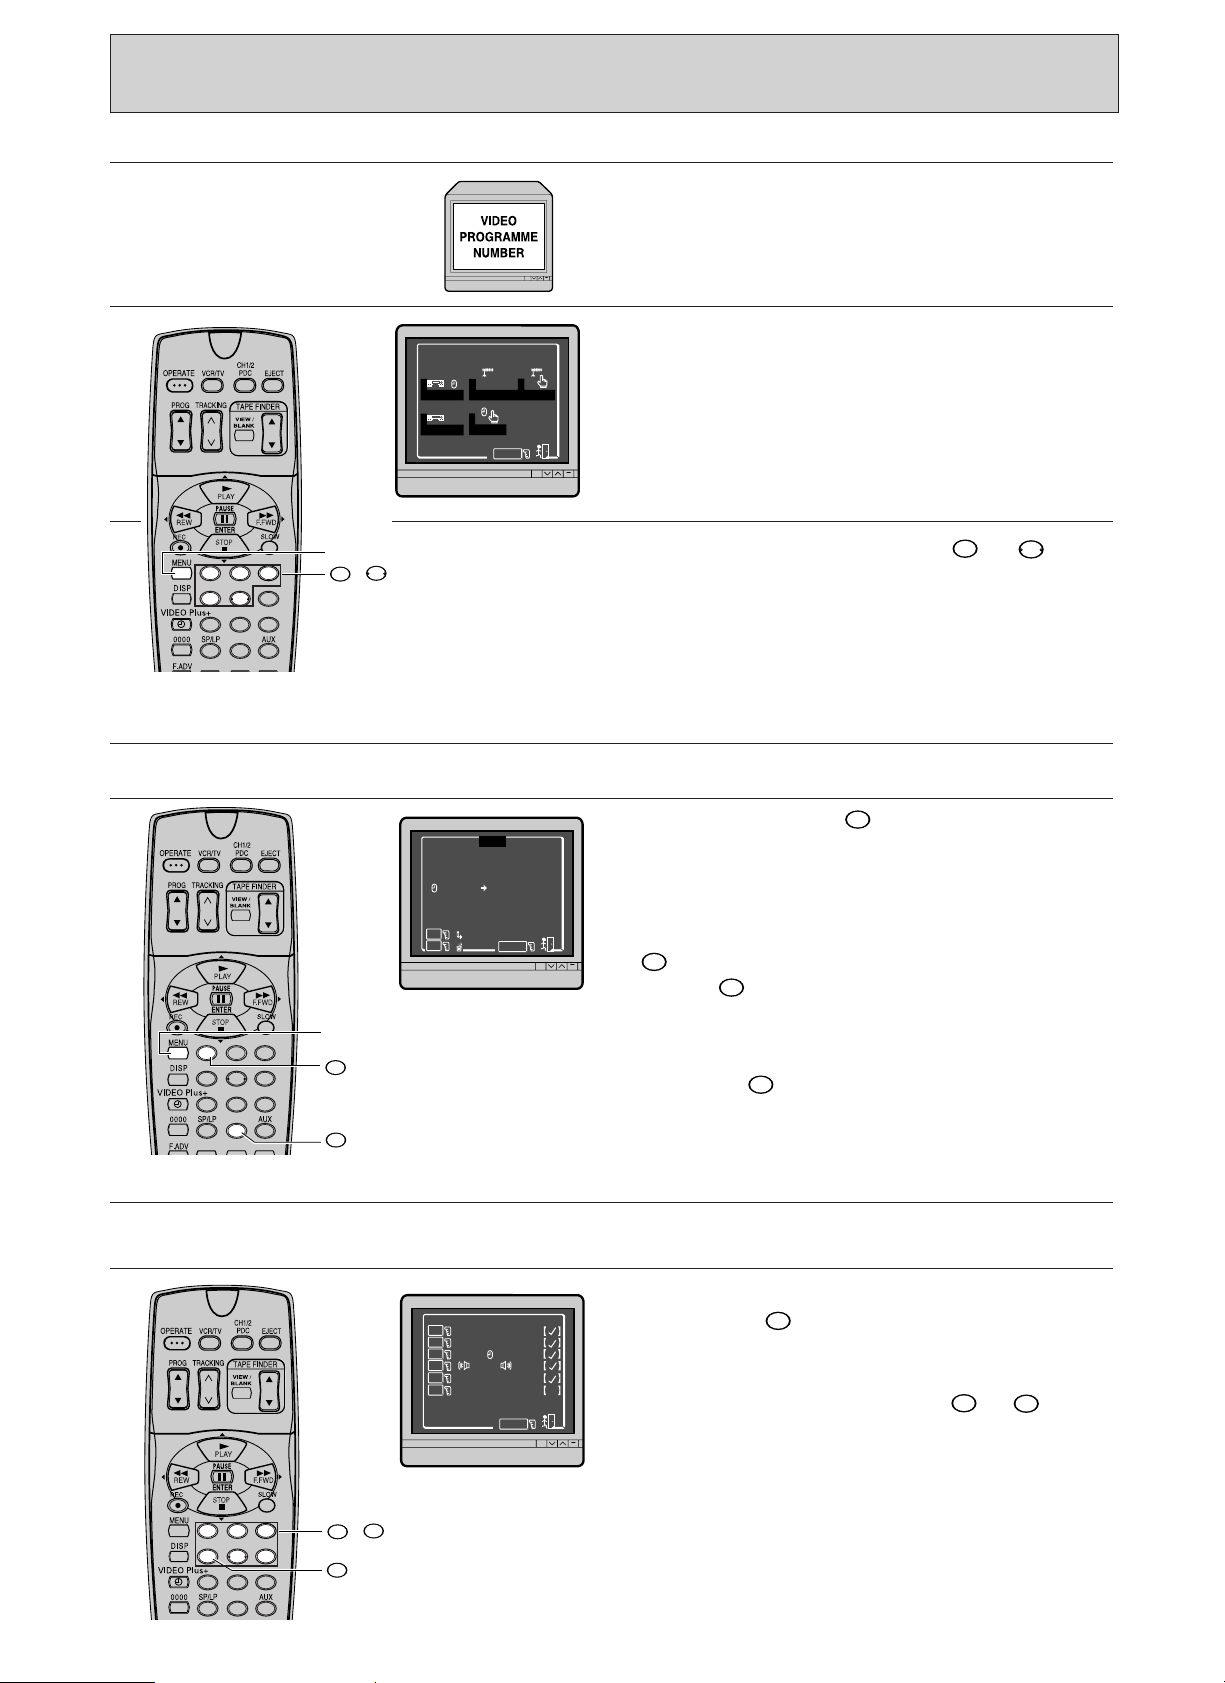
MENU FEATURES
6
1
4
0
1
1
1
M
ODE
4VCR
REVI E
W
CHANNE L
1 2 AUTO 3
CLOC
K
5
M
ENU
=
Exit
5
1
1
1
4
2
56
3
7 8 9
0
5
~
MENU
CH
M
ENU
=
Exit
2
NO . 1
17/05/00WE
SP
1
19:30 20:00
=
0
=
NE
X
T
0
1
1
0
4
2
56
3
7 8 9
0
MENU
=
1
=AUTO
AUTO
BLUE
PROGRAM PLAY
PREPARE REC
=OSD
2
3
M
ENU
=
Exit
=
6
=
5
=NI–CA
M
4
1
1
4
2
56
3
7 8 9
0
6
4
~
Controls TV Screen
1
2
3
Turn the VCR and TV on, then set the TV to the
video programme number.
Point the remote control handset at the receiver
on the front of the VCR.
Press the MENU button.
The menu, as illustrated, will appear on the TV
screen.
Press one of the buttons marked to to
select the required display.
Checking (reviewing) the programme information
Video mode setting
Press button number .
The TV screen will display the information you
entered for the lowest programme number for 1
minute.
Note: If no programme information is stored, the
menu screen will stay as it is even when button
is pressed.
• Press again if you want to view the next
programme’s information. If no more
programme information is stored, the menu
screen will be restored.
• Pressing will clear the programme.
• Press the MENU button to return to the original
picture.
You can change the VCR mode as required.
Press button .
The menu, as illustrated, will appear on the TV
screen.
Press one of the buttons marked to to
change the required display. (See next page for
details.)
42
Page 43

OSD (√) or (—)
3
2
1
=
1
=AUTO
AUTO
BLUE
PROGRAM PLAY
PREPARE REC
=OSD
2
3
M
ENU
=
Exit
=
6
=
5
=NI–CA
M
4
12/05/00FR10:20SP
STOP 0 2
On-screen display
=
1
=AUTO
AUTO
BLUE
PROGRAM PLAY
PREPARE REC
=OSD
2
3
M
ENU
=
Exit
=
6
=
5
=NI–CA
M
4
=
1
=AUTO
AUTO
BLUE
PROGRAM PLAY
PREPARE REC
=OSD
2
3
M
ENU
=
Exit
=
6
=
5
=NI–CA
M
4
1
1
4
2
56
3
7 8 9
0
DISP
1
2
4
2
56
3
1
3
4
2
56
3
7 8 9
0
Press to change the On-Screen Display
setting.
(√): Whenever you change the mode, the new
mode, programme number, date, time and
tape speed are automatically displayed on
the TV screen for a few seconds.
(—): Nothing will be displayed on the TV screen
even when the VCR is operated.
Notes:
• If the DISP button is pressed , eventhough
OSD "on (√)" or "off (–)" is set, the on-
screen display will appear for a few
seconds.
• When the DISP button is pressed again
before the display disappears, it will
change the VCR's display between the
clock time display and time counter
display.
Note: When a NTSC tape is played, no
operation mode will appear on the TV screen
regardless of the OSD on (√) or off (–) setting.
AUTO BLUE (√) or (—)
AUTO CLOCK (√) or (—)
Press to change the auto blue setting.
(√): The TV screen becomes blue when receiving
a channel on which a signal is not being
broadcast or a channel on which a weak
signal is being broadcast.
(—): The TV screen does not become blue.
Note: If no picture appears when a
programme is received, specify the AUTO
BLUE option as (–).
ADDITIONAL OPERATIONS
Press to change the auto clock setting.
(√): The clock will be set automatically when the
VCR is tuned to a channel which transmits a
PDC signal.
(—): The clock will need to be set manually.
Refer to page 19.
43
Page 44
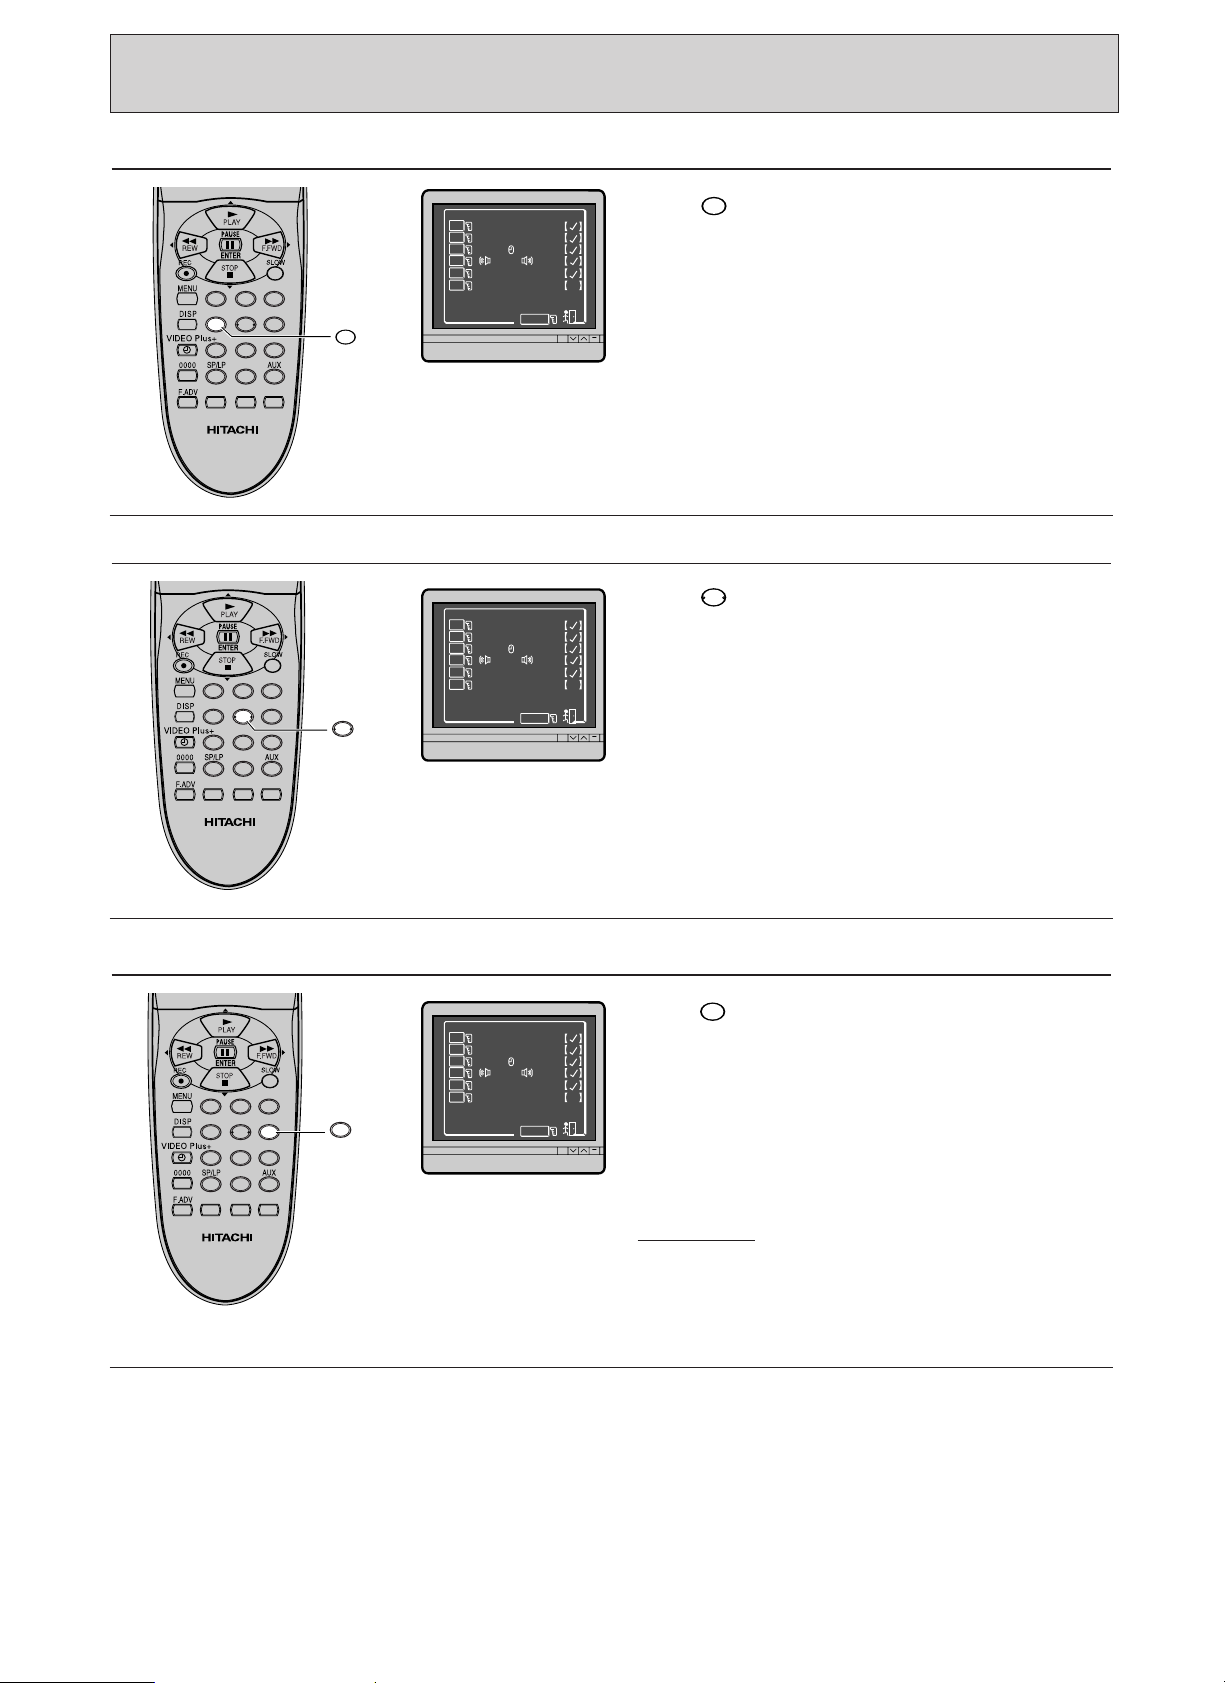
4
=
1
=AUTO
AUTO
BLUE
PROGRAM PLAY
PREPARE REC
=OSD
2
3
M
ENU
=
Exit
=
6
=
5
=NI–CA
M
4
1
4
4
2
56
3
7 8 9
0
5
6
=
1
=AUTO
AUTO
BLUE
PROGRAM PLAY
PREPARE REC
=OSD
2
3
M
ENU
=
Exit
=
6
=
5
=NI–CA
M
4
=
1
=AUTO
AUTO
BLUE
PROGRAM PLAY
PREPARE REC
=OSD
2
3
M
ENU
=
Exit
=
6
=
5
=NI–CA
M
4
142
56
3
7 8 9
0
5
142
56
3
7 8 9
0
6
(MENU FEATURES)
NICAM (√) or (—)
PROGRAM PLAY (√) or (—)
Press to change the NICAM setting.
(√): Usually select (√). The VCR discriminates
whether the broadcast is NICAM or not
automatically.
(—): Select (—) when you do not want to receive
NICAM broadcasts.
Press to change the PROGRAM PLAY setting.
(√): After timer recording has finished, the VCR
will automatically rewind the tape to locate
the programme just recorded then begin
playing it back, by merely turning the VCR
on.
Note: If two or more programme were
recorded the last is played back.
(—): The auto programme play feature is
switched off.
PREPARE REC (√) or (—)
44
Press to change the PREPARE REC setting.
(√): Your satellite/cable decoder will
automatically activate the VCR to start and
stop recording.
Refer to page 37.
(—): The VCR needs to set for the timer
recording, if you want to record satellite
broadcasts unattended.
Please Note:
Not all satellite receivers support this function.
Page 45
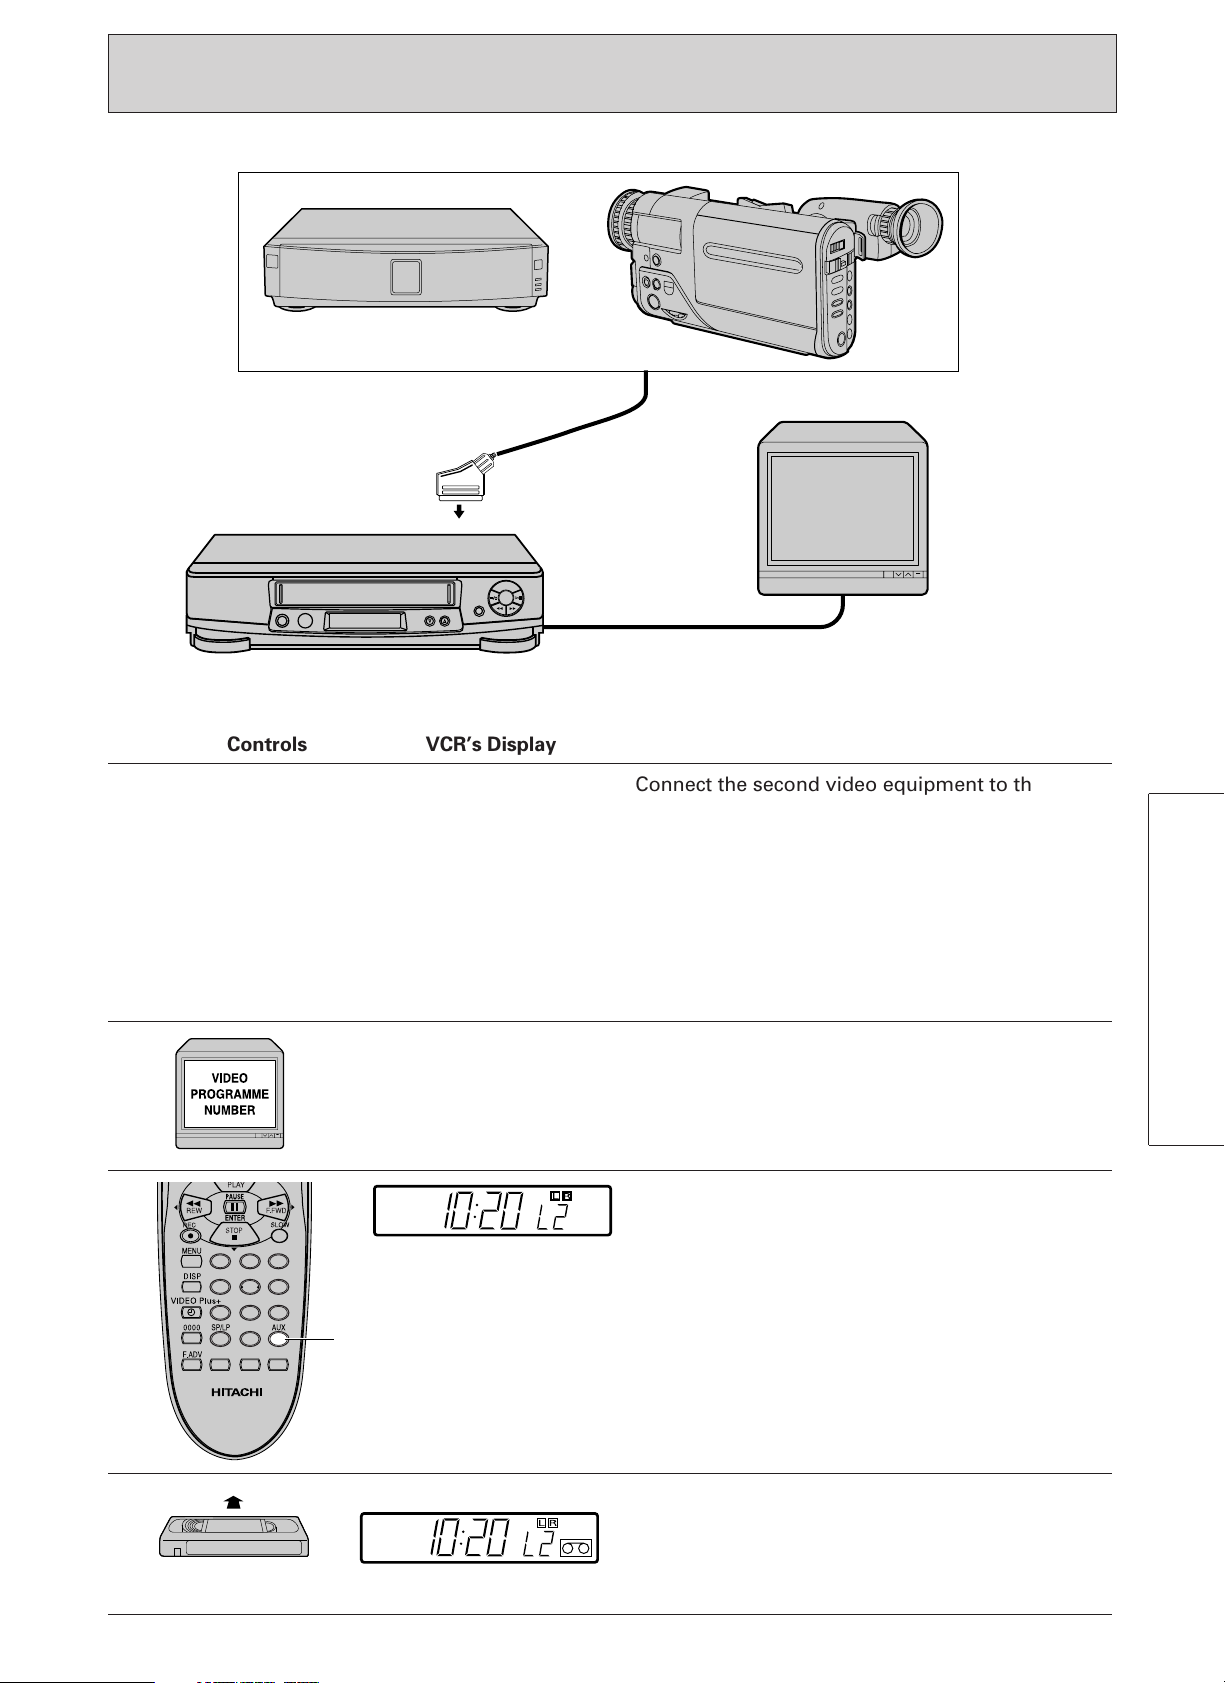
EDITING — Tape Dubbing
To Scart or DECODER socket
Recording VCR
Video equipment for playback
;
;
;
142
56
3
7 8 9
0
AUX
Controls VCR’s Display
1
2
3
Connect the second video equipment to this VCR
as shown above. (Refer to the manual of second
video equipment for connection)
If the playback video source is connected to the
Scart socket, the TV must be connected to the RF
OUT terminal of this VCR.
Note: If using this VCR for playback during
dubbing or other operation, you must use the
black Scart socket as a connector source.
Turn the VCR and TV on, then set the TV to the
video programme number.
ADDITIONAL OPERATIONS
Press the AUX button to display "L1", or "L2" in
the VCR's display.
Select "L2" to dub the source input via the
DECODER socket or "L1" to dub the source input
via the Scart socket on the back of the VCR.
If "L1" or "L2" is not displayed, the picture of the
TV programme being received will be dubbed.
4
Insert a blank cassette into the VCR for recording,
and the cassette to be copied into the playback
VCR.
45
Page 46
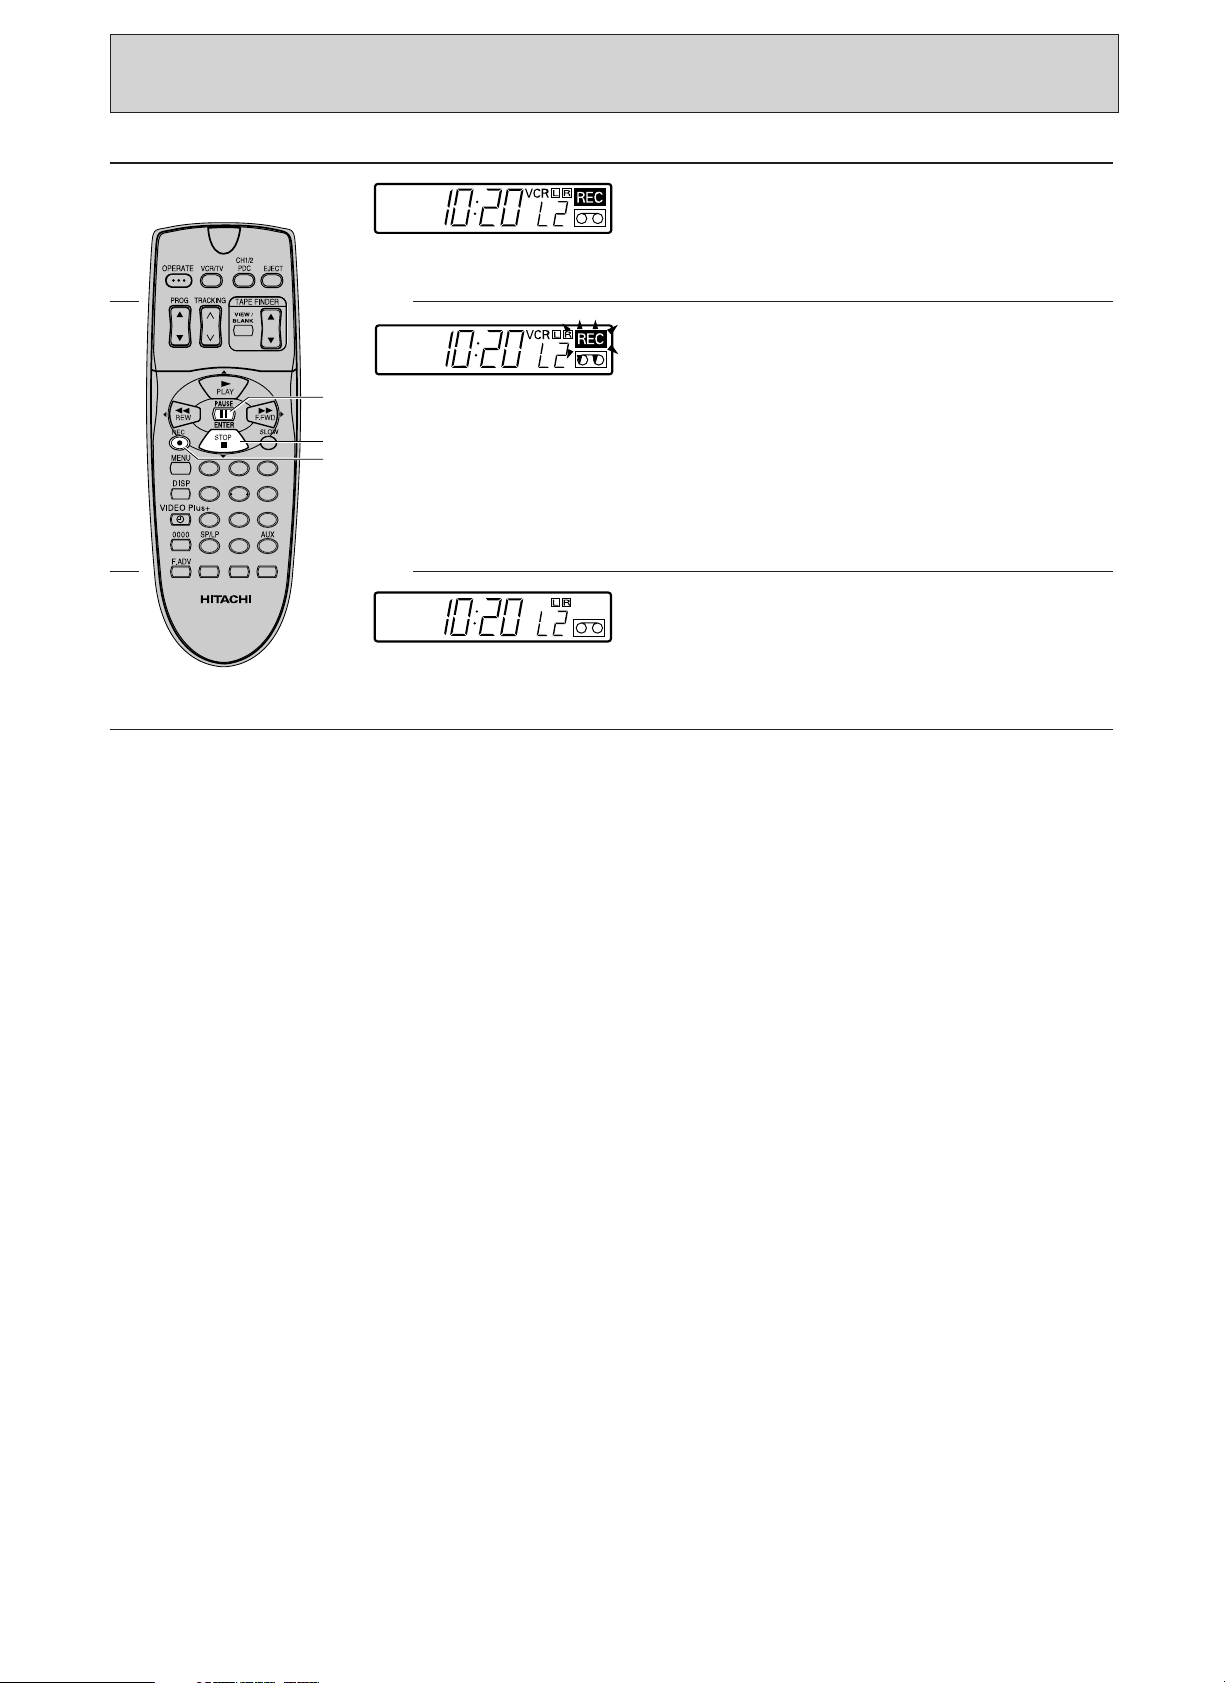
142
56
3
7 8 9
0
PAUSE
STOP
REC
(EDITING — Tape Dubbing)
Controls VCR’s Display
5
6
7
Press the REC button on the recording VCR and
the play button on the playback VCR.
To edit out unwanted material, press the PAUSE
button on the recording VCR while it is recording
at the appropriate time. Press the PAUSE button
again to resume recording.
To end tape dubbing, press both STOP buttons.
46
Page 47
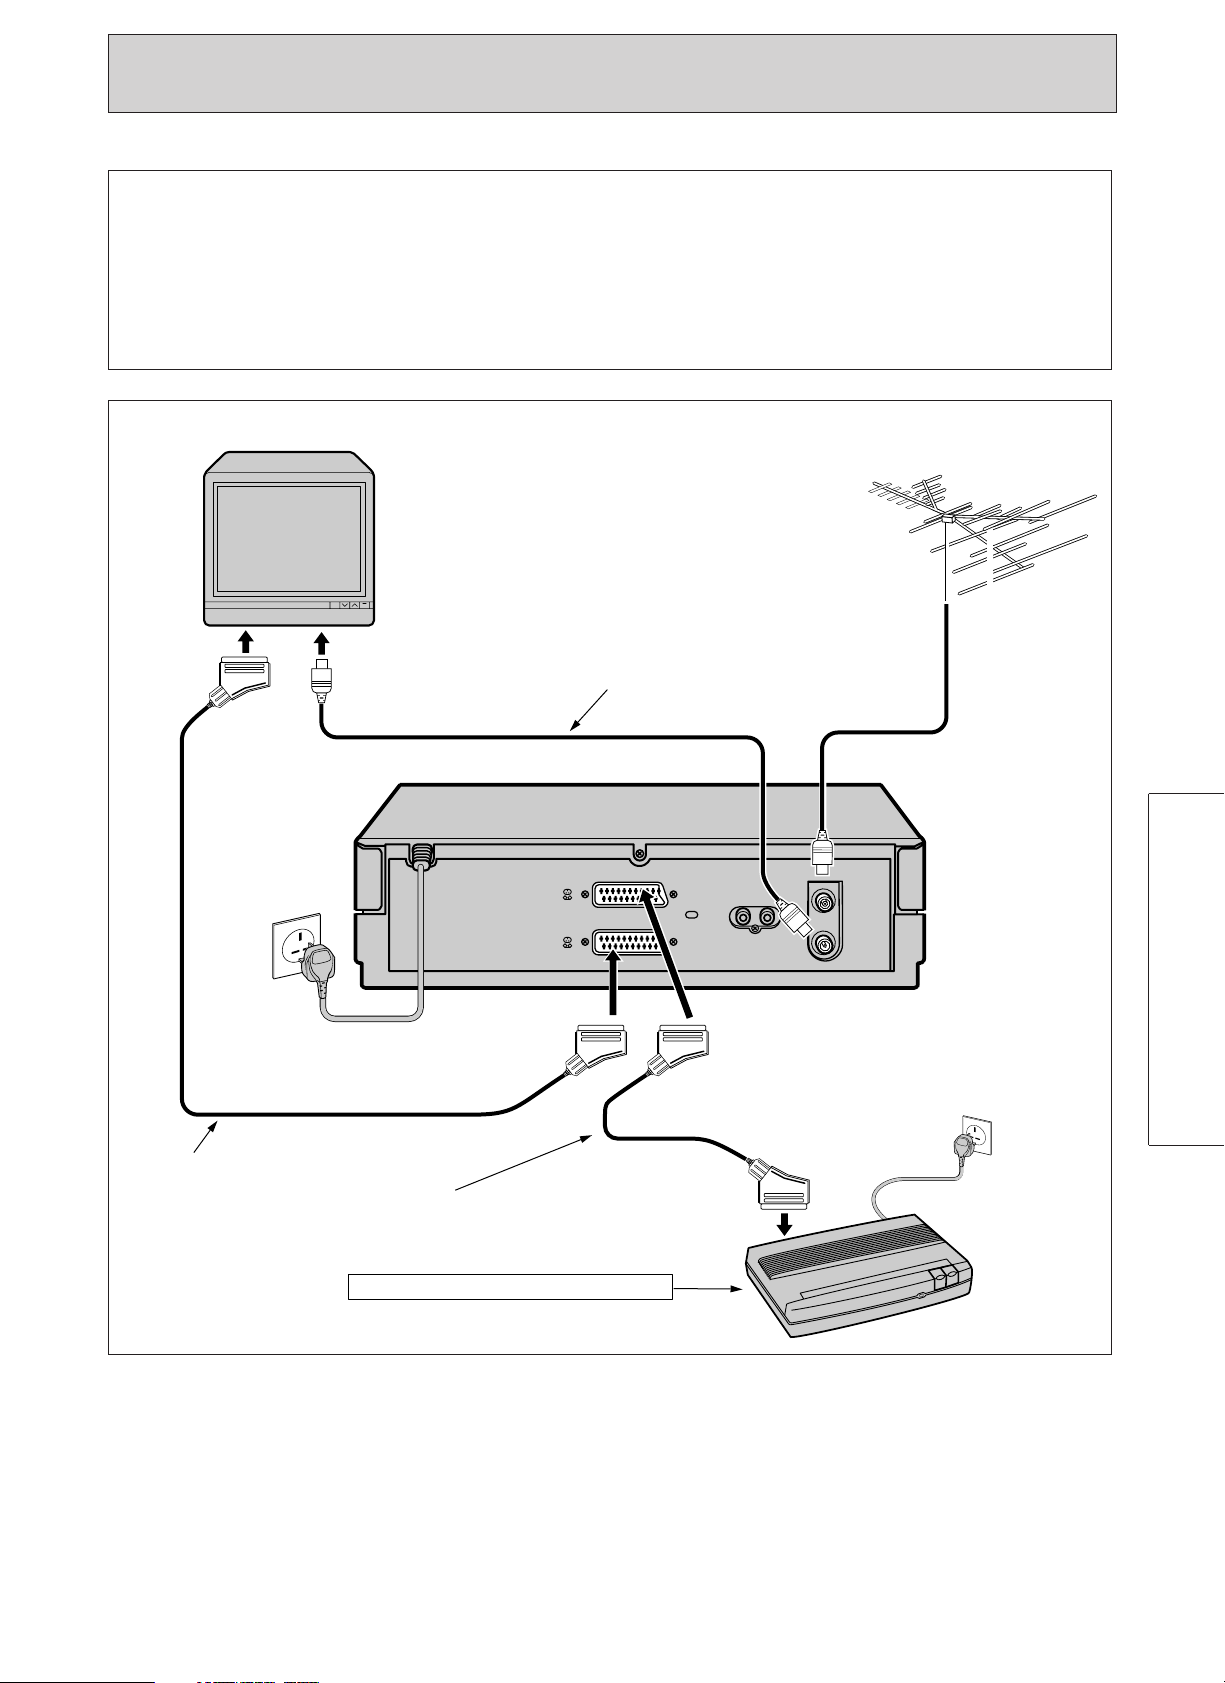
DECODER/CANAL PLUS
EURO. A/V
AERIAL
ANTENNE
RF OUT
SORTIE
RF
AUDIO OUT/
SORTIE SON
R/D. L/B.
Aerial
To AC outlet
230V/50Hz
To Aerial terminal
Aerial
cable supplied
To “RF OUT”
To “AERIAL”
Scart cable (option)
Scart cable
(supplied with “Satellite or
Cable box” Decoder)
“Satellite or Cable box” Decoder
“SATELLITE OR CABLE BOX ” DECODER OPERATION
Connect the “Satellite or Cable box” decoder as follows.
What is a “Satellite or Cable box” Broadcast?
The radio waves are transmitted from the broadcasting station in the same way as with an ordinary
TV broadcast in the “Satellite or Cable box” system, however, the radio waves are scrambled,
therefore you cannot receive them or view the broadcast on the TV without unscrambling. You must
connect an exclusive decoder to perform this unscrambling and then you can view the “Satellite or
Cable box” broadcast like an ordinary TV broadcast.
Consult your dealer for details.
ADDITIONAL OPERATIONS
47
Page 48

("SATELLITE OR CABLE BOX" DECODER OPERATION)
■ To record the "Satellite or Cable box" programme while viewing it
1. Turn the TV and VCR on.
2. Set the TV to the programme number for VCR (video programme number).
3. Press the button labeled AUX on the remote control until ‘L2’ is showing in the VCR display.
4. Start recording.
■ You can view a "Satellite or Cable box" programme even when playing back a tape by pressing the
VCR/TV button to set the VCR to the TV mode.
48
Page 49

Hi-Fi SOUND
This VCR records sound using the following two formats.
Hi-Fi sound
FM sound recorded using the rotary audio
heads.
Remarkable Specifications of Hi-Fi Sound
Recording Stereo Broadcasts
Recording Bilingual Broadcasts
Normal (mono) sound
Records in monoaural using the same format
as with a non-Hi-Fi VCR. Therefore,
conventional VCRs can be used for playback.
Frequency Range: 20 Hz to 20 kHz
Dynamic Range: More than 90dB
Wow and Flutter: Less than 0.005% WRMS
Stereo programmes are recorded in Hi-Fi on both
the L and R channels and also recorded on the
mono track as monoaural.
Both main speech and sub speech sounds are
recorded on the Hi-Fi audio tracks separately.
See "Audio to be recorded according to the
NICAM broadcast" on page 28 for the sound that
will be recorded on the mono audio track.
49
ADDITIONAL OPERATIONS
Page 50

Section-4 Subsidiary Information
Problem Guide Page 51
Some problems you will be able to solve easily by checking a
few basic items.
Please follow this section before you call for help or take your
VCR to your dealer. It could save your time and money.
User Guide Display Page 52
Maintenance Page 53
Specifications Page 54
PDC (Programme Delivery Control) function Page 55
Battery Safety Guidelines Page 56
Warranty Letter Page 57
Some Do's and Don'ts Page 59
50
Page 51

PROBLEM GUIDE
Sometimes problems can be solved easily by checking a few basic things.
Check below before you call for help or take your unit to your dealer.
No power
• Check to see if the VCR is plugged into an AC mains socket.
Does not respond to remote control handset
• Check to see if there are batteries in the handset, their polarities are correct, and they
are fitted correctly.
• The handset is not aimed at the VCR.
• Weak batteries in the handset.
Will not record
• No cassette in the VCR.
• Safety tab removed from cassette.
(In this case, the cassette will be ejected.)
Will not playback
• No cassette in the VCR.
• For playback, TV must be tuned to the video programme number.
• Set the TV to the video input mode when the VCR and TV are connected via a Scart
connector (see your TV manual).
• Press the VCR/TV button on the remote handset to display the indicator in the VCR
display when the VCR and TV are connected via a Scart connector.
Snowy/Noisy picture
• Make sure the TV is fine tuned.
• Head cleaning may be required. See “MAINTENANCE”.
• Some snow or streaks are normal during visual search, still and slow playback.
Will not make timer recordings
• The VCR should be in the standby mode to activate timer recording.
• Programmes entered incorrectly.
• Clock was not set correctly.
• Programme exceeded cassette length.
• No cassette or cassette’s safety tab removed.
Clock shows — — : — —
• Power interrupted.
Poor/No picture in normal TV viewing
• Carefully check aerial connection.
Indication of the VCR display appears abnormal/No button can be engaged
• Push the reset switch using a toothpick, etc.
The display will be reset. Then set the information again.
Auto Installation not function
• MIS-operate the auto installation in page 10.
For Recovery, refer page 12.
51
SUBSIDIARY INFORMATION
Page 52

(flashes for about 3 seconds)
(flashes continuously)
(flashes for about 3 seconds)
(flashes for about 5 seconds)
(lights for about 5 seconds)
USER GUIDE DISPLAY
(lights for about 5 seconds)
Guide indications in VCR display
The following indications appear in the VCR display to tell you the current status of your VCR.
Indication When it appears
When programming the timer
When programming the timer
When you press the MENU or
VIDEO Plus+ button to end the
programming
When you turn power off after
programming the timer
When you press the play,
record, fast forward, rewind or
Tape Finder button
Meaning and troubleshooting
• The VCR clock has been set to “– – : – –”.
Set the time and programme the timer.
• Eight programmes have already been
stored.
Cancel unnecessary programme and store
the new programme.
The VCR shows the timer programme
number which is occupied.
• A cassette has not been inserted or a
cassette without safety tab has been
inserted. A cassette without safety tab will
be ejected automatically. Insert a cassette
with safety tab intact.
• A cassette has not been inserted. Insert a
cassette.
When you press the record
button for recording or
dubbing, or press the
(VIEW/BLANK) button for
Blank Search
• A cassette without safety tab has been
inserted. It will be ejected automatically.
Insert a cassette with safety tab intact.
52
Page 53

MAINTENANCE
1. To maintain the optimum performance of this VCR, regular periodic maintenance is required. Your
dealer will advise you further.
2. Maintenance and adjustments may not be carried out by the user. In all cases of difficulty or doubt,
consult your dealer.
3. Head cleaning
Dirt accumulated on the video heads after a period of time may cause the playback picture to become
blurred or part of the video information to be lost. This does not mean that the recorded programme
has been erased but head cleaning is required. In this case, please consult your dealer.
53
SUBSIDIARY INFORMATION
Page 54

SPECIFICATIONS
Format: VHS PAL Standard
Recording: Rotary Two-Head Helical Scan Azimuth Recording
Tape Speed: 23.39 mm/sec. — SP, 11.7mm/sec. — LP
Tape Width: 12.7 mm
Operation Temperature: 5°C to 40°C
Video: PAL colour (system I) & CCIR monochrome signals 625 lines
Recording Time: 240 min. with E-240 cassette — SP
480 min. with E-240 cassette — LP
Aerial Input: UHF channels 21 — 69
RF Output: UHF channel 35 (22 — 69 adjustable) (System I)
Video Input: 0.5 to 1.5Vp-p 75 ohm Unbalanced
Video Output: 1Vp-p 75 ohm Unbalanced
S/N Ratio (Video): More than 43 dB
Horizontal Resolution: Colour 260 lines
Audio (Linear)
Input: PERI: – 3.8 dBm 10 Kohm, LINE: – 7.8 dBm 50 Kohm
Output: PERI: – 3.8 dBm 1 Kohm, LINE: – 7.8 dBm 1 Kohm
S/N Ratio: 43 dB
Frequency Range: 70 Hz to 12 kHz
Hi-Fi Audio
Frequency Range: 20 Hz to 20kHz
Dynamic Range: More than 90dB
Wow and Flutter Less than 0.005% WRMS
RF Audio Reception: NICAM Digital Stereo (I-PAL)
Fast Forward/Rewind time: 90 secs. on S:FF or S:REW
Power: AC 230V, 50 Hz
Power Consumption: 19W (including timer)
3.0W (standby mode)
Timer: 24-hour digital indication
Cabinet Size: 380 mm(W) x 93 mm(H) x 275 mm(D)
Weight: Approx. 3.5 kg
Accessories Included: 1 — Aerial cable
1 — Infrared remote control handset
2 — Batteries
* Design and specifications are subject to change without notice.
54
Page 55

CH0
M
ENU
=
Exit
=
0000
2
TI
M
ER ROPG
17/05/00WE
DAY /
M
ONTH/ YEAR S P
7
19:30 20:00
PDC
=DLY /
W
KL
PDC
PDC
142
56
3
7 8 9
0
PDC (Programme Delivery Control) FUNCTION
This VCR incorporates the PDC function.
PDC function
If the VCR is tuned to a TV station transmitting a
PDC signal, the VCR automatically takes any delay,
earliness or extension of the programme into
account and can record the specified programme.
For example, assume that you programme the
timer for a football game on station 8 from 19:00
to 20:45 on Saturday and the football game which
is broadcast is changed to 21:00 to 23:00, the PDC
function works and the VCR records the football
game automatically from 21:00 to 23:00.
Caution
For the PDC function to work, the start and end
time must be keyed-in EXACTLY as scheduled
(as advertised); even though the actual
broadcast may vary from the schedule.
Notes:
1. The first time you do timer programming with this
set, the "PDC" will be off.
2. To switch on the PDC function, press the PDC
button once. Pressing the button again turns PDC
off.
3. Subsequently, the on/off default follows your
previous setting.
4. Always programme the timer for one TV
programme to record the programme with the
PDC function turned on. If you programme the
timer for a football game and a movie on station 3
sequentially from 10:00 to 14:00 for example, only
the football game will be recorded but the movie
will not.
In this case, programme the timer with the PDC off
or input the other programme using another
programme number to turn the PDC function on
again.
5. When the VCR is tuned to a station transmitting a
ADDITIONAL OPERATIONS
PDC signal but the signal conditions are poor,
programme the timer with PDC turned off. If you
programme the timer with PDC turned on, the PDC
function may not operate normally.
6. The letters "PDC" will appear on the TV screen
when reviewing the programmed information.
7. If the "PDC" indication is on and the broadcast
programme does not have the PDC signal, your
timer recording will function according to the time
you have set on the VCR.
8. Programme without the PDC signal will be deleted
after the recording is done. Whereas, the
programme with PDC signal only will be deleted
automatically after 4:00 am the next morning.
55
Page 56

56
Page 57

HITACHI - YOUR GUARANTEE OF EXCELLENCE (for UK only)
For the period of 12 MONTHS from the date of purchase your product has the benefit of our FULL PARTS AND
LABOUR GUARANTEE as detailed below.
We undertake to replace or repair any part of the product which fails due to manufacturing defect within 12 months of
the date of purchase provided that:
1) The product has been installed and used only in accordance with the instructions supplied with the product.
2) The product has not been repaired, maintained, or modified by any person other than our authorized
Engineer.
3) The product serial number is not removed or altered.
This guarantee does not apply to products acquired second-hand or for commercial or communal use.
This guarantee does not extend to user control adjustments, battery replacement and aerial adjustment. Any parts
replaced under guarantee shall become the property of HITACHI HOME ELECTRONICS EUROPE LTD.
Please note that evidence of the date of purchase will be required before service under guarantee is carried out.
This guarantee does not affect your statutory rights. In all cases of difficulty consult your HITACHI dealer.
HITACHI HOME ELECTRONICS (EUROPE) LTD.
Dukes Meadow Millboard Road Bourne End
Buckinghamshire SL8 5XF
UNITED KINGDOM
Tel: 01628 643000
Fax: 01628 643400
Email: consumer-service@hitachi-eu.com
57
Page 58

58
Page 59

SOME DO’S AND DON’TS ON THE
SAFE USE OF EQUIPMENT
This equipment has been designed and manufactured to meet international safety standards but, like any
electrical equipment, care must be taken if you are to obtain the best results and safety is to be assured.
★★★★★★★★★★
DO read the operating instructions before you attempt to use the equipment.
DO ensure that all electrical connections (including the mains plug, extension leads and interconnections
between pieces of equipment) are properly made and in accordance with the manufacturer’s instructions.
Switch off and withdraw the mains plug when making or changing connections.
DO consult your dealer if you are ever in doubt about the installation, operation or safety of your
equipment.
DO be careful with glass panels or doors on equipment.
★★★★★★★★★★
DON’T continue to operate the equipment if you are in any doubt about it working normally, or if it is
damaged in any way — switch off, withdraw the mains plug and consult your dealer.
DON’T remove any fixed cover as this may expose dangerous voltages.
DON’T leave equipment switched on when it is unattended unless it is specifically stated that it is designed
for unattended operation or has a standby mode. Switch off using the switch on the equipment and make
sure that your family know how to do this. Special arrangements may need to be made for infirm or
handicapped people.
DON’T use equipment such as personal stereos or radios so that you are distracted from the requirements
of traffic safety. It is illegal to watch television whilst driving.
DON’T listen to headphones at high volume, as such use can permanently damage your hearing.
DON’T obstruct the ventilation of the equipment, for example with curtains or soft furnishings.
Overheating will cause damage and shorten the life of the equipment.
DON’T use makeshift stands and NEVER fix legs with wood screws — to ensure complete safety always fit
the manufacturer’s approved stand or legs with the fixings provided according to the instructions.
DON’T allow electrical equipment to be exposed to rain or moisture.
ABOVE ALL
— NEVER let anyone especially children push anything into holes, slots or any other opening
in the case — this could result in a fatal electrical shock;
— NEVER guess or take chances with electrical equipment of any kind
— it is better to be safe than sorry!
★★★★★★★★★★
59
SUBSIDIARY INFORMATION
Page 60

Hitachi, Ltd. Tokyo, Japan
International Sales Division
THE HITACHI ATAGO BUILDING,
No. 15 - 12 Nishi Shinbashi, 2 - Chome,
Minato - Ku, Tokyo 105-8430, Japan.
Tel: (03) 35022111
HITACHI HOME ELECTRONICS
(EUROPE) LTD.
Dukes Meadow
Millboard Road
Bourne End
Buckinghamshire
SL8 5XF
UNITED KINGDOM
Tel: 01628 643000
Fax: 01628 643400
Email: consumer-service@hitachi-eu.com
HITACHI SALES Europa GmbH
Am Seestern 18
40547 Düsseldorf
GERMANY
Tel. 02 11 - 5 29 15 - 0
Fax 02 11 - 5 29 15 - 190
Email: HSE-DUS.Service@Hitachi-eu.com
HITACHI SALES ITALIANA SPA
Via T. Gulli n.39
20147 MILAN
ITALY
Tel: 02 487861
Fax: 02 48786381
Servizio Clienti
Tel: 02 38073415
Email: customerservice.italy@hitachi-eu.com
HITACHI FRANCE S.A.
BP 45, 69671 Bron Cedex
FRANCE
Tel: 04-72 . 14 . 29 . 70
Fax: 04-72 . 14 . 29 . 99
Email: conso-hitachi@compuserve.com
HITACHI HOME ELECTRONICS
(HELLAS) S. A.
Faliroy 91
11741
Athens
GREECE
Tel: 01-9242620
Fax: 01-9240789
Email: dimitra.vlachou@hitachi-eu.com
HITACHI SALES IBERICA, S.A
Gran Via Carlos III, 101-1
08028 Barcelona
SPAIN
Tel: 093 409 2550
Fax: 093 491 3513
Email: rplan@hitachi-eu.com
HITACHI HOME ELECTRONICS
(NORDIC) AB
Box 77
S-164 94 KISTA
SWEDEN
Tel: 08 562 711 00
Fax: 08 562 711 11
Email: csgswe@hitachi-eu.com
HITACHI HOME ELECTRONICS
NORWAY
Brugata 14
N-0186
OSLO
NORWAY
Tel: 02205 9060
Fax: 02205 9061
Email: csgnor@hitachi-eu.com
ITEM N.V./ S.A. (INTERNATIONAL TRADE FOR
ELECTRONIC MATERIAL & MEDIA N.V. / S.A.)
UCO Tower - Bellevue,
17-B-9050 GENT
BELGIUM (for BENELUX)
Tel: 02 9 230 4801
Fax: 02 9 230 9680
Email: hitachi.item@skynet. be
www.hitachi-consumer-eu.com
QR32431 © Hitachi, Ltd. 2000 Printed in Malaysia
Page 61
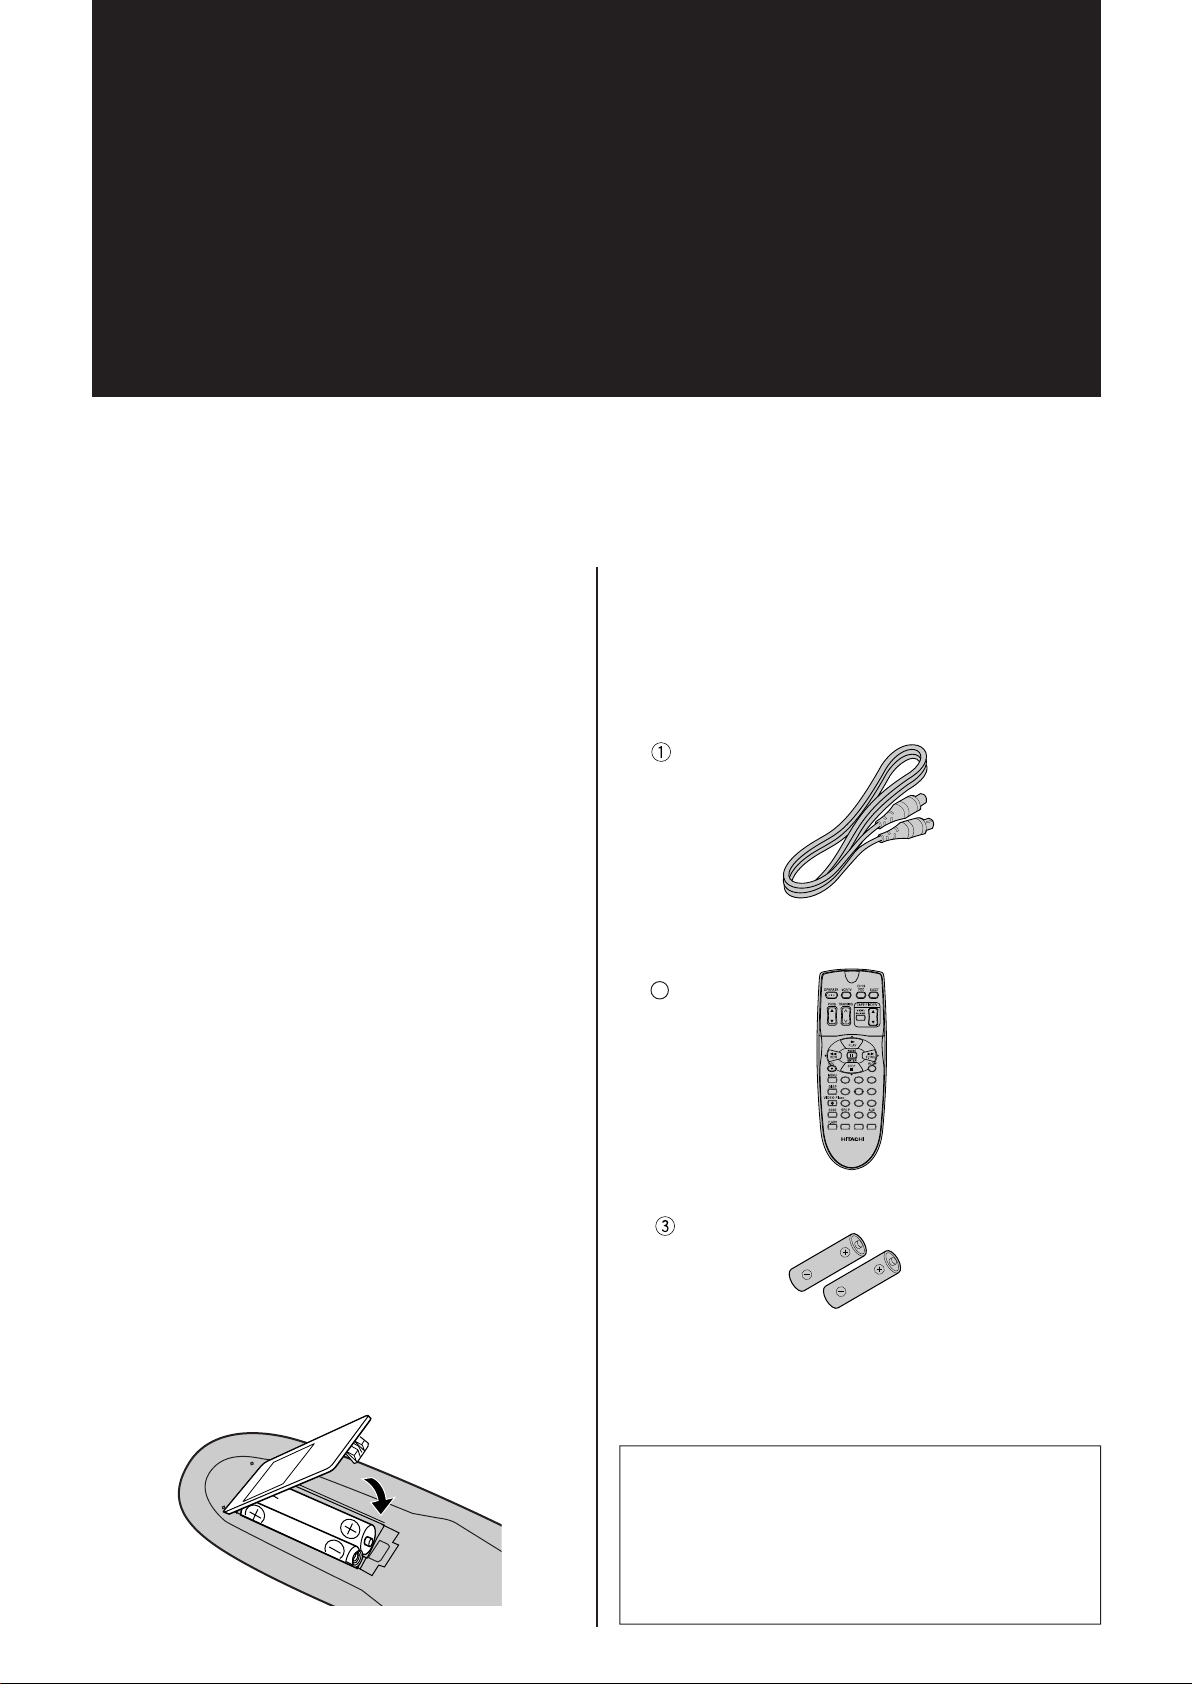
QUICK SET UP GUIDE
142563
7 8 9
0
2 pcs.
Hitachi Video Cassette Recorder
VT-FX950E(UKN)
Dear Hitachi Customer,
Congratulations on your choice of Hitachi Video
Cassette Recorder (VCR). Welcome to our companywide commitment to your complete satisfaction and
viewing enjoyment.
Before using your Hitachi VCR for the first time, we
suggest that you spend a few minutes reading these
set-up instructions.
Even if you never used a VCR before, you can
connect it up and tune it in quickly by following this
QUICK SET-UP GUIDE.
Contents
• Accessories supplied..............................................1
• Connection ..............................................................2
• Auto Install ...........................................................3-4
• Pre-Tuning the Built in Tuner ...............................5
• Resetting the Clock.................................................6
Fitting the Remote Control Batteries
• Remove battery cover of the remote control
handset.
• Insert the two batteries provided.
• Ensure that the batteries are inserted correctly,
and that the + and – terminals match those
marked inside the battery compartment.
• Replace the battery cover.
Accessories Supplied
Check and identify the accessories supplied. If any
are missing or appear damaged, contact your dealer
immediately.
Aerial cable for connecting
this VCR and a TV
2
Remote control handset
Batteries for remote
control handset (R6)
Cautions:
When the VCR is moved from a cold to a warm
QR32441 ©Hitachi, Ltd. 2000 Printed in Malaysia
place, dew condensation can occur on the
cylinder.
To avoid damaging the cylinder or tape do not
operate the set immediately. Allow it to dry by
leaving it powered on for 2 ~ 3 hours.
Page 62
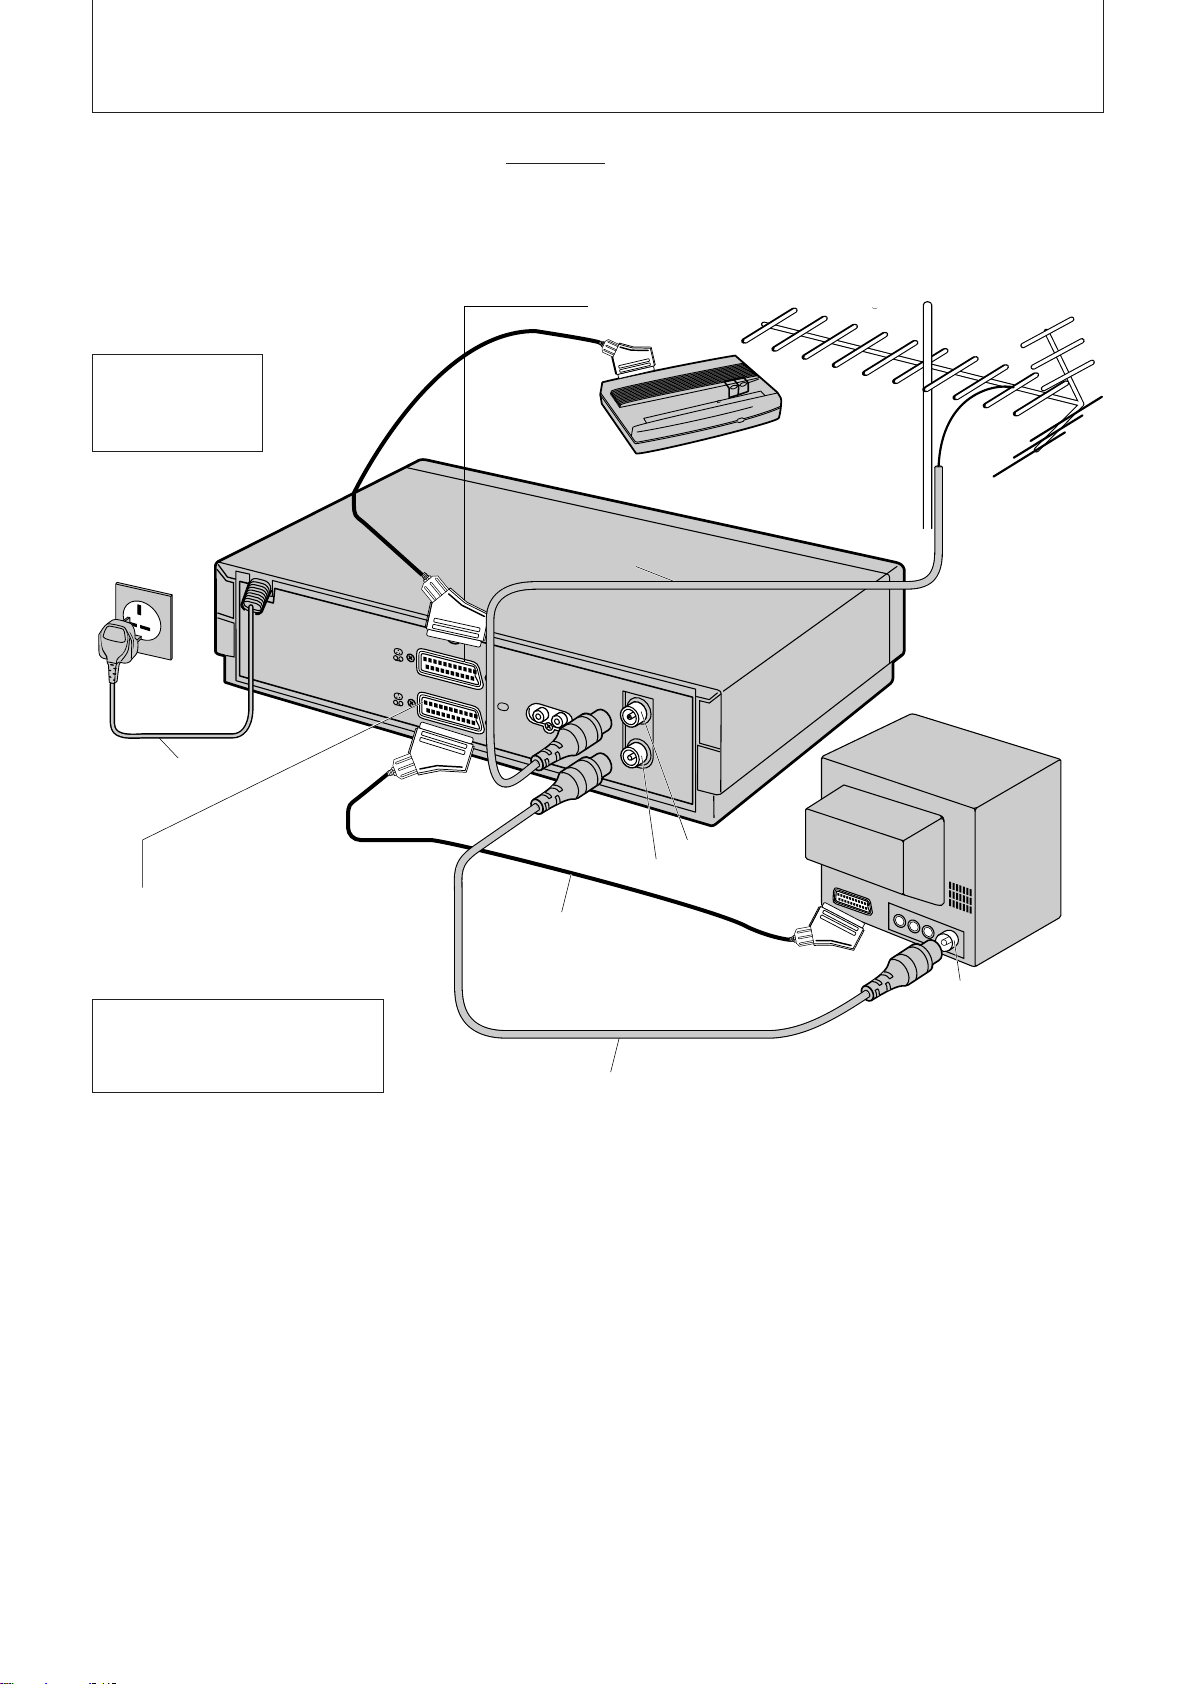
D
E
C
O
D
E
R
/
C
A
N
A
L
P
L
U
S
E
U
R
O
.
A
/
V
A
E
R
I
A
L
A
N
T
E
N
N
E
R
F
O
U
T
S
O
R
T
I
E
R
F
A
U
D
I
O
O
U
T
/
S
O
R
T
I
E
S
O
N
R
/
D
.
Connection
Connect the set and cables as shown below but do not connect the VCR to the mains power supply just yet.
Otherwise, the auto installation will not work.
Aerial
DECODER
(Satellite or Cable box)
Do not connect to
the mains supply
socket before
connecting all leads,
refer to page 3.
VCR
AC Outlet
AC230V, 50Hz
Aerial Lead
Mains lead
SCART SOCKET
Please use a scart lead (not
supplied) to get even better
picture and sound quality.
When viewing pictures on your TV,
press the VCR/TV button of the
remote control handset so the VCR
indicator lights in the VCR’s display.
TV Set
AERIAL
RF OUT
Scart connector lead
(not supplied)
To Aerial IN
Aerial cable (Supplied)
– 2 –
Page 63
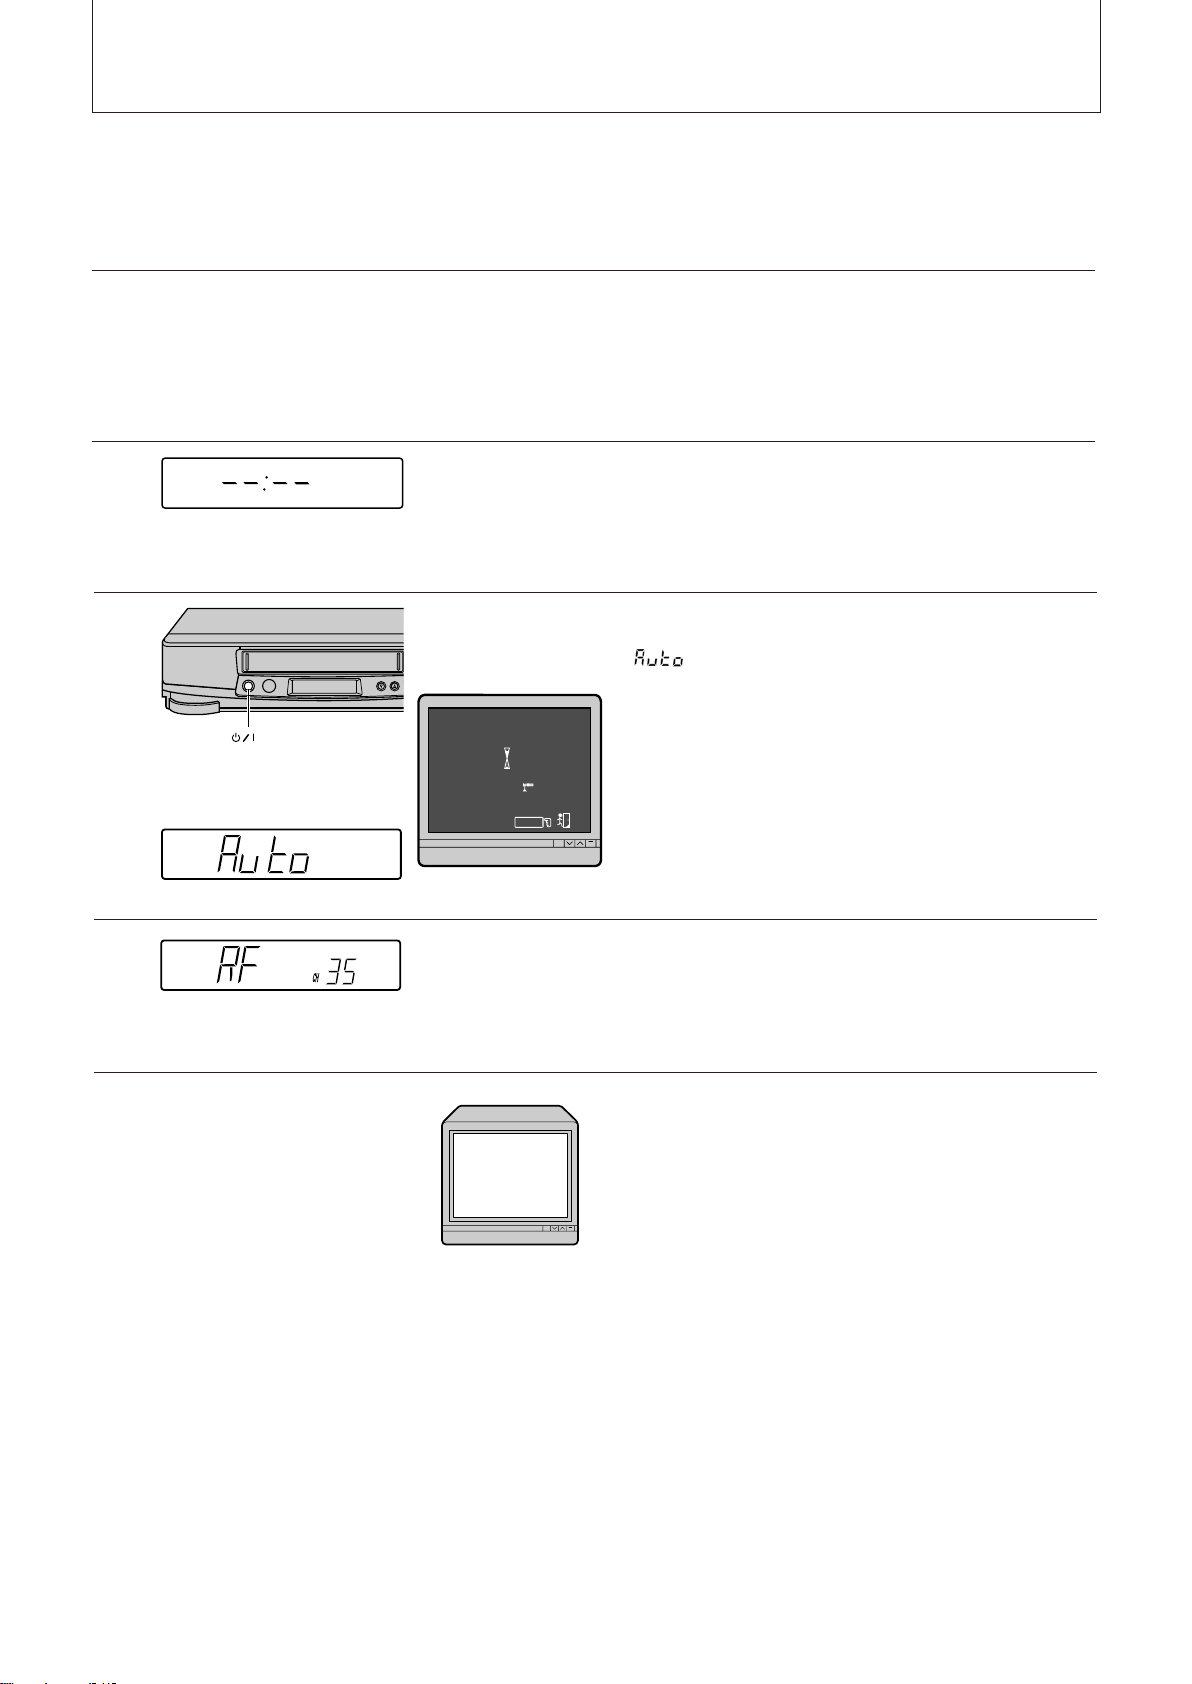
Auto Install
AUTO
M
ENU
=
Exit
Auto Install (Plug & Play) function
This automatically tunes all broadcast channels, sets the clock and date.
To operate proceed as follows;
1
2
3
Plug the aerial lead into the VCR. Plug the aerial cable (supplied) from the VCR RF OUT into the TV
aerial input. Please refer to page 2.
VCR TV screen
Connect to main power supply after completely
connecting all leads (as described on page 2:
Connection).
The VCR will be in standby mode at this stage and
the VCR display will show "– –:– –".
Press OPERATE button.
" " will appear in the VCR display.
During this time, if your set-up include scart
connector and the TV is set to AV line, the TV
screen will display as shown.
(OPERATE)
4
5
After this process is complete, the RF output
channel will appear in the VCR display.
For example, RF output channel 35.
Refer page 4, item 6 for further tuning.
Switch on your TV and select an unused
programme number. i.e. one not used for BBC1,
ITV, etc. (Please consult your TV instruction manual
as your TV may have a special VCR programme
number which must be used.)
Note: This programme number will be your VCR
programme from now on.
– 3 –
Page 64

Safety Tab
Video TV screen
CH
CH
6
7
8
Press the
Note: If the VCR display " ", press the
STOP button on the VCR or on the remote control.
The RF channel data will appear on the VCR
display. Press the PROG / button to change
the RF channel to " ". To stop the RF
output, press the STOP button on the VCR or on
the remote control again.
Tune your TV (consult your TV instruction manual)
until the test pattern shown appears.
The correct tuning position is when the picture is
clear. Ensure this programme is stored in your TV.
Press the PLAY/STILL button again, the test pattern
will disappear and the VCR will now come out of
the standby mode into the operate mode.
PLAY/STILL
button
9
You should now be able to playback a prerecorded
cassette.
Insert the cassette as shown. If the safety tab is
removed then playback will start immediately. If not
press the PLAY/STILL button and the picture will
appear on the screen.
IMPORTANT:
Insert the cassette into the VCR. Push the cassette until the machine carries the cassette in itself.
Never force the cassette in as this may damage the mechanism.
– 4 –
Page 65

Pre-Tuning the Built in Tuner
2
142
56
3
7 8 9
0
PROG /
2
MENU
M
ODE C LOC
K
4VCR5
REVI E
W
CHANNE L
1 2 AUTO 3
M
ENU
=
Exit
AUTO
M
ENU
=
Exit
Mis-Operation of Auto Install
In the case of mis-operation on the Auto Installation, please follow the procedures as shown below.
1
2
3
TV screen
Ensure the VCR is in the operate mode (VCR display
is as shown).
Make sure TV is set to the VCR programme number.
Press the MENU button.
The menu, as illustrated, appears on the TV screen.
Press the button.
The display, as illustrated, appears on the TV screen.
The VCR will automatically store channels received
in your area. It takes about 3 minutes.
4
You can watch the progress on the TV screen when
the channel numbers stop changing, pre-tuning is
complete.
Press the PROG ▲ /▼ buttons to check the
channels you can receive.
Note: If no channels have been set or a clear picture
does not appear, check the aerial or scart
connection.
Note: When the pre-tuning of a channel is
completed, the current time may appear in the
VCR's display. This is because the auto clock
setting function has operated and the VCR's clock
has been set automatically. (See page 18 of the
instruction manual for details.)
– 5 –
Page 66

Resetting the Clock
5
MENU
142
56
3
7 8 9
0
~
9
0
5
M
ODE
CLOC
K
4VCR5
REVI E
W
CHANNE L
1 2 AUTO 3
M
ENU
=
Exit
:––
M
ENU
=
Exit
=
0000
––
CLOCK SET
:20
M
ENU
=
Exit
=
0000
10
CLOCK SET
DAY /
M
ONT H
––/ ––/ ––
/YEAR
:20
M
ENU
=
Exit
=
0000
10
CLOCK SET
DAY /
M
ONT H
12/05/00
/YEAR
F
R
You should only need to reset the clock if Auto Set-up did not do this. If the clock has been set , your VCR
should now be fully operational and ready for use.
1
2
3
4
Turn the VCR and TV on, then tune the TV to the
video programme number.
Press the MENU button.
Press the button for clock setting.
Enter the current time using the number keys in
24Hr notation.
e.g. 1 0 2 0 10:20 am
2 2 2 0 10:20 pm
Enter today's date, month and year.
e.g. 1 2 0 5 0 0 12. May 2000
2 0 0 3 0 1 20. March 2001
The day of the week appears automatically.
Note: At any stage during the number entry you
can correct any errors by pressing the 0000 button
until the incorrect digit changes to "–", then you can
enter the correct number.
5
After setting the date, press the MENU button.
The time will appear in the VCR display.
FOR FURTHER INFORMATION PLEASE CONTACT OUR CUSTOMER HELP LINE ON
01628–643029
– 6 –
QR32441
 Loading...