

Page 1

ֵ⭞䃠᱄ᴮ
INSTRUCTIONS
㒣䦉*6:25' ȝ方様
HITACHI G-SWORD ROTARY SHAVER
RM-LTX7000DY
RM-LTX7000
交流/充電式兩用
AC/RECHARGEABLE
֒ᇬቻ⭞䙊
For household use only
日本製造
Made in Japan
Page 2

Page 3

1
432
Page 4

90°
( )〔 〕
5
6
7
8
9
10 11 12
13 14 15 16
(2)
(1)
17 18 19
20 21 22
Page 5
23 24 25
(2)
(1)
(2)
(1)
26 27 28
29 30 31
32 33 34
(1)
Page 6

English
Safety precautions
Items described here are for using the product safely and properly, and to prevent
hazards and injury to the user and other persons before they occur.
Items are classified as follows.All items are important descriptions related to safety,
therefore make sure to observe them.
Extent of imminent hazard which has the potential to cause death
or serious injury to the user in the case of improper handling.
Extent of hazard which has the potential to cause death or serious
injury to the user in the case of improper handling.
Extent of hazard or damage which has the potential to cause slight
injury to the user or damage to property (house or household goods)
in the case of improper handling.
<Example of graphic illustration>
This symbol means "prohibited" (never do this).
"Disassembly prohibited" "Prohibited use in wet location"
"Prohibited to wet"
This symbol means "compulsory" (be sure to do).
"General activities" "Pull out the power cord from outlet"
After reading, make sure to keep this manual in a place where users can refer to it at any time.
Use only 100 - 240V AC for power supply. (Cause of fires and electric shocks)
This appliance is not intended for use by persons (including children) with reduced
physical, sensory or mental capabilities, or lack of experience and knowledge, unless
they have been given supervision or instruction concerning use of the appliance by a
person responsible for their safety.
Children should be supervised to ensure that they do not play with the appliance.
Never place the shaver within reach of children. (Cause of injury)
Never use a power cord if they are damaged or insertion to the outlet is loosened.
Prohibited
Prohibited
(Cause of electric shocks, short circuits and ignition)
Never allow pins or dust to adhere to the power plug and plug for equipment.
(Cause of electric shock, short circuit and ignition)
Do not damage, unnecessarily bend, pull, twist, bind, place a heavy object on top,
sandwich, process or wind the power cord around the power adapter, etc.
(If the power cord breaks, fires or electric shocks may occur.)
Do not look into the light emitting lens portion while the LED light dryer is in use.
(Cause of blindness by ultraviolet light)
Never wash the power adaptor and LED light dryer with water. Also, never soak
them in water or splash water on them. (Cause of electric shocks and short circuits)
Never foam-shave or clean with water while using the AC.
(Cause of electric shocks and short circuits)
-1-
Page 7

Prohibited
Unplug
Prohibited
Make sure
Prohibited
Do not use the power adaptor and LED light dryer in a place where water is
splashed, such as a bathroom, or in a place with high humidity.
(Cause of electric shocks and short circuits)
Detach the hand-held part from the supply cord before cleaning it in water.
Be sure to disconnect the power adaptor from the outlet and main body for maintenance.
Never connect or disconnect the power plug to/from the outlet with wet hands.
(Cause of electric shocks or injury)
Never modify the shaver. Only a qualified technician may make repairs.
(Cause of fires, electric shocks or injury)
Check for any breakage or deformation of foil before use.
(Cause of damage to skin)
The foil wears each time it is used. When wear proceeds, breakage
of blades may occur during use and cause damage to skin. Replace it with a
separately sold replacement blade as soon as possible.
When disconnecting a power plug for equipment, do not pull the cord, but be
sure to pull the plug to disconnect. (Cause of electric shocks, short circuits or ignition)
Regularly clean the power plug and plug for equipment so that dust does not form on
them. (Cause of electric shocks, short circuits or ignition)
Wipe away water drops on the main body sufficiently, and charge in dry state.
(Cause of short circuits, burns due to heating)
Use carefully if you have acne or abrasions on skin. (Breakage causes damage to skin)
In case of accidental ingestion of shaver oil, force person to drink a large amount of
water to vomit the oil, and seek medical attention.
(Cause of damage to physical condition)
In case of accidental entry of shaver oil into eyes, immediately wash with a sufficient
amount of flowing water and seek medical attention. (Cause of eye impairment)
After operation, keep it in a place free from moisture.
(Cause of damage to the shaver if left in a bathroom due to condensation and
rust occurring inside the main body)
After use, make sure to put on the cap.
(Cause of damage to skin by breakage or deformation of the foil)
This is used for shaving only. Never use it for other (for hair, etc.,) than shaving.
(Causes of damage to skin and shortening the life of the foil.)
Never share the shaver with family members or others.
(Cause of infection or inflammation)
Never push the blades strongly.
(Cause of damage to skin especially lips or damage to the shaver.)
Never bring fingers or nails into contact with the foil during use.
(Cause of damage to the foil resulting in damage to skin)
Never clean the foil-cutter assembly with a cleaning brush for maintenance.
(Cause of deformation of the cutter or damage to the foil)
-2-
Page 8

Never use any other power adaptor and LED light dryer than the ones included.
Also, do not charge any other product with the included power adaptor.
(Cause of fires by short circuits or abnormal heating)
Do not remove the main body from the LED light dryer during drying.
Prohibited
Unplug
(Cause of burns by the light emitting lens or foil that becomes hot during drying)
Do not apply the trimming blade directly to ears and nose.
(Cause of injury to ears and nose)
Disconnect the power plug from the outlet when it is not used.
(Cause of injury, burns, or electric shocks and fires from electric leakage due to
insulation degradation)
Safety precautions
1. Never use cream or gel shaving agents.
Cause of clogging and damage to the blade.
2. Never soak the blade in water.
Cause of damage to the shaver.
3. Never dry it using a dryer or a fan heater, etc.
Cause of deformation or damage to the shaver.
4. Do not charge at each time of use.
Cause of impairment of the battery performance
5. Do not dry any other body than this shaver with the LED light dryer.
Cause of failures
6. Do not place the LED light dryer in a tilted or unstable position, and do not move it during use.
Cause of failure of the equipment
7. Never allow to dry or leave it in a place exposed to direct sunlight and high temperatures.
Cause of damage to the shaver due to deformation and deterioration of the waterproof rubber.
8. Never wipe the shaver or the power adaptor with alcohol, benzene, and thinner, etc.
Cause of deformation and discoloration.
If the blade surfaces are applied to the skin too strongly as the battery level is low or maintenance is
inadequate, an automatic stop may be made by the protection circuit functioning under an increased
load. The shaver can be used by connecting the power adaptor and turning "ON" the switch again.
Charge as it is or carry out a sufficient level of maintenance.
(If the shaver does not move even when the switch is turned “ON,” connect the power adaptor to the
main body, insert the power plug into an outlet, and then turn “ON” the switch again.)
Name and function of each portion (Fig.1)
Cap:Protects the blade.
Head holder
Foil-cutter assembly
Foil, cutter, center trimmer,
and cleaning washer are assembled.
Foil
Cutter (Drum razor blade)
(incorporated in the cutter)
The cutter cannot be disconnected
from the foil-cutter assembly.
Cleaning washer
Changes the flow to wash the cutter and
foil for maintenance.
Switch
If this switch is pressed, the shaver is
turned "ON" and if this is pressed again,
the shaver is turned "OFF".
Selector button
Selects between auto mode,
power mode, and normal mode.
Battery (Built in)
Lithium ion battery 1 pc.
Main body socket
Foil-cutter assembly detaching
knob
By sliding this button sideways, the
foil-cutter assembly can be detached.
Head holder removal button
Never press this button during operation.
-3-
Page 9

Mode indicator (Blue)
Auto (flashing) Power (lighting),
Normal (lighting off)
Auto lamp (Green)
The auto mode operates to light
the lamp.
Remaining battery level indicator lamp
The capacity of the battery is displayed
by three lamps. When the "EMP" lamp
flashes during use, this indicates that
charging is required.
Charging completion lamp“”
During charge: The lamp turns on. (Red)
After charging is completed: The lamp
turns off.
Main body
Center trimmer
Swivels to securely catch beard.
Trimming blade
Used when a difficult to shave long beard
is shaved with the foil, or when
sideburns are closely trimmed.
Trimming knob : Slide this upward.
Comb
Guides long or rough beard into the foil.
LED light dryer
Charging connector
Main body detection switch
The dry switch cannot be turned on unless
the main body is set properly.
(Included in the RM-LTX7000DY)
Light emitting lens
Dry switch
Each time the switch is pressed, it switches
between ON and OFF.
Lights during drying.
Flashes slowly (at intervals of 2 seconds)
while the cutter is made to be
antibacterial.
Flashes quickly (at intervals of 0.5 seconds)
to indicate an error.
Catch
Attachment/detachment button
Fan(Built-in)
Charger socket
Insert the plug for equipment of the power
adaptor.
Power adaptor : KH-187B
Power plug
Insert this into the outlet to its base.
Plug for equipment Cord
Cleaning brush
Shaver oil Pouch
Preparation before use
How to charge
Charge before first use.
Make sure to use the included power adaptor for 100 - 240V AC power.
You can also charge by using an LED light dryer.
The recommended charging temperature is in the range of 10 – 35°C
At a temperature below the recommended temperature, the charging response may slow down,
causing an insufficient charge and a reduced number of operating times.
Each battery has a service life.
(The battery life greatly varies according to the conditions of use and storage.)
If the number of operating times is extremely small in spite of use in accordance with the
instructions, it is considered that the battery life is about to expire. For battery replacement, consult
with your distributor or customer service representative listed.
Never connect or disconnect to/from the outlet with wet hands. (Cause of electric shocks or injury)
Avoid using in a place where water is splashed such as a bathroom or in a place with high moisture.
(Cause of electric shocks or short circuits)
Wipe away water drops on the main body sufficiently to dry it before charging.
(Cause of burns due to short circuits and heat generation)
1. Turn "OFF" the switch and connect the power adaptor to the main body and outlet. (Fig.2)
Turn “OFF” the switch. Connect by aligning the (+) and (-) marks on the reverse side.
Charging completion lamp
During charge: The lamp lights (red).
After charging is completed: The lamp turns off.
-4-
Page 10

Caution
When the switch is turned "ON," this cannot be charged.
When the capacity of the battery is sufficient, the charging completion lamp may be turned off early.
Charging by using an LED light dryer
Connect the power adaptor to the LED light dryer and an outlet, and insert the main
body socket into the charging connector of the LED light dryer. (Fig.3)
Caution
If the dry switch is pressed by mistake, the dry switch will flash.
It will go out if the dry switch is pressed again.
When the battery is completely discharged, the charging completion lamp may not light.
If charging is continued as it is, the battery will start to be charged after the charging completion
lamp has lit.
Recommended
Wipe off water droplets if adhered to the main body socket and the charging connector of the LED
light dryer.
Please use another outlet if noise is generated from the TV, etc., during charging or operation.
2. After completion of charging, disconnect the power adaptor. (Fig.4)
Disconnect holding the plug portion.
During charging, the power adaptor and the main body may slightly heat up, this is not abnormal.
After charging by using an LED light dryer
After completion of charging, remove the main body from the charging connector while holding the
LED light dryer, and disconnect the power adaptor from the outlet and LED light dryer. (Fig.5)
Used as a stand
The LED light dryer can be used as a stand by placing the main body since its socket portion fits in
the center hole of the LED light dryer. Remove holding the plug portion.
The standard charging time is 1.5 hours.
With one charge, it can be used for about 15 days. (For use at three minutes per day.)
(The number of operating times may decrease depending on the operating conditions, such as
beard thickness, pressing force to skin, method of maintenance, and low ambient temperature.)
(Included in the RM-LTX7000DY)
(Included in the RM-LTX7000DY)
Time to charge
If the remaining battery level indicator lamp flashes when the switch is turned "ON," this indicates that
charging is required. Charge in good time. (Fig.6)
Remaining battery level indicator lamp (Does not light while charging.)
Guidelines for remaining battery level indicator lamps
"HIGH," "MID" and "EMP" lamps light: 80% or more
"MID" and "EMP" lamps light: 50% or more
"EMP" lamp light: Less than 50%
"EMP" lamp flashes: Charging is required
NOTICE
When the remaining battery level indicator lamp "EMP" flashes, the motor may stop automatically to
prevent excessive discharge.
This product uses a lithium-ion battery.
In order to deliver full performance, observe the following:
(1) Do not overcharge. The battery life will become short.
Charge after the remaining battery level indicator lamp “EMP” flashes.
(2) Charge on condition that the ambient temperature is 10°C or more and under 35°C.
Due to the nature of the battery, it is recommended to charge in the range of 10 – 30°C.
At lower or higher temperatures, the battery performance may deteriorate.
(3) Store in a dry, cool place.
Avoid storing in a hot place where the temperature is 40°C or more or in a cold place
where it is 0°C or less.
-5-
Page 11

How to use
It is recommended to use the shaver at an ambient temperature of 5°C to 35°C.
Use or storage at a temperature below the recommended temperature may disable the shaver or
cause a reduced number of operating times.
For initial use, trim while lightly applying the shaver to skin.
How to shave with the foil
Check that there is no breakage and deformation of the foil before use.
(Cause of damage to skin)
Do not shave with the trimming blade down. (Cause of damage to skin)
Never press it strongly to the skin.
(Cause of damage to skin especially lips and cause of damage to the foil)
Never shave with only a part of the foil or bring fingers or nails into contact with the foil during use.
(Cause of damage to the foil resulting in damage to skin)
Use carefully if you have acne or abrasions on skin. (Breakage causes damage to skin)
1. Remove the cap and turn "ON" the switch..
The remaining battery level indicator lamp or charge requesting lamp lights.
If the remaining battery level indicator lamp "EMP" or charge requesting lamp flashes,
this indicates that charging is required. Charge by connecting the power adaptor to
the main body or use the shaver as it is with alternating current.
Never touch the switch during operation.
2. Shave with the trimming blade up so as to lightly glide the shaver against the flow of
beard in the arrow direction. (Fig.7)
How to shave delicately
(1) Stretch the skin by hand, and raise beard.
(2) Press the blade surface perpendicular to skin. (Fig.8)
(3) Lightly press the shaver and slowly shave upward.
When shaving a long grown beard which is difficult to shave by the foil
Cut long grown beard short with the trimming blade, and finish with the foil.
Caution
Never operate the shaver continuously for 20 minutes or more. The shaver automatically
stops in approximately 20 minutes as a circuit protector. You can use it by turning on again.
3. After use, turn "OFF" the switch and put on the cap.
The remaining battery level indicator lamp goes out in three seconds.
■Mode selection
By pressing the selector button, the auto mode, power mode, or normal
mode can be selected. After the normal mode, it returns to the auto mode. (Fig.9)
Auto → Powerful → NormalSelect the mode by pressing the selector button.
Auto mode (Auto)
The auto mode operates to automatically control the power mode and normal mode depending
on beard thickness. (Fig.10)
Mode indicator “flashes (blue).” Auto lamp “lights (green).”
The auto lamp "lights (green)."
The mode indicator flashes (blue)."
Caution
If a large amount of beard clippings accumulate in the blade or oil on the blade face runs out, the
auto mode may not operate.
Use in auto mode
When the remaining battery level indicator lamp "EMP" has started flashing, the auto mode is
reset, the auto lamp is turned off, and the mode changes to the power mode.
Direct the trimming blade upward.
-6-
Page 12

Power mode
Beard can be shaved strongly and quickly at the time of start or in response to a thick beard. (Fig.11)
Mode indicator “lights.”
The auto lamp is "turned off."
The mode indicator "lights (blue)."
Auto lamp “turns off.”
Normal Mode
Beard can be shaved comfortably and softly in response to normal beard and finishing. (Fig.12)
The auto lamp and mode indicator are turned off.
When the switch is turned "OFF," the last mode is stored.
The stored mode is automatically set for the next use.
Auto lamp “turns off.”Mode indicator “turns off.”
Foam-shaving is possible.
Foam-shaving is not allowed with AC. (Cause of short circuits)
Never press it strongly to the skin.
(Cause of damage to skin especially lips and cause of damage to the foil)
Commercially available shaving foam enables to smooth the skin and shave deeper.
Caution
Never use cream and gel shaving agents. (Cause of clogging or damage of the blade)
1. Foam well and apply to the face.
2. Further lightly press it to the skin to shave upward than when shaving dry (without shaving foam).
(Fig.13)
If shaving foam dries during shaving, resulting in poor sliding on skin, apply shaving foam again.
3. Be sure to clean with water after foam-shaving with soap.
For how to clean with water, refer to "Maintenance" .
If soap remains, it will harden and damage the shaver including impairing the rotation of the
cutter, resulting in deterioration in sharpness and a reduction in operating times.
4. Apply lubricant and store it in a place free from moisture after shaving.
Leaving it in a bathroom, etc., may result in damage since condensation and rust
will occur inside the main body.
How to use with AC
Avoid using in a place where water is splashed such as a bathroom or in a place with high moisture.
(Cause of electric shocks and short circuits)
Never foam-shave or clean with water. (Cause of electric shocks and short circuits)
1. Connect the power adaptor to the main body and outlet and turn "ON" the switch.
If the battery is completely discharged, the shaver will sometimes be difficult to start.
In this case, if the switch is turned "OFF," the battery is placed into a charging status.
Operate after charging the battery for about one minute.
If the battery is completely discharged, it may take 5 minutes or more to charge it.
2. Use following “How to shave with the foil.”
3. After use, turn "OFF" the switch and disconnect the power adaptor from the outlet and main body.
Recommended
The battery is also consumed when the shaver is used with A/C. Charge it once a month.
How to shave with trimming blade
1. Turn "ON" the switch and extend the trimming blade. (Fig.14)
Place your thumb on the projection of the trimming knob, and push it up.
Use it with the cap. (Otherwise, hair may enter the blade.)
2. Lightly press the trimming blade perpendicular to skin and slowly shave in the arrow direction.(Fig.15)
With the cap attached
Never press the blade edge strongly. (Cause of damage to skin)
If hair has intruded the blade edge at one time, hair is pulled and entanglement is
caused, and it may result in deterioration in sharpness.
-7-
Page 13

3. Turn "OFF" the switch and store the trimming blade after operation. (Fig.16)
Caution
Never place fingers on the upper side of the trimming knob.
(The trimming blade will contact fingers at the time of storing.)
If the trimming knob is pushed downward with the trimming blade contacting fingers, storage will
be impossible due to the disconnected lever.
Recommended
If the trimming blade cannot be stored, move the trimming knob upward and downward
once or twice to restore it without forcibly pushing it in.
Maintenance
Never wash the power adaptor and LED light dryer with water. Also, never soak
them in water or splash water on them. (Cause of electric shocks and short circuits)
Be sure to disconnect the power adaptor from the outlet and main body for maintenance.
(Cause of electric shocks or injury)
Do not wash with water when using the shaver with AC. (Cause of short circuits)
Never push the blades strongly. (Cause of damage to skin especially lips or damage to the shaver.)
Do not clean the foil-cutter assembly with the cleaning brush.
(Cause of deformation of the cutter or breakage of the foil)
How to keep a comfortable sharpness
After use (especially shaving with soap), make sure to perform maintenance. Make sure to wash
the foil-cutter assembly with water.
Accumulation of beard clippings will cause deterioration in sharpness or scattering of beard clippings.
For the main body and trimming blade, the cleaning brush can also be used.
Do not clean the foil-cutter assembly with the brush because doing so will cause deformation
of the cutter or breakage of the foil.
After washing with water, apply the included shaver oil to the foil.
Smoothens rotation. Prevents reduction in operating times.
Keeps sharpness. Prevents blade heat generation.
Prevents blade wear.
Purchase optionally available shaver cleaner after the attached shaver oil is used up.
Cleaning with water
The foil-cutter assembly can be washed with water.
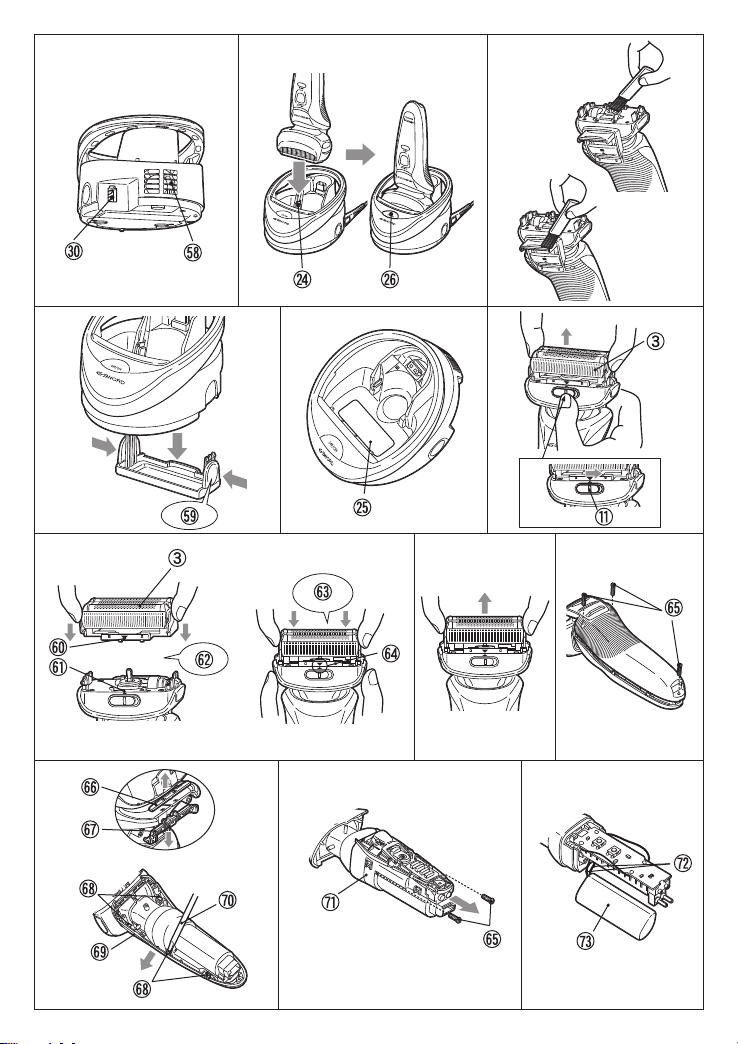
1. Turn "OFF" the switch to remove the cap and head holder.(Fig.17)
Remove the holder while pressing the head holder removal button.
Press the head holder removal button (1) to remove the head holder in the arrow (2) direction
2. Turn "ON" the switch and pour water or lukewarm water between the foil assembly and main body
for approximately 10 seconds to wash the foil and cutter assembly.(Fig.18)
Turn “ON” the switch.
Advice
If buildup is severe or difficult to remove, wash with water, apply a small amount of kitchen detergent
(neutral) to the foil, turn "ON" the switch, and evenly foam the entire surface of the blade for
approximately 20 seconds. Then, wash the shaver once again to remove buildup. (Fig.19)
Foam for approximately 20 seconds.
If buildup still cannot be removed, remove the foil-cutter assembly, soak the shaver in water or
lukewarm water containing a small amount of kitchen detergent (neutral) for approximately eight hours,
then wash it with water to remove buildup. (Fig.20)
Please refer to "How to replace the foil-cutter assembly" to detach or attach the foil-cutter assembly.
Never use bathroom or toilet detergents, etc.
Caution
Never turn "ON" the switch without pouring water on the blade and with the head holder
removed. (Cause of scattering of hair clippings)
Never use hot water. (Cause of deformation and failure of the shaver)
Never soak the main body in water. (Cause of failure of the shaver)
-8-
.
Page 14
3. After washing with water, wipe off water droplets on the main body and head holder.
Lightly wipe off water droplets on the foil surfaces with tissue, etc.
If wiping off is insufficient, water droplets may remain.
CAUTION
Never drain it by shaking. (Cause of the foil-cutter assembly coming off)
4. Press the lower part of the head holder removal button to attach the head holder. (Fig.21)
Front (Notched side corresponds to the back side.)
Push in the head holder until it clicks.
Make the front face of the head holder face the switch side for attachment.
Caution
The head holder cannot be connected in a state where it is facing back to front.
5. After drying, turn "ON" the switch, apply the included shaver oil to the foil and trimming blade, and
after 4 to 5 seconds, turn "OFF" the switch.
Wipe the surfaces of the foil and trimming blade with tissue, etc., and put on the cap. (Fig.22)
Recommended
After drying, be sure to apply the shaver oil to the foil and trimming blade.
(This will prevent deterioration in sharpness, reduction in rotational rate of the motor, reduction in
operating times, premature damage due to wear of the foil, and heat generation of the blade.)
6. After maintenance, keep it in a place free from moisture.
Leaving it in a bathroom, etc., may result in damage since condensation will occur
inside the main body.
7. Prevent deterioration of the battery.
Prevent deterioration of the battery.
If you do not use the shaver for 3 months or more, discharge until the remaining battery level
indicator lamp “EMP” flashes, and then charge for approximately 45 minutes.
This mark means suitable for cleaning under an open water tap.
Drying with the LED light dryer (Included in the RM-LTX7000DY)
The main body and trimming blade cannot be dried.
Use at an ambient temperature of 15〜35 Υ or more.
1. Connect the power adaptor to the LED light dryer and an outlet. (Fig.23)
Caution
Do not block the suction slot.
Keep out of the reach of children.
2. After washing with water, wipe off water droplets on the main body, and attach the head holder.
Lightly wipe off water droplets on the blade surfaces with tissue, etc.
3. Mount the main body on the LED light dryer. (Fig.24)
Set the main body as its front (switch side) faces front and its blade surfaces face down.
Caution
Wipe off water droplets adhered to the main body and foil surface.
Be careful because the main body may topple over if tilted forward.
Use this shaver exclusively.
4. Press the dry switch.
During drying, the dry switch lights in blue and the light emitting lens lights in purple,
and the fan rotates. After drying, the light emitting lens lights in purple for approximately
15 hours, and the inscription “G-SWORD” on the LED light dryer flashes slowly
(at intervals of 2 seconds) and then goes out.
The drying time is approximately 1.5 hours. After completion of drying, it automatically
switches to the LED light antibacterial mode, and the LED stays lit for approximately
15 hours.(If the ambient temperature is under 15°C, it will be detected by the sensor,
with the result that the drying time will become approximately 3 hours, followed by the
LED light antibacterial mode for approximately 15 hours.)
Note
If the dry switch is pressed when the main body is not set properly, the inscription
“G-SWORD” on the dry switch flashes quickly.Set the main body again.
Suction slot
-9-
Page 15

Do not remove the main body during drying (when the inscription “G-SWORD” on the dry switch lights).
(Cause of burns by the light emitting lens or foil that becomes hot during drying)
5. After completion, take out the main body, and disconnect the power adaptor from the outlet.
Caution : Never wash the LED light dryer with water. (Cause of failures)
6. After drying, apply the shaver oil, and keep it in a place free from moisture.
After drying, apply the shaver oil and store in a in a place free from moisture.
For details, see 5 and 6 under “Maintenance (Cleaning with water).”
■To deliver full performance of the lithium-ion battery
If you do not use the shaver for 3 months or more, discharge until the remaining battery level
indicator lamp “EMP” flashes, and then charge for approximately 45 minutes.
Brush cleaning
Never clean the foil-cutter assembly with a brush.
Otherwise, the cutter will deform to damage the foil, or the brush tip may be caught in the foil.
1. Turn "OFF" the switch and detach the head holder and the foil-cutter assembly.
Please refer to "How to replace the foil-cutter assembly" to detach the foil-cutter assembly.
2. Clean the main body and trimming blade. (Fig.25)
3. After cleaning, store the trimming blade, attach the foil-cutter assembly and head holder, and cover
the cap. Please refer to "How to replace the foil-cutter assembly" to attach the blade assembly.
Recommended
Once a week, turn "ON" the switch, apply of the included shaver oil to the foil and trimming blade,
and after 4 to 5 seconds, turn "OFF" the switch, and wipe the surfaces of the foil and trimming blade
with tissue, etc.
Remove contamination on the main body with a cloth which contains water or diluted kitchen
detergent (neutral) and firmly wrung.
CAUTION
Never use alcohol, benzine, and thinner, etc. (Causes of deformation and discoloration)
Maintenance of the LED light dryer (Included in the RM-LTX7000DY)
The LED light dryer cannot be washed with water.
Caution
Make sure to disconnect the power adapter from the LED light dryer.
Do not tilt the LED light dryer or turn it upside down.
(Cause of spillage or internal entry of water droplets having accumulated in the catch)
1. Clean the catch. (Fig.26)
Remove the catch by pushing the attachment/detachment button.
Be careful not to tilt it if water has accumulated.
Pour out the water, and lightly wipe with a dry cloth or tissue, etc.
Caution
When removing the catch, if the LED light dryer is turned upside down, water droplets may enter
the inside, short-circuiting the circuit board.
After maintenance, attach the catch.
2. Clean the inside. (Fig.27)
Lightly wipe away dust, dirt, etc., adhered to the light emitting lens and the inside with a cloth
or tissue, etc., moistened with water.
Clean the corners and projections and depressions with a cotton swab, etc.
Remove while pushing the attachment/detachment buttons.
How to replace the foil-cutter assembly
When replacing the foil-cutter assembly, make sure to disconnect the power plug and turn "OFF" the
switch. (Cause of failures)
Never strongly hold the foil-cutter assembly. (Cause of damage and injury to fingers)
Recommended
After blade replacement, make sure to apply the included shaver oil.
For spraying places, see 5 under “Maintenance (Cleaning with water).”
(Cause of failure of movement of the cutter or heat generation of the blade surface)
-10-
Page 16

1. Turn "OFF" the switch to remove the cap and head holder. (Fig.17)
Press the head holder removal button (1) to remove the head holder in the arrow (2) direction.
2. Detach the foil-cutter assembly. (Fig.28)
Slide the foil-cutter assembly detaching knob to the right (1),pick up and pull both ends of
the foil-cutter assembly straight upward (2) to detach it.
Never pull it diagonally, otherwise, it may not be detached.
3. Press the lower part of the head holder removal button to attach a new foil-cutter assembly. (Fig.29)
Alignment mark( ) Alignment mark( )
Align the alignment marks ( ) and ( ) of the foil-cutter assembly and main body.
Push down the both ends of the foil-cutter assembly until it clicks.
Alignment mark
Caution
Floating of the foil-cutter assembly will result in failure.
The foil-cutter assembly cannot be connected in a state where it is facing back to front.
4. Confirm the attachment of the foil-cutter assembly. (Fig.30)
Pick up and lightly pull both ends, and if the assembly cannot be removed, it is properly attached.
5. Press the lower part of the head holder removal button to attach the head holder. (Fig.21)
Align the front face of the head holder to the switch side for attachment.
Caution : The head holder cannot be connected in a state where it is facing back to front.
Troubleshooting
Before requesting repair, check the following:
Symptom Check point Remedy
- Hot blade surface
- Deterioration in
sharpness
- Weak rotation
- Small number of
operating times
- Stop during use
- Scattering of beard
clippings with the
switch “ON”
- Strong smell
- Charging completion
lamp turns off early
- Remaining battery
level indicator lamp
flashes early
- No movement with
the switch “ON”
- Failure of charging
with the LED light
dryer
- No movement of the
LED light dryer (dry
switch flashing
quickly)
Check to see if the outer-inner
blade assembly is securely
attached (not floating).
Check for heavy accumulation
of beard clippings inside the
blade.
Check the blade surface for oil
shortage.
Check for accumulation of beard
clippings.
Check for insufficient
maintenance.
Check for full charge. There is no problem.
Check for being not in use for 3
months or more.
Check for being out of charge.
Check for accumulation of beard
clippings.
Check the blade surface for oil
shortage.
Check to see if the power
adaptor is properly connected.
Check to see if the main body is
properly set to the LED light
dryer.
Push in the outer-cutter
assembly until it clicks allowing no
gap to the main body.
Periodically perform maintenance.
Periodically perform maintenance.
Use as is.
Charge when the remaining battery
level indicator lamp “EMP” flashes to
indicate that charging is required.
- Turn “OFF” the switch, and charge
for approximately 1 minute before
use.
- Disconnect the power adaptor
once, and insert it again.
- Periodically perform maintenance.
Check to see if the power adaptor is
properly connected.
Check to see if the main body socket
is properly set in the charging
connector. Reset the main body.
-11-
Page 17

Symptom Check point Remedy
- Failure of drying with
the LED light dryer
Check the above, and if the shaver is still in poor condition, do not repair by yourself but consult your
distributor.
Check for accumulation of dust,
etc., inside the LED light dryer.
Check to see if water drops on
the main body and blade surface
have been wiped off after
washing with water.
Periodically perform maintenance.
Wipe off water drops on the main
body and blade surface before setting.
Specifications
Power adaptor
Power
(KH-187B)
supply
Main body Battery (Lithium-ion battery 3.6V DC, 1300mAh) x 1
Charging time 1.5 hours as standard Rated time 5 minutes
Mass Main body : Approximate 200g
Accessories Pouch, Shaver oil, Cleaning brush
100 – 240V AC, 50/60Hz, 14VA
Power adaptor : Approximate 70g
LED light dryer : Approximate 150g
Please note when disposing of the product
Do not charge the removed battery and also: (Cause of heat generation, catching fire, or rupture)
- Do not throw in fire or overheat it.
- Do not puncture with a nail, give a shock, disassemble, or modify it.
- Do not bring (+) and (-) into contact with metal, etc.
- Do not carry or store it together with a necklace, hairpin, etc.
- Do not leave it in a hot place, such as near a fire or under a scorching sun.
Keep the removed battery out of reach of children.
If they are suspected of having swallowed the battery, immediately seek medical attention.
If the battery fluid leaks, do not touch it with bare hands but take the following action.
- If the fluid gets in eyes, do not rub eyes but immediately rinse with clean water and then seek
medical attention.
- If the fluid adheres to the body or clothing, sufficiently rinse with clean water and then seek medical
attention.
Do not disassemble except when disposing of the product.
This product includes recyclable parts.
For disposal of the parts, observe your local laws and regulations etc.
How to remove the lithium-ion battery
1. Keep the switch “ON” until the shaver stops moving completely to discharge the lithium-ion battery.
2. Remove the cap, head holder, and outer-cutter assembly.
3. Remove the screws from the rear cover with a Phillips screwdriver, and remove the rear panel.
(Fig.31)
4. Remove blind piece B and blind piece C from the front panel by using tweezers or the like, disengage
the claws with a flat-blade screwdriver or the like, and remove the front panel. (Fig.32)
5. Remove the two Phillips screws from the housing case, and remove the housing case. (Fig.33)
Housing case
6. Take out the lithium-ion battery, and cut the lead wires separately near the base of the battery. (Fig.34)
Lead wires Lithium-ion battery
Screws
Blind piece C Blind piece B Claws Front panel
Flat-blade screwdriver
Do not bring the (+) and (-) lead wires of the removed lithium-ion battery into contact.
(Cause of short circuits or burns)
-12-
Page 18

-13-
Page 19

-14-
Page 20

-15-
Page 21

-16-
Page 22

-17-
Page 23

-18-
Page 24

-19-
Page 25

-20-
Page 26

-21-
Page 27

-22-
Page 28

-23-
Page 29

-24-
 Loading...