

Page 1

SPLIT TYPE
INDOOR UNIT/OUTDOOR UNIT
MODEL
RAS-30CH7/RAC-30CH7
INDOOR UNIT
ENGLISH
OUTDOOR UNIT
RAS-30CH7
RAC-30CH7
Instruction manual Page 1~26
To obtain the best performance and ensure years of trouble free use, please read this instruction
manual completely.
Инст укция по эксплуатации
Для обеспечения наилучших эксплуатационных ха акте истик и многолетней безотказной
аботы обо удования необходимо ознакомиться с данной Инст укцией по эксплуатации.
ст . 27~52
– 1 –
Page 2

SAFETY PRECAUTION
●
Please read the “Safety Precaution” carefully before operating the unit to ensure correct usage of the unit.
●
Pay special attention to signs of “ Warning” and “ Caution”. The “Warning” section contains matters which,
if not observed strictly, may cause death or serious injury. The “Caution” section contains matters which may
result in serious consequences if not observed properly. Please observe all instructions strictly to ensure safety.
●
The sign indicate the following meanings.
Make sure to connect earth line.
Indicates the instructions that must be followed.
●
Please keep this manual after reading.
PRECAUTIONS DURING INSTALLATION
●
Do not reconstruct the unit.
Water leakage, fault, short circuit or fire may occur if you reconstruct
the unit by yourself.
●
Please ask your sales agent or qualified technician for the installation
of your unit. Water leakage, short circuit or fire may occur if you install
WARNING
the unit by yourself.
●
Please use earth line.
Do not place the earth line near water or gas pipes, lightning-conductor,
or the earth line of telephone. Improper installation of earth line may
cause electric shock.
●
A circuit breaker should be installed depending on the mounting site of
the unit. Without a circuit breaker, the danger of electric shock exists.
●
Do not install near location where there is flammable gas. The outdoor
CAUTION
unit may catch fire if flammable gas leaks around it.
●
Please ensure smooth flow of water when installing the drain hose.
PRECAUTIONS DURING SHIFTING OR MAINTENANCE
The sign in the figure indicates prohibition.
W
A
R
N
N
G
W
A
R
N
N
G
●
Should abnormal situation arises (like burning smell), please stop operating the unit
and turn off the circuit breaker. Contact your agent. Fault, short circuit or fire may
occur if you continue to operate the unit under abnormal situation.
●
Please contact your agent for maintenance. Improper self maintenance may cause
electric shock and fire.
●
I
Please contact your agent if you need to remove and reinstall the unit. Electric
shock or fire may occur if you remove and reinstall the unit yourself improperly.
●
If the supply cord is damaged, it must be replaced by the special cord obtainable
at authorized service/parts centers.
PRECAUTIONS DURING OPERATION
●
Avoid an extended period of direct air flow for your health.
●
Do not insert a finger, a rod or other objects into the air outlet or inlet. As the fan
is rotating at a high speed, it will cause injury. Before cleaning, be sure to stop the
operation and turn the breaker OFF.
●
Do not use any conductor as fuse wire, this could cause fatal accident.
I
●
During thunder storm, disconnect and turn off the circuit breaker.
●
This unit has UV LED which emits ultra violet light.
AVOID DIRECT EYE EXPOSURE.
– 2 –
Page 3

PRECAUTIONS DURING OPERATION
●
The product shall be operated under the manufacturer specification and
not for any other intended use.
●
Do not attempt to operate the unit with wet hands, this could cause fatal
accident.
●
When operating the unit with burning equipments, regularly ventilate the
room to avoid oxygen insufficiency.
●
Do not direct the cool air coming out from the air-conditioner panel to face
household heating apparatus as this may affect the working of apparatus
such as the electric kettle, oven etc.
●
Please ensure that outdoor mounting frame is always stable, firm and
without defect. If not, the outdoor unit may collapse and cause danger.
●
Do not splash or direct water to the body of the unit when cleaning it as this
may cause short circuit.
ENGLISH
●
Do not use any aerosol or hair sprays near the indoor unit. This chemical
can adhere on heat exchanger fin and blocked the evaporation water flow
to drain pan. The water will drop on tangential fan and cause water splashing
C
out from indoor unit.
A
U
T
●
Please switch off the unit and turn off the circuit breaker during cleaning, the
high-speed fan inside the unit may cause danger.
I
O
N
●
Turn off the circuit breaker if the unit is not to be operated for a long period.
●
Do not climb on the outdoor unit or put objects on it.
●
Do not put water container (like vase) on the indoor unit to avoid water
dripping into the unit. Dripping water will damage the insulator inside the unit
and causes short-circuit.
●
Do not place plants directly under the air flow as it is bad for the plants.
●
When operating the unit with the door and windows opened, (the room humidity is always above
80%) and with the air deflector facing down or moving automatically for a long period of time,
water will condense on the air deflector and drips down occasionally. This will wet your furniture.
Therefore, do not operate under such condition for a long time.
●
If the amount of heat in the room is above the cooling or heating capability of the unit (for
example: more people entering the room, using heating equipments and etc.), the preset room
temperature cannot be achieved.
●
This appliance is not intended for use by young children or infirm persons unless they have been
adequately supervised by a responsible person to ensure that they can use the appliance safely.
●
Young children should be supervised to ensure that they do not play with the appliance.
– 3 –
Page 4

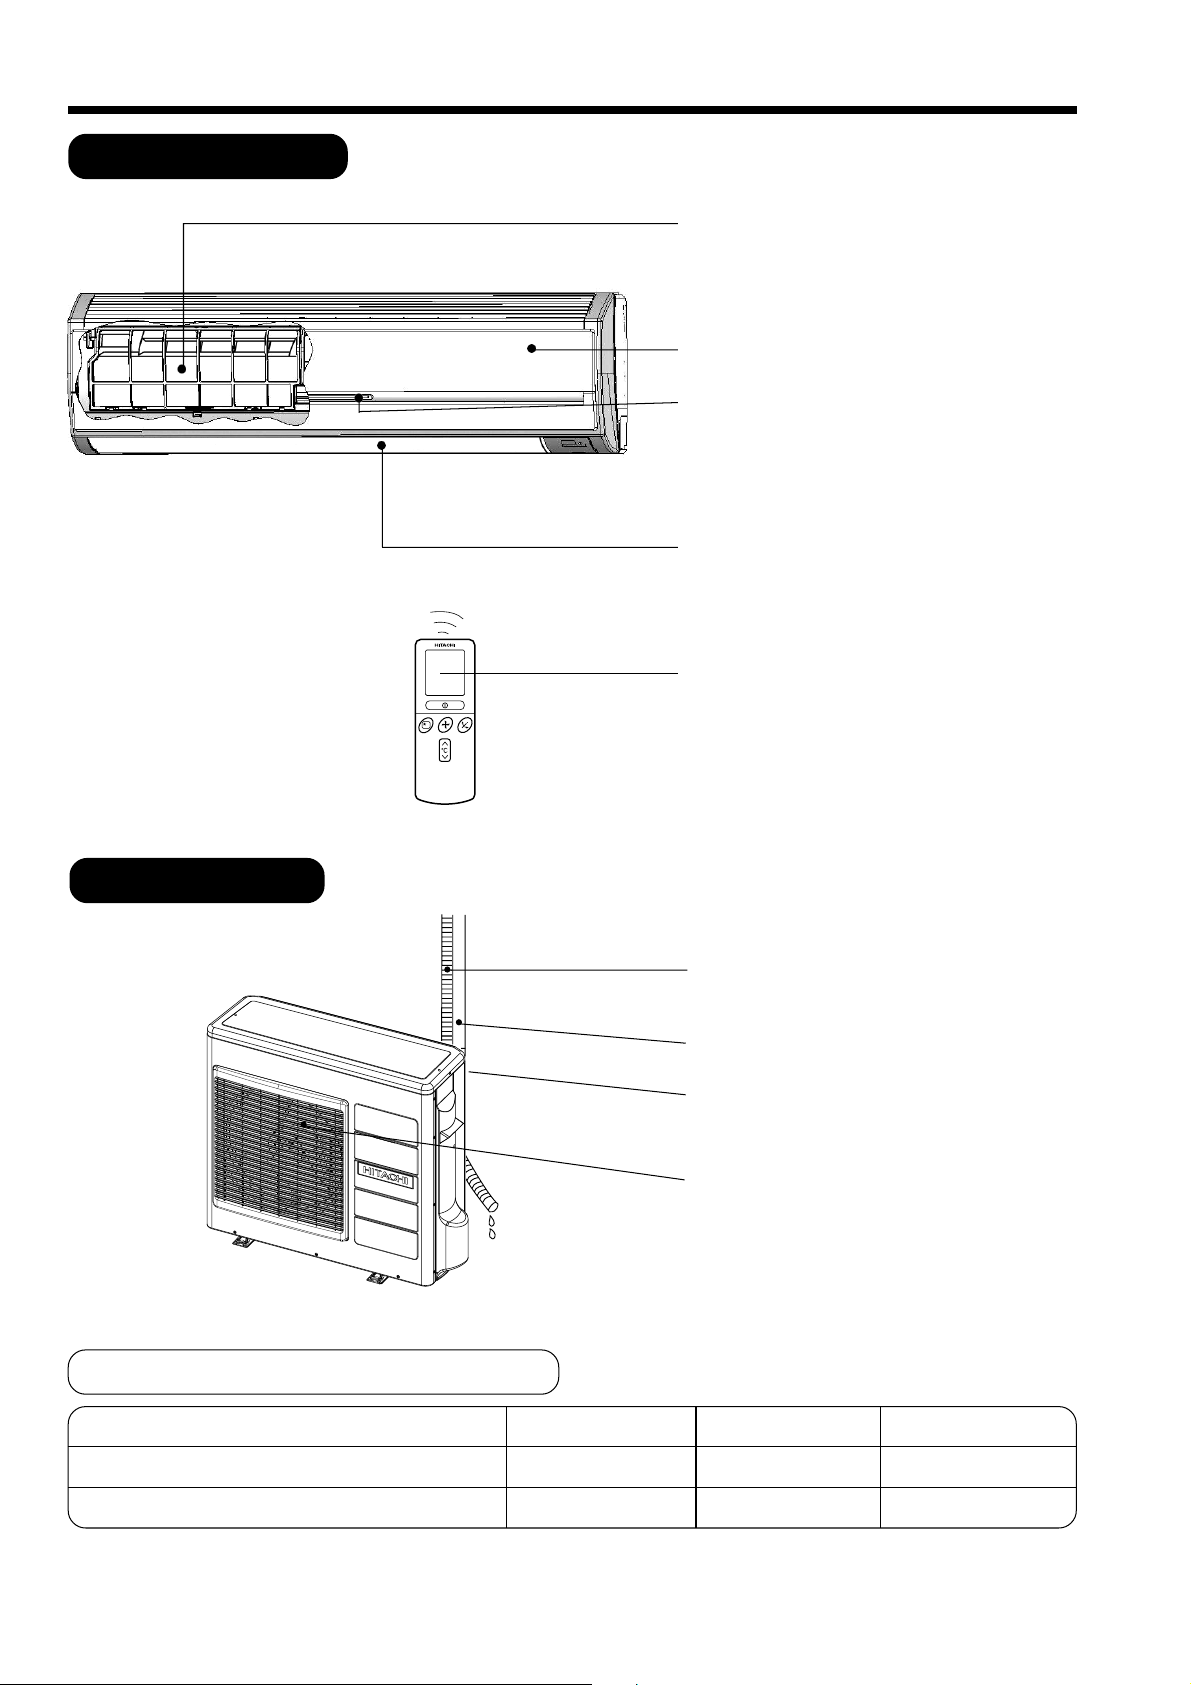
NAMES AND FUNCTIONS OF EACH PART
INDOOR UNIT
AIR FILTER
To prevent dust from coming into the
indoor unit.
(Refer page 21)
FRONT PANEL (AIR INLET).
INDOOR UNIT INDICATORS
Light indicator showing the operating
condition.
(Refer page 5)
OUTDOOR UNIT
HORIZONTAL DEFLECTOR
VERTICAL DEFLECTOR (AIR
OUTLET)
(Refer page 16)
●
REMOTE CONTROLLER
Send out operation signal to the indoor
unit. So as to operate the whole unit.
(Refer page 6)
DRAIN PIPE
Condensed water drain to outside.
CONNECTING CORD
AIR INLET (BACK, LEFT SIDE)
AIR OUTLET
●
MODEL NAME AND DIMENSIONS
MODEL
RAS-30CH7
RAC-30CH7
WIDTH (mm)
1150
850
– 4 –
HEIGHT (mm)
333
800
DEPTH (mm)
245
298
Page 5

OPERATION INDICATOR
TEMPORARY SWITCH
Temporary Switch
Press
Non-conductor Stick
Use this switch to start and stop when the remote
controller does not work. [Use non-conductor stick
(example toothpick)]
● By pressing the temporary switch, the operation is
done in previously set operation mode.
● When the operation is done using the temporary switch
after the power source is turned off and turn on again,
the operation is done in automatic mode.
ENGLISH
INDOOR UNIT INDICATORS
TIMER LAMP
This lamp lights when the timer is working.
OPERATION LAMP
This lamp lights during operation.
FILTER LAMP
When the device is operated for a total of about 200
hours, the FILTER lamp lights to indicate that it is time
to clean the filter. The lamp goes out when the
“ (AUTO SWING)” button is pressed while the
device is on “STANDBY MODE”.
– 5 –
Page 6

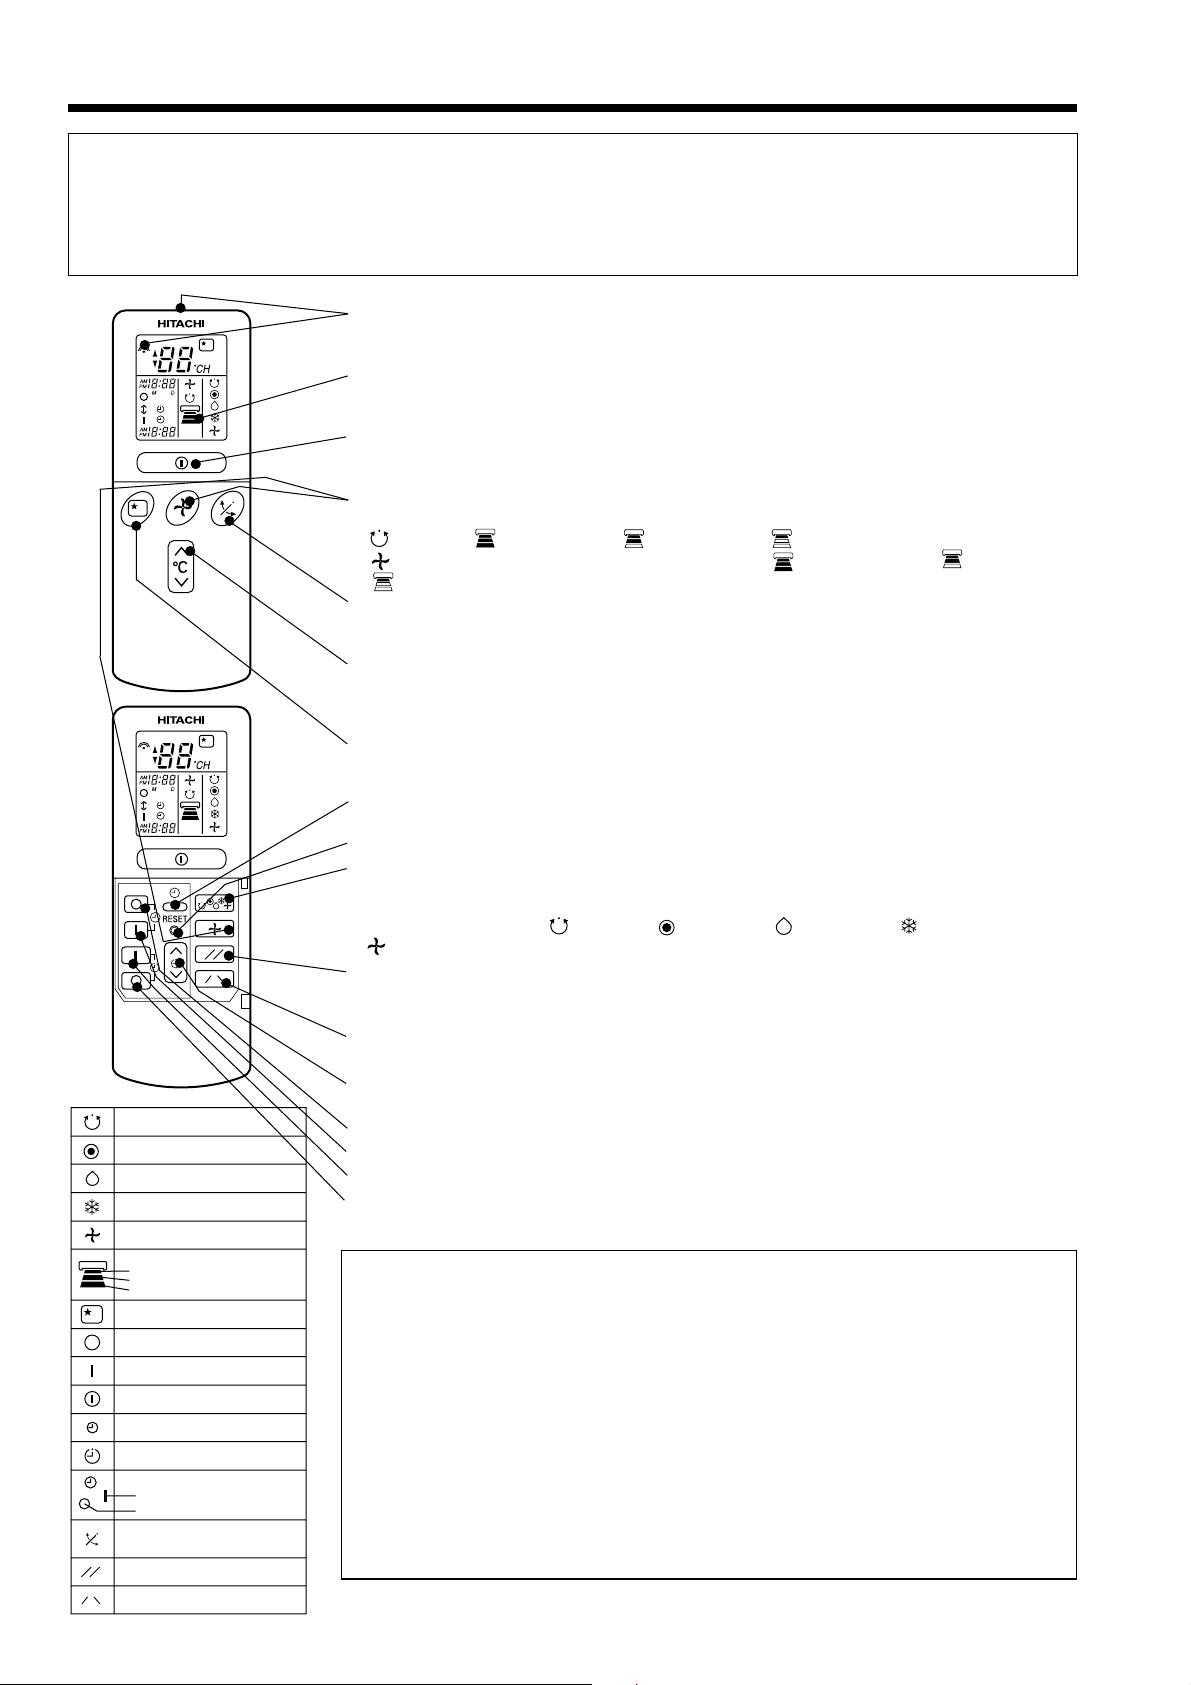
NAMES AND FUNCTIONS OF EACH PART
REMOTE CONTROLLER
This controls the operation of the indoor unit. The range of control is about 7 meters. If indoor lighting
is controlled electronically, the range of control may be shorter.
This unit can be fixed on a wall using the fixture provided. Before fixing it, make sure the indoor unit can
be controlled from the remote controller.
● Signal emitting window/transmission sign
Point this window toward the indoor unit when controlling it.
The transmission sign blinks when a signal is sent.
● Display
This indicates the room temperature selected, current time, timer status,
function and intensity of circulation selected.
● START/STOP button
Press this button to start operation. Press it again to stop operation.
● FAN SPEED selector
This determines the fan speed. Every time you press this button, the intensity
of circulation will change from (AUTO) to (HI) to (MED) to (LOW)
(during the (FAN) mode, from HI to MED to LOW).
● AUTO SWING button
Controls the angle of the horizontal air deflector.
● TEMPERATURE buttons
Use these buttons to raise or lower the temperature setting. (Keep pressed,
and the value will change more quickly.)
● SLEEP button
Use this button to set the sleep timer.
● TIME button
Use this button to set and check the time and date.
● RESET buttons
● FUNCTION selector
Use this button to select the operating mode. Every time you press it,
the mode will change from (AUTO) to (HEAT) to (DEHUMIDIFY) to
(COOL) and to (FAN) cyclically.
● PARALLEL SWING button
Controls the angle of the vertical air deflectors to parallel.
● SYMMETRY SWING button
Controls the angle of the vertical air deflectors to symmetry.
● TIMER control
Use this button to set the timer.
● OFF-TIMER button Select the turn OFF time.
● ON-TIMER button Select the turn ON time.
● RESERVE button Time setting reservation.
● CANCEL button Cancel time reservation.
Precautions for Use
● Do not put the remote controller in the following places.
● In direct sunlight.
● In the vicinity of a heater.
● Handle the remote controller carefully. Do not drop it on the floor,
and protect it from water.
● Once the outdoor unit stops, it will not restart for about 3 minutes
(unless you turn the power switch off and on or unplug the power
cord and plug it in again).
This is to protect the device and does not indicate a failure.
● If you press the FUNCTION selector button during operation, the
device may stop for about 3 minutes for protection.
– 6 –
Page 7

AUTOMATIC OPERATION
The device will automatically determine the mode of operation, HEAT, COOL or DEHUMIDIFY depending on
the initial room temperature. The selected mode of operation will not change when the room temperature
varies.
Press the FUNCTION selector so that the display indicates the (AUTO)
mode of operation.
ENGLISH
RESET
1
START
STOP
■ As the settings are stored in memory in the remote controller, you only have
● When AUTO has been selected, the device will automatically determine
the mode of operation, HEAT, COOL or DEHUMIDIFY depending on
the current room temperature.
Press the (START/STOP) button.
Operation starts with a beep.
Press the button again to stop operation.
to press the (START/STOP) button next time.
You can raise or lower the temperature setting as necessary by maximum of
3°C.
°C
● The preset temperature and the actual room temperature may vary
somewhat depending on conditions.
● The display does not indicate the preset temperature in the AUTO mode.
If you change the setting, the indoor unit will produce a beep.
Press the temperature button and the temperature setting
will change by 1°C each time.
■ Condition of Automatic Operation
Initial room temperature
(approx.)
-
Over 27°C COOL
-
23~27°C
DEHUMIDIFY
-
Under 23°C HEAT
Temperature settingFunction
27°C
Slightly lower than the
room temperature
23°C
– 7 –
FAN SPEED
HI at start, MED or LOW
after the preset temperature
is reached
LOW
HI at start, MED or LOW
after the preset temperature
is reached
Page 8

HEATING OPERATION
● Use the device for heating when the outdoor temperature is under 21°C.
When it is too warm (over 21°C), the heating function may not work in order to protect the device.
Press the FUNCTION selector so that the display indicates
1
2
(HEAT).
Set the desired FAN SPEED with the (FAN SPEED) button
(the display indicates the setting).
(AUTO): The fan speed is HI at first and varies to
MED or LOW automatically when the preset
temperature has been reached.
(HI) : Economical as the room will become warm
quickly.
But you may feel a chill at the beginning.
(MED) : Quiet.
(LOW) : More quiet.
Set the desired room temperature with the TEMPERATURE
buttons (the display indicates the setting).
3
The temperature setting and the actual room temperature may
vary somewhat depending on conditions.
START
STOP
■ As the settings are stored in memory in the remote controller, you only
Press the (START/STOP) button. Heating operation starts
with a beep. Press the button again to stop operation.
have to press the (START/STOP) button next time.
The range of 18-22°C is recommended as the
room temperature for heating.
If the temperature setting is 20°C, the room
temperature will be controlled at around 20°C.
– 8 –
Page 9

DEHUMIDIFYING OPERATION
Use the device for dehumidifying when the room temperature is over 16°C.
When it is under 15°C, the dehumidifying function will not work.
Press the FUNCTION selector so that the display indicates
(DEHUMIDIFY).
1
The FAN SPEED is set at LOW automatically.
The FAN SPEED button does not work.
Set the desired room temperature with the TEMPERATURE
button (the display indicates the setting).
ENGLISH
2
START
STOP
■ As the settings are stored in memory in the remote controller, you
Press the (START/STOP) button. Dehumidifying operation
starts with a beep. Press the button again to stop operation.
only have to press the
°C
The range of 20-26˚C is recommended as
the room temperature for dehumidifying.
(START/STOP) button next time.
■ Dehumidifying Function
When the room temperature is higher than the temperature setting: The device will dehumidify the room,
reducing the room temperature to the preset level.
When the room temperature is lower than the temperature setting: Dehumidifying will be performed at
the temperature setting slightly lower than the current room temperature, regardless of the temperature
setting. The function will stop (the indoor unit will stop emitting air) as soon as the room temperature
becomes lower than the setting temperature.
– 9 –
Page 10

COOLING OPERATION
Use the device for cooling when the outdoor temperature is 21-43°C.
If humidity is very high (over 80%) indoors, some dew may form on the air outlet grille of the indoor unit.
Press the FUNCTION selector so that the display indicates
1
(COOL).
2
3
START
STOP
Set the desired FAN SPEED with the
(the display indicates the setting).
(AUTO): The FAN SPEED is HI at first and varies to
MED or LOW automatically when the preset
temperature has been reached.
(HI) : Economical as the room will become cool
quickly.
(MED) : Quiet.
(LOW) : More quiet.
Set the desired room temperature with the TEMPERATURE
button (the display indicates the setting).
The range of 25-28°C is recommended as the
room temperature for cooling.
If the temperature setting is 27°C, the room
temperature will be controlled at around 27°C.
The temperature setting and the actual room temperature may
vary somewhat depending on conditions.
Press the
with a beep. Press the button again to stop operation. The
cooling function does not start if the temperature setting is
higher than the current room temperature (even though the
(OPERATION) lamp lights). The cooling function will start as
soon as you set the temperature below the current room
temperature.
(START/STOP) button. Cooling operation starts
(FAN SPEED) button
■ As the settings are stored in memory in the remote controller, you
only have to press the
– 10 –
(START/STOP) button next time.
Page 11

FAN OPERATION
You can use the device simply as an air circulator. Use this function to dry the interior of the indoor
unit at the end of summer.
Press the FUNCTION selector so that the display indicates
1
(FAN).
ENGLISH
RESET
2
START
STOP
Press the (FAN SPEED) button.*
Press the (START/STOP) button. Fan operation starts with
a beep. Press the button again to stop operation.
FAN SPEED (AUTO)
For the heating operation
For the cooling operation
.....
When the AUTO fan speed mode is set in the cooling/heating operation:
● The fan speed will automatically change according to the temperature
of discharged air.
● When the difference of room temperature and setting temperature is
large, fan starts to run at HI speed.
● When the room temperature reaches setting temperature, fan speed
changes to LOW automatically.
● When the difference of room temperature and setting temperature is
large, fan starts to run at HI speed.
● After room temperature reaches the preset temperature, the cooling
operation, which changes the fan speed and room temperature to obtain
optimum conditions for natural healthful cooling will be performed.
– 11 –
Page 12

HOW TO SET THE TIMER
RESET
Time, Day, Month
TIME, DAY,
MONTH
After you change the
batteries;
(current time,
day, month)
OFF TIMER
ON TIMER
OFF-Timer
RESERVE
CANCEL
You can set the device to turn off
at the present time.
ON-Timer
● The device will turn on
at the designated times.
Start
M D
STOP
Stop
Start
1
Set the current month and
day with the TIMER control
button.
M D
1
Press the (OFF-TIMER)
button. The (OFF) mark blinks
on the display.
AM
1
Press the (ON-TIMER)
button the (ON) mark blinks
on the display.
AM
3
ON/OFF-Timer
Start Stop
● The device will turn on (off) and off
(on) at the designated times.
● The switching occurs first at the
preset time that comes earlier.
● The arrow mark appearing on the
display indicates the sequence of
switching operations.
1
Press the (ON-OFF)
button so that the (OFF)
mark blinks.
PM
2
Set the turn-off time
with the TIMER control
button.
Press the (RESERVE)
button.
PM
Press the (ON-
TIMER) button so that the
(OFF) mark lights and
the (ON) mark blinks.
PM
AM
How to Cancel Reservation
Point the signal window of the remote controller toward the indoor unit, and press the (CANCEL)
button.
The (RESERVED) sign goes out with a beep and the (TIMER) lamp turns off on the indoor unit.
NOTE
You can set only one of the OFF-timer,
ON-timer and ON/OFF-timer.
– 12 –
Page 13

2
Press the
(TIME) button.
AM
PM PM
2
Set the turn-off time with the
TIMER control button.
3
TIMER control button.
PM
Set the current time with the
Example: The current time is 1:30 p.m.
3
Point the signal window of the remote controller toward the indoor unit, and
press the (RESERVE) button.
The (OFF) mark starts lighting instead of flashing and the sign (RESERVED)
lights. A beep occurs and the (TIMER) lamp lights on the indoor unit.
4
Press the (TIME) button again.
The time indication starts lighting
instead of flashing.
● The time indication will disappear
PM
● To check the current time setting,
ENGLISH
automatically in 10 second.
press the (TIME) button twice.
The setting of the current time is
now complete.
2
Set the turn-on time with the
TIMER control button.
AM
4
Set the turn-on time with the
TIMER control button.
PM
AM
PM
The setting of turn-off time is now complete.
3
Point the signal window of the remote controller toward the indoor unit, and
press the (RESERVE) button.
The (ON) mark starts lighting instead of flashing and the (RESERVED) sign
lights. A beep occurs and the (TIMER) lamp lights on the indoor unit.
Example:
AM
5
Point the signal window of the remote controller toward the indoor unit, and
press the (RESERVE) button.
The (ON) mark starts lighting instead of flashing and the (RESERVED) sign
lights. A beep occurs and the (TIMER) lamp lights on the indoor unit.
PM
AM
The device will automatically turn on earlier so that the preset
temperature can be reached at 7:00 a.m.
The setting of the turn-on time is now complete.
Example:
The device will turn off at 10:30 p.m. and then automatically
turn on earlier so that the preset temperature can be reached
at 7:00 a.m.
The settings of the turn-on/off times are now complete.
Example: The device will turn off at 11:00p.m.
● The timer may be used in three ways: off-timer, on-timer, and ON/OFF (OFF/ON)-timer. Set
the current time at first because it serves as a reference.
● As the time settings are stored in memory in the remote controller, you only have to press
the (RESERVE) button in order to use the same settings next time.
– 13 –
Page 14

HOW TO SET THE SLEEP TIMER
Set the current time at first if it is not set before (see the pages for setting
the current time). Press the (SLEEP) button, and the display changes as
shown below.
Mode
44 44
H
SLEEP
Sleep timer
Sleep Timer: The device will continue working for the designated
number of hours and then turn off.
Point the signal window of the remote controller toward the indoor
unit, and press the SLEEP button.
The timer information will be displayed on the remote controller.
The TIMER lamp lights with a beep from the indoor unit. When the
sleep timer has been set, the display indicates the turn-off time.
H
Sleep
timer
1
Set the ON-timer.
Start
1 hour 2 hours 3 hours 7 hours
The device will be turned off by the sleep
timer and turned on by on-timer.
Indication
Sleep timer off
Example: If you set 3 hours sleep
time at 11:38 p.m., the turn-off
time is 2:38 a.m.
1
2
Press the (SLEEP) button and set the sleep timer.
AM
H
AM
Example:
In this case, the device will turn off
in 2 hours (at 1:38 a.m.) and turn
on early so that the preset
temperature will be almost reached
at 6:00 next morning.
How to Cancel Reservation
Point the signal window of the remote controller toward the indoor unit, and press the (CANCEL)
button.
The (RESERVED) sign goes out with a beep and the (TIMER) lamp turns off on the indoor unit.
– 14 –
Page 15

Explanation of the sleep timer
Sleep
timer set
1 hour
3 hours later
7 hours later
2 hours
later
6 hours
later
The device will control the FAN SPEED and room temperature automatically
so as to be quiet and good for people’s health.
You can set the sleep timer to turn off after 1, 2, 3 or 7 hours. The FAN
SPEED and room temperature will be controlled as shown below.
Operation with the sleep timer
Function Operation
The room temperature will be
controlled 5°C below the
Heating
“ ”
temperature and the FAN
SPEED will be set to LOW
setting 30 minutes after the
setting of the sleep timer.
ENGLISH
Cooling
“ ”
controlled 2°C above the
temperature and the FAN
SPEED will be set to LOW
The room temperature will be
and
setting 1 hour after the setting
of the sleep timer.
dehumidifying
“ ”
Fan
The settings of room temperature and circulation are varied.
“ ”
NOTE
● If date or current time is not set, sleep timer can not be set.
● If you set the sleep timer after the off-, on/off- or off/on-timer has been set, the sleep timer
becomes effective instead of the off-, on/off- or off/on-timer set earlier.
● You can not set other timer during sleep timer operation.
● After sleep timer time is up and when press sleep button again, the sleep timer will be set as
last setting.
● Sleep timer effective only once.
– 15 –
Page 16

ADJUSTING THE AIR DEFLECTOR
1
Adjustment of the conditioned air in the upward and downward
directions.
The horizontal air deflector is automatically set to the proper
angle suitable for each operation. The deflector can be swing
up and down continuously and also set to the desired angle
using the “ (AUTO SWING)” button.
● If the “ (AUTO SWING)” button is pressed once,
the horizontal air deflector swings up and down. If the
button is pressed again, the deflector stops in its current
position. Several seconds (about 6 seconds) may be
required before the deflector starts to move.
● Use the horizontal air deflector within the adjusting range
shown on the right.
● When the operation is stopped, the horizontal air deflector
moves and stops at the position where the air outlet
closes.
Horizontal air deflector
CAUTION
● In “Cooling” operation, do not keep the horizontal and
vertical air deflector swinging for a long time. Some dew
may form on the horizontal and vertical air deflector and
dew may drop.
Adjustment of the conditioned air in the left and right directions.
2
● If the “ (PARALLEL SWING)” button is pressed
once, the vertical air deflectors swing left and right to
parallel. If the button is pressed again, the deflectors
stop in their current position. Several second (about 6
seconds) may be required before the deflectors start to
move.
● If the “ (SYMMETRY SWING) button is pressed
once, the vertical air deflectors swing left and right to
symmetry. If the button is pressed again, the deflectors
stop in their current position. Several seconds (about 6
seconds) may be required before the deflectors start to
move.
● PARALLEL SWING
● SYMMETRY SWING
PARALLEL
SWING
SYMMETRY
SWING
– 16 –
Page 17

HOW TO EXCHANGE THE BATTERIES IN THE REMOTE CONTROLLER
Remove the cover as shown in the figure and take out the
1
old batteries.
Push and pull to the
direction of arrow
=
Install the new batteries.
2
The direction of the batteries should match the marks in the
case.
CAUTION
1. Do not use new and old batteries, or different kinds of batteries
together.
2. Take out the batteries when you do not use the remote
controller for 2 or 3 months.
ENGLISH
– 17 –
Page 18

THE IDEAL WAYS OF OPERATION
Suitable Room Temperature Install curtain or blinds
Warning
Freezing temperature
is bad for health and a
waste of electric power.
Ventilation Effective Usage Of Timer
Caution
Do not close the room for a long period of
time. Occasionally open the door and windows
to allow the
entrance of
fresh air.
It is possible to
reduce heat
entering the
room through
windows.
At night, please use the “sleep timer operation
mode”, together with your wake up time in the
morning. This will enable you to enjoy a
comfortable room temperature. Please use the
timer effectively.
Do Not Forget To Clean The Air Filter
Dusty air filter will reduce the air volume and
the cooling efficiency. To prevent from wasting
electric energy, please clean the filter every 2
weeks.
Please Adjust Suitable Temperature
For Baby And Children
Please pay attention to the room temperature
and air flow direction when operating the unit
for baby, children and old folks who have
difficulty in movement.
– 18 –
Page 19

FOR USER’S INFORMATION
OFF
The Air Conditioner And The Heat Source In The Room
Caution
If the amount of heat in the room is above the cooling
capability of the air conditioner (for example: more
people entering the room, using heating equipments
and etc.), the preset room temperature cannot be
achieved.
Not Operating For A Long Time
When the indoor unit is not to be used for a long
period of time, please switch off the power from the
mains. If the power from mains remains “ON”, the
indoor unit still consumes about 8W in the operation
control circuit even if it is in “OFF” mode.
When Lightning Occurs
ENGLISH
Warning
To protect the whole unit during lightning, please
stop operating the unit and remove the plug from the
socket.
UV-LED
UV-LED will be “ON” when the START/STOP button is pressed. Light UV glare is visible when the UVLED is “ON” and this is normal (not malfunction).
Interference From Electrical Products
Caution
To avoid noise interference, please place the indoor
unit and its remote controller at least 1m away from
electrical products.
To prevent
interference,
place at least
1m away.
Inverter-type
fluorescent
lamp.
TV
– 19 –
Page 20

ATTACHING THE AIR CLEANSING FILTERS
CAUTION
Cleaning and maintenance must be carried out only by qualified service personal. Before cleaning,
stop operation and switch off the power supply.
1
2
3
Open the front panel.
● Pull up the front panel by holding it at both sides
with both hands.
Remove the filter.
● Push upward to release the claws and pull out the
filter.
Attaching the air cleansing filters to the filter.
● Attach the air cleansing filters to the frame by gently
compress its both sides and release after insertion
into filter frame.
CAUTION
Claws
(4 places)
Do not bend the air cleansing
filter as it may cause damage
to the structure.
4
Attach the filters.
● Attach the filters by ensuring that the surface written
“FRONT” is facing front.
● After attaching the filters, push the front panel at
three arrow portion as shown in figure and close it.
NOTE
● In case of removing the air cleansing filters, please follow the above procedures.
● The cooling capacity is slightly weakened and the cooling speed becomes slower when the air
cleansing filters are used. So, set the fan speed to "HIGH" when using it in this condition.
● Air cleansing filters are washable and reusable up to 20 times by using vacuum cleaner or water rinse
under running tap water. Type number for this air cleansing filter is <SPX-CFH19>. Please use this
number for ordering when you want to renew it.
● Do not operate the air conditioner without filter. Dust may enter the air conditioner and fault may occur.
– 20 –
Page 21

MAINTENANCE
CAUTION
Cleaning and maintenance must be carried out only by qualified service personal. Before cleaning,
stop operation and switch off the power supply.
1. AIR FILTER
Clean the air filter, as it removes dust inside the room. In case the air filter is full of dust, the air flow
will decrease and the cooling capacity will be reduced. Further, noise may occur. Be sure to clean the
filter following the procedure below.
PROCEDURE
ENGLISH
1
2
3
Open the front panel and remove the filter
● Gently lift and remove the air cleansing filter
from the air filter frame.
Vacuum dust from the air filter and air cleansing
filter using vacuum cleaner. If there is too much
dust, rinse under running tap water and gently
brush it with soft bristle brush. Allow filters to
dry in shade.
● Re-insert the air cleansing filter to the filter
frame. Set the filter with “FRONT” mark facing
front, and slot them into the original state.
● After attaching the filters, push the front panel
at three arrow portions as shown in figure
and close it.
NOTE:
● Air cleansing filter should be cleaned every month or sooner if noticeable loading occurs. When used
overtime, it may loose its deodorizing function. For maximum performance, it is recommended to
replace it every 3-6 months depending on application requirements.
CAUTION
● Do not wash with hot water at more than 40°C. The filter may shrink.
● When washing it, shake off moisture completely and dry it in the shade; do not expose it directly to
the sun. The filter may shrink.
● Do not use detergent on the air cleansing filter as some detergent may deteriorate the filter electrostatic
performance.
– 21 –
Page 22

2. Washable Front Panel
● Remove the front panel and wash with clean
water.
Wash it with a soft sponge.
After using neutral detergent, wash thoroughly
with clean water.
● When front panel is not removed, wipe it with
a soft dry cloth. Wipe the remote controller
thoroughly with a soft dry cloth.
● Wipe the water thoroughly.
If water remains at indicators or signal
receiver of indoor unit, it causes trouble.
Method of removing the front panel.
Be sure to hold the front panel with both hands
to detach and attach it.
Removing the Front Panel
● When the front panel is fully opened with
both hands, push the right arm to the inside
to release it, and while closing the front panel
● Move the projections of the left and right
arms into the Flanges in the unit and
securely insert them into the holes.
Attaching the Front Panel
slightly, put it out forward.
CAUTION
● Do not splash or direct water to the body of the unit when cleaning
it as this may cause short circuit.
● Never use hot water (above 40°C), benzine, gasoline, acid, thinner or
a brush, because they will damage the plastic surface and the coating.
Hole
Flange
Projection
– 22 –
Page 23

Air
Blow
CAUTION
Cleaning and maintenance must be carried out only by qualified service personal. Before cleaning,
stop operation and switch off the power supply.
3. MAINTENANCE AT BEGINNING OF LONG OFF PERIOD
● Run the unit by setting the operation mode to
(COOL), the temperature to 32°C and the fan speed
to HI for about half a day on a fine day, and dry the
whole of the unit.
● Switch off the power plug.
Note :
If the supply cord is damaged, it must be replaced by the manufacturer, its service agent or similarly
qualified persons in order to avoid a hazard.
ENGLISH
REGULAR INSPECTION
PLEASE CHECK THE FOLLOWING POINTS BY QUALIFIED SERVICE PERSONAL EITHER
EVERY HALF YEARLY OR YEARLY. CONTACT YOUR SALES AGENT OR SERVICE SHOP.
1
2
3
Confirm
Is the earth line disconnected or broken?
Is the mounting frame seriously affected by rust and is the
outdoor unit tilted or unstable?
Is the plug of power line firmly plugged into the socket?
(Please ensure no loose contact between them).
– 23 –
Page 24

AFTER SALE SERVICE AND WARRANTY
WHEN ASKING FOR SERVICE, CHECK THE FOLLOWING POINTS.
CONDITION
When it does not operate
When it does not cool well
When it does not hot well
Notes
● In quiet operation or stopping the operation, the following phenomena may
● The odor will possibly be emitted from the room air conditioner because the
CHECK THE FOLLOWING POINTS
● Is the fuse all right?
● Is the voltage extremely high or low?
● Is the circuit breaker “ON”?
● Was the air filter cleaned?
● Does sunlight fall directly on the outdoor unit?
● Is the air flow of the outdoor unit obstructed?
● Are the doors or windows opened, or is there any source of
heat in the room?
● Is the set temperature suitable?
occassionally occur, but they are not abnormal for the operation.
(1) Slight flowing noise of refrigerant in the refrigerating cycle.
(2) Slight rubbing noise from the fan casing which is cooled and then
gradually warmed as operation stops.
various odor, emitted by smoke, foodstuffs, cosmetics and so on, sticks to it.
So the air filter and the evaporator regularly must be cleaned to reduce the
odor.
●
Please contact your sales agent immediately if the air conditioner still fails to operate normally after the above
inspections. Inform your agent of the model of your unit, production number, date of installation. Please also
inform him regarding the fault.
●
Power supply shall be connected at the rated voltage, otherwise the unit will be broken or could not reach the
specified capacity.
– 24 –
Page 25

CAUTION: (Model RAS-30CH7/RAC-30CH7)
This unit is intend for operating at a power supply network with a system impedance of maximum 0.18+j0.11
Ohm at the house main power supply connection point.
The user has to make sure, that the unit will be operated only at a power supply network under this
condition. The power supply company will be able to inform you about the connection conditions.
Please note:
On switching on the equipment, particularly when the room light is dimmed, a slight brightness fluctuation
may occur. This is of no consequence.
The conditions of the local Power Supply Companies are to be observed.
Note
● Avoid to use the room air conditioner for cooling operation when the outside temperature is below
21°C (70°F).
The recommended maximum and minimum operating temperatures of the hot and cold sides
should be as below:
Cooling Heating
Minimum Maximum Minimum Maximum
Indoor
Dry bulb °C21 32 20 27
Wet bulb °C15 23 12 19
Outdoor
Dry bulb °C21 43 2 21
Wet bulb °C15 26 1 15
MEMO
ENGLISH
.....................................................................................................................................................................................
.....................................................................................................................................................................................
.....................................................................................................................................................................................
.....................................................................................................................................................................................
.....................................................................................................................................................................................
.....................................................................................................................................................................................
.....................................................................................................................................................................................
.....................................................................................................................................................................................
.....................................................................................................................................................................................
.....................................................................................................................................................................................
.....................................................................................................................................................................................
.....................................................................................................................................................................................
.....................................................................................................................................................................................
.....................................................................................................................................................................................
.....................................................................................................................................................................................
.....................................................................................................................................................................................
.....................................................................................................................................................................................
.....................................................................................................................................................................................
.....................................................................................................................................................................................
– 25 –
Page 26

MEMO
.....................................................................................................................................................................................
.....................................................................................................................................................................................
.....................................................................................................................................................................................
.....................................................................................................................................................................................
.....................................................................................................................................................................................
.....................................................................................................................................................................................
.....................................................................................................................................................................................
.....................................................................................................................................................................................
.....................................................................................................................................................................................
.....................................................................................................................................................................................
.....................................................................................................................................................................................
.....................................................................................................................................................................................
.....................................................................................................................................................................................
.....................................................................................................................................................................................
.....................................................................................................................................................................................
.....................................................................................................................................................................................
.....................................................................................................................................................................................
.....................................................................................................................................................................................
.....................................................................................................................................................................................
.....................................................................................................................................................................................
.....................................................................................................................................................................................
.....................................................................................................................................................................................
.....................................................................................................................................................................................
.....................................................................................................................................................................................
.....................................................................................................................................................................................
.....................................................................................................................................................................................
.....................................................................................................................................................................................
.....................................................................................................................................................................................
.....................................................................................................................................................................................
.....................................................................................................................................................................................
.....................................................................................................................................................................................
.....................................................................................................................................................................................
.....................................................................................................................................................................................
.....................................................................................................................................................................................
.....................................................................................................................................................................................
.....................................................................................................................................................................................
.....................................................................................................................................................................................
.....................................................................................................................................................................................
.....................................................................................................................................................................................
– 26 –
Page 27

СПЛИТ СИСТЕМА НАСТЕННОГО ТИПА
ВНУТРЕННИЙ БЛОК / НАРУЖНЫЙ БЛОК
МОДЕЛЬ
RAS-30CH7/RAC-30CH7
РУССКИЙ
HАРУЖНЫЙ БЛОК
RAC-30CH7
Instruction manual
To obtain the best performance and ensure years of trouble free use, please read this instruction manual completely.
ВНУТРЕННИЙ БЛОК
RAS-30CH7
Page 1~26
Инструкция по эксплуатации
Для обеспечения наилучших эксплуатационных характеристик и многолетней безотказной работы оборудования
необходимо ознакомиться с данной Инструкцией по эксплуатации.
– 27 –
стр. 27~52
Page 28

УКАЗАНИЯ ПО ТЕХНИКЕ БЕЗОПАСНОСТИ
!
●
Перед эксплуатацией устройства необходимо тщательно изучить данные “Указания по технике безопасности”, утобы обеспечить
правильное использование устройства.
●
Следует обратить особое внимание на указания “ Предупреждение” и “ Осторожно”. Разделы “Предупреждение”
содержат положения, которые при отсутствии их строгого соблюдения могут привести к смертельным случаям или серьезным
повреждениям. Разделы “Осторожно” содержат положения, которые в случае их неправильного выполнения могут вызвать
серьезные последствия. Для обеспечения безопасности необходимо строго выполнять все приведенные инструкции.
●
Символы обозначают следующее:
Убедитесь, что подклюючено заземление.
Обозначает инструкции, обязательные для выполнения.
●
После прочтения данную инструкцию необходимо сохранить.
ТЕХНИКА БЕЗОПАСНОСТИ ПРИ МОНТАЖЕ
●
Не вносите изменения в конструкцию устройства.
При попытке самостоятельно внести изменения в конструкцию устройства может
произойтн утечка воды, отказы, короткое замыкание или воспламенение.
●
!
ПРЕДУПРЕЖДЕНИЕ
!
ОСТОРОЖНО
Для монтажа устройства необходимо обратиться к Вашему торговому агенту или к
квалифицированному техническому специалисту. Результатом самостоятельного
монтажа устройства может явиться утечка воды, короткое замыкание или пожар.
●
Обязательно использовать заземляющий провод. Запрещается прокладывать
заземляющий провод поблизости от водопроводов и газопроводов, громоотводов,
а также вблизи заземляющих проводов телефонных линий. Неправильное
заземление может привести к электрическому удару.
●
Установка выключателя электроэнергии осуществляется в зависимосуи от
местонахождения устройства. При отсутствии выключателя электроэнергии
существует опасность электрического удара.
●
Запрещается монтаж устройств вблизи мест наличия горючих газов. Возможно
возгорание наружного блока при наличии утечки горючего газа в месте его
расположения.
●
При монтаже шланга отвода воды слвдует обеспечить безпрепятственный поток воды.
!
Этот символ обозначает запрещенные действия.
ТЕХНИКА БЕЗОПАСНОСТИ ПРИ ПЕРЕМЕЩЕНИИ И ТЕХОБСЛУЖИВАНИИ
●
При возникновении неординарной ситуации (такой, как запах горения) прекратите пользоваться
прибором и отключите прерыватель. Обратитесь в Вашу сервисную службу. Продолжение
эксплуатации прибора в неординарной ситуации может привести к поломке, короткому
замыканию или возгоранию.
●
!
ПРЕДУПРЕЖДЕНИЕ
При необходимости технического обслуживания обратитесь в Вашу сервисную службу.
Результатом неквалифицированного технического обслуживания, проведенного собственными
силами, может явиться электрический удар или возгорание.
●
При необходимости демонтажа и повторного монтажа устройства обратитесь в Вашу
сервисную службу. Результатом неквалифицированного демонтажа и повторного монтажа,
проведенного собственными силами, может явиться электрический удар или возгорание.
●
Если шнур поставкы поврежден, то оно должно быть заменено специальным шнуром
достижимым на утверженные центры service/parts
ТЕХНИКА БЕЗОЛАСНОСТИ В ХОДЕ ЭКСПЛУАТАЦИИ
●
!
П
Р
Е
Д
У
П
Р
Е
Ж
Д
Е
Н
И
Е
Для сохранения здоровья следует избегать длительное время находиться под действием
воздушного потока.
●
Не введите перст, штанга или другие предметы в выход или вход воздуха. По мере того как
вентилятор вращающ на high speed, оно причинит ушиб. Перед очищать, будьте уверено
остановить деятельность и поворачивает выключатель.
●
Запрещается использовать любые токопроводящие элементы в качестве
плавкого предохранителя, так как это может привест к несчастному спучаю.
●
ВЫКЛЮЧИТЬ
●
Этот блок имеет UV led дает ультра лиловый свет.
ИЗБЕГИТЕ СРАЗУ ВЫДЕРЖКИ ГЛАЗА.
Во время грозы выньте штепсель из розетки или выключите прерыватель электроцепи.
ВЫКЛЮЧИТЬ
– 28 –
Page 29

ВЫКЛЮЧИТЬ
О
С
О
О
Ж
Н
О
ТЕХИКА БЕЗОПАСНОСТИ В ХОДЕ ЭКСПЛУАТАЦИИ
●
Эксплуатация изделия разрешается только в соответствии со спецификацией
изготовителя, использование изделия для любых других целей запрещено.
●
Зaпрещается работать с изделием мокрыми руками, эуо может привести к
несчастному случаю.
●
При эксплуатации изделия совместно с устройствами горения необходимо
регулярно проветривать помещение, чтобы избежать явлений недостатка
кислорода.
●
Запрещается направлять струю холодного гоздуха, идущую от панели
кондиционера, непосредственно на находящиеся внутри помещения
нагревательные приборы, так как это может отрицательным образом повлиять
на работу этих приборов, например,электрического котла,печи и т.п.
●
Необходимо обеспечить постоянную стабильность,прочность и
бездефектность монтажной рамы наружнего блока. В противном случае
может произойти падение наружного блока с опасными последствиями.
●
Запрещается попадание брыэг и прямых струй воды на корпус устройства при
его очистке, так как это может вызвать короткое замыкание.
●
Не используйте любой аэрозоль или аэрозоли волос около внутренней
единицы. Этот химикат может прилипнуть к пластине обменника высокой
!
температуры и блокировать поток воды испарения дренирующей поддон.
Вода опустится на тангенциальный вентилятор и способствует разлитию воды
из внутренней единицы.
●
Т
При чистке прнбора сначала выключите его и отключите прерыватель
электроцепи-скоростной вентилятор внутри прибора может представлять
Р
ВЫКЛЮЧИТЬ
●
Выключите прерыватель электроцепи, если прибор не эксплуатируется в течение
опасность.
длительного времени.
РУССКИЙ
●
Запрещается залезать на наружный блок и ставить на него какие-либо
предметы.
●
Запрещается ставить на внутренний блок емкости с водой (например,
цветочные вазы), чтобы предотвратить попадание капель воды в устройство.
Вода может повредить изоляцию внутри устройства, следствием чего станет
короткое замыкание.
●
Не размещать комнатные растения непосредственно под струей воздуха, так
как это оказывает отрицательное действие на растения.
●
Если устройство работает при открытой двери и открытом окне (влажность воздуха в помещении
всегда превышает 80%), и в случае, если воздушный дефлектор направлен вниз или автоматически
перемещается в течении длительного периода времни, на воздушном дефпекторе могут образоваться
капли воды, которые могут падать вниз, Это приведет к намоканию Вашей мебели. В связи с этим
не следует эксплуатировать устройство в подобных условиях в течении длительного времени.
●
Если количество теплоты в помещении превышает охлаждающую способность устройства (например,
при большом количестве людей в помещении, при работающих нагревательных приборах и т.д.),
установленная температура в помещении не может быть достигнута.
●
Этих Приборов не предназначены для использования маленькими детьми или слабыми людьми,
если они соответственно не контролировались ответственным человеком, чтобы гарантировать, что
они могут использовать прибор благополучно.
●
Маленьких детей должны контролироваться, чтобы гарантировать, что они не играют с прибором.
– 29 –
Page 30
НАИМЕНОВАНИЯ И Ф УНКЦИИ КАЖДОГО УЗЛА
ВНУТРЕННИЙ БЛОК
ВОЗДУШНЫЙ ФИЛЬТР
Предотвращает попадание пыли во
внутренний блок.
(смотри стр. 47)
Передняя панель (ВХОД ВОЗДУХА)
ИНДИКАТОРЫ ВНУТРЕННЕГО
БЛОКА
Световой индикатор, показывающий
условия работы.
(смотри стр. 31)
ГОРИЗОНТАЛЬНЫЙ ОТРАЖАТЕЛЬ
• ВЕРТИКАЛНЫЙ ОТРАЖАТЕЛЬ
ВЫХОД ВОЗДУХА)
(смотри стр. 42)
НАРУЖНЫЙ БЛОК
●
ДИСТАНЦИОННЫЙ РЕГУЛЯТОР
Посылает тиналы управления
работой внутреннего блока, а также
для работы всей системы.
(смотри стр. 32)
ДРЕНАЖНАЯ ТРУБКА
Сток сконденсированной воды.
СОЕДИНИТЕЛЬНЫЙ ПРОВОД
ВХОД ВОЗДУХА
(СЗАДИ, ЛЕВАЯ СТОРОНА)
ВЫХОД ВОЗДУХА
НАИМЕНОВАНИЕ МОДЕЛИ И РАЗМЕСЫ
ШИРИНА (мм)МОДЕЛЬ ВЫСОТА (мм)
RAS-30CH7
RAC-30CH7
1150
850
– 30 –
333
800
ТОЛЩИНА (мм)
245
298
Page 31

ИНДИКАТОР РАБОТЫ
ВРЕМЕННЫЙ ПЕРЕКЛЮЧАТЕЛЬ
Temporary Switch
ИНДИКАТОРЫ ВНУТРЕННЕГО БЛОКА
Press
Non-conductor Stick
Используйте этот переключатель для начала работы
и остановки, когда дистанционный регулятор не
действует. [Используйте не проводящую
электричество палочку (например, зубочистку)]
● При нажатии временного переключателя
кондиционер будет работать в ранее
установленном режиме.
● В случае использования временного
переключателя после отключения и повторного
включения электропитания кондиционер работает
в втоматическои режиме.
РУССКИЙ
ТАЙМЕРНАЯ ЛАМПА
Эта лампа горит, когда работает таймер.
КОНТРОЛЬНАЯ ЛАМПА
Эта лампа горит во время работы устройства.
ЛАМПА ФИЛЬТРА
Когда прибор работает в общем более чем примерно
200 часов, загорается лампа FILTER (ФИЛЬТР) для
индикации того, что настало время очистки фильтра.
Светильник идет вне когда АВТОМАТИЧЕСКАЯ
КНОПКА КАЧАНИЯ отжата пока приготовьте режим
дальше.
– 31 –
Page 32
НАИМЕНОВАНИЕ И ФУНКЦИИ ОТДЕЛЬНЬІХ У3ЛОВ
ПУЛЬТ ДИСТАНЦИОННОГО УПРАВЛЕНИЯ (ДУ)
Осуществляет управление внутренним блоком. Радиус действия около 7 метров. Если освещение в
помещении также имеет дистанционный контролъ, радиус действия может быть меньше.
Этот пульт может быть закреплен на стене с помощью прилагаемого крепежа. Перед закреплением
убедитесь, что с помощью пульта ДУ можно управлять внутренним блоком.
● Oкно испускания сигнала/индикатор передачи сигнала
Для передачи команды внутреннему блоку необxодимо направить данное окно на
внутренний блок. При передаче сигнала происxодит мигание индикатора.
● Дисплей
На дисплей выводится заданное значение температуры в помещении, текущее время,
статус таймера, а также выбранная функция и интенсивность циркуляции воздуxа.
● Клавиша СТАРТ/СТОП
Hажать кнопку для запуска рабочего режима. При повторном нажатии рабочий
режим прекращается.
● Данный переключатель задает скорость вращения вентилятора. При каждом нажатии
данного переключателя интенсивность вращения снижается в последовательности
(ABTO) – (BЫСОКАЯ) – (CPEДНЯЯ) – (НИеКАЯ) (при раАоте В режиме
(BEHTИЛЯЦИЯ) B послеЋоВaтел Cности ВЫСОКАЯ – СРЕДНЯЯ –
НИеКАЯ).
● Клавиша АВТОМАТИЧЕСКИЙ ПОВОРОТ
Данная клавиша осуществляет регулирование угла направления горизонтального
дефлектора воздуха.
● Клавиши ТЕМПЕРАТУРА
C помощью данных клавиш осуществляется увеличение и уменьшение
устанавливаемых значений температуры. (Держать нажатыми для ускоренного
изменения устанавливаемых значений.)
● Клавиша 3АДЕРЖКА ОТКЛЮЧЕНИЯ
Данная кнопка используется для установки таймера для функции задержки
отключения.
● Кнопка ВРЕМЯ
Данная кнопка применяется для установки и проверки текущего времени.
● Кнопки CБРОС
● Переключатель ФУНКЦИЯ
Посредством данного переключателя производится выбор рабочего режима. При
каждом нажатии переключателя происходит переключение режима в циклической
последовательности (ABTO) – HAГРЕВ – (CУШКА) – (ОХЛАЖДЕНИЕ) –
(ВЕНТИЛЯЦИЯ).
● ПАРАЛЛЕЛЬНАЯ кнопка КОЛЕБАНИЕ
Управляет углом вертикальных воздушных дефлекторов, чтобы быть
параллельный.
● Кнопка кнопка СИММЕТРИИ
Управляет углом вертикальных воздушных дефлекторов к симметрии.
● Клавиши управления таймером
АВТО
НАГРЕВ
СУШКА
ОХЛАЖДЕНИЕ
ВЕНТИЛЯЦИЯ
СКОРОСТЬ ВЕНТИЛЯТОРА
НИЗКАЯ
СРЕДНЯЯ
ВЫСОКАЯ
ЗАДЕРЖКА ОТКЛЮЧЕНИЯ
СТОП (ОТМЕНА)
СТАРТ (РЕЗЕРВ)
СТАРТ / СТОП
ВРЕМЯ
УСТАНОВКА ТАЙМЕРА
ПЕРЕКЛЮЧАТЕЛЬ ТАЙМЕРА
ТАЙМЕР ВКЛЮЧЕНИЯ
ТАЙМЕР ВЫКЛЮЧЕНИЯ
АВТО КОЛЕБАНИЕ
(ГОРИЗОНТАЛЬНЫЙ ДЕФЛЕКТОР)
ПАРАЛЛЕЛЬНОЕ КОЛЕБАНИЕ
КОЛЕБАНИЕ СИММЕТРИИ
Данные клавиши используются для настройки значений таймера.
● Клавиша ТАЙМЕР ВЫКЛЮЧЕНИЯ Задает время выключения.
● Клавиша ТАЙМЕР ВКЛЮЧЕНИЯ Задает время включения.
● Клавиша РЕЗЕРВ У становка продолжительности времени остановки в работе.
● Kлавиша ОТМЕНА Отмена установки продолжительности времени остановки в
работе.
Меры безопасности при эксплуатации
● Запрещается помещать пульт дистанционного управления.
● под действие прямых солнечных лучей
● вблизи от нагревательных устройств.
● Обращаться с пультом дистанционного управления осторожно. Не бросать его на
пол и не допускать попадания воды.
● После прекращения работы наружнего блока повторный его запуск в работу
возможен лишь спустя примерно 3 минуты (это не распространяется на выключение
и включение устройства посредством выключателя электропитания, а также на
случай, если шнур сетевого питания был вынут из розетки, а затем вставлен
обратно.) Данное время задержки предназначено для предохранения устройства и
не свидетельствует о неисправности.
● В случае, если во время работы устройства был задействован переключатель
ФУНКЦИЯ, может произойти прекращение работы устройства примерно на 3 минуты
для его предохранения.
– 32 –
Page 33

АВТОМАТИЧЕСКИЙ РЕЖИМ РАБОТЫ
В данном режиме устройство автоматически устанавливает робочий режим-НАГРЕВ, ОХЛАЖДЕНИЕ
или Сушка в зависимости от начальной температуры в помещении. Выбранный режим работы при
изменении температуры в помещении не меняется
Задействовать переключатель ФУНКЦИЯ, чтобы на дисплее появился
символ режима АВТО .
RESET
1
СТАРТ
СТОП
■ Tак как установленные значения записываются в память пульта
● При выборе режима АВТО (AUTO) устройство автоматически
определяет режим работы, НАГРЕВ, ОХЛАЖДЕНИЕ или Сушка, в
зависимости от температуры в помещении.
Нажать клавишу (СТАРТ/СТОП).
Кондиционер начнет работать, издав звуковой сигнал.
Для прекращения работы повторно нажать данную клавишу.
дистанционного управления, в следующий раз Вам необходимо лишь нажать
клавишу (СТАРТ/СТОП).
Имеется возможность при необходимости увеличить или уменьшить
установленное значение температуры максимум на 3°C.
°C
● Реальная температура в помещении может несколько отличаться от
установленного значения температуры в зависимости от условий.
● В режиме АВТО установленное значение температуры на дисплей не
выводится. При изменении установленного значения внутренний блок
издает звуковой сигнал.
Нажмите кнопку установки температуры, значение
будет изменяться на 1°C с каждым нажатием.
РУССКИЙ
■ УСЛОВИЯ АВТОМАТИЧЕСКОГО РЕЖИМА РАБОТЫ
НАЧАЛЬНАЯ КОМН.
ТЕМПЕРАТУРА (ПРИБЛ.)
РАБОЧАЯ
ОПЕРАЦИЯ
УСТАНОВЛЕННАЯ
ТЕМПЕРАТУРА
-
Свыше 27°C ОХЛАЖДЕНИЕ
-
23 ~ 27°C
СУШКА
Несколько ниже
комн. Температуры
27°C
-
Ниже 23°C НАГРЕВ 23°C
– 33 –
СКОРОСТЬ
ВЕНТИЛЯТОРА
ВЫСОКАЯ вначале,
или НИЗК
достижения установленной
темп-ры
ВЫСОК вначале, СРЕДН или
НИЗК после достижения
установ температуры
после
НИЗКАЯ
СРЕДН
Page 34

РЕЖИМ НАГРЕВА
● Используйте устройство для отопления, когда температура на улице ниже 21°C.
Когда слишком тепло (выше 21°C), функция нагрева может отключаться, чтобы
защитить устройство от повреждения.
Задействовать переключатель ФУНКЦИЯ, чтобы на дисплее
1
появился символ режима НАГРЕВ .
Посредством клавиши (СКОРОСТЬ ВЕНТИЛЯТОРА)
установить желаемое значение СКОРОСТИ ВЕНТИЛЯТОРА
(установленное значение будет показано на дисплее).
2
3
(ABTO) :
(ВЫСОКАЯ) : Экономичный режим, так как
(СРЕДНЯЯ) : Медленное вращение.
(НИЗКАЯ) : Eще более медленное вращение.
С помоНРХ клаВим ТЕМПЕРАТУРА устаноВитС желаемуХ С
помощью клавиш ТЕМПЕРАТУРА установить желаемую
температуру в помещении (установленное значение бтдет
показано на дисплее).
CKOPOCTЬ BEHTNЛЯТОРА вначале
устанавливается на режим
ВЫСОКАЯ, а после достижения
установленного значения температуры
автоматически меняется на режим
или
СРЕДНЯЯ
помещение достаточно быстро
нагревается. Однако на начальной
стадии может возникнуть ощущение
холода.
В качестве устанавливаемого значения
температуры в помещении в режиме
нагрева рекомендуется диапазон 18-22°C.
При установленном значении температуры
20°C температура в помещении будет
поддерживаться на уровне около 20°C.
НИЗКАЯ.
Pеальная температура в помещении может несколько
отличаться от установленного значения температуры в
зависимости от условий.
СТАРТ
СТОП
■ Tак как установленные значения записываются в память пульта
Нажать клавишу (СТАРТ / СТОП). Кондиционер начнет
работать, издав звуковой сигнал. Для прекращения работы
повторно нажать данную клавишу.
дистанционного управления, в следующий раз Вам необходимо
лишь нажать клавишу (СТАРТ/СТОП).
– 34 –
Page 35

РЕЖИМ СУШКИ
Режим сушки следует использовать при температуре в помещении свыше 16°C.
При температуре в помещении ниже 15°C режим сушки не работает.
Задействовать переключатель ФУНКЦИЯ, чтобы на дисплее
появился символ режима (ВЛАЖНОСТЬ).
1
2
CKOPOCTЬ BEHTИЛЯTOPA будет автоматически
установлена на режим НИЗКАЯ.
Клавиша CKOPOCTЬ BEHTИЛЯTOPA в данном случае не
работает.
С помоНРХ клаВим ТЕМПЕРАТУРА устаноВитС желаемуХ
С помощью клавиш ТЕМПЕРАТУРА установить желаемую
температуру в помещении (установленное значение бтдет
показано на дисплее).
РУССКИЙ
°C
СТАРТ
СТОП
■ Tак как установленные значения записываются в память пульта
Нажмите кнопку (ЅТАRТ/ЅТОР). Начало режима осушения
сопровождается звуковым сигналом. Для остановки работы
нажмите кнопку ещё раз.
дистанционного управления, в следующий раз Вам необходимо
лишь нажать клавишу (СТАРТ/СТОП).
Для осушения рекомендуется поддерживать
комнатную температуру в диапазоне от 20 до
26°С градусов.
■ Функция Cушки
B случае, если температура в помещении превышает установленное значение температуры,
кондиционер осуществит сушку воздуха в помещении, снизив температуру в помещении до
установленного уровня.
В случае, если температура в помещении ниже установленного значения температуры, сушка
воздуха осуществляется при установленном значении температуры несколько ниже текущей
температуры в помещении. Когда температура в помещении станет ниже установленного значения,
работа в данном режиме будет прекращена (внутренний блок перестанет подавать воздух).
– 35 –
Page 36

РЕЖИМ ОХПАЖДЕНИЯ
Кондиционер можно использовать для охлаждения воздуха при наружной температуре
21-43°C. При высоких значениях влажности (свыше 80°C) на выходной решетке воздуха
внутреннего блока может образоваться некоторое количество росы.
3адействовать переключатель ФУНКЦИЯ, чтобы на дисплее
1
2
появился символ режима ОХЛАЖДЕНИЕ .
Посредством клавиши (СКОРОСТЬ ВЕНТИЛЯТОРА)
установить желаемое эначение СКОРОСТИ ВЕНТИЛЯТОРА
(установленное значение будет показано на дисплее).
(ABTO) : CKOPOCTЬ BEHTNЛЯТОРА вначале
устанавливается на режим ВЫСОКАЯ, а
после достижения установленного значения
температуры автоматически меняется на
режим СРЕДНЯЯ
(ВЫСОКАЯ) : Экономичный режим, так как помещение
достаточно быстро охлаждается.
(CPЕДНЯЯ) : Медленное вращение.
(НИеКАЯ) : Eще более медленное вращение.
или
НИЗКАЯ.
3
СТАРТ
СТОП
С помощью клавиш ТЕМПЕРАТУРА установить желаемую
температуру в помещении (установленное значение будет
показано на дисплее).
В качестве устанавливаемого значения
температуры в помещении в режиме
охлаждения рекомендуется Диапазон
25-28°С. При установленном значении
температуы 27°C температура в помещении
будет поддерживаться на уровне около 27°C.
Реальная температура в помещении может несколько
отличаться от установленного значения температуры в
зависимости от условий.
Нажать клавишу (CTAPT/CTOП). Kондиционер начнет
работать в режиме охлаждения, издав звуковой сигнап. Для
прекращения работы повторно нажать данную клавишу. В
случае, если установленное значение температуры выше
текущей температуры в помещении, функция охлаждения
работать не будет {несмотря на горящую индикаторную
лампу
задействована после того, как будет установлено значение
температуры ниже текущей температуры в помещении.
(ЭКСПЛУАТАЦИЯ).} Функция охлаждения будет
■ Tак как установленные значения записываются в память пульта
дистанционного управления, в следующий раз Вам необходимо лишь
нажать клавишу (СТАРТ/СТОП).
– 36 –
Page 37

РЕЖИМ ВЕНТИЛЯЦИИ
Кондиционер можно также использовать в качестве обычного вентилятора для циркуляции
воздуха. Данную функцию необходимо применять для сушки внутреннего пространства
внутреннего блока после окончания летнвго сезона.
Задействовать переключатель ФУНКЦИЯ, чтобы на дисплее
появился симвоп режима ВЕНТИЛЯЦИЯ .
Нажатием клавиши (CKOPOCTЬ ВЕНТИЛЯТОРА).*
Нажать клавишу (CTAPT/CTOП). Кондиционер начнет
работать в режиме вентиляции, издав звуковой сигнал. Для
прекращения работы повторно нажать данную клавишу.
RESET
1
2
СТАРТ
CTOП
РУССКИЙ
СКОРОСТЬ ВЕНТИЛЯТОРА
(ABTO) режиме охлаждения/нагрева;
в режиме нагрева
в режиме охлаждения
.....
При задании режима скорости вращения вентилятора ABTO в
● Скорость вращения вентилятора автоматически регулируется в
зависимости от температуры выходящего потока воздуха.
● Когда разница между комнатной температурой и заданной
температурой велика, вентилятор начинает работать на высокой (HI)
скорости.
● Когда температура в помещении доходит до заданной температуры,
скорость вентилятора автоматически изменяется на низкую (LOW).
● Когда разница между комнатной температурой и заданной
температурой велика, вентилятор начинает работать на высокой (HI)
скорости.
● После того, как температура в помещении достигнет установленного
значения температуры, будет выполняться режим охлаждения, при
котором скорость вращения вентилятора и температура в помещении
регулируются для получения оптимальных для здоровья условий
естественного охлаждения.
– 37 –
Page 38

УСТАНОВКА ТАЙМЕРА
RESET
Время суток, дата, месяц
ВРЕМЯ
СУТОК,
После установки
свежих батарей
ДАТА,
МЕСЯЦ
(текущее
время, дата,
месяц)
ТАЙМЕР
ВЫКЛЮЧЕНИЯ
Таймер ВЫКЛЮЧЕНИЯ
ТАЙМЕР
ВКЛЮЧЕНИЯ
РЕЗЕРВ
Данную функцию можно
использовать, чтобы выключить
ОТМЕНА
Tаймер BЫКЛЮЧЕНИЯ
● Прибор будет включен
кондиционер в установленное время.
в установленное
значение времени.
‘тарт
M D
‘топ
Стоп
1
С помощью клавиши
управления ТАЙМЕР установить
текущий месяц и дату
M D
1
Нажать клавишу (ТАЙМЕР
ВЫКЛЮЧЕНИЯ), после чего на дисплее
начнет мигать символ (ВЫКЛЮЧЕНИЕ).
AM
1
Старт
Нажать клавишу (ТАЙМЕР
ВКЛЮЧЕНИЯ), после чего на
дисплее начнет мигать символ
(ВКЛЮЧЕНИЕ).
AM
3
Нажать клавишу
(ТАЙМЕР ВКЛЮЧЕНИЯ),
после чего на дисплее
начнет мигать символ
(ВЫКЛЮЧЕНИЕ) и
символ (ВКЛЮЧЕНИЕ).
PM
AM
СТАРТ
● Кондиционер будет включен
(выключен) ивыключен (включен)
вустановленное значение
временивключения (выключения).
● Переключение производится в
установленное значение времени,
которое наступает первым.
● На дисплее появляется знак в виде
стрелки, который указывает
последовательность операций
переключения.
СТОП
1
Нажать клавишу
(ТАЙМЕР ВЫКЛЮЧЕНИЯ),
после чего на дисплее
начнет мигать символ
(ВЫКЛЮЧЕНИЕ).
PM
2
С помощью
клавиши управления
ТАЙМЕР установить
время выключения.
PM
Отмена Режима Резервирования
Направить окно испускания сигнала пульта дистанционного управления в направлении внутреннего
блока и нажать клавишу (ОТМЕНА).
Символ (РЕЗЕРВИРОВАНО) погаснет, раздастся звуковой сигнал, и на внутреннем блоке
погаснет лампа (ТАЙМЕР).
ПРИМЕЧАНИЕ
Возможна установка только одного из таймеров ВЫКЛЮЧЕНИЯ,
ВКЛЮЧЕНИЯ или ВКЛЮЧЕНИЯ/ВЫКЛЮЧЕНИЯ.
– 38 –
Page 39

2
Нажать
клавишу
(ВРЕМЯ)
3
Установить текущее время
посредством клавиши
управления ТАЙМЕР.
AM
PM PM
Пример: текущее время 1:30 пополудни.
4
Повторно нажать клавишу
ВРЕМЯ. Индикация времени
перестанет мигать и начнет
гореть постоянно.
PM
● Индикация времени
исчезнет автоматически
через 10 секунду.
● Тобы проверить установку
текущего времени, следует
дважды нажать клавишу
ВРЕШЯ.
Установка текущего времени
на этом завершена.
2
С помощью клавиши
управления ТАЙМЕР установить
время выключения.
PM
2
С помощью клавиши
управления ТАЙМЕР
установить время включения.
AM
4
С помощью клавиши
управления ТАЙМЕР
установить время включения.
PM
AM
3
Направить окно испускания сигнала пульта дистанционного управления
в направлении внутреннего блока и нажать клавишу (РЕЗЕРВ). Символ
(ВЫКЛЮЧЕНИЕ) перестанет мигать и начнет гореть постоянно, при этом
загорится символ (РЕЗЕРВИРОВАНО). Раздастся звуковой сигнал, и на
внутреннем блоке загорится лампа (ТАЙМЕР).
PM
3
Направить окно испускания сигнала пульта дистанционного управления
в направлении внутреннего блока и нажать клавишу (РЕЗЕРВ). Символ
(ВКЛЮЧЕНИЕ) перестанет мигать и начнет гореть постоянно, при этом
загорится символ (РЕЗЕРВИРОВАНО). Раздастся звуковой сигнал, и на
внутреннем блоке загорится лампа (ТАИМЕР).
AM
5
Направить окно испускания сигнала пульта дистанционного управления
в направлении внутреннего блока и нажать клавишу (РЕЗЕРВ). Символ
(ВКЛЮЧЕНИЕ) перестанет мигать и начнет гореть постоянно, при этом
загорится символ (РЕЗЕРВИРОВАНО). Раздастся звуковой сигнал, и на
внутреннем блоке загорится лампа (ТАЙМЕР).
PM
AM
Пример: кондиционер будет выключен в 11.00 вечера.
Установка времени выключения на этом завершена.
Пример:
Устройство автоматически включится заранее, так чтобы
заданная температура была достигнута к 7.00 утра.
Теперь установка времени включения завершена.
Пример:
Устройство выключится в 10.30 вечера, а затем
автоматически включится заранее, так чтобы заданная
температура была достигнута к 7.00 утра.
Теперь установка времени включения/выключения
завершена.
РУССКИЙ
● Таймер может быть использован в трех вариантах: в качестве таймера выключения,
таймера включения и таймера ВКЛЮЧЕНИЯ/ВЫКЛЮЧЕНИЯ (ВЫКЛЮЧЕНИЯ/
ВКЛЮЧЕНИЯ). Первоначально необходимо произвести установку текущего времени,
так как оно служит для отсчета.
● Такт как установки времени записываются в память пульта дистанционного управления,
в следующий раз для использования тех же установленных значений Вам необходимо
лишь нажать клавишу (РЕЗЕРВ).
– 39 –
Page 40

УСТАНОВКА ТАЙМЕРА ЗАДЕРЖКИ ОТКЛЮЧЕНИЯ
Первоначально необходимо произвести установку текущего времени, если это не было
сделано прежде (см. разделы по установке текущего времени). Нажать клавишу
(ЗАДЕРЖКА ОТКЛЮЧЕНИЯ), после чего индикация дисплея изменится в соответствии
с представленным ниже изображением.
Режим
44 44
H
Таймер задержки
отключения
1 час 2 часа 3 часа 7 часа
отключение таймером задержки
Индикация
1
Таймер задержки отключения: Кондиционер будет продолжать
работать в течение указанного количества часов, а затем будет
отключен. Направить окно испускания сигнала лульта
ЗАДЕРЖКА
ОТКЛЮЧЕНИЯ
дистанционного управления в направлении внутреннего блока и
нажать клавишу ЗАДЕРЖКА ОТКЛЮЧЕНИЯ. На дисплее пульта
дистанционного управления будет показана информация таймера.
Загорится индикаторная лампа ТАЙМЕР, при этом внутренний
блок издаст звуковой сигнал. После установки таймера задержки
отключения дисплей будет показывать время отключения.
Пример: Если вы в 11:38 вечера
установили время задержки отключения,
H
’аймер
задержки
отключениЯ
‘тарт
Выключение кондиционера осуществляется
таймером задержки отключения, а включение
кондиционера-таймером включения.
равное З часам, то кондиционер будет
отключен в 2:38 утра.
1
Установить таймер ВКЛЮЧЕНИЯ.
2
Нажать клавишу (ЗАДЕРЖКА ОТКЛЮЧЕНИЯ) и произвести
установку таймера задержки отключения.
AM
H
AM
Пример:
В этом случае устройство
выключится через 2 часа (в 1:38
a.m.) и включится заранее таким
образом, чтобы установочная
температура была почти достигнута
к 6:00 a.m. следующего утра.
Отмена Резервирования
Направить окно испускания сигнала пульта дистанционного управления в направлении внутреннего
блока и нажать клавишу (ОТМЕНА).
Символ (РЕЗЕРВИРОВАНО) исчезнет, при этом раздастся звуковой сигнал, и на внутреннем
блоке погаснет лампа (ТАЙМЕР).
– 40 –
Page 41

Принцип действия таймера задержки отключения
Кондиционер осуществляет автоматическое регулирование СКОРОСТИ
ВЕНТИЛЯТОРА и температуры в помещении, чтобы обеспечить тишину и
соответствующие условия для здоровья людей.
Таймер задержки отключения можно установить на отключение через 1, 2, 3 или
7 часов. Регулирование СКОРОСТИ ВЕНТИЛЯТОРА и температуры в помещении
осуществляется следующим образом.
Функция Операция
Будет поддерживаться
комнатная температура на
5°C ниже заданной
температуры, а скорость
Нагрев
“ ”
вентилятора будет
установлена на низкую
(LOW) через 30 минут
после установки таймера
задержки отключения.
Установка
таймера
задержки
через 30
минут
через 1 час
через 2
часа
через 7
часов
через 3 часа
РУССКИЙ
Будет поддерживаться
комнатная температура на
Охлаждение
“ ”
и
Сушка
“ ”
Вентилятор
“ ”
2°C выше заданной
температуры, а скорость
вентилятора будет
установлена на низкую
(LOW) через 1 час после
установки таймера
задержки отключения.
Установка
таймера
задержки
через 2
часа
1 час
через 6
часов
через 3 часа
Различные значения комнатной температуры и скорости
вентилятора.
через 7 часов
ПРИМЕЧАНИЕ
● Если не установлена дата или текущее время, таймер задержки отключения нельзя
установить.
● Если установка таймера задержки отключения произведена после установки таймера
выключения, таймера включения/выключения или таймера выключения/включения, таймер
задержки отключения получает приоритет перед этими таймерами.
● Во время работы таймера задержки отключения невозможно устанавливать другие таймеры.
● Если после окончания работы таймера задержки отключения снова нажать кнопку задержки
отключения, таймер задержки отключения будет установлен по последнему установленному
значению.
● Таймер задержки отключения работает только один раз.
– 41 –
Page 42

РЕГУЛИРОВКА ДЕФЛЕКТОРОВ ПОТОКА ВОЭДУХА
Регулировка потока воздуха от кондиционера в направлении вверх
1
и вниз.
Горизонтальный дефлектор потока воздуха автоматически
устанавливается под углом, требуемым для каждого конкретного
режима. Кнопка (АВТОМАТИЧЕСКИЙ ПОВОРОТ) позволяет
устанавливать режим постоянного колебания дефлектора вверхвниз,
а также устанавливать желаемый угол наклона.
● При однократном нажатии клавиши
(АВТОМАТИЧЕСКИЙ ПОВОРОТ) производится
автоматический поворот направления горизонтального
дефлектора потока воздуха вверх и вниз. При повторном
нажатии клавиши дефлектор останавливается в
занимаемом в данный момент положении. До начала
поворота дефлектора может пройти несколько секунд
(около 6 секунд).
● Диапазон регулирования поворота горизонтального
дефлектора потока воздуха показан на рисунке справа.
● По окончании работы устройства, горизонтальный
рефлектор воздуха двигается и затем останавливается в
положении, при котором выходные отверстия воздуха
закрыты.
ОСТОРОЖНО
● В “Охлаждающемся” действии, не держите горизонтальный и
вертикальный воздушный дефлектор покачивание в течение
долгого времени. Немного росы может сформироваться на
горизонтальном и вертикальный воздушный дефлектор и роса
могут понизиться.
Регулирование обусловленного воздуха в левых и правых
2
руководствах.
● Если “ (ПАРАЛЛЕЛЬНОЕ КОЛЕБАНИЕ)” кнопка нажата
однажды, вертикальные воздушные дефлекторы качается
левый и правый, чтобы быть параллельный. Если кнопка
нажата снова, дефлекторы заходят их текущее положение.
Несколько секунд (приблизительно 6 секунд) могут
требоваться перед дефлекторы начинают перемещаться.
● Если “ (КОЛЕБАНИЕ СИММЕТРИИ)” кнопка нажата
однажды, вертикальные воздушные дефлекторы качайтесь
левый и правый к симметрии. Если кнопка нажата снова,
дефлекторы остановитесь в их текущем положении.
Несколько секунд (приблизительно 6 секунд) могут
требоваться прежде, чем дефлекторы начинают
перемещаться.
Горизонтальных
воздушных дефлекторов
при
охлаждении и
сушке
примерно 15°
примерно 60°
при нагреве
примерно 45°
примерно
30°
● ПАРАЛЛЕЛЬНОЕ КОЛЕБАНИЕ
● КОЛЕБАНИЕ СИММЕТРИИ
ПАРАЛЛЕЛЬНОЕ
КОЛЕБАНИЕ
КОЛЕБАНИЕ
СИММЕТРИИ
– 42 –
Page 43

ЗАМЕНА БАТАРЕЙ В ПУЛЬТЕ ДИСТАНЦИОННОГО УПРАВЛЕНИЯ
Снять крышку, как показано на рисунке, и вынуть
1
отработанные батареи.
НаЂаВите толкайте по
напраВлениХ,
указанному стрелкой.
=
Вставить новые батареи.
2
Положение батарей должно совпадать с маркировкой в
отсеке.
ОСТОРОЖНО
1. Не использовать вместе старые и новые батареи, а также
батареи различных типов.
2. В случае, если пульт дистанционного управления не
используется в тецение 2-3 месяцев, необходимо вынуть
батареи из пульта.
РУССКИЙ
– 43 –
Page 44

ИДЕАЛЬНЫЙ СПОСОБ ЭКСПЛУАТАЦИИ
Температура В Помещении
Предупреждение
Холодная
температура в
помещении
неблагоприятно
Воздействует на
здоровье и вызывает
излшнний расход
злектрознергии.
Вентиляция
Осторожно
Не оставляйте помещение закрытым в
течении длительного пориода времени.
Периодически следует открывать дверь и
окна, чтобы обеспечить приток свежего
воздуха.
Использование штор или ставней
С их
помощью
можно
снизить
жару,
проникающую
в комнату,
через окна.
Эффективное использование таймера
Ночью используйте таймеры “Включить”
и “Отключить”, устанавливая их в
зависимости от времени пробуждения. Это
позволит Вам создать самую комфортную
для Вас температуру. Используйте таймер
эффективно.
Не забывайте чистить воздушный фильтр
Пыльный фильтр может уменьшить обьем
воздуха и эффективность охлаждения. Во
избежании лишней траты электроэнергии
производите чистку фильтра каждые 2
недели.
Устанавливайте подходящую t° для
грудных младенцев и детей
При использовании устройства в помещениях,
где находятся грудные младенцы, дети или
престарелые, то есть те, кому
трудно самим передвигаться,
следите за состоянием
t° и направлением
выходящего потока
воздуха.
– 44 –
Page 45

OFF
ИНФОРМАЦИЯ ДЛЯ ПОЛЬЗОВАТЕЛЯ
Воздушный Кондиционер и Нагреватель В Одном помещении
Осторожно
Если количество теплоты в ломещении превышает
охлаждающую способность устройства (например:
При большом количестве людей в помещеии, при
работающих нагревательных приборах и. т.п.),
установленная температура в помещении не может
быть достигнута.
Если кондиционер долго не используется
Если комнатный кондиционер долго не
используется, выключите его из сети. При
неотсоединенной сети он продолжает потреблять
около 8W из котрольной цепи, даже будучи
выключенным.
РУССКИЙ
Выключить
При молниях
Предупреждение
При молниях, чтобы обезопасить прибор от
повреждений, выключите его и выньте штепсель
из розетки.
UV-LED
УЛЬТРАФИОЛЕТОВОЕ-ВЕДОМЫЙ будет “ВКЛЮЧЕНО”, когда кнопка START/STOP нажата. Легкий
УЛЬТРАФИОЛЕТОВЫЙ яркий свет видим, когда УЛЬТРАФИОЛЕТОВОЕ-ВЕДОМЫЙ “ВКЛЮЧЕНО” и
настолько нормально (не, работают со сбоями).
Люфт от Электрического Шума
Предостережение
Чтобы избегать шумового люфта, пожалуйста
разместите внутреннюю единицу и ее пульт по
крайней мере на расстоянии 1м. от электрических
изделий.
– 45 –
TV
Page 46

ПРИЛОЖЕНИЕ ВОЗДУХА, ЧИСТЯЩЕГО ФИЛЬТРЫ
ОСТОРОЖНО
Чистка и обслуживание должно производиться только квалифицированным, обслуживающим
персоналом. Перед чисткой, остановите работу и отсоедините источник питания.
1
2
3
Откройте переднюю панель.
● Подтяните лицевую панель, держа её двумя
руками по двум сторонам.
Выньте фильтры.
● Придавите по направлению вверх для
освобождения зажимов и выньте фильтр.
Приложение воздуха, чистящего фильтр на
фильтр.
● Приложите воздух, чистящий фильтр к структуре,
мягко сжимая обе стороны и выпуск после
вставки в структуру наполнителя.
ОСТОРОЖНО
Лапки
(4 местах)
Не сгибать воздух, чистящий
фильтр, поскольку это может
принести убытки структуре.
Присоедините фильтры.
4
● Подсоедините фильтры, убедившись, что надпись
“FRОИТ”, на покрытии, устремлена вверх.
● После присоединения фильтров, передвиньте
переднюю панель в положение, указанное на
рисунке тремя стрелками, и закройте ее.
ПРИМЕЧАНИЕ:
●
В случае, если удаляя воздух, чистящий фильтр, пожалуйста следуйте за вышеупомянутым выше
процедуры.
●
Охлаждающаяся вместимость немного ослаблена, и охлаждающаяся скорость становится
медленнее, когда воздух, чистящий фильтры используется. Поэтому, установите вентилятор в
позицию “НІGН”, если работа происходит в таких условиях.
●
При чистке воздухо–очищающих и освежающих фильтров с помощью пылесоса или трубопроводной,
проточной воды, их можно использовать заново до 20 раз. Номер типа этого воздухо–очищающего
фильтра <ЅРХ–СFН19>. При заказе нового, пожалуйста, воспользуйтесь этим номером.
●
Не включайте кондиционер без фильтра. При проникновении пыли в кондиционер может произойти
повреждение.
– 46 –
Page 47

ОБСЛУЖИВАНИЕ
ОСТОРОЖНО
Чистка и обслуживание должно производиться только квалифицированным, обслуживающим
персоналом. Перед чисткой, остановите работу и отсоедините источник питания.
1. ВОЗДУШНЫЙ ФИЛЬТР
Воздушный фильтр необходимо чистить, так как на нем оседает пыль из комнаты. При
запыленном фильтре уменьшается поток воздуха и охладительная способность. Может
возникнуть шум при работе. При чистке соблюдайте следующие правила.
РУССКИЙ
1
2
3
Откройте лицевую панель и снимите фильтр.
● Мягко подъем и удаляют воздух, чистящий
фильтр от воздушного фильтра структура.
Вакуумная пыль от воздушного фильтра и воздуха,
чистящего фильтр, используя вакуум уборщик. Если
скопление пыли слишком большое, то ополосните
фильтр трубопроводной, проточной водой и нежно
почистите мягкой щёткой. Высушите фильтры в
тени.
● Повторно вставить воздух, чистящий
наполнитель к структуре фильтра. Установите
фильтр пометкой “FRОИТ” вперёд и вставьте
их в изначальное положение.
● После присоединения фильтров, передвиньте
переднюю панель в положение, указанное на
рисунке тремя стрелками, и закройте ее.
ПРИМЕЧАНИЕ:
● Воздухо-очищающий и освежающий фильтр должен чиститься каждый месяц, а в случае заметного
повышения нагрузки даже ранее. При использовании фильтра дольше положенного времени, он
может утратить способность освежать воздух. Для лучшего результата, рекомендуется заменять
его через каждые 3–6 месяцев, в зависимости от степени использования.
ОСТОРОЖНО
● Не мойте горячей водой с температурой выше 40°С. Это может вызвать усадку фильтра.
● После мытья стряхните влагу полностью и высушите в тени; не подвергайте воздействию прямых
солнечных лучей. Это может вызвать усадку.
● Не использовать моющее средство на воздухе, чистящем фильтр, поскольку некоторое моющее
средство может ухудшить фильтр электростатическая работа.
– 47 –
Page 48

2. Моющаяся лицевая панель
● Снимите лицевую панель и помойте её чистой
водой.
для мытья применяйте мягкую губку.
После применения мягких моющих средств,
тщательно промойте чистой водой.
● Когда лицевая панель не снята, вытирайте её
мягкой, сухой тряпкой. Хорошо протирайте
пульт дистанционного управления, используя
мягкую, сухую тряпку.
● Сетку следует вытирать насухо. Если вода
останется на индикаторах или приемнике
сигналов, это может вызвать сбои в работе.
Метод снятия лицевой панели.
Обязательно держите сетку двумя руками,
когда снимаете или устанавливаете ее обратно.
Снятие лицевой панели
● Полностью открыв лицевую панель
обоими руками, правой рукой придавите
панель вовнутрь, для её освобождения,
затем слегка прикрывая лицевую панель
Подсоединение лицевой панели
Отверстие
● Вставьте выступы с левой и с правой
стороны в соответсвующие фланцы таким
образом, чтобы выступы попали в
отверстия.
оттяните её вперёд.
ОСТОРОЖНО
● Не брызгайте водой и не направляйте воду на корпус кондиционера при
его очистке, так как это может привести к короткому замыканию.
● Не используйте горячую воду (выше 40°С), бензин, газолин, кислоту,
растворитель или щетку, так как они могут повредить покрытие и
пластиковую поверхность.
Фланец
Выступ
– 48 –
Page 49

ОСТОРОЖНО
Чистка и обслуживание должно производиться только квалифицированным, обслуживающим
персоналом. Перед чисткой, остановите работу и отсоедините источник питания.
3. ТЕХНИЧЕСКОЕ ОБСЛУЖИВАНИЕ ПЕРЕД ДЛИТЕЛЬНЫМ ПРОСТОЕМ
● Перед длительным простоем следует отключить
кондиционер на половину дня, установив
рабочий режим (ОХЛАЖДЕНИЕ), температуру
32°С и скорость вентилятора (ВЫСОК), выбрав
для этого хороший погодный день, чтобы
полностью просушить кондиционер.
● Отсоедините питание из розетки.
Воздушный
поток
Примечаний:
Eсли шнур поставки поврежден, это должно быть заменено изготовителем, обслужьте агента
или подобно компетентные люди, чтобы избежать опасности.
РУССКИЙ
ПРОФИЛАКТИЧЕСКИЕ ОСМОТРЫ
ПОЖАЛУЙСТА ВЫПОЛНЯЙТЕ НИЖЕПЕРЕЧИСЛЕННЫЕ ПРОВЕРКИ КАЖДЫЕ ПОЛГОДА ИЛИ
ЧАЩЕ. В СЛУЧАЕ КАКИХ-ЛИБО ЗАТРУДНЕНИЙ ОБРАЩАЙТЕСЬ К СПЕЦИЛИСТУ.
1
2
3
Убедитесь
Не повреждено заземление?
Крепежные кронштейны наружного блока не корродитованы,
внешний блок закреплен надежно?
Плотно ли вилка соединена с розеткой?
Убедитесь в наличии прочного контакта между ними.
– 49 –
Page 50
ГАРАНТИЙНОЕ ОБСЛУЖИВАНИЕ
ПЕРЕД ОБРАШЕНИЕМ К СПЕЦИАЛИСТУ ПРОВЕРЬТЕ НИЖЕПЕРЕЧИСЛЕННЫЕ
УСДОВИЯ
Когда прибор не работает
Когда прибор не надежно
охлаждает Когда прибор
не надежно нагревает
Примечания
● При спокойной работе или остановке прибора могут произойти
● Из-за разных запахов, используемых в комнате, незначительные
ПРОВЕРЬТЕ СЛЕДУЮЩИЕ ПУНКТЫ
● Предохранитель в порядке?
● Напряжение в сети высокое или низкое?
● Выключатель питания или прерыватель электроцепи в
положении “Вкл”?
● Очищался ли фильтр?
● Солнечный свет не падает на блок конденсации?
● Нет ли препятствий вытекающим струям тепла?
● Нет ли в комнате каких-либо источников тепла?
● Установочная температура выставлена нормально?
следующие явления, не считающиеся чем-то ненормальными.
(1) Не большой шум в процессе цикла охлаждения.
(2) Шум от работы вентилятора когда он начинает нагреваться в
процессе работы.
посторонние запахи могут возникать при работе прибора. Для
снижения неприятных запахов, воздушный фильтр и испаритель
должны чиститься регулярно.
●
Если у Вас все-таки возникают какие-либо проблемы в процессе эксплуатации прибора обращайтесь
к Вашему продавцу или квалифицированному специалисту. Сообщайте Вашему агенту насчеу модели,
номера производства и числа установки прибора.
●
Используйте только напряжение, указанное для данного кондиционера. В противном случае устройство
может испортиться или не достичь предусмотренной мощностн.
– 50 –
Page 51

ПРЕДОСТОРЕЖЕНИЕ: (модель
Этот блок предназначен для работать на сети источника питания с импедансом системы максимума
0.18+0.11 Ohm на этап соединения основного электроснабжения дома.
Потребитель должен удостоверитесъ, к, котор блок будет эксплуатироваться только на сети источника питания
под этим условием. Компания источника питания будет сообщить вы о условиях соединения.
Заметьте пожлуйстаа:
При переключении прибора, частично когда свет комнаты смутым, незнаачительное яркое колебание
может создатьсяя. Однако, это не считается ненормальым. Условия Локальной Электрической
Компании должны быть соблюдены.
RAS-30CH5/RAC-30CH5)
Примечание
● Избегите использовать кондиционер комнаты для охлаждая деятельности когда внешняя
температура под 21 ч (70ф).
Порекомендованные максимальные и минимальные температуры горячих и холодных сторон
должны быть как ниже:-
охлаждающ нагрюющ
минимума максимум минимума максимум
Внутренний
сухой шарик °C 21 32 20 27
влажный шарик °C 15 23 12 19
напольно
сухой шарик °C 21 43 2 21
влажный шарик °C 15 26 1 15
MEMO
.....................................................................................................................................................................................
.....................................................................................................................................................................................
.....................................................................................................................................................................................
РУССКИЙ
.....................................................................................................................................................................................
.....................................................................................................................................................................................
.....................................................................................................................................................................................
.....................................................................................................................................................................................
.....................................................................................................................................................................................
.....................................................................................................................................................................................
.....................................................................................................................................................................................
.....................................................................................................................................................................................
.....................................................................................................................................................................................
.....................................................................................................................................................................................
.....................................................................................................................................................................................
.....................................................................................................................................................................................
.....................................................................................................................................................................................
.....................................................................................................................................................................................
.....................................................................................................................................................................................
.....................................................................................................................................................................................
– 51 –
Page 52

MEMO
.....................................................................................................................................................................................
.....................................................................................................................................................................................
.....................................................................................................................................................................................
.....................................................................................................................................................................................
.....................................................................................................................................................................................
.....................................................................................................................................................................................
.....................................................................................................................................................................................
.....................................................................................................................................................................................
.....................................................................................................................................................................................
.....................................................................................................................................................................................
.....................................................................................................................................................................................
.....................................................................................................................................................................................
.....................................................................................................................................................................................
.....................................................................................................................................................................................
.....................................................................................................................................................................................
.....................................................................................................................................................................................
.....................................................................................................................................................................................
.....................................................................................................................................................................................
.....................................................................................................................................................................................
.....................................................................................................................................................................................
.....................................................................................................................................................................................
.....................................................................................................................................................................................
.....................................................................................................................................................................................
.....................................................................................................................................................................................
.....................................................................................................................................................................................
.....................................................................................................................................................................................
.....................................................................................................................................................................................
.....................................................................................................................................................................................
.....................................................................................................................................................................................
.....................................................................................................................................................................................
.....................................................................................................................................................................................
.....................................................................................................................................................................................
.....................................................................................................................................................................................
.....................................................................................................................................................................................
.....................................................................................................................................................................................
.....................................................................................................................................................................................
.....................................................................................................................................................................................
.....................................................................................................................................................................................
.....................................................................................................................................................................................
– 52 –
 Loading...