

Page 1

SPLIT TYPE AIR CONDITIONER
INDOOR UNIT
MODEL
RAK-18QH8S(W)
RAK-18QH8(W)
RAK-25QH8(W)
RAK-35QH8(W)
RAK-50QH8(W)
RAK-18QH8S(B)
RAK-18QH8(B)
RAK-25QH8(B)
RAK-35QH8(B)
RAK-50QH8(B)
INDOOR UNIT
ENGLISH
DEUTSCH
FRANÇAISITALIANOESPAÑOL
RAK-18QH8S(W)
RAK-18QH8(W)
RAK-25QH8(W)
RAK-35QH8(W)
RAK-50QH8(W)
RAK-18QH8S(B)
RAK-18QH8(B)
RAK-25QH8(B)
RAK-35QH8(B)
RAK-50QH8(B)
– 1 –
PORTUGUÊS
E
Page 2

SAFETY PRECAUTION
Please read the “Safety Precaution” carefully before operating the unit to ensure correct usage of the unit. ●
Pay special attention to signs of “ ● Warning” and “ Caution”. The “Warning” section contains matters which,
if not observed strictly, may cause death or serious injury. The “Caution” section contains matters which may
result in serious consequences if not observed properly. Please observe all instructions strictly to ensure safety.
The sign indicate the following meanings.
●
Make sure to connect earth line.
Indicates the instructions that must be followed.
Please keep this manual after reading.
●
PRECAUTIONS DURING INSTALLATION
Do not reconstruct the unit. ●
Water leakage, fault, short circuit or fi re may occur if you reconstruct the unit by
yourself.
Please ask your sales agent or qualifi ed technician for the installation of your unit.
●
Water leakage, short circuit or fi re may occur if you install the unit by yourself.
WARNING
CAUTION
Please use earth line.
●
Do not place the earth line near water or gas pipes, lightning-conductor, or the earth
line of telephone. Improper installation of earth line may cause electric shock.
Be sure to use the specifi ed piping set for R410A. Otherwise, this may result in
●
broken copper pipes or faults.
●
A circuit breaker should be installed depending on the mounting site of the unit.
Without a circuit breaker, the danger of electric shock exists.
Do not install near location where there is fl ammable gas. The outdoor unit may
●
catch fi re if fl ammable gas leaks around it.
Please ensure smooth fl ow of water when installing the drain hose.
●
PRECAUTIONS DURING SHIFTING OR MAINTENANCE
Should abnormal situation arises (like burning smell), please stop operating the ●
unit and turn off the circuit breaker. Contact your agent. Fault, short circuit or fi re
W
A
R
N
I
N
G
may occur if you continue to operate the unit under abnormal situation.
Please contact your agent for maintenance. Improper self maintenance may cause
●
electric shock and fi re.
Please contact your agent if you need to remove and reinstall the unit. Electric
●
shock or fi re may occur if you remove and reinstall the unit yourself improperly.
If the supply cord is damaged, it must be replaced by the special cord obtainable
●
at authorized service/parts centers.
The sign in the fi gure indicates prohibition.
PRECAUTIONS DURING OPERATION
Avoid an extended period of direct air fl ow for your health. ●
W
A
R
N
I
N
Do not use any conductor as fuse wire, this could cause fatal accident. ●
G
Do not insert a fi nger, a rod or other objects into the air outlet or inlet. As the fan ●
is rotating at a high speed, it will cause injury. Before cleaning, be sure to stop the
operation and turn the breaker OFF.
During thunder storm, disconnect and turn off the circuit breaker.
●
– 2 –
Page 3

PRECAUTIONS DURING OPERATION
The product shall be operated under the manufacturer specifi cation and ●
not for any other intended use.
Do not attempt to operate the unit with wet hands, this could cause fatal ●
accident.
●
When operating the unit with burning equipments, regularly ventilate the
room to avoid oxygen insuffi ciency.
Do not direct the cool air coming out from the air-conditioner panel to face ●
household heating apparatus as this may affect the working of apparatus
such as the electric kettle, oven etc.
Please ensure that outdoor mounting frame is always stable, fi rm and ●
without defect. If not, the outdoor unit may collapse and cause danger.
Do not splash or direct water to the body of the unit when cleaning it as this ●
may cause short circuit.
Do not use any aerosol or hair sprays near the indoor unit. This chemical
●
can adhere on heat exchanger fi n and blocked the evaporation water fl ow to
drain pan. The water will drop on tangential fan and cause water splashing
out from indoor unit.
ENGLISH
C
A
Please switch off the unit and turn off the circuit breaker during cleaning, the ●
high-speed fan inside the unit may cause danger.
U
T
I
O
Turn off the circuit breaker if the unit is not to be operated for a long period.
●
N
Do not climb on the outdoor unit or put objects on it. ●
Do not put water container (like vase) on the indoor unit to avoid water ●
dripping into the unit. Dripping water will damage the insulator inside the unit
and causes short-circuit.
Do not place plants directly under the air fl ow as it is bad for the plants. ●
Do not hang any laundry onto the moveable panels. ●
The moveable panels may get dislodged and may cause serious injuries.
When operating the unit with the door and windows opened, (the room humidity is always above ●
80%) and with the air defl ector facing down or moving automatically for a long period of time,
water will condense on the air defl ector and drips down occasionally. This will wet your furniture.
Therefore, do not operate under such condition for a long time.
If the amount of heat in the room is above the cooling or heating capability of the unit (for example: ●
more people entering the room, using heating equipments and etc.), the preset room temperature
cannot be achieved.
This appliance is not to be used by children or persons with reduced physical, sensory or mental
●
capabilities, or lack of experience and knowledge, unless they have been given supervision or
instruction. Children must be supervised not to play with the appliance.
– 3 –
Page 4

NAMES AND FUNCTIONS OF EACH PART
INDOOR UNIT
AIR CLEANSING FILTER
(Refer Instruction manual)
AIR FILTER
To prevent dust from coming into the indoor unit.
(Refer Instruction manual)
FRONT PANEL
MOVEABLE PANEL
It will be open when the air conditioner is operate
and close when the air conditioner is not in operation.
(Occasionally it may not be open during the operating
mode)
HORIZONTAL DEFLECTOR ● VERTICAL
DEFLECTOR (AIR OUTLET)
(Refer Instruction manual)
INDOOR UNIT INDICATORS
Light indicator showing the operating condition.
(Refer page 3)
REMOTE CONTROLLER
Send out operation signal to the indoor unit. So as to
operate the whole unit.
(Refer Instruction manual)
Moveable Panel■
It will open up automatically when the air conditioner is in operation and it will close up automatically when the●
air conditioner stopped operating. Avoid physical adjustments as it may damage the panels’ mechanisms.
Please do not touch the moving panel during operations as it may pinch your fi ngers.
●
NOTE
Air cleansing and deodorizing fi lters are washable and reusable up to 20 times by using vacuum cleaner or●
water rinse under running tap water. Type number for this air cleansing fi lter is <SPX-CFH20>. Please use
this number for ordering when you want to renew it.
Air cleansing fi lter should be cleaned every month or sooner if noticeable loading occurs.
●
overtime, it may loose its deodorizing function. For maximum performance, it is recommended to replace it
every 1 year depending on application requirements.
MODEL NAME AND DIMENSIONS
MODEL
RAK-18QH8(W)
RAK-25QH8(W)
RAK-35QH8(W)
RAK-50QH8(W)
RAK-18QH8(B)
RAK-25QH8(B)
RAK-35QH8(B)
RAK-50QH8(B)
WIDTH (mm)
795
– 2 –
HEIGHT (mm)
295
DEPTH (mm)
When used
198
Page 5

INDOOR UNIT INDICATORS
OPERATION INDICATOR
1. Opening up the front panel
Moveable panel
Front panel
FILTER LAMP
When the device is operated for a total of about 200 hours,
the FILTER lamp lights to indicate that it is time to clean the
fi lter. The lamp goes out when the “
button is pressed while the device is on “STANDBY
MODE”.
OPERATION LAMP
This lamp lights during operation.
The OPERATION LAMP fl ashes in the following cases
during heating.
(1) During preheating
For about 2–3 minutes after starting up.
(2) During defrosting
Defrosting will be performed about once every one
hour when frost forms on the heat exchanger of the
outdoor unit, for 5–10 minutes each time.
SIGNAL RECEIVING PORT
TIMER LAMP
This lamp lights when the timer is working.
(AUTO SWING)”
ENGLISH
Hand grip point
Do not hold the moveable panel●
Hand grip point
TEMPORARY SWITCH
Use this switch to start and stop when the remote controller does not work.
By pressing the temporary switch, the operation is done in previously set operation mode.
●
When the operation is done using the temporary switch after the power source is turned off and turn on again,●
the operation is done in automatic mode.
Lift the front panel ●
when the front panel is in either
opened/closed position.
CAUTION
Never try to force open/close the moveable panel manually.●
Manually opening or closing the moveable panel may cause breakdowns (The moveable panel will
automatically close or open when the power supply is switched on or switched off and whenever the unit is
in operations or has stopped operating.
– 3 –
Page 6

2. Closing the Front Panel
● Pull toward the down direction.
Initially press the left and the right sides of the front ●
panel and fi nally press the central portion until you
hear a clicking sound.
CAUTION
When front panel is shaky, there is a possibility panel coming off and ●
falling down.
Do not apply extra force on the front panel when it is opened up in the
●
upright position.
Also frequent removal of the front panel from the front cover may
cause damage.
Note
Avoid to use the room air conditioner for cooling operation when the outside temperature is below -10°C (14°F). ●
The recommended maximum and minimum operating temperatures of the hot and cold sides should be as
below:
Cooling Heating
Minimum Maximum Minimum Maximum
Wet bulb °C 15 23 12 19
Wet bulb °C 15 26 1 15
Dry bulb °C 21 32 20 27
Indoor
Dry bulb °C 21 43 2 21
Outdoor
– 4 –
Page 7
NAMES AND FUNCTIONS OF REMOTE CONTROL UNIT
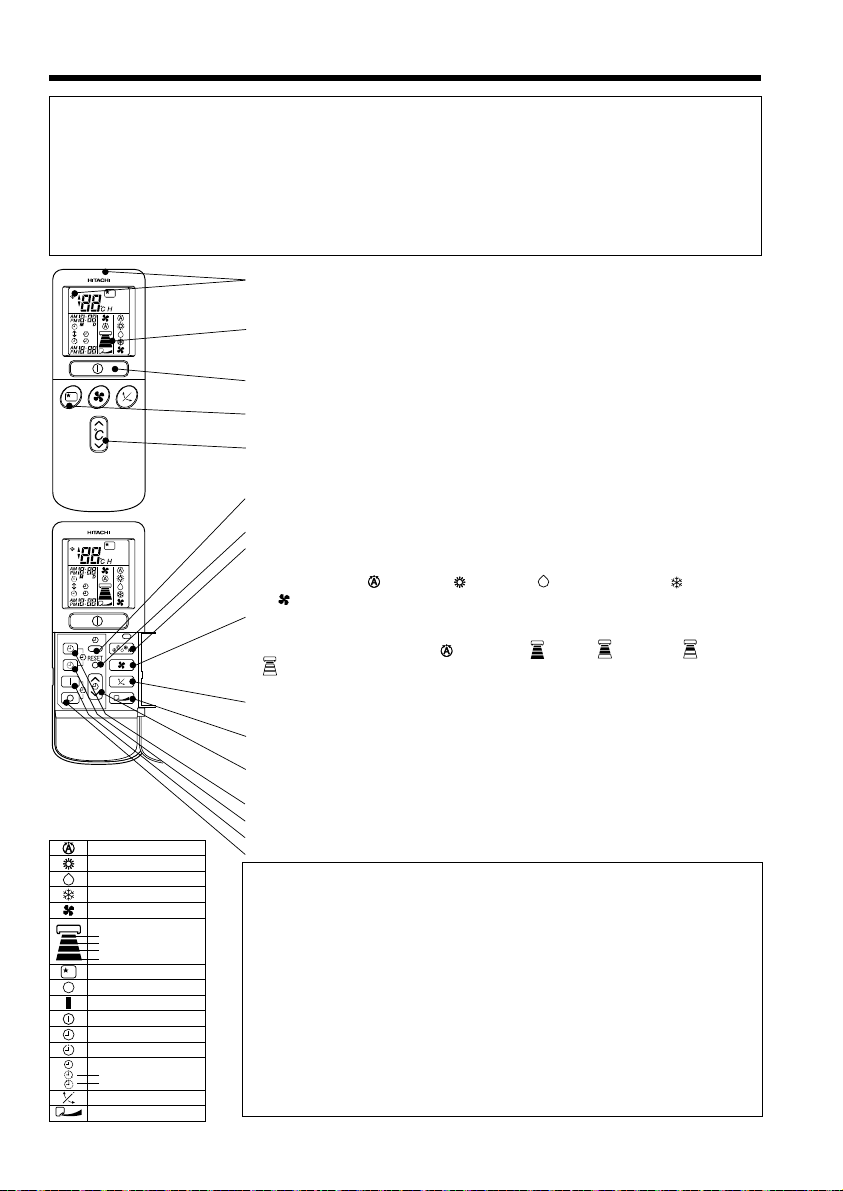
REMOTE CONTROLLER
This controls the operation of the indoor unit. The range of control is about 7 meters. If indoor lighting is●
controlled electronically, the range of control may be shorter.
This unit can be fi xed on a wall using the fi xture provided. Before fi xing it, make sure the indoor unit can be
controlled from the remote controller.
Handle the remote controller with care. Dropping it or getting it wet may compromise its signal transmission●
capability.
After new batteries are inserted into the remote controller, the unit will initially require approximately 10●
seconds to respond to commands and operate.
Signal emitting window/transmission sign
●
Point this window toward the indoor unit when controlling it.
The transmission sign blinks when a signal is sent.
Display
●
This indicates the room temperature selected, current time, timer status, function
and intensity of circulation selected.
START/STOP button ●
Press this button to start operation. Press it again to stop operation.
SLEEP button ●
Use this button to set the sleep timer.
TEMPERATURE buttons
●
Use these buttons to raise or lower the temperature setting. (Keep pressed, and
the value will change more quickly.)
TIME button ●
Use this button to set and check the time and date.
RESET buttons
●
FUNCTION selector ●
AUTO
HEAT
DEHUMIDIFY
COOL
FAN
FAN SPEED
SILENT
LOW
MED
HI
SLEEPING
STOP (CANCEL)
START (RESERVE)
START/STOP
TIME
TIMER SET
TIMER SELECTOR
ON TIMER
OFF TIMER
AUTO SWING
EXTENDED AIRFLOW
Use this button to select the operating mode. Every time you press it, the mode
will change from
to (FAN) cyclically.
FAN SPEED selector ●
This determines the fan speed. Every time you press this button, the intensity of
circulation will change from
(SILENT) (This button allows selecting the optimal or preferred fan speed for
each operation mode).
AUTO SWING button ●
Controls the angle of the horizontal air defl ector.
EXTENDED AIRFLOW ●
Use this button to deliver faster and more comfortable air-conditioning.
TIMER control ●
Use this button to set the timer.
OFF-TIMER button ● Select the turn OFF time.
ON-TIMER button ● Select the turn ON time.
RESERVE button ● Time setting reservation.
CANCEL button ● Cancel time reservation.
Precautions for Use
Do not put the remote controller in the following places.
●
Under direct sunlight.●
In the vicinity of a heater.●
Handle the remote controller carefully. Do not drop it on the fl oor, and●
protect it from water.
Once the outdoor unit stops, it will not restart for about 3 min
●
you turn the power switch off and on or unplug the power cord and plug it
in again).
This is to protect the device and does not indicate a failure.
If you press the FUNCTION selector button during operation, the de
●
may stop for about 3 minutes for protection.
(AUTO) to (HEAT) to (DEHUMIDIFY) to (COOL) and
(AUTO) to (HI) to (MED) to (LOW) to
utes (unless
– 4 –
vice
Page 8

VARIOUS FUNCTIONS
■ Auto Restart Control
If there is a power failure, operation will be automatically restarted when the power is resumed with previous ●
operation mode and airfl ow direction.
(As the operation is not stopped by remote controller.)
If you intend not to continue the operation when the power is resumed, switch off the power supply. ●
When you switch on the circuit breaker, the operation will be automatically restarted with previous operation
mode and airfl ow direction.
Note: 1. If you do not require Auto Restart Control, please consult your sales agent or OFF by remote
2. Auto Restart Control is not available when Timer or Sleep Timer mode is set.
control.
AUTOMATIC OPERATION
The device will automatically determine the mode of operation, HEAT, COOL or DEHUMIDIFY depending on
the current room temperature. The selected mode of operation will change when the room temperature varies.
However the mode of operation will not change when indoor unit connected to multi type outdoor unit.
Press the FUNCTION selector so that the display indicates the
(AUTO) mode of operation.
When AUTO has been selected, the device will automatically
●
determine the mode of operation, HEAT, COOL or
1
DEHUMIDIFY depending on the current room temperature.
However the mode of operation will not change when indoor
unit connected to multi type outdoor unit.
If the mode automatically selected by the unit is not satisfactory, ●
manually change the mode setting (heat, dehumidify, cool or
fan).
ENGLISH
START
STOP
Press the (START/STOP) button.
Operation starts with a beep.
Press the button again to stop operation.
As the settings are stored in memory in the remote controller, you ■
only have to press the (START/STOP) button next time.
You can raise or lower the temperature setting as necessary by
maximum of 3°C.
Press the temperature button and the
temperature setting will change by 1°C each
time.
The preset temperature and the actual room temperature may
●
vary somewhat depending on conditions.
The display does not indicate the preset temperature in the ●
AUTO mode. If you change the setting, the indoor unit will
produce a beep.
Press the (FAN SPEED) button, AUTO, LOW and SILENT is
available.
– 5 –
Page 9

HEATING OPERATION
Use the device for heating when the outdoor temperature is under 21°C.●
When it is too warm (over 21°C), the heating function may not work in order to protect the device.
In order to keep reliability of the device, please use this device above -15°C of the outdoor temperature. ●
Press the FUNCTION selector so that the display indicates
1
(HEAT).
Set the desired FAN SPEED with the (FAN SPEED) button (the
display indicates the setting).
(AUTO) : The fan speed changes automatically according
to the temperature of the air which blows out.
2
3
(HI) : Economical as the room will become warm
quickly.
But you may feel a chill at the beginning.
(MED) : Fan speed slow.
(LOW) : Fan speed slower.
(SILENT) : Fan speed ultra slower.
Set the desired room temperature with the TEMPERATURE buttons
(the display indicates the setting).
The temperature setting and the actual room temperature may vary
somewhat depending on conditions.
START
STOP
Press the
a beep. Press the button again to stop operation.
■
As the settings are stored in memory in the remote controller, y
have to press the (START/STOP) button next time.
(START/STOP) button. Heating operation starts with
ou only
■ Defrosting
Defrosting will be performed about once an hour when frost forms on the heat exchange of the outdoor unit, for
5~10 minutes each time.
During defrosting operation, the operation lamp blinks in cycle of 3 seconds on and 0.5 second off.
The maximum time for defrosting is 20 minutes.
However, if it is connected to multi type outdoor unit, the maximum time for defrosting is 15 minutes.
(If the piping length used is longer than usual, frost will likely to form.)
– 6 –
Page 10

DEHUMIDIFYING OPERATION
Use the device for dehumidifying when the room temperature is over 16°C.
When it is under 15°C, the dehumidifying function will not work.
Press the FUNCTION selector so that the display indicates
1
(DEHUMIDIFY).
The FAN SPEED is set at LOW or SILENT.
Set the desired room temperature with the TEMPERATURE button
(the display indicates the setting).
2
The range of 20-26˚C is recommended as the room
temperature for dehumidifying.
ENGLISH
START
STOP
Press the (START/STOP) button. Dehumidifying operation
starts with a beep. Press the button again to stop operation.
As the settings are stored in memory in the remote controller, you only
■
have to press the (START/STOP) button next time.
■ Dehumidifying Function
When the room temperature is higher than the temperature setting: The device will dehumidify the room, ●
reducing the room temperature to the preset level.
When the room temperature is lower than the temperature setting: Dehumidifying will be performed at the
temperature setting slightly lower than the current room temperature, regardless of the temperature setting.
The function will stop (the indoor unit will stop emitting air) as soon as the room temperature becomes lower
than the setting temperature.
The preset room temperature may not be reached depending on the number of people present in the room
●
or other room conditions.
– 7 –
Page 11

COOLING OPERATION
Use the device for cooling when the outdoor temperature is 21~ 43°C.
If in doors humidity is very high (80%), some dew may form on the air outlet grille of the indoor unit.
Press the FUNCTION selector so that the display indicates
1
(COOL).
Set the desired FAN SPEED with the
display indicates the setting).
(AUTO) : The FAN SPEED is HI at fi rst and varies to MED
2
(HI) : Economical as the room will become cool
(MED) : Fan speed slow.
(LOW) : Fan speed slower.
(SILENT) : Fan speed ultra slower.
Set the desired room temperature with the TEMPERATURE button
(the display indicates the setting).
The temperature setting and the actual room temperature may vary
3
some how depending on conditions.
Press the
beep. Press the button again to stop operation. The cooling function
START
STOP
does not start if the temperature setting is higher than the current
room temperature (even though the
The cooling function will start as soon as you set the temperature
below the current room temperature.
■
As the settings are stored in memory in the remote controller, you only
have to press the (START/STOP) button next time.
automatically when the preset temperature has
been reached.
quickly.
(START/STOP) button. Cooling operation starts with a
(FAN SPEED) button (the
(OPERATION) lamp lights).
– 8 –
Page 12

FAN OPERATION
You can use the device simply as an air circulator. Use this function to dry the interior of the indoor unit at the
end of summer.
Press the FUNCTION selector so that the display indicates
1
(FAN).
Press the
2
(HI) : The strongest air blow.
(MED) : Fan speed slow.
(LOW) : Fan speed slower.
(FAN SPEED) button.
(SILENT) : Fan speed ultra slower.
ENGLISH
START
STOP
Press the
beep. Press the button again to stop operation.
(START/STOP) button. Fan operation starts with a
FAN SPEED (AUTO) ..... When the AUTO fan speed mode is set in the cooling/heating operation:
The fan speed will automatically change according to the temperature of
●
discharged air.
When the difference of room temperature and setting temperature is large,
For the heating operation
For the cooling operation
●
fan starts to run at HI speed.
When the room temperature reaches setting temperature, fan speed changes ●
to LOW automatically.
When the difference of room temperature and setting temperature is large,
●
fan starts to run at HI speed.
After room temperature reaches the preset temperature, the cooling ●
operation, which changes the fan speed and room temperature to obtain
optimum conditions for natural healthful cooling will be performed.
EXTENDED AIRFLOW
During operations, press the ■ button to select the various operating modes
that will set the preferred air fl ow direction and will also adjust the air fl ow speed to
reach the furthest distance within its range. (During the cooling operating mode, the
air fl ow direction and air fl ow speed will return to their original settings after 3 hours
of operations).
If the ● (EXTENDED AIRFLOW) button is pressed while the AUTO SWING
mode is set, the AUTO SWING mode is cancelled and the EXTENDED AIRFLOW
mode is set.
If the
● (AUTO SWING) button is pressed while the EXTENDED AIRFLOW
mode is set, the EXTENDED AIRFLOW mode is cancelled and the AUTO
SWING mode is set.
If the ● (EXTENDED AIRFLOW) button is pressed when the horizontal air
defl ector stops at your preferred angle, the defl ector will change to EXTENDED
AIRFLOW.
As the angle of the horizontal air defl ector changes, the air may blow directly ●
onto the body.
– 9 –
Page 13

HOW TO SET THE TIMER
ON/OFF Timer
Start
The device will turn on (off) and off ●
(on) at the designated times.
The switching occurs fi rst at the ●
preset time that comes earlier.
The arrow mark appearing on the ●
display indicates the sequence of
switching operations.
TIME
OFF TIMER
ON TIMER
RESERVE
CANCEL
Stop
Time
After you change the
batteries;
OFF-Timer
Start
You can set the device to turn off at the
preset time.
ON-Timer
The device will turn on at the ●
designated times.
1 Press the (ON-OFF)
button so that the
mark blinks.
(OFF)
PM
1 Press the (OFF-TIMER)
button. The
the display.
STOP
Start
2 Set the turn-off time
with the TIMER control
button.
Press the
button.
Stop
(RESERVE)
PM
1 Set the (TIME) button.
AM
PM
(OFF) mark blinks on
AM
1 Press the (ON-TIMER)
button the
on the display.
(ON) mark blinks
AM
3 Press the (ON-
TIMER) button so that the
(OFF) mark lights and
the
(ON) mark blinks.
PM
AM
How to Cancel Reservation
Point the signal window of the remote controller toward the indoor unit, and press the (CANCEL) button.
The (RESERVED) sign goes out with a beep and the (TIMER) lamp turns off on the indoor unit.
NOTE
You can set only one of the OFF-timer,
ON-timer and ON/OFF-timer.
– 10 –
Page 14

2 Press the
utton.
(TIME) b
3 Set the current time with the
TIMER control button.
AM
PM
Example: The current time is 1:30 p.m.
PMPMPM
4 Press the (TIME) button again.
The time indication starts lighting instead of
fl ashing.
The time indication will disappear ●
PM
automatically in 10 second.
To check the current time setting, ●
press the
twice.
The setting of the current time is
now complete.
ENGLISH
(TIME) button
2 Set the turn-off time with
the TIMER control button.
PMPMPM
2 Set the turn-on time with
the TIMER control button.
AMAMAM
4 Set the turn-on time with
the TIMER control button.
PM
PM
AM
AM
3 Point the signal window of the remote controller toward the indoor unit, and press
the
(RESERVE) button.
The
(OFF) mark starts lighting instead of fl ashing and the sign (RESERVED)
lights. A beep occurs and the
PM
The setting of turn-off time is now complete.
3 Point the signal window of the remote controller toward the indoor unit, and
press the
(RESERVE) button.
The
(ON) mark starts lighting instead of fl ashing and the (RESERVED) sign
lights. A beep occurs and the
AM
5 Point the signal window of the remote controller toward the indoor unit, and
press the
(RESERVE) button.
The
(ON) mark starts lighting instead of fl ashing and the (RESERVED) sign
lights. A beep occurs and the
PM
PM
AM
AM
(TIMER) lamp lights on the indoor unit.
Example: The device will turn off at 11:00p.m.
(TIMER) lamp lights on the indoor unit.
Example:
The device will turn on at 7:00 a.m.
The setting of the turn-on time is now complete.
(TIMER) lamp lights on the indoor unit.
Example:
The device will turn off at 10:30 p.m. and it will be turned on
at 7:00 a.m.
The settings of the turn-on/off times are now complete.
The timer may be used in three ways: off-timer, on-timer, and on/off (off/on)-timer. Set the current time at fi rst●
because it serves as a reference.
As the time settings are stored in memory in the remote controller, you only have to press the
● (RESERVE)
button in order to use the same settings next time.
– 11 –
Page 15

HOW TO SET THE SLEEP TIMER
Set the current time at fi rst if it is not set before (see the pages for setting the current time). Press the
(SLEEP) b
utton, and the display changes as shown below.
Mode
Sleep timer
Indication
44 44
1 hour 2 hours 3 hours 7 hours
Sleep timer off
1
Sleep Timer: The device will continue working for the designated
number of hours and then turn off.
SLEEP
Point the signal window of the remote controller toward the indoor unit,
and press the SLEEP button.
The timer information will be displayed on the remote controller. The
TIMER lamp lights with a beep from the indoor unit. When the sleep
timer has been set, the display indicates the turn-off time.
AM
Example: If you set 3 hours sleep
time at 11:38 p.m., the turn-off time
Sleep
timer
H
Start
The device will be turned off by the sleep timer
and turned on by on-timer.
is 2:38 a.m.
1 Set the ON-timer.
2 Press the (SLEEP) button and set the sleep timer.
AM
H
AM
For heating:
In this case, the device will turn off in
2 hours (at 1:38 a.m.) and it will be
turned on 6:00 next morning.
How to Cancel Reservation
Point the signal window of the remote controller toward the indoor unit, and press the (CANCEL) button.
The (RESERVED) sign goes out with a beep and the (TIMER) lamp turns off on the indoor unit.
– 12 –
Page 16
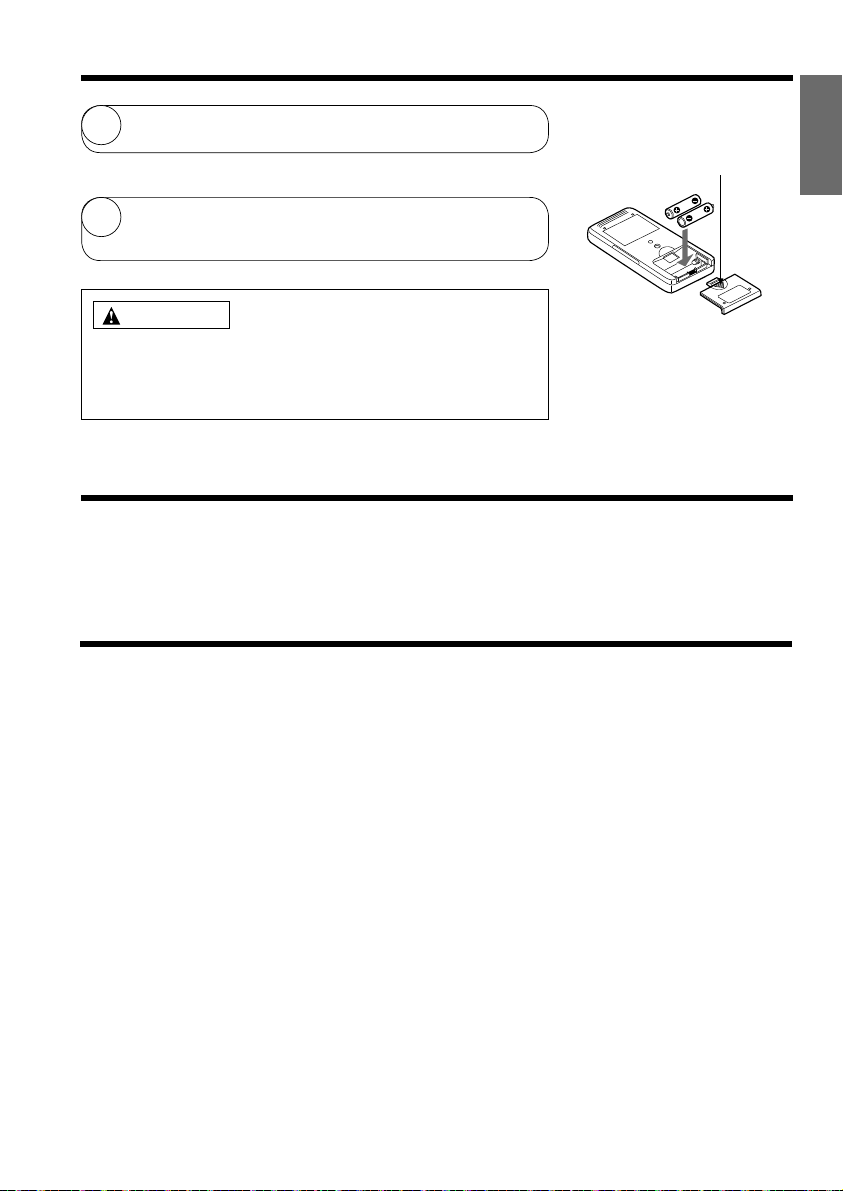
HOW TO EXCHANGE THE BATTERIES IN THE REMOTE CONTROLLER
Remove the cover as shown in the fi gure and take out the old
1
batteries.
Push and pull to the
direction of arrow
=
Install the new batteries.
2
The direction of the batteries should match the marks in the case.
CAUTION
Do not use new and old batteries, or different kinds of batteries1.
together.
Take out the batteries when you do not use the remote controller for2.
2 or 3 months.
TEMPORARY SWITCH
If the remote controller does not work due to battery failure, press this switch to start and stop operation.
This temporary operation will be at the setting made most recently. (The unit will immediately go into automatic
●
operation once power is switched on.)
CIRCUIT BREAKER
ENGLISH
When you do not use the room air conditioner, set the circuit breaker to “OFF”.
– 13 –
Page 17

THE IDEAL WAYS OF OPERATION
Suitable Room Temperature Install curtain or blinds
Warning
Freezing temperature
is bad for health and
a waste of electric
power.
Ventilation Effective Usage Of Timer
Caution
Do not close the room for a long period
of time. Occasionally open the door and
windows to
allow the
entrance of
fresh air.
Do Not Forget To Clean The Air Filter
Dusty air fi lter will reduce the air volume and
the cooling effi ciency. To prevent from wasting
electric energy, please clean the fi lter every 2
weeks.
It is possible
to reduce heat
entering the
room through
windows.
At night, please use the “OFF or ON timer
operation mode”, together with your wake up
time in the morning. This will enable you to
enjoy a comfortable room temperature. Please
use the timer effectively.
Please Adjust Suitable Temperature
For Baby And Children
Please pay attention to the room temperature
and air fl ow direction when operating the unit
for baby, children and old folks who have
diffi culty in movement.
– 14 –
Page 18

FOR USER’S INFORMATION
The Air Conditioner And The Heat Source In The Room
Caution
If the amount of heat in the room is above the cooling
capability of the air conditioner (for example: more
people entering the room, using heating equipments
and etc.), the preset room temperature cannot be
achieved.
Not Operating For A Long Time
When the indoor unit is not to be used for a long
period of time, please switch off the power from the
mains. If the power from mains remains “ON”, the
indoor unit still consumes about 8W in the operation
control circuit even if it is in “OFF” mode.
When Lightning Occurs
Warning
To protect the whole unit during lightning, please
stop operating the unit and remove the plug from the
socket.
ENGLISH
OFF
Interference From Electrical Products
Caution
To avoid noise interference, please place the indoor
unit and its remote controller at least 1m away from
electrical products.
– 15 –
To prevent
interference,
place at least
1m away.
Inverter-type
fl uorescent
lamp
TV
Page 19

ATTACHING THE AIR CLEANSING FILTERS
CAUTION
Cleaning and maintenance must be carried out only by qualifi ed service personal. Before cleaning, stop
operation and switch off the power supply.
Open the front panel.
1
2
3
Pull up the front panel by holding it at both sides with ●
both hands.
Remove the fi lter.
Push upward to release the claws and pull out the
●
fi lter.
Attaching the air cleansing fi lters to the fi lter.
Attach the air cleansing fi lters to the frame by
●
gently compress its both sides and release after
insertion into fi lter frame.
Claws
(4 places)
CAUTION
Do not bend the air cleansing
fi lter as it may cause damage to
the structure.
Attach the fi lters.
4
●
Attach the fi lters by ensuring that the surface written
“FRONT” is facing front.
After attaching the fi lters, push the front panel at three ●
arrow portion as shown in fi gure and close it.
NOTE
In case of removing the air cleansing fi lters, please follow the above procedures. ●
The cooling capacity is slightly weakened and the cooling speed becomes slower when the air cleansing ●
fi lters are used. So, set the fan speed to "HIGH" when using it in this condition.
Do not operate the air conditioner without fi lter. Dust may enter the air conditioner and fault may occur.
●
– 16 –
Page 20

MAINTENANCE
CAUTION
Cleaning and maintenance must be carried out only by qualifi ed service personal. Before
cleaning, stop operation and switch off the power supply.
1. AIR FILTER
Clean the air fi lter, as it removes dust inside the room. In case the air fi lter is full of dust, the air fl ow will
decrease and the cooling capacity will be reduced. Further, noise may occur. Be sure to clean the fi lter
following the procedure below.
PROCEDURE
Open the front panel and remove the fi lter
1
2
Gently lift and remove the air cleansing fi lter
●
from the air fi lter frame.
Vacuum dust from the air fi lter and air cleansing
fi lter using vacuum cleaner. If there is too much
dust, air fi lter only rinse under running tap water
and gently brush it with soft bristle brush. Allow
fi lters to dry in shade.
ENGLISH
3
Re-insert the air cleansing fi lter to the fi
●
frame. Set the fi lter with “FRONT” mark facing
front, and slot them into the original state.
After attaching the fi lters, push the front panel●
at three arrow portions as shown in fi gure and
close it.
lter
CAUTION
Do not wash with hot water at more than 40°C. The fi lter may shrink.●
When washing it, shake off moisture completely and dry it in the shade; do not expose it directly to the sun. ●
The fi lter may shrink.
Do not use detergent on the air cleansing fi lter as some detergent may deteriorate the fi
●
performance.
– 17 –
lter electrostatic
Page 21
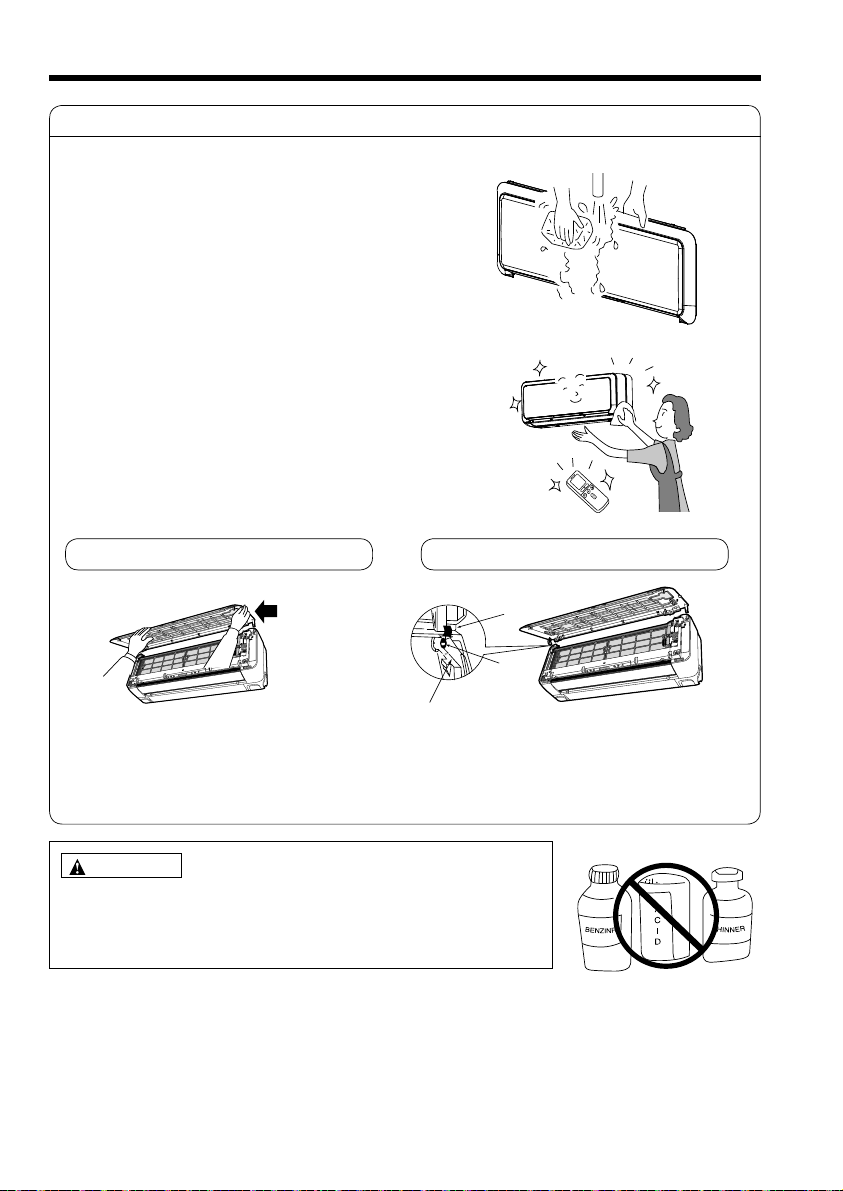
2. Washable Front Panel
Remove the front panel and wash with clean●
water.
Wash it with a soft sponge.
After using neutral detergent, wash thoroughly
with clean water.
When front panel is not remov
●
a soft dry cloth. Wipe the remote controller
thoroughly with a soft dry cloth.
Wipe the water thoroughly.
●
If water remains at indicators or signal receiver
of indoor unit, it causes trouble.
Method of removing the front panel.
Be sure to hold the front panel with both hands
to detach and attach it.
ed, wipe it with
Removing the Front Panel
Arm
Flange
When the front panel is fully opened with●
both hands, push the right arm to the inside
to release it, and while closing the front panel
Attaching the Front Panel
Projection
Move the projections of the left and right arms●
into the Flanges in the unit and securely insert
them into the holes.
slightly, put it out forward.
CAUTION
Do not splash or direct water to the body of the unit when cleaning it as●
this may cause short circuit.
Never use hot water (above 40°C), benzine, gasoline, acid, thinner or a●
brush, because they will damage the plastic surface and the coating.
Hole
– 18 –
Page 22

CAUTION
Cleaning and maintenance must be carried out only by qualifi ed service personal. Before cleaning, stop
operation and switch off the power supply.
3. MAINTENANCE AT BEGINNING OF LONG OFF PERIOD
Running the unit setting the operation mode to ●
(FAN) and the fan speed to HI for about half a day on a
fi ne day, and dry the whole of the unit.
●
Switch off the power plug.
Air
Blow
REGULAR INSPECTION
PLEASE CHECK THE FOLLOWING POINTS BY QUALIFIED SERVICE PERSONAL EITHER
EVERY HALF YEARLY OR YEARLY. CONTACT YOUR SALES AGENT OR SERVICE
SHOP.
ENGLISH
1
2
3
Confi rm
Is the earth line disconnected or broken?
Is the mounting frame seriously affected by rust and is the
outdoor unit tilted or unstable?
Is the plug of power line fi rmly plugged into the socket?
(Please ensure no loose contact between them).
– 19 –
Page 23

AFTER SALE SERVICE AND WARRANTY
WHEN ASKING FOR SERVICE, CHECK THE FOLLOWING POINTS.
CONDITION CHECK THE FOLLOWING POINTS
If the remote controller is not
transmitting a signal.
Remote controller display
●
Do the batteries need replacement?
Is the polarity of the inserted batteries correct? ●
is dim or blank.)
Is the fuse all right? ●
When it does not operate
Is the voltage extremely high or low? ●
Is the circuit breaker “ON”? ●
Is the setting of operation mode different from other indoor units? ●
Is the air fi lter blocked with dust? ●
Does sunlight fall directly on the outdoor unit? ●
Is the air fl ow of the outdoor unit obstructed? ●
When it does not cool well
When it does not hot well
Are the doors or windows opened, or is there any source of heat in ●
the room?
Is the set temperature suitable? ●
Are the air inlets or air outlets of indoor and outdoor units ●
blocked?
Is the fan speed “LOW” or “SILENT”?
●
Notes
In quiet operation or stopping the operation, the following phenomena may ●
occassionally occur, but they are not abnormal for the operation.
(1) Slight fl owing noise of refrigerant in the refrigerating cycle.
(2) Slight rubbing noise from the fan casing which is cooled and then
gradually warmed as operation stops.
The odor will possibly be emitted from the room air conditioner because the
●
various odor, emitted by smoke, foodstuffs, cosmetics and so on, sticks to it.
So the air fi lter and the evaporator regularly must be cleaned to reduce the
odor.
Please contact your sales agent immediately if the air conditioner still fails to operate normally after the above
●
inspections. Inform your agent of the model of your unit, production number, date of installation. Please also
inform him regarding the fault.
Power supply shall be connected at the rated voltage, otherwise the unit will be broken or could not reach the
●
specifi ed capacity.
NOTE:
If the supply cord is damaged, it must be replaced by the special cord obtainable at authorized service
●
parts centers.
On switching on the equipment, particularly when the room light is dimmed, a slight brightness fl uctuation ●
may occur. This is of no consequence.
The conditions of the local Power Supply Companies are to be observed.
The moveable panels are not moving
■
Check to ensure whether the front panels have been installed in a proper manner. ●
– 20 –
Page 24

MEMO
......................................................................................................................................................................................
......................................................................................................................................................................................
......................................................................................................................................................................................
......................................................................................................................................................................................
......................................................................................................................................................................................
......................................................................................................................................................................................
......................................................................................................................................................................................
......................................................................................................................................................................................
......................................................................................................................................................................................
......................................................................................................................................................................................
......................................................................................................................................................................................
......................................................................................................................................................................................
......................................................................................................................................................................................
......................................................................................................................................................................................
......................................................................................................................................................................................
......................................................................................................................................................................................
......................................................................................................................................................................................
......................................................................................................................................................................................
......................................................................................................................................................................................
......................................................................................................................................................................................
......................................................................................................................................................................................
......................................................................................................................................................................................
......................................................................................................................................................................................
......................................................................................................................................................................................
......................................................................................................................................................................................
......................................................................................................................................................................................
......................................................................................................................................................................................
......................................................................................................................................................................................
......................................................................................................................................................................................
......................................................................................................................................................................................
......................................................................................................................................................................................
......................................................................................................................................................................................
......................................................................................................................................................................................
......................................................................................................................................................................................
......................................................................................................................................................................................
......................................................................................................................................................................................
......................................................................................................................................................................................
......................................................................................................................................................................................
......................................................................................................................................................................................
ENGLISH
– 21 –
Page 25

MEMO
......................................................................................................................................................................................
......................................................................................................................................................................................
......................................................................................................................................................................................
......................................................................................................................................................................................
......................................................................................................................................................................................
......................................................................................................................................................................................
......................................................................................................................................................................................
......................................................................................................................................................................................
......................................................................................................................................................................................
......................................................................................................................................................................................
......................................................................................................................................................................................
......................................................................................................................................................................................
......................................................................................................................................................................................
......................................................................................................................................................................................
......................................................................................................................................................................................
......................................................................................................................................................................................
......................................................................................................................................................................................
......................................................................................................................................................................................
......................................................................................................................................................................................
......................................................................................................................................................................................
......................................................................................................................................................................................
......................................................................................................................................................................................
......................................................................................................................................................................................
......................................................................................................................................................................................
......................................................................................................................................................................................
......................................................................................................................................................................................
......................................................................................................................................................................................
......................................................................................................................................................................................
......................................................................................................................................................................................
......................................................................................................................................................................................
......................................................................................................................................................................................
......................................................................................................................................................................................
......................................................................................................................................................................................
......................................................................................................................................................................................
......................................................................................................................................................................................
......................................................................................................................................................................................
......................................................................................................................................................................................
......................................................................................................................................................................................
......................................................................................................................................................................................
– 22 –
Page 26

MEMO
......................................................................................................................................................................................
......................................................................................................................................................................................
......................................................................................................................................................................................
......................................................................................................................................................................................
......................................................................................................................................................................................
......................................................................................................................................................................................
......................................................................................................................................................................................
......................................................................................................................................................................................
......................................................................................................................................................................................
......................................................................................................................................................................................
......................................................................................................................................................................................
......................................................................................................................................................................................
......................................................................................................................................................................................
......................................................................................................................................................................................
......................................................................................................................................................................................
......................................................................................................................................................................................
......................................................................................................................................................................................
......................................................................................................................................................................................
......................................................................................................................................................................................
......................................................................................................................................................................................
......................................................................................................................................................................................
......................................................................................................................................................................................
......................................................................................................................................................................................
......................................................................................................................................................................................
......................................................................................................................................................................................
......................................................................................................................................................................................
......................................................................................................................................................................................
......................................................................................................................................................................................
......................................................................................................................................................................................
......................................................................................................................................................................................
......................................................................................................................................................................................
......................................................................................................................................................................................
......................................................................................................................................................................................
......................................................................................................................................................................................
......................................................................................................................................................................................
......................................................................................................................................................................................
......................................................................................................................................................................................
......................................................................................................................................................................................
......................................................................................................................................................................................
ENGLISH
– 23 –
Page 27

MEMO
......................................................................................................................................................................................
......................................................................................................................................................................................
......................................................................................................................................................................................
......................................................................................................................................................................................
......................................................................................................................................................................................
......................................................................................................................................................................................
......................................................................................................................................................................................
......................................................................................................................................................................................
......................................................................................................................................................................................
......................................................................................................................................................................................
......................................................................................................................................................................................
......................................................................................................................................................................................
......................................................................................................................................................................................
......................................................................................................................................................................................
......................................................................................................................................................................................
......................................................................................................................................................................................
......................................................................................................................................................................................
......................................................................................................................................................................................
......................................................................................................................................................................................
......................................................................................................................................................................................
......................................................................................................................................................................................
......................................................................................................................................................................................
......................................................................................................................................................................................
......................................................................................................................................................................................
......................................................................................................................................................................................
......................................................................................................................................................................................
......................................................................................................................................................................................
......................................................................................................................................................................................
......................................................................................................................................................................................
......................................................................................................................................................................................
......................................................................................................................................................................................
......................................................................................................................................................................................
......................................................................................................................................................................................
......................................................................................................................................................................................
......................................................................................................................................................................................
......................................................................................................................................................................................
......................................................................................................................................................................................
......................................................................................................................................................................................
......................................................................................................................................................................................
– 24 –
<
H526: A
>
Page 28

SPLIT-KLIMAANLAGE
INNENGERÄT
MODELL
RAK-18QH8S(W)
RAK-18QH8(W)
RAK-25QH8(W)
RAK-35QH8(W)
RAK-50QH8(W)
RAK-18QH8S(B)
RAK-18QH8(B)
RAK-25QH8(B)
RAK-35QH8(B)
RAK-50QH8(B)
INNENGERÄT
DEUTSCH
RAK-18QH8S(W)
RAK-18QH8(W)
RAK-25QH8(W)
RAK-35QH8(W)
RAK-50QH8(W)
RAK-18QH8S(B)
RAK-18QH8(B)
RAK-25QH8(B)
RAK-35QH8(B)
RAK-50QH8(B)
– 5 –
Page 29

SICHERHEITSHINWEISE
Lesen Sie die folgenden Sicherheitshinweise sorgfältig durch, bevor Sie das Gerät in Betrieb nehmen, um eine ordnungsgemäße ●
Verwendung sicherzustellen.
Achten Sie besonders auf mit
● Warnung und Vorsicht gekennzeichnete Hinweise. Wenn mit „Warnung“ gekennzeichnete Hinweise
nicht strengstens beachtet werden, kann dies schwere oder tödliche Verletzungen zur Folge haben. Wenn mit „Vorsicht“ gekennzeichnete
Hinweise nicht ordnungsgemäß beachtet werden, kann dies schwerwiegende Folgen haben. Bitte beachten Sie alle Anweisungen
genauestens, um die Sicherheit zu gewährleisten.
Die Symbole haben folgende Bedeutung:
●
Stellen Sie sicher, dass das Erdungskabel angeschlos-
sen ist.
Dieses Symbol weist darauf hin, dass die
Anweisungen beachtet werden müssen.
Bewahren Sie dieses Handbuch nach dem Lesen auf.
●
VORSICHTSMASSNAHMEN FÜR DIE INSTALLATION
Versuchen Sie nicht, das Gerät selbst zusammenzubauen. ●
Wenn Sie das Gerät selbst zusammenbauen, kann es zu Wasserlecks, Störungen,
Kurzschlüssen oder einem Brand kommen.
Beauftragen Sie Ihren Händler oder einen qualifi zierten Techniker mit der Installation ●
des Geräts. Wenn Sie das Gerät selbst installieren, kann es zu Wasserlecks, Störungen,
Kurzschlüssen oder einem Brand kommen.
WARNUNG
VORSICHT
Schließen Sie das Erdungskabel an. ●
Verlegen Sie das Erdungskabel nicht in der Nähe von Wasser- oder Gasleitungen, Blitzableitern
oder dem Erdungskabel des Telefons. Unsachgemäße Installation des Erdungskabels kann
zu Stromschlägen führen.
Verwenden Sie ausschließlich die angegebenen Leitungen für R410A. Die Verwendung
●
anderer Leitungen kann defekte Kupferleitungen oder Störungen zur Folge haben.
Es muss ein Trennschalter installiert werden, der für den Montageort geeignet ist. Ohne ●
Trennschalter besteht die Gefahr von Stromschlägen.
Installieren Sie das Gerät nicht in der Nähe von Orten, an denen sich entzündbare Gase ●
befi nden. Das Außengerät kann in Brand geraten, wenn entzündbare Gase in seiner Nähe
entweichen.
Stellen Sie bei der Installation des Abfl ussschlauchs einen ungehinderten Wasserfl uss
●
sicher.
VORSICHTSMASSNAHMEN FÜR DEN TRANSPORT UND FÜR WARTUNGSARBEITEN
Bei ungewöhnlichen Vorkommnissen (wie Brandgeruch) nehmen Sie das Gerät außer ●
Betrieb und schalten den Trennschalter aus. Wenden Sie sich an Ihren Händler. Wenn Sie
das Gerät bei ungewöhnlichen Vorkommnissen weiter betreiben, kann es zu Störungen,
W
A
R
N
U
N
G
Kurzschlüssen oder einem Brand kommen.
●
Wenden Sie sich an Ihren Händler, um Wartungsarbeiten durchführen zu lassen.
Unsachgemäße Wartungsarbeiten durch den Gerätebesitzer können zu Stromschlägen und
einem Brand führen.
●
Wenden Sie sich an Ihren Händler, wenn das Gerät entfernt oder neu installiert werden
muss. Wenn Sie das Gerät selbst unsachgemäß entfernen und neu installieren, kann es zu
Stromschlägen oder einem Brand kommen.
Wenn das Netzkabel beschädigt ist, muss es durch das spezielle Kabel ersetzt werden, das
●
bei autorisierten Service-/Ersatzteilzentren erhältlich ist.
VORSICHTSMASSNAHMEN FÜR DEN BETRIEB
Das abgebildete Symbol weist auf ein Verbot hin.
Vermeiden Sie im Interesse Ihrer Gesundheit direkte Zugluft über einen längeren ●
Zeitraum.
W
A
R
N
U
N
G
Verwenden Sie keinen Leiter als Sicherungsdraht, da dies zu einem tödlichen Unfall ●
führen könnte.
Stecken Sie keine Gegenstände (Finger, Stangen usw.) in den Lufteinlass oder -auslass. Da ●
der Lüfter mit hoher Drehzahl rotiert, kann dies zu Verletzungen führen. Stellen Sie vor dem
Reinigen sicher, dass das Gerät ausgeschaltet ist und der Trennschalter auf AUS gestellt
wurde.
Trennen Sie das Gerät während eines Gewitters von der Stromversorgung und schalten
●
Sie den Trennschalter aus.
– 26 –
Page 30

VORSICHTSMASSNAHMEN FÜR DEN BETRIEB
Das Produkt muss entsprechend der Herstellerspezifi kation bedient ●
werden und ist für keine sonstigen Verwendungszwecke vorgesehen.
Versuchen Sie nicht, das Gerät mit nassen Händen zu bedienen – es besteht ●
Lebensgefahr.
●
Wenn Sie das Gerät bei gleichzeitigem Gebrauch von Brennstoffen
betreiben, lüften Sie den Raum regelmäßig, um eine ausreichende
Sauerstoffzufuhr zu gewährleisten.
Richten Sie die kalten Luftströmung aus der Luftaustrittsblende nicht direkt ●
auf Geräte zum Heizen und zur Warmwasserbereitung (z. B. Wasserkocher,
Ofen), da sie dadurch in ihrer Funktion beeinträchtigt werden können.
Überprüfen Sie regelmäßig, dass der Anbaurahmen für das Außengerät ●
sicher befestigt und nicht beschädigt ist. Andernfalls könnte das
Außengerät herunterfallen und eine Gefahr darstellen.
Achten Sie beim Reinigen des Geräts darauf, dass kein Wasser auf das ●
Gerätegehäuse tropft oder in das Gehäuse eindringt, da es sonst zu einem
Kurzschluss kommen kann.
●
Verwenden Sie keine Aerosole oder Haarspray in der Nähe des Innengeräts.
Die chemische Substanz kann sich an den Wärmetauscherrippen anlagern und
den Verdampfer-Wasserdurchfl uss zur Abfl usswanne blockieren. Das Wasser
tropft dann auf den Querstromlüfter und läuft aus dem Innengerät heraus.
DEUTSCH
V
O
Schalten Sie beim Reinigen das Gerät und den Trennschalter aus, da der ●
Hochgeschwindigkeitslüfter im Gerät ein Verletzungsrisiko darstellt.
R
S
●
I
C
Schalten Sie den Trennschalter aus, wenn das Gerät für einen längeren
Zeitraum nicht verwendet wird.
H
T
Stellen Sie sich nicht auf das Außengerät und stellen Sie keine ●
Gegenstände darauf ab.
Stellen Sie keine Wasserbehälter (wie z. B. eine Vase) auf das Innengerät, ●
um zu vermeiden, dass Wasser in das Gerät eindringt. Tropfwasser kann die
Geräteisolierung beschädigen und zu einem Kurzschluss führen.
Stellen Sie keine Pfl anzen direkt unter den Luftstrom, da die Zugluft den ●
Pfl anzen schadet.
Hängen Sie an den beweglichen Blenden keine Wäsche auf. ●
Die beweglichen Blenden könnten sich dadurch lösen und schwere
Verletzungen verursachen.
Wenn das Gerät bei geöffneten Türen und/oder Fenstern betrieben wird (bei einer Luftfeuchtigkeit ●
im Raum von über 80 %) und der Luftdefl ektor für eine längere Zeit nach unten weist oder sich
automatisch bewegt, kondensiert Wasser am Luftdefl ektor und tropft gelegentlich herunter. Damit
Ihre Einrichtung nicht feucht wird, vermeiden Sie derartige Betriebsbedingungen über einen
längeren Zeitraum.
Wenn die Temperatur im Raum die Kühl- bzw. Heizleistung des Geräts übersteigt (z. B. wenn sich ●
mehrere Personen im Raum aufhalten, zusätzliche Heizgeräte verwendet werden usw.), kann die
voreingestellte Raumtemperatur nicht erreicht werden.
Dieses Gerät sollte nicht von Kindern oder Personen bedient werden, die eingeschränkte körperliche,
●
sensorische oder mentale Fähigkeiten besitzen oder nicht über die entsprechenden Erfahrungen
oder das entsprechende Wissen verfügen, es sei denn, sie wurden in der Bedienung des Gerätes
eingewiesen und werden bei den entsprechenden Tätigkeiten beaufsichtigt. Achten Sie darauf, dass
Kinder nicht mit dem Gerät spielen.
– 27 –
Page 31

BEZEICHNUNGEN UND FUNKTIONEN DER EINZELNEN TEILE
INNENGERÄT
LUFTREINIGUNGSFILTER
(Siehe Bedienungsanleitung)
LUFTFILTER
Verhindert das Eindringen von Staub in das Innengerät.
(Siehe Bedienungsanleitung)
FRONTBLENDE
BEWEGLICHE BLENDE
Sie ist im Klimaanlagenbetrieb geöffnet und wird
geschlossen, wenn die Klimaanlage nicht genutzt
wird. (Es kann vorkommen, dass die Blende auch im
Betriebsmodus geschlossen ist.)
HORIZONTALER DEFLEKTOR ● VERTIKALER
DEFLEKTOR (LUFTAUSLASS)
(Siehe Bedienungsanleitung)
ANZEIGEN DES INNENGERÄTS
Leuchten, die den Betriebszustand anzeigen.
(Siehe Seite 7)
FERNBEDIENUNG
Sendet ein Betriebssignal an das Innengerät für den
Betrieb des gesamten Geräts.
(Siehe Bedienungsanleitung)
Bewegliche Blende ■
Sie wird im Klimaanlagenbetrieb automatisch geöffnet und wieder geschlossen, wenn die Klimaanlage nicht mehr ●
genutzt wird. Vermeiden Sie mechanische Änderungen der Blendenstellung, da diese den Blendenmechanismus
beschädigen können.
Berühren Sie die bewegliche Blende nicht während des Betriebs, da Sie sich dabei die Finger einklemmen
●
könnten.
HINWEIS
Luftreinigungsfi lter und Filter mit lufterfrischender Funktion können gewaschen und bis zu 20 Mal ●
wiederverwendet werden, indem sie mit einem Staubsauger oder durch Abspülen unter fl ießendem Wasser
gereinigt werden. Die Typennummer für diesen Luftreinigungsfi lter lautet <SPX-CFH20>. Bitte geben Sie
diese Nummer an, wenn Sie einen neuen Luftreinigungsfi lter bestellen möchten.
Der Luftreinigungsfi lter sollte jeden Monat gereinigt werden bzw. früher, falls er sich merklich zugesetzt hat.
●
Bei Dauergebrauch kann der Luftreinigungsfi lter seine lufterfrischende Funktion verlieren. Für eine optimale
Leistung sollte er je nach Anforderung der unterschiedlichen Anwendungen einmal pro Jahr ausgetauscht
werden.
BEZEICHNUNG UND ABMESSUNGEN DES MODELLS
MODELL
RAK-18QH8(W)
RAK-25QH8(W)
RAK-35QH8(W)
RAK-50QH8(W)
RAK-18QH8(B)
RAK-25QH8(B)
RAK-35QH8(B)
RAK-50QH8(B)
BREITE (mm)
795
– 6 –
HÖHE (mm)
295
TIEFE (mm)
198
Page 32

ANZEIGEN DES INNENGERÄTS
BETRIEBSANZEIGE
1. Öffnen der Frontblende
Bewegliche Blende
Frontblende
FILTER-LAMPE
Wenn das Gerät eine Gesamtbetriebsdauer von ca.
200 Stunden erreicht hat, leuchtet die FILTER-Lampe auf
und zeigt dadurch an, dass der Filter gereinigt werden muss.
Die Lampe erlischt, wenn die Taste (AUTOMATIKSCHWINGKLAPPE) gedrückt wird, während sich das Gerät
im STANDBY-MODUS befi ndet.
BETRIEBSANZEIGE
Diese Anzeige leuchtet während des Betriebs auf.
In den folgenden Fällen blinkt die BETRIEBSANZEIGE beim
Heizbetrieb:
(1) Während des Vorheizens
Für die Dauer von ca. 2 bis 3 Minuten nach dem
Starten
(2) Während des Entfrosterbetriebs
Die Entfrostung wird etwa einmal pro Stunde
durchgeführt, wenn sich Frost auf dem
Wärmetauscher des Außengeräts bildet. Die
Entfrostungsdauer beträgt jeweils ca. 5 bis 10
Minuten.
SIGNALEMPFÄNGER
TIMER-LAMPE
Diese Lampe leuchtet, wenn der Timer in Betrieb ist.
DEUTSCH
Hier anfassen
Halten Sie die bewegliche Blende ●
Hier anfassen
MANUELLER EIN-/AUSSCHALTER
Mit diesem Schalter können Sie das Gerät ein- bzw. ausschalten, wenn die Fernbedienung nicht funktioniert.
Wenn Sie den manuellen Ein-/Ausschalter drücken, wird das Gerät im zuvor eingestellten Betriebsmodus
●
gestartet.
●
Wenn der Betrieb über den manuellen Ein-/Ausschalter gestartet wird, nachdem die Stromzufuhr unterbrochen
und dann wiederhergestellt wurde, läuft das Gerät im Automatikbetrieb.
Frontblende anheben ●
nicht fest (weder wenn die
Frontblende geöffnet noch wenn sie
geschlossen ist).
VORSICHT
Versuchen Sie in keinem Fall, die bewegliche Blende mit Gewalt von Hand zu öffnen. ●
Das manuelle Öffnen oder Schließen der beweglichen Blende kann zu Störungen führen. (Die bewegliche
Blende wird automatisch geöffnet und geschlossen, wenn die Stromversorgung ein- bzw. ausgeschaltet
wird oder das Gerät in Betrieb ist bzw. angehalten wird.)
– 7 –
Page 33

2. Schließen der Frontblende
● Blende nach unten drücken.
Drücken Sie zunächst auf der rechten und linken ●
Seite gegen die Frontblende und schließlich in der
Mitte, bis ein Klicken zu hören ist.
VORSICHT
Wenn die Frontblende nicht fest eingesetzt ist, kann sich die Blende ●
lösen und herunterfallen.
Vermeiden Sie zusätzliche Kraftanwendung auf die Frontblende,
●
wenn sie in aufrechter Position geöffnet ist.
Auch ein häufi ges Entfernen der Frontblende von der Frontabdeckung
kann Schäden verursachen.
Hinweis
Verwenden Sie die Raumklimaanlage nicht zum Kühlen, wenn die Außentemperatur unter –10 °C liegt. ●
Die empfohlenen maximalen und minimalen Betriebstemperaturen für den Heiz- und den Kühlbetrieb sind im
Folgenden aufgeführt:
Kühlbetrieb Heizbetrieb
Minimal Maximal Minimal Maximal
Feuchtkugel (°C) 15 23 12 19
Feuchtkugel (°C) 15 26 1 15
Trockenkugel (°C) 21 32 20 27
Innen
Trockenkugel (°C) 21 43 2 21
Außen
– 8 –
Page 34

BEZEICHNUNGEN UND FUNKTIONEN DER FERNBEDIENUNGSELEMENTE
FERNBEDIENUNG
Hiermit wird der Betrieb des Innengeräts gesteuert. Die Reichweite der Fernbedienung beträgt etwa 7 Meter. ●
Wird die Innenraumbeleuchtung elektronisch geregelt, kann die Reichweite der Fernbedienung kürzer sein.
Dieses Gerät kann mit der bereitgestellten Halterung an der Wand montiert werden. Stellen Sie vor der
Montage sicher, dass das Innengerät über die Fernbedienung gesteuert werden kann.
●
Gehen Sie umsichtig mit der Fernbedienung um. Die Signalübertragung kann beeinträchtigt werden, wenn
sie fallen gelassen oder feucht wird.
Wenn neue Batterien in die Fernbedienung eingelegt werden, dauert es etwa 10 Sekunden, bis das Gerät
●
auf Befehle reagiert und angesteuert werden kann.
●
Infrarotfenster/Übertragungssignal
Richten Sie dieses Infrarotfenster auf das Innengerät, um es zu steuern.
Das Übertragungssignal blinkt, wenn ein Signal gesendet wird.
●
Display
Darauf werden die gewählte Raumtemperatur, die aktuelle Uhrzeit, der TimerStatus, die Funktion und die ausgewählte Drehzahl angezeigt.
START/STOPP-Taste ●
Drücken Sie diese Taste, um das Gerät einzuschalten. Durch erneutes Drücken
wird das Gerät ausgeschaltet.
●
BETRIEBSZEIT-Taste
Mit dieser Taste stellen Sie den Betriebszeit-Timer ein.
TEMPERATUR-Tasten ●
Mit diesen Tasten passen Sie die Temperatureinstellung an. (Wenn Sie die Taste
gedrückt halten, ändert sich der Wert schneller.)
UHRZEIT-Taste
●
Mit dieser Taste stellen Sie die Uhrzeit und das Datum ein bzw. überprüfen die
Einstellung.
RESET-Tasten
●
FUNKTIONSAUSWAHL ●
Mit dieser Taste wählen Sie den Betriebsmodus aus. Bei jedem Tastendruck
AUTO
HEIZEN
ENTFEUCHTEN
KÜHLEN
LÜFTER
LÜFTERDREHZAHL
GERÄUSCHARM
NIEDRIG
MITTEL
HOCH
BETRIEBSZEIT
STOPP (STORNIEREN)
START
(RESERVIEREN)
START/STOPP
UHRZEIT
TIMER-EINSTELLUNG
TIMER-AUSWAHL
EINSCHALT-TIMER
AUSSCHALT-TIMER
AUTOMATIKSCHWINGKLAPPE
ERHÖHTER
LUFTSTROM
wechselt das Gerät nacheinander in der folgenden Reihenfolge zwischen den
Betriebsmodi: von
(KÜHLEN) und zu (LÜFTER).
LÜFTERDREHZAHLAUSWAHL ●
Hiermit wird die Lüfterdrehzahl festgelegt. Bei jedem Tastendruck wechselt
das Gerät nacheinander in der folgenden Reihenfolge zwischen den
Zirkulationseinstellungen: von
(NIEDRIG) zu (GERÄUSCHARM). (Mit dieser Taste kann die optimale/
bevorzugte Lüfterdrehzahl für den jeweiligen Betriebsmodus gewählt werden).
Taste AUTOMATIK-SCHWINGKLAPPE ●
Legt den Winkel für den horizontalen Luftdefl ektor fest.
ERHÖHTER LUFTSTROM ●
Mit dieser Taste aktivieren Sie eine schnellere und angenehmere Klimatisierung.
TIMER-Steuerung ●
Mit dieser Taste stellen Sie den Timer ein.
AUSSCHALT-TIMER-Taste ● Wählen Sie die Ausschaltzeit.
EINSCHALT-TIMER-Taste ● Wählen Sie die Einschaltzeit.
RESERVIEREN-Taste
● Reservieren Sie eine Zeiteinstellung.
STORNIEREN-Taste ● Stornieren Sie die Zeitreservierung.
Vorsichtsmaßnahmen für die Verwendung
●
Schützen Sie die Fernbedienung vor:
direkter Sonneneinstrahlung ●
unmittelbarer Einwirkung eines Heizgeräts ●
Gehen Sie umsichtig mit der Fernbedienung um. Lassen Sie sie nicht fallen ●
und schützen Sie sie vor Wasser.
Nachdem das Außengerät angehalten wurde, startet es erst nach etwa
●
3 Minuten wieder (sofern Sie es nicht über den Netzschalter aus und wieder
einschalten bzw. das Netzkabel abziehen und dann wieder einstecken).
Das dient zum Schutz des Geräts und weist nicht auf einen Fehler hin.
●
Wenn Sie die FUNKTIONSAUSWAHL-Taste während des Betriebs drücken,
wird das Gerät zu seinem Schutz etwa 3 Minuten lang angehalten.
(AUTO) zu (HEIZEN) zu (ENTFEUCHTEN) zu
(AUTO) zu (HOCH) zu (MITTEL) zu
– 28 –
Page 35

VERSCHIEDENE FUNKTIONEN
■ Automatische Neustartfunktion
Bei einem Stromausfall wird das Gerät automatisch im vorherigen Betriebsmodus und mit der vorherigen ●
Luftstromrichtung neu gestartet, wenn die Stromversorgung wiederhergestellt ist.
(Da das Gerät nicht über die Fernbedienung angehalten wurde.)
Wenn der Betrieb nach Wiederherstellung der Stromversorgung nicht fortgesetzt werden soll, schalten Sie ●
die Stromversorgung aus.
Wenn Sie den Trennschalter einschalten, wird das Gerät automatisch im vorherigen Betriebsmodus und mit
der vorherigen Luftstromrichtung neu gestartet.
Hinweis: 1. Wenn Sie die automatische Neustartfunktion nicht benötigen, wenden Sie sich an Ihren Händler
2. Die automatische Neustartfunktion ist im Timer- und Betriebszeit-Timer-Modus nicht verfügbar.
oder deaktivieren Sie sie über die Fernbedienung.
AUTOMATIKBETRIEB
Das Gerät ermittelt den Betriebsmodus (HEIZEN, KÜHLEN oder ENTFEUCHTEN) automatisch anhand der
aktuellen Raumtemperatur. Der gewählte Betriebsmodus ändert sich, wenn sich die Raumtemperatur ändert.
Der Betriebsmodus ändert sich jedoch nicht, wenn das Innengerät mit einem Außengerät der Multi-Bauart
verbunden ist.
DEUTSCH
Drücken Sie die FUNKTIONSAUSWAHL, damit auf dem Display
der Betriebsmodus
Bei Auswahl von AUTO ermittelt das Gerät den Betriebsmodus ●
(HEIZEN, KÜHLEN oder ENTFEUCHTEN) automatisch
1
anhand der aktuellen Raumtemperatur. Der Betriebsmodus
ändert sich jedoch nicht, wenn das Innengerät mit einem
Außengerät der Multi-Bauart verbunden ist.
Wenn der vom Gerät automatisch gewählte Modus Ihnen
●
nicht zusagt, können Sie die Moduseinstellung (HEIZEN,
ENTFEUCHTEN, KÜHLEN oder LÜFTER) manuell ändern.
START
STOPP
Drücken Sie die Taste (START/STOPP).
Bei Betriebsstart wird ein Signalton ausgegeben.
Drücken Sie die Taste erneut, um das Gerät anzuhalten.
Da die Einstellungen im Speicher der Fernbedienung gesichert ■
werden, müssen Sie das nächste Mal nur die Taste (START/
STOPP) drücken.
Sie können die Temperatureinstellung nach Bedarf um maximal
3 °C erhöhen oder reduzieren.
Die voreingestellte Temperatur und die tatsächliche
●
Raumtemperatur können je nach Bedingungen etwas
abweichen.
Im Modus AUTO wird die voreingestellte Temperatur nicht auf ●
dem Display angezeigt. Wenn Sie die Einstellung ändern, gibt
das Innengerät einen Signalton aus.
Wenn Sie die Taste (LÜFTERDREHZAHL) drücken, stehen die
Einstellungen AUTO, NIEDRIG und GERÄUSCHARM zur Auswahl.
(AUTO) angezeigt wird.
Durch Drücken der TEMPERATUR-Taste
ändert sich die Temperatureinstellung in
Schritten von 1 °C.
– 29 –
Page 36
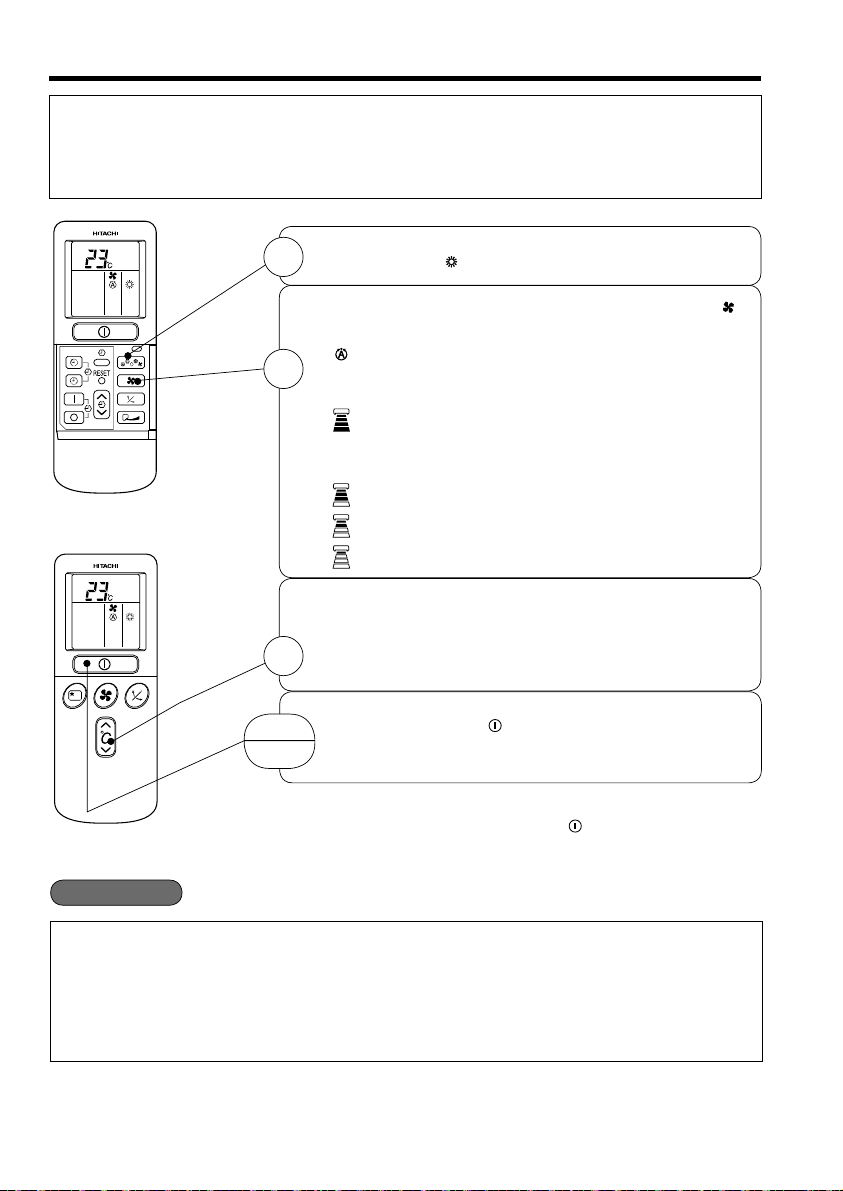
HEIZBETRIEB
Verwenden Sie das Gerät zum Heizen, wenn die Außentemperatur unter 21 °C liegt. ●
Wenn die Außentemperatur zu hoch ist (über 21 °C), funktioniert die Heizfunktion möglicherweise nicht, um
das Gerät zu schützen.
Verwenden Sie dieses Gerät ab einer Außentemperatur von –15 °C, um einen langfristig zuverlässigen ●
Gerätebetrieb zu gewährleisten.
Drücken Sie die FUNKTIONSAUSWAHL, damit auf dem Display
der Betriebsmodus (HEIZEN) angezeigt wird.
1
Stellen Sie die gewünschte LÜFTERDREHZAHL über die Taste
(LÜFTERDREHZAHL) ein (die Einstellung wird auf dem Display
angezeigt).
2
(AUTO) : Die Lüfterdrehzahl wird automatisch
(HOCH) : Sparsamer Betrieb, da der Raum
Zu Beginn könnte es aber noch
(MITTEL) : Mittlere Lüfterdrehzahl.
(NIEDRIG) : Niedrige Lüfterdrehzahl.
(GERÄUSCHARM) : Sehr niedrige Lüfterdrehzahl.
Stellen Sie die gewünschte Raumtemperatur über die
TEMPERATUR-Tasten ein (die Einstellung wird auf dem Display
angezeigt).
Die Temperatureinstellung und die tatsächliche Raumtemperatur
3
können je nach Bedingungen etwas abweichen.
gemäß der Luftauslasstemperatur
angepasst.
schnell erwärmt wird.
unangenehm kalt sein.
START
STOPP
Drücken Sie die Taste
Heizbetriebs wird ein Signalton ausgegeben. Drücken Sie die Taste
erneut, um das Gerät anzuhalten.
■
Da die Einstellungen im Speicher der Fernbedienung gesichert werden,
müssen Sie das nächste Mal nur die Taste (START/STOPP) drücken.
(START/STOPP). Zu Beginn des
■ Entfrosten
Die Entfrostung wird etwa einmal pro Stunde durchgeführt, wenn sich Frost auf dem Wärmetauscher des
Außengeräts bildet. Die Entfrostungsdauer beträgt jeweils ca. 5 bis 10 Minuten.
Beim Entfrosten blinkt die Betriebsanzeige im folgenden Muster: 3 Sekunden ein, 0,5 Sekunden aus.
Die maximale Dauer für den Entfrosterbetrieb beträgt 20 Minuten.
Besteht jedoch eine Verbindung mit einem Außengerät der Multi-Bauart, beträgt die maximale Betriebsdauer für
den Entfrosterbetrieb 15 Minuten.
(Wenn eine längere Leitung als gewöhnlich verwendet wird, steigt die Wahrscheinlichkeit der Frostbildung.)
– 30 –
Page 37

ENTFEUCHTERBETRIEB
Verwenden Sie das Gerät zum Entfeuchten, wenn die Raumtemperatur über 16 °C liegt.
Unter 15 °C steht die Entfeuchterfunktion nicht zur Verfügung.
Drücken Sie die FUNKTIONSAUSWAHL, damit auf dem Display
der Betriebsmodus
1
Die Einstellung für die LÜFTERDREHZAHL ist NIEDRIG oder
GERÄUSCHARM.
(ENTFEUCHTEN) angezeigt wird.
Stellen Sie die gewünschte Raumtemperatur über die
TEMPERATUR-Taste ein (die Einstellung wird auf dem Display
angezeigt).
2
START
STOPP
Drücken Sie die Taste (START/STOPP). Zu Beginn des
Entfeuchterbetriebs wird ein Signalton ausgegeben. Drücken Sie
die Taste erneut, um das Gerät anzuhalten.
Da die Einstellungen im Speicher der Fernbedienung gesichert werden,
■
müssen Sie das nächste Mal nur die Taste (START/STOPP)
drücken.
Für den Entfeuchterbetrieb sollte die
Raumtemperatur zwischen 20 und 26 °C liegen.
■ Entfeuchterfunktion
Wenn die Raumtemperatur über der Temperatureinstellung liegt: Das Gerät entfeuchtet den Raum und kühlt ●
die Raumtemperatur auf den voreingestellten Wert.
Wenn die Raumtemperatur unter der Temperatureinstellung liegt: Das Entfeuchten erfolgt bei einer
Temperatureinstellung, die etwas unter der aktuellen Raumtemperatur liegt. Dabei spielt es keine Rolle,
welche Temperatur eingestellt ist. Der Entfeuchterbetrieb wird beendet (d. h., das Innengerät bläst keine Luft
mehr aus), sobald die Raumtemperatur unter die Temperatureinstellung fällt.
Je nach Anzahl der Personen im Raum oder anderen Raumbedingungen wird die eingestellte Raumtemperatur
●
möglicherweise nicht erreicht.
DEUTSCH
– 31 –
Page 38

KÜHLBETRIEB
Verwenden Sie das Gerät zum Kühlen, wenn die Außentemperatur zwischen 21 und 43 °C liegt.
Wenn die Luftfeuchtigkeit im Raum sehr hoch ist (80 %), kann sich Kondensat am Luftauslassgitter des
Innengeräts bilden.
Drücken Sie die FUNKTIONSAUSWAHL, damit auf dem Display
der Betriebsmodus (KÜHLEN) angezeigt wird.
1
Stellen Sie die gewünschte LÜFTERDREHZAHL über die Taste
(LÜFTERDREHZAHL) ein (die Einstellung wird auf dem Display
angezeigt).
(AUTO) : Die LÜFTERDREHZAHL ist
2
(HOCH) : Sparsamer Betrieb, da der Raum
(MITTEL) : Mittlere Lüfterdrehzahl.
(NIEDRIG) : Niedrige Lüfterdrehzahl.
(GERÄUSCHARM) : Sehr niedrige Lüfterdrehzahl.
Stellen Sie die gewünschte Raumtemperatur über die
TEMPERATUR-Taste ein (die Einstellung wird auf dem Display
angezeigt).
3
Die Temperatureinstellung und die tatsächliche Raumtemperatur
können je nach Bedingungen etwas abweichen.
Drücken Sie die Taste
START
STOPP
Kühlbetriebs wird ein Signalton ausgegeben. Drücken Sie die
Taste erneut, um das Gerät anzuhalten. Die Kühlfunktion wird
nicht gestartet, wenn die Temperatureinstellung über der aktuellen
Raumtemperatur liegt (auch wenn die BETRIEBSANZEIGE
leuchtet). Der Kühlbetrieb wird gestartet, sobald Sie eine
Temperatureinstellung unter der aktuellen Raumtemperatur
wählen.
Da die Einstellungen im Speicher der Fernbedienung gesichert
■
werden, müssen Sie das nächste Mal nur die Taste (START/
STOPP) drücken.
zunächst auf HOCH eingestellt
und wird automatisch auf MITTEL
umgestellt, wenn die voreingestellte
Temperatur erreicht ist.
schnell gekühlt wird.
(START/STOPP). Zu Beginn des
– 32 –
Page 39

LÜFTERBETRIEB
Sie können das Gerät einfach als Luftumwälzungsventilator verwenden. Verwenden Sie diese Funktion, um
das Innere des Innengeräts am Ende des Sommers zu trocknen.
Drücken Sie die FUNKTIONSAUSWAHL, damit auf dem Display
der Betriebsmodus (LÜFTER) angezeigt wird.
1
2
START
STOPP
Drücken Sie die Taste
(HOCH) : Maximaler Luftstrom.
(MITTEL) : Mittlere Lüfterdrehzahl.
(NIEDRIG) : Niedrige Lüfterdrehzahl.
(GERÄUSCHARM) : Sehr niedrige Lüfterdrehzahl.
Drücken Sie die Taste
Lüfterbetriebs wird ein Signalton ausgegeben. Drücken Sie die
Taste erneut, um das Gerät anzuhalten.
(LÜFTERDREHZAHL).
(START/STOPP). Zu Beginn des
LÜFTERDREHZAHL (AUTO) ..... Wenn der Modus AUTO für die Lüfterdrehzahl beim Kühl-/Heizbetrieb
gewählt wird:
Die Lüfterdrehzahl wird automatisch gemäß der Auslasslufttemperatur
●
angepasst.
Heizbetrieb
Kühlbetrieb
Bei einem großen Unterschied zwischen Raumtemperatur und eingestellter ●
Temperatur läuft der Lüfter mit der Drehzahleinstellung HOCH an.
●
Wenn die Raumtemperatur die eingestellte Temperatur erreicht hat, wird die
Lüfterdrehzahl automatisch auf NIEDRIG umgestellt.
Bei einem großen Unterschied zwischen Raumtemperatur und eingestellter
●
Temperatur läuft der Lüfter mit der Drehzahleinstellung HOCH an.
Wenn die Raumtemperatur die eingestellte Temperatur erreicht hat, erfolgt ●
der Kühlbetrieb so, dass die Lüfterdrehzahl und die Raumtemperatur
entsprechend geändert werden, um optimale Bedingungen für eine
natürliche, gesunde Kühlung zu erreichen.
ERHÖHTER LUFTSTROM
Drücken Sie während des Betriebs die Taste ■ , um einen der Betriebsmodi
zu wählen, mit dem die bevorzugte Luftstromrichtung eingestellt und die
Luftstromgeschwindigkeit so angepasst wird, dass der Luftstrom alle Bereiche
des Raums erreicht. (Im Kühlbetrieb werden die Luftstromrichtung und die
Luftstromgeschwindigkeit nach drei Betriebsstunden auf die ursprünglichen
Einstellungen zurückgesetzt.)
Wenn die Taste
● (ERHÖHTER LUFTSTROM) im Modus AUTOMATIK-
SCHWINGKLAPPE gedrückt wird, wechselt das Gerät vom Modus AUTOMATIKSCHWINGKLAPPE in den Modus ERHÖHTER LUFTSTROM.
Wenn die Taste ● (AUTOMATIK-SCHWINGKLAPPE) im Modus ERHÖHTER
LUFTSTROM gedrückt wird, wechselt das Gerät vom Modus ERHÖHTER
LUFTSTROM in den Modus AUTOMATIK-SCHWINGKLAPPE.
Wird die Taste ● (ERHÖHTER LUFTSTROM) gedrückt, wenn sich der
horizontale Luftdefl ektor im gewünschten Winkel befi ndet, wechselt der Defl ektor
zum Modus ERHÖHTER LUFTSTROM.
Wenn sich der Winkel des horizontalen Luftdefl ektors ändert, kann der Luftstrom
●
direkt auf den Körper gerichtet werden.
– 33 –
DEUTSCH
Page 40

SO STELLEN SIE DEN TIMER EIN
Ein-/Ausschalt-Timer
Start
Das Gerät wird zu den vorgegebenen ●
Uhrzeiten ein- und ausgeschaltet
(bzw. aus- und eingeschaltet).
Das Umschalten erfolgt zuerst zu ●
der eingestellten Uhrzeit, die am
frühesten eintritt.
Das Pfeilsymbol, das auf dem Display ●
erscheint, gibt die Reihenfolge der
Umschaltvorgänge an.
UHRZEIT
AUSSCHALTTIMER
EINSCHALTTIMER
RESERVIEREN
STORNIEREN
Einschalt-Timer
1 Drücken Sie die Taste
Stopp
Symbol
Display blinkt.
Uhrzeit
Nach dem
Batteriewechsel
Ausschalt-Timer
Start
Sie können das Gerät so einrichten, dass es zu
einer vorgegebenen Uhrzeit ausgeschaltet wird.
Das Gerät wird zu den ●
vorgegebenen Uhrzeiten
eingeschaltet.
(EIN-AUS), sodass das
(AUS) auf dem
PM
STOPP
Start
2 Stellen Sie die
Ausschaltzeit über die
Taste „TIMER-Steuerung“
ein.
Drücken Sie die Taste
(RESERVIEREN).
1 Stellen Sie die Uhrzeit über
die Taste
1 Drücken Sie die Taste
(AUSSCHALT-TIMER). Das Symbol
(AUS) blinkt auf dem Display.
1 Drücken Sie die Taste
Stopp
(EINSCHALT-TIMER), sodass
das Symbol
Display blinkt.
PM
(UHRZEIT) ein.
AM
PM
(EIN) auf dem
3 Drücken Sie die Taste
(EINSCHALT-TIMER),
sodass das Symbol
(AUS) leuchtet und das
Symbol
AM
AM
(EIN) blinkt.
PM
AM
So stornieren Sie eine Reservierung
Richten Sie das Infrarotfenster der Fernbedienung auf das Innengerät und drücken Sie die Taste
(STORNIEREN).
Das Symbol
(RESERVIERT) und die TIMER-Lampe (TIMER) am Innengerät leuchten nicht mehr;
gleichzeitig wird ein Signalton ausgegeben.
HINWEIS
Sie können nur jeweils einen Timer-Modus festlegen:
den Ausschalt-Timer, den Einschalt-Timer oder den
Ein-/Ausschalt-Timer.
– 34 –
Page 41

2 Drücken Sie
die Taste
(UHRZEIT).
AM
PM
3 Stellen Sie die aktuelle Uhrzeit
über die Taste „TIMER-Steuerung“
ein.
PMPMPM
Beispiel: Die aktuelle Uhrzeit ist 13.30 Uhr.
4 Drücken Sie die Taste (UHRZEIT)
erneut.
Die Uhrzeitanzeige leuchtet stetig (anstatt zu
blinken).
PM
Die Uhrzeit wird automatisch nach ●
10 Sekunden ausgeblendet.
Um die aktuell eingestellte Uhrzeit ●
zu prüfen, drücken Sie die Taste
(UHRZEIT) zwei Mal.
Die Einstellung der aktuellen
Uhrzeit ist damit abgeschlossen.
2 Stellen Sie die Ausschaltzeit
über die Taste „TIMERSteuerung“ ein.
PMPMPM
2 Stellen Sie die Einschaltzeit
über die Taste „TIMERSteuerung“ ein.
AMAMAM
4 Stellen Sie die Einschaltzeit
über die Taste „TIMERSteuerung“ ein.
PM
PM
AM
AM
3 Richten Sie das Infrarotfenster der Fernbedienung auf das Innengerät und
drücken Sie die Taste
Das Symbol
(RESERVIERT) leuchtet. Ein Signalton ist zu hören und die TIMER-Lampe
Innengerät leuchtet.
3 Richten Sie das Infrarotfenster der Fernbedienung auf das Innengerät und
drücken Sie die Taste
Das Symbol
(RESERVIERT) leuchtet. Ein Signalton ist zu hören und die TIMER-Lampe
am Innengerät leuchtet.
5 Richten Sie das Infrarotfenster der Fernbedienung auf das Innengerät und
drücken Sie die Taste
Das Symbol
(RESERVIERT) leuchtet. Ein Signalton ist zu hören und die TIMER-Lampe
Innengerät leuchtet.
(RESERVIEREN).
(AUS) leuchtet stetig (anstatt zu blinken) und das Symbol
PM
Die Einstellung der Ausschaltzeit ist damit abgeschlossen.
(RESERVIEREN).
(EIN) leuchtet stetig (anstatt zu blinken) und das Symbol
Beispiel:
AM
(RESERVIEREN).
(EIN) leuchtet stetig (anstatt zu blinken) und das Symbol
PM
PM
AM
AM
Das Gerät wird um 7.00 Uhr eingeschaltet.
Die Einstellung der Einschaltzeit ist damit abgeschlossen.
Beispiel:
Das Gerät wird um 22.30 Uhr ausgeschaltet und um 7.00 Uhr
wieder eingeschaltet.
Die Einstellung der Ein- und Ausschaltzeit ist damit
abgeschlossen.
Beispiel: Das Gerät wird um 23.00 Uhr
ausgeschaltet.
DEUTSCH
am
am
Der Timer kann auf drei Arten verwendet werden: als Timer zum Ausschalten, als Timer zum Einschalten und ●
als Timer zum Einschalten/Ausschalten (bzw. Ausschalten/Einschalten). Stellen Sie zuerst die aktuelle Uhrzeit
ein, da diese als Bezugspunkt verwendet wird.
Da die Uhrzeiteinstellungen im Speicher der Fernbedienung gesichert werden, müssen Sie das nächste Mal
●
nur die Taste (RESERVIEREN) drücken, um das nächste Mal dieselben Einstellungen zu verwenden.
– 35 –
Page 42

SO STELLEN SIE DEN BETRIEBSZEIT-TIMER EIN
Stellen Sie zunächst die aktuelle Uhrzeit ein, wenn dies noch nicht geschehen ist (Informationen dazu fi nden
Sie im Abschnitt zur Einstellung der aktuellen Uhrzeit). Drücken Sie die Taste
(BETRIEBSZEIT). Die
Anzeige auf dem Display ändert sich, wie unten abgebildet.
Modus
Betriebszeit-Timer
44 44
1 Stunde 2 Stunden 3 Stunden 7 Stunden
Betriebszeit-Timer aus
Anzeige
1
Betriebszeit-Timer: Das Gerät läuft für die angegebene Anzahl
Stunden weiter und wird dann ausgeschaltet.
BETRIEBSZEIT
Richten Sie das Infrarotfenster der Fernbedienung auf das Innengerät
und drücken Sie die BETRIEBSZEIT-Taste.
Die Timer-Information wird auf der Fernbedienung angezeigt. Ein
Signalton ist zu hören und die TIMER-Lampe am Innengerät leuchtet.
Wenn der Betriebszeit-Timer eingestellt wurde, wird auf dem Display die
Ausschaltzeit angezeigt.
AM
Beispiel: Wenn Sie eine Betriebszeit
von 3 Stunden um 23.38 einstellen,
Betriebszeit-
Timer
H
Start
Das Gerät wird vom Betriebszeit-Timer
ausgeschaltet und vom Einschalt-Timer
ist die Ausschaltzeit 2.38 Uhr.
eingeschaltet.
1 Stellen Sie den Einschalt-Timer ein.
2 Drücken Sie die Taste (BETRIEBSZEIT) und stellen Sie den
Betriebszeit-Timer ein.
H
AM
AM
So stornieren Sie eine Reservierung
Richten Sie das Infrarotfenster der Fernbedienung auf das Innengerät und drücken Sie die Taste
(STORNIEREN).
Das Symbol
gleichzeitig wird ein Signalton ausgegeben.
(RESERVIERT) und die TIMER-Lampe (TIMER) am Innengerät leuchten nicht mehr;
– 36 –
Heizbetrieb:
In diesem Fall wird das Gerät in
2 Stunden (um 1.38 Uhr) ausgeschaltet
und um 6.00 Uhr am nächsten Morgen
eingeschaltet.
Page 43

SO WECHSELN SIE DIE BATTERIEN IN DER FERNBEDIENUNG AUS
Entfernen Sie die Abdeckung, wie in der Abbildung gezeigt, und
1
nehmen Sie die alten Batterien heraus.
Drücken und in
Pfeilrichtung schieben
=
Legen Sie die neuen Batterien ein.
2
Die Batterien müssen wie in der Darstellung im Gehäuse
ausgerichtet eingesetzt werden.
VORSICHT
Verwenden Sie nicht alte und neue Batterien oder unterschiedliche 1.
Batterietypen gemeinsam.
Nehmen Sie die Batterien heraus, wenn Sie die Fernbedienung über 2.
einen längeren Zeitraum (2 bis 3 Monate) nicht verwenden.
MANUELLER EIN-/AUSSCHALTER
Drücken Sie diesen Schalter, um das Gerät ein- bzw. auszuschalten, wenn die Fernbedienung aufgrund einer
Fehlfunktion der Batterien nicht funktioniert.
Beim Start über den manuellen Ein-/Ausschalter wird das Gerät mit den zuletzt gewählten Einstellungen
●
betrieben. (Das Gerät wechselt sofort in den Automatikbetrieb, sobald die Stromversorgung eingeschaltet
wird.)
TRENNSCHALTER
DEUTSCH
Wenn Sie die Raumklimaanlage nicht verwenden, stellen Sie den Trennschalter auf „AUS“.
– 37 –
Page 44

IDEALER BETRIEB
Angemessene Raumtemperatur Vorhänge oder Jalousien anbringen
Warnung
Zu kühle
Temperaturen sind
gesundheitsschädlich
und verbrauchen viel
Strom.
Lüftung Effektive Nutzung des Timers
Vorsicht
Räume sollten regelmäßig gelüftet werden.
Öffnen Sie gelegentlich die Tür und die
Fenster, damit
Frischluft in
den Raum
gelangt.
Nicht vergessen, den Luftfi lter zu reinigen
Durch verstaubte Luftfi lter wird das
Luftvolumen reduziert und die Kühlleistung
beeinträchtigt. Um den Stromverbrauch
niedrig zu halten, sollte der Filter alle zwei
Wochen gereinigt werden.
Sie können
damit
verhindern,
dass Hitze
durch die
Fenster in
das Zimmer
gelangt.
Verwenden Sie nachts den Ausschaltoder Einschalt-Timer und stellen Sie Ihre
morgendliche Aufwachzeit ein. So haben
Sie stets eine angenehme Raumtemperatur.
Nutzen Sie den Timer effektiv.
Angemessene Temperatur für Säuglinge
und Kinder wählen
Achten Sie bei der Verwendung der
Klimaanlage für Säuglinge, Kinder und
ältere Menschen mit eingeschränkter
Bewegungsfreiheit auf die Raumtemperatur
und die Richtung des Luftstroms.
– 38 –
Page 45

INFORMATIONEN FÜR DEN BENUTZER
Klimaanlage und Wärmequellen im selben Raum
Vorsicht
Wenn die Temperatur im Raum die Kühlleistung der
Klimaanlage übersteigt (z. B. wenn sich mehrere
Personen im Raum aufhalten, zusätzliche Heizgeräte
verwendet werden usw.), kann die voreingestellte
Raumtemperatur nicht erreicht werden.
Wenn das Gerät über einen längeren Zeitraum nicht verwendet wird
Wenn das Innengerät für einen längeren Zeitraum nicht
betrieben wird, unterbrechen Sie die Stromversorgung
über das Netz. Wenn die Stromversorgung über das
Netz nicht getrennt wird, verbraucht das Gerät weiter
8 Watt im Betriebsschaltkreis, auch wenn es sich im
Modus AUS befi ndet.
Bei Gewittern
DEUTSCH
AUS
Warnung
Um das gesamte Gerät während Gewittern zu
schützen, schalten Sie das Gerät aus und ziehen
den Stecker aus der Steckdose.
Störungen durch elektrische Geräte
Vorsicht
Um elektrische Störungen zu vermeiden,
sollte ein Abstand von einem Meter zwischen
elektrischen Geräten und dem Innengerät sowie der
Fernbedienung eingehalten werden.
– 39 –
Mindestabstand
1 Meter, um
Störungen zu
vermeiden
WechselrichterGlühlampe
Fernseher
Page 46

ANBRINGEN DER LUFTREINIGUNGSFILTER
VORSICHT
Reinigung und Wartung dürfen nur von qualifi ziertem Wartungspersonal ausgeführt werden. Stellen Sie vor
dem Reinigen sicher, dass das Gerät ausgeschaltet ist und die Stromversorgung getrennt wurde.
Öffnen Sie die Frontblende.
1
2
3
Heben Sie die Frontblende an. Halten Sie sie dabei an ●
beiden Seiten mit den Händen.
Bauen Sie den Filter aus.
Drücken Sie den Filter nach oben, um die Klemmen zu
●
lösen, und ziehen Sie den Filter heraus.
Befestigen Sie die Luftreinigungsfi lter am Filter.
Bringen Sie die Luftreinigungsfi lter am Rahmen
●
an, indem Sie sie vorsichtig zusammendrücken
und nach dem Einsetzen in den Filterrahmen
wieder loslassen.
Klemmen
(4 Stück)
VORSICHT
Verbiegen Sie den
Luftreinigungsfi lter nicht, da
dies die Struktur beschädigen
könnte.
Bringen Sie die Filter an.
4
●
Befestigen Sie die Filter so, dass die Kennzeichnung
FRONT nach vorne weist.
Drücken Sie nach dem Einsetzen der Filter ●
wie abgebildet an den mit den drei Pfeilen
gekennzeichneten Stellen gegen die Frontblende, um
sie zu schließen.
HINWEIS
Beachten Sie beim Entfernen der Luftreinigungsfi lter die oben beschriebene Vorgehensweise. ●
Bei Verwendung der Luftreinigungsfi lter sind die Kühlleistung und die Kühlgeschwindigkeit etwas geringer. ●
Deshalb sollten Sie in diesem Fall die Lüfterdrehzahl auf HOCH einstellen.
Betreiben Sie die Klimaanlage nicht ohne Filter. Staub könnte in die Klimaanlage gelangen und zu
●
Funktionsstörungen führen.
– 40 –
Page 47

WARTUNG
VORSICHT
Reinigung und Wartung dürfen nur von qualifi ziertem Wartungspersonal ausgeführt
werden. Stellen Sie vor dem Reinigen sicher, dass das Gerät ausgeschaltet ist und die
Stromversorgung getrennt wurde.
1. LUFTFILTER
Reinigen Sie den Luftfi lter, da er Staub aus der Raumluft entfernt. Ist der Luftfi lter mit Staub zugesetzt, wird
das Luftvolumen reduziert und die Kühlleistung beeinträchtigt. Außerdem kann es zu Geräuschentwicklung
kommen. Beachten Sie beim Reinigen des Filters die folgende Vorgehensweise.
VORGEHENSWEISE
Öffnen Sie die Frontblende und entfernen Sie den
1
Filter.
Heben Sie den Luftreinigungsfi lter vorsichtig an ●
und lösen Sie ihn so aus dem Luftfi lterrahmen.
Entfernen Sie den Staub mit einem Staubsauger
2
vom Luftfi lter und Luftreinigungsfi lter. Wenn sich zu
viel Staub darauf befi ndet, kann nur der Luftfi lter
unter fl ießendem Wasser abgespült und mit einer
weichen Bürste vorsichtig abgebürstet werden.
Lassen Sie die Filter im Schatten trocknen.
DEUTSCH
3
den Filterrahmen ein. Setzen Sie den Filter
so ein, dass die Kennzeichnung FRONT nach
vorne weist, und lassen Sie ihn wieder in die
dafür vorgesehenen Vertiefungen einrasten.
Drücken Sie nach dem Einsetzen der ●
Filter wie abgebildet an den mit den drei
Pfeilen gekennzeichneten Stellen gegen die
Frontblende, um sie zu schließen.
Setzen Sie den Luftreinigungsfi lter wieder in
●
VORSICHT
Verwenden Sie zum Abspülen kein heißes Wasser mit einer Temperatur über 40 °C. Dadurch kann der ●
Filter einlaufen.
Schütteln Sie das Wasser nach dem Abspülen vollständig vom Filter ab und lassen Sie ihn im Schatten
●
trocknen. Vermeiden Sie direkte Sonneneinstrahlung, da der Filter sonst einlaufen könnte.
Verwenden Sie keine Reinigungsmittel für den Luftreinigungsfi lter, da einige Reinigungsmittel die
●
elektrostatischen Filtereigenschaften beeinträchtigen können.
– 41 –
Page 48

2. Abwaschbare Frontblende
Entfernen Sie die Frontblende und reinigen Sie ●
sie mit sauberem Wasser.
Waschen Sie sie mit einem weichen Schwamm
ab.
Nach der Verwendung eines neutralen
Reinigungsmittels spülen Sie sie gründlich mit
sauberem Wasser.
●
Wenn die Frontblende nicht entfernt wird,
wischen Sie sie mit einem weichen, trockenen
Tuch ab. Wischen Sie die Fernbedienung mit
einem weichen, trockenen Tuch ab.
Trocknen Sie die Frontblende sorgfältig ab.
●
Wasserreste an den Anzeigen oder am
Signalempfänger des Innengeräts verursachen
Störungen.
Vorgehensweise zum Ausbau der Frontblende:
Halten Sie die Frontblende beim Abnehmen und
Anbringen immer mit beiden Händen fest.
Abnehmen der Frontblende
Arm
Flansch
Wenn Sie die Frontblende mit beiden Händen ●
vollständig geöffnet haben, drücken Sie den
rechten Arm der Blende nach innen, um
die Arretierung zu lösen. Schließen Sie die
Anbringen der Frontblende
Ansatz
Öffnung
Führen Sie die Ansätze des rechten und ●
linken Arms in die Flansche des Geräts und
führen Sie sie sicher in die entsprechenden
Öffnungen ein.
Frontblende dann leicht und ziehen Sie sie
dabei nach vorne.
VORSICHT
Achten Sie beim Reinigen des Geräts darauf, dass kein Wasser auf das ●
Gerätegehäuse tropft oder in das Gehäuse eindringt, da es sonst zu
einem Kurzschluss kommen kann.
Verwenden Sie niemals heißes Wasser (mit einer Temperatur über ●
40 °C), Kraftstoff, Säure, Verdünner oder Bürsten, da dadurch die
Kunststoffoberfl äche und die Beschichtung beschädigt werden.
– 42 –
Page 49

VORSICHT
Reinigung und Wartung dürfen nur von qualifi ziertem Wartungspersonal ausgeführt werden. Stellen Sie vor
dem Reinigen sicher, dass das Gerät ausgeschaltet und von der Stromversorgung getrennt ist.
3. WARTUNG VOR LÄNGEREN NUTZUNGSPAUSEN
Wählen Sie den Betriebsmodus ● (LÜFTER), stellen
Sie die Lüfterdrehzahl auf HOCH und lassen Sie das
Gerät bei schönem Wetter ungefähr einen halben Tag
lang laufen. Trocknen Sie das Gerät vollständig.
Ziehen Sie das Netzkabel ab.
●
Luftstrom
REGELMÄSSIGE INSPEKTION
LASSEN SIE DIE FOLGENDEN PUNKTE BITTE HALBJÄHRLICH ODER JÄHRLICH DURCH
QUALIFIZIERTES WARTUNGSPERSONAL ÜBERPRÜFEN. WENDEN SIE SICH AN IHREN
HÄNDLER ODER WARTUNGSDIENST.
DEUTSCH
1
2
3
Überprüfen
Ist das Erdungskabel nicht angeschlossen oder beschädigt?
Ist der Anbaurahmen stark verrostet, und ist das Außengerät
schief bzw. liegt nicht stabil auf?
Ist der Stecker des Stromkabels fest in die Steckdose
eingesteckt?
(Vergewissern Sie sich bitte, dass kein Wackelkontakt vorliegt).
– 43 –
Page 50

KUNDENDIENST UND GARANTIE
WENN SIE SICH AN DEN KUNDENDIENST WENDEN,
ÜBERPRÜFEN SIE DIE FOLGENDEN PUNKTE.
ZUSTAND FOLGENDE PUNKTE ÜBERPRÜFEN:
Fernbedienung überträgt
keine Signale.
(Anzeige der Fernbedienung
ist dunkel oder leer.)
Das Gerät funktioniert nicht
Unzureichende Kühlleistung
Unzureichende Heizleistung
Müssen die Batterien ersetzt werden? ●
Sind die Batterien richtig eingesetzt (Polarität korrekt)? ●
Ist die Sicherung in Ordnung? ●
Ist die Spannung äußerst hoch oder niedrig? ●
Ist der Trennschalter eingeschaltet? ●
Unterscheidet sich der Betriebsmodus von dem anderer ●
Innengeräte?
●
Hat sich der Luftfi lter mit Staub zugesetzt?
Ist das Außengerät direkter Sonneneinstrahlung ausgesetzt? ●
Wird der Luftstrom des Außengeräts behindert? ●
Sind Türen oder Fenster geöffnet, oder gibt es eine Wärmequelle ●
im Raum?
Ist die eingestellte Temperatur angemessen? ●
Ist der Lufteinlass oder der Luftauslass des Innen- bzw. ●
Außengeräts blockiert?
●
Ist die Lüfterdrehzahl auf NIEDRIG oder GERÄUSCHARM
eingestellt?
Hinweise
Im geräuscharmen Betrieb oder nach dem Ausschalten können gelegentlich ●
die folgenden Geräusche auftreten – sie stellen aber keine Fehlfunktion dar.
(1) Schwache Fließgeräusche des Kältemittels im Kühlkreislauf.
(2) Schwache Geräusche vom Lüftergehäuse, das gekühlt wird und sich
nach dem Beenden des Betriebs langsam erwärmt.
Die Raumklimaanlage kann unter Umständen unangenehme Gerüche ●
abgeben, wenn sich z. B. Rauch-, Essens- und Kosmetikgerüche anlagern.
Zur Geruchsvermeidung müssen daher der Luftfi lter und der Verdampfer
regelmäßig gereinigt werden.
Setzen Sie sich bitte umgehend mit Ihrem Händler in Verbindung, falls die Klimaanlage auch nach Überprüfung
●
der oben genannten Punkte nicht normal funktioniert. Teilen Sie Ihrem Händler das Gerätemodell, die
Seriennummer und das Installationsdatum mit. Informieren Sie ihn auch über alle relevanten Details hinsichtlich
der Störung.
Die Stromversorgung muss an ein Stromnetz mit der erforderlichen Nennspannung angeschlossen sein –
●
andernfalls kann das Gerät beschädigt werden oder die angegebene Leistung nicht erreichen.
HINWEIS:
Wenn das Netzkabel beschädigt ist, muss es durch das spezielle Kabel ersetzt werden, das bei
●
autorisierten Service- bzw. Ersatzteilzentren erhältlich ist.
Wenn das Gerät eingeschaltet wird, kann vor allem bei gedimmtem Raumlicht ein leichtes Flackern ●
auftreten. Dies hat jedoch keinerlei Auswirkungen.
Die Bedingungen der lokalen Netzbetreiber sind zu beachten.
Die beweglichen Blenden bewegen sich nicht
■
Stellen Sie sicher, dass die Frontblenden ordnungsgemäß installiert wurden. ●
– 44 –
Page 51

NOTIZEN
......................................................................................................................................................................................
......................................................................................................................................................................................
......................................................................................................................................................................................
......................................................................................................................................................................................
......................................................................................................................................................................................
......................................................................................................................................................................................
......................................................................................................................................................................................
......................................................................................................................................................................................
......................................................................................................................................................................................
......................................................................................................................................................................................
......................................................................................................................................................................................
......................................................................................................................................................................................
......................................................................................................................................................................................
......................................................................................................................................................................................
......................................................................................................................................................................................
......................................................................................................................................................................................
......................................................................................................................................................................................
......................................................................................................................................................................................
......................................................................................................................................................................................
......................................................................................................................................................................................
......................................................................................................................................................................................
......................................................................................................................................................................................
......................................................................................................................................................................................
......................................................................................................................................................................................
......................................................................................................................................................................................
......................................................................................................................................................................................
......................................................................................................................................................................................
......................................................................................................................................................................................
......................................................................................................................................................................................
......................................................................................................................................................................................
......................................................................................................................................................................................
......................................................................................................................................................................................
......................................................................................................................................................................................
......................................................................................................................................................................................
......................................................................................................................................................................................
......................................................................................................................................................................................
......................................................................................................................................................................................
......................................................................................................................................................................................
......................................................................................................................................................................................
DEUTSCH
– 45 –
Page 52

NOTIZEN
......................................................................................................................................................................................
......................................................................................................................................................................................
......................................................................................................................................................................................
......................................................................................................................................................................................
......................................................................................................................................................................................
......................................................................................................................................................................................
......................................................................................................................................................................................
......................................................................................................................................................................................
......................................................................................................................................................................................
......................................................................................................................................................................................
......................................................................................................................................................................................
......................................................................................................................................................................................
......................................................................................................................................................................................
......................................................................................................................................................................................
......................................................................................................................................................................................
......................................................................................................................................................................................
......................................................................................................................................................................................
......................................................................................................................................................................................
......................................................................................................................................................................................
......................................................................................................................................................................................
......................................................................................................................................................................................
......................................................................................................................................................................................
......................................................................................................................................................................................
......................................................................................................................................................................................
......................................................................................................................................................................................
......................................................................................................................................................................................
......................................................................................................................................................................................
......................................................................................................................................................................................
......................................................................................................................................................................................
......................................................................................................................................................................................
......................................................................................................................................................................................
......................................................................................................................................................................................
......................................................................................................................................................................................
......................................................................................................................................................................................
......................................................................................................................................................................................
......................................................................................................................................................................................
......................................................................................................................................................................................
......................................................................................................................................................................................
......................................................................................................................................................................................
– 46 –
Page 53

NOTIZEN
......................................................................................................................................................................................
......................................................................................................................................................................................
......................................................................................................................................................................................
......................................................................................................................................................................................
......................................................................................................................................................................................
......................................................................................................................................................................................
......................................................................................................................................................................................
......................................................................................................................................................................................
......................................................................................................................................................................................
......................................................................................................................................................................................
......................................................................................................................................................................................
......................................................................................................................................................................................
......................................................................................................................................................................................
......................................................................................................................................................................................
......................................................................................................................................................................................
......................................................................................................................................................................................
......................................................................................................................................................................................
......................................................................................................................................................................................
......................................................................................................................................................................................
......................................................................................................................................................................................
......................................................................................................................................................................................
......................................................................................................................................................................................
......................................................................................................................................................................................
......................................................................................................................................................................................
......................................................................................................................................................................................
......................................................................................................................................................................................
......................................................................................................................................................................................
......................................................................................................................................................................................
......................................................................................................................................................................................
......................................................................................................................................................................................
......................................................................................................................................................................................
......................................................................................................................................................................................
......................................................................................................................................................................................
......................................................................................................................................................................................
......................................................................................................................................................................................
......................................................................................................................................................................................
......................................................................................................................................................................................
......................................................................................................................................................................................
......................................................................................................................................................................................
DEUTSCH
– 47 –
Page 54

NOTIZEN
......................................................................................................................................................................................
......................................................................................................................................................................................
......................................................................................................................................................................................
......................................................................................................................................................................................
......................................................................................................................................................................................
......................................................................................................................................................................................
......................................................................................................................................................................................
......................................................................................................................................................................................
......................................................................................................................................................................................
......................................................................................................................................................................................
......................................................................................................................................................................................
......................................................................................................................................................................................
......................................................................................................................................................................................
......................................................................................................................................................................................
......................................................................................................................................................................................
......................................................................................................................................................................................
......................................................................................................................................................................................
......................................................................................................................................................................................
......................................................................................................................................................................................
......................................................................................................................................................................................
......................................................................................................................................................................................
......................................................................................................................................................................................
......................................................................................................................................................................................
......................................................................................................................................................................................
......................................................................................................................................................................................
......................................................................................................................................................................................
......................................................................................................................................................................................
......................................................................................................................................................................................
......................................................................................................................................................................................
......................................................................................................................................................................................
......................................................................................................................................................................................
......................................................................................................................................................................................
......................................................................................................................................................................................
......................................................................................................................................................................................
......................................................................................................................................................................................
......................................................................................................................................................................................
......................................................................................................................................................................................
......................................................................................................................................................................................
......................................................................................................................................................................................
– 48 –
<
H526: A
>
Page 55

SYSTÈME DE CLIMATISATION MULTIBLOC
UNITÉ INTÉRIEURE
MODÈLE
RAK-18QH8S(W)
RAK-18QH8(W)
RAK-25QH8(W)
RAK-35QH8(W)
RAK-50QH8(W)
RAK-18QH8S(B)
RAK-18QH8(B)
RAK-25QH8(B)
RAK-35QH8(B)
RAK-50QH8(B)
UNITÉ INTÉRIEURE
FRANÇAIS
RAK-18QH8S(W)
RAK-18QH8(W)
RAK-25QH8(W)
RAK-35QH8(W)
RAK-50QH8(W)
RAK-18QH8S(B)
RAK-18QH8(B)
RAK-25QH8(B)
RAK-35QH8(B)
RAK-50QH8(B)
– 9 –
Page 56

PRÉCAUTION DE SÉCURITÉ
Avant d'utiliser l'unité, lisez attentivement la section « Précautions de sécurité » pour prendre connaissance des ●
recommandations d'utilisation de l'unité.
● Avertissement et Attention. La section « Avertissement » contient
Tenez tout particulièrement compte des symboles
des instructions qui doivent être scrupuleusement respectées. Le non-respect de ces instructions peut provoquer de graves
blessures ou causer la mort de l'utilisateur. La section « Attention » contient des instructions importantes. Le non-respect de
ces instructions peut entraîner de graves conséquences. Suivez attentivement ces instructions pour garantir votre sécurité.
Ce symbole englobe les signifi cations suivantes.
●
Vérifi ez que le fi l de terre est connecté. Ce symbole affi ché dans la fi gure indique une interdiction.
Indique les instructions à suivre.
Conservez ce manuel après l'avoir lu. ●
PRÉCAUTIONS D'INSTALLATION
Ne réassemblez pas l'unité. ●
Si vous réassemblez vous-même l'unité, vous risquez de provoquer une fuite d'eau, une
panne, un court-circuit ou un incendie.
Contactez votre agent commercial ou un technicien qualifi é pour procéder à l'installation de
●
votre unité. Si vous installez vous-même l'unité, vous risquez de provoquer une fuite d'eau,
AVERTISSE-
MENT
ATTENTION
PRÉCAUTIONS CONCERNANT LE DÉPLACEMENT OU LA MAINTENANCE
AVERTISSEMENT
un court-circuit ou un incendie.
Utilisez le fi l de terre.
●
Ne placez pas la ligne de terre près d'une tuyauterie de gaz ou d'eau, d'un paratonnerre ou
du câblage de terre pour le téléphone. Une mauvaise installation de la ligne de terre vous
expose à un risque d'électrocution.
Veillez à installer les tuyaux conformément à la norme R410A. Sinon, les tuyaux de cuivre
●
risquent de se fi ssurer.
Selon le site de montage de l'unité, il peut être nécessaire d'installer un disjoncteur.
●
L'absence de disjoncteur vous expose à un risque d'électrocution.
N'installez pas l'unité à proximité d'une source de gaz infl ammable. Le groupe extérieur
●
risque de prendre feu si une fuite de gaz se produit à proximité.
●
Vérifi ez que le fl ux d'eau est continu lorsque vous installez le tuyau d'évacuation.
Si une situation anormale survient (odeur de brûlé, par exemple), cessez d'utiliser l'unité et ●
coupez le disjoncteur. Contactez votre agent. Si vous continuez d'utiliser l'unité dans des
conditions anormales, vous risquez de provoquer une panne, un court-circuit ou un incendie.
Contactez votre agent pour procéder à la maintenance de l'appareil. Une mauvaise
●
maintenance vous expose à un risque d'électrocution et d'incendie.
Contactez votre agent si vous devez déposer et réinstaller l'unité. Si vous déposez
●
et réinstallez vous-même l'unité, vous vous exposez à une électrocution ou risquez de
provoquer un incendie.
Si le câble d'alimentation est endommagé, vous devez le remplacer par le câble spécial
●
disponible dans les centres de dépannage agréés.
Évitez toute exposition prolongée devant un débit d'air direct. ●
AVERTISSEMENT
Pour éviter tout risque mortel d'électrocution, n'utilisez aucun objet conducteur comme fusible. ●
PRÉCAUTIONS D'UTILISATION
N'insérez pas vos doigts, une tige ou toute autre objet dans la sortie ou l'entrée d'air. Le ●
ventilateur tourne à une vitesse élevée et pourrait entraîner des blessures. Avant de nettoyer
l'appareil, mettez-le hors tension et coupez le disjoncteur (OFF).
En cas d'orage, coupez le disjoncteur.
●
– 50 –
Page 57

Le produit doit être exclusivement utilisé conformément aux spécifi cations du ●
fabricant.
Si vous utilisez l'appareil avec d'autres équipements de chauffage, aérez
●
régulièrement la pièce pour éviter tout risque d'asphyxie.
Vérifi ez que le cadre de montage extérieur est parfaitement stable, fermement ●
installé et ne présente aucun défaut. Sinon, le groupe extérieur pourrait se
décrocher et entraîner de graves conséquences.
●
N'utilisez aucune bombe aérosol ni laque à proximité de l'unité intérieure. Ces produits
chimiques peuvent adhérer à la surface des ailettes de l'échangeur thermique et
empêcher ainsi l'évaporation de l'eau vers le plateau d'évacuation des condensats.
L'eau coulerait alors sur le ventilateur tangentiel et serait projetée hors de l'unité
intérieure.
ATTENTION
Coupez le disjoncteur si l'unité doit être arrêtée pendant une période prolongée.
●
PRÉCAUTIONS D'UTILISATION
Pour éviter tout risque mortel d'électrocution, ne manipulez jamais l'appareil avec les ●
mains mouillées.
Ne dirigez pas le débit d'air froid du climatiseur vers des appareils électroménagers ●
de chauffage (bouilloires électriques, four, etc.) pour ne pas perturber leur
fonctionnement.
Lorsque vous lavez l'unité, évitez d'éclabousser ou de verser de l'eau directement sur ●
la structure pour éviter tout risque de court-circuit.
Mettez l'unité hors tension et coupez le disjoncteur pendant le nettoyage de l'appareil ●
pour éviter tout risque de blessure susceptible d'être occasionnée par le ventilateur
à vitesse rapide situé à l'intérieur de l'unité.
FRANÇAIS
Ne montez pas sur le groupe extérieur et ne posez aucun objet dessus. ●
Ne placez aucun récipient d'eau (vase, par exemple) sur l'unité intérieure pour éviter ●
que des gouttes ne tombent dans l'unité. Un écoulement d'eau pourrait endommager
l'isolant à l'intérieur de l'unité et provoquer un court-circuit.
Le débit d'air n'est pas bon pour les plantes, ne les placez pas juste en dessous. ●
N'accrochez aucun vêtement aux panneaux orientables. ●
Ces derniers pourraient se détacher et provoquer de graves blessures.
Lorsque le climatiseur fonctionne avec portes et fenêtres ouvertes (le niveau d'humidité de la pièce est ●
toujours supérieur à 80 %) et que le défl ecteur d'air est orienté vers le bas ou se déplace automatiquement
pendant une période prolongée, l'eau se condense sur le défl ecteur d'air et peut tomber sous forme de
gouttelettes. Cette humidité risque d'abîmer vos meubles. Par conséquent, ne prolongez par l'utilisation de
l'appareil dans ces conditions.
Si la quantité de chaleur présente dans la pièce dépasse les capacités de refroidissement ou de chauffage
●
de l'unité (par exemple, davantage de personnes dans la pièce, utilisation d'appareils de chauffage, etc.), la
température préréglée ne peut pas être atteinte.
Cet appareil ne doit pas être utilisé par des enfants ou des personnes dont les capacités physiques,
●
sensorielles ou intellectuelles sont réduites, ou manquant d'expérience ou de connaissances, à moins d'être
sous surveillance ou d'avoir reçu des instructions. Veuillez à ce que les enfants ne jouent pas avec l'appareil.
– 51 –
Page 58

NOM ET FONCTION DE CHAQUE PIÈCE
UNITÉ INTÉRIEURE
FILTRE À AIR
(Reportez-vous au manuel d'instructions)
FILTRE À AIR
Empêche la poussière de pénétrer dans l'unité intérieure.
(Reportez-vous au manuel d'instructions)
PANNEAU AVANT
PANNEAU ORIENTABLE
Il est ouvert lorsque le climatiseur est en fonctionnement,
et fermé dans le cas contraire. (Dans certains cas, il peut
rester fermé en mode de fonctionnement.)
DÉFLECTEUR HORIZONTAL ● DÉFLECTEUR
VERTICAL (SORTIE D'AIR)
(Reportez-vous au manuel d'instructions)
INDICATEURS DE L'UNITÉ INTÉRIEURE
Voyants indiquant les conditions de fonctionnement.
(Voir page 11)
TÉLÉCOMMANDE
Envoie le signal de fonctionnement à l'unité intérieure.
Permet de commander toute l'unité.
(Reportez-vous au manuel d'instructions)
Panneau orientable ■
Il s'ouvre automatiquement lorsque le climatiseur est en fonctionnement, et se ferme automatiquement dans le ●
cas contraire. Évitez tout actionnement manuel, qui pourrait endommager ses mécanismes.
Ne touchez pas le panneau orientable pendant le fonctionnement, au risque de coincer vos doigts.
●
REMARQUE
Les fi ltres à air désodorisants sont lavables et réutilisables 20 fois. Leur nettoyage peut s'effectuer avec un ●
aspirateur ou par rinçage à l'eau du robinet. La référence de ce fi ltre à air est <SPX-CFH20>. Utilisez cette
référence lorsque vous souhaitez commander un nouveau fi ltre.
Le fi ltre à air doit être nettoyé une fois par mois ou plus fréquemment en cas de formation de dépôts. Après
●
une période d'utilisation prolongée, le fi ltre peut perdre ses propriétés désodorisantes. Pour obtenir des
performances optimales, il est recommandé de le remplacer chaque année si nécessaire.
NOM ET DIMENSIONS DU MODÈLE
MODÈLE
RAK-18QH8(W)
RAK-25QH8(W)
RAK-35QH8(W)
RAK-50QH8(W)
RAK-18QH8(B)
RAK-25QH8(B)
RAK-35QH8(B)
RAK-50QH8(B)
LARGEUR (mm)
795
– 10 –
HAUTEUR (mm)
295
PROFONDEUR (mm)
198
Page 59

INDICATEURS DE L'UNITÉ INTÉRIEURE
INDICATEUR DE FONCTIONNEMENT
1. Ouverture du panneau avant
Panneau orientable
Panneau avant
VOYANT DU FILTRE
Après environ 200 heures d'utilisation, le voyant FILTRE
de l'appareil s'allume pour indiquer qu'il est nécessaire
de nettoyer le fi ltre. Le voyant s'éteint si vous appuyez sur
le bouton (BALAYAGE AUTOMATIQUE) lorsque
l'appareil est en MODE VEILLE.
TÉMOIN DE FONCTIONNEMENT
Ce témoin s'allume lorsque l'appareil est en fonctionnement.
Lors de la phase de chauffage, le TÉMOIN DE
FONCTIONNEMENT clignote dans les cas suivants.
(1) Lors du préchauffage
Pendant 2 à 3 minutes après le démarrage.
(2) Lors du dégivrage
Un dégivrage de 5 à 10 minutes a lieu environ
toutes les heures si du givre se forme au niveau de
l'échangeur thermique du groupe extérieur.
PORT DE RÉCEPTION DE SIGNAL
VOYANT DU PROGRAMMATEUR
Ce voyant s'allume lorsque le programmateur est déclenché.
FRANÇAIS
Point d'ouverture
manuelle
Point d'ouverture
manuelle
COMMUTATEUR TEMPORAIRE
Utilisez ce commutateur pour démarrer et arrêter l'appareil si la télécommande ne fonctionne pas.
Lorsque vous appuyez sur le commutateur temporaire, l'appareil fonctionne selon le mode défi ni précédemment.
●
Si vous utilisez le commutateur temporaire après un redémarrage de l'appareil, ce dernier fonctionne en mode ●
automatique.
Soulevez le panneau avant ●
Ne retenez pas le panneau orientable ●
lorsque le panneau avant est en
position ouverte ou fermée.
ATTENTION
N'essayez jamais de forcer manuellement l'ouverture ou la fermeture du panneau orientable. ●
L'ouverture ou la fermeture manuelle du panneau orientable peut provoquer des défaillances. (Le panneau
orientable se ferme ou s'ouvre automatiquement lorsque l'appareil est allumé ou éteint et à chaque fois
que l'unité entre en fonctionnement ou s'arrête.)
– 11 –
Page 60

2. Fermeture du panneau avant
● Appuyez vers le bas.
Appuyez tout d'abord sur les côtés gauche et droit ●
du panneau avant, puis au centre jusqu'à entendre
un clic.
ATTENTION
Lorsque le panneau avant est instable, il peut arriver qu'il se détache ●
et tombe.
Ne forcez pas le panneau orientable lorsqu'il est ouvert en position
●
verticale.
D'autre part, un démontage trop fréquent du panneau avant de la
façade peut provoquer des dommages.
Remarque
Évitez d'utiliser le climatiseur individuel pour refroidir une pièce lorsque la température extérieure est inférieure ●
à -10°C (14°F).
Les températures de fonctionnement maximale et minimale recommandées pour les côtés chaud et froid sont
indiquées ci-dessous :
Refroidissement Chauffage
Minimum Maximum Minimum Maximum
Thermomètre mouillé (°C) 15 23 12 19
Thermomètre mouillé (°C) 15 26 1 15
Thermomètre sec (°C) 21 32 20 27
Intérieur
Thermomètre sec (°C) 21 43 2 21
Extérieur
– 12 –
Page 61

NOM ET FONCTIONS DE LA TÉLÉCOMMANDE
TÉLÉCOMMANDE
Contrôle le fonctionnement de l'unité intérieure. La télécommande offre une portée d'environ 7 mètres. ●
Si l'éclairage de la pièce est contrôlé électroniquement, cette portée peut être inférieure.
L'unité peut être installée au mur à l'aide du support de fi xation fourni. Avant de l'installer au mur, vérifi ez que
l'unité intérieure peut être contrôlée à l'aide de la télécommande.
Manipulez la télécommande avec soin. Si vous la faites tomber ou versez accidentellement de l'eau dessus, ●
la transmission des signaux en sera affectée.
Si vous avez remplacé les piles de la télécommande, il faudra environ 10 secondes à l'unité pour recevoir les ●
signaux et fonctionner normalement.
Fenêtre d'émission du signal/symbole de transmission ●
Pointez cette fenêtre en direction de l'unité intérieure pour la contrôler.
Lors de l'envoi d'un signal, le symbole de transmission clignote.
●
Écran
Indique la température sélectionnée pour la pièce ainsi que l'heure, l'état du programmateur,
la fonction et l'intensité de circulation.
●
Bouton MARCHE/ARRÊT
Appuyez sur ce bouton pour commencer à utiliser l'appareil. Appuyez de nouveau dessus
l'arrêter.
●
Bouton SLEEP (veille)
Utilisez ce bouton pour régler le programmateur de veille.
●
Boutons TEMPERATURE
Utilisez ces boutons pour augmenter ou baisser la température de réglage. (Maintenez le
bouton enfoncé pour accélérer le défi lement de la valeur).
●
Bouton TIME (heure)
Utilisez ce bouton pour régler et affi cher l'heure et la date.
●
Boutons RESET (réinitialisation)
Sélecteur FUNCTION (mode de fonctionnement) ●
Utilisez ce bouton pour sélectionner le mode de fonctionnement. Chaque pression sur ce
AUTO
CHAUFFAGE
DÉSHUMIDIFICATION
REFROIDISSEMENT
VENTILATION
VITESSE DE VENTILATION
SILENCIEUX
PV
MV
GV
VEILLE
ARRÊT (ANNULER)
MARCHE (RÉSERVER)
MARCHE/ARRÊT
HEURE
RÉGLAGE PROGRAMMATEUR
SÉLECT. PROGRAMMATEUR
ACTIVÉ
DÉSACTIVÉ
BALAYAGE AUTO
DÉBIT D'AIR AMÉLIORÉ
bouton permet de faire défi ler les différents modes de façon cyclique :
[chauffage]
[ventilation].
●
Sélecteur FAN SPEED (vitesse de ventilation)
Permet de régler la vitesse du ventilateur. Chaque pression sur ce bouton permet de faire
défi ler les différents niveaux d'intensité du débit d'air :
[MV]
vitesse optimale ou préférée du ventilateur pour chaque mode de fonctionnement).
●
Bouton AUTO SWING (balayage automatique)
Contrôle l'angle du défl ecteur d'air horizontal.
●
DÉBIT D'AIR AMÉLIORÉ
Utilisez ce bouton pour obtenir une climatisation plus rapide et plus confortable.
Contrôle TIMER (programmateur)
●
Utilisez ce bouton pour régler le programmateur.
● Permet de sélectionner l'heure d'arrêt
Bouton OFF-TIMER (programmateur désactivé)
du programmateur.
● Permet de sélectionner l'heure de démarrage
Bouton ON-TIMER (programmateur activé)
du programmateur.
Bouton RESERVE (réserver)
● Permet de réserver l'heure.
● Annule la réservation horaire.
Bouton CANCEL (annuler)
(DEHUMIDIFY) [déshumidifi cation] (COOL) [refroidissement] et (FAN)
(AUTO) (HI) [GV] (MED)
(LOW) [PV] et (SILENT) [silencieux]. (Ce bouton permet de sélectionner la
Précautions d'utilisation
Ne laissez pas la télécommande dans les endroits suivants.
●
Au soleil. ●
Près d'un radiateur. ●
Manipulez la télécommande avec soin. Ne la laissez pas tomber par terre et ●
protégez-la de l'humidité.
●
Une fois arrêté, le groupe extérieur ne redémarre pas avant environ 3 minutes
(à moins de le mettre hors tension puis sous tension ou de débrancher puis
rebrancher le câble d'alimentation).
Cette procédure est destinée à protéger l'appareil et n'indique aucun
dysfonctionnement.
Si vous appuyez sur le sélecteur de mode FUNCTION alors que l'appareil
●
est en cours de fonctionnement, celui-ci risque de s'arrêter environ 3 minutes
pour des raisons de sécurité.
– 52 –
(AUTO) (HEAT)
Page 62

FONCTIONS DIVERSES
■ Contrôle du redémarrage automatique
En cas de coupure de courant, cette fonction permet de redémarrer automatiquement l'unité après rétablissement ●
de l'alimentation en utilisant le mode de fonctionnement et la direction du débit d'air précédemment sélectionnés.
(La télécommande ne permet pas d'arrêter le fonctionnement).
Si vous ne souhaitez pas réutiliser l'appareil une fois le courant rétabli, mettez-le hors tension.
●
Lorsque vous réarmez le disjoncteur, l'unité redémarre automatiquement en utilisant le mode de fonctionnement et
la direction du débit d'air précédemment sélectionnés.
Remarque : 1. Si vous n'avez pas besoin de la fonction de contrôle du redémarrage automatique, contactez votre
2. La fonction de contrôle du redémarrage automatique n'est pas disponible si le mode TIMER
agent commercial ou appuyez sur la touche OFF (arrêt) de la télécommande.
(programmateur) ou SLEEP TIMER (programmateur de veille) est sélectionné.
FONCTIONNEMENT AUTOMATIQUE
L'appareil ajustera automatiquement le mode de fonctionnement HEAT (chauffage), COOL (refroidissement) ou
DEHUMIDIFY (déshumidifi cation) en fonction de la température ambiante de la pièce. Le mode de fonctionnement
sélectionné s'adaptera aux variations de température de la pièce. Il restera cependant inchangé si l'unité intérieure est
connectée à un groupe extérieur multibloc.
FRANÇAIS
Appuyez sur le sélecteur FUNCTION (mode de fonctionnement)
pour affi cher le mode
Lorsque le mode AUTO est sélectionné, l'appareil ajuste
●
automatiquement le mode de fonctionnement HEAT (chauffage),
1
COOL (refroidissement) ou DEHUMIDIFY (déshumidifi cation)
en fonction de la température ambiante de la pièce. Il restera
cependant inchangé si l'unité intérieure est connectée à un
groupe extérieur multibloc.
Si le mode automatiquement sélectionné par l'unité ne convient ●
pas, modifi ez manuellement le mode (HEAT [chauffage],
DEHUMIDIFY [déshumidifi cation], COOL [refroidissement] ou
FAN [ventilation]).
MARCHE
ARRÊT
Appuyez sur le bouton (MARCHE/ARRÊT).
L'appareil démarre en émettant un bip.
Appuyez de nouveau sur le bouton pour l'arrêter.
Les réglages étant stockés dans la mémoire de la télécommande, il ■
vous suffi t d'appuyer sur le bouton (MARCHE/ARRÊT) pour les
réactiver.
Le cas échéant, vous pouvez augmenter ou baisser la température par
incréments maximaux de 3°C.
●
La température prédéfi nie et la température réelle de la pièce
peuvent légèrement varier selon les conditions.
En mode AUTO, l'écran n'indique pas la température prédéfi nie.
●
Si vous modifi ez ce réglage, l'unité intérieure émet un bip.
Appuyez sur le bouton (FAN SPEED) [vitesse de ventilation] :
les modes AUTO, LOW (PV) et SILENT (silencieux) s'affi chent.
(AUTO) à l'écran.
Appuyez sur le bouton de température pour
modifi er la température par incréments de 1°C.
– 53 –
Page 63

MODE CHAUFFAGE
Utilisez l'appareil pour chauffer une pièce lorsque la température extérieure est inférieure à 21°C. ●
Si la température est trop élevée (plus de 21°C), la fonction chauffage peut être désactivée pour protéger
l'appareil.
Pour garantir la fi abilité de l'appareil, utilisez-le quand la température de la pièce est inférieure de 15°C à la
●
température extérieure.
Appuyez sur le sélecteur FUNCTION (mode de fonctionnement) pour
affi cher le mode (HEAT) [chauffage] à l'écran.
1
Sélectionnez la vitesse de ventilation souhaitée à l'aide du bouton
(FAN SPEED) [vitesse de ventilation] (indiqué à l'écran).
(AUTO) : La vitesse de ventilation s'adapte
2
(HI) [GV] : Fonction économique permettant de
Mais vous sentirez sans doute une
(MED) [MV] : Faible vitesse de ventilation.
(LOW) [PV] : Vitesse de ventilation encore plus faible.
(SILENT) [silencieux] : Vitesse de ventilation la plus faible.
Réglez la température de la pièce à votre convenance à l'aide des
boutons TEMPERATURE (indiqué à l'écran).
La température réglée et la température réelle de la pièce peuvent
3
légèrement varier selon les conditions.
MARCHE
ARRÊT
Appuyez sur le bouton
démarre en émettant un bip. Appuyez de nouveau sur le bouton pour
l'arrêter.
Les réglages étant stockés dans la mémoire de la télécommande, il vous suffi t
■
d'appuyer sur le bouton (MARCHE/ARRÊT) pour les réactiver.
automatiquement à la température de
l'air expulsé par l'appareil.
chauffer rapidement la pièce.
légère sensation de froid au début.
(MARCHE/ARRÊT). Le mode chauffage
■ Dégivrage
Un dégivrage de 5 à 10 minutes a lieu environ toutes les heures si du givre se forme au niveau de l'échange thermique
du groupe extérieur.
Pendant le dégivrage, le témoin de fonctionnement clignote par cycle de 3 secondes à 0,5 seconde d'intervalle.
Le temps de dégivrage maximum est de 20 minutes.
Cependant, si l'appareil est connecté à un groupe extérieur multibloc, ce délai est réduit à 15 minutes.
(L'utilisation d'un tuyau plus long que d'ordinaire peut entraîner la formation de givre.)
– 54 –
Page 64

MODE DÉSHUMIDIFICATION
Utilisez l'appareil pour déshumidifi er une pièce lorsque sa température est supérieure à 16°C.
En dessous de 15°C, le mode déshumidifi cation ne fonctionne pas.
Appuyez sur le sélecteur de mode pour affi cher le mode de
fonctionnement
1
La vitesse de ventilation est réglée sur LOW [PV] ou SILENT
[silencieux].
Réglez la température de la pièce à votre convenance à l'aide du
bouton TEMPERATURE (indiqué à l'écran).
2
MARCHE
ARRÊT
Appuyez sur le bouton (MARCHE/ARRÊT). Le mode déshumidifi cation
démarre en émettant un bip. Appuyez de nouveau sur le bouton pour
l'arrêter.
■
Les réglages étant stockés dans la mémoire de la télécommande, il vous
suffi t d'appuyer sur le bouton (MARCHE/ARRÊT) pour les réactiver.
(DEHUMIDIFY) [déshumidifi cation] à l'écran.
Pour déshumidifi er une pièce, il est recommandé de
choisir une température comprise entre 20 et 26°C.
FRANÇAIS
■ Mode déshumidifi cation
Lorsque la température de la pièce est supérieure à la température de réglage : l'appareil déshumidifi e la pièce ●
afi n de réduire sa température au niveau prédéfi ni.
Lorsque la température de la pièce est inférieure à la température de réglage : la déshumidifi cation s'effectue à
une température légèrement inférieure à celle de la pièce, quelle que soit la température de réglage. L'opération
s'arrête (l'unité intérieure n'envoie plus d'air) dès que la température de la pièce est inférieure à la température de
réglage.
●
La température prédéfi nie de la pièce peut ne pas être atteinte en fonction du nombre de personnes dans la pièce
ou d'autres facteurs.
– 55 –
Page 65

MODE REFROIDISSEMENT
Utilisez l'appareil pour rafraîchir une pièce lorsque la température extérieure est comprise entre
Si l'humidité de la pièce est très élevée (80 %), des gouttelettes de condensation peuvent se former sur la grille de la
sortie d'air de l'unité intérieure.
1
2
3
MARCHE
ARRÊT
Appuyez sur le sélecteur de mode pour affi cher le mode de
fonctionnement
Sélectionnez la vitesse de ventilation souhaitée à l'aide du bouton
(FAN SPEED) [vitesse de ventilation] (indiqué à l'écran).
(AUTO) : La vitesse de ventilation est réglée
(HI) [GV] : Fonction économique permettant de
(MED) [MV] : Vitesse de ventilation faible.
(LOW) [PV] : Vitesse de ventilation encore plus faible.
(SILENT) [silencieux] : Vitesse de ventilation la plus faible.
Réglez la température de la pièce à votre convenance à l'aide du
bouton TEMPERATURE (indiqué à l'écran).
La température de réglage et la température réelle de la pièce peuvent
légèrement varier selon les conditions.
Appuyez sur le bouton
démarre en émettant un bip. Appuyez de nouveau sur le bouton pour
l'arrêter. Le mode refroidissement ne démarre pas si la température
de réglage est supérieure à la température actuelle de la pièce (même
si le voyant
refroidissement s'arrête dès que vous choisissez une température
inférieure à celle de la pièce.
(COOL) [refroidissement] à l'écran.
tout d'abord sur HI (GV) puis passe
automatiquement à la valeur MED
(MV) une fois atteinte la température
prédéfi nie.
rafraîchir rapidement la pièce.
(MARCHE/ARRÊT). Le mode refroidissement
(OPERATION) [fonctionnement] est allumé). Le mode
21°C
e t 43°C.
Les réglages étant stockés dans la mémoire de la télécommande, il vous
■
suffi t d'appuyer sur le bouton (MARCHE/ARRÊT) pour les réactiver.
– 56 –
Page 66

FONCTIONNEMENT VENTILATEUR
Vous pouvez utiliser l'appareil comme un simple recycleur d'air. Utilisez cette fonction pour sécher la partie interne
de l'unité intérieure à la fi n de l'été.
1
2
MARCHE
ARRÊT
Appuyez sur le sélecteur FUNCTION (mode de fonctionnement) pour
affi cher le mode
Appuyez sur le bouton
(HI) [GV] : Débit d'air le plus puissant.
(MED) [MV] : Vitesse de ventilation faible.
(LOW) [PV] : Vitesse de ventilation encore plus faible.
(SILENT) [silencieux] : Vitesse de ventilation la plus faible.
Appuyez sur le bouton
démarre en émettant un bip. Appuyez de nouveau sur le bouton pour
l'arrêter.
(FAN) [ventilation] à l'écran.
(FAN SPEED) [vitesse de ventilation].
(MARCHE/ARRÊT). Le mode ventilation
FAN SPEED [vitesse de ventilation] (AUTO) .....
Lorsque la vitesse de ventilation est réglée sur AUTO en mode refroidissement/chauffage :
La vitesse de ventilation s'adapte automatiquement à la température de l'air
●
refoulé.
Dans le cas où l'écart entre la température de la pièce et la température de
En mode chauffage
En mode refroidissement
●
réglage est important, le ventilateur passe à la vitesse supérieure (HI) [GV].
Lorsque la température de la pièce atteint de la température de réglage, le
●
ventilateur passe automatiquement à la vitesse lente (LOW) [PV].
●
Dans le cas où l'écart entre la température de la pièce et la température de
réglage est important, le ventilateur passe à la vitesse supérieure (HI) [GV].
●
Lorsque la température de la pièce atteint la température prédéfi nie, le mode
refroidissement est activé et modifi e la vitesse de ventilation et la température de
la pièce afi n de créer des conditions optimales pour un refroidissement naturel
et sain.
FRANÇAIS
DÉBIT D'AIR AMÉLIORÉ
Pendant le fonctionnement, appuyez sur le ■ bouton pour sélectionner les
différents modes de fonctionnement ajustant les préférences de direction d'air et la
vitesse de souffl age pour atteindre la plus longue distance compte tenu de sa portée.
(En mode refroidissement, la direction et la vitesse de l'air retourneront à leurs réglages
d'origine après 3 heures de fonctionnement).
Si vous appuyez sur le
● bouton (EXTENDED AIRFLOW) [débit d'air amélioré]
alors que vous êtes en mode AUTO SWING, celui-ci s'annule et l'appareil passe en
mode de débit d'air amélioré.
Si vous appuyez sur le
● bouton (AUTO SWING) [balayage auto] alors que vous
êtes en mode EXTENDED AIRFLOW, celui-ci s'annule et l'appareil passe en mode
de balayage automatique.
Si vous appuyez sur le ● bouton (EXTENDED AIRFLOW) [débit d'air amélioré],
lorsque le défl ecteur d'air horizontal s'arrête dans votre position préférée, il passe en
mode de débit d'air amélioré.
Au fur et à mesure que l'angle du défl ecteur d'air horizontal change, le fl ux d'air peut ●
s'orienter directement sur le corps.
– 57 –
Page 67

RÉGLAGE DU PROGRAMMATEUR
HEURE
OFF TIMER
[programmateur
désactivé]
ON TIMER
[programmateur activé]
RESERVE [réserver]
CANCEL [annuler]
ON/OFF Timer [marche/arrêt
du programmateur]
Marche
L'appareil démarrera (ON) et ●
s'arrêtera (OFF) aux heures
choisies.
Le basculement s'effectuera à la ●
première heure prédéfi nie.
La fl èche à l'écran indique la ●
séquence des basculements.
Arrêt
Heure
Après avoir remplacé les
piles ;
ON/OFF-Timer [marche/arrêt
du programmateur]
Vous pouvez confi gurer l'appareil pour s'arrêter
à une heure prédéfi nie.
ON-Timer
[programmateur activé]
L'appareil démarrera aux heures ●
choisies.
1 Appuyez sur le bouton
(ON-OFF) [marche/arrêt]
afi n que le voyant (OFF)
[désactivé] clignote sur l'écran.
PM
Marche
1 Appuyez sur le bouton
(OFF-TIMER) [programmateur désactivé].
Le symbole
ARRÊT
Marche
2 Réglez l'heure d'arrêt du
programmateur à l'aide du
bouton de contrôle TIMER
[programmateur].
Appuyez sur le bouton
(RESERVE) [réserver].
sur l'écran.
Arrêt
PM
1 Réglez le bouton (TIME)
[heure].
AM
PM
(OFF) [désactivé] clignote
AM
1 Appuyez sur le bouton
(ON-TIMER) [programmateur
activé] afi n que le voyant (ON)
[activé] clignote à l'écran.
AM
3 Appuyez sur le
bouton (ON-TIMER)
[programmateur activé] afi n
que les voyants (OFF)
[désactivé] et
[activé] clignotent.
(ON)
PM
AM
Annulation d'une réservation
Pointez la fenêtre d'émission du signal de la télécommande en direction de l'unité intérieure, puis appuyez sur le bouton
(CANCEL) [Annuler].
Le symbole
(RESERVED) [réservé] disparaît en émettant un bip et le voyant (TIMER) [programmateur] s'éteint sur
l'unité intérieure.
REMARQUE
Vous ne pouvez régler qu'une seule des options
OFF-timer [programmateur désactivé], ON-timer
[programmateur activé] ou ON/OFF-timer [marche/
arrêt du programmateur].
– 58 –
Page 68

2 Appuyez sur le
bouton
(TIME)
[heure].
AM
PM
3 Réglez l'heure actuelle à l'aide
du bouton de contrôle TIMER
(programmateur).
PMPMPM
Exemple : l'heure actuelle est 13h30.
4 Appuyez de nouveau sur le bouton (TIME)
[heure].
L'affi chage de l'heure s'allume au lieu de clignoter.
L'affi chage de l'heure disparaît ●
PM
après 10 secondes.
Pour affi cher l'heure actuellement ●
défi nie, appuyez deux fois sur le
bouton
L'heure actuelle est à présent
réglée.
(TIME) [heure].
2 Réglez l'heure d'arrêt du
programmateur à l'aide du bouton de
contrôle TIMER (programmateur).
PMPMPM
2 Réglez l'heure de démarrage
du programmateur à l'aide du
bouton de contrôle TIMER
(programmateur).
AMAMAM
4 Réglez l'heure de démarrage
du programmateur à l'aide du
bouton de contrôle TIMER
(programmateur).
PM
PM
AM
AM
3 Pointez la fenêtre d'émission du signal de la télécommande en direction de l'unité
intérieure, puis appuyez sur le bouton
Le voyant (OFF) [désactivé] s'allume au lieu de clignoter et le voyant (RESERVED)
[réservé] s'allume également. L'appareil émet un bip et le voyant (TIMER) [programmateur]
s'allume sur l'unité intérieure.
PM
L'heure d'arrêt est à présent réglée.
3 Pointez la fenêtre d'émission du signal de la télécommande en direction de l'unité
intérieure, puis appuyez sur le bouton (RESERVE) [réserver].
Le voyant (ON) [activé] s'allume au lieu de clignoter et le voyant (RESERVED)
[réservé] s'allume également. L'appareil émet un bip et le voyant
[programmateur] s'allume sur l'unité intérieure.
AM
5 Pointez la fenêtre d'émission du signal de la télécommande en direction de l'unité
intérieure, puis appuyez sur le bouton (RESERVE) [réserver].
Le voyant (ON) [activé] s'allume au lieu de clignoter et le voyant (RESERVED)
[réservé] s'allume également. L'appareil émet un bip et le voyant
[programmateur] s'allume sur l'unité intérieure.
PM
PM
AM
AM
(RESERVE) [réserver].
Exemple : l'appareil s'arrêtera à 23h00.
(TIMER)
Exemple :
L'appareil démarrera à 07h00.
L'heure de démarrage est à présent réglée.
(TIMER)
Exemple :
L'appareil s'arrêtera à 22h30 et redémarrera à 07h00.
Les heures de démarrage et d'arrêt sont à présent réglées.
FRANÇAIS
Vous pouvez utiliser le programmateur de trois façons : off-timer (désactivé), on-timer (activé) et on/off time (marche/ ●
arrêt du programmateur). Réglez d'abord l'heure actuelle car elle servira de référence.
Les réglages étant stockés dans la mémoire de la télécommande, il vous suffi t d'appuyer sur le bouton
● (RESERVE)
[réserver] pour les réactiver.
– 59 –
Page 69

RÉGLAGE DU PROGRAMMATEUR DE VEILLE
Le cas échéant, réglez d'abord l'heure actuelle (consultez les pages décrivant le réglage de l'heure actuelle). Appuyez
sur le bouton
(SLEEP) [veille] ; l'écran change comme illustré ci-dessous.
Mode
44 44
1 heure 2 heures 3 heures 7 heures
Programmateur de veille désactivé
AM
Le programmateur de veille arrêtera l'appareil, puis
celui-ci redémarrera selon l'heure de démarrage
du programmateur (on-timer)
SLEEP [veille]
Programmateur de
veille
Programmateur de veille : l'appareil continuera de fonctionner pendant le
nombre d'heures spécifi é avant de s'arrêter.
Pointez la fenêtre d'émission du signal de la télécommande en direction de
l'unité intérieure, puis appuyez sur le bouton SLEEP (veille).
Les informations du programmateur s'affi cheront sur la télécommande. Le
voyant (TIMER) [programmateur] s'allume sur l'unité intérieure en émettant un
bip. Une fois le programmateur de veille réglé, l'écran affi che l'heure d'arrêt.
H
Program-
mateur de
veille
Marche
Indication
1
Exemple : si vous avez programmé la
mise en veille après 3 heures à 23h38,
l'heure d'arrêt sera 02h38.
1 Réglez le bouton ON-timer (programmateur activé).
2 Appuyez sur le bouton (SLEEP) [veille] et réglez le programmateur
de veille.
H
AM
AM
En mode chauffage :
Dans ce cas, l'appareil s'arrêtera au bout
de 2 heures (à 01h38) et redémarrera
à 06h00 le lendemain matin.
Annulation d'une réservation
Pointez la fenêtre d'émission du signal de la télécommande en direction de l'unité intérieure, puis appuyez sur le
bouton
Le symbole (RESERVED) [réservé] disparaît en émettant un bip et le voyant (TIMER) [programmateur]
s'éteint sur l'unité intérieure.
(CANCEL) [Annuler].
– 60 –
Page 70
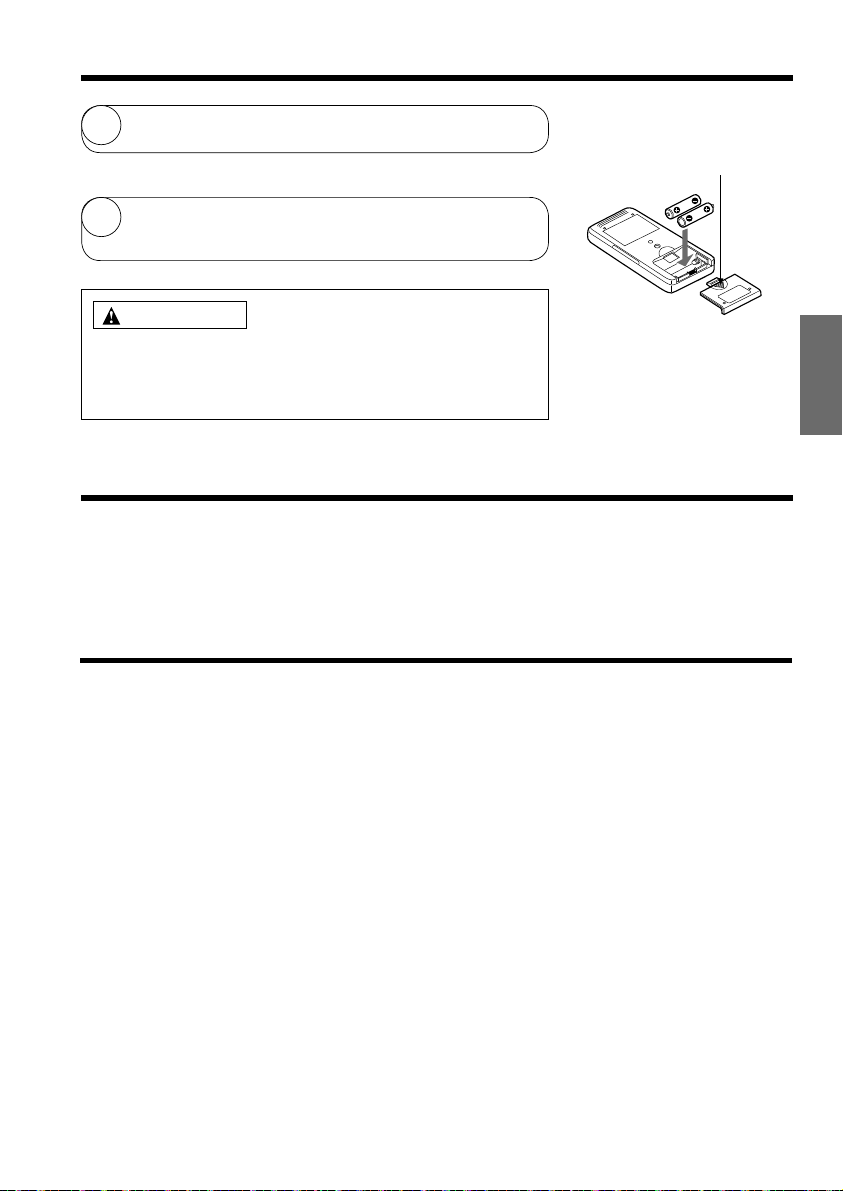
REMPLACEMENT DES PILES DE LA TÉLÉCOMMANDE
Ouvrez le couvercle comme indiqué sur la fi gure et retirez les piles
1
usées.
Appuyez puis tirez dans
le sens de la fl èche
=
Installez les nouvelles piles.
2
Installez les piles dans le bon sens en vous aidant des repères du
compartiment.
ATTENTION
Ne mélangez pas des piles neuves et usées ni des piles de différents 1.
modèles.
Retirez les piles si vous n'utiliserez pas la télécommande pendant 2 ou 2.
3 mois.
COMMUTATEUR TEMPORAIRE
Si la télécommande ne fonctionne pas en raison d'un problème de piles, utilisez ce commutateur pour démarrer et arrêter
l'appareil.
●
L'appareil fonctionnera temporairement selon le mode défi ni précédemment. (Il retournera automatiquement en mode
normal une fois le courant rétabli.)
FRANÇAIS
DISJONCTEUR
Lorsque vous n'utilisez pas le climatiseur individuel, placez le disjoncteur en position OFF.
– 61 –
Page 71

CONSEILS POUR UNE UTILISATION OPTIMALE
Température ambiante appropriée Installation de rideaux ou de volets
Avertissement
Une température trop
basse nuit à votre
santé et entraîne un
gaspillage d'électricité.
Ventilation
Attention
Ne gardez pas la pièce fermée pendant une
longue période. Ouvrez régulièrement portes
et fenêtres
pour aérer la
pièce.
N'oubliez pas de nettoyer le fi ltre à air
Un fi ltre à air obstrué diminuera le volume d'air
et la puissance frigorifi que du climatiseur. Pour
éviter un gaspillage d'électricité, nettoyez le fi ltre
toutes les 2 semaines.
Vous pouvez
diminuer la
chaleur qui
pénètre dans
une pièce au
niveau des
fenêtres.
Utilisation effi cace du programmateur
La nuit, réglez le programmateur de veille
de l'appareil en fonction de l'heure à laquelle
vous vous levez. Vous profi terez ainsi d'une
température agréable à votre réveil. Utilisez le
programmateur à bon escient.
Réglez la température d'une pièce
accueillant un bébé ou des enfants
Tenez compte de la température de la pièce et
de la direction du débit d'air si la pièce accueille
un bébé, des enfants ou des personnes âgées
à mobilité réduite.
– 62 –
Page 72

INFORMATIONS DESTINÉES À L'UTILISATEUR
Climatiseur et source de chaleur dans une pièce
Attention
Si la quantité de chaleur présente dans la pièce
dépasse les capacités de refroidissement du climatiseur
(par exemple, davantage de personnes dans la pièce,
utilisation d'appareils de chauffage, etc.), la température
préréglée ne peut pas être atteinte.
Appareil inactif pendant une période prolongée
Si l'unité intérieure ne sera pas utilisée durant une
longue période, mettez le système hors tension.
Si l'appareil reste sous tension, le circuit de contrôle de
l'unité intérieure consommera environ 8W, même en
mode OFF (désactivé).
En cas d'orage
Avertissement
Pour protéger l'intégralité de l'unité en cas d'orage,
arrêtez-la et débranchez la fi che d'alimentation de la
prise électrique.
Interférences d'équipements électriques
Attention
Pour éviter les interférences, placez l'unité intérieure et sa
télécommande à 1 m minimum des autres équipements
électriques.
À au moins
1 m de
distance pour
éviter les
interférences.
OFF
Lampe
fl uorescente de
type Inverter
Téléviseur
FRANÇAIS
– 63 –
Page 73

INSTALLATION DES FILTRES À AIR
ATTENTION
Le nettoyage et la maintenance doivent être uniquement effectués par du personnel qualifi é. Avant de nettoyer
l'appareil, arrêtez-le et mettez-le hors tension.
Ouvrez le panneau avant.
1
●
Ouvrez le panneau avant en tenant chaque côté des
deux mains.
Retirez le fi ltre.
2
3
Tirez pour libérer les crochets de fi xation et extraire le
●
fi ltre.
Installation des fi ltres à air.
●
Installez les fi ltres en appuyant doucement des
deux côtés jusqu'à ce qu'ils soient correctement
positionnés dans leur cadre.
Crochets
(4 endroits)
ATTENTION
Ne pliez pas le fi ltre à air, au risque
d'endommager la structure.
Installez les fi ltres.
4
●
Installez les fi ltres en positionnant la surface marquée
FRONT à l'avant.
●
Une fois les fi ltres installés, fermez le panneau avant en
appuyant sur les trois zones symbolisées par des fl èches
comme indiqué ci-contre.
REMARQUE
Pour extraire les fi ltres à air, suivez les procédures susmentionnées. ●
L'utilisation des fi ltres à air réduit légèrement la puissance frigorifi que et la vitesse de refroidissement. Dans ce cas, ●
réglez la vitesse de ventilation sur HIGH (élevé).
●
N'utilisez pas le climatiseur sans fi ltre. La poussière risquerait de s'infi ltrer dans l'unité et de perturber son
fonctionnement.
– 64 –
Page 74

MAINTENANCE
ATTENTION
Le nettoyage et la maintenance doivent être uniquement effectués par du personnel qualifi é.
Avant de nettoyer l'appareil, arrêtez-le et mettez-le hors tension.
1. FILTRE À AIR
Nettoyez le fi ltre à air servant à collecter la poussière en suspension dans la pièce. Un fi ltre à air très obstrué réduit
le débit d'air et la puissance frigorifi que du climatiseur, et peut également générer des nuisances sonores. Nettoyez
le fi ltre en procédant comme suit.
PROCÉDURE
Ouvrez le panneau avant et retirez le fi ltre.
1
●
Extrayez délicatement le fi ltre à air de son cadre.
Éliminez la poussière présente sur le fi ltre à air à
2
l'aide d'un aspirateur. Si le fi ltre à air est très obstrué,
nettoyez-le sous l'eau en le frottant délicatement avec
une brosse à poils souples. Laissez sécher les fi ltres
à l'ombre.
FRANÇAIS
●
3
Replacez le fi ltre à air dans son cadre. Positionnez
le fi ltre dans son emplacement d'origine en plaçant
le repère FRONT à l'avant.
●
Une fois les fi ltres installés, fermez le panneau
avant en appuyant sur les trois zones symbolisées
par des fl èches comme indiqué ci-contre.
ATTENTION
N'utilisez pas d'eau chaude dont la température excède 40°C. Le fi ltre risquerait de se contracter. ●
Lors du lavage, éliminez toute trace d'humidité et laissez sécher le fi ltre à l'ombre ; ne l'exposez pas au soleil. ●
Le fi ltre risquerait de se contracter.
N'utilisez aucun détergent pour laver le fi ltre à air car cela réduirait ses propriétés électrostatiques.
●
– 65 –
Page 75

2. Panneau avant lavable
Retirez le panneau avant et lavez-le à l'eau claire. ●
Utilisez une éponge douce.
Rincez abondamment l'unité à l'eau claire si vous
avez utilisé un détergent neutre.
●
Si le panneau avant reste en place, nettoyez-le
à l'aide d'un chiffon sec et doux. Nettoyez
soigneusement la télécommande à l'aide d'un
chiffon sec et doux.
Épongez tous les résidus d'eau.
●
La présence d'eau au niveau des voyants ou du
récepteur de signaux de l'unité intérieure peut
entraîner des dysfonctionnements.
Procédure de retrait du panneau avant.
Utilisez vos deux mains pour extraire et installer le
panneau avant.
Retrait du panneau avant
Bras
Une fois le panneau avant complètement ouvert ●
des deux mains, appuyez sur le bras droit et tirez
vers l'extérieur tout en refermant légèrement le
Installation du panneau avant
Projection
Bride
Insérez les projections des bras gauche et droit ●
dans les brides de l'unité et fi xez-les fermement
dans les orifi ces.
panneau avant afi n de l'extraire.
ATTENTION
Lorsque vous lavez l'unité, évitez d'éclabousser ou de verser de l'eau ●
directement sur la structure pour éviter tout risque de court-circuit.
●
N'utilisez jamais d'eau chaude (supérieure à 40°C) ni de benzine, essence,
acide, diluant ou brosse pour ne pas endommager la surface en plastique et
le revêtement.
Orifi ce
– 66 –
Page 76

ATTENTION
Le nettoyage et la maintenance doivent être uniquement effectués par du personnel qualifi é. Avant de nettoyer
l'appareil, arrêtez-le et mettez-le hors tension.
3. MAINTENANCE AVANT UNE LONGUE PÉRIODE D'INACTIVITÉ
Faites fonctionner l'unité en mode ● (FAN) [ventilation]
en réglant la vitesse de ventilation sur HI (GV) pendant
une demie journée avec une météo clémente, puis laissez
l'unité sécher totalement.
●
Débranchez le câble d'alimentation.
Débit
d'air
INSPECTION PÉRIODIQUE
DEMANDEZ À UN PERSONNEL QUALIFIÉ D'INSPECTER LES POINTS SUIVANTS TOUS
LES SIX MOIS OU TOUS LES ANS. CONTACTEZ VOTRE AGENT COMMERCIAL OU
ATELIER DE DÉPANNAGE.
FRANÇAIS
1
2
3
Confi rmer
La ligne de terre est-elle interrompue ou endommagée ?
Le cadre de montage est-il très rouillé ou le groupe extérieur est-il
incliné ou instable ?
La fi che d'alimentation est-elle fermement branchée sur la prise
secteur ?
(Vérifi ez l'absence de jeu entre ces deux éléments).
– 67 –
Page 77

SERVICE APRÈS-VENTE ET GARANTIE
AVANT DE FAIRE APPEL AU SERVICE APRÈS-VENTE, VÉRIFIEZ LES POINTS SUIVANTS.
CONDITION VÉRIFIEZ LES POINTS SUIVANTS
Si la télécommande n'émet
aucun signal.
L'écran de la télécommande
est illisible ou vide.)
Les piles doivent-elles être changées ? ●
La polarité des nouvelles piles est-elle correcte ? ●
Le fusible est-il en bon état ? ●
Si l'appareil ne fonctionne pas
La tension est-elle trop élevée ou trop basse ? ●
Le disjoncteur est-il en position ON ? ●
Le mode de fonctionnement est-il différent de celui des autres unités ●
intérieures ?
●
Le fi ltre à air est-il encrassé ?
Le groupe extérieur est-il exposé directement au soleil ? ●
Si le refroidissement est
insuffi sant
Si le chauffage est insuffi sant
Le débit d'air du groupe extérieur est-il obstrué ? ●
Les portes ou les fenêtres sont-elles ouvertes ou une source de ●
chaleur est-elle présente dans la pièce ?
La température est-elle correctement réglée ? ●
Les entrées et sorties d'air des unités intérieures et des groupes ●
extérieurs sont-elles obstruées ?
La vitesse de ventilation est-elle réglée sur LOW (PV) ou SILENT
●
(silencieux) ?
Remarques
Lorsque l'appareil est en veille ou hors tension, les phénomènes suivants peuvent ●
se produire mais ils ne perturbent pas son bon fonctionnement.
(1) Léger bruit dû à la circulation du fl uide frigorigène dans le cycle de
réfrigération.
(2) Léger frottement dans le boîtier de ventilation lorsqu'il est refroidi puis
progressivement chauffé pendant l'arrêt de l'appareil.
Le climatiseur individuel peut dégager une certaine odeur due à la présence de
●
fumée, de débris alimentaires, de traces de produits cosmétiques, etc. Le fi ltre à air
et l'évaporateur doivent donc être régulièrement nettoyés pour éliminer cette odeur.
●
Contactez immédiatement votre agent commercial si le climatiseur présente toujours des dysfonctionnements malgré
les inspections susmentionnées. Indiquez-lui le modèle, le numéro de production et la date d'installation de votre
unité. Décrivez-lui également le problème rencontré.
L'alimentation électrique doit affi cher la tension nominale. Sinon, l'unité sera endommagée ou n'atteindra pas la
●
capacité spécifi ée.
REMARQUE :
Si le câble d'alimentation est endommagé, vous devez le remplacer par le câble spécial disponible chez les ●
centres de dépannage agréés.
●
Lors de la mise sous tension de l'appareil, la luminosité fl uctue légèrement, en particulier dans une pièce
faiblement éclairée. Ce phénomène est bénin.
Vous devez suivre les recommandations de votre fournisseur d'électricité.
■
Les panneaux orientables ne bougent pas
Vérifi ez le montage des panneaux avant. ●
– 68 –
Page 78

MÉMO
......................................................................................................................................................................................
......................................................................................................................................................................................
......................................................................................................................................................................................
......................................................................................................................................................................................
......................................................................................................................................................................................
......................................................................................................................................................................................
......................................................................................................................................................................................
......................................................................................................................................................................................
......................................................................................................................................................................................
......................................................................................................................................................................................
......................................................................................................................................................................................
......................................................................................................................................................................................
......................................................................................................................................................................................
......................................................................................................................................................................................
......................................................................................................................................................................................
......................................................................................................................................................................................
......................................................................................................................................................................................
......................................................................................................................................................................................
......................................................................................................................................................................................
......................................................................................................................................................................................
......................................................................................................................................................................................
......................................................................................................................................................................................
......................................................................................................................................................................................
......................................................................................................................................................................................
......................................................................................................................................................................................
......................................................................................................................................................................................
......................................................................................................................................................................................
......................................................................................................................................................................................
......................................................................................................................................................................................
......................................................................................................................................................................................
......................................................................................................................................................................................
......................................................................................................................................................................................
......................................................................................................................................................................................
......................................................................................................................................................................................
......................................................................................................................................................................................
......................................................................................................................................................................................
......................................................................................................................................................................................
......................................................................................................................................................................................
......................................................................................................................................................................................
FRANÇAIS
– 69 –
Page 79

MÉMO
......................................................................................................................................................................................
......................................................................................................................................................................................
......................................................................................................................................................................................
......................................................................................................................................................................................
......................................................................................................................................................................................
......................................................................................................................................................................................
......................................................................................................................................................................................
......................................................................................................................................................................................
......................................................................................................................................................................................
......................................................................................................................................................................................
......................................................................................................................................................................................
......................................................................................................................................................................................
......................................................................................................................................................................................
......................................................................................................................................................................................
......................................................................................................................................................................................
......................................................................................................................................................................................
......................................................................................................................................................................................
......................................................................................................................................................................................
......................................................................................................................................................................................
......................................................................................................................................................................................
......................................................................................................................................................................................
......................................................................................................................................................................................
......................................................................................................................................................................................
......................................................................................................................................................................................
......................................................................................................................................................................................
......................................................................................................................................................................................
......................................................................................................................................................................................
......................................................................................................................................................................................
......................................................................................................................................................................................
......................................................................................................................................................................................
......................................................................................................................................................................................
......................................................................................................................................................................................
......................................................................................................................................................................................
......................................................................................................................................................................................
......................................................................................................................................................................................
......................................................................................................................................................................................
......................................................................................................................................................................................
......................................................................................................................................................................................
......................................................................................................................................................................................
– 70 –
Page 80

MÉMO
......................................................................................................................................................................................
......................................................................................................................................................................................
......................................................................................................................................................................................
......................................................................................................................................................................................
......................................................................................................................................................................................
......................................................................................................................................................................................
......................................................................................................................................................................................
......................................................................................................................................................................................
......................................................................................................................................................................................
......................................................................................................................................................................................
......................................................................................................................................................................................
......................................................................................................................................................................................
......................................................................................................................................................................................
......................................................................................................................................................................................
......................................................................................................................................................................................
......................................................................................................................................................................................
......................................................................................................................................................................................
......................................................................................................................................................................................
......................................................................................................................................................................................
......................................................................................................................................................................................
......................................................................................................................................................................................
......................................................................................................................................................................................
......................................................................................................................................................................................
......................................................................................................................................................................................
......................................................................................................................................................................................
......................................................................................................................................................................................
......................................................................................................................................................................................
......................................................................................................................................................................................
......................................................................................................................................................................................
......................................................................................................................................................................................
......................................................................................................................................................................................
......................................................................................................................................................................................
......................................................................................................................................................................................
......................................................................................................................................................................................
......................................................................................................................................................................................
......................................................................................................................................................................................
......................................................................................................................................................................................
......................................................................................................................................................................................
......................................................................................................................................................................................
FRANÇAIS
– 71 –
Page 81

MÉMO
......................................................................................................................................................................................
......................................................................................................................................................................................
......................................................................................................................................................................................
......................................................................................................................................................................................
......................................................................................................................................................................................
......................................................................................................................................................................................
......................................................................................................................................................................................
......................................................................................................................................................................................
......................................................................................................................................................................................
......................................................................................................................................................................................
......................................................................................................................................................................................
......................................................................................................................................................................................
......................................................................................................................................................................................
......................................................................................................................................................................................
......................................................................................................................................................................................
......................................................................................................................................................................................
......................................................................................................................................................................................
......................................................................................................................................................................................
......................................................................................................................................................................................
......................................................................................................................................................................................
......................................................................................................................................................................................
......................................................................................................................................................................................
......................................................................................................................................................................................
......................................................................................................................................................................................
......................................................................................................................................................................................
......................................................................................................................................................................................
......................................................................................................................................................................................
......................................................................................................................................................................................
......................................................................................................................................................................................
......................................................................................................................................................................................
......................................................................................................................................................................................
......................................................................................................................................................................................
......................................................................................................................................................................................
......................................................................................................................................................................................
......................................................................................................................................................................................
......................................................................................................................................................................................
......................................................................................................................................................................................
......................................................................................................................................................................................
......................................................................................................................................................................................
– 72 –
<
H526 : A
>
Page 82

CONDIZIONATORE MODELLO SPLIT
UNITÀ INTERNA
MODELLO
RAK-18QH8S(W)
RAK-18QH8(W)
RAK-25QH8(W)
RAK-35QH8(W)
RAK-50QH8(W)
RAK-18QH8S(B)
RAK-18QH8(B)
RAK-25QH8(B)
RAK-35QH8(B)
RAK-50QH8(B)
UNITÀ INTERNA
ITALIANO
RAK-18QH8S(W)
RAK-18QH8(W)
RAK-25QH8(W)
RAK-35QH8(W)
RAK-50QH8(W)
RAK-18QH8S(B)
RAK-18QH8(B)
RAK-25QH8(B)
RAK-35QH8(B)
RAK-50QH8(B)
– 13 –
Page 83

PRECAUZIONI DI SICUREZZA
Per assicurare un utilizzo corretto dell'unità, leggere attentamente le “Precauzioni di sicurezza” prima di avviare l'apparecchio. ●
Prestare particolare attenzione ai segnali di “ ● Avvertenza” e “ Attenzione”. La sezione “Avvertenza” contiene istruzioni
che, se non strettamente osservate, possono causare il decesso o lesioni di grave entità. La sezione “Attenzione” contiene
istruzioni che, se non strettamente osservate, possono causare gravi conseguenze. Per un utilizzo sicuro, osservare
attentamente tutte le istruzioni.
Il segnale rappresenta i seguenti signifi cati.
●
Assicurarsi di collegare la linea di terra. Il segnale nella fi gura indica una proibizione.
Indica le istruzioni da seguire.
●
Conservare il presente manuale dopo la lettura.
PRECAUZIONI DURANTE L'INSTALLAZIONE
Non riassemblare l'unità. ●
Se si riassembla l'unità da soli potrebbero verifi carsi perdite d'acqua, guasti, cortocircuiti
o incendi.
●
Per l'installazione dell'unità, richiedere l'intervento dell'agente di vendita o di un tecnico
specializzato. Se si installa l'unità da soli potrebbero verifi carsi perdite d'acqua, guasti,
AVVERTENZA
ATTENZIONE
PRECAUZIONI DURANTE LO SPOSTAMENTO O LA MANUTENZIONE
A
V
V
E
R
T
E
N
Z
A
cortocircuiti o incendi.
Utilizzare la linea di terra.
●
Non posizionare la linea di terra accanto a tubature dell'acqua o del gas, fi li della luce
o linea telefonica. Una errata installazione della linea di terra potrebbe causare scosse
elettriche.
Assicurarsi di utilizzare il set di tubi corretti per R410A. In caso contrario, si potrebbe
●
verifi care la rottura dei tubi di rame o guasti.
In base al luogo di installazione dell'unità, è necessario installare un interruttore di circuito.
●
In assenza di interruttore di circuito esiste il pericolo di scossa elettrica.
Non installare accanto a fonti di gas infi ammabile. L'unità esterna potrebbe incendiarsi in
●
presenza di perdite di gas infi ammabili.
Assicurare un fl usso regolare d'acqua durante l'installazione del fl essibile di drenaggio.
●
Nel caso in cui si verifi chino situazioni anomale, ad esempio odore di bruciato, arrestare ●
l'unità e l'interruttore di circuito. Contattare l'agente di zona. Se si continua ad utilizzare l'unità
in presenza di situazioni anomale, si potrebbero verifi care guasti, cortocircuiti o incendi.
●
Per la manutenzione, contattare l'agente di zona. La manutenzione eseguita impropriamente
dall'utente potrebbe causare scosse elettriche e incendi.
Se si desidera rimuovere e installare nuovamente l'unità, contattare l'agente di zona. La
●
rimozione e reinstallazione eseguita impropriamente dall'utente potrebbe causare scosse
elettriche o incendi.
●
Se il cavo di alimentazione è danneggiato deve essere sostituito con materiale reperibile
presso centri di distribuzione e assistenza autorizzati.
PRECAUZIONI DURANTE IL FUNZIONAMENTO
Evitare un'esposizione prolungata diretta al fl usso di aria che potrebbe essere nociva ●
per la salute.
A
V
V
E
R
T
E
N
Z
A
Non utilizzare materiale conduttore come fusibili poiché potrebbe comportare incidenti mortali. ●
Non inserire dita, bastoncini o altri oggetti nell'ingresso e nell'uscita dell'aria. Poiché la ●
ventola ruota ad alta velocità, una simile operazione potrebbe essere pericolosa. Prima
delle operazioni di pulizia, assicurarsi di arrestare l'apparecchio e spegnere l'interruttore.
●
In caso di temporale, scollegare e spegnere l'interruttore di circuito.
– 74 –
Page 84
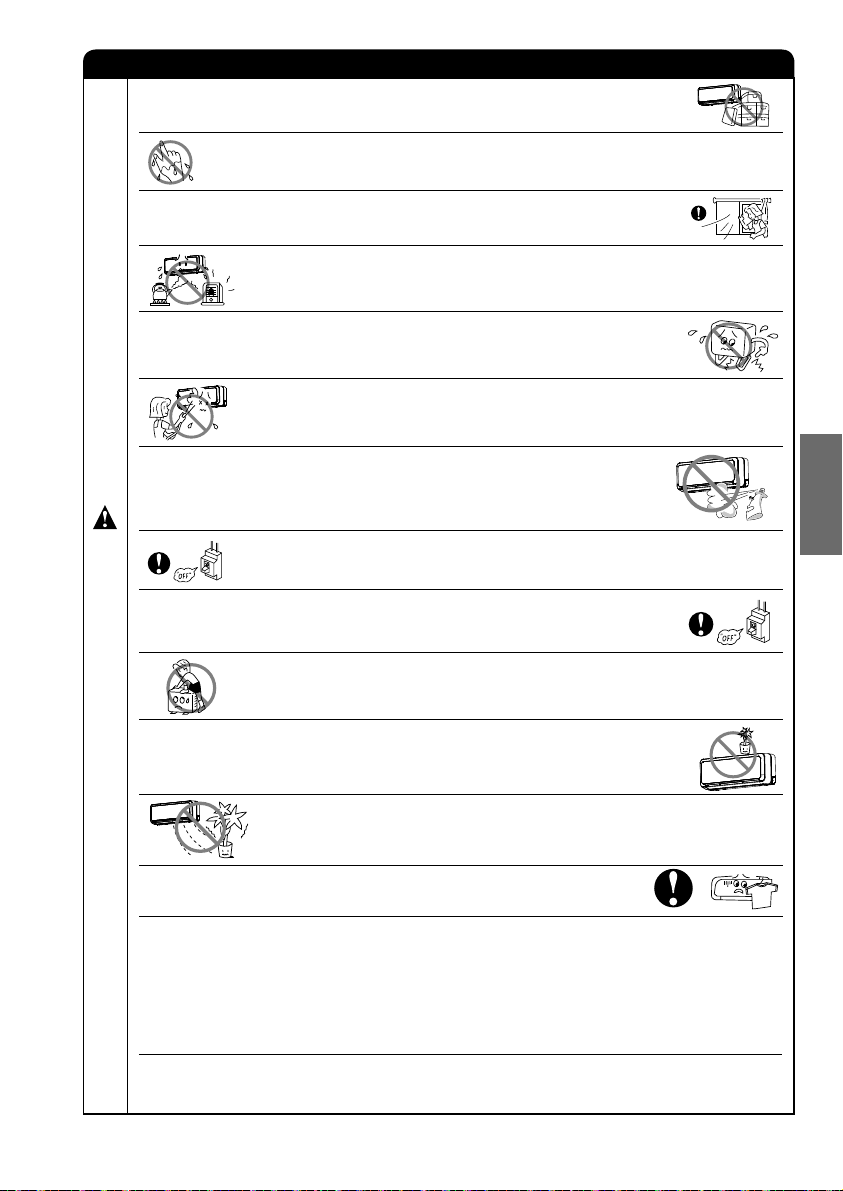
PRECAUZIONI DURANTE IL FUNZIONAMENTO
Il prodotto deve essere utilizzato esclusivamente secondo le istruzioni del produttore. ●
Non utilizzare l'unità con le mani umide. Tale operazione potrebbe causare incidenti mortali.
●
Durante il funzionamento dell'unità con apparecchiature a combustione, ventilare ●
regolarmente la stanza per evitare un'insuffi cienza di ossigeno.
Non direzionare l'aria fredda che fuoriesce dal pannello del condizionatore verso ●
elettrodomestici che producono calore, quali bollitori e forni elettrici, poiché ciò potrebbe
comprometterne il funzionamento.
Assicurarsi che il telaio di montaggio esterno sia sempre stabile, saldo e privo di difetti. ●
In caso contrario, l'unità esterna potrebbe cadere causando pericoli.
Durante la pulizia del corpo dell'unità non schizzare o dirigere l'acqua poiché questo ●
potrebbe causare cortocircuiti.
Non utilizzare bombolette spray o lacca per capelli vicino all'unità interna. I componenti
●
chimici potrebbero aderire all'aletta dello scambiatore di calore e impedire il fl usso
dell'acqua di evaporazione nella bacinella di drenaggio. Le gocce d'acqua cadrebbero
sulla ventola tangenziale causando il gocciolamento dell'unità interna.
A
T
Durante le operazioni di pulizia, arrestare l'unità e l'interruttore di circuito poiché la ventola ●
ad alta velocità presente all'interno potrebbe rappresentare un pericolo.
T
E
N
Se l'unità non viene utilizzata per un lungo periodo, spegnere l'interruttore di circuito.
●
Z
I
O
N
Non salire sull'unità esterna né appoggiarvi oggetti. ●
E
ITALIANO
Non posizionare contenitori d'acqua, ad esempio vasi, sull'unità interna per evitare che ●
l'acqua penetri all'interno dell'unità. L'infi ltrazione dell'acqua danneggerebbe l'isolante
all'interno dell'unità e causerebbe cortocircuiti.
Non posizionare piante sotto il fl usso diretto dell'aria in quanto dannoso per le piante stesse. ●
Non appendere biancheria ai pannelli mobili. ●
I pannelli mobili potrebbero cadere e causare gravi lesioni.
Durante il funzionamento dell'unità con porte e fi nestre aperte (l'umidità ambiente è sempre superiore ●
all'80%) e con il defl ettore dell'aria rivolto verso il basso o in modalità di movimento automatico per un lungo
periodo di tempo, sul defl ettore dell'aria si forma una condensa che occasionalmente determina la caduta
di gocce d'acqua. Ciò potrebbe bagnare l'arredo. Pertanto, non utilizzare l'unità in queste condizioni per un
lungo periodo.
Se la quantità di calore della stanza è superiore alla potenza di raffreddamento o riscaldamento dell'unità
●
(ad esempio: la presenza nella stanza di molte persone, l'utilizzo di apparecchiature di riscaldamento e così
via), non è possibile raggiungere la temperatura ambiente programmata.
Questo apparecchio non deve essere utilizzato da bambini o persone con capacità mentali, sensoriali o fi siche
●
ridotte, o prive di esperienza e delle conoscenze necessarie, a meno che non siano in presenza di un
supervisore o non abbiano ricevuto istruzioni. Accertarsi che i bambini non giochino con l'apparecchio.
– 75 –
Page 85

NOMI E FUNZIONI DEI COMPONENTI
UNITÀ INTERNA
FILTRO DI PULIZIA DELL'ARIA
(Vedere il manuale di istruzioni)
FILTRO DELL'ARIA
Per impedire che la polvere penetri nell'unità interna.
(Vedere il manuale di istruzioni)
PANNELLO ANTERIORE
PANNELLO MOBILE
È aperto quando il condizionatore è in funzione e chiuso
quando il condizionatore non è in funzione. (Talvolta,
potrebbe non essere aperto anche quando è in funzione)
DEFLETTORE ORIZZONTALE ● DEFLETTORE
VERTICALE (USCITA ARIA)
(Vedere il manuale di istruzioni)
INDICATORI DELL'UNITÀ INTERNA
Indicatore luminoso che mostra le condizioni di
funzionamento.
(Vedere a pagina 15)
TELECOMANDO
Invia segnali operativi all'unità interna. Invia il segnale di
avviamento dell'intera unità.
(Vedere il manuale di istruzioni)
Pannello mobile ■
Si apre automaticamente quando il condizionatore è in funzione e si chiude automaticamente quando l'apparecchio
●
smette di funzionare. Non effettuare regolazioni fi siche in quanto potrebbero danneggiare i meccanismi dei pannelli.
Non toccare il pannello mobile mentre è in funzione in quanto sussiste il pericolo di schiacciamento delle dita.
●
NOTA
I fi ltri di pulizia dell'aria e deodoranti sono lavabili e riutilizzabili fi no a 20 volte utilizzando un aspirapolvere ●
o risciacquandoli con acqua corrente del rubinetto. Il numero di tipo di questo fi ltro di pulizia dell'aria è <SPXCFH20>. Utilizzare questo numero per ordinare fi ltri nuovi.
È necessario pulire il fi ltro ogni mese o prima in caso di accumulo di sporcizia. Se utilizzato oltre il tempo
●
consigliato, può perdere la sua funzione deodorante. Per ottenere il massimo delle prestazioni, si consiglia
di sostituire il fi ltro una volta all'anno in base alle esigenze di applicazione.
NOME MODELLO E DIMENSIONI
MODELLO
RAK-18QH8(W)
RAK-25QH8(W)
RAK-35QH8(W)
RAK-50QH8(W)
RAK-18QH8(B)
RAK-25QH8(B)
RAK-35QH8(B)
RAK-50QH8(B)
LARGHEZZA (mm)
795
– 14 –
ALTEZZA (mm)
295
PROFONDITÀ (mm)
198
Page 86

INDICATORI DELL'UNITÀ INTERNA
INDICATORE DI FUNZIONAMENTO
1. Apertura del pannello anteriore
Pannello mobile
Pannello anteriore
SPIA DEL FILTRO
Quando l'apparecchio è stato utilizzato per un totale di circa
200 ore, la spia del FILTRO si illumina per indicare che
è necessario pulire il fi ltro. La spia si spegne quando si preme
il pulsante " (INCLINAZIONE AUTOMATICA)" mentre
l'apparecchio è in "MODALITÀ STANDBY".
SPIA DI FUNZIONAMENTO
La spia si illumina durante il funzionamento.
Durante il riscaldamento, la SPIA DI FUNZIONAMENTO
lampeggia nei seguenti casi.
(1) Durante il preriscaldamento
Per circa 2–3 minuti dopo l'avvio.
(2) Durante lo sbrinamento
Lo sbrinamento viene eseguito circa ogni ora in caso
di formazione di brina sullo scambiatore di calore
dell'unità esterna per circa 5-10 minuti ogni volta.
PORTA DI RICEZIONE SEGNALE
SPIA DEL TIMER
Questa spia si illumina quando il timer è in funzione.
ITALIANO
Maniglia
Non afferrare il pannello mobile ●
Maniglia
INTERRUTTORE TEMPORANEO
Utilizzare questo interruttore per avviare e arrestare l'apparecchio quando il telecomando non funziona.
Premendo l'interruttore temporaneo, il funzionamento viene eseguito nella modalità precedentemente impostata.
●
Quando il funzionamento viene eseguito utilizzando l'interruttore temporaneo dopo avere interrotto e riattivato ●
l'alimentazione, viene utilizzata la modalità automatica.
Sollevare il pannello anteriore ●
quando il pannello anteriore è in
posizione aperta/chiusa.
ATTENZIONE
Non tentare mai di forzare manualmente l'apertura/chiusura del pannello mobile. ●
L'apertura o chiusura manuale del pannello mobile può causare rotture (il pannello mobile sia chiuderà
o aprirà automaticamente all'accensione o spegnimento dell'apparecchio o ogni qualvolta l'unità è in funzione
o è stata arrestata.
– 15 –
Page 87

2. Chiusura del pannello anteriore
● Tirare nella direzione della freccia.
Premere inizialmente i lati sinistro e destro del ●
pannello anteriore e infi ne premere la porzione
centrale fi no a udire uno scatto.
ATTENZIONE
Quando il pannello anteriore vibra, è possibile che si stacchi e cada. ●
Non esercitare una forza eccessiva sul pannello anteriore quando ●
è aperto in posizione verticale.
Anche la frequente rimozione del pannello anteriore dal coperchio
anteriore può causare danni.
Nota
Non utilizzare il condizionatore d'aria per operazioni di raffreddamento quando la temperatura esterna è inferiore ●
a -10°C (14°F).
Le temperature massime e minime consigliate per l'azionamento in modalità riscaldamento e raffreddamento
sono le seguenti:
Raffreddamento Riscaldamento
Minima Massima Minima Massima
Bulbo secco °C 21 32 20 27
Interna
Bulbo umido °C 15 23 12 19
Bulbo secco °C 21 43 2 21
Esterna
Bulbo umido °C 15 26 1 15
– 16 –
Page 88
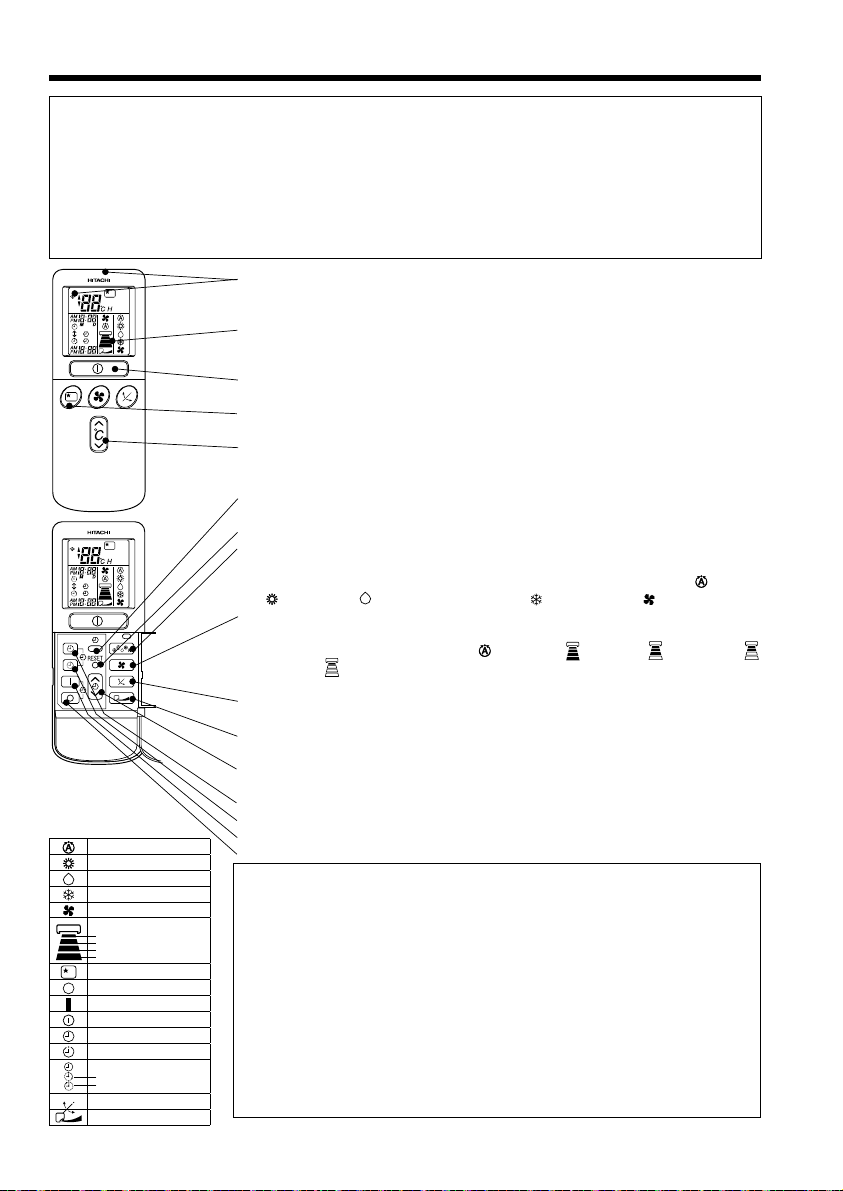
NOMI E FUNZIONI DEL TELECOMANDO
TELECOMANDO
Controlla il funzionamento dell'unità interna. Il raggio di funzionamento è di circa 7 metri. Se la luce interna è ●
controllata elettronicamente, il raggio di azione potrebbe essere inferiore.
L'unità può essere fi ssata a muro utilizzando i dispositivi di fi ssaggio forniti. Prima del fi ssaggio, assicurarsi
che sia possibile controllare l'unità interna con il telecomando.
Maneggiare il telecomando con cura. Eventuali cadute o il contatto con l'acqua potrebbero comprometterne ●
la capacità di trasmissione del segnale.
Dopo che sono state inserite nuove batterie nel telecomando, sono necessari circa 10 secondi prima che ●
l'unità risponda ai comandi e funzioni.
●
Finestra di emissione del segnale/segnale di trasmissione
Puntare questa fi nestra verso l'unità interna per controllarla.
Quando viene inviato un comando, il segnale di trasmissione lampeggia.
Display
●
Indica la temperatura ambiente selezionata, l'ora corrente, lo stato del timer, la
funzione e l'intensità di circolazione selezionata.
Pulsante di AVVIO/ARRESTO ●
Premere questo pulsante per avviare il l'apparecchio. Premerlo di nuovo per arrestarlo.
Pulsante SLEEP ●
Utilizzare questo pulsante per impostare la modalità Sleep con il timer.
Pulsanti TEMPERATURA
●
Utilizzare questi pulsanti per aumentare o diminuire l'impostazione della temperatura.
(Tenendo premuto il pulsante, il valore cambia più velocemente).
Pulsante ORA ●
Utilizzare questo pulsante per impostare e controllare data e ora.
Pulsanti di RESET
●
Selettore di FUNZIONE ●
Utilizzare questo pulsante per selezionare la modalità di funzionamento. Ogni
volta che si preme questo pulsante, la modalità passa ciclicamente da
a (CALDO) a (DEUMIDIFICATORE) a (FREDDO) e a (VENTOLA).
Selettore di VELOCITÀ VENTOLA ●
AUTO
CALDO
DEUMIDIFICATORE
FREDDO
VENTOLA
VELOCITÀ VENTOLA
SILENZIOSA
BASSA
MEDIA
ALTA
SLEEP
ARRESTO (ANNULLA)
AVVIO (PROGRAMMA)
AVVIO/ARRESTO
ORA
IMPOSTAZIONE TIMER
SELETTORE TIMER
ACCENSIONE CON IL TIMER
SPEGNIMENTO CON IL TIMER
INCLINAZIONE AUTOMATICA
FLUSSO D’ARIA ESTESO
Determina la velocità della ventola. Ogni volta che si preme questo pulsante,
l'intensità di circolazione passa da
(BASSA) a
(SILENZIOSA) (Questo pulsante consente di selezionare la velocità
ottimale o preferita della ventola per ogni modalità di funzionamento).
Pulsante di INCLINAZIONE AUTOMATICA ●
Controlla gli angoli del defl ettore orizzontale dell'aria.
FLUSSO D'ARIA ESTESO ●
Questo pulsante fornisce un condizionamento dell'aria più rapido e confortevole.
Controllo del TIMER ●
Utilizzare questo pulsante per impostare il timer.
Pulsante di SPEGNIMENTO CON IL TIMER ● Seleziona l'ora di SPEGNIMENTO.
Pulsante di ACCENSIONE CON IL TIMER ● Seleziona l'ora di ACCENSIONE.
Pulsante PROGRAMMAZIONE ● Programmazione dell'impostazione dell'ora.
Pulsante ANNULLA ● Annulla la programmazione dell'ora.
Precauzioni di utilizzo
Non posizionare il telecomando nei seguenti luoghi.
●
Sotto la luce diretta del sole. ●
In prossimità di un radiatore. ●
Maneggiare il telecomando con cura. Non farlo cadere a terra e proteggerlo ●
dall'acqua.
●
Una volta che si arresta l'unità esterna, questa non riparte per circa 3 minuti
(salvo qualora si arresti e riavvii l'unità o si scolleghi e ricolleghi il cavo di
alimentazione).
Ciò si verifi ca per proteggere l'apparecchio, non indica un guasto.
Se durante il funzionamento si preme il pulsante di selezione di FUNZIONE,
●
l'apparecchio può arrestarsi per circa 3 minuti per motivi di protezione.
– 76 –
(AUTO) a (ALTA) a (MEDIA) a
(AUTO)
Page 89

FUNZIONI AGGIUNTIVE
■ Controllo di riavvio automatico
In caso di interruzione dell'alimentazione, l'apparecchio viene riavviato automaticamente una volta ripristinata ●
l'alimentazione mantenendo la modalità di funzionamento e la direzione del fl usso dell'aria precedenti.
(Il funzionamento non viene interrotto dal telecomando).
Se non si desidera continuare il funzionamento quando l'alimentazione viene ripristinata, spegnere l'apparecchio. ●
Azionando l'interruttore di circuito, l'apparecchio viene riavviato automaticamente mantenendo la modalità di
funzionamento e la direzione del fl usso dell'aria precedenti.
Nota: 1. Se non si desidera il controllo di riavvio automatico, consultare l'agente di zona o DISATTIVARE la
funzione tramite il telecomando.
2. Il controllo di riavvio automatico non è disponibile se è impostata la modalità timer o Sleep con il timer.
FUNZIONAMENTO AUTOMATICO
L'apparecchio determina automaticamente la modalità di funzionamento CALDO, FREDDO o DEUMIDIFICATORE
in base alla temperatura ambiente corrente. La modalità di funzionamento selezionata viene modifi cata in base
alle variazioni di temperatura ambiente. Tuttavia, la modalità di funzionamento non varia quando l'unità interna è
collegata a un'unità esterna di tipo multi.
Premere il selettore di FUNZIONE in modo che il display indichi
la modalità di funzionamento
Se è stata selezionata la modalità AUTO, l'apparecchio ●
determina automaticamente la modalità di funzionamento
1
CALDO, FREDDO o DEUMIDIFICATORE in base alla
temperatura ambiente corrente. Tuttavia, la modalità di
funzionamento non varia quando l'unità interna è collegata a
un'unità esterna di tipo multi.
Se la modalità di funzionamento selezionata automaticamente
●
non è soddisfacente, modifi care manualmente l'impostazione
della modalità (caldo, deumidifi catore, freddo o ventola).
(AUTO).
ITALIANO
AVVIO
ARRESTO
Premere il pulsante (AVVIO/ARRESTO).
L'apparecchio viene avviato con un segnale acustico.
Premere di nuovo il pulsante per arrestarlo.
Le impostazioni vengono memorizzate sul telecomando, pertanto ■
la volta successiva sarà suffi ciente premere il pulsante
(AVVIO/ARRESTO).
È possibile aumentare o diminuire la temperatura in base alle
necessità fi no a un massimo di 3°C.
Premendo il pulsante della temperatura, la
temperatura verrà modifi cata in incrementi di 1°C.
La temperatura programmata e la temperatura ambiente effettiva
●
possono variare di poco in base alle condizioni presenti.
In modalità AUTOMATICA, il display non indica la temperatura ●
programmata. Se si modifi cano le impostazioni, l'unità interna
emette un segnale acustico.
Premere il pulsante (VELOCITÀ VENTOLA), sono disponibili le
modalità AUTO, BASSA e SILENZIOSA.
– 77 –
Page 90

FUNZIONE DI RISCALDAMENTO
Utilizzare l'apparecchio in modalità riscaldamento quando la temperatura esterna è inferiore a 21°C. ●
Quando è troppo caldo (oltre i 21°C), la funzione di riscaldamento potrebbe non funzionare per proteggere
l'apparecchio.
Per un utilizzo sicuro dell'apparecchio, si consiglia di utilizzarlo a una temperatura esterna superiore a -15°C. ●
Premere il selettore di FUNZIONE in modo che il display indichi la
1
modalità di funzionamento (CALDO).
Impostare la VELOCITÀ VENTOLA desiderata con il pulsante
(VELOCITÀ VENTOLA) (il display indica l'impostazione).
(AUTO) : La velocità della ventola cambia
2
(ALTA) : Modalità economica poiché la stanza
All'inizio si potrebbe avvertire aria fredda.
(MEDIA) : Ventola a bassa velocità.
(BASSA) : Ventola a velocità più bassa.
(SILENZIOSA) : Ventola a velocità bassissima.
Impostare la temperatura ambiente desiderata con i pulsanti
TEMPERATURA (il display indica l'impostazione).
L'impostazione della temperatura e la temperatura ambiente effettiva
3
possono leggermente variare in funzione delle condizioni presenti.
AVVIO
ARRESTO
Premere il pulsante
funzione riscaldamento, l'apparecchio emette un segnale acustico.
Premere di nuovo il pulsante per arrestarlo.
■
Le impostazioni vengono memorizzate sul telecomando, pertanto la volta
successiva sarà suffi ciente premere il pulsante (AVVIO/ARRESTO).
automaticamente in base alla temperatura
dell'aria che fuoriesce.
viene riscaldata velocemente.
(AVVIO/ARRESTO). Quando si avviata la
■ Sbrinamento
Lo sbrinamento viene eseguito circa ogni ora quando in caso di formazione di brina sullo scambiatore di calore
dell'unità esterna per circa 5-10 minuti ogni volta.
Durante l'operazione di sbrinamento, la spia lampeggia per 3 secondi a intervalli di 0,5 secondi.
Il tempo massimo di sbrinamento è di 20 minuti.
Tuttavia, se connesso a un'unità esterna di tipo multi, il tempo massimo di sbrinamento è di 15 minuti.
(Se si utilizzano tubi più lunghi del normale, è probabile che si verifi chi la formazione di brina).
– 78 –
Page 91

FUNZIONE DI DEUMIDIFICAZIONE
Utilizzare l'apparecchio in modalità deumidifi cazione quando la temperatura ambiente è superiore a 16°C.
Quando è inferiore a 15°C, la funzione di deumidifi cazione non è disponibile.
Premere il selettore di FUNZIONE in modo che il display indichi la
modalità di funzionamento (DEUMIDIFICATORE).
1
La VELOCITÀ VENTOLA è impostata su BASSA o SILENZIOSA.
Impostare la temperatura ambiente desiderata con il pulsante
TEMPERATURA (il display indica l'impostazione).
2
Per la deumidifi cazione, si consiglia di impostare
una temperatura ambiente compresa tra i 20 e i 26˚C.
AVVIO
ARRESTO
Premere il pulsante (AVVIO/ARRESTO). Quando si avvia
la modalità deumidifi cazione, l'apparecchio emette un segnale
acustico. Premere di nuovo il pulsante per arrestarlo.
Le impostazioni vengono memorizzate sul telecomando, pertanto la volta
■
successiva sarà suffi ciente premere il pulsante (AVVIO/ARRESTO).
■ Funzione di deumidifi cazione
Quando la temperatura ambiente è superiore alla temperatura impostata: l'apparecchio deumidifi ca l'ambiente ●
riducendo la temperatura al livello programmato.
Quando la temperatura ambiente è inferiore alla temperatura impostata: la deumidifi cazione viene eseguita
a una temperatura leggermente inferiore rispetto alla reale temperatura ambiente, indipendentemente dalla
temperatura impostata. La funzione si arresta (l'unità interna interrompe l'erogazione di aria) non appena la
temperatura ambiente scende al di sotto di quella impostata.
È possibile che la temperatura ambiente programmata non venga raggiunta in presenza di numerose persone
●
nella stanza o per altre condizioni ambiente.
ITALIANO
– 79 –
Page 92

MODALITÀ DI RAFFREDDAMENTO
Utilizzare l'apparecchio in modalità raffreddamento quando la temperatura esterna è compresa fra 21~ 43°C.
Se l'umidità interna è molto elevata (80%), sulla griglia di fuoriuscita dell'aria dell'unità interna può formarsi della
condensa.
Premere il selettore di FUNZIONE in modo che il display indichi la
1
modalità di funzionamento
(FREDDO).
Impostare la VELOCITÀ VENTOLA desiderata con il pulsante
(VELOCITÀ VENTOLA) (il display indica l'impostazione).
(AUTO) : La VELOCITÀ VENTOLA è ALTA all'inizio
2
(ALTA) : Modalità economica poiché la stanza viene
(MEDIA) : Ventola a bassa velocità.
(BASSA) : Ventola a velocità più bassa.
(SILENZIOSA) : Ventola a velocità bassissima.
Impostare la temperatura ambiente desiderata con il pulsante
TEMPERATURA (il display indica l'impostazione).
3
L'impostazioni della temperatura e la temperatura ambiente effettiva
possono leggermente variare in base alle condizioni presenti.
Premere il pulsante
la modalità raffreddamento, l'apparecchio emette un segnale
AVVIO
ARRESTO
acustico. Premere di nuovo il pulsante per arrestarlo. La funzione
di raffreddamento non viene avviata se la temperatura impostata
è superiore alla temperatura ambiente corrente, anche se la spia
(FUNZIONAMENTO) lampeggia. La funzione di raffreddamento
viene avviata quando si imposta una temperatura inferiore alla
temperatura ambiente corrente.
Le impostazioni vengono memorizzate sul telecomando, pertanto la volta
■
successiva sarà suffi ciente premere il pulsante (AVVIO/ARRESTO).
e passa automaticamente a MEDIA quando
viene raggiunta la temperatura programmata
raffreddata velocemente.
(AVVIO/ARRESTO). Quando si avvia
.
– 80 –
Page 93

VENTILAZIONE
È possibile utilizzare l'apparecchio semplicemente per far circolare l'aria. Utilizzare questa funzione per
deumidifi care l'unità interna ed esterna al termine dell'estate.
Premere il selettore di FUNZIONE in modo che il display indichi la
modalità di funzionamento (VENTOLA).
1
Premere il pulsante
2
(ALTA) : Massimo fl usso d'aria.
(MEDIA) : Ventola a bassa velocità.
(BASSA) : Ventola a velocità più bassa.
(SILENZIOSA) : Ventola a bassissima velocità.
(VELOCITÀ VENTOLA).
AVVIO
ARRESTO
Premere il pulsante
la modalità ventola, l'apparecchio emette un segnale acustico.
Premere di nuovo il pulsante per arrestarlo.
(AVVIO/ARRESTO). Quando si avvia
VELOCITÀ VENTOLA (AUTO)
..... Se durante la funzione di raffreddamento/riscaldamento la velocità della ventola è impostata in modalità AUTO:
La velocità della ventola cambia automaticamente in base alla temperatura
●
dell'aria che fuoriesce.
In presenza di una differenza sostanziale fra la temperatura ambiente e la
In modalità riscaldamento
In modalità raffreddamento
●
temperatura impostata, la ventola inizia a funzionare ad ALTA velocità.
Quando la temperatura ambiente raggiunge la temperatura impostata, la ●
velocità della ventola passa automaticamente a BASSA.
In presenza di una differenza sostanziale fra la temperatura ambiente e la
●
temperatura impostata, la ventola inizia a funzionare ad ALTA velocità.
Quando la temperatura ambiente raggiunge la temperatura impostata, viene ●
avviata la funzione di raffreddamento, che modifi ca la velocità della ventola
e la temperatura ambiente in modo da ottenere condizioni ottimali per un
raffreddamento naturale e salutare.
FLUSSO D’ARIA ESTESO
Durante il funzionamento, premere il pulsante ■ per selezionare le varie modalità
di funzionamento che imposteranno la direzione desiderata del fl usso di aria e regolare
inoltre la velocità del fl usso dell'aria in modo che raggiunga la massima distanza possibile.
(In modalità di funzionamento raffreddamento, la direzione e la velocità del fl usso dell'aria
saranno ripristinati alle impostazioni originali dopo 3 ore di funzionamento).
Se si preme il pulsante
● (FLUSSO D'ARIA ESTESO) mentre è impostata la
modalità INCLINAZIONE AUTOMATICA, quest'ultima risulta annullata e viene
impostata la modalità FLUSSO D'ARIA ESTESO.
Se si preme il pulsante ● (INCLINAZIONE AUTOMATICA) mentre è impostata la
modalità FLUSSO D'ARIA ESTESO, quest'ultima risulta annullata e viene impostata
la modalità INCLINAZIONE AUTOMATICA.
Se si preme il pulsante ● (FLUSSO D'ARIA ESTESO) quando il defl ettore
orizzontale dell'aria si arresta all'angolazione desiderata, il defl ettore entrerà in
modalità FLUSSO D'ARIA ESTESO.
Mano a mano che l'angolazione del defl ettore orizzontale dell'aria si modifi ca, il
●
fl usso d'aria potrebbe essere rivolto direttamente sulle persone.
– 81 –
ITALIANO
Page 94

MODALITÀ DI IMPOSTAZIONE DEL TIMER
ORA
SPEGNIMENTO
CON IL TIMER
ACCENSIONE
CON IL TIMER
PROGRAMMA
ANNULLA
ACCENSIONE/SPEGNIMENTO CON IL TIMER
Avvio
L'apparecchio si accende e si ●
spegne agli orari programmati.
L'accensione o spegnimento ●
avviene in base all'operazione
programmata più vicina nel tempo.
La freccia che appare sul display ●
indica la sequenza delle operazioni
di avvio e arresto.
Arresto
Ora
Dopo avere sostituito
le batterie;
SPEGNIMENTO con il timer
È possibile programmare l'arresto
dell'apparecchio a una determinata ora.
ACCENSIONE CON IL TIMER
L'apparecchio si avvierà agli ●
orari programmati.
1 Premere il pulsante
(ACCENSIONESPEGNIMENTO) in
modo che il simbolo
(SPEGNIMENTO) lampeggi.
1 Impostare l'ora con il
pulsante
(ORA).
AM
PM
1 Premere il pulsante
(SPEGNIMENTO CON IL TIMER).
Il simbolo
lampeggia sul display.
Avvio
ARRESTO
Avvio
Arresto
2 Impostare l'ora di
spegnimento con il
pulsante di controllo
TIMER.
Premere il pulsante
(PROGRAMMA).
PM
PM
(SPEGNIMENTO)
AM
1 Premere il pulsante
(ACCENSIONE CON IL TIMER)
il simbolo
lampeggia sul display.
(ACCENSIONE)
AM
3 Premere il pulsante
(ACCENSIONE CON
IL TIMER) in modo che
si illumini il simbolo
(SPEGNIMENTO) e il simbolo
(ACCENSIONE) lampeggi.
PM
AM
Modalità di annullamento della programmazione
Puntare la fi nestrella del segnale del telecomando verso l'unità interna e premere il pulsante (ANNULLA).
Il segnale
(PROGRAMMATO) si spegne con un segnale acustico e la spia (TIMER) sull'unità interna si
spegne.
NOTA
È possibile impostare solo per l'accensione con il timer, lo spegnimento
con il timer e ACCENSIONE/SPEGNIMENTO con il timer.
– 82 –
Page 95

2 Premere il
pulsante
(ORA).
AM
PM
3 Impostare l'ora corrente con
il pulsante di controllo TIMER.
PMPMPM
Esempio: L'ora corrente è 13:30.
4 Premere di nuovo il pulsante (ORA).
L'indicazione dell'ora si illumina anziché lampeggiare.
L'indicazione dell'ora scompare ●
PM
automaticamente dopo 10 secondi.
Per controllare l'impostazione ●
dell'ora corrente, premere due
volte il pulsante
L'impostazione dell'ora
corrente è stata completata.
(ORA).
2 Impostare l'ora di spegnimento
con il pulsante di controllo TIMER.
PMPMPM
2 Impostare l'ora di accensione
con il pulsante di controllo TIMER.
AMAMAM
4 Impostare l'ora di accensione
con il pulsante di controllo TIMER.
PM
PM
AM
AM
3 Puntare la fi nestrella del segnale del telecomando verso l'unità interna e premere
il pulsante
Il simbolo
(PROGRAMMATO) si illumina. Si avverte un segnale acustico e la spia
si illumina sull'unità interna.
(PROGRAMMA).
(SPEGNIMENTO) si illumina anziché lampeggiare e il segnale
PM
L'impostazione dell'ora di spegnimento è stata completata.
Esempio: L'apparecchio si spegne alle 23:00.
(TIMER)
3 Puntare la fi nestrella del segnale del telecomando verso l'unità interna e premere
il pulsante
Il simbolo
(PROGRAMMATO) si illumina. Si avverte un segnale acustico e la spia
si illumina sull'unità interna.
(PROGRAMMA).
(ACCENSIONE) si illumina anziché lampeggiare e il segnale
Esempio:
AM
L'apparecchio si accende alle 7:00.
L'impostazione dell'ora di accensione è stata completata.
(TIMER)
5 Puntare la fi nestrella del segnale del telecomando verso l'unità interna e premere
il pulsante
Il simbolo
(PROGRAMMATO) si illumina. Si avverte un segnale acustico e la spia
si illumina sull'unità interna.
(PROGRAMMA).
(ACCENSIONE) si illumina anziché lampeggiare e il segnale
Esempio:
PM
PM
AM
AM
L'apparecchio si spegne alle 22:30 e si accende alle 7:00.
L'impostazione degli orari di accensione/spegnimento è stata
completata.
(TIMER)
ITALIANO
È possibile utilizzare il timer in tre modi: Spegnimento con il timer, accensione con il timer e accensione/ ●
spegnimento con il timer. Impostare innanzitutto l'ora corrente poiché viene utilizzata come riferimento.
●
Le impostazioni dell'ora vengono memorizzate sul telecomando, pertanto la volta successiva sarà suffi ciente
premere il pulsante (PROGRAMMA) per utilizzare le stesse impostazioni.
– 83 –
Page 96
MODALITÀ DI IMPOSTAZIONE DEL TIMER DELLA MODALITÀ SLEEP
Se non ancora impostata, impostare per prima cosa l'ora corrente (vedere le pagine per l'impostazione dell'ora
corrente). Premere il pulsante
(SLEEP) e il display viene modifi cato come mostrato di seguito.
Modalità
Modalità Sleep con
il timer
4
1 ora 2 ore 3 ore 7 ore
Spegnimento modalità
Indicazione
4
Sleep con il timer
4
4
1
Modalità Sleep con il timer: l'apparecchio continua a funzionare per il
numero di ore programmato, quindi si arresta.
Puntare la fi nestrella del segnale del telecomando verso l'unità interna e
SLEEP
premere il pulsante SLEEP.
Le informazioni relative al timer vengono visualizzate sul telecomando.
La spia del TIMER si accende emettendo un segnale acustico dall'unità
interna. Quando il timer della modalità Sleep è stato impostato, il display
indica l'ora di spegnimento.
AM
Esempio: Se è stata programmata la
modalità Sleep per 3 ore alle 23:38,
l'ora di spegnimento sarà alle 2:38.
Modalità
Sleep con
il timer
H
Avvio
L'apparecchio sarà arrestato in base al timer
della modalità Sleep e riavviato all'ora di
accensione prevista.
1 Impostare l'ora di ACCENSIONE coni il timer.
2
Premere il pulsante (SLEEP) e impostare il timer della modalità Sleep
H
AM
In modalità riscaldamento:
In questo caso, l'apparecchio si
AM
spegne entro 2 ore (alle ore 1:38)
e si riaccende alle 6:00 del mattino
successivo.
.
Modalità di annullamento della programmazione
Puntare la fi nestrella del segnale del telecomando verso l'unità interna e premere il pulsante (ANNULLA).
Il segnale (PROGRAMMATO) si spegne con un segnale acustico e la spia (TIMER) sull'unità interna si
spegne.
– 84 –
Page 97

MODALITÀ DI SOSTITUZIONE DELLE BATTERIE DEL TELECOMANDO
Rimuovere il coperchio come mostrato nella fi gura ed estrarre le
1
vecchie batterie.
Spingere e tirare nel verso
indicato dalla freccia
=
Inserire le batterie nuove.
2
La direzione delle batterie deve seguire i simboli indicati
nell'alloggiamento.
ATTENZIONE
Non utilizzare contemporaneamente batterie nuove e vecchie o di 1.
diverso tipo.
Se si prevede di non utilizzare il telecomando per 2 o 3 mesi, estrarre 2.
le batterie.
INTERRUTTORE TEMPORANEO
Se il telecomando non funziona a causa dell'esaurimento delle batterie, premere questo interruttore per avviare
e arrestare l'apparecchio.
Questo funzionamento temporaneo avviene secondo le impostazioni più recenti. (Quando viene attivata
●
l'alimentazione, l'unità si commuta immediatamente in modalità automatica).
INTERRUTTORE DI CIRCUITO
Quando non si utilizza il condizionatore d'aria, impostare l'interruttore di circuito su “OFF”.
ITALIANO
– 85 –
Page 98

CONDIZIONI DI FUNZIONAMENTO OTTIMALI
Temperatura ambiente adeguata Installare tende o oscuranti
Avvertenza
Temperature troppo
basse sono dannose
per la salute e causano
uno spreco di energia
elettrica.
Ventilazione Utilizzo corretto del timer
Attenzione
Non tenere la stanza chiusa per un lungo
periodo di tempo. Aprire occasionalmente
la porta e le
fi nestre per
consentire
l'ingresso di
aria fresca.
Non dimenticare di pulire
il fi ltro dell'aria
La presenza di polvere nel fi ltro dell'aria riduce
il volume d'aria e l'effi cienza di raffreddamento.
Per evitare sprechi di energia elettrica, pulire il
fi ltro ogni 2 settimane.
È possibile
ridurre la
penetrazione
di calore nella
stanza dalle
fi nestre.
Durante la notte, utilizzare la modalità di
accensione e spegnimento con il timer in base
all'orario di sveglia del mattino. In questo modo
sarà possibile godere di una temperatura
ambiente confortevole. Utilizzare il timer in
modo appropriato.
Impostare una temperatura adeguata
per neonati e bambini
Quando si utilizza l'unità in presenza di neonati,
bambini e anziani con diffi coltà motorie, prestare
attenzione alla temperatura ambiente e alla
direzione del fl usso dell'aria.
– 86 –
Page 99

INFORMAZIONI PER L'UTENTE
Condizionatore d'aria e fonti di calore nella stanza
Attenzione
Se la quantità di calore della stanza è superiore alla
potenza di raffreddamento del condizionatore d'aria
(ad esempio: presenza nella stanza di molte persone,
l'utilizzo di apparecchiature di riscaldamento e così
via), non è possibile raggiungere la temperatura
ambiente programmata.
Inattività per un lungo periodo
Se l'unità interna non viene utilizzata per un lungo
periodo, scollegare la spina di alimentazione dalla
presa. Se il cavo di alimentazione rimane collegato,
l'unità interna continua a consumare 8W nel circuito
di controllo anche se è in modalità “OFF” (spento).
In caso di temporali
OFF
ITALIANO
Avvertenza
Per proteggere l'intera unità durante i temporali,
arrestare l'apparecchio e rimuovere la spina dalla
presa.
Interferenze causate da apparecchi prodotti
Attenzione
Per evitare interferenze, posizionare l'unità interna
e il telecomando ad almeno 1 metro di distanza da
apparecchi elettrici.
– 87 –
Per prevenire
interferenze,
mantenere
almeno 1 m
di distanza.
Lampada
fl uorescente di
tipo a inverter
TV
Page 100

COLLEGAMENTO DEI FILTRI DI PULIZIA DELL'ARIA
ATTENZIONE
Le operazioni di pulizia e manutenzione devono essere eseguite esclusivamente da personale qualifi cato. Prima
della pulizia, arrestare l'apparecchio e interrompere l'alimentazione.
Aprire il pannello anteriore.
1
2
3
Sollevare il pannello anteriore sorreggendolo ai lati ●
con entrambe le mani.
Rimuovere il fi ltro.
Spingere verso l'alto per sganciare i morsetti ed
●
estrarre il fi ltro.
Collegamento dei fi ltri di pulizia dell'aria al fi ltro.
Collegare i fi ltri di pulizia dell'aria al telaio
●
premendo gentilmente su entrambi i lati e
rilasciandoli una volta inseriti.
Morsetti
(4 punti)
ATTENZIONE
Non piegare il fi ltro di pulizia
dell'aria in quanto questo potrebbe
danneggiare il telaio.
Collegare i fi ltri.
4
●
Collegare i fi ltri assicurandosi che la superfi cie con
l'indicazione “FRONT” sia rivolta verso la parte anteriore.
Dopo avere inserito i fi ltri, premere sul pannello anteriore
●
in corrispondenza delle tre frecce come mostrato in
fi gura e chiuderlo.
NOTA
Per rimuovere i fi ltri di pulizia dell'aria, seguire la procedura sopra riportata. ●
Quando i fi ltri di pulizia dell'aria sono usurati, la potenza di raffreddamento risulta leggermente ridotta e la ●
velocità di raffreddamento diminuisce. Pertanto, se utilizzato in tali condizioni, impostare la velocità su "ALTA".
Non mettere in funzione il condizionatore d'aria senza fi ltro. La polvere potrebbe penetrare nel condizionatore
●
d'aria e causare guasti.
– 88 –
 Loading...