

Hitachi RAS-18YH4, RAC-18YH4, RAS-25YH4, RAC-25YH4, RAS-35YH4 Operation Manual
...
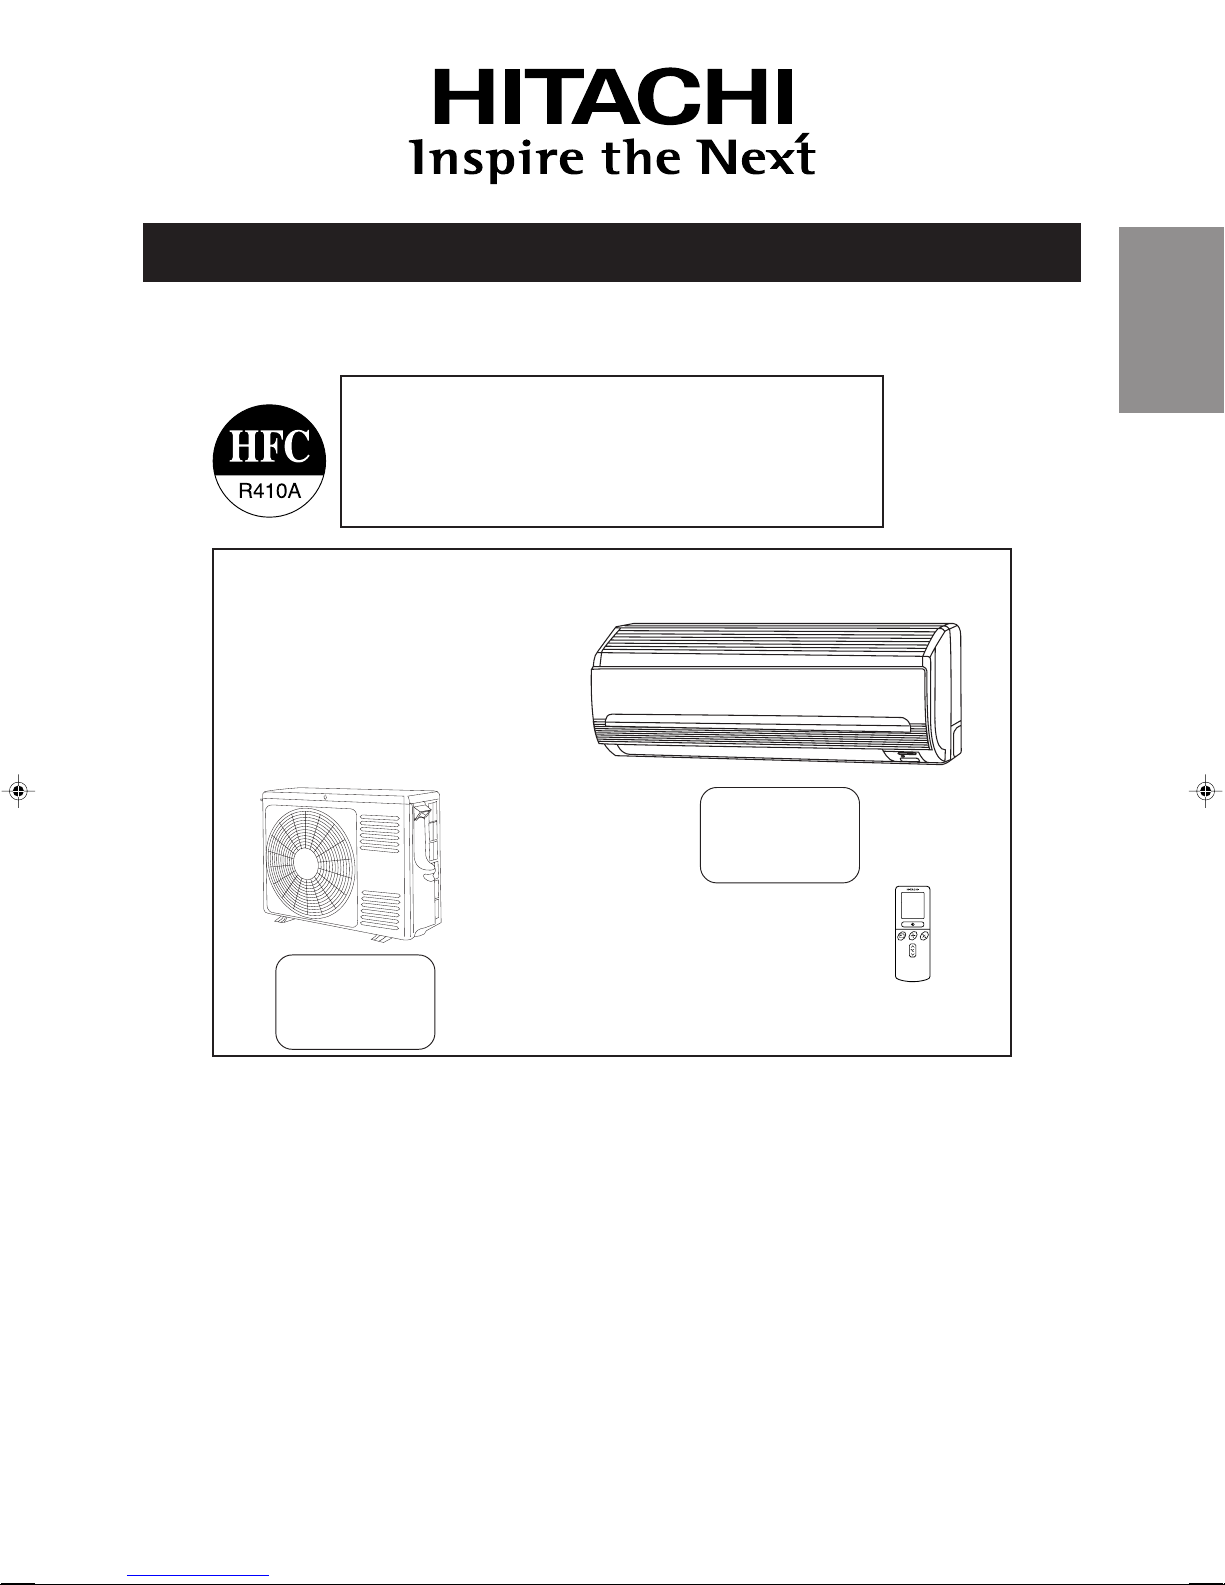
SPLIT TYPE AIR CONDITIONER
MODEL
RAS-18YH4/RAC-18YH4
RAS-25YH4/RAC-25YH4
RAS-35YH4/RAC-35YH4
INDOOR UNIT/OUTDOOR UNIT
INDOOR UNIT
Instruction manual Page 1~20
To obtain the best performance and ensure years of
trouble free use, please read this instruction manual
completely.
Bedlenungsanleitung Seite 21~40
Bitte lesen Sie diese Bedienungsanleitung aufmerksam
durch, um durch richtige Bedienung jahrelangen und
störungsfreien Betrieb zu gewährleisten.
Mode d’emploi Page 41~60
Des performances optimales et un fonctionnement à
long terme seront assurés en appliquant les présentes
instructions après avoir entièrement lu ce mode
d’emploi.
Manuale di istruzioni Pag. 61~80
Per garantire la migliore prestazione e la più lunga
durataleggere attentamente e al completo le seguanti
istruzioni
Manual de instrucciones Página 81~100
Para obtener el mejor funcionamiento y asegurar años
de uso libre de problemas, lea cuidadosamente este
manual de instrucciones.
Manual de instruções Página 101~120
A fim de obter um bom funcionamento e de garantir
uma utilização sem falhas durante muitos anos, é favor
ler este manual de instruções completamente.
√‰ËÁ›Â˜ ¯Ú‹Û˘ ™ÂÏ›‰· 121~140
°И· ЩЛУ О·П‡ЩВЪЛ ·fi‰ФЫЛ ЩФ˘ ОПИМ·ЩИЫЩИОФ‡ О·И
БИ· ЩЛУ М·ОЪФЪfiıВЫМЛ ¯Ъ‹ЫЛ ЩФ˘ ¯ˆЪ›˜
ЪФ‚П‹М·Щ·, ‰И·‚¿ЫЩВ ЪФЫВОЩИО¿ ·˘Щ¤˜ ЩИ˜ Ф‰ЛБ›В˜
¯Ъ‹ЫЛ˜.
OUTDOOR UNIT
– 1 –
ENGLISH
RAC-18YH4
RAC-25YH4
RAC-35YH4
RAS-18YH4
RAS-25YH4
RAS-35YH4

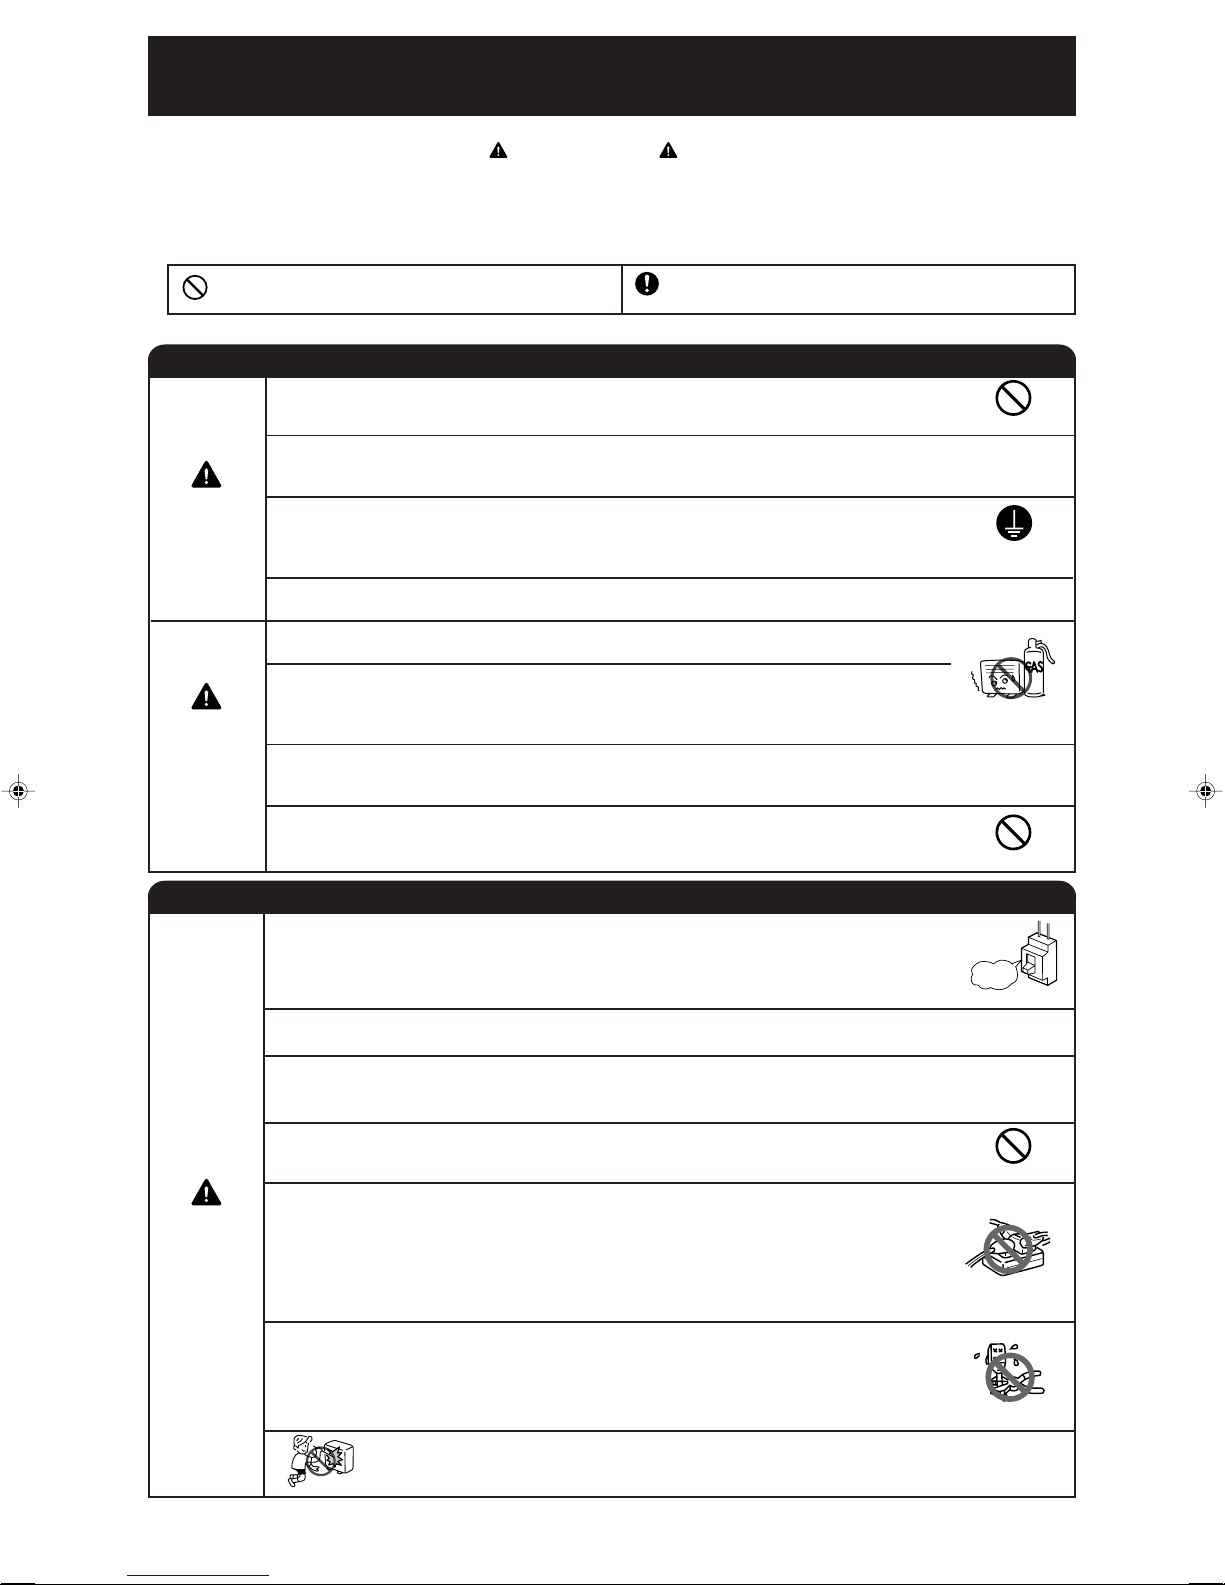
SAFETY PRECAUTION
• Please read the “Safety Precaution” carefully before operating the unit to ensure correct usage of the unit.
• Pay special attention to signs of “
Warning” and “ Caution”. The “Warning” section contains
matters which, if not observed strictly, may cause death or serious injury. The “Caution” section
contains matters which may result in serious consequences if not observed properly. Please observe
all instructions strictly to ensure safety.
• The signs indicate the following meanings. (The following are examples of signs.)
• Please keep this manual after reading.
This sign in the figure indicates prohibition.
Indicates the instructions that must be followed.
WARNING
CAUTION
• Do not reconstruct the unit.
Water leakage, fault, short circuit or fire may occur if you reconstruct the unit by
yourself.
• Please ask your sales agent or qualified technician for the installation of your
unit.
Water leakage, short circuit or fire may occur if you install the unit by yourself.
• Please use earth line.
Do not place the earth line near water or gas pipes, lightning-conductor, or the
earth line of telephone. Improper installation of earth line may cause electric
shock.
• Be sure to use the specified piping set for R410A. Otherwise, this may result in
broken copper pipes or faults.
• A circuit breaker should be installed depending on the mounting site of the unit.
Without a circuit breaker, the danger of electric shock exists.
• Do not install the unit near a location where there is flammable gas.
The outdoor unit may catch fire if flammable gas leaks around it. Piping shall be
suitable supported with a maximum spacing of 1m between the supports.
• Please ensure smooth flow of water when installing the drain hose. If any failure
is found in the drain path, water drops from the indoor and outdoor units, causing
wet household effects.
• Make sure that a single phase 230V power source is used.
The use of other power sources may cause electrical components to overheat
and lead to fire.
PROHIBITION
CONNECT EARTH LINE
PROHIBITION
PROHIBITION
• Should abnormal situation arise (like burning smell), please stop operating the
unit and remove plug from the socket or turn off the circuit breaker. Contact your
agent. Fault, short circuit or fire may occur if you continue to operate the unit
under abnormal situation.
• Please contact your agent for maintenance.
Improper self maintenance may cause electric shock and fire.
• Please contact your agent if you need to remove and reinstall the unit.
Electric shock or fire may occur if you remove and reinstall the unit yourself improperly.
WARNING
PRECAUTIONS DURING INSTALLATION
PRECAUTIONS DURING SHIFTING OR MAINTENANCE
“OFF”
PROHIBITION
• Avoid an extended period of direct air flow for your health.
• Do not connect the power calbe with an extension cable or do not plug too many
leads of the other electric appliance into the socket where this cable is plugged.
In addition, wire the cable with some allowances to prevent the cable from stretching.
Not doing so will cause an electrical shock, heat generation or fire.
PROHIBITION
• Do not put objects like thin rods into the panel of blower and suction side
because the high-speed fan inside may cause danger.
• Do not bundle the power cable, pull it, put something on it, heat it, process it, or
put it between things. Breakage of the power cable may result.
Use of a damaged cable may cause an electrical shock or a fire.
PROHIBITION
PROHIBITION
– 2 –
WARNING
PRECAUTIONS DURING OPERATION
• Do not use any conductor as fuse wire, this could cause fatal accident.
“OFF”
• Spray cans and other combustibles should not be located within a meter of the air
outlets of both indoor and outdoor units.
As a spray can’s internal pressure can be increased by hot air, a rupture may result.
• The product shall be operated under the manufacturer specification and not for
any other intended use.
DON’T WET
• When operating the unit with burning equipments, regularly ventilate
the room to avoid oxygen insufficiency.
PROHIBITION
• During thunder storm, disconnect the plug top or turn off the circuit breaker.
• Do not attempt to operate the unit with wet hands, this could cause fatal accident.
STRICTLY OBSERVE
PRECAUTIONS
• Do not direct the cool air coming out from the air-conditioner panel to
face household heating apparatus as this may affect the working of
apparatus such as the electric kettle, oven etc.
PROHIBITION
ENGLISH
PROHIBITION
PROHIBITION
CAUTION
• Please ensure that outdoor mounting frame is always stable, firm and
without defect. If not, the outdoor unit may collapse and cause danger.
• Do not wash the unit with water or place a water container such as a
vase on the indoor unit.
PROHIBITION
Electrical leakage could be present and cause electric shock.
• Do not place plants or animals directly under the air flow as it is bad for the plants or
animals.
• Do not climb on the outdoor unit or put objects on it.
PROHIBITION
• When operating the unit with the door and windows opened, (the room humidity
is always above 80%) and with the air deflector facing down or moving automatically for a long period of time, water will condense on the air deflector and drips
down occasionally. This will wet your furniture. Therefore, do not operate under
such condition for a long time.
• If the amount of heat in the room is above the cooling or heating capability of the
unit (for example: more people entering the room, using heating equipments and
PROHIBITION
etc.), the preset room temperature cannot be achieved.
• Indoor unit cleaning must be performed by authorized personnel only. Consult
your sales agent.
Using a commercially available detergent or similar can damage the plastic parts
or clog the drain pipe, causing water to drip with potential electric shock hazard.
PROHIBITION
PROHIBITION
PROHIBITION
PROHIBITION
DON’T TOUCH
• Do not touch the refrigerant pipe and connecting valve.
Burns may result.
• Do not touch the air outlet, bottom surface and aluminum fin of the outdoor
unit.
You may get hurt.
DON’T TOUCH
– 3 –
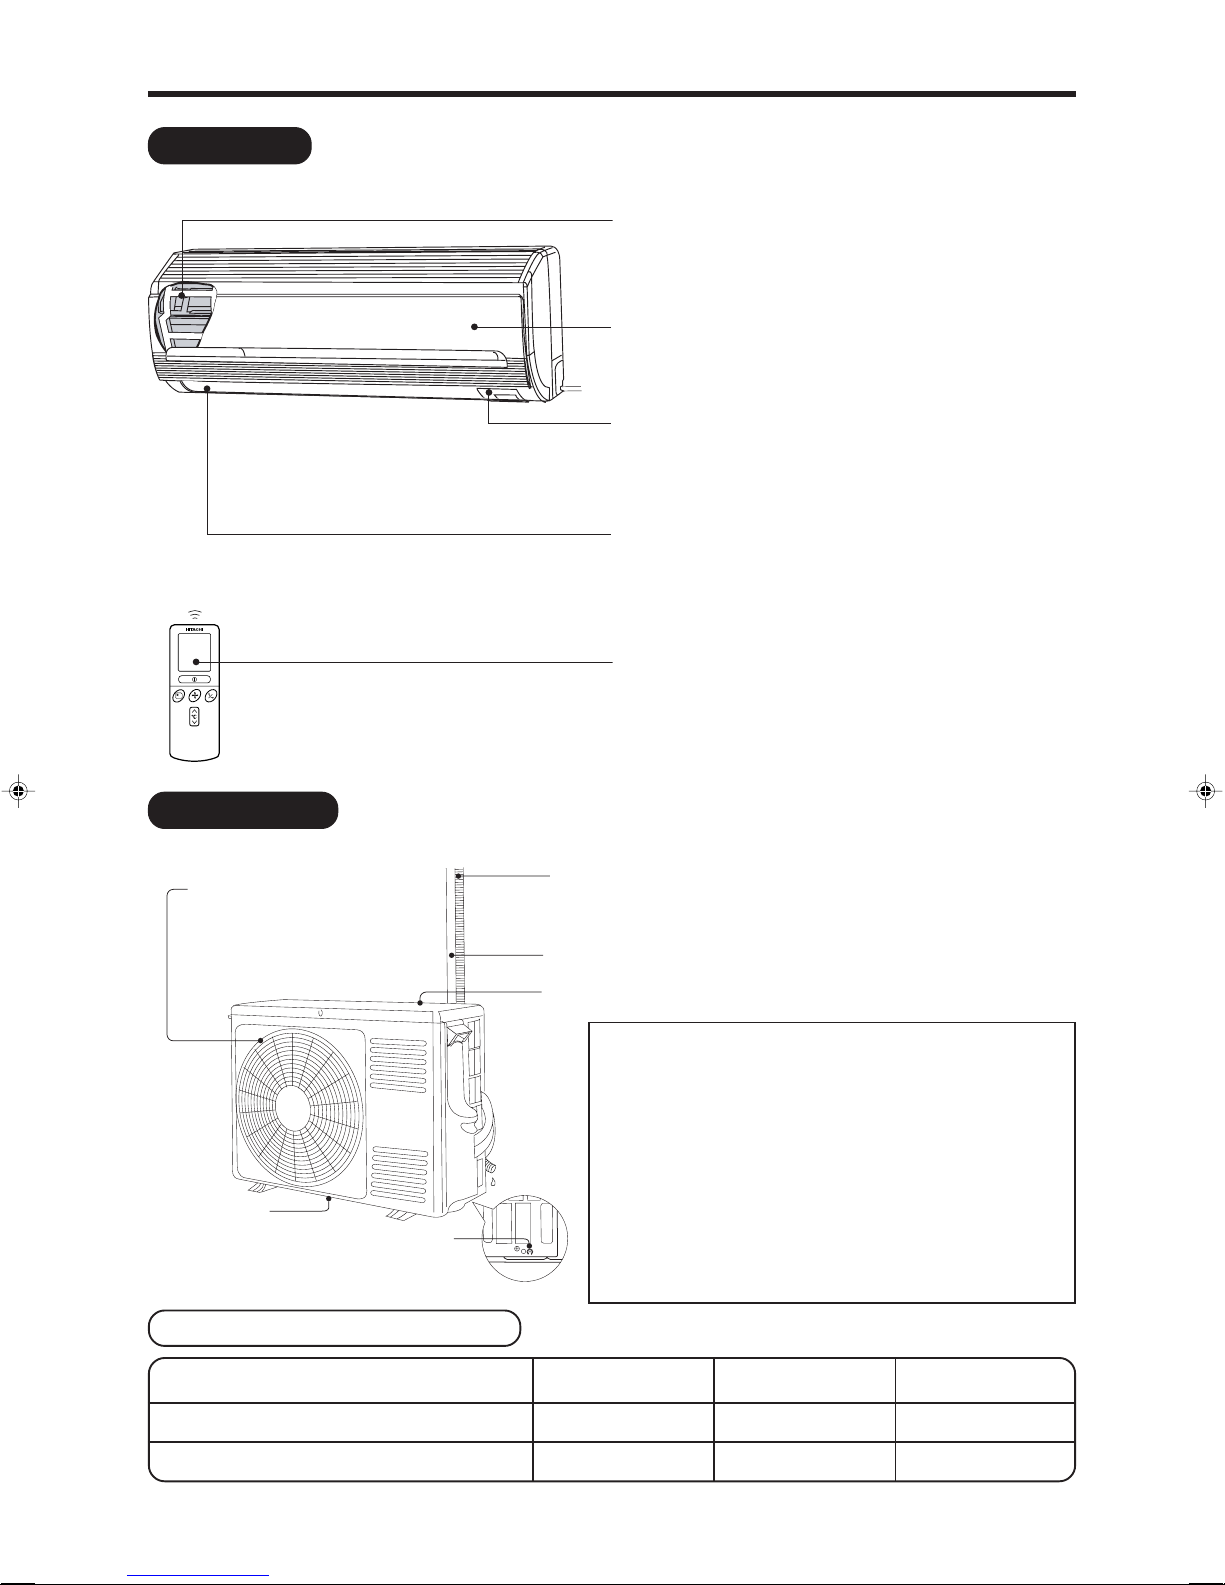
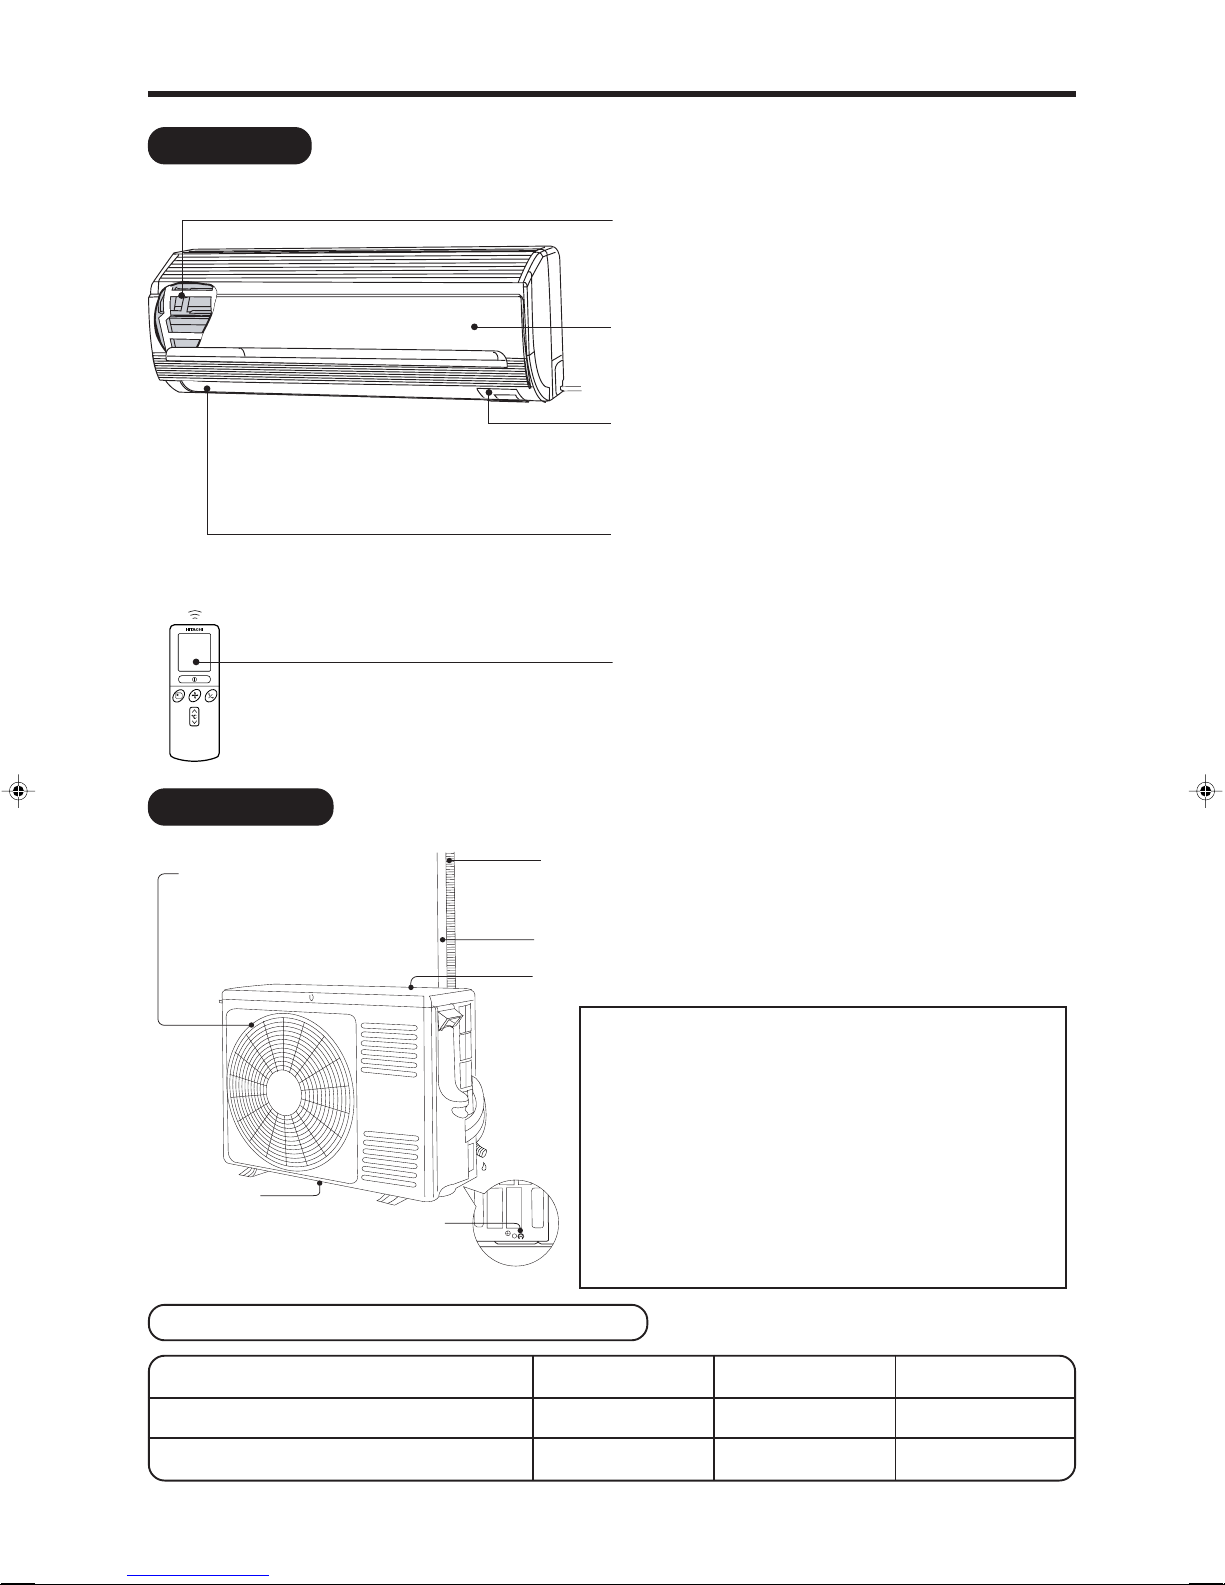
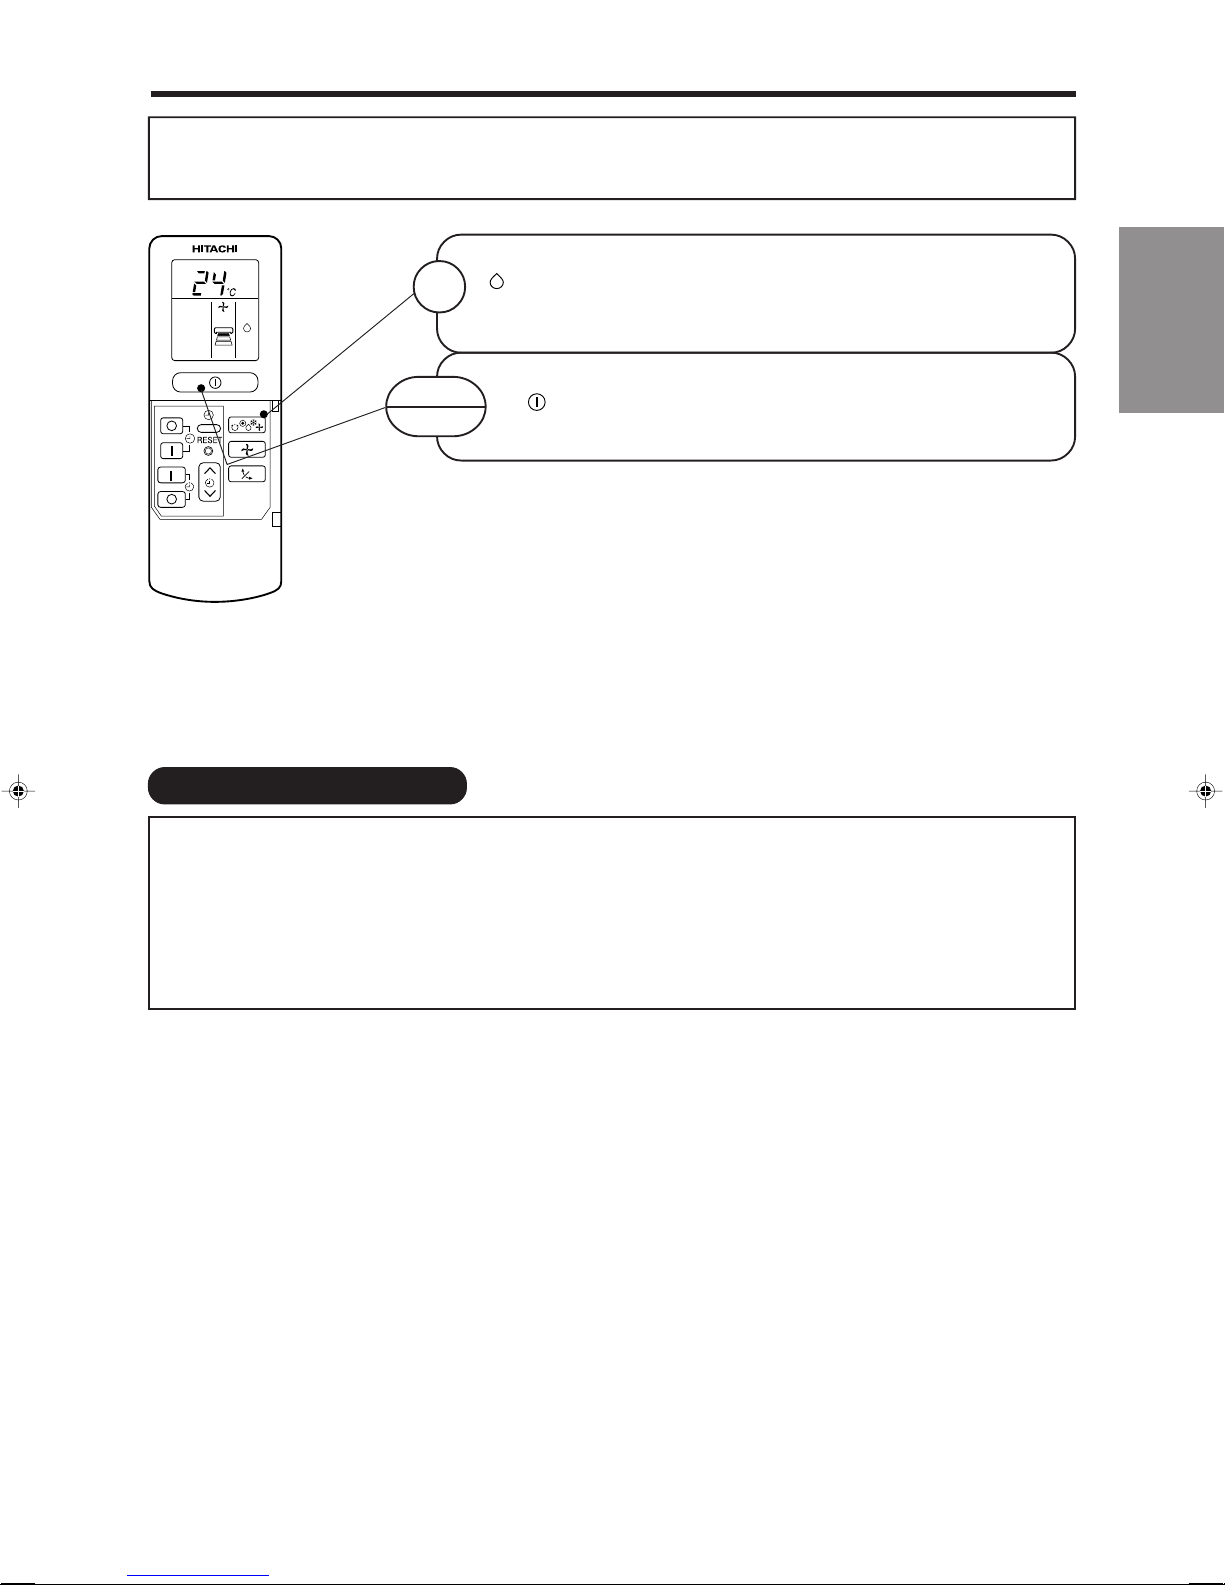
NAMES AND FUNCTIONS OF EACH PART
INDOOR UNIT
Air filter
To prevent dust from coming into the indoor unit.
(Refer page 16)
Front panel
Indoor unit indicators
Light indicator showing the operating condition.
(Refer page 5)
Horizontal deflector Vertical deflector
(Air Outlet)
(Refer page 15)
OUTDOOR UNIT
Air outlet
When “heating” operation is
performed, cool air blows
and when “cooling” or
“dehumidifying” operation is
performed, warm air blows.
Drain port
(Bottom)
(Lower section of the side)
Earth terminal
Remote controller
Send out operation signal to the indoor unit. So as
to operate the whole unit.
(Refer page 6)
Drain hose
Drains the dehumidified water from the indoor unit to the outdoor
during “cooling” or “dehumidifying” operation.
Piping and Wiring
Air inlets (Rear and left sides)
About the outdoor unit:
• When “Stop” is selected during operation of the indoor
unit, the fan of the outdoor unit continues turning for
10 to 60 seconds to cool the electric parts down.
• In heating operation, condensate or water due to
defrosting will flow.
Do not cover the drain port of the outdoor unit because
such water may freeze in the chilly area.
• When the outdoor unit is hung on the ceiling, install
the bush and drain pipe on the drain port and drain
water.
MODEL NAME AND DIMENSIONS
MODEL WIDTH (mm) HEIGHT (mm) DEPTH (mm)
RAS-18YH4, RAS-25YH4, RAS-35YH4 780 280 205
RAC-18YH4, RAC-25YH4, RAC-35YH4 750 548 288
– 4 –
NAMES AND FUNCTIONS OF EACH PART
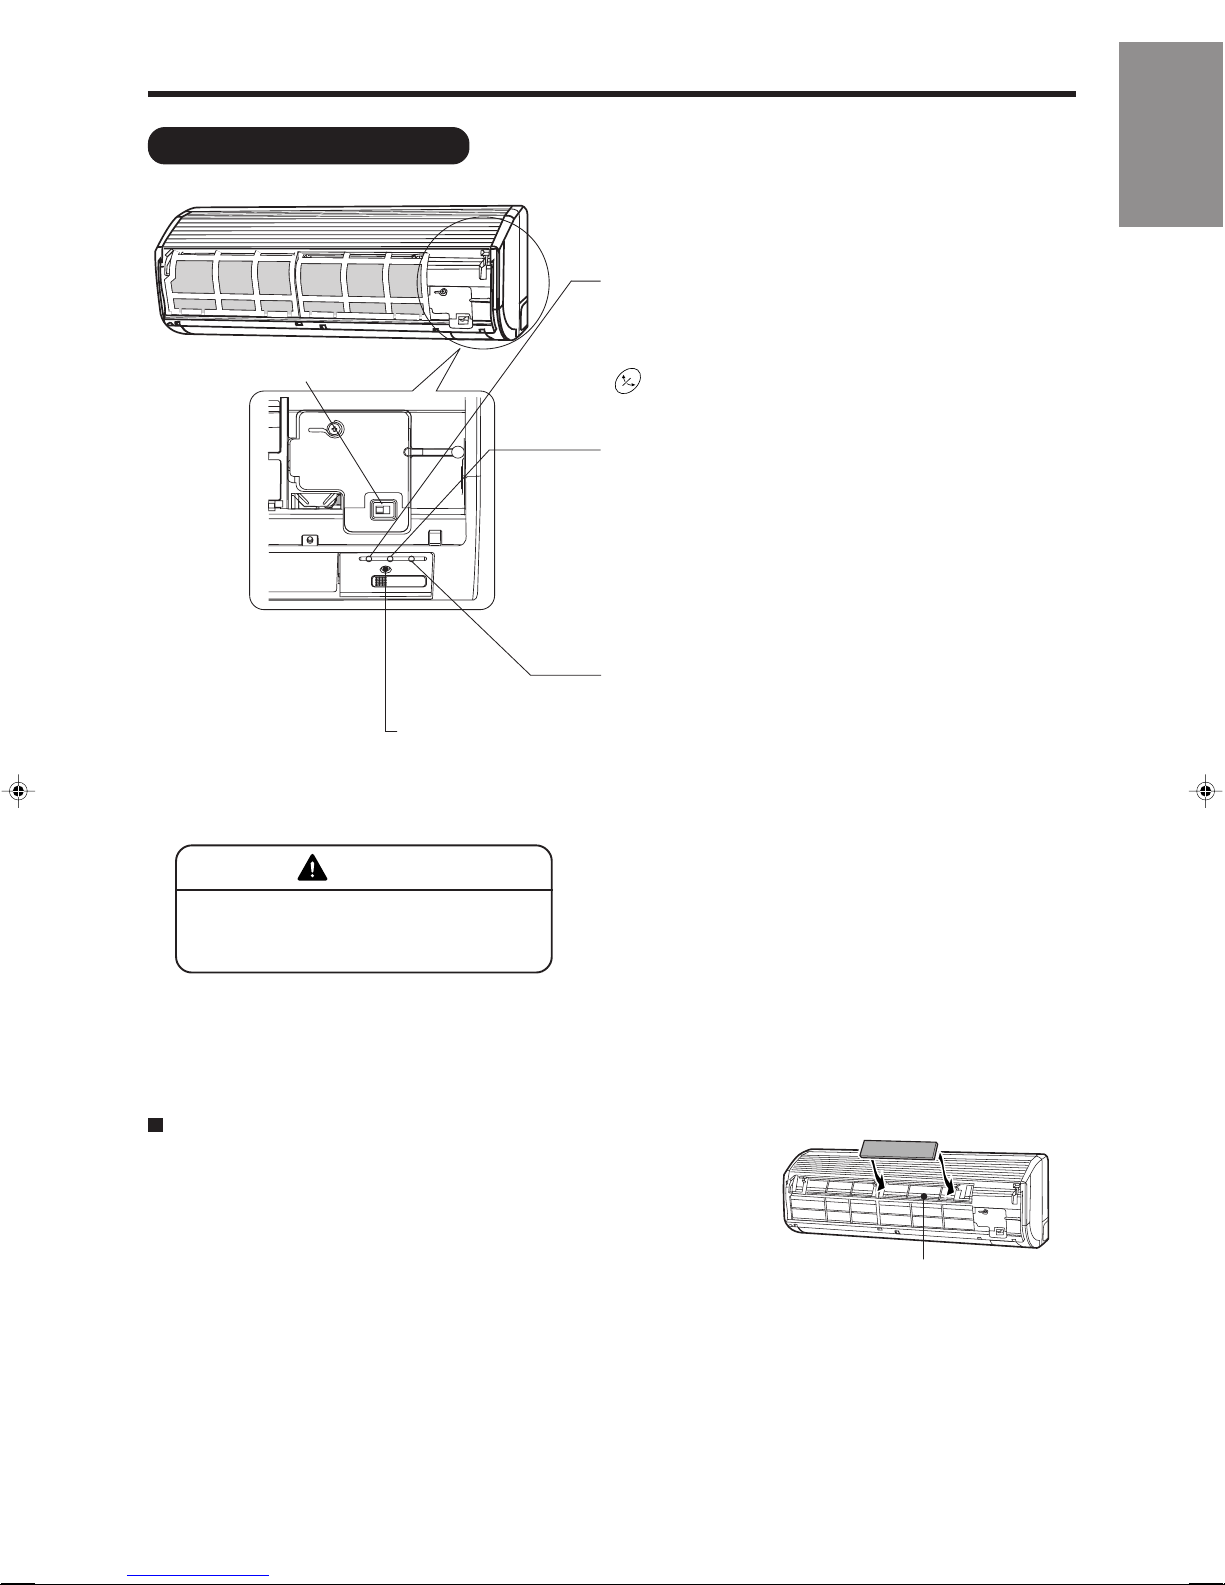
INDOOR UNIT INDICATIONS
FILTER LAMP (Green)
When the device is operated for a total of about 200
hours, the FILTER lamp lights indicates that it is time
POWER SWITCH
to clean the filter.The lamp goes out when the
“
operation is stopped.
OPERATION LAMP (Yellow)
This lamp lights during operation.
The OPERATION LAMP flashes in the following
cases during heating.
(1) During preheating
(2) During defrosting
TIMER LAMP (Orange)
This lamp lights when the timer is working.
ENGLISH
(AUTO SWING)” button is pressed while the
For about 2-3 minutes after starting up.
Defrosting will be performed about once an hour
when frost forms on the heat exchanger of the
outdoor unit, for 5-10 minutes each time.
TEMPORARY SWITCH
●
Use this switch to start and stop when the remote controller does not work.
●
This temporary operation will be at the most recent setting made. (The unit
will immediately go into automatic operation once power is switched on.)
CAUTION
Turn off the circuit breaker or pull out
the power plug if the unit is not be
operated for a long period.
✩ If the power stays on and the unit is not operated, power is slightly consumed in the control circuit.
The power is saved by turning off the power switch (or the circuit breaker when the power is supplied
from the outdoor unit).
Attaching the air cleansing and deodorizing filters (Accessories) to the filter frame.
• Attach the air cleansing and deodorizing filters to the frame by
gently compress its both sides and release after insertion into
filter frame.
• The cooling capacity is slightly weakened and the cooling speed
becomes slower when the air cleansing and deodorizing filters
are used.
• Air cleansing and deodorizing filters are washable and reusable up to 20 times by using vacuum
cleaner or water rinse under running tap water. When you want to renew it, please ask your sales
agent.
Frame
– 5 –
NAMES AND FUNCTIONS OF EACH PART
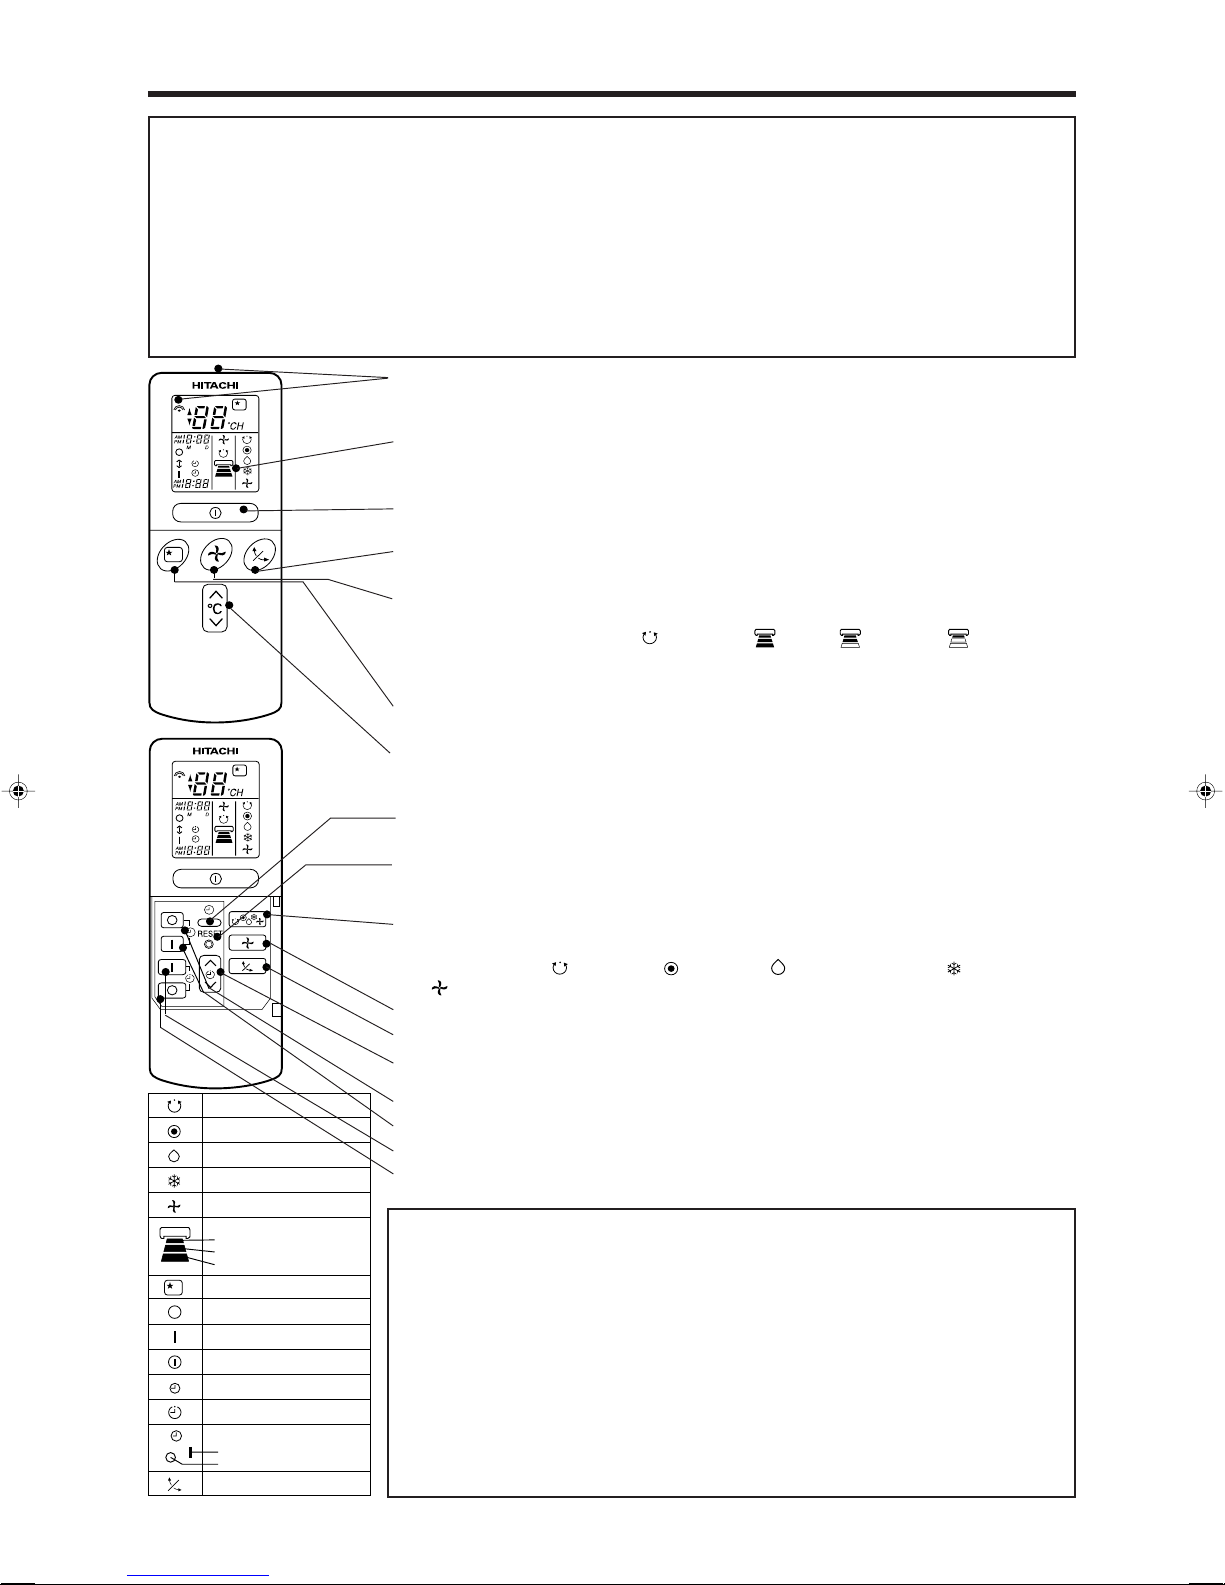
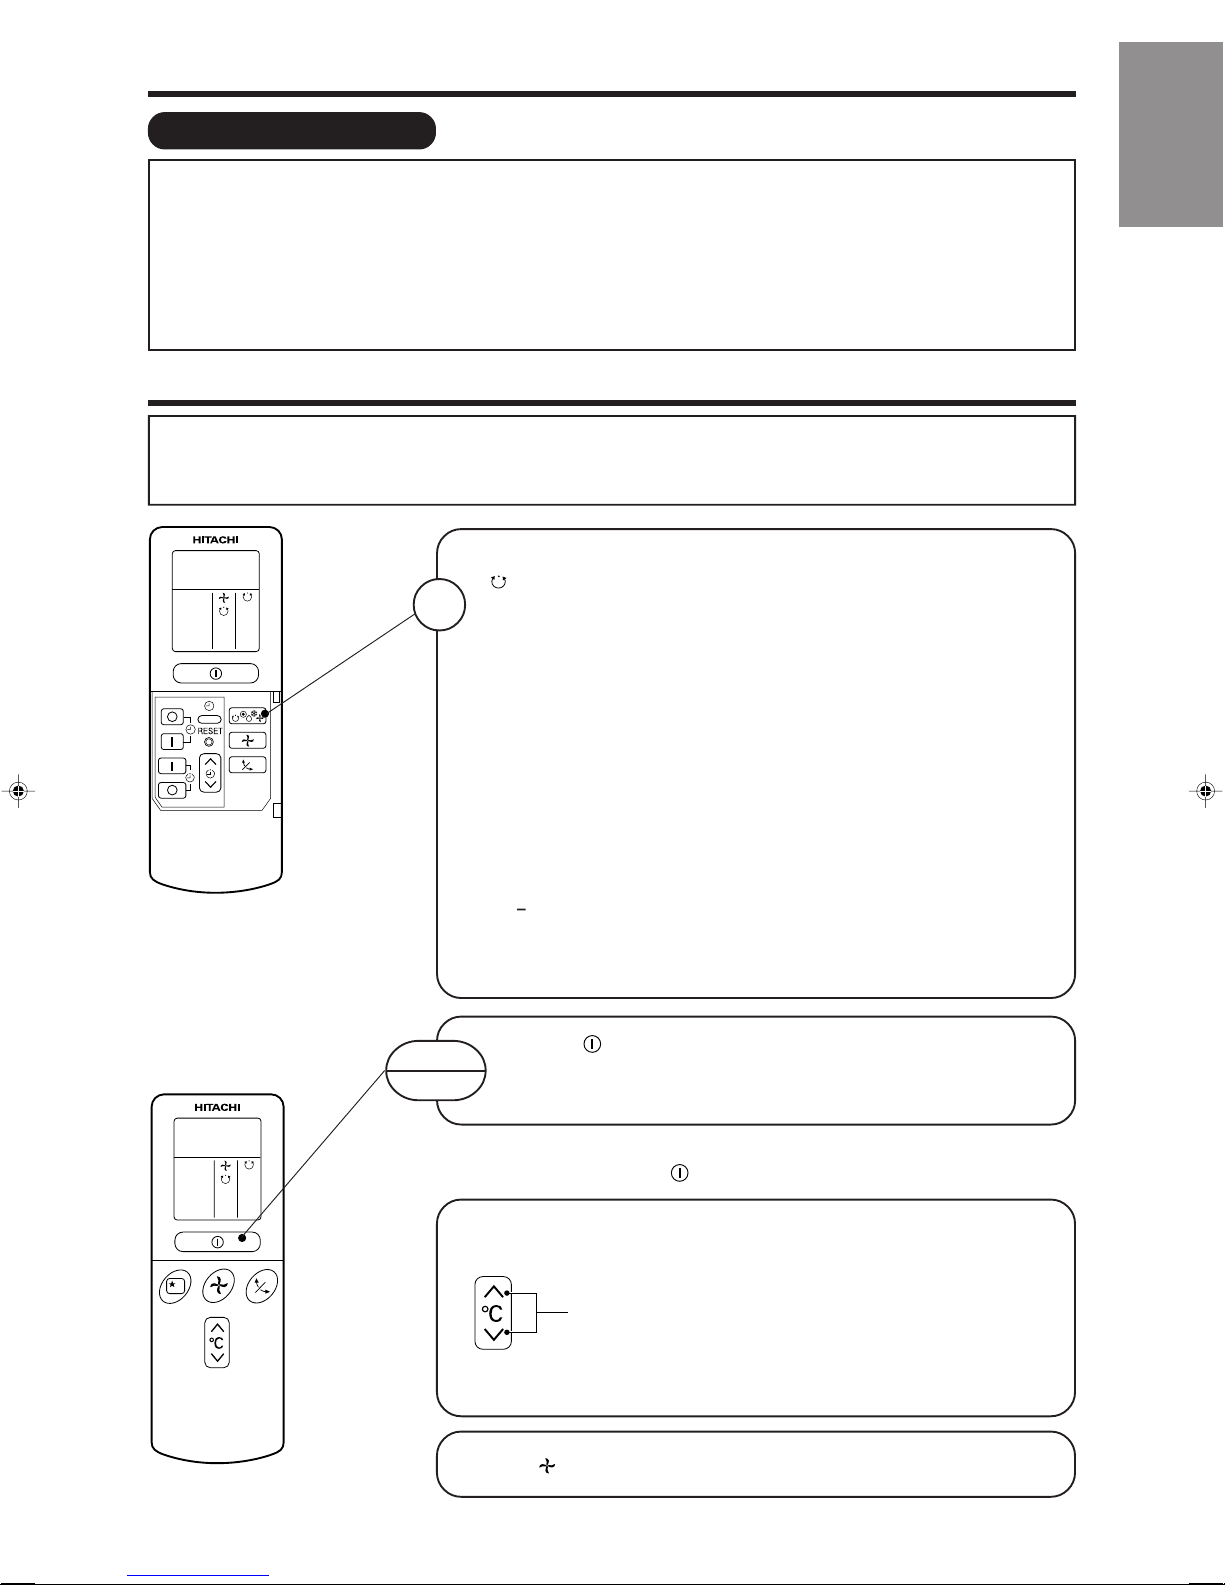
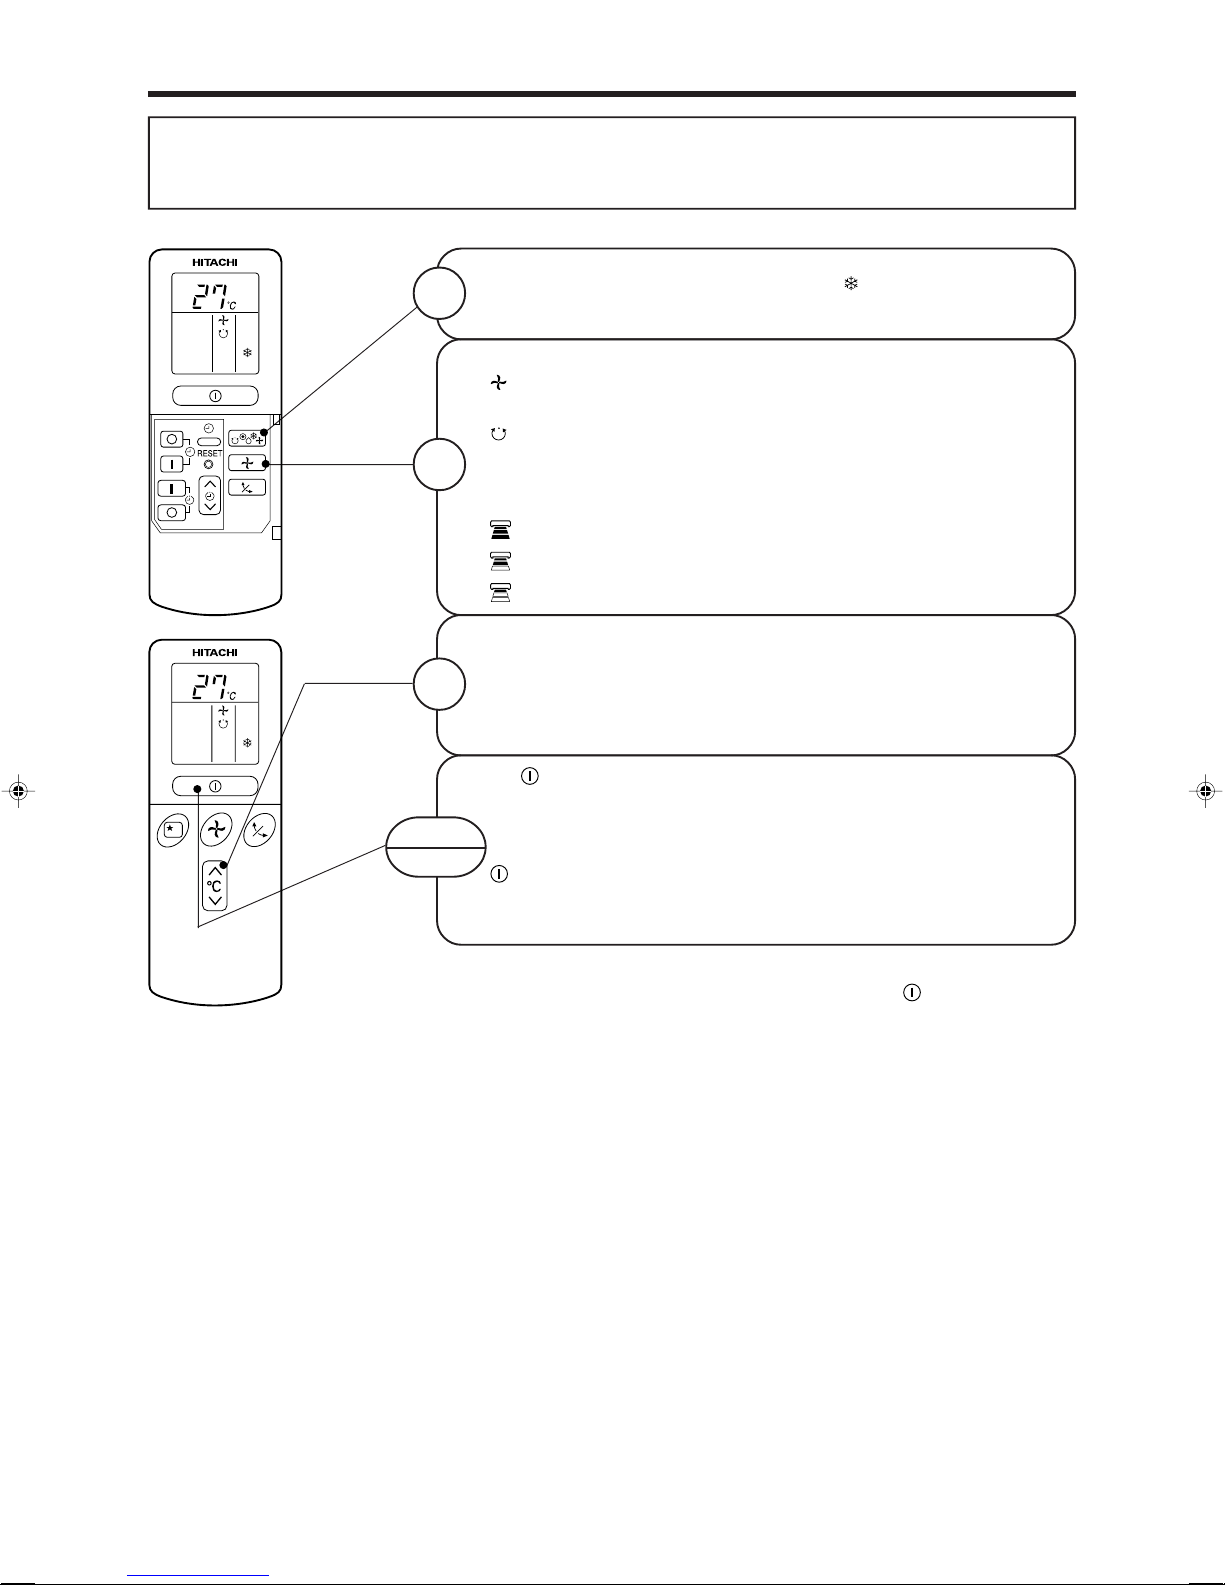
REMOTE CONTROLLER
• This controls the operation of the indoor unit.
The range of control is about 7 meters. If indoor lighting is controlled electronically, the range of
control may be shorter, in some cases, the control signal may not be received.
This unit can be fixed on a wall using the fixture provided. Before fixing it, make sure the indoor unit
can be controlled from the remote controller.
• Handle the remote controller with care.
Dropping it or getting it wet may compromise its signal transmission capability.
• After new batteries are inserted into the remote controller, the unit will initially require approximately
10 seconds to respond to commands and operate.
● Signal emitting window/transmission sign
Point this window toward the indoor unit when controlling it.
The transmission sign blinks when a signal is sent.
● Display
This indicates the room temperature selected, current time, timer status,
function and intensity of circulation selected.
● START/STOP button
Press this button to start operation. Press it again to stop operation.
● AUTO SWING button
Controls the angle of the horizontal air deflector.
● FAN SPEED selector
This determines the fan speed. Every time you press this button, the intensity of
circulation will change from (AUTO) to (HI) to (MED) to (LOW).
(This button allows selecting the optimal or preferred fan speed for each
operation mode.)
● SLEEP button
Use this button to set the sleep timer.
● TEMPERATURE buttons
Use these buttons to raise or lower the temperature setting. (Keep pressed, and
the value will change more quickly.)
● TIME button
Use this button to set and check the time and date.
● RESET button
Press this button after the batteries are replaced or when some irregular
operation is found.
● FUNCTION selector
Use this button to select the operating mode. Every time you press it, the mode
will change from (AUTO) to (HEAT) to (DEHUMIDIFY) to (COOL) and
to (FAN) cyclically.
● FAN SPEED selector
● AUTO SWING button
● TIMER control
Use these buttons to set the timer.
AUTO
HEAT
DEHUMIDIFY
COOL
FAN
FAN SPEED
LOW
MED
HI
SLEEPING
STOP (CANCEL)
START (RESERVE)
START/STOP
TIME
TIMER SET
TIMER SELECTOR
ON TIMER
OFF TIMER
AUTO SWING
● OFF-TIMER button Select the turn OFF time.
● ON-TIMER button Select the turn ON time.
● RESERVE button Time setting reservation.
● CANCEL button Cancel time reservation.
Precautions for Use
• Do not put the remote controller in the following places.
• In direct sunlight
• In the vicinity of a heater.
• Handle the remote controller carefully. Do not drop it on the floor, and
protect it from water.
• Once the outdoor unit stops, it will not restart for about 3 minutes (unless
you turn the power switch off and on or unplug the power cord and plug
it in again).
This is to protect the device and does not indicate a failure.
• If you press the FUNCTION selector button during operation, the device
may stop for about 3 minutes for protection.
– 6 –
VARIOUS FUNCTIONS
■ Auto Restart Control
• If there is a power failure, operation will be automatically restarted when the power is resumed with
previous operation mode and airflow direction.
(As the operation is not stopped by remote controller.)
• If you intend not to continue the operation when the power is resumed, switch off the power supply.
When you switch on the circuit breaker, the operation will be automatically restarted with previous
operation mode and airflow direction.
Note: 1. If you do not require Auto Restart Control, please consult your sales agent.
2. Auto Restart Control is not available when Timer or Sleep Timer mode is set.
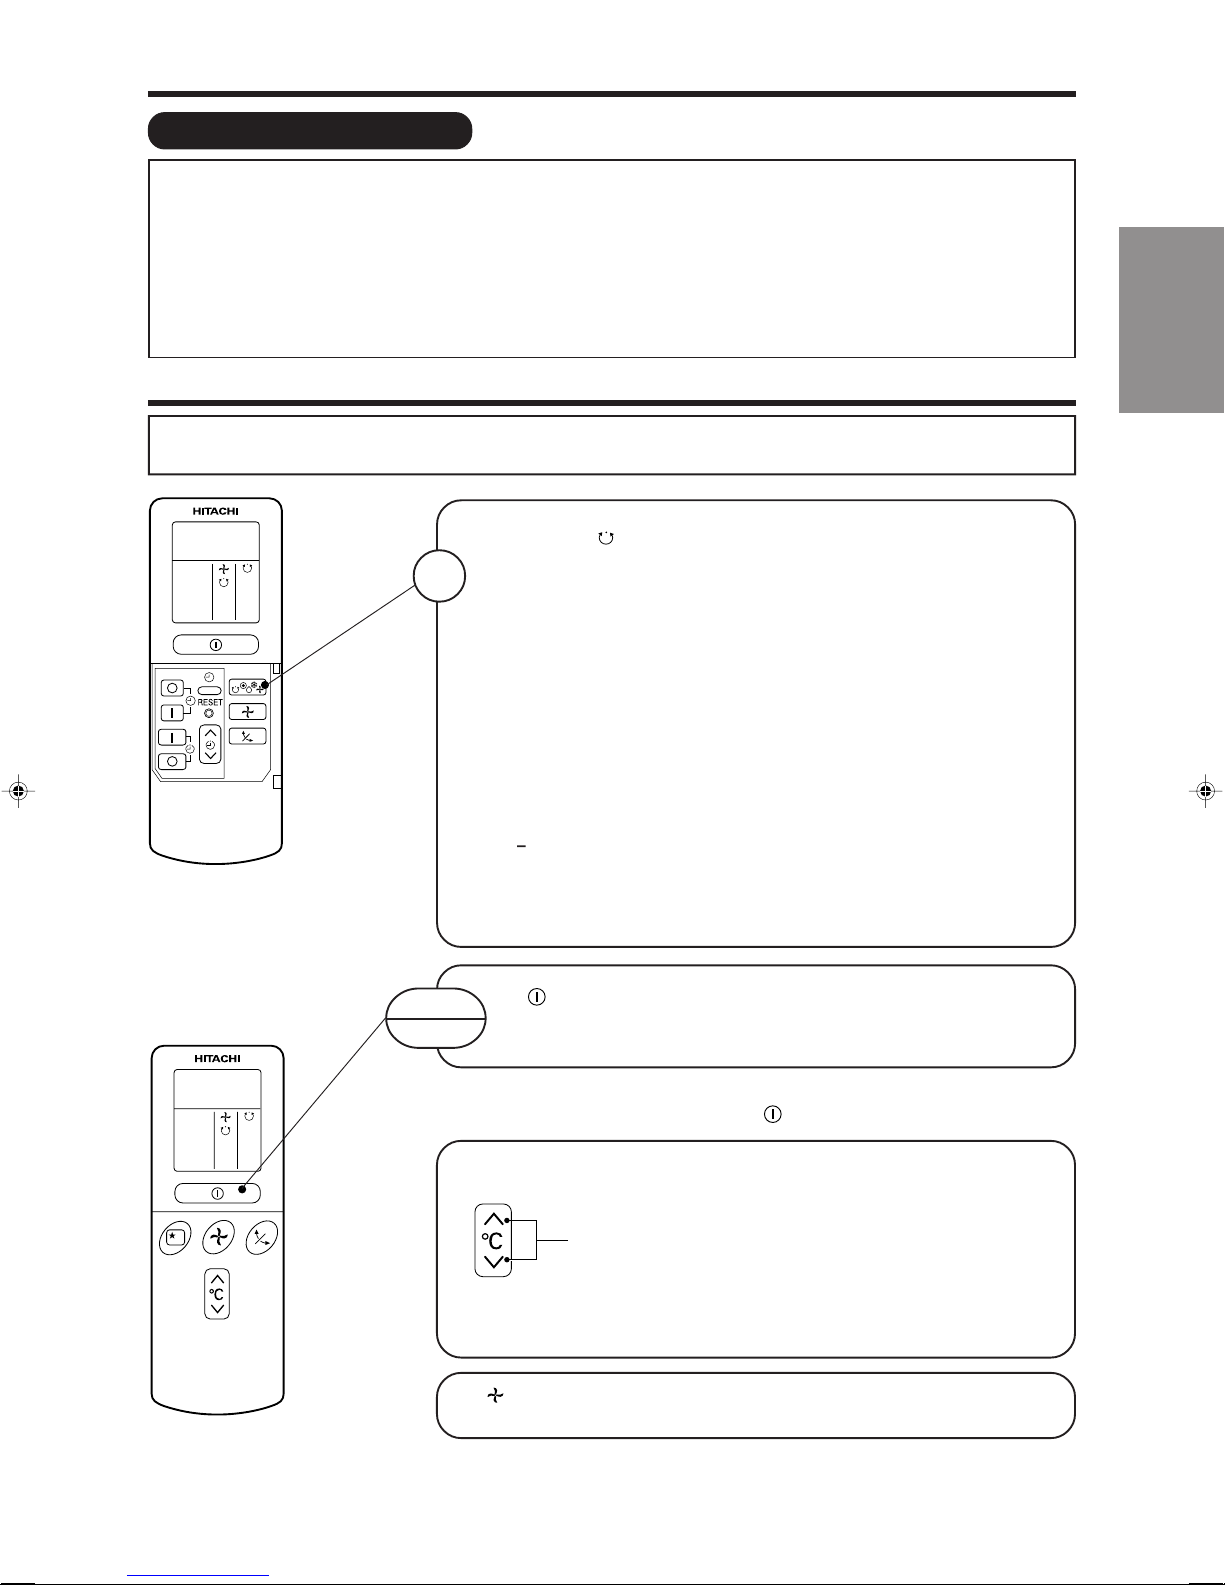
AUTOMATIC OPERATION
The device will automatically determine the mode of operation, HEAT or COOL depending on the
initial room temperature. The selected mode of operation will change when the room temperature
varies.
Press the FUNCTION selector so that the display indicates the
(AUTO) mode of operation.
1
• When AUTO has been selected, the device will automatically
determine the mode of operation, HEAT or COOL depending
on the current room temperature.
• When AUTO is first selected, the device will determine the
current room temperature and select the proper operation
mode accordingly.
• When the air conditioner has adjusted the room's temperature
to the near preset temperature, it will begin to monitor
operation. If the room temperature subsequently changes,
the air conditioner will once again select the appropriate
operation (heating or cooling) to adjust the temperature to
the preset temperature. The monitoring operation range is
+
3°C relative to the preset temperature.
• If the mode automatically selected by the unit is not
satisfactory, manually change the mode setting (heat,
dehumidify, cool or fan).
ENGLISH
START
STOP
Press the (START/STOP) button.
Operation starts with a beep.
Press the button again to stop operation.
■ As the settings are stored in memory in the remote controller, you
only have to press the
You can raise or lower the temperature setting as necessary by
maximum of 3°C.
Press the temperature button and the temperature
setting will change by 1°C each time.
• The preset temperature and the actual room temperature may
vary somewhat depending on conditions.
Press the (FAN SPEED) button, AUTO and LOW is available.
– 7 –
(START/STOP) button next time.

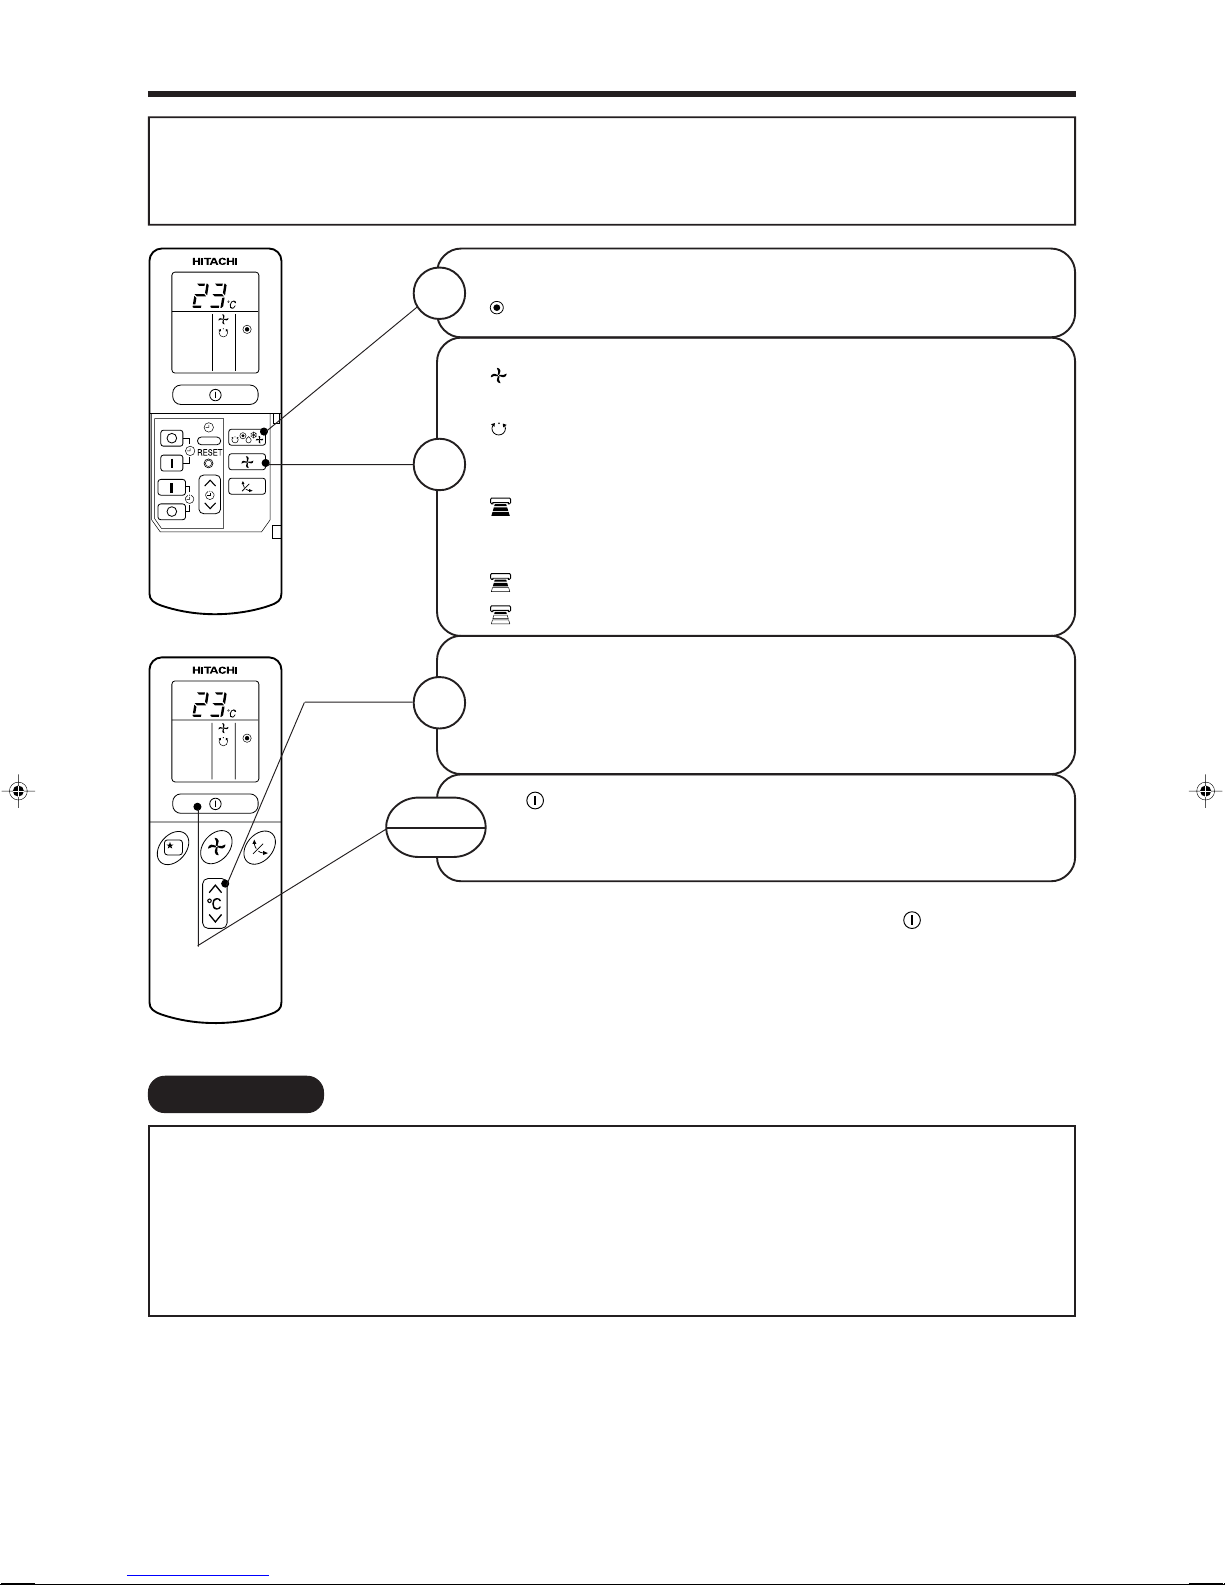
HEATING OPERATION
• Use the device for heating when the outdoor temperature is under 21°C.
When it is too warm (over 21°C), the heating function may not work in order to protect the device.
• In order to keep reliability of the device, please use this device above -10°C of the outdoor
temperature.
Press the FUNCTION selector so that the display indicates
1
(HEAT).
Set the desired FAN SPEED with the (FAN SPEED) button
(the display indicates the setting).
(AUTO) : The fan speed changes automatically according
to the temperature of the air which blows out.
2
(HI) : Economical as the room will become warm
quickly.
But you may feel a chill at the beginning.
(MED) : Quiet.
(LOW) : More quiet.
Set the desired room temperature with the TEMPERATURE
buttons (the display indicates the setting).
3
START
STOP
■ Defrosting
Defrosting will be performed about once an hour when frost forms on the heat exchange of the outdoor unit,
for 5~10 minutes each time.
During defrosting operation, the operation lamp blinks in cycle of 3 seconds on and 0.5 second off.
The maximum time for defrosting is 20 minutes.
The temperature setting and the actual room temperature may
vary somewhat depending on conditions.
Press the (START/STOP) button. Heating operation starts
with a beep. Press the button again to stop operation.
■ As the settings are stored in memory in the remote controller, you
only have to press the
(START/STOP) button next time.
(If the piping length used is longer than usual, frost will likely to form.)
– 8 –
DEHUMIDIFYING OPERATION
Use the device for dehumidifying when the room temperature is over 16°C.
When it is under 15°C, the dehumidifying function will not work.
Press the FUNCTION selector so that the display indicates
1
(DEHUMIDIFY).
The FAN SPEED is set at LOW automatically.
The FAN SPEED button does not work.
ENGLISH
START
Press the (START/STOP) button.
STOP
■ When you want to change the operation mode, please use the
FUNCTION selector.
■ Set the desired temperature is available.
■ You also can use the FUNCTION selector to select this operation.
■ Dehumidifying Function
• Dehumidifying takes place with a target temperature which is slightly lower than the room
temperature setting. (However, target temperature is 16°C for a temperature setting of 16°C.)
If the room temperature becomes lower than the target value, operation stops. If the room
temperature becomes higher than the target value, operation restarts.
• The preset room temperature may not be reached depending on the number of people present in
the room conditions.
– 9 –

COOLING OPERATION
Use the device for cooling when the outdoor temperature is 22-42°C.
If humidity is very high (over 80%) indoors, some dew may form on the air outlet grille of the indoor
unit.
Press the FUNCTION selector so that the display indicates
1
2
(COOL).
Set the desired FAN SPEED with the (FAN SPEED) button
(the display indicates the setting).
(AUTO) : The FAN SPEED is HI at first and varies to MED
automatically when the preset temperature has
been reached.
(HI) : Economical as the room will become cool quickly.
(MED) : Quiet.
(LOW) : More quiet.
Set the desired room temperature with the TEMPERATURE
buttons (the display indicates the setting).
3
START
STOP
The temperature setting and the actual room temperature may
vary somewhat depending on conditions.
Press the (START/STOP) button. Cooling operation starts
with a beep. Press the button again to stop operation. The cooling
function does not start if the temperature setting is higher than
the current room temperature (even though the (OPERATION)
lamp lights).
The cooling function will start as soon as you set the temperature
below the current room temperature.
■ As the settings are stored in memory in the remote controller, you
only have to press the
(START/STOP) button next time.
– 10 –
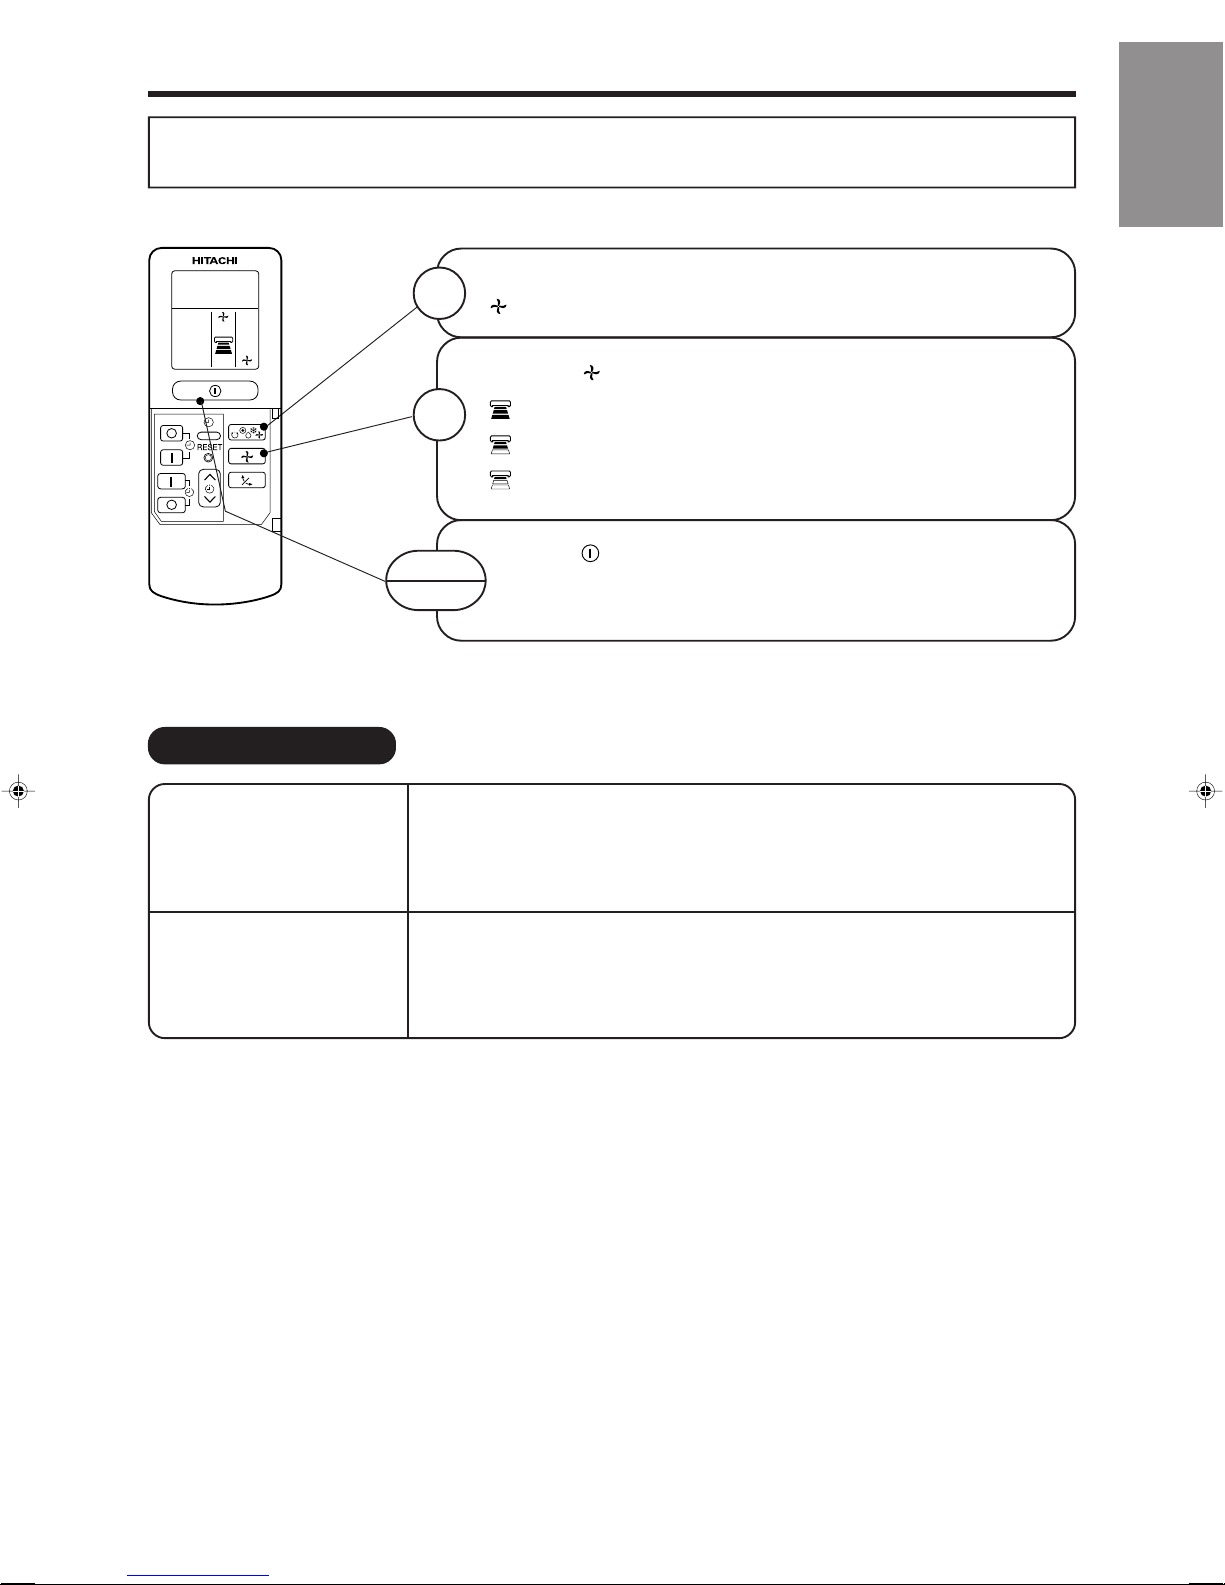
FAN OPERATION
You can use the device simply as an air circulator. Use this function to dry the interior of the indoor unit
at the end of summer.
Press the FUNCTION selector so that the display indicates
1
(FAN).
Press the (FAN SPEED) button.
ENGLISH
FAN SPEED (AUTO)
For the heating operation
For the cooling operation
2
(HI) : The strongest air blow.
(MED) : Quiet.
(LOW) : More quiet.
START
STOP
… When the AUTO fan speed mode is set in the cooling/heating operation:
• The fan speed will automatically change according to the temperature of
• As room temperature reaches the preset temperature, a very light breeze
• Operation starts in the “HI” mode to reach the preset temperature.
• As room temperature approaches the preset temperature, fan speed auto-
Press the (START/STOP) button. Fan operation starts with a
beep.
Press the button again to stop operation.
discharged air.
will blow.
matically switches to “LOW”.
– 11 –
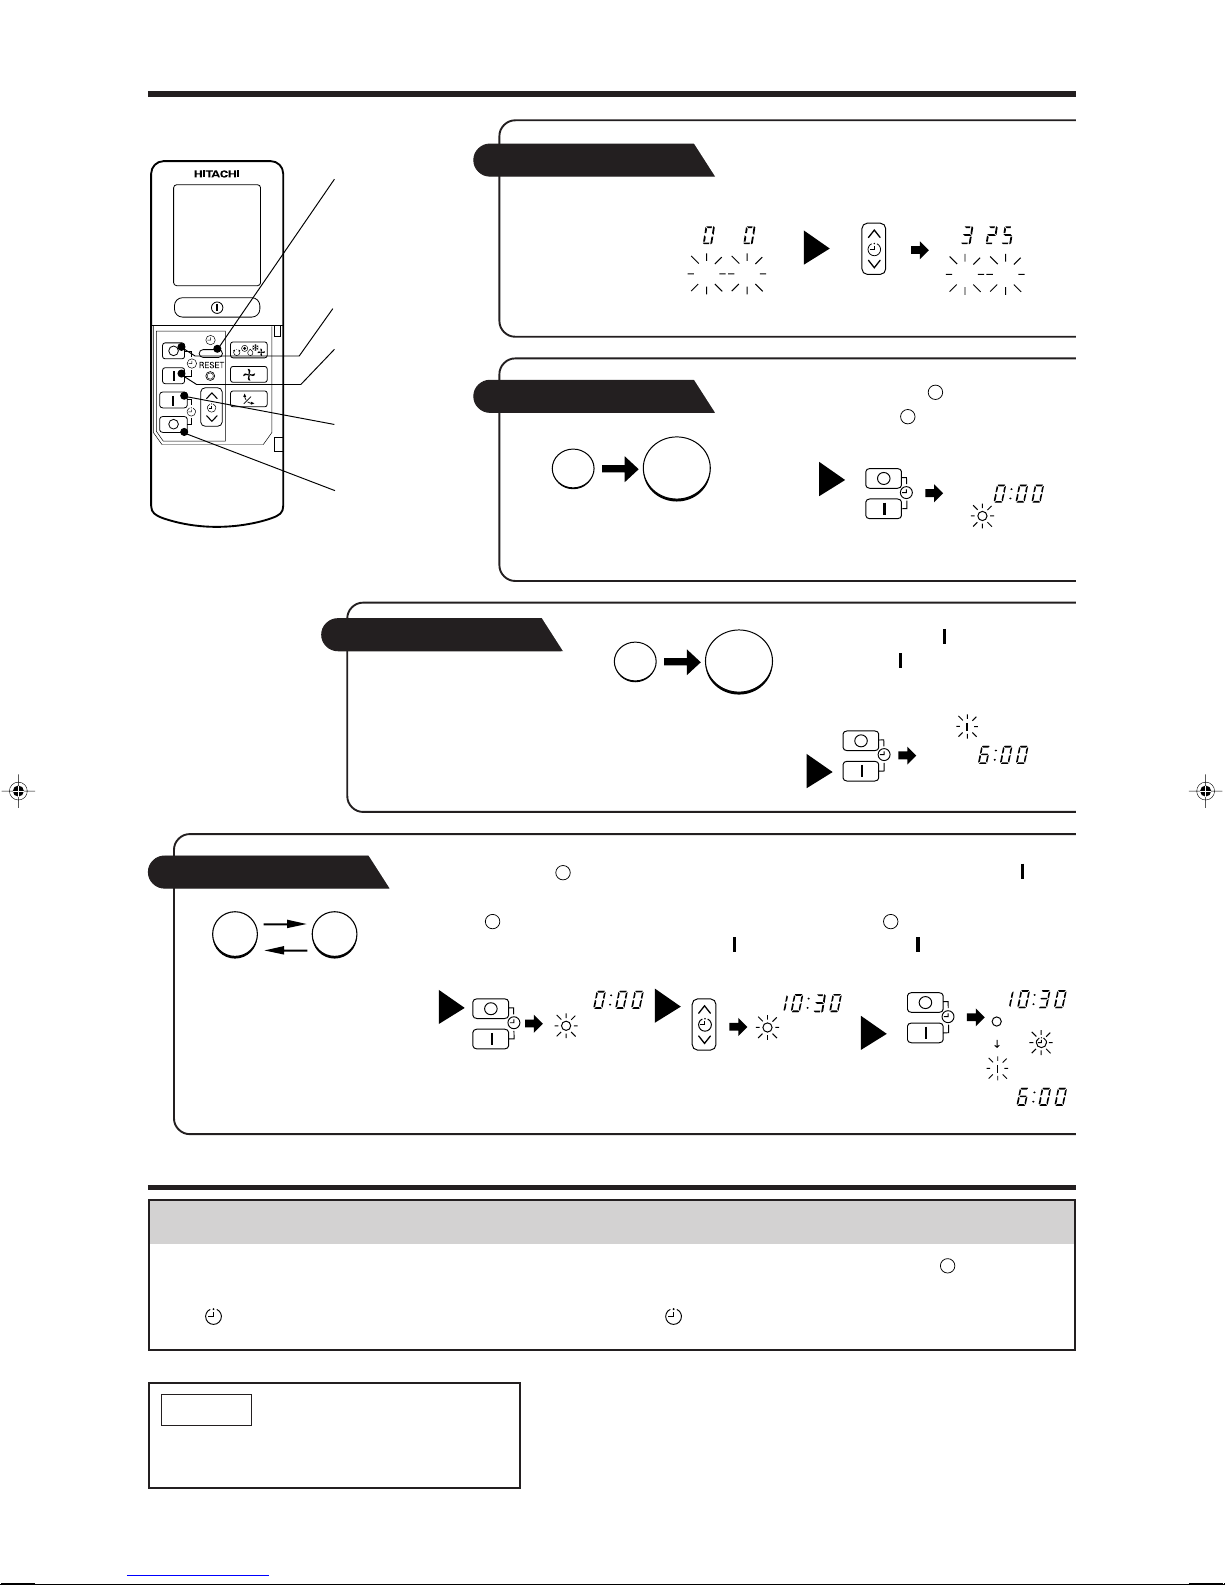
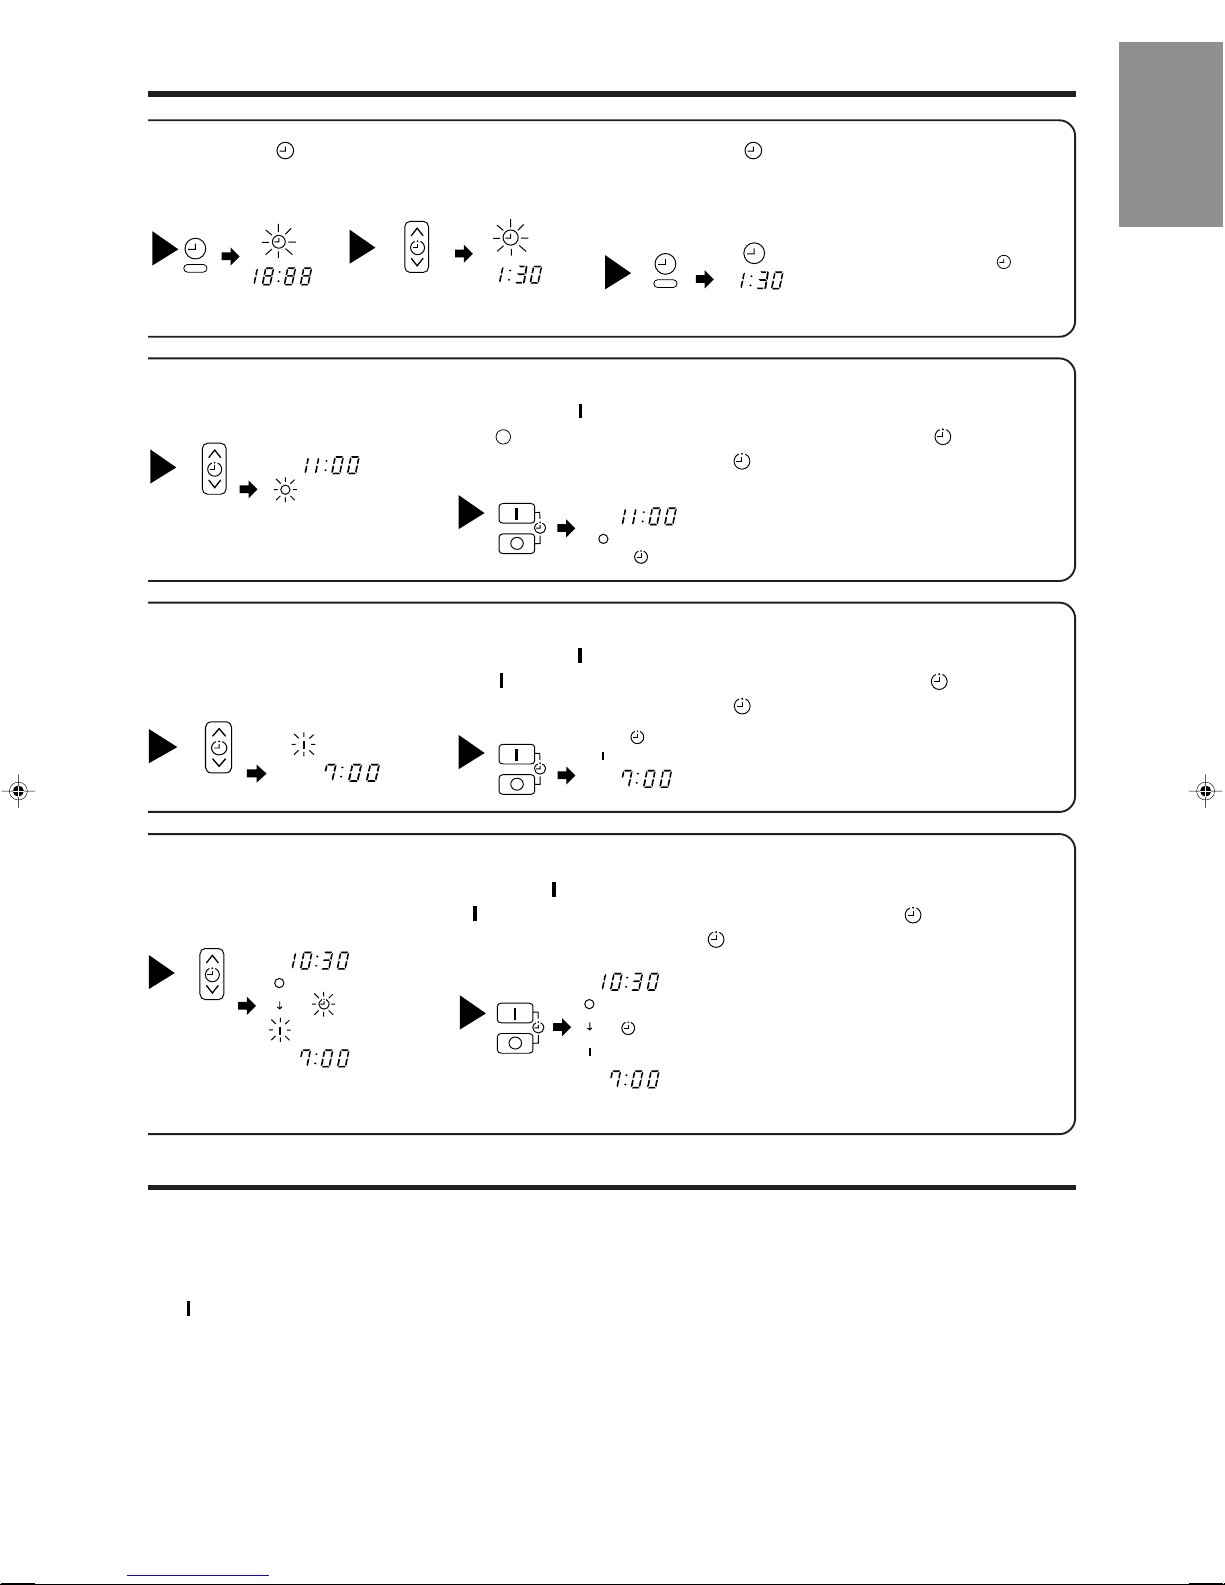
HOW TO SET THE TIMER
AM
TIME, DAY,
MONTH (current
time, day, month)
Time, Day, Month
After you change the
batteries;
1
Set the current month and day
with the TIMER control button.
OFF TIMER
ON TIMER
OFF-Timer
RESERVE
CANCEL
You can set the device to turn off at
the present time.
ON-Timer
The device will turn on at the
designated times.
Start
Stop
Stop
M D
Start
DM
1
Press the (OFF-TIMER)
button. The (OFF) mark blinks
on the display.
AM
1
Press the (ON-TIMER)
button. The (ON) mark blinks on
the display.
ON/OFF-Timer
Start Stop
• The device will turn on (off) and
off (on) at the designated times.
• The switching occurs first at the
preset time that comes earlier.
• The arrow mark appearing on the
display indicates the sequence of
switching operations.
1
Press the (OFFTIMER) button so that
the (OFF) mark
blinks.
PM
2
Set the turn-off time
with the TIMER control
button.
Press the (RESERVE)
button.
PM
3
Press the (ON-
TIMER) button so that the
(OFF) mark lights and
the (ON) mark blinks.
PM
AM
How to Cancel Reservation
Point the signal window of the remote controller toward the indoor unit, and press the (CANCEL)
button.
The
You can set only one of the OFF-timer,
ON-timer and ON/OFF-timer.
(RESERVED) sign goes out with a beep and the (TIMER) lamp turns off on the indoor unit.
NOTE
– 12 –
2
Set the
(TIME) button.
AM
PM
2
Set the turn-off time with
3
the TIMER control button.
the TIMER control button.
PM
Set the current time with
4
Press the (TIME)
button again. The time
indication starts lighting
instead of flashing.
PM
Example: The current time is 1:30p.m.
3
Point the signal window of the remote controller toward the indoor unit,
and press the (RESERVE) button.
The (OFF) mark starts lighting instead of flashing and the (RESERVED)
sign lights. A beep occurs and the (TIMER) lamp lights on the indoor unit.
• The time indication will
disappear automatically in 10
seconds.
• To check the current time
setting, press the (TIME)
PM
button twice.
The setting of the current
time is now complete.
ENGLISH
2
Set the turn-on time with
the TIMER control button.
AM
4
Set the turn-on time with
the TIMER control button.
PM
AM
PM
3
Point the signal window of the remote controller toward the indoor unit,
Example: The device will turn off at 11:00p.m.
The setting of turn-off time is now complete.
and press the (RESERVE) button.
The (ON) mark starts lighting instead of flashing and the (RESERVED)
sign lights. A beep occurs and the (TIMER) lamp lights on the indoor unit.
Example:
AM
5
Point the signal window of the remote controller toward the indoor unit,
The device will turn on early so that the preset
temperature be almost reached at 7:00 a.m.
The setting of the turn-on time is now complete.
and press the (RESERVE) button.
The (ON) mark starts lighting instead of flashing and the (RESERVED)
sign lights. A beep occurs and the (TIMER) lamp lights on the indoor unit.
PM
AM
Example:
For heating, the device will turn off at 10:30 p.m.,
and then turn on early so that the preset
temperature be almost reached at 7:00 a.m.;
for cooling and dehumidifying, it will simply
turned on at 7:00 a.m. The settings of the turn
on/off times are now complete.
• The timer may be used in three ways: off-timer, on-timer and ON/OFF (OFF/ON)-timer. Set the
current time at first because it serves as a reference.
• As the time settings are stored in memory in the remote controller, you only have to press the
(RESERVE) button is order to use the same settings next time.
– 13 –
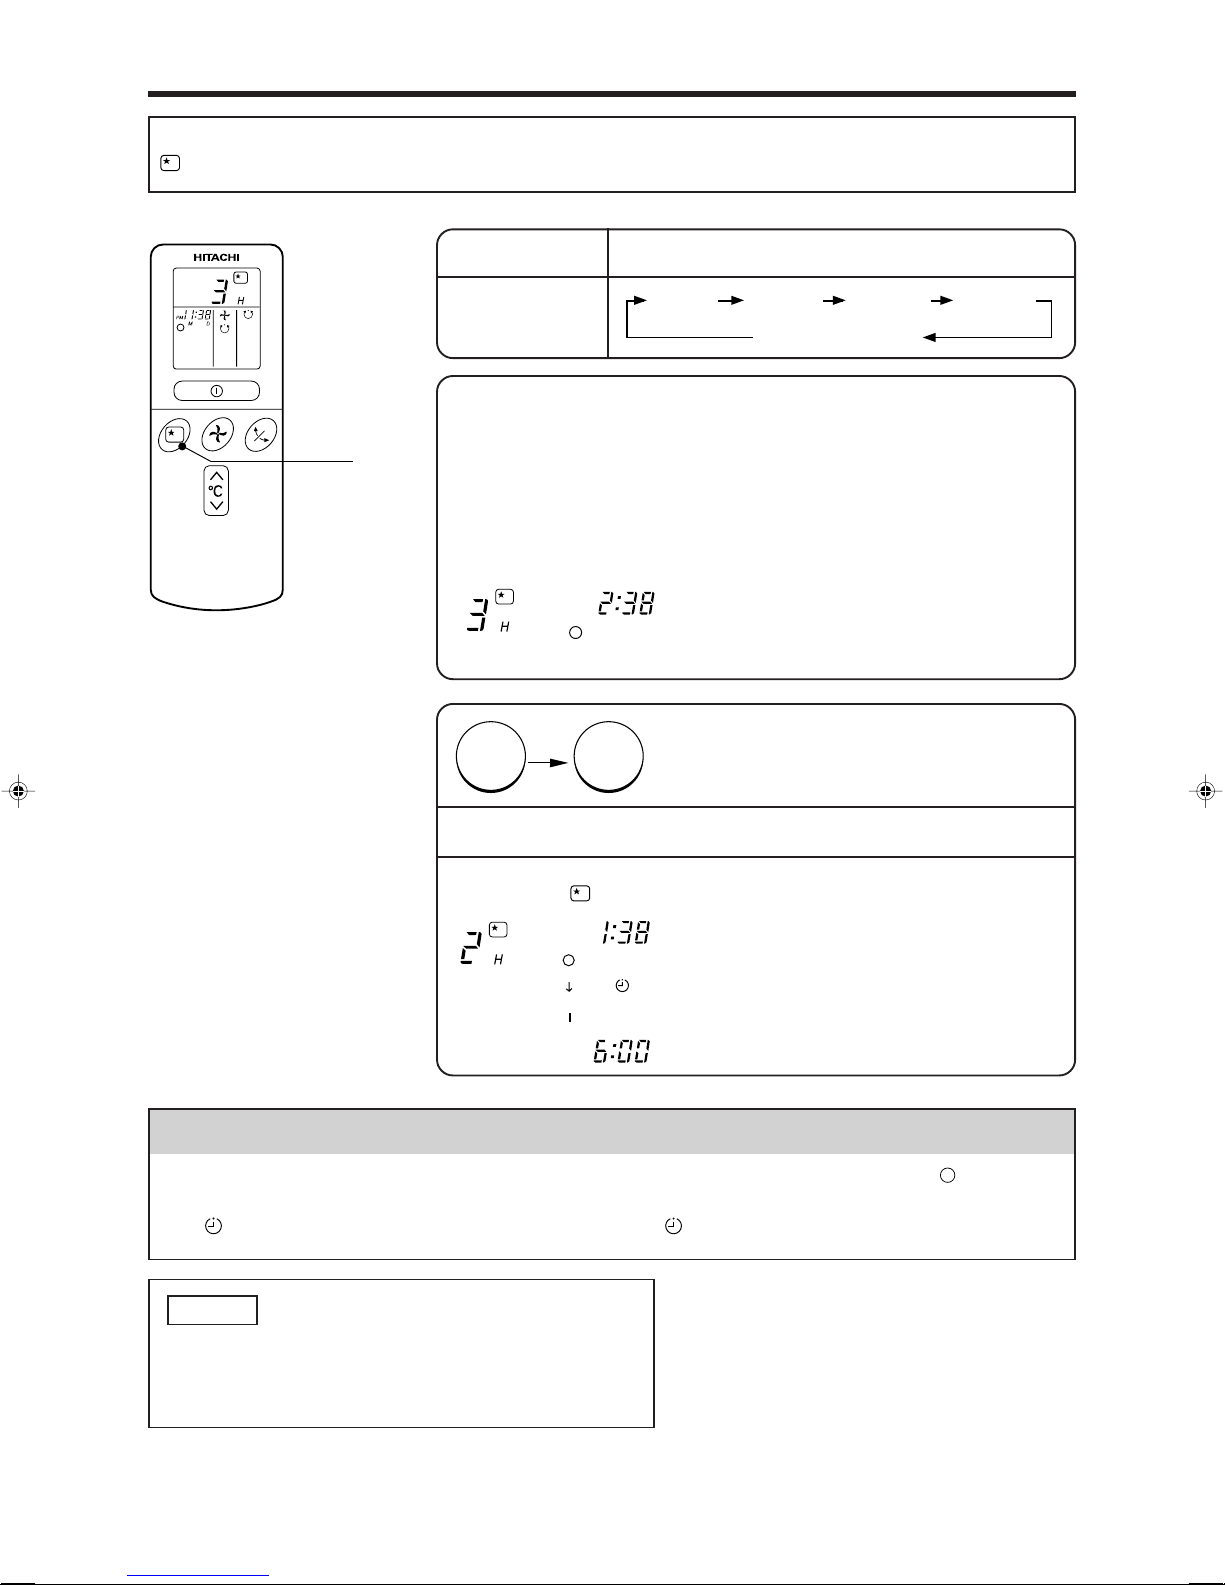
HOW TO SET THE SLEEP TIMER
Set the current time at first if it is not set before (see the pages for setting the current time). Press the
(SLEEP) button and the display changes as shown below.
Mode Indication
●
SLEEP
Sleep Timer
Sleep Timer: The device will continue working for the desired number of
hours and then turn off.
Point the signal window of the remote controller toward the indoor unit, and
press the SLEEP button.
The timer information will be displayed on the remote controller. The TIMER
lamp lights with a beep from the indoor unit. When the sleep timer has
been set, the display indicates the turn-off time.
AM
Sleep
timer
1
Set the ON-timer.
Start
1 hour 2 hours 3 hours 7 hours
Sleep timer off
Example: If you set 3 hours sleep time at
11:38 p.m., the turn-off time is 2:38 a.m.
The device will be turned off by the sleep timer
and turned on by on-timer.
2
Press the (SLEEP) button and set the sleep timer.
AM
AM
For heating:
In this case, the device will turn off in
2 hours (at 1:38 a.m.) and turn on early
so that the preset temperature will be
almost reached at 6:00 next morning.
How to Cancel Reservation
Point the signal window of the remote controller toward the indoor unit, and press the (CANCEL)
button.
The
NOTE
If you set the sleep timer when the off-time or on/offtimer has been set earlier, the sleep timer becomes
effective instead of the off - or on/off-timer set earlier.
(RESERVED) sign goes out with a beep and the (TIMER) lamp turns off on the indoor unit.
– 14 –
ADJUSTING THE AIR DEFLECTORS
1
2
Adjustment of the conditioned air in the upward and downward
directions.
The horizontal air deflector is automatically set to the proper angle
suitable for each operation. The deflector can be swung up and
down continuously and also set to the desired angle using the
“
•
• Use the horizontal air deflector within the adjusting range
• When the operation is stopped, the horizontal air deflector
• In “Cooling” operation, do not keep the horizontal air
Adjustment of the conditioned air to the left and right.
(AUTO SWING)” button.
If the “ (AUTO SWING)” button is pressed once, the horizontal
air deflector swings up and down. If the button is pressed again, the
deflector stops in its current position. Several seconds (about 6
seconds) may be required before the deflector starts to move.
shown in the right.
moves and stops at the position where the air outlet closes.
CAUTION
deflector swinging for a long time. Some dew may form on
the horizontal air deflector and dew may drop.
ENGLISH
When cooling,
dehumidifying
Vertical
about 15°
about 60°
When heating
Hold the vertical air deflector as shown in the figure and adjust
the conditioned air to the left and right.
Left side: Hold the third
blade from the left end
of the air deflector to
adjust the direction. The
pull for the blade is
marked.
Right side: Hold the third
blade from the right end
of the air deflector to
adjust the direction. The
pull for the blade is
marked.
Vertical
about 45°
about 30°
HOW TO EXCHANGE THE BATTERIES IN THE REMOTE CONTROLLER
1
2
Remove the cover as shown in the figure and take out
the old batteries.
Install the new batteries.
The direction of the batteries should match the marks
in the case.
CAUTION
1. Do not use new and old batteries, or different kinds of
batteries together.
2. Take out the batteries when you do not use the remote
controller for 2 or 3 months.
Push and pull to the
direction of arrow.
– 15 –
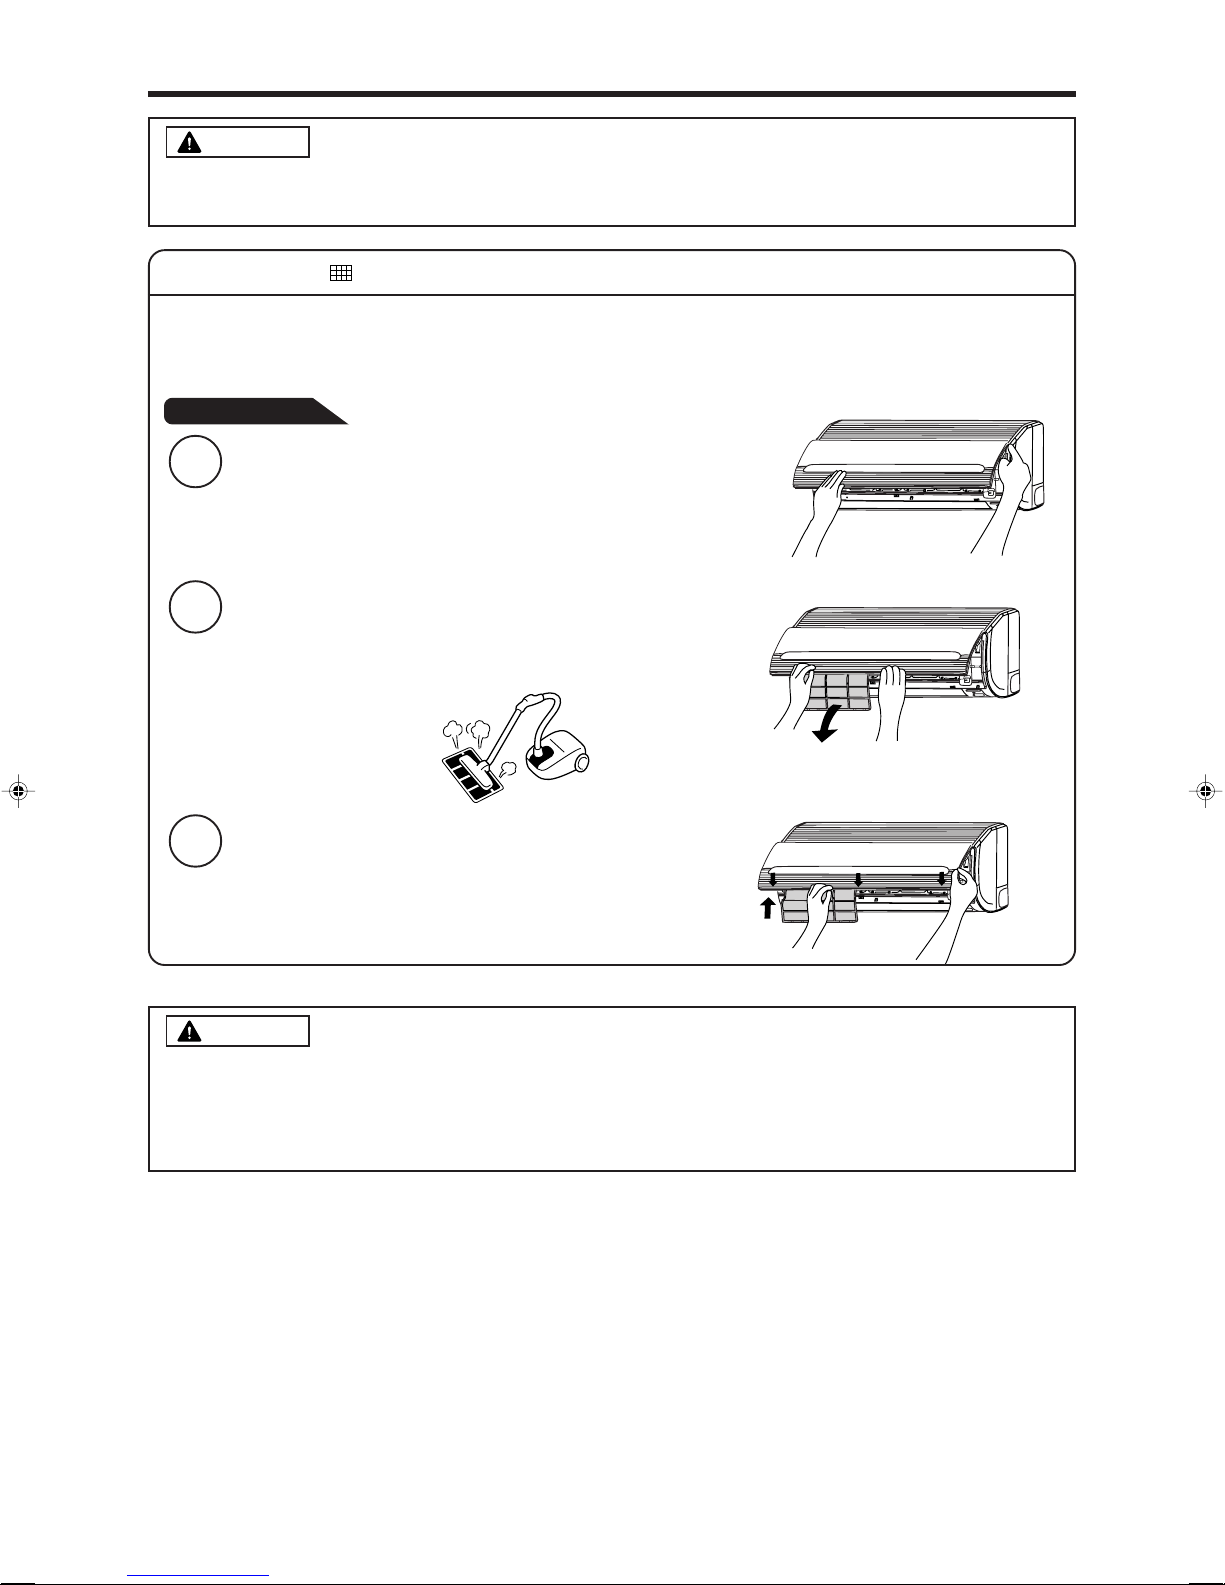
MAINTENANCE
CAUTION
Cleaning and maintenance must be carried out only by qualified service personal. Before cleaning,
stop operation and switch off the power supply.
1. AIR FILTER
When the filter indicator lamp comes on, be sure to clean the filter. By doing so, the power rates are
saved. In case the air filter is full of dust, the air flow will decrease and the cooling capacity will be
reduced. Further, noise may occur. Be sure to clean the filter following the procedure below.
PROCEDURE
Open the front panel carefully and remove the filter.
1
Vacuum dust from the air filter using vacuum cleaner.
2
If there is too much dust, wash the filter with a detergent
and rinse it thoroughly. After that, dry it in the shade.
• Set the filter with “FRONT” mark facing front, and
3
• Do not wash with hot water at more than 40°C. The filter may shrink.
• When washing it, shake off moisture completely and dry it in the shade; do not expose it directly
to the sun. The filter may shrink.
• Don't operate the unit without filter. Fault may occur if you continue.
slot them into the original state.
• After attaching the filters, push the front panel at
three arrow portions as shown in figure and close
it.
CAUTION
– 16 –
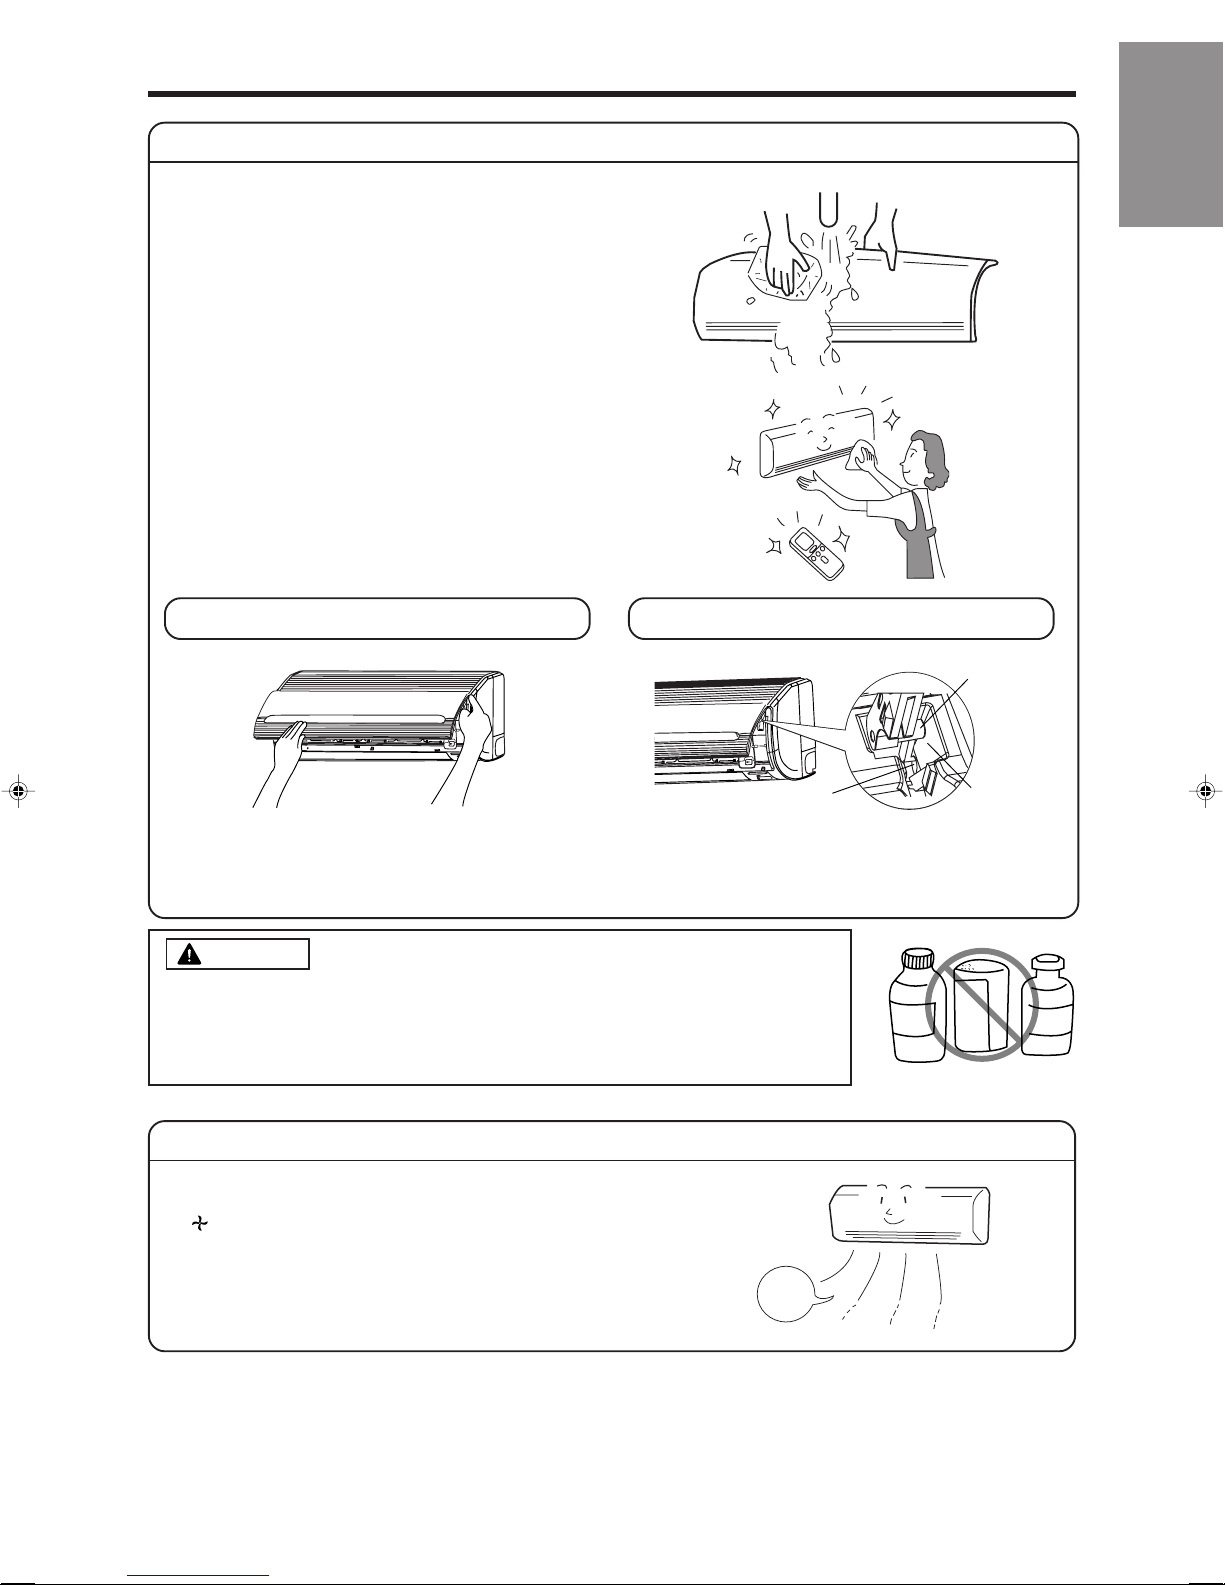
2. CLEANING OF FRONT PANEL
• Remove the front panel and wash with clean water.
Wash it with a soft sponge.
After using neutral detergent, wash thoroughly with
clean water.
• When front panel is not removed, wipe it with a soft
dry cloth. Wipe the remote controller thoroughly with
a soft dry cloth.
• Wipe the water thoroughly.
If water remains at indicators or signal receiver of
indoor unit, it causes trouble.
Method of removing the front panel.
Be sure to hold the front panel with both hands to
detach and attach it.
Removing the Front Panel Attaching the Front Panel
ENGLISH
Shaft
Hole
• When the front panel is fully opened with both
hands, push the right arm to the inside to
release it, and while closing the front panel
• Move the shafts of the left and right arms into
the steps in the unit and securely insert them
into the holes.
slightly, put it out forward.
CAUTION
• Do not splash or direct water to the body of the unit when cleaning it as
this may cause short circuit.
• Never use hot water (above 40°C), benzine, gasoline, acid, thinner or a
brush, because they will damage the plastic surface and the coating.
3. MAINTENANCE AT BEGINNING OF LONG OFF PERIOD
• Run the unit by setting the operation mode to
(FAN) and the fan speed to HI for about half a day
on a fine day, and dry the whole of the unit.
• Switch off the power plug or turn off the circuit breaker.
Air
Blow
Step
A
B
E
N
C
E
Z
N
I
D
T
R
H
E
I
N
I
N
– 17 –

INFORMATION
CAPABILITIES
Heating Capability
• This room air conditioner utilizes a heat pump system that absorbs
exterior heat and brings it into a room to be heated. As the ambient
temperature gets lower, heating capability will also lower. In such a
situation, the inverter work to increase compressor rpm to keep the
unit’s heating capability from decreasing. If the unit’s heating performance is still unsatisfactory, other heating appliances should be used
to augment this unit’s performance.
• The air conditioner is designed to heat an entire room so that it may take some time before you feel warm.
Timer operation is recommended for effective preheating ahead of the desired time.
Cooling and Dehumidifying Capabilities
• If the heat present in a room exceeds the unit’s cooling capacity (for example, if there are many people in
the room or other heating appliances are used), the preset room temperature may not be reached.
VARIOUS FUNCTIONS
• When fan speed, room temperature are set with the remote controller before starting manual operation and
the buttons are released, the indication of settings will go off in 10 seconds and only the operation mode
will be displayed.
• Pressing the button while the unit is in operation will let the protective circuit work so that the unit will
not operate for approximately 3 minutes.
• During heating operation, the indoor unit’s color indicator lamp may flash with no air emitted for a while.
• If you feel cold wind during heating operation with the (HI) fan speed or want to make the unit operation
quieter after the room is heated, use of (AUTO) setting is recommended.
• With the (LOW) setting, the unit’s cooling capability will lower slightly.
• With the (LOW) setting, the unit’s heating capacity will vary with the operating conditions.
CAUTION
Do not use a stove
or any other
hightemperature
devices in proximity
to the indoor unit.
PROHIBITION
TIMER PROGRAMMING/SLEEP TIMER OPERATION
• When the timer has been programmed, the unit will not operate even if the set time is reached unless the
unit receives a signal from the remote controller. Confirm that timer programming is complete (beep) and
the TIMER lamp of the indoor unit lights.
• If the (SLEEP) button is pressed while the ON/OFF timer is programmed, the sleep timer takes priority.
• During sleep timer operation, the fan speed sets to (LOW) regardless of the preset speed. The remote
controller display indication will remain unchanged even with the (LOW) setting.
– 18 –
REGULAR INSPECTION
PLEASE CHECK THE FOLLOWING POINTS EVERY EITHER HALF YEARLY OR YEARLY. CONTACT
YOUR SALES AGENT SHOULD YOU NEED ANY HELP.
Check to see if the unit’s earth line has been con-
1
WARNING
nected correctly.
If the earth line is disconnected or faulty, unit failure or
electric shock hazard may result.
Check to see if the mounting frame has rusted ex-
2
WARNING
cessively or if the outdoor unit has tilted or become
unstable.
It could collapse or fall, causing injury.
Check to see if the power plug is securely inserted
into the wall socket.
3
WARNING
If the power plug is not inserted into the wall socket
securely or becomes hot, an electric shock or fire may result.
If dust or dirt is found on the power plug, clean the plug
and insert it into the wall socket.
AFTER SALES SERVICE AND WARRANTY
WHEN ASKING FOR SERVICE, CHECK THE FOLLOWING POINTS.
CONDITION CHECK THE FOLLOWING POINTS
ENGLISH
If the remote controller is not
transmitting a signal.
(Remote controller display is
dim or blank.)
• Do the batteries need replacement?
• Is the polarity of the inserted batteries correct?
• Is the fuse all right?
• Is the voltage extremely high or low?
When it does not operate.
• Is the circuit breaker “ON”?
• Is the power plug inserted?
• Do you have any power cut?
• Is the air filter blocked with dust?
• Is the set temperature suitable?
When it does not cool well.
When it does not heat well.
• Have horizontal air deflectors been adjusted to their correct
positions according to the operation mode selected?
• Are the air inlets or air outlets of indoor and outdoor units
blocked?
• Is the fan speed “LOW”?
■ The following phenomena do not indicate unit failure.
<Operation start>
During heating, the operation
indicator blinks and air blow stops
Hissing or fizzy sounds
Squeaking noise
Rustling noise
Clicking noise
The unit is preparing to blow warm air. Please wait.
<In operation>
The outdoor unit is defrosting. Please wait.
Refrigerant flow noise in the pipe or valve sound generated when flow rate is
adjusted.
Noise generated when the unit expands or contracts due to temperature changes.
Noise generated with the indoor unit fan’s rpm changing such as operation start
times.
Noise of the motorized valve when the unit is switched on.
– 19 –
Perking noise
Changing operation noise
Mist emission
Steam emitted from the outdoor unit
Odors
The outdoor unit continues to operate
even if operation is stopped.
The OPERATION lamp is blinking.
Does not reach the temperature
setting
Noise of the ventilation fan sucking in air present in the drain hose and blowing out
dehumidifying water that had accumulated in the condensed water collector. For
details, consult your sales agent.
Operation noise changes due to power variations according to room temperature
changes.
Mist is generated as the air within the room is suddenly cooled by conditioned air.
Water generated during defrosting operation evaporates and steam is emitted.
Caused as the smells and particles of smoke, food, cosmetics, etc. present in room
air become attached the unit and blown off into the room again.
Defrosting is underway (as the heating operation is stopped, the microcomputer
checks frost accumulated in the outdoor unit and instructs the unit to perform
automatic defrosting if necessary).
Shows preheating or defrosting operation is underway.
As the protective circuit or preheat sensor operates when unit operation is stopped
during preheating and then restarted, or when operation mode is switched from cooling
to heating, the lamp continues to blink.
Actual room temperature may deviate slightly from the remote controller's
temperature setting depending on the number of people in the room, indoor or
outdoor conditions.
• If the unit still fails to operate
normally after performing the
above inspections, turn the
circuit breaker off, or pull the
power plug out, and contact
your sales agent immediately.
Notes
• In quiet operation or stopping the running, the following phenomena may
occasionally occur, but they are not abnormal for the operation.
(1) Slight flowing noise of refrigerant in the refrigerating cycle.
(2) Slight rubbing noise from the fan casing which is cooled and then
• The odor will possibly be emitted from the room air conditioner because
the various odor, emitted by smoke, foodstuffs, cosmetics and so on,
sticks to it. So please clean the air filter and the evaporator regularly to
reduce the odor.
Contact your sales agent immediately if the
following phenomena should occur:
The circuit breaker switches off or the fuse blows
•
frequently.
•
The switch operation is not stable.
•
Foreign matter or water accidentally enters the unit interior.
•
The power cord gets excessively hot or its insulation is torn or stripped.
•
TIMER lamp on the indoor unit display blinks.
As the nature of the failure can be identified by the blinking cycle,
(
check the blinking cycle before turning off the circuit breaker.
gradually warmed as operation stops.
)
• Please contact your sales agent immediately if the air conditioner still fails to operate normally after
the above inspections. Inform your agent of the model of your unit, production number, date of
installation. Please also inform him regarding the fault.
Please note:
On switching on the equipment, particularly when the room light is dimmed, a slight brightness
fluctuation may occur. This is of no consequence.
The conditions of the local Power Supply Companies are to be observed.
– 20 –
AUFGETEILTE KLIMAANLAGE
INNENGERÄT/AUSSENGERÄT
MODELL
RAS-18YH4/RAC-18YH4
RAS-25YH4/RAC-25YH4
RAS-35YH4/RAC-35YH4
INNENGERÄT
AUSSENGERÄT
ENGLISH
DEUTSCH
RAC-18YH4
RAC-25YH4
RAC-35YH4
Instruction manual Page 1~20
To obtain the best performance and ensure years of
trouble free use, please read this instruction manual
completely.
Bedlenungsanleitung Seite 21~40
Bitte lesen Sie diese Bedienungsanleitung aufmerksam
durch, um durch richtige Bedienung jahrelangen und
störungsfreien Betrieb zu gewährleisten.
Mode d’emploi Page 41~60
Des performances optimales et un fonctionnement à
long terme seront assurés en appliquant les présentes
instructions après avoir entièrement lu ce mode
d’emploi.
Manuale di istruzioni Pag. 61~80
Per garantire la migliore prestazione e la più lunga
durataleggere attentamente e al completo le seguanti
istruzioni
RAS-18YH4
RAS-25YH4
RAS-35YH4
Manual de instrucciones Página 81~100
Para obtener el mejor funcionamiento y asegurar años
de uso libre de problemas, lea cuidadosamente este
manual de instrucciones.
Manual de instruções Página 101~120
A fim de obter um bom funcionamento e de garantir
uma utilização sem falhas durante muitos anos, é favor
ler este manual de instruções completamente.
Οδηγίες χρήσης ™ÂÏ›‰· 121~140
°И· ЩЛУ О·П‡ЩВЪЛ ·fi‰ФЫЛ ЩФ˘ ОПИМ·ЩИЫЩИОФ‡ О·И
БИ· ЩЛУ М·ОЪФЪfiıВЫМЛ ¯Ъ‹ЫЛ ЩФ˘ ¯ˆЪ›˜
ЪФ‚П‹М·Щ·, ‰И·‚¿ЫЩВ ЪФЫВОЩИО¿ ·˘Щ¤˜ ЩИ˜ Ф‰ЛБ›В˜
¯Ъ‹ЫЛ˜.
– 21 –
SICHERHEITSMASSNAHMEN
• Bitte lesen Sie die Sicherheitsmaßnahmen vor der Inbetriebnahme der Klimaanlage aufmerksam durch.
•
Beachten Sie besonders die mit “ Warnung” und “ Vorsicht” bezeichneten Abschnitte. Die mit
“WARNUNG” bezeichneten Abschnitte enthalten Punkte, die zum Tode oder zu ernshaften
Verletzungen führen können, wenn sie nicht strikt eingehalten werden. Bei Nichteinhaltung der mit
“VORSICHT” bezeichneten Abschnitte kann es zu ernsthaften Konsequenzen kommen. Bitte beachten
Sie strikt alle Anweisungen, um Sicherheit zu gewährleisten.
•
Die Symbole haben folgende Bedeutung. (Nachstehend sind einige Beispiele von Signalen.)
Dieses Symbol heißt “verboten”.
•
Bitte bewahren Sie diese Anleitung sorgfältig auf.
VORSICHTSMASSNAHMEN WÄHREND DES EINBAUS
• Bauen Sie das Gerät nicht selbst ein, sonst könnten Probleme wie Wasserlecken,
Kurzschluß oder Feuer auftreten.
• Wenden Sie sich bitte an den Händler oder an einen qualifizierten Techniker für
den Einbau des Gerätes. Sollten Sie persönlich den Einbau ausführen, dann
könnte Wasserleck, Kurzschluß oder Feuer die Folge sein.
WARNUNG
VORSICHT
• Verwenden Sie bitte einen Schutzleiter(Erdunagsleitung).
Der Schutzleiter darf nicht in der Nähe von Gas-, Wasserröhren oder dem Schutzleiter eines Telephons plaziert werden. Falsche Installation des Schutzleiters
könnte elektrischen Schlag verursachen.
• Verwenden Sie nur den angegebenen Rohrsatz für R410A. Andernfalls könnte
ein Rohrschaden oder Defekt stattfinden.
• Ein Unterbrecher sollte jenach Montagestandort eingesetzt werden.
Ohne den Unterbrecher besteht die Gefahr des elektrischen Schlages.
• Montieren Sie das Gerät nicht in der Nähe von brennbarem Gas.
Das Außen-gerät könnte Feuer fangen, wenn brennbares Gas in seiner Umgebung entweicht. Die Rohrleitungen sind gut abzustützen, wobei der Zwischenraum zwischen den Stützen nicht mehr als 1 m betragen soll.
•
Achten Sie beim Einbau darauf, daß eine einwandfreie Wasserableitung möglich ist.
Wenn in der Abflußleitung Defekte auftreten, tropft Wasser von den Innen- und Außengeräten und verursacht Wasserschäden an der Wohnungseinrichtung.
•Überprüfen Sie, dass eine einphasige 230V Stromquelle eingesetzt ist.
Die Anwendung von anderen Stromquellen kann zu einem Überhitzen der
elektrischen Komponenten, und deswegen zu einem Feuerbruch bringen.
Dieses Symbol zeigt die Anweisungen an, die
befolgt werden müssen.
VERBOT
DIE ERDLEITUNG
ANSCHLIESSEN
VERBOT
VERBOT
VORSICHTSMASSNAHMEN WÄHREND DES TRANSPORTS UND DER WARTUNG
• Im Falle anormaler Begebenheiten (z.B. es riecht verbrannt), das Gerät sofort ausschal-
ten und den Stecker aus der Steckdose ziehen. Verständigen Sie Ihren Fachhändler.
WARNUNG
Weiterer Betrieb des Gerätes unter anormalen Bedingungen kann zu Kurzschluß und
Feuergefahr führen.
•
Bitte wenden Sie sich für die Wartung an Ihren Fachhändler oder an einen Kundendienst.
Selbst ausgeführte, fehlerhafte Wartung kann zu Feuer- und Stromschlaggefahr führen.
•
Bitte wenden Sie sich für den Ausbau und Einbau des Gerätes an Ihren Fachhändler oder an einen
Kundendienst.
Selbst ausgeführter, fehlerhafter Ausbau und Einbau können zu Feuer- und Stromschlaggefahr führen.
• Aus gesundheitlichen Gründen sollten Sie es vermeiden für längere Zeit dem
direkten Luftstrom ausgesetzt zu sein.
• Kein Verlängerungskabel an das Netzkabel anschließen oder zu viele andere Elektrogeräte an die
Netzsteckdose, in die das Netzkabel eingesteckt ist, anschließen.
Darüber hinaus das Kabel mit etwas zusätzlicher Kabellänge verdrahten, damit das Kabel keiner
Zugspannung ausgesetzt ist.
Nichtbeachtung kann einen Stromschlag, Wärmeentwicklung oder einen Brand zur Folge haben.
• Das Netzkabel nicht bündeln, daran ziehen, etwas darauf stellen, es erwärmen, es bearbeiten oder zwischen Gegenstände legen. Nichtbeachtung kann Brechen des Netzkabels zur
Folge haben.
Verwendung eines beschädigten Netzkabels kann einen Stromschlag oder einen Brand zur
Folge haben.
• Keine Gegenstände wie Stäbe in die Luftansaug- oder Luftauslaßöffnungen
VERBOT
einschieben. Sonst verursacht der Hochgeschwindigkeitsventilator Gefahr.
– 22 –
“AUS”
VERBOT
VERBOT
VERBOT

WARNUNG
VORSICHTSMASSNAHMEN WÄHREND DES BETRIEBS
• Verwenden Sie nicht irgend einen Draht als Sicherung. Das könnte lebesgefährlich
werden.
• Während eines Gewitters den Netzanschluß trennen oder den Unterbrecher-
“AUS”
• Spritzbehälter und andere Brennstoffe müssen an wenigstens ein Meter weg von
Ablüftern der Innen- und Außeneinheiten aufgestellt werden.
Der Innendruck eines Spritzbehälters wird von Warmluft erhöht werden; dies kann
einen Bruch verursachen.
schalter ausschalten.
VERBOT
ENGLISH
VERBOT
VORSICHT
• Das Gerät darf nur für die vom Hersteller vorgeschriebenen Zwecke verwendet
werden und nicht für andere Zwecke.
• Das Gerät niemals mit nassen Händen Betätigen. Tödliche Unfälle können
NICHT BENETZEN
dadurch zustandekommen.
• Wenn Verbrennungsgeräte wie Gasherd in Betrieb sind, dann lüften
Sie regelmäßig, um Sauerstoffmangel zu vermeiden.
VORSICHTSMASSNAHMEN
STRENG BEFOLGEN
• Richten Sie die aus dem Innengerät ausströmende Kühlluft nicht auf
Heizgeräte, Warmhalteflaschen, Öfen usw., da sonst das Leistungs-
VERBOT
vermögen dieser Geräte beeinträchtigt werden kann.
• Sorgen Sie bitte dafür, daß das Gestell des Außengerätes stabil, standhaft, schadenfrei und in gutem Zustand ist. Denn sonst könnte das Gerät einstürzen und
Gefahren verursachen.
• Die Einheit mit Wasser nicht waschen und keinen Wasserbehälter (wie
eine Schale) innerhalb der Inneneinheit stellen.
VERBOT
Eine Elektroleakage könnte erfolgen und einen elektrischen Schlag
verursachen.
• Keine Tiere oder Pflanzen unmittelbar unter dem Luftstrom halten, da dies
schädlich für Tiere oder Pflanzen ist.
• Nicht auf das Außengerät steigen oder Gegenstände darauf stellen.
VERBOT
• Wenn das Gerät für längere Zeit bei geöffneten Türen und/oder Fenstern (Luftfeuchtigkeit über 80%) bzw. bei nach unten weisendem oder automatisch schwen-
kendem Luftreflektor betrieben wird, dann kann Wasser an dem Luftreflektor kondensieren und gelegentlich abtropfen. Dadurch können Ihre Möbel naß werden.
Daher lassen Sie Ihr Gerät unter solchen Bedingungen nicht für längere Zeit
laufen.
• Wenn die Wärmemenge im Raum größer als die Kühl- oder Heizleistung des
Gerätes ist (z.B. wenn zuviele Personen im Zimmer sind oder Heizgeräte ver-
VERBOT
wendet werden), dann kann die voreingestellte Raumtemperatur nicht erreicht
werden.
• Die Reinigungsarbeiten an der Inneneinheit sind nur von genehmigtem Personal
durchzuführen. Befragen Sie Ihren Verkaufsagenten.
Die Anwendung von handelsüblichen Reinigungsmitteln oder ähnlichen Produkten kann die Plastikteile beschädigen bzw. das Abflußrohr verstopfen; dies verursacht ein Wassertropfen mit darauffolgender Gefahr von elektrischem Schlag.
VERBOT
VERBOT
VERBOT
VERBOT
VERBOT
DEUTSCH
NICHT BERÜHREN
• Das Kühlmittelrohr sowie das Anschlussventil nicht berühren.
Man könnte sich verbrennen.
• Den Luftabfluss, die untere Oberfläche sowie den Aluminiumflügel der
Außeneinheit nicht berühren.
Man könnte sich verletzen.
NICHT BERÜHREN
– 23 –
BEZEICHNUNGEN UND FUNKTIONEN JEDES EINZELTEILS
INNENGERÄT
Luftfilter
Verhindert das Eindringen von Staub in das
Innengerät
(Siehe Seite 36)
Stirntafel
Anzeigen am Innengerät
Leuchtanzeige zur Darstellung des Betriebszustandes.
(Siehe Seite 25)
Horizontaler Luftableiter vertikaler Luftableiter
(Abluftausgang)
(Siehe Seite 35)
AUSSENGERÄT
Abluftausgang
In der Betriebsart “Heizen”
strömt kühle Luft aus, und in
der Betriebsart “Kühlen” oder
“Entfeuchten” strömt Warmluft
aus.
Abfluß
(unten)
(Im unteren Bereich seitlich)
Erdungsklemme
Fernbedienung
Sendet Betriebssignale an das Innengerät.
Dadurch wird die ganze Anlage betrieben.
(Siehe Seite 26)
Ablaßschlauch
Sorgt während der Betriebsarten “Kühlen” oder “Entfeuchten”
für das Abführen des beim Entfeuchten entstehenden Wassers
vom Innengerät zum Außengerät.
Verrohrung und Verdrahtung
Lufteingänge (Hinten und links)
Über das Außengerät:
• Wenn während des Betriebs des Innengerätes “Stop”
gewählt wird, läuft der Ventilator des Außengerätes
weitere 10 bis 60 Sekunden, damit sich die Elektroteile
abkühlen.
• Im Heizbetrieb fließt wegen des Enteisens Kondensat
oder Wasser.
Den Abfluß des Außengerätes nicht abdecken, weil
dieses Wasser in der kalten Zone gefrieren kann.
• Wenn das Außengerät an der Decke aufgehängt ist,
die Buchse und das Abflußrohr am Abfluß installieren
und das Wasser ablaufen lassen.
MODELLBEZEICHNUNG UND ABMESSUNGEN
MODELL BREITE (mm) HÖHE (mm) TIEFE (mm)
RAS-18YH4, RAS-25YH4, RAS-35YH4 780 280 205
RAC-18YH4, RAC-25YH4, RAC-35YH4 750 548 288
– 24 –

BEZEICHNUNGEN UND FUNKTIONEN JEDES EINZELTEILS
ANZEIGEINSTRUMENTE FÜR INNENRAUMGERÄT
FILTERLAMPE (Grün)
Die FILTER-Lampe leuchtet, wenn die Vorrichtung
etwa 200 Stunden insgesamt gearbeitet hat und zeigt
NETZSCHALTER
dadurch an, dass der Filter gereinigt werden muss.
Die Lampe erlischt, wenn die “ (AUTO-SCHWENK)”
Taste bei ausgeschaltetem Betrieb gedrückt wird.
BETRIEBSLAMPE (Gelb)
Diese Lampe leuchtet während des Betriebs.
Die BETRIEBSLAMPE blinkt während des
Heizbetriebs in den folgenden Fällen.
(1) Beim Vorheizen
Etwa 2-3 Minuten lang nach dem Einschalten.
(2) Beim Enteisen
Wenn sich am Wärmetauscher der Außenanlage Frost bildet, wird das Enteisen etwa einmal
stündlich jeweils 5-10 Minuten durchgeführt.
ZEITSCHATER KONTROLLAMPE (Orange)
Diese Lampe leuchtet, wenn der Zeitgeber arbeitet.
ENGLISH
-
DEUTSCH
TEMPORÄR-SCHALTER
● Wenn die Fernbedienung nicht arbeitet, diesen Schalter zum Starten
und Ausschalten benutzen.
● Diese vorübergehende Funktion wird zu der neusten Einstellung gemacht.
(Die Einheit schaltet beim Einschaltung sofort auf automatische
Betriebsart um.)
VORSICHT
Wenn das Gerät über einen längeren
Zeitraum nicht eingesetzt werden soll, den
Unterbrecherschalter ausschalten oder den
Netzstecker herausziehen.
✩ Wenn der Strom eingeschaltet bleibt und das Gerät nicht betrieben wird, wird durch den
Steuerstromkreis in geringem Umfang Strom verbraucht. Durch Ausschalten des Netzschalters
(oder des Unterbrecherschalters, wenn die Stromversorgung über das Außengerät erfolgt) wird
Strom gespart.
Die Luftreinigungs- und Desodorisationsfilter (Zubehör) am Filterrahmen anbringen.
•
Die Luftreinigungs- und Desodorisationsfilter werden im Rahmen
angebracht, indem man ihre beiden Seiten sanft zusammendrückt
und sie nach Einsetzen in den Filterrahmen wieder frei gibt.
• Bei Verwendung der Luftreinigungs- und Desodorisationsfilter
wird die Kühlleistung geringfügig schwächer und die
Kühlgeschwindigkeit langsamer.
• Luftreinigungs- und Desodorisationsfilter können mit einem Staubsauger oder durch Spülen unter
fließendem Wasser gewaschen und bis zu 20mal wieder verwendet werden. Wenn Sie sie erneuern
möchten, wenden Sie sich bitte an Ihren Vertragshändler.
Rahmen
– 25 –

BEDIENUNGSELEMENTE UND IHRE FUNKTIONEN
FERNBEDIENUNG
• Mit Hilfe der Fernbedienung kann der Betrieb des Kühleinheit gesteuert werden.
Der Steuerungsbereich beträgt etwa 7 Meter. Falls die Innenbeleuchtung elektronisch gesteuert
wird, kann der Steuerungsbereich kürzer sein, in einigen Fällen kann das Steuersignal nicht
empfangen werden.
Diese Fernbedienung kann mit Hilfe der mitgelieferten Befestigung an einer Wand angebracht werden.
Vor dem Anbringen ist darauf zu achten, daß die Kühleinheit mit der Fernbedienung gesteuert werden kann.
• Handeln Sie das Fernbedienungsgerät sorgfältig.
Lassen es fallen bzw. nass werden kann die Signalübertragung gefährden.
• Beim Wechseln der Batterien in dem Fernbedienungsapparat wird die Einheit erst nach 10 Sekunden
die Befehle beantworten und starten zum laufen.
● Signalsendefenster/Übertragungsanzeige
Dieses Fenster auf das Innengerät, wenn dieses gesteuert werden soll. Die
Übertraungsanzeige blinkt, wenn ein Signal gesandt wurde.
● Display
Zeigt die gewählte Raumtemperatur, die derzeitige Uhrzeil, den Zeitschalterstatus,
die Funktion und die Intensität der gewählten Luftumwälzung an.
● START/STOP-Taste
Diese Taste drücken, um den Betrieb zu beginnen. Die Taste nochmals drücken,
um den Betrieb zu stoppen
● Taste für automatisches Schwenken
Steuert den Winkel des horziotalen Luftreflektors.
● Ventilatordrehzahltaste
Damit wird die Ventilatordrehzahl eingestellt. Mit jedem Drücken dieser Taste wird die
Intensität der Luftumwälzung von (Automatik) auf (Hoch), (Mittel) und
(Niedrig). (Diese Taste erlaubt die Auswahl der optimale bzw. gewünschte
Ventilatorgeschwindigkeit für jede Betriebsart.)
● Einschlaftaste (SLEEP)
Diese Taste verwenden, um den Einschlaf-Zeitschalter einzustellen.
● Temperaturregeltasten
Verwenden Sie diese Tasten, um die eingestellte Temperatur zu erhöhen oder
zu vermindern. (Die entsprechende Taste gedrückt halten, um die Einstellung
schneller zu ändern.)
● Zeittasten
Diese Taste verwenden, um Zeit und Datum einzustellen und zu prüfen.
● RÜCKSTELL - Taste (RESET)
Diese Taste nach Austausch der Batterien oder nach irregulären Betriebsabläufen drücken.
● Betriebsart-Wahltaste
Verwenden Sie diese Taste, um die Betriebsart zu wählen. Mit jeder Betätigung
dieser Taste wird die Betriebsart zyklisch von (Automatik) auf (Heizbetrieb),
(Entfeuchten), (Kühlbetrieb) und (Ventilator) umgeschaltet.
● Ventilatordrehzahltaste
● Taste für automatisches Schwenken
● Zeitschalter-Regler
Diese Tasten verwenden, um den Zeitschalter einzustellen.
AUTOMATIK
HEIZBETRIEB
ENTFEUCHTEN
KÜHLBETRIEB
VENTILATOR
LUFT-INTENSITÄT
NIEDRIG
MITTEL
HOCH
SCHLAF
STOP (LÖSCHUNG)
START (SUBSKRIPTION)
START/STOP
ZEIT
ZEITSCHALTER-EINSTELLUNG
ZEITSCHALTER-WÄHLER
EINSCHALTZEIT
AUSSCHALTZEIT
AUTOSCHWENK
● Ausschaltzeittaste Wählt die Ausschaltzeit.
● Einschaltzeittaste Wählt die Einschaltzeit.
● Subskription Reservierung der Zeiteinstellung.
● Löschtaste Löschen der reservierten Zeit.
Vorsichtsmaßnahmen bel der Verwendung
• Die Fernbedienung nicht an den folgenden Orten ablegen.
• In direktem Sonnenlicht
• In der Nähe einer Heizung.
• Die Fernbedienung sorgfältig behandeln. Nicht fallen lassen und vor
Wasser schützen.
• Wenn das Außengerät einmal stoppt, dann schaltet es für etwa 3
Minuten nicht ein (ausgenommen, wenn Sie den Netzschalter aus-und
einschalten oder das Netzkabel abziehen und wieder anstecken).
Dies dient für den Schutz des Gerätes und stellt keine Störung dar.
•
Falls Sie die Betriebsart-Wahltaste während des Betriebs drücken, dann kann das
Gerät zum Schutze für etwa 3 Minuten stoppen.
– 26 –
VERSCHIEDENE FUNKTIONEN
■ Auto Restart Steuerung
• Beim Stromabfall, wird der Betrieb in der vorhergehenden Betriebsart und Luftflussrichtung
automatisch neugestartet, sobald die Stromversorgung wieder hergestellt worden ist. (Dies erfolgt,
weil der Betrieb nicht durch die Fernbedienung unterbrochen worden ist)
• Um den Betrieb beim Stromversorgungswiederherstellung nicht weiterzuführen, schalten Sie die
Stromquelle ab. Beim Betätigen des Selbstausschalters wird der Betrieb mit der vorhergehenden
Betriebsart und Luftflussrichtung automatisch neugestartet.
Hinweis: 1. Sollten Sie keine Automatische Neustart Steuerung benötigen, so bitte nehmen Sie
mit Ihrem Verkaufsagent Kontakt auf.
2. Die Auto Restart Steuerung kann nicht verwendet werden, wenn das Modus Timer
oder Sleep eingestellt ist.
AUTOMATIKBETRIEB
Das Gerät bestimmt automatisch je nach anfänglicher Raumtemperatur die richtige Betriebsart,
HEIZEN oder KÜHLEN. Die gewählte Betriebsart ändert, wenn die Raumtemperatur variiert.
Die Betriebsart-Wahltaste drücken, so daß das Display die
(AUTOMATIK) anzeigt.
1
Betriebsart
• Wenn AUTO eingestellt wurde, bestimmt das Gerät
automatisch je nach der aktuellen Raumtemperatur die
richtige Betriebsart, HEIZEN oder KÜHLEN.
• Wenn AUTO als erstes eingestellt wurde, bestimmt das Gerät
die aktuelle Raumtemperatur und wählt dementsprechend
die geeignete Betriebsart.
• Wenn die Klimaanlage die Raumtemperatur annähernd an
die voreingestellte Temperatur angepaßt hat, beginnt sie mit
der Überwachung des Betriebs. Wenn sich die
Raumtemperatur nachfolgend ändert, wählt die Klimaanlage
erneut die geeignete Betriebsart (Heizen oder Kühlen), um
die Temperatur an die voreingestellte Temperatur
anzupassen. Der Bereich des Überwachungsbetriebs beträgt
+
3°C im Verhältnis zur voreingestellten Temperatur.
• Wenn die von der Anlage automatisch gewählte Betriebsart
nicht zufriedenstellend ist, muß die Betriebsarteinstellung
(Heizen, Entfeuchten, Kühlen oder Luftumwälzung) von Hand
geändert werden.
ENGLISH
DEUTSCH
START
STOP
Die (START/STOP)-Taste drücken.
Der Betrieb startet mit einem Piepton.
Diese Taste nochmals drücken, um den Betrieb zu stoppen.
■
Da die Einstellungen in dem Speicher der Fernbedienung gespeichert werden,
müssen Sie das nächste Mal nur die
Sie können die Temperatureinstellung wie erforderlich um maximal
3°C erhöhen oder vermindern.
Bei jedem Betätigen der Temperaturtaste ändert sich
die Temperatureinstellung jeweils um 1°C.
• Die voreingestellte Temperatur und die tatsächliche
Raumtemperatur können in Abhängigkeit von den Bedingungen
etwas variieren.
Die (Ventilatordrehzahl)Taste drücken. “Automatik” und “Niedrig”
stéhen zur Verfügung.
– 27 –
(START/STOP)-Taste drücken.
HEIZBETRIEB
• Die Einheit für Heizbetrieb verwenden, wenn die Außentemperatur unter 21°C liegt. Bei warmem
Wetter (über 21°C) arbeitet die Heizfunktion vielleicht nicht, um die Einheit zu schützen.
• Auf befehle bis behalte zuverlässigkeit der vorrichtung, erfreue gebrauch das vorrichtung obig
-10°C der Außentemperatur.
Die Betriebsart-Wahltaste drücken, so daß das Display
1
2
(HEIZBETRIEB) anzeigt.
Die gewünschte Intensität der Luftzirkulation mit der
Ventilatordrehzahltaste einstellen (das Display zeigt die
Einstellung an).
(AUTOMATIK) : Die Ventilatordrehzahl ändert automatisch
in Abhängigkeit von der Temperatur der
abgeblasenen Luft.
(HOCH) : Besonders wirtschaftlich, da der Raum
schnell erwärmt wird. Am Beginn können
Sie jedoch eine Kühlung fühlen.
(MITTEL) : Ruhiger Betrieb.
(NIEDRIG) : Noch ruhigerer Betrieb.
Die gewünschte Raumtemperatur mit den Temperaturregeltasten
einstellen (das Display zeigt die Einstellung an).
3
START
STOP
■ Enteisens
Beim Erzeugen vom Frost um den Wärmeaustauscher der externen Einheit wird das Entfrosten für 5~10 Minuten
lange einmal in der Stunde vorgenommen.
Während des Enteisens blinkt die Betriebsleuchte in Intervallen von 3 Sekunden an und 0,5 Sekunden aus.
Die eingestellte Temperatur und die tatsächliche Raumtemperatur können
etwas abweichen, abhängig von den Verwendungsbedingungen.
Die (START/STOP)-Taste drücken. Der Heizbetrieb beginnt mit
einem Piepton. Diese Taste nochmals drücken, um den Betrieb zu
stoppen.
■ Da die Einstellungen in dem Speicher der Fernbedienung gespeichert
werden, müssen Sie das nächste Mal nur die
Taste drücken.
(START/STOP)-
Der Vorgang des Enteisens dauert maximal 20 Minuten.
(Wenn die Rohrlänge länger als gewöhnlich ist, wird der Frost wahrscheinlich erzeugt.)
– 28 –
ENTFEUCHTUNGSBETRIEB
Das Gerät für das Entfeuchten verwenden, wenn die Raumtemperatur über 16°C beträgt.
Beträgt die Raumtemperatur unter 15°C, arbeitet die Entfeuchtungsfunktion nicht.
Die Betriebsart-Wahltaste drücken, so daß das Display
1
(Entfeuchtungstaste) anzeigt.
Die Ventilatordrehzahl wird automatisch auf “NIEDRIG” eingestellt.
Die Ventilatordrehzahltaste arbeitet nicht.
ENGLISH
START
STOP
■ Entfeuchtungsfunktion
• Beim Entfeuchtungsbetrieb liegt die Solltemperatur etwas niedriger als die eingestellte
Zimmertemperatur. (Der Sollwert liegt jedoch bei 16°C, wenn die Temperatureinstellung 16°C
beträgt.)
Wenn die Zimmertemperatur unter den Sollwert fällt, wird der Betrieb gestoppt. Wenn die
Zimmertemperatur über den Sollwert steigt, wird der Betrieb wiederaufgenommen.
• Je nach der Zahl der Personen, die im Raum anwesend sind, wird die voreingestellte
Raumtemperatur gegebenenfalls nicht erreicht.
Die (START/STOP)-Taste drücken.
■ Wenn Sie den Betriebsmodus ändern möchten, die Betriebsart-
Wahltaste verwenden.
■ Die gewünschte Temperatur einstellen.
■ Sie können auch die Betriebsart-Wahltaste verwenden, um diesen
Betrieb zu wählen.
DEUTSCH
– 29 –
KÜHLBETRIEB
Das Gerät für Kühlbetrieb verwenden, wenn die Außentemperatur 22 bis 42°C beträgt.
Bei sehr hoher Luftfeuchtigkeit (über 80%) in dem zu kühlenden Raum, kann sich Frost an dem
Luftauslaßgrill der Innengerätes bilden.
Die Betriebsart-Wahltaste drücken, bis (KÜHLBETRIEB) auf
1
2
dem Display angezeigt wird.
Die gewünschte Intensität der Luftzirkulation mit der
Ventilatordrehzahltaste einstellen (das Display zeigt die
Einstellung an).
(AUTOMATIK) : Die Intensität der Luftzirkulation ist zuerst
auf HOCH eingestellt und variiert
automatisch auf MITTEL, wenn die
voreingestellte Temperatur erreicht ist.
(HOCH) :
(MITTEL) : Ruhiger Betrieb.
(NIEDRIG) : Noch ruhigerer Betrieb.
Die gewünschte Raumtemperatur mit den Temperaturregeltasten
einstellen (das Display zeigt die Einstellung an).
Wirtschaftlich, da der Raum schnell gekühlt wird.
3
START
STOP
Die Temperatureinstellung und die tasächliche Raumtemperatur
können in Abhängigkeit von den Bedingungen etwas variieren.
Die (START/STOP)-Taste drücken. Der Kühlbetrieb beginnt mit einem
Piepton. Diese Taste nochmals drücken, um den Betrieb zu
stoppen. Die Kühlfunktion startet nicht, wenn die Temperatureinstellung
höher als die derzeitige Raumtemperatur ist
Betriebs-Kontrollampe leuchtet).
Die Kühlfunktion startet, sobald Sie die Temperatur unter die
derzeitige Raumtemperatur eingestellt haben.
■ Da die Einstellungen in dem Speicher der Fernbedienung gespeichert
werden, müssen Sie das nächste Mal nur die
Taste drücken.
(obwohl die
(START/STOP)-
– 30 –
 Loading...