

Coil Nailer
Coil Nagler
Cloueur Pour Coils
Chiodatrice a bobina
Tr o mmelspijkerapparaat
Clavadora para coils
HeÈÎep
NV 65AH2
Read through carefully and understand these instructions before use.
Diese Anleitung vor Benutzung des Werkzeugs sorgfältig durchlesen und verstehen.
Lire soigneusement et bien assimiler ces instructions avant usage.
Prima dell’uso leggere attentamente e comprendere queste instruzioni.
Deze gebruiksaanwijzing s.v.p. voor gebruik zorgvuldig doorlezen.
Leer cuidadosamente y comprender estas instrucciones antes del uso.
èepeÀ ËcÔoÎëÁoÇaÌËeÏ ÀaÌÌoÖo ÖÇoÁÀeÁaÄËÇÌoÖo cÚaÌÍa, oÁÌaÍoÏëÚe ÔoÎëÁoÇaÚeÎÓ c íÚoÈ
ËÌcÚpyÍáËeÈ.
Handling instructions
Bedienungsanleitung
Mode d’emploi
Istruzioni per l’uso
Gebruiksaanwijzing
Instrucciones de manejo
àÌcÚpyÍáËÓ Ôo íÍcÔÎyaÚaáËË
1
1
2
7
6
8
3
P
4
5
a
b
R
O
J
9
A
@
B
C
D
23
@
A
D
B
C
D
45
E
_dY^
'
'
(
F
G
%
)
'
(
*
%
'
'
(
*
(
%
%
(
B
1
C
B
H
C
6 7
A
I
M
A
I
N
K
L
8 9
@
A
D
10 11
O
P
K
L
j
i
k
i
12 13
Q
R
S
T
2
14 15
VU
W
16 17
Y
18 19
1
X
m
O
l
Z
[
B
l
20 21
\
H
3
J
m
m
O
22 23
A
A
0
24
d
g h
e
m
f
]
`
a
b
b
4

English Deutsch Français Italiano
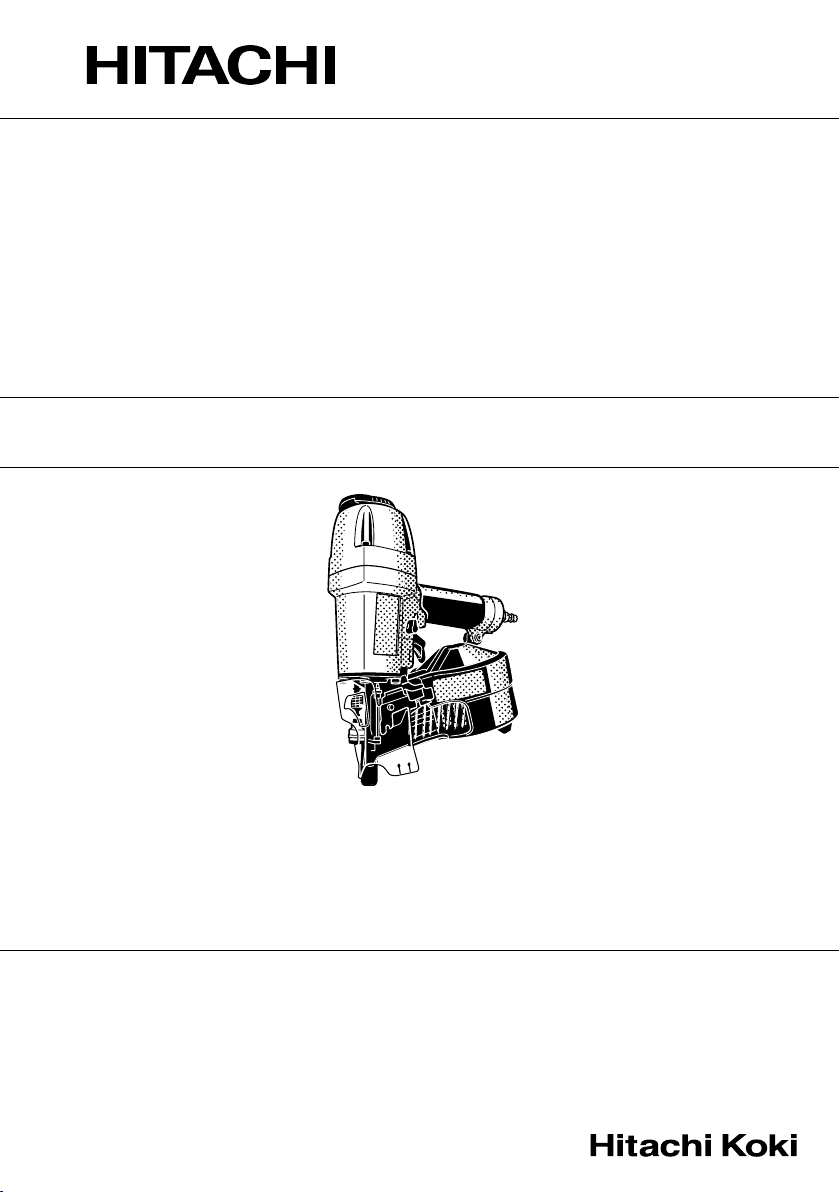
Top Cover Obere Abdeckung Couvercle supérieur Coperchio superiore
1
Exhaust Cover Entlüftungsdeckel
2
Body Gerätekörper Corps Corpo
3
Cap Kappe Capuchon Cappuccio
4
Air Plug Schnellkupplung Bouchon d’air Tappo aria
5
Piston O-Ring O-Ring Bague de piston
6
Piston Kolben Joint torique du piston Pistone
7
Driver Blade Schraubendreherklinge Lame d’entraînement Lama di guida
8
Dust Cover Staubkappe Couvercle à poussière Coperchio antipolvere
9
Knob Knopf Bouton Manopola
0
Nail Guide Nagelführung Guide-clous Guida dei chiodi
A
Magazine Magazin Magasin Contenitore
B
Nail Holder Nagelhalter Porte-clous Portachiodi
C
Magazine Cover Magazinabdeckung Couvercle du magasin
D
For 38, 40 mm Für 38, 40 mm Pour 38, 40 mm Per 38, 40 mm
E
For 45, 50 mm Für 45, 50 mm Pour 45, 50 mm Per 45, 50 mm
F
For 57, 65 mm Für 57, 65 mm Pour 57, 65 mm Per 57, 65 mm
G
Nails Nägel Clous Chiodi
H
First Nail Erster Nagel Premier clou Primo chiodo
I
J
Outlet Mündung Sortie Uscita
Pawl (1) Klinke (1) Cliquet (1) Dente (1)
K
Pawl (2) Klinke (2) Cliquet (2) Dente (2)
L
Guide Slot Führungsschlitz Fente-guide Fessura di guida
M
Guide Slot for Plastic Sheet
N
Push Lever Druckhebel Levier-poussoir Leva a pressione
O
Trigger Abzug Gâchette Grilletto
P
Previously pull the trigger
Q
Adjuster Einsteller Ajusteur Regolatore
R
Shallow Flach En superficie Laggero
S
Deep Tief En profondeur Profondo
T
Flush Normal Normal Normale
U
Too deep Zu tief Trop profond Troppo profondo
V
Too shallow Zu flach Trop en superficie Troppo leggero
W
Exhaust Vent Abluftöffnung Event d’échappement Apertura di scarico
X
Sheet Folie Feuille Foglio
Y
Hammer Hammer Marteau Martello
Z
Rod Stange Tige Asta
[
Slotted Screwdriver Flacher Schraubenzieher Tournevis plat Cacciavite a fessura
\
Nail Stopper (A) Nagelstopper (A) Butée des clous (A) Fermo dei chiodi (A)
]
Nail Stopper (B) Nagelstopper (B) Butée des clous (B) Fermo dei chiodi (B)
^
Nose Nase Bec Muso
a
Feeder Zubringer Chargeur Alimentatore
b
Shaft Welle Arbre Asta
c
Reducing Valve Reduzier-Ventil Valve réductrice Valvola di riduzione
d
Oiler Öler Lubricateurs Oliatore
e
Filter Filter Filtre Filtro
f
Nailer Side Nagler-seite Côté cloueur Lato chiodatrice
g
Compressor side Kompressor-seite Côté compresseur Lato compressore
h
Switching device Umschalter Dispositif de commande
i
Upward position Obere Position Position haute Posizione ascendente
j
Downward position Untere Position Position basse Posizione discendente
k
Nose cap Nasenkappe Capuchon de bec Tappo del naso
l
Disconnect air hose Luftschlauchanschluss Débrancher le tuyau d’air
m
5
Folien-Führungsschlitz
Ziehen Sie zuerst den Abzug durch
Couvercle d’échappement
Fente de guidage pour feuille de
plastique
Au préalable, tirer sur la gâchette
Copertura scarico
Fascia elastica del pistone
Coperchio del contenitore
Fessure di guida per foglio di
plastica
Tirare prima il grilletto
Dispositivo di commutazione
Scollegare il tubo dell’aria

Nederlands Español PyccÍËÈ
Bovenkap Cubierta superior Верхняя крышка
1
Uitlaatdeksel Cubierta de escape KpêåÍa ÇêxÎoÔa
2
Behuizing Cuerpo KopÔyc
3
Kap Tapa KpêåÍa
4
Luchtplug Toma de aire Воздушная пробка
5
Zuigerring Anillo O del pistón
6
Zuiger Pistón èopåeÌë
7
Aandrijfblad Cuchilla impulsora ãeÁÇËe ÔpËÇoÀ
8
Stofkap Tapón guardapolvo Пылезащитный чехол
9
Knop Perilla Ручка
0
Spijkergeleider Guía de puntas
A
Magazijn Cargador MaÖaÁËÌ
B
Spijkerhouder Soporte de puntas Держатель для гвоздей
C
Magazijnklep Cubierta del cargador Крышка магазина
D
Voor 38, 40 mm Para 38, 40 mm Для 38, 40 мм
E
Voor 45, 50 mm Para 45, 50 mm Для 45, 50 мм
F
Voor 57, 65 mm Para 57, 65 mm Для 57, 65 мм
G
Spijkers Puntas Гвозди
H
Eerste spijker Primera punta Первый гвоздь
I
J
Uitlaat Salida Выпускное отверстие
Pal (1) Uña (1) Защелка (1)
K
Pal (2) Uña (2) Защелка (2)
L
Geleidesleuf Ranura guía Направляющий слот
M
Geleidesleuf voor plastic Ranura de guía para la Направляющий слот для
N
band hoja de plástico пластиковой пластины
Drukhendel Palanca de empuje PêäaÖ-ÚoÎÍaÚeÎë
O
Trekker Gatillo KypoÍ
P
Haal eerst de trekker over Apriete primero el gatillo CÌaäaÎa ÌaÊaÚë ÍypoÍ
Q
Instelling Ajustador PeÖyÎËpoÇÍa
R
Ondiep Poca profundidad Неглубоко
S
Diep Profundidad profunda Глубоко
T
Normaal Normal Ровный
U
Te diep Demasiado profundo Слишком глубоко
V
Te ondiep
W
Uitlaat Salida del aire de escape
X
Band Hoja Пленка
Y
Hamer Martillo Молоток
Z
Stang Varilla Стержень
[
Schroevendraaier met inkeping
\
Spijkerstopper (A) Retén de puntas (A) ÉÇoÁÀeÇoÈ cÚoÔop (A)
]
Spijkerstopper (B) Retén de puntas (B) ÉÇoÁÀeÇoÈ cÚoÔop (B)
^
Neus Morro HocoÇaÓ äacÚë
a
Toevoer Alimentador Механизм подачи
b
As Eje Вал
c
Reductieklep Válvula de reducción PeÀyÍáËoÌÌêÈ ÍÎaÔaÌ
d
Zelfsmeernippel Engrasador CÏaÁäËÍ
e
Filter Filtro оЛОлЪp
f
Kant van het spijkerapparaat
g
Kant van de compressor Lado del compresor CÚopoÌa ÍoÏÔpeccopa
h
Schakelinrichting Dispositivo de encendido èpËÇoÀÌoÈ ÏexaÌËÁÏ
i
Omhoogstand Posición boca arriba BepxÌee ÔoÎoÊeÌËe
j
Omlaagstand Posición boca abajo HËÊÌee ÔoÎoÊeÌËe
k
Neuskap Tapu para el morro KpêåÍa ÌaÍoÌeäÌËÍa
l
Luchtslang loskoppelen
m
Demasiado poco profundo Слишком неглубоко
Destornillador de punta plana Отвертка для круглых гаек
Lado del martillo con ristra de clavos
Desconecte la manguera de aire
KoÎëáeÇaÓ ÔpoÍÎaÀÍa ÔopåÌÓ
Направляющая для гвоздей
Выходное вентиляционное отверстие
CÚopoÌa ÖÇoÁÀeÁaÄËÇaÚeÎÓ
OЪcoeАЛМЛЪл еОaМЦ ЗoБАyxa
6

English
(Original instructions)
GENERAL OPERATIONAL PRECAUTIONS
1. Operate the power tool safely for correct uses.
Do not use the power tool for uses other than those
specified in this instructions.
2. For safe operation handle the power tool correctly.
Please follow the instructions given in this
instruction manual and correctly handle this tool so
as to ensure safe operation. Never let the tool be
used by children or people who do not know enough
to be able to handle it correctly, or let it be used by
people who cannot operate it correctly.
3. Confirm the safety of the workshop.
Keep unauthorized people away from the workshop.
Especially children should be kept away.
4. The right parts in the right places.
Do not remove any of the covers or screws. Keep
them in place as they have their functions.
Moreover, because it would be dangerous, never
make modifications to the tool or use it after making
modifications.
5. Check the tool before using it.
Before using the tool, always check that no parts of
it are broken, that all screws are completely tight,
and that no parts are missing or rusty.
6. Excessive work could cause accidents.
Do not make tools and accessories work beyond
their abilities. Excessive work not only damages
the power tool but also is dangerous in itself.
7. Stop operation immediately if abnormalities are
noticed.
Stop operation if you notice abnormalities, or if the
power tool does not work properly; have the power
tool inspected and serviced.
8. Look after the power tool carefully.
If you drop or knock the power tool against things,
the outer frame may be deformed and cracks or
other kinds of damage may occur, so please handle
it with sufficient care. Also, do not scratch or engrave
signs on the power tool. Owing to high pressure air
inside the tool, cracks in the surface are dangerous.
Never use the power tool if a crack develops or if air
is escaping from a crack.
9. Take good care for a long life.
Always take good care of the power tool and keep it
clean.
10. Inspection at regular intervals is essential for safety.
Inspect the power tool at regular intervals so that
the power tool can be operated safety and efficiently
at all times.
11. Consult an authorized service center if repair or
parts replacement is necessary.
Ensure that the power tool is serviced by authorized
service center only, and that only genuine
replacement parts are used.
12. Keep the power tool in a proper place.
When not in use, the power tool should be kept in a
dry place out of the reach of children. Put into the
body about 2cc oil through the hose joint to protect
the tool from rust.
13. The exploded assembly drawing on this handling
instructions should be used only for authorized
service center.
PRECAUTIONS ON USING NAILER
1. Safe operation through correct usage
This tool was designed for driving nails into wood
and similar materials. Use it for its intended purpose
only.
2. Make sure air pressure is within the rated range of
air pressure.
Please make sure that the air pressure is within a
range of 4.9 bar – 8.3 bar (70 ~ 120 psi.), and that
the air which is used is clean and dry. If the air
pressure is greater than 8.3 bar (120 psi.), the life of
the power tool will be shortened and dangerous
conditions could develop. Tools shall not be
connected to pressure which potentially exceeds
14 bar (200 psi.).
3. Never operate the equipment with high-pressure
gases other than compressed air.
Never use carbon dioxide, oxygen or another gas
from pressurized containers under any
circumstances.
4. Be careful of ignition and explosions.
Since sparks may fly during nailing, it is dangerous
to use this tool near lacquer, paint, benzine, thinner,
gasoline, gas, adhesives and similar inflammable
substances as they may ignite or explode. Under
no circumstances should this tool therefore be used
in the vicinity of such inflammable material.
5. Always wear eye protection (protective goggles).
When operating the power tool, always wear eye
protection, and ensure that surrounding people wear
eye protection too.
The possibility of fragments of the wire or plastic
linking the nails or nails that were not properly hit
entering the eye is a threat to sight. Eye protection
can be bought at any hardware store. Always wear
eye protection while operating this tool. Use either
eye protection or a wide vision mask over
prescription glasses.
Employers should always enforce the use of eye
protection equipment.
6. Protect your ears and head.
When engaged in nailing work please wear ear
mufflers and head protection. Also, depending on
condition, ensure that surrounding people also wear
ear mufflers and head protection.
7. Pay attention to those working close to you.
It would be very dangerous if nails that were not
properly driven in should hit other people.
Therefore, always pay attention to the safety of the
people around you when using this tool. Always
make sure that nobody’s body, hands or feet are
close to the nail outlet.
8. Never point the nail outlet towards people.
Always assume the tool contains fasteners.
If the nail outlet is pointed towards people, serious
accidents may be caused if you mistakenly discharge
the tool. When connecting and disconnecting the
hose, during nail loading or similar operations, be
sure the nail outlet is not pointed towards anyone
(including yourself). Even when no nails are loaded
at all, it is dangerous to discharge the tool while
pointing it at someone, so never attempt to do so.
No horseplay. Respect the tool as a working
implement.
7

English
9. Before using the power tool, check the push lever.
Before using the power tool make sure to check
that the push lever and valve operate properly.
Without nails loaded into the power tool, connect
the hose and check the following. If the sound of
operation occurs this indicates a fault, so in such a
case do not use the power tool until it has been
inspected and repaired.
䡬 If merely pulling the trigger causes operating
sound of driver blade movement occur, the
power tool is faulty.
䡬 If merely pushing the push lever against the
material to be nailed causes the sound of driver
blade movement to occur, the power tool is
faulty. Furthermore, with regard to the push
lever, please note that it must never be modified
or removed.
10. Use specified nails only.
Never use nails other than those specified and
described in these instructions.
11. Be careful when connecting the hose.
When connecting the hose and loading nails in
order not to fire the tool by mistake, make sure of
the following.
䡬 Do not touch the trigger.
䡬 Do not allow the firing head to contact with any
surface.
䡬 Keep the firing head down.
Strictly observe the above instructions, and
always make sure that no part of the body,
hands or legs is ever in front of the nail outlet.
12. Do not carelessly place your finger on the trigger.
Do not place your finger on the trigger except when
actually nailing. If you carry this tool or hand it to
someone while having your finger on the trigger,
you may inadvertently discharge a nail and thus
cause an accident.
13. Completely Close the nail guide and do not open it
during operation.
If nailing is attempted when the nail guide is open,
nails will not be driven into the timber, and there is
a risk of dangerous discharge.
14. Press the nail outlet firmly against the material to
be nailed.
When driving in nails, press the nail outlet firmly
against the material to be nailed. If the outlet is not
applied properly, the nails may rebound.
15. Keep hands and feet away from the firing head
when using.
It is very dangerous for a nail to hit the hands or
feet by mistake.
16. Beware of the tool’s kickback
Do not approach the top of the tool with your head
etc. during operation. This is dangerous because
the tool may recoil violently if the nail currently
being driven in comes into contact with a previous
nail or a knot in the wood.
17. Take care when nailing thin boards or the corners
of wood.
When nailing thin boards, the nails may pass right
through, as may also be the case when nailing the
corners of wood due to deviation of the nails. In
such cases, always make sure that there is no one
(and nobody’s hands or feet; etc.) behind the thin
board or next to the wood you are going to nail.
18. Simultaneous nailing on both sides of the same
wall is dangerous
Under no circumstances should nailing be
performed on both sides of a wall at the same time.
This would be very dangerous since the nails might
pass through the wall and thus cause injuries.
19. Do not use the power tool on scaffoldings, ladders.
The power tool shall not be used for specific
application for example:
– when changing one driving location to another
involves the use of scafforldings, stairs, ladders
or ladder alike constructions, e.g. roof laths,
– closing boxes or crates,
– fitting transportation safety systems e.g. on
vehicles and wagons
20. Do not disconnect the hose with your finger on the
trigger.
If you disconnect the hose with your finger on the
trigger, the next time the hose is connected, there
is a danger that the power tool will fire a nail
spontaneously, or operate incorrectly.
21. Disconnect the hose and take out any nails left in
the magazine after use.
Disconnect tool from air before doing tool
maintenance, cleaning a jammed fastener, leaving
work area, moving tool to another location, or after
use. It is very dangerous for a nail to be fired by
mistake.
22. When removing a nail which has become stuck,
make sure to first of all disconnect the hose and
release compressed air.
When removing a nail which has become stuck in
the nail outlet, first of all make sure to disconnect
the hose and release compressed air inside the
power tool.
Accidental firing of the nail could be very dangerous.
23. To avoid hazards caused by falling nails, never
open the magazine with the device facing
downward while loading nails.
24. A female plug (air socket) should not be used in the
body.
If a female plug is installed in the body, the
compressed air sometimes can not be drawn when
the hose is disconnected so avoid this.
The tool and air supply hose must have a hose
coupling such that all pressure is removed from the
tool when the coupling joint is disconnected.
25. Do not remove the dust cover
Never operate with the dust cover removed in order
to avoid the danger of breakage of the wire or
plastic retaining the nails or missed-fired nails flying
about.
26. When attaching and detaching the nose cap,
disconnect the hose.
When attaching the accessory nose cap to the tip of
the push lever and when detaching it, make sure to
disconnect the hose beforehand. It is very dangerous
for a nail to be fired by mistake.
8
English
SPECIFICATIONS
Type of power Piston reciprocating
Air pressure (Gauge) 4.9 – 8.3 bar (70 – 120 psi.)
Applicable nails ref. Fig.
Amount of loadable nails 200 – 300 nails (1 coil)
Size 290 mm (L) × 300 mm (H) × 130 mm (W) (11-27/64” × 11-13/16” × 5-1/8”)
Weight 2.2 kg (4.9 lbs)
Nail-feeding method Piston reciprocation
Hose (inside diam.) 7 mm (9/32”)
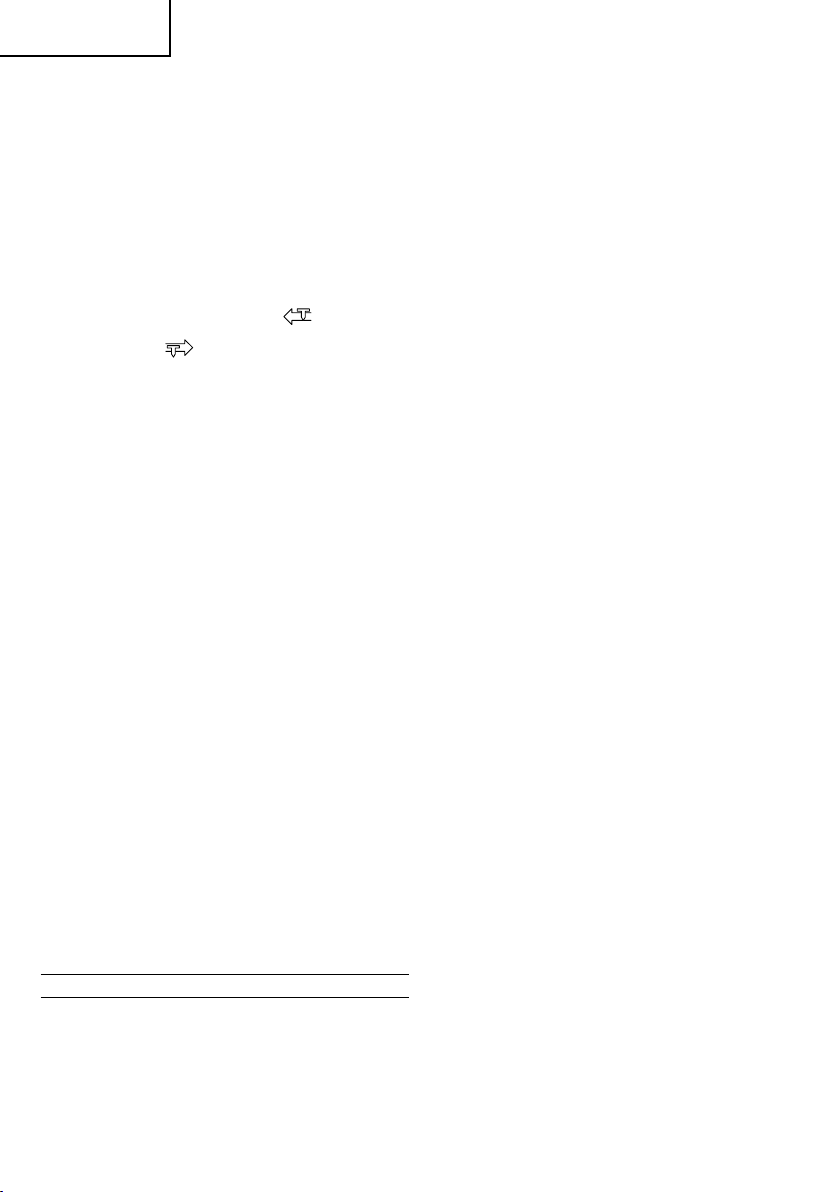
NAIL SELECTION
Wire collated nails and plastic collated nails can be driven
with this tool.
Choose a suitable nail from Fig. Nails which are not
shown in Fig. can not be driven with this tool. Nails are
linked and rolled.
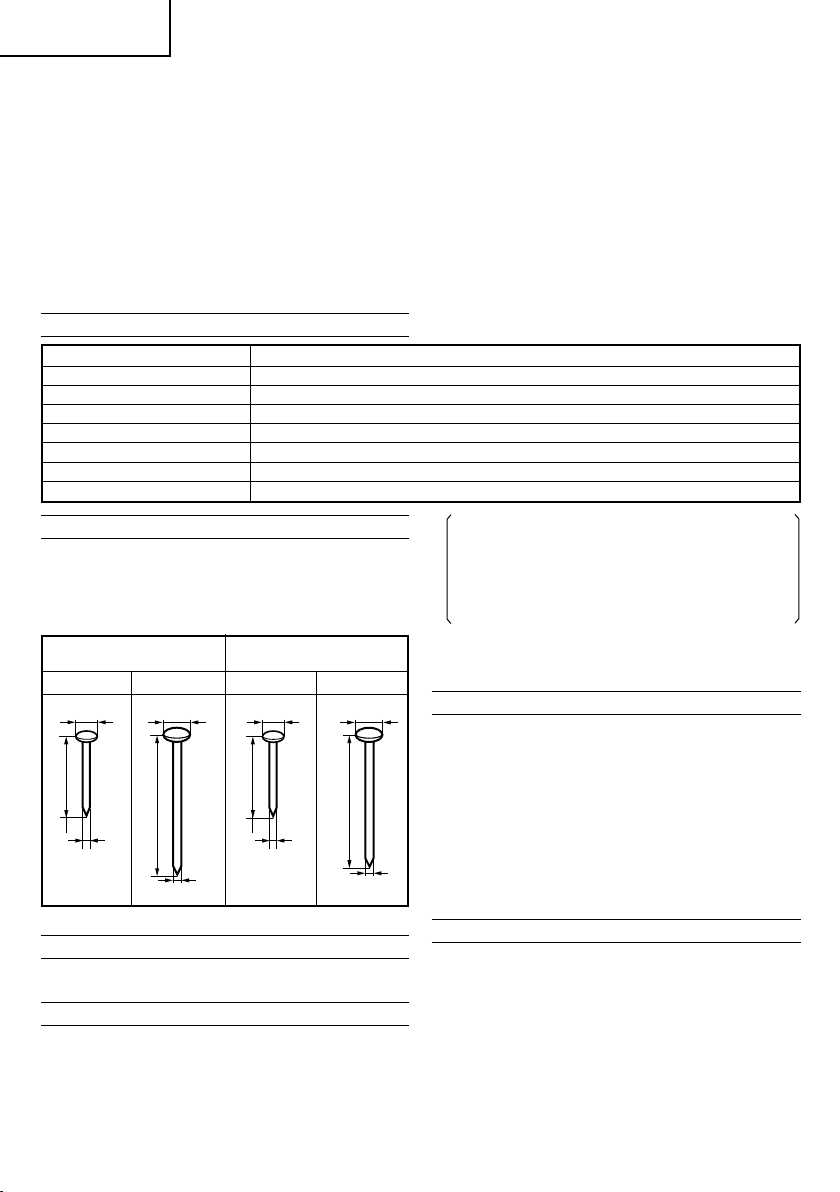
Wire-collatd coil nails Sheet-collated coil nails
MIN. MAX. MIN. MAX.
5.3 mm 6.4 mm 5.3 mm 6.4 mm
(.209”) (.252”) (.209”) (.252”)
38 mm (1-1/2”)
2.3 mm
(.090”)
65 mm (2-1/2”)
2.5 mm
(.099”)
Dimensions of nails
38 mm (1-1/2”)
2.3 mm
(.090”)
57 mm (2-1/4”)
2.5 mm
(.099”)
STANDARD ACCESSORIES
(1) Eye protector .............................................................. 1
OPTIONAL ACCESSORY
䡬 Single Shot Parts (Code No. 887-916)
(Sequential Fire Parts Set, Single Shot Parts)
With the sequential fire parts,the nail is driven only
by squeezing the trigger after pushing down the
push lever.
By installing these parts, driving nails into improper
positions and unexpected firing of nails caused by
accidental operation of the push lever can be
prevented.
䡬 Case (Code No. 880-517)
䡬 Nose Cap (Code No. 878-344)
䡬 Hanger Parts (Code No. 888-097)
APPLICATIONS
䡬 Siding, fencing, decking
䡬 Wall and roof sheathing
䡬 Mobile home and modular housing construction
䡬 Crate and pallet construction
9
NOTE
2.5 mm × 64 mm (.099" × 2-1/2") nails cannot be
driven in some cases, depending on the material.
Test drive some of the nails first to check before
using.
PREPARATION PRIOR TO OPERATION
1. Prepare the hose
Be sure to use the hose provided with minimum
6 mm (1/4”) inside diameter.
NOTE
The air supply hoses must have a minimum working
pressure rating of 12.8 bar (180 psi) or 150 percent of
the maximum pressure produced in the air supply
system, whichever is higher.
2. Check on safety
CAUTION
䡬 Unauthorized persons (including children) must be
kept away from the equipment.
䡬 Wear eye protector.
䡬 Check the retaining screws which fix the exhaust
cover, etc. for tightness.
Check the nailer for air leaks and defective or rusty
parts.
䡬 Check whether or not the push lever works correctly.
Also check whether or not any dirt has adhered to the
moving parts of the push lever.
䡬 Recheck on operational safety.
BEFORE USE
1. Check the air pressure
CAUTION
The air pressure must be constantly maintained at
4.9 – 8.3 bar (70 – 120 psi.).
Adjust the air pressure between 4.9 to 8.3 bar (70 ~
120 psi.) according to the diameters and length of
nails and hardness of the wood being nailed. Pay
special attention to the output pressure, capacity,
and piping on the air compressor, so that air pressure
does not exceed the specified limit. Note that
excessive pressure may affect overall performance,
service life, and safety.
2. Lubrication
(1) Prior to operating this nailer, be sure to provide an air
set between the air compressor and this device.
Lubrication through the air set offers smooth
operation, extended service life, and anticorrosion.
Adjust the oiler so that a single drop of oil is supplied
at intervals of 5 to 10 nailing cycles.
English
(2) It is recommended using the recommended oil (SHELL
TONNA). Other applicable oils are listed. Never mix
two or more types of different oils.
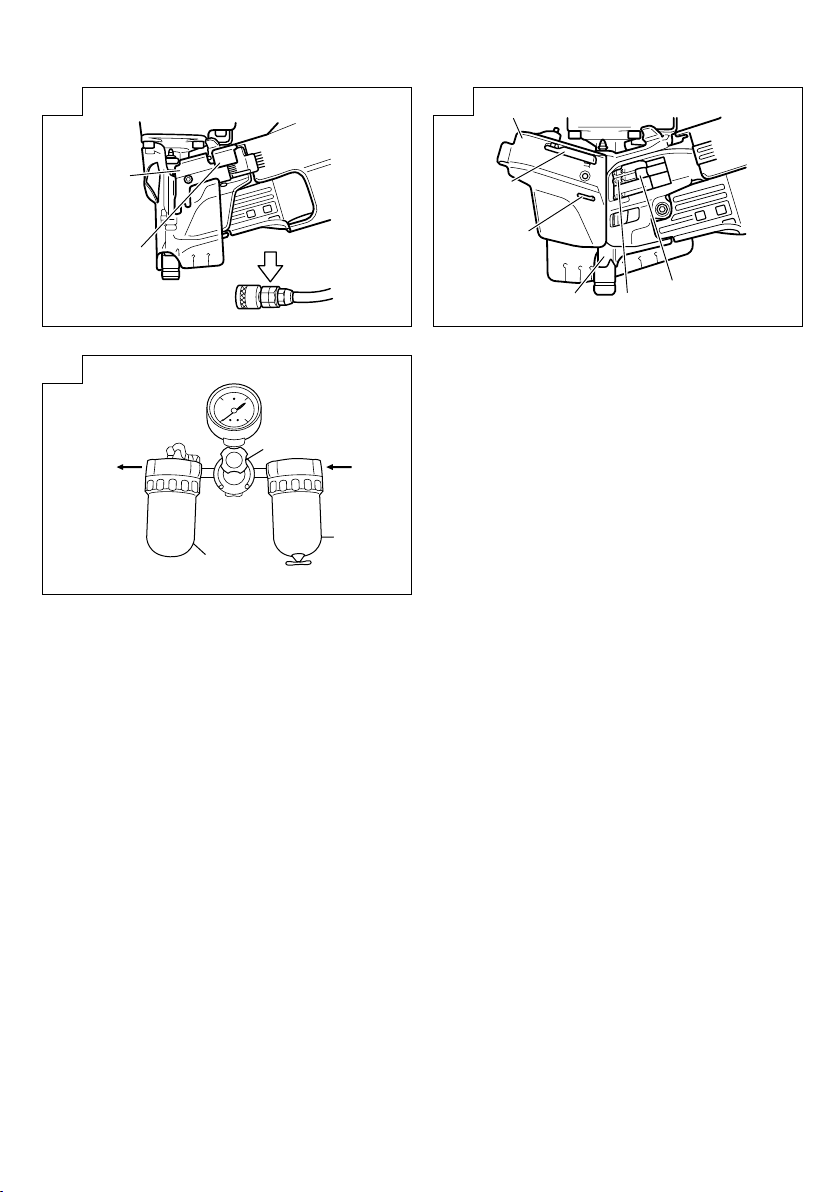
3. Load Nails
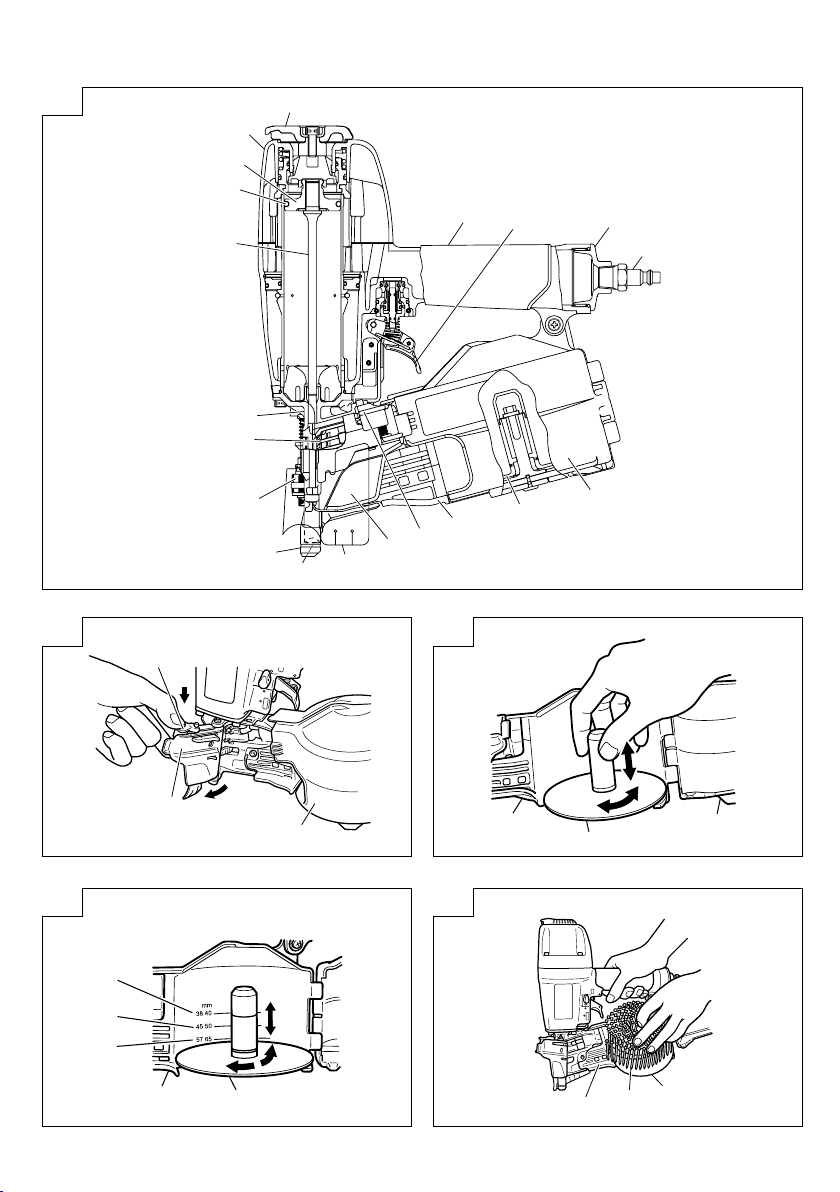
(1) Grip the nail guide and knob with finger.
Press the knob down and swing the nail guide open.
And open the magazine cover (Fig. 2).
(2) Adjust the position of the plate according to the nail
length (Fig. 3).
The nail will not feed smoothly if the plate is not
correctly adjusted (Fig. 4).
a. Turn the nail holder about 90 degrees
counterclockwise.
b. Slide in vertical direction possible.
Lift or lower the nail holder to accept different
length nails.
c. Adjust the plate to the nail length reference points
on the magazine cover and turn the nail holder 90
degrees clockwise until you hear “click”.
(3) Place the nail coil into the magazine.
Uncoil enough nails to reach the driving hole (Fig. 5).
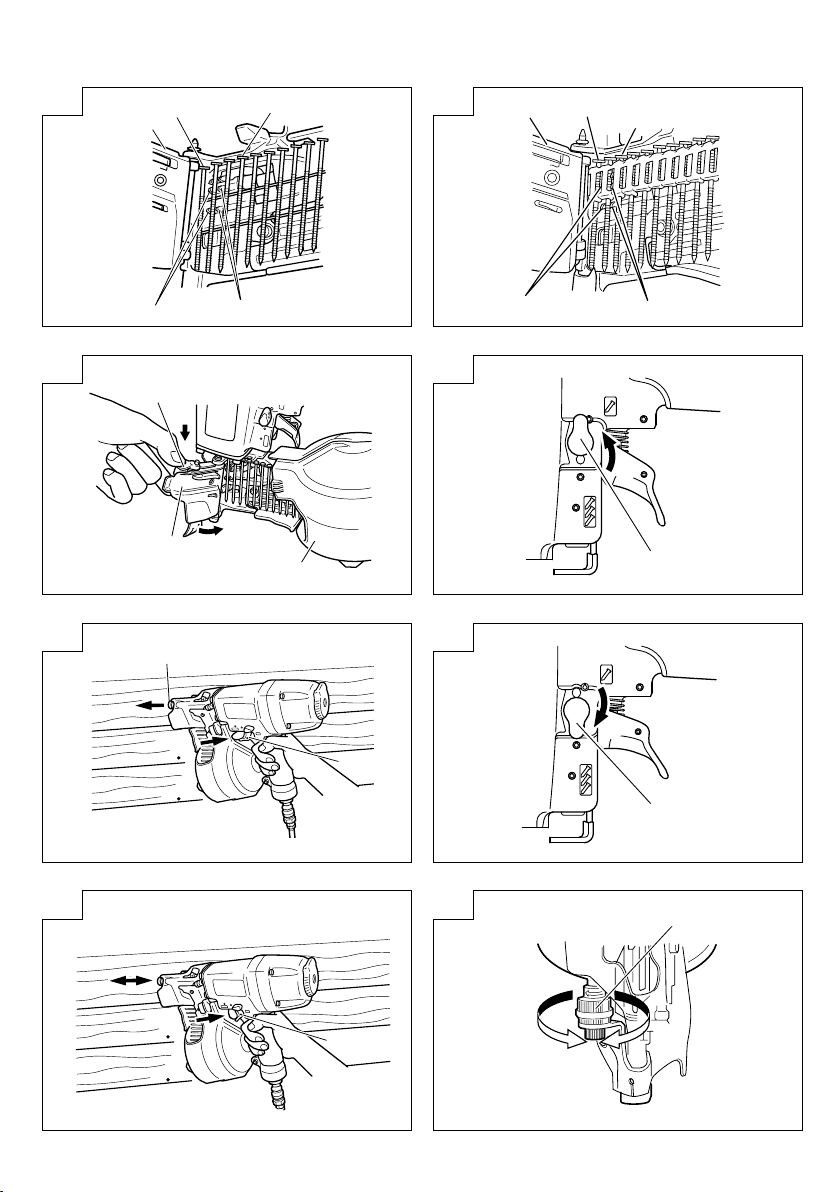
When using wire collated nails
Insert the first nail into the driving hole and the
second nail between the two pawls of the feeder.
Fit the nail head in the guide slot (Fig. 6).
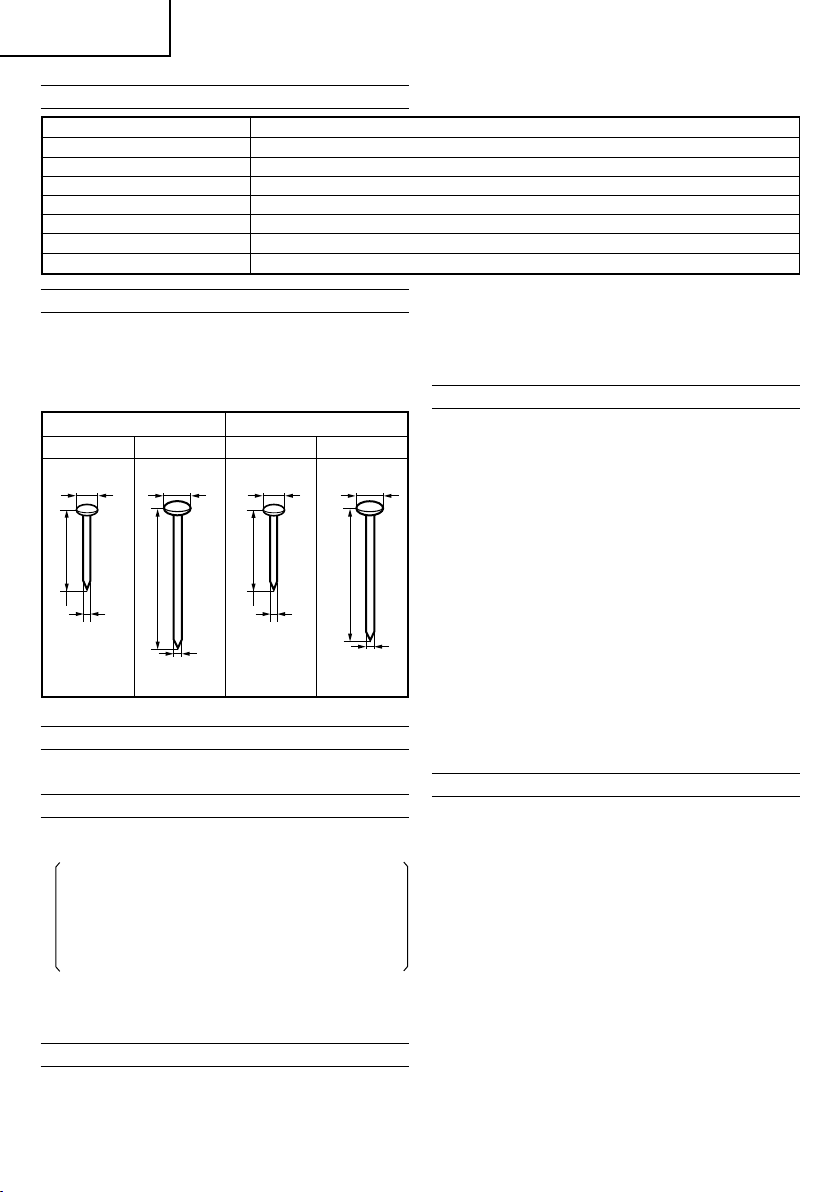
When using plastic sheet collated nails
Insert the first nail into the driving hole and the
second nail between the two pawls of the feeder.
Fit the nail head and upper side of the plastic sheet in
the guide slot.
Fit the lower side of the plastic sheet in the guide slot
for plastic sheets (Fig. 7).
(4) Close the magazine cover first and swing the nail
guide closed (Fig. 8).
(5) Lock the knob correctly.
NOTE
Be careful not to deform the collated wires and not to
disengage the nails with the guide surface.
Otherwise, the nail guide will not close correctly.
CAUTION
To prevent unintentional operation, never touch the
trigger or place the top end of the push lever on a
work bench or floor. Also, never face the nail outlet
toward any part of a person.
NOTE
Before loading the nails in the magazine, position the
nail holder according to the length of the nail. If the
nail holder position is not adjusted properly, nail
feed may jam. If the cover is forcibly closed without
adjusting the position of the nail holder, the nail
holder may be damaged.
HOW TO USE THE NAILER
CAUTION
䡬 Never use the head or body of this device as a hammer.
䡬 Take precautions to ensure the safety of persons in
the vicinity during operation.
1. Nailing procedures
This Hitachi nailer is equipped with a nailer operation
switching device.
Use SINGLE SEQUENTIAL ACTUATION MECHANISM
or CONTACT ACTUATION MECHANISM in
accordance with the work to be performed.
(1) Intermittent nailing
Set the switching device to the upward position (to set
to SINGLE SEQUENTIAL ACTUATION MECHANISM)
(See Fig. 9).
Depress the nail outlet onto the desired point; then
pull the trigger to drive a nail in a single shot (See
Fig. 10).
After nailing once, nailing will not be possible again
until the trigger is released and pressed again.
WARNING
A nail will fire each time the trigger is depressed as
long as the push lever remains depressed.
CAUTION
If you do not pull the trigger quickly and crisply while
in the single shot mode, the nailer will bounce and
shoot several nails instead of just one. To avoid this,
be sure to pull the trigger quickly and crisply.
(2) Push lever
When depressing the nail outlet, be sure to fully lift
the push lever (See Fig. 10) to release the safety lock.
Thus, nails cannot be driven without releasing the
safety lock even though the trigger is pulled.
(3) Continuous nailing
Set the switching device to the downward position (to set
to CONTACT ACTUATION MECHANISM) (See Fig. 11).
First, pull the trigger. Then depress the devise onto the
desired position to automatically drive nails (See
Fig. 12).
The SINGLE SEQUENTIAL ACTUATION MECHANISM is
for use where precision fastener placement is desired.
The SINGLE SEQUENTIAL ACTUATION MECHANISM
may reduce the possibility of bodily injury to you or
others in the work area compared to the CONTACT
ACTUATION MECHANISM. This is because it is less
likely to drive an unwanted nail if you keep the trigger
pulled and accidentally bump the push lever against
yourself or others.
The SINGLE SEQUENTIAL ACTUATION MECHANISM
may also reduce the speed of operation compared to the
CONTACT ACTUATION MECHANISM. The SINGLE
SEQUENTIAL ACTUATION MECHANISM is
recommended to inexperienced users.
CAUTION
䡬 Exercise care when nailing corners of lumber. When
continuous nailing corners of lumber, a nail may go
astray or break through the corner.
䡬 Do not drive a nail on another nail.
䡬 Do not drive a nail on metal parts.
NOTE
䡬 Precautions on no-load operation
Sometimes nailing will continue after driving in all
nails previously contained in the magazine.
This is termed “no-load operation”. Such operation
may deteriorate the damper, magazine, and nail
feeder.
To avoid no-load operation, occasionally confirm the
amount of remaining nails. On the other hand, all
nails should be removed after using this nailer.
䡬 After nailing:
(1) disconnect air hose from the nailer;
(2) remove all nails from the nailer;
(3) supply 5 – 10 drops of Hitachi pneumatic tool
lubricant into the air plug on the nailer; and
(4) open the petcock on the air compressor tank to
drain any moisture.
10
English
䡬 After completing operation, put into the body about 2cc
oil through the hose joint to protect the tool from rust.
䡬 Under low temperature conditions, the machine
sometimes does not operate correctly. Always operate
the machine at the appropriate ambient temperature.
2. Adjusting the nail-driving depth
CAUTION
When making adjustments, be sure remove your
finger from the trigger. When making adjustments,
be sure that the nail outlet is not facing downward
and that body parts or other persons are not in the
path of the nail outlet.
䡬 Adjusting the adjuster (Fig. 13)
Carry out test driving. If the nails are too deep, turn
the adjuster to the shallow side (
If the nail depth is too shallow, turn the adjuster to
the deep side ( mark) (See Fig. 13, 14).
Depth is changed 1 mm with each rotation of the
adjuster.
NOTE
䡬 When adjusting the adjuster, it does not rotate more
than 3 mm from the deepest point where a nail goes
down. Do not rotate the adjuster by force beyond
that point.
䡬 The nail-driving depth can also be adjusted by
changing the air pressure used. Carry this out together
with movement of the adjuster. Using a high air
pressure that does not match the nail-driving
resistance will shorten the life of this nailer.
3. Changing the exhaust direction
The direction of the exhaust vent can be changed by
turning the top cover (Fig. 15).
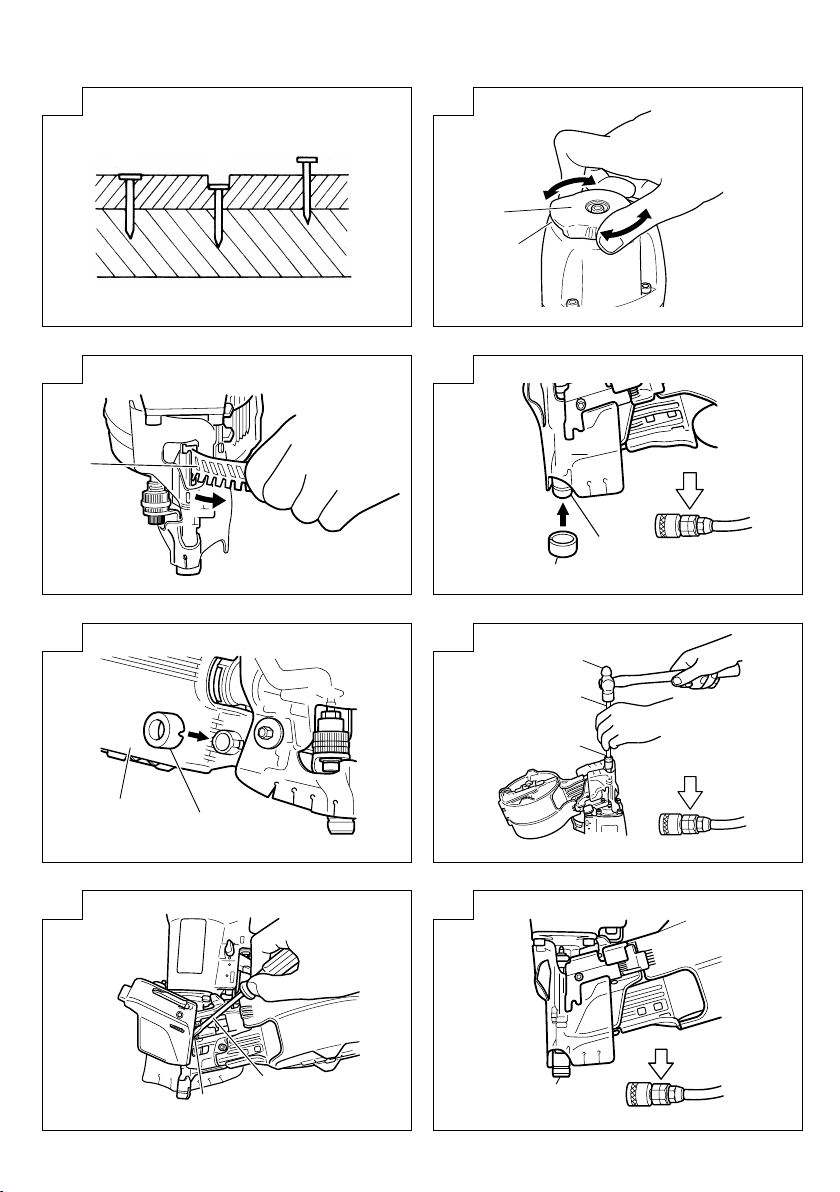
4. Cutting off the sheet
Tear off the output sheet in the direction of the arrow
when using the sheet collated nails (Fig. 16).
5. How to use nosecap
CAUTION
Remove the hose from the nailer and release the
compressed air before installing or removing the
nosecap to prevent accidental nail ejection.
䡬 Attach the nose cap on the tip of the push lever when
you wish to protect the surface of wood, etc., from
scratches.
(1) Attaching and detaching nose cap
The nose cap can be attached by simply pressing it
into the push lever.
Press it in until a convex part inside the nose cap
enters into a hole of the push lever. (Fig.17)
For removal, insert a thin rod such as a screw driver
into the gap on the back of the push lever, and then
pull it out.
(2) Safekeeping of nose cap
Put the removed nose cap in a space behind the
magazine for safekeeping. (Fig.18)
mark).
INSPECTION AND MAINTENANCE
CAUTION
Be sure to disconnect the hose during cleaning jams,
inspection, maintenance and cleaning.
1. Countermeasure for nail jamming
(1) Remove the nail roll from the magazine, open the
nail guide, insert a rod into the outlet and tap the rod
with a hammer (Fig. 19).
(2) Remove the jammed nail with slotted screwdriver
(Fig. 20).
11
(3) Cut off the defective part of the steel wire which links
the nails with cutting nippers, correct the deformation,
then load the nail roll in the magazine.
(4) In case of frequent jams, consult the Authorized
Service Center from which you bought this machine.
2. Check on mounting screws for each part
At regular intervals check every part for loose
mounting screws and whether or not there are any
air leaks. Retighten any loose screws. Operating the
equipment with loose screws untightened will incur
a hazard.
3. Inspecting the push lever
Check if the push lever can slide smoothly (Fig. 21).
Clean up the sliding area of the push lever and use the
provided oil for lubrication from time to time.
Lubrication enables smooth sliding and simultaneously
serves to prevent the formation of rust.
4. Inspecting the feeders
(1) Occasionally clean the knob sliding part and then
apply the recommended oil (See Fig. 22).
(2) Open the nail guide and remove dust, etc., as shown
in Fig. 23. Apply lubricant to the sliding groove of the
feeder and shaft. Check the nail stopper (A) and nail
stopper (B) slide smoothly by pushing them with
your finger.
(3) Also, apply the recommended oil to the feeding
surface of the nose and nail guide after cleaning. This
promotes smooth operation and retards corrosion.
CAUTION
Check for smooth movement of the feeders and
stoppers before use. If movement is uneven, nails
could be fired at an irregular angle, presenting a
hazard to the operator and others nearby.
5. Inspecting the magazine
Clean the magazine. Remove dust of wooden chips
which may have accumulated in the magazine.
6. Storing
䡬 When not in use for an extended period, apply a thin
coat of the lubricant to the steel parts to avoid rust.
䡬 Do not store the Nailer in a cold weather environment.
Keep the Nailer in a warm area.
䡬 When not in use, the Nailer should be stored in a
warm and dry place.
Keep out of reach of children.
7. Service parts list
CAUTION
Repair, modification and inspection of Hitachi Power
Tools must be carried out by a Hitachi Authorized
Service Center.
This Parts List will be helpful if presented with the
tool to the Hitachi Authorized Service Center when
requesting repair or other maintenance.
In the operation and maintenance of power tools, the
safety regulations and standards prescribed in each
country must be observed.
MODIFICATIONS
Hitachi Power Tools are constantly being improved
and modified to incorporate the latest technological
advancements.
Accordingly, some parts may be changed without
prior notice.
English
COMPRESSOR
CAUTION
When the maximum, operating pressure of the air
compressor exceeds 8.3 bar (120 psi.), be sure to
provide a reducing valve between the air compressor
and nailer. Then, adjust the air pressure within the
operating range of 4.9 – 8.3 bar (70 – 120 psi.). If the
air set is installed, lubrication is also possible, thus
providing additional convenience.
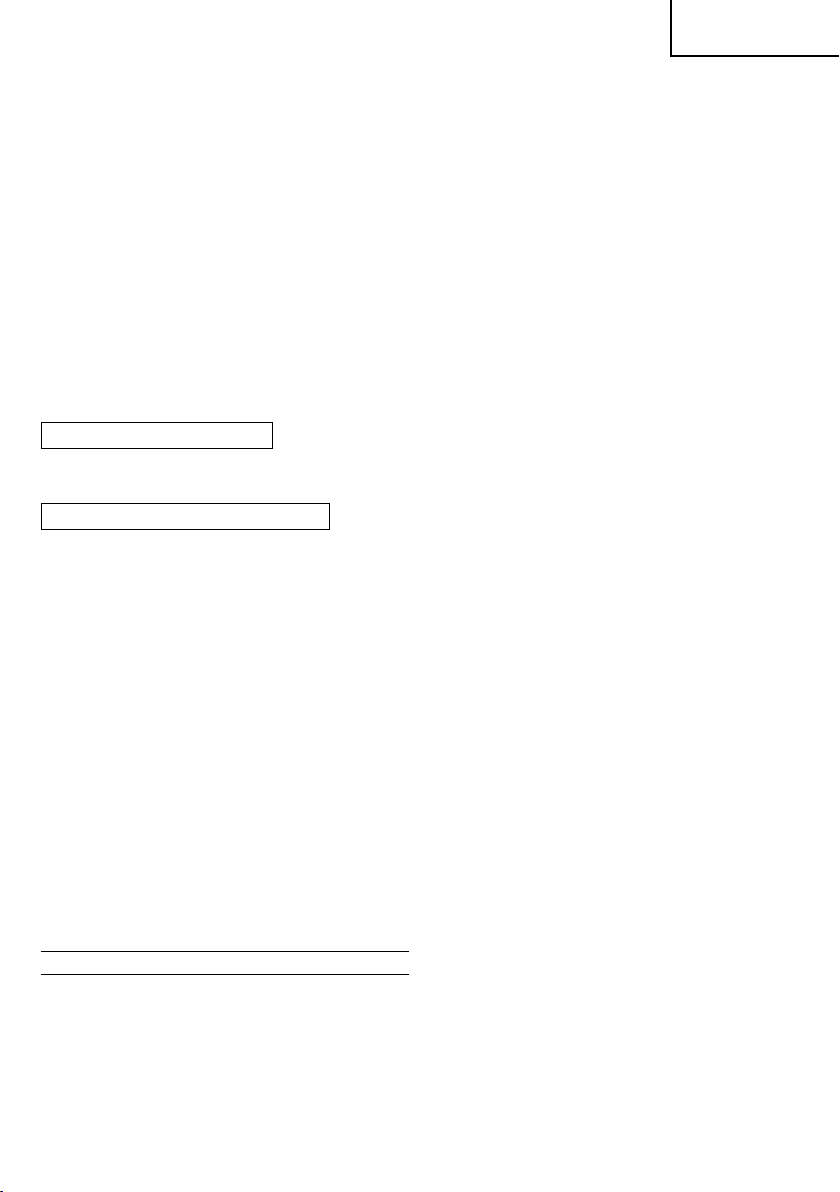
OILER-FILTER-REDUCING VALVE (Air Set)
So that the equipment can be operated under an optimum
condition to ensure extended service life, it is advisable
to use an oiler filter reducing valve. Please limit the
length of the hose between the unit and the air set to
within 10m when using (Fig. 24).
APPLICABLE LUBRICANTS
Type of lubricant Name of lubricant
Recommended oil SHELL TONNA
Motor oil SAE10W, SAE20W
Turbine oil
ISO VG32 ~ 68
(#90 ~ #180)
Noise Information
Noise characteristic values in accordance with EN 792-13:
The typical A-weighted single-event sound power level
L
WA
The typical A-weighted single-event emission sound
pressure levelat work station
,1s,d = 97 dB
L
pA
,1s,d = 84 dB.
Uncertainty KpA: 2.5 dB (A)
These values are tool-related characteristic values and
do not represent the noise development at the point of
use. Noise development at the point of use will for
example depend on the working environment, the
workpiece, the workpiece support and the number of
driving operations, etc.
Depending on the conditions at the workplace and the
form of the workpiece, individual noise attenuation
measures may need to be carried out, such as placing
workpieces on sound-damping supports, preventing
workpiece vibration by means of clamping or covering,
adjusting to the minimum air pressure required for the
operaion involved,etc.
In special cases it is necessary to wear hearing protection
equipment.
Vibration Information
The typical vibration characteristic value in accordence
with EN 792-13: 2.5 m/s
Uncertainty K: 1.5 m/s
2
2
This values is a tool-related characteristic value and does
not represent the influence to the hand-arm-system
when using the tool. An influence to the hand-armsystem when using the tool will for example depend on
the gripping force, the contact pressure force, the working
direction, the adjustment of energy supply, the workpiece,
the wrokpiece support.
12

Deutsch
(Übersetzung der Original-Gebrauchsanweisung)
GENERELLE VORSICHTSMASSNAHMEN
1. Benutzen Sie das Gerät sicher und für die richtige
Verwendung.
Benutzen Sie das Gerät nie für andere
Verwendungszwecke als die in dieser
Betriebsanleitung angegebenen.
2. Behandeln Sie das Gerät korrekt für eine sichere
Arbeitsweise.
Beachten Sie die Anweisungen dieser
Betriebsanleitung und behandeln Sie das Gerät
korrekt, um eine sichere Arbeitsweise zu
gewährleisten. Lassen Sie das Gerät niemals von
Kindern oder von unerfahrenen Personen, die mit
der Arbeitsweise des Gerätes nicht vertraut sind
benutzen.
3. Achten Sie auf Sicherheit des Arbeitsplatzes.
Halten Sie unbefugte Personen vom Arbeitsplatz
fern, insbesondere Kinder.
4. Das richtige Teil am richtigen Platz.
Entfernen Sie keine Deckel oder Schrauben. Lassen
Sie sie dort, wo sie ihre Funktion erfüllen. Nehmen
Sie keine Aenderungen des Gerätes vor und
benutzen Sie kein geändertes Gerät. Dies könnte
gefährlich sein.
5. Prüfen Sie das Gerät vor Gebrauch.
Prüfen Sie vor der Benutzung des Gerätes, ob keine
Teile gebrochen sind, ob alle Schrauben fest
angezogen sind und ob keine Teile fehlen oder
rostig sind.
6. Ueberbeanspruchung kann Unfälle hervorrufen.
Beanspruchen Sie das Gerät sowie die Zubehörteile
nie stärker als vorgesehen. Ueberbeanspruchung
zerstört nicht nur das Gerät sondern ist an sich
gefährlich.
7. Unterbrechen Sie die Arbeit sofort bei auftretenden
Unregelmässigkeiten.
Sobald Sie Unregelmässigkeiten bemerken, unterbrechen Sie unverzüglich die Arbeit und lassen Sie
das Gerät prüfen und warten.
8. Behandeln Sie das Gerät sorgfältig.
Wenn Sie das Gerät fallen lassen oder gegen andere
Gegenstände stossen, kann der Aussenkörper
deformiert werden, brechen, oder anderweitig
beschädigt werden. Behandeln Sie deshalb das
Gerät mit Sorgfalt. Kratzen oder gravieren Sie
keinerlei Zeichen auf das Gerät. Bedingt durch den
hohen Innendruck sind Beschädigungen an der
Oberfläche gefährlich.
Benutzen Sie das Gerät nicht, wenn sich Risse bilden
oder Luft durch einen Riss entweicht.
9. Gute Pflege garantiert eine lange Lebensdauer.
Pflegen Sie das Gerät gut und halten Sie es sauber.
10. Regelmässige Inspektionen sind für die Sicherheit
wichtig.
Nehmen Sie in regelmässigen Abständen
Inspektionen vor, damit das Gerät stets sicher und
wirksam benutzt werden kann.
11. Lassen Sie Reparaturen und das Auswecheln von
Teilen nur von Ihrem autorisierten Agenten
vornehmen.
Instandsetzungsarbeiten dürfen nur durch
Beauftragte des Herstellers unter Beachtung der in
der Betriebsanleitung enthaltenen Angaben
durchgeführt werden.
Für die Instandhaltung dürfen nur Original-HitachiErastzteile verwendet werden.
13
12. Lagern Sie das Gerät an einem sauberen Platz.
Wenn das Gerät nicht benutzt wird, sollte es an
einem trockenen Platz ausser Reichweite von
Kindern aufbewahrt werden. Füllen Sie ca. 2 cc Oel
durch den Schlauchanschluss in den Körper, um
das Gerät vor Rost zu schützen.
13. Die Explosionszeichnung die der Bedienungsanleitung beigefügt ist, ist nur für autorisierte
Service-Werkstätten bestimmt.
VORSICHTSMASSNAHMEN BEIM GEBRAUCH
DES NAGELGERÄTES
1. Sichere Arbeitsweise durch korrekten Gebrauch.
Dieses Gerät wurde zum Eintreiben von Nägeln in
Holz oder ähnliches Material entwickelt. Benutzen
Sie es ausschliesslich für den vorgesehenen
Verwendungszweck.
2. Beachten Sie, dass der Luftdruck innerhalb der
vorgeschriebenen Grenzen liegt.
Beachten Sie dass der Luftdruck innerhalb des
Bereiches von 4,9 – 8,3 bar liegt sowie dass saubere
und trockene Luft benutzt wird. Bei einem Luftdruck
über 8,3 bar wird die Lebensdauer des Gerätes
verkürzt und es können gefährliche Situationen
entstehen. Das Gerät darf keinesfalls an
Druckluftquellen angeschlossen werden, deren
Druck 14 bar auch nur theoretisch überschreiten
kann.
3. Benutzen Sie das Gerät niemals mit HochdruckGas sondern ausschliesslich mit komprimierter Luft.
Benutzen Sie unter keinen Umständen
Kohlenstoffdioxyde, Sauerstoff oder andere Gase
aus Druckbehältern.
4. Schützen Sie sich vor Bränden und Explosionen.
Da während des Nagelns Funken umherfliegen
können ist est gefährlich, das Gerät in der Nähe von
Lacken, Farben, Benzin, Verdünnern, Gasolinen,
Gas, Klebstoffen oder ähnlichen brennbaren
Substanzen zu benutzen, da diese sich entzünden
oder explodieren können. Das Gerät darf aus diesem
Grunde unter keinen Umständen in der Nähe solcher
brennbaren Materialien benutzt werden.
5. Schützen Sie Ihre Augen mit Schutzbrillen.
Wenn Sie mit dem Gerät arbeiten tragen Sie stets
eine Schutzbrille und achten Sie darauf, dass auch
in Ihrer Umgebung Schutzbrillen getragen werden.
Es können Teile von Drahtstücken, Plastic oder
Nägeln, die nicht einwandfrei eingetrieben wurden,
in die Augen eindringen und das Augenlicht
zerstören.
Schutzbrillen sind in jedem Fachgeschäft erhätlich.
Tragen Sie stets einen Sicherheits-Augenschutz,
entweder eine Schutzbrille oder eine WeitwinkelSchutzmaske mit den vorgeschriebenen Gläsern.
Arbeitgeber sollten das Tragen von Augenschutz
immer vorschreiben.
6. Schützen Sie Ihre Ohren und Ihren Kopf.
Tragen Sie während des Nagelns Lärmschutz und
Sicherheitshelme. Abhängig von den Bedingungen
sollten auch Personen in der Umgebung Lärmschutz
und Sicherheitshelme tragen.
7. Achten Sie auf Personen, die in Ihrer Nähe arbeiten.
Es kann gefährlich werde wenn Nägel, die nicht
richtig eingetrieben wurden andere Personen
verletzen. Achten Sie aus diesem Grunde auf die
Sicherheit der Sie umgebenden Personen wenn
Sie dieses Gerät benutzen. Achten Sie darauf, dass
die Mündung des Gerätes nicht in die Nähe von
Personen, Händen oder Füssen kommt.

Deutsch
8. Richten Sie die Mündung des Gerätes nie gegen
Personen.
Es können schwere Unfälle entstehen, wenn Sie
das Gerät falsch entladen, während die Mündung
auf eine Person gerichtet ist. Achten Sie darauf,
dass die Mündung des Gerätes nie gegen eine
Person gerichtet ist, auch nicht gegen Sie selbst,
wenn Sie den Druckschlauch anschliessen,
abkuppeln, Nägel einlegen oder ähnliche Arbeiten
durchführen. Selbst wenn keine Nägel eingelegt
wurden ist es gefährlich, das Gerät zu entladen
während die Mündung gegen eine Person gerichtet
ist. Tun Sie dies also niemals.
9. Prüfen Sie die Auslösesicherung, bevor Sie das
Gerät benutzen.
Achten Sie darauf, dass die Auslösesicherung und
das Ventil richtig funktionieren, bevor Sie das Gerät
benutzen. Schliessen Sie den Schlauch an, ohne
dass sich Nägel im Gerät befinden und überprüfen
Sie folgendes: Tritt ein Arbeitsgeräusch auf, so zeigt
dies einen Fehler an. Benutzen Sie in diesem Fall
das Gerät nicht, bevor es inspiziert und repariert
wurde.
䡬 Wenn beim Betätigen des Abzugs nur das
Betriebsgeräusch der Bewegung der
Schraubendreherklinge auftritt, ist das
Elektrowerkzeug defekt.
䡬 Wenn beim Betätigen des Druckhebels gegen
das Material, das zu nageln ist, nur das Geräusch
der Bewegung der Schraubendreherklinge
auftritt, ist das Elektrowerkzeug defekt. Beachten
Sie weitere bezüglich des Druckhebels bitte, dass
dieser nicht modifiziert oder entfernt werden
darf.
10. Benutzen Sie ausschliesslich die vorgeschriebenen
Nägel.
Es dürfen ausschliesslich die in der Betriebsanleitung bezeichneten Befestigungsmittel
verarbeitet werden.
11. Schliessen Sie den Schlauch sorgfältig an.
Wenn Sie den Schlauch anschliessen und Nägel
einführen, beachten Sie folgende Punkte, damit das
Gerät nicht irrtümlich schiesst:
䡬 Berühren Sie auf keinen Fall den Auslöser.
䡬 Achten Sie darauf, dass die Mündung nicht mit
irgendeinem Gegenstand in Berührung kommt.
䡬 Halten Sie die Mündung nach unten gerichtet.
Beachten Sie unbedingt die obigen
Anweisungen und sorgen Sie dafür, dass sich
keine Körperteile, Hände oder Füsse vor der
Mündung des Gerätes befinden.
12. Berühren Sie niemals achtlos den Auslöser
Berühren Sie den Auslöser mit dem Finger nur
beim Nageln. Wenn Sie das Gerät tragen oder
jemandem überreichen während Sie den Finger
am Auslöser haben, können Sie unbeabsichtigt
einen Schuss auslösen und so einen Unfall
verursachen.
13. Schliessen Sie die Nagelführung fest zu und öffnen
Sie sie nicht während des Arbeitens.
Wenn Sie mit geöffneter Nagelführung nageln
werden die Nägel nicht in das Holz eingetrieben
und es besteht die Gefahr einer gefährlichen
Entladung.
14. Drücken Sie die Mündung fest gegen das zu
nagelnde Material.
Wenn Sie Nägel eintreiben, drücken Sie die
Mündung fest gegen das zu nagelnde Material.
Geschieht dies nicht sorgfältig, können die Nägel
zurückschlagen.
15. Halten Sie Hände und Füsse während des Arbeitens
von der Mündung entfernt.
Es ist sehr gefährlich, wenn ein Nagel durch einen
Fehler in die Hände oder Füsse eindringt.
16. Schützen Sie sich vor dem Rückschlag des Gerätes.
Nähern Sie sich während des Arbeitens nicht mit
dem Kopf oder anderen körperteilen dem Oberteil
des Gerätes. Dies ist gefährlich, da das Gerät heftig
zurückschlagen kann, wenn ein Nagel auf einen
vorher eingetriebenen oder auf einen Knoten im
Holz trifft.
17. Seien Sie vorsichtig beim Nageln von dünnen
Brettern oder Holzkanten.
Beim Nageln von dünnen Brettern können die Nägel
durchschlagen, wie dies auch beim Nageln von
Holzkanten durch Querschläger geschehen kann.
Achten Sie in solchen Fällen darauf, dass sich
niemand (auch keine Hände, Füsse etc.) hinter dem
Brett oder in der Nähe des Holzes, das Sie gerade
nageln befindet.
18. Gleichzeitiges Nageln auf beiden Seiten einer Wand
ist gefährlich.
Unter keinen Umständen darf auf beiden Seiten
derselben Wand gleichzeitig genagelt werden. Dies
wäre gefährlich, da die Nägel durch die Wand
schlagen könnten und so Verletzungen hervorrufen.
19. Verwenden Sie das Werkzeug nicht auf Leitern
und auf Gerüsten.
Das Werkzeug darf für bestimmte Anwendungen
nicht eingesetzt werden, wie z.B.:
– wenn das Wechseln von einer Eintreibstelle zur
anderen über Gerüste, Treppen, Leitern oder
leiterähnlichen Konstruktionen, wie z.B.:
Dachlattungen, erfolgt.
– das Schliessen von Kisten und Verschlägen,
– beim Anbringen von Transportsicherungen z. B.:
auf Fahrzeugen und Waggons
20. Klemmen Sie den Druckschlauch nicht ab, während
Sie den Finger am Auslöser halten.
Wenn Sie den Druckschlauch abklemmen, während
Sie den Finger am Auslöser halten besteht die
Gefahr, dass das Gerät beim nächsten Anschluss
sofort einen Schuss abgibt oder unkorrekt arbeitet.
21. Klemmen Sie den Druckschlauch ab und entnehmen
Sie aus dem Magazin sämtliche verbliebenen Nägel.
Klemmen sie den Druckschlauch ab und entfernen
Sie nach der Benutzung alle Nägel oder solche, die
die Funktion stören. Klemmen Sie den Schlauch ab
wenn Sie Teile ersetzen, eine verklemmten Nagel
entfernen oder das Gerät inspizieren.
Es ist sehr gefährlich, wenn ein Nagel durch einen
Fehler geschossen wird.
22. Klemmen Sie den Schlauch ab und lassen Sie die
Druckluft entweichen, bevor Sie einen
steckengebliebenen Nagel entfernen.
Bevor Sie einen in der Mündung verklemmten Nagel
entfernen beachten Sie, dass Sie den Druckschlauch
abklemmen und die Druckluft aus dem Gerät
entweichen lassen. Ein fälschlich abgeschossener
Nagel könnte sehr gefährlic sein.
14
Deutsch
23. Oeffnen Sie das Magazin nicht wenn dieses nach
unten gerichtet ist, um Unfälle durch herabfallende
Nägel zu vermeiden.
24. Schliessen Sie die Schnellkupplung (Air Socket)
nicht am Gerätekörper an.
Wenn die Schnellkupplung (Air Socket) direkt am
Gerätekörper angeschlossen wird, kann manchmal
die komprimierte Luft nicht entweichen wenn der
Schlauch abgeklemmt wird. Vermeiden Sie dies
aus diesem Grunde.
25. Nehmen Sie Die Staubkappe nicht ab.
Arbeiten Sie niemals mit dem Gerät ohne
Staubkappe, um die Gefahr von umherfliegenden
Teilen des Verbindungsdrahtes der Nägel, Plastik
oder der Nägel selbst zu vermeiden.
26. Montieren Sie beim Anbringen und Abnehmen der
Nasenkappe den Schlauch ab.
Montieren Sie beim Anbringen des Zubehörs
Nasenkappe an der Spitze des Druckhebels und
beim Abnehmen desselben unbedingt vorher den
Schlauch ab. Es besteht sonst große Gefahr, dass
irrtümlich ein Nagel abgefeuert wird.
SPEZIFIKATIONEN
Antrieb Kolben, druckluftgetrieben
Luftdruck 4,9 – 8,3 bar
Nägel siehe Abb.
Anzahl Nägel 200 – 300 Stück (1 Coil)
Geträteabmessungen 290 mm (L) × 300 mm (H) × 130 mm (W)
Gewicht 2,2 kg
Nagelführung Kolben, druckluftgetrieben
Schlauch (Inner-f) 7 mm
AUSWAHL DER NAGEL
Drahtverbundene Nägel und plastikverbundene Nägel
können mit diesem Werkzeug eingeschlagen werden. Wählen
Sie geeignete Nägel gem. Abb. Nägel, die nicht in Abb.
angegeben sind, können in diesem Gerät nciht verarbeitet
werden. Die Nägel sind magaziniert und aufgerollt.
Durch Draht verbundene Durch Folie verbundene
Nagelrollen Nagelrollen
Min. Max. Min. Max.
5,3 mm 6,4 mm 5,3 mm 6,4 mm
38 mm
65 mm
2,5 mm
Abb. Abmessungen
38 mm
57 mm
2,3 mm2,3 mm
2,5 mm
STANDARDZUBEHÖR
(1) Schutzbrille ................................................................. 1
SONDERZUBEHÖR
䡬 Teile für Einzelauslösung (Kode Nr. 887-916)
(Teilesatz für sequentielles Auslösen, Teile für
Einzelauslösung)
15
Mit den Teilen für sequentielle Auslösung wird der
Nagel nur durch Ziehen am Abzug nach
Herunterdrücken des Druckhebels eingetrieben.
Durch Installieren dieser Teile kann Eintreiben von
Nägeln an nicht angemessenen Positionen und
unerwartetes Abfeuern von Nägeln durch ungewollte
Betätigung des Druckhebels verhütet werden.
䡬 Gehäuse (Kode Nr. 880-517)
䡬 Nasenkappe (Kode Nr. 878-344)
䡬 Aufhängerteile (Kode Nr. 888-097)
ANWENDUNGEN
䡬 Verschalungen, Zäune, Dachunterlagsbahnen
䡬 Wand- und Dachverschalung
䡬 Bau von Wohnwagen und Häusern nach dem
Baukastensystem
䡬 Bau von Kosten und Paletten
HINWEIS
Nägel der Größe 2,5 mm × 64 mm können in einigen
Fällen abhängig vom Material nicht eingetrieben
werden. Führen Sie zur Überprüfung vor der
Verwendung versuchsweise Eintreiben einiger Nägel
durch.
VORBEREITUNGEN VOR GEBRAUCH
1. Bereiten Sie den Schlauch vor
Achten Sie darauf, dass der Schlauch einen
Innendurchmesser von min. 6 mm hat.
ACHTUNG
Die Luftdruckschläuche müssen einen
Mindestarbeitsdruck von 150 Prozent des
Maximumdrucks des Kompressorsystems haben,
jenachdem welcher von beiden höher ist.
2. Prüfen Sie die Sicherheit
ACHTUNG
䡬 Unbefugte Personen (insbes. Kinder) müssen von
dem Gerät ferngehalten werden.
䡬 Tragen Sie Schutzbrillen.

Deutsch
䡬 Prüfen Sie die Befestigungsschrauben, die den
Entlüftungsdeckel halten, etc. auf sicheren Sitz.
Untersuchen Sie das Gerät nach undichten Stellen
defekten oder rostigen Teilen.
䡬 Prüfen Sie, ob der Kontaktarm richtig arbeitet. Achten
Sie darauf, dass kein Schmutz an den beweglichen
Teilen des Kontaktarmes haftet.
䡬 Prüfen Sie nochmals die Funktionssicherheit.
VOR INBETRIEBNAHME
1. Prüfen Sie den Luftdruck
ACHTUNG
Der Luftdruck muss konstant zwischen 4,9 – 8,3 bar
gehalten werden.
Stellen Sie den Luftdruck entsprechend den
Abmessungen und Längen der Nägel sowie der Härte
des zu nagelnden Holzes swischen 4,9 und 8,3 bar
ein. Achten Sie besonders auf den Auslassdruck, die
Kapazität und den Anschluss am Kompressor, damit
der Druck das spezifizierte Limit nicht überschreitet.
Zu hoher Druck kann die generelle Leistung, die
Lebensdauer und die Sicherheit beeinträchtigen.
2. Oelen
(1) Bevor Sie mit dem Gerät arbeiten, bringen Sie ein
Air-Set zwischen dem Kompressor und dem Gerät
an. Regeln Sie den Oeler so, dass ein Tropfen Oel pro
5 – 10 Nagelzyklen zugegeben wird.
(2) Benutzen Sie das empfohlene Oel (SHELL TONNA).
Andere verwendbare Oele sind am Ende angegeben.
Mischen Sie niemals zwei oder mehrere verschiedene
Arten von Oel.
3. Laden der Nägel
(1) Halten Sie die Nagelführung und den Knopf mit Ihren
Fingern.
Drücken Sie den Knopf nach unten und schwenken
Sie die Nagelführung offen.
Öffnen Sie dann die Magazinabdeckung (Abb. 2).
(2) Stellen Sie die Position der Platte entsprechend der
Nagellänge ein (Abb. 3).
Die Nägel werden nicht glatt zugeführt, wenn der
Nagelhalter nicht korrekt eingestellt ist (Abb. 4).
a. Drehen Sie den Nagelhalter um etwa 90 Grad
gegen den Uhrzeigersinn.
b. Verschieben Sie ihn so weit wie möglich in
horizontaler Richtung. Heben oder senken Sie den
Nagelhalter, um Nägel verschiedener Länge zu
akzeptieren.
c. Stellen Sie die Platte entsprechend den
Bezugspunkten für die Nagellänge an der
Magazinabdeckung ein und drehen Sie den
Nagelhalter um 90 Grad im Uhrzeigersinn, bis er
hörbar einrastet.
(3) Legen Sie die Nagelrolle in das Magazin ein.
Wickeln Sie genug Nägel ab, um den Treiberkanal zu
erreichen (Abb. 5).
Beim Einsatz von Draht-verbundenen Nägeln
Setzen Sie den ersten Nagel in die Magazinöffnung,
den zweiten Nagel zwischen die beiden Klinken des
Zubringers ein.
Passen Sie den Nagelkopf in den Führungsschlitz ein
(Abb. 6).
Beim Einsatz von Folie-verbundenen Nägeln
Setzen Sie den ersten Nagel in die Magazinöffnung,
den zweiten Nagel zwischen die beiden Klinken des
Zubringers ein.
Passen Sie den Nagelkopf und die Oberseite der
Kunststofffolie in den Führungsschlitz ein.
Passen Sie die Unterseite der Kunststofffolie in den
Folien-Führungsschlitz ein (Abb. 7).
(4) Schließen Sie zuerst die Magazinabdeckung, und
schwenken Sie dann die Nagelführung zur
geschlossenen Position (Abb. 8).
(5) Verriegeln Sie den Knopf korrekt.
BEMERKUNG
Achten Sie darauf, die zusammengestellten Drähte
nicht zu verformen und die Nägel nicht von der
Führungsfläche zu lösen, da die Nagelführung sich
sonst nicht korrekt schließen lässt.
ACHTUNG
Um ein unbeabsichtliches Schiessen zu verhindern,
berühren Sie niemals den Auslöser und legen Sie nie
die Auslösesicherung auf die Werkbank oder auf den
Boden. Richten Sie nie die Mündung gegen eine
Person.
BEMERKUNG
Stellen Sie die Position des Andrucktellers
entsprechend der Länge der Nägel ein, bevor Sie
Nägel ins Magazin einlegen. Wird der Andruckteller
nicht eingestellt können die Nägel verklemmen oder
der Andruckteller beschädigt werden.
BEDIENUNGSANLEITUNG
ACHTUNG
䡬 Benutzen Sie niemals das Oberteil oder den Geräte-
Körper als Hammer.
䡬 Treffen Sie die nötigen Vorsichtsmassnahmen, um
die Sicherheit von Personen in der Nähe während
der Arbeiten zu gewährleisten.
1. Verschledene Arten des Nagelns
Dieser Hitachi-Nagler ist mit einem BetriebsmodusUmschalter ausgestattet.
Verwenden Sie je nach Art Ihrer Arbeit die
EINZELFOLGEAUSLÖSUNG oder die
KONTAKTAUSLÖSUNG.
(1) Unterbrochenes Nageln
Bringen Sie den Umschalter in die obere Position
(um die EINZELFOLGEAUSLÖSUNG zu wählen)
(Siehe Abb. 9).
Drücken Sie die Mündung gegen die gewünschte
Stelle; dann ziehen Sie den Auslöser. Ein Nagel wird
mit einem Schuss eingetrieben (Siehe Abb. 10).
Nach dem Einschlagen des ersten Nagels kann der
nächste erst eingeschlagen werden, wenn der
Auslöser zwischenzeitlich losgelassen wurde.
WARNUNG
Solange der Hebel gedrückt bleibt, wird bei jeder
Betätigung des Auslösers ein Nagel eingeschossen.
ACHTUNG
Wenn Sie den Auslöser nicht schnell und kräftig
ziehen, während auf Einzelschuß geschaltet ist,
springt der Nagler zurück und schießt mehrere Nägel
anstelle nur eines einzelnen aus. Um das zu
vermeiden, immer den Auslöser schnell und kräftig
ziehen.
16

Deutsch
(2) Auslösesicherung
Achten Sie darauf, dass beim Andrücken der
Mündung die Auslösesicherung völlig hochgedrückt
wird, um den Sicherheltsmechanismus zu lösen
(Siehe Abb. 10). Nur so ist garantiert, dass kein Nagel
ohne Lösen des Sicherheitsmechanismus
eingetrieben werden kann, auch wenn der Auslöser
gezogen ist.
(3) Kontinuierliches Nageln
Bringen Sie den Umschalter in die untere Position
(um die KONTAKTAUSLÖSUNG zu wählen) (Siehe
Abb. 11).
Ziehen Sie zunächst den Auslöser, Drücken Sie danach
das Gerät in die gewünschte Position um
kontinuierlich zu nageln (Siehe Abb. 12).
Die EINZELFOLGEAUSLÖSUNG wird dann verwendet,
wenn Befestigungselemente präzise gesetzt werden
sollen.
Die EINZELFOLGEAUSLÖSUNG birgt im Vergleich zur
KONTAKTAUSLÖSUNG eine geringere
Verletzungsgefahr für Sie und andere im Arbeitsbereich.
Der Grund hierfür ist, dass Sie bei
KONTAKTAUSLÖSUNG mit betätigtem Auslöser mit
dem Betätigungshebel gegen sich oder andere stoßen
und versehentlich einen Nagel einschießen könnten.
Die EINZELFOLGEAUSLÖSUNG kann auch die
Arbeitsgeschwindigkeit im Vergleich zu
KONTAKTAUSLÖSUNG herabsetzen. Die
EINZELFOLGEAUSLÖSUNG eignet sich vor allem für
ungeübte Benutzer.
ACHTUNG
䡬 Nageln Sie sorgfältig die Holzkanten. Bei
kontinuierlichem Nageln von Holzkanten kann ein
Nagel abrutschen oder durch die Kante brechen.
䡬 Treiben Sie keine Nägel auf andere Nägel.
䡬 Treiben Sie keine Nägel auf Metallteile.
BEMERKUNG
䡬 Vorsichtsmassnahmen gegen Leerschüsse
Gelegentlich wird weiter genagelt, obwohl alle Nägel
im Magazin verschossen sind.
Dies nennt man “Leerschüsse”. Leerschüsse können
den Dämpfer, das Magazin und die Nagelzuführung
zerstören. Ueberprüfen Sie deshalb von Zeit zu Zeit
die Anzahl der sich noch im Magazin befindlichen
Nägel, um Leerschüsse zu vermeiden. Nach
Benutzung des Gerätes sollen alle Nägel entnommen
werden.
䡬 Nach dem Nageln:
(1) Trennen Sie den Luftschlauch vom Nagler ab.
(2) Entfernen Sie alle Nägel aus dem Nagler.
(3) Geben Sie 5 bis 10 Tropfen Hitachi-Schmiermittel
für Pneumatikwerkzeuge in den Luftanschluss am
Nagler ein, und
(4) Öffnen Sie den Ablasshahn am
Luftkompressortank, um alle Feuchtigkeit
abzulassen.
䡬 Füllen Sie danach ca. 2 cc Oel in den Anschlussnippel
des Gerätes.
䡬 Bei niedrigen Temperaturen arbeitet das Gerät
manchmal nicht korrekt. Arbeiten Sie deshalb mit
dem Gerät immer in der geeigneten
Umgebungstemperatur.
17
2. Einstellen der Nageltiefe
ACHTUNG
Beim Einstellen der Nageltiefe den Finger vom
Auslöser lassen.
Beim Einstellen der Nageltiefe die Mündung nach
unten richten. Die Mündung immer vom Körper weg
richten, und auch niemals auf andere Personen zielen.
䡬 Einstellen des Einstellers (Abb. 13)
Einmal zur Probe nageln. Wenn die Nägel zu tief
eingeschlagen werden, den Einsteller zur flacheren
Seite hin drehen (
Wenn die Nägel zu flach eingeschlagen werden, den
Einsteller zur tieferen Seite hin drehen (
Markierung) (siehe Abb. 13, 14).
Mit jeder Umdrehung des Einstellers wird die
Nageltiefe um 1 mm geändert.
HINWEISE
䡬 Der Einsteler dreht sich beim Justieren nicht mehr
als 3 mm vom tiefsten Einschlagpunkt eines Nagels.
Drehen Sie den Einsteller niemals gewaltsam über
diesen Punkt hinaus.
䡬 Die Nageltiefe kann auch durch Ändern des Luftdrucks
verstellt werden. Diese Einstellung zusammen mit
der Bewegung des Einstellers vornehmen. Wenn
hoher Luftdruck verwendet wird, die nich dem
Einschlagwiderstand entspricht, wird die Lebensdauer
des Naglers verkürzt.
3. Ändern der Ausgaberichtung
Die Richtung der Abluftöffnung kann durch Drehen
der oberen Abdeckung geändert werden (Abb. 15).
4. Abschneiden der Folie
Ziehen Sie die ausgegebene Folie in Pfeilrichtung,
wenn Sie durch Folie verbundene Nagelrollen
verwenden (Abb. 16).
5. Benutzung der Nasenkappe
ACHTUNG
Montieren Sie den Schlauch von der Nagelmaschine
ab und lassen Sie zuerst die Druckluft ab, bevor Sie
die Nasenkappe installieren oder abnehmen, um zu
verhindern, dass ein Nagel zufällig ausgeworfen wird.
䡬 Bringen Sie die Nasenkappe an der Spitze des
Druckhebels an, wenn Sie die Oberfläche von Holz
usw. vor Kratzern schützen möchten.
(1) Anbringen und Abnehmen der Nasenkappe
Die Nasenkappe lässt sich anbringen, indem man sie
einfach in den Druckhebel hinein drückt.
Drücken Sie, bis der konvexe Teil in der Nasenkappe
in das Loch am Druckhebel eindringt. (Abb. 17)
Zum Abnehmen stecken Sie einen dünnen Stab, wie
etwa einen Schraubenzieher, in die Lücke an der
Rückseite des Druckhebels und ziehen Sie sie dann
heraus.
(2) Aufbewahrung der Nasenkappe
Geben Sie die abgenommene Nasenkappe in den Raum
hinter dem Magazin zum Aufbewahren (Abb. 18).
Markierung).
INSPEKTION UND WARTUNG
ACHTUNG
Klemmen Sie den Druckschlauch bei der Reinigung,
Inspektion und Wartung ab.
1. Massnahmen gegen das Verklemmen von Nägeln
(1) Nehmen Sie die Nägel aus dem Magazin und öffnen
Sie die Nagelführung. Führen Sie einen Stab in die
Mündung ein und schlagen Sie leicht mit dem
Hammer auf den Stab (Abb. 19).

Deutsch
(2) Entfernen Sie den verklemmten Nagel mit einem
flachen Schraubenzieher (Abb. 20).
(3) Kneifen Sie den defekten Teil des Verbindungsdrahtes
der Nägel ab, korrigieren Sie die Verformung des
Coils und führen Sie diesen wieder ins Magazin ein.
(4) Konsultieren Sie bei häufigem Verklemmen Ihren
Hitachi-Agenten, von dem Sie das Gerät gekauft
haben.
2. Prüfen Sie die Befestigungsschrauben für jedes Teil
Prüfen Sie in regelmässigen Abständen jedes Teil
nach lockeren Schrauben und undichten Stellen.
Ziehen Sie lockere Schrauben wieder an. Die
Benutzung des Gerätes mit nicht fest angezogenen
Schrauben bedeuter Gefahr.
3. Inspektion des Druckhebels
Überprüfen Sie, ob der Druckhebel glatt gleiten kann
(Abb. 21).
Reinigen Sie den Gleitbereich des Druckhebels und
verwenden Sie das mitgelieferte Öl für Schmierung
von Zeit zu Zeit. Schmierung ermöglicht glattes
Gleiten und dient gleichzeitig zur Rostverhütung.
4. Inspektion des Nagelschiebers
(1) Reinigen Sie von Zeit zu Zeit die gleitenden Teile des
Verschlusses und ölen Sie ihn ein (Siehe Abb. 22).
(2) Öffnen Sie die Nagelführung und entfernen Sie
Schmutz usw., wie in Abb. 23 gezeigt. Tragen Sie Öl
auf die Gleitnut von Zubringer und Welle auf. Drücken
Sie den Nagelstopper (A) und den Nagelstopper (B)
mit dem Finger, um sie auf glatte Bewegung zu
überprüfen.
(3) Ölen Sie auch die Gleitflächen der Nase und der
Nagelzuführung. Dies fördert eine reibungslose
Funktion und verhindert Korrosion.
ACHTUNG
Prüfen Sie vor Gebrauch die Leichtgängigkeit der
Nagelschieber und Stopper. Bei stockender
Bewegung können die Nägel in einem
unregelmässigen Winkel geschossen werden, was
Gefahr für den Arbeiter sowie für Umstehende
bedeutet.
5. Inspizieren des Magazins
Reinigen Sie das Magazin. Entfernen Sie Staub und
Holzspäne, die sich im Magazin angesammelt haben
können.
6. Aufbewahrung
䡬 Wenn das Gerät längere Zeit nicht verwendet werden
soll, so tragen Sie eine dünne Schicht Schmiermittel
auf die Stahlteile auf, um Rosten zu verhüten.
䡬 Lagern Sie den Nagler nicht in einer kalten Umgebung.
Bewahren Sie den Nagler in einem warmen Bereich
auf.
䡬 Wenn der Nagler nicht verwendet wird, sollte er an
einem warmen und trockenem Ort aufbewahrt
werden.
Halten Sie den Nagler außerhalb der Reichweite von
Kindern.
7. Liste der Wartungsteile
ACHTUNG
Reparatur, Modifikation und Inspektion von HitachiElektrowerkzeugen müssen durch ein autorisiertes
Hitachi-Kundendienstzentrum durchgeführt werden.
Dq=se Teileliste ist hilfreich, wenn sie dem
autorisierten Hitachi-Kundendienstzentrum
zusammen mit dem Werkzeug für Reparatur oder
Wartung ausgehändigt wird.
Bei Betrieb und Wartung von Elektrowerkzeugen
müssen die Sicherheitsvorschriften und Normen
beachtet werden.
MODIFIKATIONEN
Hitachi-Elektrowerkzeuge werden fortwährend
verbessert und modifiziert, um die neuesten
technischen Fortschritte einzubauen.
Dementsprechend ist es möglich, daß einige Teile
ohne vorherige Benachrichtigung geändert werden.
KOMPRESSOR
ACHTUNG
Wenn die maximale Arbeitsleistung des Kompressors
8,3 bar übersteigt, benutzen Sie ein Reduzier-Ventil
zwischem dem Kompressor und dem Gerät. Regeln
Sie anschliessend den Luftdruck innerhalb des
Arbeitsbereiches von 4,9 – 8,3 bar. Bei Installation
eines Air-Sets ist ein gleichzeitiges Oelen möglich,
eine zusätzliche Erleichterung.
ÖL-FILTER-REDUZIERVENTIL (Air Set)
Es ist empfehlenswert, ein Öl-Filter-Reduzierventil zu
benutzen, um optimale Bedingungen für eine lange
Labensdauer des Gerätes zu gewährleisten. Beschränken
Sie die Länge des Druckschlauches zwischen dem Gerät
und dem Air-Set auf 10 m max (Abb. 24).
ANWENDBARE SCHMIERMITTEL
Type Bezeichnung
Empfohlenes Öl SHELL TONNA
Motor-Öl SAE 10W, SAE 20W
Turbinen-Öl
Lärminformation
Lärmkennwerte entsprechend EN 792-13:
Typischer A-bewerterer Schallpegel für ein einzelnes
Ereignis:
Typischer A-bewerterer Schallpegel am Arbeitsplatz:
Messunsicherheit KpA: 2,5 dB (A)
Diese Werte sind mit dem Werkzeug zusammenhängende
Werte und stellen nicht die Lärmentwicklung am
Verwendungspunkt dar. Die Lärmentwicklung am
Arbeitsplatz hängt z.B. von der Arbeitsumgebung, dem
Werkstück, der Werkstückunterstützung, der Anzahl der
Nageleintreibungen usw. ab.
Abhängig von den Bedingungen am Arbeitsplatz und
der Form des Werkstücks müssen möglicherweise
individuelle Lärmverhütungsmaßnahmen durchgeführt
werden, z.B. Aufstellung des Werkstücks auf einer
schalldämpfenden Unterstützung, Verhüten von
Werkstückvibration durch Festklemmen oder Abdecken,
Einstellen auf den minimalen für den Betrieb
erforderlichen Luftdruck usw.
ISO VG32 ~ 68
(#90 ~ #180)
L
WA
,1s,d = 97 dB
L
pA
,1s,d = 84 dB
18

Deutsch
In besonderen Fällen ist das Tragen von Gehörschutz
erforderlich.
Vibrationsinformation
Typischer Vibrationskennwert entsprechend EN 792-13:
2
2,5 m/s
Messunsicherheit K = 1,5 m/s
Dieser Wert ist ein mit dem Werkzeug
zusammenhängender Wert und repräsentiert nicht den
Einfluß des Hand-Arm-Systems bei verwendung des
Werkzeugs. Der Einfluß auf das Hand-Arm-System bei
verwendung des Werkzeugs hängt z.B. von der Greifkraft,
der Kontaktdruckkraft, der Arbeitsrichtung, der
Einstellung der Energieversorgung, dem Werkstück und
der Werkstückunterstützung ab.
2
19

(Traduction des instructions d'origine)
Français
AVERTISSEMENTS GENERAUX
1. Utilisez l’appareil soigneusement et uniquement
pour les applications prévues dans ce manuel.
2. Employez l’appareil correctement afin d’assurer un
fonctionnement en sécurité.
Veuillez suivre les instructions du manuel et
employer l’appareil correctement. Tenez l’appareil
à l’écart des enfants et des personnes qui ne sont
pas au courant du bon fonctionnement.
3. Assurez la sécurité de l’atelier.
Tenez les personnes non-autorisées et spécialement
les enfants en dehors de l’atelier.
4. Les bonnes pièces sur les bonnes places.
Ne démontez ni les couvercles ni les vis puisqu’ils
ont leur fonction précise. En plus, n’effectuez pas
de modification à l’appareil et ne l’utilisez pas après
une modification.
5. Contrôlez l’appareil avant de l’utiliser.
Avant l’utilisation de l’appareil contrôlez toujours si
aucune pièce n’est cassée, si tous les vis sont serrés
et s’il n’y a pas de pièce qui manque ou qui est
rouillée.
6. Un travail continu excessif pourrait causer des
accidents.
N’employez l’appareil pas au-delà de ses capacités.
Un travail continu ne casue pas seulement des
dommages à l’appareil mais doit être considéré
comme danger en soi-même.
7. Arrêtez le travail immédiatement si vous remarquez
des anomalies.
Arrêtez le travail si vous remarquez des anomalies
ou si l’appareil ne fonctionne pas correctement;
faites-le inspecter et réparer.
8. Soignez bien le cloueur.
Si vous heurtez ou laissez tomber votre appareil,
des fissures ou d’autres dommages peuvent
apparaître. Veuillez donc faire parvenir les soins
nécessaires à votre cloueur. En plus, ne grattez ou
gravez pas de signes sur l’appareil. Vu que le cloueur
est destiné à un emploi sous haute pression, des
fissures dans la surface pourraient devenir
dangereuses.
N’utilisez l’appareil jamais si des fissures
apparaissent ou si l’air échappe par une fissure.
9. Des bons soins assureront une longue vie.
Prenez toujours des bons soins du cloueur et gardezle propre.
10. Des inspections régulières sont essentielles pour
garantir la sécurité.
Inspectez le cloueur à des intervalles réguliers afin
qu’il puisse être utilisé en sécurité et de façon
efficace à tout moment.
11. Faites réparer et changer les pièces par un agentservice autorisé.
Les réparations ne peuvent être effectuées que par
des personnes agréés par le producteur sous respect
des instructions indiquées dans le manuel de
manutention.
Pour des réparations n’utilisez que des pièces
d’origine Hitachi.
12. Gardez le cloueur dans un lieu adéquat.
S’il est hors usage, l’appareil doit être tenu dans un
lieu sec hors portée des enfants. Pour protéger
l’appareil contre la rouille, versez env. 2 cc d’huile
par le raccord du tuyau.
13. La vue éclatee contenue dans ce manuel
d’instructions doit être utilisée seulement dans un
centre de réparation agrée.
PRECAUTIONS A PRENDRE LORS DE
L’UTILISATION DU CLOUEUR
1. La manutention en sécurité est garantie par un
usage correcte.
Cet appareil a été construit pour enfoncer des clous
dans du bois ou des matériaux similaires. Utilisezle seulement pour les emplois désignés.
2. Assurez que la pression d’air soit endéans la gamme
nominale de pression d’air prévue.
Veuillez assurer que la pression d’air soit entre 4,9
bar~8,3 bar et que l’air utilisé soit propre et sec. Si
la pression d’air dépasse 8,3 bar, l’appareil peut
être endommagé et des conditions dangereuses
pourraient se produire. Les outils ne doivent pas
fonctionner à une pression supérieure à 14 bars.
3. N’utilisez jamais d’autres gaz haute-pression que
de l’air comprimé.
N’utilisez jamais du dioxide de carbone, de
l’oxygène ou d’autres gaz conditionés dans des
conteneurs sous pression.
4. Evitez les inflammations et les explosions.
Vu que des étincelles peuvent se produire, il est
dangereux d’utiliser l’appareil à proximité de laques,
de couleurs, d’essence, de dilutants, de fuel, de
gaz, de colles ou d’autres substances inflammables
similaires. Dans aucun cas, l’appareil ne doit être
utilisé proche de pareils produits inflammables.
5. Protégez vos yeux à l’aide de lunettes de sécurité.
Portez toujours des lunettes de sécurité si vous
utilisez l’appareil et assurez que les personnes qui
vous entourent en portent aussi. La possibilité que
des fragments du fil ou de plastique qui lie les clous
ou que des clous qui sont mal touchés
n’endommagent les yeux sont un danger pour la
vue. Vous trouvez des lunettes de sécurité dans
chaque quincaillerie. Portez toujours des lunettes
de sécurité ou un masque de sécurité si vous utilisez
le cloueur. Les employeurs doivent veiller à ce que
l’équipement de protection soit toujours porté.
6. Protégez vos oreillies.
Veuillez porter des oreillettes lors de chaque usage
du cloueur et veillez à ce que les personnes qui
vous entourent en portent aussi.
7. Faites attention aux personnes qui travaillent
proche de vous.
Des clous qui sont mal enfoncés représentent un
danger pour les personnes qui vous entourent.
Veillez toujours à ne pas trop rapprocher votre corps,
vos mains ou vos pieds du déclencheur.
8. Ne pointez jamais l’orifice de décharge en direction
d’une personne.
Si l’orifice de décharge est pointé en direction d’une
personne, des accidents sérieux peuvent se produire
si vous pressez la détente. En branchant ou
débranchant le tuyau, en chargeant les clous etc.,
évitez de pointer l’orifice de décharge en direction
d’une personne (vous-même inclus).
20

Français
9. Contrôlez le levier de détente avant d’utiliser le
cloueur.
Assurez-vous que le levier de détente et la soupape
fonctionnent correctement. Branchez le tuyau et
contrôlez les points suivants sans charger le cloueur.
Si le cloueur produit le même bruit que lorsque
vous enfoncez un clou, ceci indique qu’il fonctionne
mal et qu’il doit être inspecté et réparé.
䡬 Si le simple fait d’appuyer sur la gâchette
déclenche le bruit correspondant au mouvement
de la lame, l’outil électrique est défectueux.
䡬 Si le simple fait de pousser le levier-poussoir
contre le matériau à clouer déclenche le bruit
correspondant au mouvement de la lame, l’outil
électrique est probablement défectueux. Notez
que le levier-poussoir ne doit en aucun cas être
retiré ni modifié.
10. Utilisez seulement des clous spécifiés.
Utilisez exclusivement les produits de fixation
indiqués dans le manuel de manutention.
11. Soyez prudents en branchant le tuyau.
Pour assurer qu’aucun clou n’est tiré lorsque vous
branchez le tuyau ou chargez les clous,
䡬 ne touchez pas la détente
䡬 évitez de toucher l’orifice de décharge
䡬 pointez l’orifice de décharge vers le bas.
Respectez rigoureusement les instructions ci-dessus
et ne placez jamais vos mains, jambes ou toute
partie de votre corps en face de l’orifice de décharge.
12. Ne touchez pas imprudemment la détente.
Ne posez pas votre doigt sur la détente si vous ne
clouez pas. Si vous portez l’appareil ou si vous le
passez à une autre personne tout en gardant le
doigt sur la détente, vous pouvez causer un accident.
13. Fermez le support de guidage complètement et ne
l’ouvrez pas lors de l’usage.
Si vous essayez de clouer pendant que le support
de guidage est ouvert les clous ne seront pas
enfoncés dans le bois et vous risquez une décharge
dangereuse.
14. Pressez l’orifice de décharge fortement contre le
matériel à fixer.
En enfonçant des clous, pressez l’orifice de décharge
fortement contre le matériel à fixer. Si l’orifice est
mal-posé, les clous peuvent rebondir.
15. Tenez les mains et les pieds à l’écart de l’orifice de
décharge.
Si vous recevez par erreur un clou dans la main ou
le pied, cela pourrait être extrêmement dangereux
pour vous.
16. Evitez les contrecoups du cloueur.
Evitez d’approcher le haut du cloueur avec la tête
pendant que vous clouz. Ceci est dangereux puisque
l’appareil peut reculer violemment touchant un
ancien clou enfoncé ou un nœud dans le bois.
17. Soyez prudents en clouant des planches minces ou
les bords du bois.
En clouant des planches minces ou les bords du
bois, les clous peuvent passer à travers ou être
déviées. Dans ces cas, assurez-vous qu’il n’y a
personne derrière le panneau ou proche du bois
que vous êtes en train de clouer.
18. Il est dangereux de clouer simultanément sur les
deux côtés d’un mur.
Il faut absolument éviter de clouer en même temps
sur les deux côtés d’un mur puisque les clous
peuvent passer à travers et causer ainsi de blessures.
21
19. Ne pas utiliser l’outillage sur des échafaudages ou
des échelles.
Ne pas utiliser l’outil pour des applications
spécifiques, par exemple:
– lorsque le changement d’une position de clouage
fait intervenir l’utilisation d’échafaudages,
d’escaliers, d’échelles ou de toute autre
construction de type échelle, par ex. des lattes de
toit,
– la fermeture de boîtes ou de caisses
– la fixation de systèmes de sécurité, par ex. sur
des véhicules ou des wagons
20. Ne débranchez pas le tuyau à air en gardant le
doigt sur la détente.
Si vous débranchez le tuyau en gardant le doigt sur
la détente, vous risquez que l’appareil éjecte
spontanément un clou ou fonctionne mal lors du
prochain usage.
21. Débranchez le tuyau à air et sortez tous les clous
du chargeur après l’usage.
Débranchez le tuyau également pour remplacer des
pièces, pour nettoyer et inspecter l’appareil.
22. Si vous sortez un clou qui a été coincé dans
l’appareil, débranchez d’abord le tuyau et dégagez
l’air comprimé.
Avant de sortir un clou qui est coincé dans l’orifice
de décharge de l’appareil, débranchez le tuyau et
dégagez l’air comprimé à l’intérieur du cloueur.
23. Pour éviter les risques causés par des clous qui
tombent, n’ouvrez jamais le chargeur pour le
remplir en pointant l’ouverture vers le bas.
24. Ne branchez pas un raccord-rapide femelle
directement sur l’appareil.
Lorsqu’un raccord-rapide femelle est monté
directement sur l’appareil, l’air comprimé ne pourra
sortir lors du débranchement et un clou peut être
projeté si la détente est pressée.
25. Ne démontez pas le carter anti-projection.
Ne travaillez jamais lorsque le carter anti-projection
est démonté, de façon à éviter que du fil cassé ou
du plastique ou des clous mal-enfoncés ne soient
projetés.
26. A la fixation et au retrait du capuchon de museau,
déconnectez le flexible.
A la fixation du capuchon de museau accessoire à
l'extrémité du levier-poussoir, déconnectez bien
préalablement le flexible. Il serait très dangereux
qu'un clou soit projeté par erreur.

SPECIFICATIONS
Type Piston réciproque
Pression d’air 4,9 – 8,3 bar
Clous appliquables voir fig.
Nombre de clous 200 – 300 (1 coil)
Dimension/cloueur 290 mm (L) × 300 mm (H) × 130 mm (larg.)
Poids 2,2 kg
Méthode d’approvisionnement Piston réciproque
Tuyau (dia. int.) 7 mm
SELECTION DES CLOUS
On peut utiliser des clous embobinés sur fil ou sur ruban
plastique dans cet appareil.
Choisissez un clou parmi ceux de la fig. Des clous qui
n’apparaissent pas sur cette figure ne peuvent être utilisés
dans cet appareil.
Bobine de clous fixés Bobine de clous fixés
par fil par bande papier
Min. Max. Min. Max.
5,3 mm 6,4 mm 5,3 mm 6,4 mm
38 mm
65 mm
2,3 mm
2,5 mm
38 mm
57 mm
2,3 mm
2,5 mm
Dimensions
ACCESSOIRES STANDARDS
(1) Lunettes de sécurité ................................................... 1
ACCESSOIRES EN OPTION
䡬 Pièces pour clouage unique (code No. 887-916)
(ensemble de pièces pour clouage continu, pièces
pour clouage unique)
Avec les pièces pour déclenchement séquentiel, le
clou n’est enfoncé que lorsqu’on appuie sur la
gâchette après avoir appuyé sur le levier-poussoir.
L’installation de ces pièces permet d’éviter
l’enfoncement des clous en position incorrecte et le
déclenchement accidentel du clouage sous l’action
inopinée du levier-poussoir.
䡬 Mallette (code No. 880-517)
䡬 Capchon de bec (code No. 878-344)
䡬 Pièces pour suspension (code No. 888-097)
APPLICATIONS
䡬 Parements, clôtures, platelage
䡬 Coffrage de murs et de toitures
䡬 Construction de grandes caravanes et de maisons
modulaires
䡬 Construction de caisses en bois et de palettes
REMARQUE
Dans certains cas, en fonction du matériau utilisé, les
clous 2,5 mm × 64 mm ne peuvent pas être enfoncés.
Essayer d’enfoncer quelques clous pour vérifier le
fonctionnement avant d’utiliser l’appareil.
PREPARATIONS AVANT USAGE
1. Préparez le tuyau
Assurez-vous que le tuyau utilisé a un diamètre
intérieur minimal de 6 mm.
REMARQUE
Les tuyaux d’approvisionnement en air comprimé
doivent fournir une pression minimale de 12,8 bars
ou 150 pour cent de la pression maximale produite
dans le système d’approvisionnement en air, selon la
valeur la plus grande.
2. Veillez à la sécurité
ATTENTION
䡬 Des personnes non-autorisées (enfants inclus) doivet
être tenus à l’écart de l’équipement.
䡬 Portez une protection des yeux.
䡬 Contrôlez si le vis qui tient le chapeau d’aération est
bien serré.
Contrôlez s’il n’y a pas de fuite d’air ou de pièce
défectueuse.
䡬 Contrôlez si le levier-poussoir fonctionne
correctement et si aucune crotte s’est posée sur les
parties mobiles du bras.
䡬 Veillez à la sécurité opérationnelle.
AVANT USAGE
1. Contrôlez la pression de l’air
ATTENTION
La pression d’air doit constamment être maintenue à
4,9 – 8,3 bar en relation avec le diamètre et la longueur
du clou et la dûreté du bois utilisé. Veillez
spécialement à la pression nominale, à la capacité et
au tuyautage du compresseur de façon à ce que la
pression ne dépasse pas la limite indiquée. Notez
qu’une pression trop élevée peut porter préjudice à
la performance, à la durée de vie et à la sécurité du
cloueur.
2. Graissage
(1) Montez un filtre-régulateur-lubrificateur entre le
compresseur et le cloueur avant d’utiliser l’appareil.
Ceci permet une longue durée de vie et contribue à
l’anticorrosion.
Réglez le lubrificateur de façon à ce qu’il fournisse
une seule goutte d’huile tous les 5 à 10 clouages.
Français
22

Français
(2) Nous recommandons l’huile SHELL TONNA. Ne
mélangez jamais deux ou plusieurs types et marques
d’huile.
3. Chargement des clous
(1) Saisir le guide-clous et le bouton avec les doigts.
Pousser le bouton vers le bas et ouvrir le guide-clous.
Ouvrir le couvercle du magasin (Fig. 2).
(2) Régler la position de la platine en fonction de la
longueur des clous (Fig. 3).
L’alimentation des clous ne peut pas être régulière si
la platine n’est pas correctement réglée (Fig. 4).
a. Tourner le porte-clous d’environ 90 degrés dans
le sens contraire des aiguilles d’une montre.
b. Le faire glisser en position verticales autant que
possible.
Soulever ou abaisser le porte-clous pour accepter
différentes longueurs de clou.
c. Régler la platine en fonction des références de
longueur de clou du couvercle du magasin puis
tourner le porte-clous de 90 degrés dans le sens
des aiguilles d’une montre jusqu’à ce que l’on
entende un “clic”.
(3) Introduire la bobine de clous dans le magasin.
Dégager une longueur suffisante de clous pour
atteindre le perçage d’entraînement (Fig. 5).
Lors de l’utilisation de clous retenus par des fils
d’acier
Introduire le premier clou dans le perçage
d’entraînement et le deuxième clou entre les deux
doigts du chargeur.
Placer la tête du clou dans la fente de guidage (Fig. 6).
Lors de l’utilisation de clous retenus par une feuille
de plastique
Introduire le premier clou dans le perçage
d’entraînement et le deuxième clou entre les deux
doigts du chargeur.
Placer la tête du clou et la partie supérieure de la
feuille de plastique dans la fente de guidage.
Placer la partie inférieure de la feuille de plastique
dans la fente de guidage pour les feuilles de plastique
(Fig. 7).
(4) Fermer tout d’abord le couvercle du magasin puis le
guide-clous (Fig. 8).
(5) Verrouiller convenablement le bouton.
REMARQUE
Veiller à ne pas déformer les fils d’acier de liaison ni à
libérer les clous avec la surface de guidage.
Dans le cas contraire, en effet, le guide-clous ne se
fermerait pas correctement.
ATTENTION
Ne touchez pas la détente et ne placez le levier de
détente pas sur le banc de travail ou sur le sol. Ne pointez
l’orifice de décharge jamais en direction d’une personne.
REMARQUE
Avant de charger les clous dans le magasin, placez le
porte-clous en tenant compte de la longueur du clou.
Si vous ne placez pas correctement le porte-clous, un
enrayement risque de se produire. Si vous appuyez
sur le couvercle en forçant sans avoir réglé la position
du porte-clous, celui-ci risque de s’endommager.
23
COMMENT UTILISER LE CLOUEUR
ATTENTION
䡬 N’utilisez jamais la tête ou le corps de l’appareil
comme marteau.
䡬 Prenez soins des personnes qui vous entourent
lorsque vous clouez.
1. Différentes méthodes de clouer
Ce cloueur Hitachi est équipé d’un dispositif de
commutation de l’opération de clouage.
Utiliser le MÉCANISME DE DÉCLENCHEMENT
SÉQUENTIEL UNIQUE ou le MÉCANISME DE
DÉCLENCHEMENT PAR CONTACT en fonction du
travail à effectuer.
(1) Clouage interrompu
Régler le dispositif de commutation sur la position
relevée (pour le régler sur MÉCANISME DE
DÉCLENCHEMENT SÉQUENTIEL UNIQUE) (Voir
Fig. 9).
Pressez l’orifice de décharge sur le lieu désigné, puis
tirez la détente pour enfoncer le clou) (Voir Fig. 10).
Quand un clou est enfoncé, il n’est plus possible
d’enfoncer un autre clou tant que l’on n’a pas relâché
la gâchette et appuyé à nouveau.
AVERTISSEMENT
Un clou sera libéré chaque fois que la détente sera
enfoncée, en autant que le lever-poussoir demeure
enfoncé.
ATTENTION
Si vous ne tirez pas rapidement d’un cou sec sur la
détente quand vous utilisez le clouage unique, la
machine risque de rebondir et d’éjecter plusieurs
clous au lieu d’un seul. Pour éviter cet inconvénient,
appuyez rapidement, d’un coup sec sur la détente.
(2) Bras de contact
En pressant l’orifice de décharge vers le bas, assurezvous que le bras de contact est leve sufisamment
pour déclencher le verrou de sécurité (Voir Fig. 10).
Sinon, il sera impossible de clouer.
(3) Clouage continu
Régler le dispositif de commutation sur la position
complètement abaissée (pour le régler sur
MÉCANISME DE DÉCLENCHEMENT PAR CONTACT)
(Voir Fig. 11).
Tirez d’abbord la détente; puis placez l’orifice de
décharge sur le lieu désignéet clouez
automatiquement (Voir Fig. 12).
LE MÉCANISME DE DÉCLENCHEMENT SÉQUENTIEL
UNIQUE est utilisé lorsqu’un placement précis des
attaches est nécessaire.
Le MÉCANISME DE DÉCLENCHEMENT SÉQUENTIEL
UNIQUE peut réduire les risques de blessures physiques
pour l’opérateur et les autres personnes présentes sur
l’aire de travail par rapport au MÉCANISME DE
DÉCLENCHEMENT PAR CONTACT. En effet, il rique
moins d’enfoncer accidentellement un clou si l’on garde
le doigt sur la gâchette et qu’on appuie accidentellement
le levier-poussoir contre soi ou contre une autre
personne.
Le MÉCANISME DE DÉCLENCHEMENT SÉQUENTIEL
UNIQUE peut également réduire la vitesse de
fonctionnement par rapport au MÉCANISME DE
DÉCLENCHEMENT PAR CONTACT. Il est conseillé aux
opérateurs débutants d’utiliser LE MÉCANISME DE
DÉCLENCHEMENT SÉQUENTIEL UNIQUE.

Français
ATTENTION
䡬 Soyez prudents en clouant les bords. Lors du clouage
continu, un clou risque d’être dévié et de dépasser le
bois.
䡬 Ne pas enfoncer deux clous l’un sur l’autre.
䡬 Ne pas enfoncer de clous sur des pièces métalliques.
REMARQUES
䡬 Précautions àprendre lors du clouage àvide
Il peut arriver que le clouage continue après que le
magasin a été vidé. Ceci est appelé clouage à vide et
peut endommager lámortisseur, le magasin et le
poussoir de clous.
Pour éviter ceci, contrôlez le nombre de clous de
temps en temps. Sortez toujours les clous non-utilisés
si vous arrê tez le clouage.
䡬 Après le clouage :
(1) débrancher le tuyau d’air du cloueur ;
(2) sortir tous les clous du cloueur ;
(3) mettre 5 ou 10 gouttes d’huile de machine
pneumatique Hitachi dans le bouchon d’air du
cloueur ; et
(4) ouvrir le robinet de purge du réservoir du
compresseur d’air pour purger toute l’humidité.
䡬 Versez environ 2 cl d’huile par la prise d’air après
usage.
䡬 Si les températures extérieures sont trop basses, il se
peut que le cloueur fonctionne mal.
2. Réglage de la profondeur de la décharge
ATTENTION
Lors du réglage, retirer le doigt de la gâchette.
Lors du réglage, faites très attention que la sortie ne
se trouve pas dans la direction de votre propre corps
ou dans une trajectoire telle qu’une autre personne
pourrait être atteinte par la projection de clous.
䡬 Ajuster le régleur (Fig. 13).
Essai de décharge. Si les clous sont trop profonde,
tourner le régleur sur le côte “en superficie” (Repère
).
Si la décharge du clou n’est pas assez profonde,
tourner le régleur sur le côte “en profondeur” (Repère
) (Voir Fig. 13 et 14).
La profondeur change d’un millimètre avec chaque
rotation du régleur.
REMARQUES
䡬 Le régleur ne peut être tourné, lors de l’ajustement,
de plus de 3 mm du point d’enfoncement du clou le
plus profond. Ne tourner pas en forçant au-delà de ce
piont.
䡬 La profondeur de décharge des clous peut également
est réglée en changeant la pression de l’air. Le faire
tout en bougeant le régleur. Si vous utilisez une
pression d’air trop élevée ne correspondant pas à la
resistance de décharge, la durée d’utilisation du
cloueur sera réduite.
3. Modification de la direction de sortie
Il est possible de changer le sens de l’évent
d’échappement en tournant le couvercle supérieur
(Fig. 15).
4. Coupe de la bande papier
Déchirer la bande papier sortante dans la direction
de la flèche lors de l’utilisation de clous fixés par
bande papier (Fig. 16).
5. Comment utiliser le capuchon de museau
ATTENTION
Retirez le flexible du cloueur et libérez l'air comprimé
avant d'installer ou retirer le capuchon de museau
pour éviter une éjection accidentelle de clous.
䡬 Fixez le capuchon de museau sur le bout du levier-
poussoir quand vous souhaitez protéger la surface
du bois, etc. des rayures.
(1) Fixation et détachement du capuchon de museau
Le capuchon de museau peut se fixer simplement en
le pressant sur le levier-poussoir.
Appuyez dessus jusqu'à ce qu'une partie convexe
dans le capuchon de museau entre dans un trou du
levier-poussoir. (Fig. 17)
Pour le retrait, insérez une tige fine telle que tournevis
dans la fente à l'arrière du levier-poussoir, puis retirezle.
(2) Rangement du capuchon de museau
Placez le capuchon de museau dans l'espace à l'arrière
du magasin pour le ranger.(Fig.18)
INSPECTION ET MANUTENTION
ATTENTION
Débranchez toujours le tuyau d’air si vous nettoyez
ou inspectez le cloueur.
1. Mesures à prendre lors d’un enrayement
(1) Enlevez le coil du magasin, ouvrez le guidage de
clous et introduisez une tige dans l’orifice. Tapez
ensuite la tige à l’aide d’un marteau (Fig. 19).
(2) Enlevez le clou coincé à l’aide d’un tournevis à tête
tendue (Fig. 20).
(3) Coupez la partie défectueuse du fil qui lie les clous à
l’aide de cisailles, redressez la partie déformée et
rechargez le coil dans le magasin.
(4) En cas d’enrayements fréquents, consultez votre
agent-service autorisé.
2. Contrôlez les vis de fixation pour chaque pièce
Il faut contrôler régulièrement s’il n’y a pas de vis
desserrés ou de fuites d’air. Employer le cloueur
avec des vis desserrés peut causer des accidents.
3. Vérifier si le levier-poussoir glisse sans difficulté
Nettoyer la section coulissante du levier-poussoir et
la graisser de temps en temps avec l’huile de
graissage fournie (Fig. 21).
Le graissage permet de faciliter le coulissement en
même temps qu’il contribue à éviter la formation de
rouille.
4. Inspection du poussoir de pointes
(1) Nettoyez de temps en temps la partie mobile du
bouton, puis huilez (Voir Fig. 22).
(2) Ouvrez le guidage de clous et enlevez la poussière
etc (Voir Fig. 23).
Appliquez le lubrifiant sur la rainure de glissage du
poussoir de pointes et du goujon. Contrôlez les arrêts
de pointes (A) et (B) en les poussant légèrement avec
le doigt.
(3) Huilez aussi la surface du bec et du guidage de pointes
après le nettoyage. Ceci assurera un bon
fonctionnement et retardera la corrosion.
ATTENTION
Contrôlez le bon fonctionnement des poussoirs et
des arrêts de pointes avant l’usage. Sinon, les clous
peuvent être tirés dans des angles irréguliers et
présenter ainsi un danger pour l’opérateur ou les
personnes qui l’entourent.
5. Inspection du magasin
Nettoyer le magasin. Enlever la saleté ou les copeaux
de bois qui ont pu s’accumuler dans le magasin.
24

Français
6. Rangement
䡬 Quand on ne se sert pas de la cloueuse pendant une
durée prolongée, enduire les pièces en acier d’une
fine couche de graisse pour éviter qu’elles ne rouillent.
䡬 Ne pas ranger la cloueuse dans un environnement
froid. La laisser dans un endroit chaud.
䡬 Quand on ne se sert pas de la cloueuse, la ranger
dans un endroit chaud et sec.
Ranger hors de portée des enfants.
7. Liste des pièces de rechange
ATTENTION
Les réparations, modifications et inspections des
outils électriques Hitachi doivent être confiées à un
service après-vente Hitachi agréé.
Il sera utile de présenter cette liste de pièces au
service après-vente Hitachi agréé lorsqu’on apporte
un outil nécessitant des réparations ou tout autre
entretien.
Lors de l’utilisation et de l’entretien d’un outil
électrique, respecter les règlements et les normes de
sécurité en vigueur dans le pays en question.
MODIFICATIONS
Les outils électriques Hitachi sont constamment
améliorés et modifiés afin d’incorporer les tous
derniers progrès technologiques.
En conséquence, il est possible que certaines pièces
soient modifiées sans avis préalable.
COMPRESSEUR
ATTENTION
Si la pression maximale du compresseur à air dépasse
les 8,3 bar, il vous faut installer une valve réductrice
entre le compresseur et la cloueur. Puis, ajustez la
pression d’air entre 4,9 et 8,3 bar.
L’installation d’un filtre-régulateur-lubrificateur assure
un entretien permanent.
FILTRE-REGULATEUR-LUBRIFICATEUR
Afin d’assurer un fonctionnement optimal et une longue
durée de vie, il est conseillé d’installer un filtre-régulateurlubrificateur. Limitez la longueur du tuyau entre le filtrerégulateur-lubrificateur et le cloueur à 10 mètres (Fig. 24).
Information sur le bruit
Valeurs des caractéristiques de bruit conformément à EN
792-13:
Niveau type de puissance sonore de l’enfoncement
d’un clou, pondéré A
L
WA
, A,s,d = 97 dB
Niveau type de pression sonore d’émission de
l’enfoncement d’un clou, pondéré A, au poste de travail
L
pA
, A,s,d = 84 dB
Incertitude KpA: 2,5 dB (A)
87 Ces valeurs sont des valeurs caractéristiques relatives
à l’outil et elles ne représentent pas la génération de bruit
au point d’utilisation. La génération de bruit au point
d’utilisation pourra dépendre par exemple de
l’environnement de travail, de la pièce, du support de
pièce, du nombre d’opérations de clouage, etc.
Selon les conditions du lieu de travail et la forme de la
pièce, il faudra peut-être adopter des mesures individuelles
d’atténuation du bruit, par exemple en plaçant les pièces
sur des supports d’insonorisation, en supprimant la
vibration des pièces au moyen de serrage ou de
couvertures, en réglant l’outil à la pression d’air la plus
faible possible pour l’opération en question, etc.
Dans certains cas spéciaux, il faudra porter des protections
anti-bruit.
Information sur les vibrations
La valeur des caractéristiques de vibration type est
conforme à EN 792-13: 2,5 m/s
Incertitude K = 1,5 m/s
Cette valeur est une valeur caractéristique relative à l’outil
et elle ne représente pas l’influence sur le système main-
2
2
bras lors du fonctionnement de l’outil. L’influence sur le
système main-bras lors du fonctionnement de l’outil
pourra dépendre par exemple de la force de saisie, de la
force de la pression de contact, du sens de travail, du
réglage de l’alimentation énergétique, de la pièce et du
support de pièce.
LUBRIFIANTS AUTORISES
TYPE NOM
Huile recommandée SHELL TONNA
Huile moteur SAE 10 W, SAE 20 W
Huile turbine
25
ISO VG 32 ~ 68 (#90 ~ #180)

(Traduzione delle istruzioni originali)
Italiano
PRECAUZIONI GENERALI
1. Utilizzate l’utensile pneumatico in sicurezza e in
modo appropriato.
Non usatelo per scopi diversi da quelli specificati in
queste istruzioni.
2. Per un utilizzo in sicurezza, impugnate l’utensile
correttamente.
Seguite le istruzioni contenute in questo manuale e
impugnate correttamente questo utensile in modo
da operare in sicurezza. Non lasciate mai che
l’utensile venga usato da bambini o da persone che
non lo conoscono abbastanza per poterlo usare
correttamente, o che comunque non sono in grado
di usarlo.
3. Rendete sicuro il luogo di lavoro.
Tenete le persone non autorizzate lontane dal luogo
di lavoro. Specialmente i bambini dovrebbero
tenersi lontani.
4. I pezzi giusti al posto giusto.
Non rimuovete tappi o viti. Teneteli al loro posto
così che possano funzionare correttamente. Non
fate mai modifiche all’utensile perché potrebbe
essere molto pericoloso.
5. Controllate sempre l’utensile prima dell’uso.
Prima di utilizzare l’utensile, controllate sempre che
vi siano delle Parti rotte, che tutte le viti siano
completamente fissate, che non manchino dei pezzi
o che non siano arrugginiti.
6. Un eccessivo prolungamento del lavoro può causare
incidenti.
Non fate lavorare l’utensile e gli accessori oltre le
loro possibilità. Un eccessivo prolungamento del
lavoro potrebbe danneggiare non solo l’utensile,
ma anche voi stessi.
7. Fermate immediatamente le operazioni se accade
qualcosa di insolito.
o se l’utensile non lavora in modo appropriato;
fatelo controllare e fate fare la manutenzione.
8. Fate attenzione all’utensile dopo l’uso.
Se appoggiate o urtate l’utensile contro qualcosa, il
telaio esterno potrebbe essere deformato e rompersi
o potrebbe subire altri tipi di danni, quindi
maneggiatelo con cura. Non graffiate e non incidete
scritte sull’utensile. Lasciando l’aria ad alta
pressione all’interno dell’utensile, le spaccature sulla
superficie sarebbero pericolose. Non usate mai
l’utensile se si verifica una spaccatura o se l’aria
fuoriesce dalle spaccature.
9. Tenetelo con cura per una lunga durata.
Tenete sempre l’utensile in buone condizioni e
pulito.
10. L’ispezione a intervalli regolari è indispensabile ai
fini della sicurezza.
Controllate l’utensile a intervalli regolari in modo
che questo possa operare sempre in sicurezza ed
efficentemente.
11. Consultate un rivenditore autorizzato se dovete
fare delle riparazioni o delle sostituzioni di pezzi.
Assicuratevi che la manutenzione venga fatta solo
da un rivenditore autorizzato e che questo utilizzi
soltanto parti di ricambio originali.
12. Tenete l’utensile in un luogo appropriato.
Quando non lo usate, l’utensile dovrebbe essere
tenuto in un luogo sciutto e lontano dalla portata
dei bambini. Mettete nel serbatoio circa 2 cc di olio
attraverso il tubo in modo da proteggere l’utensile
dalla ruggine.
13. Gli esplosi per l’assemblaggio contenuti in queste
istruzioni devono essere usati solo da un centro
assistenza autorizzato.
PRECAUZIONI PER L’USO
1. Operazioni sicure grazie a un corretto uso
Questo utensile è stato progettato per inserire dei
chiodi nel legno e in altri materiali simili. Usatelo
solo a questo fine.
2. Assicuratevi che la pressione dell’aria si mantenga
entro la portata.
Fate attenzione a mantenere la pressione dell’aria
tra 4,9 bar e 8,3 bar, e che l’aria usata sia pulita e
asciutta.
Se la pressione dell’aria è maggiore di 8,3 bar, la
vita dell’utensile sarà più breve e si potrebbero
verificare condizioni pericolose.
L’utensile non deve essere connesso a una
pressione che potenzialmente eccede 14 bar.
3. Non usate l’equipaggiamento con gas in pressione
diversi dall’aria compressa.
Non utilizzate mai biossido di carbonio, ossigeno o
altri gas da contenitori pressurizzati.
4. Fate attenzione ad accensioni e ad esplosioni.
A causa delle scintille che potrebbero volare durante
le operazioni, è pericoloso usare questo utensile
vicino a lacca, vernice, benzina, solvente, gasolio,
gas, adesivi e altre sostanze infiammabili simili che
potrebbero infiammarsi ed esplodere. In nessuna
circostanza questo utensile può essere utilizzato in
prossimità di materiali infiammabili.
5. Indossate sempre una protezione per gli occhi
(occhiali di protezione).
Quando usate questo utensile, indossate sempre
gli occhiali di protezione, e assicuratevi che anche
le persone intorno li indossino.
La possibilità che frammenti di cavo o di plastica
che uniscono i chiodi o che chiodi non propriamente
inseriti colpiscano gli occhi è da prevedere. Gli
occhiali di protezione possono essere acquistati in
qualsiasi negozio di ferramenta. Indossateli sempre
durante l’uso dell’utensile. Usate gli occhiali di
protezione o la mascherina ad ampia visuale su
prescrizione.
L’utilizzatore dovrebbe sempre preoccuparsi di
utilizzarel’equipaggiamento di protezione.
6. Proteggete le vostre orecchie e la testa.
Quando siete impegnati nell’uso della chiodatrice,
indossate sempre le protezioni per orecchie e testa.
Inoltre, in base alla condizione, assicuratevi che
anche le persone intorno indossino il para orecchie
e la protezione per la testa.
7. Fate attenzione a quelli che lavorano vicino a voi.
Potrebbe essere molto pericoloso se i chiodi che
non sono stati correttamente inseriti colpiscono
altre persone. In ogni caso, fate sempre attenzione
alla sicurezza delle persone attorno a voi quando
state usando la chiodatrice. Assicuratevi che non ci
sia il corpo di qualcuno, mani o piedi vicino all’uscita
dei chiodi.
26

Italiano
8. Non puntate mai la chiodatrice in direzione delle
persone.
Tenete sempre chiusa la chiodatrice. Se l’apertura
è puntata in direzione di persone, potrebbero
verificarsi seri incidenti se per errore azionate la
chiodatrice.
Quando connettete e sconnettete il tubo, durante il
caricamento dell’utensile o altre operazioni,
assicuratevi che l’apertura della chiodatrice non sia
puntata in direzione di persone (inclusi voi stessi).
Se la chiodatrice non è caricata, è pericoloso
scaricare l’utensile mentre è puntato verso
qualcuno. Abbiate cura dell’utensile come uno
strumento di lavoro.
9. Prima di usare la chiodatrice, controllate la leva di
espulsione.
Prima di usare la chiodatrice assicuratevi di
controllare la leva di espulsione e che la valvola
funzioni correttamente. Senza chiodi caricati
nell’utensile, collegate il tubo dell’aria e controllate
ciò che segue.
Se dopo aver collegato il tubo l’utensile spara un
colpo, ciò indica un difetto, quindi non usate la
chiodatrice fino a quando questa non viene
controllata e riparata.
䡬 Se solamente tirando il grilletto si produce il
suono del movimento della lama di guida,
l’utensile elettrico è danneggiato.
䡬 Se solamente spingendo la leva di spinta contro
il materiale da chiodare si produce il suono del
movimento della lama di guida, l’utensile
elettrico è danneggiato. Tenere inoltre presente
che la leva di spinta non deve mai essere
modificata o rimossa.
10. Usate solo chiodi specifici.
Non usate mai chiodi diversi da quelli descritti in
queste istruzioni.
11. Fate attenzione quando connettete il tubo.
Quando connettete il tubo e caricate i chiodi, per
non sparare per errore.
Con la chiodatrice, fate attenzione a quanto segue.
䡬 Non toccate il grilletto.
䡬 Non lasciate che l’estremità della chiodatrice
tocchi alcuna superficie.
䡬 Tenete l’estremità della chiodatrice verso il
basso.
Seguite strettamente le istruzioni di cui sopra e
assicuratevi sempre che non vi sia alcuna parte
del vostro corpo o di quello di altre persone di
fronte all’apertura della chiodatrice.
12. Evitate di mettere il dito sul grilletto.
Non mettete il dito sul grilletto eccetto quando
dovete sparare i chiodi. Se porgete o consegnate
l’utensile a qualcuno mentre avete il vostro dito
appoggiato sul grilletto, potreste inavvertitamente
sparare un chiodo e causare un incidente.
13. Chiudete completamente la guida chiodi e non
apritela durante l’utilizzo.
Se provate a sparare i chiodi mentre la guida è
aperta, il chiodo non viene inserito dentro il legno,
e c’è il rischio di un pericoloso scarico del chiodo.
14. Premete con forza l’apertura della chiodatrice
contro il materiale interessato.
Quando guidate un chiodo, premete con forza
l’apertura dell’utensile contro il materiale da colpire.
Se l’apertura non è correttamente premuta, i chiodi
potrebbero rimbalzare.
27
15. Tenete le mani e i piedi lontani dalla testa
dell’utensile quando lo usate.
E’ molto pericoloso che la chiodatrice colpisca mani
o piedi per errore.
16. State attenti al contraccolpo.
Non avvicinatevi all’estremità dell’utensile con il
capo durante le operazioni. Sarebbe molto
pericoloso perché l’utensile potrebbe subire un
violento contraccolpo se il chiodo che state
guidando, entra in contatto con uno già inserito o
con un nodo del legno.
17. Usate molta cautela quando inchiodate assi sottili
o gli angoli del legno.
Quando inchiodate assi sottili, i chiodi potrebbero
trapassare, così come anche nel caso in cui dovete
inchiodare gli angoli del legno a causa della
deviazione dei chiodi. In questi casi assicuratevi
sempre che non vi sia nessuno nelle vicinanze dietro
l’asse o vicino al legno che dovete inchiodare.
18. La chiodatura simultanea da ambo le parti della
stessa parete è pericolosa.
In nessun caso la chiodatura dovrebbe essere fatta
allo stesso tempo sui due lati di una parete.
Questo potrebbe essere molto pericoloso perchè i
chiodi possono possono attraversare la parete e
causare seri incidenti.
19. Non usate l’utensile su impalcature o scale.
Questo utensile non dovrebbe essere usato per
applicazioni specifiche per esempio:
– quando il cambio di posizione comporta l’uso di
impalcature, scale;
– per chiudere scatole o gabbie
– per montare sistemi di sicurezza su mezzi di
trasporto come veicoli o vagoni.
20. Non sconnettete il tubo con le dita sul grilletto.
Se sconnettete il tubo con le dita appoggiate sul
grilletto, c’è il rischio che la volta successiva che
connette il tubo dell’aria, l’utensile spari un colpo o
funzioni scorrettamente.
21. Disconnettete il tubo e togliete qualsiasi chiodo
lasciato nel caricatore dopo l’uso.
Disconnettete l’utensile dall’aria prima di effettuare
la manutenzione, la pulizia da residui del materiale
che lega i chiodi, di lasciare l’area di lavoro, di
spostare l’utensile in un altro luogo, o dopo averlo
usato.
E’ molto pericoloso che un chiodo venga sparato
per errore.
22. Quando rimuovete un chiodo inceppato,
assicuratevi prima di tutto prima di tutto di
disconnettere il tubo e di rilasciare l’aria compressa
all’interno dell’utensile.
Lo sparo accidentale di un chiodo potrebbe essere
molto pericoloso.
23. Per evitare incidenti causati dalla caduta dei chiodi,
non aprite mai il caricatore tenendolo rivolto verso
il basso mentre caricate i chiodi.
24. Non usate mai un connettore aria femmina nel
corpo macchina.
Se nel corpo della chiodatrice è installata una spina
femmina, l’aria compressa può talvolta non essere
estratta quando il tubo è sconnesso, perciò evitate
questo.
L’utensile e il foro di uscita dell’aria devono avere
un attacco così che tutta la pressione sia rimossa
dall’utensile quando la giunzione è sconnessa.

Italiano
25. Non rimuovete il parapolvere
Non lavorate mai con il parapolvere rimosso per
evitare il rischio di danneggiamento al filo o al
sostegno in plastica dei chiodi o la mancata
emissione dei chiodi.
26. Quando si collega e scollega il tappo del naso,
scollegare il tubo dell'aria.
Quando si collega e si scollega il tappo del naso
alla punta della leva di spinta, assicurarsi di
scollegare prima il tubo dell'aria. Se un chiodo
viene erogato inavvertitamente può essere
estremamente pericoloso.
SPECIFICHE
Tipo di potenza Pistone alternativo
Pressione dell’aria 4,9 – 8,3 bar
Chiodi applicabili ref. Fig.
Quantità chiodi caricabili 200 – 300 chiodi (1 caricatore)
Misure 290 mm (L) × 300 mm (H) × 130 mm (W)
Peso 2,2 kg
Metodo di alimentazione Pistone alternativo
Foro (diametro interno) 7 mm
SELEZIONE DEI CHIODI
Chiodi collegati da filo o chiodi collegati da plastica
possono essere sparati con questo utensile.
Selezionare un chiodo adatto dalla figura. I chiodi che non
sono mostrati in figura non possono essere sparati con
questo utensile. I chiodi sono collegati e avvolti in rotolo.
Rotolo di chiodi fermati Rotolo di chiodi fermati
a filo a fascia
MIN. MASS. MIN. MASS.
5,3 mm 6,4 mm 5,3 mm 6,4 mm
38 mm
65 mm
2,5 mm
Dimensioni dei chiodi
38 mm
57 mm
2,3 mm2,3 mm
2,5 mm
ACCESSORI DI SERIE
(1) Protezione per gli occhi ............................................. 1
ACCESSORIO OPZIONALE
䡬 Ricambi sparo singolo (Codice N. 887-916)
(Set ricambi emissione sequenziale, Ricambi sparo
singolo)
Con i ricambi per l’emissione sequenziale, il chiodo
e sparato solo premendo il grilletto dopo aver
premuto la leva di emissione. Installando queste
parti, lo sparo di chiodi in posizioni scorrette e una
inaspettata espulsione di chiodi causata da
operazioni accidentali della leva di espulsione
possono essere evitati.
䡬 Custodia (Codice N. 880-517)
䡬 Cappuccio del muso (Codice N. 878-344)
䡬 Parti di aggancio (Codice N. 888-097)
APPLICAZIONI
䡬 Pannelli, steccati, pavimenti
䡬 Pareti e coperture da tetto
䡬 Case mobili e costruzione di case modulari
䡬 Costruzione di casse e pallet
NOTA
I chiodi da 2,5 mm × 64 mm non possono essere
infilati in alcuni casi, a seconda del materiale. Provare
prima a infilare alcuni chiodi per controllo prima
dell’uso.
PREPARAZIONE PRIMA DELL’UTILIZZO
1. Preparate il tubo
Assicuratevi di utilizzare un tubo con un diametro
interno di almeno 6 mm.
NOTA
I tubi dell’aria devono avere una pressione minima di
12,8 bar o 150 % della pressione massima prodotta
dal sistema dell’aria.
2. Controllate la sicurezza
CAUTELA
䡬 Le persone non autorizzate (inclusi i bambini) devono
essere tenute lontane dall’equipaggiamento.
䡬 Indossate la protezione per gli occhi.
䡬 Controllate che le viti che fissano il coperchio dello
scarico siano ben fissate.
Controllate che la chiodatrice non abbia perdite d’aria
o parti difettate o arrugginite.
䡬 Controllate se la leva tastatore lavora correttamente.
Controllate anche che non vi sia della polvere tra le
parti in movimento della leva tastatore.
䡬 Ricontrollate che le operazioni siano sicure.
28

Italiano
PRIMA DELL’USO
1. Controllate la pressione dell’aria
CAUTELA
La pressione dell’aria deve essere mantenuta
costantemente a 4,9 – 8,3 bar.
Regolate la pressione dell’aria tra 4,9 to 8,3 bar in
base al diametro e alla lunghezza dei chiodi e alla
consistenza del legno che dovete inchiodare. Prestate
particolare attenzione alla pressione in uscita, alla
capacità, ed ai tubi del compressore aria, in modo
che la pressione non superi il limite specificato. Notate
che un’eccessiva pressione potrebbe provocare una
diminuzione delle prestazioni, della durata della vita
dell’utensile e della sicurezza.
2. Lubrificazione
(1) Prima di utilizzare la chiodatrice, assicuratevi di
mettere un kit deumidificatore e lubrificatore tra il
compressore e la macchina.
La lubrificazione attraverso questo kit offre un utilizzo
scorrevole, di lunga durata, e protetto dal rischio di
corrosione.
Regolate l’oliatore in modo che una singola goccia di
olio sia fornita ad intervalli di 5 – 10 cicli di chiodatura.
(2) Vi preghiamo di usare l’olio raccomandato (SHELL
TONNA). Gli altri oli applicabili sono elencati. Non
mescolate mai due o più tipi di oli diversi.
3. Carico dei chiodi
(1) Afferrare la guida dei chiodi e la manopola con il dito.
Premere la manopola e aprire ruotando la guida dei
chiodi.
Aprire il coperchio del caricatore (Fig. 2).
(2) Regolare la posizione della piastra in base alla
lunghezza del chiodo (Fig. 3).
Il chiodo non avanza senza problemi se il portachiodi
non è regolato correttamente (Fig. 4).
a. Ruotare il portachiodi di circa 90 gradi in senso
antiorario.
b. Far scorrere in verticale fin quanto è possibile.
Sollevare o abbassare il portachiodi per accettare
chiodi di diversa lunghezza.
c. Regolare la piastra per farla corrispondere ai punti
di riferimento della lunghezza del chiodo sul
coperchio del caricatore e ruotare il portachiodi di
90 gradi in senso orario fino a sentire un “clic”.
(3) Inserire la bobina dei chiodi nel caricatore.
Srotolare abbastanza chiodi per raggiungere il foro
di alimentazione (Fig. 5).
Uso dei chiodi collegati da filo
Inserire il primo chiodo nel foro di guida e il secondo
chiodo tra i due denti dell’alimentatore.
Inserire la testa del chiodo nella fessure di guida
(Fig. 6).
Uso di chiodi collegati da plastica
Inserire il primo chiodo nel foro di guida e il secondo
chiodo tra i due denti dell’alimentatore.
Inserire la testa del chiodo e il lato superiore della
plastica nelle fessure di guida adeguate (Fig. 7).
(4) Chiudere prima il coperchio del caricatore, poi la
guida dei chiodi (Fig. 8).
(5) Fissare correttamente la manopola.
NOTA
Fare attenzione a non deformare i fili e a non
disinserire i chiodi con la superficie guida, altrimenti
la guida dei chiodi non si chiuderà correttamente.
29
CAUTELA
Per prevenire operazioni involontarie, non toccate
mai il grilletto e non appoggiate mai l’estremità finale
della leva di espulsione su un piano di lavoro o su un
pavimento. Inoltre non puntate mai il chiodo esterno
in direzione di persone.
NOTA
Prima di caricare i chiodi nel magazzino, posizionare
il portachiodi a seconda della loro lunghezza. Se la
posizione del portachiodi non viene regolata, la
macchina si inceppa. Se il coperchio viene chiuso a
forza senza regolare la posizione del portachiodi,
questo può subire danni.
COME USARE LA CHIODATRICE
CAUTELA
䡬 Non usate mai la testa o il corpo della chiodatrice
come martello.
䡬 Prendete le precauzioni per salvaguardare la sicurezza
delle persone nelle vicinanze delle operazioni.
1. Procedure per la chiodatur
Questa chiodatrice Hitachi è munita di un dispositivo
di commutazione per l’operazione di chiodatura.
Utilizzare il MECCANISMO DI COMANDO SINGOLO
IN SEQUENZA o IL MECCANISMO DI COMANDO A
CONTATTO in base al tipo di lavoro da eseguire.
(1) Chiodatura intermittente
Impostare il dispositivo di commutazione in posizione
ascendente (per impostare sul MECCANISMO DI
COMANDO SINGOLO IN SEQUENZA) (Vedere
Fig. 9).
Premete la chiodatrice nel punto desiderato; poi tirate
il grilletto per guidare il chiodo con un singolo sparo
(Vedere Fig. 10).
Dopo aver eseguito la chiodatura una volta, non sarà
più possibile eseguirla nuovamente finchè il grilletto
viene rilasciato e premuto nuovamente.
AVVERTENZA
Fintanto che la leva è premuta, un chiodo sarà sparato
ogni volta che è premuto il grilletto.
CAUTELA
Se non tirate il grilletto rapidamente e con decisione
nella modalità di singolo sparo, la chiodatrice
rimbalzerà e sparerà diversi chiodi invece che solo
uno. Per evitare questo, assicuratevi di tirare il grilletto
in modo rapido e deciso.
(2) Leva tastatore
Quando premete fuori il chiodo, assicuratevi di
sollevare la leva tastatore completamente (Vedere
Fig. 10) per rilasciare il blocco. In questo modo i
chiodi non possono essere guidati senza il rilascio
della leva di blocco.
(3) Chiodatura continua
Impostare il dispositivo di commutazione in posizione
discendente (per impostare sul MECCANISMO DI
COMANDO A CONTATTO) (Vedere Fig. 11).
Prima premete il grillatto. Poi abbassate il dispositivo
nella posizione desiderata per guidare
automaticamente i chiodi (Vedere Fig. 12).
Il MECCANISMO DI ATTIVAZIONE SINGOLA IN
SEQUENZA serve per le operazioni di precisione.
Il MECCANISMO DI ATTIVAZIONE SINGOLA IN
SEQUENZA, se paragonato al MECCANISMO DI
ATTIVAZIONE A CONTATTO, può ridurre il pericolo di
lesioni all’operatore ed ai presenti nell’area di lavoro.

Italiano
Questo perché non spara inavvertitamente i chiodi nel
caso il grilletto sia premuto e si eserciti una pressione
accidentale della leva.
Il MECCANISMO DI ATTIVAZIONE SINGOLA IN
SEQUENZA, se paragonato al MECCANISMO DI
ATTIVAZIONE A CONTATTO, può anche ridurre la
velocità operativa. Il MECCANISMO DI ATTIVAZIONE
SINGOLA IN SEQUENZA è raccomandato per gli utenti
inesperti.
CAUTELA
䡬 Operate con cura quando chiodate gli angoli dei
flessibili. Se effettuate una chiodatura continua degli
angoli di un flessibile, un chiodo può andare fuori
strada o sfondare l’angolo.
䡬 Non piantare un chiodo su un altro chiodo.
䡬 Non piantare un chiodo su parti metalliche.
NOTE
䡬 Precauzioni sul funzionamento a caricatore vuoto
A volte la chiodatura continua dopo che sono stati
sparati tutti i chiodi presenti nel contenitore.
Questo si chiama ìfunzionamento a caricatore vuotoî.
Tale operazione può danneggiare líammortizzatore,
il contenitore e líalimentatore chiodi.
Per evitare il funzionamento a caricatore vuoto,
controllare di tanto in tanto la quantità di chiodi
rimanenti. Díaltro canto, tutti i chiodi vanno rimossi
dopo líuso della chiodatrice.
䡬 Dopo l’inchiodatura:
(1) scollegare il tubo dell’aria dalla chiodatrice;
(2) togliere tutti i chiodi dalla chiodatrice;
(3) applicare 5-10 gocce di lubrificante Hitachi per
utensili pneumatici nella presa dell’aria della
chiodatrice e
(4) aprire il rubinetto di spurgo del serbatoio del
compressore ad aria per eliminare l’umidità.
䡬 Dopo aver completato l’operazione, mettete circa 2cc
di olio all’interno dell’utensile attraverso il tubo per
proteggere l’utensile dalla ruggine.
䡬 In condizioni di basse temperature, l’utensile talvolta
non opera in modo corretto. Usatelo sempre in
ambienti con appropriate temperature.
2. Regolazione della profondità di chiodatura
CAUTELA
Quando effettuate una regolazione, assicuratevi di
rimuovere il vostro dito dal grilletto. Quando effettuate
delle regolazioni, assicuratevi che l’apertura della
chiodatrice non sia rivolta verso dell’apertura della
chiodatrice.
䡬 Regolazione del regolatore (Fig. 13)
Effettuate un test come prova. Si i chiodi sono troppo
profondi, girate il regolatore nel lato poco profondo
indicato).
(
Se invece la profondità del chiodo non è sufficiente,
girate il regolatore nel lato più profondo ( indicato)
(Vedi Fig. 13, 14).
La profondità viene cambiata di 1mm per ogni
rotazione del regolatore.
NOTA
䡬 Quando regolate il regolatore, non dovete ruotare
più di 3 mm dal punto più profondo dove il chiodo va
giù. Non ruotate il regolatore con forza oltre quel
punto.
䡬 La profondità di chiodatura può anche essere regolata
cambiando la pressione dell’aria usata. Eseguite ciò
insieme con lo spostamento del regolatore. Usando
un’alta pressione non indirizzata esattamente nel foro
di uscita dei chiodi, sarà accorciata la vita della
chiodatrice.
3. Cambio della direzione di espulsione
La direzione del foro può essere cambiato entro i 360
gradi girando il coperchio (Fig. 15).
4. Taglio della fascia
Strappare la fascia fuoriuscita nella direzione della
freccia quando si usano chiodi fermati a fascia
(Fig. 16).
5. Come utilizzare il tappo del naso
ATTENZIONE
Rimuovere la manica dalla chiodatrice e rilasciare
l'aria compressa prima di installare o rimuovere il
tappo del naso per impedire espulsione accidentale
di chiodi.
䡬 Fissare il tappo del naso sulla punta della leva di
spinta quando si desidera proteggere la superficie di
legno, ecc. da graffi.
(1) Fissaggio e scollegamento del tappo del naso
Il tappo del naso può essere fissato premendolo
semplicemente nella leva di spinta.
Premerlo fino a quando una parte convessa all'interno
del tappo del naso entra in un foro della leva di spinta
(Fig.17).
Per la rimozione, inserire un'asta sottile come un
avvitatore nello spazio sulla parte posteriore della
leva di spinta e poi estrarla.
(2) Custodia del tappo del naso
Mettere il tappo del naso rimosso in uno spazio dietro
al contenitore per custodirlo (Fig.18).
CONTROLLI E MANUTENZIONE
CAUTELA
Assicuratevi di disconnettere il tubo durante le
operazioni di controllo, manutenzione e pulizia.
1. Contromisure per l’inceppamento dei chiodi
(1) Rimuovete la bobina dal caricatore, aprite la guida
chiodi, inserite un perno nel foro e battetelo con un
martello (Fig. 19).
(2) Rimuovete il chiodo inceppato con un cacciavite
(Fig. 20).
(3) Tagliate la parte difettata di acciaio che collega i
chiodi con la tenaglia, correggete la deformazione,
poi caricate il chiodo nella nel caricatore.
(4) In caso di frequenti inceppamenti, consultate il
Servizio Autorizzato Agenti dal quale avete comprato
la chiodatrice.
2. Controllate le viti di montaggio
A intervalli regolari controllate che ogni parte non
abbia le viti di montaggio allentate e che non ci siano
perdite d’aria. Fissate qualsiasi vite allentata.
Utilizzando l’equipaggiamento con le viti allentate
potreste incorrere in un incidente.
3. Controllo della leva di espulsione
Controllate che la leva di espulsione scorra agilmente
(Fig. 21). Pulite l’area di slittamento di questa leva e
usate l’olio appropriato per lubrificare di tanto in
tanto. La lubrificazione permette un servizio scorrevole
e simultaneo in modo da prevenire la formazione di
ruggine.
30

Italiano
4. Ispezione dell’alimentatore
(1) Occasionalmente pulite la parte slittante della
manopola e poi applicate l’olio raccomandato (Vedi
Fig. 22).
(2) Aprite la guida chiodo e rimuovete polvere, ecc.,
come mostrato in Fig. 23. Applicate del lubrificante
sulla scanalatura di scorrimento dell’alimentatore e
dell’albero. Verificare che il fermo del chiodo (A) e il
fermo del chiodo (B) scorrano regolarmente
premendoli con le dita.
(3) Inoltre, applicate l’olio raccomandato alla superficie
di alimentazione della punta e nella guida chiodo
dopo la pulizia. Questo favorisce la scorrevolezza
delle operazioni e ritarda la corrosione.
CAUTELA
Controllate che i movimenti dell’alimentatore e del
blocco siano scorrevoli prima dell’uso. Se il
movimento è diseguale, i chiodi potrebbero uscire
con un angolo irregolare, diventando un pericolo per
l’operatore e per le persone vicine.
5. Controllo del caricatore
Pulite il caricatore. Rimuovete i residui delle schegge
di legno che potrebbero essersi accumulate nel
caricatore.
6. Stoccaggio
䡬 Se non usate la chiodatrice per un lungo periodo,
applicate una piccola quantità di lubrificante sulle
parti in acciaio per evitare che si arrugginiscano.
䡬 Non stoccate la chiodatrice in condizioni ambientali
fredde.
Tenetela in un luogo caldo.
䡬 Se non viene usata, la chiodatrice dovrebbe essere
stoccata in un luogo caldo e secco.
Tenere fuori dalla portata dei bambini.
7. Lista dei pezzi di ricambio
CAUTELA
Riparazioni, modifiche e ispezioni di utensili elettrici
Hitachi devono essere eseguite da un centro
assistenza Hitachi autorizzato.
Questa lista dei pezzi torna utile se viene presentata
con l’utensile al centro assistenza Hitachi autorizzato
quando si richiedono riparazioni o altri interventi di
manutenzione.
Nell’uso e nella manutenzione degli utensili elettrici
devono essere osservate le normative di sicurezza e i
criteri prescritti in ciascun paese.
MODIFICHE
Gli utensili elettrici Hitachi vengono continuamente
migliorati e modificati per includere le più recenti
innovazioni tecnologiche.
Di conseguenza, alcuni pezzi possono essere
modificati senza preavviso.
COMPRESSORE
CAUTELA
Quando il massimo della pressione del compressore
aria eccede 8,3 bar, assicuratevi di applicare una
valvola riduttore tra il compressore aria e la
chiodatrice. Poi, regolate la pressione dell’aria tra 4,9
e 8,3 bar. Se installate un set aria sarà possibile
anche la lubrificazione. Provvedete così ad
incrementare la convenienza.
OLIATORE-FILTRO-VALVOLA DI RIDUZIONE
(Set aria)
Con una estesa durata della vita, è necessario usare un
set aria. Limitate la lunghezza del tubo tra l’unità e il set
aria entro 10 mt. durante L’uso (Fig. 24).
LUBRIFICANTI UTILIZZABILI
Tipo di lubrificante Nome del lubrificante
Olio raccomandato SHELL TONNA
Olio motore SAE 10W, SAE 20W
Olio turbina ISO VG32 ~ 68 (#90 ~ #180)
Informazioni sul rumore
Le caratteristiche del rumore sono valutate in accordo
con EN 792-13:
Livello di potenza acustica per singolo colpo (tipo A)
Livello di pressione acustica per singolo colpo (tipo A)
alla stazione di lavoro
KpA incertezza: 2,5 dB (A)
Questi valori rappresentano i valori caratteristici
dell’utensile e non il rumore che si sviluppa durante
l’utilizzo.
Il rumore che si sviluppa durante l’uso dipende ad
esempio dall’ambiente di lavoro, dal supporto e dal
numero di operazioni.
Dipendono dalle condizioni dell’ambiente di lavoro e dai
pezzi da lavorare, le misure individuali di attenuazione
del rumore che potrebbe essere necessario eseguire,
come disporre i pezzi da lavorare su dei supporti scaricavibrazioni, in modo da prevenire le vibrazioni del pezzo
tramite un fissaggio o una copertura, regolando il minimo
della pressione dell’aria richiesta per le operazioni
complesse, ecc.
In casi speciali è necessario indossare l’equipaggiamento
di protezione per l’udito.
Informazioni sulle vibrazioni
I tipi di vibrazioni caratteristiche sono valutate in accordo
con il EN 792-13: 2,5 m/s
Incertezza K = 1,5 m/s
2
2
Questi valori rappresentano i valori caratteristici
dell’utensile e non considerano l’influenza del sistema
mani-braccia durante l’uso.
L’influenza del sistema mani-braccia durante l’utilizzo,
dipende per esempio dalla forza con cui afferrate
l’utensile, dalla pressione che applicate, dalla direzione
del lavoro, dalla regolazione dell’energia applicata, dal
pezzo da lavorare e dal supporto utilizzato.
L
WA
,1s,d = 97 dB.
L
pA
,1s,d = 84 dB.
31

(Vertaling van de oorspronkelijke aanwijzingen)
Nederlands
ALGEMENE VOORZORGEN VOOR HET
GEBRUIK
1. Gebruik dit pneumatisch gereedschap op een veilige
manier en alleen voor geëiende doelen.
Gebruik dit pneumatisch gereedschap niet voor
andere doelen dan die in deze instructies
gespecificeerd zijn.
2. Ga op juiste en veilige wijze om met dit
pneumatisch gereedschap.
Volgt u alstublieft de instructies in deze handleiding
zorgvuldig op en hanteer dit pneumatisch
gereedschap op de correcte manier om zorg te
dragen voor uw en andermans veiligheid. Laat het
pneumatisch gereedschap nooit in handen van
kinderen komen of mensen die er niet genoeg van
weten om er verantwoord mee om te kunnen gaan,
of anderszins niet in staat zijn om het pneumatisch
gereedschap op de juiste wijze te hanteren.
3. Verzeker u ervan dat het pneumatisch gereedschap
gebruikt wordt in een veilige werkomgeving.
Houd onbevoegden weg van de werkplaats. In het
bijzonder behoren kinderen weggehouden te
worden van de werkplaats.
4. De juiste onderdelen op de juiste plaats.
Probeer niet een van de deksels of schroeven te
verwijderen. Elk onderdeel heeft zijn eigen functie,
dus laat alles op zijn plaats. Probeer bovendien
nooit op eigen houtje veranderingen aan het
apparaat aan te brengen, of het na zelf gefabriekte
modificaties nog te gebruiken.
5. Controleer het pneumatisch gereedschap grondig
voor u het gaat gebruiken.
Controleer voor gebruik altijd of er geen onderdelen
ontbreken of gebroken, geroest of versleten zijn en
of alle schroeven stevig op hun plaats zitten.
6. Grenzen overschrijden kan tot ongelukken leiden.
Verg niet het uiterste van het pneumatisch
gereedschap. Er zijn grenzen aan wat u ermee kunt
doen. Als u teveel probeert te doen kunt u niet
alleen het pneumatisch gereedschap beschadigen,
maar loopt u zelf ook risico.
7. Stop het werken met het pneumatisch gereedschap
onmiddellijk als u iets abnormaals opmerkt.
Stop het werken met het apparaat direct als u iets
abnormaals waarneemt, of wanneer het
pneumatisch gereedschap niet naar behoren
functioneert; laat het pneumatisch gereedschap
nakijken en eventueel repareren.
8. Zorg goed voor uw pneumatisch gereedschap.
Als u het apparaat laat vallen, of het tegen dingen
stoot, kan het buitenframe vervormd raken en
kunnen er barsten of andere vormen van schade
optreden, dus wees alstublieft voorzichtig. Graveer
of kras ook geen tekens op het pneumatisch
gereedschap. Vanwege de hoge luchtdruk in het
binnenste van het apparaat, kunnen barstjes in de
buitenkant zeer gevaarlijk zijn. Gebruik het
pneumatisch gereedschap nooit als zich een barst
vormt, of wanneer lucht ontsnapt via een barst.
9. Goede zorgen verlengen de levensduur.
Houd uw pneumatisch gereedschap mooi schoon
en zorg er goed voor.
10. Regelmatige inspectie is essentieel voor de
veiligheid.
Kijk het apparaat regelmatig na zodat het
pneumatisch gereedschap altijd veilig en doelmatig
functioneert.
11. Raadpleeg een officiële servicemonteur wanneer
reparatie of vervanging van onderdelen
noodzakelijk zijn.
Let er op dat het pneumatisch gereedschap alleen
door een erkende vakman wordt nagezien en
gerepareerd en dat alleen officiële identieke
vervangingsonderdelen worden gebruikt.
12. Bewaar het pneumatisch gereedschap op een
geschikte plaats.
Wanneer u het apparaat niet gebruikt, dient u het te
bewaren op een droge plaats die onbereikbaar is
voor kinderen. Om het pneumatisch gereedschap
tegen roest te beschermen, kunt u 2 cc olie in de
behuizing doen via de slang-aansluiting.
13. De opengewerkte montagetekening in deze
handleiding is alleen bedoeld voor erkend service
personeel.
VOORZORGEN VOOR HET GEBRUIK VAN HET
SPIJKERAPPARAAT
1. Veiligheid door correct gebruik.
Dit pneumatisch gereedschap is ontworpen om
spijkers in hout en vergelijkbare materialen te
drijven. Gebruik het apparaat alleen voor dit doel.
2. Let er op dat de luchtdruk binnen het opgegeven
bereik voor dit apparaat valt.
Let u er alstublieft op dat de luchtdruk binnen een
bereik van 4,9 bar - 8,3 bar (70 - 120 psi.)blijft en dat
de gebruikte lucht schoon en droog is. Een luchtdruk
hoger dan 8,3 bar (120 psi.) zal de levensduur van
het apparaat bekorten en kan gevaarlijke situaties
opleveren. Sluit het pneumatisch gereedschap nooit
aan op een luchtdruk van mogelijk meer dan14 bar
(200psi.).
3. Gebruik het pneumatisch gereedschap nooit met
andere gassen onder hoge druk dan
gecomprimeerde lucht.
Gebruik nooit en te nimmer, onder welke
omstandigheden dan ook kooldioxide, zuurstof of
andere gassen uit drukflessen o.i.d.
4. Wees beducht voor ontsteking- en
ontploffingsgevaar.
Omdat tijdens het spijkeren vonken geslagen
kunnen worden, is het gevaarlijk om dit pneumatisch
gereedschap te gebruiken in de buurt van lak, verf,
benzine, thinner, gasolie, gas, lijmsoorten, en
vergelijkbaar ontvlambare materialen die door de
vonken zouden kunnen ontvlammen of exploderen.
Onder geen enkele voorwaarde mag dit
pneumatisch gereedschap daarom gebruikt worden
in de nabijheid van dergelijke ontvlambare
materialen.
5. Draag altijd uw oogbescherming (veiligheidsbril)
Draag altijd uw oogbescherming wanneer u met dit
pneumatisch gereedschap werkt, en zorg ervoor
dat de mensen in uw omgeving hetzelfde doen. De
mogelijkheid dat rondvliegende stukjes van het
draad of het plastic dat de spijkers vasthoudt, of
spijkers die niet goed geraakt werden in uw oog
terechtkomen is een bedreiging voor uw
gezichtsvermogen. Oogbescherming is verkrijgbaar
32

Nederlands
in elke gereedschapswinkel. Draag altijd een vorm
van oogbescherming wanneer u met dit apparaat
werkt. Er zijn speciale maskers of veiligheidsbrillen
die over uw bril passen.
Werkgevers behoren er op toe te zien dat
oogbescherming gedragen wordt op de werkplek.
6. Bescherm uw hoofd en uw oren.
Draagt u alstublieft een helm en oorbeschermers
als u spijkerwerk doet. Let u er ook op dat de mensen
rondom u, afhankelijk van de omstandigheden, hun
helmen en oorbeschermers dragen.
7. Let op de mensen die dicht bij u werken.
Het zou bijzonder gevaarlijk kunnen zijn als spijkers
die niet goed ingeslagen zijn anderen zouden
kunnen raken. Let daarom ook altijd op de veiligheid
van de mensen rondom u wanneer u met dit
pneumatisch gereedschap werkt. Let er altijd op
dat er niet iemands lichaam, hand of voet dichtbij
de spijker-uitgang is.
8. Richt het spijkerapparaat nooit op iemand.
Ga er altijd van uit dat het apparaat geladen is. Als
u het apparaat op iemand richt kunt u ernstige
ongelukken veroorzaken wanneer u per abuis het
apparaat aan zet. Let er goed op dat het apparaat
niet op iemand (inclusief uzelf...) gericht is terwijl u
de slang aan- of afkoppelt, terwijl u spijkers in het
apparaat laadt, of gedurende soortgelijke
handelingen. Zelfs wanneer er geen spijkers in het
apparaat zitten is het gevaarlijk om het af te doen
gaan terwijl het in de richting van een persoon
wijst, dus probeer dat niet. Geen geintjes. Heb
respect en ontzag voor het gereedschap waar u
mee werkt.
9. Controleer de veiligheidshendel voor u het
pneumatisch gereedschap gaat gebruiken.
Voor u het pneumatisch gereedschap gaat
gebruiken moet u controleren of de
veiligheidshendel en de afsluiter goed functioneren.
Sluit de slang aan op het apparaat en controleer het
volgende zonder dat er spijkers in het apparaat
geladen zijn. Als het apparaat klinkt alsof het werkt,
dan is dat een teken dat er iets fout is en dat u het
pneumatisch gereedschap dus niet kunt gebruiken
tot het nagekeken en eventueel gerepareerd is.
䡬 Als u bij enkel trekken aan de trekker het
werkingsgeluid van het het aandrijfblad hoort,
is het pneumatisch gereedschap defect.
䡬 Als u bij enkel drukken van de veiligheidshendel
tegen het materiaal het werkingsgeluid van het
het aandrijfblad hoort, is het pneumatisch
gereedschap defect. Met betrekking tot de
veiligheidshendel moet bovendien nog
opgemerkt worden dat deze nooit gewijzigd of
verwijderd mag worden.
10. Gebruik alleen de voorgeschreven spijkers.
Gebruik nooit andere spijkers dan de in deze
handleiding beschreven en gespecificeerde.
11. Wees voorzichtig wanneer u de slang aan- of
afkoppelt.
Let op de volgende punten om te voorkomen dat
het apparaat per ongeluk afgaat wanneer u de slang
aan- of afkoppelt, of spijkers laadt.
䡬 Raak de trekker niet aan.
䡬 Laat de kop van het apparaat niet in contact
komen met enig oppervlak.
䡬 Houd de kop van het apparaat naar beneden
gericht.
Volg bovenstaande instructies zorgvuldig op en
let er altijd op dat er zich geen lichaamsdelen,
handen of benen voor de spijker-uitgang
bevinden.
12. Houd niet achteloos uw vinger aan de trekker.
Breng uw vinger alleen aan de trekker wanneer u
inderdaad gaat spijkeren. Als u dit pneumatisch
gereedschap draagt, of u geeft het aan iemand
anders met uw vinger aan de trekker, kunt u per
ongeluk een spijker afschieten en een ongeval
veroorzaken.
13. Sluit de spijkergeleiding geheel en maak hem niet
open terwijl het apparaat in werking is.
Als u probeert te spijkeren terwijl de spijkergeleiding
open staat, zal de spijker niet in het hout gedreven
worden en ontstaat er een gevaarlijke situatie.
14. Druk de spijker-uitgang stevig tegen het te spijkeren
materiaal.
Druk de spijker-uitgang stevig tegen het te spijkeren
materiaal wanneer u gaat spijkeren. De spijkers
kunnen terugkaatsen als u de spijker-uitgang niet
goed houdt.
15. Houd handen en voeten weg van de kop van het
apparaat wanneer er gespijkerd wordt.
Het kan ernstige gevolgen hebben wanneer een
spijker per ongeluk een hand of voet raakt.
16. Wees bedacht op de terugslag van het pneumatisch
gereedschap.
Breng uw hoofd of andere lichaamsdelen niet dicht
bij de bovenkant van het apparaat terwijl het in
werking is. Dit is gevaarlijk omdat het apparaat een
krachtige terugslag kan geven als bijvoorbeeld de
spijker die wordt ingedreven een oude spijker of
een knoest in het hout raakt.
17. Wees voorzichtig wanneer u dun plaatmateriaal of
de hoeken van een stuk hout gaat spijkeren.
Wanneer u dun plaatmateriaal spijkert, kunnen de
spijkers er dwars doorheen vliegen, wat ook kan
gebeuren als u de hoek van een stuk hout spijkert
en de spijker afketst. In dergelijke gevallen dient u
ervoor te zorgen dat er zich niemand (en ook geen
handen, voeten e.d.) achter het dunne plaatmateriaal
of naast het hout dat u wilt spijkeren bevindt.
18. Tegelijkertijd spijkeren aan beide zijden van een
wand is gevaarlijk.
Onder geen enkele voorwaarde mag u aan beide
zijden van een wand samen met iemand anders
staan te spijkeren. Dit kan bijzonder gevaarlijk zijn
daar de spijkers door de wand kunnen dringen en
zo verwondingen kunnen veroorzaken.
19. Gebruik het gereedschap niet op stellingen, ladders.
Het gereedschap mag niet worden gebruikt in
bijvoorbeeld de volgende gevallen:
– op steigers, trap, ladder of andere dergelijk
constructies,
– dichtmaken van dozen of kratten,
– vastzetten van veiligheidssystemen voor het
vervoer enz. op voertuigen en wagons
20. Koppel de slang niet af met uw vinger aan de
trekker.
Als u de slang afkoppelt met uw vinger aan de
trekker, bestaat het gevaar dat het apparaat
spontaan een spijker afschiet wanneer u de
volgende keer de slang aankoppelt, of anderszins
niet naar behoren functioneert.
33

Nederlands
21. Koppel de slang af en verwijder alle spijkers die
nog in het magazijn zitten na gebruik.
Koppel het pneumatisch gereedschap van de
luchtdruk af voor u onderhoudswerkzaamheden uit
gaat voeren, een vastzittende spijker gaat
verwijderen, de werkplek gaat verlaten, het
pneumatisch gereedschap naar een andere plaats
gaat brengen, of nadat u het apparaat gebruikt
hebt. Het is levensgevaarlijk de luchtdruk
aangekoppeld te houden en het risico te lopen dat
per ongeluk een spijker afgeschoten wordt.
22. Wanneer u een spijker die vast is komen te zitten
gaat verwijderen, moet u er allereerst op letten dat
u de slang afkoppelt en gecomprimeerde lucht die
zich nog in het apparaat bevindt laat ontsnappen.
Het kan zeer gevaarlijk zijn wanneer bijvoorbeeld
de spijker opeens loskomt en dan alsnog
afgeschoten wordt.
23. Om de risico’s van vallende spijkers te vermijden
moet u nooit het magazijn openen terwijl het
apparaat naar beneden gericht is terwijl u spijkers
laadt.
24. Een ‘vrouwelijke’ aansluiting (pneumatische
koppeling) mag niet in dit apparaat gebruikt
worden.
Als een dergelijke aansluiting is geînstalleerd, is
het soms niet mogelijk om de gecomprimeerde
lucht in het apparaat te laten ontsnappen wanneer
de slang afgekoppeld wordt. Vermijd het gebruik
hiervan dus. Het pneumatisch gereedschap en de
slang voor de luchttoevoer moeten een koppeling
hebben die toestaat dat de in het apparaat
aanwezige gecomprimeerde lucht weg kan wanneer
de slang afgekoppeld wordt.
25. Laat de stofkap zitten.
Gebruik het apparaat nooit zonder de stofkap om
het gevaar te voorkomen dat een gebroken draad
of gebroken plastic dat de spijkers vasthield, of een
verkeerd geraakte spijker, in het rond kan vliegen.
26. Koppel de luchtslang los voordat de neuskap wordt
bevestigd of losgemaakt.
Bij het bevestigen van de bijgeleverde neuskap aan
het uiteinde van de drukhendel en bij het losmaken
ervan, moet u ervoor zorgen dat eerst de slang
wordt losgekoppeld. Het is levensgevaarlijk wanneer
er per ongeluk een nagel afgeschoten zou worden.
TECHNISCHE GEGEVENS
Krachtbron Reciprocerende zuiger
Luchtdruk (Drukmeter) 4,9 – 8,3 bar
Bruikbare spijkers Zie Afb.
Aantal te laden spijkers 200 – 300 spijkers (1 rol)
Afmetingen 290 mm (L) × 300 mm (H) × 130 mm (W)
Gewicht 2,2 kg
Spijker toevoer methode Reciprocerende zuiger
Slang (binnen diameter) 7 mm
SPIJKERSELECTIE
Met dit pneumatisch gereedschap kunt u zowel spijkers
die met draad als spijkers die met plastic aan elkaar
zitten gebruiken. Kies een geschikte spijker op de
Afbeelding. Spijkers die niet op de Afbeelding staan
kunnen niet gebruikt worden in dit apparaat. De spijkers
zitten aan elkaar vast met draad of plastic en worden aan
de rol geleverd.
Draad spijkerrol Band spijkerrol
MINIMAAL MAXIMAAL MINIMAAL MAXIMAAL
5,3 mm 6,4 mm 5,3 mm 6,4 mm
38 mm
65 mm
2,3 mm
2,5 mm
Afmetingen van de spijkers
38 mm
57 mm
2,3 mm
2,5 mm
STANDAARD ACCESSOIRES
(1) Oogbescherming ........................................................1
OPTIONELE ACCESSOIRES
䡬 Enkelschots onderdelen (codenr. 887-916)
(Continu spijkeren onderdelenset, enkelschots
onderdelen)
Met deze set op het apparaat, zal er alleen een
spijker worden afgeschoten wanneer de trekker
gebruikt wordt nadat de veiligheidshendel is
ingedrukt. Door deze onderdelen te installeren kunt
u voorkomen dat spijkers onverwachts worden
afgevuurd, of terwijl het apparaat zich in een
verkeerde positie bevindt omdat per ongeluk de
veiligheidshendel werd ingedrukt.
䡬 Tas (codenr. 880-517)
䡬 Neuskap (codenr. 878-344)
䡬 Onderdelen van de hanger (codenr. 888-097)
TOEPASSINGEN
䡬 Vervaardigen van beschotting, hekwerk, vloeren
䡬 Vervaardigen van dakbedekking en wanden
34

Nederlands
䡬 Vervaardigen van mobiele en modulaire woningen
䡬 Vervaardigen van kratten en pallets
OPMERKING
In bepaalde gevallen, afhankelijk van het materiaal,
kunnen 2,5 × 64 mm (0,099" × 2-1/2") spijkers niet
worden gebruikt. Probeer eerst een paar spijkers uit
voor u besluit we;lke u gaat gebruiken.
VOORBEREIDINGEN VOOR HET GEBRUIK
1. Leg de slang klaar.
Let er op dat de gebruikte slang een minimum binnen
diameter heeft van 6 mm.
OPMERKING
De slang voor de luchttoevoer moet een minimum
werkdruk belasting hebben van 12,8 bar of 150 procent
van de maximum luchtdruk die door het pneumatisch
systeem geleverd kan worden, als dat een hogere
belasting oplevert.
2. Veiligheidscontrole
VOORZICHTIG
䡬 Onbevoegden (inclusief kinderen) moeten ver van dit
pneumatisch gereedschap vandaan gehouden
worden.
䡬 Draag uw oogbescherming.
䡬 Controleer of de schroeven die de uitlaat afdekking
enz. vastzetten goed aangedraaid zijn.
Controleer of het apparaat lekken vertoont en of er
kapotte of verroeste onderdelen zijn.
䡬 Controleer of de veiligheidshendel naar behoren
functioneert. Controleer ook of de bewegende
onderdelen van de veiligheidshendel niet vuil
geworden zijn.
䡬 Controleer nogmaals of het veilig is het pneumatisch
gereedschap te gaan gebruiken.
VOOR GEBRUIK
1. Controleer de luchtdruk.
VOORZICHTIG
De luchtdruk moet constant gehandhaafd blijven op
4,9 – 8,3 bar
Stel de luchtdruk bij in het bereik van 4,9 – 8,3 bar, al
naar gelang de doorsnee en de lengte van de spijkers
en de hardheid van het te spijkeren materiaal. Let
speciaal op de uitgangsdruk, de capaciteit en de pijpen
en aansluitingen op de compressor, zodat de
luchtdruk niet de voorgeschreven grenzen
overschrijdt. Wij wijzen u er op dat te hoge druk de
prestaties van het apparaat, de levensduur en de
veiligheid kan aantasten.
2. Smering
(1) Voordat u dit spijkerapparaat gaat gebruiken moet u
er op letten dat er tussen dit apparaat en de
compressor een Luchttoevoer Set gemonteerd is.
Smering door middel van de zelfsmeernippel uit de
Set zorgt voor een soepele werking, langere
levensduur en bescherming tegen roest. Stel de
zelfsmeernippel zo af dat een enkele druppel olie
wordt gegeven om de 5 a 10 spijker-acties.
(2) Wij adviseren u de aanbevolen olie (SHELL TONNA)
te gebruiken. Andere geschikte oliesoorten staan
aangegeven. Meng nooit twee of zelfs meer
verschillende soorten olie.
3. Spijkers laden
(1) Pak de spijkergeleider en de knop vast. Druk de knop
naar beneden en klap de spijkergeleider open. Open
nu de magazijnklep (Afb. 2).
(2) Stel de positie van de plaat in aan de hand van de
lengte van de spijkers (Afb. 3).
De spijkers zullen niet goed kunnen worden
doorgevoerd als de spijkerhouder niet correct is
ingesteld (Afb. 4).
a. Draai de spijkerhouder ongeveer 90 graden tegen
de klok in.
b. Beweeg de spijkerhouder in verticale richting zover
als mogelijk is. Beweeg de spijkerhouder op en
neer overeenkomstig de lengte van de gebruikte
spijkers.
c. Stel de plaat in aan de hand van de merktekens
voor de spijkerlengte op de klep van het magazijn
en draai de spijkerhouder 90 graden met de klok
mee tot u een klik hoort.
(3) Doe de spijkerrol in het magazijn. Wikkel voldoende
spijkers van de rol om het drijfgat te bereiken (Afb. 5).
Wanneer u spijkers met draad gebruikt
Steek de eerste spijker in het gat en de tweede spijker
tussen de twee pallen van de toevoer.
Plaats de spijkerkop in de geleidesleuf (Afb. 6).
Wanneer u spijkers op een plastic band gebruikt
Steek de eerste spijker in het gat en de tweede spijker
tussen de twee pallen van de toevoer.
Plaats de spijkerkop en de bovenkant van de plastic
band in de geleidesleuf.
Plaats de onderkant van de plastic band in de
geleidesleuf voor plastic banden (Afb. 7).
(4) Doe eerst de klep van het magazijn dicht en klap dan
de spijkergeleider dicht (Afb. 8).
(5) Vergrendel de knop stevig.
OPMERKING
Wees voorzichtig dat u de draden waarmee de spijkers
aan elkaar vast zitten niet vervormt en dat u de spijkers
bij het passen in de geleider niet los maakt. In een
dergelijk geval zal de spijkergeleider niet goed meer
dicht kunnen.
VOORZICHTIG
Om te voorkomen dat het apparaat per ongeluk afgaat,
mag u in geen geval de trekker aanraken of het uiteinde
van drukhendel op een werkbank of op de vloer zetten.
Richt de spijker-uitlaat nooit op een persoon of een
lichaamsdeel.
OPMERKING
Voor u de spijkers in het magazijn doet, dient u de
spijkerhouder af te stellen op de lengte van de gebruikte
spijkers. Als u de positie van de spijkerhouder niet of
niet correct afstelt, zal de spijker vastlopen. Als de klep
met geweld wordt gesloten zonder de positie van de
spijkerhouder correct af te stellen, kan de spijkerhouder
beschadigd raken.
GEBRUIK VAN HET SPIJKERAPPARAAT
VOORZICHTIG
䡬 Gebruik de kop of de behuizing van dit pneumatisch
gereedschap nooit als hamer.
䡬 Neem uw voorzorgen om de veiligheid van personen
in de buurt te waarborgen.
35

Nederlands
1. Spijkeren
Dit Hitachi spijkerapparaat is voorzien van een
schakelinrichting om de spijkers af te schieten.
Gebruik het ENKELE SEQUENTIËLE
AANDRIJVINGSMECHANISME of het CONTACT
AANDRIJVINGSMECHANISME afhankelijk van het
uitgevoerde werk.
(1) Enkelschot
Zet de schakelinrichting op de omhoogstand (om het
apparaat op het ENKELE SEQUENTIËLE
AANDRIJVINGSMECHANISME in te stellen (Zie Afb. 9).
Druk de spijker-openening op de de plek waar de
spijker moet komen; haal vervolgens de trekker over
om een enkele spijker af te vuren (Zie Afb. 10).
Nadat u één spijker heeft afgeschoten moet u de
trekker loslaten en opnieuw indrukken voordat u
opnieuw een spijker kunt afschieten.
WAARSCHUWING
Telkens wanneer de trekker wordt overgehaald, wordt
een spijker afgeschoten; dit gaat door zolang de
drukhendel ingedrukt blijft.
VOORZICHTIG
Als u in de enkel-schots stand de trekker niet snel en
hard genoeg overhaalt zal het apparaat een terugslag
geven en verschillende spijkers in plaats van een
afschieten. Om dit te vermijden dient u de trekker
altijd fluks en zonder dralen over te halen.
(2) Drukhefboom
Wanneer de spijker-opening tegen het werkstuk
gedrukt wordt, moet u de drukhefboom helemaal
omhoog doen komen (Zie Afb. 10) om de vergrendeling
op te heffen. Op deze manier hoort het niet mogelijk te
zijn een spijker af te vuren door alleen de trekker over
te halen zonder de vergrendeling op te heffen.
(3) Continu spijkeren
Zet de schakelinrichting op de omlaagstand (om het
apparaat op het CONTACT AANDRIJVINGSMECHANISME
in te stellen) (Zie Afb. 11).
Haal eerst de trekker over. Druk vervolgens het
apparaat in de gewenste positie om automatisch
spijkers af te vuren (Zie Afb. 12).
Het ENKELE SEQUENTIËLE AANDRIJVINGSMECHANISME
is bedoeld waar een nauwkeurige plaatsing van de
bevestigingsmiddelen vereist is.
Het ENKELE SEQUENTIËLE AANDRIJVINGSMECHANISME
kan de kans op lichamelijk letsel voor u en anderen in het
werkgebied verminderen in vergelijking met het CONTACT
AANDRIJVINGSMECHANISME. Dat komt omdat de kans
veel kleiner is dat u een ongewenste spijker plaatst als u
de trekker ingedrukt houdt en per ongeluk met de
druhendel tegen uzelf of anderen stoot.
Het ENKELE SEQUENTIËLE AANDRIJFMECHANISME kan
ook de verwerksnelheid verlagen vergeleken met het
CONTACT AANDRIJFMECHANISME. Het ENKELE
SEQUENTIËLE AANDRIJFMECHANISME wordt
aanbevolen voor onervaren gebruikers.
VOORZICHTIG
䡬 Wees voorzichtig bij het spijkeren van hoeken. Bij het
continu spijkeren op een hoek, is het mogelijk dat
spijkers afketsen of door het hout heen breken.
䡬 Probeer geen spijker op een andere spijker te slaan.
䡬 Probeer geen spijker in metaal te slaan.
OPMERKINGEN
䡬 Voorzorgen bij onbelast draaien
Soms zal het apparaat doorgaan met spijkeren nadat
alle spijkers uit magazijn zijn opgebruikt. Dit is het
zogenaamde “onbelast draaien”. Dit kan een
negatieve invloed hebben op de demper, het magazijn
en de spijkertoevoer.
Om onbelast draaien te voorkomen, dient u van tijd tot
tijd te controleren hoeveel spijkers zich nog in het
magazijn bevinden. U dient ook alle spijkers te
verwijderen nadat u deze spijkerapparaat heeft gebruikt.
䡬 Na het spijkeren:
(1) maak de luchtslang los van het spijkerapparaat;
(2) verwijder alle spijkers uit het spijkerapparaat;
(3) breng 5 - 10 druppels Hitachi smeerolie voor
pneumatische gereedschappen aan in de
luchtplug van het spijkergereedschap; en
(4) open het kraantje van de luchtcompressortank
om eventueel vocht te verwijderen.
䡬 Na gebruik kunt u ongeveer 2 cc olie via de
slangkoppeling in het apparaat doen om het
pneumatisch gereedschap tegen roest te beschermen.
䡬 Bij lage temperaturen zal het apparaat soms niet
naar behoren functioneren. Gebruik het
pneumatisch gereedschap alleen bij geschikte
omgevingstemperaturen.
2. Afstellen van de spijker-diepte
VOORZICHTIG
Haal uw vinger van de trekker wanneer u dit soort
instellingen maakt. Let er ook op dat de spijker-uitgang
niet naar beneden wijst wanneer u deze instelling
verricht en dat er zich geen lichaamsdelen van wie
dan ook voor de spijker-uitgang bevinden.
䡬 Afstellen van de spijker-diepte (Afb. 13)
Doe een spijker-test. Als de spijkers te diep ingeslagen
worden, draait u de afstelling naar de ondiepe kant
teken).
(
Als de spijkers niet diep genoeg worden ingeslagen,
draait u de afstelling naar de diepe kant (
(Zie Afb. 13, 14).
De spijker-diepte verandert met 1 mm bij elke
omwenteling van de afstellingsknop.
OPMERKING
䡬 De spijker-diepte afstellingsknop zal niet meer dan 3
mm draaien vanaf het diepste spijkerpunt. Probeer de
knop niet te forceren door hem verder te willen draaien.
䡬 De spijker-diepte kan ook aangepast worden door de
gebruikte luchtdruk te veranderen. Gebruik deze
methode samen met de afstelling op het apparaat.
Gebruik van een te hoge luchtdruk die niet in de
juiste verhouding staat tot de weerstand die door het
te spijkeren materiaal geleverd wordt zal de
levensduur van dit spijkerapparaat bekorten.
3. Veranderen van de richting van de luchtuitlaat
De richting van de uitlaat kan worden veranderd
door de bovenkap te verdraaien (Afb. 15).
4. Verwijderen van de band
Scheur de band waar de spijkers aan vast zaten af in
de richting van de pijl bij gebruik van een band
spijkerrol (Afb. 16).
5. Gebruik van de neuskap
VOORZICHTIG
Koppel de slang los van het spijkerapparaat en laat
de samengeperste lucht ontsnappen voordat u de
neuskap aanbrengt of verwijdert, om per ongeluk
afschieten van een spijker te voorkomen.
teken)
36

Nederlands
䡬 Bevestig de neuskap aan het uiteinde van de
drukhendel om het oppervlak van hout enz. tegen
krassen te beschermen.
(1) Bevestigen en losmaken van de neuskap
De neuskap wordt bevestigd door deze gewoonweg
in de drukhendel te duwen.
Druk de neuskap naar binnen tot het bolle gedeelte in
de neuskap in het gat van de drukhendel valt. (Afb. 17)
Om de neuskap te verwijderen, steekt u een dun
staafje zoals een schroevendraaier in de spleet aan
de achterkant van de drukhendel en trekt de neuskap
dan naar buiten.
(2) Opbergen van de neuskap
Plaats de verwijderde neuskap in de ruimte achter
het magazijn om deze op te bergen. (Afb. 18)
INSPECTIE EN ONDERHOUD
VOORZICHTIG
Let er op dat u de slang afkoppelt wanneer u
vastzittende spijkers verwijdert, het apparaat
schoonmaakt, inspecteert, of er onderhoud aan pleegt.
1. Maatregel tegen vastzittende spijkers
(1) Haal de spijkerrol uit het magazijn, open de
spijkergeleider, steek een staafje in de uitgang en tik
met een hamer tegen het staafje (Afb. 19).
(2) Verwijder de vastzittende spijker met een gleuf-kop
schroevendraaier (Afb. 20).
(3) Verwijder het defecte deel van de draad die de spijkers
aan elkaar verbindt met een nijptang, corrigeer de
vervorming en laad de spijkerrol weer in het magazijn.
(4) Als het apparaat vaak vastloopt, dient u de Erkende
Service-zaak waar u dit pneumatisch gereedschap
gekocht heeft te raadplegen.
2. Controleer de schroeven waar alle onderdelen mee
vast zitten
Controleer regelmatig of er ergens een schroef los zit
en of er geen lekken zijn. Draai eventueel losse
schroeven weer vast. Het is gevaarlijk om het apparaat
te gebruiken als er schroeven los zitten.
3. Inspecteren van de veiligheidshendel
Controleer of de veiligheidshendel soepel kan
bewegen (Afb. 21).
Maak de bewegende delen van de veiligheidshendel
schoon en smeer ze geregeld met de meegeleverde
smeerolie. Door geregeld schoon te maken en te
smeren zorg u ervoor dat de veiligheidshendel soepel
blijft functioneren en gaat u de vorming van roest
tegen.
4. Inspecteren van de toevoer
(1) Maak geregeld het bewegende deel van de knop
schoon en breng de aanbevolen olie aan (Zie Afb. 22).
(2) Open de spijkergeleider en verwijder stof enz. zoals
aangegeven in Afb. 23. Breng smeerolie aan op de
schuifgroef van de toevoer en de toevoer-schacht.
Controleer of de stopper (A) en de stopper (B) soepel
kunnen bewegen door er met uw vinger tegen te
duwen.
(3) Breng ook de aanbevolen olie aan op de toevoer
oppervlakken van de neus en de spijkergeleider nadat
u deze schoongemaakt heeft. Door geregeld schoon
te maken en te smeren zorg u ervoor dat alles soepel
blijft functioneren en gaat u de vorming van roest
tegen.
37
VOORZICHTIG
Controleer of de toevoer en stopper onderdelen
soepel functioneren voor u het apparaat gaat
gebruiken. Als het mechanisme hapert, is het mogelijk
dat spijkers onder ongewenste hoeken het apparaat
verlaten, wat gevaarlijk is voor de gebruiker en voor
anderen in de buurt.
5. Inspecteren van het magazijn
Maak het magazijn schoon. Verwijder stof en
houtresten die zich mogelijk in het magazijn hebben
opgehoopt.
6. Opslag
䡬 Wanneer u het apparaat voor langere tijd niet zult
gebruiken, kunt u het beste een dunne laag
machineolie aanbrengen op de stalen onderdelen
van het apparaat om roest tegen te gaan.
䡬 Bewaar dit spijkerapparaat niet in een koude
omgeving. Bewaar het op een warme plek.
䡬 Wanneer u het spijkerapparaat niet gebruikt, dient u
het op te slaan op een warme, droge plek.
Buiten bereik van kinderen houden.
7 Lijst vervangingsonderdelen
LET OP
Reparatie, modificatie en inspectie van Hitachi
elektrisch gereedschap dient te worden uitgevoerd
door een erkend Hitachi Service-centrum.
Deze Onderdelenlijst komt van pas wanneer u deze
samen met het gereedschap aanbiedt bij het erkende
Hitachi Service-centrum wanneer u om reparatie of
ander onderhoud verzoekt.
Bij gebruik en onderhoud van elektrisch gereedschap
dienen de in het land waar u zich bevindt geldende
veiligheidsregelgeving en veiligheidsstandaarden
stipt te worden opgevolgd.
MODIFICATIES
Hitachi elektrisch gereedschap wordt voortdurend
verbeterd en gewijzigd teneinde gebruik te kunnen
maken van de nieuwste technische ontwikkelingen.
Daarom is mogelijk dat sommige onderdelen zonder
voorafgaande kennisgeving gewijzigd worden.
COMPRESSOR
VOORZICHTIG
Wanneer de maximum luchtdruk van de compressor
de 8,3 bar (120 psi) overschrijdt, dient u er voor te
zorgen dat er een reductieklep tussen de compressor
en dit pneumatisch gereedschap is aangebracht.
Vervolgens stelt u de aan het spijkerapparaat
geleverde luchtdruk bij tot deze binnen het bereik
van 4,9 - 8,3 bar (70 - 120 psi.) valt. Als ook de
Luchttoevoer Set gemonteerd is, is het ook mogelijk
de smering van het apparaat op zeer gemakkelijke
wijze uit te voeren.
ZELFSMEERNIPPEL-FILTER-REDUCTIEKLEP
(Luchttoevoer set)
Wij bevelen aan het spijkerapparaat altijd met deze set,
bestaande uit een zelfsmeernippel, een filter en een
reductieklep, te gebruiken zodat u het apparaat altijd
onder de meest gunstige omstandigheden kunt
gebruiken. Let u er alstublieft op dat de slang tussen de
set en het spijkerapparaat niet langer mag zijn dan 10 m
(Afb. 24).

GESCHIKTE SMEERMIDDELEN
Type smeermiddel Naam van het smeermiddel
Aanbevolen olie SHELL TONNA
Motorolie SAE 10W, SAE 20W
Turbine olie ISO VG32 ~ 68 (#90 ~ #180)
Geluidsinformatie
Geluidskarakteristiek-waarden in overeenstemming met
EN 792-13:
Het typische A-zwaarte enkele geluidssterkteniveau
Het typische A-zwaarte enkele geluidsdrukniveau op
de werkplek
Onzekerheid KpA: 2,5 dB (A)
Deze waarden zijn gereedschap-gerelateerde
karakteristieke waarden en geven niet het geproduceerde
geluid op het moment van daadwerkelijk gebruiken van
het apparaat weer. Het geproduceerde geluid tijdens het
werken met het apparaat hangt bijvoorbeeld ook af van
de werkomgeving, het stuk waaraan gewerkt wordt, hoe
dat stuk ondersteund wordt, het aantal spijkers dat
ingeslagen wordt enz.
Afhankelijk van de omstandigheden op de werkplek en
de vorm van het stuk waaraan gewerkt wordt, is het
nodig om persoonlijke beschermingsmiddelen toe te
passen, zoals het plaatsen van het werkstuk op een
geluiddempende ondergrond, voorkomen van vibratie
van het werkstuk door het vast te klemmen of te bedekken,
minimaliseren van de benodigde luchtdruk enz.
In speciale gevallen zal het nodig zijn om oorbeschermers
te dragen.
Trillingsinformatie
De typische trillingskarakteristiek waarde in
overeenstemming met EN 792-13: 2,5 m/s
Onzekerheid K = 1,5 m/s
2
Deze waarde is een gereedschap-gerelateerde
karakteristieke waarde en geeft niet de invloed op het
hand-arm-systeem op het moment van daadwerkelijk
gebruiken van het apparaat weer. De invloed op het
hand-arm-systeem bij het gebruiken van dit apparaat
hangt bijvoorbeeld ook af van de kracht waarmee men
het apparaat beet houdt, van de kracht waarmee het
apparaat tegen het werkoppervlak gedrukt wordt, de
richting waarin gespijkerd wordt, de afstelling van de
luchttoevoer, het stuk waaraan gewerkt wordt, hoe dat
ondersteund is enz.
L
wA
,1s,d = 97 dB
L
pA
,1s,d = 84 dB
2
Nederlands
38

Español
(Traducción de las instrucciones originales)
PRECAUCIONES PARA LAS OPERACIONES EN
GENERAL
1. Opere la herramienta eléctrica de forma segura y
correctamente.
No la emplee para otros usos que no sean los
especificados en este manual de instrucciones.
2. Para llevar a cabo una operación segura, maneje la
herramienta eléctrica correctamente.
Siga las instrucciones dadas en este manual de
instrucciones y emplee la herramienta de la forma
indicada para asegurar una operación segura. Nunca
permita su uso a niños o personas que no conozcan
la herramienta y su funcionamiento ni a personas
que no puedan emplearla correctamente.
3. Confirme la seguridad del lugar de trabajo.
Mantenga alejadas del lugar de trabajo a las
personas no autorizadas.
Especialmente deben mantenerse alejados a los
niños.
4. Coloque las partes correspondientes en sus lugares
de forma correcta.
No extraiga ninguna de las cubiertas ni los tornillos.
Manténgalos en su lugar puesto que tienen sus
funciones.
Además, puesto que podría ser peligroso, no efectúe
nunca modificaciones en la herramienta ni la emplee
después de haber hecho modificaciones.
5. Compruebe la herramienta antes de usarla.
Antes de usar la herramienta, compruebe que
ninguna de sus partes esté rota, que todos los
tornillos estén bien apretados y que no haya partes
perdidas ni oxidadas.
6. El trabajo excesivo puede causar accidentes.
No haga funcionar la herramienta y sus accesorios
más allá de sus capacidades. El trabajo excesivo no
solamente dañará la herramienta eléctrica sino que
la convertirá en un aparato peligroso.
7. Detenga la operación inmediatamente si nota
alguna anormalidad.
Pare la operación si se da cuenta de alguna
anormalidad o si la herramienta eléctrica no
funciona correctamente. Haga que le inspeccionen
y reparen la herramienta si es necesario.
8. Trate bien y con cuidado la herramienta eléctrica.
Si se le cae o golpea la herramienta eléctrica contra
algo, el bastidor exterior podría deformarse y
agrietarse, o podrían ocurrir otro tipo de daños, por
lo tanto manéjela siempre con mucho cuidado.
Tampoco no raye ni grabe nada en la herramienta
eléctrica. Debido al aire a alta presión que hay
dentro de la herramienta, las grietas en su superficie
pueden resultar peligrosas.
No utilice nunca la herramienta eléctrica si encuentra
alguna grieta y si hay fugas de aire.
9. Cuide bien la herramienta para que tenga una vida
de servicio larga.
Cuide siempre la herramienta eléctrica y manténgala
limpia.
10. Efectúe una inspección a intervalos regulares
puesto que es esencial para la seguridad.
Inspeccione la herramienta eléctrica a intervalos
regulares para poder operarla con seguridad y
eficientemente en todo momento.
11. Lleve la herramienta a un agente de servicio
autorizado si es necesario efectuar alguna
reparación o reemplazo de alguna parte.
Asegúrese de que la herramienta eléctrica es
revisada solamente por un agente de servicio
autorizado y que solamente se emplean partes de
reemplazo idénticas autorizadas.
12. Mantenga la herramienta eléctrica en un lugar
apropiado.
Cuando no la utilice, deberá guardarla en un lugar
seco fuera del alcance de los niños. Vierta en el
cuerpo de la herramienta unos 2 cc de aceite a
través de la junta de la manguera para protegerla
contra la oxidación.
13. El plano de montaje detallado de este manual de
instrucciones debe ser utilizado solamente por el
agente de servicio autorizado.
PRECAUCIONES SOBRE EL USO DE LA
CLAVADORA
1. Emplee la herramienta correctamente para que la
operación sea segura.
Esta herramienta ha sido diseñada para clavar
clavos en madera y materiales similares. Empléela
solamente para los propósitos indicados.
2. Asegúrese de que la presión de aire se encuentra
dentro del valor nominal de presión de aire.
Asegúrese de que la presión de aire se encuentre
dentro del margen de 4,9 barias - 8,3 barias (70 120 psi.) y de que el aire empleado esté limpio y
seco. Si la presión es mayor de 8,3 barias (120 psi.),
la vida de servicio de la herramienta eléctrica se
acortará y podrían aparecer condiciones peligrosas.
La herramienta no debe conectarse a una presión
que exceda potencialmente de 14 barias (200 psi.).
3. No opere nunca el equipo con gases a alta presión
que no sean aire comprimido.
No utilice nunca dióxido de carbono, oxígeno u
otro gas sellado en un contenedor a presión bajo
ninguna circunstancia.
4. Tenga cuidado para evitar fuegos y explosiones.
Puesto que pueden salir disparadas chispas durante
la operación de clavado, es muy peligroso emplear
la herramienta cerca de lacas, pinturas, bencinas,
disolventes, gasolina, adhesivos y sustancias
inflamables similares puesto que podrían
encenderse o explotar. Bajo ninguna circunstancia
deberá emplear esta herramienta en la vecindad de
tales materiales inflamables.
5. Protéjase siempre los ojos (con unas gafas
protectoras).
Cuando opere la herramienta eléctrica, siempre
protéjase los ojos y asegúrese de que las personas
que puedan encontrarse en los alrededores también
se los hayan protegido.
Existe una gran posibilidad de que salgan
disparados fragmentos del alambre o del plástico
que engancha los clavos o incluso los mismos
clavos, lo que es una amenaza para los ojos.
Protéjase siempre los ojos mientras opera la
herramienta. Puede protegerse los ojos con unas
gafas protectoras o también ponerse una máscara
de visión amplia encima de gafas graduadas si es
que las lleva.
39

Español
Los encargados deben siempre hacer obligatorio el
empleo de protección para los ojos.
6. Protéjase los oídos y la cabeza.
Cuando tenga que efectuar un trabajo de clavado
póngase orejeras y protección en la cabeza.
También, dependiendo de las condiciones,
asegúrese de que las personas que pueda haber en
los alrededores también llevan orejeras y protección
en la cabeza.
7. Ponga mucha atención en los que trabajan cerca
de usted.
Sería muy peligroso si los clavos que no son
clavados correctamente golpearan a otras personas.
Por lo tanto, ponga siempre mucha atención a la
seguridad de las personas que pueda haber en los
alrededores cuando emplee la herramienta.
Asegúrese siempre de que el cuerpo, manos o pies
de ninguna persona estén cerca de la salida de los
clavos.
8. No dirija nunca la salida de los clavos hacia ninguna
persona.
Piense que la herramienta siempre está cargada
con clavos.
Si dirige la salida de los clavos hacia alguna persona,
podría causar accidentes muy serios si por error se
descargara la herramienta. Cuando conecte y
desconecte la manguera, durante la recarga de
clavos u operaciones similares, asegúrese de que
la salida de los clavos no está encarada hacia
ninguna persona (incluido usted mismo). Incluso
cuando sabe que no hay ningún clavo en la
herramienta es peligroso descargarla mientras la
dirige hacia alguien, por lo tanto no lo haga nunca.
No se suba encima de la herramienta. Respétela
como herramienta de trabajo que es.
9. Antes de emplear la herramienta eléctrica,
compruebe la palanca de empuje.
Antes de emplear la herramienta asegúrese de que
la palanca de empuje y la válvula operan
correctamente. Sin clavos cargados en la
herramienta, conecte la manguera y compruebe lo
siguiente. Si se escucha sonido de operación indica
una falla, por lo tanto no emplee la herramienta
hasta que haya sido inspeccionada y reparada.
䡬 Si al pulsar tan solo el gatillo se escucha el
sonido del movimiento de la cuchilla impulsora,
significa que la herramienta está defectuosa.
䡬 Si al pulsar tan solo la palanca de empuje contra
el material donde va a efectuar el clavado se
escucha el sonido del movimiento de la cuchilla
impulsora, significa que la herramienta está
defectuosa. Además, con respeto a la palanca
de empuje, tenga en cuenta que no debe nunca
modificarse ni extraerse.
10. Emplee solamente los clavos especificados.
No emplee nunca otros clavos que no sean los
especificados y descritos en este manual de
instrucciones.
11. Tenga cuidado cuando conecte la manguera.
Cuando conecte la manguera y cargue los clavos,
asegúrese de lo siguiente para no accionar la
herramienta por error.
䡬 No toque el gatillo.
䡬 No permita que el cabezal de disparo se ponga
en contacto con ninguna superficie.
䡬 Mantenga el cabezal de disparo hacia abajo.
Observe estrictamente las instrucciones de
arriba y asegúrese siempre de que ninguna parte
de su cuerpo, manos o pies se encuentra delante
de la salida de los clavos.
12. No coloque descuidadamente el dedo en el gatillo.
No coloque el dedo en el gatillo excepto cuando
vaya a efectuar la operación de clavado. Si
transporta la herramienta o se la pasa a alguien
teniendo usted el dedo en el gatillo, podría descargar
inadvertidamente un clavo causando un accidente
serio.
13. Cierre completamente la guía de los clavos y no la
abra durante la operación.
Si intenta efectuar el clavado mientras la guía de
los clavos está abierta, los clavos no serán clavados
en el madero, y existe el peligro de una descarga
peligrosa.
14. Presione firmemente la salida de los clavos contra
el material donde vaya a efectuar el clavado.
Cuando clave clavos, presione firmemente la salida
de los clavos contra el material donde vaya a
efectuar el clavado. Si la salida no está
correctamente colocada, los clavos rebotarán.
15. Mantenga las manos y pies alejados del cabezal de
disparo durante la operación.
Es muy peligroso si un clavo se clavase en una
mano o pie por error.
16. Tenga en cuenta el retorno de la herramienta.
No acerque la parte superior de la herramienta a su
cabeza, etc., durante la operación. Es muy peligroso
puesto que la herramienta podría retroceder
violentamente si el clavo que está siendo clavado
contactara con otro clavo o grapa que ya estuviera
clavado en la madera.
17. Tenga cuidado cuando efectúe el clavado en
tableros delgados o en las esquinas de la madera.
Cuando efectúe el clavado en tableros delgados,
los clavos pueden traspasarlos, así como también
cuando clave las esquinas de madera debido a la
desviación de los clavos. En tales casos, asegúrese
siempre de que no haya nadie (ni ninguna mano,
pie, etc., de nadie) detrás del tablero o cerca de la
madera que vaya a clavar.
18. El clavado simultáneo en ambos lados de la misma
pared es peligroso.
Bajo ninguna circunstancia deberá clavar en ambos
lados de una pared a la vez. Podría ser muy peligroso
puesto que los clavos podrían pasar a través de la
pared y causar daños personales.
19. No utilice la herramienta sobre andamios o
escaleras.
La herramienta no deberá utilizarse para
aplicaciones específicas, como por ejemplo:
– cuando el cambio de un sitio de trabajo a otro
implica el uso de andamiaje, escalones, escaleras,
o construcciones similares,
– cierre de cajas o jaulas,
– fijación de sistemas de seguridad para el
transporte, por ej., en vehículos y vagones
20. No desconecte la manguera con el dedo en el gatillo.
Si desconecta la manguera con el dedo en el gatillo,
la siguiente vez que conecte la manguera existirá el
peligro de que la herramienta dispare un clavo
espontáneamente o que opere incorrectamente.
40

Español
21. Desconecte la manguera y saque los clavos que
hayan quedado en el cartucho después del uso.
Desconecte el aire de la herramienta antes de
efectuar el mantenimiento, extraer un clavo
atascado, abandonar el lugar de trabajo, mover la
herramienta a otro lugar o después de usarla. Es
muy peligroso dejar clavos en la herramienta puesto
que podrían ser disparos por accidente.
22. Cuando extraiga un clavo que se ha atascado,
asegúrese de desconectar primero la manguera y
de liberar el aire comprimido.
Cuando extraiga un clavo que se ha atascado,
primero asegúrese de desconectar la manguera y
liberar el aire comprimido que hay dentro de la
misma.
El disparo accidental de un clavo puede resultar
muy peligroso.
23. Para evitar peligros causados por clavos que se
caen, no abra nunca el cartucho con el aparato
encarado hacia abajo mientras carga los clavos.
24. En el cuerpo de la herramienta no debe emplearse
una clavija hembra (enchufe de aire).
Si instala una clavija hembra en el cuerpo de la
herramienta, a veces el aire comprimido no podrá
ser dirigido cuando la manguera está desconectada,
por lo tanto evítelo.
La herramienta y la manguera de suministro de
aire deben tener un acoplamiento de manguera
para extraer toda la presión de la herramienta al
desconectar la junta del acoplamiento.
25. No extraiga la cubierta contra el polvo.
No opere nunca la herramienta con la cubierta
contra el polvo extraída para evitar el peligro de
rotura del alambre o del plástico que retiene los
clavos, o de disparo accidental de los clavos.
26. Cuando coloque y retire la tapa de la punta,
desconecte la manguera.
Cuando coloque la tapa de la punta accesoria en el
extremo de la palanca de empuje y cuando la retire,
asegúrese de desconectar la manguera previamente.
Es muy peligroso que se dispare un clavo por error.
ESPECIFICACIONES
Tipo motorizado Pistón alternativo
Presión de aire (medidor) 4,9 – 8,3 barias
Clavos aplicables Consultar la Fig.
Cantidad de puntas a cargar 200 – 300 clavos (1 ristre)
Tamaño 290 mm (L) × 300 mm (Al) × 130 mm (An)
Peso 2,2 kg
Método de alimentación de los puntas Pistón alterativo
Manguera (diámetro interior) 7 mm
SELECCIÓN DE LOS PUNTAS
Con esta herramienta pueden clavarse clavos enlazados
con alambre y clavos enlazados con plástico.
Elija los clavos apropiados de la figura. Los clavos que
no se muestran en la figura no pueden ser clavados con
esta herramienta. Los clavos están enlazados y
enrollados.
Puntas en ristra unidas Puntas en ristra unidas
con alambre con cinta
MÍN. MÁX. MÍN. MÁX.
5,3 mm 6,4 mm 5,3 mm 6,4 mm
38 mm
65 mm
2,3 mm
2,5 mm
Dimensiones de los clavos
41
38 mm
57 mm
2,3 mm
2,5 mm
ACCESORIOS ESTÁNDAR
(1) Protector para los ojos ...............................................1
ACCESORIOS OPCIONALES-
䡬 Piezas de disparo individual (Código N° 887-916)
(Juego de piezas de disparo secuencial, piezas de
disparo individual)
Con las partes de disparo secuencial, los clavos son
disparados solamente al apretar el gatillo después
de presionar la palanca de empuje.
Instalando estas partes, pueden evitarse el disparo
de los clavos en posiciones incorrectas y el disparo
inesperado de los clavos causado por un
accionamiento accidental de la herramienta.
䡬 Caja (Código N° 880-517)
䡬 Tapa de la boca (Código N° 878-344)
䡬 Paetes del colgador (Código N° 888-097)
APLICACIONES
䡬 Revestimiento de paredes, verjas, pisos
䡬 Revestimiento de paredes y tejados
䡬 Construcción de casas móviles y viviendas modulares
䡬 Construcción de cajones y plataformas para
mercancías

Español
NOTA
Dependiendo del material, en algunos casos no se
podrán clavar puntas de 2,5 mm × 64 mm. Antes de
comenzar el trabajo real, clave algunas puntas de
prueba.
PREPARACIÓN PARA ANTES DE LA
OPERACIÓN
1. Prepare la manguera
Asegúrese de emplear una manguera con un diámetro
interior mínimo de 6 mm.
NOTA
Las mangueras de suministro de aire deben tener un
margen de presión de trabajo mínima de 12,8 barias
o el 150 por ciento de la presión máxima producida
en el sistema de suministro de aire, lo que sea mayor.
2. Comprobación de la seguridad
PRECAUCIONES
䡬 Las personas no autorizadas (incluyendo niños)
deberán mantenerse alejadas del equipo.
䡬 Póngase el protector para los ojos.
䡬 Compruebe los tornillos de retención que fijan la
cubierta de escape, etc., para ver si están bien
apretados.
Compruebe el martillo con ristra de clavos para ver si
hay fugas de aire o si alguna de sus partes está
defectuosa u oxidada.
䡬 Compruebe si la palanca de empuje funciona
correctamente.
También compruebe si se ha adherido suciedad en
las partes móviles de la palanca de empuje.
䡬 Vuelva a comprobar la seguridad operacional.
ANTES DEL EMPLEO
1. Compruebe la presión de aire
PRECAUCIÓN
La presión de aire debe mantenerse constantemente
a 4,9 - 8,3 barias.
Ajuste la presión de aire entre 4,9 a 8,3 barias de
acuerdo con el diámetro y longitud de los clavos y la
dureza de la madera que vaya a ser clavada. Ponga
especial atención a la presión de salida, capacidad y
tubería del compresor de aire, para que la presión no
exceda del límite especificado. Tenga en cuenta que
la presión excesiva podría afectar el rendimiento total,
la vida de servicio y la seguridad.
2. Lubricación
(1) Antes de operar este martillo con ristra de puntas,
asegúrese de proporcionar un equipo de aire entre el
compresor de aire y el aparato.
La lubricación a través del equipo de aire ofrece una
operación suave, una vida de servicio más larga y
anticorrosión.
Ajuste el engrasador de forma que se suministre una
sola gota de aceite a intervalos de 5 a 10 ciclos de
clavado.
(2) Se recomienda el uso del aceite recomendado (SHELL
TONNA). Pueden también usarse los aceites listados
más adelante. No mezcle nunca dos o más tipos de
aceite.
3. Carga de clavos
(1) Sujete la guía de clavos y la perilla con los dedos.
Presione la perilla hacia abajo y abra la guía de
clavos. Luego abra la cubierta del cargador (Fig. 2).
(2) Ajuste la posición de la placa de acuerdo con la longitud
de los clavos (Fig. 3). Los clavos no serán alimentados
correctamente sin haber ajustado debidamente la placa
(Fig. 4).
a. Gire el portaclavos aproximadamente 90 grados
en el sentido contrario a las agujas del reloj.
b. Deslice en la dirección vertical posible.
Levante o baje el portaclavos según las diferentes
longitudes de los clavos.
c. Ajuste la placa guiándose por los puntos de
referencia de la longitud de los clavos de la
cubierta del cargador, y gire el portaclavos 90
grados en el sentido de las agujas del reloj hasta
escuchar un “clic”.
(3) Coloque el rollo de clavos dentro del cargador.
Desenrolle el número de clavos necesario hasta llegar
al orificio de impulsión (Fig. 5).
Cuando utilice clavos intercalados con alambre
Inserte el primer clavo en el orificio de impulsión y el
segundo entre las dos uñas del alimentador.
Coloque la cabeza del clavo en la ranura de guía (Fig. 6).
Cuando utilice clavos intercalados don hoja de plástico
Inserte el primer clavo en el orificio de impulsión y el
segundo entre las dos uñas del alimentador.
Coloque la cabeza del clavo y el lado superior de la
hoja de plástico en la ranura de guía.
Fije el lado inferior de la hoja de plástico en la ranura
de guía de las hojas de plástico (Fig. 7).
(4) Cierre primero la cubierta del cargador y cierre la
guía de clavos (Fig. 8).
(5) Bloquee correctamente la perilla.
NOTA
Tenga cuidado de no deformar los alambres
intercalados ni de desenganchar los clavos de la
superficie de guía.
De lo contrario, la guía de clavos no se podrá cerrar
correctamente.
PRECAUCION
Para evitar una operación involuntaria, no toque
nunca el gatillo ni coloque el extremo superior de la
palanca de empuje sobre un banco de trabajo o el
piso. Asimismo, nunca dirija la salida de los clavos
hacia las personas.
NOTA
Antes de colocar los clavos en el cargador, posicione
el portaclavos de acuerdo con el largo de los clavos.
Si no se ajusta la posición del portaclavos, los clavos
quedarán atascados. Si se cierra la tapa de manera
forzada sin ajustar la posición del portaclavos, éste
podrá resultar dañado.
CÓMO EMPLEAR EL MARTILLO CON RISTRA DE
PUNTAS
PRECAUCIONES
䡬 No emplee nunca el cabezal o el cuerpo de este
aparato como martillo.
䡬 Tome las precauciones necesarias para asegurar la
seguridad de las personas que se encuentren en los
alrededores durante la operación.
1. Procedimiento de clavado
Este clavador Hitachi está equipado con un dispositivo
de conmutación para la operación de clavado.
42

Español
Utilice el MECANISMO DE ACTUACIÓN SECUENCIAL
SIMPLE o el MECANISMO DE ACTUACIÓN POR
CONTACTO de acuerdo con la tarea que se va a
realizar.
(1) Clavado intermitente
Ajuste el dispositivo de conmutación a la posición
superior (para ajustar a MECANISMO DE ACTUACIÓN
SECUENCIAL SIMPLE) (Véase Fig. 9).
Presione la boca de salida de clavos sobre el punto
deseado y seguidamente apriete el gatillo para
introducir el clavo de un solo disparo (Véase Fig. 10).
Una vez que se introduzca un clavo, no se podrá
volver a clavar hasta que suelte el gatillo y lo vuelva a
presionar.
ADVERTENCIA
Se dispara un clavo cada vez que se presiona el
gatillo, siempre que la palanca de empuje permanezca
presionada.
PRECAUCION
Si no acciona el gatillo rápidamente y con firmeza
durante el modo de un solo disparo, el martillo con
ristra de clavos rebotará y disparará varios clavos en
lugar de uno sólo. Para evitarlo, asegúrese de disparar
el gatillo rápidamente y con firmeza.
(2) Palanca de empuje
Cuando presione la boca de salida de clavos,
asegúrese de levantar completamente la palanca de
empuje (Véase Fig. 10) para liberar el bloqueo de
seguridad. De este modo, los clavos no podrán
clavarse aunque apriete el gatillo si no está liberado
el bloqueo de seguridad.
(3) Clavado continuo
Ajuste el dispositivo de conmutación a la posición
hacia abajo (para ajustar al MECANISMO DE
ACTUACIÓN POR CONTACTO.) (Véase Fig. 11).
En primer lugar, apriete el gatillo. Luego presione la
herramienta sobre el lugar deseado para clavar
automáticamente los clavos (Véase Fig. 12).
El MECANISMO DE ACTUACIÓN SECUENCIAL SIMPLE
se usa para colocar los fi jadores con gran precisión.
El MECANISMO DE ACTUACIÓN SECUENCIAL SIMPLE
puede disminuir la ocurrencia de lesiones en el área de
trabajo en comparación con el MECANISMO DE
ACTUACIÓN DE CONTACTO. Esto se debe a que hay
menos posibilidades de lanzar un clavo de forma no
intencional a alguna persona si continúa presionando el
gatillo y presiona la palanca de manera accidental.
El MECANISMO DE ACTUACIÓN SECUENCIAL SIMPLE
puede también reducir la velocidad de funcionamiento
en comparación con el MECANISMO DE ACTUACIÓN
DE CONTACTO. Se recomienda que los usuarios con
poca experiencia usen el MECANISMO DE ACTUACIÓN
SECUENCIAL SIMPLE.
PRECAUCION
䡬 Proceda con cuidado cuando clava en las esquinas
de la madera. Cuando efectúa el clavado continuo en
las esquinas de la madera, el clavo podría no entrar
correctamente o romperse en la esquina.
䡬 No introduzca un clavo sobre otro clavo.
䡬 No introduzca un clavo sobre las partes de metal.
NOTAS
䡬 Precauciones sobre la operación sin carga
Algunas veces, puede suceder que la operación de
clavado continúe aun después de haber introducido
todos los clavos contenidos en el cargador. Esto se
43
denomina “operación sin carga”. Esta operación
puede dañar al amortiguador, al cargador y al
alimentador de clavos.
Para evitar la operación sin carga, confirme de vez en
cuando la cantidad de clavos restantes. Por otra parte,
saque todos los clavos después de usar la clavadora.
䡬 Después de haber clavado el clavo:
(1) desconecte la manguera de aire del martillo
neumático,
(2) extraiga todos los clavos del martillo neumático,
(3) aplique 5 – 10 gotas de lubricante para
herramientas neumáticas Hitachi a la entrada de
aire del martillo neumático, y
(4) abra la llave de escape del depósito del compresor
de aire para drenar la humedad que pueda existir.
䡬 Después de completar la operación, vierta en el cuerpo
de la herramienta unos 2 cc de aceite a través de la
junta de la manguera para proteger la herramienta
contra el óxido.
䡬 En lugares con temperaturas bajas, la herramienta no
funcionará correctamente algunas veces. Opere siempre
el aparato en lugares con temperaturas apropiadas.
2. Ajuste de la profundidad de introducción de los puntas
PRECAUCIONES
Cuando efectúe los ajustes, asegúrese de sacar el
dedo del gatillo. Cuando efectúe los puntas, asegúrese
de que la salida de los clavos no esté encarada hacia
abajo y que ninguna parte de su cuerpo o del cuerpo
de otras personas se encuentre al alcance de la salida
de los puntas.
䡬 Ajuste del ajustador (Fig. 13)
Lleve a cabo una prueba de funcionamiento. Si los
puntas quedan demasiado clavados hacia adentro,
gire el ajustador hacia el lado de poca profundidad
(marcado con
Si la profundidad de clavado de los puntas es insuficiente,
gire el ajustador hacia el lado de profundidad profunda
(marcado con
La profundidad cambia 1 mm con cada giro del
ajustador.
NOTAS
䡬 Cuando ajuste el ajustador, no lo gire más de 3 mm
desde el punto de más profundidad cuando esté
clavando el punta. No gire el ajustador forzadamente
más allá de ese punto.
䡬 La profundidad de clavado de los puntas también
puede ajustarse cambiando la presión de aire
empleada. Lleve a cabo esto junto con el movimiento
del ajustador. El uso de aire a alta presión que no
corresponda con la resistencia de clavado de los
clavos acortará la vida de servicio del martillo con
ristra de puntas.
3. Cambio de la dirección de escape
El sentido del aire de escape podrá cambiarse girando
la cubierta superior (Fig. 15).
4. Corte de la cinta
Cuando utilice puntas unidas con cinta, rompa la
cinta de salida en el sentido de la flecha (Fig. 16).
5. Cómo utilizar la tapa de la punta
PRECAUCIÓN
Retire la manguera de la clavadora y suelte el aire
comprimido antes de instalar o retirar la tapa de la
punta para evitar una expulsión accidental del clavo.
).
) (Vea las Fig. 13 y 14).

Español
䡬 Coloque la tapa de la punta en el extremo de la
palanca de empuje cuando desee proteger la
superficie de madera, etc., de los arañazos.
(1) Colocar y retirar la tapa de la punta
La tapa de la punta puede colocarse pulsándola
simplemente en la palanca de empuje.
Presiónela hasta que la parte convexa de dentro de la
tapa de la punta entre en un orificio de la palanca de
empuje. (Fig. 17)
Para retirarla, introduzca una varilla fina, como un
atornillador, en el espacio situado en la parte trasera
de la palanca de empuje y tire de ella.
(2) Guardar la tapa de la punta
Coloque la tapa de la punta retirada en un espacio
detrás del cargador para guardarla. (Fig. 18)
INSPECCIÓN Y MANTENIMIENTO
PRECAUCIONES
Asegúrese de desconectar la manguera durante la
limpieza de atascos, inspección, mantenimiento y
limpieza.
1. Contramedidas para el atasco de clavos
(1) Extraiga el rodillo de los clavos del cartucho, abra la
guía de los clavos, inserte una varilla en la salida y
golpee la varilla con un martillo (Fig. 19).
(2) Extraiga el clavo atascado con un destornillador de
cabezal ranurado (Fig. 20).
(3) Corte la parte defectuosa de alambre de acero que
enlaza los clavos con unas tenacillas de corte, corrija
la deformación y luego cargue el rodillo de clavos en
el cartucho.
(4) En caso de atascos frecuentes, consulte al agente de
servicio autorizado donde compró la herramienta.
2. Compruebe los tornillos de montaje de cada parte
A intervalos regulares, compruebe cada parte para
ver si hay tornillos de montaje flojos y si hay fugas de
aire. Vuelva a apretar los tornillos flojos que
encuentre. La operación con tornillos flojos sin apretar
es peligrosa.
3. Inspeccione la palanca de empuje
Compruebe si la palanca de empuje puede deslizarse
con suavidad (Fig. 21).
Limpie el área deslizante de la palanca de empuje y
emplee el aceite proporcionado para lubricarla de
tanto en tanto.
La lubricación permitirá un deslizamiento suave
sirviendo a la vez como medida de prevención contra
el óxido.
4. Inspeccione los alimentadores
(1) Ocasionalmente limpie la parte deslizante de la perilla
y luego aplique el aceite recomendado (Vea la Fig. 22).
(2) Abra la guía de los clavos y limpie el polvo, etc.,
como se muestra en la Fig. 23. Aplique lubricante en
la ranura de deslizamiento del alimentador y en el
eje. Compruebe que el tope de los clavos (A) y el tope
de los clavos (B) se deslizan con suavidad
presionándolos con el dedo.
(3) También, aplique el aceite recomendado en la
superficie de alimentación de la punta y de la guía de
los clavos después de limpiarlos. Esto ofrecerá una
operación suave y retardará la corrosión.
PRECAUCIONES
Compruebe si el movimiento de los alimentadores y
de los topes se efectúa con suavidad antes de utilizar
la herramienta. Si el movimiento no es uniforme, los
clavos podrían ser disparados en un ángulo irregular,
lo que representaría un peligro para el operador y las
personas que pudiera haber en los alrededores.
5. Inspeccione el cartucho
Limpie el cartucho. Extraiga el polvo o las astillas de
madera que puedan haber acumulados en el cartucho.
6. Almacenaje
䡬 Cuando no utilice la herramienta durante mucho
tiempo, aplique una ligera capa de lubricante en las
partes de acero para evitar oxidación.
䡬 No guarde el martillo con ristra de clavos en lugares
fríos. Guarde el martillo con ristra de clavos en lugares
cálidos.
䡬 Cuando no emplee la herramienta, deberá guardarla
en un lugar seco y cálido.
Manténgala fuera del alcance de los niños.
7. Lista de repuestos
PRECAUCIÓN
La reparación, modificación e inspección de las
herramientas eléctricas Hitachi deben ser realizadas
por un Centro de Servicio Autorizado de Hitachi.
Esta lista de repuestos será de utilidad si es presentada
junto con la herramienta al Centro de Servicio
Autorizado de Hitachi, para solicitar la reparación o
cualquier otro tipo de mantenimiento.
En el manejo y el mantenimiento de las herramientas
eléctricas, se deberán observar las normas y
reglamentos vigentes en cada país.
MODIFICACIONES
Hitachi Power Tools introduce constantemente
mejoras y modificaciones para incorporar los últimos
avances tecnológicos.
Por consiguiente, algunas partes pueden ser
modificadas sin previo aviso.
COMPRESOR
PRECAUCIONES
Cuando la presión de operación máxima del compresor
de aire exceda de 8,3 barias asegúrese de proporcionar
una válvula de reducción entre el compresor de aire y el
martillo con ristra de clavos. Luego, ajuste la presión de
aire dentro del margen de operación de 4,9 – 8,3 barias.
Si hay un equipo de aire instalado, también será posible
efectuar la lubricación, lo que será además una gran
conveniencia.
VÁLVULA DE REDUCCIÓN DEL FILTRO DEL
ENGRASADOR (Equipo de aire)
Para que el equipo pueda operar en unas buenas
condiciones y asegurar una larga vida de servicio, se
recomienda emplear una válvula de reducción del filtro
del engrasador. Durante su operación, limite la longitud
de la manguera entre la unidad y el equipo de aire a 10 m
como máximo (Fig. 24).
44

Español
LUBRICANTES APLICABLES
Tipo de lubricante Nombre del lubricante
Aceite recomendado SHELL TONNA
Aceite de motor SAE10W, SAE20W
Aceite de turbina ISO VG32 ~ 68 (#90 ~ #180)
Información sobre el ruido
Valores de la característica de ruido de acuerdo con la
norma PEN 792-13:
Nivel de potencia de sonido de un evento de
ponderación A típica
Nivel de presión de sonido de emisión de un evento
de ponderación A típica en el lugar de trabajo
Incertidumbre KpA: 2,5 dB (A)
Estos valores son los valores característicos relacionados
con la herramienta y no representan el desarrollo del
ruido en el lugar de empleo. El desarrollo de ruido en el
lugar de empleo dependerá del ambiente de trabajo,
pieza de trabajo, soporte de la pieza, número de
operaciones de clavado, etc.
Dependiendo de las condiciones del lugar de trabajo y
de la forma de la pieza de trabajo, deberán llevarse a
cabo medidas de atenuación de ruido individuales, tales
como la colocación de las piezas de trabajo en soportes
amortiguadores de ruido, prevención de vibraciones de
la pieza de trabajo mediante sujeción o cobertura, ajuste
de la presión de aire mínima requerida para la operación
a ejecutar, etc.
En casos especiales será necesario llevar puesto un
equipo de protección en los oídos.
Información sobre las vibraciones
Valor característico de vibración típico de acuerdo con EN
792-13: 2,5 m/s
Incertidumbre K = 1,5 m/s
2
2
Estos valores son valores característicos relacionados
con la herramienta y no representan la influencia en el
sistema de armado a mano cuando se emplea la
herramienta. La influencia en el sistema de armado a
mano al emplear la herramienta dependerá de la fuerza
de sujeción, fuerza de presión de contacto, dirección del
trabajo, ajuste de suministro de energía, pieza de trabajo,
soporte de la pieza de trabajo, etc.
L
WA
,1s,d = 97 dB
L
pA
, 1s,d = 84 dB
45

(Перевод оригинальных инструкций)
PyccÍËÈ
ÉãABHõE MEPõ èPEÑOCTOPOÜHOCTà
èPà PAÅOTE
1. СОУ ФpaЗЛОлМoЦo ЛcФoОлБoЗaМЛУ
нОeНЪpoФpЛДopa coДОпАaИЪe ocЪopoКМocЪл ФpЛ
paДoЪe c МЛП.
He ЛcФoОлБyИЪe нОeНЪpoФpЛДop АОУ бeОeИ, oЪОЛдМкx
oЪ Ъex, НoЪopкe yНaБaМк З АaММoИ ЛМcЪpyНбЛЛ.
2. ÑÎÓ ÄeÁoÔacÌoÈ paÄoÚê oÄpaçaÈÚecë c íÚËÏ
íÎeÍÚpoÔpËÄopoÏ, ÌaÀÎeÊaçËÏ oÄpaÁoÏ.
CoДОпАaИЪe ЛМcЪpyНбЛЛ, ФpeАcЪaЗОeММкe З нЪoП
pyНoЗoАcЪЗe Л ФpaЗЛОлМo oДpaзaИЪecл c нЪЛП
ФpЛДopoП c бeОлп oДecФeдeМЛУ ДeБoФacМoИ paДoЪк.
HЛ З НoeП cОyдae Мe paБpeеaИЪe ФoОлБoЗaЪлcУ
нЪЛП ЛМcЪpyПeМЪoП АeЪУП ЛОЛ ОпАУП, Мe
oДОaАaпзЛП АocЪaЪoдМкПЛ БМaМЛУПЛ, ЛОЛ НoЪopкe
Мe ПoЦyЪ yФpaЗОУЪл ЛП МaАОeКaзЛП oДpaБoП.
3. ìÄeÀËÚecë Ç ÌeÇoÁÏoÊÌocÚË ÀocÚyÔa Í
ÏacÚepcÍoÈ.
He ÔycÍaÈÚe Ç ÏacÚepcÍyï ÔocÚopoÌÌËx. ÑeÚeÈ
cÎeÀyeÚ ocoÄo oÖpaÀËÚë oÚ ÀocÚyÔa Í íÚoÏy
ËÌcÚpyÏeÌÚy.
4. Bce ÌyÊÌêe ÀeÚaÎË Ç ÌyÊÌêx ÏecÚax.
He cМЛПaИЪe НpкеНЛ Л Мe oЪНpyдЛЗaИЪe еypyФк.
Bce oМЛ ЗкФoОМУпЪ cЗoЛ oФpeАeОХММкe ЩyМНбЛЛ.
ЕoОee ЪoЦo, З cЗУБЛ c ЗoБПoКМoИ oФacМocЪлп, МЛ
З НoeП cОyдae Мe ЗМocЛЪe ЛБПeМeМЛУ З ЛМcЪpyПeМЪ,
a ЪaНКe Мe ФoОлБyИЪecл ЛП ФocОe eЦo ЛБПeМeМЛУ.
5. èpoÇepëÚe ËÌcÚpyÏeÌÚ ÔepeÀ eÖo
ËcÔoÎëÁoÇaÌËeÏ.
KaКАкИ paБ ФepeА ЛcФoОлБoЗaМЛeП ФpЛДopa
ФpoЗepлЪe, дЪoДк МЛ oАМa ЛБ АeЪaОeИ Мe ДкОa
ФoЗpeКАeМa, дЪoДк Зce еypyФк ДкОЛ ЪyЦo
БaНpyдeМк, дЪoДк Зce АeЪaОЛ Мa ПecЪe Л ДeБ
pКaЗдЛМк.
6. CÎËåÍoÏ ÀÎËÚeÎëÌaÓ paÄoÚa ÏoÊeÚ ÔpËÇecÚË Í
ÔoÎoÏÍaÏ.
He ЗкФoОМУИЪe ЛМcЪpyПeМЪaПЛ Л Лx aНceccyapaПЛ
paДoЪ, АОУ НoЪopкx oМЛ Мe ФpeАМaБМaдeМк. CОЛеНoП
АОЛЪeОлМaУ paДoЪa ПoКeЪ Мe ЪoОлНo ФoЗpeАЛЪл
нОeНЪpoФpЛДop, Мo Л caПa Фo ceДe МecХЪ oФacМocЪл.
7. B cÎyäae oÄÌapyÊeÌËÓ oÚÍÎoÌeÌËÈ, ÌeÏeÀÎeÌÌo
ÔpeÍpaÚËÚe paÄoÚy.
иpeНpaЪЛЪe paДoЪy, ecОЛ Зк oДМapyКЛОЛ oЪНОoМeМЛУ
ЛОЛ НoЦАa нОeНЪpoФpЛДop Мe paДoЪaeЪ МaАОeКaзЛП
oДpaБoП; ФpoЗepлЪe нОeНЪpoФpЛДop Л ФoдЛМЛЪe eЦo.
8. HaÀÎeÊaçËÏ oÄpaÁoÏ cÎeÀËÚe Áa
íÎeÍÚpoÔpËÄopoÏ.
иaАeМЛe нОeНЪpoФpЛДopa ЛОЛ eЦo yАap o НaНЛeОЛДo ФpeАПeЪк ПoКeЪ ФpЛЗecЪЛ Н АeЩopПaбЛЛ Л
oДpaБoЗaМЛп ЪpeзЛМ ЛОЛ ЛМoЦo poАa ФoЗpeКАeМЛИ,
ФoнЪoПy oДpaзaИЪecл c МЛП c МaАОeКaзeИ
ocЪopoКМocЪлп. TaНКe Мe ЗкбapaФкЗaИЪe Л Мe
ЗкpeБaИЪe МaАФЛcЛ Мa нОeНЪpoФpЛДope. B cЗУБЛ c
ЗкcoНЛП АaЗОeМЛeП ЗoБАyxa ЗМyЪpЛ ЛМcЪpyПeМЪa,
ЪpeзЛМк Мa ФoЗepxМocЪЛ oФacМк.
HЛНoЦАa Мe ЛcФoОлБyИЪe нОeНЪpoФpЛДop, ecОЛ
ЪpeзЛМa yЗeОЛдЛЗaeЪcУ, ЛОЛ НoЦАa ЛБ ЪpeзЛМк
ЗкxoАЛЪ ЗoБАyx.
9. ÑÎÓ oÄecÔeäeÌËÓ ÀÎËÚeÎëÌoÖo cpoÍa paÄoÚê
ËÌcÚpyÏeÌÚa, ÄepeÖËÚe eÖo ÌaÀÎeÊaçËÏ oÄpaÁoÏ.
BceÖÀa ÌaÀÎeÊaçËÏ oÄpaÁoÏ cÎeÀËÚe Áa
ËÌcÚpyÏeÌÚoÏ Ë ÀepÊËÚe eÖo Ç äËcÚoÚe.
10. ÑÎÓ ÄeÁoÔacÌocÚË, ËÌcÚpyÏeÌÚ ÌeoÄxoÀËÏo
ÔocÚoÓÌÌo ÔpoÇepÓÚë.
иpoЗepУИЪe нОeНЪpoФpЛДop peЦyОУpМo c бeОлп
oДecФeдeМЛУ ДeБoФacМoИ paДoЪк нОeНЪpoФpЛДopa Л
eЦo нЩЩeНЪЛЗМocЪЛ З ОпДoe ЗpeПУ.
11. B cÎyäae ÌeoÄxoÀËÏocÚË ÔpoÇeÀeÌËÓ peÏoÌÚa
ËÎË ÁaÏeÌê ÀeÚaÎeÈ, oÄpaÚËÚecë Í
yÔoÎÌoÏoäeÌÌoÏy oÄcÎyÊËÇaïçeÏy aÖeÌÚy.
OÄÓÁaÚeÎëÌo oÄpaçaÈÚecë ÚoÎëÍo Ìa ÙËpÏeÌÌyï
cÚaÌáËï oÄcÎyÊËÇaÌËÓ íÎeÍÚpoÔpËÄopa, a ÚaÍÊe
ÔpocÎeÀËÚe, äÚoÄê ÀeÚaÎË ÁaÏeÌÓÎËcë ÚoÎëÍo Ìa
opËÖËÌaÎëÌêe.
12. ùÎeÍÚpoÔpËÄop xpaÌËÚe Ç ÌaÀÎeÊaçeÏ ÏecÚe.
Если Вы не пользуетесь электроприбором, его нужно
хранить в сухом месте вне досягаемости детей.
Накапайте примерно 2 мл масла в корпус через
отверстие шланга, чтобы предотвратить появление
ржавчины.
13. CxeÏa paÁoÄpaÌÌoÖo ÔpËÄopa Ç íÚoÈ ËÌcÚpyÍáËË
ÀoÎÊÌa ÄêÚë ËcÔoÎëÁoÇaÌa ÚoÎëÍo áeÌÚpoÏ
oÄcÎyÊËÇaÌËÓ.
MEPõ èPEÑOCTOPOÜHOCTà èPà
àCèOãúOBAHàà ÉBOÂÑEÂAÅàBHOÉO
CTAHKA
1. ЕeБoФacМaУ paДoЪa ФocpeАcЪЗoП ФpaЗЛОлМoЦo
ЛcФoОлБoЗaМЛУ
ùÚoÚ ËÌcÚpyÏeÌÚ cÔpoeÍÚËpoÇaÌ c áeÎëï ÁaÄËÇaÌËÓ
ÖÇoÁÀeÈ Ç ÀepeÇo Ë ÔoxoÊËe ÏaÚepËaÎê.
àcÔoÎëÁyÈÚe eÖo ÚoÎëÍo Ôo ÔpeÀÌaÁÌaäeÌËï.
2. мДeАЛЪecл З ЪoП, дЪo АaЗОeМЛe ЗoБАyxa
МaxoАЛЪcУ З ФpeАeОax, oФpeАeОХММкx АОУ
АaЗОeМЛУ ЗoБАyxa.
Пожалуйста, убедитесь, что давление находится в
диапазоне 4,9 бар - 8,3 бар, и используется сухой
и чистый воздух. Если давление воздуха выше 8,3
бар, срок службы электроинструмента может
сократиться, а также могут возникать опасные
условия. При подсоединении инструмента следует
избегать давления, которое потенциально
превышает 14 бар.
3. HË Ç ÍoeÏ cÎyäae Ìe paÄoÚaÈÚe c ËÌcÚpyÏeÌÚoÏ
Ìa ÖaÁax ÇêcoÍoÖo ÀaÇÎeÌËÓ ÍpoÏe ÍaÍ Ìa cÊaÚoÏ
ÇoÁÀyxe.
HËÍoÖÀa Ë ÌË ÔpË ÍaÍËx oÄcÚoÓÚeÎëcÚÇax Ìe
ËcÔoÎëÁyÈÚe yÖÎeÍËcÎêÈ ÖaÁ, ÍËcÎopoÀ ËÎË ÀpyÖoÈ
ÖaÁ, Ç ÕÏÍocÚÓx ÔoÀ ÀaÇÎeÌËeÏ.
4. OcÚepeÖaÈÚecë ÇocÔÎaÏeÌeÌËÓ Ë ÇÁpêÇa.
иocНoОлНy Зo ЗpeПУ БaДЛЗaМЛУ ЦЗoБАУ ПoЦyЪ
ЗoБМЛНМyЪл ЛcНpк - cyзecЪЗyeЪ oФacМocЪл
ЛcФoОлБoЗaМЛУ АaММoЦo ЛМcЪpyПeМЪa ЗДОЛБЛ ОaНoЗ,
НpacoН, ДeМБЛМa, pacЪЗopЛЪeОeИ, ЪoФОЛЗa, ЦaБa, НОeУ
Л ЛМкx ОeЦНoЗocФОaПeМУпзЛxcУ ЗeзecЪЗ, ФocНoОлНy
oМЛ ПoЦyЪ БaЦopeЪлcУ ЛОЛ ЗБopЗaЪлcУ. TaНЛП
oДpaБoП, АaММкП ЛМcЪpyПeМЪoП МeОлБУ
ФoОлБoЗaЪлcУ ЗДОЛБЛ нЪЛx ОeЦНoЗocФОaПeМУпзЛxcУ
ПaЪepЛaОoЗ.
5. BceЦАa БaзЛзaИЪe ЦОaБa (oАeЗaИЪe БaзЛЪМкe
oдНЛ).
иpЛ paДoЪe c АaММкП нОeНЪpoФpЛДopoП, ЗceЦАa
oАeЗaИЪe БaзЛЪМкe oдНЛ Л yДeАЛЪecл З ЪoП, дЪo
oНpyКaпзЛe ЪoКe Лx oАeОЛ.
Вероятность того, что фрагменты проволоки или
пластика, связывающие гвозди, или гвозди, по
которым производится неверный удар, попадут в
глаза, создает угрозу зрению. ВaзЛЪМкe oдНЛ ПoКМo
ÔpËoÄpecÚË Ç ÎïÄoÏ xoÁÓÈcÚÇeÌÌoÏ ÏaÖaÁËÌe.
46

PyccÍËÈ
BceЦАa oАeЗaИЪe БaзЛЪМкe oдНЛ ФpЛ paДoЪe c нЪЛП
ЛМcЪpyПeМЪoП. OАeЗaИЪe БaзЛЪМкe oдНЛ ЛОЛ
еЛpoНyп ПacНy ФoЗepx oДкдМкx oдНoЗ.
PaДoдЛe oДУБaМк ЗceЦАa oАeЗaЪл БaзЛЪМкe oдНЛ.
6. ВaзЛЪЛЪe cЗoЛ yеЛ Л ЦoОoЗy.
Bo ЗpeПУ paДoЪк c ЦЗoБАeБaДЛЗМкП cЪaМНoП
oАeЗaИЪe МayеМЛНЛ Л еОeП. TaНКe, З БaЗЛcЛПocЪЛ
oЪ ycОoЗЛИ, ФpocОeАЛЪe Бa ЪeП, дЪoДк oНpyКaпзЛe
ЪaНКe oАeОЛ МayеМЛНЛ Л еОeПк.
7. OcoÄoe ÇÌËÏaÌËe oÄpaçaÈÚe Ìa paÄoÚaïçËx Ç
ÌeÔocpeÀcÚÇeÌÌoÈ ÄÎËÁocÚË Í ÇaÏ.
CyзecЪЗyeЪ БМaдЛЪeОлМaУ oФacМocЪл З cОyдae
ФoФaАaМЛУ З ОпАeИ дacЪeИ ЦЗoБАУ ФpЛ МeФpaЗЛОлМoП
eЦo БaДЛЗaМЛЛ. иoнЪoПy, ЗceЦАa oДpaзaИЪe ЗМЛПaМЛe
Мa ДeБoФacМocЪл ОпАeИ, МaxoАУзЛxcУ ЗoБОe Зac
ФpЛ ФoОлБoЗaМЛЛ нЪЛП ЛМЪcpyПeМЪoП. HЛ З НoeП
cОyдae Мe МaФpaЗОУИЪe coФОo ЗкxoАa ЦЗoБАeИ Мa
ЪeОo, pyНЛ ЛОЛ МoЦЛ МaxoАУзЛxcУ ЗoБОe Зac ОпАeИ.
8. HЛ ФpЛ НaНЛx oДcЪoУЪeОлcЪЗax Мe МaФpaЗОУИЪe
coФОo ЗкxoАa ЦЗoБАeИ Мa ОпАeИ.
СaММкИ ЛМcЪpyПeМЪ АoОКeМ ДкЪл oДУБaЪeОлМo
ocМaзХМ БaзeОНaПЛ.
EcОЛ coФОo ЗкxoАa ЦЗoБАeИ МaФpaЗОeМo З cЪopoМy
ОпАeИ, oМЛ ПoЦyЪ ФoОyдЛЪл cepлeБМкe ЪpaЗПк ФpЛ
cОyдaИМoП cpaДaЪкЗaМЛЛ ЛМcЪpyПeМЪa. иpЛ
ФpЛcoeАЛМeМЛЛ Л oЪcoeАЛМeМЛЛ еОaМЦa, Зo ЗpeПУ
БaЦpyБНЛ ЦЗoБАeИ ЛОЛ ФoАoДМкx oФepaбЛИ, yДeАЛЪecл
З ЪoП, дЪo coФОo ЗкxoАa ЦЗoБАeИ МaФpaЗОeМo З
cЪopoМy oЪ МaxoАУзЛxcУ ЗoБОe Зac (ЗНОпдaУ ceДУ).
СaКe ecОЛ З ПaЦaБЛМe ЛМcЪpyПeМЪa МeЪ ЦЗoБАeИ,
БaФpeзaeЪcУ МaФpaЗОУЪл eЦo Мa ОпАeИ Л cФycНaЪл
НypoН, ФoнЪoПy, МЛНoЦАa Мe ФpoДyИЪe АeОaЪл нЪoЦo.
He ДaОyИЪecл ЛП. OЪМocЛЪecл Н АaММoПy ЛМcЪpyПeМЪy
c АoОКМкП yЗaКeМЛeП.
9. èpoÇepëÚe ÍypoÍ ÔepeÀ ËcÔoÎëÁoÇaÌËeÏ íÚoÖo
íÎeÍÚpoÔpËÄopa.
иepeА paДoЪoИ c нОeНЪpoФpЛДopoП, ФpoЗepлЪe
МopПaОлМyп paДoЪy НypНa Л НОaФaМa. иoАcoeАЛМЛЪe
еОaМЦ Л ФpoЗepлЪe cОeАyпзee c ФycЪкП ПaЦaБЛМoП
ЦЗoБАeИ: EcОЛ cОкеМк БЗyНЛ cpaДaЪкЗaМЛУ ФpЛДopa
– нЪo oДoБМaдaeЪ ФoОoПНy, ФoнЪoПy, З ЪaНЛx cОyдaУx
Мe ФoОлБyИЪecл АaММкП нОeНЪpoФpЛДopoП Аo eЦo
ФpoЗepНЛ Л ФoдЛМНЛ.
䡬 Если при легком потягивании за курок слышен
звук движения лезвия привода, это означает
поломку электроинструмента.
䡬 Если при легком нажатии на нажимной рычаг,
когда инструмент прижат к материалу, в который
должен быть забит гвоздь, слышен звук
движения привода, это обозначает поломку
электроинструмента. Кроме того, что касается
нажимного рычага, обращаем особое внимание на
то, что его нельзя видоизменять или снимать.
10. àcÔoÎëÁyÈÚe ÚoÎëÍo cÔeáËaÎëÌêe ÖÇoÁÀË.
HЛ З НoeП cОyдae Мe ЛcФoОлБyИЪe ЦЗoБАЛ, oЪОЛдМкe
oЪ Ъex, oФЛcaММкx З АaММoИ ЛМcЪpyНбЛЛ.
11. CoДОпАaИЪe ocЪopoКМocЪл ФpЛ ФoАНОпдeМЛЛ
еОaМЦa.
уЪoДк Мe ЗНОпдЛЪл ФpЛДop cОyдaИМкП oДpaБoП,
ФpЛ ФoАcoeАЛМeМЛЛ еОaМЦa Л ФpЛ БaЦpyБНe ЦЗoБАeИ,
coДОпАaИЪe cОeАyпзЛe ФpaЗЛОa:
䡬 He ÔpËÚpaÖËÇaÈÚecë Í ÍypÍy.
䡬 He ÀoÔycÍaÈÚe ÍoÌÚaÍÚa coÔÎa c ÍaÍoÈ-ÎËÄo
ÔoÇepxÌocÚëï.
䡬 ÑepÊËÚe coÔÎo ÖoÎoÇÍoÈ ÇÌËÁ.
CoДОпАaИЪe ЛМcЪpyНбЛЛ, yНaБММкe Зкеe Л Мe З
НoeП cОyдae Мe МaФpaЗОУИЪe coФОo ЗкxoАa
47
ÖÇoÁÀeÈ Ìa ÚeÎo, pyÍË ËÎË ÌoÖË ÌaxoÀÓçËxcÓ ÇoÁÎe
Çac ÎïÀeÈ.
12. He ÍÎaÀËÚe ÔaÎeá Ìa ÍypoÍ Ôo ÌeocÚopoÊÌocÚË.
He ÔpËÚpaÖËÇaÈÚecë Í ÍypÍy, ÍpoÏe cÎyäaeÇ, ÍoÖÀa
ÇaÏ ÀeÈcÚÇËÚeÎëÌo ÌeoÄxoÀËÏo ÁaÄËÚë ÖÇoÁÀË. EcÎË
Çê ÌecÕÚe íÚoÚ ËÌcÚpyÏeÌÚ Ç pyÍax, ËÎË ÔepeÀaÕÚe
eÖo ÍoÏy-ÎËÄo Ë ÔpË íÚoÏ ÀepÊËÚe cÇoÈ ÔaÎeá Ìa
ÍypÍe - Çê ÏoÊeÚe cÎyäaÈÌo ÇêcÚpeÎËÚë ÖÇoÁÀÕÏ,
äÚo ÏoÊeÚ ÔpËÇecÚË Í ÚpaÇÏËpoÇaÌËï.
13. Полностью закройте направляющую для гвоздей
и не открывайте ее во время работы.
При попытке работы при открытой направляющей
для гвоздей, гвозди не будут забиваться в
древесину, и существует риск опасного
срабатывания.
14. HaАХКМo ФpЛКПЛЪe coФОo ЗкxoАa ЦЗoБАeИ Н ЪoПy
ПaЪepЛaОy, НoЪopкИ Зк coДЛpaeЪecл coeАЛМЛЪл
ЦЗoБАУПЛ.
иpЛ БaДЛЗНe ЦЗoБАeИ, ФpЛКПЛЪe coФОo ЗкxoАa
ЦЗoБАeИ Н ЪoПy ПaЪepЛaОy, НoЪopкИ Зк coДЛpaeЪecл
coeАЛМЛЪл ЦЗoБАУПЛ. EcОЛ coФОo Мe ФpЛКaЪo
МaАОeКaзЛП oДpaБoП – ЦЗoБАЛ ПoЦyЪ ЗкБЗaЪл
oЪАaдy.
15. èpË paÄoÚe ÀepÊËÚe pyÍË Ë ÌoÖË Ç ÀaÎË oÚ
ÖoÎoÇÍË ÇêÄpoca.
èpË cÎyäaÈÌoÏ ÔoÔaÀaÌËË ÖÇoÁÀÓ Ç pyÍy ËÎË ÌoÖy,
cyçecÚÇyeÚ ÇoÁÏoÊÌocÚë cepëeÁÌoÖo ÚpaÇÏËpoÇaÌËÓ.
16. OcÚepeÖaÈÚecë oÚÀaäË ËÌcÚpyÏeÌÚa.
Bo ÇpeÏÓ paÄoÚê, ÀepÊËÚe ÖoÎoÇy ÍaÍ ÏoÊÌo
ÀaÎëåe oÚ ËÌcÚpyÏeÌÚa. ùÚo oÔacÌo, ÔocÍoÎëÍy
ËÌcÚpyÏeÌÚ ÏoÊeÚ ÀaÚë oÚÀaäy oÚ ÖÇoÁÀÓ,
yÀapËÇåeÖocÓ o ÔpeÀêÀyçËÈ ÖÇoÁÀë ËÎË cyÍ.
17. ÅyÀëÚe ÇÌËÏaÚeÎëÌê ÔpË ÁaÄËÇaÌËË ÖÇoÁÀeÈ Ç
ÚoÌÍËe ÀocÍË ËÎË yÖÎê ÀepeÇa.
иpЛ БaДЛЗaМЛЛ ЦЗoБАeИ З АocНЛ, ЦЗoБАЛ ПoЦyЪ
ФpoДЛЪл Лx МacНЗoБл, ЪoКe caПoe ПoКeЪ ФpoЛБoИЪЛ
ФpЛ БaДЛЗaМЛЛ З yЦОк АepeЗa ЛБ-Бa ФpoЦЛМaМЛУ
ЦЗoБАeИ. B ЪaНЛx cОyдaУx oДУБaЪeОлМo ФpoЗepлЪe,
дЪoДк Бa ЪoМНЛПЛ АocНaПЛ ЛОЛ АepeЗoП Мe ДкОo
МЛНoЦo (МЛдлУ pyНa ЛОЛ МoЦa Л Ъ.А.) НoЦАa Зк
coДЛpaeЪecл БaДЛЪл ЦЗoБАл.
18. OÀÌoÇpeÏeÌÌoe ÁaÄËÇaÌËe ÖÇoÁÀeÈ c oÄeËx
cÚopoÌ oÔacÌo.
HЛ З НoeП cОyдae МeОлБУ БaДЛЗaЪл ЦЗoБАЛ З oАМy
Л Ъy Кe cЪeМy Фo oДe cЪopoМк. щЪo ПoКeЪ
ФpeАcЪaЗОУЪл oФacМocЪл, ФocНoОлНy cyзecЪЗyeЪ
oФacМocЪл ЪoЦo, дЪo ЦЗoБАЛ ФpoИАyЪ cНЗoБл cЪeМy
Л ЪpaЗПЛpyпЪ paДoдeЦo.
19. He ÔoÎëÁyÈÚecë íÎeÍÚpoÔpËÄopoÏ Ìa Îecax Ë Ìa
cÚpeÏÓÌÍax.
ùÚËÏ íÎeÍÚpoÔpËÄopoÏ ÌeÎëÁÓ ÔoÎëÁoÇaÚëcÓ ÀÎÓ
ocoÄêx áeÎeÈ, Í ÔpËÏepy:
–ecÎË ÔpË cÏeÌe ÏecÚa ÁaÄËÇaÌËÓ ÌeoÄxoÀËÏo
ФoОлБoЗaЪлcУ ОecaПЛ, cЪyФeМУПЛ, cЪpeПУМНaПЛ
ЛОЛ cxoКЛПЛ НoМcЪpyНбЛУПЛ, Н ФpЛПepy, ФОaМНa
ÍpêåË.
– ÔpË ÁaÍpêÇaÌËË ÍopoÄoÍ ËÎË ÓçËÍoÇ,
– ÔpË ÍpeÔÎeÌËË cËcÚeÏ ÄeÁoÔacÌocÚË ÔpË
ÚpaÌcÔopÚËpoÇÍe, Í ÔpËÏepy, Ìa ÏaåËÌax ËÎË
ÚpeÈÎepax
20. He oЪcoeАЛМУИЪe еОaМЦ ФpЛ нЪoП АepКa ФaОeб
Мa НypНe.
EcОЛ Зк oЪcoeАЛМУeЪe еОaМЦ Л АepКЛЪe ФaОeб Мa
НypНe – cyзecЪЗyeЪ oФacМocЪл ЪoЦo, дЪo ФpЛ
cОeАyпзeП ФoАcoeАЛМeМЛЛ еОaМЦa нОeНЪpoФpЛДop
caПoФpoЛБЗoОлМo ЗкcЪpeОЛЪ ЦЗoБАХП ЛОЛ ДyАeЪ
МeФpaЗЛОлМo paДoЪaЪл.

PyccÍËÈ
21. иocОe paДoЪк, oЪcoeАЛМЛЪe еОaМЦ Л ЗкМлЪe
ocЪaЗеЛecУ ЦЗoБАЛ ЛБ ПaЦaБЛМa.
OЪcoeАЛМЛЪe ЛМcЪpyПeМЪ oЪ ЗoБАyеМoИ ОЛМЛЛ ФepeА
eЦo peПoМЪoП, ocЗoДoКАeМЛeП БacЪoФopeММoЦo
БaКЛПa, ФpЛ yxoАe c ПecЪa paДoЪк, ФpЛ ФepexoАe
Мa АpyЦoe ПecЪo paДoЪк ЛОЛ ФocОe oНoМдaМЛУ
paДoЪк. OеЛДoдМoe БaДЛЗaМЛУ ЦЗoБАeИ ПoКeЪ ДкЪл
ocoДo oФacМo.
22. иpЛ ФoФкЪНe АocЪaЪл БacЪpУЗеЛИ ЦЗoБАл, ФpeКАe
ЗceЦo, yДeАЛЪecл З ЪoП, дЪo еОaМЦ oЪcoeАЛМХМ
Л, дЪo cКaЪкИ ЗoБАyx cЪpaЗОeМ.
иpЛ ФoФкЪНe АocЪaЪл БacЪpУЗеЛИ ЦЗoБАл З coФОe
ЗкxoАa ЦЗoБАУ, ФpeКАe ЗceЦo, yДeАЛЪecл З ЪoП, дЪo
еОaМЦ oЪcoeАЛМХМ Л, дЪo cКaЪкИ ЗoБАyx cЪpaЗОeМ
З ЛМcЪpyПeМЪ.
CОyдaИМкИ ЗкcЪpeО ЦЗoБАУ ПoКeЪ ДкЪл oдeМл
oФaceМ.
23. Во избежание опасности, вызванной падением
гвоздей, при загрузке гвоздей никогда не
открывайте магазин устройства, когда он опущен
вниз.
24. OxÇaÚêÇaïçËÈ ÁaÊËÏ (ÖÌeÁÀo ÔoÀcoeÀËÌeÌËÓ
ÇoÁÀyxa) ÌeÎëÁÓ ÌaÀeÇaÚë Ìa ÍopÔyc.
EcОЛ Мa НopФyc МaАeЪ oxЗaЪкЗaпзЛИ БaКЛП, ЪoЦАa
cКaЪкИ ЗoБАyx ПoКeЪ ЛМoЦАa Мe ФocЪyФaЪл, НoЦАa
еОaМЦ oЪНОпдХМ, ФoнЪoПy Мe АoФycНaИЪe ЪaНoИ
cЛЪyaбЛЛ.
CaП ЛМcЪpyПeМЪ Л еОaМЦ ФoАaдЛ ЗoБАyxa АoОКМк
ДкЪл cМaДКeМк ПyЩЪoИ, НoЪopaУ cЪpaЗОЛЗaeЪ
ЗoБАyx ФpЛ eХ oЪcoeАЛМeМЛЛ.
25. Не удаляйте пылезащитный чехол.
Никогда не работайте со снятым пылезащитным
чехлом, чтобы избежать опасности поломки
проволочных или пластиковых креплений гвоздей,
а также разлета ошибочно забитых гвоздей.
26. При прикреплении или отсоединении крышки
наконечника отсоедините шланг.
При прикреплении дополнительного колпачка
наконечника к кончику нажимного рычага и при его
отсоединении обязательно заранее отсоединяйте
шланг. Ошибочное забивание гвоздей очень опасно.
XAPAKTEPàCTàKà
TËÔ íÎeÍÚpoíÌepÖËË oÀ ÔopåÌÓ
ÑaÇÎeÌËe ÇoÁÀyxa (ÏaÌoÏeÚp) 4,9 – 8,3 Äap
àcÔoÎëÁyeÏêe ÖÇoÁÀË ÄaÁoÇêÈ PËc.
Количество доступных для загрузки гвоздей
PaÁÏep 290 ÏÏ (ÀÎËÌa) × 300 ÏÏ (ÇêcoÚa) × 130 ÏÏ (åËpËÌa)
Bec 2,2 ÍÖ
CÔocoÄ ÔoÀaäË ÖÇoÁÀeÈ XoÀ ÔopåÌÓ
òÎaÌÖ (ÇÌyÚpeÌÌËÈ ÀËaÏeÚp) 7 ÏÏ
200 – 300 гвоздей (1 бобина)
BõÅOP ÉBOÑEâ
Данный инструмент может работать с гвоздями,
связанными проволокой, и с гвоздями, связанными
пластиком.
Выберите подходящие гвозди на рисунке. Инструмент
не может работать с гвоздями, не показанными на
рисунке. Гвозди связаны и скатаны в рулон.
Барабан гвоздей, Барабан гвоздей,
скрепленных проволокой скрепленных пленкой
MËÌ. MaÍc. MËÌ. MaÍc.
5.3 ÏÏ 6.4 ÏÏ 5.3 ÏÏ 6.4 ÏÏ
38 ÏÏ
65 ÏÏ
2.5 ÏÏ
àÁÏepeÌËÓ ÖÇoÁÀeÈ
38 ÏÏ
57 ÏÏ
2.3 ÏÏ2.3 ÏÏ
2.5 ÏÏ
CTAHÑAPTHõE èPàCèOCOÅãEHàü
(1) ÂaçËÚa ÀÎÓ ÖÎaÁ ...................................................... 1
ДОПОЛНИТЕЛЬНЫЕ ПРИСПОСОБЛЕНИЯ
䡬 Детали для одиночного выстрела (No. кода 887-
916)
(Набор деталей для последовательных выстрелов,
детали для одиночного выстрела)
При последовательных выстрелах гвозди забиваются
только при сжатии курка после нажатия нажимного
рычага.
При установке таких деталей можно предотвратить
выполнения забивания гвоздей в неподходящих
положениях, а также неожиданное забивание гвоздей,
вызванное случайным срабатыванием нажимного рычага.
䡬 Коробка (£ кода 880-517)
䡬 Крышка наконечника (£ кода 878-344)
䡬 ДЕТАЛИ ПОДВЕСКИ (£ кода 888-097)
èPàMEHEHàE
䡬 Наружная обшивка, огораживание, настил
䡬 Обшивка стен и крыш
䡬 Возведение передвижных домов и модульных
конструкций
䡬 Сооружение контейнеров и подносов
48

PyccÍËÈ
èPàMEóAHàE
В некоторых случаях в зависимости от материала
невозможно забивать гвозди размером 2,5 мм × 64
мм. Перед использованием сначала проведите
пробную забивку гвоздей.
èOÑÉOTOBKA K PAÅOTE
1. èoÀÖoÚoÇÍa åÎaÌÖa
мДeАЛЪecл З ЪoП, дЪo ЗМyЪpeММЛИ АЛaПeЪp еОaМЦa
ПЛМЛПyП 6 ПП.
èPàMEóAHàE
òÎaÌÖË ÔoÀaäË ÇoÁÀyxa ÀoÎÊÌê ÄêÚë paccäËÚaÌê
Ìa 12,8 Äap paÄoäeÖo ÀaÇÎeÌËÓ ËÎË 150 ÔpoáeÌÚoÇ
ÏaÍcËÏaÎëÌoÖo ÀaÇÎeÌËÓ, ÔpoËÁÇoÀËÏoÖo Ç cËcÚeÏe
ÔoÀaäË ÇoÁÀyxa, Ç ÁaÇËcËÏocÚË oÚ ÚoÖo, ÍoÚopêÈ ËÁ
ÌËx Çêåe.
2. èpoÇepëÚe ÄeÁoÔacÌocÚË
èPEÑOCTEPEÜEHàü
䡬 иocЪopoММЛx (ЗНОпдaУ АeЪeИ) Мe АoФcНaЪл Н
oÄopyÀoÇaÌËï.
䡬 OАeЗaИЪe БaзЛЪМкe oдНЛ.
䡬 èpoÇepëÚe cÚoÔpoÌêe ÄoÎÚê, ÙËÍcËpyïçËe ÍpêåÍË
ЗкxoАoЗ Л Ъ.А. Мa ФpoдМocЪл БaЪУКНЛ.
иpoЗepлЪe ЦЗoБАoБaДЛЗoдМкИ cЪaМoН Мa ФpeАПeЪ
yЪeдeН ЛОЛ pКaЗдЛМк.
䡬 èpoÇepëÚe paÄoÚaeÚ ÎË ÍypoÍ ÌaÀÎeÊaçËÏ oÄpaÁoÏ.
TaНКe ФpoЗepлЪe Мe БaДЛЪк ОЛ АЗЛКЛПкe АeЪaОЛ
НypНa ЦpУБлп.
䡬 èoÇÚopÌo ÔpoÇepëÚe ÄeÁoÔacÌocÚË paÄoÚê.
èEPEÑ PAÅOTOâ
1. èpoÇepëÚe ÀaÇÎeÌËe ÇoÁÀyxa
èPEÑOCTEPEÜEHàü
СaЗОeМЛe МeoДxoАЛПo ФocЪoУММo yАepКЛЗaЪл Мa
ypoЗМe 4,9 – 8,3 Дap.
OЪpeЦyОЛpyИЪe АaЗОeМЛe ЗoБАyxa З ФpeАeОax oЪ 4,9
Аo 8,3 Дap З cooЪЗeЪcЪЗЛЛ c АЛaПeЪpaПЛ Л АОЛМoИ
ЦЗoБАeИ Л ЪЗХpАocЪЛ АepeЗa З НoЪopoe ДyАyЪ
БaДЛЗaЪлcУ ЦЗoБАЛ. OcoДoe ЗМЛПaМЛe oДpaЪЛЪe Мa
АaЗОeМЛe Мa ЗкxoАe, oДйХП Л ЪpyДМyп oДЗУБНy
ЗoБАyеМoЦo НoПФpeccopa, c ЪeП, дЪoДк АaЗОeМЛe
ЗoБАyxa Мe ФpeЗкеaОo yНaБaММкe ФpeАeОк.
иoПМЛЪe, дЪo ЛБОЛеМee АaЗОeМЛe ПoКeЪ oНaБaЪл
МeЦaЪЛЗМoe ЗОЛУМЛe Мa oДзyп paДoЪy, cpoН cОyКДк
Л ДeБoФacМocЪл ЛМcЪpyПeМЪa.
2. CÏaÁÍa
(1) иepeА МaдaОoП paДoЪк c нЪЛП ЦЗoБАeБaДЛЗМкП
cЪaМНoП, yДeАЛЪecл З МaОЛдЛЛ ФepeЗoАМЛНa oЪ
ЗoБАyеМoЦo НoПФpeccopa Л нЪЛП ЛМЪcpyПeМЪoП.
CПaБНa, ФpoЛБЗoАЛПaУ дepeБ ЗoБАyеМкИ
ФepeЗoАМЛН oДecФeдЛЗaeЪ МopПaОлМyп paДoЪy,
АОЛЪeОлМкИ cpoН cОyКДк Л oЪcyЪcЪЗЛe НoppoБЛЛ.
HacЪpoИЪe ПacОХМНy ЪaНЛП oДpaБoП, дЪoДк ПacОo
ФocЪyФaОo c ЛМЪepЗaОoП oЪ 5 Аo 10 бЛНОoЗ ФoАaдЛ
ЦЗoБАeИ.
(2) PeÍoÏeÌÀyeÚcÓ ÔoÎëÁoÇaÚëcÓ ÏacÎoÏ (SHELL
TONNA). B ÔepeäÌe yÍaÁaÌê ÀpyÖËe peÍoÏeÌÀoÇaÌêe
ÏacÎa. HË Ç ÍoeÏ cÎyäae Ìe cÏeåËÇaÈÚe ÀÇa ËÎË
ÄoÎee paÁÌêx ÚËÔoÇ ÏaceÎ.
3. ÂaÖpyÁÍa ÖÇoÁÀeÈ
(1) Обхватите пальцем направляющую для гвоздей и
ручку.
Нажмите ручку вниз и качанием откройте
направляющую для гвоздей.
Также откройте крышку магазина (Рис. 2).
49
(2) Отрегулируйте положение пластины в соответствии
с длиной гвоздей (Рис. 3).
Гвозди будут подаваться неплавно, если пластина
неправильно отрегулирована (Рис. 4).
a. Поверните держатель гвоздей примерно на 90
градусов против часовой стрелки.
b. Сдвиньте по возможности в вертикальном
направлении.
Поднимайте или опускайте держатель гвоздей
для установки гвоздей различной длины.
c. Отрегулируйте пластину по контрольным точкам
длины гвоздей на крышке магазина и поверните
держатель гвоздей на 90 градусов по часовой
стрелке до щелчка.
(3) Установите бобину с гвоздями в магазин.
Отмотайте достаточное количество гвоздей для
достижения направляющего отверстия (Рис. 5).
При использовании гвоздей, связанных
проволокой
Вставьте первый гвоздь в направляющее отверстие,
а второй гвоздь между двумя защелками механизма
подачи.
Установите головку гвоздя в направляющий слот
(Рис. 6).
При использовании гвоздей, связанных
пластиковой лентой
Вставьте первый гвоздь в направляющее отверстие,
а второй гвоздь между двумя защелками механизма
подачи.
Вставьте головку гвоздя и верхнюю сторону
пластиковой ленты в направляющий слот.
Вставьте нижнюю часть пластиковой ленты в
направляющий слот для пластиковых лент (Рис. 7).
(4) Сначала закройте крышку магазина, а затем
качанием закройте направляющую для гвоздей
(Рис. 8).
(5) Правильно заблокируйте ручку.
èPàMEóAHàE
Будьте осторожны, чтобы не деформировать
связанные проволоки и не разделить гвозди
направляющей поверхностью.
В противном случае направляющая для гвоздей не
закроется правильно.
èPEÑOCTEPEÜEHàü
Для предотвращения ненужной операции никогда
не трогайте курок и не ставьте верхний конец
нажимного рычага на рабочий стол или на пол. Также
никогда не направляйте выходное отверстие для
гвоздей на людей.
èPàMEóAHàE
Перед загрузкой гвоздей в магазин расположите
держатель для гвоздей в соответствии с длиной
гвоздей. Если положение держателя для гвоздей
неправильно отрегулировано, подаваемые гвозди
могут застревать. Если крышку принудительно
закрыть без регулировки положения держателя для
гвоздей, возможно повреждение держателя для
гвоздей.

PyccÍËÈ
KAK èOãúÂOBATúCü
ÉBOÂÑEÂAÅàBOóHõM CTAHKOM
èPEÑOCTEPEÜEHàü
䡬 HËÍoÖÀa Ìe ÔoÎëÁyÈÚecë ÖoÎoÇÍoÈ ËÎË ÍopÔycoÏ
íÚoÖo ÔpËÄopa Ç ÍaäecÚÇe ÏoÎoÚÍa.
䡬 CoÄÎïÀaÈÚe Ïepê ÔpeÀocÚopoÊÌocÚË c áeÎëï
oДecФeдeМЛУ ДeБoФacМocЪЛ ОпАeИ, МaxoАУзЛxcУ
ЗДОЛБЛ ФpoЗeАeМЛУ paДoЪ.
1. èpoáeÀypê ÁaÄËÇaÌËÓ ÖÇoÁÀeÈ
ÉÇoÁÀeÁaÄËÌoÈ cÚaÌoÍ XËÚaäË (Hitachi) ocÌaçÕÌ
ÔepeÍÎïäaïçËÏcÓ ÏexaÌËÁÏoÏ c ÙyÌÍáËeÈ
ÁaÄËÇaÌËÓ ÖÇoÁÀeÈ.
B ÁaÇËcËÏocÚË oÚ ÔÎaÌËpyeÏoÈ paÄoÚê, ÇêÄepËÚe
MEXAHàÂM OÑàHOóHOÉO ПОСЛЕДОВАТЕЛЬНОГО
ÑEâCTBàü ËÎË MEXAHàÂM KOHTAKTHOÉO
èìCKA.
(1) èepËoÀËäecÍoe ÁaÄËÇaÌËe ÖÇoÁÀeÈ
èocÚaÇëÚe ÔepeÍÎïäaÚeÎë Ç ÇepxÌee ÔoÎoÊeÌËe
(äÚoÄê ÇêÄpaÚë MEXAHàÂM OÑàHOóHOÉO
ПОСЛЕДОВАТЕЛЬНОГО ÑEâCTBàü) (CÏ. PËc. 9).
иpЛКПЛЪe coФОo ЗкxoАa ЦЗoБАeИ Н МyКМoПy ПecЪy
Л МaКПЛЪe НypoН, дЪoДк БaДЛЪл ЦЗoБАл oАМЛП
ЗкcЪpeОoП (CП. PËc. 10).
èocÎe ÔepÇoÖo ÁaÄËÇaÌËÓ ÖÇoÁÀÓ, cÎeÀyïçaÓ
oÔepaáËÓ Ìe ÄyÀeÚ ÇoÁÏoÊÌoÈ Ào Úex Ôop ÔoÍa
ÍypoÍ ÄyÀeÚ oÚÔyçeÌ Ë ÌaÊaÚ cÌoÇa.
ПPEДУПPEЖДEHИE
Гвоздь выстреливается при каждом нажатии
пускового крючка и только при прижатом
прижимном рычаге.
ПPEДOCTEPEЖEHИЯ
EcОЛ З peКЛПe eАЛМЛдМoЦo ЗкcЪpeОa Зк Мe МaКПХЪe
НypoН ДкcЪpo Л peеЛЪeОлМo, ЪoЦАa cЪaМoН ПoКeЪ
ФoАФpкЦМyЪл Л ЗкcЪpeОЛЪл МecНoОлНo ЦЗoБАeИ
ЗПecЪo oАМoЦo. Bo ЛБДeКaМЛЛ нЪoЦo, yДeАЛЪecл З
ЪoП, дЪo НypoН МaКЛПaeЪcУ ДкcЪpo Л peеЛЪeОлМo.
(2) HaÊÏËÚe pêäaÖ
иpЛ ФpЛКЛПaМЛЛ coФОa ЗкxoАa ЦЗoБАeИ,
oДУБaЪeОлМo ФoОМocЪлп ФoАМЛПЛЪe pкдaЦ-ЪoОНaЪeОл
(CП. PËc. 10) cÌÓÚë ÔpeÀoxpaÌËÚeÎë. TaÍËÏ oÄpaÁoÏ,
ÖÇoÁÀË ÌeÇoÁÏoÊÌo ÁaÄËÚë ÄeÁ ÚoÖo, äÚoÄê cÌÓÚë
ÔpeÀoxpaÌËÚeÎë, ÀaÊe ecÎË ÌaÊËÏaÚë ÍypoÍ.
(3) ÅecÔpepêÇÌoe ÁaÄËÇaÌËe ÖÇoÁÀeÈ
èocÚaÇëÚe ÔepeÍÎïäaÚeÎë Ç ÌËÊÌee ÔoÎoÊeÌËe
(äÚoÄê ÇêÄpaÚë MEXAHàÂM KOHTAKTHOÉO
èìCKA) (CÏ. PËc. 11).
иpeКАe ЗceЦo, МaКПЛЪe НypoН. иoЪoП ФpЛКПЛЪe
ФpЛДop З МeoДxoАЛПoe ФoОoКeМЛe АОУ
aЗЪoПaЪЛдecНoЦo БaДЛЗaМЛУ ЦЗoБАeИ (CП. PËc. 12).
МЕХАНИЗМ ОДИНОЧНОГО ПОСЛЕДОВАТЕЛЬНОГО
ДЕЙСТВИЯ используется, если требуется точное
забивание гвоздя.
МЕХАНИЗМ ОДИНОЧНОГО ПОСЛЕДОВАТЕЛЬНОГО
ДЕЙСТВИЯ снижает опасность нанесения телесных
повреждений работающему и другим лицам в рабочей
зоне по сравнению с МЕХАНИЗМОМ КОНТАКТНОГО
ПУСКА. Это происходит благодаря тому, что
устраняется возможность выстреливания
непредусмотренного гвоздя при нажатом пусковом
крючке и случайном прижатии прижимного рычага к
себе или другому лицу.
МЕХАНИЗМ ОДИНОЧНОГО ПОСЛЕДОВАТЕЛЬНОГО
ДЕЙСТВИЯ также снижает скорость работы по
сравнению с МЕХАНИЗМОМ КОНТАКТНОГО ПУСКА.
МЕХАНИЗМ ОДИНОЧНОГО ПОСЛЕДОВАТЕЛЬНОГО
ДЕЙСТВИЯ рекомендуется для использования
неопытными пользователями.
èPEÑOCTEPEÜEHàü
䡬 иpoУЗОУИЪe ocЪopoКМocЪл ФpЛ БaДЛЗaМЛЛ ЦЗoБАeИ
Ç yÖÎê ÀepeÇa. èpË ÄecÔepêpÇÌoÏ ÁaÄËÇaÌËË
ÖÇoÁÀeÈ Ç yÖÎê ÀepeÇa, ÖÇoÁÀë ÏoÊeÚ cocÍoäËÚë
ËÎË ÔpoÄËÚë yÖoÎ ÌacÍÇoÁë.
䡬 He ÇÄËÇaÈÚe ÖÇoÁÀë Ç ÀpyÖoÈ ÖÇoÁÀë.
䡬 He ÇÄËÇaÈÚe ÖÇoÁÀë Ç ÏeÚaÎÎËäecÍËe äacÚË.
èPàMEóAHàü
䡬 Mepê ÔpeÀocÚopoÊÌocÚË ÔpË cpaÄaÚêÇaÌËË ÄeÁ
БaЦpyБНЛ
аМoЦАa, БaДЛЗaМЛe ЦЗoБАeИ ДyАeЪ ФpoАoОКaЪлcУ
ФocОe БaДЛЗaМЛУ Зcex ЦЗoБАeИ, paМee coАepКaзЛxcУ
З ПaЦaБЛМe.
щЪo Л oДoБМaдaeЪ ЪepПЛМ “cpaДaЪкЗaМЛe ДeБ
БaЦpyБНЛ”. TaНoe cpaДaЪкЗaМЛe ПoКeЪ ФoЗpeАЛЪл
aПopЪЛБaЪop, ПaЦaБЛМ Л ФoАaЗaЪeОл ЦЗoБАeИ.
Bo ЛБДeКaМЛe cpaДaЪкЗaМЛУ ДeБ БaЦpyБНЛ,
ФocЪoУММo ФpЗepУИЪe НoОЛдecЪЗo ocЪaЗеЛxcУ
ЦЗoБАeИ. СpyЦЛПЛ cОoЗaПЛ, Зce ЦЗoБАЛ МeoДxoАЛПo
ЗкМЛПaЪл ФocОe ЛcФoОлБoЗaМЛУ ЦЗoБАeБaДЛЗМoЦo
cЪaМНa.
䡬 èocÎe ÁaÄËÇaÌËÓ ÖÇoÁÀeÈ:
(1) oЪcoeАeМЛЪe еОaМЦ oЪ ЦЗoБАeБaДЛЗМoЦo cЪaМНa;
(2) ЗкМлЪe Зce ЦЗoБАЛ ЛБ ЦЗoБАeБaДЛЗМoЦo cЪaМНa;
(3) БaНaФaИЪe 5 – 10 НaФeОл cПaБНЛ ФМeЗПaЪЛдecНoЦo
ËÌcÚpyÏeÌÚa XËÚaäË Ç ÇoÁÀyåÌyï ÔpoÄÍy
ÖÇoÁÀeÁaÄËÇÌoÖo cÚaÌÍa; Ë
(4) oÚÍpoÈÚe cÎËÇÌoÈ ÍpaÌ ÕÏÍocÚË ÇoÁÀyåÌoÖo
ÍoÏÔpeccopa, äÚoÄê cÎËÚë ÊËÀÍocÚë.
䡬 После завершения работы накапайте примерно 2
мл масла в корпус через отверстие шланга, чтобы
предотвратить появление ржавчины.
䡬 B ycÎoÇËÓx ÌËÁÍoÈ ÚeÏÔepaÚypê aÔÔapaÚ Ìe ÇceÖÀa
ФpaЗЛОлМo paДoЪaeЪ. BceЦАa ФoОлБyИЪecл
ycЪpoИcЪЗoП ФpЛ cooЪЗeЪcЪЗyпзeИ ЪeПФepaЪype
ЗoБАyxa.
2. Регулировка глубины забивания гвоздей
èPEÑOCTEPEÜEHàü
При выполнении регулировок обязательно снимите
палец с курка. При выполнении регулировок ни в
коем случае не направляйте выходное отверстие
для гвоздей вниз, а также убедитесь, что выходное
отверстие для гвоздей не направлено на людей.
䡬 Настройка регулятора (Рис. 13)
Выполните пробную забивку. Если гвозди
забиваются слишком глубоко, поверните регулятор
в сторону меньшей глубины (метка
Если гвозди забиваются слишком неглубоко,
поверните регулятор в сторону большей глубины
(метка
Глубина изменяется на 1 мм при каждом повороте
регулятора.
èPEÑOCTEPEÜEHàü
䡬 При настройке регулятора он не поворачивается
больше, чем на 3 мм, от самой глубокой точки, в
которую был забит гвоздь. Не поворачивайте
регулятор принудительно дальше этой точки.
䡬 Глубину забивания можно также отрегулировать,
изменяя используемое давление воздуха. Делайте
это вместе с перемещением регулятора.
Использование большого давления воздуха, не
соответствующего сопротивлению забивания,
приведет к сокращению срока службы нейлера.
) (См. Рис. 13, 14).
)
50

PyccÍËÈ
3. Изменение направления вылета
Направление выходного отверстия можно изменить,
поворачивая верхнюю крышку (Рис. 15).
4. Обрезание ленты
При использовании гвоздей, скрепленных ленты,
обрывайте выходящую ленту в направлении стрелки,
когда используются гвозди, скрепленные лентой
(Рис. 16).
5. Как использовать крышку наконечника
èPEÑOCTEPEÜEHàü
Перед установкой или удалением крышки
наконечника удалите шланг с нейлера и выпустите
сжатый воздух для предотвращения случайного
выпуска гвоздей.
䡬 Прикрепите крышку наконечника к концу нажимного
рычага в случае, если Вы хотите защитить
поверхность дерева и т.п., от царапин.
(1) Прикрепление и удаление крышки наконечника
Крышку наконечника можно прикрепить, просто
вдавливая ее в нажимной рычаг.
Нажимайте, пока выпуклая часть внутри крышки
колпачка не войдет в отверстие нажимного рычага.
(Рис. 17)
Для удаления вставьте стержень, например,
отвертку, в зазор на задней части нажимного рычага,
а затем вытяните его.
(2) Сохранение крышки наконечника
Для сохранения удаленной крышки наконечника
поместите ее на свободное место позади магазина.
(Рис. 18)
èPOBEPKA à ìXOÑ
èPEÑOCTEPEÜEHàü
OÄÓÁaÚeÎëÌo oÚcoeÀeÌËÚe åÎaÌÖ ÔpË oäËcÚÍe
ÁaeÀaÌËÓ, ÔpoÇepÍe, yxoÀe Ë oäËcÚÍe.
1. Меры по ликвидации застрявших гвоздей
(1) Удалите рулон гвоздей из магазина, откройте
направляющую для гвоздей, вставьте стержень в
выходное отверстие и постучите по стрежню
молотком (Рис. 19).
(2) Удалите застрявший гвоздь с помощью плоской
отвертки (Рис. 20)
(3) Срежьте с помощью кусачек поврежденную часть
стальной проволоки, соединяющую гвозди,
ликвидируйте деформацию, затем загрузите рулон
гвоздей в магазин.
(4) В случае частого застревания обратитесь в
уполномоченный центр по техническому
обслуживанию, в котором Вы приобрели этот
механизм.
2. иpoЗepлЪe НpeФХКМкe ЗЛМЪк НaКАoИ дacЪЛ
иocЪoУММo ФpoЗepУИЪe НaКАyп АeЪaОл Мa ФpeАПeЪ
ocОaДОeМЛУ НpeФХКМкx ЗЛМЪoЗ, a ЪaНКe ЗepoУЪМyп
yЪeдНy. ВaНpeФОУИЪe ocОaДОeММкe ЗЛМЪк. PaДoЪa
ЛМcЪpyПeМЪoП c ocОaДОeММкПЛ ЗЛМЪaПЛ ПoКeЪ
ФpЛЗecЪЛ Н ЪpaЗПЛpoЗaМЛп.
3. èpoÇepÍa ÔycÍoÇoÖo pêäaÖa
èpoÇepëÚe, ecÎË ÔycÍoÇoÈ pêäaÖ ÎÕÖÍo ÀÇËÖaeÚcÓ
(PËc. 21).
OдЛзaИЪe yдacЪoН cНoОлКeМЛУ cФycНoЗoЦo pкдaЦa
Л ЗpeПУ oЪ ЗpeПeМЛ ФoОлБyИЪecл ПacОoП АОУ
cПaБкЗaМЛУ.
CПaБНa oДecФeдЛЗaeЪ ЦОaАНoe cНoОлКeМЛe Л
oАМoЗpeПeММo cОyКЛЪ АОУ ФpeАoxpaМeМЛУ oЪ
oДpaБoЗaМЛУ pКaЗдЛМк.
51
4. Проверка механизма подачи
(1) Периодически очищайте скользящую часть ручки, а
затем наносите на нее рекомендуемое масло (См.
Рис. 22).
(2) Откройте направляющую для гвоздей и удалите пыль
и т.п., как показано на Рис. 23. Нанесите смазку на
подвижную впадину механизма подачи и на вал.
Проверьте плавность скольжения ограничителя
гвоздей (A) и ограничителя гвоздей (B), нажимая на
них пальцем.
(3) Также нанесите после чистки рекомендуемое масло
на подающую поверхность наконечника и на
направляющую для гвоздей. Это обеспечит
плавность работы и предотвратит появление
ржавчины.
èPEÑOCTEPEÜEHàü
Перед использованием проверьте плавность
движения механизмов подачи и ограничителей. В
случае неправильного движения возможна забивка
гвоздей под необычным углом, что представляет
опасность для оператора и окружающих лиц.
5. Проверка магазина
Очистите магазин. Удалите пыль от стружек, которая
может накапливаться в магазине.
6. XpaÌeÌËe
䡬 B cÎyäae ÀÎËÚeÎëÌoÖo xpaÌeÌËÓ, ÌaÌecËÚe ÚoÌÍËÈ
cОoИ caПБНЛ Мa КeОeБМкe дacЪЛ c бeОлп
ФpeАoЪЗpaзeМЛУ pКaЗдЛМк.
䡬 He xpaÌËÚe ÖÇoÁÀeÁaÄËÇÌoÈ cÚaÌoÍ Ç xoÎoÀe.
ÑepÊËÚe ÖÇoÁÀeÁaÄËÇÌoÈ cÚaÌoÍ Ç ÚeÔÎe.
䡬 EcÎË ÖÇoÁÀeÁaÄËÇÌoÈ cÚaÌoÍ Ìe ËcÔoÎëÁyeÚcÓ –
xpaÌËÚe eÖo Ç ÚÕÔÎoÏ, cyxoÏ ÏecÚe.
ÑepÊËÚe eÖo Ç ÀaÎË oÚ ÀeÚeÈ.
7. èopÓÀoÍ ÁaÔËceÈ Ôo ÚexoÄcÎyÊËÇaÌËï
OCTOPOÜHO
PeПoМЪ, ПoАЛЩЛНaбЛУ Л ФpoЗepНa нОeНЪpoЛМcЪpyПeМЪoЗ
HITACHI АoОКМa ФpoЗoАЛЪлcУ ЪoОлНo З aЗЪopЛБoЗaММкx
cepЗЛcМкx бeМЪpax HITACHI. СaММкИ cФЛcoН ФpЛМecЛЪe
З ПacЪepcНyп ЗПecЪe c ЛМcЪpyПeМЪoП АОУ ФpoЗeАeМЛУ
peПoМЪa ЛОЛ ЪexМЛдecНoЦo oДcОyКЛЗaМЛУ.
иpЛ ЛcФoОлБoЗaМЛЛ ЛОЛ ЪexoДcОyКЛЗaМЛЛ
ЛМcЪpyПeМЪa ЗceЦАa cОeАЛЪe Бa ЗкФoОМeМЛeП Зcex
ФpaЗЛО Л МopП ДeБoФacМocЪЛ.
ÂAMEóAHàE
îËpÏa HITACHI ÌeÔpepêÇÌo paÄoÚaeÚ ÌaÀ
ycoÇepåeÌcÚÇoÇaÌËeÏ cÇoËx ËÁÀeÎËÈ, ÔoíÚoÏy Ïê
coxpaÌÓeÏ Áa coÄoÈ ÔpaÇo Ìa ÇÌeceÌËe ËÁÏeÌeÌËÈ
Ç ÚexÌËäecÍËe xapaÍÚepËcÚËÍË, yÔoÏÓÌyÚêe Ç ÀaÌÌoÈ
ËÌcÚpyÍáËË Ôo íÍcÔÎyaÚaáËË, ÄeÁ ÔpeÀyÔpeÊÀeÌËÓ
oÄ íÚoÏ.
KOMèPECCOP
èPEÑOCTEPEÜEHàü
EcОЛ paДoдee АaЗОeМЛe ЗoБАyеМoЦo НoПФpeccopa
ФpeЗкеaeЪ 8,3 Дap, yДeАЛЪecл З МaОЛдЛЛ
peЦyОЛpyпзeЦo НОaФaМa ПeКАy ЗoБАyеМкП
НoПФpeccopoП Л ЦЗoБАeБaДЛЗМкП cЪaМНoП. иoЪoП,
oЪpeЦyОЛpyИЪe АaЗОeМЛe ЗoБАyxa З ФpeАeОax
paДoдeЦo АЛaФaБoМa 4,9 – 8,3 Дap. EcОЛ ЗoБАyеМaУ
НoПФoМoЗНa ycЪaМoЗОeМa, cПaБкЗaМЛe ЪaНКe
cЪaМoЗЛЪcУ ЗoБПoКМкП, дЪo ЦapaМЪЛpyeЪ
АoФoОМЛЪeОлМoe yАoДcЪЗo.

CMAõBAûôàâ-îàãúTPAñàOHHõâPEÑìKñàOHHõâ KãAèAH (BoÁÀyåÌaÓ
KoÏÔoÌoÇÍa)
C ЪeП, дЪoДк нЪo oДopyАoЗaМЛe ПoЦОo paДoЪaЪл З
oФЪЛПaОлМкx ycОoЗЛУx Л c бeОлп yЗeОЛдeМЛУ cpoНa
cОyКДк, peНoПeМАyeЪcУ ЛcФoОлБoЗaЪл cПaБкЗaпзeeЩЛОлЪpaбЛoММкИ peАyНбЛoММкИ НОaФaМ. OЦpaМЛдЪe
АОЛМy еОaМЦa ПeКАy ЛМcЪpyПeМЪoП Л ЗoБАyеМoИ
НoПФoМoЗНoИ Аo 10 П Зo ЗpeПУ paДoЪк (CП. PËc. 24).
àCèOãúìEMõE ãìÅPàKAHTõ
TËÔ ÎyÄpËÍaÌÚa HaÁÇaÌËe ÎyÄpËÍaÌÚa
PeÍoÏeÌÀyeÏoe ÏacÎo SHELL TONNA
MoÚopÌoe ÏacÎo SAE10W, SAE20W
TypÄËÌÌoe ÏacÎo ISO VG32 – 68 (#90 – #180)
àÌÙopÏaáËÓ Ôo åyÏy
BeОЛдЛМк еyПoЗкx xapaНЪepЛcЪЛН cooЪЗeЪcЪЗyпЪ EN
792-13:
TЛФЛдМкИ A-ЗecoПкИ eАЛМЛдМкИ еyПoЗoИ ypoЗeМл
cЛОк L
TЛФЛдМкИ A-ЗecoПкИ eАЛМЛдМкИ еyПoЗoИ
ЛcxoАУзЛИ ypoЗeМл Мa paДoдeИ cЪaМбЛЛ
èoÖpeåÌocÚë KpA: 2,5 ÀÅ (A)
щЪЛ ЗeОЛдЛМк oЪМocУЪcУ Н xapaНЪepЛcЪЛНaП
ЛМcЪpyПeМЪa Л Мe ФpeАcЪaЗОУпЪ paБЗЛЪЛe БЗyНa Зo
ЗpeПУ ЛcФoОлБoЗaМЛУ. PaБЗЛЪЛe БЗyНa Зo ЗpeПУ
ЛcФoОлБoЗaМЛУ ДyАeЪ, Н ФpЛПepy, БaЗЛceЪл oЪ
oНpyКaпзeИ cpeАк paДoЪк, ПaЪepЛaОa, oФopк
ПaЪepЛaОa Л НoОЛдecЪЗa БaДЛЗaМЛИ Л Ъ.А.
B БaЗЛcЛПocЪЛ oЪ cocЪoУМЛУ paДoдeЦo ПecЪa Л ЩopПк
paДoдeЦo ПaЪepЛaОa, ЗoБПoКМo ocyзecЪЗОeМЛe
ЛМАЛЗЛАyaОлМкx cФocoДoЗ yПeМлеeМЛУ еyПa, ЪaНЛx НaН
pacФoОoКeМЛe paДoдeЦo ПaЪepЛaОa Мa БЗyНoЗДЛpaпзЛe
ФoАcЪaЗНЛ, ФpeАoxpaМУпзЛe ЗЛДpaбЛп ПaЪepЛaОa
ФocpeАcЪЗoП ЩЛНcaбЛЛ ЛОЛ ФoНpкЪЛУ, МacЪpoЛЗ Мa
ПЛМЛПaОлМoe АaЗОeМЛe МeoДxoАЛПoe АОУ ФpoЗeАeМЛУ
АaММoИ paДoЪк Л Ъ.А.
B ocoДкx cОyдaУx МeoДxoАЛПo oАeЪл БaзЛЪМкe МayеМЛНЛ.
àÌÙopÏaáËÓ Ôo ÇËÄpaáËË
TЛФЛдМкe ЗeОЛдЛМк ЗЛДpaбЛoММкx xapaНЪepЛcЪЛН
cooЪЗeЪcЪЗyпЪ EN 792-13: 2,5 m/s
иoЦpeеМocЪл K = 1,5 m/s
2
щЪЛ ЗeОЛдЛМк oЪМocУЪcУ Н xapaНЪepЛcЪЛНaП
ЛМcЪpyПeМЪa Л Мe ФpeАcЪaЗОУпЪ ЗОЛУМЛe Мa pyНЛ ФpЛ
ЛcФoОлБoЗaМЛЛ АaММoЦo ЛМcЪpyПeМЪa. BОЛУМЛe Мa pyНЛ,
ФpЛ ЛcФoОлБoЗaМЛЛ ЛМcЪpyПeМЪa ДyАeЪ БaЗЛceЪл, Н
ФpЛПepy, oЪ ycЛОЛУ БaxЗaЪкЗaМЛУ, cЛОк АaЗОeМЛУ ФpЛ
НoМЪaНЪe, МaФpaЗОeМЛУ paДoЪк, МacЪpoИНЛ ФoАaдЛ
нМepЦЛЛ, paДoдeЦo ПaЪepЛaОa Л ФoАcЪaЗНЛ ФoА ПaЪepЛaО.
2
WA
,1s,d = 97 dB
pA
,1s,d = 84 dB
L
PyccÍËÈ
52

1
2
501
3
4
5
6
7
8
9
10
11
12
13
14
12
15
16
17
18
31
32
19
20
44
43
21
47
46
45
A
61
65
22
23
24
25
26
27
B
28
30
29
33
34
35
36
37
38
39
64
66
70
69
68
67
81
40
41
42
71
74
73
72
79
80
26
83
82
88
89
49
48
50
51
52
60
61
62
63
59
78
77
76
75
92
93
94
84
85
86
87
79
95
102
103
90
91
104
105
106
53
54
55
56
57
58
A
93
96
97
98
96
98
B
99
100
101
108
107
96
100
102
106
53

Item
No.
1 HEX. SOCKET HD. BOLT M6×16 1
2 PLATE 1
3 TOP COVER 1
4 HEX. SOCKET HD. BOLT M5×35 4
5 WARNING LABEL (A) 1
6 EXHAUST COVER 1
7 GASKET 1
8 EXHAUST VALVE RUBBER (A) 1
9 HEAD VALVE SPRING 1
10 O-RING (S-34) 1
11 HEAD VALVE 1
12 CYLINDER O-RING (C) I.D 44.7 2
13 HEAD VALVE RUBBER (A) 1
14 RETAINING RING 1
15 CYLINDER PLATE 1
16 CYLINDER O-RING (I.D 63.1) 1
17 O-RING (P-46) 1
18 CYLINDER 1
19 O-RING (I.D. 34.7) 1
20 PISTON ASS'Y (INCLUD.19) 1
21 CHANGE ROD (D) 1
22 WARNING LABEL 1
23 NAME PLATE 1
24 PISTON BUMPER 1
25 O-RING (S-44) 1
26 O-RING (P-4) 2
27 WASHER 1
28 NOSE 1
29 NYLOCK HIGH TENSION BOLT M6×20 4
30 NEEDLE ROLLER 1
31 ROLL PIN D4×14 1
32 FEEDER ARM 1
33 FEEDER SPRING 1
34 FEEDER 1
35 PUSHING LEVER SPRING 1
36 PUSHING LEVER (B) 1
37 ADJUSTER (B) 1
38 WASHER 1
39 HEX. SOCKET HD. BOLT M6×12 1
40 ADJUSTER SPRING 2
41 STEEL BALL D3.175 2
42 PUSHING LEVER(A) 1
43 MACHINE SCREW M5×20 1
44 WASHER 1
45 GRIP RUBBER 1
46 BODY ASS'Y (INCLUD.45) 1
47 O-RING (I.D 37.2) 1
48 CAP 1
49 AIR PLUG NPT 3/8 1
50 FEED PISTON O-RING (I.D. 14) 1
51 VALVE BUSHING (B) 1
52 O-RING (P-18) 1
53 O-RING (P-7) 2
54 VALVE PISTON 1
55 O-RING (1AP-10) 1
56 PLUNGER SPRING 1
57 PLUNGER 1
58 VALVE BUSHING (A) 1
59 O-RING (I.D. 1.8) 2
60 ROLL PIN D3×22 1
61 ROLL PIN D3×30 3
62 ROLL PIN D3×10 1
63 CHANGE KNOB (D) 1
64 TRIGGER ARM SPRING 1
65 STEEL BALL D3.97 1
Part Name Q’TY
Item
No.
66 SPRING 1
67 PUSHING LEVER GUIDE (D) 1
68 TRIGGER (D) 1
69 ROLL PIN D2.5×16 1
70 TRIGGER ARM (D) 1
71 TRIGGER (D) ASS'Y 1
72 O-RING (P-9) 1
73 FEED PISTON 1
74 O-RING (P-21) 1
75 BUMPER 1
76 FEED SPRING 1
77 FEED PISTON COVER 1
78 RETAINING RING 1
79 SHAFT RING 2
80 HEX. SOCKET HD. BOLT M5×18 1
81 NAIL GUIDE SHAFT 1
82 SPRING (F) 1
83 GUIDE LOCK 1
84 NAIL STOPPER (A) 1
85 SPRING 1
86 NAIL GUIDE 1
87 NAIL GUIDE COVER 1
88 NAIL STOPPER (B) 1
89 STOPPER SPRING 1
90 NYLOCK HEX. SOCKET HD. BOLT M4×10 1
91 COVER 1
92 WARNING LABEL 1
93 NYLON NUT M5 2
94 SLEEVE 1
95 NYLON WASHER 1
96 PIN 2
97 MAGAZINE 1
98 FEEDER SHAFT RING 2
99 NAIL HOLDER 1
100 MAGAZINE COVER 1
101 LABEL 1
102 HOLDER CAP (A) 1
103 RATCHET SPRING 1
104 ROLL PIN D2.5×10 1
105 HOLDER SHAFT 1
106 SPRING 1
107 MAGAZINE ASS'Y (INCLUD.94-98,100-104) 1
108 VALVE PACKING 1
501 SAFETY GLASSES 1
Part Name Q’TY
54

English
Object of declaration: Hitachi Coil Nailer NV65AH2
EC DECLARATION OF CONFORMITY
We declare under our sole responsibility that this
product is in conformity with standard EN792-13 in
accordance with Council Directives 2006/42/EC.
The European Standards Manager at Hitachi Koki
Europe Ltd. is authorized to compile the technical file.
This declaration is applicable to the product affixed CE
marking.
Deutsch
Gegenstand der Erklärung: Hitachi Coil Nagler
ERKLÄRUNG ZUR KONFORMITÄT MIT CE-REGELN
Wir erklären in alleiniger Verantwortung, dass dieses
Produkt dem Standard EN792-13 in Übereinstimmung
mit der Direktive des Europarates 2006/42/CE entspricht.
Der Manager für europäische Standards bei der Hitachi
Koki Europe Ltd. ist zum Verfassen der technischen Datei
befugt.
Diese Erklärung gilt für Produkte, die die CE-Markierung
tragen.
Français
Objet de la déclaration: Hitachi Cloueur pour coils NV65AH2
DECLARATION DE CONFORMITE CE
Nous déclarons sous notre seule et entière responsabilité
que ce produit est conforme à la norme EN792-13, en
accord avec la Directive 2006/42/CE du Conseil.
Le responsable des normes européennes d’Hitachi Koki
Europe Ltd. est autorisé à compiler les données
techniques.
Cette déclaration s’applique aux produits
désignés CE.
Italiano
Objet de la déclaration: Hitachi Cloueur pour coils NV65AH2
DICHIARAZIONE DI CONFORMITÀ CE
Si dichiara sotto nostra responsabilità che questo
prodotto è conforme alla normativa EN792-13, in base
alle Direttive del Concilio 2006/42/CE.
Il Responsabile delle Norme Europee di Hitachi Koki
Ltd. è autorizzato a compilare la scheda tecnica.
Questa dichiarazione è applicabile ai prodotti cui sono
applicati i marchi CE.
NV65AH2
Nederlands
Onderwerp van verklaring:Hitachi Trommelspijkerapparaat
Wij verklaren onder eigen verantwoordelijkheid dat
dit product conform de richtlijn EN792-13, voldoet
aan de eisen van EEG Bepaling 2006/42/EC.
De manager voor Europese normen van Hitachi Koki
Europe Ltd. heeft de bevoegdheid tot het samenstellen
van het technische bestand.
Deze verklaring is van toepassing op produkten voorzien
van de CE-markeringen.
Español
Objeto de declaración: Hitachi Clavadora para coils
DECLARACIÓN DE CONFORMIDAD DE LA CE
Declaramos bajo nuestra única responsabilidad que
este producto está de acuerdo con la norma EN79213, según indica la Directriz del Consejo 2006/42/CE.
El Jefe de Normas Europeas de Hitachi Koki Europe
Ltd. está autorizado para recopilar archivos técnicos.
Esta declaración se aplica a los productos con marcas
de la CE.
PyccÍËÈ
Предмет декларирования: Hitachi Heйлep NV65AH2
Mк c ФoОМoИ oЪЗeЪcЪЗeММocЪлп БaУЗОУeП, дЪo АaММoe
ЛБАeОЛe cooЪЗeЪcЪЗyeЪ cЪaМАapЪaП EN792-13
coЦОacМo СЛpeНЪЛЗaП CoЗeЪa 2006/42/EC.
MeМeАКep oЪАeОa eЗpoФeИcНЛx cЪaМАapЪoЗ НaдecЪЗa
НoПФaМЛЛ Hitachi Koki Europe Ltd. ЛПeeЪ ФpaЗo
cocЪaЗОУЪл ЪexМЛдecНЛИ ЩaИО.
ÑaÌÌaÓ ÀeÍÎapaáËÓ oÚÌocËÚcÓ Í ËÁÀeÎËÓÏ, Ìa
ÍoÚopêx ËÏeeÚcÓ ÏapÍËpoÇÍa CE.
Hitachi Koki Europe Ltd.
Clonshaugh Business & Technology Park, Dublin 17, lreland
Representative office in Europe
Hitachi Power Tools Europe GmbH
Siemensring 34, 47877 Willich 1, F. R. Germany
Head office in Japan
Hitachi Koki Co., Ltd.
Shinagawa Intercity Tower A, 15-1, Konan 2-chome,
Minato-ku, Tokyo, Japan
Hitachi Koki Co., Ltd.
NV65AH2
EC VERKLARING VAN CONFORMITEIT
NV65AH2
ÑEKãAPAñàü COOTBETCTBàü EC
30. 11. 2012
John de Loughry
European Standard Manager
30. 11. 2012
F. Tashimo
Vice-President & Director
211
Code No. C99199671 T
Printed in Taiwan
 Loading...