

Page 1

LCD Color Television
User Manual
L32AX03A
Thank you for purchasing this HITACHI product.
To obtain the best performance and safety, please read this manual carefully.
Please keep this manual for future reference.
Page 2

Thank you for purchasing this HITACHI LCD Color Television.
The instructions in this manual are described mainly with the remote control.
You can also use the buttons on the TV if they have the same names as those on the remote control.
To obtain the best performance and safety, please read this manual carefully.
Please keep this manual for future reference.
Contents
Important Safety Instructions 3
Supplied Accessories 4
Preparation
Stand Installation
Detaching the TV Stand for Wall Mounting
Positioning the TV Set
Antenna and Power Connections
Securing the TV Set
Remote Control Batteries Installation
Functional Overview
Front Panel
Side Panel
Rear Panel
Remote Control
Connections 10
Basic Operation
Power On/Off
Channel Selection
Input Source Selection
Volume Adjustment
On-Screen Display Selection and Adjustment
Stereo/Bilingual Sound Selection
Picture Size Selection
11
11
11
11
11
11
12
12
Teletext Operation 13
Menu Operation
Picture Menu
Audio Menu
5
Timer Menu
5
Function Menu
5
Setup Menu (TV Mode)
6
Setup Menu (RGB Mode)
6
6
6
Troubleshooting 21
7
Specification
7
Recommended Signal List
7
8
9
14
14
15
16
17
18
20
22
23
2
Page 3

Important Safety Instructions
Read Instructions - All the safety and operating
1.
instructions should be read before the product
is operated.
Retain Instructions - The safety and operating
2.
instructions should be retained for future
reference.
3.
Heed Warnings - All warnings on the product
and in the operating instructions should be
adhered to.
4.
Follow Instructions - All operating and use
instructions should be followed.
5.
Cleaning - Unplug the product from the wall
outlet before cleaning. Do not use liquid
cleaners or aerosol cleaners. Use a dry cloth
for cleaning.
6.
Attachments - Only use attachments/
accessories specified by the manufacturer.
7.
Water and Moisture - Do not use the product
near water, for example, near a bath tub, wash
bowl, kitchen sink, or laundry tub, in a wet
basement, or near a swimming pool, etc.
8.
Accessories - Do not place the product on
an unstable cart, stand, tripod, bracket, or
table. The product may fall, causing serious
injury to a child or adult, and serious damage
to the product. Use only with a cart, stand,
tripod, bracket, or table recommended by
the manufacturer, or sold with the product.
Any mounting of the product should follow
the manufacturer’s instructions and should
use a mounting accessory recommended
by the manufacturer. The product and cart
combination should be moved with care. Quick
stops, excessive force, and uneven surfaces
may cause the product and cart combination
to overturn.
9.
Ventilation - Slots and openings in the cabinet
are provided for ventilation and to ensure reliable
operation of the product and to protect it from
overheating, and these openings must not be
blocked or covered. The openings should never
be blocked by placing the product on a bed,
sofa, rug, or other similar surface. The product
should not be placed in a built-in installation
such as a bookcase or rack unless proper
ventilation is provided or the manufacturer’s
instructions have been adhered to.
10.
Power Sources - The product should be
operated only from the type of power source
indicated on the marking label. If you are not
sure of the type of power supply to your home,
consult your appliance dealer or local power
company.
Power Cord Protection - Power cords should be
11.
routed so that they are not likely to be walked
on or pinched by items placed upon or against
them, paying particular attention to cords at
plugs, convenience receptacles, and the point
where they exit from the appliance.
12.
Lightning - For added protection for the product
during a lightning storm, or when it is left
unattended and unused for long periods of time,
unplug it from the wall outlet and disconnect
the antenna or cable system. This will prevent
damage to the product due to lightning and
power-line surges.
13.
Power Lines - An outside antenna system
should not be located in the vicinity of overhead
power lines or other electric light or power
circuits, or where it can fall into such power lines
or circuits. When installing an outside antenna
system, extreme care should be taken to keep
from touching such power lines or circuits as
contact with them might be fatal.
Overloading - Do not overload wall outlets and
14.
extension cords as this can result in a risk of fire
or electric shock.
15.
Object and Liquid Entry - Never push objects of
any kind into the product through any openings
as they may touch dangerous voltage points
or short-out parts that can result in a fire or
electric shock. Never spill liquid of any kind on
the product.
16.
Servicing - Do not attempt to service the
product yourself as opening or removing covers
may expose you to dangerous voltage or other
hazards. Refer all servicing to qualified service
personnel.
17.
Repairing - Unplug the product from the wall
outlet and refer servicing to qualified service
personnel under the following conditions:
a.
When the power cord or plug is damaged.
b.
If liquid has been spilled, or objects have
fallen into the product.
c.
If the product has been exposed to rain or
water.
d.
If the product does not operate normally by
following the operating instructions. Adjust
3
Page 4
only those controls that are covered by
the operating instructions as an improper
adjustment of other controls may result in
damage and will often require extensive
work by a service technician to restore the
product to its normal operation.
If the product has been dropped or damaged
e.
in any way.
f.
When the product exhibits a distinct change
in performance this indicates a need for
service.
18.
Replacement Parts - When replacement parts
are required, be sure the service technician
has used replacement parts specified by the
manufacturer or have the same characteristics
as the original part. Unauthorized substitutions
may result in fire, electric shock or other
hazards.
19.
Safety Check - Upon completion of any
service or repairs to the product, ask the
service technician to perform safety checks
to determine that the product is in proper
operating condition.
20.
Heat - Do not install the product near any heat
sources such as radiators, heat registers,
stoves, or other products (including amplifiers)
that produce heat.
Installation Location - Place the product on a
21.
firm and flat surface. Avoid placing the product
in areas of direct sunlight, heating radiators,
closed automobiles, high temperature, high
humidity, excessive dust, strong vibration,
impact or strong magnetic fields, as the
internal parts may be seriously damaged.
Hazards of Electrical Shock and Fire - Do not
22.
touch the power cord with wet hands. Hold
the plug when disconnecting the power cord.
Do not pull the power cord. Unplug the power
cord from the wall outlet when the product is
not used for long periods of time.
Hearing Safety - Listen at a moderate volume.
23.
Using headphones at high volume can impair
your hearing.
Sometimes, the LCD screen may have some tiny
•
red, blue, white or black spots. This is normal and
does not affect the performance.
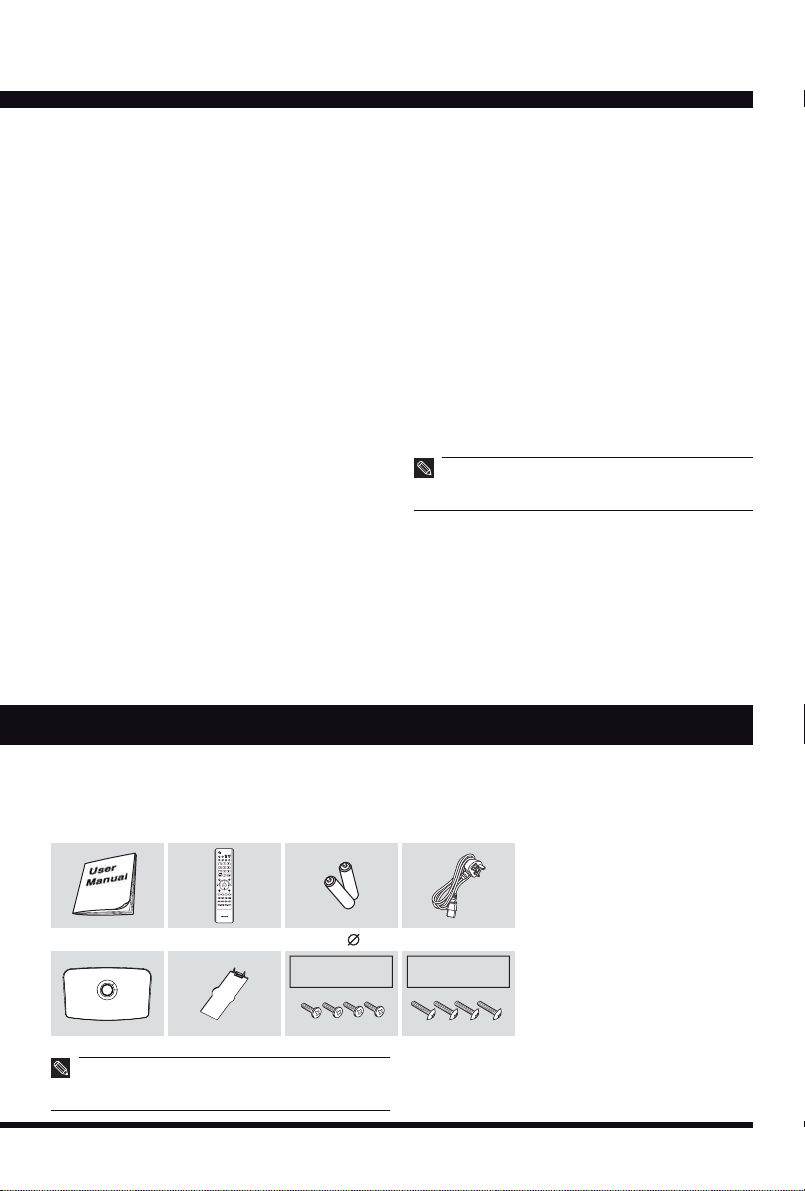
Supplied Accessories
Check the supplied accessories before installation.
In case of missing or damaged, please contact the dealer immediately.
User Manual Remote Control AAA Batteries Power Cord
TV Stand Cap
The type of power plug provided may be different
•
from the above picture for some countries.
Please store the screws that are not used.
•
Screws (
(For TV stand
installation)
4x10)
4
Screws (M5x15)
(For wall mount
bracket installation)
Page 5
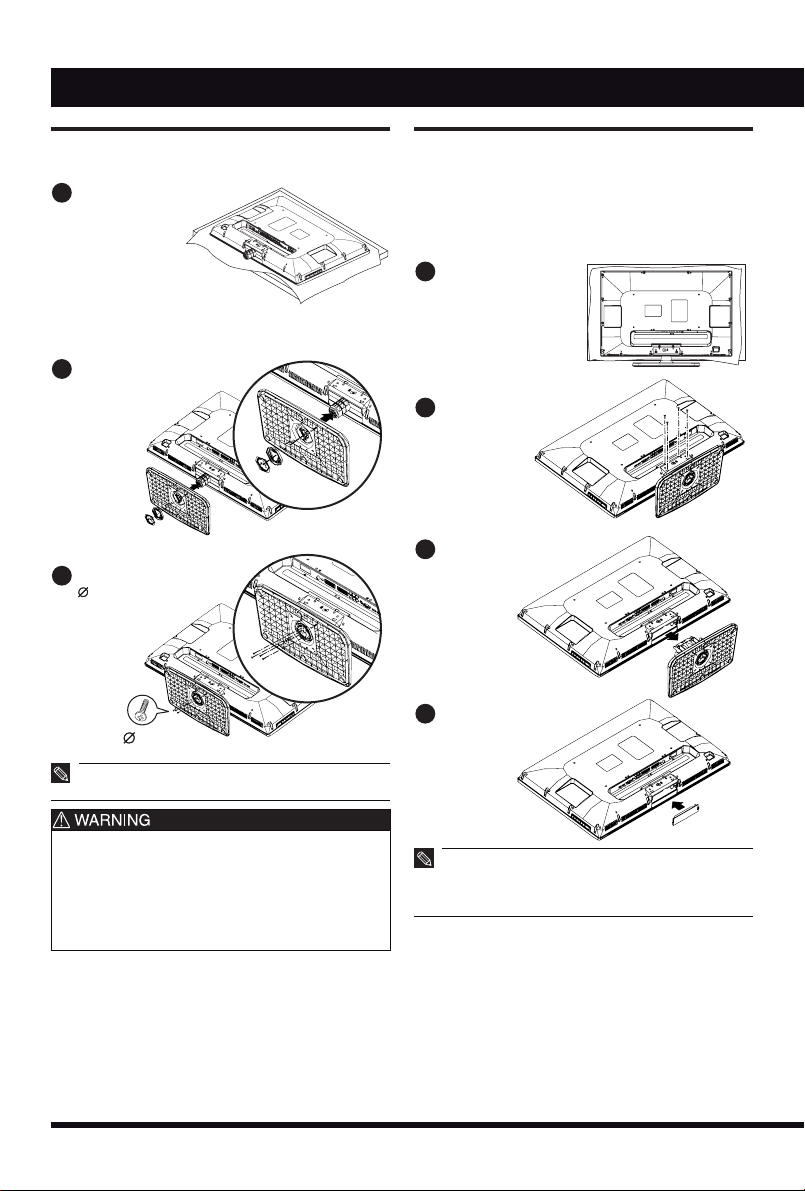
Preparation
Stand Installation
Carefully place the
1
TV with its front
side facing down
on a cushioned
flat surface.
Attach the TV stand to
2
the TV as shown.
Tighten the supplied
3
4x10 screws to fix
the TV stand
securely in
place.
4x10
Detaching the TV Stand for Wall
Mounting
Before mounting the TV on the wall, the TV stand
must be removed.
Carefully place the
1
TV with its front side
facing down on a
cushioned flat
surface.
Unscrew and remove
2
the 4 screws as
shown.
Remove the TV stand
3
with two hands.
Attach the cap as
4
shown.
The TV stand may not be securely fixed in place
•
after repeated tightening and loosening the screws.
During assembling and disassembling the TV stand,
•
please use your hand to support it. Failing to do so
may cause the TV stand to fall and result in personal
injury.
After installing the TV stand, please ensure that the
•
screws are tightened firmly. Failure to do so may
cause the TV set to tip over or become damage.
Fasten the wall bracket to the TV using the supplied
•
M5x15 screws.
For wall bracket installation, refer to the wall bracket
•
instruction guide.
5
Page 6
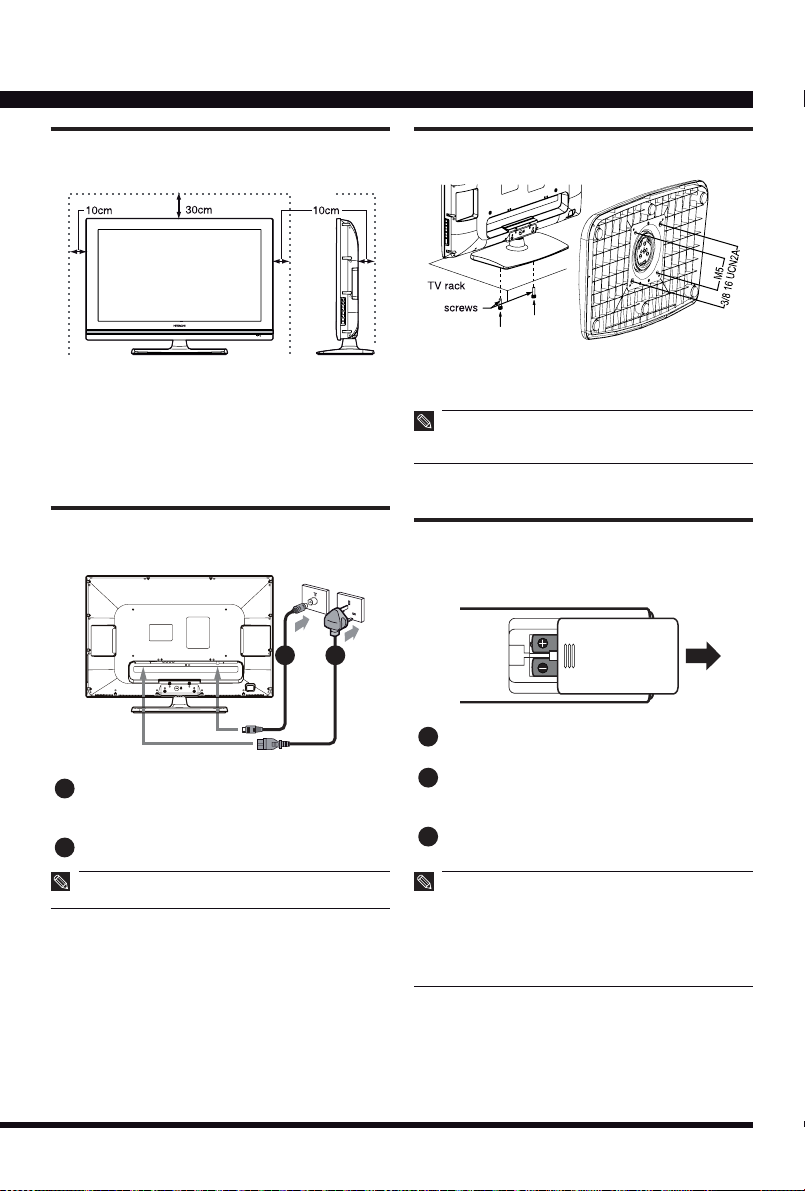
Positioning the TV Set
Place the TV on a firm and flat surface, leaving a
space of at least 10cm around the set and 30cm
from the top of the set to the wall.
Securing the TV Set
Secure the TV set as shown above using screws
that are available in the market.
If you do not take the above safety measures, the
•
TV set could fall and result in personal injury or
physical damage.
Antenna and Power Connections
2
1
Connect the antenna cable into the antenna
1
input terminal at the rear panel and wall
antenna socket.
Connect the power plug into the wall outlet.
2
The type of power plug provided may be different
•
from the above picture for some countries.
Remote Control Batteries
Installation
Slide open the battery compartment cover in
1
the direction of the arrow.
Insert two AAA batteries. Make sure the
2
polarity match the indication inside the battery
compartment.
Slide close the battery compartment cover
3
until it clicks.
The remote control can be used within the range of
•
8 meters and about 15° in each direction from the
front of the remote control sensor. Make sure there
is no obstacle between them.
If the remote control is not used for a long period
•
of time, remove the batteries to prevent battery
leakage.
6
Page 7

Functional Overview
Front Panel
Side Panel
3
4
5
6
7
Remote Control Sensor
1
Receives signal from the remote control.
Power Indicator
2
Lights up in red when the TV at standby mode.
1
2
Lights up in green when the TV is turned on.
3
Input Select ( )
Press to select TV, AV1, AV2, AV3, S-VIDEO,
AV4, AV5, RGB, HDMI1 or HDMI2 mode.
4
Menu ( )
Press to enter or exit from the TV menu.
5
Volume Up/Down ( / )
Press to adjust the volume.
Volume Up/Down buttons also work as Left/
Right Cursor (
Program Up/Down ( / )
6
Press to select previous/next channel.
Program Up/Down buttons also work as
Up/Down Cursor (
7
Power On/Standby ( )
Press to turn the TV on or standby.
) on TV menu.
) on TV menu.
7
Page 8

Rear Panel
8 9
10
11 12 13 14
15
16 17
18
19
20
21
22
Main Power Switch
8
Press the “ ” position to turn the main power
on or “ ” position to off.
Power Cord Socket
9
Connect to power cord.
HDMI1/ HDMI2 Input terminal
10
Connect to equipment with HDMI output.
RGB Input terminal
11
Connect to PC.
S-VIDEO Input terminal
12
Connect to equipment with s-video output.
AV1 Input terminal
13
Connect to equipment with composite video
output.
AV4 Input terminals
14
Connect to equipment with component video
output.
AV1/AV4/S-VIDEO Audio Input terminals
15
Connect to equipment with audio output.
AV2 Input terminal
16
Connect to equipment with composite video
output.
AV5 Input terminals
17
Connect to equipment with component video
output.
AV2/AV5 Audio Input terminals
18
Connect to equipment with audio output.
AV3 Input terminals
19
Connect to equipment with audio/composite
video output.
Output terminals
20
Connect to equipment with audio/composite
video input.
RGB/HDMI Analog Audio Input terminal
21
Connect to equipment using HDMI-DVI
connection or PC with audio output.
Antenna Input terminal
22
Connect to equipment with antenna output or
wall antenna socket.
8
Page 9

Remote Control
1
2
3
4
5
6
7
8
9
10
11
12
13
Some buttons are only use
•
in Teletext mode, and other
buttons have different functions
in Teletext mode from that
of TV mode. Those buttons
are indicated by [ ]. Refer to
“Teletext Operation” on page
13.
1
Power On/Standby ( )
14
15
16
17
Press to turn the TV on or
standby.
2
Picture Size ( )
Press to select the desired
picture format.
3
Input Select ( )
Press to select
TV, AV1, AV2,
AV3, S-VIDEO, AV4, AV5,
RGB, HDMI1 or HDMI2 mode.
18
19
20
21
22
23
24
25
Not Available
4
Auto Adjust ( AUTO )
5
Press to adjust the picture
automatically in RGB mode.
Press to view the preset
favorite channels in TV mode.
You need to preset the favorite
•
channels in the SETUP menu
to enable this function.
Program Select [Page Select]
6
Press to select the TV channel
directly.
Recall ( RECALL )
7
Press to show input signal
status.
Digit (
)
This button is not available for
this model.
8
Menu ( )
Press to enter or exit from the
TV menu.
Program Up/Down [Page
9
Select] ( / )
Press to select previous/next
channel.
Up/Down Cursor (
)
Press to select or adjust the
desired item on the TV menu.
10
[TV/Text] ( )
[Color]
11
12
[Cancel] ( )
13
[Index] ( )
14
Picture Mode ( )
Press to select the desired
picture mode.
15
Sound Mode ( )
Sleep Timer ( )
16
Press to set the time to switch
the TV to standby mode.
To cancel “Sleep Timer”,
•
press repeatedly until “
- - Min.” appears.
To display the remaining
•
time, press once.
If you switch off the TV and
•
turn it on again, “Sleep
Timer” is reset to “
- - Min.”.
During the last 10 seconds
•
of the “Sleep Timer” setting,
an on-screen countdown
will be displayed. Pressing
any button on the remote
control or TV during the
countdown will cancel the
“Sleep Timer”.
Ch I/II ( )
17
Press to select audio language
or sound output when receiving
a bilingual or stereo program
respectively.
Last Channel ( LST-CH )
18
Press to return to previously
viewed channel.
Mute ( )
19
Press to mute or restore the
volume.
OK [Subpage] (OK)
20
Press to confirm and execute
the selection.
21
Volume Up/Down ( / )
Press to adjust the volume.
Left/Right Cursor (
Press to select or adjust the
desired item on the TV menu.
22
Freeze [Hold] ( )
Press to freeze or unfreeze the
picture.
23
[Subtitle] ( )
24
[Reveal] ( )
Direct Input Select
25
Press to select the input source
directly.
HDMI3 Input is not available.•
)
Press to select the desired
sound mode.
9
Page 10

Connections
You can connect VCR, DVD player, set-top box, computer, game console or other video equipment to the
TV. To view external source images, press to select the input source or Direct Input Select buttons to
select the input source directly.
Connect via HDMI In
Connect via Component Video In
Connect via S-Video In
Connect via Composite Video In
Connect via RGB In
or
(DVI)
(HDMI)
[Example]
VCR
DVD Player
Set-Top Box
Game Console
Camcorder
[Example]
Computer
Connect via Composite Video Out
If the external equipment has DVI output, you can connect it to the HDMI terminal using a HDMI-DVI cable. In case
•
of using the HDMI-DVI cable, connect analog audio signal to RGB/HDMI Analog Audio Input terminal.
Please refer to the user manual of the external equipment for more information on the connection to the TV.
•
Please disconnect all the power supplies to the equipment and TV before connection.
•
[Example]
Recording Device
10
Page 11

Basic Operation
Power On/Off
To turn on the TV
Press the “ ” position of the main power
1
switch located on the rear panel.
The power indicator lights in red, indicating
that the TV is in standby mode.
2
Press or / .
The power indicator lights in green and the
TV turns on.
To turn off the TV
Press .
1
The power indicator lights in red and the
TV turns off to standby mode.
Press the “ ” position of the main power
2
switch located on the rear panel to completely
power off the TV.
It takes approximately 10 seconds for the picture to
•
appear after the TV is turned on.
The TV will switch to standby mode automatically if
•
there is no signal input for 10 minutes.
If the TV will not be used for a long periods of time,
•
unplug the TV from the wall outlet.
Channel Selection
To select a channel
Press / or Program Select buttons to
1
select the channel number directly.
Volume Adjustment
To change the volume
Press to increase the sound volume.
1
Press to decrease the sound volume.
2
To mute the sound
1
Press to temporarily turn off the sound.
2
Press or to restore the sound to
previous level.
You can decrease the sound volume by pressing
•
while the sound is muted.
On-Screen Display (OSD)
Selection and Adjustment
1
Press to display the main menu.
2
Press to select a menu.
The selected menu page displays.
Press to set your selection.
3
Press to choose an item on the menu
4
page and press to set your selection.
5
Press to adjust an item value or choose
options.
6
Press to return to the menu, press
again to exit.
Input Source Selection
To select input source
Press .
1
Press to select the desired input
2
source (TV, AV1, AV2, AV3, S-VIDEO, AV4,
AV5, RGB, HDMI1, HDMI2).
The selected input source image displays.
AV1~4, HDMI1~2 and RGB can be selected directly
•
using the Direct Input Select buttons.
11
The OSD menu screen will be closed automatically
•
when no operation has been made for the set OSD
menu display time.
Page 12

Stereo/Bilingual Sound
Selection
When receiving stereo/bilingual sound system,
you can select the sound output modes by using
.
To select stereo sound program
1
When a stereo program is received, “ ”
appears on the screen.
2
Press to select “ ” or “ ”.
To select bilingual sound program
When a bilingual program is received, “ ”
1
appears on the screen.
Press to select the sound to be heard.
2
•
Audio Signal
Select “ ” in case of poor reception, noise or poor
•
stereo sound due to signal condition so that you can
receive a clear mono sound.
Stereo
Mode
Main
Language
Sub
Language
Mono
Force
Mono
Picture Size Selection
Depending on the input signal, you can select the
desired picture size by pressing repeatedly.
For Standard Definition (SD) Pictures
(480i, 480p, 576i, 576p)
Stretch a 4:3 picture horizontally to
fill the 16:9 screen.
Full
Display a 4:3 picture in its original
size. Black bars appear on both left
and right sides.
4:3
Enlarge a 4:3 picture linearly from
the center towards the edges of the
Panoramic
Zoom
For High Definition (HD) Pictures
(720p, 1080i, 1080p)
4:3 Zoom
For RGB Input
display.
Display a 16:9 picture in 4:3 frame
(Vista size).
Display a 16:9 picture in its original
size.
Full
Stretch a 4:3 picture horizontally to
fill the 16:9 screen.
Stretch a 4:3 picture horizontally to
fill the 16:9 screen.
Full
Display a 4:3 picture in its original
size. Black bars appear on both left
and right sides.
4:3
12
In some cases, the screen display may have slight
•
blanking or noise at the edges.
Page 13

Teletext Operation
Teletext is a free service broadcast provided by most TV stations. It provides information on the current
affairs news, weather forecasts, program previews, stock market report and many other topics.
Page Select
1
Press to select a Teletext page. (Enter 3 digits)
Page Select ( / )
2
Press to move to the next or previous Teletext
page.
3
TV/Text ( )
1
2
3
4
5
6
7
8
9
10
Press to enter Teletext mode.
Press again to exit Teletext mode.
Color buttons
4
Press to a link page displayed at the bottom of
the Teletext page. (Select the corresponding
colored page)
5
Cancel ( )
Press to return to TV program temporarily while
searching for a Teletext page.
When the search is done, “ ” will be
displayed on the upper left of the screen.
Press again to return to the Teletext page.
6
Index ( )
Press to display index page.
Subpage ( OK )
7
Press to enter or exit subpage mode (if
subpage is available).
Press RED/GREEN or Page Select buttons to
select the desired subpage.
8
Hold ( )
Press to hold the current Teletext page.
Press again to cancel the hold mode.
9
Subtitle ( )
Press to access subtitle service directly (if the
channel has the subtitle service broadcasting).
10
Reveal ( )
Press to display the hidden text (e.g. the
answers of puzzles or riddles).
Press again to close the revealed answer.
Teletext function will only operate in countries where
•
Teletext transmission service is available.
13
Page 14

Menu Operation
Picture Menu
PICTURE
Picture Mode
Contrast
Brightness
Color
Sharpness
Color Temperature
Select Set Return
Natural
75
45
40
10
Normal
MENU
Digital Noise Reduction
Select Set Return
PICTURE
Middle
MENU
Selected Items Setup Hints
Picture Mode Dynamic Select the most suitable picture mode according to
our lighting condition.
Natural
y
Cinema
Favorite
Contrast Adjust to increase or decrease the picture contrast.
Brightness Adjust to brighten or darken the picture.
Color Adjust to increase or decrease the color intensity.
Sharpness Adjust to sharpen or soften the picture.
Color Temperature Cool Select the most suitable settings depending on your
Normal
preferred color tone.
Warm
Digital Noise Reduction Low Set to reduce noise in the picture due to weak
Middle
signal condition.
High
Off
“Color”, “Sharpness” and “Digital Noise Reduction” are not available in RGB mode.•
14
Page 15

Audio Menu
AUDIO
Sound Mode
Treble
Bass
Balance
Movie
60
60
0
Select Set Return
MENU
Selected Items Setup Hints
Sound Mode Movie Select the most suitable sound mode according to
our watching contents.
Music
y
Speech
Favorite
Treble Adjust the high-pitched sound.
Bass Adjust the low-pitched sound.
Balance Adjust the left and right sound channel volume.
15
Page 16

Timer Menu
TIMER
On Timer
On Timer Program
--:--
0
Select Set Return
MENU
Selected Items Setup Hints
On Timer Set the length of time to switch on the TV from
y mode.
standb
Press to enter.
1
Press to move the cursor.
2
Press or Program Select buttons to set
3
the time.
On Timer Program Set the program number for “On Timer” to switch on
the TV from standby mode.
If a power failure occurs or the TV is unplugged, on timer will be reset.
•
The TV must be in standby mode for the “On Timer” to work.
•
16
Page 17

Function Menu
FUNCTION
Language
Menu Background
Menu Display Time
Blue Background
Child Lock
Teletext Language
Select Set Return
English
Opaque
4 Sec.
On
Off
West Europe
MENU
Reset
Select Set Return
FUNCTION
MENU
Selected Items Setup Hints
Language English Select the on-screen display language.
Menu Background Opaque Select the menu background.
Transparent
Menu Display Time 4 Sec. Select the display time for the on-screen display.
8 Sec.
16 Sec.
32 Sec.
Blue Background On Select “On” to change the screen to blue at no
Off
signal condition.
Child Lock On Select “On” to disable the buttons on the TV.
Off
If “Child Lock” is set to “On”, you can access the TV
•
by remote control unit only.
Teletext Language West Europe Select the appropriate teletext language.
East Europe
Russian
Arabic
Reset Reset all items to the original factory settings.
“Teletext Language” is only available in TV mode.
•
The items indicated by “ ” may not be available for some countries.
•
17
Page 18

Setup Menu (TV Mode)
On
SETUP
Position
Auto Tuning
Manual Tuning
Name
Sound System
Color System
Select Set Return
1
xxx.xxMHz
----
BG
Auto
MENU
Fine Tuning
Program Sorting
Select Set Return
SETUP
On
MENU
Selected Items Setup Hints
Position Set the channel number.
uto Tuning Tune for all the available channels automatically.
A
When auto search is completed, the TV will
automatically return to Channel 1.
Manual Tuning Set the frequency of the channel.
Name Set a name for the channel.
Press or OK to enter.
1
Press to enter the desired characters.
2
Press to move to the next character.
3
Press OK when the name is completed.
4
The name will be displayed on the screen when the
channel is selected.
Sound System BG Select the appropriate sound system.
I
DK
M
Color System Auto Select the appropriate color system.
PA L
SECAM
NTSC 3.58
Fine Tuning Fine tune the current channel.
Press
to decrease or increase the frequency.
Program Sorting Set the channels according to your preference.
You can set your favorite channels, delete, swap or
skip the channels you want.
To delete the channel
Press to select the channel to be
1
deleted.
Press the RED button twice.
2
The selected channel is deleted, all the following
•
channels are shifted up one position.
18
Page 19

Setup Menu (TV Mode) (continue)
Selected Items Setup Hints
Program Sorting T
o swap the channel
Press to select the channel to be
1
moved.
Press the YELLOW button.
2
Press to select the new position for the
3
channel.
Press the YELLOW button to release this
4
function.
To set favorite channel
Press to select the favorite channel.
1
Press the GREEN button (check mark
2
appears).
To cancel the favorite channel, select the channel
•
and press the GREEN button (check mark is
removed).
To skip the channel
Press to select the channel to be
1
skipped.
Press the CYAN button (check mark appears).
2
You can still select a skipped channel using the
•
Program Select buttons.
To unskip the channel, select the channel and press
•
the CYAN button (check mark is removed).
19
Page 20

Setup Menu (RGB Mode)
SETUP
Auto Adjust
H Position
V Position
H Clock
Clock Phase
Reset
0
0
0
0
Select Set Return
MENU
Selected Items Setup Hints
Auto Adjust Auto adjust the screen position, clock and phase.
osition Adjust the picture horizontal position.
H P
V Position Adjust the picture vertical position.
H Clock Adjust the picture width.
Clock Phase Adjust to remove the horizontal interference.
Reset Restore the “H Position”, “V Position”, “H Clock”
and “Clock Phase” to the original factory settings.
“Auto Adjust” may not work well with certain input signals. In such cases, manually adjust “H Position”,
•
“V Position”, “H Clock” and “Clock Phase”.
20
Page 21

Troubleshooting
Before calling service personnel, please check the following troubleshooting guide. If any problem still
persists, unplug the TV set and call for servicing.
Symptom Check List
No picture, no sound Check if the main power of the TV is turned on.
Normal picture, no sound Check the volume level.
Poor color or no color, normal sound Check the value level of “Brightness” and “Contrast” in
Multiple images, normal sound Check the antenna connection and direction.
Snowy picture, poor sound Check the antenna connection and direction.
Intermittent interference Check if the source of interference is shield well.
Poor stereo sound The TV station may have broadcast difficulties. Try to
Remote control does not work Check if the batteries are installed correctly.
“No Signal” appears on the screen The TV cannot detect any signals from any input terminals.
“No Signal” or “Unsupported Signal”
appears on the screen (RGB mode only)
Image not centered (RGB mode only) Adjust the “H Position” and “V Position” in the SETUP
•
k the connection of the power cord and/or other cables.
•
Chec
•
Check if the
•
Check the connection of the external equipment.
•
button has been pressed or not.
•
PICTURE menu.
•
Fine tuning the TV.
•
Check the connection of the external equipment.
•
The TV station may have broadcast difficulties. Try another
•
channel.
•
The TV station may have broadcast difficulties. Try another
•
channel.
•
Remove those kinds of electrical devices away from the TV.
•
•
change to mono mode.
•
The batteries may be exhausted. Replace them with new
•
ones.
Remove all obstruction between the remote control and the
•
remote control sensor.
Ensure there is no strong light shining on the remote control
•
sensor.
•
Check if the cable is connected correctly and firmly.
•
Check if the power of any external equipment is turned on.
•
Check if the input source selection is correct.
•
Check if the display resolution and frequency from your PC
•
is a valid mode for the TV. Refer to the recommended RGB
input signal chart
•
menu.
21
Page 22

Specification
Model Name L32AX03A
Panel Size Approx. 32 inches
Resolution
Power Requirement AC 110-240V, 50/60Hz
Power Consumption 150W
Audio Output 7W + 7W
Dimension (WxHxD) With Stand 807 x 591 x 249mm
Without Stand 807 x 525 x 95mm
Weight With Stand 12.0kg
Without Stand 11.0kg
Terminals AV1 VIDEO IN, L/R AUDIO IN
AV2 VIDEO IN, L/R AUDIO IN
AV3 VIDEO IN, L/R AUDIO IN
S-VIDEO S-VIDEO IN, L/R AUDIO IN
AV4 COMPONENT IN, L/R AUDIO IN
AV5 COMPONENT IN, L/R AUDIO IN
RGB RGB IN, AUDIO IN
HDMI1 HDMI IN
HDMI2 HDMI IN
OUT VIDEO OUT, L/R AUDIO OUT
Input Signals RF PAL B/G, D/K, I
Video PAL, SECAM, NTSC
Component 480i/p, 576i/p, 720p(50/60), 1080i(50/60),
HDMI 480i/p, 576i/p, 720p(50/60), 1080i(50/60),
Analog RGB VGA, SVGA, XGA, SXGA
*1 These are common audio input terminals for AV1, AV4 and S-VIDEO.
*2 These are common audio input terminals for AV2 and AV5.
Design and specification are subject to change without notice.
•
Weight and dimensions shown are approximate values only.
•
1920 x 1080
SECAM B/G, D/K
NTSC M
1080p(50/60)
1080p(24/50/60)
*1
*2
*1
*1
*2
22
Page 23

Recommended Signal List
RGB Input Signal Chart
Resolution
Vertical
Frequency (Hz)
VGA 640 x 480 60 31.47 25.18
GA 800 x 600 60 37.88 40.00
SV
XGA 1024 x 768 60 48.36 65.00
SXGA 1280 x 1024 60 63.98 108.00
If the message “No Signal” or “Unsupported Signal” appears on the screen, adjust the PC display setting as in
•
the above chart.
Modes that are not listed in the above chart may not be supported. For an optimal picture, it is recommended to
•
choose a mode listed in the chart.
Sometimes, the image may be disrupted due to the frequency standard from the VGA card. This is not an error,.
•
You may improve this situation by pressing the AUTO button or adjusting the position, clock and phase settings in
the SETUP menu manually.
If you switch off the TV, interference lines may occur on the TV screen. This is normal.
•
HDMI Input Signal Chart
Resolution
Vertical
Frequency (Hz)
VGA 640 x 480 60 31.47 25.18
576i
1440 x 576 50 15.63 27.00
480i 1440 x 480 60 15.73 27.00
576p 720 x 576 50 31.25 27.00
480p 720 x 480 60 31.47 27.00
1080i/50 1920 x 1080 50 28.13 74.25
1080i/60 1920 x 1080 60 33.75 74.25
720p/50 1280 x 720 50 37.50 74.25
720p/60 1280 x 720 60 45.00 74.25
1080p/50 1920 x 1080 50 56.25 148.50
1080p/60 1920 x 1080 60 67.50 148.50
1080p/24 1920 x 1080 24 27.00 74.25
Horizontal
Frequency (kHz)
Horizontal
Frequency (kHz)
Frequency (MHz)
Frequency (MHz)
Dot Clock
Dot Clock
23
Page 24

 Loading...