

Page 1

LCD olo r TelevisionCu
Télévision Couleur LCD
LCD-Farb-TV-Gerät
Televisione a Colori LCD
L32A01 A
Instructions for use
Notice d'utilisation
Bedienungsanleitung
Istruzioni per l'uso
GB
F
D
I
Page 2

Contents
Safety Precautions ........................................... 3
Features ............................................................. 6
Acce ssori e s ...................................................... 6
LCD TV Front View ........................................... 7
Rear View and Peripheral Connections ....... 7
Remote Control Buttons ................................. 8
Installation Of The TFT TV To The Wall .......... 9
Prepa ration ...................................................... 11
Before Switching On Your TV ....................... 11
Power Connection ..................................... 11
Connections ToThe Aerial Input Socket ..... 11
Inserting Batteries In The Remote Control
Handset ..................................................... 11
Handlingthe RemoteControl...................... 11
Operating Range for the Remote Control ... 11
Switching The TV ON/OFF .............................. 12
Navigating the Menu System ........................ 12
Initial Settings ................................................. 12
Basic Operations ............................................ 12
Operation with the buttons on the TV ........ 12
VolumeSetting ........................................... 12
ProgrammeSelection ................................. 12
EnteringMain Menu.................................... 12
AV Mode .................................................... 13
Operation with Remote Control .................. 13
VolumeSetting ........................................... 13
Programme Selection (Previous or next
programme) ............................................... 13
Programme Selection (direct access): ....... 13
Me nu Syste m .................................................. 13
PictureMenu.............................................. 13
Mode.......................................................... 13
Contrast/Brightness/Sharpness/Colour/
Hue ............................................................ 13
ColourTemp ............................................... 13
Noise Reduction ......................................... 13
FilmMode ................................................... 13
3DComb .................................................... 14
PictureZoom.............................................. 14
Reset ......................................................... 14
Sound Menu............................................... 14
Volume....................................................... 14
Equalizer.................................................... 14
Balance...................................................... 14
Headphone ................................................ 14
volume ..................................................................... 14
sound mode ............................................................. 14
balance ................................................................... 14
Sound Mode............................................... 14
AVL ...........................................................14
Effect ......................................................... 14
Dynamic Bass............................................ 14
Subwoofer ................................................ 14
3DS............................................................ 15
Feature Menu............................................. 15
PIP .............................................................. 15
PIP ON-OFF ............................................................ 15
PIP Picture ............................................................. 15
PIP Position ............................................................ 15
PIP Source ............................................................. 15
PIP SWAP .............................................................. 15
PAP ............................................................ 15
PAPON-OFF ........................................................... 15
PAP Picture ............................................................. 15
PAP Source ............................................................. 16
PAPSWAP .............................................................. 16
SleepTimer ................................................ 16
ChildLock .................................................. 16
Language ................................................... 16
AV-2 Out .................................................... 16
PCAudioIn................................................. 16
Blue Background ....................................... 16
Menu Background...................................... 16
MenuTimeout............................................. 16
Teletext Language ..................................... 16
Default Zoom ............................................. 16
InstallMenu ................................................ 16
ProgramTable ............................................17
Name ....................................................................... 17
Insert ...................................................................... 17
Delete ..................................................................... 17
APS (Auto Programming System) ............................ 17
A.P.S. (Auto Programming System)
Country ...................................................... 17
Program ..................................................... 17
Band .......................................................... 18
Channel ...................................................... 18
Colour System ........................................... 18
Sound System ........................................... 18
FineTune ................................................... 18
Search ....................................................... 18
Store .......................................................... 18
Install menu inAV modes ........................... 18
Colour System ......................................................... 18
VCR ......................................................................... 18
Store .......................................................... 18
Source menu ............................................. 18
PC Mode ........................................................... 19
Installation .................................................. 19
MenuSysteminPC mode........................... 19
Sound Menu/Feature Menu ........................ 19
PCPictureMenu......................................... 19
PCPOSITIONMenu .................................... 19
Autoposition ............................................... 19
H (Horizontal) Position ............................... 19
V (Vertical) Position ................................... 19
Phase ........................................................ 19
GB - 1-
Page 3

DotClock .................................................... 19
Soundin PCmode...................................... 19
Other Features ................................................ 20
TV Status................................................... 20
MuteIndicator ............................................ 20
PIPand PAPModes.................................... 20
AV Modes .................................................. 20
Zoom Modes ..............................................20
Auto ...........................................................20
Zoom ......................................................... 20
Cinema....................................................... 20
16:9 Zoom.................................................. 20
Subtitle....................................................... 20
4:3 ............................................................. 21
14:9 Zoom.................................................. 21
Panoramic.................................................. 21
Freeze Picture ........................................... 21
Telet ext ............................................................. 21
Connect Peripheral Equipment .................... 22
HighDefinition ............................................ 22
Via The Scart ............................................. 22
Via Aerial Input........................................... 22
Decoder ..................................................... 22
Connect a decoder with an aerial socket to
the TV ........................................................ 22
Connect a decoder without an aerial socket
to the TV ....................................................22
TV And Video Recorder............................. 22
PlaybackNTSC ..........................................22
CameraAnd Camcorder............................. 22
To Connect ToAV Input .............................. 22
To Connect To S-VHS Input........................22
Connect The Decoder To The Video
Recorder....................................................22
Connecting Headphones (optional)............ 22
Audio Lineout .............................................22
Connecting Subwoofer.............................. 22
Ti ps ................................................................... 23
Care Of The Screen ..................................23
PoorPicture ............................................... 23
NoPicture .................................................. 23
Sound ........................................................23
RemoteControl ..........................................23
Peripheral Equipment Connections ............ 24
Aerial Connection ........................................... 24
Specifications .................................................. 25
SignalInput ................................................ 27
Appendix A: PC Input Typical Display
Mod e s ............................................................... 28
Appendix B: AV and HDMI Signal
Compatibility ................................................... 29
Appendix C: Main and PIP-PAP Picture
Combinatio ns .................................................. 30
Addendum to the instruction book. ............ 30
UK Guarantee ................................................... 31
GB - 2 -
Page 4

Safety Precautions
Please read the following recommended safety precautions carefully for your safety.
IMPORTANT SAFETY
INFORMATION ON OPERATING
YOUR TV
Do’s and Don’ts
DO’s
This Television has been designed and manufacturedto meet international safety standards,
but like any electrical equipment, care must be
taken if you are to obtain the best results and
safety is to be assured.
DO read the operating instructions before you
attempt to use the equipment.
DO consult your dealer if you are in any doubt
about installation, operation or safety of your
equipment.
DO be careful with glass panels or doors on
equipment.
ThisTV is suppliedwitha fittedmainsplug. This
plugmust not be cut offas it may contain a specialradiointerferencefilter,theremovalofwhich
couldleadto impaired performance. If youwish
to extend the lead, obtain an appropriate safety
approved extensionlead or consult yourdealer.
Observe the manufacturers instructions when
connectingextensionleadstotheTV. Checkthe
fuseratingon thenew plug, thisshouldbe fitted
witha 5Ampfusewhichconformsto eitherASTA
or BSI (BS1 362) approvals, these are easily
identifiablebyeitherthe
you are in any doubt about the installation of an
extension lead, please consult a competent
electrician.
or symbols. If
DON’Ts
DON’Tcontinuetooperatethe equipmentifyou
arein any doubt about it workingnormally,orif it
is damaged in any way switch off, withdraw the
mains plug and consult your dealer.
DON’T place water filled vessels on top of T.V.
cabinets.
DON’T remove any fixed cover as this may expose dangerous voltages.
DON’T leave equipment switched on when it is
unattended unless it is specifically stated that it
is designed for unattended operation or has a
stand-by mode. Switch off using the switch on
the equipment and make sure your familyknow
howtodothis. Specialarrangementsmayneed
to be made for infirm or handicapped people.
DON’Tuseequipmentsuchaspersonalstereos
or radios so that you are distracted from the re-
quirementsof traffic safety. It is illegal to watch
television whilst driving.
DON’Tobstructtheventilationof the equipment,
for example with curtains or soft furnishings.
Overheatingwillcausedamageandshortenthe
life of the equipment.
DON’TusemakeshiftstandsandNEVERfixlegs
or stands to the TV with any screws other than
those provided - to ensure complete safety always use the manufacturers approved stand
with the fixings provided.
DON’Tallowelectricalequipmenttobeexposed
to rain or moisture.
ABOVE ALL
• NEVER let anyone, especially children push
anything into holes, slots or any other open-
ing in the case - this could result in a fatal
electric shock.
• NEVER guess or take chances with electrical
equipment of any kind - it is better to be safe
than sorry!
Be sure to ground the connection properly.
Connect the ground terminal of TV with the ground terminal provided at
the power outlet using the enclosed power cord. If the provided plug
does not fit your outlet, consult an electrician for replacement of the
obsolete outlet.
GB - 3 -
Page 5
1.Power Source
TheTVset shouldbeoperated onlyfroma220-240 V
AC, 50 Hz outlet. Ensure that you select the correct
voltage setting for your convenience.
2.Power Cord
Do not place the set, a piece of furniture, etc. on the
power cord (mains lead) or pinch the cord. Handle
thepowercord by the plug. Do not pull out the plug by
tugging the cord and never touch the power cord
when your hands are wet as this could cause a short
circuitor electricshock.Never makeaknotinthecord
or tie it with other cords. The power cords should be
placed in such a way that they are not likely to be
steppedon.Adamagedpower cord can cause fire or
give you an electric shock. When it is damaged and
needs to be changed, it should be done by qualified
personnel.
3. Moisture and Water
Donotuse thisequipmentinahumid anddampplace
(avoidthebathroom,thesink in the kitchen,andnear
the washingmachine).Do not expose this equipment
to rain or water, as this may be dangerousand do not
place objects filled with liquids, such as flower vases,
on top. Avoid from dripping or splashing.
Ifanysolid objector liquidfallsinto thecabinet,unplug
the TV and have it checked by qualified personnel
before operating it any further.
4.Cleaning
Before cleaning, unplug the TV set from the wall outlet.Donotuse liquidoraerosolcleaners.Use soft and
dry cloth.
5. Ventilation
Theslotsandopeningsonthe TV set are intendedfor
ventilation and to ensure reliable operation. To pre-
ventoverheating,theseopeningsmust not beblocked
or covered in anyway.
6. Heat and Flames
The set should not be placed near to naked flames
and sources of intense heat, such as an electric
heater. Ensure that no naked flame sources, such as
lightedcandles, are placedontop of the TV.Batteries
shall not be exposed to excessive heat such as sunshine, fire or the like.
7. Lightning
In case of storm and lightning or when going on holiday, disconnect the power cord from the wall outlet.
8. Replacement Parts
When replacement parts are required, be sure the
servicetechnician has used replacementparts which
are specified by the manufacturer or have the same
specifications as the original one. Unauthorized substitutions may result in fire, electrical shock, or other
hazards.
9. Servicing
Please refer all servicing to qualified personnel. Do
notremovethe coveryourselfas thismay result in an
electric shock.
10. Waste Disposal
Instructions for waste disposal:
• Packaging and packaging aids are recyclable and
shouldprincipallyberecycled. Packagingmaterials,
such as foil bag, must be kept away from children.
• Battery, including those which are heavy metal-free,
should not be disposed of with household waste.
Please dispose of used battery in an environmentallysoundmanner. Find out about the legal regulations which apply in your area.
• Cold cathode fluoresant lamp in LCD PANEL containsa small amount of mercury;pleasefollow local
ordinates or regulations for disposal.
Information for users applicable
in European Union countries
Thissymbolon theproductor onitspackagingmeans
that your electrical and electronic equipment should
be disposed at the end of life separately from your
household wastes. There are separate collection
systems for recycling in EU.
Formoreinformation,pleasecontact the localauthor-
ity or the dealer where you purchased the product.
11. Disconnect Device
Themains plug is used to disconnectTV set from the
mains and therefore it shall remain readilyoperable.
12. Excessive sound pressure from earphones and
headphones can cause hearing loss.
13. To prevent injury, this device must be securely
attached to the wall in accordance with the installation instructions when mounted to the wall
(if the option is available).
GB - 4 -
Page 6
14. Connection to a television
distribution system (Cable TV etc.)
from tuner:
Apparatus connected to the protective earthing of
the buildinginstallation throughthe mains connection
or through other apparatus with a connection to pro-
tective earthing - and to a television distribution system using coaxial cable, may in some circumstances
create a fire hazard.
To ground the antenna system properly, be sure that
the cable grounding is connected with the building's
grounding system. Note that the connection should
followIEC 60364-7-707 and IEC 603646-5-548 stan-
dards which require that the grounding should be as
close as possible to the cable connection.
VHF/UHF
REAR OF THE TV
CABLE TV
GB - 5 -
Page 7
Features
• Remote controlled 32” colour LCDTV.
• 100 programmes from VHF, UHF bands or cable
channels can be preset.
• It can tune cable channels.
• Controlling the TV is very easy by its menu driven
system.
• It has 3 Scart sockets for external devices (such as
video, video games, audio set, etc.)
• Stereo sound system (German+Nicam).
• Full function Teletext (1000 pages).
• Fastext, TOP text.
• Headphone connection.
•A.P.S. (AutomaticProgrammingSystem).
•All programmes can be named.
• Forward or backward automatic tuning.
•Sleeptimer.
• Child Lock.
• Automatic sound mute when no transmission.
•NTSCPlayback.
•AV in andS-VIDEOin are available.
• It has two HDMI connectors for Digital Video and
Audio. This connection is also designed to accept
HighDefinitionsignals.
•AVL(Automatic VolumeLimiting)
• When no validsignalisdetected, after5 minutesthe
TV switches itself automatically to stand-by mode.
• PLL (Frequency Search)
•PC Input
• Plug&Play for Windows 9X, ME, Vista,2000, XP.
•AudioLineOut
PhonoL+Rto3.5mmJackAudioCable.
DVD SAT
AV1
1
AV4
4
7
I/II
MENU GUIDE
+
RGB2
RemoteController
CLE-984
Batteries
2 X AA
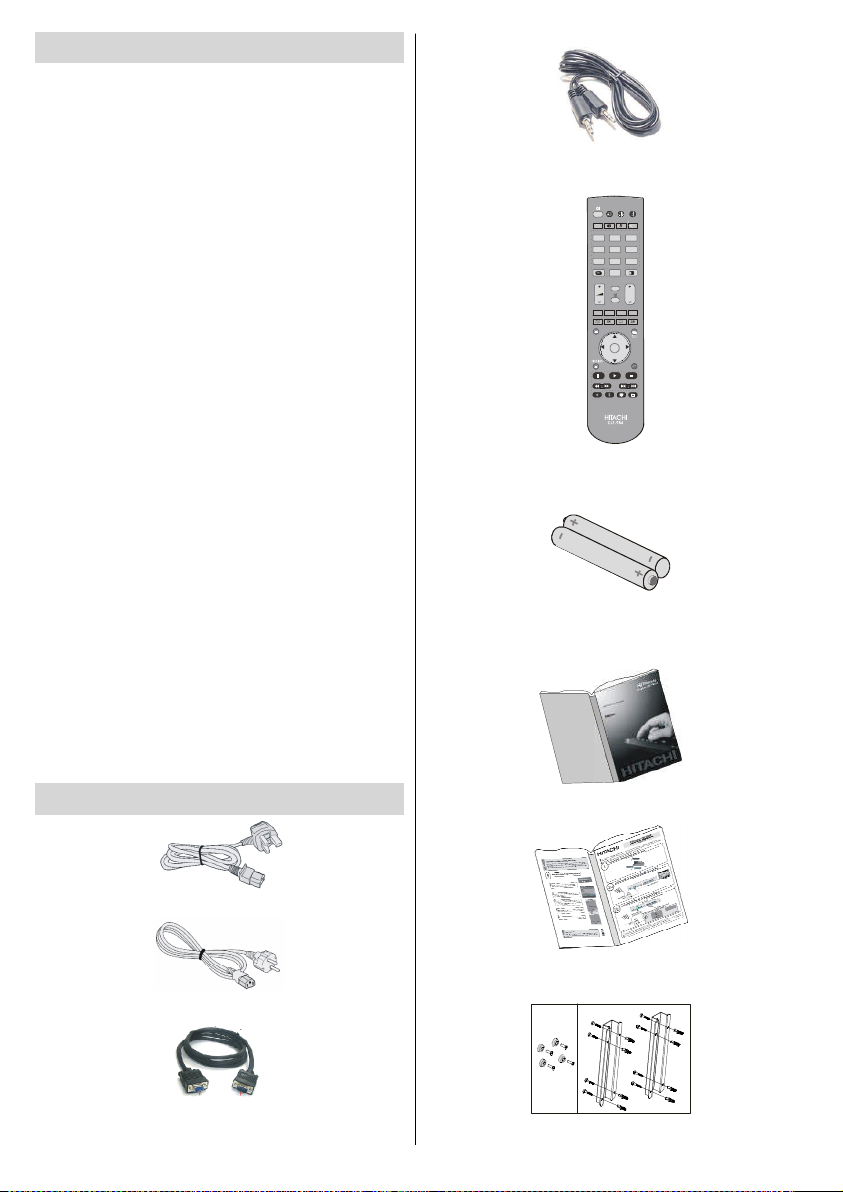
Accessories
15PinD-SUBVGACable.
Instruction Book
UKPlug
Quick Guide
EUPlug
WallMountKit
GB - 6 -
Page 8
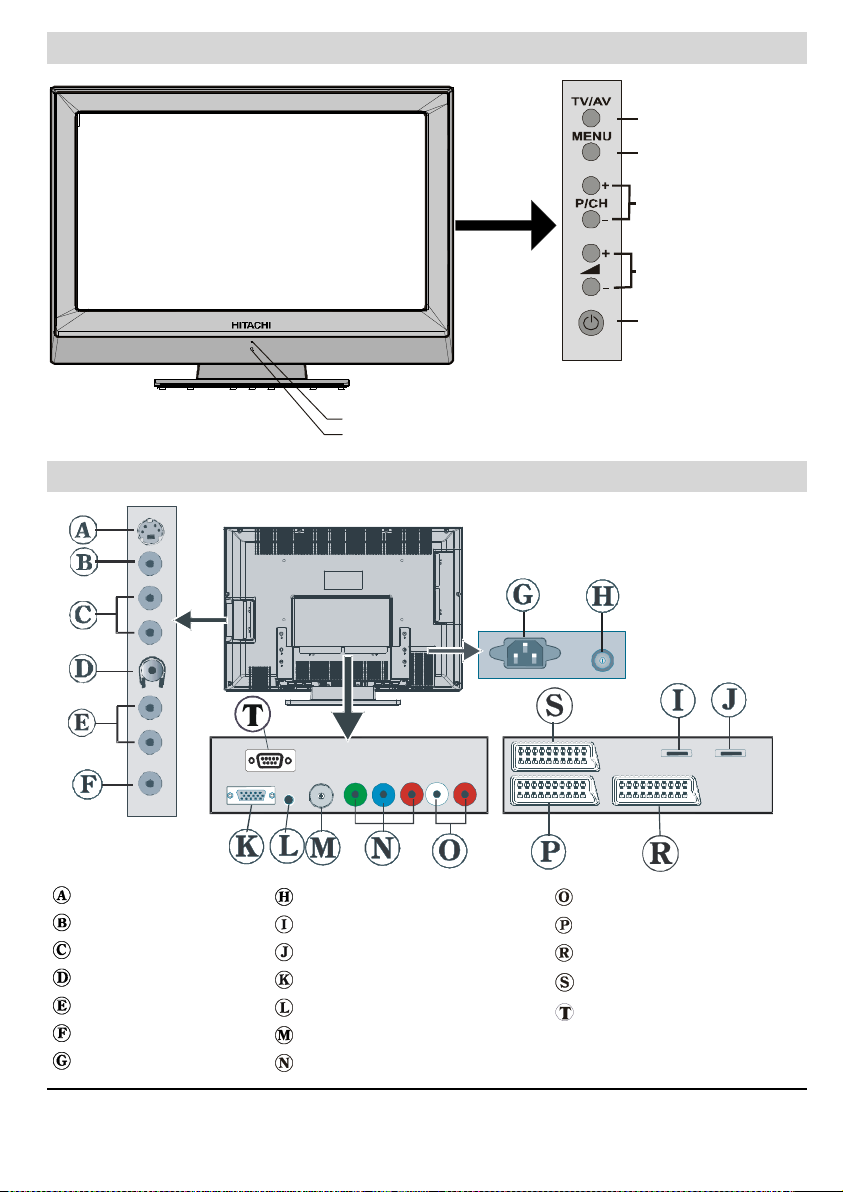
LCD TV Front View
IR Receiver
Standby LED
FRONTVIEW
Rear View and Peripheral Connections
MENU BUTTON
VOLUME UP/DOWN
STANDBY BUTTON
S-VIDEOInput
Video Input
Audio Inputss
Headphone
Audio Line Outss
Subwoofer Output
PowerCord Input
Note: Because FAVCVBS and SVHSY are connected parallelly, the picture may blend if the two peripheralsare usedat the same
time. Likewise, because SVHS C and SCART II R are connected parallelly, the picture may blend if the two peripherals are used
at the same time. Thus these two are not to be used at the same time.
Power On/Off Switch
HDMIInput2
HDMIInput1
PCVGAInput
PCAudioInput
RF
Component VideoInputs (YPBPR)
ComponentAudioInputss
SCART1
SCART2
SCART3
For Service Use Only
GB - 7 -
Page 9
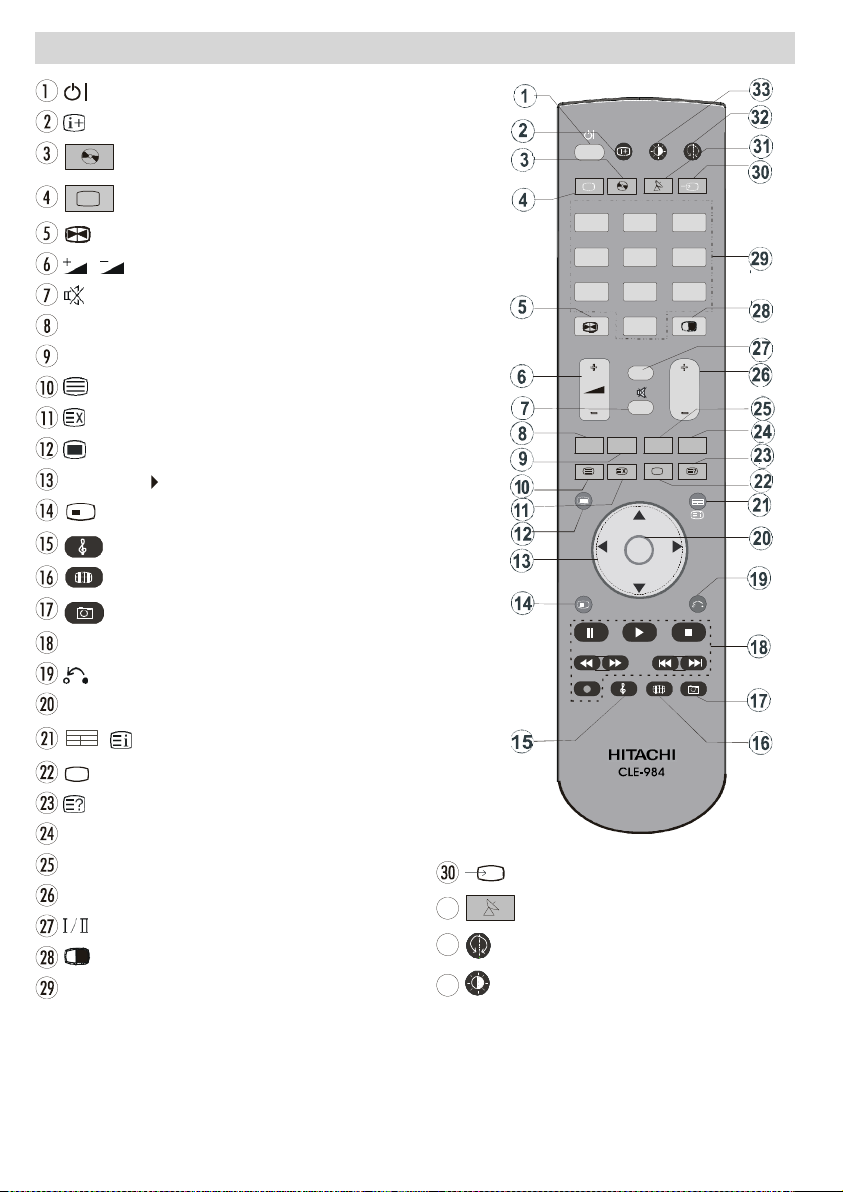
Remote Control Buttons
TV/DTT
= Stand by On/Offf
= Info
DVD = Select DVD
TV/DTT = TV / Quit Menu
= Hold in teletext mode, Freezepicture
/ = Volume Up/ Down
= Mute On/Off
RED (Onlyuse in Teletextmode)
GREEN(Only use inTeletextmode)
= Teletext On-Offf
= Time/ Teletext& TVTV
= Menu On/Off
/
/
/
= Cursor buttons
+
FUNCTION = No function
= Equalizer Sound Mode
= Aspect ratio
= No Function
Control buttons for DVD players/recorders (**)
= Go back to previous menu
OK =Enter
/ / GUIDE =IndexPage
= TXT Subtitle in TV mode; Subpagein teletextmode.
= Reveal
BLUE (Only use in Teletextmode)
YELLOW (Only use in Teletext mode)
P+/ - =Programme Up/ Down
= Mono/Stereo - DualA-B
=PIP, PAPOn-Off/ PATAT
0 - 9= Digit buttons
AV1
AV4
HDMI2
MENU
+
RGB2
/INPUT =INPUT
SATT = Select SAT
= No function
= Picture mode
DVD SAT
1 2
4 5
7
8
0
I/II
GUIDE
** These buttons can control most Hitachi DVD Players and Recorders.
GB - 8 -
Page 10
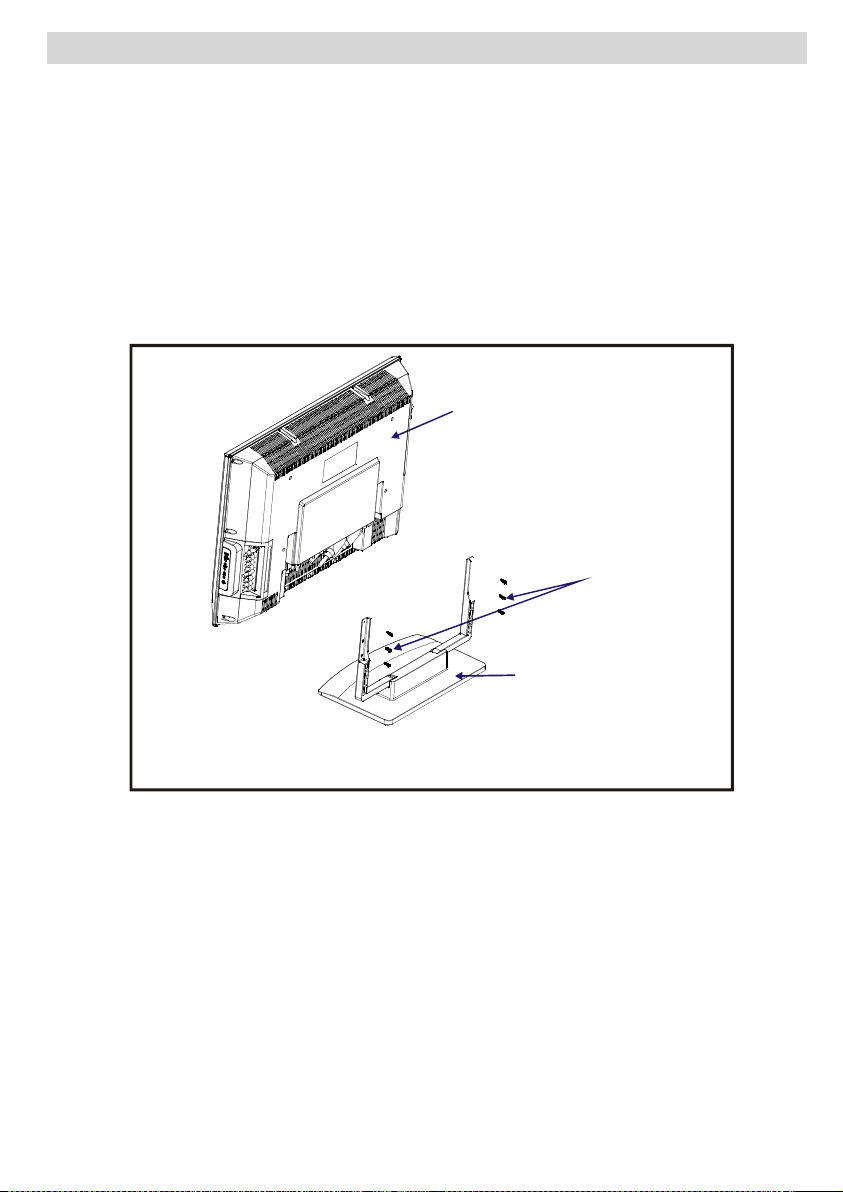
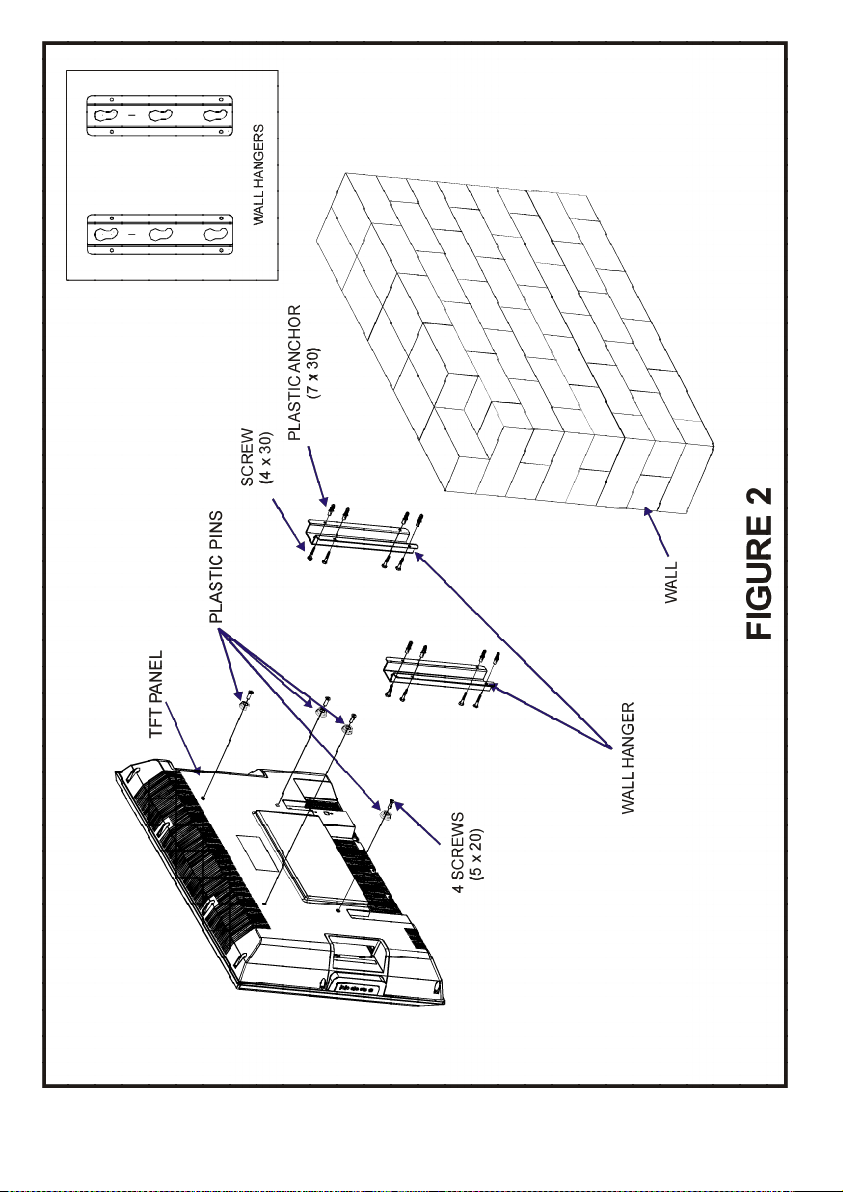
Installation Of The TFT TV To The Wall
1- To install the TFT TV on the wall, first of all, foot assembly should be removed. (Figure 1). Unscrew the 6
screws (M4 x 12) that attach the foot assembly to the TFT panel and remove the foot assembly from the
TFTpanel.
2- Decide the place on the wall where the TFT panel would be placed. Fix the wall mounting stencil on the
wall.
The stencil is used for placing the wall hangers on the wall, properly.
3- Level and mark with a pencil the 4 mounting points on each wall hanger.
Drill pilot holes for the plastic anchors (7x30) and then fix the wall hangers with 8 screws
(4 x 30).
4- Raise the TFT panel and hang it to the holes on the wallhanger from the 4 hangingscrewsat the rearof the
TFTpanel.
IMPORTANT
1. Please follow the installation instructions carefully as failure to do so may result in injury or damage to the
set.
2. If you do not feel confident in carrying out the installationyourself, please ask a specialist installer to carry
out the installation for you.
3. The wall anchors providedareforsolid (brick, concreteetc) walls only.Forall other wall types please obtain
the correct fixings for the wall type from your hardware retailer. If you are unsure which anchors to use,
please seek professional advice.
4. To avoid potential injury it is advisableto have assistancefrom another personto carry out this installation.
5. Hitachi assumes absolutely no responsibility for injuries or damages that may occur due to improper
installationandhandling.
GB - 9 -
Page 11
“Attention: Only the original wall bracket should be used with this product”
GB - 10 -
Page 12
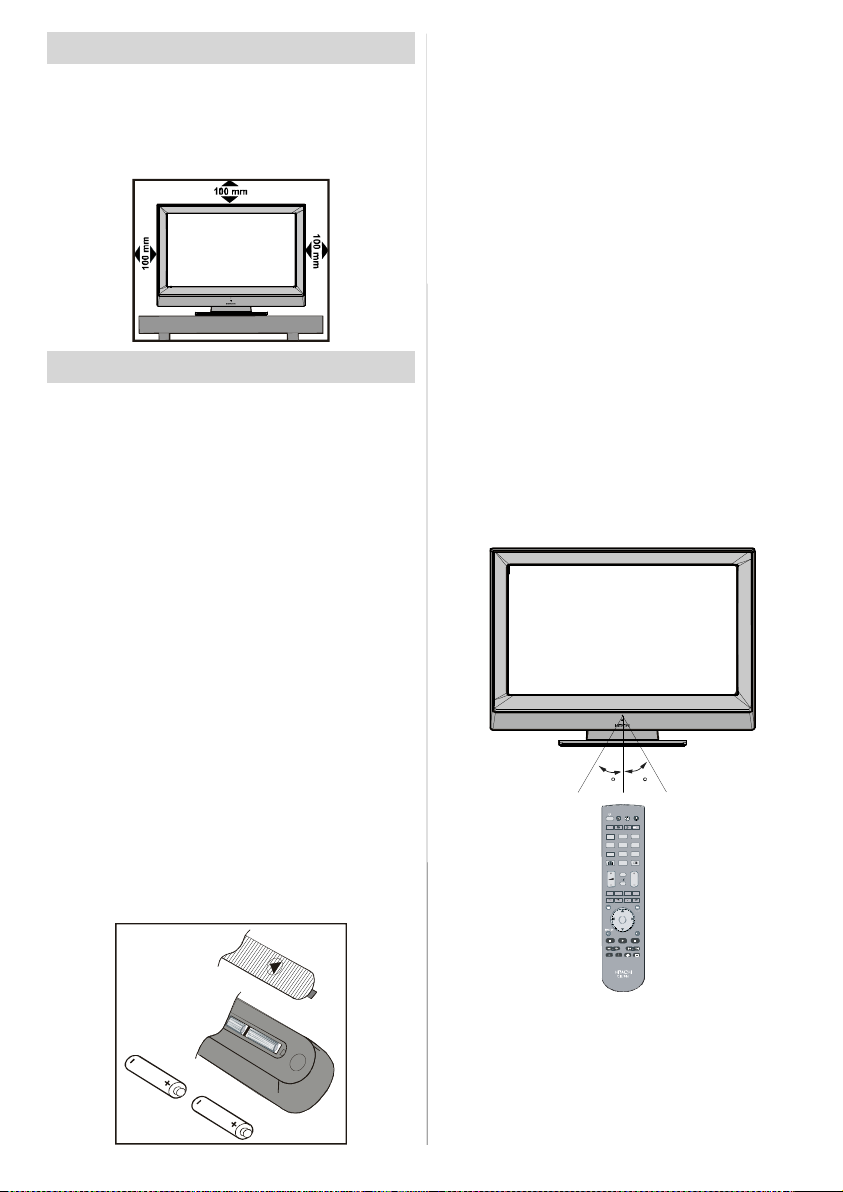
Preparation
Forventilation,leavea space of at least10cm freeall
around the set. To prevent any fault and unsafe situ-
ations, please do not place any objects on top of the
set.
Use this apparatus in moderate climates.
Before Switching On Your TV
Power Connection
IMPORTANT: The TV set is designed to operate on
220-240V AC, 50 Hz.
•Afterunpacking, allow the TV set to reachthe ambi-
ent room temperaturebeforeyouconnectthe set to
themains.
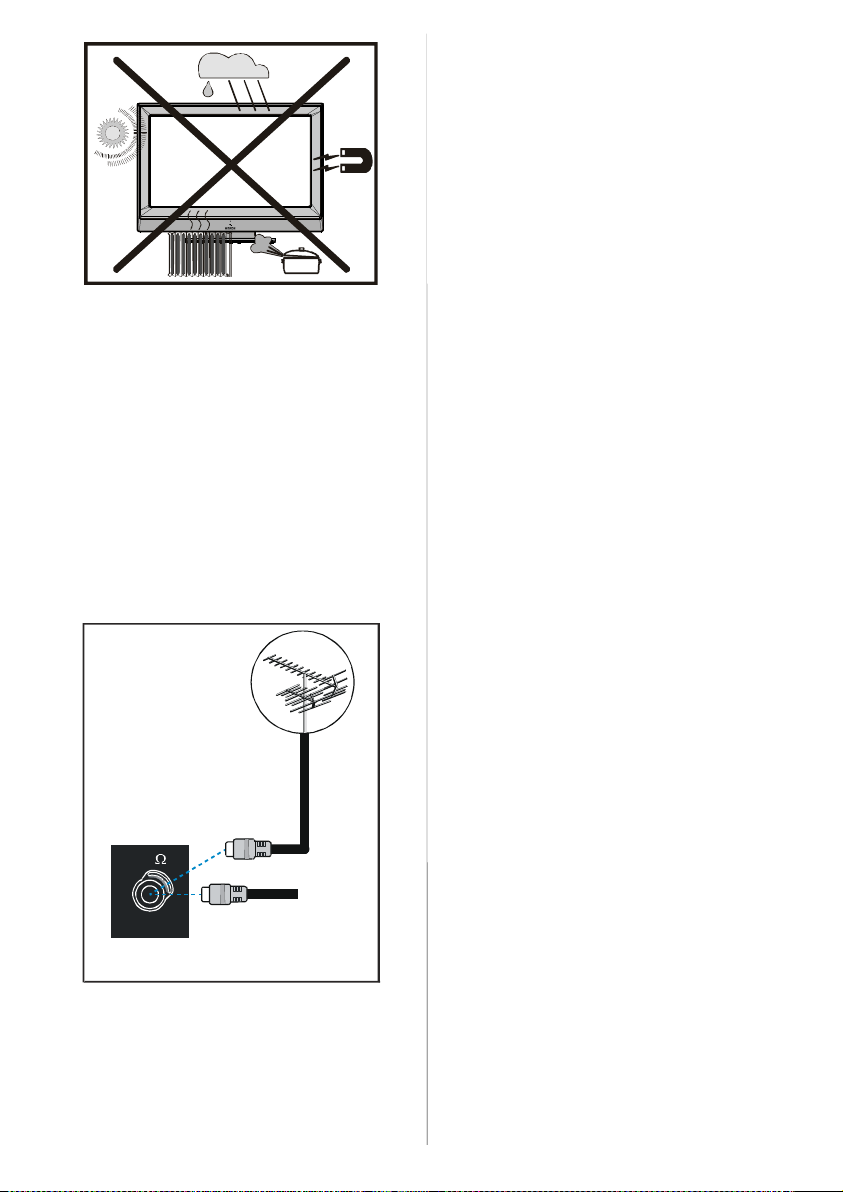
Connections To The Aerial Input Socket
•Connecttheaerialorcable TVplugto theAerialinput
socketlocatedatthe rearof the TV and connectthe
cable plug coming out from the TV out socket lo-
catedon the devices (VCR, DVB etc.) to thissocket
as well.
Inserting Batteries In The Remote
Control Handset
WARNING : Remotecontrolis batteryincluded.Aplas-
tic protector is used to disconnect the batteries in
orderto preventthebatterylife from reducing.Please
remove the plastic protector before the first use.
• Removethebatterycover locatedontheback of the
handset by gently pulling backwards from the indicated part.
• Insert two AA/R6 or equivalenttype batteries inside.
Placethe batteriesin the rightdirectionsandreplace
the battery cover.
Note: Remove the battery from remote control handset when it is not to be used for a long period. Other-
wise it can be damaged due to any leakage of battery.
Handling the Remote Control
• It couldcausecorrosion or battery leakage and may
result in physical injury and/or property damage in-
cluding fire.
• Never mix used and new batteries in the device.
•Replaceall thebatteriesin a deviceat thesametime.
• Remove the batteries if the remote control is not
going to be used for an extended period of time.
• To avoid possible failure, read the following instructions and handle the remote control properly.
• Do not drop or cause impact to the remote control.
• Do not spillwateror any liquidon theremotecontrol.
• Do not place the remote control on a wet object.
• Do not place the remote control under the direct
sunlight or near sources of excessive heat.
Operating Range for the Remote Control
• Point the top of the remote control toward the LCD
TV's remote sensor LED while pressing a button.
DVD S AT
AV1
1 2
AV4
4 5
HDMI2
7 8
0
I/II
MENU GUIDE
+
GB - 11 -
Remote range is approximately 7m/23ft.
Page 13

Switching The TV ON/OFF
To switch the TV on:
Your TV will switch on in two steps:
1- Connectthepowercordto thesystem.PressPower
On/Off switch. Then the TV switches itself to
stand-by mode (optional).
2- To switch on the TV from stand-by mode either:
Press a digit button on the remote control so that a
programme number is selected,orPress the "-P/CH"
or "P/CH+" button on the TV or press the P+ or P-
button on the remote control, so that last mode
switched off is selected.
By either method the TV will switch on.
To switch the TV off:
• Press the “ (stand-by)”buttononthe remote con-
trol or On/Off switch on the TV, so the TV will switch
to stand-by mode.
To power down the TV completely, press On/Off
switch
or,
Unplug the power cord from the mains socket.
Navigating the Menu System
For Displaying
Menu Options
1- Press to display the menu.
2- Press
3- Use
optionsinanalogueTVmode.UseOK inDTVmode
for viewing a submenu.
4- Press
OK to set as default.
5- To exit the menu or return from sub-menu screen,
press
These explanations are available for the navigation
of the whole menu system. To select options that are
explained in the following parts, refer to “Navigating
The Menu System”.
MENU
For Navigation
OK
+
/
button to select an icon.
/
button to highlight. Pressfor more
/
buttons to change the settings. Press
.
RETURN
Initial Settings
When the TV is turned on for the first time, Auto
Programmemenu willbe displayedonthescreen
Becausethisisthe firsttimetheTVisused, there are no
channelsstoredinthememoryandthefollowingmessage
appearsonthescreen.
Auto Program
Country
Language
TXT Language
AUTO. PROGRAMMING SYSTEM
By pressing or button, adjust the Country item
and press
or button to set “Language”. Use or but-
tons to select “TXT Language” and set it by using
or buttons. Press “OK” button to continue:
For more information on this process, see “Install
Menu” section.
to highlight “Language” item. Use
Basic Operations
You can operate your TV using both the remote
control and onset buttons.
Operation with the buttons on the TV
Volume Setting
• Press - button to decrease volume or +
button to increase volume, so a volume level scale
(slider)willbe displayed at the middle of the bottom
on the screen.
Programme Selection
•PressP/CH + button toselectthenextprogrammeor
P/CH - button to select the previous programme.
Entering Main Menu
• Press the MENU button to enter Main menu. In the
Mainmenu selectsub-menuusing P/CH - or P/CH +
buttons and enter the sub-menuusing
+ buttons. Tolearnthe usage of the menus, referto
the Menu System sections.
- or
GB - 12 -
Page 14

AV Mode
PICTURE
Pressthe AV buttonat the controlpanel on the the TV
to switch your TV to AV modes.
Operation with Remote Control
The remote control of your TV is designed to control
all the functions of the model youselected.The func-
tions will be described in accordance with the menu
system of your TV.
Functions of the menu system are described in the
following sections.
Volume Setting
Press + button to increase volume. Press button to decrease volume. A volume level scale
(slider)will be displayedinthe middleat the bottom of
the screen.
Programme Selection (Previous or next
programme)
• Press P - button to select the previous programme.
• Press P + button to select the next programme.
Programme Selection (direct access):
Press digit buttons on the remote control to select
programmes between 0 and 9. TV will switch to the
selectedprogramme.Toselectprogrammes between
10-99 (for analogue), press the digit buttons con-
secutively which programme you want to select (eg.
forprogramme 27,firstpress2 and then 7).When it is
late to press second digit button only the first digit
programme will be displayed. The limit of the delay
time is 3 seconds.
Pressdirectlytheprogrammenumbertoreselectsingle
digitprogrammes.
Menu System
Picture Menu
Mode
Contrast
Brightness
Sharpness
Colour
In the picture menu; if PC, YPbPr or HDMI modes is
selected, resolution information is displayed at the
bottom of the menu OSD.
Mode
By pressing
buttonto choose from one of theseoptions:Cinema,
Dynamic and Natural.
Contrast/Brightness/Sharpness/Colour/Hue
By pressing
Press
Hint: Hue is displayed in picture menu when the TV
receives an NTSC signal.
ColourTemp
• By pressing
• Press
Cool, Normal and Warm.
Noise Reduction
By pressing
Press
Low, Medium, High or Off.
Film Mode
Films are recorded at a different number of frames
per second to normal television programmes.
By pressing
Press
this feature on when you are watchingfilms to see
the fast motion scenes clearly.
/
button,select Mode. Press
/
button,select the desired Option.
/
button to set the level.
/
button select Colour Temp.
/
to choose from one of these options:
/
button select Noise Reduction.
/
to choose from one of these options:
/
button,select Film Mode.
/
button to set this featureOn or Off. Turn
/
GB - 13 -
Page 15

3D Comb
3D Comb is used to improve colour transitions and
colour quality of pictures.
/
By pressing
/
button to set this feature On or Off.
Note: 3D Comb feature is not functional in NATU-
RAL picture mode.
button,select 3D Comb. Press
Picture Zoom
By pressing
Use
/
16:9, 4:3, Panaromic, 14:9 Zoom, Cinema, Sub-
title or Zoom.
/
button select Picture Zoom.
buttons, to change picture zoom to Auto,
Reset
By pressing
OK button to reset the picture modes to factory de-
fault settings.
/
button, select Reset. Press
Sound Menu
SOUND
Volume
Balance
Sound Mode
Volume
By pressing
button to change the level of the Volume.
/select Volume . Press
/
Equalizer
By pressing
button to change the Equalizer setting. In equalizer
menu,themodecan be changedtoPop, Rock, Jazz,
Flat, Classic or User. Select the desired frequency
by
/
quency gain by pressing
Note: Equalizer menu settings can be altered only
when the Equalizer Mode is in User.
/
select Equalizer.Press
button and increase or decrease the fre-
/
button.
/
Balance
Bypressing
/selectBalance.Press/button
to change the level of the balance.Balance level can
be adjusted between -32 and +32.
Headphone
By pressing
button to enter hedphone menu.
/
button,select Headphone. Press
volume
By pressing
buttonto increase hp volume level. Press
decrease hp volume level. Headphone volume level
can be adjusted between 0 and 63.
/button, select Volume. Press
sound mode
Bypressing
/
button to change sound mode.
Sound mode is used to identify sound mode of the
or
headphone and can be set to mono, stereo, dual I or
dual II according to the transmission.
/
button,select Sound Mode.Press
balance
By pressing
buttonto increase balancetothe right.Press
to decrease balance to the left. Balance level can be
adjusted between -32 and +32.
PresstheMENU buttonto returnto thepreviousmenu.
/
button,select Balance. Press
Sound Mode
By pressing
button,you can select Mono,Stereo, Dual I or Dual II
mode,onlyif theselectedchannelsupportsthatmode.
/
select Sound Mode. Press
AVL
By pressing
set the AVL as on or off.
/
selectAVLVL. Press
Effect
By pressing
to set Effect as on or off.
/
select Effect. Press
Dynamic Bass
Dynamic Bass is used to increase bass effect of the
TV set.
By pressing
pressing
orOff.It isnotrecommendedtoselectHighiflistening
at high volume levels. There is a subwoofer output
that can accept an active subwoofer if you wish to
create very high levels of Bass.
Subwoofer is active only if Dynamic Bass is set to
Off.
/
button, select Dynamic Bass. By
/
button set Dynamic bass to Low, High
Subwoofer
It is possible to connect an external,activesubwoofer
to the set to give a much deeper bass effect.
By pressing
Subwoofer can be set to On or Off.
/
button, select Subwoofer..
button to
/
button to
/
button
/
button
GB - 14 -
Page 16

Dynamic Bass is not available if Subwoofer is set to
On.
Set Subwoofer to On when you connect an external
subwoofer to the set.
3DS
By pressing
set to On or Off.
Set 3DS to On when you connect an external
subwoofer to the set.
If you select “3DS” On, AVL, Effect and Equalizer
items will be invisible.
/
button, select 3DS. 3DS can be
Feature Menu
PIP
PAP
Child Lock
Language
PIP
In the Feature menu, highlightPIP item by pressing
/
buttons.Press
buttonto enterPIP submenu:
PIP Picture
Press
justmentsofContrast,Brightness,Sharpness,Colour,
Reset and Store items in this part are identical with
Picture menu in the analogue TV menu System.
Refer to Picture menu explanations in the previous
parts.
button to enter PIP Picture submenu. Ad-
PIPPosition
Select PIP Position item by using
Use
/button to adjust PIP position.PIP Posi-
tion info will be displayed at the bottom of the menu
OSD.You can directly change PIP position by press-
ing
/
buttons.
Positionsavailableare:Bottom Right,Bottom Centre,
Bottom Left, Top Left, TopCenterandTopRight.
/
button.
PIP Source
Select PIP Source item by using
/
button to set PIP source.
Note: When main picture source is TV, AV-1, AV-2
or AV-3, PIP Window can only be set to HDMI1, HDMI-2, AV-5, PC source or vice versa.
/
button.Use
PIP SWAP
SelectPIP SWAP itembyusing
/
button to set. This function enables to swap be-
tweenthe main and the PIP picture.
/
button.Use
PAP
In the Feature menu, highlight PAP item by pressing
/
buttons.Press
buttontoenterPAPAP submenu:
PIP
PIP ON-OFF
PIP Picture
PIP Position
PIP Source
PIP SWAP
PIP ON-OFF
You can activate or deactivatePIP mode by pressing
/
button.
GB - 15 -
PAP
PAP ON-OFF
PAP Source
PAP SWAP
PAP ON-OFF
You can activate or deactivate PAP mode by press-
ing
/
button.
PAP Picture
Press
button to enter PAP Picture submenu. Ad-
Page 17

justmentsofContrast,Brightness,Sharpness,Colour,
/
Program Table
Colour System
Reset and Store items in this part are identical with
Picture menu in the Menu System. Refer to Picture
menu explanations in the previous parts.
PAP Source
Select PAP Source itembyusing
/
button to set PAP source.
Note: When main picture source is TV, AV-1, AV-2
or AV- 3, PIP w indow ca n onl y be set to
HDMI-1, HDMI-2, YPbPr (AV-5), PC source or vice
versa.
/
button.Use
PAP SWAP
SelectPAP SWAP item by using
/
button. This function enables to swap between
themain and thePAPpicture.
Note: See Appendix C for all PIP/PAT modes.
/
button.Use
Sleep Timer
By pressing
buttonto set the SleepTimer.
The timer can be programmed between Off and 120
minutes in steps of 10 minutes.
/select Sleep Timer. Press/
Child Lock
By pressing
Press
When on is selected,theTVcanonlybe controlledby
the remote control handset. In this case the control
panelbuttons will not work (except for theSTANDBY
button). Hence, if one of these buttons is pressed,
“ChildLock On” will be displayedon the screen when
the menu screen is not visible.
/
select Child Lock.
button to set the Child Lock on or off.
Language
By pressing
/
button to select the language.Available language
options are; English, French, German, Italian, Spanish, Portuguese, Dutch, Greek, Swedish, Norwegian,
Danish,Finnish, Turkish,Croatian, Slovenian, Polish,
Czech, Hungarian, Russian, Bulgarian, Greek, Slovak.
/
button, select Language.Use
AV-2Out
By pressing/
to set AV-2 Out to TV, AV-1, AV-3, FAV, YPbPr Au-
dio or PC Audio.
Note: When TV Source is set to HDMI, HDMI Audio
setting will be availableamong AV-2 Out options.
selectAV-2 Out.Use/button,
PCAudioIn
By pressing
/
button, you can change the PC Audio In to TV,,
AV-1, AV-2, AV-3, FAV, YPbPr Audio, PC Audio.
/
select Pc Audio In.By pressing
BlueBackground
You can set the TV to automatically change to a blue
screen if the signal is weak or absent, or when there
is no input from an external device.
The Blue Background feature can be turned on or off
/
by pressing
button.
Menu Background
By pressing
Transparency level is adjusted by pressing
button.
/
button,select Menu Background.
/
Menu Timeout
By pressing
Press
30 sec or 60 sec.
/
button, select Menu Timeout.
/
buttonto changemenutimeoutto 15 sec,
Teletext Language
By pressing
Press
West, East, Turk/Greek,Cyrillic, or Arabic.
/
button,selectTeletext Language.
/
button to change Teletext Language to
DefaultZoom
Defaultzoom isafeaturethatprovidesthe zoommode
of the TV set to be switched to the selected default
zoom mode (Panoramic, 4:3 ,14:9 zoom) in case no
WSS or 4:3 signal by end-user.
By pressing
cansetDefault Zoomto Panoramic,4:3or 14:9 Zoom
by pressing
/
button,select Default Zoom. Youou
/
button.
Install Menu
Program
Band
Channel
GB - 16 -
Page 18

Program Table
APS
Program Table
Cancel
By pressing
Press
to display Program Table.
/
button, select Program Table.
APS (Auto Programming System)
When you press theBLUE button forAPS,Auto Programming System Menu will appear on the screen.
P01 BBC 1
P02 C 04
P03 C 05
P05 CH 4
P07 C 04
P08 C 07
P09 C 12
P10 C 15
By moving the cursor in fourdirections you can reach
20 programmes in the same page. You can scroll the
pages up or down by pressing the navigation buttons
to see all the programmes in TV mode(except theAV
mode).By cursoraction,programmeselectionisdone
automatically.
P11 S 18
P12 S 29
P13 S 31
P14 S 33
P15 S 34
P16 S 35
P17 S 36
P18 S 37
P19 S 40
P20 C 21
Name
Delete
Name
To change the nameof a decided programme,select
the programmeand press the RED button.
Thefirst letterofthe selectedname willbehighlighted.
Press
buttonto selecttheother letters. By pressingthe RED
button, you can store the name.
/
button to change that letter and
Insert
Select the programme which you want to insert by
navigationbuttons.Pressthe GREEN button.Bynavi-
gation buttons move the selected programme to the
decidedprogrammespaceandpresstheGREEN but-
ton again.
Delete
To delete a programme, press the YELLOW button.
Pressing the YELLOW button again erases the se-
lected programme from the programme list, and the
programmes below shift one up.
Insert
Country
WARNING!
will be deleted
A.P.S. (Auto Programming System) Country
Press
/
to exit fromA.P.S. function, press the BLUE button.
When you press OK orRED button for starting APS,
all stored programs will be erased and the following
screen will be displayed:
button to select your country. If you want
APS is running...
/
UK
P 03 - C 04
Whenever you press the BLUE button, A.P.S. function stops and Program Tableappearson the screen.
If you wait until the end of A.P.S., Program Table is
displayed with the programmes found and located.
Program
By pressing/
/
buttontoselecttheprogram number.Youcanalso
entera numberviadigit buttonsonthe remote control.
There are 100 program storage between 0 and 99.
button,select Program. Press
GB - 17 -
63.75 MHz
63.75 MHz
6%
Page 19

Band
Colour System
Band can be selected either C or S by press
button.
/
Channel
Channel can be changed by
Buttons.
/
button or Digit
Colour System
By pressing/
Press
PAL, SECAM, PAL60 or AUTO.
IfSound Systemis set to I,SECAMis notavailablefor
theColourSystem.
Note: In AV mode, you can choose NTSC 3.58 and
/
NTSC 4.43 as well.
button, select Colour System.
button to change the colour system to
SoundSystem
By pressing
Press
I,L,L’,DK.
/button, select Sound System.
/
buttonto changethesound system to BG,,
Fine Tune
Bypressing/
/
button to adjust the tuning.
button,select FineTune.Press
Search
By pressing
button to start program searching.You can also
enter the desired frequency via digit buttons when
searchitem is highlighted.
/
button, select Search. Press
Store
By pressing
OK button to store the adjustments. “Stored...” will
be displayed on the screen.
/
button, select Store. Press
Install menu in AV modes
The following screen appears in the install menu:
Colour System
By pressing
ing
/
PAL, SECAM, PAL 60, NTSC 4,43, NTSC 3,58 or
AUTO.
/
selectColour System. By press-
button,you can change the coloursystemto
VC R
By pressing
button,you can set the VCR to ON or OFF.
/select VCR. By pressing
Store
By pressing
OK button to store the adjustments. “Stored...” will
be displayed on the screen.
/
button,select Store. Press
Source menu
Bypressing / button,selectthe fifthicon.Source
menu appears on the screen.
SOURCE
TV
/
or
AV-1
AV-2
AV-3
AV-3 S
In source menu, highlight a source by pressing/
button and switch to that mode by pressing
OK button. Source options are; TV, AV-1, AV-2,
AV-3, AV-3 S, FAV, S-Video, YPbPr, HDMI-1, HDMI-
2 and PC.
/
or
or
VCR
Store
GB - 18 -
Page 20

PC Mode
Installation
•Poweroff both Computerand Displaybeforemaking
any connections.
• Set your PC’s resolution correctly before connecting to the TV.See the tableonAppendixAon page
28.
• Use15-pindisplay cabletoconnecta PC to the LCD
TV.
Menu System in PC mode
SoundMenu/Feature Menu
The items in these menus are described at Sound &
Feature Menu explained in “Menu System”.
PC Picture Menu
Bypressing
Picture menu appears on the screen.
Brightness, Contrast and ColourTemperatureadjustments in this menu are identical to adjustments de-
finedin TV picturemenuin “MENUSYSTEM”.
PC POSITION Menu
By pressing
POSITION menuappears on the screen.
/
button,selectthe second icon. PC
/
button, select the sixth icon. PC
H (Horizontal) Position
This item shifts the image horizontally to right hand
side or left hand side of the screen.
• SelectH Position item by using
• Use
/
button to adjust the value.
/
button.
V (Vertical) Position
Thisitemshiftstheimageverticallytowards the top or
bottom of the screen.
• Select V Positionitem by using
/
• Use
button to adjust the value.
/
button.
Phase
Depending on the resolutionandscan frequency that
you input to the TV Set, you may see a hazy or noisy
picture on the screen. In such a case you can use
thisitem togeta clearpictureby trialanderrormethod.
• Use
/
button to adjust the value.
DotClock
Dot Clock adjustments correct interference that appear as vertical banding in dot intensive presentationslikespreadsheetsorparagraphsortextin smaller
fonts.
• Use
/
button to adjust the value.
Soundin PC mode
•Connectthe PC’sAudio outputto the TV’sPC Audio
In socket with an audio cable.
PC POSITION
Autoposition
H Position
V Position
Phase
Dot Clock
Autoposition
If you shift the picture horizontally or vertically to an
unwantedposition,use this item to put the pictureinto
correct place automatically.
• Select Autoposition item by using
Press orOK button.
Warning: Auto position adjustment recommendedto
be done with the full screen image for the proper
adjustment.
/
buttons.
GB - 19 -
Page 21

Other Features
TV Status
Pr ogr amm e Numbe r, Progra mme Na me,
Sound Indicator and Zoom Mode are displayed
on the screen when a new programme is entered.
Mute Indicator
It is placed in the upper side of the screen when
enabled.
Mute
To cancel mute, there are two alternatives; the first
one is pressing the
increasing the volume level.
PIP and PAP Modes
PIP picture is displayed on the screen by pressing
button.AtPIPMode,asmallpicture(PIPpicture)
is displayed in the main picture.
When PIP Mode is entered,the defaultactivewindow
is PIP window and the active window is indicated by
a red frame around it. The active window can be
changed by pressing
PIP position can be changed by pressing
tons.
button and the second one is
/
buttons.
/
but-
Zoom Modes
Zoom mode can be changed by pressing the
button. You can change the screen size according to
the picture aspect ratio. Select the optimum onefrom
the following ZOOM modes.
Note:
• In YPBPR and HDMI modes, while in 720p-1080i
resolutions, only FULL mode is available.
• In PC mode,only4:3and16:9modesareavailable.
Auto
When a W SS (Wide Screen Signalling) signal,
which shows the aspect ratio of the picture, is in-
cluded in the broadcast signal or the signal from an
external device, the TV automatically changes the
ZOOM mode accordingto theWSS signal.
• When the AUTO mode does not function correctly
due to poor WSS signalquality or when you want to
changethe ZOOM mode,changeto anotherZOOM
modemanually.
Zoom
This uniformly stretches the left and right sides of a
normal picture (4:3 aspect ratio) to fill the wide TV
screen.
When
to PAP mode. In PAP Mode, two pictures with equal
sizes are displayed on the screen. Aspect Ratios of
the windows are fixed.
When you switch to PAPMode,main window in PAP
Modeis displayedon therightsideof the screen.The
active window can be changed by pressing
button.
Press the
Note: When main picture source is TV, AV-1, AV-2,
button is pressed again, the TV switches
buttonagainto exit the PAPmode.
AV-3 or AV-4; PAP or PIP window can only be
set to HDMI-1, HDMI-2, YPBPR, PC source or
vice versa.
AV Modes
You can switch your TV to AV modes by using related buttons on the remote control.
First,press
on the screen. You can then use; AV1, AV2, AV3,
AV4, AV5, HDMI1 or HDMI2 buttons on your remote
control to select the desired source (except being in
teletext).
Note that in PIP/PAP modes, pressing
will directly change sources.
buttontill INPUT OSD is displayed
/
button
GB - 20 -
• For 16:9 aspect ratio pictures that have been
squeezed into a normal picture (4:3 aspect ratio),
usethe Full modetorestorethepicturetoits original
shape.
Cinema
This zooms up the wide picture (16:9 aspect ratio) to
the full screen.
16:9 Zoom
This zooms up the wide picture (16:9 aspect ratio) to
the full screen.
Subtitle
This zooms up the wide picture (16:9 aspect ratio)
with subtitles to the full screen.
Page 22

4:3
Use to view a normalpicture(4:3aspect ratio) as this
is its original shape.
14:9 Zoom
This zooms up the wide picture (14:9 aspect ratio) to
the upper and lower limits of the screen.
Panoramic
This stretches the left and right sides of a normal
picture (4:3 aspect ratio) to fill the screen, without
making the picture appearunnatural.
The top and bottom of the picture are slightly cut off.
Freeze Picture
You can freezethe picture on the screen by pressing
the
Note: This feature will be unavailable to be used
button.
while watching PC, YPBPr and HDMI sources.
Teletext
Teletext system transmits informartion such as news,
sportsandweatheron yourTV. Note that if thesignal
becomes insufficient, some text errors may occur or
the teletext mode may be quitted.Teletext function
buttons are listed below:
Teletext On/Off
Activates teletext mode when pressed once.
Teletext PAT mode
Pressing this buton will split the screen into two windows, one displaying the teletext and the other displayingthe currentchannel.Pressingagainwillswitch
to teletext mode in a single screen.
Index
Selects the teletext index page.
Reveal
Shows hidden information (solutions of games, for
example).
Hold
Holds a text page when convenient. Press again to
resume.
Subcode Pages
Selects subcode pages if available when the teletext
is activated.
P+ / P- and numbers (0-9)
Press to select a page.
Note: Most TV stations use code 100 for their index
pages.
Coloured buttons (RED/GREEN/YELLOW/BLUE)
Your TV supports both FASTEXT and TOP text sys-
tems. When these systems are available, the pages
are divided into groups or topics.
When FASTEXT system is available, sections in a
teletext page will become colour-coded and can be
selected by pressing the coloured buttons. Press a
coloured button that conrresponds with your needs.
The coloured writings will appear, showing you which
coloured buttons to use when TOP text transmission
is present.PressingP - orP + commandswillrequest
the next or previous page respectively.
GB - 21 -
Page 23

Connect Peripheral Equipment
High Definition
Your LCD Television is capable of displaying High
Definition pictures from devices such as a High Defi-
nitionSatelliteReceiverorDVDPlayer.Thesedevices
must be connected via the HDMI socket or Compo-
nent Socket. These sockets can accept either 720p
or 1080i signals.
Note: When it is desired to watch HDMI source with
a DVI to HDMI cable; in order to enable audio,
Audio Input (which is located at the left side of
the antenna input) is to be used to get DVI
device’s audio signals.
Via The Scart
The TV has 3 Scart sockets. If you want to connect
peripherals (e.g. video, decoder, etc.) which have
Scart sockets to the TV, you can use SCART socket
of the TV.
Note: If an external device is connected via the Scart
sockets, the TV will automatically switch to AV
mode. If both sockets are employed at the sime
time, SCART 1 becomes the preferential.
Via Aerial Input
If the device you want to connect does not have a
Scart socket, you should connect it to the Aerial input
of the TV.
If the VCR is connected via Aerial input, it is
suggested to use Programme 0.
Decoder
If you are subscribed to cable TV offers, the
organisation will supply you a corresponding decoder
unit to allow the programmes to be unscrambled.
For further information consult your dealer.
Connect a decoder with an aerial socket to
the TV
• Connect the aerial cable.
Connect a decoder without an aerial socket
to the TV
• Connect the decoder to the EXTERNAL socket of
TV with a RCA cable. Through the SCART/RCA
socket of the decoder, you may attain a better dis-
play resolution.
TV And Video Recorder
• Connect the aerial cables.
Betterpicturequalitycan be obtained if you also connect a Scart cable to SCART sockets.
Playback NTSC
• Connect NTSC VCR player to a SCART socket of
the TV.
•Then,selecttherelatedsourcefromtheSOURCE menu.
Source selection for VCR recording.
• Select Feature menu.
• Select AV-2 Out by pressing
• For copying the picture that comes from the tuner,
selectSCART 1.
/
button.
Camera And Camcorder
To Connect ToAV Input
Connectyourcameraor camcordertoAVinput of the
TV.
• Connect your equipment to the TV via VIDEO (yellow), AUDIO R (red) and AUDIO L (white) inputs.
You must connect the jacks into the input with the
same colour.
To ConnectTo S-VHS Input
Connect your camera or camcorder S-VHS input of
the TV.
• Connect your equipment to the TV via S-VHS input
and audio inputs of AV inputs by using S-VHS
cables.
Connect The Decoder To The Video
Recorder
Some video recorders have a special Scart socket
for decoder.
• Connect a SCART cable to the SCART socket of
your decoder and to the special Scart socket of
your video recorder. Refer to the booklet of your
video recorder.
ConnectingHeadphones (optional)
Use the stereo headphone socket of the TV, to connect headphones.
Note: If you want to connect more equipment to your
TV, consult your dealer.
Audio Lineout
To connect the external speakers to your TV, use the
Line Outs of the TV.
Note: While watching PC or YPbPr sources, Lineout
selection could only be the current source.
Connecting Subwoofer
Use Subwoofer Out socket to connect an external,
active subwoofer to the set to give a much deeper
bass effect.
GB - 22 -
Page 24

Tips
Care Of The Screen
Clean the screen with a slightly damp, soft cloth. Do
not use abrasive solvents as they may damage the
TV screen coating layer.
Poor Picture
Haveyouselectedthe correct TV system?Is your TV
set or house aerial located too close to non-earthed
audioequipmentor neon lights, etc.?
Mountains or high buildings can cause double pictures or ghost images. Sometimes you can improve
the picture quality by changing the direction of the
aerial.
Is the picture or Teletext unrecognisable? Check if
you have entered the correct frequency.
The picture quality may degrade when two peripherals are connectedto theTV at the sametime. In such
a case, disconnect one of the peripherals.
No Picture
Is the aerial connected properly? Are the plugs connected tightly to the aerial socket? Is the aerial cable
damaged? Are suitable plugs used to connect the
aerial? If you are in doubt, consult your dealer.
No Picture means that your TV is not receiving a
transmission. Have you selected the correct button
on the remote control?Try once more.
Sound
You can not hear any sound. Did you perhaps interrupt the sound, pressing the
Soundis coming from only one of the speakers.Isthe
balance set to one extreme?See Sound menu.
Remote Control
Your TV no longer responds to the remote control.
Perhaps the batteries are exhausted. If so you can
still use the local buttonsat the bottom of the TV.
button?
GB - 23 -
Page 25

Peripheral Equipment Connections
AUDIO
VIDEO I N
(R)(L)
VIDEO
ANT.IN
ANTENNA
Aerial Connection
Outdoor Aerial Connection
IN
CAMCORDER
Round 75 ohm coaxial cable
GB - 24 -
Rear of TV
Page 26

Specifications
DISPLAY
Size/Diagonal 32"(16:9Display)
Viewablescreensize/Diagonal 69.87x39.33(cm) / 80.18(cm)
VIDEO STANDARDS
Video PAL/NTSC/SECAM
TVTuner PAL/SECAM/B/GD/KK' I/I' L/L'
Formats 4:3,16:9, 14:9,Panoramic,DefaultZoom,AutoWide
AUDIO German+ NicamStereo
FREQUENCY RANGE PC
Horizontal Frequency: 64Khz (max)
Vertical Frequency: 75Hz (max)
ClockFrequency: 108Mhz (max)
Resolutions: 1360x 768(max)
Formats: 4:3,16:9
INPUT CONNECTIONS
PC D-SUB 15 (VGA)
VIDEO TVTUNER: IEC75 Ohms inputresistance
VHF(BANDI/III)
UHF(BAND U)
HYPERBAND
CABLETV(S1-S20/ S21-S41)
100PRESETCHANNELS
SCART1:CVBS, RGB
SCART2:CVBS, RGB
SCART3:CVBS, S
CVBS:1 xRCA
Y/C(S-Video) MiniDIN
YPbPr:3 x RCA
HDMI x 2:MultimediaInterface
AUDIO SCART1:AudioL/R
SCART2:AudioL/R
SCART3:AudioL/R
Y/CorCVBS: AudioPhonoL/R
YPbPr:AudioPhonoL/R
PC:3.5mmJackStereo
Headphones:3.5mmJackStereo
GB - 25 -
Page 27

Specifications
OUTPUT CONNECTIONS
LineOut AudioPhono L/R
Subwoofer 1 x Phono (Mono)
AudioSpeaker Output 2x8W RMS
Synchronization Sync on green,composite sync with automatic detection
Operator Control Keys On/Off, Standby,Vol+, Vol-,Prog +, Prog -, Menu, TV/AV.
OPERATING CONDITIONS
Temperature 0°C ~40°C (in operation)
Air Humidity 20%~80%(nocondensation)
Atmospheric Pressure 800~1114HPa
POWER SUPPLY
Voltage Supply 220-240VAC
Mains Frequency 50Hz
Power Consumption 150W (Max),<1 W (Standby)
DIMENSIONS AND WEIGHT
Displaywith stand D x L x H: 245x807 x 605 (mm)
Displaywithout stand:D x L x H: 123 x 807x 555 (mm)
Weight Display: 14 kg
Weight Stand: 3 kg
Weight (net): 17 kg
separateHand V sync.
GB - 26 -
Page 28

Specifications
Signal Input
PC RGB Terminal (D-sub 15-pin connector)
Pin Input signal
1 R
2 G or sync on green
3 B
4 No connection
5 No connection
6 R.GND
7 G.GND
8 B.GND
9 No connection
10 GND
11 No connection
12 [SDA]
13 H.sync or H/V composite sync
14 V.sync. [V.CLK]
15 [SCL]
S-input connector pin specifications
Pin Input signal
1 Y
2 Y-GND
3 C
4 C-GND
Frame GND
• Whendifferentkinds of input signalsaresimultaneously input to the monitor via a graphics
board or the like, the monitorwillautomatically
select the signalsin the following priority order:
Sync signal type Priority
H/V separate sync. 1
H/V composite sync. 2
sync.on Green * 3
• Even in the case ofthe recommendedsignals
shown on the following page, there may be
instances when correct display is not pos-
sible. In this case, use H/V separate sync, H/
V composite sync.
HDMI connector pin specifications
Pin Input signal Pin Input signal
1 TMDS Data2+ 11 TMDS Clock Shield
2 TMDS Data2 Shield 12 TMDS Clock-
3 TMDS Data 2- 13 CEC
4 TMDS Data 1+ 14 Reserved (N.C. on device)
5 TMDS Data1 Shield 15 SCL
6 TMDS Data1- 16 SDA
7 TMDS Data0+ 17 DDC/CED Ground
8 TMDS Data0 Shield 18 +5V Power
9 TMDS Data0- 19 Hot Plug Detect
10 TMDS Clock+
SCART connector pin specifications
Pin Input signal Pin Input signal
1 AUDIO OUT (RIGHT) 12 Not used
2 AUDIOIN (RIGHT) 13 RGB-R GND
3 AUDIOOUT (LEFT/MONO) 14 GND
4 AUDIO GND 15 RGB-R / S.VHS CHROMINANCE IN
5 RGB-B GND 16 BLANKING SIGNAL
6 AUDIO IN(LEFT/MONO) 17 COMPOSITE VIDEO GND
7 RGB-B IN 18 BLANKING SIGNAL GND
8 AUDIO/ RGB SWITCH / 16:9 19 COMPOSITE VIDEO OUT
9 RGB-G GND 20 COMPOSITE VIDEO / S.VHS LUMINANCE IN
10 Not used 21 GND / SHIELD (CHASSIS)
11 RGB-G IN
GB - 27 -
Page 29

Appendix A: PC Input Typical Display Modes
The display has a maximum resolution of 1360 x 768, frequency range of 56-75 Hz.
The following table is an illustration of some of the typical video displaymodes.
Mode
1
2
3
4
5
6
7
8
9
10
11
12
13
Horizontal Vertical
640 480 31,5 60
640 480 37,9 72
640 480 37,5 75
800 600 35,2 56
800 600 37,9 60
800 600 48,1 72
800 600 46,9 75
1024 768 48,4 60
1024 768 56,5 70
1024 768 60 75
1280 1024 64 60
1280 768 47,8 60
1360 768 47,7 60
Ver.(Hz)
GB - 28 -
Page 30

Appendix B: AV and HDMI Signal Compatibility
AV-4S
Source Available
AV-1
(SCART 1)
AV-2
(SCART-2)
AV-3
(SCART-3)
AV-4 FAV
(S-Video)
Supported Signals
PAL 50/60
NTSC 60
RGB 50
RGB 60
PAL 50/60
NTSC 60
RGB 50
RGB 60
PAL 50/60
NTSC 60
S-VHS 50
S-VHS 60
PAL 50/60
NTSC 60
PAL 50/60
NTSC 60
O
O
O
O
O
O
O
O
O
O
O
O
O
O
O
O
480I 60Hz O
480P 60Hz O
576I 50Hz O
AV-5
YPbPr
576P 50Hz O
720P 50Hz O
720P 60Hz O
1080I 50Hz O
1080I 60Hz O
480I 60Hz O
480P 60Hz O
576I 60Hz O
576P 60Hz O
HDMI1
HDMI2
720P 60Hz O
720P 50Hz O
1080I 50Hz O
1080I 50Hz O
1080P 50Hz X
1080P 60Hz X
1080P 24 HZ
(X: Not Available, O: Av ailable)
Note: Insome cases a signal on the LCD TV may not be displayedproperly. The problem
may be a inconsistency with standards from the source equipment(DVD, Set-top box, etc…).
Ifyoudo expereince such a problem please contact your dealer and also the manufacturer
of the source equipment.
GB - 29 -
Page 31

Appendix C: Main and PIP-PAP Picture Combinations
M ain a nd PIP, PAP p icture c o m binatio n s
AV-1 AV-1 AV-2 AV-2 AV-3 AV-3 F AV S-VHS YPbPr
MAIN
PIP,PAP
TUNER
CVBS RGB CVBS RGB CVBS SVHS CVBS
AV-4 AV4-S AV-5
HD M I 1 HD M I 2
PC
X
TUNER X X X X X X
AV-1 X
CVBS
AV-1 X
RGB
AV – 2 X
CVBS
AV– 2 X
RGB
AV-3
CVBS X X X X X X X X X X O O O
AV-3
SVHS X X X X X X X X X X O O O
AV-4 FAV X
CVBS
AV4-S X
SVHS
AV-5 O
YPbPr
HDMI 1 O O O O O O O O O
HDMI 2 O O O O O O O O O X X X X
PC O O O O O O O O O X X X X
X X X X X XX X
X X X X
X X X X X XX
X X X X X XX
X X X X X XX X O
X X X
O O O O O XO
X X X
X
X
X
X
X
X
O
(X: Not available, O : Available)
XX X O
X O O
XX
X O O
X O O
X X OX
O X
X
O O
X X
O
O
O
O
O
O
O
O
O
O
X
X
X
Addendum to the instruction book.
For source selection, first press INPUT button on the remote controller then source button which you want to
switch.
The following is a key to the AV inputs:
Remote Control S ource Menu I nput Socke ts on the set
TV/DTT TV Not applicable
TV/DTT DTT Not applicable
AV1 AV-1 AV1 (scart 1)
AV2 AV-2 AV2 (scart 2)
AV3 AV-3 AV3 (scart 3)
* AV-3S (not marked see note below)
AV4 FAV AV4
* S-VIDEO S-VHS
AV5 YPbPr (Component) Y PB PR L R
HDMI1 HDMI-1 HDMI-1
HDMI2 HDMI-2 HDMI-2
(there is no PC button ) PC PC INPUT
Inputscanbeselectedbyeither usingthe appropriatebuttonsontheremotecontrol or by selectingan inputon
the source menu.
*ForAV-3S, select from the menu.
NB. AV-3S can be used by the use of an S-VHS to scart converter plug (not supplied) or a device which has
scart output with S-video can be connected
*For S-VIDEO press INPUT and AV-4 twice or select from the menu.
PC can only be selected using the source menu.
GB - 30 -
Page 32

UK Guarantee
Your Guarantee of Excellence
Thank you for purchasing this Hitachi Television.
In the unlikely event that this product should develop a fault, we undertaketo replace or repair any part of the
product which fails due to a manufacturing defect within 12 months of the date of purchase provided that:
i) The product has been installed and used only in accordancewith the instructions supplied with the product
ii) The product has not been repaired, maintained, or modified by any personotherthan an Hitachi authorised
engineer
iii) The product serial number has not been removed or altered
This guarantee does not apply to product acquired second hand or for commercial or communal use
This guarantee does not cover the replacement of exhausted batteries, the adjustment of user controls, or
aerialalignment.
Any parts replaced under this guarantee shall become the property of Hitachi Europe Ltd.
Please note that evidence of the date of purchase will be required before any service under this guarantee is
carried out.
THIS GUARANTEE DOES NOTAFFECTYOUR STATUTORYRIGHTS.
IN ALL CASES OF DIFFICULTYPLEASE CONSULT YOUR HITACHI DEALER
GB - 31 -
Page 33

QUICK GUIDE
L32A01 A
IMPORT ANT - If placing TV into cabinet or alcove, ensure there is at least a 100mm (10cm) gap to the sides,
rear and top of the TV. This is to allow for adequate ventilation during operation. Please read the
main Users Guide for more safety information before installation.
insert the batteries into your handset
+
+
either connect the aerial straight to your TV...
Rear view
Aerial (RF) Socket
Aerial (RF)
wall
socket
Lead
...or connect the aerial through a VCR...
TFT-LCD TV
(RF) connector
Aerial (RF)
lead VCR to TV
wall
socket
Aerial (RF) Socket VCR
ANT.IN
Lead
• It is recommended that a scart lead should be fitted between your TV and VCR to enhance your picture and sound
quality. Scart leads are essential if you have a s tereo TV and VCR and wish to obtain stereo sound from your equipment.
These leads can be purchased from your Hitachi dealer or any good High Street electrical retailer.
Aerial (RF) Socket
Optional Scart L ead
TV to VCR
AV-1
AV-2
VCR
Page 34

...or through a satellite decoder...
TFT-LCD TV
RF Lead from
Aerial
Satellite to TV
• Scart Lead to
AV-1 on TV.
ANT.IN
TV
VCR
RF Lead to Aerial
...or through a VCR and satellite decoder.
TFT-LCD TV
RF Lead from
VCR to TV
RF Lead
from VCR to
Satellite
Aerial
ANT.IN
RF Lead to
Aerial
TV
• Scart Lead to
AV on TV.-1
VCR
Satellite LNB lead
Satellite LNB lead
ANT.IN
AV-1
AV-2
VCR
Page 35

connect the TV plug to the mains socket
Plug the
into the TV
Power Cord
Input
mains lead
...
Power on/off
button
UK plug
insert plug...
...and switch on
European
plug
switch your TV on
by pressing the On/Off button
TV/AV
MENU
P/CH
Front View
NB: When the set is first switched on, the set will be in standby
on the front of the set will illuminate red , P+)
. Press the channel up down (P-
or numeric buttons (1, 2, 3, ...) to operate.
basic functions of remote control
TV/DTT
DVD SAT INPUT
AV1 AV 2 AV 3AV3
Vol um e U p
Volume Down
To enter the main menu
123
AV4 AV 5 H DMI 1
45 6
HDMI2
78 9
0
I/II
....
MENU
OK
+
To select a programme
number.
Programme Up
P
Programme Down
GUIDE
For navigation of the menus
RETURNFUNCTION
To go back to previous menu
and the indicator
insert plug...
RGB2
Page 36

important note before starting Auto Setup
If you have a Video Cassette Recorder or a Satellite receiver connected to your TV please
ensure that they are switched on before automatic tuning begins. In the case of a VCR, insert
a pre-recorded tape and begin playback of your equipment. These measures ensure that all
your external equipment is tuned in during the Auto Setup procedure.
start A.P.S. (Auto Progr amming System)
1
First of all choose , and by using /
and / buttons. T his will affect the sort process in APS. To start APS,
press the RED or “ ” button.
2
Press the button when search is completed.
Language Country TXT Language
OK
Country
Language
TXT Language
PLEASE CHECK ANTENNA CABLE
AUTO. PROGRAMMING SYSTEM
UK
APS is running...
UK
P03-C04
63.75 MHz
63.75 MHz
Cancel
6%
Cancel
Ok
important note.
Once the TV has found all your local stations, they are then automatically
assigned a programme numberand name, if available from the broadcast.
Page 37

Hitachi, Ltd.
Shin-Otemachi Bldg 5f, 2-1, Otemachi 2-Chome,
Consumer Business Group
Chiyoda-Ku, Tokyo 100-0004 Japan
HITACHI EUROPE LTD.
Consumer Affairs Department
PO Box 3007
Maidenhead
Berkshire SL6 8ZE
UNITED KINGDOM
Tel: 0870 405 4405
consumer.mail@hitachi-eu.com
Email:
HITACHI EUROPE GmbH
Munich Office
Dornacher Strasse 3
D-85622 Feldkirchen bei München
GERMANY
Tel: 089-991 80-0
Fax: 089 - 991 80 -224
Hotline: 0180 - 551 25 51 (12ct/min.)
dmg-mun.service@hitachi-eu.com
Email:
HITACHI EUROPE S.r.l.
Via T. Gulli
20147 MILAN
ITALY
Servizio Clienti
Tel. 02 38073415
Email:
HITACHI EUROPE S.A.S
Digital Media Group
Cité Internationale
94 Quai Charles de Gaulle,
69463 LYON cedex 06
FRANCE
Tel: 04 72 14 29 70
Fax: 04 72 14 29 99
Email:
HITACHI EUROPE LTD.
Benelux Branche Office
Bergensesteenweg 421
1600 Sint-Pieters-Leeuw
BELGIUM
Tel : 0032/2 363 99 01
Fax: 0032/2 363 99 00
Email :
HITACHI EUROPE LTD.
Kodanska 46
101 00 Praha 10
CZECH REPUBLIC
Tel : 234 064 514
Fax: 234 064 513
Email :
n.39
customerservice.italy@hitachi-eu.com
france.consommateur@hitachi-eu.com
info@hitachi.be
dmg.eeu@hitachi-eu.com
HITACHI EUROPE S.A.
364, Kifissias Ave. & 1, Delfon Str.
152 33 Chalandri
Athens
GREECE
Tel: 210 6837200
Fax: 210 6835694
dmgservice.gr@hitachi-eu.com
Email:
HITACHI EUROPE S.A.
Gran Via Carles III, 86 Planta 5ª
Edificios Trade - Torre Este
08028 Barcelona
SPAIN
Tel: 93 409 2550
Fax: 93 491 3513
atencion.cliente@hitachi-eu.com
Email:
HITACHI EUROPE AB
Box 77
S-164 94 KISTA
SWEDEN
Tel: 08 562 711 00
Fax: 08 562 711 11
csgswe@hitachi-eu.com
Email:
HITACHI EUROPE AB
(Norway Branch Nuf)
Strandveien 18
1366 Lysaker
NORWAY
Tel:
67519030
Fax: 67519032
csgnor@hitachi-eu.com
Email:
HITACHI EUROPE AB
Egebækvej 98
2850 Nærum
DENMARK
Tel: 43
43 60 50
Fax: 43 43 60 51
csgden@hitachi-eu.com
Email:
HITACHI EUROPE AB
Lars Sonckin kaari 16
FIN-02600 ESPOO
FINLAND
Tel: 010-8503085
Fax: 010-8503086
Email:
info.finland@hitachi-eu.com
www.hitachidigitalmedia.com
 Loading...