

Page 1

Instruction Manual
KC 1105D
D A B / F M / C D A l a rm Clock Radio
Page 2

Safety Precautions
To achieve the utmost in enjoyment and performance, and in order to become familiar with its
features, please read this manual carefully before attempting to operate the unit, this will assure
you years of faithful, trouble free performance and listening pleasure.
x This safety and operating instruction should be retained for future reference
x The apparatus shall not be exposed to dripping or splashing and that no objects filled
with liquids, such as vases, shall be placed on apparatus.
x Avoid installing the unit in locations described below:
o Places exposed to direct sunlight or close to heat radiating appliances such as
electric heaters.
o On top of other stereo equipment that radiate too much heat.
o Places blocking ventilation or dusty places.
o Places subject to constant vibration.
o Humid or moist places.
x No naked flame sources such as lighted candles should be placed on or near the unit;
x Please dispose of batteries in an environmentally friendly manner.
x Make sure not to obstruct the ventilation openings, minimum
around the apparatus for ventilation.
x The ventilation should not be impeded by covering the ventilation openings with items
such as newspaper, table-cloths, curtains, etc.
x The use of apparatus in moderate climates.
x Operate turning controls and switches as instructed in the manual.
x Before turning on the power for the first time, make sure the power cord is properly
installed.
For safety reasons, do not remove any covers or attempt to gain access to the inside of the
product. Refer any servicing to qualified personnel.
Do not attempt to remove any screws, or open the casing of the unit; there are no user
serviceable parts inside, refer all servicing to qualified service personnel
Important Notes
10cm
should be kept
CAUTION: TO REDUCE THE RISK OF ELECTRIC SHOCK DO NOT REMOVE COVER (OR
BACK), NO USER SERVICEABLE PARTS INSIDE, REFER SERVICING TO QUALIFIED
SERVICE PERSONNEL.
Dangerous Voltages, that may be of sufficient magnitude to constitute a risk of
electric shock to persons is present within this product’s enclosure.
The owner’s manual contains important operating and maintenance instructions,
for your safety, it is necessary to refer to the manual.
WARNING: TO PREVENT FIRE OR SHOCK HAZARD, DO NOT EXPOSE THIS APPLIANCE
TO DRIPPING OR SPLASHING.
Note: This unit will become warm when used for a long period of time. This is normal and does
not indicate a problem with the unit.
2
DANGEROUS VOLTAGE
ATTENTION
Page 3

Safety Information
Some Do’s And Don’ts On the Safe Use Of Equipment
This equipment has been designed and manufactured to meet international safety
standards but, like any electrical equipment, care must be taken if you are to obtain the
best results and safety is to be assured.
DO read the operating instructions before you attempt to use the equipment.
DO ensure that all electrical connections (including the mains plug, extension leads and
inter-connections between the pieces of equipment) are properly made and in
accordance with the manufacturer’s instructions. Switch off and withdraw the mains
plug before making or changing connections.
DO consult your dealer if you are ever in doubt about the installation, operation or safety
of your equipment.
DON’T remove any fixed cover as this may expose dangerous voltages.
DON’T obstruct the ventilation openings of the equipment with items such as
newspapers, tablecloths, curtains, etc.
Overheating will cause damage and shorten the life of the equipment.
DON’T allow electrical equipment to be exposed to dripping or splashing, or objects filled
with liquids, such as vases, to be placed on the equipment.
DON’T place hot objects or naked flame sources such as lighted candles or nightlights
on, or close to equipment. High temperatures can melt plastic and lead to fires.
DON’T use equipment such as personal stereos or radios so that you are distracted
from the requirements of traffic safety.
DON’T listen to headphones at high volume, as such use can permanently damage your
hearing.
DON’T leave equipment switched on when it is unattended unless it is specifically stated
that it is designed for unattended operation. Switch off using the switch on the equipment
and make sure that your family knows how to do this. Special arrangements may need
to be made for infirm or handicapped people.
DON’T continue to operate the equipment if you are in any doubt about it working
normally or if it is damaged in any way, switch off, withdraw the mains plug and consult
your dealer.
Caution: The power adapter has a removable plug, please handle with care.
Caution: The power adaptor will still be supplying power to the unit when connected,
even if the unit appears to be off. The power adaptor must be removed from the mains
socket to power off completely.
ESD Remark: In case of malfunction due to electrostatic discharge just reset the
product (reconnection of power source may be required) to resume normal operation.
NOTE: This product is exclusively available through Dixons Stores Group. In the unlikely
event of a problem with your product please return to the store where your purchase was
made.
3
Page 4

Table of Contents
Instruction ManualSafety Precautions __________________________________ 1
Safety Precautions____________________________________________________ 2
Safety Information ____________________________________________________ 3
Table of Contents_____________________________________________________ 4
Package Content ____________________________________________________ 6
Controls Overview (a) ________________________________________________ 7
Controls Overview (b) ________________________________________________ 8
Turn on the DAB radio _____________________________________________________ 9
Scanning for Radio Stations ________________________________________________ 9
How to Reset the DAB Radio _______________________________________________ 9
How to tune in FM Radio Stations __________________________________________10
Setting DAB/FM Station Presets ____________________________________________ 11
Selecting a Preset DAB/FM station_________________________________________11
To Show the Signal Strength in DAB mode __________________________________ 12
Finding and Adding New Stations _________________________________________ 12
Volume Control __________________________________________________________12
Headphone Socket: ______________________________________________________ 12
Menu Options (DAB only) ____________________________________________ 13
Menu Controls ___________________________________________________________ 13
To change station order __________________________________________________14
To specify the order in which stations are displayed ________________________14
Dynamic Label Segment (DLS): ___________________________________________ 15
Manual Tune: ____________________________________________________________ 15
DRC (Dynamic Range Control) value: _____________________________________ 15
SW Version: ______________________________________________________________15
Changing the DAB Station Information_____________________________________16
Dynamic Label Segment (DLS) ____________________________________________16
Program Type (PTY): ______________________________________________________ 16
Multiplex Name: _________________________________________________________ 16
4
Page 5

Time and Date: __________________________________________________________ 16
Channel and Frequency: _________________________________________________ 16
Signal Information: _______________________________________________________ 16
Signal Error: ______________________________________________________________ 16
Getting Started ______________________________________________________ 17
Switching between DAB, FM, CD, USB, and SD/MMC playback ______________ 17
Playing a CD ________________________________________________________ 18
Playing a SD/MMC __________________________________________________ 20
Playing a USB________________________________________________________ 21
Play and Pause __________________________________________________________22
Skip and Search _________________________________________________________ 22
Stop Playback ___________________________________________________________ 22
Playback Mode__________________________________________________________22
Setting the Clock ____________________________________________________ 23
Setting the Alarm ____________________________________________________ 24
Snooze Button _______________________________________________________ 27
Setting the Backlight _________________________________________________ 28
Specification ________________________________________________________ 29
5
Page 6

Package Content
AC/DC Adapter
Instruction
manual
DAB/FM Radio
6
Page 7

Controls Overview (a)
DAB Radio Front and Top View
7
Page 8

Controls Overview (b)
DAB Radio Back View
8
Page 9

Turn on the DAB radio
Extend the antenna found on the rear of the DAB radio. Press the Standby/on
button to switch on your radio.
Scanning for Radio Stations
For initial use, press the SCAN
button. The DAB radio will now
scan for DAB stations in your area
and store them in memory.
Once the scanning is completed,
the DAB stations will be displayed
in alphanumeric order. The first
station in the list will be selected.
Press < or > button to cycle
through the available stations.
Press the SELECT button to
select the chosen station.
Note: If no DAB signal is found in your area, it may be necessary for you to
relocate your radio. Alternatively, visit
http://www.ukdigitalradio.com/coverage to check that DAB coverage is
available in your area.
How to Reset the DAB Radio
You can delete all of the preset stations and return the radio to its factory settings
as following:
1. Press MENU button first, then Press < or > button
2. The display will show “press SELECT to confirm reset…”.
3. Press the SELECT button
The presets are being erased and the radio is being returned to its factory
condition.
Note: If you do not wish to reset the radio, wait a few seconds without pressing
any buttons and the radio will revert to its previous operating condition.
9
Page 10

How to tune in FM Radio Stations
To listen to FM radio stations switching the DAB radio on
and press the FUNCTION button.
1. To change frequency you
press and hold the < or >
buttons.
2. To search the next active
station, press the SCAN
button. Press the > button
to scan up through the
frequency band. Press the
< button to scan down
through the frequency
band.
10
Page 11

Setting DAB/FM Station Presets
Your DAB radio can store 10 FM presets and 10 DAB presets.
To store the current station:
1. Press the MENU button, and
then press the < or > button
until PRESET being displayed.
2. Use < or > buttons to select
the preset position and then
press and hold the SELECT
button for 5 sec. Preset *
saved being displayed.
Selecting a Preset DAB
To select a stored DAB or FM station, simply press the MENU button, press < or > to
browse the preset stations. Press SELECT button to select.
/FM station
11
Page 12

To Show the Signal Strength in DAB mode
Press the SELECT button, and
the LCD screen display will show
a signal bar with the strength of
the current station.
The indicator on the signal bar shows the
minimum acceptable signal level.
Note: Stations with signal strength below the minimum signal level will not
provide a steady stream of audio.
Finding and Adding New Stations
Press the SCAN button until “Scanning…” appears on the display. The radio will
scan all the DAB channels and add any new stations available to the station list.
Volume Control
Adjust the radio volume to the desired level by pressing the Volume + / - button.
Headphone Socket:
You can listen to your radio with stereo headphones.
12
Page 13

Menu Options (DAB only)
Menu Controls
13
Page 14

To change station order
1. Press < or > button until the
name of the option is
displayed.
2. Press the SELECT button to
select your choice.
To specify the order in which stations are displayed
The top line of the display shows the current selected Station Order (eg. Fav.
Station, Alphanumeric, Active Station, Prune stations) and it can be changed.
1. Press the < or > button to
choose between the station
order options.
2. Press the SELECT button to
select the current option.
Station order Description
Fav station List the most frequently selected stations first.
Alphanumeric Display all stations in alphanumeric order.
Active station List active stations [ones that are currently
broadcasting] before inactive ones.
Prune stations Remove inactive stations from the station list.
14
Page 15

Dynamic Label Segment (DLS):
This is scrolling text information supplied by the DAB station. It may comprise
information on music titles or details of the programme and is provided by the
broadcaster.
Manual Tune:
It allows you to manually tune in
the DAB station.
1. Select the Manual tune
option.
2. The display will show the
current channel number and
frequency.
3. Press the < or > button to step
between the channels and
press the SELECT button to
select the current channel. If
there is a multiplex
corresponding to this channel
and frequency, then the
display will show a tuning
meter with the signal strength
and the multiplex name after a
few seconds.
4. Press the SELECT button to
add stations and exit Manual
exit.
DRC (Dynamic Range Control) value:
You can set the level of compression of stations to eliminate the differences in
dynamic range or sound level between radio stations. Set DRC to 0 means no
compression, ½ indicates medium compression, and 1 shows maximum
compression.
SW Version:
Software version of this DAB radio.
15
Page 16
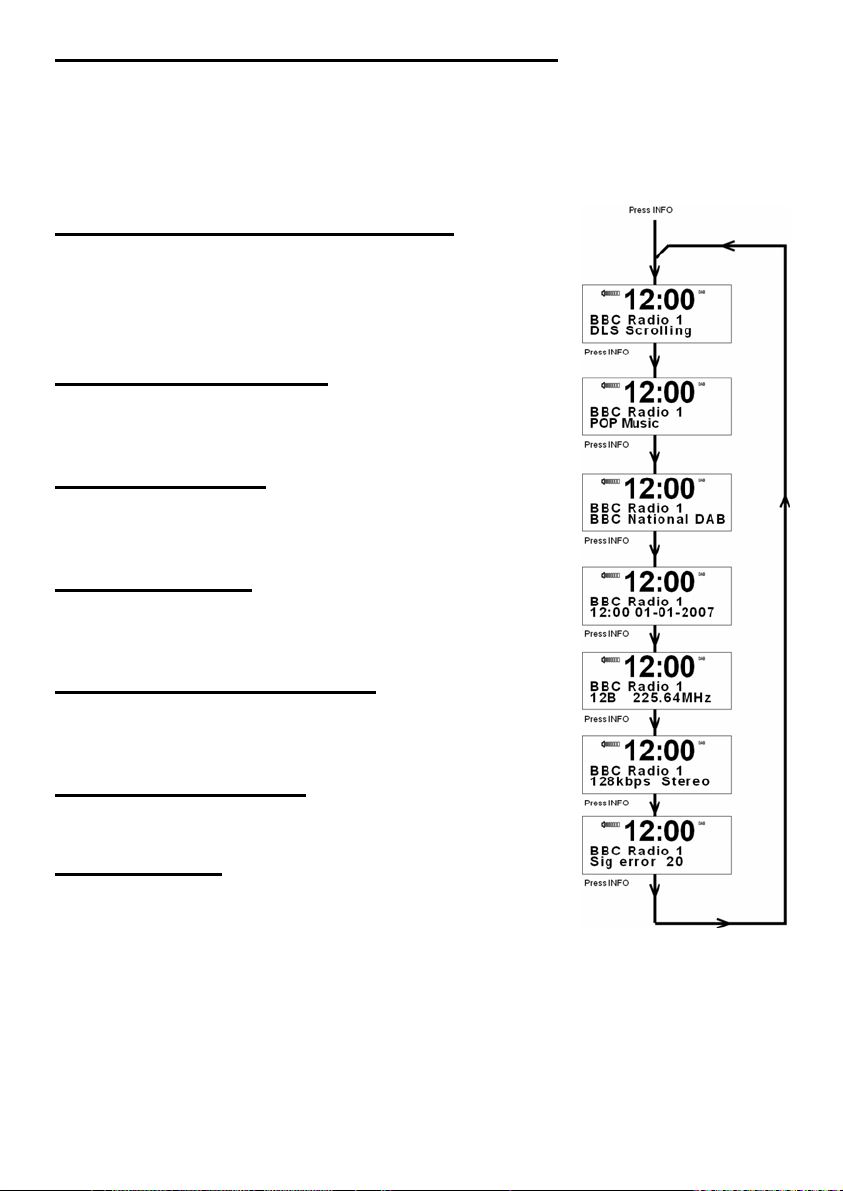
Changing the DAB Station Information
It is possible to change the information that is displayed on the second line of the
display when listening to a DAB station. There are seven types of information
available as listed below with examples on the right.
To change the information displayed press the INFO button.
Dynamic Label Segment (DLS)
This is scrolling text information supplied by the DAB
station. It may comprise information on music titles or
details of the programme and is provided by the
broadcaster.
Program Type (PTY):
This is a description of the type of programme provided
by the DAB station and is provided by the broadcaster.
Multiplex Name:
This will show the multiplex that is broadcasting the
programme you are listening to.
Time and Date:
This displays the time and date and is provided by the
broadcaster so will be accurate.
Channel and Frequency:
This displays the channel number and the transmission
frequency.
Signal Information:
This shows the digital bit rate and the signal mode.
Signal Error:
This displays the signal error rate being received from 0
to 100. 0 means no error signal being detected, while
100 means it is a bad signal.
16
Page 17
Getting Started
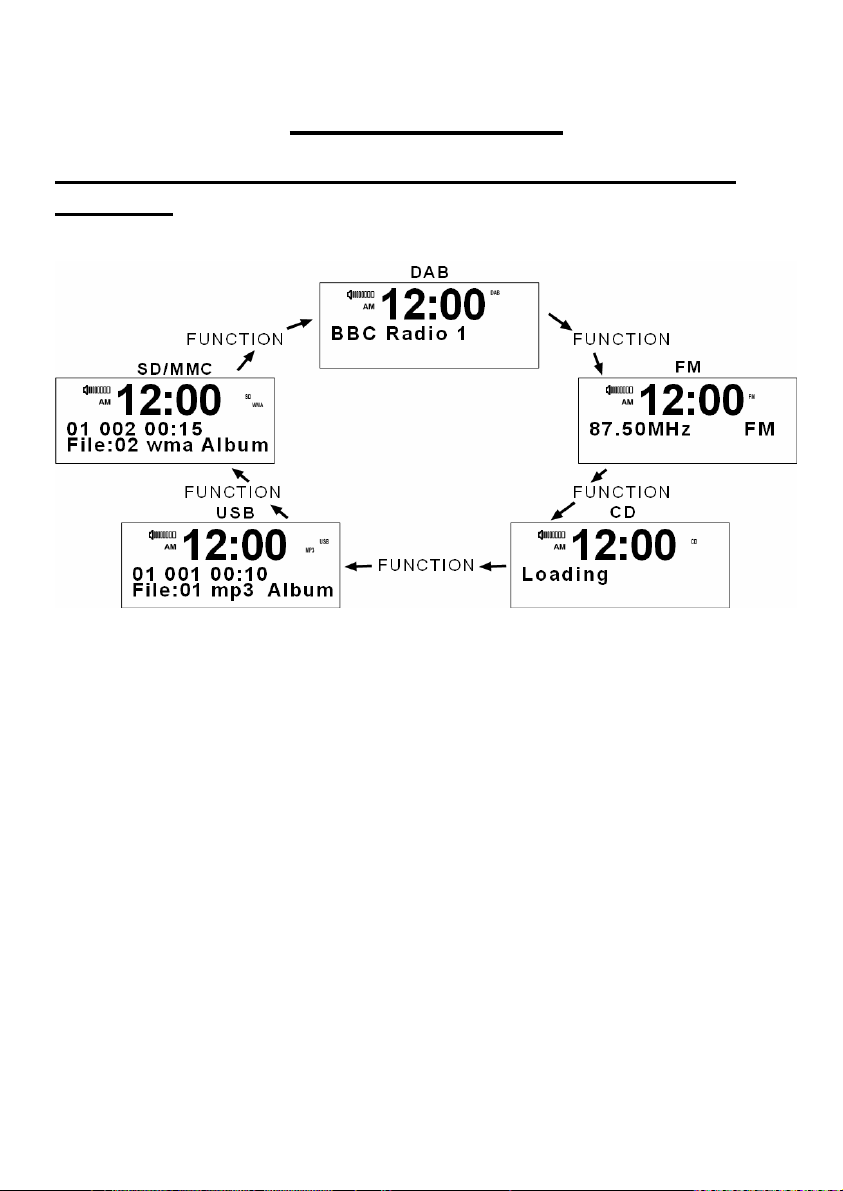
Switching between DAB, FM, CD, USB, and SD/MMC
playback
Attention:
1ṊThis DAB radio can play ordinary audio CDs, CD-R, CD-RW discs.
2Ṋ It can also playback MP3 or unprotected WMA files from a CD, SD
Card or USB device
Note: For your CD-R/RW, USB, and SD/MMC devise, make sure backup your
data on this device, and then it will be work normally.
17
Page 18

Playing a CD
This DAB radio can play ordinary audio CDs, CD-R, CD-RW discs. It does can
also playback MP3 or WMA files from a CD.
1. Press the FUNCTION button to select CD mode.
2. Open the CD cover.
3. Place a disc on the disc tray with the label side facing up.
4. Close the CD cover.
During Audio CD playback the
screen displays the track number
and the elapsed time.
In CD STOP mode, if the disc is a
normal audio CD, the display shows
the total number of tracks and total
tracks time on the disc.
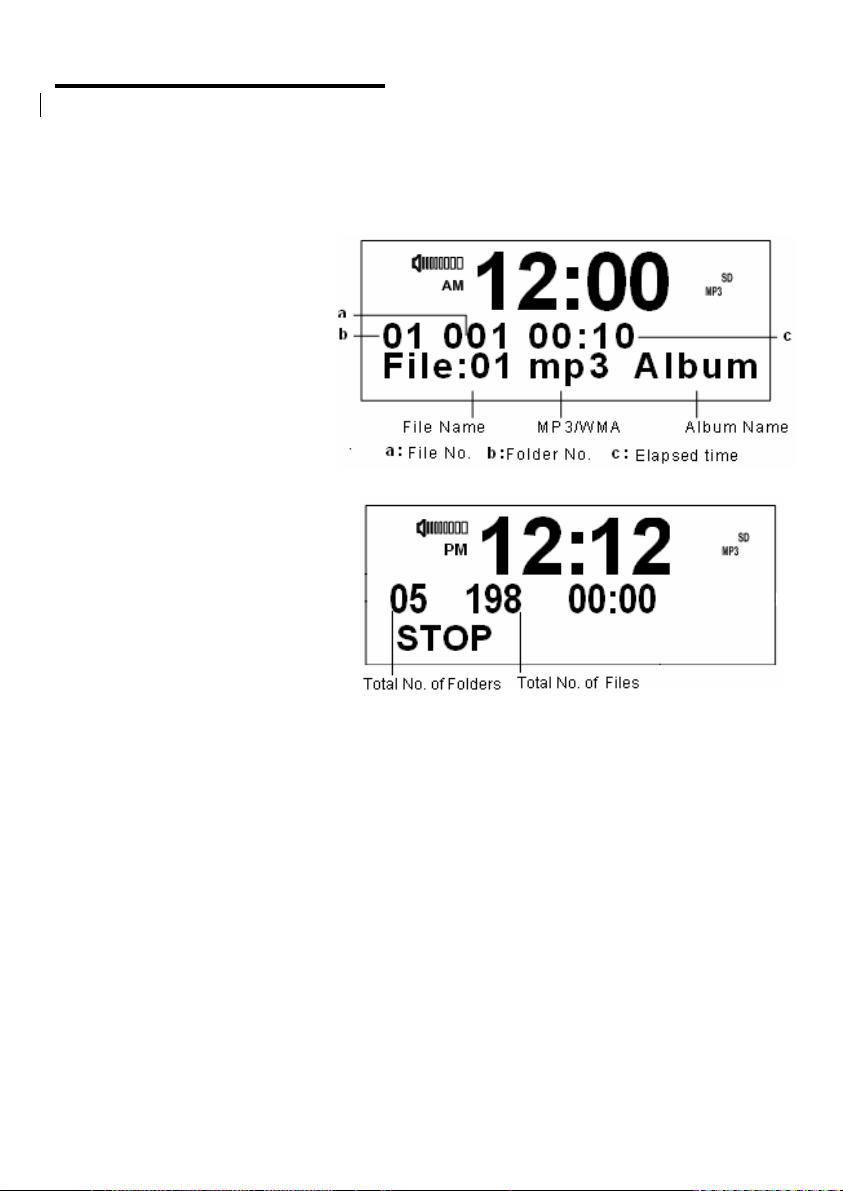
During MP3/WMA playback the
screen displays folder number, file
number and elapsed time on the
display top line and scrolling file
information (ID3/ASF text), where
available. File name, Album, Title
and Artist are located at the bottom.
18
Page 19

In STOP mode, the total number of
folders and files on the disc are also
displayed.
19
Page 20
Playing a SD/MMC
Note1: Some SD/MMC card may be incompatible.
1. Press the FUNCTION button to select SD mode.
2. Insert the SD/MMC card into the SD card slot.
During MP3/WMA playback
the screen displays track
folder number, track number
and elapsed time on the
display top line and scrolling
file information
(ID3/ASF text) where
available. File name, Album,
Title and Artist are located at
the bottom.
In STOP mode, the total
number of folders and files
on the disc are also
displayed.
Note: To the previous or next folder respectively, MP3/WMA can also using the
BACK and NEXT button.
20
Page 21
Playing a USB
Note 1: For your USB devices, please make sure they are charged before
connecting to the unit. Otherwise, it may not be detected. Backup your data
on this device, then it will be work normally.
Note 2: In all play mode, if the filename is not in English, the international character
for MP3/WMA tracks replaced with “-”.
Note 3: Some USB devices may be incompatible.
1. Press the FUNCTION button to select USB mode.
2. Insert the USB Flash disk into the USB socket.
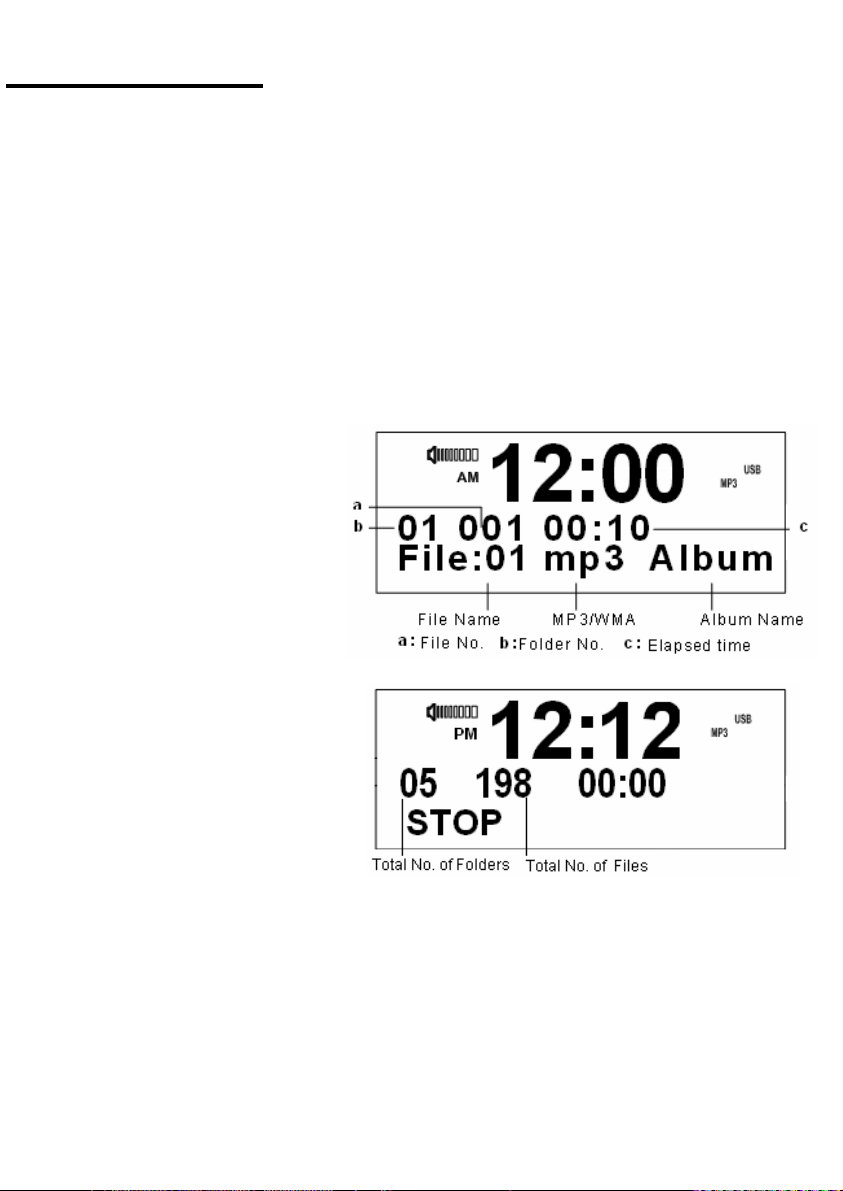
During MP3/WMA playback the
screen displays folder number,
file number and the elapsed time
on the display top line and
scrolling file information
(ID3/ASF text) where available.
File name, Album, Title and
Artist are located at the bottom.
In STOP mode, the total number
of folders and files on the disc
are also displayed.
21
Page 22

Play and Pause
1. In STOP mode, press button to begin CD playback.
2. During CD playback, press
to pause playback. Press again to resume.
Skip and Search
1. Single Press (Skip Down) or (Skip Up) once to jump to previous or next
track.
2. Press and hold of skip button fast forward or fast rewind of current track
to jump to next or previous folder when using an MP3/WMA CD, USB device
or SD card.
Note 1: In MP3/WMA mode, you can also use the BACK and NEXT button, to go
to previous or next folder.
Note 2: The SKIP Up/Down and Folder Up/Down are only available on
MP3/WMA/CD Playback mode.
Stop Playback
Press button to stop playback.
Playback Mode
Press REPEAT button repeatedly to select among:
x
x FOLDER-Repeats all files in the current folder. (MP3/WMA only)
x ALL-Repeats the entire disc.
Repeats current track
22
Page 23
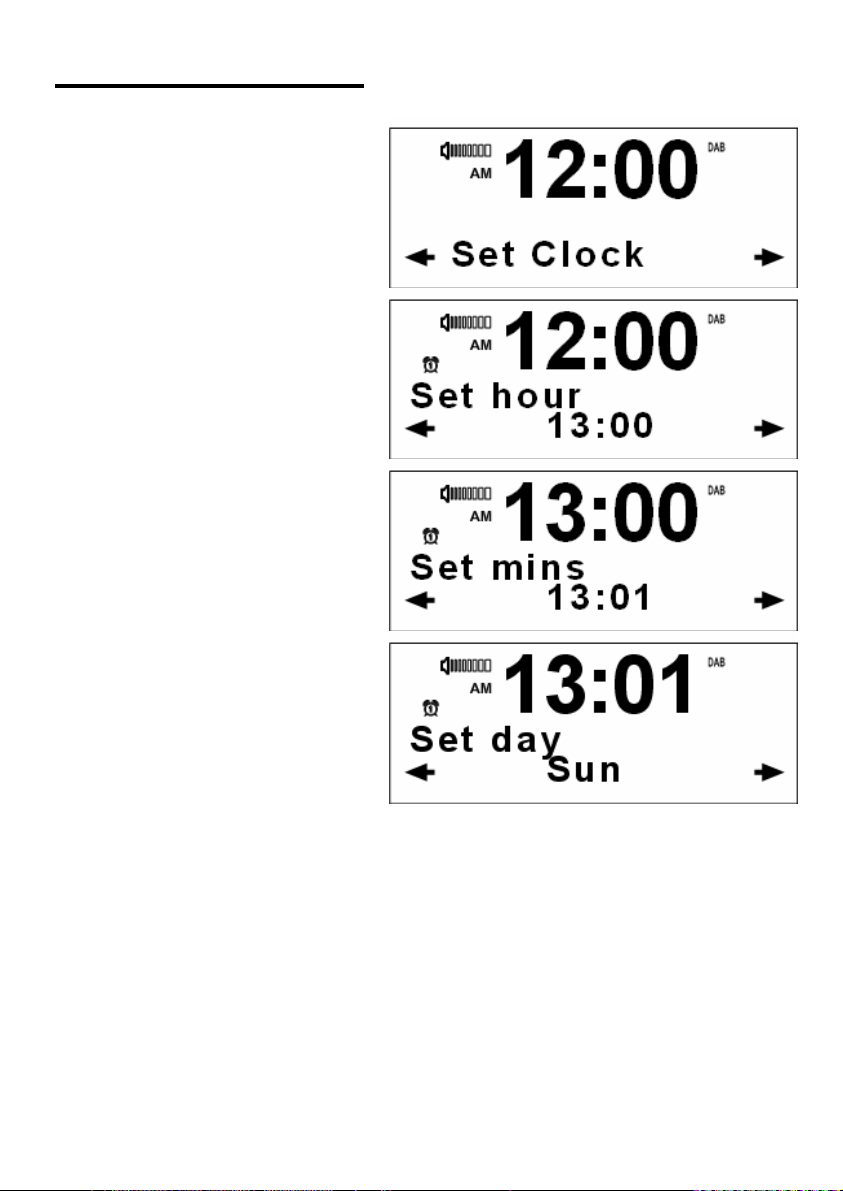
Setting the Clock
1. Press the MENU button,
choose Set Clock, and press
the SELECT button.
2. Press < or > button to set the
hour. Press the SELECT
button to confirm.
3. Press < or > button to set the
minute. Press the SELECT
button to confirm.
4. Press < or > button to set the
day. Sun, Mon, Tue, Wed,
Thu, or, and Sat.
Note: The time will keep changing to the correct time, while listening to a DAB
station, even if it is changed manually.
23
Page 24
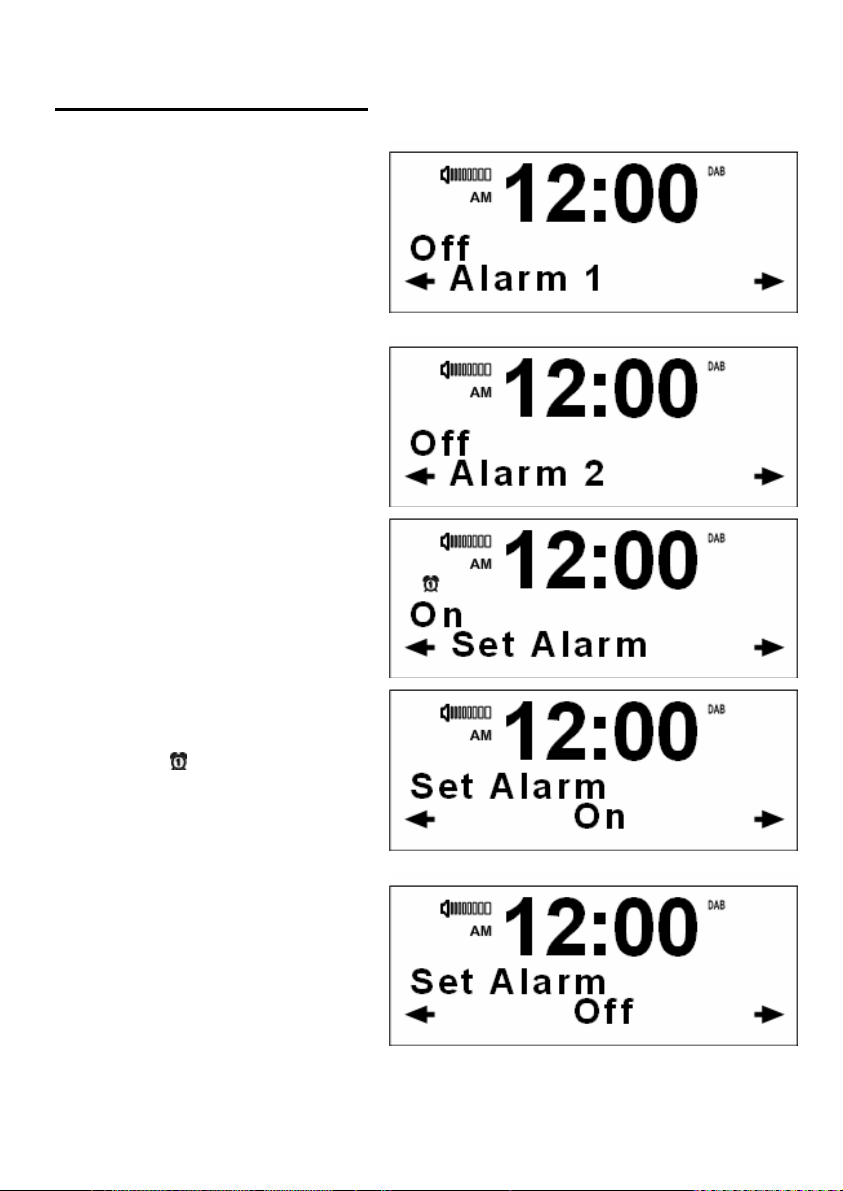
Setting the Alarm
1. Press the ALARM button and
then press the < or > button to
select Alarm 1 or Alarm 2
settings. Press the SELECT
button.
2. The Set Alarm option is being
displayed. Press the SELECT
button.
or
3. Press the < or > button to
enable or disable the alarm.
Press the SELECT button to
confirm.
is enabled.
24
icon will display if it
or
Page 25
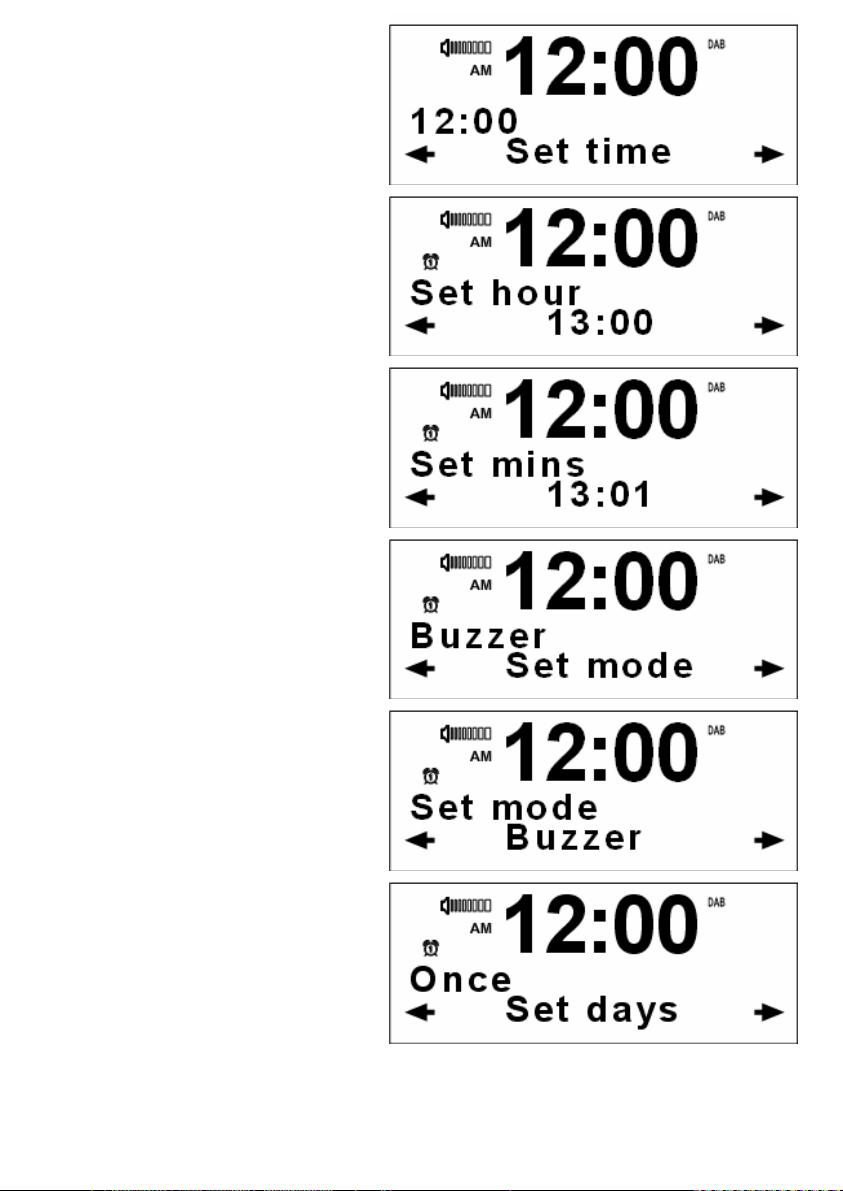
4. Press the SELECT button to
set the Time.
5. Press the < or > button to set
the hour. Press the SELECT
button to confirm.
6. Press the < or > button to set
the minute. Press the
SELECT button to confirm.
7. Press the SELECT button to
set the Alarm mode.
8. Press the < or > button to
change the Alarm mode.
DAB/FM/CD/USB/SD
Card/Buzzer are available.
Press the SELECT button to
confirm.
9. Press < or > button to display
Set days. Then, press the
SELECT button to set the
days.
25
Page 26

10. Press the < or > button to
change Alarm days.
Once/Daily/Weekday/weekend
are available. Press the
SELECT button to confirm.
11. Press Alarm or Standby button to deactivate the Alarm function.
Note: 1. The Alarm volume level is default to 10 no matter what the volume has
been set to.
2. Ensure that a CD, SD/MMC card or USB device with music files is
inserted when selecting either of these modes.
3. Some USB devices may not support in Alarm mode.
4. If the unit does not find a DAB signal, CD, USB device, or SD card, the
unit will default as buzzer.
26
Page 27

Snooze Button
When alarm time is up, the screen will be highlighted and blinking.
1. Press the SNOOZE button,
and turn the alarm off for 9
minutes.
2. SNOOZE icon will be
showing on the top left
corner of the screen after
pressing it.
3. Press Alarm or Standby to exit snooze mode and to turn alarm off
27
Page 28

Setting the Backlight
1. Press the MENU button. Then
press the > button to select Set
backlight, and press the SELECT
button.
2. Press < or > button to set
brightness of the LCD display
between 1 and 10. Press the
SELECT button to confirm.
28
Page 29

Specification
General: Stereo DAB and FM radio with full Band III
reception. CD/SD/USB-MP3/WMA Playback
Audio Output: 2W x 2 rms (10% THD) (8ohm)
Frequency Ranges: DAB Band III (174 - 240 MHz)
FM (87.5 - 108 MHz)
Antenna: Wire antenna
Input Connectors: DC power socket
Output Connectors: 3.5mm stereo headphone socket (32 ohm)
LCD Display: High resolution display
Power Supply: 9V dc 1500mA (AC/DC adaptor supplied)
Dimension 155mm x183mm x171mm
Visit Partmaster.co.uk today for the easiest way to buy electrical spares and accessories.
With over 1 million spares and accessories in stock we can deliver direct to your door the very
Visit www.partmaster.co.uk
Calls charged at National Rate.
next day.
or call
0870 6001 338
(UK customers only)
For product help or out-of-guarantee support:
Dixons customers please call: 08701 54 55 60
Currys customers please call: 08701 54 55 70
(all calls charged at national rates)
This symbol on the product or in the instructions means that your electrical and electronic equipment should
be disposed at the end of its life separately from your household waste. There are separate collection
systems for recycling in the EU.
For more information, please contact the local authority or your retailer where you purchased the product.
29
 Loading...