

Hitachi HTS428080F9AT00, HTS428060F9AT00, HTS428040F9AT00, HTS428030F9AT00 Quick Installation Guide
Quick Installation Guide
2.5” Hard Disk Drives ATA/IDE
Models:
HTS428030F9AT00,
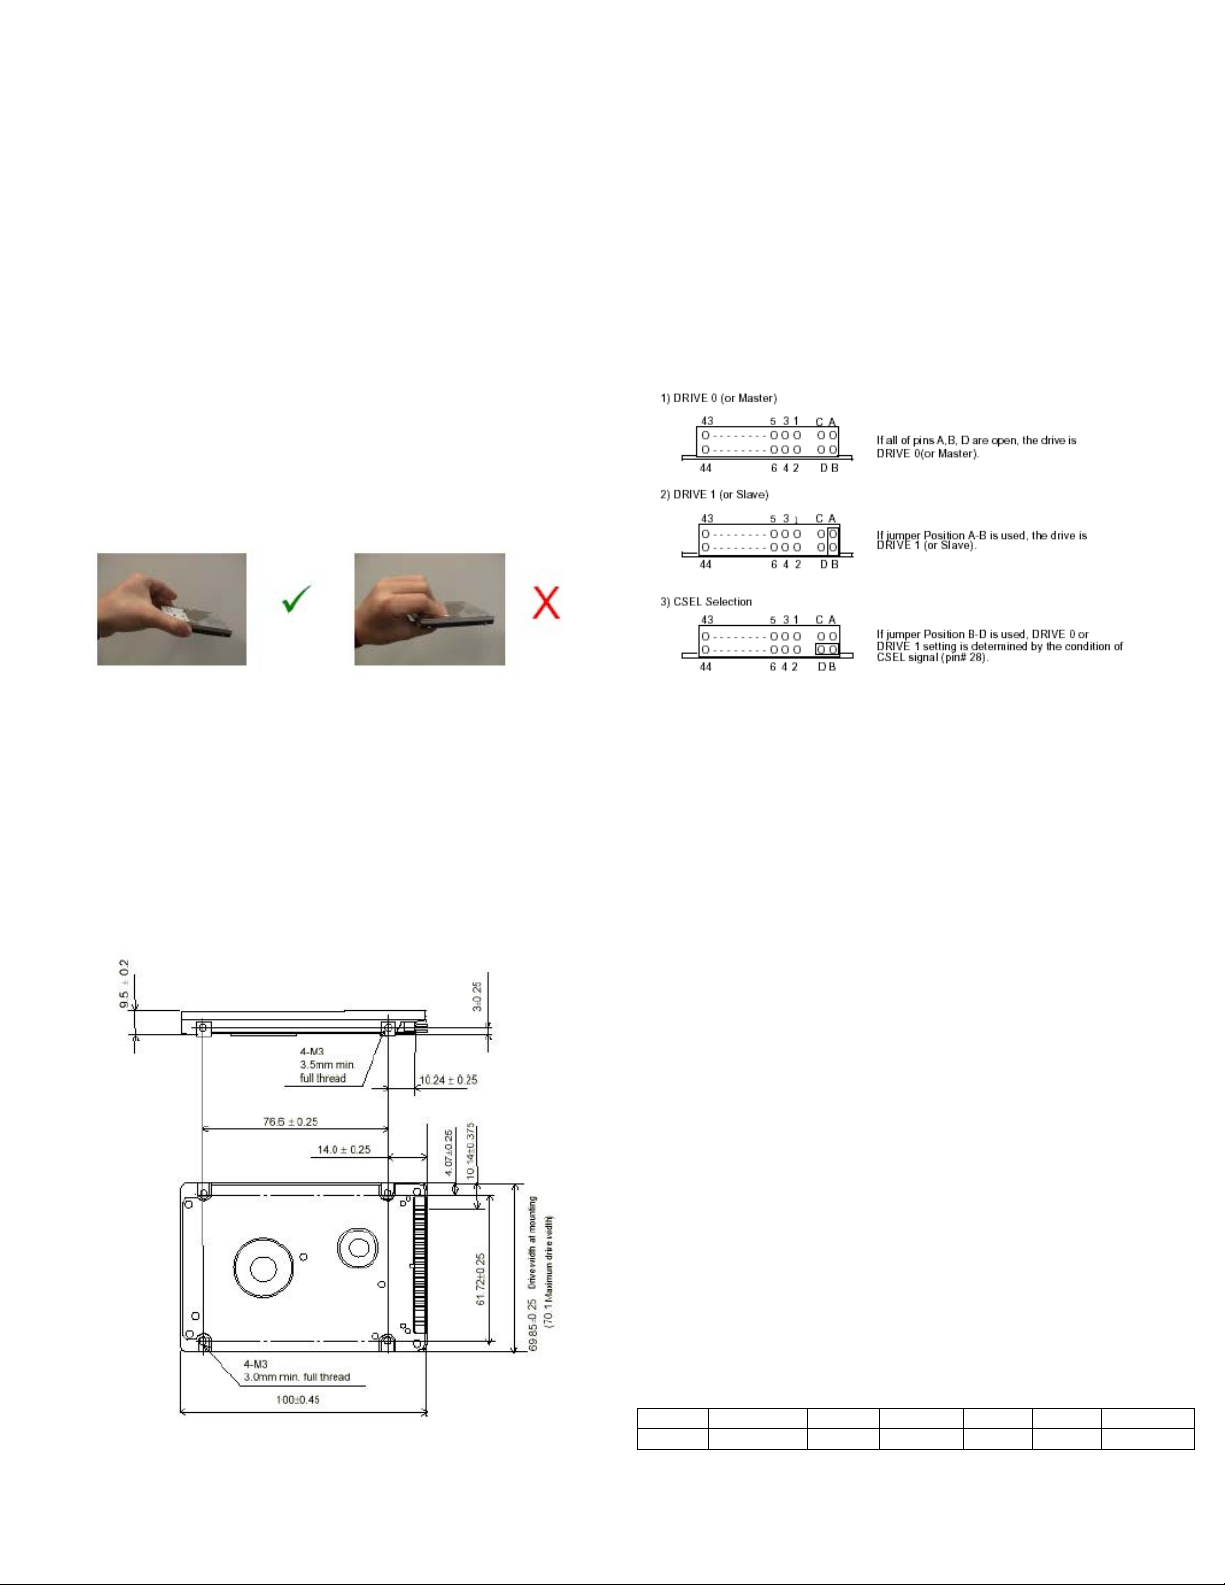
Handling Precautions
1. Do not press on the drive. Hold the drive by the sides only, do
not apply any force to the drive during handling or installation
2. Always handle the drive with care to prevent damage from
shock, vibration or electrostatic discharge (ESD). Do not touch
the Printed Circuit Board (PCB).
3. Electrostatic Discharge. Static electricity can damage the
drive. Before handling the drive, touch an unpainted metal
surface for a few seconds to drain any static electricity from
your body.
4. Keep the original packaging and static -protective bag in case
the drive has to be returned.
HTS428080F9AT00, HTS428060F9AT00, HTS428040F9AT00,
Setting the jumpers
1. In a one drive system configure the new drive as a Master with
no jumpers attached.
2. In a two drive system, one drive must be designated as Master
and the other as Slave.
3. When installing the new drive as a Slave set the jumper to
position A-B. Check the Master drive to determine if a jumper
change is required to indicate Slave present.
4. Before selecting Cable Select (CSEL D-B) consult your system
manual to see if this is supported.
Quick Installation Procedure
It is advisable to backup all data before proceeding with the
installation.
If your system BIOS cannot handle large capacity drives (over
540MB, or 8.4GB) you may need to use a disk overlay program
such as Ontrack’s Disk Manager software. Contact your Hitachi
supplier or the local Hitachi office.
Dimensions / Screw locations
Check that the dimensions and screw hole locations are correct for
your system.
Attaching the drive
1. Turn off the computer, unplug the power cord and remove the
notebook battery.
2. Open the cover.
3. Match pin 1 of the 44 pin cable, usually denoted by a red
stripe, to pin 1 of the drive interface connector, shown above.
4. Mount the drive securely using 4 M3 (metric) screws with a
maximum screw length of 2.5 mm.
Configuring your computer
1. Reinstall the notebook battery, plug in the power cord and turn
on the computer.
2. The computer may detect a configuration change and prompt
you to proceed to the Setup screen.
3. If it does not, enter the Setup screen using the key selection.
Refer to the onscreen instructions or the computer handbook.
4. Select “Auto Detect” for the new drive, if your system supports
this feature. If it does not , select the “User Definable Type”
and enter the parameters from the table.
5. If you cannot see the full capacity of the drive use Disk
Manager.
6. Partition and Format the drive, then install your data.
If, after complete installation, your system will not boot up,
recheck all settings. If the system still fails to boot up, contact
your supplier’s
Model Cylinders Heads Sectors LZ WPC Capacity
All 16383 16 63 16383 16383 8.4GB+*
* Maximum addressable capacity in CHS mode is 8.455 GB

© Copyright Hitachi Global Storage
Technologies
Hitachi Global Storage Technologies
5600 Cottle Road
San Jose, CA 95193
Produced in the United States
9/03
All rights reserved
Deskstar
TM
is a trademark of
Hitachi Global Storage Technologies.
Microsoft, Windows XP, and Windows are
trademarks of Microsoft Corporation in the
United States, other countries, or both.
Other product names are trademarks or
registered trademarks of their respective
companies.
References in this publication to Hitachi Global
Storage Technologies products, programs or
services do not imply that Hitachi Global
Storage Technologies intends to make these
available in all countries in which Hitachi Global
Storage Technologies operates.
Product information is provided for information
purposes only and does not constitute a warranty.
Information is true as of the date of publication
and is subject to change. Actual results may
vary.
This publication is for general guidance only.
Photographs may show design models.
04 September 2003
 Loading...