

Hitachi HTS421212H9AT00, HTS421210H9AT00, HTS421280H9AT00, HTS421260H9AT00, HTS421240H9AT00 Quick installation guide
Hitachi Global Storage Technologies
Quick installation guide
Hitachi Travelstar 4K120
2.5 inch ATA/IDE hard disk drive
HTS421212H9AT00Models:
HTS421210H9AT00
HTS421280H9AT00
HTS421260H9AT00
HTS421240H9AT00
Handling precautions
y Wear a grounded wrist strap while handling the drive
to prevent damage from Electrostatic Discharge
(ESD).
y Set the drive down gently to prevent damage from
impact or vibration.
y Do not open the ESD bag containing the drive until
needed.
y Handle the drive carefully by the edges. Do not
touch the exposed printed circuit board or any
electronic components.
y Do not press on the top or bottom of the drive.
y Do not cover the drive’s breather hole.
Quick installation
Installation of this Hitachi Travelstar drive in some notebooks may require use of unique hardware (such as
mounting trays, connecting cable, insulating material). If
you are uncertain if hardware is needed, consult your
notebook manufacturer as this operation may require a
qualified technician.
Back up all data before proceeding with installation.
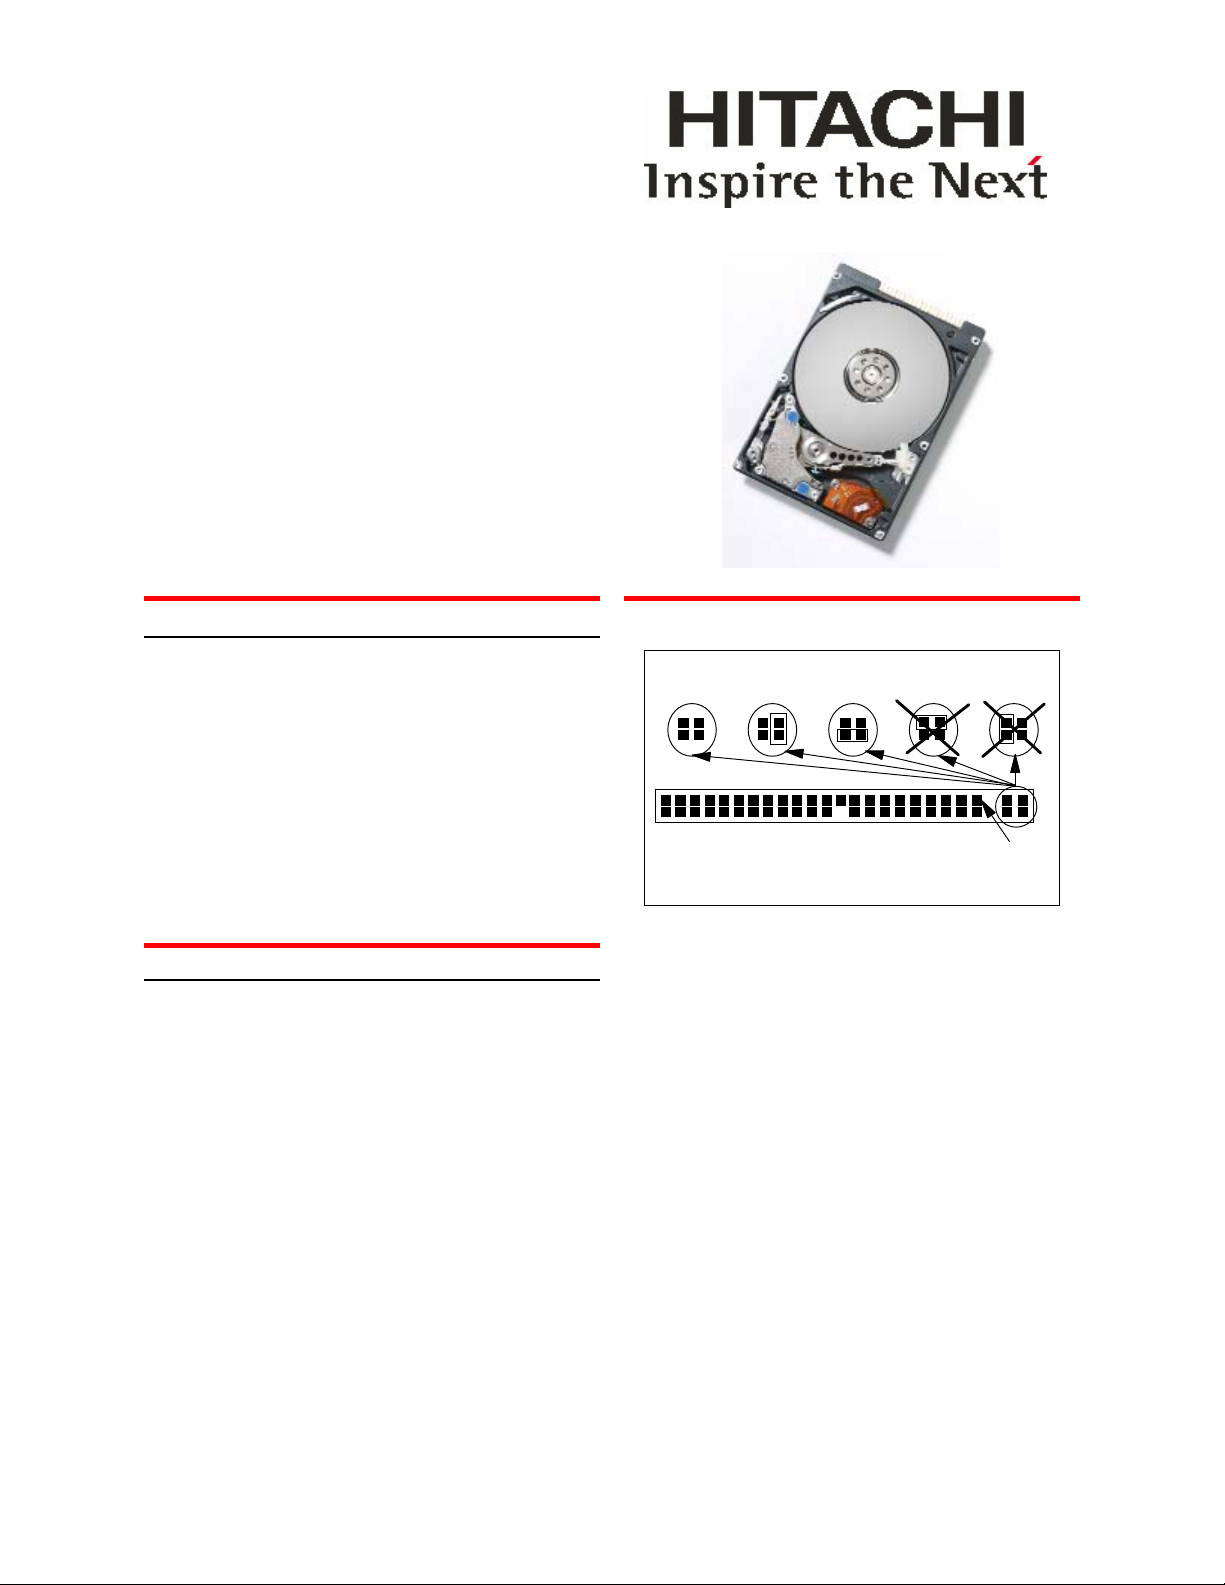
1. Set the jumpers
y Master drive. No jumper is required if the drive is
the only drive in a system or the Master drive in a
two-drive system.
y Slave drive. If this is the Slave drive in a system,
place a jumper in setting A2. (See the A2 setting in
the illustration.)
y Cable Select. Setting A3 in the illustration. Consult
the system manual to see if your computer supports
Cable Select
.
Jumper settings
A1. A2. A3. A4. A5.
Pin 1
A1. Master A2. Slave A3. Cable Select
A4 & A5. Never attach a jumper in these positions!
2. Attach the drive
For assistance on the physical installation of the drive,
consult your system manual.
3. Configure the computer
1. Turn on the computer.
2. Enter Setup.
3. Go to Hard Disk Drive Configuration.
4. Select Autodetect if it is available.
5. If Autodetect is not available, set to User and set to
appropriate parameters from the table below.
6. Save the settings and exit.
7. Reboot the system from a floppy disk.
page 1 version 1.0

Hitachi Global Storage Technologies
Track
Capacity
(GB)
12063416,383
10063416,383
8063316,383
6063216,383
4063216,383
HTS421212H9AT00
HTS421210H9AT00
HTS421280H9AT00
HTS421260H9AT00
HTS421240H9AT00
4. Partition and format
Sectors/
HeadsCylindersModel Number
y FDISK.EXE and FORMAT.EXE (or a similar parti-
tioning software from the operating system)
Follow the instructions provided with your operating
system to partition the drive. If FDISK.EXE recognizes only 8.4 GB of a drive, the BIOS may not
support Interrupt 13 Extensions.
Format the drive by following the instructions provided with FORMAT.EXE. Formatting will verify the
hard disk media and create file allocation tables for
the partition.
5. Boot up the computer
If the system does not boot up after the installation of the
drive, check all the settings. If the system still fails to
boot up, contact the Hitachi Global Storage
Technologies Support Center at:
www.hitachigst.com/support
© Copyright Hitachi Global Storage Technologies
Hitachi Global Storage Technologies
5600 Cottle Road
San Jose, CA 95193
Produced in the United States
7/05
All rights reserved Travelstar™ is a trademark of
Hitachi Global Storage Technologies.
Microsoft, Windows XP, and Windows are trademarks
of Microsoft Corporation in the United States, other
countries, or both.
Other product names are trademarks or registered
trademarks of their respective companies.
References in this publication to Hitachi Global Storage
Technologies products, programs or services do not
imply that Hitachi Global Storage Technologies intends
to make these available in all countries in which Hitachi
Global Storage Technologies operates.
Product information is provided for information
purposes only and does not constitute a warranty.
Information is true as of the date of publication and is
subject to change. Actual results may vary.
This publication is for general guidance only.
Photographs may show design models.
06 July 2005
page 2 version 1.0
 Loading...