

Page 1
1
Projector
HOME-1
HOME-1
User
User’’
s Manual – Quick Guide
s Manual – Quick Guide
Thank you for purchasing this projector.
• The information in this manual is subject to change without notice.
• The manufacturer assumes no responsibility for any errors that may appear in this manual.
• The reproduction, transmission or use of this document or contents is not permitted without express
written authority.
NOTE
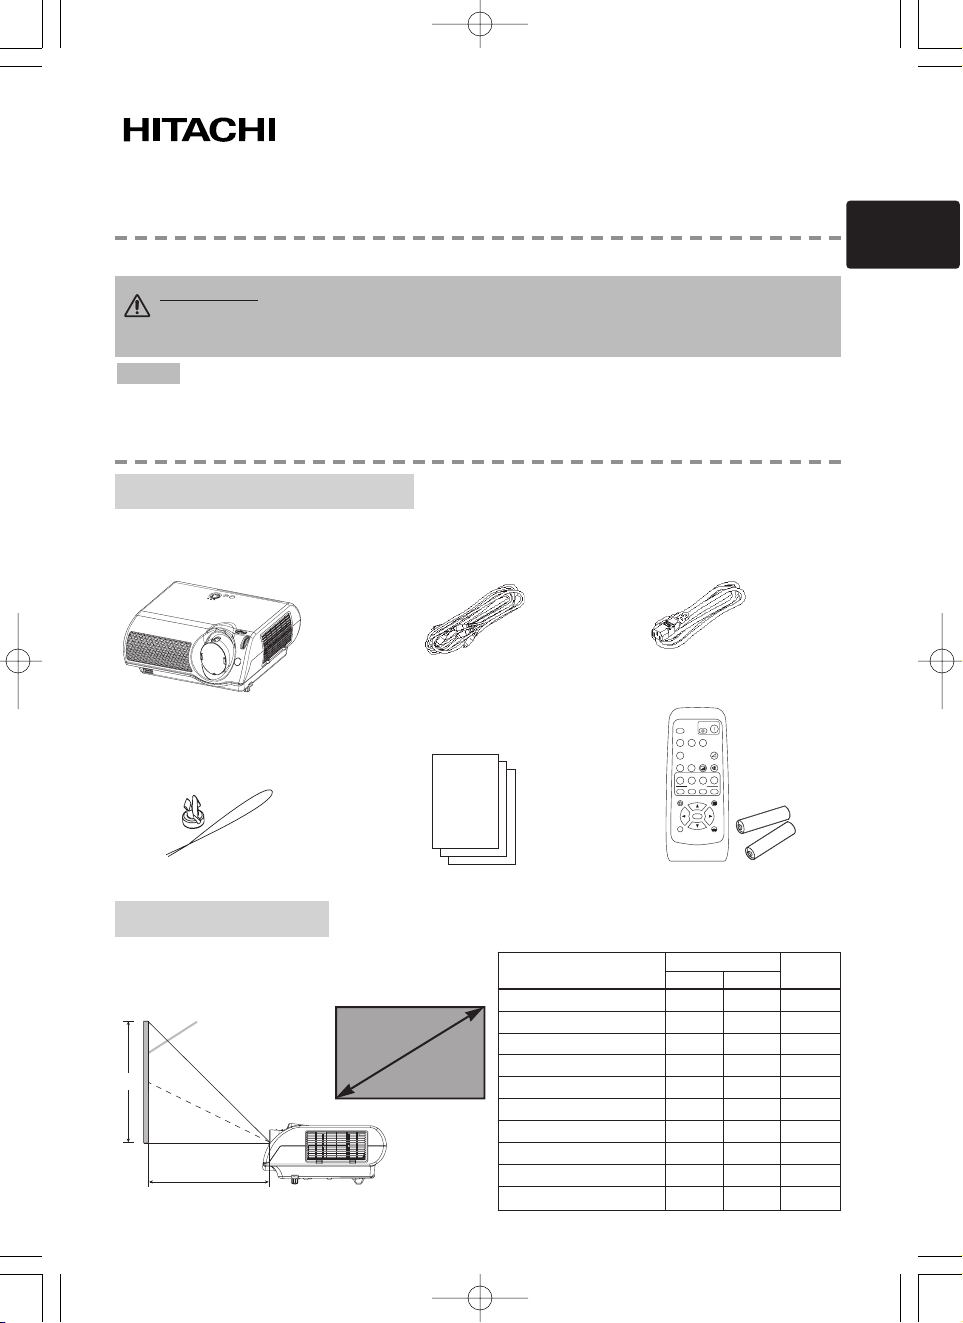
Your projector should come with the items shown below. Contact your dealer if anything is missing.
Keep the original packing material for future reshipment. For moving the projector, be sure to use the
original packing material. Use special caution for the lens part.
WARNING Before using, read the "User's Manual - Safety Guide" and
these manuals to ensure correct usage through understanding. After reading,
store them in a safe place for future reference.
User’s manuals (3)
Remote control &
AA batteries (2)
Contents Of Package
Contents Of Package
Refer to this table, in case of 16:9 aspect ratios.
The values (a) and (b) shown in the table are
calculated for a full size screen: 854x480.
Arrangement
Arrangement
(±10%)
Rivet & Strap
Projector
(with Lens Cap)
Video/Audio
cable
Power cords
(a)
(b)
Screen
Side View
Screen
size
Screen Size [type (m)]
(a) [type (m)]
(b)
[type (cm)]
Min. Max.
30 (0.8) 29(0.7) 60(1.5) 15(37)
40 (1.0) 40(1.0) 81(2.1) 20(50)
50 (1.3) 50(1.3) 102(2.6) 25(62)
60 (1.5) 60(1.5) 122(3.1) 29(75)
70 (1.8) 71(1.8) 143(3.6) 34(87)
80 (2.0) 81(2.1) 163(4.2) 39(100)
90 (2.3) 91(2.3) 184(4.7) 44(112)
100 (2.5) 101(2.6) 205(5.2) 49(125)
200 (5.1) 204(5.2)
411(10.4)
98(249)
300 (7.6) 307(7.8)
616(15.7)
147(374)
01HOME-1E-QG03.9.114:16PMページ1
SEARCH
OFF
SRC
COMPONENTS-VIDEO
VIDEO
VSVC
COMPUTER
PC
WIDEAUTO
BLANK
AT
WID
CINEMA
DYNAMIC
NORMAL
CIN
DYN
NOR CUS
MYMEMORY
M1
M2 M3 M4
KEYSTONE
ENTER
ENT
ESC RESET
E
ON
VOLUME
MUTE
CUSTOM
MENU
Page 2
2
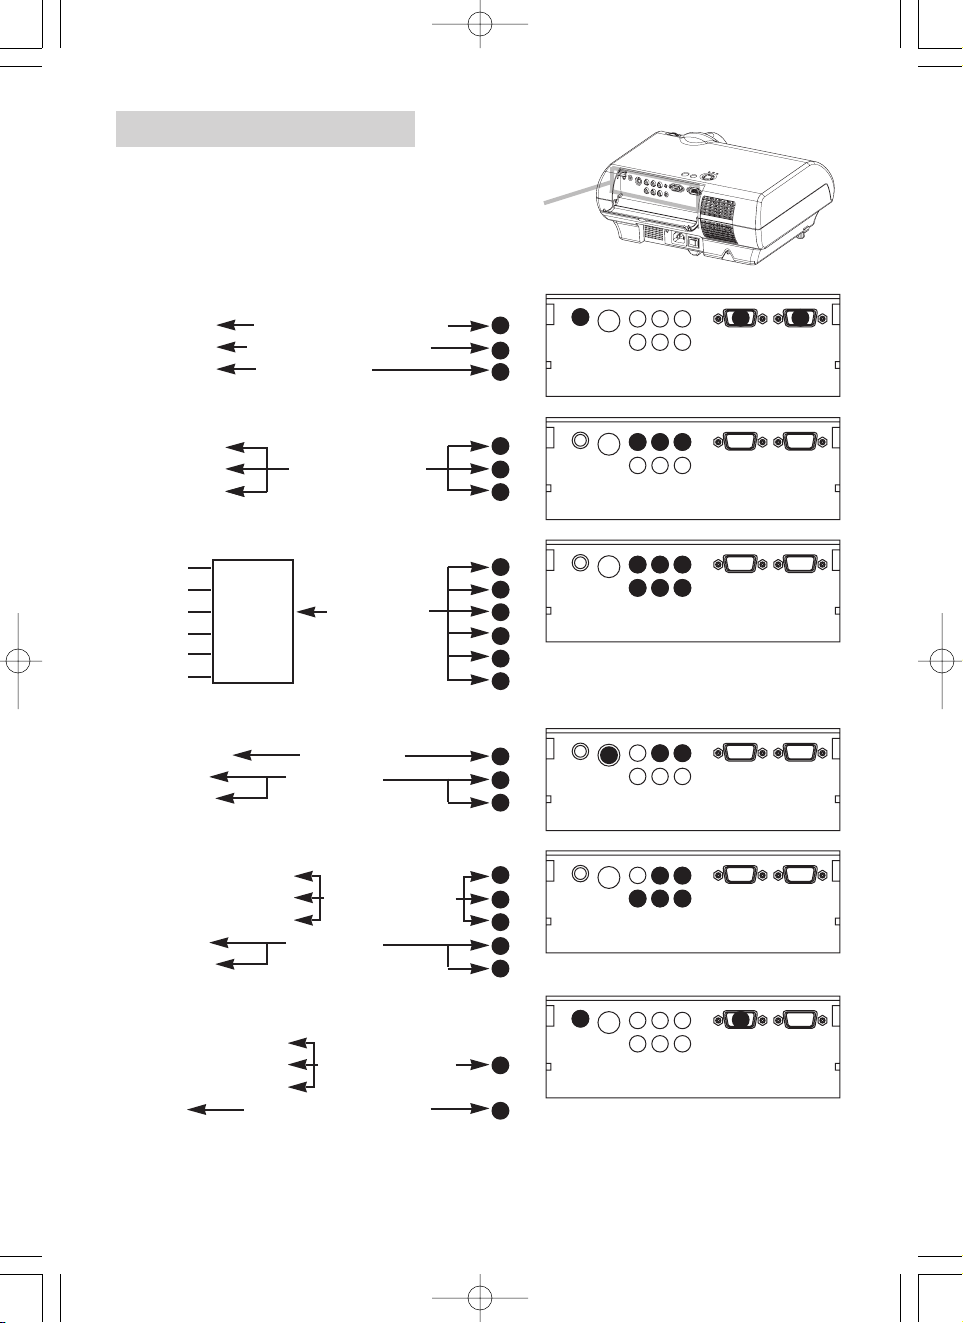
Connecting Devices
Connecting Devices
Please refer to the following for connecting your devices.
See the rear of the projector and open the ports cover.
You can see the ports.
Connecting to a computer
RGB out RGB cable (D-sub 15 pin)
Audio out Audio cable (Stereo mini)
RS-232C port RS-232C cable
Connecting to a DVD/VCR player
Video out
Audio out (L) Audio/Video cable
Audio out (R)
If using a SCART RGB input,
Video
AUDIO-L
AUDIO-R SCART SCART cable
G out port
B
R
If using a S-video input,
S-video out port S-video cable
Audio out (L) Audio cable
Audio out (R)
If using a component input,
Component (Y) out
Component (CB/PB) out Component cable
Component (CR/PR) out
Audio out (L) Audio cable
Audio out (R)
If using a component input from
COMPUTER port,
Component (Y) out
Component (CB/PB) out Component cable
Component (C
R/PR) out (with D-sub 15 pin)
Audio out Audio cable(Stereo mini)
01HOME-1E-QG03.9.114:16PMページ2
1
2
3
4
5
6
4
5
6
7
8
9
10
5
6
7
8
9
5
6
1
2
VIDEO
S-VIDEO
S-VIDEO
S-VIDEO
10
S-VIDEO
S-VIDEO
S-VIDEO
L-AUDIO-R
Y
B/PB CR/PR
C
COMPONENT VIDEO
VIDEO
L-AUDIO-R
4
5
Y
B/PB CR/PR
C
COMPONENT VIDEO
VIDEO
L-AUDIO-R
4
5
8
7
Y
C
B/PB CR/PR
COMPONENT VIDEO
VIDEO
L-AUDIO-R
5
Y
C
B/PB CR/PR
COMPONENT VIDEO
VIDEO
L-AUDIO-R
5
8
7
Y
C
B/PB CR/PR
COMPONENT VIDEO
VIDEO
L-AUDIO-R
Y
C
B/PB CR/PR
COMPONENT VIDEO
1
COMPUTER
6
COMPUTER
6
COMPUTER
9
6
COMPUTER
6
COMPUTER
9
1
COMPUTER
3
CONTROL
CONTROL
CONTROL
CONTROL
CONTROL
CONTROL
2
AUDIO
AUDIO
AUDIO
AUDIO
AUDIO
2
AUDIO
Page 3
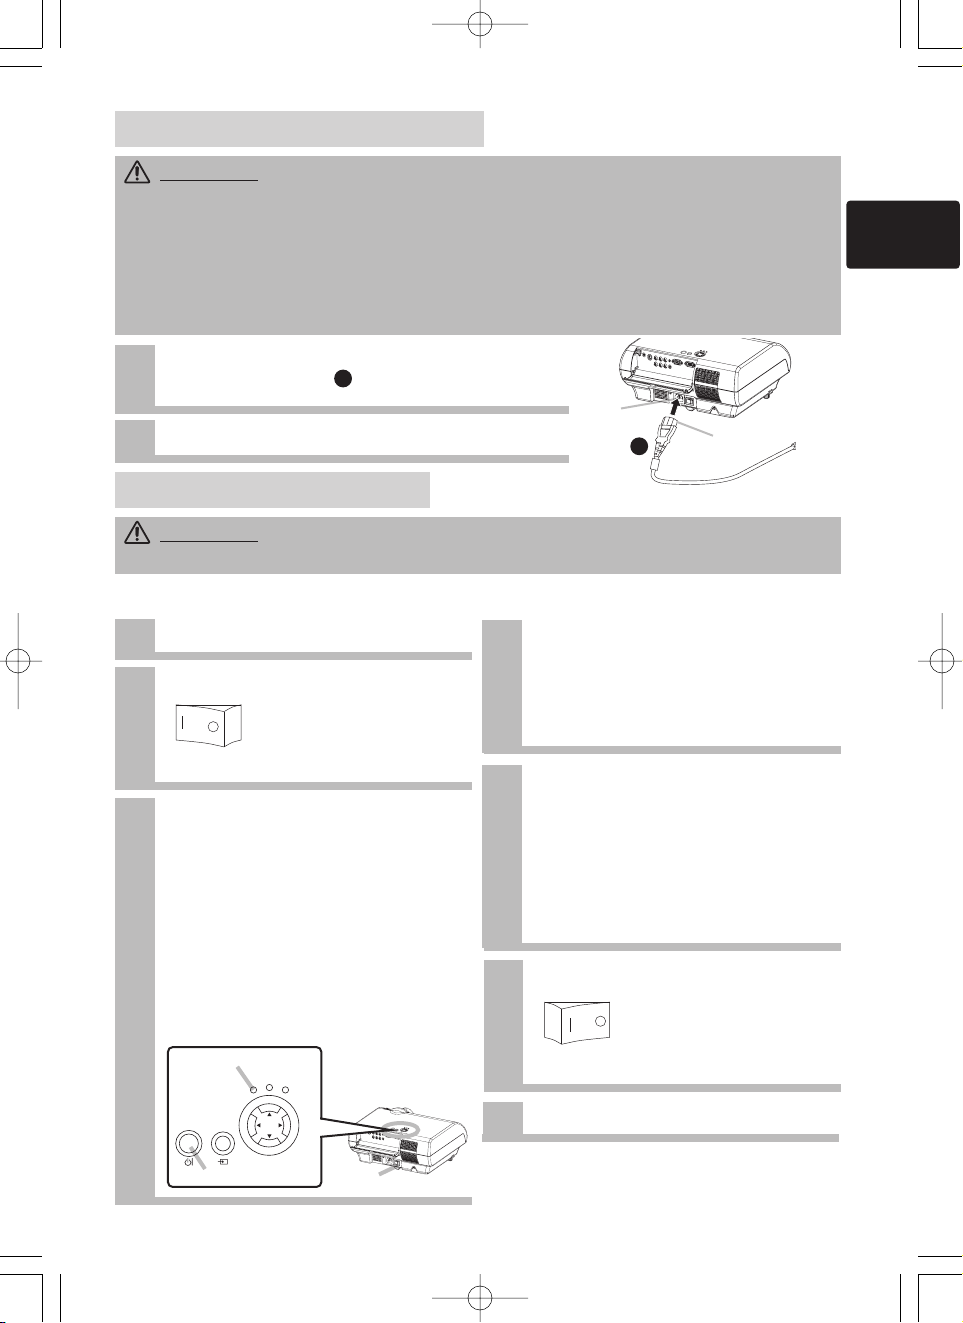
Power switch
3
1
Connect the connector of the power cord to the AC
inlet of the projector.
2
Firmly plug the power cord’s plug into the outlet.
1
Remove the lens cap.
2
Set the power switch to [ | ] (ON).
3
Press the STANDBY/ON button of the
projector or the ON button of the
remote control.
The projector lamp will light up and the
POWER indicator will begin blinking green.
According to a setup, the projector lamp
may light up and the POWER indicator
may begin blinking green, without
pressing this button.
When the power is completely on, the
indicator will stop blinking and light green.
The POWER indicator will light orange.
WARNING
• Please use extra caution when connecting the power cord as incorrect or faulty
connections may result in FIRE and/or ELECTRICAL SHOCK. Please adhere to the “User’s manual – Safety
Guide” and the following.
• Only plug the power cord into outlets rated for use with the power cord’s specified voltage range.
• Only use the power cord that came with the projector. If it is damaged, contact your dealer to newly get
correct one.
• Never modify the power cord. Never attempt to defeat the ground connection of the three-pronged plug.
• Make sure that you firmly connect the power cord to the projector and wall outlet.
WARNING
• When the power is ON, a strong light is emitted. Do not look into the lens or vents of
the projector.
Connecting Power Supply
Connecting Power Supply
TTurning On/Of
urning On/Of
f Power
f Power
Turning ON The Power
Turning OFF The Power
Power switch (ON position)
1
Press the STANDBY/ON button of the
projector or the OFF button of the remote
control.
The message “Power off?” will appear on
the screen for approximately 5 seconds.
4
Attached the lens cap.
2
Press the STANDBY/ON button again
while “Power off?” the message is
visible.
The projector lamp will go off, and the
POWER indicator will begin blanking orange.
Then the POWER indicator will stop
blinking and light to solid orange when the
lamp cooling is complete.
3
Switch the power switch to [O] (OFF).
The POWER indicator will go off.
Power switch (OFF position)
STANDBY/ON button
POWER indicator
AC Inlet
Connector Side
Power cord
01HOME-1E-QG03.9.114:16PMページ3
1
1
STANDBY/ON
INPUT
POWER
TEMP
MENU
LAMP
Page 4

4
Adjusting The Projector's Elevator
Using The Picture Shift Dials
CAUTION •
To prevent damaging the projector and injuring yourself, ALWAYS
HOLD THE PROJECTOR whenever using the elevator buttons to adjust the elevator feet.
You can use the elevator feet to adjust the angle of projection. The adjustment range of
the elevator feet is 0 to 9 degrees.
Press and hold in the elevator buttons.
2
Raise or lower the projector to the desired
height and then release the elevator buttons.
When you release the elevator buttons, the elevator feet will
lock into position.
3
As necessary, you can also finely adjust the
height of the projector by twisting the
elevator feet by hand.
Selecting An Input Signal
1
2
Use the zoom ring to adjust the screen
size.
Press the INPUT button.
As illustrated below, each time you press the INPUT
button, the projector switches between its input signal
ports. Select the signal you wish to project.
COMPUTER VIDEO S-VIDEO
COMPONENT VIDEO
INPUT button
PrProjecting The Pictur
ojecting The Picturee
3
Use the focus ring to focus the picture.
Zoom ring
Focus ring
Elevator buttons
Elevator feet
1
When you want to finely adjust the picture position, use the picture shift dials.
Horizontal picture shift dial
7.5:2.5
to
2.5:7.5
10:0
to
0:10
Vertical picture shift dial
• Generally, better quality of a picture is available when the lens shift is set to the center.
• Do not attach anything other than specified options (such as an optional conversion lens) to the
screw thread. For details, please ask your dealer.
NOTE
01HOME-1E-QG03.9.114:16PMページ4
STANDBY/ON
INPUT
POWER
TEMP
MENU
LAMP
1
2
Page 5

5
See the top of the projector. You can see the control buttons.
Contr
Contr
ol Buttons
ol Buttons
PrPreparing Remote Contr
eparing Remote Controlol
POWER indicator
tells the state of power
supply. Refer to the section
“Turning On/Off Power”.
INPUT button
toggles between
the signal ports.
MENU buttons
operate the menu function.
STANDBY/ON button
prepares for turning the power on/off. Refer
to the section “Turning On/Off Power”.
TEMP indicator
lights or blinks when any
problem about internal
temperature has happened.
LAMP indicator
lights or blinks when any
problem about the lamp has
happened.
CAUTION Always handle the batteries with care and use them only as directed.
Improper use may result in battery cracking or leakage, which could result in fire, injury
and/or polution of the surrounding environment.
• Keep the battery away from children and pets.
• Be sure to use only the batteries specified for use with the remote control. Do not mix
new batteries with used ones.
• When inserting batteries, verify that the plus and minus terminals are aligned correctly
(as indicated in the remote control).
• When you dispose the battery, you should obey the law in the relative area or country.
Putting Batteries Into The Remote Control
1
Remove the
battery cover.
Slide back and
remove the battery
cover in the direction
of the arrow.
Insert the batteries.
Align and insert the two
AA batteries according to
their plus and minus
terminals (as indicated in
the remote control).
Close the battery
cover.
Replace the battery
cover in the direction
of the arrow and
snap it back into
place.
2
3
01HOME-1E-QG03.9.114:16PMページ5
COMPUTER VIDEO
COMPONENT VIDEO
LAMP
S-VIDEO
TEMP
POWER
STANDBY/ON
INPUT
MENU
Page 6

6
See the remote control.
Remote Contr
Remote Controlol
OFF button
prepares for turning the
power off.
SEARCH button
searches for an input
signal between the
following signal ports of
COMPUTER, VIDEO,
S-VIDEO and
COMPONENT VIDEO.
MENU button
opens/closes the menu.
S-VIDEO button
selects the input signal
of S-VIDEO port.
COMPONENT
button
selects the input signal of
COMPONENT port.
VOLUME button
turns on/off the VOLUME
mode.
In the VOLUME mode,
To adjust the volume,
use the cursor
/
buttons.
MUTE button
mutes/restores the sound.
BLANK button
blanks the screen
temporarily.
M1, M2, M3, M4
buttons
call the setting data on
each memory.
VIDEO button
selects the input signal of
VIDEO port.
ON button
prepares for turning the
power on.
COMPUTER button
selects the input signal of
COMPUTER port.
WIDE button
toggles between the
modes for aspect ratio.
AUTO button
executes automatic
adjustment.
CINEMA, DYNAMIC,
NORMAL, CUSTOM
buttons
select each of gamma
mode.
KEYSTONE button
turns on/off the KEYSTONE
mode.
In the KEYSTONE mode,
To adjust the
keystone,
use the cursor
/
buttons.
ESC button
returns to the previous
display at the menu
functions.
,,,
(Cursor) buttons
works for adjusting or
menu controlling.
RESET button
cancels the adjustment in
progress.
* The adjustments of the
volume etc. are not reset.
ENTER button
proceeds to the next
operation at the menu
functions.
01HOME-1E-QG03.9.114:16PMページ6
SEARCH
SRC
VIDEO
VSVC
COMPUTER
PC
AT
CINEMA
CIN
M1
KEYSTONE
ESC RESET
E
OFF
COMPONENTS-VIDEO
WIDEAUTO
BLANK
WID
DYNAMIC
NORMAL
DYN
NOR CUS
MYMEMORY
M2 M3 M4
ENTER
ENT
CUSTOM
ON
VOLUME
MUTE
MENU
Page 7

After making sure that the projector has cooled adequately,
slowly flip over the projector, so that the bottom is facing up.
7
Lamp
Lamp
WARNING Please carefully read the “User’s Manual - Safety Guide”.
The projector uses a high-pressure mercury glass lamp made of glass. The lamp can
break with a loud bang, or burn out. When the bulb bursts, it is possible for shards of
glass to fly into the lamp housing, and for gas containing mercury to escape from the
projector’s vent holes.
• Do not open the lamp cover, if the lamp should break, or while the projector is
suspended from above. Ask your dealer to clean the projector or replace the lamp.
• Before replacing the lamp, make sure the power switch is off and the power cable is
not plugged in, then wait at least 45 minutes for the lamp to cool sufficiently.
• Use the lamp of the specified type only. Type number: DT00611
(sold separately)
CAUTION
• Do not reset the lamp timer without replacing the lamp.
Replacing The Lamp
If the indicators or a message prompts you to replace the lamp, replace the lamp
as soon as possible.
1
Turn off the projector, and unplug the power cord. Allow the lamp bulb to cool for at
least 45 minutes.
2
Contact your local dealer to prepare a new lamp.
Tell the dealer your lamp type number. If the projector is mounted on the ceiling, or if the lamp has
broken, also ask the dealer to replace the lamp.
3
4
Unscrew the screw of the lamp cover, then slide and take
the lamp cover up.
5
Unscrew the 2 screws, and slowly pick up the lamp by the
handles.
6
Insert the new lamp, and tighten the 2 screws firmly to lock
it in place.
7
Slide the lamp cover into place, and tighten the screw of the
lamp cover firmly.
8
Slowly turn the projector so that the top is facing up.
9
Turn on the projector, and reset the lamp timer. When the lamp has been replaced after
the message of "THE POWER WILL TURN OFF AFTER 0hr." is display, complete the
following operation within 10 minutes of switching power on.
(1) While the projector running, press the MENU button to open the menu.
(2)
Choose the “OPTION” on the menu using the/ button, then press the button or ENTER button.
(3) Choose the “LAMP TIME” using the
/
button, then press and hold the button of
projector or the RESET button of remote control for 3 seconds.
(4) Choose the “RESET” using the button.
In the case of replacement by yourself,
Lamp cover
Screw
Handles
Screws
01HOME-1E-QG03.9.114:16PMページ7
Page 8

8
Air Filter
Air Filter
WARNING
• Please carefully read the “User’s Manual - Safety Guide”.
If the air filter becomes clogged by dust or the like, internal temperature rises and could cause malfunction.
• Use the air filter of the specified type only.Type number: NJ08312
(sold separately)
• Do not use the projector with the air filter and filter cover removed.
CAUTION
• Do not reset the filter timer without cleaning or replacing the air filter.
• When you replace the lamp, please replace also the air filter. The air filter may be attached when you buy a
replacement lamp for this projector. Please ask your dealer.
Caring For The Air Filter
The air filter should be cleaned about every 100 hours. If the indicators or a message prompts you to
clean the air filter, clean the air filter as soon as possible.
Replacing The Air Filter
Turn off the projector, and unplug the power cord.
Apply a vacuum cleaner to the top of the filter cover to clean the air filter.
Reset the filter timer, according to following “Reset The Filter Timer”.
Turn off the projector, and unplug the power cord.
Insert a new air filter, and replace the filter cover.
Reset the filter timer, according to following “Reset The Filter Timer”.
2
Contact your local dealer to prepare a new air filter. Tell the dealer
your air filter type number.
Reset The Filter Timer
Only after cleaning or changing the air filter, the filter timer has to be reset. To reset the filter timer,
1
Turn on the projector. While the projector running, press the MENU button to open the
menu.
2
Choose the “OPTION” on the menu using the / button, then press the button
or ENTER button.
3
Choose the “FILTER TIME” using the / button, then press and hold the
button of projector or the RESET button of remote control for 3 seconds.
Choose the “RESET” using the button.
3
After making sure that the projector has cooled adequately,
remove the filter cover. Hold the release buttons of the filter
cover, while pulling up it.
Hold the release buttons of the air filter, while pulling down it.
4
1
1
4
5
6
2
3
Filter cover
If the soiling will not come off the air filter, or it becomes damaged, then it needs to be replaced.
Please replace the air filter as soon as possible.
Filter cover
Air filter
Release buttons
Release buttons
01HOME-1E-QG03.9.114:16PMページ8
3
3
4
4
 Loading...