

Page 1

HL19KN1/HL22KN1
LCD TV
USER MANUAL
Please read this manual carefully
before using this TV set and leep it
for future reference.
Page 2
Page 3
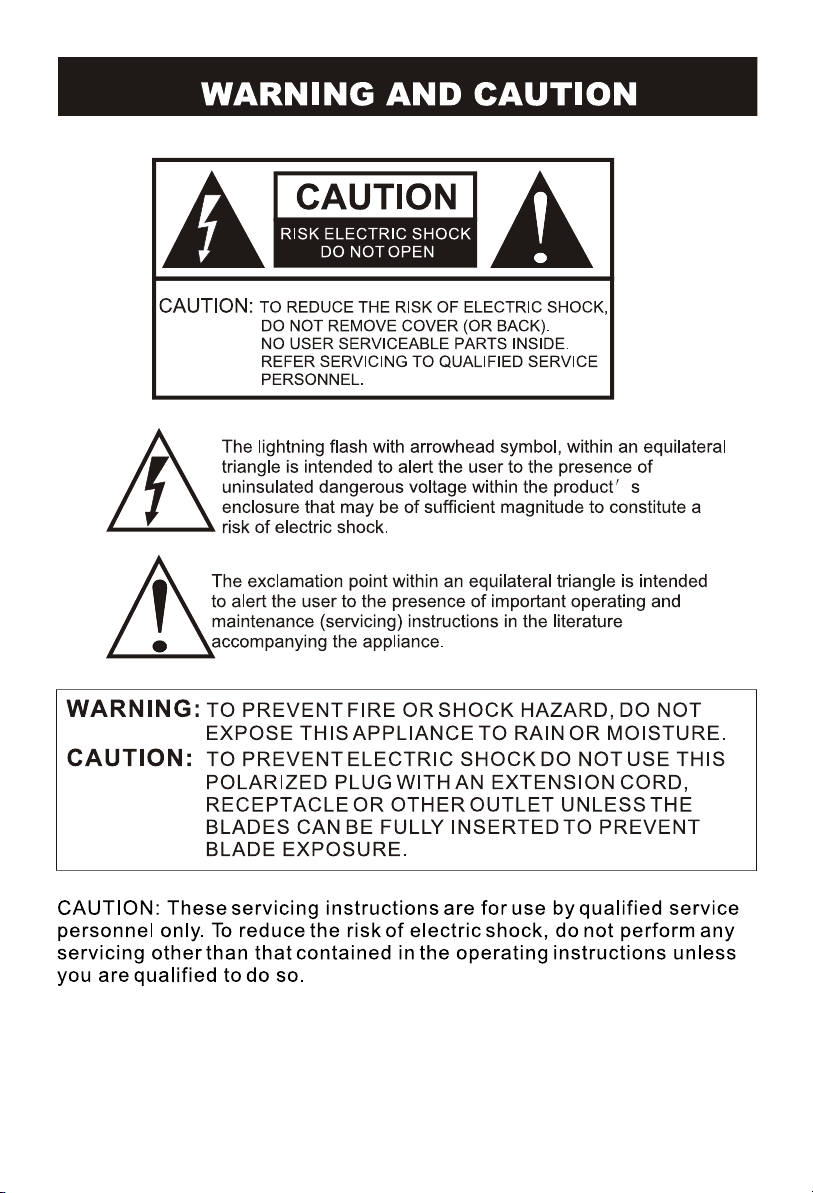
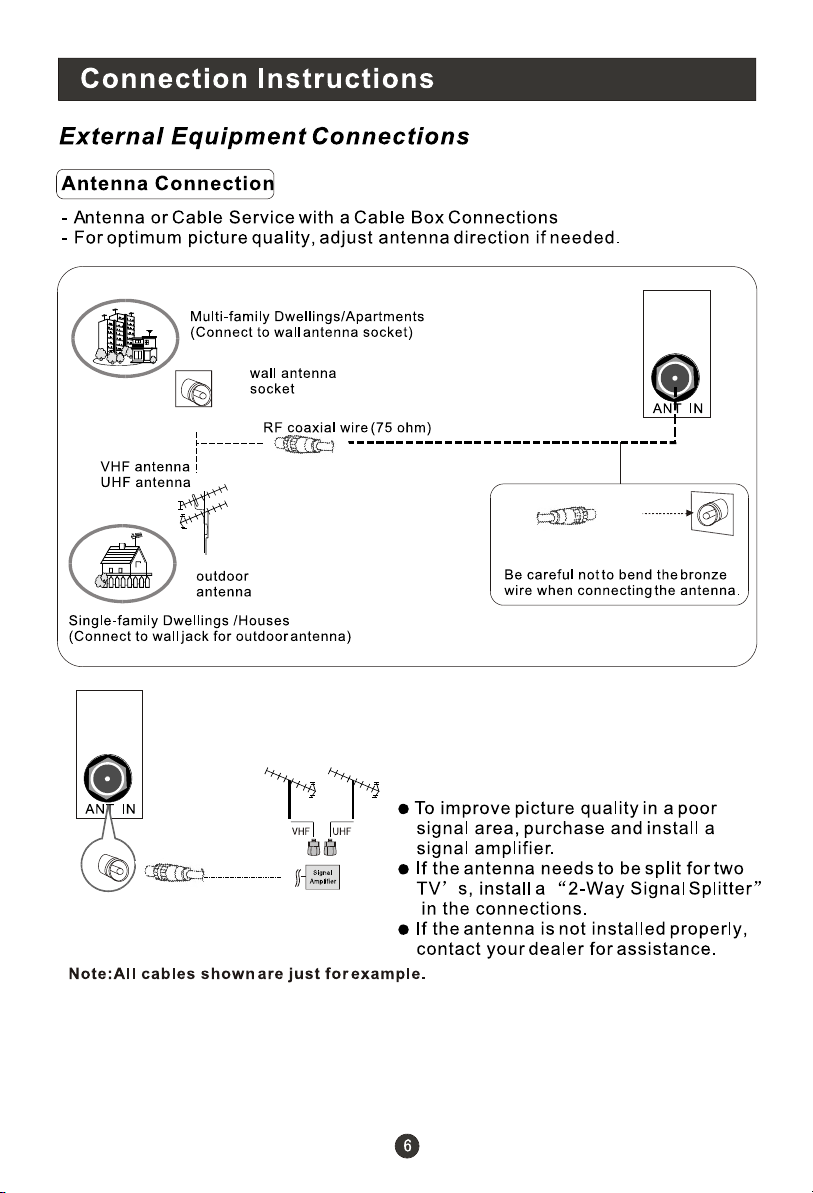
IMPORTANT SAFETY INSTRUCTIONS
Page 4
Page 5
Page 6
HDMI
Page 7
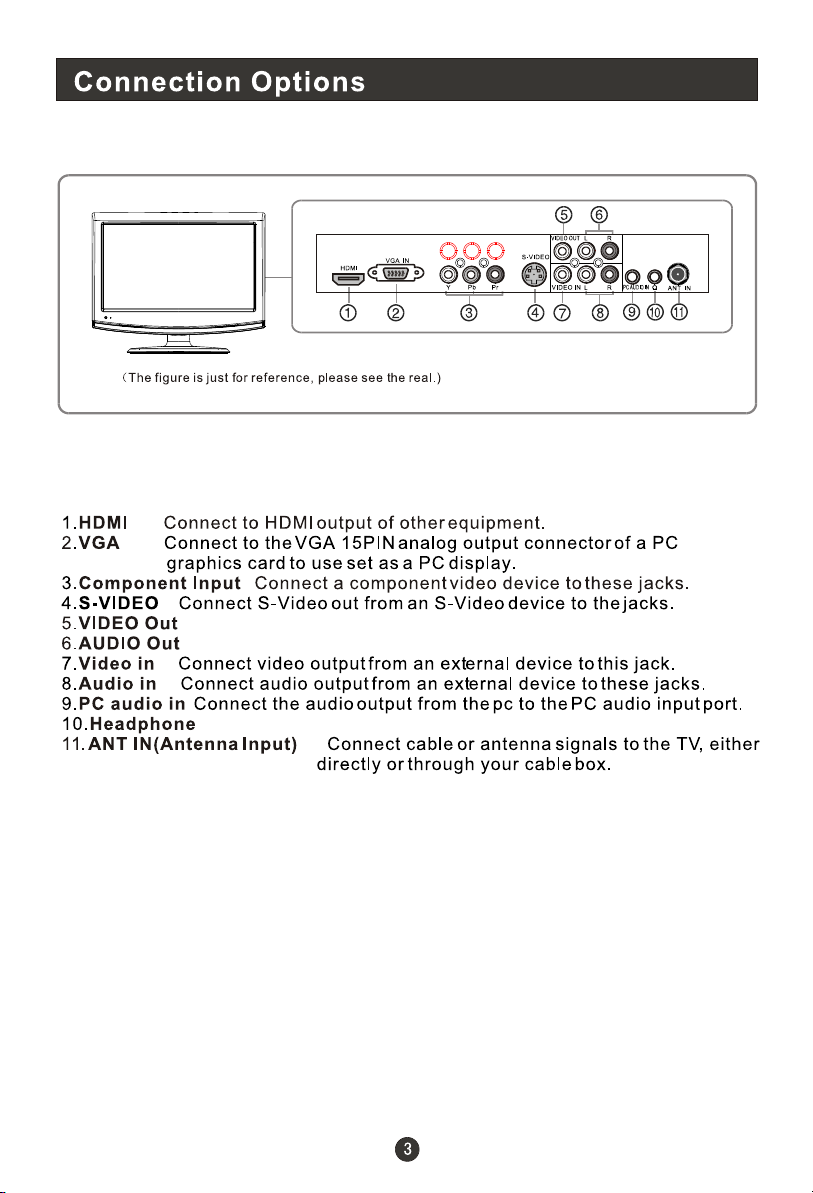
Connect video input from an external device to this jack.
Connect audio input from an external device to these jacks.
Page 8
1
2
3
4
5
6
7
8
9
10
11
12
13
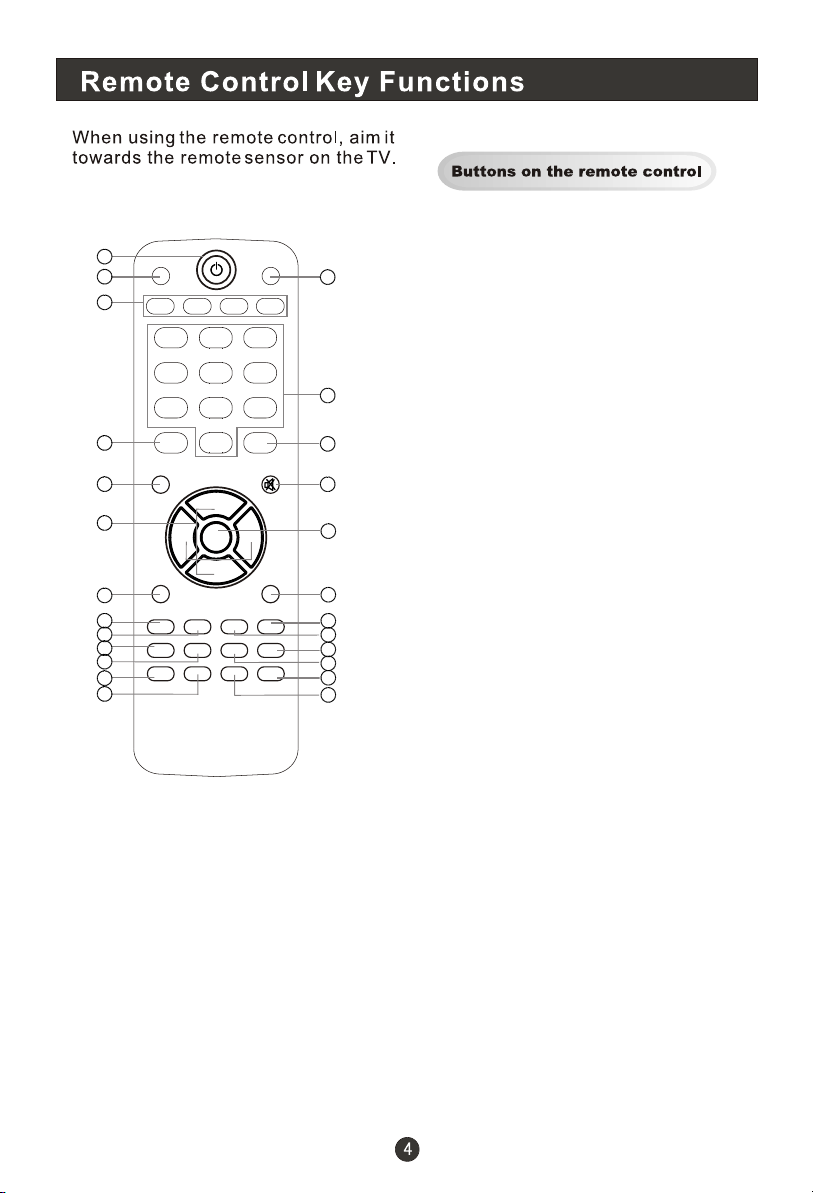
SCAN
1 2 3
4 5 6
7 8 9
INPUT DISPLAY
0
MENU
CH+
VOL-
OK
CH-
EXIT
P.MODE ARC
CCD MTS/SAP
PIP SWAP MOVE
SLEEP
H.LOCK
VOL+
HDMI
MUTE
RECALL
S.MODE
FREEZE
FAVORITE
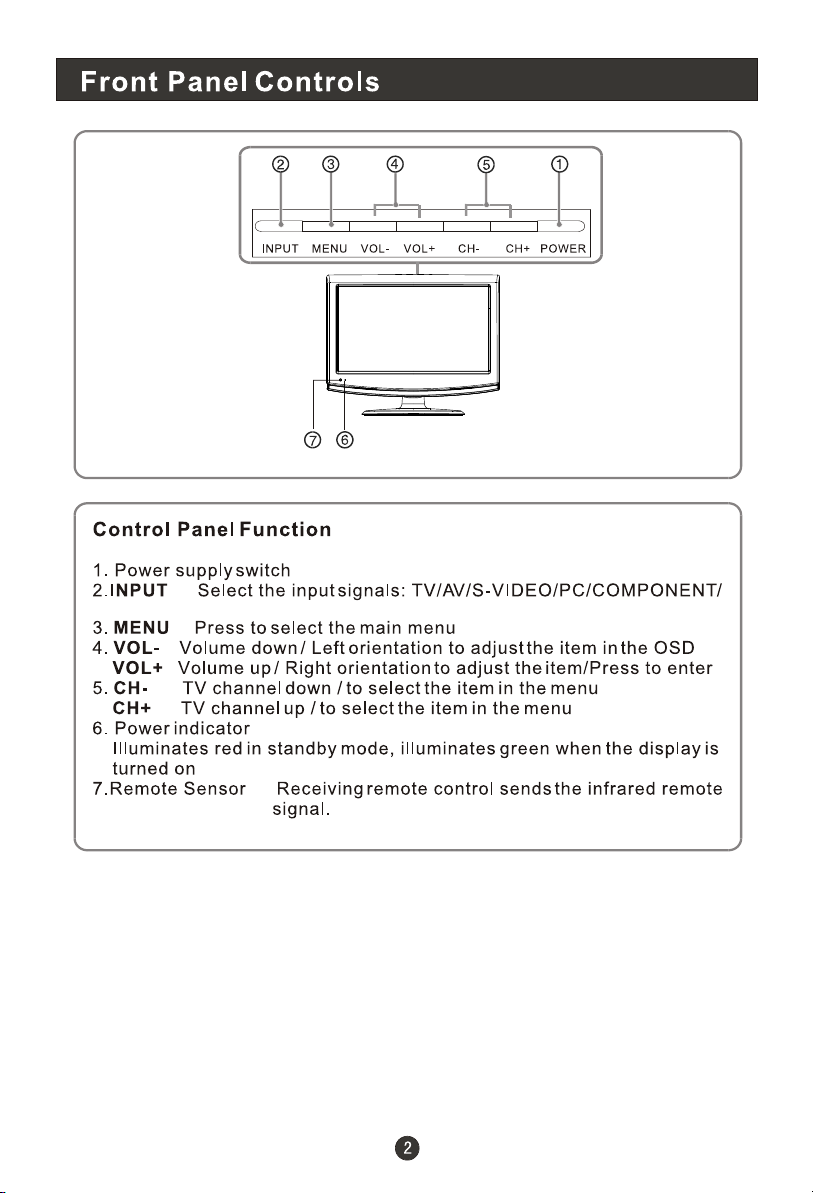
1.Power
14
2.SCAN
3.Not available
4. Input selection
5.MENU
6.Volume/Channel Selection
15
7.Exit On Screen Display
8.Adjust Picture Mode
16
17
18
9.Select the aspect ratio
10.Close caption
11.Select Mono/SAP/Stereo
12.Not available
13.Not available
14.HDMI mode
19
20
21
22
23
24
25
15.Program Number
16.Program Information
17.Mute
18.Confirm button
19.Return to previous channel in TV mode
20.Adjust sound mode
21.Sleep button
22.Not available
23.Hotel Lock
24.Not available
25.Not available
Page 9

Page 10
Page 11

Page 12
Page 13
Page 14

SCAN
1 2 3
4 5 6
7 8 9
INPUT DISPLAY
0
MENU
CH+
VOL-
OK
CH-
EXIT
P.MODE ARC
CCD MTS/SAP
H.LOCK
PIP SWAP MOVE
HDMI
MUTE
VOL+
RECALL
SLEEP
S.MODE
FREEZE
FAVORITE
Page 15

Press H.LOCK to enter it and input the password correctly, the H.LOCK menu
will appear on the screen(The initial password is 0000).
Change password: The password can be changed. Press CH+/- to select
Change password and VOL+/OK to enter. The screen will display New PW:----,
then enter the new password and the screen display Confirm PW:----, if the same
password is input correctly twice, the old password will be changed.
Tuner Lock: The tuner can be locked. Press CH+/- to select.
Preset Source: Preset the source.
Preset CH.: Preset the channel.
Source Lock: The source can be locked. Press CH+/- to select.
Child Lock: Press CH+/- to select it . Press VOL+/- to set on or off mode. If lock
on mode is set, child lock is inactivated automatically. In such case, buttons
on the television is useless and only buttons on remote control can be used,
if buttons on the television are pressed, the screen will display Child Lock.
The child lock mode can be resumed by entering lock set menu, set child lock on.
Unlocked: Press to turn to the unlocked mode.
Page 16

In this manual, the OSD (On Screen Display) may be different from your TV s
because it is just an example to illustrate the TV operation.
Press INPUT to select the input source, and the menu for each source is different.
1. Press MENU button to display the main menu, and VOL+/-to select the main
menu.
2. Press CH+/- to scroll through the parameters.
3. Press VOL+/- buttons to make changes to the parameters.
4. Press EXIT button to exit the menu.
Not available
Not available in PC
Note: Symbols on top of the menu in this manual may be different from the actual
set.
Page 17

Reset : Reset all settings to factory mode.
Page 18

Reset : Reset all settings to factory mode.
Page 19
Menu Language Selection:
The menus can be shown on the screen in the selected language. First select
your language.
1. Press MENU button and VOL+/- until the following menu appears on the screen.
2. Press CH+/- button to enter the function menu and to go up and down to select
the desired option .
3. Press VOL+/- button to adjust the selected option to your preference .
Functions:
Language: This item displays the language of the OSD.
Pic. Size: To select the display mode :4:3/Full/Zoom.
Menu Time: To select 5S/10S/15S.
Halftone: To select the menu transparency.
Blue screen :Press VOL+/- to select On or Off. To set On, screen will be in blue
screen after 3 seconds if there is no signal.
Page 20

DNR: Digital Noise Reduction. Reduces the appearance of digitizing errors
caused by compression. Press VOL+/- to select On or Off.
Page 21

1. Press MENU and VOL+/- button until the following menu appears on the
screen.
Note: This menu is only appears in TV mode .
2. Press CH+/- button to enter the turning menu and to go up and down to
select the desired option .
3.Press VOL+/- button to adjust the selected option to your preference .
Functions:
Channel Type: Press VOL+/- to select Air or cable.
Color System: Press VOL+/- to select Auto/NTSC/PAL N/PAL M.
Auto Search: Auto search and save the channel .Press the VOL+ button
to start automatic search function operation. All channels now available
will be automatically preset in order .After the search has finished,
the first program number will display on the screen. This search automatically
adds only the active channels in your area to the TV's memory. It deletes any
channels on which there is no broadcast or a poor signal.
Note: The Auto Search function will scan the channels on the selected
Air input. If the TV is connected to cable, please select Cable under
' Air ' sub menu.
Fine Tune : If the image and / or sound received is not very good , you can
press CH+/- to select Fine Tune in the menu . Then , press VOL+/button to adjust and improve the image quality. Do not use this feature unless
reception is poor.
Skip : If you want skip a channel , press VOL+/- to select On , and this
channel will be skipped next time when you press CH+/- . You can press
the digit buttons to select the channel . If you want to restore the channel , select
Off.
Page 22

1. Press MENU and VOL+/- button until the following menu appears on the
screen.
2. Press CH+/- button to enter the turning menu and to go up and down to
select the desired option .
3.Press VOL+/- button to adjust the selected option to your preference.
Functions:
Clock: Set the Correct time.
Time Off: Set the time that the TV goes off automatically.
Time On: Set the time that the TV comes on automatically.
Book Channel: Set the channel that the TV comes on automatically.
Remind Time: Set the time that you want to remind.
Remind Channel: Set the channel that you want to remind.
Page 23
1. Press MENU and VOL+/- button until the following menu appears on the
screen.
Note: This menu is only appears in PC mode .
2. Press CH+/- button to enter the adjust menu and to go up and down to
select the desired option .
3.Press VOL+/- button to increase and decrease the level to adjust the
selected option to your preference .
Functions:
H-Position: Picture horizontal position adjust.
V-Position: Picture vertical position adjust.
Clock : Adjust the TFT-LCD to match the PC input source.
Phase : Removes any horizontal distortion and clears or sharpness the displayed
characters.
Auto Adjust : Is opted for adjustment of picture location frequency and phase
parameters.
Page 24

Page 25
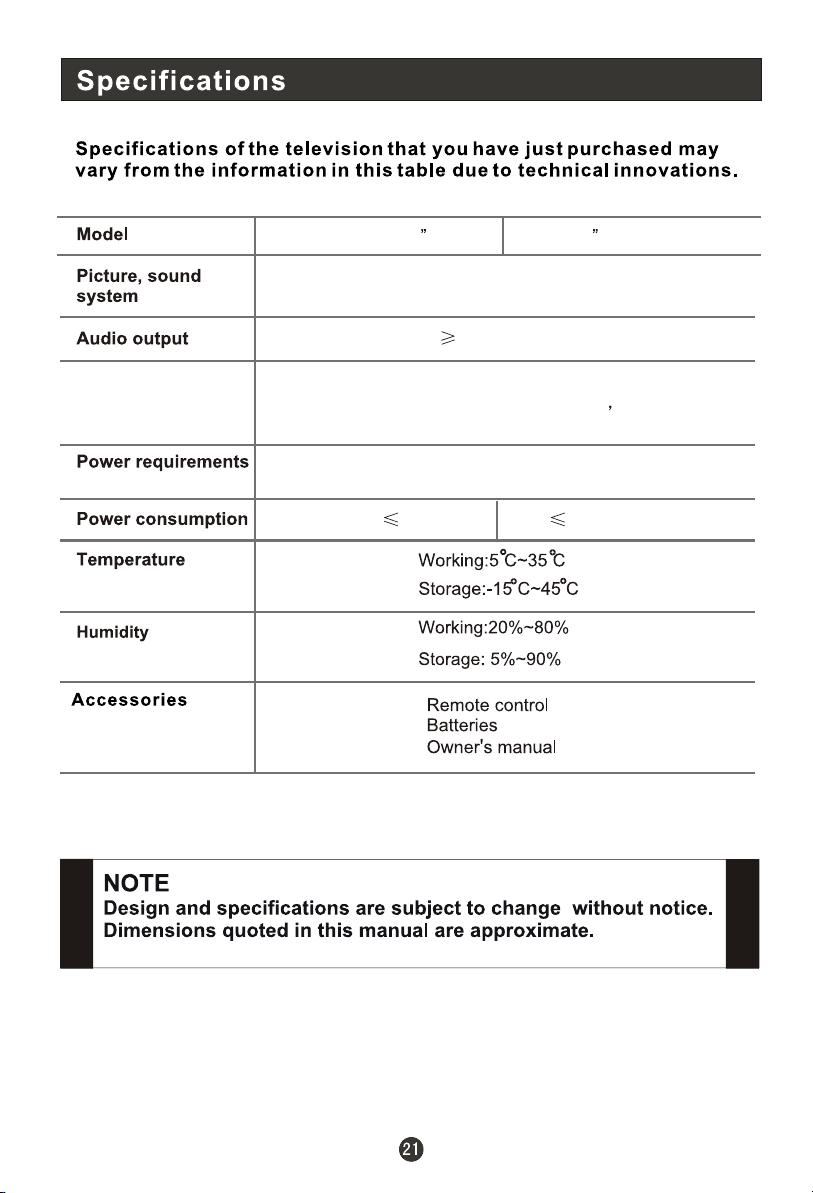
2219
PAL M, PAL N, NTSC M
2.5W+2.5W
External jack
COMPONENT input, PC input, S-VIDEO input,
Audio input, Video input, Antenna input HDMI input,
A/V out, PC Audio in, Headphone
~110-220V 50/60Hz
60W50W
Page 26

V0.1
0090509049
 Loading...