

Page 1

Hitachi Telecom (USA), Inc.
3617 Parkway Lane
Norcross, GA 30092
(770) 446-8820
HCX5000 Systemi
Release 9.0
Attendant Operations
SelecSet 500A
User Guide
HCXTD840
Page 2

Table of Contents
Preface
1 About Your SelecSet 500A
The Display .............................................................................. 1-3
Displaying Caller ID Information ............................................1 -7
Displaying Programmable Key Information............................ 1-9
Displaying VIP and Language Status..................................... 1-10
Keys........................................................................................ 1-12
Fixed Keys..............................................................................1-13
About Call Appearance Keys (CAPs)....................................1-16
Soft Keys................................................................................ 1-18
Programmable Keys...............................................................1-20
Suggested Programmable Keys..............................................1-21
Optional Programmable Keys................................................1-23
Key Lamps ............................................... ..............................1-26
Basic Operations.....................................................................1-27
Calling ....................................................................................1-28
Placing An Outside Call.........................................................1-29
Placing an Outside Call for an Idle Station............................1-30
Answering ..............................................................................1-31
Answering Returned Calls (Recalls)......................................1-33
Answering Coverage Calls.....................................................1-35
Answering Multiple Calls ......................................................1-37
Holding...................................................................................1-38
Holding a Single Call.............................................................1-39
Holding Multiple Calls (Soft Park)........................................1-41
Transferring............................................................................1-42
Switchhook-Flash To Transfer Calls......................................1-44
Conferencing..........................................................................1-46
Bridged CAPs to Create a Conference...................................1-48
Creating a Multi-party Conference.........................................1-50
Messaging............................................................................... 1-52
Breaking Into a Busy Station..................................................1-60
HCXTD840, Issue 1, July 2001 iii
Page 3

T
ABLE OF CONTENTS
S
ELECSET
500A U
2 Additional Operations
Soft Key-Controlled Features..........................................................2-3
Registering Call Restrictions....................................................2-5
Canceling Call Restrictions ......................................................2-7
Coverage...................................................................................2-8
Registering Coverage................................................................2-9
Canceling Coverage................................................................2-11
Credit Limit ............................................................................2-13
Controlling Credit Limit.........................................................2-15
Do-Not-Disturb.......................................................................2-19
Ringing a Do-Not-Disturb Station..........................................2-24
Transferring to a Station in Do-Not-Disturb...........................2-25
Receiving Forwarded Calls from DND Stations....................2-26
Setting the System Clock........................................................2-28
Wakeup/Reminder Calls.........................................................2-32
Registering a Wakeup/Reminder Call.....................................2-33
Canceling a Wakeup/Reminder Call.......................................2-35
Registering a Second Wakeup Call.........................................2-36
Canceling a Second Wakeup Call...........................................2-39
Registering a Repeat Wakeup.................................................2-41
Displaying and Providing a VIP wakeup................................2-43
Viewing the Cost of Calls.......................................................2-46
Other Feature Operations..............................................................2-47
Assigning an Account Code...................................................2-47
Alarm Indications...................................................................2-50
Receiving a Combined Alarm ................................................2 -50
Receiving a System Alarm.....................................................2-51
Receiving a PMS Alarm.........................................................2-52
Receiving a VMS Alarm ........................................................2-52
Receiving an Answer Detection Alarm..................................2-53
Receiving a Wakeup/Reminder Call Alarm............................2-53
Receiving a Long Trunk Alarm..............................................2-55
Receiving an E911 Alarm.......................................................2-56
Receiving a Line Lockout Alarm ...........................................2-57
Announced Calls.....................................................................2-58
SER’S GUIDE
iv HCXTD840, Issue 1, July 2001
Page 4

S
ELECSET
500A U
SER’S GUIDE
T
ABLE OF CONTENTS
Answering Another Phone......................................................2-59
Answering a Specific Line......................................................2-60
Attendant Continuous Ringing...............................................2 -61
Blocking and Sending Caller ID.............................................2-62
Blocking Calls Between Guest Rooms...................................2-66
Calling Out on a Specific Trunk.............................................2-67
Camping-on to a Busy Station................................................2-68
Checking a Trunk....................................................................2-70
Code Calls...............................................................................2-72
Dialing Frequently Called Numbers.......................................2-74
Extending an Incoming Data Call to a Station.......................2-76
Intercom (ICOM) Calls...........................................................2-77
Night Service..........................................................................2-78
Paging.....................................................................................2-79
Parking a Call .........................................................................2-82
Recording a Conversation.......................................................2-83
Redialing Numbers.................................................................2-85
Sending Pushbutton Tones......................................................2-87
Training Attendant Operators.................................................2-89
Trunk Answer From Any Station (TAFAS)............................2-90
Programming Your SelecSet 500A ...............................................2-92
Programming an Autodial Number........................................2-95
Canceling a Feature................................................................2-96
Labeling Instructions..............................................................2-97
Quick Reference Sheet..................................................................2-99
Appendix: Testing the Console
Entering Test Mode..................................................................A-2
Demonstrating Ringing Frequencies.......................................A-6
Changing the Ringing Level............ ......... ...............................A-7
Demonstrating Default Ringing Patterns.................................A-9
Determining if a Data Adapter is Assigned........................... A-11
Displaying Your Console ROM Level...................................A-12
Testing the Liquid Crystal Display........................................A-13
Index
HCXTD840, Issue 1, July 2001 v
Page 5

T
ABLE OF CONTENTS
S
ELECSET
500A U
SER’S GUIDE
vi HCXTD840, Issue 1, July 2001
Page 6

List of Figures
Figure 1-1: SelecSet 500A . . . . . . . . . . . . . . . . . . . . . . . . . . . . . . 1-1
Figure 1-2: SelecSet 500A Liquid Crystal Display . . . . . . . . . . . 1-3
Figure 1-3: 500A fixed keys. . . . . . . . . . . . . . . . . . . . . . . . . . . . 1-13
Figure 1-4: Illustration of CAPs 1 through 4 . . . . . . . . . . . . . . . 1-16
Figure 1-5: 500A soft keys. . . . . . . . . . . . . . . . . . . . . . . . . . . . . 1-18
Figure 1-6: Soft key menu . . . . . . . . . . . . . . . . . . . . . . . . . . . . . 1-19
Figure 1-7: 500A programmable keys . . . . . . . . . . . . . . . . . . . . 1-20
Figure 2-1: Recording jack. . . . . . . . . . . . . . . . . . . . . . . . . . . . . 2-84
Figure 2-2: Programmable key numbering. . . . . . . . . . . . . . . . . 2-94
Figure 2-3: Example of key labeling . . . . . . . . . . . . . . . . . . . . . 2-98
Figure A-1: Attendant console control panel . . . . . . . . . . . . . . . . A-2
Figure A-2: Console test display . . . . . . . . . . . . . . . . . . . . . . . . . A-2
Figure A-3: Console test display. . . . . . . . . . . . . . . . . . . . . . . . . . A-3
Figure A-4: Normal ringing level (volume) . . . . . . . . . . . . . . . . . A-7
Figure A-5: Ringing level changed to low . . . . . . . . . . . . . . . . . . A-7
Figure A-6: Default for station-to-station calls. . . . . . . . . . . . . . . A-9
Figure A-7: Displaying another ringing pattern . . . . . . . . . . . . . . A-9
Figure A-8: Displaying data adapter assignment . . . . . . . . . . . . A-11
Figure A-9: Displaying console ROM version . . . . . . . . . . . . . . A-12
Figure A-10: Display LCD test. . . . . . . . . . . . . . . . . . . . . . . . . . . A-13
HCXTD840, Issue 1, July 2001 vii
Page 7

L
IST OF FIGURES
S
ELECSET
500A U
SER’S GUIDE
viii HCXTD840, Issue 1, July 2001
Page 8

List of Tables
Table 1-1 SelecSet 500A Fixed Keys. . . . . . . . . . . . . . . . . . . . . . 1-14
Table 1-2 Suggested programmable keys. . . . . . . . . . . . . . . . . . . 1-21
Table 1-3 Optional programmable keys . . . . . . . . . . . . . . . . . . . . 1-23
Table 2-1 Call restriction levels . . . . . . . . . . . . . . . . . . . . . . . . . . . 2-4
Table 2-2 Summary of credit limit types . . . . . . . . . . . . . . . . . . . 2-13
Table 2-3 SelecSet 500A Programmable Keys . . . . . . . . . . . . . . . 2-92
Table A-1 Description of Key Labels and Functions . . . . . . . . . . . A-4
HCXTD840, Issue 1, July 2001 ix
Page 9

L
IST OF TABLES
S
ELECSET
500A U
SER GUIDE
x HCXTD840, Issue 1, July 2001
Page 10

P
REFACE
REFACE
P
About this
section
Purpose
About the
features
selected for
your phone
When your
phone system
is part of a
network
This preface includes a description of the purpose,
contents and use of this document, along with an overview
of how the document is organized.
The purpose of this guide is to describe SelecSet 500A™
attendant operations for both WelCOMM
and COMMerce
between WelCOMM and COMMerce terminology are
noted.
Your SelecSet 500A may not be set up to perform all the
operations described in this document. However, your
system administrator has carefully selected the features
assigned to your phone.
If your phone system is part of a privat e networ k (separate
phone systems sharing resources through direct
connections), attendant operations may differ slightly.
Contact your system administrator and refer to the online
Networking Applicatio n Not es (H CXT D96 0)
information.
®
(business) systems. Differences
®
(hotel/motel)
for more
HCXTD840, Issue 1, July 2001 xi
Page 11

S
ELECSET
500A U
SER GUIDE
Intended
audience
Organization
This guide is intended to provide the attendant or any
other user of the SelecSet 500A wit h descriptions and
guidelines regarding attendant features and functions that
are available with this attendant console.
Chapters and topics included in this document are:
Section 1: About Your
SelecSet 50 0A
This section introduces
the SelecSet 500A
attendant console and
provides basic
information to help you
understand how your
telephone operates.
Basic Operations
Describes procedures fo r
basic attendant
operations.
Section 2: Additional
Operations
Describes operations that
are performed less
frequently than basic
operations.
Programming
Your SelecSet
Provides instructions on
programming SelecSet
keys.
The Quick
Reference Sheet
Appendix A:Testing the
Console
Provides a quick reference
for the most frequently
performed attendant
operations.
Provides instructions for
testing the SelecSet display
and lamps.
xii HCXTD840, Issue 1, July 2001
Page 12
C
HAPTER
1: A
BOUT YOUR SELECSET
500A
1A
BOUT YOUR SELECSET
About the
SelecSet 500A
Alarm
Key
all Appearance
eys (CAPs)
Handset
500A
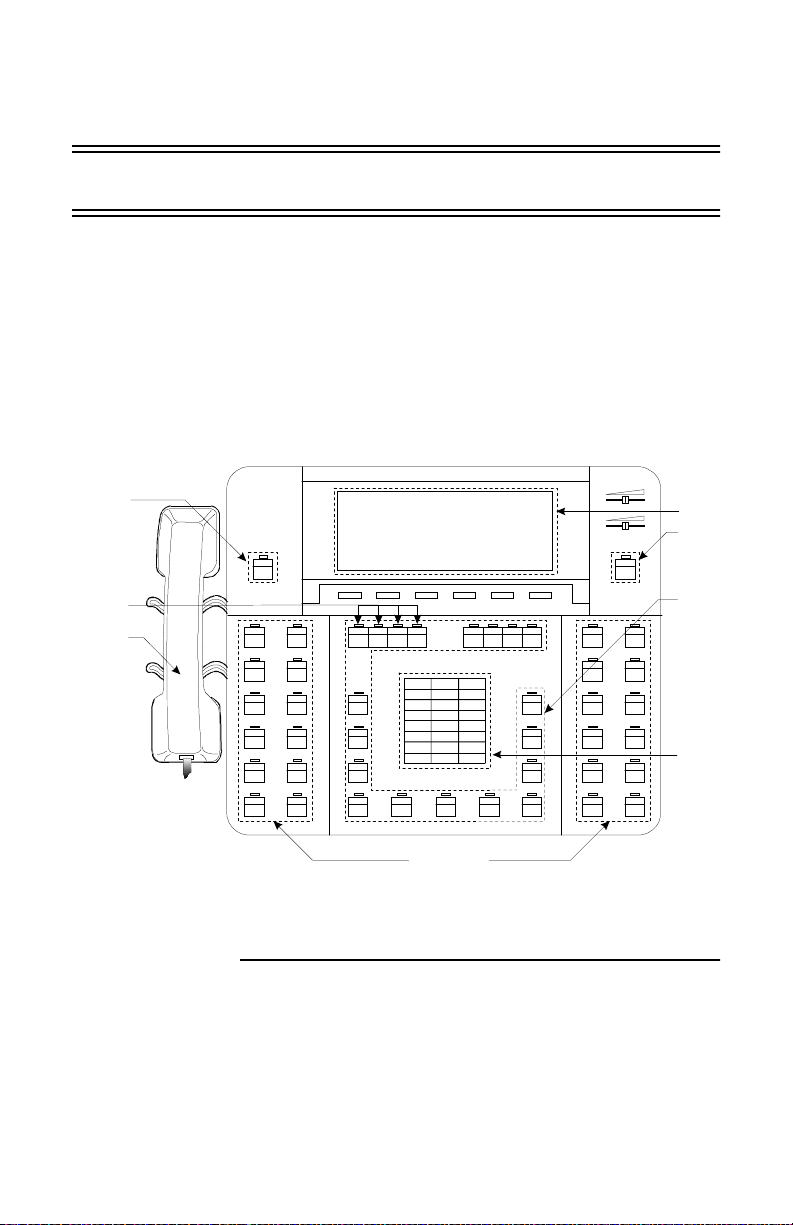
The SelecSet 500A is a multifunction telephone that is
used for call control operations and to serve other users in
a facility. It is also called an attendant console. Your
SelecSet 500A should look like the one shown in
Figure 1-1. Note that some of your keys may be labeled
differently.
RECEI VER
RINGER
ALARM
HLD 1
HLD 2
MW SFPK
CLME TONE
LOA BRKNLTA ANNO
NY CAMPLA DSPL
DALLAS
ATL
SEATL
BOSTON
CAP 1
CAP2
CAP3
ABC DEF
231
JKL MNOGHI
564
TUV WXYPRS
89
7
OPER
0#
SWAP
*
HLD 3CAP 4 HLD4
RCL C ONV
INC ZPG /P
NIGHT
ICOMCHI CONF INF PARK
ZPG
TGNODETR START CNCL HOLD JOIN ANS CLME
LCD
Display
Night
Key
Fixed
Keys
Dial
Pad
Programmable
Keys
Figure 1-1: SelecSet 500A
HCXTD840, Issue 1, July 2001 1-1
Page 13

S
ELECSET
500A U
SER GUIDE
SelecSet keys The SelecSet 500A has 21 fixed keys, 24 programmable
keys, and an 8 x 40 display. Operations are perfo rmed
using the display and the keys. Both are described in detail
on the following pages.
1-2 HCXTD840, Issue 1, July 2001
Page 14

C
HAPTER
1: A
BOUT YOUR SELECSET
The Display
500A
THE D
ISPLAY
About the
display
(Lin e 1)
(Lin e 2)
(Lin e 3)
(Lin e 4)
(Lin e 5)
(Lin e 6)
(Lin e 7)
(Lin e 8)
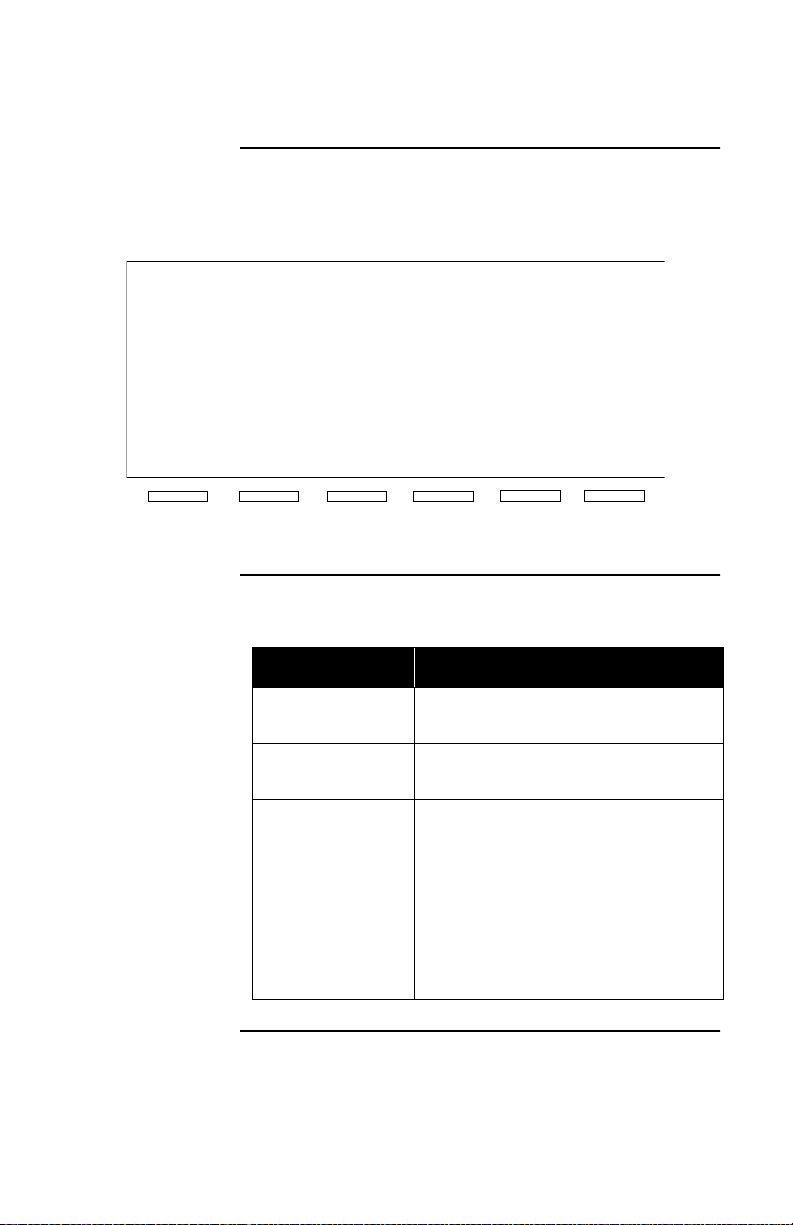
The SelecSet 500A 8 line, 40 character display simplifies
the placement and answering of calls, along with other
attendant functions. See Figure 1-2 for an example of what
you see when your console is idle.
04:20 P M Mon Jun 27 301
Calls Wait: 0
1
2
3
4
LI:
L3:
MSG
Figure 1-2: SelecSet 500A Liquid Crystal Display
L2:
L4:
CHARGE
FEATUR
HCXTD840, Issue 1, July 2001 1-3
Page 15

ISPLAY S
THE D
ELECSET
500A U
SER GUIDE
Display
components
A line-by-line explanation of the display follows.
Line Function
1 Provides the time and date, your station
number, and the number of calls waiting.
The calls waiting display registers incoming
3- or 4-digit trunk calls, internal calls,
information (dial 0) calls and recalls
(outside calls that are transferred to a station
that does not answer and automatically
return to your console). While users in your
facility call you by dialing 0, you also have
your own 3- or 4-digit station number.
2 through 5 Represent call appearances. Four call
appearances keys, or CAPs, labeled CAP,
CAP2, CAP3 and CAP4 are provided. Each
CAP can be used to represent a single call.
CAPs are located above and to the left of the
keypad. They are discussed in more detail
under “Displaying Caller ID Information”
on page 1-7.
6 and 7 Display information about hold loops. Four
hold loops (HLD1-HLD4) are usually
provided on your SelecSet. These hold
loops are located above and to the right of
the keypad. Hold loops are discussed in
greater detail under “Displaying Caller ID
Information” on page 1-7.
8 The soft key menu lets you retrieve
messages, view the charge for the last
outgoing c all made from the console, and
control certain station features. See “Soft
Keys” on page 1-18 for more information.
1-4 HCXTD840, Issue 1, July 2001
Page 16

C
HAPTER
1: A
BOUT YOUR SELECSET
500A
THE D
ISPLAY
Display
changes
The displays on your SelecSet 500 A change dep endin g on
the operation being performed. For example, line 8 of the
display can be used to show how a particular key is
programmed. As various operations are described in the
following sections, you see examples of the appropriate
displays. This section illustrates the most commonly
viewed displays.
When you dial
an internal
number
04:20 pm Mon Jun 27 301 Cal ls Wai t : 0
1*Dial 300
2
3
4
L1: L2:
L3: L4:
MS G CHARGE F EA T UR
You see this display when you dial a number in your
facility:
HCXTD840, Issue 1, July 2001 1-5
Page 17

ISPLAY S
THE D
ELECSET
500A U
SER GUIDE
When you
connect to an
You see this display when you are connected to that
number:
.
internal
number
04:20 pm Mon Jun 27 301 Cal ls Wai t : 0
1*Connect 300 MARTI N RYAN In Of f ice
2
3
4
L1: L2:
L3: L4:
MS G CHARGE F EA T UR
When you
answer an
internal call
04:20 pm Mon Jun 27 301 Cal ls Wai t : 0
1*Inc Sta 300 MARTIN RYAN
2
3
4
L1: L2:
L3: L4:
MS G CHARGE F EA T UR
Y ou see this display when you answer a call from someone
within your facility:
1-6 HCXTD840, Issue 1, July 2001
Page 18

C
HAPTER
1: A
BOUT YOUR SELECSET
500A
ISPLAYING CALLER
D
Displaying Caller ID Information
NFORMATION
ID I
About caller
ID display
Depending on your phone system setup, your SelecSet
may display caller ID information for incoming calls. This
data may include the caller’s name and/or the caller’s
number. Caller ID data displays between the first and
second rings for new and waiting calls. If the caller has
privacy set, your SelecSet displays privacy text.
Ringing call
05:56 pm Wed Sep 24 2002 Cal l s Wai t : 0
1 Inc Trnk 6300 DUNN CAROLYN 7704468820
2
3
4
L1: L2:
L3: L4:
MS G CHARGE F EA T UR
The following display is shown for a ringing PRI call:
Answered call This displays when you answer an incoming PRI call:
05:56 pm Wed Sep 24 2002 Cal l s Wai t : 0
1* Inc Trnk 6300 DUNN CAROLYN 7704468820
2
3
4
L1: L2:
L3: L4:
MS G CHARGE F EA T UR
HCXTD840, Issue 1, July 2001 1-7
Page 19

ISPLAYING CALLER
D
NFORMATION S
ID I
ELECSET
500A U
SER GUIDE
Receiving a
call from a
payphone
Receiving a
call from a new
number
Receiving a
call from a
business
If you receive a call from a pay phone or some type of
public telephone, you see the word PAYPHONE on your
display.
When you receive a call from a new telephone number,
you may see the number displayed but not the name,
because the name may not be registered in the central
office where the call originated.
If you receive a call from a business whose PBX is not
networked with your phone system, the business name and
number is displayed, but not the caller’s name or extension
number.
1-8 HCXTD840, Issue 1, July 2001
Page 20

C
HAPTER
1: A
BOUT YOUR SELECSET
500A
ISPLAYING PROGRAMMABLE KEY
D
Displaying Programmable Key Information
Procedure To display autodial information:
1
Press <DSPL>.
2
Press the autodial key whose information you want
displayed.
3
Press <START> or lift handset to return to the basic
display.
HCXTD840, Issue 1, July 2001 1-9
Page 21

ISPLAYING
D
AND LANGUAGE STATUS S
VIP
ELECSET
500A U
Displaying VIP and Language Status
SER GUIDE
About VIP and
language
indicators
If your SelecSet 500A attendant console is used in a front
desk operation or hotel/motel environment and a guest
with VIP or foreig n language status calls you, yo u may see
VIP and language indicators on your SelecSet display.
Examples of displays showing VIP and language
indicators follow.
If a guest has only VIP or language designated, that
indicator is displayed in the same position as when the
guest has both.
Ringing
You see this display for a ringing VIP language call:
VIP/language
call
05:56 PM Wed Sep 24 11458 Cal l s Wai t : 0
1*Ringing 11852 Dunn Carolyn/ V FR TOS=1
2
3
4
L1: L2:
L3: L4:
MS G CHARGE F EA T UR
1-10 HCXTD840, Issue 1, July 2001
Page 22

C
HAPTER
1: A
BOUT YOUR SELECSET
500ADISPLAYING
AND LANGUAGE STATUS
VIP
Answered
VIP/language
You see this display when you answer a VIP/language
call:
call
05:56 PM Wed Sep 24 11458 Cal l s Wai t : 0
1*Connect 11852 Dunn Carolyn/V FR TOS=1
2
3
4
L1: L2:
L3: L4:
MS G CHARGE F EA T UR
HCXTD840, Issue 1, July 2001 1-11
Page 23

EYS S
K
ELECSET
500A U
SER GUIDE
Keys
Key types Your SelecSet 500A is equipped with three types of keys.
These include:
• 15 fixed keys
• 6 soft keys
• 24 programmable keys
- Suggested programmable keys
- Optional programmable keys
1-12 HCXTD840, Issue 1, July 2001
Page 24
C
HAPTER
1: A
BOUT YOUR SELECSET
Fixed Keys
500A
IXED KEYS
F
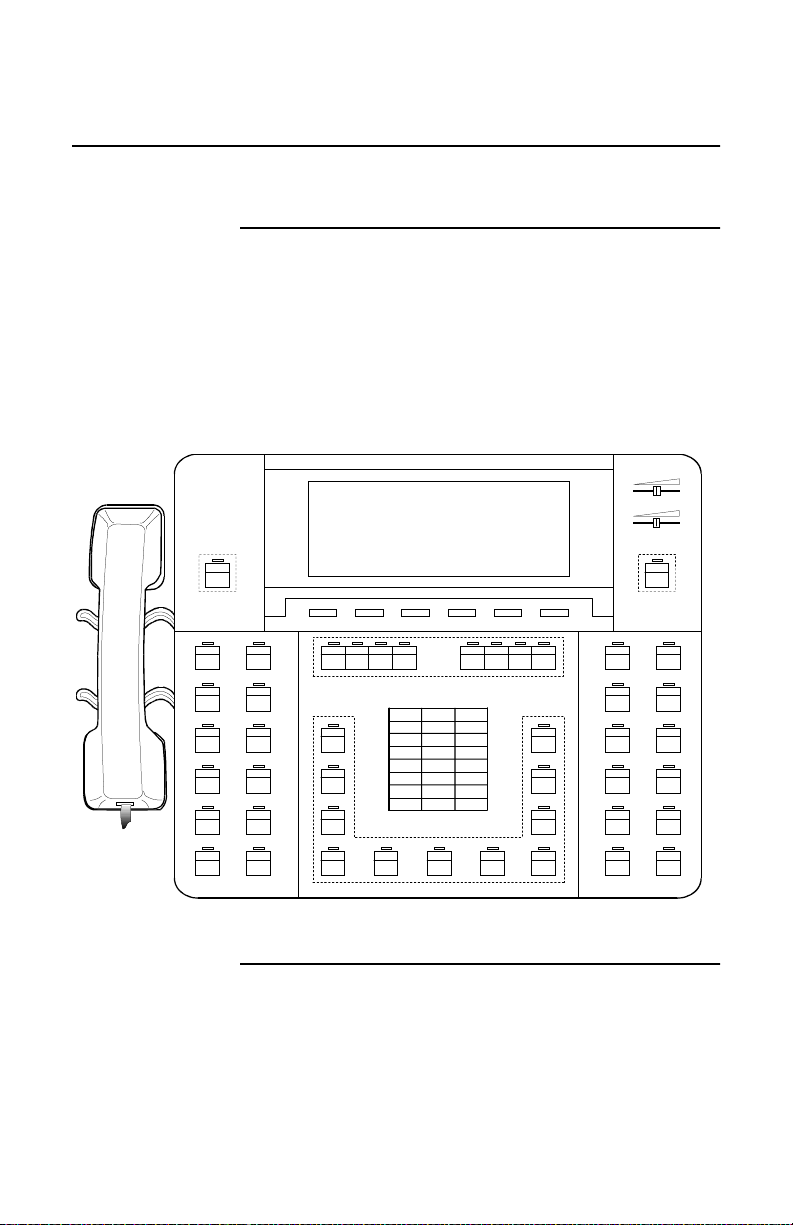
About fixed
keys
Fixed keys provide easy access to important, frequently
used functions. Their location and purpose cannot be
changed. In Figure 1-3, the fixed keys are enclosed by
dotted lines. Figure 1-3 shows how each fixed key is
labeled. Table 1-1 on page 1-14 provides a brief
explanation of the function of each fixed key. Details on
how and when to use these keys are provided later.
RECEIVER
RINGER
ALARM
HLD 2
HLD 3
MW SFPKCLME TONE
LTA
LOA BRKN
NY CAMPLA DSPL
DALLAS
ATL
SEATL
BOSTON
CAP 1 HLD 1CAP 2
SWAP
CAP 3
CAP 4
PRS
4
7
*
ABC DEF
231
JKL MNOGHI
56
TUV WXY
89
OPER
0#
HLD 4
RCL
INC ZPG/P
NIGHT
ICOMCHI CONF INF PARK
ZPG
TGNODETR START CNCL HOLD JOIN ANS CLME
ANNO
CONV
Figure 1-3: 500A fixed keys
HCXTD840, Issue 1, July 2001 1-13
Page 25

IXED KEYS S
F
ELECSET
500A U
SER GUIDE
Table 1-1 SelecSet 500A Fixed Keys
Key Name Function/operation
<ALARM> The major/minor alarm lights steadily when a system
malfunction is detected. The alarm remains lit until the
problem is corrected.
<NIGHT> Press <NIGHT> to place the system in night mode
(CAP1-CAP4) Call appearances are virtual lines that are used to receive/
place/hold calls while call control operations are performed.
CAPs can represent up to four calls, with each CAP
representing one call.
<HLD1>-<HLD4> Hold loops are used to place up to four calls on hold, with
each held call represented by a display. (Each hold loop can
be used to place a single call on hold).
<DSPL> Press <DSPL> to display functions of programmed keys
<CONF> Press <CONF> to establish a conference call. Press
<JOIN>, dial a station number or outside number and press
<CONF> to establish a three-party conference. Press
<CONF>, dial a number and press <CONF> again to
establish a multiparty conference of up to six parties.
<SWAP> Press <SWAP> to alternate between two sides of a split call.
<START> Press <START> to originate calls or perform other call
processing functions (like picking up the receiver on other
phones). Gives or cancels dial tone.
<CNCL> Press <CNCL> during call transfer if you misdial a number .
Pressing this key disconnects the last party added to a
conference.
<HOLD> Press <HOLD> to place an active call on hold.
<JOIN> Press <JOIN> to transfer a call and return to the idle state.
<ANS> Press <ANS> to answer all calls that ring at the attendant
position.
1-14 HCXTD840, Issue 1, July 2001
Page 26

C
HAPTER
1: A
BOUT YOUR SELECSET
500A
IXED KEYS
F
Table 1-1 SelecSet 500A Fixed Keys (continued)
Key Name Function/operation
<INC> Distinguishes incoming calls from outside the facility.
When an outside call comes to the console, the <INC> key
and the <ANS> key both ring. Press either key to answer.
<INF> Distinguishes calls from inside the facility. When an inside
call comes to your console, the <INF> key and the <ANS>
key both ring. Press either key to answer.
<RCL> The <RCL> key distinguishes recalls (returned calls) from
other calls. When a recall comes to your phone, both the
<RCL> key and the <ANS> key ring. Press either key to
answer.
Keys used to
answer specific
calls
These keys are used to answer specific types of calls:
• Incoming
• Information
• Recall
When calls ring at these keys, the associated lamp flashes.
HCXTD840, Issue 1, July 2001 1-15
Page 27
BOUT CALL APPEARANCE KEYS
A
(CAPS)
S
ELECSET
500A U
SER GUIDE
About Call Appearance Keys (CAPs)
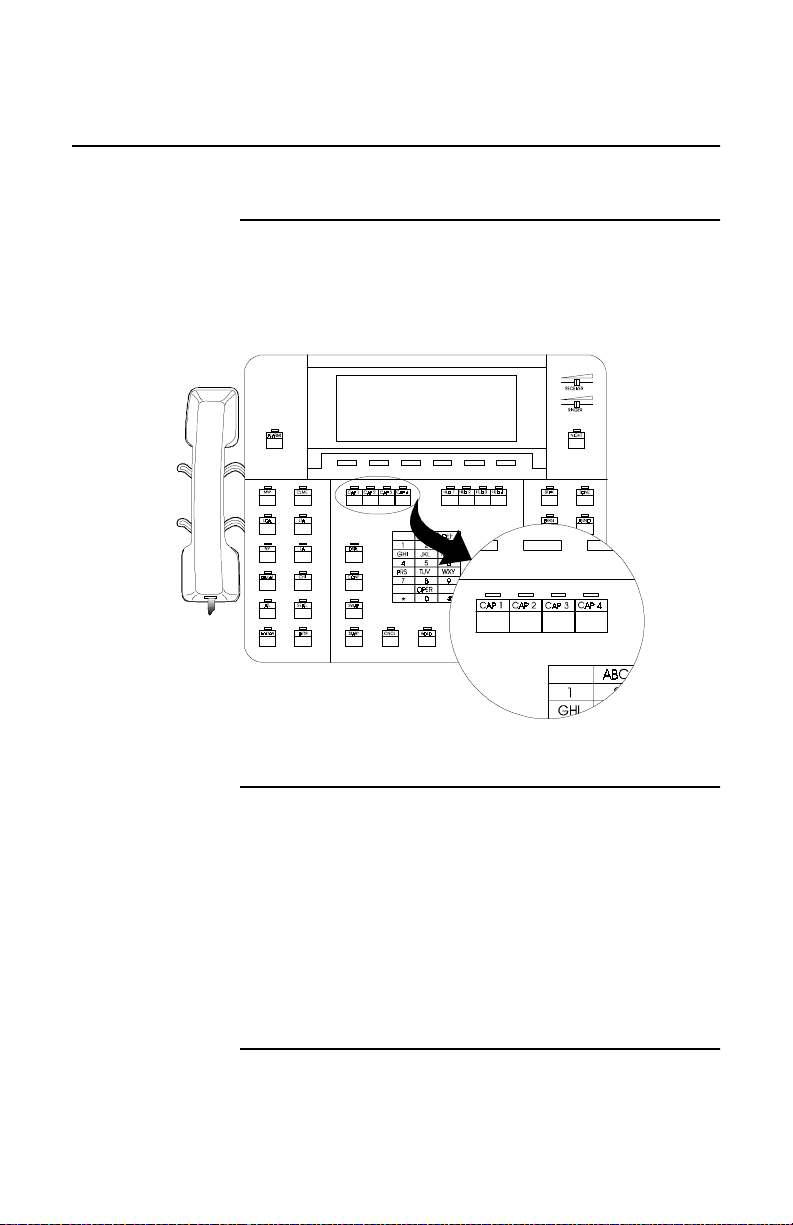
CAP keys Call appearance keys, labeled 1, 2, 3, and 4, are located
below the display and soft key menu and above and to the
left of the key pad.
Figure 1-4: Illustration of CAPs 1 through 4
Fixed keys These keys are fixed because their location and purpose do
not change. However, they have different functions than
the other fixed keys. Together these keys simulate having
four lines to your phone. While you actually have on ly one
line, you can use CAPs 1, 2, 3, and 4 for multiple calls.
When you perform call handling functions (answering,
placing a call, etc.), the lowest-numbered CAP available is
automatically selected to represent the call. To answer the
call, press the flashing CAP.
1-16 HCXTD840, Issue 1, July 2001
Page 28

C
HAPTER
1: A
BOUT YOUR SELECSET
500AABOUT CALL APPEARANCE KEYS
(CAPS)
Call
appearance
key lamps
CAP
availability
Calls that ring
at CAPs
The lamps above the CAPs show the status of each CAP:
This lamp status... Indicates that...
Dark lamp the CAP is idle
Winking CAP a call is on h old
Flashing lamp a ringing call
Steadily lit CAP an active call
At least two CAPs must be available before a call can be
answered: one to answer calls and another to place calls.
The following calls ring at a CAP (rather than at one of the
answer keys):
Call type Description
Automatic callback Rings with a fast ringing pattern
Outgoing trunk
Rings with a fast ringing pattern
queuing
Calls to your
directory number
Any call to a station number
assigned to the 500A that usually
consists of three or four digits
Priority calls to the
attendant
Ring at the highest numbered
CAP available.
HCXTD840, Issue 1, July 2001 1-17
Page 29
OFT KEYS S
S
Soft Keys
ELECSET
500A U
SER GUIDE
About soft
keys
Six blank soft keys are located just under the display. In
Figure 1-5 the soft keys are enclosed by dotted lines.
ALARM
HLD 2
HLD 3
HLD 4
RCL
INC ZPG/P
7
*
HLD 1
ABC DEF
231
JKL MNOGHI
564
TUV WXY
89
OPER
0#
MW SFPK
CLME TONE
LOA BRKNLTA
NY CAMPLA DSPL
DALLAS
ATL
SEATL
BOSTON
CAP 1
SWAP
CAP 2
CAP 3
CAP 4
PRS
Figure 1-5: 500A soft keys
RECEIVER
RINGER
NIGHT
ANNO
CONV
ICOMCHI CONF INF PARK
ZPG
TGNODETR START CNCL HOLD JOIN ANS CLME
Purpose Soft keys perform various functions, depending on how
your phone is used.
Labels Labels are affixed to the bottom of the display to identify
active soft keys. In Figure 1-6, the bottom line of the
SelecSet 500A phone shows the soft key menu.
1-18 HCXTD840, Issue 1, July 2001
Page 30
C
Soft key menu See Figure 1-6 for an example of the soft key menu.
HAPTER
1: A
BOUT YOUR SELECSET
500A
OFT KEYS
S
04:20 PM M on Jun 27 301
1
2
3
4
L1:
L3:
MSG
Components of
soft key menu
Ca lls Wait: 0
L2:
L4:
CHARGE
Figure 1-6: Soft key menu
The soft key menu consists of three basic keys:
Press this key... To do this...
MSG retrieve or delete three types of
messages including callmes
CHARGE view the duration and cost of your
last outgoing call
FEATUR display features that you can control
for stations in your facility. These
features include:
• coverage
• wakeup/reminders
• do-not-disturb
• call restrictions
• credit limit
FEATUR
HCXTD840, Issue 1, July 2001 1-19
Page 31

ROGRAMMABLE KEYS S
P
Programmable Keys
ELECSET
500A U
SER GUIDE
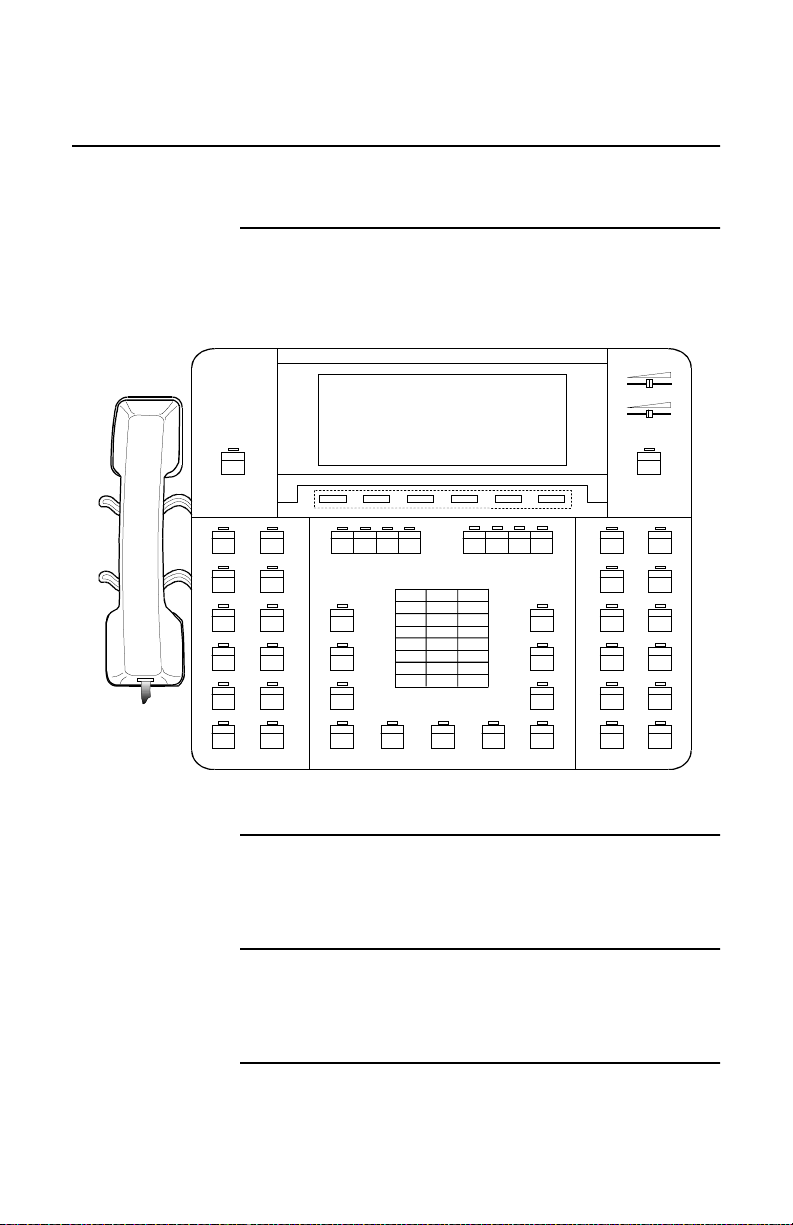
About
programmable
keys
Key
assignment
The SelecSet 500A includes 24 programmable keys,
indicated by dotted lines in Figure 1-7.
RECEIVER
RINGER
ALARM
MW SFPK
CLME TONE
LOA BRKNLTA
NY CAMPLA DSPL
DALLAS
ATL
SEATL
BOSTON
CAP 1
CAP2
CAP 3
SWAP
PRS
7
*
HLD 1
ABC DEF
231
JKL MNOGHI
564
TUV WXY
89
OPER
0#
HLD 2
HLD 3CAP 4 HLD 4
RCL
INC ZPG/P
NIGHT
ANNO
CONV
ICOMCHI CONF INF PARK
ZPG
TGNODETR START CNCL HOLD JOIN ANS CLME
Figure 1-7: 500A programmable keys
Six of these programmable keys should be used for
specific features, and are described in the section entitled
“Suggested Pro grammable Keys” on page 1-21.
You can use the remaining keys as autodial keys (for
one-touch access to access codes, account codes, and
frequently called numbers) or optional features. See
“Optional Programmable Keys” on page 1-23.
Programming instructions are at the end of this guide.
1-20 HCXTD840, Issue 1, July 2001
Page 32

C
HAPTER
1: A
BOUT YOUR SELECSET
500A
UGGESTED PROGRAMMABLE KEYS
S
Suggested Programmable Keys
About
suggested
programmable
keys
Suggested programmable keys should be assigned to
features that are important or frequently performed
attendant operations. Your system administrator assigns all
of these keys at the Customer Maintenance/Administration
Terminal (CMAT).
T a ble 1-2 Suggested programmable keys
Key Name Purpose
<CLME> Press <CLME> to send a callme message for and turn on
the message waiting lamp of a called station.
<DISC> Disconnects an active call or operation and immediately
lets you dial another number (without first pressing
<START>).
<LTA/VER> The lamp associated with the long trunk
alarm/verification key flashes when a trunk has been
connected for an unusually long time. You also can press
<LTA/VER> to check a specific trunk.
<OVR>
(override)
Press <OVR> to break into a busy station or a busy
trunk. All parties hear breakin tone and a three-way
conference is established. Also breaks into a station with
do-not-disturb activated. This button can be u sed fo r the
switchhook flash to a trunk feature to access central
office trunks and related services.
<SFPK> Use the <SFPK> soft park key to place up to ten calls on
hold, using a single key. Calls held at this key are
answered in first in/first out order (FIFO) and do not
occupy a call appearance (CAP) key.
HCXTD840, Issue 1, July 2001 1-21
Page 33

UGGESTED PROGRAMMABLE KEYS S
S
ELECSET
500A U
SER GUIDE
Table 1-2 Suggested programmable keys (continued)
Key Name Purpose
<TONE> Press the <TONE> key to cancel automatic h old, so that
you can operate equipment controlled by touch tones.
<CALM> The lamp associated with the combined alarm key lights
when a malfunction is detected in the system, the answer
detection link, the PMS/PMSHOBIC link, or the VMS
link. The CALM lamp stays lit until the problem is
corrected.
The CALM lamp indicates the status of the alarms:
This lamp status... Indicates that...
Dark no alarm conditions exist
Lit steadily one alarm has occurred
Slow wink/flash two or three alarms have occurred
Fast wink/flash all four alarms have occurred
When you press the <CALM> key, alarm(s) that are
activated are shown in the LCD:
This display... Represents this alarm...
MJ/MN major/minor system alarm
ANSDET answer detection link alarm
PMS PMS/PMSHOBIC link alarm
VMS VMS link alarm
The PMS alarm applies to WelCO MM systems only.
1-22 HCXTD840, Issue 1, July 2001
Page 34

C
HAPTER
1: A
BOUT YOUR SELECSET
500A
PTIONAL PROGRAMMABLE KEYS
O
Optional Programmable Keys
About optional
programmable
keys
Optional programmable keys ca n be used as autodial keys
(for one-key access to access codes, account codes, and
frequently called numbers), or for optional features. Wh ile
some optional programmable keys are programmed from
your attendant console, others must be programmed from
the Customer Maintenance/Administration (CMAT)
terminal by your system administrator. See Table 1-3 for a
list of possible uses for optional programmable keys .
Table 1-3 Optional programmable keys
Key Name Purpose
Autodial keys Provide one-key access to access codes, account
codes and frequently called numbers.
Call park <PARK> Parks a call.
Code <CODE> Distinguishes code calls from other calls. When a
code call comes to your console, it rings at the
<CODE> and <ANS> keys. Press either key to
answer.
Convert <CONV> Converts an incoming voice call to a data call,
allowing the attendant to transfer the data call to a
station.
Detection <DET> Lights when the answer detection unit is down. The
answer detection unit is optional external equipment.
E911 key (<E911>) The lamp on the E91 1 alarm key bl inks wh en a 9-1 -1
call is made. Pressing the key disp lays th e number of
the station user who placed the call. This information
is then deleted from the 911 call queue. The lamp on
all attendants continues to blink until all 911 calls in
the queue are deleted. This key functions with both
911 and E911 service.
HCXTD840, Issue 1, July 2001 1-23
Page 35

PTIONAL PROGRAMMABLE KEYS S
O
ELECSET
500A U
SER GUIDE
Table 1-3 Optional programmable keys (continued)
Key Name Purpose
The next three keys, Data, Auto Answer, and Data Function are required for data
communications. Data communications capabilities require the use of a data
adapter, which mounts underneath your SelecSet 500A phone.
Data <DATA> To originate, receive, and disconnect data calls
(required for data communications).
Auto answer Provides automatic answer for data calls (required
for data communications).
Data function Lets you view active data call information (required
for data communications).
Headset mode (HSET) Act i vates headset mode by pressing a programmable
option key
Hold loops
<HLD5>-<HLD8>
Place a call on hold and provide a display of the held
call. The first four hold loops are fixed keys
(HLD1-HLD4).
Intercom/priority <ICOM> Originates a priority call.
Last number redial <LNR> Redials the last number dialed.
Line lockout alarm <LOA> Lights when a station has been in use for an
unusually long time.
Manual answer <MANS> Restricts announced calls to your SelecSet. Your
phone rings and you must answer it manually.
Manual campon <CAMP> Activates camp-on to a busy station.
Message waiting <MW> Lights when you have a message waiting.
Outgoing trunk queuing
Initiates outgoing trunk queuing.
<OTQ>
PMS/PMS-HOBIC
(<PMS-A>)
(WelCOMM only)
Indicates trouble with the PMS link and/or trouble
over the PMS-HOBIC link when ACK/NAK
protocol is used. The PMS is optional external
equipment.
Priority radio paging
Initiates priority radio paging.
(<PRPG>)
Radio paging (<RPG>) Initiates radio paging.
1-24 HCXTD840, Issue 1, July 2001
Page 36

C
HAPTER
1: A
BOUT YOUR SELECSET
500A
PTIONAL PROGRAMMABLE KEYS
O
Table 1-3 Optional programmable keys (continued)
Key Name Purpose
Record (<REC>) Records a conversation (requires a recorder).
Reminder alarm (<RAL>)
or
Wakeup alarm (<WAL>)
Indicates when a station has not answered a
wakeup/reminder call. (When a wakeup/reminder
call is not answered, the system automatically retries
the call five minutes later. If the second attempt is
unsuccessful, the system waits another five minutes
and retries the call again. The <RAL> or <WAL>
key lights only after the third unsuccessful attempt).
The reminder and wakeup alarms are actually the same key. However, the term
reminder applies in COMMerce (business) environments and wakeup applies to
WelCOMM (hotel/motel) systems.
Room-to-room blocking
<RRB>
Saved number redial
Blocks calls between guest rooms. (WelCOMM
systems only)
Saves a specific number to be redialed later.
(<SNR>)
Trunk group answe r
(<TGN0>-<TGN9>)
Allows you to answer calls over a specific trunk
group. When a call over a specific trunk group comes
to your phone, both the <ANS> key and the
appropriate <TGN> key ring. You can answer using
either key.
VIP wakeup (<VIP>) The <VIP> key flashes, alerting you to place a VIP
wake-up for a special guest in the hotel. Press the
<DISPLAY> key plus the <VIP> key to display the
name of the first guest in the VIP wakeup queue and
also how many wakeups are in the queue. Press the
<VIP> key to call the VIP guest’s room and leave a
personalized wakeup message.
VMS alarm (<VMS-A>) Lights if the voice message system goes out. The
VMS is optional external equipment.
Voice announce
Initiates a voice-announced call.
(<ANNO>)
Zone paging (<ZPG>) Accesses zone paging equipment.
Zone paging with park
Accesses zone paging equipment to park a call.
(<ZPG/P>)
HCXTD840, Issue 1, July 2001 1-25
Page 37

AMPS S
KEY L
ELECSET
500A U
SER GUIDE
Key Lamps
About lamps Each fixed or programmable key has an associated lamp
located just above it. These include the following:
Lamp Function
Feature key lamps
(CONF, JOIN)
Light when the key is activated. Answer key lamps
(answer, incoming, information, recall, or trunk
group answer) flash when a call terminates at the
key.
CAP lamps Indicate the status of their associated CAPs. For
example:
This lamp status Indicates
Dark the CAP is idle
Winking a call is on hold
Flashing a ringing call
Steadily lit an active call
1-26 HCXTD840, Issue 1, July 2001
Page 38

C
HAPTER
1: A
BOUT YOUR SELECSET
Basic Operations
500A
ASIC OPERATIONS
B
About this
section
This section provides instructions for the most frequently
performed attendant operations. Other operations are
described in “Additional Operations” on page 2-1.
Calling ................................................................page 1-28
Answering...........................................................page 1-31
Holding...............................................................page 1-38
Transferring........................................................page 1-42
Conferencing......................................................page 1-46
Messaging........................................................... page 1-52
Breaking into a busy station...............................page 1-60
HCXTD840, Issue 1, July 2001 1-27
Page 39

ALLING S
C
ELECSET
500A U
SER GUIDE
Calling
Procedure To call another party from your SelecSet 500A console:
1
Press <ST ART>.
2
Dial the station number or outside number. If you dial
an outside number, remember to dial the trunk access
code first (usually 9).
Y o u hear ringing and are connected as the called party
answers.When you call an outside number, the
duration of the call is displayed.
3
To disconnect the call, press <START>.
1-28 HCXTD840, Issue 1, July 2001
Page 40

C
HAPTER
1: A
BOUT YOUR SELECSET
500A
LACING AN OUTSIDE CALL
P
Placing An Outside Call
Procedure To place an outside call for another station to which you
are connected:
1
Dial the trunk access code (normally 9), and then dial
the number .
2
When the dialed number begins to ring, press
<JOIN>.
HCXTD840, Issue 1, July 2001 1-29
Page 41

LACING AN OUTSIDE CALL FOR AN IDLE STATION S
P
ELECSET
500A U
SER GUIDE
Placing an Outside Call for an Idle Station
Procedure To place an outside call for an idle station:
1
Press <ST ART>.
2
Dial the trunk access code (e.g. 9) then the number.
3
Press <CONF>.
4
Dial the station number.
5
When the station user answers, inform him or her that
the outside call is ringing.
6
Press <JOIN>.
1-30 HCXTD840, Issue 1, July 2001
Page 42

C
HAPTER
1: A
BOUT YOUR SELECSET
Answering
500A
NSWERING
A
About this
section
Answering
your calls
The following topics are presented in this section:
• Answering your calls
• Answering returned calls (recalls)
• Answering coverage calls
• Answering multiple calls
All calls to your phone ring at the answer (ANS) key.
However, your SelecSet also has special keys assigned to
distinguish certain types of calls. These include:
This key Rings when
Incoming (INC) Calls come to your phone from
outside the facility
Information (INF) Calls from inside the facility come
to your phone
Recall (RCL) A call from outside the facility is
extended to stations that do not
answer. The unanswered call
returns to your SelecSet after a
predetermined amount of time. (If
the called station has coverage
registered for outside calls, the
call goes to the coverage point
instead of to your SelecSet. See
“Answering Coverage Calls”
on page 1-35.
The next sections describe how to use these keys.
HCXTD840, Issue 1, July 2001 1-31
Page 43

NSWERING S
A
Procedure To answer a call:
1
When a call rings at a key, the lamp above the key
flashes.
2
T o a nswer the call, press either the <ANS> key o r the
appropriate special answer key.
ELECSET
500A U
SER GUIDE
About
answering and
CAPs
About type of
station values
Calls to your station number ring at a CAP, rather than an
answer key. To answer one of these calls, press the
flashing CAP.
At least two CAPs must be available before a call can be
answered. This ensures that one CAP can be used to
answer a call, while another can be used to place a call.
Every station within your facility is assigned a type of
station (TOS) value. The T OS value determines the type of
calling privileges a station user has. For example, some
stations are permitted to make local and long-distance
calls, while others may be restricted to local calls only.
When a station calls and asks you to dial an outside
number, check the TOS value to make sure the connection
is permitted. Ask your system administrator for a list of
the connections allowed for each TOS.
For instructions on how to hold a call, see “Holding”
on page 1-38. For instructions on how to transfer a call,
see “Transferring” onpage 1-42.
1-32 HCXTD840, Issue 1, July 2001
Page 44

C
HAPTER
1: A
BOUT YOUR SELECSET
500AANSWERING RETURNED CALLS
(R
ECALLS
Answering Returned Calls (Recalls)
About recalls If yo u o r an ot her at tendant extends, camps on, or tr ans fers
a call from outside the facility to a station that does not
answer, the unanswered call returns to your SelecSet (or
another attendant) after a predetermined amount of time.
This type of returned call is referred to as a recall.
Procedure To answer a recall:
1
Press the <ANS> key or the <RCL> key.
2
If the called station has coverage registered for
outside calls, the call goes to the coverage point rather
than to your SelecSet.
3
You are connected to the calling party
)
The station status (available in this case) displays.
Ringing indicates that the station is ringing. The
station continues to ring while you receive further
instructions from the caller. If the station answers, the
display changes from Ringing to Hold and you can
transfer the recall back to the station.
HCXTD840, Issue 1, July 2001 1-33
Page 45

NSWERING RETURNED CALLS
A
(R
ECALLS
)
S
ELECSET
500A U
SER GUIDE
Additional
recall
operations
While connected to the recall, you can perform any of the
following operations:
To turn the message light on at the called station...
1
Press <CLME>
2
The message waiting lamp is turned on.
To transfer the caller back to the called station...
1
Press <JOIN>.
2
The call is transferred back to the called station.
To transfer the caller to another station...
1
Press <CNCL> to disconnect the called station.
2
Dial a new station number (to which the call is to be
transferred).
3
Press <JOIN>.
To disconnect the called station...
1
Press <CNCL>.
2
The station is disconnected.
1-34 HCXTD840, Issue 1, July 2001
Page 46

C
HAPTER
1: A
BOUT YOUR SELECSET
500A
Answering Coverage Calls
NSWERING COVERAGE CALLS
A
About
coverage calls
Telephone users within the facility can cover (forward)
their calls to the attendant. These calls are known as
coverage calls. Coverage calls ring at different keys
depending on where they originate:
When the coverage
call originates...
It rings at these keys
Outside the facility <INC> and <ANS> keys
Inside the facility <INF> and <ANS> keys
Procedure To answer a coverage call and send it to the covered
station:
1
Press the appropriate key to answer the coverage call.
2
Press <ICOM>.
The caller is placed in consultation hold and the
covered station is dialed automatically. (Consultation
hold temporarily removes a p arty from t he connection
so transfer or conference operations can be
performed.) When sending a coverag e call back to the
covered station, you may want to remain in the
connection to see if the station answers.
3
If the station answers, press <JOIN> to connect the
two parties.
4
If the station does not answer, press <CNCL> to
reconnect to the caller.
HCXTD840, Issue 1, July 2001 1-35
Page 47

NSWERING COVERAGE CALLS S
A
ELECSET
500A U
SER GUIDE
Feature access
codes
Stations can cover calls to you by dialing the appropriate
feature access code plus 0.
1-36 HCXTD840, Issue 1, July 2001
Page 48

C
HAPTER
1: A
BOUT YOUR SELECSET
500A
Answering Multiple Calls
NSWERING MULTIPLE CALLS
A
Handling
multiple calls
CAP
availability
Attendant operators o fte n h andle multiple calls. To handle
multiple calls using a hold loop:
1
Press a hold loop (HLD1–HLD4) to place the active
call on hold. The hold loop winks.
2
Press <ANS> (or the appropriate special answer key).
The display shows the active call, as well as the call
on the hold loop.
3
Once the second call is disconnected, press the
winking hold loop to retrieve the held call.
At least two CAPs must be available before you can
answer a call. This ensures that one CAP can be used to
answer a call, while another can be used to place a call.
See “Holding” on page 1-38 fo r more details on hold i ng
calls.
HCXTD840, Issue 1, July 2001 1-37
Page 49

OLDING S
H
ELECSET
500A U
Holding
About holding Depending on how your SelecSet 500A phone is
programmed, you can hold calls three different ways. In
most cases, it is preferable to use the soft park key or a
hold loop to hold calls because the <HOLD> key uses a
CAP. A description of each of the different methods
follows:
Method Description
Soft park key Use it to place up to 10 calls on hold.
The held calls do not occupy a CAP.
Calls are automatically retrieved in
first-in/first-out order. Therefore the
first call placed in soft park hold is
the first call retrieved. Although soft
park is often used to hold single
calls, hold loops are preferred
because they do not tie up CAPs.
Your system administrator must
program this key.
Hold loop (1-8) Use to hold a single call. The held
call does not occupy a CAP. A single
key represents a single call when
using a hold loop. Your system
administrator must assign hold loops
5-8.
<HOLD> key Use it to place a single call on hold.
Not recommended because the held
call occupies a CAP. However, you
must use the <HOLD> key to ho ld a
conference.
SER GUIDE
1-38 HCXTD840, Issue 1, July 2001
Page 50

C
HAPTER
1: A
BOUT YOUR SELECSET
500A
Holding a Single Call
OLDING A SINGLE CALL
H
Using a hold
To hold a single call using a hold loop:
loop...
1
Press a hold loop (HLD1-HLD4) to place an active
call on hold.
The hold loop winks, and the associated hold loop
displays the held call.
11:00 am Wed Mar 10 686 Cal l s Wai t :1
1
2
3
4
L1201 Stat ion L2
L3 L4
MS G CHARGE F EA T UR
2
Press the winking hold loop to retrieve the call.
Fixed and
additional hold
loops
Each SelecSet 500A terminal is equipped with four fixed
hold loops (HLD1-HLD4). However, you can assign up to
four additional hold loops (HLD5-HLD8) to your
programmable keys. The first four hold loops are used in
the examples in this guide because they have
corresponding displays. Additional hold loops function in
the same way, but do not have displays.
HCXTD840, Issue 1, July 2001 1-39
Page 51

OLDING A SINGLE CALL S
H
ELECSET
500A U
SER GUIDE
One active call
and two calls
This display indicates one active call and two calls being
held using hold loop keys:
held
11:00 am Wed Mar 10 686 Cal l s Wai t :0
1*Connect 91168820
2
3
4
L1201 Stat ion L2133 Stat i on
L3 L4
MS G CHARGE F EA T UR
Using the hold
Use the hold key to hold a call as follows:
key
1
Press the <HOLD> key while on an active call.
A CAP winks representing the held call.
2
Press the winking CAP to retrieve the call.
Using the <HOLD> key ties up a CAP (at least two
CAPs must be available before a call can be
answered. This ensures that one CAP can be used to
answer a call, while another can be used to place a
call.) Therefore, if your console is programmed with
hold loops, use a hold loop rather than the hold key to
hold a single call. The hold loops are preferred
because they do not tie up CAPs.
Placing a
conference call
on hold
1-40 HCXTD840, Issue 1, July 2001
To place a conference call on hold, you must use the
<HOLD> key. Neither hold loops nor soft park can be
used to hold conference calls.
Page 52

C
HAPTER
1: A
BOUT YOUR SELECSET
500AHOLDING MULTIPLE CALLS
Holding Multiple Calls (Soft Park)
OFT PARK
(S
)
About holding
several calls
Placing calls
on hold using
soft park
Displaying
calls in soft
park
You can hold u p t o 10 calls on one key using soft park.
Because the soft park feature provides an easy way to hold
and retrieve a large number of calls, it is ideal for use
during busy hours.
To place a call on hold using soft park:
1
Press <SFPK> to place the call in soft park hold.
CAP1 goes dark and the <SFPK> key begins to wink.
2
Park up to 10 calls on the <SFPK> key.
To display calls in soft park:
1
Press <DSPL>.
2
Press <SFPK>.
3
Press <DSPL> plus any soft key to return to the
normal display.
Retrieving
calls in soft
park
Soft-parked calls are retrieved in first in/first out order, so
you do not have to remember which call you placed on
hold first. The first call in is always the first call out.
• Press the winking <SFPK> key. This retrieves the first
call placed in soft park. The <SFPK> winks until all
calls are retrieved.
When there are multiple attendants, only the attendant
who parks a call can retrieve it.
HCXTD840, Issue 1, July 2001 1-41
Page 53

RANSFERRING S
T
Transferring
ELECSET
500A U
SER GUIDE
About call
transfer
Use the following call transfer operation to transfer
(extend) a caller to another number. You can use this
procedure even if both the caller and the desired number
are outside the facility.
Procedure To transfer a call:
1
After making or answering a call, dial the number to
which you are transferring a call. Remember to dial
the trunk access code (e.g 9) if dialing an outside
number.
The caller is automatically placed in consultation hold
(the party is temporaril y removed from the conn ection
so transfer or conference operations can be
performed.) An idle CAP is automatically selected.
2
To cancel the transfer and return to the caller, press
<CNCL>.
3
To transfer before the called party answers, press
<JOIN>.
4
To announce the call, wait until the user answers and
make your announcement, and then complete the
transfer by pressing <JOIN>.
5
To swap between the two sides of the call, when the
called party answers, press <SWAP>. The active call
and call on consultation hold are switched. To return
to the originally active call, press <SWAP> again.
You can alternate between the two calls as often as
1-42 HCXTD840, Issue 1, July 2001
Page 54

C
HAPTER
1: A
BOUT YOUR SELECSET
500A
RANSFERRING
T
you like. To disconnect the person to whom you are
speaking and reconnect the person on consultation
hold, press <CNCL>. To exit and connect the two
calls, press <JOIN>.
HCXTD840, Issue 1, July 2001 1-43
Page 55

WITCHHOOK-FLASH TO TRANSFER CALLS S
S
ELECSET
500A U
Switchhook-Flash To Transfer Calls
SER GUIDE
Using central
office features
The switchhook flash (SHF)-to-a-trunk feature lets you
use central office business/telephone features to
supplement the features provided by your HCX5000
system.
The most typical us e o f switchhhook-flash-to-a-trunk is to
transfer calls. Transferring calls in this way prevents you
from tying up two HCX5000 trunks.
Conditions To transfer a call using switchhook flash to a trunk, the
following conditions must be satisfied:
• You must be talking on an incoming call from a central
office phone
• The trunk over which this call is received must be set up
to use the SHF-to-a-trunk feature.
Ask your system administ rator if your system is set up for
this feature.)
Example You receive a call over a trunk that is set up for the
SHF-to-a-trunk feature. The call is from Mr. Smith, whose
phone is a central office station and who wants to make a
reservation. You must transfer the call to the centralized
reservation service for your hotel.
1-44 HCXTD840, Issue 1, July 2001
Page 56

C
HAPTER
1: A
BOUT YOUR SELECSET
500ASWITCHHOOK-FLASH TO TRANSFER CALLS
Procedure To transfer a call using the switchhook-flash-to-trunk
feature for this type of application:
1
While connected to a caller on a trunk set up for
switchhook flash to a trunk, press <OVR> (the
override key). When you press this key, the HCX5000
system sends a switchhook flash signal to the central
office and the central office places the caller on hold.
Pressing <OVR> automatically activates the
<TONE> key to provide DTMF tones. These tones
enable you to dial the number to which you want to
transfer the caller.
2
Dial the number for centralized reservations.
3
Press <START> to complete the transfer. This
automatically deactivates the <TONE> key.
Therefore, your next caller does n ot hear DTMF tones
when you dial the number to transfer his/her call.
Deactivating
the TONE key
You can deactivate the <TONE> key by pressing any of
the following keys:
• <HOLD>
• <HLD1>-<HLD8>
• <CONF>
• <JOIN>
Pressing <OVR> repeatedly toggles the <TONE> key
between on and off status.
HCXTD840, Issue 1, July 2001 1-45
Page 57

ONFERENCING S
C
Conferencing
ELECSET
500A U
SER GUIDE
Types of
conferences
Creating a
standard
three-party
conference
Procedure,
continued
You can set up two types of conferences using your
SelecSet 500A attendant console. These include:
• Three-party conferences
- setting up a three-party conference the standard way
- setting up a three-party conference using bridged
CAPs
• Multiparty conferences of up to six parties.
You can set up a three-party conference, consisting of as
many as two outside parties. To create a three-party
conference:
1
While connected to one party, dial the station number
of a second party.
The first party is placed in consultation hold and an
idle CAP is automatically selected for you.
2
To cancel the call and return to the caller, press
<CNCL>.
3
To announce the conference, wait until the called
party answers and make your announcement.
4
T o conn ect all parties immediately, press <CONF> as
soon as the called party picks up. (Wait for the party
to pick up before pressing <CONF>. Pressing
<CONF> before the called party picks up i s ig nor ed.)
When the conference is formed, your display
indicates how many parties are in the conference.
5
T o disconnect the last person added to the conference,
press <CNCL>.
1-46 HCXTD840, Issue 1, July 2001
Page 58

C
HAPTER
1: A
BOUT YOUR SELECSET
500A
6
To exit the conference without disconnecting the
ONFERENCING
C
other two parties, press <JOIN>. The conference is
still connected but out of your control. Press
<START> to hang up.
7
T o place the conference on hold, press <HOLD>.
You can only hold a conference by pressing the
<HOLD> key. You cannot u se soft park or hold loop
keys to hold a conference. You can only place a
conference on hold if your system is set up for
multiparty conferences.
8
T o retrieve the held conferenc e, press <START>, then
press the winking CAP representing the held
conference.
HCXTD840, Issue 1, July 2001 1-47
Page 59

RIDGED
B
CAPS TO C
REATE A CONFERENCE S
ELECSET
500A U
Bridged CAPs to Create a Conference
SER GUIDE
About bridged
CAPs
You can create a three-party conference with two
incoming calls using the CAPs on your SelecSet 500A.
This feature, known as bridged CAPs, is helpful if you
need to page guests or employees for waiting calls in a
casino environment.
Procedure To create a three-party conference using bridged CAPs:
1
You are talking on a call on CAP1.
2
When a second call comes in, place the first caller on
hold by pressing either a hold loop or the <HOLD>
key . Answer the second call on CAP 2 by pressing the
<ANS> key.
3
Press the <CONF> key to place the second caller on
consultation hold (or <JOIN> to connect the two
callers).
4
To conference CAP 1 with CAP 2, press the CAP 1
key. This keeps the caller on CAP 2 on consultation
hold and lets you talk with the caller on CAP 1.
Notify the caller on CAP 1 that he or she is about to
be conferenced, and with whom.
1-48 HCXTD840, Issue 1, July 2001
Page 60

C
HAPTER
1: A
BOUT YOUR SELECSET
500A
5
Press the <CONF> key again to join the two CAPs or:
RIDGED
B
CAPS TO C
To transfer the call to the caller on CAP1 press
<JOIN>. Y ou are out of the conference once you press
the <JOIN> key.
If your system administrator has set up your phone
system with the multiparty conference capability, you
can place a conference on hold after connecting the
two parties on CAP 1 and CAP 2. You can then take
another call by pressing the <HOLD> key.
Both the CAP key with the conference and the
<CONF> key flash slowly. At least one of these
conferenced members should be an internal party to
prevent trunk-to-trunk lockup.
Otherwise, remove yourself from the conference if an
incoming internal caller is connected with an outside
caller.
Note: If three CAPs are busy, you cannot use CAP 4
to initiate a conference or to join or bridge two parties.
REATE A
6
To disconnect the last party from the conference (the
caller on CAP1), press the <DISC> key.
HCXTD840, Issue 1, July 2001 1-49
Page 61

REATING A MULTI-PARTY CONFERENCE S
C
ELECSET
Creating a Multi-party Conference
Procedure To set up a multiparty conference:
1
While connected to one party, press <CONF>. Dial a
second party.
2
After the called party answers, press <CONF> to
create a three-party conference.
3
To add an additional party, press <CONF> and dial
the desired number. The two other parties are
automatically placed on consultation hold
(temporarily removes a party from a connection so
transfer or conference operations can be performed).
4
If you misdial, press <CNCL>. This returns you to the
three-party conference. You can then redial the new
party.
500A U
SER GUIDE
To announce the conference to the new party, make
your announcement and then press <CONF> to
connect all parties. Or, you can connect all parties
immediately by pressing <CONF> as soon as the
called party picks up. When the con ference is fo rmed,
the display is updated with the new number of
conferees.
5
Repeat these steps to add additional conferees. You
can have a total of six people in a conference.
6
Press <HOLD> to place the conference on hold.
You can only hold a conference by pressing the
<HOLD> key. You cannot hold a conference using
soft park and hold loops.
7
T o retrieve the held conferenc e, press <START>, then
the winking CAP representing the held conference.
1-50 HCXTD840, Issue 1, July 2001
Page 62

C
HAPTER
1: A
BOUT YOUR SELECSET
500ACREATING A MULTI-PARTY CONFERENCE
8
T o disconnect the last person added to the conference,
press <CNCL>.
Only the final person added to the conference can be
dropped by pressing <CNCL>. Afterwards, other
parties must disconnect by hanging up.
9
To exit without disconnecting the other parties, press
<JOIN>. The conference is still active, but is now
controlled by the remaining parties.
Dropping out
of a multiparty
conference
If you drop out of a multiparty conference, the remaining
parties located at your facility cannot transfer or add other
members to the conference. (Droppin g out of a three-party
conference does not affect the remaining parties this way.)
HCXTD840, Issue 1, July 2001 1-51
Page 63

ESSAGING S
M
Messaging
ELECSET
500A U
SER GUIDE
About
messaging
Turning on
MW lamps
without calling
the station
You can use two keys to control messaging as follows:
Use this key... To do this...
<CLME> control the message waiting lamps
on phones in your facility
<MSG> retrieve multiple message types
To turn on a message waiting lamp without calling the
station, follow these steps:
1
Press <START>. An idle CAP is selected.
2
Press the <CLME> key.
3
Dial the desired station number.
The display confirms that the lamp is o n and y ou hear
confirmation tone (three short beeps).
1-52 HCXTD840, Issue 1, July 2001
Page 64

C
HAPTER
1: A
BOUT YOUR SELECSET
500A
ESSAGING
M
Turning on the
MW lamp
while calling a
station
Turning on the
MW lamp
while talking
to a covering
station
You can turn on the message light on someone’s phone by
pressing <CLME> when the phone is ringing or busy.
1
Press <ST ART>.
2
Dial the desired station number.
3
Press <CLME> when the phone is ringing or busy.
The display confirms that the lamp was turned on and
you hear confirmation tone (three short beeps).
If you call a station with coverage activated, you can still
activate message waiting even if your call is answered by
the covering station.
HCXTD840, Issue 1, July 2001 1-53
Page 65

ESSAGING S
M
ELECSET
500A U
SER GUIDE
Procedure To turn on the message waiting lamp while talking to a
covering station:
1
While talking to the covering station, press the
<CLME> key.
2
Your <CLME> lamp lights and the called station’s
message waiting lamp is lit, not the lamp of the
covering station to which you are cu rrently connected.
Because you are not connected to the station whose
message waiting lamp you have activated, you do not
receive either confirmation tone or a confirmation
display. A confirmation tone or display might lead
you to believe you activated the message waiting light
of the station to whom you are talking.
Turning a
Follow these steps to turn a message waiting lamp off:
message
1
waiting lamp
off
When a user calls you because his message lamp is
flashing, your <CLME> lamp lights.
2
Press your <CLME> key to extinguish the caller’s
message waiting lamp.
3
To extinguish a message waiting lamp when you are
not connected to the station, dial the callme
cancellation code (usually ##0), then the station
number.
1-54 HCXTD840, Issue 1, July 2001
Page 66

C
HAPTER
1: A
BOUT YOUR SELECSET
500A
ESSAGING
M
The <CLME>
key and MW
status
When there
are multiple
attendants
Turning off
MW lampslimitations
Automatic
deletion of
callme message
The <CLME> key indicates message lamp status only
when someone calls you. If you call a station, the
<CLME> key does not indicate the status of the message
waiting lamp.
In facilities with multiple attendant consoles, the
<CLME> key on all attendants indicates the message lamp
status of calling stations.
Pressing a lit <CLME> key or dialing the callme
cancellation code only turns off message waiting lamps
turned on by the <CLME> key on an attendant console.
Message waiting lamps can also be turned on through the
CommCenter or VMS (voice message system). When a
callme message is returned, it rings at both the <INF> and
<ANS> keys. Press either key to answer the call.
When a station returns a callme message, the message is
automatically deleted. SelecSet users can use the
<DELETE> soft key to delete callme messages without
returning them.
Return feature
access code for
non-SelecSets
A station's message waiting lamp may have been activated
by someone other than the attendant text message center or
voice message system, for example. Therefore, users who
do not have SelecSets (with a <RETURN> soft key)
should use the return feature access code (usually #0) to
respond to their message lamps.
HCXTD840, Issue 1, July 2001 1-55
Page 67

ESSAGING S
M
ELECSET
500A U
SER GUIDE
Retrieving
messages
You can retrieve three message types from your SelecSet
500A console using the <MSG> soft key:
• Callme messages, which are sent by internal users
(within your company)
• Voice messages (from internal and external callers)
• Text messages
Procedure To retrieve these types of messages:
1
If your message lamp is flashing, press the <MSG>
soft key to retrieve your message(s).
2
For a callme message, press <NEXT> to view other
messages, <RETURN> to dial the originator of the
message (470 in the example) and <DELETE> to
discard the message or <EXIT> to leave the
messaging displays.
If you receive a call while using the soft keys, press
<EXIT> before answering the call.
3
For a VMS message, press <NEXT> to view other
messages, <RETURN> to dial the VMS (350),
<DELETE> to discard the message, or <EXIT> to
leave the messaging displays.
1-56 HCXTD840, Issue 1, July 2001
Page 68

C
HAPTER
1: A
BOUT YOUR SELECSET
500A
M
When you have a voice message system (VMS)
message, you see this display (the mess age is from the
VMS extension, in this case, extension 350):
11:00 am Wed Mar 10 686 Cal l s Wai t :0
1
2
3
4
L1 L2
01 Apr14 10:16am 350
NEX T RET URN DEL E TE EX I T
• 01 indicates that this is the first message in the queue.
4
When you are connected to the voice message system,
you are directed to press certain keys on your keypad
to retrieve your voice message(s). Befor e pressing any
keys, press the <TONE> key, which sends pushbutton
signals to the VMS. When you finish sending
pushbutton signals, press the <T ON E> key again. F or
a full description of the <TONE> key, see “Sending
Pushbutton Tones” on page 2-87.
ESSAGING
5
When you receive a text message, you see the
following initial text message display, which in this
case, shows a callme message from the text message
center operator. To retrieve the text message, press
<MAIL>. The display indicates a message from Jane
Hitel, the text message center operator.
HCXTD840, Issue 1, July 2001 1-57
Page 69

ESSAGING S
M
ELECSET
500A U
SER GUIDE
Procedure,
continued
11:00 am Wed Mar 10 686 Cal l s Wai t :0
1
2
3
4
L1 L2
01 Apr14 10:16am 400 HITEL JANE
MA I L NEX T RET URN EX I T
• 400 is the text message center number
• Jane Hitel is the operator
• 01 indicates that this is the first message in the queue.
6
Y o u can press <RETURN > to speak to Jane to r eceive
your message verbally or request a printout of your
message from her, or you can press <MAIL> to view
the text message yourself. After you press <MAIL>,
the system may require a password and possibly a
mailbox number. Your system administrator can help
you in either case.
7
Press <SCROLL> to continue (showing more
information about the sender and/or the message
itself), <NEXT> to view other messages, <DELETE>
to discard the current message, or <EXIT> to exit
from the messaging displays.
1-58 HCXTD840, Issue 1, July 2001
Page 70

C
HAPTER
1: A
BOUT YOUR SELECSET
500A
ESSAGING
M
Procedure,
continued
If you view the text mess age but do not want to dele te
it, call the text message center operator and ask
him/her to save the message. Otherwise, after you
press <MAIL>, your display updates as follows:
11:00 am Wed Mar 10 686 Cal l s Wai t :0
1
2
3
4
L1 L2
01 Apr14 10:16am SIKES TOM
SCROL L NEX T DEL E TE EXI T
• Tom Sikes sent the message.
HCXTD840, Issue 1, July 2001 1-59
Page 71

REAKING INTO A BUSY STATION S
B
Breaking Into a Busy Station
ELECSET
500A U
SER GUIDE
About the
override
You can use the override (OVR) feature to break into a
busy station.
feature
Procedure To break into a busy station:
1
While listening to busy tone, press <OVR>. You see
this display:
11:00 am Wed Mar 10 686 Cal l s Wai t :0
1 * Bu s y 200 SI KES T OM Av a i l a b l e
2
3
4
L1 L2
L3 L4
MS G CHARGE F EA T UR
2
All parties hear breakin tone, and a three-party
conference is formed.
1-60 HCXTD840, Issue 1, July 2001
Page 72

C
HAPTER
2: A
DDITIONAL OPERATIONS
2A
DDITIONAL OPERATIONS
About this
section
Soft key
features and
functions
This section describes additional attendant operations.
Some of these operations are performed using the soft key
menu, while others require optional programmable keys
(see “Optional Programmable Keys” on page 1-23. and
“Programming Your SelecSet 500A” on page 2-92, and/or
additional equipment.
Instructions are provided for the following operations:
Call Restrictions .................................................. page 2-4
Coverage..............................................................page 2-8
Credit Limit....................................................... page 2-13
Do-Not-Disturb .................................................page 2-19
Setting the System Clock ..................................page 2-28
Wakeup/Reminder Calls....................................page 2-32
Programming Your SelecSet 500A ...................page 2-92
Other feature
operations
Assigning an Account Code.............................. page 2-47
Alarm Indications..............................................page 2-50
Announced Calls............................................... page 2-58
Answering Another Phone ................................page 2-59
Answering a Specific Line................................page 2-60
Attendant Continuous Ringing..........................page 2-61
Blocking and Sending Caller ID .......................page 2-62
Blocking Calls Between Guest Rooms ............. page 2-66
Calling Out on a Specific Trunk........................page 2-67
Camping-on to a Busy Station...........................page 2-68
Checking a Trunk..............................................page 2-70
HCXTD840, Issue 1, July 2001 2-1
Page 73

S
ELECSET
500A U
SER GUIDE
Other feature
operations,
continued
Code Calls .........................................................page 2-72
Dialing Frequently Called Number s..................page 2-74
Extending an Incoming Data Call to a Station.. page 2-76
Night Service.....................................................page 2-78
Paging................................................................page 2-79
Paging................................................................page 2-79
Recording a Conversation.................................page 2-83
Redialing Numbers............................................ page 2-85
Sending Pushbutton Tones................................page 2-87
Training Attendant Operators............................page 2-89
Trunk Answer From Any Station (TAFAS)...... page 2-90
...........................................................................................
2-2 HCXTD840, Issue 1, July 2001
Page 74

C
HAPTER
2: A
DDITIONAL OPERATIONS
Soft Key-Controlled Features
Soft key
features
Using your SelecSet 500 A, you can p erfor m the follo wing
functions and activate the following features for stations
(phones) within your facility via soft keys that interact
with the LCD.
• Call restrictions
• Changing your status
• Coverage
• Credit limit
• Do-not-disturb
• Setting the system clock
• Wakeup (reminder) calls
• Viewing the cost of calls
HCXTD840, Issue 1, July 2001 2-3
Page 75

Call Restrictions
S
ELECSET
500A U
SER GUIDE
Controlling
station calling
privileges
As the attendant, you can control station calling privileges
using three levels of restrictions. These restrictions are set
and canceled at your SelecSet 500A console through the
<FEATUR> soft key menu. Table 2-1 defines each
restriction level.
The station restrictions invoked by this feature pertain
only to calls originated by a station. These restrictions do
not affect the station’s ability to receive calls.
Table 2-1 Call restriction levels
Restriction
(displayed)
Definition
TOLL All direct-dial long-distance calls are
restricted. The station can make:
• Local calls
• Operator-assisted long-distance
calls
• Calls to other stations
• Calls to the attendant
TOL/OP All long-distance calls are restricted.
The station can make:
• Local calls
• Calls to other stations
• Calls to the attendant
ALL All outside calls are restricted. The
station can make calls to other stations
and the attendant.
Note: You can control call restrictions while your
console is idle or while you are talking.
2-4 HCXTD840, Issue 1, July 2001
Page 76

C
HAPTER
2: A
DDITIONAL OPERATIONS
EGISTERING CALL RESTRICTIONS
R
Registering Call Restric tions
Procedure To register call restrictions:
1
Press the <FEATUR> soft key. You see this display:
11:00 am Wed Mar 10 686 Cal l s Wai t :0
1
2
3
4
L1 L2
Se l e c t On e So f t Ke y
COVER WA KEUP DND REST R NE XT EX I T
2
Press <RESTR>.
If you are not connected to the station for which
you’re setting restrictions, enter the station number. If
you are connected to the station, you see the
restriction display:
11:00 am Wed Mar 10 686 Cal l s Wai t :0
1
2
3
4
L1 L2
Di al Stat i on No
CL E AR EX I T
HCXTD840, Issue 1, July 2001 2-5
Page 77

EGISTERING CALL RESTRICTIONS S
R
ELECSET
500A U
SER GUIDE
Procedure,
continued
3
If you make an error before you finish dialing, press
<CLEAR> and reenter the number.You see this
display:
11:00 am Wed Mar 10 686 Cal l s Wai t :0
1
2
3
4
L1 L2
Cal l Res t r ic t ions:Stat ion 200
A L L T OL / OP TOL L EX I T
4
To set the restriction level, press the appropriate key.
To restrict... Press...
All direct-dial long-distance calls <TOLL>
All long-distance calls <TOL/OP>
All outside calls <ALL>
T o exit without setting restrictions, press <EXIT>.
5
The display changes to confirm the restriction level
you have set. For instance, if you register ALL
restrictions, you see this display:
11:00 am Wed Mar 10 686 Cal l s Wai t :0
1
2
3
4
L1 L2
OK: AL L Ca l l Res t r i c t i on s Reg i s t e r ed
EX I T
Note: If you attempt to register restrictions and system
resources are unavailable, this message is
displayed: Please try later. Try again
momentarily.
2-6 HCXTD840, Issue 1, July 2001
Page 78

C
HAPTER
2: A
DDITIONAL OPERATIONS
ANCELING CALL RESTRICTIONS
C
Canceling Call Restriction s
Procedure To cancel call restrictions:
1
Press <FEATUR> to enter the call restrictions menu.
2
Press <RESTR>. (Also dial the station number if your
console is idle).
The following display shows restr icti o ns regis t ered
for station 200:
11:00 am Wed Mar 10 686 Cal l s Wai t :0
1
2
3
4
L1 L2
Cal l Res t r ic t ions:Stat ion 200
CANCEL EX I T
3
Press the <CANCEL> soft key. When restrictions are
canceled, you see this display:
11:00 am Wed Mar 10 686 Cal l s Wai t :0
1
2
3
4
L1 L2
OK: Ca l l Res t r i c t i on s Canc e l l ed
EX I T
HCXTD840, Issue 1, July 2001 2-7
Page 79

OVERAGE S
C
Coverage
ELECSET
500A U
SER GUIDE
About
coverage
Controlling
cover busy/no
answer for
outside calls to
inside numbers
Coverage enables users to redirect calls that come to their
stations. Depending on th e type of coverage us ed, calls can
be redirected automatically or only when the called station
is busy or does not answer.
You can c ontrol the cover busy/no answer setting for calls
from outside the facility through your attendant console.
However, the covering point registered from the attendant
can only be an inside number. All other types of coverage
(including cover busy/no answer for outside calls to an
outside number) are programmed at the user's station.
Cover busy/no answer for outside calls to inside numbers
can be registered from station s or your Selec500A . Neither
station nor attendant registration has priority. Therefore,
the most recently registered coverage is in effect,
regardless of whether it was registered from the station or
your console.
2-8 HCXTD840, Issue 1, July 2001
Page 80

C
HAPTER
2: A
DDITIONAL OPERATIONS
Registering Coverage
EGISTERING COVERAGE
R
Procedure
11:00 am Wed Mar 10 686 Cal l s Wai t :0
1
2
3
4
L1 L2
Se l e c t On e So f t Ke y
COVER WA KEUP DND REST R NE XT EX I T
11:00 am Wed Mar 10 686 Cal l s Wai t :0
1
2
3
4
L1 L2
Dia l Stat i on No:
1
Press the <FEATUR> soft key. You see this display:
2
Press <COVER>. You s ee this display:
CL E AR EX I T
3
Dial the desired station number. If you make an error
before you finish dialing, press <CLEAR> and
reenter the number.
HCXTD840, Issue 1, July 2001 2-9
Page 81

EGISTERING COVERAGE S
R
ELECSET
500A U
SER GUIDE
Procedure,
When a valid number is entered, you see this display:
continued
11:00 am Wed Mar 10 686 Cal l s Wai t :0
1
2
3
4
L1 L2
Coverage Station:
CL E AR EX I T
4
Enter the number of the covering station. When you
dial a valid covering station, you see this display:
11:00 am Wed Mar 10 686 Cal l s Wai t :0
1
2
3
4
L1 L2
OK:Coverage Regi stered
EX I T
2-10 HCXTD840, Issue 1, July 2001
Page 82

C
HAPTER
2: A
DDITIONAL OPERATIONS
Canceling Cove rage
ANCELING COVERAGE
C
Procedure
11:00 am Wed Mar 10 686 Cal l s Wai t :0
1
2
3
4
L1 L2
Se l e c t On e So f t Ke y
COVER WA KEUP DND REST R NE XT EX I T
1
Press the <FEATUR> soft key. You see this display:
2
Press <COVER>. The display changes to allow you
to enter a station number:
11:00 am Wed Mar 10 686 Cal l s Wai t :0
1
2
3
4
L1 L2
Di al Stat i on N:
CL E AR EX I T
HCXTD840, Issue 1, July 2001 2-11
Page 83

ANCELING COVERAGE S
C
ELECSET
500A U
SER GUIDE
Procedure,
3
Dial the desired station number. You see this display:
continued
11:00 am Wed Mar 10 686 Cal l s Wai t :0
1
2
3
4
L1 L2
Current Coverage Stat ion:200
CANCE L E X I T
After you dial the station number, the current
coverage point for the station is displayed (200 in this
example).
4
Press the <CANCEL> soft key to cancel the
coverage. Note that you can only change a station’s
coverage point by first canceling the active coverage
point, then registering a new one.
Invalid
displays
Sometimes, when you try to register coverage for a station,
you receive an error message on your display as follows:
You see this display... When you try to...
Invalid Station Class or
Number
Register coverage for a station
for which coverage is not
allowed
Invalid Station Number Register a station as a
covering point that cannot be
specified as a coverage point.
2-12 HCXTD840, Issue 1, July 2001
Page 84

C
HAPTER
2: A
DDITIONAL OPERATIONS
Credit Limit
REDIT LIMIT
C
About credit
limit
As the attendant, you can control credit limit on a
per-station basis to regulate calling privileges for
cash-paying customers. Your facility can choose from
three versions of the credit limit feature as follows:
Table 2-2 Summary of credit limit types
Credit Limit
Feature
Definition
Trunk disconnect Trunk disconnect limits calls from a
credit-limit station to a certain
duration. Calls that exceed the
duration are automatically
disconnected. This method is
intended for highly restrictive
environments (e.g. prisons or
businesses that limit usage on certain
phones).
Lookahead credit The lookahead option pre-calculates
a charge and corresponding
maximum call duration for each call
type. Calls are automatically
disconnected when the current credit
value is exhausted. A warning tone is
sent to the caller 60 seconds before a
call is disconnected.
Positive value The positive value credit limit never
disconnects a call in progress.
However, the station is not allowed
to begin the call, unless the credit
value is above zero.
HCXTD840, Issue 1, July 2001 2-13
Page 85

REDIT LIMIT S
C
ELECSET
500A U
SER GUIDE
Your credit
limit type
When the
credit limit
feature is
appropriate
Ask your system administrator what type of credit limit
your facility uses.
The credit limit feature is not appropriate for all
establishments. It should only be used in situations where
it is appropriate to disconnect or disallow a user’s call
based on his account balance.
2-14 HCXTD840, Issue 1, July 2001
Page 86

C
HAPTER
2: A
DDITIONAL OPERATIONS
Controlling Credit Limit
ONTROLLING CREDIT LIMIT
C
About credit
limit
Credit limit can be assigned at the CommCenter-VDU as
well as from the SelecSet 500A attendant console. If you
control credit limit from your consol e, you can do so while
your console is idle or while you are talking.
Procedure To control credit limit:
1
Press the <FEATUR> soft key. You see this display:
11:00 am Wed Mar 10 686 Cal l s Wai t :0
1
2
3
4
L1 L2
Se l e c t One So f t Ke y
COVER WA KEUP DND REST R NE XT EX I T
2
Press <NEXT>. You see this display:
11:00 am Wed Mar 10 686 Cal l s Wai t :0
1
2
3
4
L1 L2
Se l e c t One So f t Ke y
T I ME 2 NDWU CRED I T NEXT EX I T
3
Press <CREDIT>.
HCXTD840, Issue 1, July 2001 2-15
Page 87

ONTROLLING CREDIT LIMIT S
C
ELECSET
500A U
SER GUIDE
Procedure,
continued
4
If you are not connected to the station for which
you’re setting credit, enter the station number.
5
If you are connected to the station, you see this
display, where you can enter a credit value.
Note: To register credit for a group, your console must
be idle.
11:00 am Wed Mar 10 686 Cal l s Wai t :0
1
2
3
4
L1 L2
Di al Stat i on No
CL E AR EX I T
If the station has a zero balance, you see this display:
11:00 am Wed Mar 10 686 Cal l s Wai t :0
1
2
3
4
L1 L2
200/Not Us ing Cred i t Feat ure
UPDA T E EX I T
2-16 HCXTD840, Issue 1, July 2001
Page 88

C
HAPTER
2: A
DDITIONAL OPERATIONS
ONTROLLING CREDIT LIMIT
C
Procedure,
continued
If the station has a balance, the display shows the
credit value. In the following display, station 200 has
a credit balance of $6.00.
11:00 am Wed Mar 10 686 Cal l s Wai t :0
1
2
3
4
L1 L2
200/Credi t Amount :+$06.00
UPDA T E CANCEL EX I T
6
T o enter a credit value (either negative or positive),
press <UPDATE>. To clear the current credit value
assigned, press <CANCEL>.
7
Use the key pad to dial a four- to five-digit number
plus the * or # sign. Press * to subt ract. Press # to add.
For example, when adding $4.00, your entry looks
like this:
11:00 am Wed Mar 10 686 Cal l s Wai t :0
1
2
3
4
L1 L2
Ent er Chg Amount :0400* ( *=add,#=sub)
CL E AR EX I T
HCXTD840, Issue 1, July 2001 2-17
Page 89

ONTROLLING CREDIT LIMIT S
C
ELECSET
500A U
SER GUIDE
Procedure,
Your display updates to confirm the value, as follows:
continued
11:00 am Wed Mar 10 686 Cal l s Wai t :0
1
2
3
4
L1 L2
OK:Credi t Updated By:+$4.00
CL E AR EX I T
Various
displays
When you attempt to enter credit limit information, you
may see any of several displays:
This display... Indicates that...
Invalid Station
Class or Number
the station is not allowed to use
the credit limit feature or you
dialed an invalid station number.
Credit Feature in
Use
Error: Max/Min
Value Assigned
the credit limit is being edited
from another terminal
the credit value update would
make the credit limit more than
$9999 or less than $0
Error: Invalid
Dollar Amount
you entered an invalid number or
waited too long before entering a
value.
2-18 HCXTD840, Issue 1, July 2001
Page 90

C
HAPTER
2: A
DDITIONAL OPERATIONS
Do-Not-Disturb
DO-NOT-D
ISTURB
About
do-not-disturb
Do-not-disturb (DND) prevents a station from being
called. You can control this feature from your SelecSet
500A while the station is idle or while you are on a call.
Registering
To register do-not-disturb for a station:
Do-not-disturb
1
Press the <FEATUR> soft key. You see this display:
11:00 am Wed Mar 10 686 Cal l s Wai t :0
1
2
3
4
L1 L2
Se l e c t One So f t Ke y
COVER WA KEUP DND REST R NE XT EX I T
2
Press <DND>.
3
If you’re not connected to the station for which you’re
setting do-not-disturb, enter the station or group
number. If you are connected to a station, the
do-not-disturb display is shown, as in the next
example:
Note: To register DND for a group, your console mus t
be idle.
HCXTD840, Issue 1, July 2001 2-19
Page 91

DO-NOT-D
ISTURB S
ELECSET
500A U
Procedure,
continued
11:00 am Wed Mar 10 686 Cal l s Wai t :0
1
2
3
4
L1 L2
Di al Stat i on No
CL E AR EX I T
4
If you make an error before you finish dialing, press
<CLEAR> and reenter the number.
5
Press <REG> to activate do-not-disturb. Press
<EXIT> to leave the display without activating
do-not-disturb:
11:00 am Wed Mar 10 686 Cal l s Wai t :0
1
2
3
4
L1 L2
Do n ‘ t Disturb Stat ion/Group:200
REG EX I T
SER GUIDE
6
The following display confirms DND registration:
11:00 am Wed Mar 10 686 Cal l s Wai t :0
1
2
3
4
L1 L2
OK : Do n ‘ tDisturbRegistered
EX I T
2-20 HCXTD840, Issue 1, July 2001
Page 92

C
HAPTER
2: A
DDITIONAL OPERATIONS
DO-NOT-D
ISTURB
Canceling
To cancel do-not-disturb:
do-not-disturb
1
To display the do-not-disturb registration, press
<FEATUR> then <DND>.
2
If you are not connected to the station, dial the station
number.
This display shows DND registered for station 200:
11:00 am Wed Mar 10 686 Cal l s Wai t :0
1
2
3
4
L1 L2
Do n ‘ t Disturb Stat ion/Group:200
CANCE L EXI T
3
Press <CNCL> to cancel do-not-disturb.
When do-not-disturb is canceled for a group, all
members of the group have do-not-disturb canceled
simultaneously.
4
Press <EXIT> to leave the display without canceling
do-not-disturb.
HCXTD840, Issue 1, July 2001 2-21
Page 93

DO-NOT-D
ISTURB S
ELECSET
500A U
SER GUIDE
Procedure,
continued
11: 00 am Wed Mar 10 686 Cal l s Wai t : 0
1
2
3
4
L1 L2
OK : D o n ‘ t Disturb Cancelled
Using a feature
access code
The following display confirms that do-not-disturb
has been canceled:
5
Press <EXIT> to leave the display.
A station user can register or cancel do-not-disturb by
entering a feature access code (if do-not-disturb is allowed
for that station).
Do-not-disturb
priority
Attendant-registered do-not-disturb has no priority over
station-registered do-not-disturb. Therefore,
do-not-disturb can be registered by the attendant, but
canceled by the station, and vice versa.
EXI T
2-22 HCXTD840, Issue 1, July 2001
Page 94

C
HAPTER
2: A
DDITIONAL OPERATIONS
DO-NOT-D
ISTURB
Error
messages
In some cases, you may see an error message on your
display when you attempt to register do-not-disturb. See
the following table:
When you try to... You see this display...
register do-not-disturb
Invalid S tation or Group
for a station or group
number that is invalid or
not allowed to have DND
register do-not-disturb
and system resources are
Please Try Later
(try agai n momentarily)
unavailable
register do-not-disturb
and there is a system
Sorry: System Error
(try agai n momentarily)
error
HCXTD840, Issue 1, July 2001 2-23
Page 95

INGING A DO-NOT-DISTURB STATION S
R
Ringing a Do-Not-Disturb Station
ELECSET
500A U
SER GUIDE
About this
section
The procedures described in this section let you ring
(break in to) a station that has invoked the do-not-disturb
feature. When you dial a station in do-not-disturb, you
hear reorder tone (fast busy tone) , and you r di s play shows
DO NOT DISTURB. In the following example, the dialed
number is 3196.
11:00 am Wed Mar 10 686 Cal l s Wai t :0
1*NO-DSTRB 3196
2
3
4
L1 L2
L3 L4
MS G CHARGE F EA T UR
Procedure To ring the station:
1
Press <ST ART>.
2
Press <OVR>.
3
Dial the station number.
2-24 HCXTD840, Issue 1, July 2001
Page 96

C
HAPTER
2: A
DDITIONAL OPERATIONS
RANSFERRING TO A STATION IN
T
Transferring to a Station in Do-Not-Disturb
Procedure To transfer a caller to a do-not-disturb station:
1
When you answer a call to be transferred, dial the
station number to which you want to transfer the call.
2
You see the following display and hear reorder tone
(like a fast busy signal.) The display indicates that the
first party (in this example, station 1102) is on hold at
CAP2 and the second party, who is in the
do-not-disturb state (station 3196), is at CAP1:
11:00 am Wed Mar 10 686 Cal l s Wai t :0
1*NO-DSTRB 3196
2*HOLD 1102
3
4
L1 L2
L3 L4
MS G CHARGE F EA T UR
3
The display indicates the first party (station 1102) is
on hold on CA P 2, and the second party (station
3196), (in t he do-not-disturb state), is on CAP 1.
4
Press the CAP representing the caller on hold.
5
Press <JOIN>.
6
Press <OVR>.
7
Dial the station number.
HCXTD840, Issue 1, July 2001 2-25
Page 97

ECEIVING FORWARDED CALLS FROM
R
DND S
TATIONS S
ELECSET
Receiving Forwarded Calls from DND Stations
500A U
SER
Example
displays
Although no attendant operations are required, when a
station with do-not-disturb activated forwards calls to yo u,
you see the displays shown in this section.
Incoming call
while ringing
05:56 pm Wed Sep 24 1458 Cal l s Wai t : 0
1 * NO - DS T RB 1 8 5 2 J o h n B l a c k T OS= 1
2
3
4
L1: L2:
L3: L4:
MS G CHARGE F EA T UR
Incoming
station call
This is an example of the display for an incoming ringing
call:
This example shows the display for an incoming station
call after you answer it:
(after answer)
05:56 pm Wed Sep 24 1458 Cal l s Wai t : 0
1*
NO- DS T RB
2
3
4
L1: L2:
L3: L4:
MS G CHARGE F EA T UR
1157 Mary Smi th TOS=1
2-26 HCXTD840, Issue 1, July 2001
Page 98

C
HAPTER
2: A
DDITIONAL OPERATIONS
ECEIVING FORWARDED CALLS FROM
R
DND
Incoming
trunk call
This example shows the display after you answer an
incoming trunk call.
(after answer)
05:56 pm Wed Sep 24 1458 Cal l s Wai t : 0
1 * NO - DS T RB 8 0 0 0 I n c 1
2
3
4
L1: L2:
L3: L4:
MS G CHARGE F EA T UR
TOS=1
Note: In the case of a trunk-to-attendant-to-station call,
an attendant transfers the call to the station
number (not to 0) of the SelecSet 500A
designated as the do-not-disturb forwarding
point. In the examples here, the station number
for this attendant is 1458.
HCXTD840, Issue 1, July 2001 2-27
Page 99

ETTING THE SYSTEM CLOCK S
S
Setting the System Clock
ELECSET
500A U
SER GUIDE
About this
section
You can set the system clock to adjust for standard or
daylight time or power outages.
The system clock affects various system operations. See
your system administrator before changing the
time-of-day setting.
Procedure
1
Press the <FEATUR> soft key. You see this display:
11:00 am Wed Mar 10 686 Cal l s Wai t :0
1
2
3
4
L1 L2
Se l e c t One So f t Ke y
COVER WA KEUP DND REST R NE XT EX I T
2
Press <NEXT>. You see this display:
11:00 am Wed Mar 10 686 Cal l s Wai t :0
1
2
3
4
L1 L2
Se l e c t One So f t Ke y
T I ME 2 NDWU CRED I T NEXT EX I T
2-28 HCXTD840, Issue 1, July 2001
Page 100

C
HAPTER
2: A
DDITIONAL OPERATIONS
ETTING THE SYSTEM CLOCK
S
Procedures,
3
Press <TIME>. You see this display:
continued
11:00 am Wed Mar 10 686 Cal l s Wai t :0
1
2
3
4
L1 L2
Ent er New Time: (*=am,#=pm)
CL E AR EX I T
4
Enter the new time from the keypad. Your input
displays as you dial. If you make a mistake before you
finish, press <CLEAR> to erase the input.
Note: Your input must include five digits (a four digit
number plus the * symbol for a.m. or # symbol
for p.m.). For example, enter a reminder call for
9:00 am as 0900*.
HCXTD840, Issue 1, July 2001 2-29
 Loading...