

Page 1

Model Battery Charger
Modèle Chargeur de batterie
Modelo Cargador de baterías
ET 18DM
Multi Charger
Multi-chargeur
Cargador múltiple
SAFETY INSTRUCTIONS AND INSTRUCTION MANUAL
WARNING
IMPROPER OR UNSAFE use of this battery charger can result in death or serious
bodily injury!
This manual contains important information about product safety. Please read
and understand this manual BEFORE operating the power tool. Please keep this
manual available for other users and owners before they use the battery charger.
This manual should be stored in safe place.
INSTRUCTIONS DE SECURITE ET MODE D’EMPLOI
AVERTISSEMENT
Une utilisation INCORRECTE OU DANGEREUSE de ce chargeur de batterie peut
entraîner la mort ou de sérieuses blessures corporelles !
Ce mode d’emploi contient d’importantes informations à propos de la sécurité de
ce produit. Prière de lire et de comprendre ce mode d’emploi AVANT d’utiliser
l’outil motorisé. Garder ce mode d’emploi à la disponibilité des autres utilisateurs
et propriétaires avant qu’ils utilisent le chargeur de batterie. Ce mode d’emploi
doit être conservé dans un endroit sûr.
INSTRUCCIONES DE SEGURIDAD Y MANUAL DE INSTRUCCIONES
ADVERTENCIA
¡La utilización INAPROPIADA O PELIGROSA de este cargador de baterías puede
resultar en lesiones de gravedad o la muerte!
Este manual contiene información importante sobre la seguridad del producto.
Lea y comprenda este manual ANTES de utilizar la herramienta eléctrica. Guarde
este manual para que puedan leerlo otras personas antes de utilizar el cargador
de baterías. Este manual debe ser guardado en un lugar seguro.
Page 2
English
IMPORTANT SAFETY INFORMATION................. 3
MEANINGS OF SIGNAL WORDS......................... 3
SAFETY
IMPORTANT SAFETY INSTRUCTIONS
FOR BATTERY CHARGER .............................. 4
IMPORTANT SAFETY INSTRUCTIONS
FOR USE OF THE BATTERY AND
BATTERY CHARGER ...................................... 5
IMPORTANT SAFETY INSTRUCTIONS
FOR USE OF THE ADAPTER AND
DC POWER SOURCE ..................................... 6
DISPOSAL OF THE EXHAUSTED BATTERY .......... 6
CONTENTS
Page
OPERATION AND MAINTENANCE
MODEL ............................................................... 7
NAME OF PARTS .............................................. 7
SPECIFICATIONS .............................................. 8
APPLICATIONS.................................................. 8
CHARGING METHOD ........................................ 8
DC POWER SOURCE METHOD ...................... 12
CAUTION FOR CIRCULAR SAW MODEL C6DC2
BEFORE USE ................................................... 14
MAINTENANCE AND INSPECTION ............... 15
STORAGE ........................................................ 15
SERVICE AND REPAIRS.................................. 15
Page
WITH DC POWER SOURCE ..................... 14
Français
INFORMATIONS IMPORTANTES
DE SÉCURITÉ ............................................... 16
SIGNIFICATION DES MOTS
D’AVERTISSEMENT .................................... 16
SECURITE
CONSIGNES DE SÉCURITÉ IMPORTANTES
POUR LE CHARGEUR DE BATTERIE .......... 17
CONSIGNES DE SÉCURITÉ IMPORTANTES
POUR L’UTILISATION DE LA BATTERIE
ET DU CHARGEUR DE BATTERIE ............... 18
INSTRUCTIONS DE SECURITE IMPORTANTES
SUR L’UTILISATION DE L’ADAPTATEUR ET
DE LA SOURCE D’ALIMENTATION CC ...... 19
MISE AU REBUT D’UNE BATTERIE USÉE ........ 20
TABLE DES MATIERES
Español
INFORMACIÓN IMPORTANTE SOBRE
SEGURIDAD ............................................. 30
SIGNIFICADO DE LAS PALABRAS
DE SEÑALIZACIÓN ................................. 30
SEGURIDAD
INSTRUCCIONES IMPORTANTES
DE SEGURIDAD PARA EL CARGADOR
DE BATERÍAS ........................................... 31
INSTRUCCIONES IMPORTANTES
DE SEGURIDAD PARA LA BATERÍA
Y EL CARGADOR DE BATERÍAS ............. 32
INSTRUCCIONES IMPORTANTES DE
SEGURIDAD PARA USAR EL
ADAPTADOR Y LA FUENTE DE
ALIMENTACIÓN DE CC ........................... 33
ELIMINACIÓN DE LAS BATERÍAS AGOTADAS ......
Page
ÍNDICE
Página
34
UTILISATION ET ENTRETIEN
MODÈLE ........................................................... 21
NOM DES PARTIES ......................................... 21
SPECIFICATIONS ............................................ 22
UTILISATIONS ................................................. 22
MÉTHODE DE RECHARGE ............................. 22
MÉTHODE DE SOURCE
D’ALIMENTATION CC .............................. 26
PRECAUTION RELATIVE À LA SCIE
CIRCULAIRE MODELE C6DC2 AVEC
ALIMENTATION CC ..................................
AVANT L’UTILISATION .................................. 29
ENTRETIEN ET INSPECTION .......................... 29
RANGEMENT .................................................. 29
SERVICE APRES-VENTE ET RÉPARATIONS .... 29
OPERACIÓN Y MANTENIMIENTO
MODELO .......................................................... 35
NOMENCLATURA ........................................... 35
ESPECIFICACIONES ........................................ 36
APLICACIONES ............................................... 36
MÉTODO DE CARGA ...................................... 36
MÉTODO DE FUENTE DE
ALIMENTACIÓN DE CC ........................... 40
PRECAUCIÓN SOBRE LA SIERRA CIRCULAR
MODELO C6DC2 CON FUENTE DE
ALIMENTACIÓN DE CC ........................... 43
ANTES DE LA UTILIZACIÓN .......................... 43
MANTENIMIENTO E INSPECCIÓN ................ 43
ALMACENAMIENTO ....................................... 43
SERVICIO Y REPARACIÓNES ......................... 43
Page
29
Página
Page 3

English
IMPORTANT SAFETY INFORMATION
Read and understand all of the safety precautions, warnings and operating instructions in
the Instruction Manual before operating or maintaining this battery charger.
Most accidents that result from battery charger operation and maintenance are caused by
the failure to observe basic safety rules or precautions. An accident can often be avoided by
recognizing a potentially hazardous situation before it occurs, and by observing appropriate
safety procedures.
Basic safety precautions are outlined in the “SAFETY” section of this Instruction Manual and
in the sections which contain the operation and maintenance instructions.
Hazards that must be avoided to prevent bodily injury or machine damage are identified by
WARNINGS on the battery charger and in this Instruction Manual.
NEVER use this battery charger in a manner that has not been specifically recommended by
HITACHI.
MEANINGS OF SIGNAL WORDS
WARNING indicates a potentially hazardous situations which, if ignored, could result in
death or serious injury.
CAUTION indicates a potentially hazardous situations which, if not avoided, may result in
minor or moderate injury, or may cause machine damage.
NOTE emphasizes essential information.
3
Page 4
English
SAFETY
IMPORTANT SAFETY INSTRUCTIONS FOR BATTERY CHARGER
WARNING: Death or serious bodily injury could result from improper or unsafe use
of battery chargers. To avoid these risks, follow these basic safety
instructions:
READ ALL INSTRUCTIONS
1. This manual contains important safety and operating instructions for battery charger
Model ET18DM. (Adapter Model ET18-18A)
2. Before using battery charger, read all instructions and cautionary markings on (1) battery
charger, (2) battery, and (3) product using battery.
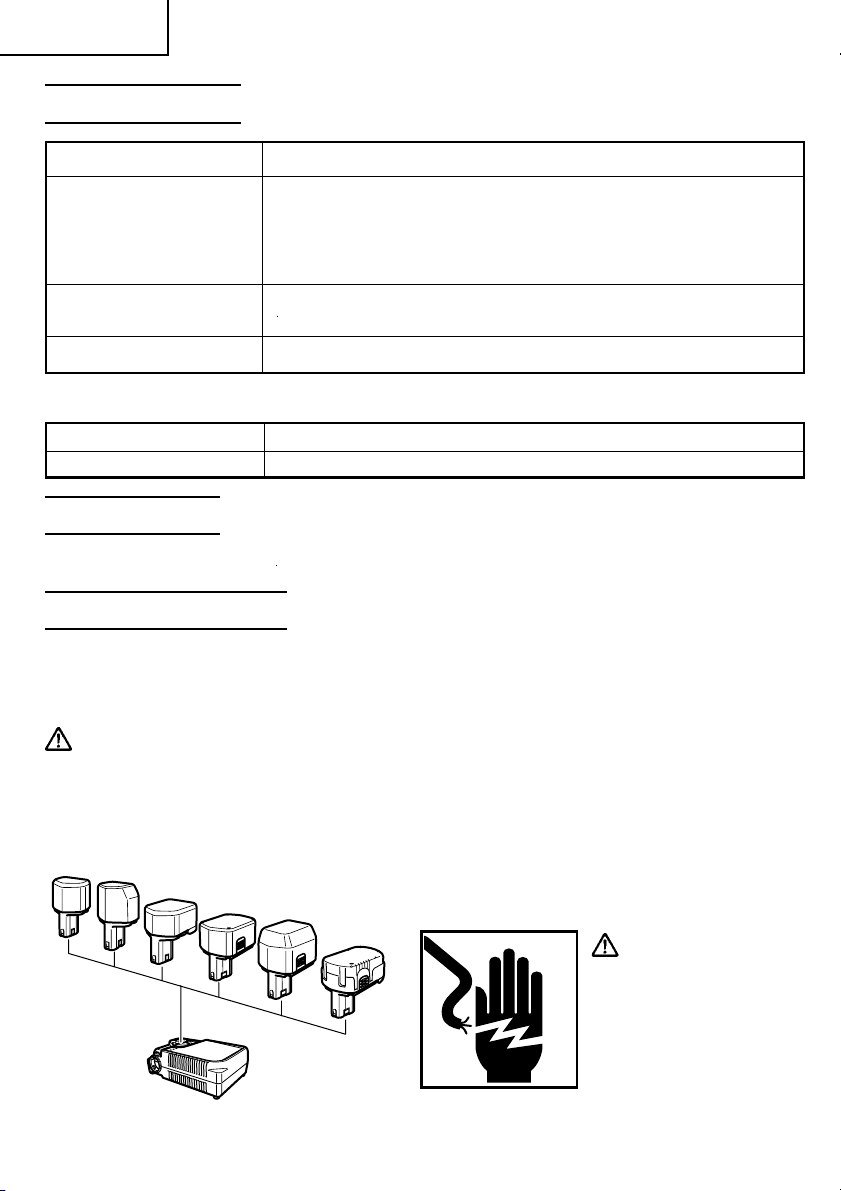
3. To reduce risk of injury, charge HITACHI rechargeable battery types EB9, EB12, EB14,
EB18 series. Other type of batteries may burst causing personal injury and damage.
4. Do not expose battery charger to rain or snow.
5. Use of an attachment not recommended or sold by the battery charger manufacturer may
result in a risk of fire, electric shock, or injury to persons.
6. To reduce risk of damage to electric plug and cord, pull by plug when disconnecting
battery charger.
7. Make sure cord is located so that it will not be stepped on, tripped over, or otherwise
subjected to damage or stress.
If extension cord must be used make sure:
a. That blades of extension cord are the same number, size, and shape as those of plug
on battery charger:
b. That extension cord is properly wired and in good electrical condition; and
c. That wire size is large enough for AC ampere rating of battery charger as specified
in Table 1.
Table 1
RECOMMENDED MINIMUM AWG SIZE FOR
EXTENSION CORDS FOR BATTERY CHARGERS
AC Input Rating Amperes* AWG Size of Cord
Equal to or but less Length of Cord, Feet (Meter)
greater than than 25 (7.5) 50 (15) 100 (30) 150 (45)
0 2 18 18 18 16
2 3 18 18 16 14
3 4 18 18 16 14
* If the input rating of a battery charger is given in watts rather than in amperes, the
corresponding ampere rating is to be determined by dividing the wattage rating by the
voltage rating–for example:
4
Page 5

English
1250 watts
125 volts
9. Do not operate battery charger with damaged cord or plug–replace them immediately.
10. Do not operate battery charger if it has received a sharp blow, been dropped, or
otherwise damaged in any way; take it to a qualified serviceman.
11. Do not disassemble battery charger and adapter; take it to a qualified serviceman when
service or repair is required. Incorrect reassembly may result in a risk of electric shock
or fire.
12. To reduce risk of electric shock, unplug charger from receptacle before attempting any
maintenance or cleaning. Removing the battery will not reduce this risk.
13. This battery charger might be attached to HITACHI battery operated tools as a standard
accessory. In this case, please confirm Instruction Manual of the HITACHI battery
operated tools before using the battery charger.
14. Do not abuse the cord. Never use the cord to carry the tools or pull the plug from an
outlet. Keep cord away from heat, oil, sharp edges or moving parts. Replace damaged
cords immediately. Damaged cords increase the risk of electric shock.
15. Disconnect the battery or cord from the tool before making any adjustments,
changing accessories, or storing the tool. Such preventive safety measures reduce
the risk of starting the tool accidentally.
= 10 amperes
IMPORTANT SAFETY INSTRUCTIONS FOR USE OF THE
BATTERY AND BATTERY CHARGER
You must charge the battery before you can use the power tool. Before using the model
ET18DM battery charger, be sure to read all instructions and cautionary statements on it, the
battery and in this manual.
REMEMBER: USE ONLY HITACHI BATTERY TYPES EB9 SERIES, EB12 SERIES, EB14
SERIES, EB18 SERIES. OTHER TYPES OF BATTERIES MAY BURST AND CAUSE INJURY!
Follow these instructions to avoid the risk of injury:
WARNING: Improper use of the battery or battery charger can lead to serious injury.
To avoid these injuries:
1. NEVER disassemble the battery.
2. NEVER incinerate the battery, even if it is damaged or is completely worn out. The
battery can explode in a fire.
3. NEVER short-circuit the battery.
4. NEVER insert any objects into the battery charger’s air vents. Electric shock or
damage to the battery charger may result.
5. NEVER charge outdoors. Keep the battery away from direct sunlight and use only
where there is low humidity and good ventilation.
6. NEVER use when the temperature is below 32°F (0°C) or above 104°F (40°C).
7. NEVER connect two battery chargers together.
5
Page 6

English
8. NEVER insert foreign objects into the hole for the battery or the battery charger.
9. NEVER use a booster transformer when charging.
10. NEVER use an engine generator or DC power, when this charger is used.
11. NEVER store the battery or battery charger in places where the temperature may
reach or exceed 104°F (40°C).
12. ALWAYS operate charger on standard household electrical power (120 volts). Using
the charger on any other voltage may overheat and damage the charger.
13. ALWAYS disconnect the power cord from its receptacle when the charger is not in use.
IMPORTANT SAFETY INSTRUCTIONS FOR USE OF THE
ADAPTER AND DC POWER SOURCE
WARNING: Improper use of the adapter or DC power source can lead to serious
injury. To avoid these injuries:
1. ALWAYS use with the applicable cordless tools. (See P.8 SPECIFICATIONS)
Use with non-applicable cordless tools may cause abnormal heating and
damage cordless tool.
2. NEVER short the adapter terminals.
3. ALWAYS use the appropriate cordless tool for the job. Also, make sure to carefully
read in the instruction manual for the cordless tool in use.
DISPOSAL OF THE EXHAUSTED BATTERY
WARNING: Do not dispose of the exhausted battery. The battery must explode if
it is incinerated. The product that you have purchased contains a
rechargeable battery. The battery is recyclable. At the end of it’s useful
life, under various state and local laws, it may be illegal to dispose of
this battery into the municipal waste stream. Check with your local
solid waste officials for details in your area for recycling options or
proper disposal.
SAVE THESE INSTRUCTIONS
AND
MAKE THEM AVAILABLE TO
OTHER USERS
AND
OWNERS OF THIS TOOL!
6
Page 7
English
OPERATION AND MAINTENANCE
NOTE:
The information contained in this Instruction Manual is designed to assist you in the safe
operation and maintenance of the battery charger.
NEVER operate, or attempt any maintenance on the battery charger unless you have first
read and understood all safety instructions contained in this manual.
Some illustrations in this Instruction Manual may show details or attachments that differ
from those on your own battery charger.
MODEL
ET18DM
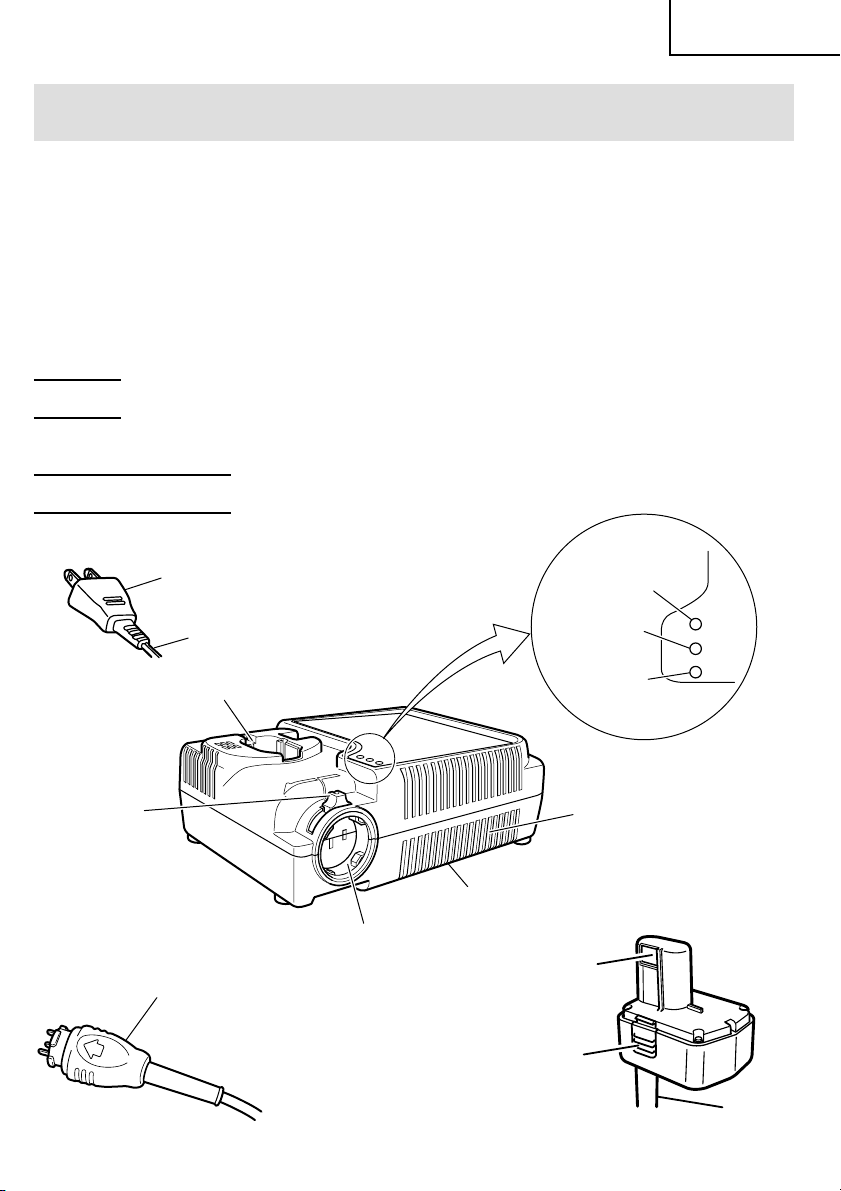
NAME OF PARTS
BATTERY CHARGER (ET18DM)
Outlet plug
Cord
Battery
installation hole
Lock
lever
ADAPTER (ET18-18A)
Adapter plug
Adapter
plug socket
Fig. 1
Charge time lamp
Charge
status lamp
DC power
source lamp
Ventilation
holes
Nameplate
(bottom surface)
Terminal
Latch
Cable
7
Page 8
English
SPECIFICATIONS
Input power source Single phase: AC120V 60Hz
Charging time Approx. 9 minutes ............... EB9S, EB12S
Approx. 12 minutes ............. EB9B, EB12B, EB1220BL
Approx. 14 minutes ............. EB14B, EB18B, EB1820, EB1820L
Approx. 28 minutes ............. EB1830H, EB1830HL
Charger
Weight 3.5 lbs (1.6kg)
ADAPTER (ET18-18A)
Applicable cordless tools DS18DMR, C6DC2, CR18DV, UB18D
Weight 3.1 lbs (1.4kg)
Charging voltage
Charging current
..................
....................
DC 9.6 – 18V
DC 12A (9.6 – 12V), 9A (14.4 – 18V)
APPLICATIONS
For charging the HITACHI batteries types EB9, EB12, EB14, EB18 series.
CHARGING METHOD
NOTE: Before plugging into the receptacle, make sure the following points.
䡬 The power source voltage is stated on the nameplate.
䡬 The cord is not damaged.
WARNING: Do not charge at voltage higher than indicated on the nameplate.
If charged at voltage higher than indicated on the nameplate, the
charger will burn up.
1. Insert the plug of battery charger into
EB9S
EB9B
8
EB12S
EB12B
EB1220BL
Fig. 2
EB14B
EB18B
EB1820
EB1830H
EB1820L
EB1830HL
the receptacle.
When the plug of battery charger has been
inserted into the receptacle, pilot lamp will
blink in red. (At 1-second intervals)
WARNING:
Do not use the electrical
cord if damaged. Have it
repaired immediately.
Page 9

English
2. Insert the battery to the battery charger.
Insert the battery into the battery charger as shown in Fig. 2. Make sure it contacts the
bottom of the battery charger.
3. Charging
Reading the Lamps
This charger is provided with a charging time lamp which displays estimated charging
time, and a charging status lamp which displays the charging status.
(a) Charging Time Display
After beginning charging, the charging time lamp lights red with about 30 minutes
remaining, lights orange with about 20 minutes remaining, and lights green with about
five minutes remaining. When charging is complete, the charging status lamp lights
green.
(b) High Temp Standby Display
Charging will not begin if the battery temperature is high. When this happens, the
charging time of lamp flashes red (0.6 second cycle). Leave the battery in the charger, and
charging will begin automatically when the temperature decreases.
(c) Charging Standby Display
Because the charger prioritizes power source output, charging is paused when the
cordless tool switch is triggered during charging. When this happens, the charging time
lamp will repeatedly flash (1 second cycle) in the current charging time display color (red/
orange/green). After the switch is released, charging automatically resumes in
approximately one minute, and the lamp will light continuously.
(d) Unable to Charge Display
When the charger or the battery is malfunctioning, the charging status lamp flickers
orange (0.2 second cycle). (See Table 2)
9
Page 10
English
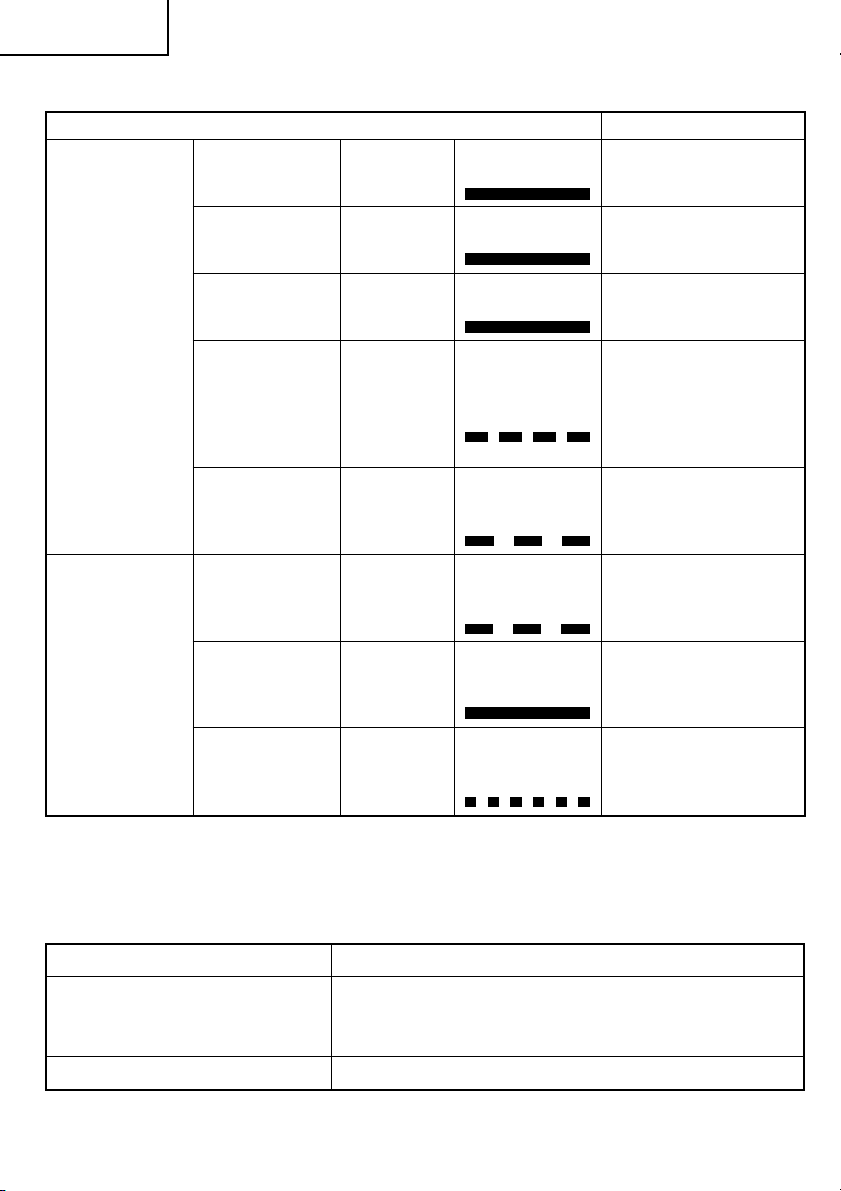
Table 2 Lamp Indications
Lamp indications Meaning
Charging time
30 minutes in about 30 minutes
Lights red continuously
Lights
Charging complete
Charging time
lamp (red/
orange/green)
Charging status
lamp (red/
orange/green)
Charging time Lights
20 minutes orange
Charging time
5 minutes
Lights green continuously
Lights
continuously
Lights
Charging complete in
about 20 minutes
Charging complete
in about 5 minutes
Cannot charge
Lights 0.3 because battery
High temp
standby off 0.3 seconds (Charging begins
Flashes red
seconds/ temperature is high.
automatically when
temperature drops.)
Lights 0.5 Using power source
seconds/off 0.5 output. (After power
seconds
source output, charging
begins automatically.)
Charging
standby
Flashes red
/orange
/green
Lights 0.5
Before
charging seconds power source.
Charging
complete
Flashes red
Lights green
seconds/off 0.5 Plugged into
Lights
continuously
After charging is
complete, battery
activation (trickle
charge) begins.
Lights 0.1
Charging Flickers seconds/off 0.1 Malfunction in the
impossible orange seconds battery or the charger.
䡬 Regarding the temperature of the rechargeable battery.
The temperatures for rechargeable batteries are as shown in the table below, and
batteries that have become hot should be cooled for a while before being recharged.
Table 3
Rechargeable batteries
Temperatures at which the battery can be recharged
EB9S, EB9B, EB12S, EB12B,
EB1220BL, EB14B, EB18B,
–5°C — 60°C
EB1820, EB1820L
EB1830H, EB1830HL
10
–5°C — 55°C
Page 11
English
䡬 Regarding recharging time
Table 4 shows the recharging time required according to the type of battery.
Table 4 Recharging time (approx. min.) at 20°C
Battery type Ni-MH BATTERY Ni-Cd BATTERY
Battery capacity 3.0Ah 2.0Ah 1.2Ah
9.6V EB9B 12 min. EB9S 9 min.
12V
Battery
voltage
NOTE: The recharing time may vary according to the ambient temperature and the
14.4V EB14B 14 min.
18V
power supply voltage.
EB1830H
EB1830HL
27 min. EB1820 14 min.
EB12B
EB1220BL
EB18B
EB1820L
12 min. EB12S 9 min.
4. Disconnect battery charger from the receptacle.
CAUTION:
Do not pull the plug out of the receptacle by pulling on the cord.
Make sure to grasp the plug when removing from receptacle to avoid damaging cord.
5. Remove the battery from the battery charger.
Supporting the battery charger with hand, pull out the battery from the battery charger.
Regarding electric discharge in case of new batteries, etc.
As the internal chemical substance of new batteries and batteries that have not been used
for an extended period is not activated, the electric discharge might be low when using
them the first and second time. This is a temporary phenomenon, and normal time
required for recharging will be restored by recharging the batteries 2 – 3 times.
How to make the batteries perform longer
䡬 Recharge the batteries before they become completely exhausted.
When you feel that the power of the tool becomes weaker, stop using the tool and
recharge its battery. If you continue to use the tool and exhaust the electric current, the
battery may be damaged and its life will become shorter.
䡬 Avoid recharging at high temperatures.
A rechargeable battery will be hot immediately after use. If such a battery is recharged
immediately after use, its internal chemical substance will deteriorate, and the battery life
will be shortened. Leave the battery and recharge it after it has cooled for a while.
11
Page 12
English
CAUTION:
● If the battery is rechraged when it is warm due to battery use or exposure to sunlight,
the pilot lamp may light in green.
The battery will not be recharged. In such a case, let the battery cool before charging.
● When the pilot lamp flickers in red (at 0.2 – second intervals), check for and take out any
foreign objects in the charger’s battery installation hole. If there are no foreign objects,
it is probable that the battery or charger is malfunctioning. Take it to your authorized
Service Center.
DC POWER SOURCE METHOD
A cordless tool can be used with a 120V power source by using an adapter with the charger.
1. Connecting the adapter (ET18-18A)
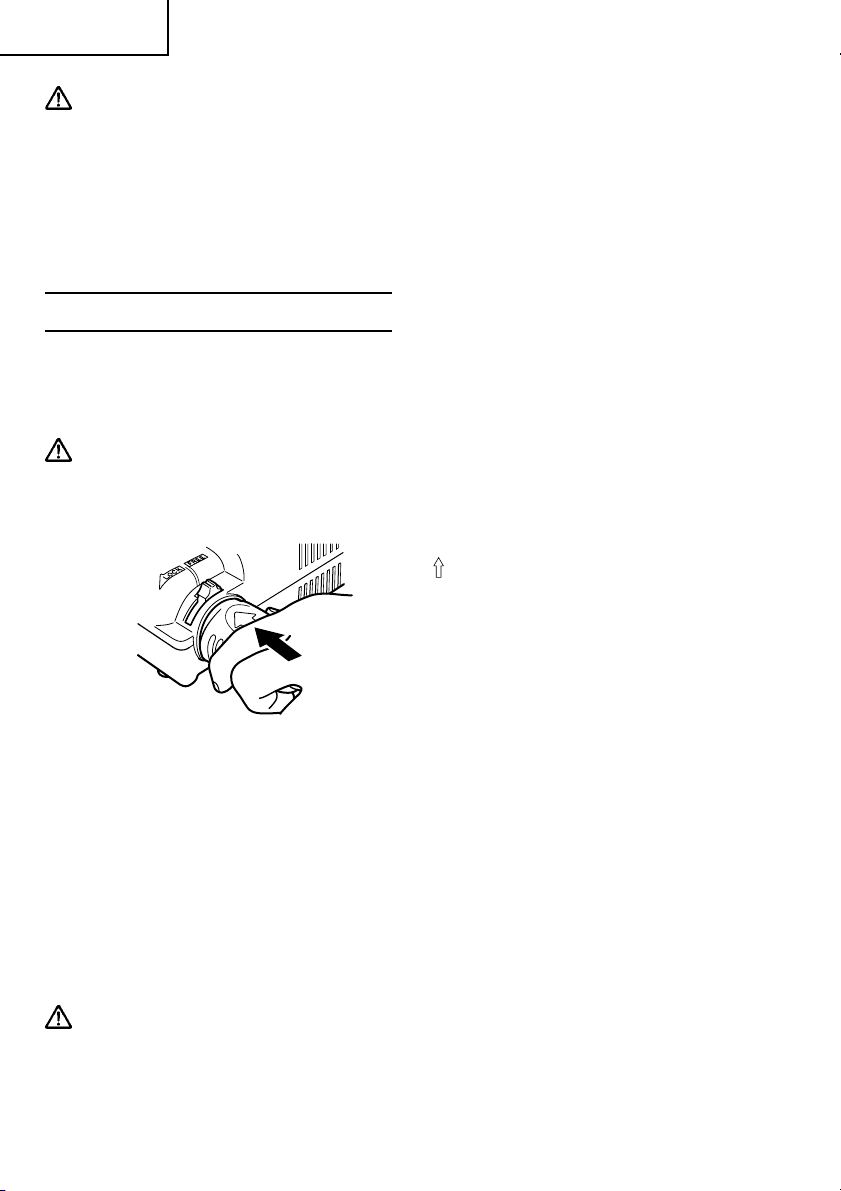
(1) Inserting/unplugging the adapter plug
WARNING: ALWAYS confirm the switch is off, to prevent accidents.
1 Inserting
Confirm that the lock lever on the adapter plug socket
on the charger is in the 1 FREE position. With the
arrow “ ” on the adapter plug facing upward, insert
the plug firmly into the socket. Turn the lock lever
toward 2 LOCK until it clicks, and confirm that the
adapter plug will not unplug.
2 LOCK
1
FREE
2 Unplugging
Move the lock lever to the 1 FREE position, and unplug the adapter plug.
NOTE:
䡬 Remove any chips or other debris adhering to the charger of the adapter plug
socket or the adapter plug. These may prevent secure insertion of the adapter
plug.
䡬 Do not yank the adapter cable with the adapter plug inserted. This may damage
the adapter plug socket on the charger.
2. Using the adapter (ET18-18A)
(1) Connecting/disconnecting the adapter and tool unit
WARNING: ALWAYS confirm the switch is off, to prevent accidents.
12
Page 13

English
1 Connecting
With the adapter facing the correct direction, insert the adapter into the cordless tool
unit battery insertion socket until it clicks.
Switch trigger
Handle
Insert
Pull out
Latch
Adapter
2 Disconnecting
To disconnect, firmly grasp the cordless tool unit, press the latches on both sides of
the adapter, and pull out.
(2) Operation
WARNING: ALWAYS follow the tool unit instruction manual for handling cordless
tools. Extend the output cable during use. Using the cable tightly coiled
risks overheating.
Like operation with the battery, trigger the switch for operation, and release it to stop.
3. DC Power Source Lamp
(1) Normal Use
When the adapter is connected and “power source ready” red lamp is continuously
lit, the cordless tool can be used by triggering the switch.
(2) Output may stop in the following conditions.
1 High temperature protection
Work involving large continuous current and intense continuous work in high
temperature locations will raise the internal temperature of the charger. To prevent
breakdowns caused by high temperatures, stop the output, and the red lamp will
flicker (0.2 second cycle) repeatedly. Rest the charger for at least 30 minutes.
Then, unplug the charger from the outlet, wait 20 seconds, and plug it in again. (This
resets the output function, and restores output voltage.)
2 Continuous overuse protection
When a cordless tool is used continuously for a long time without breaks (such as
work which would consume three Hitachi 2Ah batteries in one hour), stop the output,
and the red lamp will flicker (0.2 second cycle) repeatedly. Rest the cordless tool for
at least 30 minutes.
Then, unplug the charger from the outlet, wait 20 seconds, and plug it in again. (This
resets the output function, and restores output voltage.)
13
Page 14

English
CAUTION: ALWAYS rest the cordless tool at least 30 minutes before resetting the
output function.
3 Excessive current protection
When continuous excessive current is detected, to prevent cordless tool or charger
breakdowns caused by sudden overheating, stop the output, and the red lamp will
flicker repeatedly.
Rest the cordless tool and the charger for at least 30 minutes.
Then, unplug the charger from the outlet, wait 20 seconds, and plug it in again. (This
resets the output function, and restores output voltage.)
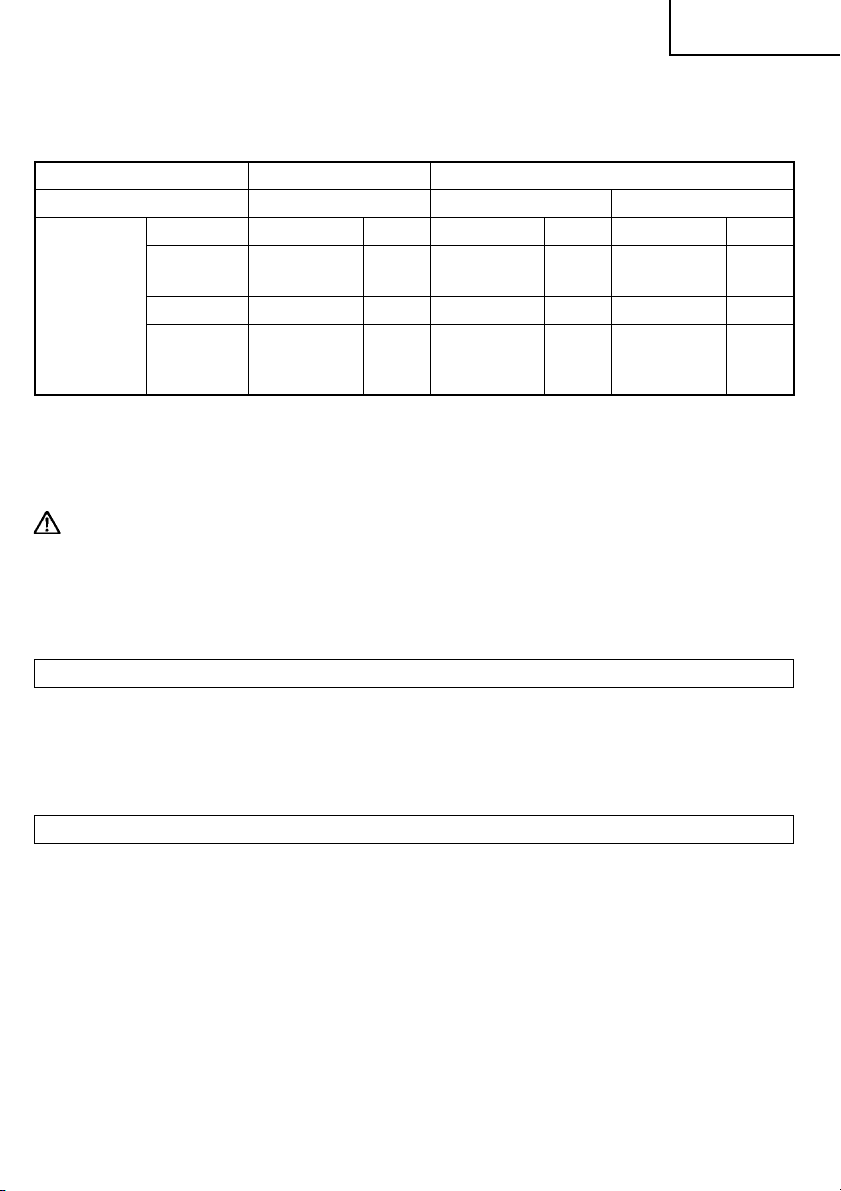
DC Power Source Lamp Indications
Status Lamp Output
On
Power source ready lights continuously Normal output possible
Flashes
High temp protection 0.1 second on/0.1 second off Output stopped
Continuous overuse protection
(equivalent to three B batteries)
Excessive current protection 0.1 second on/0.1 second off Output stopped
Even with continuous work spanning long hours, output will not stop during intermittent
work which would use up three Hitachi 2Ah batteries in a half day, because the cordless
tool temperature increase remains low. You can continue to use the tool.
NOTE: If the lamp continues to flicker despite proper use, the charger may be malfunctioning.
Please take the charger to the store where you purchased it.
0.1 second on/0.1 second off Output stopped
Flashes
Flashes
CAUTION FOR CIRCULAR SAW MODEL C6DC2 WITH DC POWER
SOURCE
CAUTION: The maximum continuous operation time of Model C6DC2 is 5 minutes.
After about 5 minutes operation, rest the tool more than 5 minutes.
BEFORE USE
Check the work area to make sure that it is clear of debris and clutter.
Clear the area of unnecessary personnel. Ensure that lighting and ventilation is adequate.
14
Page 15

English
MAINTENANCE AND INSPECTION
CAUTION: Pull out battery before doing any inspection or maintenance.
1. Check the Screws
Loose screws are dangerous. Regularly inspect them and make sure they are tight.
CAUTION: Using this battery charger with loosened screws is extremely dangerous.
2. Check for Dust
Dust may be removed with a soft cloth or a cloth dampened with soapy water.
Do not use bleach, chlorine, gasoline or thinner, for they may damage the plastics.
STORAGE
Storing in a place below 104°F (40°C) and out of the reach of children.
SERVICE AND REPAIRS
All quality power tools will eventually require servicing or replacement of parts because of
wear from normal use. To assure that only authorized replacement parts will be used, all
service and repairs must be performed by a HITACHI AUTHORIZED SERVICE CENTER,
ONLY.
NOTE: Specifications are subject to change without any obligation on the part of the
HITACHI.
15
Page 16

Français
INFORMATIONS IMPORTANTES DE SÉCURITÉ
Lire et comprendre toutes les précautions de sécurité, les avertissements et les instructions
de fonctionnement dans ce mode d’emploi avant d’utiliser ou d’entretenir ce chargeur de
batterie.
La plupart des accidents causés lors de l’utilisation ou de l’entretien du chargeur de batterie
proviennent d’un non respect des règles ou précautions de base de sécurité. Un accident
peut la plupart du temps être évité si l’on reconnaît une situation de danger potentiel avant
qu’elle ne se produise, et en observant les procédures de sécurité appropriées.
Les précautions de base de sécurité sont mises en évidence dans la section “SECURITE” de
ce mode d’emploi et dans les sections qui contiennent les instructions de fonctionnement
et d’entretien.
Les dangers qui doivent être évités pour prévenir des blessures corporelles ou un
endommagement de la machine sont identifiés par AVERTISSEMENTS sur le chargeur de
batterie et dans ce mode d’emploi.
NE JAMAIS utiliser ce chargeur de batterie d’une manière qui n’est pas spécifiquement
recommandée par HITACHI.
SIGNIFICATION DES MOTS D’AVERTISSEMENT
AVERTISSEMENT indique des situations potentiellement dangereuses qui, si elles sont
ignorées, pourraient entraîner la mort ou de sérieuses blessures.
ATTENTION indique des situations dangereuses potentilles qui, si elles ne sont pas évitées,
peuvent entraîner de mineures et légères blessures ou endommager la machine.
REMARQUE met en relief des informations essentielles.
16
Page 17

Français
SECURITE
CONSIGNES DE SÉCURITÉ IMPORTANTES POUR LE CHARGEUR
DE BATTERIE
AVERTISSEMENT : Une utilisation incorrecte ou dangereuse des chargeurs de
batterie peut entraîner la mort ou des blessures graves. Pour
éviter ces risques, observer les consignes de sécurité de
base ci-dessous.
LIRE TOUT CE MODE D’EMPLOI
1. Ce manuel renferme des consignes de sécurité et d’utilisation importantes pour le
chargeur de batterie modèle ET18DM. (Modèle d’adaptateur ET18-18A)
2. Avant d’utiliser le chargeur de batterie, lire toutes les étiquettes d’instruction et de
précaution apposées sur (1) le chargeur de batterie, (2) la batterie, et (3) le produit utilisant
la batterie.
3. Pour réduire tout risque de blessure, ne recharger que les batteries rechargeables
HITACHI utilisées dans le modèle series EB9, EB12, EB14, EB18. Les autres types de
batterie pourraient exploser et provoquer des blessures ou des dommages.
4. Ne pas exposer le chargeur à la pluie ni à la neige.
5. L’utilisation d’un accessoire non recommandé ou non vendu par le fabricant du chargeur
de batterie risque de provoquer un feu, une décharge électrique ou des blessures.
6. Pour réduire tout risque de dommage de la fiche et du cordon électrique, débrancher le
cordon du chargeur en tirant sur la fiche.
7. Vérifier que le cordon est placé de façon que personne ne puisse marcher dessus, se
prendre les pieds dedans, ni l’endommager ou le soumettre à des contraintes.
8. Ne pas utiliser de cordon de rallonge si cela n’est pas absolument nécessaire. L’utilisation
d’un cordon de rallonge incorrect pourrait entraîner un feu ou une décharge électrique.
Si l’on doit utiliser un cordon de rallonge, s’assurer que :
a. Les broches de la rallonge ont les mêmes numéro, taille et forme que celles de la fiche
du chargeur ;
b. Le cordon de rallonge est correctement raccordé et en bon état électrique ;
c. Le calibre du fil doit être au moins suffisant pour l’intensité nominale CA (ampères)
du chargeur de batterie spécifiées dans le tableau ci-dessous.
17
Page 18

Français
Tableau 1
CALIBRE MINIMUM RECOMMANDÉ POUR LES CORDONS DE RALLONGE
DES CHARGEURS DE BATTERIE
Intensité nominale d’entrée CA (ampères)*
Egal ou mais non Longueur de cordon en pieds (mètres)
supérieur à inférieur à 25 (7,5) 50 (15) 100 (30) 150 (45)
0 2 18 18 18 16
2 3 18 18 16 14
3 4 18 18 16 14
* Si l’intensité nominale d’entrée du chargeur de batterie est donnée en watts et non en
ampères, calculer la capacité en ampères correspondante en divisant la capacité en
ampères par la capacité de tension, par exemple :
1250 watts
125 volts
9. Ne pas utiliser le chargeur si son cordon ou sa fiche sont endommagés - Le remplacer
immédiatement.
10. Ne pas utiliser le chargeur s’il a reçu un coup, s’il est tombé ou endommagé de toute autre
manière. L’apporter à un réparateur qualifié.
11. Ne pas démonter le chargeur de batterie ni l’adaptateur ; si un entretien ou des
réparations sont nécessaires, les apporter à un réparateur qualifié. Un remontage
incorrect pourrait provoquer une décharge électrique ou un feu.
12. Pour réduire tout risque de décharge électrique, débrancher le chargeur de la prise
secteur avant tout entretien ou nettoyage. Il ne suffit pas de sortir la batterie.
13. Ce chargeur de batterie pourra être fixé comme accessoire standard sur les outils
HITACHI alimentés sur batterie. Dans ce cas, vérifier le mode d’emploi de l’outil HITACHI
alimenté sur batterie avant d’utiliser le chargeur de batterie.
14. Manipulez le cordon avec soin. Ne jamais transporter les outils par leur cordon ni tirer
sur le cordon pour les débrancher. Toujours protéger le cordon de la chaleur, de la
graisse, des bords tranchants ou des pièces mobiles. Remplacer immédiatement tout
cordon endommagé. Des cordons endommagés augmentent les risques de choc
électrique.
15. Débrancher la batterie ou le cordon de l’outil avant d'effectuer un réglage, de remplacer
un accessoire ou de remiser l’outil. Ces mesures de sécurité préventives réduisent le
risque de démarrage accidentel de l'outil.
= 10 ampères
Calibre du cordon
CONSIGNES DE SÉCURITÉ IMPORTANTES POUR L’UTILISATION
DE LA BATTERIE ET DU CHARGEUR DE BATTERIE
Pour pouvoir utiliser l’outil motorisé, il faudra recharger la batterie. Avant d’utiliser le
chargeur de batterie modèle ET18DM, bien lire attentivement toutes les consignes et les
avertissements signalés sur le chargeur, sur la batterie ou dans ce manuel.
BIEN NOTER : UTILISER EXCLUSIVEMENT DES BATTERIES HITACHI DES SERIES EB9,
EB12, EB14, EB18. LES AUTRES TYPES DE BATTERIE POURRAIENT EXPLOSER OU PROVOQUER DES BLESSURES.
Pour éviter tout risque de blessure, observer les consignes suivantes :
18
Page 19

Français
AVERTISSEMENT : Une utilisation incorrecte de la batterie ou du chargeur de
batterie risque de provoquer des blessures. Pour éviter tout
risque de blessure :
1. NE JAMAIS démonter la batterie.
2. NE JAMAIS jeter la batterie au feu, même si elle est endommagée ou complètement
usée. La batterie risque d’exploser au feu.
3. NE JAMAIS court-circuiter la batterie.
4. NE JAMAIS insérer d’objets dans les ouïes d’aération du chargeur. Il pourrait en
résulter un choc électrique ou des dommages du chargeur.
5. NE JAMAIS effectuer la recharge à l’extérieur. Eloigner la batterie des rayons directs
du soleil et utiliser exclusivement dans des endroits à faible humidité et
bien aérés.
6. NE JAMAIS utiliser si la température est inférieure 0°C (32°F) ou supérieure 40°C
(104°F).
7. NE JAMAIS raccorder deux chargeurs de batterie ensemble.
8. NE JAMAIS insérer de corps étrangers dans l’orifice de la batterie ou du chargeur de
batterie.
9. NE JAMAIS utiliser de transformateur-élévateur pour la recharge.
10. NE JAMAIS utiliser de générateur de moteur ni d’alimentation CC AVEC ce chargeur.
11. NE JAMAIS ranger la batterie ni le chargeur de batterie dans un lieu où la température
peut atteindre ou dépasser 40°C (104°F).
12. TOUJOURS alimenter le chargeur sur une prise secteur domestique standard (120
volts). L’utilisation du chargeur à une autre tension peut entraîner une
surchauffe et endommager le chargeur.
13. TOUJOURS débrancher le cordon d’alimentation de la prise secteur lorsqu’on ne se
sert pas du chargeur.
INSTRUCTIONS DE SECURITE IMPORTANTES SUR
L’UTILISATION DE L’ADAPTATEUR ET DE LA SOURCE
D’ALIMENTATION CC
AVERTISSEMENT : Une utilisation incorrecte de l’adaptateur secteur ou de la
source d’alimentation CC peut entraîner de graves blessures.
Pour éviter ces blessures :
1. TOUJOURS utiliser les outils à batterie applicables. (Voir P. 22 SPECIFICATIONS)
L’utilisation avec des outils à batterie non adaptés au travail peut entraîner
une surchauffe excessive et endommager l’outil à batterie.
2. NE JAMAIS court-circuiter les bornes de l’adaptateur.
3. TOUJOURS utiliser l’outil à batterie qui convient pour le travail. Par ailleurs, toujours
lire attentivement toutes les instructions du mode d’emploi de l’outil à
batterie utilisé.
19
Page 20

Français
MISE AU REBUT D’UNE BATTERIE USÉE
AVERTISSEMENT : Ne pas jeter la batterie usée aux ordures ménagères. La
batterie risque d’exploser si elle est incinérée. L’appareil que
vous avez acheté renferme une batterie rechargeable. La
batterie est recyclable. Lorsqu’elle a atteint sa limite de
service, selon les lois des états et les lois locales, il peut être
illégal de jeter cette batterie aux ordures ménagères. Vérifier
auprès de son service de ramassage d’ordures les options de
recyclage et la procédure correcte de mise au rebut.
CONSERVER CES INSTRUCTIONS
ET
LES METTRE A LA DISPOSITION
DES AUTRES UTILISATEURS
ET
PROPRIETAIRES DE CET OUTIL !
20
Page 21

Français
UTILISATION ET ENTRETIEN
REMARQUE :
Les informations contenues dans ce mode d’emploi sont conçues pour assister l’utilisateur
dans une utilisation sans danger et un entretien du chargeur de batterie.
NE JAMAIS utiliser ni entreprendre une révision du chargeur de batterie sans avoir
d’abord lu et compris toutes les instructions de sécurité contenues dans ce manuel.
Certaines illustrations dans ce mode d’emploi peuvent montrer des détails ou des
accessoires différents de ceux du chargeur de batterie.
MODÈLE
ET18DM
NOM DES PARTIES
CHARGEUR DE BATTERIE (ET18DM)
Fiche de branchement
Cordon
Orifice d’installation
de la batterie
Levier de
verrouillage
Douille
ADAPTATEUR (ET18-18A)
Fiche d’adaptateur
d’adaptateur
Voyant de
temps de
charge
Voyant
d’état de
charge
Voyant de source
d’alimentation CC
Orifices de
ventilation
Plaque signalétique
(fond)
Borne
Verrou
Fig. 1
Câble
21
Page 22

Français
SPECIFICATIONS
Source d’alimentation d’entrée Monophasée : CA 120 V 60 Hz
Durée de recharge Environ 9 minutes ......... EB9S, EB12S
Environ 12 minutes ....... EB9B, EB12B, EB1220BL
Environ 14 minutes ....... EB14B, EB18B, EB1820,
EB1820L
Environ 28 minutes ....... EB1830H, EB1830HL
Chargeur Tension de charge ......... CC 9,6 – 18 V
Courant de charge ........ CC 12A (9,6 – 12 V),
9A (14,4 – 18 V)
Poids 3,5 lbs (1,6 kg)
ADAPTATEUR (ET18-18A)
Outils à batterie applicables DS18DMR, C6DC2, CR18DV, UB18D
Poids 3,1 Ibs (1,4 kg)
UTILISATIONS
Pour recharger les batteries HITACHI du type de la série EB9, EB12, EB14, EB18.
MÉTHODE DE RECHARGE
REMARQUE : Avant de brancher le chargeur dans la prise, vérifier les points suivants.
䡬 La tension de la source d’alimentation est indiquée sur la plaque signalétique.
䡬 Le cordon n’est pas endommagé.
AVERTISSEMENT : Ne pas effectuer de recharge à une tension supérieure à la
tension indiquée sur la plaque signalétique. Cela brûlerait le
chargeur.
EB9S
EB9B
EB12S
EB12B
EB1220BL
EB14B
EB18B
EB1820
EB1830H
EB1820L
EB1830HL
1. Brancher la fiche du chargeur de batterie
dans la prise.
Quand la fiche du chargeur de batterie est
branchée dans la prise, le voyant de recharge
clignote lentement en rouge. (A intervalles
d’une seconde)
AVERTISSEMENT :
Ne pas utiliser le cordon
électrique s’il est
endommagé. Le faire
réparer immédiatement.
Fig. 2
22
Page 23

Français
2. Insérer la batterie dans le chargeur de batterie.
Insérer la batterie dans le chargeur de batterie comme indiqué à la Fig. 2. Bien s’assurer
qu’elle touche le fond du chargeur de batterie.
3. Recharge
Lecture des voyants
Ce chargeur possède un voyant de temps de charge qui affiche le temps de charge
estimé, et un voyant d’état de charge qui affiche l’état de charge.
(a) Affichage du temps de charge
Quand la recharge commence, le voyant de temps de charge s’allume en rouge lorsqu’il
reste environ 30 minutes de charge, en orange lorsqu’il reste environ 20 minutes de
charge, et en vert pendant les 5 dernières minutes restantes environ. Lorsque la recharge
est terminée, le voyant d’état de charge s’allume en vert.
(b) Affichage d’attente de température élevée
La recharge ne commencera pas si la température de la batterie est élevée. Dans ce cas,
le voyant de temps de charge clignote en rouge (cycles de 0,6 seconde). Laisser la batterie
dans le chargeur, et la recharge commencera automatiquement lorsque la température
aura baissé.
(c) Affichage d’attente de charge
Le chargeur donnant la priorité à la sortie de courant de la source d’alimentation, la
recharge s’interrompt lorsqu’on appuie sur l’interrupteur à gâchette de l’outil à batterie
pendant la recharge. Dans ce cas, le voyant de temps de charge clignotera de façon
répétée (cycles de 1 seconde) dans la couleur d’affichage du temps de charge en vigueur
(rouge/orange/vert). Quand on relâche l’interrupteur, la recharge reprend
automatiquement environ une minute plus tard, et le voyant reste allumé en continu.
(d) Affichage de recharge impossible
Lorsque le chargeur ou la batterie ne fonctionnent pas correctement, le voyant d’état de
charge clignote en orange (cycles de 0,2 seconde). (Voir le Tableau 2)
23
Page 24

Français
Tableau 2 Indication des voyants
Indication des voyants Signification
Temps de charge
30 minutes environ 30 minutes
S’allume
en rouge
S’allume
en continu
Recharge terminée dans
Voyant de
temps de
charge (rouge/
Voyant d’état de
charge (rouge/
orange/vert)
Temps de charge
S’allume
20 minutes en orange
Temps de charge
S’allume
5 minutes en vert
S’allume
en continu
S’allume
en continu
Recharge terminée dans
environ 20 minutes
Recharge terminée dans
environ 5 minutes
Recharge impossible
S’allume pendant 0,3
car la température est
Attente pour Clignote seconde/s’éteint trop élevée. (La
température élevée
en rouge
pendant 0,3 seconde
recharge commencera
automatiquement quand
la température aura baissé.)
Sortie de courant de la
source d’alimentation
utilisée. (Après la
sortie de courant de la
source d’alimentation,
Attente de
charge
Clignote en
rouge/
orange/vert
S’allume pendant 0,5
seconde/s’éteint
pendant 0,5 seconde
la recharge commencera
automatiquement.)
S’allume pendant 0,5
Avant la Clignote seconde/s’éteint Branché dans la
charge en rouge
Recharge S’allume
terminée en vert
pendant 0,5 seconde
S’allume
en continu
source d’alimentation.
Quand la recharge sera
terminée, l’activation
de la batterie (charge
d’entretien) commencera.
S’allume pendant 0,1
Recharge Clignote seconde/s’éteint Anomalie du chargeur
impossible en orange
pendant 0,1 seconde
ou de la batterie.
䡬 Température admissible d’une batterie rechargeable.
La température admissible des batteries rechargeables est indiquée dans le tableau cidessous, et les batteries qui ont chauffé devront être laissées à refroidir pendant quelque
temps avant de pouvoir être rechargées.
Tableau 3
Batteries rechargeables
Température à laquelle la batterie peut être rechargée
EB9S, EB9B, EB12S, EB12B,
EB1220BL, EB14B, EB18B,
–5°C — 60°C
EB1820, EB1820L
EB1830H, EB1830HL
24
–5°C — 55°C
Page 25

Français
䡬 Durée de recharge
Le Tableau 4 montre le temps de recharge nécessaire en fonction du type de batterie.
Tableau 4 Temps de recharge (en minutes approx.) à 20°C
Type de batterie BATTERIE Ni-MH BATTERIE Ni-Cd
Capacité de la batterie 3,0Ah 2,0Ah 1,2Ah
9,6V EB9B 12 min. EB9S 9 min.
12V
Tension de
la batterie
REMARQUE :
Le temps de recharge peut varier en fonction de la température ambiante et de la
tension d’alimentation.
14,4V EB14B 14 min.
18V
EB1830H
EB1830HL
27 min. EB1820 14 min.
EB12B
EB1220BL
EB18B
EB1820L
12 min. EB12S 9 min.
4. Débrancher le chargeur de batterie de la prise.
ATTENTION :
Ne pas débrancher la fiche de la prise en tirant sur le cordon.
Pour éviter tout dommage lorsqu’on débranche la fiche de la prise, bien tenir la fiche
proprement dite.
5. Retirer la batterie du chargeur de batterie.
Sortir la batterie du chargeur tout en la soutenant de la main.
En ce qui concerne le courant de décharge d’une batterie neuve
Etant donnée que les substances chimiques internes sont restées inactives dans le cas
des batteries neuves ou des batteries qui sont restées longtemps inutilisées, le courant
de décharge risque d’être très faible lors des première et deuxième utilisations. Ce
phénomène est temporaire et le temps de recharge normal sera rétabli quand les
batteries auront été rechargées 2 ou 3 fois.
Comment prolonger la durée de vie des batteries
䡬 Recharger les batteries avant qu’elles ne soient complètement épuisées.
Quand la puissance de l’outil utilisé faiblit, l’éteindre et recharger la batterie. Si l’outil
continue d’être utilisé jusqu’à épuisement du courant électrique, la batterie risque d’être
endommagée et sa durée de vie se raccourcira.
䡬 Eviter d’effectuer la recharge sous des températures élevées.
Une batterie est toujours chaude immédiatement après son utilisation. Si la batterie est
rechargée immédiatement après utilisation, les substances chimiques internes risquent
de se détériorer et la durée de vie de la batterie se raccourcira. Laisser la batterie refroidir
un moment avant de l’utiliser.
25
Page 26

Français
ATTENTION :
● Si l’on recharge la batterie lorsqu’elle est chaude, soit parce qu’elle vient de fonctionner,
soit parce qu’elle est en plein soleil, il se peut que la lampe témoin s’allume en vert.
La batterie ne se rechargera pas. Dans ce cas, laisser la batterie refroidir avant de la
recharger.
● Si la lampe témoin scintille rapidement en rouge (à intervalles de 0,2 seconde), vérifier
s’il y a des corps étrangers dans l’orifice d’installation de la batterie du chargeur, et les
enlever le cas échéant. S’il n’y a pas de corps étrangers, il s’agit probablement d’une
anomalie de la batterie ou du chargeur. Les porter au service après-vente agréé.
MÉTHODE DE SOURCE D’ALIMENTATION CC
Un outil à batterie peut fonctionner sur une alimentation 120 V si l’on utilise un adaptateur
avec le chargeur.
1. Raccordement de l’adaptateur (ET18-18A)
(1) Branchement/débranchement de la fiche d’adaptateur
AVERTISSEMENT : TOUJOURS s’assurer que l’interrupteur est coupé, pour
1 Branchement
1
FREE
2
LOCK
2 Débranchement
Amener le levier de verrouillage sur la position 1 FREE, et débrancher la fiche de
l’adaptateur.
REMARQUE :
䡬 Retirer tous les copeaux et autres débris qui adhèrent au chargeur de la douille
d’adaptateur ou de la fiche de l’adaptateur. Ces débris pourraient empêcher une
bonne insertion de la fiche de l’adaptateur.
䡬 Ne pas tirer d’un coup sec sur le câble de l’adaptateur lorsque la fiche de
l’adaptateur est branchée. Cela pourrait endommager la douille d’adaptateur du
chargeur.
éviter tout risque d’accident.
Vérifier que le levier de verrouillage de la douille
d’adaptateur du chargeur se trouve sur la
position 1 FREE. La flèche “ ” de l’adaptateur
étant dirigée vers le haut, brancher la fiche à
fond dans la douille. Tourner le levier de
verrouillage vers 2 LOCK jusqu’à ce qu’il fasse
entendre un déclic, et vérifier que la fiche de
l’adaptateur ne va pas se débrancher.
2. Utilisation de l’adaptateur (ET18-18A)
(1) Branchement/débranchement de l’adaptateur et de l’outil
26
Page 27

Français
AVERTISSEMENT : TOUJORS s’assurer que l’interrupteur est coupé pour
éviter tout risque d’accident.
1 Raccordement
L’adaptateur étant dirigé dans le bon sens, insérer l’adaptateur dans la douille
d’insertion de batterie de l’outil à batterie jusqu’à ce qu’il fasse entendre un déclic.
Gâchette
Poignée
Insérer
Tirer
Verrou
Adaptateur
2 Débranchement
Pour débrancher, saisir fermement l’outil à batterie, appuyer sur les verrous des
deux côtés de l’adaptateur, et tirer.
(2) Utilismation
AVERTISSEMENT : TOUJOURS suivre le mode d’emploi de l’outil pour le
maniement des outils à batterie. Déployer le câble de
sortie de courant pendant l’utilisation. L’utilisation d’un
câble étroitement enroulé risque de provoquer une
surchauffe.
Comme pour le fonctionnement avec la batterie, tirer sur la gâchette pour faire
marcher l’outil, et la relâcher pour arrêter l’outil.
3. Voyant de source d’alimentation CC
(1) Utilisation normale
Quand l’adaptateur est raccordé et que le voyant rouge “source d’alimentation
prête“ s’allume en continu, il est possible d’utiliser l’outil à batterie en tirant sur
la gâchette.
(2) La sortie de courant peut s’arrêter dans les cas suivants.
1 Protection contre les températures élevées
Les travaux impliquant de gros volumes de courant continus et les travaux
continu intenses dans des endroits où la température est élevée feront augmenter
la température interne du chargeur. Pour prévenir toute panne due à une
température élevée, arrêter la sortie de courant, et le voyant rouge clignotera
(cycles de 0,2 seconde) de façon répétée. Laisser le chargeur se reposer pendant
au moins 30 minutes.
Ensuite, débrancher le chargeur de la prise, attendre 20 secondes, puis le
rebrancher. (Cela réinitialise la fonction de sortie de courant et restaure la tension
de sortie.)
27
Page 28

Français
2 Protection contre les longues utilisations continues
Quand un outil à batterie fonctionne de façon continue pendant longtemps sans
interruptions (par exemple pour un travail qui consommerait trois batteries Hitachi
de 2 Ah en une heure), arrêter la sortie de courant et le voyant rouge se met à clignoter
(cycles de 0,2 seconde) de façon répétée. Laisser l’outil à batterie se reposer pendant
au moins 30 minutes.
Ensuite, débrancher le chargeur de la prise, attendre 20 secondes, puis le rebrancher.
(Cela réinitialise la fonction de sortie de courant et restaure la tension de sortie.)
ATTENTION : TOUJOURS laisser l’outil à batterie reposer pendant au moins 30
minutes avant de réinitialiser la fonction de sortie de courant.
3 Protection contre les courants excessifs
Lorsque l’outil détecte un courant excessif, arrêter la sortie pour éviter toute panne
de l’outil à batterie ou du chargeur ; le voyant rouge se met à clignoter de façon
répétée.
Laisser l’outil à batterie et le chargeur se reposer pendant au moins 30 minutes.
Ensuite, débrancher le chargeur de la prise, attendre 20 secondes, puis le rebrancher.
(Cela réinitialise la fonction de sortie de courant et restaure la tension de sortie.)
Indications du voyant de source d’alimentation CC
Etat Voyant Sortie de courant
Allumé
Source d’alimentation prête S’allume en continu Sortie normale possible
Protection contre les
températures élevées
Protection contre les longues Clignote Allumé 0,1
utilisations continues seconde/éteint 0,1 seconde Sortie arrêtée
(équivalentes à trois batteries B)
Protection contre les
courants excessifs
Même avec des travaux continus s’étalant sur plusieurs heures, la sortie de courant
ne s’arrêtera pas pendant un travail intermittent qui utiliserait jusqu’à trois batteries
Hitachi 2 Ah en une demi-journée, parce que l’augmentation de température de l’outil
à batterie restera faible. Il est donc possible de continuer à utiliser l’outil.
REMARQUE :
Si le voyant continue à clignoter bien que le fonctionnement soit correct, Il s’agit peutêtre
d’une anomalie du chargeur. Apporter le chargeur au magasin où il a été acheté.
28
Clignote Allumé 0,1
seconde/éteint 0,1 seconde Sortie arrêtée
Clignote Allumé 0,1
seconde/éteint 0,1 seconde Sortie arrêtée
Page 29

Français
PRECAUTION RELATIVE À LA SCIE CIRCULAIRE MODELE C6DC2
AVEC ALIMENTATION CC
ATTENTION : Le temps de fonctionnement continu maximum du modèle C6DC2 est de
5 minutes.
Après cinq minutes de fonctionnement environ, laisser l’outil reposer
pendant plus de 5 minutes.
AVANT L’UTILISATION
Vérifier l’aire de travail pour s’assurer qu’il n’y a ni débris ni désordre.
Evacuer toutes les personnes non nécessaires au travail. S’assurer que l’éclairage et la
ventilation sont satisfaisants.
ENTRETIEN ET INSPECTION
ATTENTION : Sortir la batterie avant toute opération d’inspection ou d’entretien.
1. Vérifier les vis
Des vis mal serrées sont dangereuses. Les inspecter régulièrement et vérifier qu’elles
sont serrées à fond.
ATTENTION : Il serait extrêmement dangereux d’utiliser ce chargeur de batterie avec
des vis mal serrées.
2. Vérifier s’il y a de la poussière
Enlever la poussière avec un chiffon doux ou un chiffon humecté d’eau savonneuse.
Ne pas utiliser de décolorant, chlorure, essence ou diluant, car ces produits pourraient
endommager le plastique.
RANGEMENT
Ranger dans un lieu dont la température est inférieure à 40°C (104°F), et hors de portée des
enfants.
SERVICE APRES-VENTE ET RÉPARATIONS
Tous les outils motorisés de qualité auront éventuellement besoin d’une réparation ou du
remplacement d’une pièce à cause de l’usure normale de l’outil. Pour assurer que seules des
pièces de rechange autorisées seront utilisées, tous les entretiens et les réparations doivent
être effectués uniquement par UN CENTRE DE SERVICE HITACHI AUTORISE.
REMARQUE :
Les spécifications sont sujettes à modification sans aucune obligation de la part de
HITACHI.
29
Page 30

Español
INFORMACIÓN IMPORTANTE SOBRE SEGURIDAD
Antes de utilizar o de realizar cualquier trabajo de mantenimiento de este cargador de
baterías, lea y comprenda todas las precauciones de seguridad, advertencias e instrucciones
de funcionamiento de este Manual de instrucciones.
La mayoría de los accidentes producidos en la operación y el mantenimiento de un cargador
de baterías se deben a la falta de observación de las normas o precauciones de seguridad.
Los accidentes normalmente podrán evitarse reconociendo una situación potencialmente
peligrosa a tiempo y siguiendo los procedimientos de seguridad apropiados.
Las precauciones básicas de seguridad se describen en la sección “SEGURIDAD” de este
Manual de instrucciones y en las secciones que contienen las instrucciones de operación y
mantenimiento.
Para evitar lesiones o el daño del cargador de baterías, los riesgos están identificados con
ADVERTENCIAS en dicho cargador y en este Manual de instrucciones.
No utilice NUNCA este cargador de baterías de ninguna forma que no esté específicamente
recomendada por HITACHI.
SIGNIFICADO DE LAS PALABRAS DE SEÑALIZACIÓN
ADVERTENCIA indica situaciones potencialmente peligrosas que, si se ignoran, pueden
resultar en la muerte o en lesiones de gravedad.
PRECAUCIÓN indica situaciones potencialmente peligrosas que, de no evitarse, pueden
resultar en lesiones menores o moderadas, o causar daños en la herramienta eléctrica.
NOTA acentúa información esencial.
30
Page 31

Español
SEGURIDAD
INSTRUCCIONES IMPORTANTES DE SEGURIDAD PARA EL
CARGADOR DE BATERÍAS
ADVERTENCIA: La utilización inadecuada del cargador de baterías puede resultar
en lesiones serias o en la muerte. Para evitar estos riesgos, siga las
instrucciones de seguridad ofrecidas a continuación.
LEA TODAS LAS INSTRUCCIONES
1. Este manual contiene instrucciones importantes de seguridad para el cargador de
baterías modelo ET18DM. (Modelo del adaptador ET18-18A)
2. Antes de utilizar el cargador de baterías, lea todas las instrucciones y tenga en cuenta las
marcas de precaución de (1) el cargador de baterías, (2) la batería, y (3) el producto que
utiliza la batería.
3. Para reducir el riesgo de lesiones, cargue la batería HITACHI de tipo de la serie EB9, EB12,
EB14, EB18. Otros tipos de baterías podrían explotar causando lesiones y daños.
4. No exponga el cargador de baterías a la lluvia ni a la nieve.
5. La utilización de un accesorio no recomendado o vendido por el fabricante del cargador
de baterías puede resultar en el riesgo de incendios, en descargas eléctricas, o en
lesiones.
6. Para reducir el riesgo de dañar el cable y el enchufe, para desconectar el cable del
cargador de baterías, tire del enchufe.
7. Cerciórese de que el cable quede situado donde no pueda pisarse, donde nadie pueda
tropezar con él, y donde no pueda recibir daños.
8. A menos que sea absolutamente necesario, no deberá utilizarse un cable prolongador.
La utilización de un cable prolongador inadecuado podría resultar en el riesgo de
incendios y descargas eléctricas.
Cuando tenga que utilizar un cable prolongador, cerciórese de que:
a. El enchufe del cable prolongador sea igual en tamaño y forma que el del cargador
de baterías;
b. El cable prolongador esté adecuadamente conectado y en buenas condiciones
eléctricas; y
c. Que el calibre del cable sea suficiente para el amperaje de CA del cargador de
baterías, como se especifica en la Tabla 1.
31
Page 32

Español
Tabla 1
CALIBRE (AWG) MÍNIMO RECOMENDADO PARA CABLES PROLONGADORES
PARA EL CARGADOR DE BATERÍAS
Amperaje nominal de entrada de CA* Calibre (AWG) del cable
Igual o pero Longitud del cable, Pies (metros)
superior a inferior a 25 (7,5) 50 (15) 100 (30) 150 (45)
0 2 18 18 18 16
2 3 18 18 16 14
3 4 18 18 16 14
* Si la entrada nominal del cargador de baterías se indica en vatios en vez de amperios, el
amperaje nominal correspondiente se determinará dividiendo el vataje por la tensión,
por ejemplo:
9. No utilice el cargador de baterías con un cable o un enchufe dañado. Si están dañados,
reemplácelos inmediatamente.
10. No utilice el cargador de baterías si ha recibido un golpe, si ha caído, o si está dañado de
alguna otra forma. Llévelo a un técnico cualificado.
11. No desarme el cargador de baterías ni el adaptador. Cuando necesite servicio o
reparación, llévelo a un técnico cualificado. El reensamblaje incorrecto podría resultar en
el riesgo de incendios o descargas eléctricas.
12. Para reducir el riesgo de descargas eléctricas, desenchufe el cargador del tomacorriente
antes de intentar realizar cualquier operación de mantenimiento o de limpiarlo. La
extracción de la batería no reducirá este riesgo.
13. Este cargador de baterías puede utilizarse con herramientas alimentadas con batería
HITACHI como accesorio estándar. En este caso, antes de utilizarlo, lea los manuales de
instrucciones de las herramientas alimentadas con batería HITACHI.
14. No maltrate el cable de alimentación. No utilice el cable para transportar la herramienta
ni para desconectarla del tomacorriente. Mantenga el cable alejado del calor, aceite,
bordes cortantes o partes móviles. Reemplace inmediatamente cualquier cable dañado.
Los cables dañados aumentan el riesgo de sufrir descargas eléctricas.
15. Desconecte la batería o el cable de la herramienta antes de realizar cualquier ajuste,
cambiar accesorios, o guardar la herramienta. Tales medidas preventivas de seguridad
reducirán el riesgo de que la herramienta se ponga accidentalmente en marcha.
1250 vatios
125 voltios
= 10 amperios
INSTRUCCIONES IMPORTANTES DE SEGURIDAD PARA LA
BATERÍA Y EL CARGADOR DE BATERÍAS
Usted deberá cargar la batería antes de utilizar la herramienta eléctrica. Antes de utilizar el
cargador de baterías modelo ET18DM, cerciórese de leer todas las instrucciones y
precauciones del mismo, de la batería, y de este manual.
RECUERDE: ¡UTILICE SOLAMENTE BATERÍAS HITACHI DE LOS TIPOS DE LA SERIE EB9,
SERIE EB12, SERIE EB14, SERIE EB18. LOS DEMÁS TIPOS DE BATERÍAS PODRÍAN EXPLOTAR
Y CAUSAR LESIONES!
Para evitar el riesgo de lesiones, siga las instrucciones ofrecidas a continuación:
32
Page 33

Español
ADVERTENCIA: La utilización inadecuada de la batería o del cargador de baterías
puede conducir a lesiones serias. Para evitar estas lesiones:
1. NUNCA desarme la batería.
2. NUNCA incinere la batería, aunque esté dañada o completamente descargada. La
batería podría explotar en el fuego.
3. NUNCA cortocircuite la batería.
4. NUNCA inserte ningún objeto en las ranuras de ventilación del cargador. Si lo hiciese
podría recibir descargas eléctricas o dañar el cargador de baterías.
5. NUNCA cargue en exteriores. Mantenga la batería alejada de la luz solar directa, y
utilícela solamente donde haya poca humedad y una buena ventilación.
6. NUNCA lo utilice cuando la temperatura sea inferior a 0˚C (32˚F) o superior a 40˚C
(104˚F).
7. NUNCA conecte dos cargadores de baterías juntos.
8. NUNCA inserte objetos extraños en el orificio para la batería ni en el cargador de
baterías.
9. NUNCA utilice un transformador elevador para cargar.
10. NUNCA utilice un motogenerador ni tensión de CC cuando emplee este cargador.
11. NUNCA guarde la batería ni el cargador de baterías en lugares en los que la
temperatura pueda alcanzar o sobrepasar 40°C (104°F).
12. SIEMPRE utilice el cargador con un tomacorriente (120 voltios). La utilización de un
cargador con cualquier otra tensión podría hacer que éste se recalentase y
dañase.
13. SIEMPRE desconecte el cable de alimentación del tomacorriente cuando no vaya a
utilizar el cargador.
INSTRUCCIONES IMPORTANTES DE SEGURIDAD PARA USAR EL
ADAPTADOR Y LA FUENTE DE ALIMENTACIÓN DE CC
ADVERTENCIA: El uso incorrecto del adaptador o de la fuente de alimentación de
CC puede ocasionar serias lesiones. Para evitar lesiones:
1. SIEMPRE se deberá usar con las herramientas sin cable especificadas. (Véase P. 36
ESPECIFICACIONES)
El uso de herramientas sin cable no especificadas puede ocasionar
calentamiento anormal y daños a la herramienta sin cables.
2. NUNCA ponga en cortocircuito los terminales del adaptador.
3. SIEMPRE utilice la herramienta sin cables apropiada para la tarea. Asimismo, asegúrese
de leer atentamente el manual de instrucciones de la herramienta sin cables
en uso.
33
Page 34

Español
ELIMINACIÓN DE LAS BATERÍAS AGOTADAS
ADVERTENCIA: No tire las baterías agotadas. Las baterías pueden explotar si se
incineran. El producto que ha adquirido contiene una batería. La
batería es reciclable. Cuando se agote su duración útil, de acuerdo
con las leyes estatales y locales, puede ser ilegal tirar esta batería
a la basura. Solicite a las autoridades locales los detalles sobre las
opciones de reciclado o de la forma de deshacerse apropiadamente
de la batería.
¡GUARDE ESTAS INSTRUCCIONES
Y
PÓNGALAS A DISPOSICIÓN DE
OTROS USUARIOS
Y
PROPIETARIOS DE ESTA
HERRAMIENTA!
34
Page 35

Español
OPERACIÓN Y MANTENIMIENTO
NOTA:
La información contenida en este Manual de instrucciones ha sido diseñada para
ayudarle a utilizar con seguridad y mantener este cargador de baterías.
NUNCA haga funcionar ni efectúe el mantenimiento del cargador de baterías antes de
leer y comprender todas las instrucciones de seguridad contenidas en este manual.
Algunas ilustraciones de este Manual de Instrucciones pueden mostrar detalles o
accesorios diferentes a los del propio cargador de baterías.
MODELO
ET18DM
NOMENCLATURA
CARGADOR DE BATERÍAS (ET18DM)
Enchufe
Cable
Orificio para
instalar la batería
Palanca de
bloqueo
Receptáculo para la
clavija del adaptador
ADAPTADOR (ET18-18A)
Clavija del adaptador
Lámpara del
tiempo de carga
Lámpara del
estado de carga
Lámpara de
la fuente de
alimentación de CC
Rejillas de
ventilación
Placa de características
(superficie inferior)
Terminal
Pestillo
Fig. 1
Cable
35
Page 36

Español
ESPECIFICACIONES
Fuente de alimentación de entrada
Tiempo de carga Aprox. 9 minutos ............ EB9S, EB12S
Cargador Tensión de carga ............ 9,6 – 18V CC
Peso 3,5 libras (1,6 kg)
ADAPTADOR (ET18-18A)
Herramientas sin cable aplicables
Peso 3,1 libras (1,4 kg)
Monofásica: 120 V CA, 60 Hz
Aprox. 12 minutos .......... EB9B, EB12B, EB1220BL,
Aprox. 14 minutos ... ......
Aprox. 28 minutos ... ...... EB1830H, EB1830HL
Corriente de carga ..........
DS18DMR, C6DC2, CR18DV, UB18D
EB14B, EB18B, EB1820, EB1820L
12A (9,6 –12 V), 9A (14,4 – 18 V) CC
APLICACIONES
Carga de baterías de tipos de la serie EB9, EB12, EB14 y EB18 HITACHI.
MÉTODO DE CARGA
NOTA:
Antes de enchufar el cargador en un tomacorriente, tenga en cuenta los puntos
siguientes.
䡬 La tensión de la fuente de alimentación está indicada en la placa de características.
䡬 El cable no deberá estar dañado.
ADVERTENCIA: No cargue con una tensión superior a la indicada en la placa de
características. Si cargase con una tensión superior a la indicada
en la placa de características, el cargador se quemaría.
EB9S
EB9B
EB12S
EB12B
EB1220BL
EB14B
EB18B
EB1820
EB1830H
EB1820L
EB1830HL
1. Inserte el enchufe del cargador de
baterías en un tomacorriente.
Cuando haya insertado el enchufe del
cargador de baterías en un tomacorriente,
la lámpara piloto parpadeará lentamente en
rojo. (A intervalos de 1 segundo)
ADVERTENCIA:
No utilice el cargador si su
cable está dañado. Haga
que se lo reparen
inmediatamente.
Fig. 2
36
Page 37

Español
2. Inserte la batería en el cargador de baterías.
Inserte la batería en el cargador de baterías como se muestra en la Fig. 2. Cerciórese de
que haya quedado en contacto con la base del cargador de baterías.
3. Carga
Indicaciones de las lámparas
Este cargador está equipado con una lámpara del tiempo de carga que indica el tiempo
estimado de carga, y de una lámpara del estado de carga, que indica el estado de carga.
(a) Indicación del tiempo de carga
Una vez que se inicie la carga, la lámpara del tiempo de carga se enciende en rojo para
indicar que faltan 30 minutos para finalizar la carga, en naranja, para indicar que faltan
20 minutos y en verde, para indicar que faltan 5 minutos. Al finalizar la carga, la lámpara
del estado de carga se enciende en verde.
(b) Indicación de espera por temperatura alta
La carga no se iniciará cuando la batería esté a una temperatura alta. En este caso, la
lámpara del tiempo de carga destellará en rojo (ciclos de 0,6 seg.). Deje la batería en el
cargador, pues la carga se iniciará automáticamente al descender la temperatura.
(c) Indicación de espera de carga
Debido a que el cargador da prioridad a la salida de la fuente de alimentación, la carga
se interrumpe cuando se acciona el interruptor de gatillo de la herramienta sin cables
durante la operación de carga. En este caso, la lámpara del tiempo de carga destellará
(ciclos de 1 seg.) con el color de indicación del tiempo de carga actual (rojo/naranja/
verde). La carga se reanudará automáticamente y la lámpara se encenderá de forma
continua aproximadamente un minuto después de soltar el interruptor.
(d) Indicación de carga imposible
En caso de un fallo de funcionamiento del cargador o de la batería, la lámpara del estado
de carga parpadeará rápidamente en naranja (ciclos de 0,2 seg.). (Véase Tabla 2)
37
Page 38

Español
Tabla 2 Indicaciones de las lámparas
Indicaciones de la lámpara Significado
Tiempo de carga
30 minutos en unos 30 minutos
Luz roja
encendida
Iluminación
continua
La carga finalizará
Iluminación
continua
Iluminación
continua
La carga finalizará
en unos 20 minutos
La carga finalizará
en unos 5 minutos
No se puede cargar
Se enciende 0,3 debido a temperatura
Lámpara del
tiempo de
carga (roja/
naranja/verde)
Tiempo de carga
Luz naranja
20 minutos encendida
Tiempo de carga
Luz verde
5 minutos encendida
Espera por Destella 0,3 seg./se alta de la batería.
temperatura alta
en rojo apaga 0,1 seg. (La carga se iniciará
automáticamente al
descender la temperatura).
Salida de la fuente
de alimentación en
uso. (Cuando se deje
de usar la salida de la
fuente de alimentación,
Espera
de carga
Destella en
rojo/naranja/
verde
Se enciende
0,5 seg./se
apaga 0,5 seg.
la carga se iniciará
automáticamente).
Se enciende
Antes de Destella 0,5 seg./se Enchufado en la
la carga en rojo apaga 0,5 seg.
Lámpara del
estado de carga Carga Luz verde
(roja/naranja completa encendida
Iluminación
continua
fuente de alimentación.
Después de finalizar la
carga, comenzará
la activación de la
/verde) batería (carga lenta).
Se enciende
Carga Parpadea 0,1 seg./se
imposible en naranja apaga 0,1 seg.
Fallo de funcionamiento de
la batería o del cargador.
䡬 Temperatura de la batería.
La temperatura de la batería se muestra en la tabla siguiente, y si la batería se calentado,
habrá que dejar que se enfríe durante cierto tiempo antes de recargarla.
Tabla 3
Batería
Temperatura a la que podrá recargarse la batería
EB9S, EB9B, EB12S, EB12B,
EB1220BL, EB14B, EB18B,
–5°C — 60°C
EB1820, EB1820L
EB1830H, EB1830HL
38
–5°C — 55°C
Page 39

Español
䡬 Tiempo de carga
En la Tabla 4 se muestra el tiempo de recarga requerido de acuerdo con el tipo de batería.
Tabla 4 Tiempo de recarga (min. aprox.) a 20°C
Tipo de batería BATERÍA DE Ni-MH BATERÍA DE Ni-Cd
Capacidad de la batería 3,0Ah 2,0Ah 1,2Ah
9,6V EB9B 12 min. EB9S 9 min.
12V
Voltaje de
la batería
NOTA: El tiempo de recarga puede variar de acuerdo con la temperatura ambiental y la
14,4V EB14B 14 min.
18V
tensión de la fuente de alimentación.
EB1830H
EB1830HL
27 min. EB1820 14 min.
EB12B
EB1220BL
EB18B
EB1820L
12 min. EB12S 9 min.
4. Desconecte el cargador de baterías del tomacorriente.
PRECAUCIÓN:
No desconecte el cable del tomacorriente tirando delmismo.
Cerciórese de tirar del enchufe para desconectarlo del tomacorriente a fin de evitar dañar
el cable.
5. Extraiga la batería del cargador de baterías.
Sujetando el cargador de baterías con una mano, extraiga la batería del mismo.
Descarga eléctrica en caso de baterías nuevas, etc.
Como la substancia química interna de las baterías nuevas o las que no se hayan utilizado
durante mucho tiempo no está activada, la descarga eléctrica puede ser inferior cuando
se utilicen por primera y segunda vez. Este fenómeno es temporal, y el tiempo normal
requerido para la recarga se restablecerá recargando las baterías 2 – 3 veces.
Forma de hacer que las baterías duren más
䡬 Recarque las baterías antes de que se hayan agotado completamente.
Si siente que la potencia de la herramienta eléctrica se debilita, deje de utilizarla y
recargue su batería. Si continuase utilizando la herramienta hasta agotar la capacidad de
la batería, ésta podría dañarse y su duración útil podría acortarse.
䡬 Evite realizar la recarga a altas temperaturas.
Una batería se calentará inmediatamente después de haberla utilizado. Si recargase tal
batería inmediatamente después de haberla utilizado, su substancia química interna se
deterioraría, y la duración útil de la batería se acortaría. Deje la batería y recárguela
después de que se haya enfriado durante cierto tiempo.
39
Page 40

Español
PRECAUCIÓN:
● Si recarga una batería caliente o expuesta al sol, la lámpara piloto puede encenderse en
verde.
La batería no se cargará. En tal caso, deje que la batería se enfríe antes de cargarla.
● Cuando la lámpara piloto destelle rápidamente en rojo (a intervalos de 0,2 segundos),
compruebe y elimine los objetos extraños que haya en el orificio de instalación del
cargador de baterías. Si no hay objetos extraños, es probable que la batería o que el
cargador de baterías esté funcionando mal. Llévelos a un centro de reparaciones
autorizado.
MÉTODO DE FUENTE DE ALIMENTACIÓN DE CC
Usando el adaptador junto con el cargador, podrá usar una herramienta sin cables con una
fuente de alimentación de 120V.
1. Conexión del adaptador (ET18-18A)
(1) Inserción/extracción de la clavija del adaptador
ADVERTENCIA: Para evitar accidentes, SIEMPRE confirme que el interruptor esté
desconectado.
1 Inserción
1
FREE
2 LOCK
2 Extracción
Mueva la palanca de bloqueo hacia la posición 1 FREE, y extraiga la clavija del
adaptador.
NOTA:
䡬 Elimine las rebabas y otras impurezas adheridas a la parte de conexión de la
clavija del adaptador en el cargador o en la clavija del adaptador. Tales impurezas
podrían obstaculizar la correcta inserción de la clavija del adaptador.
䡬 No tire del cable del adaptador con la clavija insertada. Se podrían producir daños
en la parte de fijación de la clavija del adaptador.
En el cargador, confirme que la palanca de bloqueo
provista en el receptáculo para la clavija del adaptador
se encuentre en la posición 1 FREE. Con la flecha “ ”
de la clavija del adaptador dirigida hacia arriba,
inserte firmemente la clavija en el receptáculo. Gire
la palanca de bloqueo hacia 2 LOCK hasta escuchar
un chasquido, y compruebe que la clavija del
adaptador se encuentre enclavada.
2. Uso del adaptador (ET18-18A)
(1) Conexión/desconexión del adaptador y de la unidad de la herramienta
ADVERTENCIA: Para evitar accidentes, SIEMPRE confirme que el interruptor esté
desconectado.
40
Page 41

1 Conexión
Con el adaptador en la dirección correcta, insértelo en el receptáculo de inserción de
la batería de la herramienta sin cables hasta que encaje con un chasquido.
2 Desconexión
Para desconectar, sujete firmemente la unidad de la herramienta sin cables, pulse los
pestillos de ambos lados del adaptador, y extráigala.
(2) Operación
Insertar
Extraer
Español
Interruptor de gatillo
Asa
Pestillo
Adaptador
ADVERTENCIA: SIEMPRE maneje las herramientas sin cable siguiendo las
indicaciones del manual de instrucciones. Extienda el cable de
salida durante el uso. El uso de un cable enrollado implica riesgo
de recalentamientos.
Al igual que la operación con batería, apriete el interruptor de gatillo para la operación
y suéltelo para detener la operación.
3. Lámpara de la fuente de alimentación de CC
(1) Uso normal
Con el adaptador conectado y con la lámpara roja de “fuente de alimentación
preparada” continuamente encendida, accione el interruptor de gatillo para usar la
herramienta sin cables.
(2) La salida se podrá interrumpir en los siguientes casos.
1 Protección contra altas temperaturas
Los trabajos que implican el uso continuo de corrientes muy intensas o el trabajar
continuamente en lugares de altas temperaturas provocará el aumento de la
temperatura interna del cargador. Para evitar fallos de funcionamiento producidos
por altas temperaturas, la salida se para y la lámpara roja parpadea (ciclos de 0,2 seg.)
repetidamente. Deje en reposo el cargador por lo menos durante 30 minutos.
Luego, desenchufe el cargador de la toma de corriente, espere 20 segundos, y
vuélvalo a enchufar. (Con esto se reinicializa la función de la salida, y se restablece
el voltaje de salida.)
2 Protección contra el sobreuso continuo
El uso continuo de la herramienta sin cables durante un tiempo prolongado (como
aquellos trabajos que consumen tres baterías Hitachi de 2Ah en una hora, por
ejemplo), provocará la detención de la salida y el parpadeo repetido (ciclos de 0,2
seg.) de la lámpara roja. Deje la herramienta eléctrica en reposo por lo menos durante
30 minutos.
Luego, desenchufe el cargador de la toma de corriente, espere 20 segundos y
vuélvalo a enchufar. (Con esto se reinicializa la función de la salida, y se restablece
el voltaje de salida.)
41
Page 42

Español
PRECAUCIÓN: SIEMPRE deje en reposo la herramienta sin cables durante 30 minutos
antes de reinicializar la función de salida.
3 Protección contra corriente excesiva
Para evitar fallos de funcionamiento de la herramienta sin cables o del cargador
debido a un recalentamiento imprevisto, la salida se para y la lámpara roja parpadea
repetidamente cuando se detecta una corriente excesiva continua.
Deje en reposo la herramienta eléctrica y el cargador por lo menos durante 30
minutos.
Luego, desenchufe el cargador de la toma de corriente, espere 20 segundos, y
vuélvalo a enchufar. (Con esto se reinicializa la función de la salida, y se restablece
el voltaje de salida.)
Indicaciones de la lámpara de la fuente de
alimentación de CC
Estado Lámpara Salida
Fuente de
alimentación preparada
Encendida
Iluminación continua Salida normal posible
Protección contra
altas temperaturas
Protección contra sobreuso
continuo (equivalente a tres baterías B)
Protección contra
corriente excesiva
Aunque se trabaje continuamente durante períodos prolongados, no se efectuará la
detención de la salida durante trabajos intermitentes que consuman unas tres
baterías Hitachi de 2Ah en medio día, por ejemplo, debido a que en estos casos la
temperatura de la herramienta sin cables permanecerá baja. En estas condiciones
podrá continuar con el uso de herramienta.
NOTA: Si la lámpara continúa parpadeando a pesar de un uso correcto, es posible que
indique un fallo de funcionamiento del cargador. En tal caso, se ruega llevar el
cargador al establecimiento donde lo compró.
Destella Se enciende 0,1
seg./se apaga 0,1 seg. Salida detenida
Destella Se enciende 0,1
seg./se apaga 0,1 seg. Salida detenida
Destella Se enciende 0,1
seg./se apaga 0,1 seg. Salida detenida
42
Page 43

Español
PRECAUCIÓN SOBRE LA SIERRA CIRCULAR MODELO C6DC2 CON
FUENTE DE ALIMENTACIÓN DE CC
PRECAUCIÓN: El tiempo máximo de funcionamiento del modelo C6DC2 es de 5
minutos.
Después de hacerlo funcionar durante 5 minutos, déjelo en reposo
durante unos 5 minutos.
ANTES DE LA UTILIZACIÓN
Compruebe el área de trabajo para cerciorarse de que esté libre de escombros y bien
ordenada.
Despeje el área de personal innecesario. Cerciórese de que la iluminación y la ventilación
sean adecuadas.
MANTENIMIENTO E INSPECCIÓN
PRECAUCIÓN: Extraiga la batería antes de realizar cualquier trabajo de inspección o de
mantenimiento.
1. Comprobación de los tornillos
Los tornillos son peligrosos. Inspecciónelos regularmente y cerciórese de que estén bien
apretados.
PRECAUCIÓN: La utilización del cargador de baterías con tornillos flojos es
extremadamente peligrosa.
2. Comprobación del polvo
El polvo podrá eliminarse con un paño suave y seco o ligeramente humedecido en agua
jabonosa.
No utilice lejía, cloro, gasolina, ni diluidor de pintura, porque podrían dañar el plástico.
ALMACENAMIENTO
Guarde la herramienta en un lugar con menos de 40°C (104°F) y fuera del alcance de niños.
SERVICIO Y REPARACIÓNES
Todas las herramientas eléctricas de calidad requieren de vez en cuando el servicio de
mantenimiento o el reemplazo de piezas debido al desgaste producido durante la utilización
normal. Para asegurarse de que solamente se utilicen piezas de reemplazo autorizadas,
todos los servicios de mantenimiento y reparación deberán realizarse SOLAMENTE EN UN
CENTRO DE REPARACIONES AUTORIZADO POR HITACHI.
NOTA: Las especificationes están sujetas a cambio sin ninguna obligación por parte de
HITACHI.
43
Page 44

Please contact HITACHI KOKI U.S.A. LTD.
at 1-800-59-TOOLS (toll free), or HITACHI
AUTHORIZED POWER TOOL SERVICE
CENTER regarding COLLECTION.
Pour le RAMASSAGE, contacter HITACHI
KOKI U.S.A. LTD. au 1-800-59-TOOLS (appel
gratuit), ou UN SERVICE APRES-VENTE
D’OUTILS ELECTRIQUE AGREE PAR
HITACHI.
Con respecto a la RECOLECCIÓN de
baterías, póngase en contacto con HITACHI
KOKI U.S.A. LTD. número 1-800-59-TOOLS
(llamada gratis), o con HITACHI AUTORIZED
POWER TOOL SERVICE CENTER.
Issued by
Hitachi Koki Co., Ltd.
Sinagawa Intercity Tower A, 15-1, Konan 2-chome,
Minato-ku, Tokyo 108-6020, Japan
Distributed by
Hitachi Koki U.S.A., Ltd.
3950 Steve Reynolds Blvd.
Norcross, GA 30093
Hitachi Koki Canada Co.
6395 Kestrel Road
Mississauga ON L5T 1Z5
Code No. C99139162
Printed in Hong Kong
406
 Loading...